

Page 1

Page 2

Û²º±½«- ͱº¬©¿®» ó Ý«-¬±³»® Í«°°±®¬
2
Page 3
IMPORTANT SAFETY INSTRUCTIONS
The present set had been designed and manufactured to assure personal safety. Improper use can
result in electric shock orfire hazard. The safeguards incorporated with the present unit will protect
you if you observe the following procedures when installation, operating and servicing. The present
unit is fully transistorized and does not contain any element that can be repaired by user.
Read Before Operating Equipment
1. Keep these instructions.
2. Read all warnings.
3. Follow all instructions.
4. Do not use this apparatus near water.
5. Clean only with a dry cloth.
6. Do not block any of the ventilation openings. Install in accordance with the manufacturers instructions.
7. Do not install near any heat sources such as radiators, heat registers, stoves, or other apparatus
(including amplifiers) that produce heat.
8. Do not defeat the safety purpose of the polarized or grounding type plug. A polarized plug has two
blades with one wider than the other. A grounding type plug has two blades and third grounding prong.
The wide blade or third prong is provided for your safety. When the provided plug does not fit into your
outlet, consult an electrician for replacement of the obsolete outlet.
9. Protect the power cord from being walked on or pinched particularly at plugs, convenience receptacles,
and the point where they exit from the apparatus.
10. Only use attachments/accessories specified by the manufacturer.
11. Use only with a cart, stand, tripod, bracket, or table specified by the manufacturer, or sold with the
apparatus. When a cart is used, use caution when moving the cart/apparatus combination to avoid injury
from tip-over.
12. The TV should be operated only from the type of power source indicated on the label. If you are not sure
of the type of power supplied to your home, consult your dealer or local power company.
13. Unplug this apparatus during lightning storms or when unused for long periods of time.
14. Refer all servicing to qualified service personnel. Servicing is required when the apparatus has been
damaged in any way, such as power-supply cord or plug is damaged, liquid has been spilled or objects
have fallen into apparatus, the apparatus has been exposed to rain or moisture, does not operate
normally, or has been dropped.
15. This product may contain mercury. Disposal of these materials may be regulated due to environmental
considerations. For disposal or recycling information, please contact your local authorities or the
Electronic Industries Alliance: www.eiae.org
Û²º±½«- ͱº¬©¿®» ó Ý«-¬±³»® Í«°°±®¬
3
Page 4
16. Damage Requiring Service – The appliance should be serviced by qualified service personnel when:
A. The power supply cord or the plug has been damaged; or
B. Objects have fallen, or liquid has been spilled into the appliance; or
C. The appliance has been exposed to rain; or
D. The appliance does not appear to operate normally or exhibits a marked change in performance;
or
E. The appliance has been dropped, or the enclosure damaged.
17. Tilt/Stability – All televisions must comply with recommended international global safety standards for
tilt and stability properties of its cabinets design.
Do not compromise these design standards by applying excessive pull force to the front, or top, of
the cabinet, which could ultimately overturn the product.
Also, do not endanger yourself, or children, by placing electronic equipment/toys on the top of the
cabinet. Such items could unsuspectingly fall from the top of the set and cause product damage
and/or personal injury.
18. Wall or Ceiling Mounting – The appliance should be mounted to a wall or ceiling only as recommended
by the manufacturer.
19. Power Lines – An outdoor antenna should be located away from power lines.
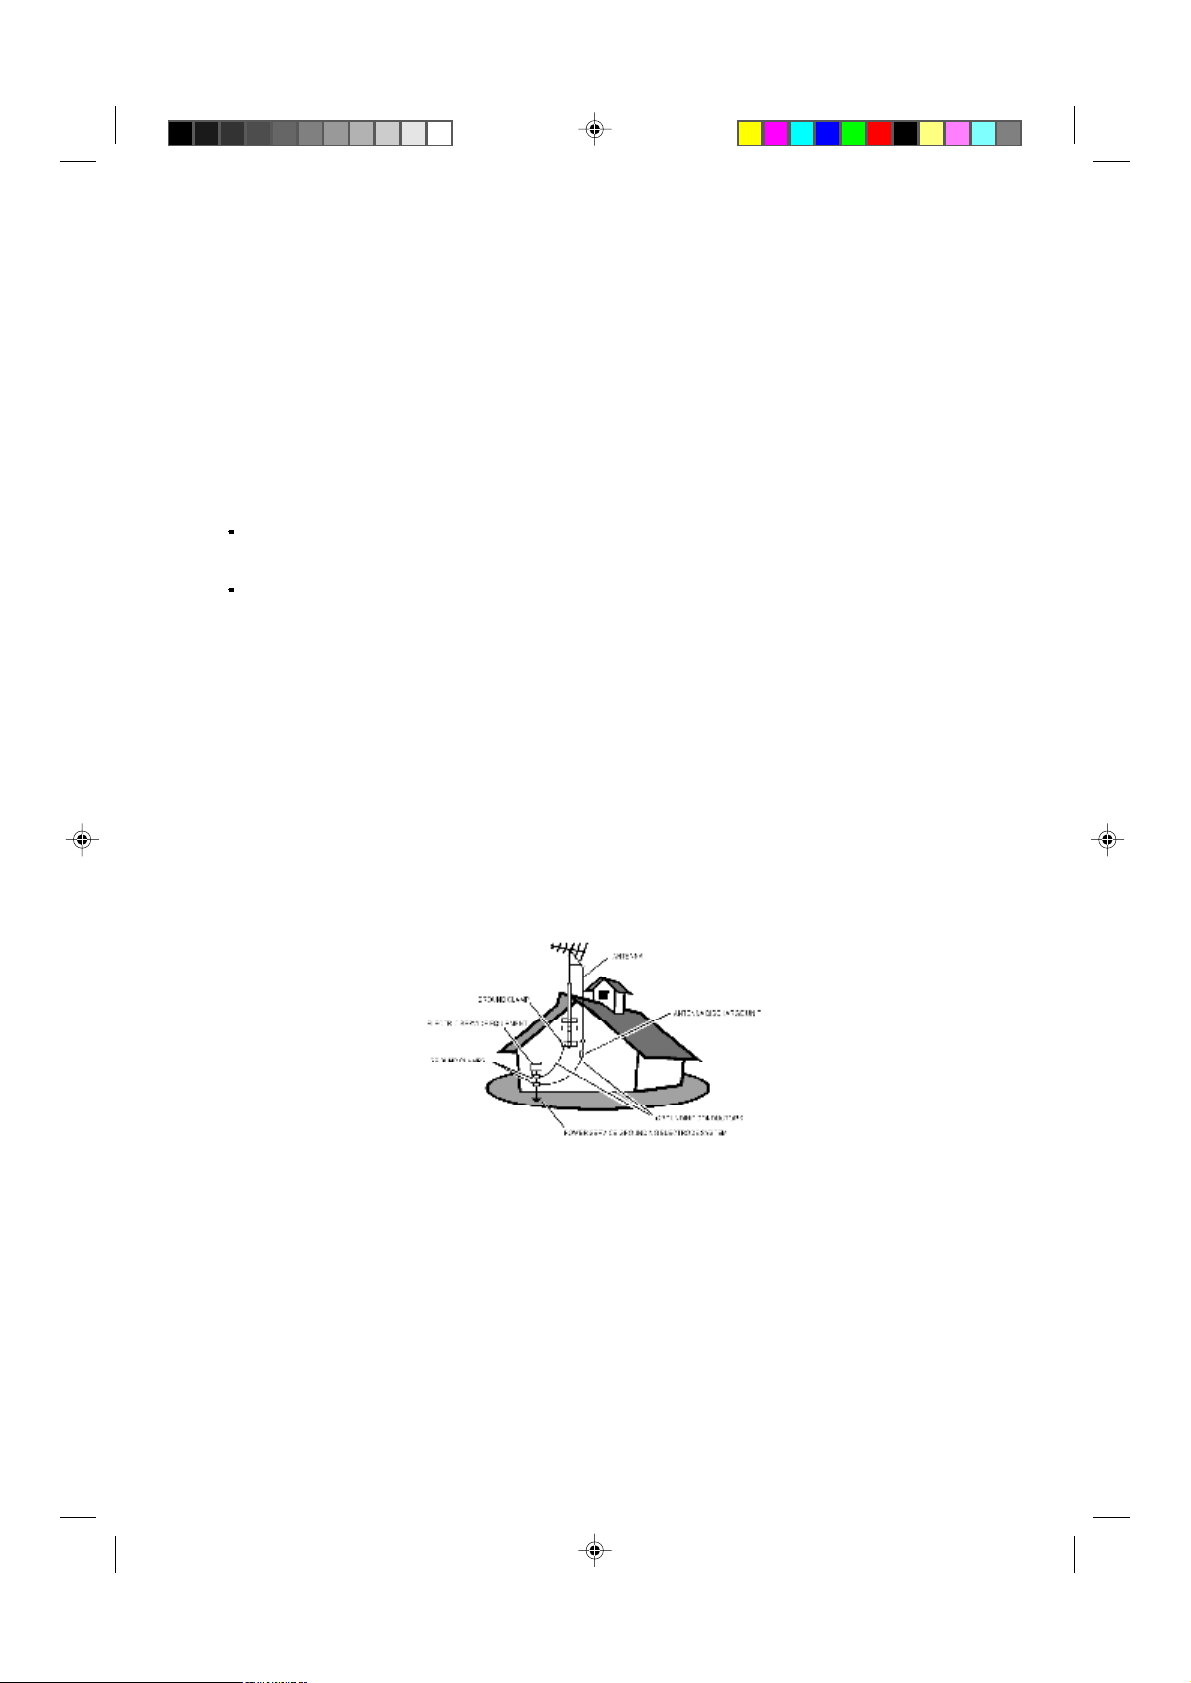
20. Outdoor Antenna Grounding – If an outside antenna is connected to the receiver, be sure the antenna
system is grounded so as to provide some protection against voltage surges and built up static charges.
Section 810 of the National Electric Cord, ANSI/NFPA No. 70-1984, provides information with respect to
proper grounding of the mats and supporting structure grounding of the lead-in wire to an
antenna-discharge unit, size of grounding connectors, location of antenna-discharge unit, connection to
grounding electrodes and requirements for the grounding electrode. See Figure below.
EXAMPLE OF ANTENNA GROUNDING AS PER NATIONAL ELECTRICAL CODE
Note to the CATV system installer: This reminder is provided to call the CATV system installer’s attention
to Article 820-40 of the NEC that provides guidelines for proper grounding and, in particular, specifies
that the cable ground shall be connected to the grounding system of the building, as close to the point of
cable entry as practical.
21. Objects and Liquid Entry – Care should be taken so that objects do not fall and liquids are not spilled
into the enclosure through openings.
Û²º±½«- ͱº¬©¿®» ó Ý«-¬±³»® Í«°°±®¬
4
Page 5

TABLE OF CONTENT
INSTRODUCTION
WELCOME/REGISTRATION OF YOUR TV ---------------------------------------------------------------- 2
IMPORTANT SAFETY INSTRUCTIONS -------------------------------------------------------------------- 3
TABLE OF CONTENT -------------------------------------------------------------------------------------------- 5
INSTALLATION
PRESENTATION OF THE LCD TV --------------------------------------------------------------------------- 6-7
SUPPLIED ACCESSORIES ------------------------------------------------------------------------------------ 8
REMOTE CONTROL OPERATION --------------------------------------------------------------------------- 9
INSTALLING LCD TV ON THE WALL ------------------------------------------------------------------------ 10
GETTING STARTED --------------------------------------------------------------------------------------------- 11
OSD SETTING ----------------------------------------------------------------------------------------------------- 12
CONNECT VIDEO RECORDER ------------------------------------------------------------------------------ 13
CONNECT CAMERA /CAMCORDER/ VIDEO GAME SET --------------------------------------------- 13
CONNECT DVD PLAYER --------------------------------------------------------------------------------------- 14
CONNECT DIGTAL SET TOP BOX --------------------------------------------------------------------------- 14
TV SETUP MENU
TV CHANNEL INSTALLATION --------------------------------------------------------------------------------- 15
CHANNEL EDIT --------------------------------------------------------------------------------------------------- 16
SLEEP TIMER ------------------------------------------------------------------------------------------------------ 16
CLOSED CAPTION ---------------------------------------------------------------------------------------------- 17
CHANNEL LOCK -------------------------------------------------------------------------------------------------- 17-20
SOUND SETUP MENU ------------------------------------------------------------------------- 21-22
PICTURE SETUP MENU ---------------------------------------------------------------------- 23-24
PC SETUP MENU ------------------------------------------------------------------------------- 25-26
GENERAL INFORMATION
TIPS ------------------------------------------------------------------------------------------------------------------- 27
CALL BEFORE SERVICE --------------------------------------------------------------------------------------- 28
GLOSSARY --------------------------------------------------------------------------------------------------------- 29
PRODUCT SPECIFICATION ----------------------------------------------------------------------------------- 30-31
ФЧУЧМЫЬ ЙЯООЯТМЗ ---------------------------------------------------------------------------------------------íî
THANK YOU VERY MUCH FOR CHOOSING THE LCD TV.
WE RECOMMEND THAT YOU TAKE A FEW MINUTES TO READ CAREFULLY THROUGH THIS MANUAL
BEFORE INSTALLING AND SWITCHING ON THE TV. PLEASE KEEP THIS MANUAL IN A SAFE PLACE
FOR YOUR FUTURE REFERENCE.
The present set had been designed and manufactured to assure personal safety. Improper use can result in
electric shock or fire hazard. The safeguards incorporated with the present unit will protect you if you observe
the following procedures when installation, operating and servicing. The present unit is fully transistorized
and does not contain any element that can be repaired by user.
LAMP(S) INSIDE THIS PRODUCT CONTAIN MERCURY AND MUST BE RECYCLED OR DISPOSED
OF ACCORDING TO LOCAL, STATE OR FEDERAL LAWS. FOR MORE INFORMATION, CONTACT THE
ELECTRONIC INDUSTRIES ALLIANCE AT WWW.EIAE.ORG
Û²º±½«- ͱº¬©¿®» ó Ý«-¬±³»® Í«°°±®¬
5
Page 6

PRESENTATION OF THE LCD TV
Front Panel Control Knobs
INSTALLATION
Source Key
> or < Key
or Key
MENU Key
Power Key Press to turn on or off the TV.
Press to select your input source.
Press to confirm your function selection and adjust the volume
Press to ½±²º·®³ your function selection and adjustTV channel
Press to show the OSD menu and exit OSD menu at the TV.
Û²º±½«- ͱº¬©¿®» ó Ý«-¬±³»® Í«°°±®¬
6
Page 7
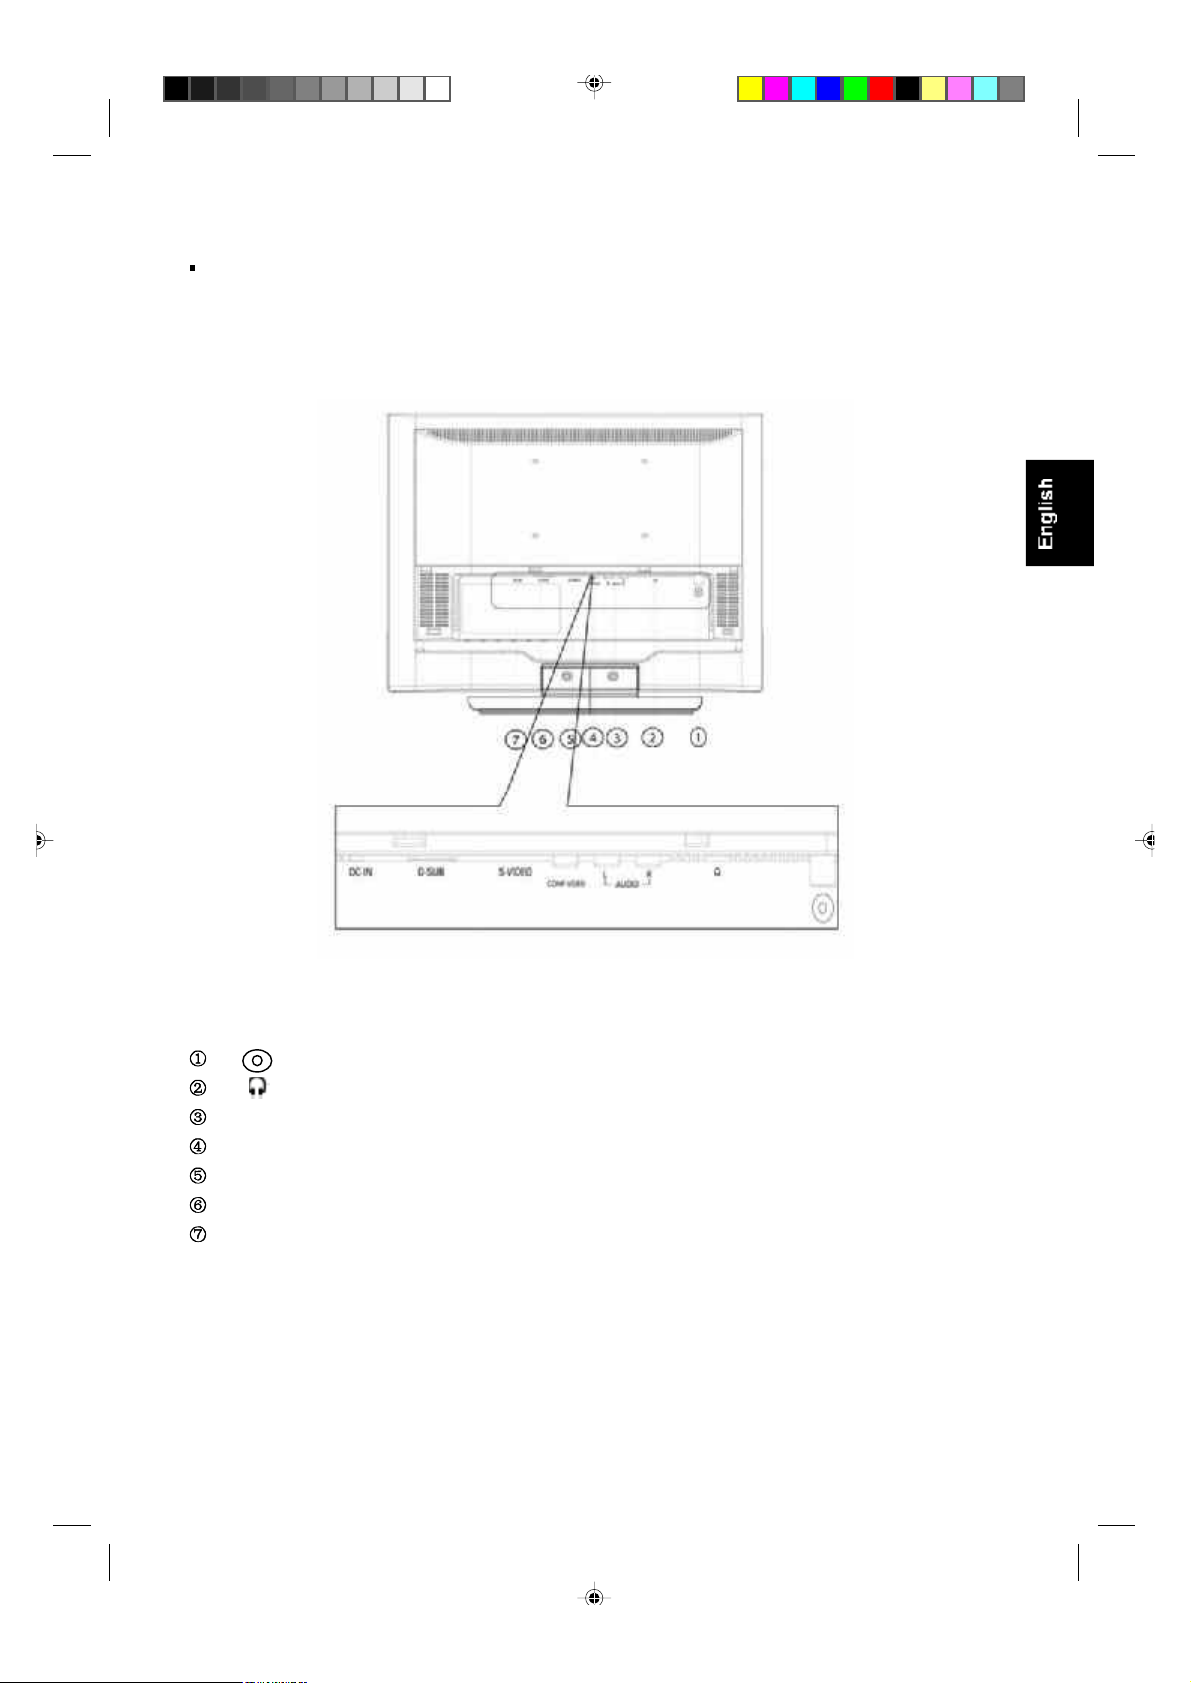
Preparation
Remove the back plate at the back of the TV as shown on the illustration opposite. Lay the LCD TV with the
screen down on a table, as it will be easier to connect your peripheral equipment. Please take precaution not
to damage the screen.
Audio R/L
COMPVIDEO
S-VIDEO
D-SUB
DC IN
Û²º±½«- ͱº¬©¿®» ó Ý«-¬±³»® Í«°°±®¬
TV input
Earphone jack
Audio Right /Left Channel input
Ê·¼»± Input
S-VIDEO Input
PC Input
12V DC Power Input
7
Page 8
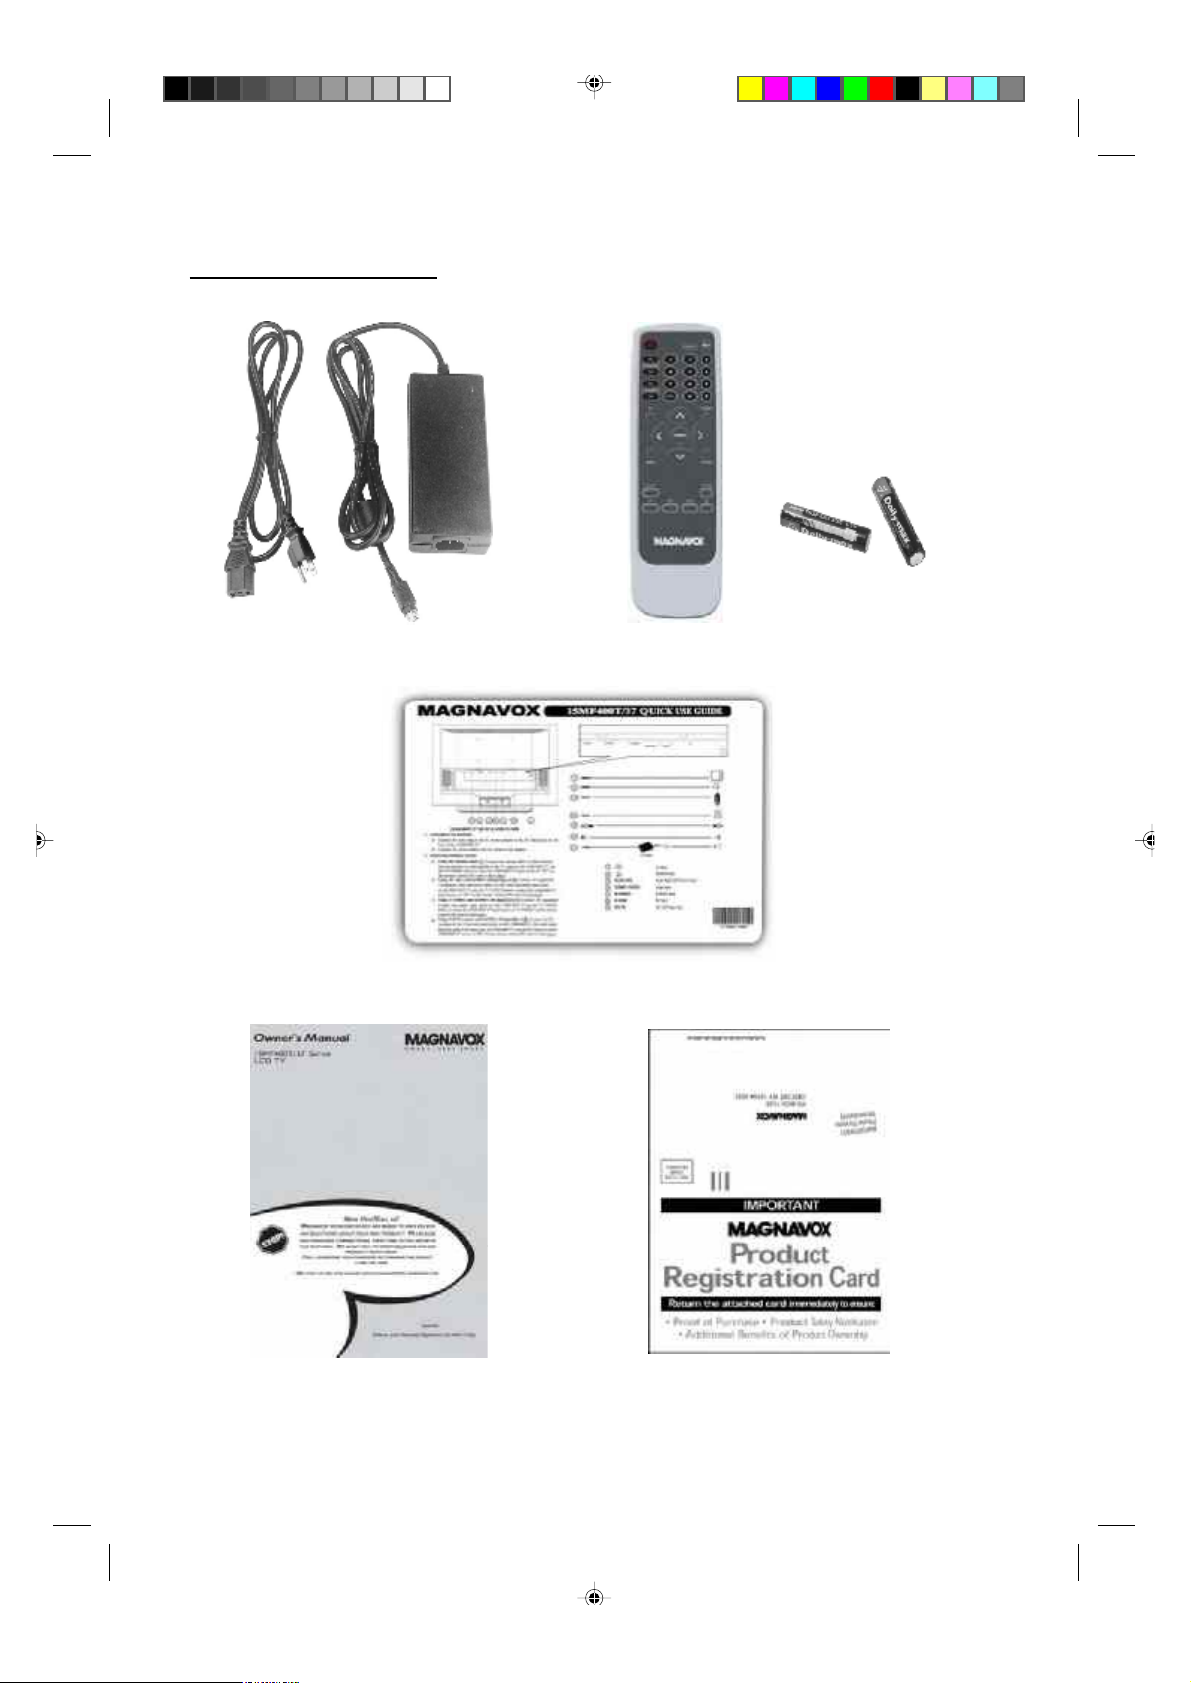
SUPPLIED ACCESSORIES
Power adapter Remote control
Quick Setup Guide
Owner’s Manual Warrant Card
8
Û²º±½«- ͱº¬©¿®» ó Ý«-¬±³»® Í«°°±®¬
Page 9
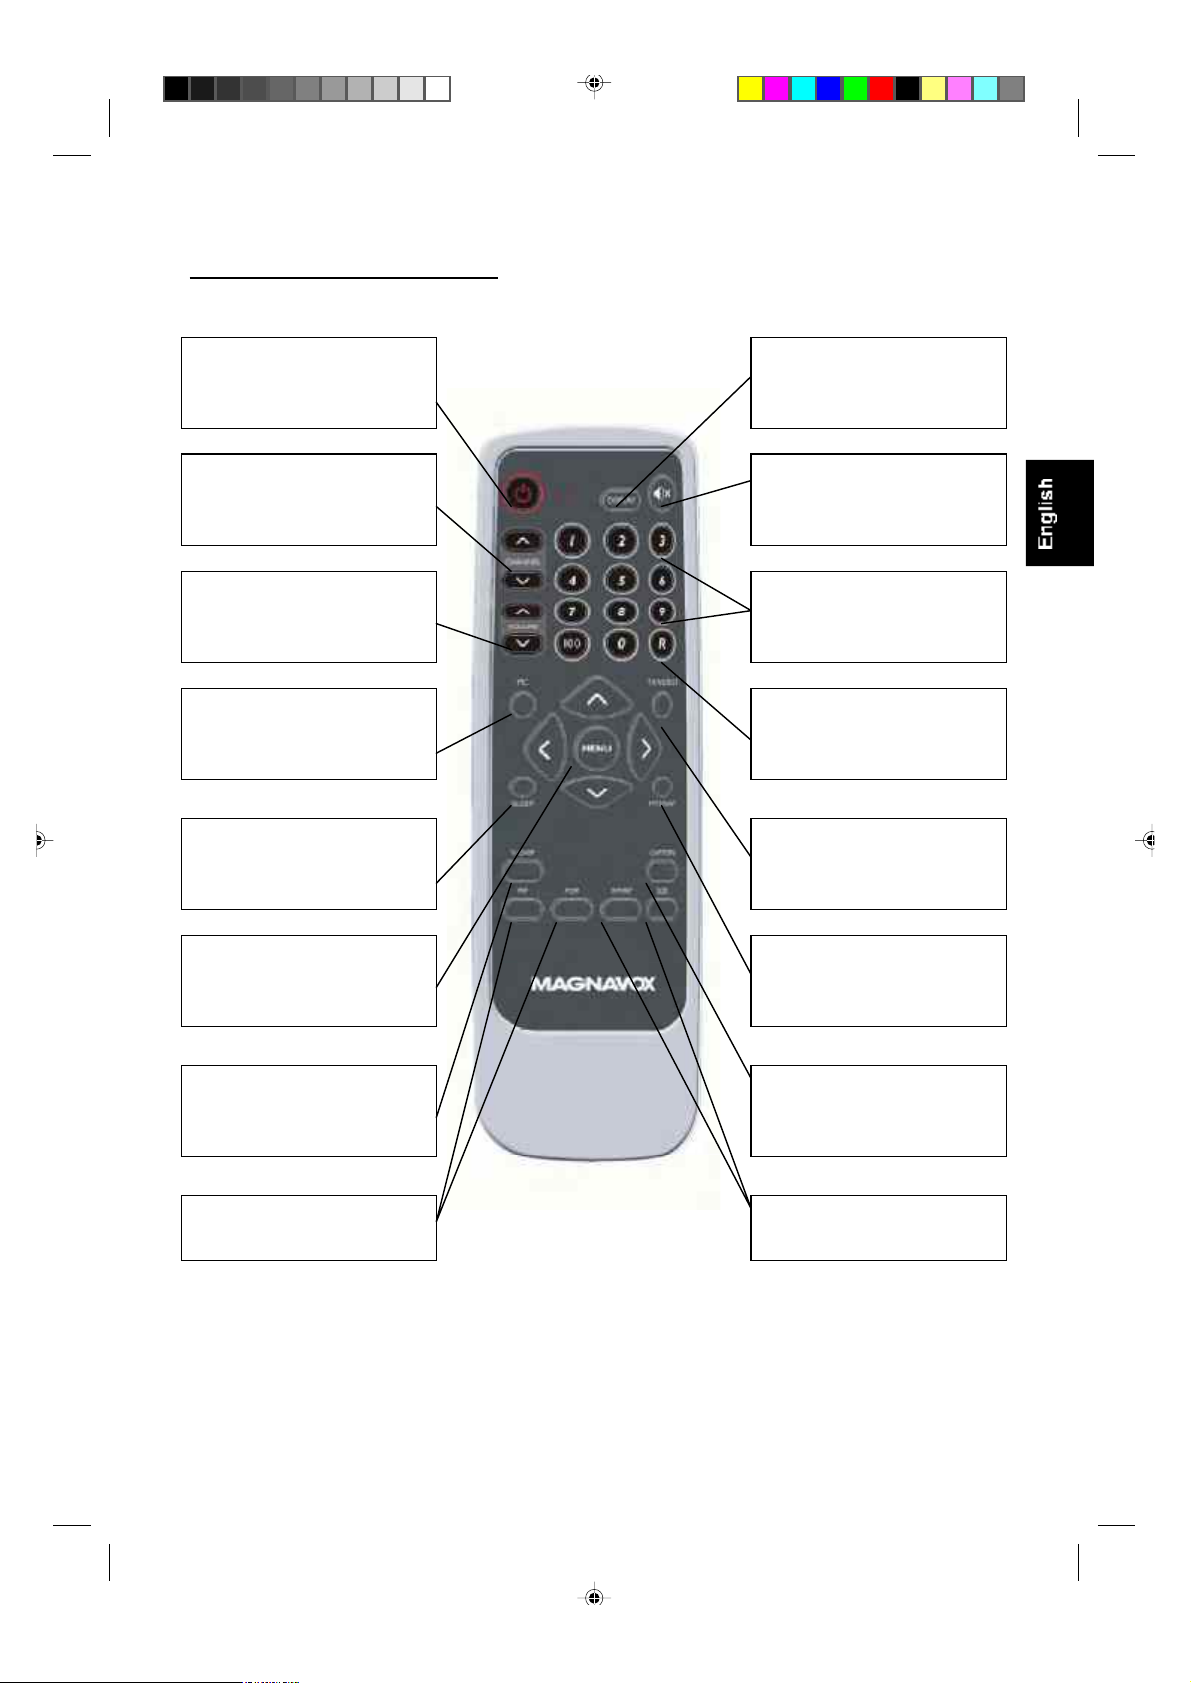
REMOTE CONTROL OPERATION
f
f
POWER button
Press to turn on/off the TV
CHANNELbutton
Press to adjust the channel up or
down.
VOLUME button
Press to adjust the sound level
PCbutton
Press to switch on your PC signal.
SLEEP button
Press to set the LCD TV to turnof
Itself within a certain time.
DISPLAY button
Press to "Display” channel
number on
MUTE button
Press to eliminate or restore the
LCD
NUMBER button
Press to select TV channels
R button
Press to display the previously
selected TV channel
TV/VIDEO button
Select your video input source
MENU button
Press repeatedly to display main
menu and exit OSD function
V-CHIP button
Press this button to setup parental
control.
PIP/POP button
Not applicable
MTS /SAP button
Press to select sound mode i
available
CAPTION button
Press to "activate" closed
Caption.
SIZE/SWAP button
Not applicable
9
Û²º±½«- ͱº¬©¿®» ó Ý«-¬±³»® Í«°°±®¬
Page 10
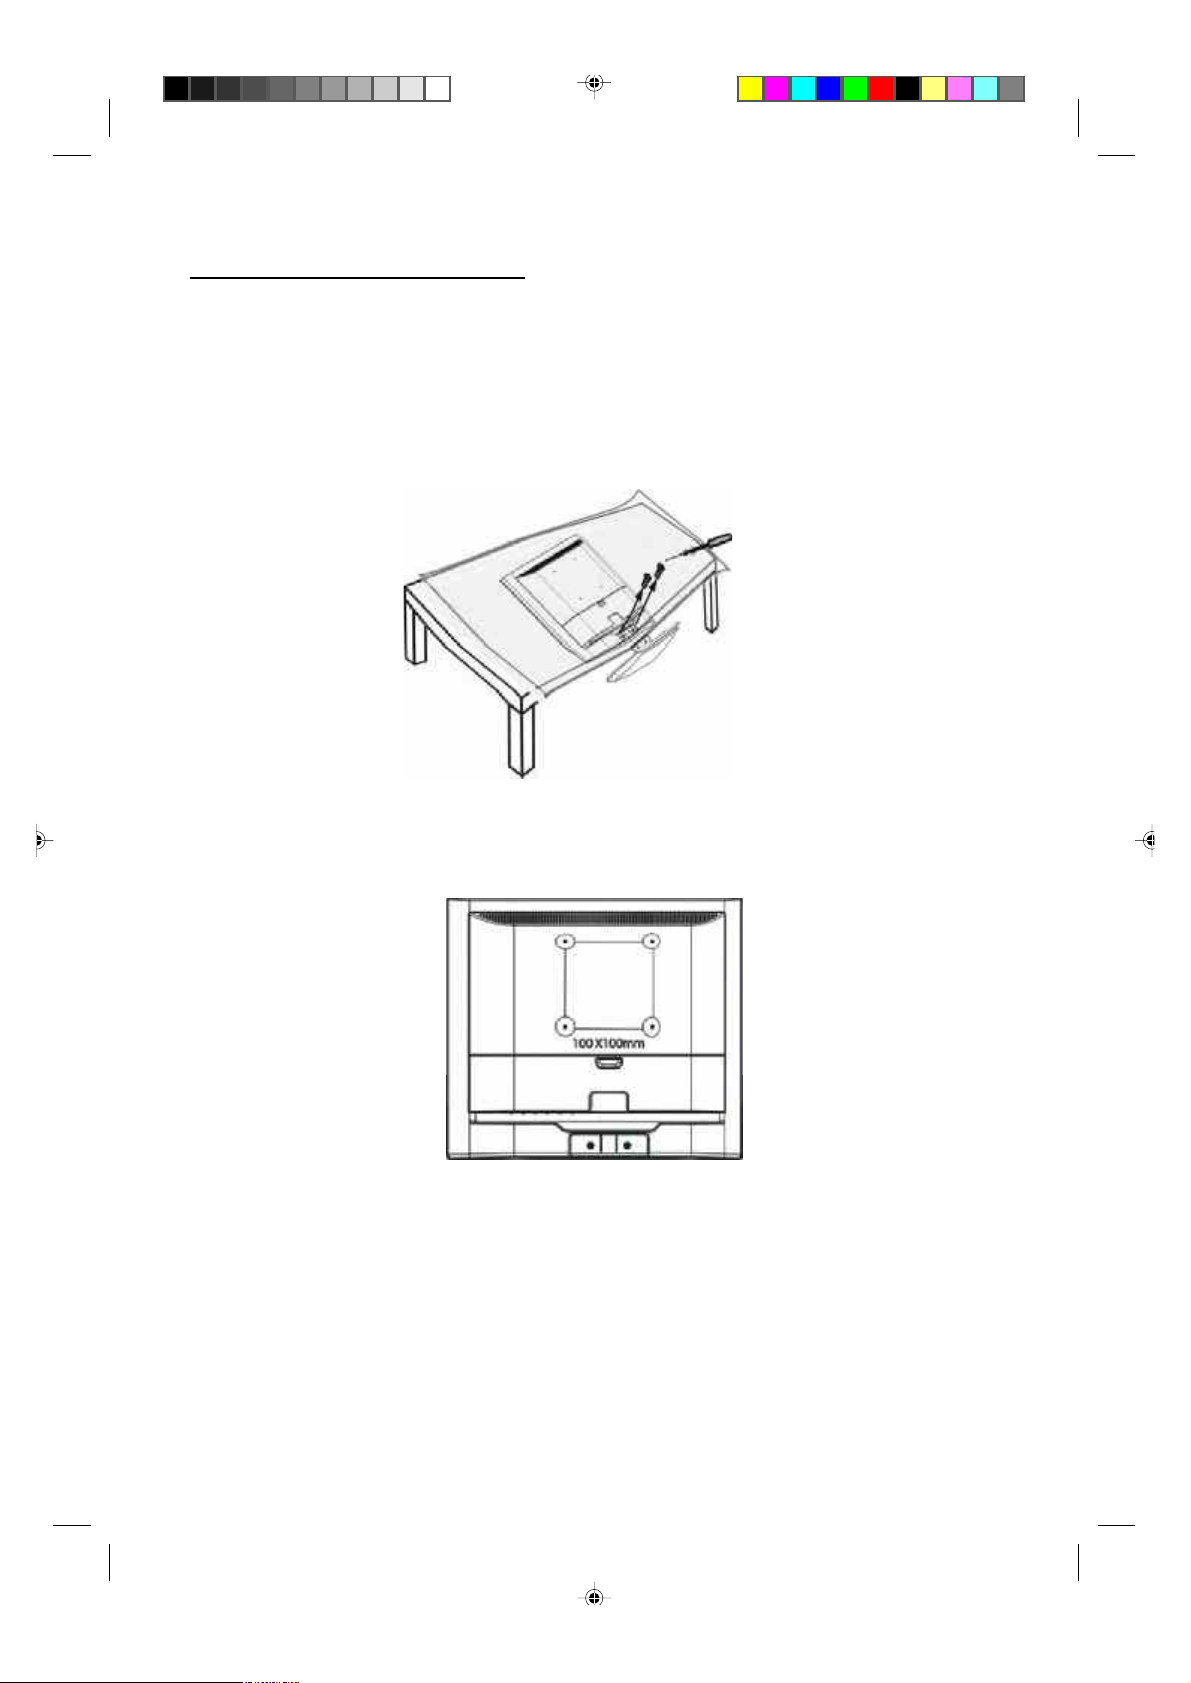
INSTALLING LCD TV ON THE WALL
Before you can install your LCD TV on the wall, you MUST first remove the base using
the steps below:
1. Place the set facing down on a flat surface with a protective sheet or cloth the TV.
2. Remove two screws from the base, grasp the base and pull it out.
When installing the LCD TV on the wall, please consult a professional technician for proper installing.
The manufacture accepts no liability for installations not performed by professional technician.
Û²º±½«- ͱº¬©¿®» ó Ý«-¬±³»® Í«°°±®¬
10
Page 11
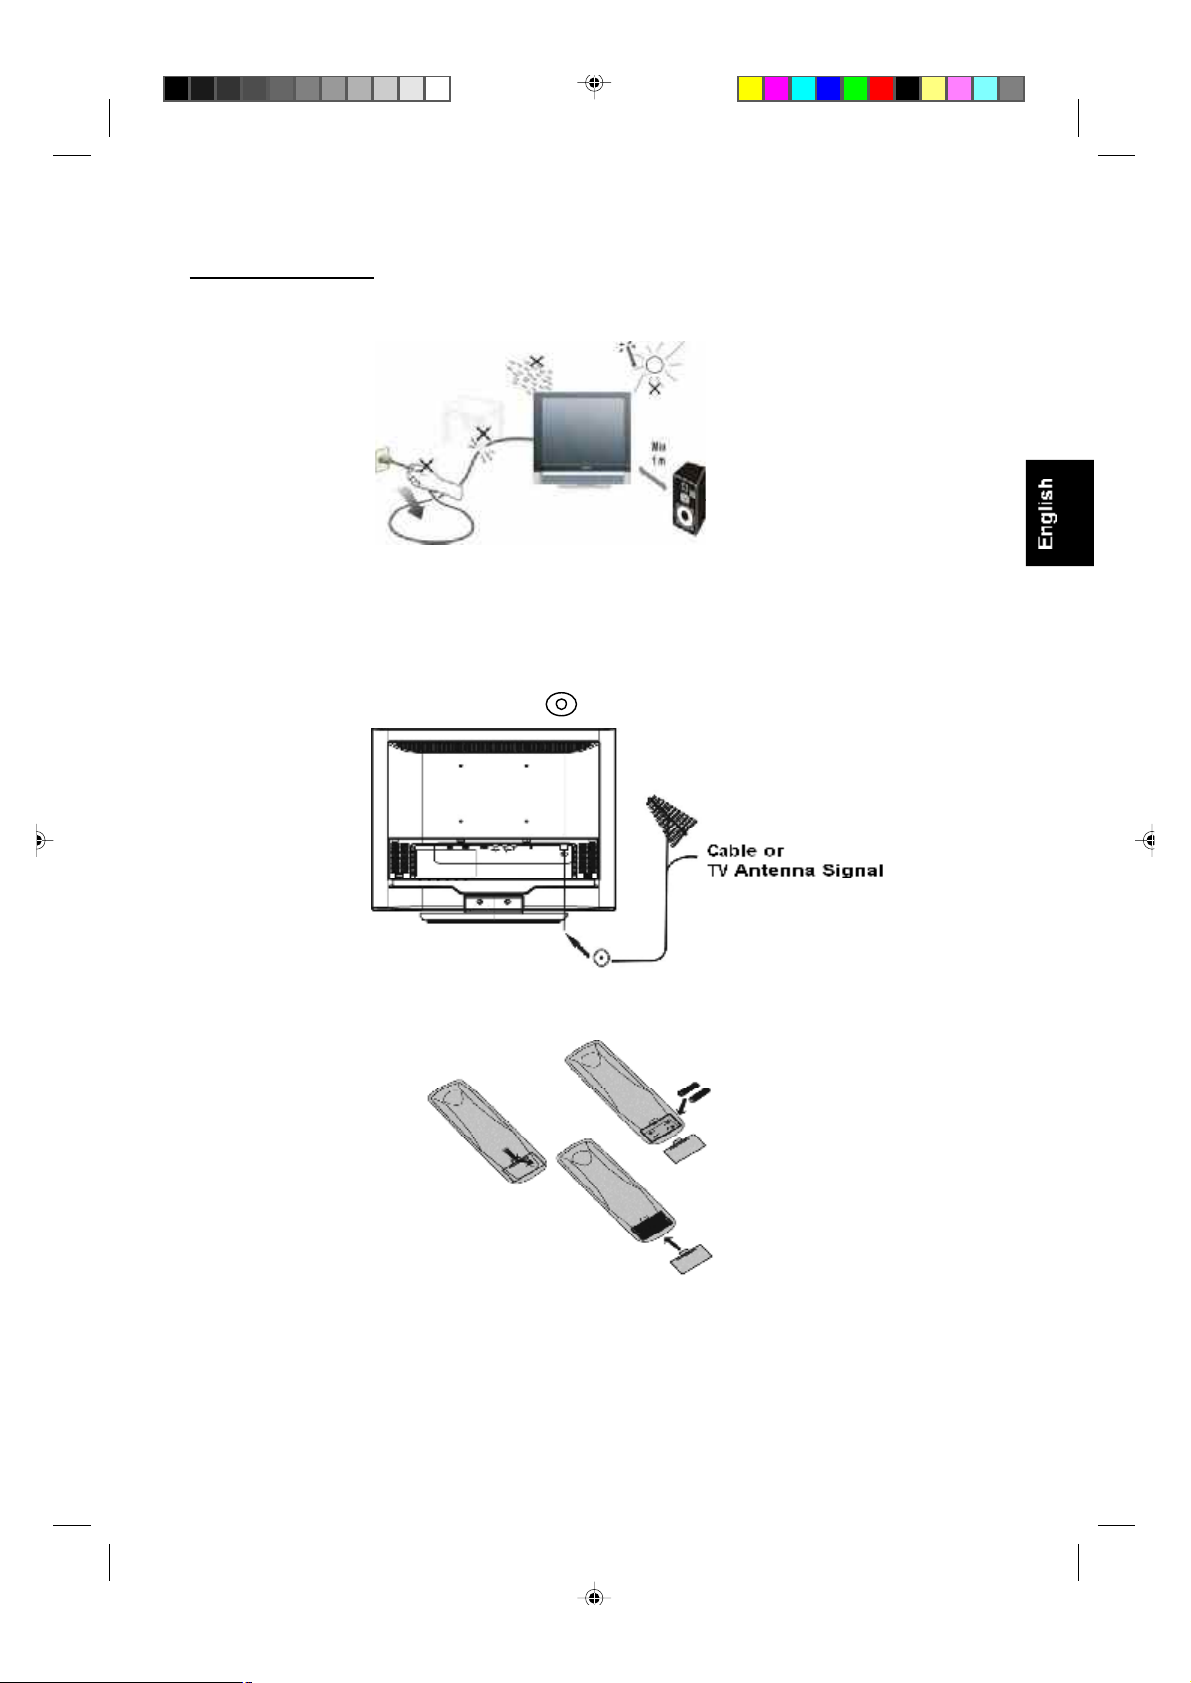
GETTING STARTED
1. Place the TV on a sturdy surface.
Note: Ensure that the TV is placed in a position to allow free flow of air. Do not cover the ventilation
openings on the back cover.
To prevent any unsafe situations, no naked flame sources, such as lighted candles, should be placed on or
in the vicinity.
Avoid heat, direct sunlight and exposure to rain or water. The equipment shall not be exposed to dripping
or splashing.
2. Connect the antenna to the TV jack on the rear of LCD TV
3. Battery Installation:
Remove the battery compartment lid. Place 2 AAA batteries in the remote.
4. Plug the DC adaptor into DC IN 12V jack on the LCD TV
Plug the power cable into an outlet and switch TV set on.
5.Press the РСЙЫО button to turn on the TV
6. Run the Auto Scan function to install your LCD TV channels (Refer to Page15)
11
Û²º±½«- ͱº¬©¿®» ó Ý«-¬±³»® Í«°°±®¬
Page 12
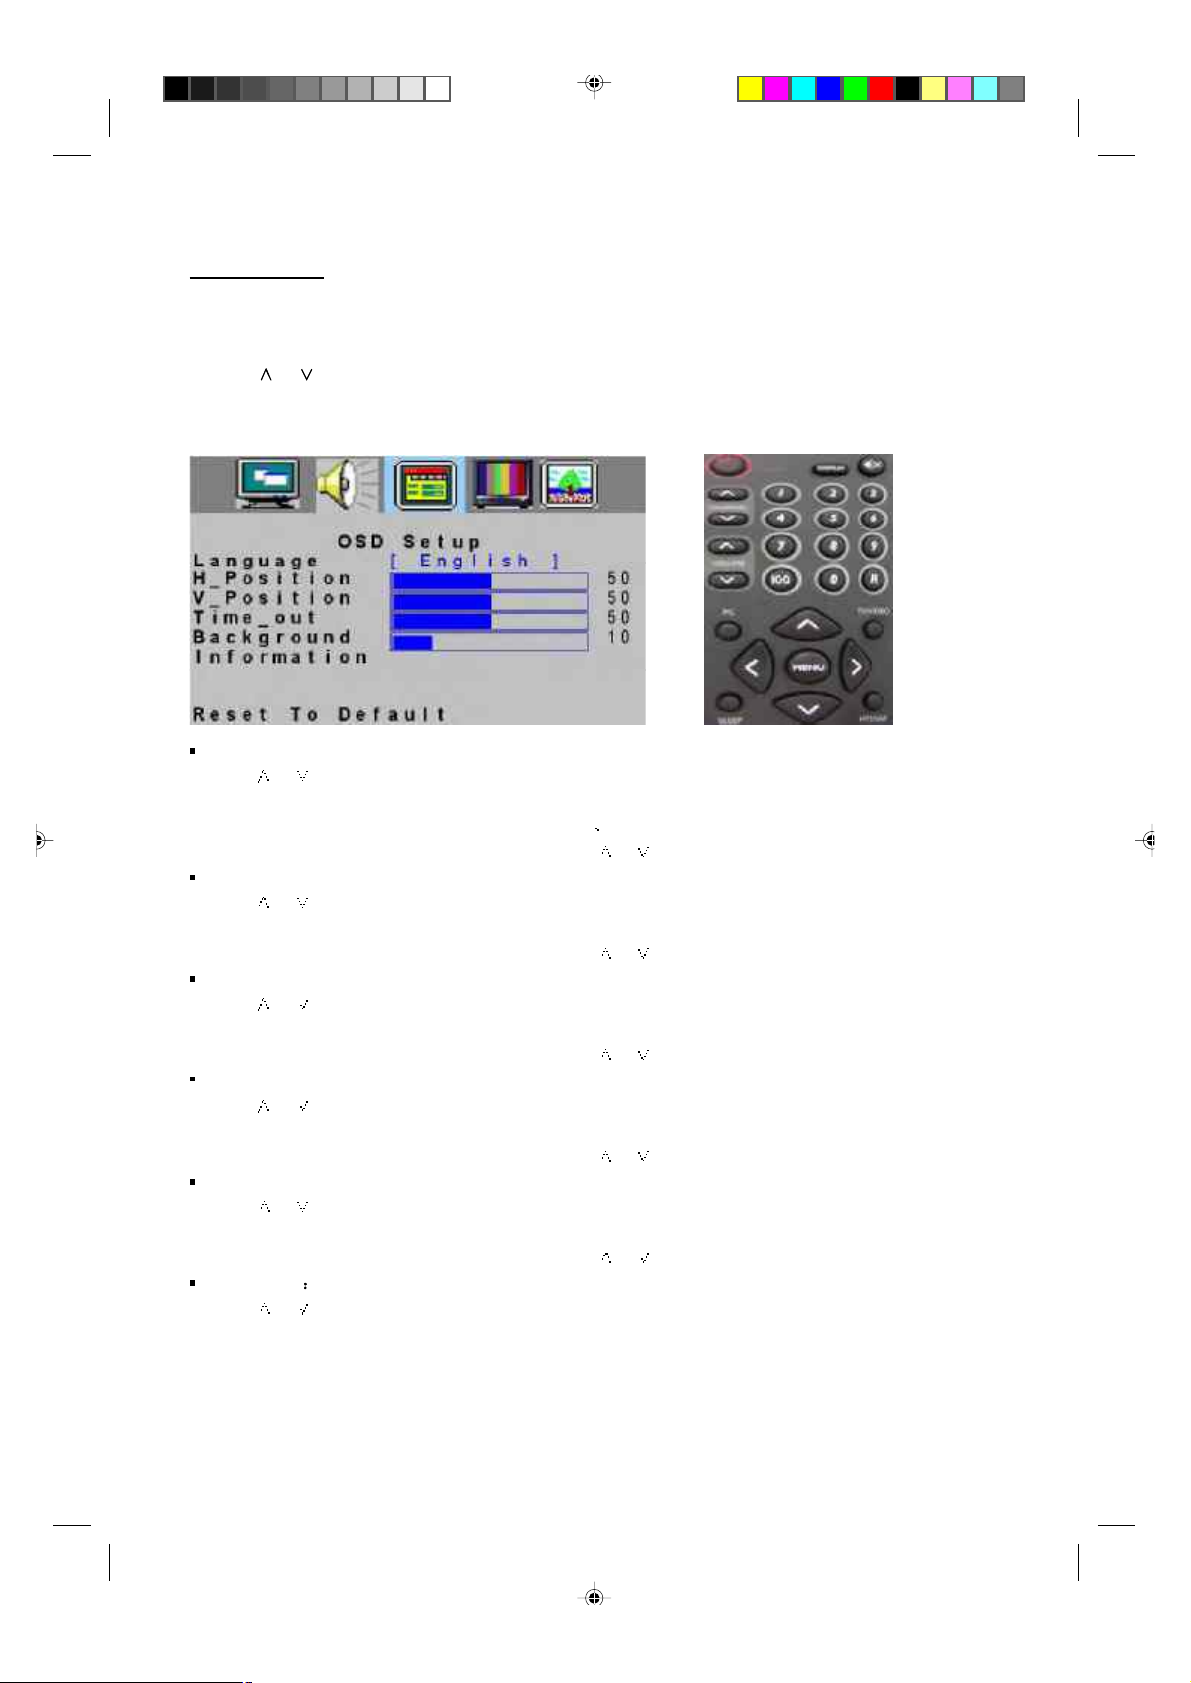
OSD SETTING
1. Press “MENU’’ key to open OSD menu
2. Press > or < key to select “OSD Setup’’ option
3. Press or key to select submenu
OSD Setup
Language
1. Press or key to select “Language” option
2. Press > or < key to select language
There are three kinds of language to select :English French and Spanish
3. After adjustment, press “MENU” key to exit or press or key to adjust other options
H_Position
1. Press or key to select “H Position” option
2. Press > or < key to adjust OSD horizontal position
3. After adjustment, press “MENU” key to exit or press or key to adjust other options
V_Position
1. Press or key to select “V_Position” option
2. Press > or < key to adjust OSD vertical position
3. After adjustment, press “MENU” key to exit or press or key to adjust other options
Time_out
1. Press or key to select “Time_out” option
2. Press > or < key to adjust OSD display time
3. After adjustment, press “MENU” key to exit or press or key to adjust other options
Background
1. Press or key to select “Background” option
2. Press > or < key to adjust OSD background
3. After adjustment, press “MENU” key to exit or press or key to adjust other options
Information This option can only be operated on PC signal source
1. Press or key to select “Information” option
2. Press > or < key then the screen will display the current input information
3. Press “MENU” key to exit information menu
Û²º±½«- ͱº¬©¿®» ó Ý«-¬±³»® Í«°°±®¬
12
Page 13
CONNECT VIDEO RECORDER
How to connect:
1. Connect the antenna to VCR RF input
2. Connect the other RF cable from VCR output to TV input port ( ); if you connect the VCR to TV’s
AV input port (COMP VIDEO), you will get the better quality of video and audio
3. TV’s AV input does not include audio; please connect VCR audio output to TV’s audio input at
AUDIO L/R
If your VCR is equipped with S-VHS video port:
For better picture quality, connect an S-Video signal with the S-VIDEO input on the TV instead of connecting
to the AV input port (COMP VIDEO)
S-Video does not include audio, audio cables must be connected to TV audio input at AUDIO L/R
Watching VCR
1. If you use TV connection, select the TV channel search
2. If you use AV connection, select AV
3. If you use S-Video connection. Select s-video
4. Insert videotape in the VCR and press the PLAY button
CONNECT CAMERA /CAMCORDER/ VIDEO GAME SET
1. Connect the video output port of Camera /Camcorder/ Video Game Set to the TV’s AV input port
(COMP VIDEO)
2. Connect the left and right audio channels of Camera /Camcorder/ Video Game Set to the left and right
channels of audio input at AUDIO L/R of TV
If your Camera /Camcorder/ Video Game Set is equipped with S-VHS video port:
For better picture quality, please connect the S-Video cable to the S-Video input of TV. Connect the left and
right channels of Camera /Camcorder/ Video Game Set to the left and right channels of audio input at AUDIO
L/R of TV
How to play
If you use AV connection, please select AV;
If you use S-Video connection, please select S-VIDEO;
13
Û²º±½«- ͱº¬©¿®» ó Ý«-¬±³»® Í«°°±®¬
Page 14

CONNECT DVD PLAYER
1. Connect the video output port of DVD player to the AV input port (COMP VIDEO) of TV
2. Connect the left and right audio channels of DVD to the left and right channels of audio input at
AUDIO L/R of TV
If your DVD player is equipped with S-VHS video port:
For better picture quality, please connect the S-Video cable to the S-Video input of TV. Connect the left and
right channels of DVD to the left and right channels of audio input at AUDIO L/R of TV
How to play
If you use AV connection, please select AV;
If you use S-Video connection, please select S-VIDEO;
CONNECT DIGTAL SET TOP BOX
How to connect
1. Connect the video output port of Digital Set Top Box to the AV input port (COMP VIDEO) of TV
2. Connect the left and right audio channels of Digital Set Top Box to the left and right channels of audio
input at AUDIO L/R of TV
How to use
1. Select AV.
2. Turn on the DTV Set Top Box set.
Note: In case you notice scrolling images, wrong colors or no color, no picture or even combinations of
these, on your screen, check if the connections are done in the right way. Check if the cable colors match
with the Input connector colors.
14
Û²º±½«- ͱº¬©¿®» ó Ý«-¬±³»® Í«°°±®¬
Page 15
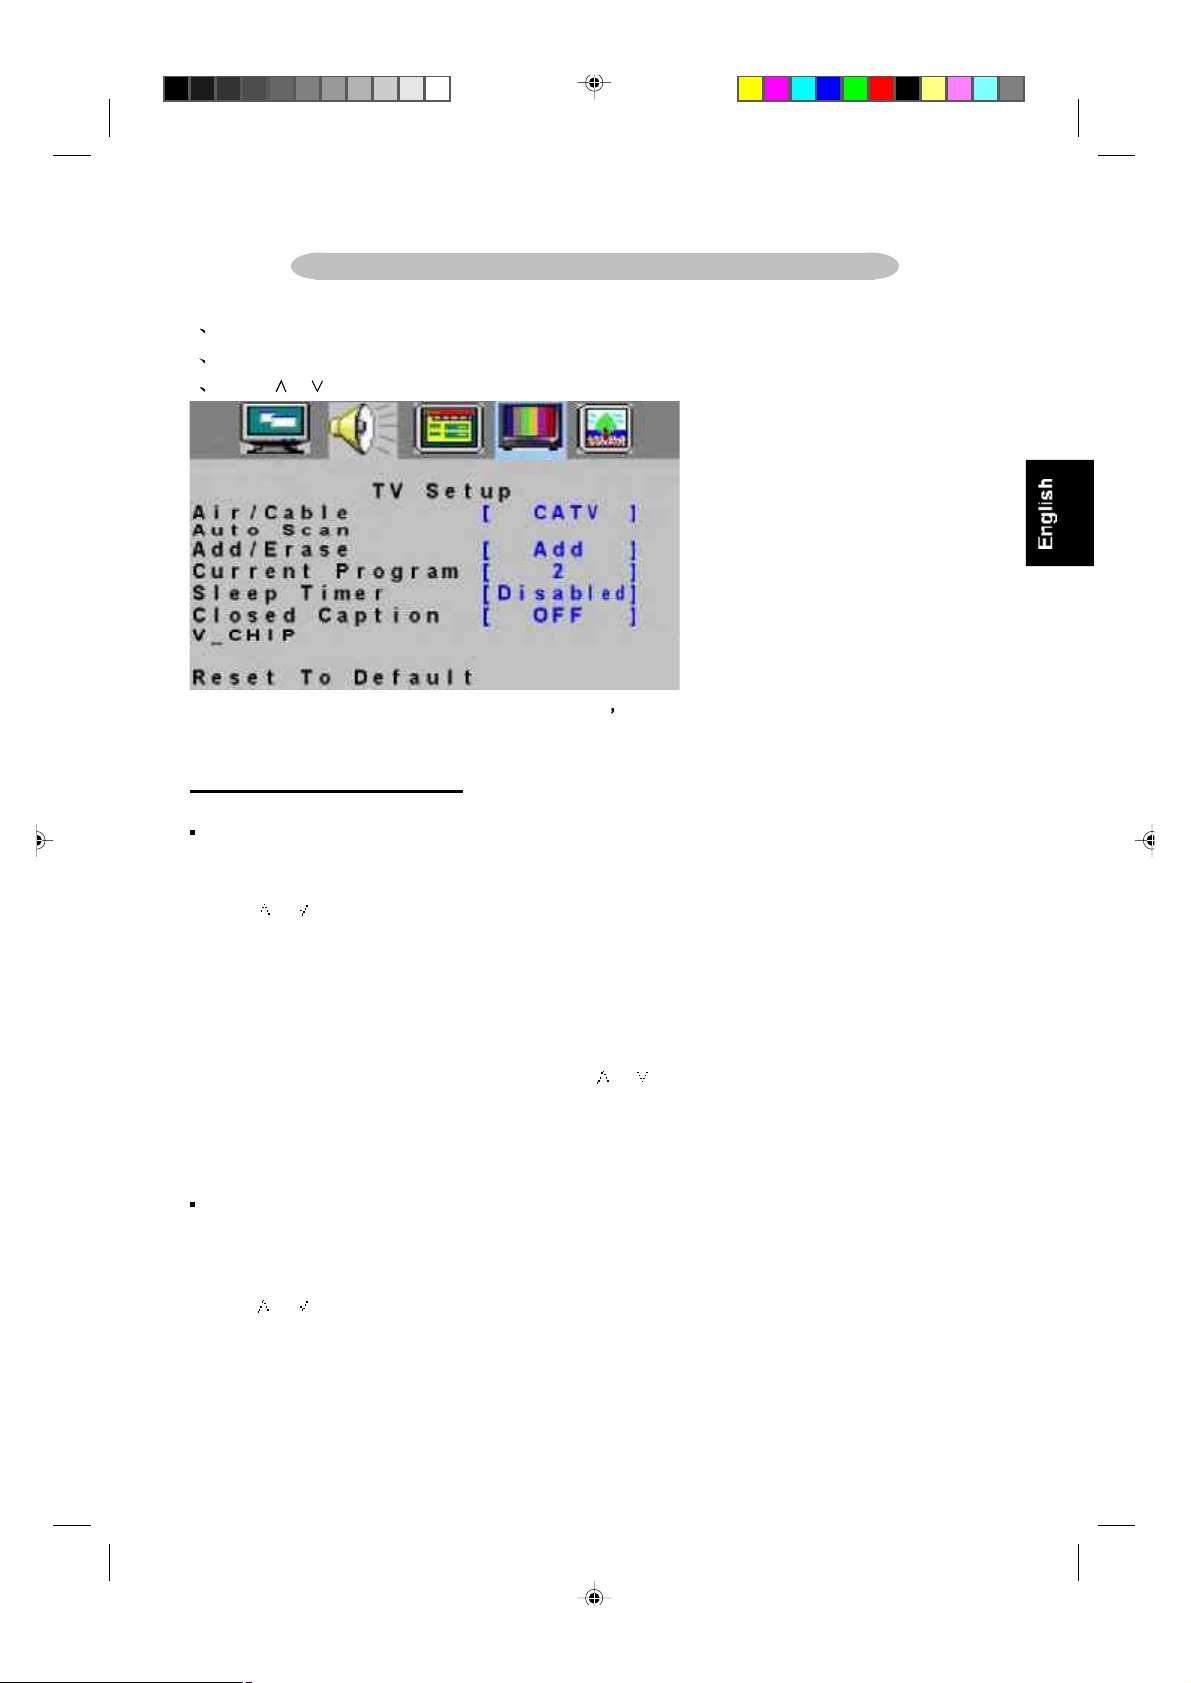
TV SETUP MENU
1 Press” MENU’’ key to open OSD menu
2 Press > or < key to select “TV Setup’’ option
3 Press or key to select submenu
Note: Air/Cable, Auto Scan, Current Program Sleep Timer options can only display on
TV Source
TV CHANNEL INSTALLATION
Air/Cable
1. Press” MENU’’ key to open OSD menu
2. Press > or < key to select “TV Setup’’ option
3. Press or key to select “AIR/CATV” option
4. Press > or < key to select the automatic search system that your TV need, there are four options:
CATV: Community Antenna Television
AIR: Over the Air
HRC: Harmonically Related Carrier
IRC: Incrementally Related Carrier
5. Press “MENU” key to exit AIR/CATV menu or press or key to adjust other options
Note: Please run the auto scan function to setup the TV for the broadcast or cable channels available in
your area. If you do not run the auto scan function to setup the channels, your television may not operate
properly.
Auto scan
Channel auto search and memorize all viewable channel.
1. Press “MENU’’ key to open OSD menu
2. Press > or < key to select “TV Setup’’ option
3. Press or key to select “Auto scan” option
4. Press > or < key to start auto scan.
Note: Please run the auto scan function to setup the TV for the broadcast or cable channels available in
your area. If you do not run the auto scan function to setup the channels, your television may not operate
properly.
Û²º±½«- ͱº¬©¿®» ó Ý«-¬±³»® Í«°°±®¬
15
Page 16
CHANNEL EDIT
Add/Erase
1. Press” MENU’’ key to open OSD menu
2. Press > or < key to select “TV Setup’’ option
3. Press or key to select “Add/Erase” option
4. Press > or < key to select Add or Erase.
5. Press “MENU” key to exit Add/Erase menu or press or key to adjust other options
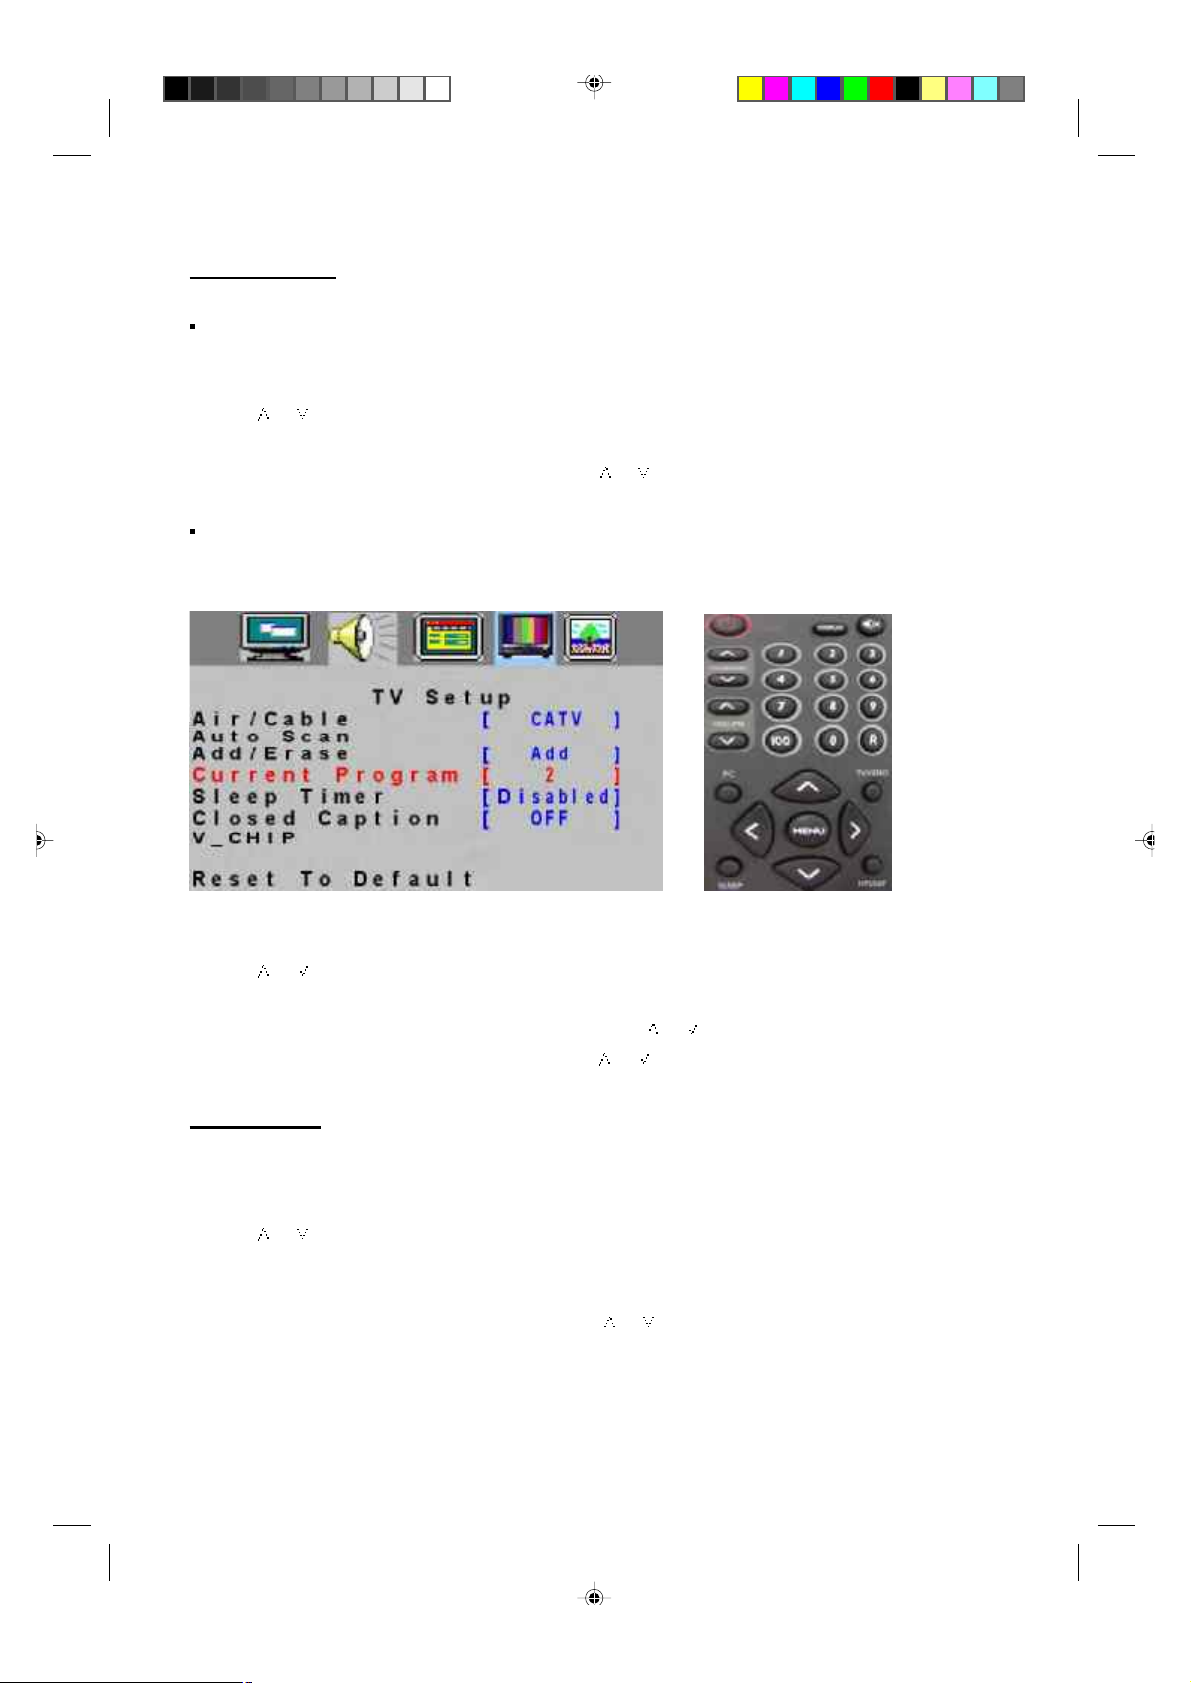
Current Program
Current program is the channel set by the current TV, you can press “DISPLAY” key to display the current
channel on the top right of the screen.
1. Press” MENU’’ key to open OSD menu
2. Press > or < key to select “TV SETUP’’ option
3. Press or key to select “Current Program” option
4. Press > or < key to select the channel.
5. Press “MENU” key to exit Current Program menu or press or key to adjust other options
You can also press the digital keys 0-9/100 or channel or on the remote control to select channel
SLEEP TIMER
1. Press” MENU’’ key to open OSD menu
2. Press > or < key to select “TV Setup’’ option
3. Press or key to select “Sleep Timer” option
4. Press > or < key to select the sleep timer that you need to set, you can select 30/60/90/120 minutes sleep
timer.
5. Press “MENU” key to exit sleep timer menu or press or key to adjust other options
Note: You can also press “SLEEP” on the remote control, the sleep timer will display on the top right of the
screen.
16
Û²º±½«- ͱº¬©¿®» ó Ý«-¬±³»® Í«°°±®¬
Page 17
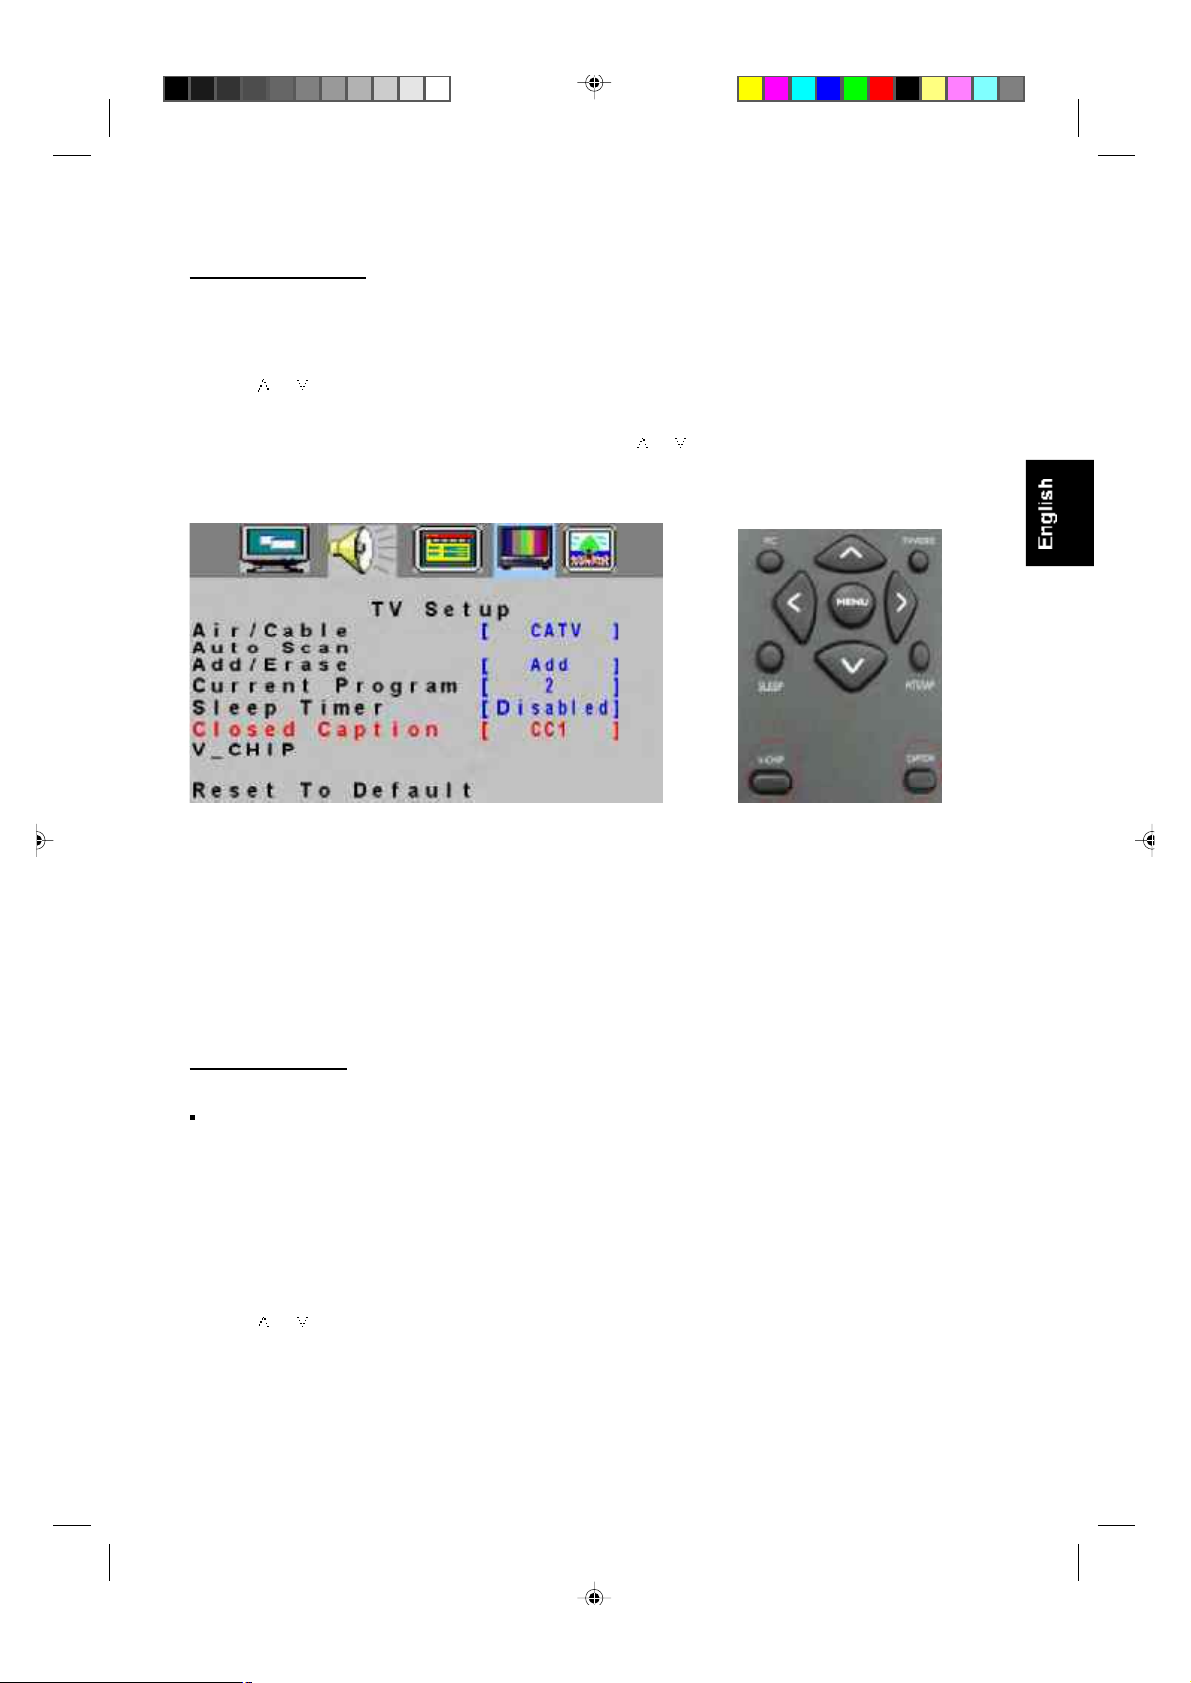
CLOSED CAPTION
1. Press MENU’’ key to open OSD menu
2. Press > or < key to select “TV SETUP’’ option
3. Press or key to select “Closed Caption” option
4. Press > or <key to set CC1~CC4 and TT1 and TT4.
5. Press “MENU” key to exit Closed Caption menu or press or key to adjust other options
You can also press “CAPTION” on the remote control, enter Closed Caption menu directly, then press step 4
to adjust.
Caption Mode: CC1~CC4
Dialogue (and descriptions) for the action on the captioned TV program shows on screen.
Text Mode: TT1~TT4
Often used for channel guide, schedules, bulletin board information for Closed Caption programs, news,
weather information or stock marker reports.
“
Note: Not all Closed Caption modes are necessarily being use by a TV channel during the transmission of a
Closed Caption program.
CHANNEL LOCK
V-Chip
It is the parental control function (V-chip). It is used to block program viewing based on the ratings by the
broadcaster. The default setting is to allow all programs to be viewed. Viewing can be blocked by the type of
program and by the categories chosen be blocked. It is also possible to block all program viewing for a time
period.
1. Press MENU’’ keyto open OSD menu
2ò Press > or < keyto select “TV Setup’’ option
3. Press or key to select “V _CHIP” option
4. Press > or < key to enter V _CHIP password validation menu.
You can press V-CHIP key on the remote control to enter the menu directly.
“
Û²º±½«- ͱº¬©¿®» ó Ý«-¬±³»® Í«°°±®¬
17
Page 18
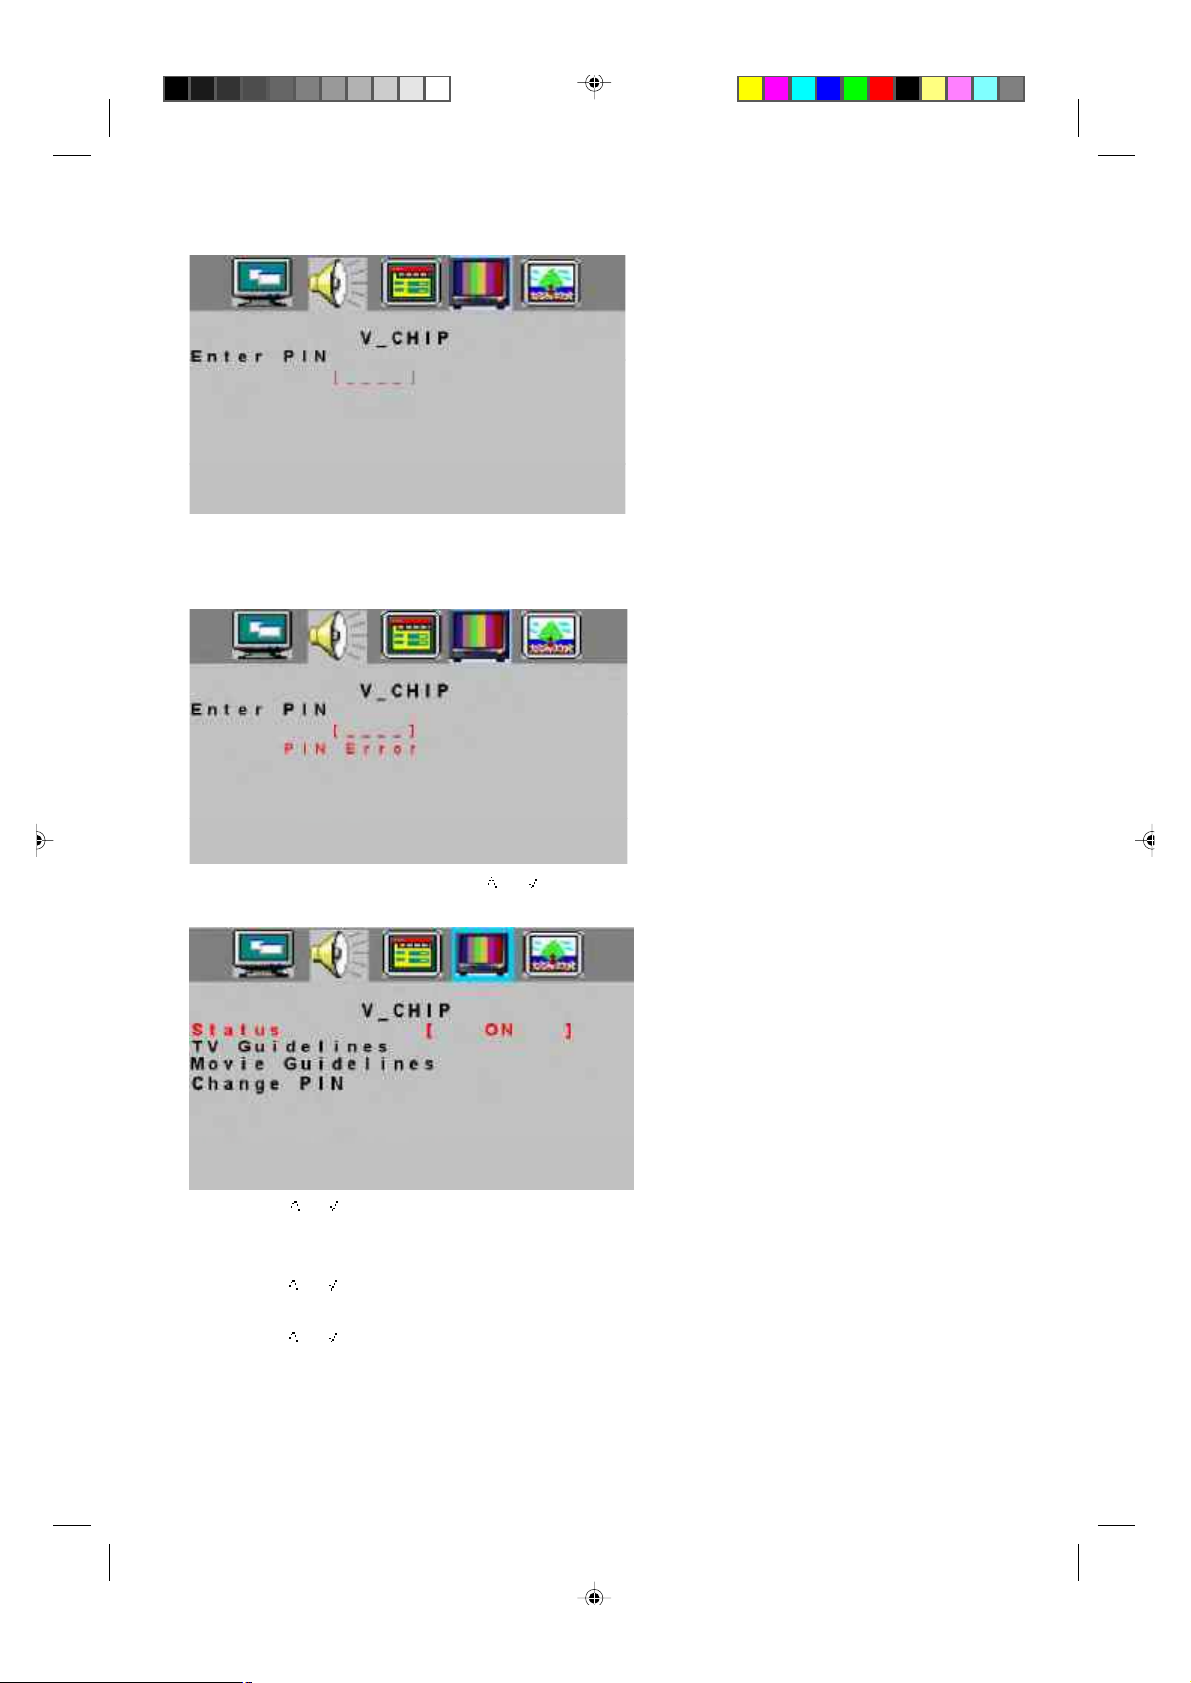
Press digital keys on the remote control; enter the password to go into V-CHIP control menu
(Default pass code for V-Chip: 0711 and should press twice time)
If your password is error, then the screen will display “PIN ERROR”.
5. After enter the V-CHIP menu, press or key to select, if you want to set V_CHIP, you need to set the
“Status” on the condition of “ON”.
1) Press or key to select “Status’’ option
2) Press > or < key to select “ON’’ or “OFF”
6. TV Guidelines Setting
1) Press or key to select “TV Guidelines” option
2) Press > or < key to enter “TV Guidelines” menu
3) Press or key to select block item.
4) Press > or < key to select U or B, selecting U means “Unlock”, selecting B means “Block”.
5) If the setting is OK, press “MENU” key to exit TV Guidelines menu.
Û²º±½«- ͱº¬©¿®» ó Ý«-¬±³»® Í«°°±®¬
18
Page 19
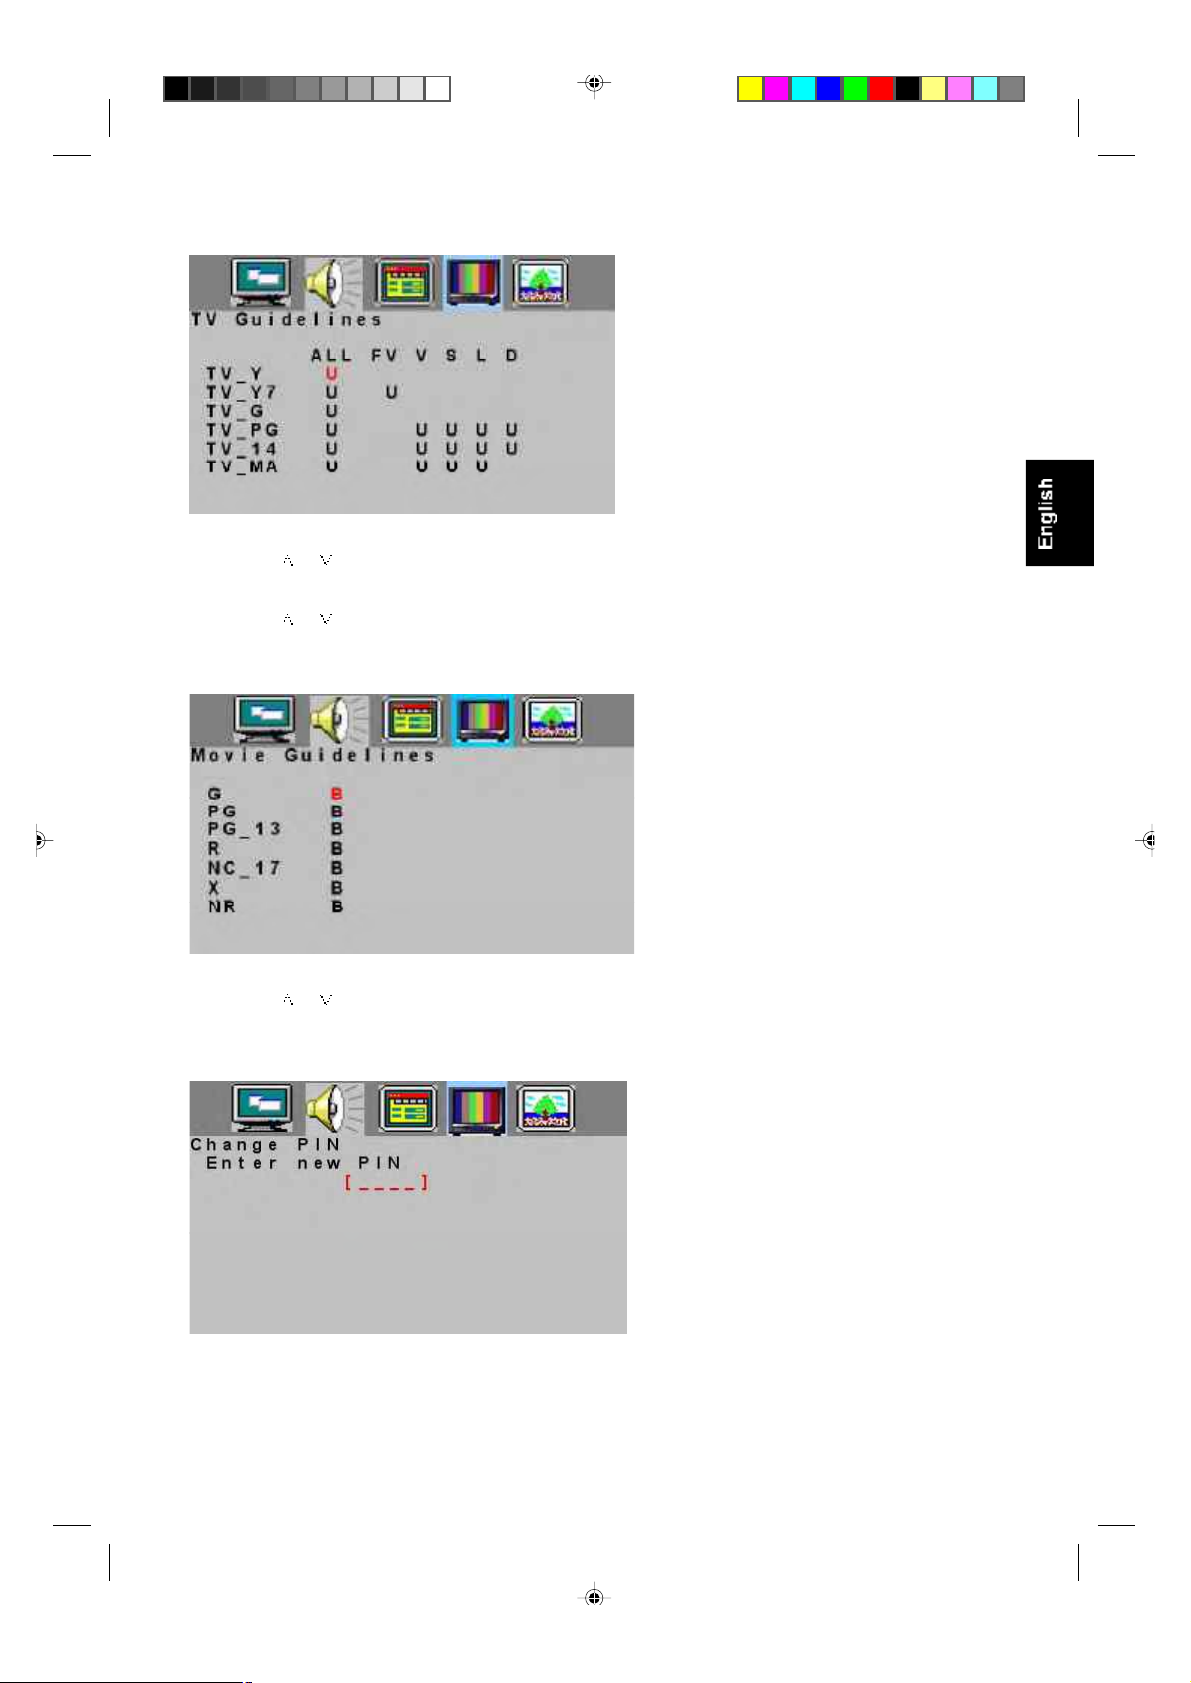
7. Movie Guidelines Setting
1) Press or key to select “Movie Guidelines” option.
2) Press > or < key to enter Movie Guidelines menu.
3) Press or key to select block item.
4) Press > or < key to select U or B, selecting U means “Unlock”, selecting B means “Block”.
5) If the setting is OK, press “MENU” key to exit Movie Guidelines menu.
8. Change PIN
1) Press or key to select “Change PIN” option
2) Press > or < key to enter Change PIN menu.
3) Press digital keys on the remote control, and then enter the new password.
4) Enter the new password again, if the setting is OK, the display information as below, then it will exit
the Change PIN menu automatically.
Û²º±½«- ͱº¬©¿®» ó Ý«-¬±³»® Í«°°±®¬
19
Page 20

Reset To Default
1. Press “MENU” key to open OSD menu.
2. Press > or < key to select any Setup options
3. Press or key to select “Reset To Default” option.
4. Press > or < key to reset.
Reset To Default is convenient for all settings in the user OSD to recall to factory default data.
Note: The reset to default function in each function item is the same under the signal source of
AV/TV/S-VIDEO. When we select the Reset To Default in each function item under the PC signal source, it
not only recall all data to default data, but also have an adjustment automatically.
Û²º±½«- ͱº¬©¿®» ó Ý«-¬±³»® Í«°°±®¬
20
Page 21
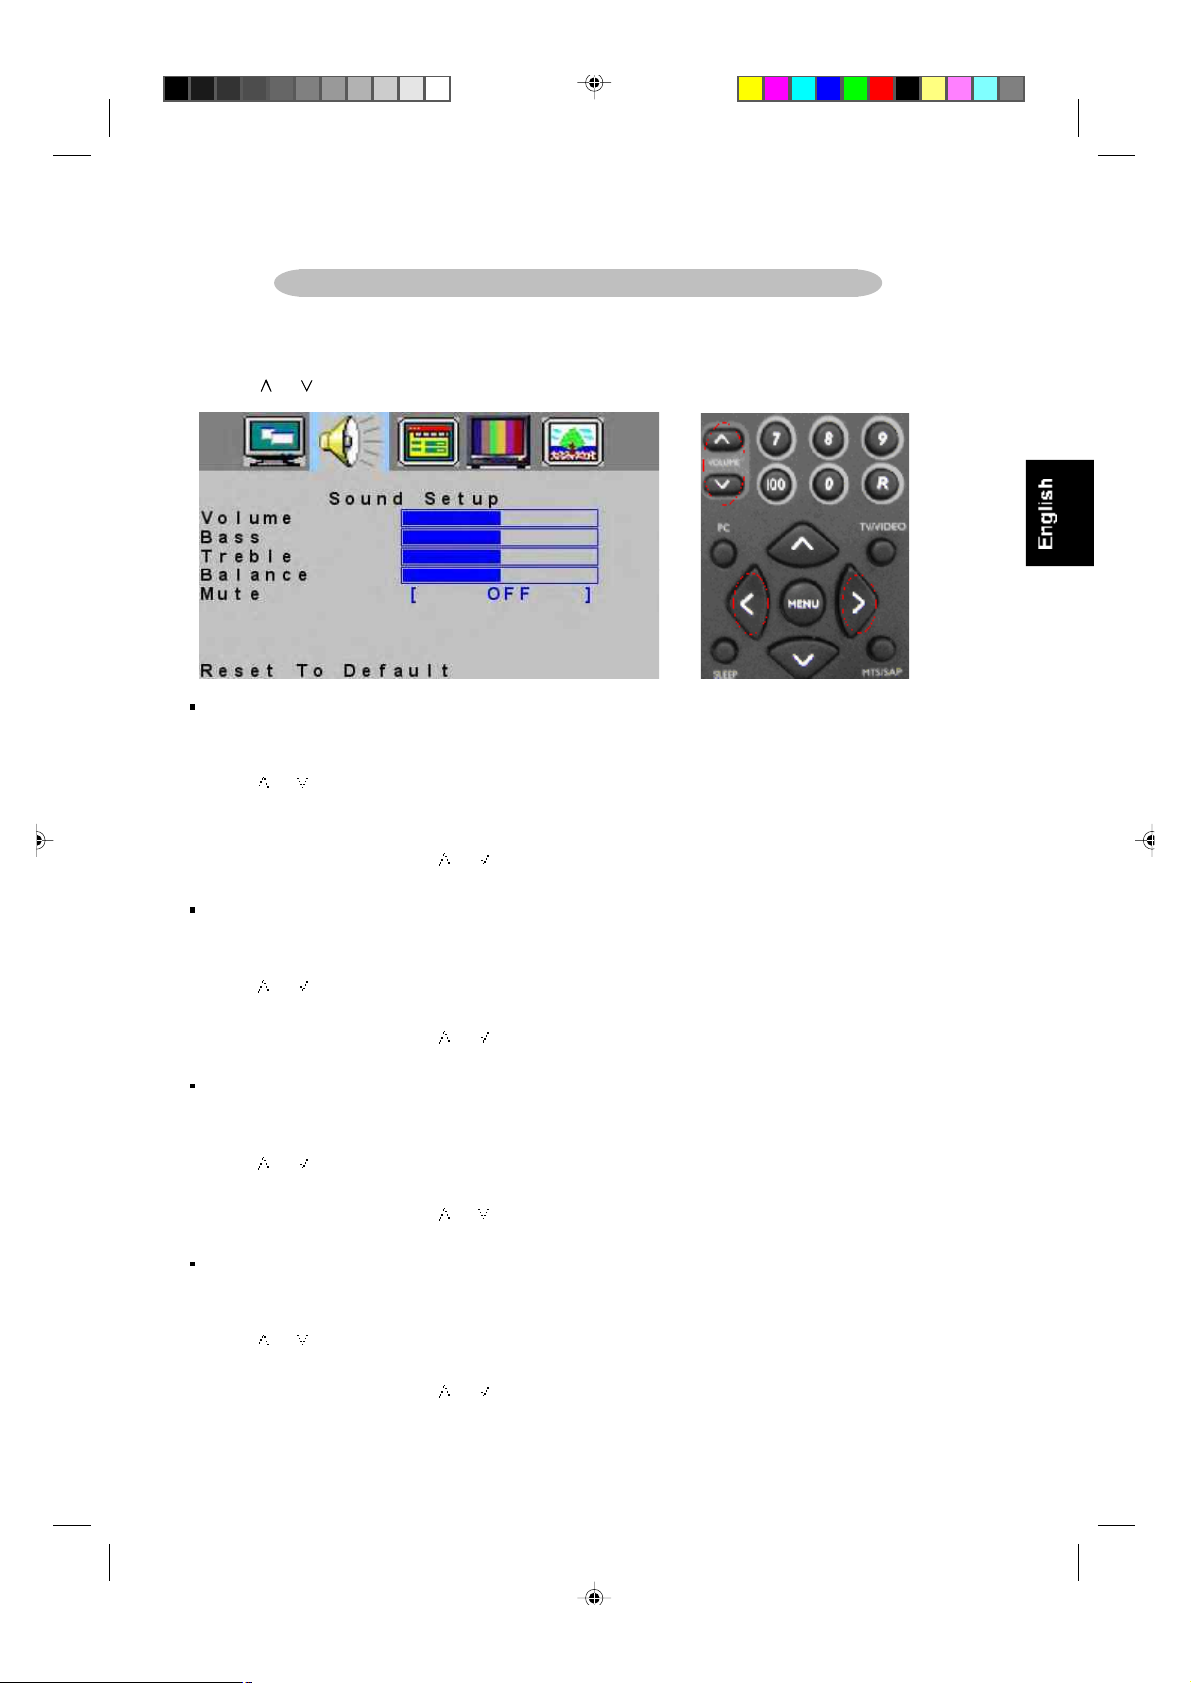
SOUND SETUP MENU
1. Press “MENU” key to open OSD menu.
2. Press > or < key to select “Sound Setup” option
3. Press or key to select submenu.
Volume
1. Press “MENU” key to open OSD menu.
2. Press > or < key to select “Sound Setup” option.
3. Press or key to select “Volume” option
4. Press > or < key to adjust Volume data.
You can also press Volume > or < key on the remote control to adjust volume.
5. Press “MENU” to exit or press or key to adjust others
Bass
1. Press “MENU” key to open OSD menu.
2. Press > or < key to select “Sound Setup” option
3. Press or key to select “Bass” option.
4. Press > or <key to adjust Bass data.
5. Press “MENU” to exit or press or key to adjust others.
Treble
1. Press “MENU” key to open OSD menu.
2. Press > or < key to select “Sound Setup” option
3. Press or key to select “Treble” option.
4. Press > or <key to adjust Treble data.
5. Press “MENU” to exit or press or key to adjust others.
Balance
1. Press “MENU” key to open OSD menu.
2. Press > or < key to select “Sound Setup” option
3. Press or key to adjust “Balance” option.
4. Press > or < key to adjust “Balance” data.
5. Press “MENU” to exit or press or key to adjust others.
21
Û²º±½«- ͱº¬©¿®» ó Ý«-¬±³»® Í«°°±®¬
Page 22
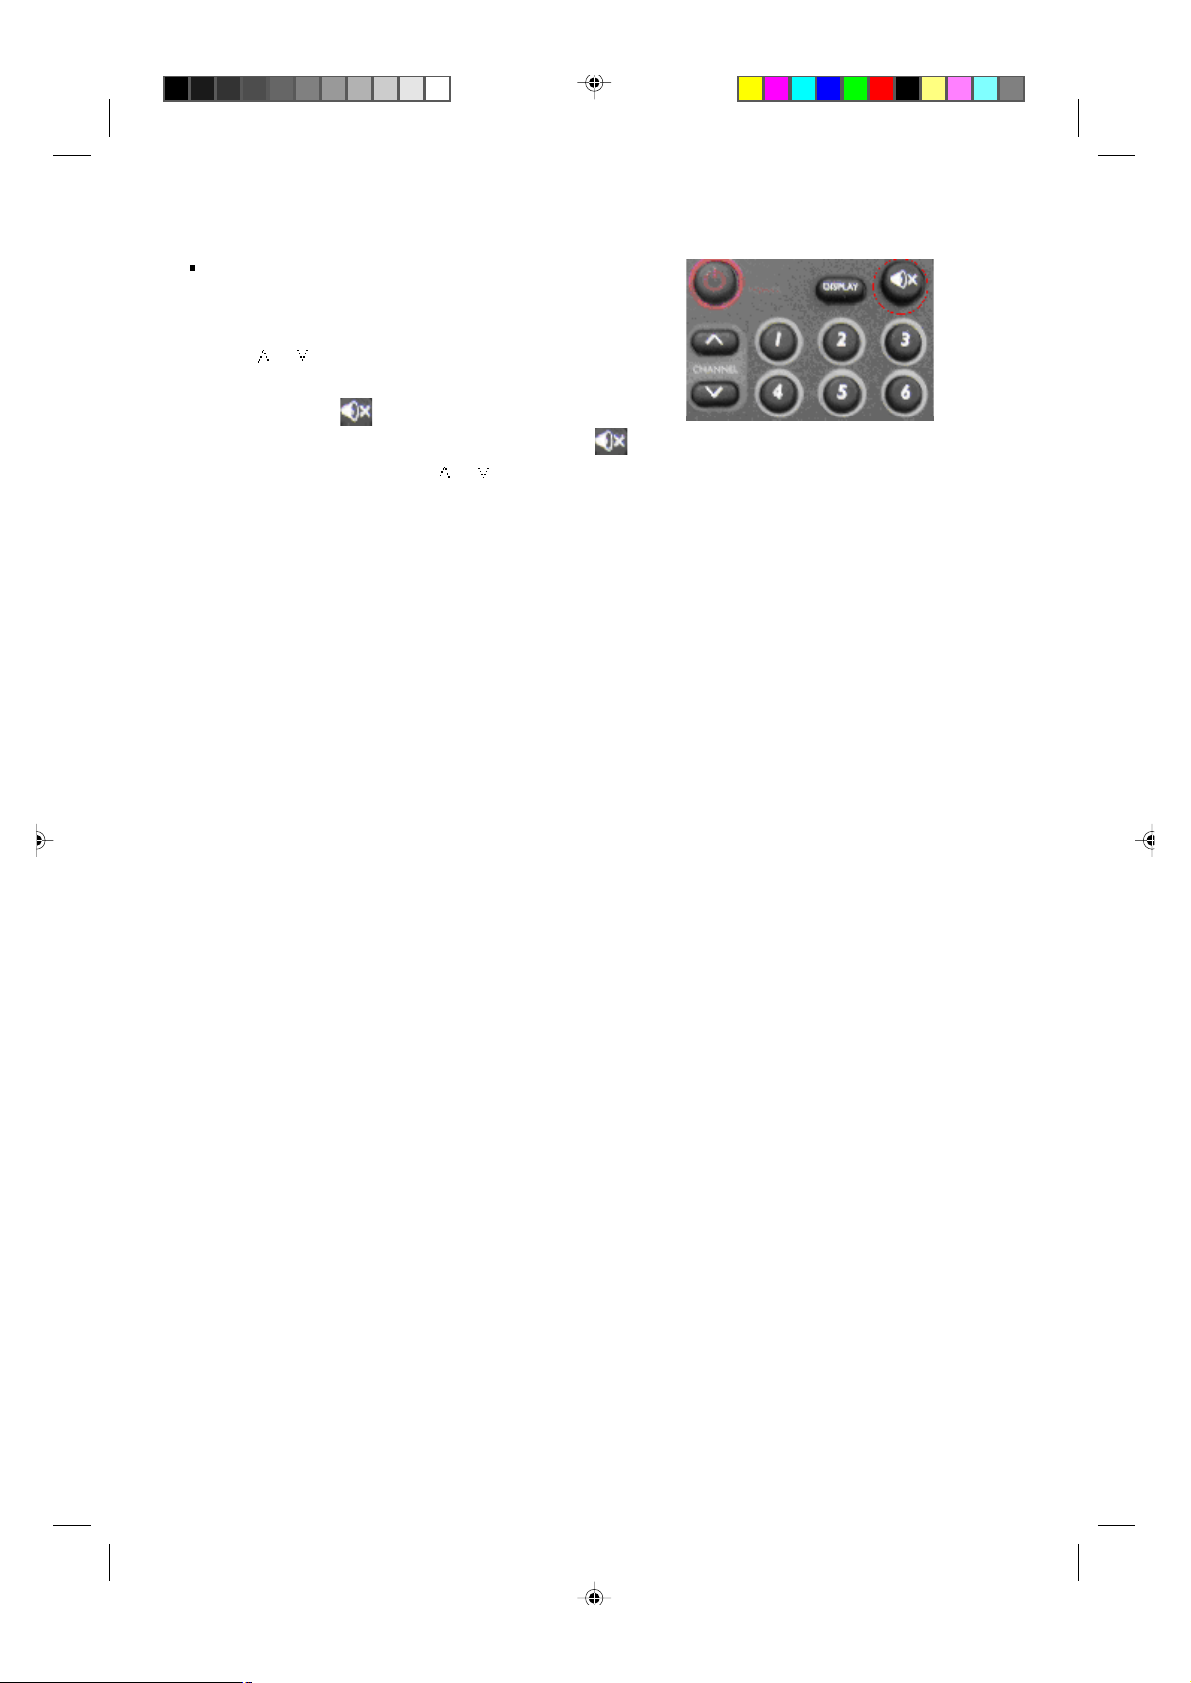
Mute
1. Press “MENU” key to open OSD menu.
2. Press > or < key to select “Sound Setup” option
3. Press or key to select “Mute” option.
4. Press > or <key to select ON/OFF.
You can also press key on remote control to select mute,
after the selection you can adjust the volume or press to cancel the Mute
5. Press “MENU” to exit or press or key to adjust others.
Û²º±½«- ͱº¬©¿®» ó Ý«-¬±³»® Í«°°±®¬
22
Page 23
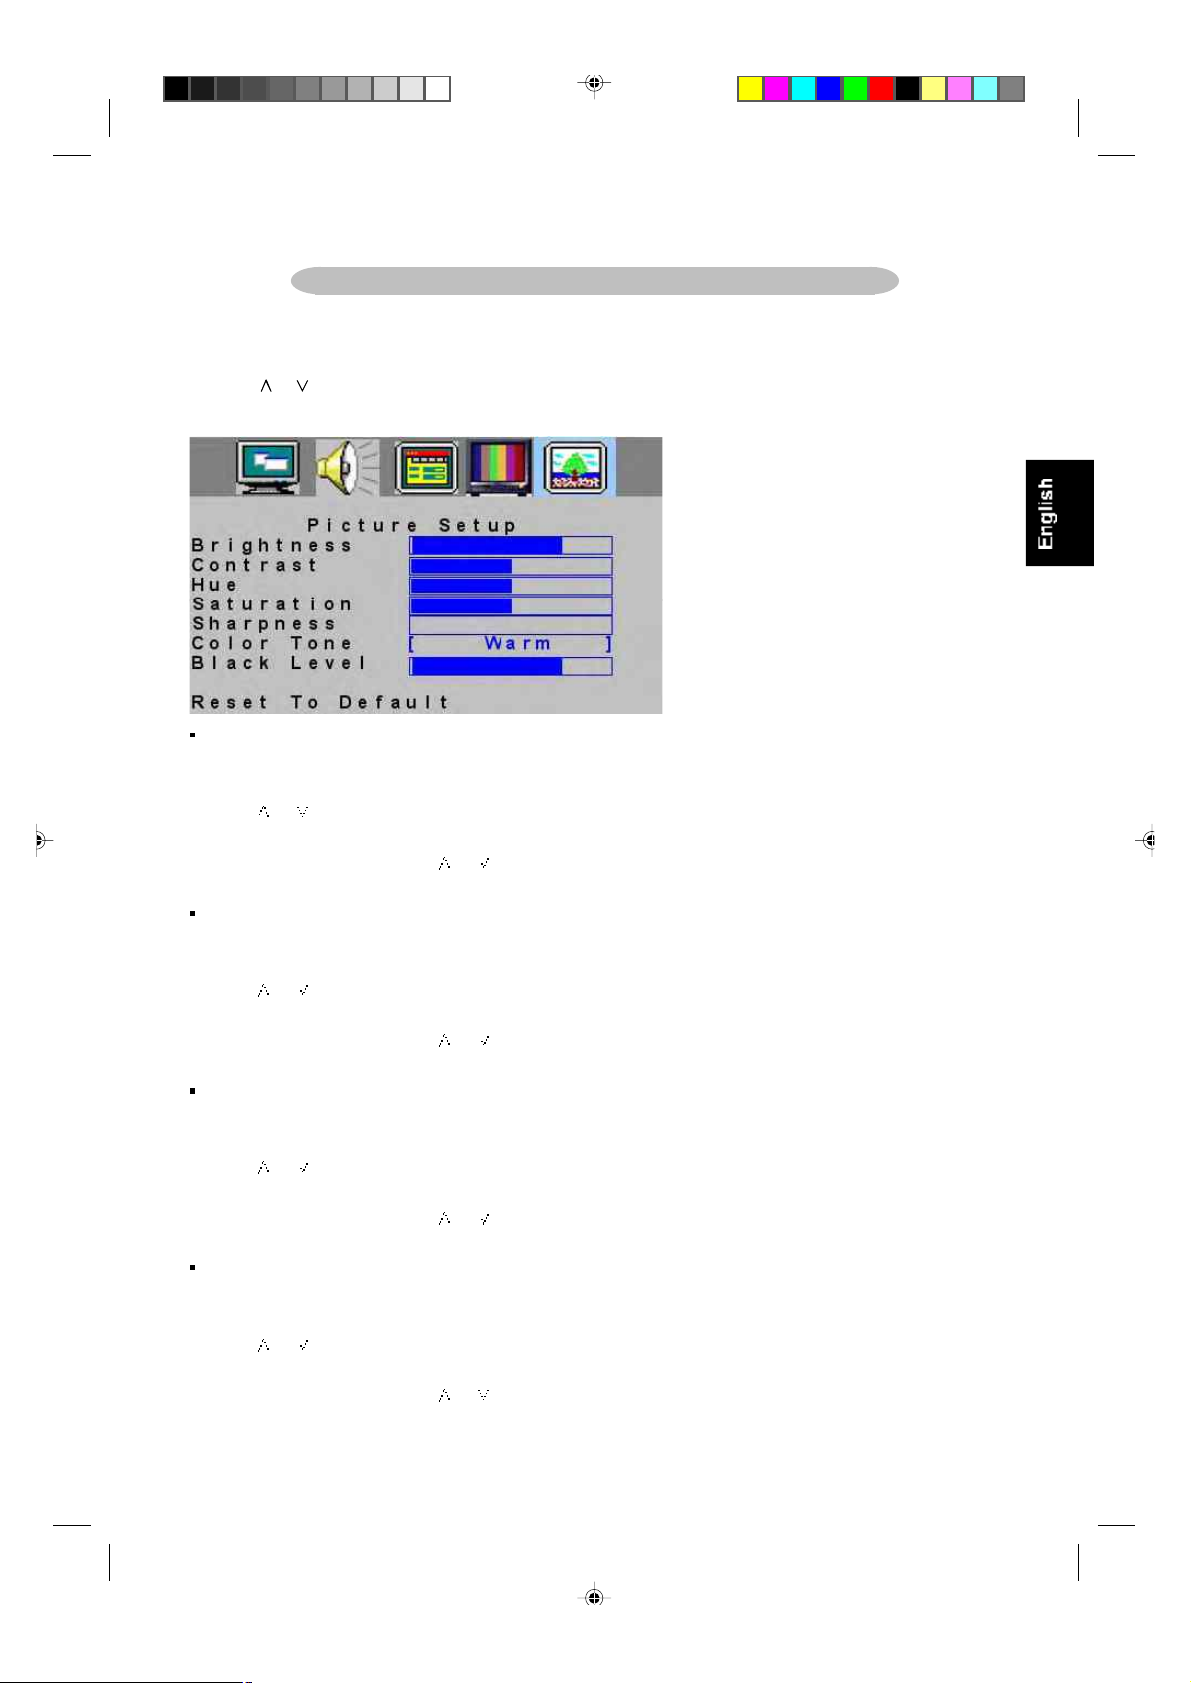
PICTURE SETUP MENU
1. Press “MENU” key to open OSD menu.
2. Press > or < key to select “Picture Setup” option
3. Press or key to select submenu.
Note: Picture Setup menu can only be selected under the signal source of AV/TV/S-VIDEO.
Brightness
1. Press “MENU” key to open OSD menu.
2. Press > or < key to select “Picture Setup” option
3. Press or key to select “Brightness” option.
4. Press > or < key to adjust Brightness data.
5. Press “MENU” to exit or press or key to adjust others
Contrast
1. Press “MENU” key to open OSD menu.
2. Press > or < key to select “Picture Setup” option
3. Press or key to select “Contrast” option.
4. Press > or <key to adjust Contrast data.
5. Press “MENU” to exit or press or key to adjust others
Hue
1. Press “MENU” key to open OSD menu.
2. Press > or < key to select “Picture Setup” option
3. Press or key to select “Hue” option.
4. Press > or < key to adjust Hue data.
5. Press “MENU” to exit or press or key to adjust others.
Saturation
1. Press “MENU” key to open OSD menu.
2. Press > or <key to select “Picture Setup” option
3. Press or key to select “Saturation” option.
4. Press > or < key to adjust Saturation data.
5. Press “MENU” to exit or press or key to adjust others.
23
Û²º±½«- ͱº¬©¿®» ó Ý«-¬±³»® Í«°°±®¬
Page 24

Sharpness
1. Press “MENU” key to open OSD menu.
2 Press > or <key to select “Picture Setup” option
3. Press or key to select “Sharpness” option.
4. Press > or < key to adjust sharpness data.
5. Press “MENU” to exit or Press or key to adjust others.
Color Tone
1. Press “MENU” key to open OSD menu.
2. Press > or < key to select “Picture Setup” option
3. Press or key to select “Color Tone” option.
4. Press > or < key to select warm or cool color
5. Press “MENU” to exit or press or key to adjust others.
Black Level
1. Press “MENU” key to open OSD menu.
2 Press > or < key to select “Picture Setup” option
3. Press or key to select “Black Level” option.
4. Press > or < key to adjust Black level data.
5. Press “MENU” to exit or press or key to adjust others.
Û²º±½«- ͱº¬©¿®» ó Ý«-¬±³»® Í«°°±®¬
24
Page 25
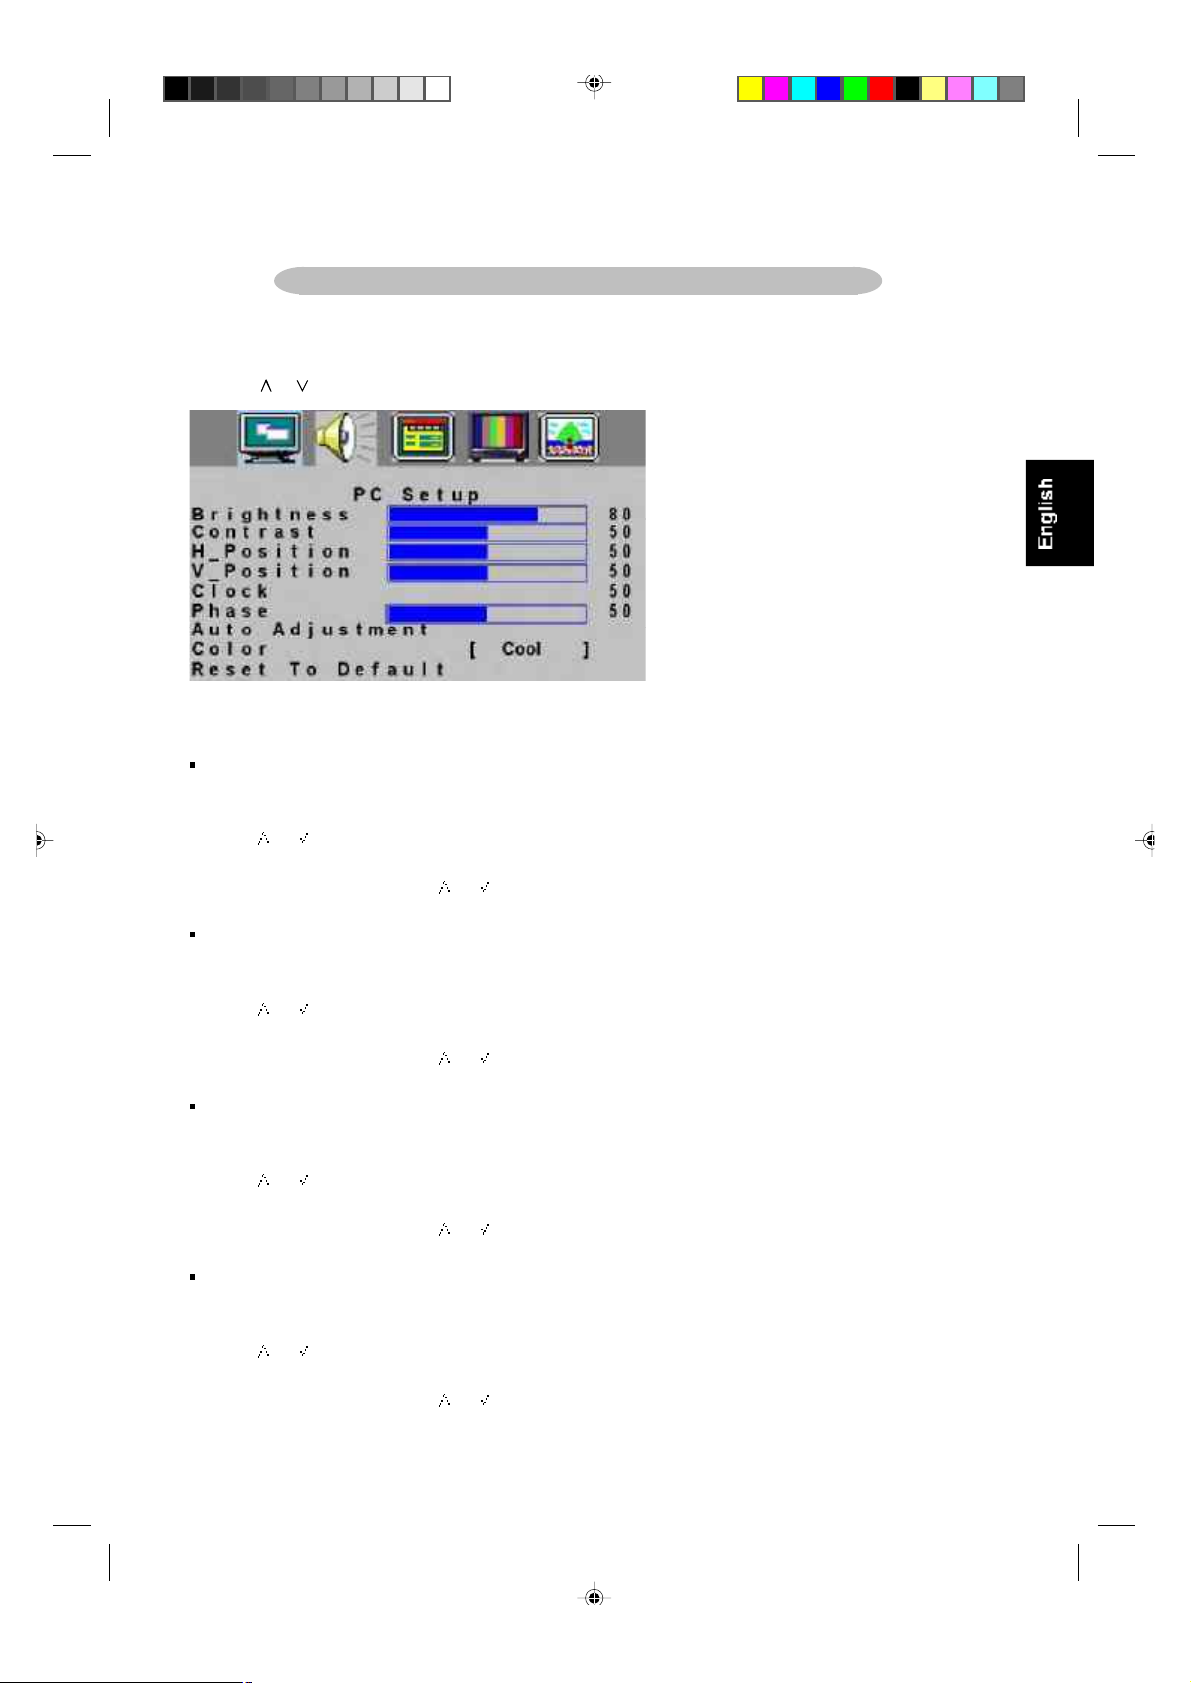
PC SETUP MENU
1. Press “MENU” key to open OSD menu.
2. Press > or <key to select “PC Setup” option
3. Press or key to select submenu
Note: PC Setup menu can only be selected under the PC signal source
Brightness
1. Press “MENU” key to open OSD menu.
2. Press > or < key to select “PC Setup” option
3. Press or key to select “Brightness” option.
4. Press > or < key to adjust Brightness data.
5. Press “MENU” to exit or press or key to adjust others.
Contrast
1. Press “MENU” key to open OSD menu.
2. Press > or < key to select “PC Setup” option
3. Press or key to select “Contrast” option.
4. Press > or < key to adjust contrast data.
5. Press “MENU” to exit or press or key to adjust others.
H_Position
1. Press “MENU” key to open OSD menu.
2. Press > or < key to select “PC Setup” option
3. Press or key to select “H_position” option.
4. Press > or < key to adjust H_Position data.
5. Press “MENU” to exit or press or key to adjust others.
V_Position
1. Press “MENU” key to open OSD menu.
2. Press > or < key to select “PC Setup” option
3. Press or key to select “V_Position” option.
4. Press > or <key to adjust “V_Position” data
5. Press “MENU” to exit or press or key to adjust others.
25
Û²º±½«- ͱº¬©¿®» ó Ý«-¬±³»® Í«°°±®¬
Page 26
Clock
1. Press “MENU” key to open OSD menu.
2. Press > or < key to select “PC Setup” option
3. Press or key to select “Clock” option.
4. Press > or < key to adjust Clock data
5. Press “MENU” to exit or press or key to adjust others.
Phase
1. Press “MENU” key to open OSD menu.
2. Press > or <key to select “PC Setup” option
3. Press or key to select “Phase” option.
4. Press > or < key to adjust Phase data
5. Press “MENU” to exit or press or key to adjust others.
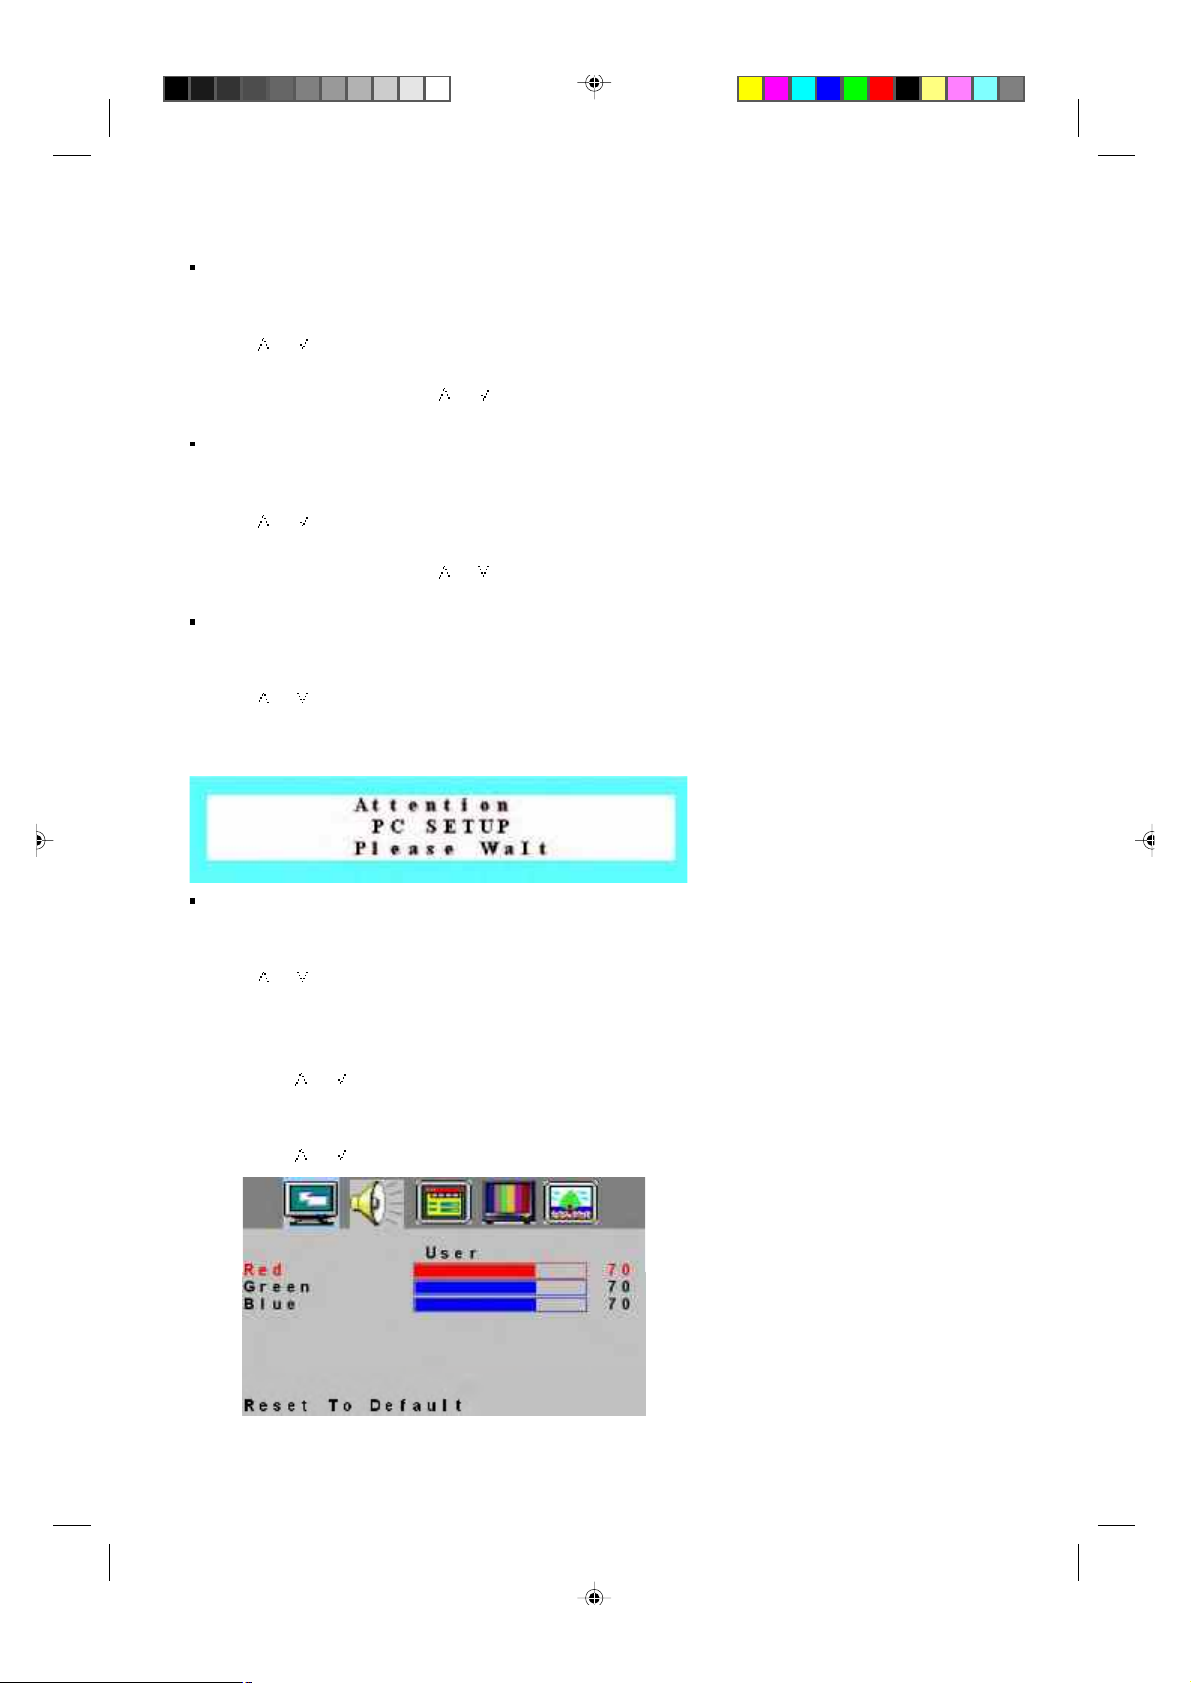
Auto Adjustment
1. Press “MENU” key to open OSD menu.
2. Press > or <key to select “PC Setup” option
3. Press or key to select “Auto Adjustment” option.
4. Press > or <key to conduct Auto Adjustment, then PC will adjust automatically, if the adjustment is OK, it
will exit OSD menu automatically
Color
1. Press “MENU” key to open OSD menu.
2. Press > or < key to select “PC Setup” option
3. Press or key to select “Color” option.
4. Press > or <key to select Color
If you choose Color as User, you can adjust R/G/B according to your need
1) Press “MENU” key to enter User Color menu.
2) Press or key to select Red/Green/Blue option.
3) Press > or < key to adjust Red/Green/Blue data
4) Press MENU TO exit to Color menu
5) Press or key to select other adjustment items, then press MENU to exit
26
Û²º±½«- ͱº¬©¿®» ó Ý«-¬±³»® Í«°°±®¬
Page 27

General Information
Tips
Care of the screen
Do not rub or strike the screen with anything hard as this may scratch, mar, or damage the screen
permanently.
Unplug the screen before cleaning the screen. Dust the TV by wiping the screen and the cabinet with a soft,
clean cloth. If the screen requires additional cleaning, use a clean, damp cloth. Do not use liquid cleaners or
aerosol cleaners.
Mobile telephone warning
To avoid disturbances in picture and sound, malfunctioning of your TV or even damage to the TV, keep away
your mobile telephone from the TV.
End of life directives
É» ¿®» °¿§·²¹ ¿ ´±¬ ±º ¿¬¬»²¬·±² ¬± °®±¼«½» »²ª·®±²³»²¬¿´´§ º®·»²¼´§ ·² ¹®»»² º±½¿´ ¿®»¿-ò DZ«® ²»© ÔÝÜ ÌÊ
½±²¬¿·²- ³¿¬»®·¿´- ©¸·½¸ ½¿² ¾» ®»½§½´»¼ ¿²¼ ®»«-»¼ò
߬ ¬¸» »²¼ ±º ·¬- ´·º» -°»½·¿´·¦»¼ ½±³°¿²·»- ½¿² ¼·-³¿²¬´» ¬¸» ¼·-½¿®¼»¼ ÔÝÜ ÌÊ ¬± ½±²½»²¬®¿¬» ¬¸» ®»«-¿¾´»
³¿¬»®·¿´- ¿²¼ ¬± ³·²·³·¦» ¬¸» ¿³±«²¬ ±º ³¿¬»®·¿´- ¬± ¾» ¼·-°±-»¼ ±ºò
ɸ»² §±« ®»°´¿½» §±«® »¨·-¬·²¹ »¯«·°³»²¬ô °´»¿-» º·²¼ ±«¬ ¿¾±«¬ ¬¸» ´±½¿´ ®»¹«´¿¬·±² ®»¹¿®¼·²¹ ¼·-°±-¿´ ±º
§±«® ±´¼ ¬»´»ª·-·±²ô ¾¿¬¬»®·»-ô ¿²¼ °¿½µ·²¹ ³¿¬»®·¿´-ò
Û²º±½«- ͱº¬©¿®» ó Ý«-¬±³»® Í«°°±®¬
27
Page 28
Before Call Service
Please make these simple checks before calling service. These tips may save you time and money since
charges for receiver installation and adjustments of customer controls are not covered under your warranty.
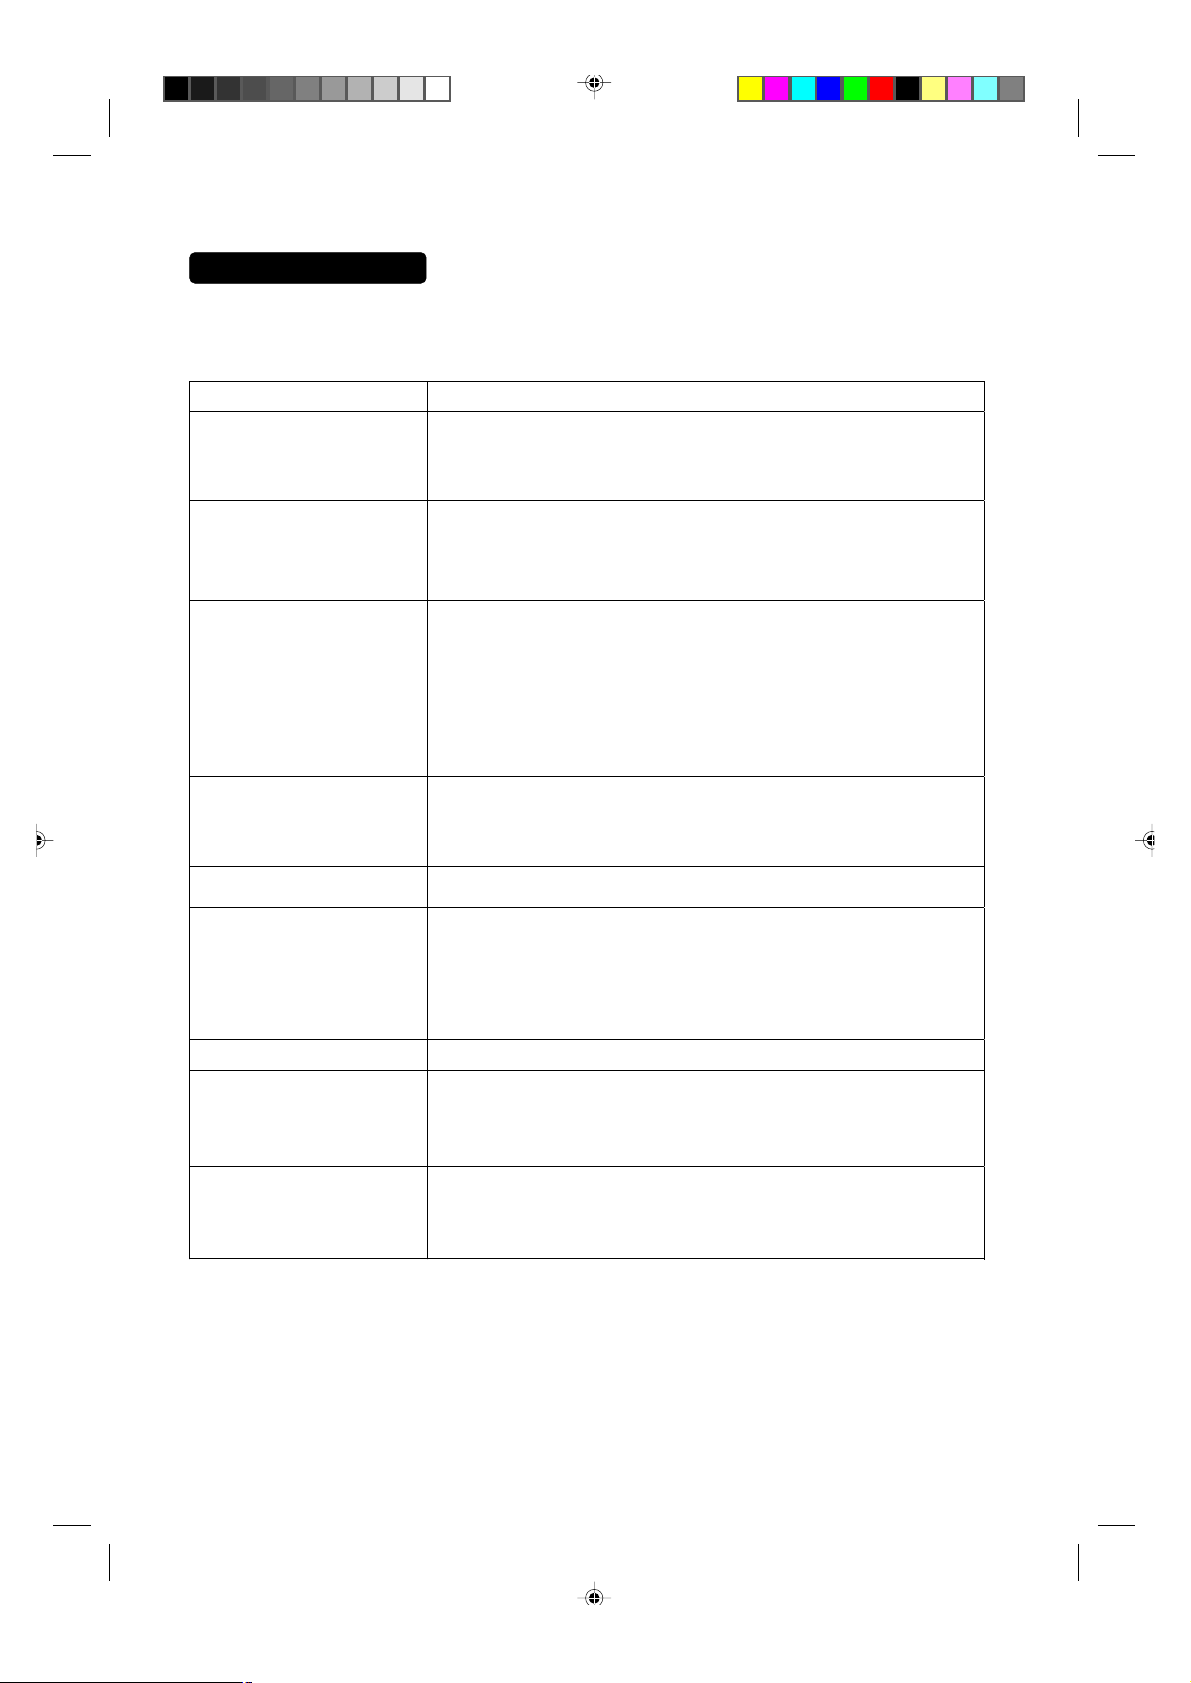
Symptoms Items to Check and Actions to follow
“Ghost ” or double image *This may be caused by obstruction to the antenna due to high rise
buildings or hills. Using a highly directional antenna may inprove the
picture.
No power *Check that the TV’s AC power cord is plugged into the mains socket.
*Unplug the TV, wait for 60 seconds. Then re-insert plug into the mains
socket and turn on the TV again.
No picture *Check antenna connections at the rear of the TV to see if it is properly
connected to the TV.
*possible broadcast station trouble. Try another channel.
*Adjust the contrast and brightness settings.
*Check the Closed Captions control. Some TEXT modes could block the
screen.
Good picture but no sound *Check the cable connection
*Increase the VOLUME.
*Check that the TV is not muted; press the button on the remote control.
Good sound but poor color *Adjust the contrast, color and brightness settings.
Poor picture *Sometimes, poor picture quality occurs when having activated an
S-VHS camera or camcorder connected and having connected
another peripheral at the same time. In this case, please connect
power cords of other peripherals to a different power outlet.
Snowy picture and noise *Check the antenna connection
Horizontal dotted line *This may be caused by electrical interference (e.g. hairdryer, nearby
neon lights, etc.)
*Turn off the equipment.
Television not responding
to remote control
*Check whether the batteries are working. Replace if necessary
*Clean the remote control sensor lens on the TV.
*Use the buttons at the front of your TV.
28
Û²º±½«- ͱº¬©¿®» ó Ý«-¬±³»® Í«°°±®¬
Page 29

GLOSSARY
Audio / Video Inputs
Located on the rear and the front of the receiver these connectors (RCA photo type plug) are used for the
input of audio and video signals. Designed for use with VCRs (or other accessories) in order to receive higher
picture resolution and offer sound connection options.
S-Video Input
Allow directly connection of high-resolution video sources, such as a Super VHS videocassette recorder,
Laser Disc player, etc. Provide improved picture resolution, sharpness, and clarity.
Composite Input
Allows direct connector of high-resolution video sources, such as DVD player, digital TV, etc, provides
improved picture resolution, sharpness and clarity.
Audio output
Provide sound output, it can be connected external speaker, and enhance the sound quality.
Menu
An on-screen listing of feature control shows on the TV screen which is available for user adjustments.
Multichannel Television sound (MTS)
The broadcast standard that allow stereo sound to be transmitted with the TV picture.
RF
Radio Frequency or modulated signal design used as the carrier for television broadcasts.
Second Audio Program (SAP)
Another or additional audio channel provided for in the Multichannel Television Sound (MTS) broadcast
standard. A monaural soundtrack included within the recorded or video signal (usually containing a second
language translation for the displayed program).
Sleep Timer
The function which you can set a time period after the TV turns off.
29
Û²º±½«- ͱº¬©¿®» ó Ý«-¬±³»® Í«°°±®¬
Page 30

PRODUCT SPECIFICATION
15MF400T/37
Item
LCD Panel
TV Function
Video Input
Specification
Screen Size 15"
Aspect Ratio 4:3
Resolution 1024x768
Brightness 250cd/m² (typ.)
Contrast Ratio 400:1
Response Time 16ms
Viewing Angle left/right = 60°/60°
Display Colors 16.7M
TV Tuner NTSC M
Color System NTSC
Sound System MTS + SAP
Closed-Caption & V-chip Yes
Composite x1
S-Video x1
Color System NTSC/PAL
Signal Input Analog
PC Input
Audio Output
Power
Video Feature
Horizontal Frequency (kHz) 31.5~60
Vertical Frequency (Hz) 56~75
Max. Resolution 1024x768 @ 75Hz
Recommended Resolution 1024x768 @ 60Hz
Built-in Speakers 2 x 2W (L/R)
Headphone Output Yes (3.5mm )
Power Supply +12V DC Input
Adapter 100-240V AC, 50/60Hz
Power Consumption (Max.)
De-interlacer 2D de-interlacer
Comb Filter Adaptive 4H Y/C Separation
3-2 Pull Down Recovery Yes
30
Power on<50W,
Off m±de<2W
Û²º±½«- ͱº¬©¿®» ó Ý«-¬±³»® Í«°°±®¬
Page 31

Other Features
Dimension
Weight
Accessory
Wall Mount VESA 100mm x 100mm
Multi-Function Remote Yes
Sleep Timer Yes
Tilt Angle (front/back) 5°/15°
English/French(Canadian
OSD language
type)/Spanish
with Stand(W x H x D) 371.6mm x 346 mm x 147.5mm
without Stand (W x H x D) 371.6mm x 324mm x 47.5mm
Carton (W x H x D) 434mm x 407mm x 192mm
Net, kg 3.5kg
Loose, including package 5.0kg
Remote controller, Batteriesx2, AC Power adapter, Power Cord
User manual<English/French(Canadian type)/Spanish>, QSG
Warranty Card <English only>,
Û²º±½«- ͱº¬©¿®» ó Ý«-¬±³»® Í«°°±®¬
31
Page 32

Û²º±½«- ͱº¬©¿®» ó Ý«-¬±³»® Í«°°±®¬
3î
Page 33

IMPORTANTES CONSIGNES DE SÉCURITÉ
L'ensemble actuel avait été conçu et fabriqué pour assurer la sûreté personnelle. L'utilisation inexacte peut
avoir comme conséquence la décharge lectrique ou le risque d'incendie. Les sauvegardes incorporées avec
l'unité actuelle vous protégeront si vous observez les procédures suivantes quand installation, opération et
entretien. L'unité actuelle est entièrement transistorisée et ne contient pas n'importe quel élément qui peut être
réparé par l'utilisateur.
A lire avant d'utiliser l'équipement
1. Conservez ces instructions.
2. Respectez scrupuleusement tous les avertissements.
3. Suivez toutes les instructions.
4. Ne pas utiliser cet appareil près de l'eau.
5. Nettoyez exclusivement avec un chiffon sec.
6. Ne bloquez aucun des orifices de ventilation. Installez l'appareil conformément aux instructions du
fabricant.
7. Ne pas installer près d'une source quelconque de chaleur, comme par exemple radiateur, climatiseur,
four ou tout autre appareil (y compris les amplificateurs) produisant de la chaleur.
8. Ne vous privez pas de la sécurité apportée par la fiche polarisée ou avec borne terre. Si la fiche ne
rentre pas dans votre prise, demandez de l'aide à un électricien pour faire remplacer votre prise
obsolète.
9. Protégez le cordon d'alimentation contre tout risque de piétinement ou de pincement, en particulier au
niveau des fiches, des prises ou des points de sortie du cordon de l'appareil.
10. Utilisez exclusivement les accessoires et pièces spécifiés par le fabricant.
11. Utilisez uniquement avec un chariot, un stand, un trépied, un support ou une table spécifié par le
fabricant ou vendu avec l'appareil. Si vous utilisez un chariot, faites attention lorsque vous déplacez le
chariot avec l'appareil avant d'éviter tout risque d'accident dû à une chute de l'appareil.
12. Le téléviseur doit être alimenté exclusivement par le type de source d'alimentation spécifié sur l'étiquette.
Si vous n'êtes pas sûr du type d'alimentation que vous avez chez vous, demandez conseil à votre
distributeur ou à votre compagnie d'électricité locale.
13. Débranchez cet appareil pendant les orages ou s'il doit rester inutilisé pendant une période prolongée.
14. Pour toute réparation, veuillez vous adresser à du personnel qualifié. L'appareil doit être réparé lorsqu'il
a été endommagé d'une façon quelconque, par exemple lorsque le cordon d'alimentation ou la fiche ont
été endommagés, lorsqu'un liquide a coulé sur l'appareil ou lorsqu'un objet est tombé dedans, lorsque
l'appareil a été exposé à la pluie ou à l'humidité, lorsqu'il ne fonctionne pas normalement, ou encore
lorsqu'il est tombé.
15. Il se peut que ce produit contienne du plomb ou du mercure. Il est possible que la mise au rebut de ces
métaux soit soumise à une réglementation sur la protection de l'environnement. Pour les informations
concernant la mise au rebut ou le recyclage, veuillez prendre contact avec vos autorités locales ou avec
l'Alliance des industries de l'électronique : www.eiae.org
16. Dommages nécessitant réparation – L'appareil doit être réparé par un technicien de maintenance
qualifié lorsque :
A. Le cordon d'alimentation ou la fiche électrique a été endommagé, ou
B. Des objets sont tombés ou du liquide a coulé dans l'appareil, ou
Û²º±½«- ͱº¬©¿®» ó Ý«-¬±³»® Í«°°±®¬
1
Page 34

C. L'appareil a été exposé à la pluie, ou
D. L'appareil semble ne pas fonctionner normalement ou bien vous constatez une modification
sensible de ses performances, ou
E. L'appareil est tombé ou son boîtier a été endommagé.
17. Inclinaison/Stabilité – Tous les téléviseurs doivent respecter les normes générales de
sécurité internationales quant aux propriétés d'inclinaison et de stabilité du boîtier.
Ne compromettez pas ces normes de sécurité en appliquant une force excessive sur le sommet ou
l'avant du boîtier, car vous risqueriez de renverser l'appareil.
De même, ne vous mettez pas en danger ou ne mettez pas vos enfants en danger en plaçant des
jeux et/ou des équipements électroniques au sommet du boîtier. Ces éléments risquent de tomber
du haut du poste et de causer des dommages et/ou un accident corporel.
18. Montage sur un mur ou au plafond – L'appareil doit être monté sur un mur ou au plafond
uniquement de la façon recommandée par le fabricant.
19. Lignes électriques – Toute antenne extérieure doit être placée éloignée des lignes électriques.
20. Mise à la terre de l'antenne extérieure – Si vous connectez une antenne externe au récepteur,
assurez-vous que le système d'antenne est bien mis à la terre afin de vous protéger contre les
brusques surtensions et les accumulations d'électricité statique.
La Section 810 du Code national de l'électricité, ANSI/NFPA No. 70-1984, donne des informations
quant à la mise à la terre correcte des mâts, la mise à la terre de la structure du fil d'entrée sur une
unité de décharge d'antenne, la taille des connecteurs de mise à la terre, l'emplacement de l'unité
de décharge d'antenne, la connexion des électrodes de mise à la terre et les exigences concernant
ces électrodes. Voir la figure ci-dessous.
PINCE DE MISE A LA TERRE
EQUIPEMENT ELECTRIQUE
PINCES DE
MISE A LA
TERRE
SYSTEME D'ELECTRODES DE MISE A LA TERRE DE L'ALIMENTATION ELECTRIQUE
ANTENNE
UNITE DE DECHARGE
D'ANTENNE
CONDUCTEURS DE MISE A LA TERRE
EXEMPLE DE MISE À LA TERRE CONFORME AUX DISPOSITIONS DU CODE NATIONAL DE
L'ÉLECTRICITÉ
Remarque à l'attention de l'installateur de la télévision par câble : Ce rappel est destiné à attirer
l'attention de l'installateur du système de télévision par câble sur les dispositions de l'Article 820-40
du Code national de l'électricité qui donne des consignes pour une mise à la terre correcte, et qui
spécifie en particulier que la mise à la terre du câble doit être connectée au système de mise à la
terre du bâtiment, aussi près du point d'entrée du câble que possible.
Veuillez prendre le soin de brancher la fiche d'alimentation sur la prise murale après avoir branché
l'adaptateur sur le téléviseur !
21. Entrée d'objets et de liquides – Faites bien attention d'éviter que des objets ne tombent dans les
orifices du boîtier ou que des liquides ne coulent dessus.
Û²º±½«- ͱº¬©¿®» ó Ý«-¬±³»® Í«°°±®¬
2
Page 35

TABLE DES MATIÈRES
INTRODUCTION
CONSIGNES DE SÉCURITÉ IMPORTANTES------------------------------------------------------------------------------ 1
TABLE DES MATIÈRES----------------------------------------------------------------------------------------------------------- 3
INSTALLATION
PRÉSENTATION DE LA TELEVISION À CRISTAUX LIQUIDES---------------------------------------------------- 4-5
ACCESSOIRES FOURNIS-------------------------------------------------------------------------------------------------------- 6
UTILISATION DE LA TÉLÉCOMMANDE-------------------------------------------------------------------------------------- 7
INSTALLER LA TELEVISION À CRISTAUX LIQUIDES AU MUR------------------------------------------------------- 8
DEMARRER--------------------------------------------------------------------------------------------------------------------------- 9
RÉGLAGE DE L’AFFICHAGE À L’ÉCRAN---------------------------------------------------------------------------------- 10
CONNECTER UN MAGNÉTOSCOPE---------------------------------------------------------------------------------------- 11
CONNECTER UNE CAMÉRA /UN CAMÉSCOPE/ UN APPAREIL DE JEUX
VIDÉOS-------------------------------------------------------------------------------------------------------------------------------- 11
CONNECTER UN LECTEUR DVD ------------------------------------------------------------------------------------------- 12
CONNECTER UN BOÎTIER DÉCODEUR NUMÉRIQUE---------------------------------------------------------------- 12
MENU DE RÉGLAGE DE LA TELEVISION
INSTALLATION DES CHAÎNES TELEVISION ---------------------------------------------------------------------------- 13
MODIFICATION DES CHAÎNES----------------------------------------------------------------------------------------------- 14
TEMPORISATION DE MISE EN SOMMEIL--------------------------------------------------------------------------------- 14
SOUS-TITRE CODÉ--------------------------------------------------------------------------------------------------------------- 15
VERROUILLAGE DES CHAÎNES------------------------------------------------------------------------------------------ 15-18
MENU DE RÉGLAGE DU SON ------------------------------------------------------------------------ 19-20
MENU DE RÉGLAGE DE L’IMAGE------------------------------------------------------------------- 21-22
MENU DE RÉGLAGE D’ORDINATEUR------------------------------------------------------------- 23-24
INFORMATIONS GÉNÉRALES
ASTUCES --------------------------------------------------------------------------------------------------------------------------- 25
AVANT D’APPELER LES SERVICES---------------------------------------------------------------------------------------- 26
GLOSSAIRE------------------------------------------------------------------------------------------------------------------------- 27
DESCRIPTION DU PRODUIT---------------------------------------------------------------------------------------------- 28-29
ЩЯОЯТМЧЫ ФЧУЧМЫ----------------------------------------------------------------------------------------------ууууууууууууууууу нрÉ
MERCI D’AVOIR CHOISI LA TELEVISION À ÉCRAN PLASMA.
NOUS VOUS CONSEILLONS DE PRENDRE QUELQUES MINUTES POUR LIRE ATTENTIVEMENT CE
MANUEL AVANT D’INSTALLER ET D’ALLUMER LA TELEVISION. VEUILLEZ CONSERVER CE MANUEL
DANS UN ENDROIT SÛR POUR VOUS Y RÉFÉRER ULTÉRIEUREMENT.
Û²º±½«- ͱº¬©¿®» ó Ý«-¬±³»® Í«°°±®¬
3
Page 36

INSTALLATION
PRÉSENTATION DE LA TELEVISION À ÉCRAN PLASMA
Boutons de commande de la face avant
Touche Source
Touche < / >
Touche /
Touche MENU
Touche Power
Pour sélectionner votre source d’entrée.
Pour confirmer votre sélection de fonction et ajuster le volume
Pour activer la sélection de fonction et de chaîne de télévision
Pour faire apparaître le menu l’écran d’affichage sur la télévision.
Pour allumer ou éteindre la télévision.
Û²º±½«- ͱº¬©¿®» ó Ý«-¬±³»® Í«°°±®¬
4
Page 37

Préparation
Retirer la plaque arrière au dos de la télévision comme l’illustre la figure opposée. Coucher la télévision à
écran plasma, l’écran sur une table, cela facilitera la connexion des appareils périphériques. Veuillez agir
avec précaution pour ne pas abîmer l’écran.
Audio D/G
COMP VIDEO
S-VIDEO
D-SUB
DC IN
Û²º±½«- ͱº¬©¿®» ó Ý«-¬±³»® Í«°°±®¬
Entrée télévision
Prise écouteur
Entrée de chaîne Audio Droite/Gauche
Entrée КЧЬЫС
Entrée S-VIDEO
Entrée Ordinateur
Entrée 12V CC
5
Page 38

ACCESSOIRES FOURNIS
Adapteur électrique Télécommande
Rapidement Guide D'Installation
Manuel d’utilisateur Carte de garantie
6
Û²º±½«- ͱº¬©¿®» ó Ý«-¬±³»® Í«°°±®¬
Page 39

UTILISATION DE LA TÉLÉCOMMANDE
de latélévisionàécranplasma
dechaîne à
r
déo
Bouton POWER:
Allume/éteint la télévision
Bouton CHANNEL
Pour passer à la chaîne suivante
ou précédente.
Bouton VOLUME
Pour ajuster le niveau sonore.
Bouton PC
Pour allumer le signal ordinateur.
Bouton SLEEP
Pour régler la télévision à écran
plasma pour qu’elle s’éteigne dans
un certain temps.
Bouton DISPLAY
Appuyer pour “afficher” le numéro
l’écran
Bouton MUTE
Pour éliminer ou restaurer le son
Boutons NUMÉRO
Pour sélectionner les chaînes t l
vision
Bouton R
Pour afficher la chaîne télévision
précédemment sélectionnée
Bouton TV/VIDEO
Sélectionne votre source d’entrée
vi
Bouton MENU
Appuyer à plusieurs reprises pou
afficher le menu principal et
également pour quitter la fonction
d’affichage à l’écran
Bouton V_CHIP
Pour régler le contrôle parental.
Bouton PIP/POP
Non disponible
Bouton MTS /SAP
Pour sélectionner le mode son s’il
est disponible sur le programme
télévision: Mono, Stéréo ou SAP
Bouton CAPTION
Pour "activer" les sous-titres
Bouton SIZE/SWAP
Non disponible
7
Û²º±½«- ͱº¬©¿®» ó Ý«-¬±³»® Í«°°±®¬
Page 40

INSTALLER LA TELEVISION À ÉCRAN PLASMA AU MUR
Avant de pouvoir installer votre télévision à écran plasma au mur, vous DEVEZ d’abord
retirer la base en suivant les étapes suivantes:
1. Placer l’appareil face tournée vers le bas sur une surface plate recouverte d’une feuille ou d’un tissu de
protection pour la télévision.
2. Retirer deux vis de la base, saisir la base et la tirer.
En installant la télévision à écran plasma au mur, veuillez consulter un technicien professionnel pour
l’installer correctement.
Le fabricant n’accepte aucune responsabilité pour des installations qui n’ont pas été effectuées par un
technicien professionnel.
Û²º±½«- ͱº¬©¿®» ó Ý«-¬±³»® Í«°°±®¬
8
Page 41

DEMARRER
1. Placer la télévision sur une surface stable.
Note: Assurez-vous que la position de la télévision permette une circulation libre de l’air. Ne pas couvrir
les ouvertures d’aération sur le dos.
Pour éviter toute situation dangereuse, ne pas placer de sources de flammes nues, telles que des bougies
allumées, sur la télévision ou à proximité.
Éviter de placer la télévision près de sources de chaleur, sous la lumière directe du soleil et à l’exposition
de la pluie ou d’eau. L’appareil ne doit pas être exposé à des dégouttements ou à des éclaboussures.
2. Connecter l’antenne au connecteur à l’arrière de la télévision à écran plasma
Signal du câble ou
de l’antenne TV
3. Installation des piles:
Retirer le couvercle du boîtier de piles. Placer 2 piles AAA dans la télécommande.
9
Û²º±½«- ͱº¬©¿®» ó Ý«-¬±³»® Í«°°±®¬
Page 42

4. Brancher l’adaptateur CC dans le connecteur CC IN 12 V de la télévision à écran
plasma.
Brancher le câble de tension dans une prise de courant et allumer le téléviseur.
5. Appuyer sur le bouton POWER pour allumer la télévision.
6. Activer la fonction Balayage Automatique pour installer les chaînes de votre
téléviseur à écran plasma (Veuillez vous référer à la page 15)
RÉGLAGES DE L’AFFICHAGE À L’ÉCRAN
1. Appuyer sur la touche “MENU’’ pour ouvrir le menu d’affichage à l’écran
2. Appuyer sur la touche > ou < pour sélectionner l’option de “RÉGLAGE DE L’AFFICHAGE À
L’ÉCRAN’’
3. Appuyer sur la touche ou pour sélectionner le sous-menu
Réglage de l’affichage à l’écran
Langue
1. Appuyer sur la touche ou pour sélectionner l’option “Langue”
2. Appuyer sur la touche > ou < pour sélectionner la langue, il y a trois types de langues à sélectionner:
Anglais Français et Espagnol
3. Après réglage, appuyer sur la touche “MENU” pour quitter ou appuyer sur le touche ou pour régler
d’autres options
Position-H
1. Appuyer sur la touche ou pour sélectionner l’option de “Position H”
2. Appuyer sur la touche > ou < pour régler l’affichage à l’écran en position horizontale
3. Après réglage, appuyer sur la touche “MENU” pour quitter ou appuyer sur la touche ou pour régler
d’autres options
Position-V
1. Appuyer sur la touche ou pour sélectionner l’option de “Position V”
2. Appuyer sur la touche > ou < pour régler l’affichage à l’écran en position verticale
3. Après réglage, appuyer sur la touche “MENU” pours quitter ou appuyer sur la touche ou
pours régler d’autres options
Temporisation
1. Appuyer sur la touche ou pour sélectionner l’option de “Temporisation ”
2. Appuyer sur la touche > ou < pour régler le temps d’affichage à l’écran
3. Après réglage, appuyer sur la touche “MENU” pour quitter ou appuyer sur la touche ou pour régler
d’autres options
Fond d’écran
1. Appuyer sur la touche ou pour sélectionner l’option de “Fond d’écran”
2. Appuyer sur la touche > ou < pour régler le fond de l’affichage à l’écran
3. Après réglage, appuyer sur la touche “MENU” pour quitter ou appuyer sur la touche ou pour régler
d’autres options
Û²º±½«- ͱº¬©¿®» ó Ý«-¬±³»® Í«°°±®¬
10
Page 43

Informations Cette option peut être activée à la source du signal de l’ordinateur
1. Appuyer sur la touche ou pour sélectionner l’option “Informations”
2. Appuyer sur la touche > ou < , alors l’écran affichera les informations entrées en cours
3. Appuyer sur la touche “MENU” pour quitter le menu “Informations”
CONNECTER UN MAGNÉTOSCOPE
Comment le connecter:
1. Connecter l’antenne à l’entrée FR du magnétoscope
2. Connecter l’autre câble FR de la sortie du magnétoscope à l’entrée de la télévision; si vous
connectez la fréquence vidéo du magnétoscope au connecteur d’entrée AV de la télévision, vous
obtiendrez une meilleure qualité d’image et de son
3. L’entrée AV COMP VIDEO de la télévision ne fournit pas de fréquence audio, vous devez donc
connecter la sortie de fréquence audio du magnétoscope à l’entrée de fréquence AUDIO L/R de la
télévision.
Si votre magnétoscope est équipé d’un port Vidéo S-VHS:
Pour une amélioration de la qualité d’image, connecter un câble S-Vidéo avec l’entrée S-VIDEO de la
télévision au lieu de connecter le magnétoscope au port VIDÉO.
S-Vidéo ne fournit pas de son, les câbles audio doivent toujours être connectés pour fournir du son
Regarder une Vidéo
5. Si vous utilisez la connexion de la télévision, sélectionnez la recherche de chaîne de télévision.
6. Si vous utilisez la connexion AV, sélectionnez AV
7. Si vous utilisez la connexion S-Vidéo. Sélectionnez S-Vidéo
8. Insérer la cassette vidéo dans le magnétoscope et appuyer sur le bouton de lecture
CONNECTER UNE CAMÉRA /UN CAMÉSCOPE/ UN APPAREIL DE JEUX VIDÉO
1. Connecter le port de sortie vidéo de la Caméra /Caméscope/ Appareil de jeux vidéo à l’entrée AV de la
télévision
2. Connecter les chaînes audio droite et gauche sur la Caméra /Caméscope/ Appareil de jeux vidéo aux
chaînes droite et gauche de l’entrée audio de la télévision
Si votre Caméra /Caméscope/ Appareil de jeux vidéo est équipé d’un port vidéo S-VHS:
Pour une meilleure qualité d’image, veuillez connecter le câble S-Vidéo à l’entrée S-Vidéo de la télévision.
Connecter les chaînes droite et gauche de la Caméra /Caméscope/ Appareil de jeux vidéo aux chaînes
droite et gauche de l’entrée audio de la télévision
Comment lire
Si vous utilisez une connexion AV, veuillez sélectionner AV;
Si vous utilisez une connexion S-Vidéo, veuillez sélectionner S-VIDEO;
11
Û²º±½«- ͱº¬©¿®» ó Ý«-¬±³»® Í«°°±®¬
Page 44

CONNECTER UN LECTEUR DVD
1. Connecter le port de sortie vidéo du lecteur DVD au port d’entrée AV de la télévision
2. Connecter les chaînes audio droite et gauche du lecteur DVD aux chaînes droite et gauche de l’entrée
audio de la télévision
Si votre lecteur DVD est équipé d’un port vidéo S-VHS:
Pour une meilleure qualité d’image, veuillez connecter le câble S-Vidéo à l’entrée S-Vidéo de la télévision.
Connecter les chaînes droite et gauche du lecteur DVD aux chaînes droite et gauche de l’entrée audio de la
télévision
Comment lire un DVD
Si vous utilisez une connexion AV, veuillez sélectionner AV;
Si vous utilisez une connexion S-Vidéo, veuillez sélectionner S-VIDEO;
CONNECTER UN BOÎTIER DE DÉCODEUR NUMÉRIQUE
Comment connecter
1. Connecter le port de sortie vidéo du boîtier de décodeur numérique à l’entrée AV de la télévision
2. Connecter les chaînes audio droite et gauche du boîtier de décodeur numérique aux chaînes audio droite
et gauche de l’entrée audio de la télévision
Comment utiliser
1. Sélectionner AV.
2. Mettre le boîtier de décodeur numérique sous tension.
Note: Si vous constatez sur votre écran que des images défilent, que les couleurs sont mauvaises
ou absentes, voire plusieurs de ces occurrences à la fois, vérifiez que les connexions sont correctes.
Vérifiez que les couleurs des câbles correspondent aux couleurs des connecteurs d’entrée.
12
Û²º±½«- ͱº¬©¿®» ó Ý«-¬±³»® Í«°°±®¬
Page 45

Menu de réglage de l’heure
1 Appuyer sur la touche ” MENU’’ pour ouvrir le menu d’affichage à l’écran
2 Appuyer sur la touche > ou < pour sélectionner l’option de “TV SETUP“ (RÉGLAGE DE LA
TELEVISION )’
3 Appuyer sur ou pour s électionner un sous-menu
Note: Les optionsAntenne/Câble, Balayage Automatique, Programme en cours Temporisateur
de Mise en Sommeil ne peuvent s’afficher que sur la Source de la télévision
INSTALLATION DES CHAÎNES DE TELEVISION
Antenne/Câble
1. Appuyer sur la touche ” MENU’’ pour ouvrir le menu d’affichage à l’écran
2. Appuyer sur la touche > ou < pour sélectionner l’option de “TV SETUP“ (réglage de la télévision)
3. Appuyer sur la touche ou pour sélectionner l’option de “AIR/VATV“ (Antenne/TV Câble)
4. Appuyer sur la touche > ou < pour sélectionner le système de recherche automatique qu’il faut pour votre
télévision, il y a quatre options:
TV par Câble: Câblodistribution
Antenne: Par l’antenne
HRC: Fréquence associée à l’opérateur de type harmonique
IRC: Fréquence associée à l’opérateur par Incrément
5. Appuyer sur la touche “MENU” pour quitter le menu Antenne/TV par Câble ou appuyer sur la touche ou
pour régler d’autres options
Note: Veuillez lancer la fonction de balayage automatique pour régler la télévision sur les chaînes
hertziennes ou câblées disponibles dans votre région. Si vous ne lancez pas la fonction de balayage
automatique pour régler les chaînes, il se peut que votre télévision ne fonctionne pas correctement.
Balayage automatique
Lancer la recherche automatique de chaînes et mémoriser toutes les chaînes visibles.
1. Appuyer sur la touche “MENU’’ pour ouvrir le menu d’affichage à l’écran
2. Appuyer sur la touche > ou < pour sélectionner l’option de “TV SETUP“ (RÉGLAGE DE LA TELEVISION ’)
3. Appuyer sur la touche ou pour sélectionner l’option de “Auto scan“ (Balayage Automatique)
Û²º±½«- ͱº¬©¿®» ó Ý«-¬±³»® Í«°°±®¬
13
Page 46

4. Appuyer sur la touche > ou < pour sélectionner la recherche automatique.
Note: Veuillez lancer la fonction de balayage automatique pour régler la télévision sur les chaînes
hertziennes ou câblées disponibles dans votre région. Si vous ne lancez pas la fonction de balayage
automatique pour régler les chaînes, il se peut que votre télévision ne fonctionne pas correctement.
MODIFICATION DES CHAÎNES
Ajouter/Effacer
1. Appuyer sur la touche” MENU’’ pour ouvrir le menu d’affichage à l’écran.
2. Appuyer sur la touche > ou < pour sélectionner l’option de “TV SETUP“ (RÉGLAGE DE LA TÉLÉVISION’)
3. Appuyer sur la touche ou pour sélectionner l’option“Add/Erase“ ( Ajouter/Effacer )
4. Appuyer sur la touche > ou < pour sélectionner Ajouter ou Effacer.
5. Appuyer sur la touche “MENU” pour quitter le menu Ajouter/Effacer ou appuyer sur la touche ou pour
régler d’autres options
Programme en cours
Le programme en cours est la chaîne diffusée en cours par la télévision; vous pouvez appuyer sur la touche
“Affichage” pour faire apparaître la chaîne en cours sur l’écran en haut à droite.
1. Appuyer sur la touche ” MENU’’ pour ouvrir le menu d’affichage à l’écran
2. Appuyer sur la touche > ou < pour sélectionner l’option de “TV SETUP“ (RÉGLAGE DE LA TÉLÉVISION’)
3. Appuyer sur la touche ou pour sélectionner l’option de “Current program“ ( Programme en cours )
4. Appuyer sur la touche > ou < pour sélectionner la chaîne.
5. Appuyer sur la touche “MENU” pour quitter le menu de Programme en cours ou appuyer sur la touche
ou pour régler d’autres options
Vous pouvez également appuyer sur les touches numériques 0-9/100 ou les chaînes ou sur la
télécommande pour sélectionner une chaîne
TEMPORISATEUR DE MISE EN SOMMEIL
1. Appuyer sur la touche ” MENU’’ pour ouvrir le menu d’affichage à l’écran
2. Appuyer sur la touche > ou < pour sélectionner l’option de “TV SETUP“(RÉGLAGE DE LA TÉLÉVISION’)
3. Appuyer sur ou pour sélectionner l’option de “Sleep Time“ ( Temporisateur de Mise en Sommeil )
4. Appuyer sur la touche > ou < pour sélectionner a durée souhaitée avant la mise en sommeil, vous pouvez
sélectionner des durées de 30/60/90/120 minutes avant la mise en sommeil.
5. Appuyer sur la touche “MENU” pour quitter le menu de temporisation avant mise en sommeil ou appuyer
sur la touche ou pour régler d’autres options
Note: Vous pouvez également appuyer sur la touche “SLEEP” de la télécommande, le temps avant la mise
en sommeil s’affichera sur l’écran en haut à droite.
14
Û²º±½«- ͱº¬©¿®» ó Ý«-¬±³»® Í«°°±®¬
Page 47

SOUS-TITRES FERMÉS
1. Appuyer sur la touche ” MENU’’ pour ouvrir le menu d’affichage à l’écran
2. Appuyer sur la touche > ou < pour sélectionner l’option de “TV SETUP“ (RÉGLAGE DE LA TÉLÉVISION)
3. Appuyer sur la touche ou pour sélectionner l’option de “Closed caption“( Sous-titres fermés )
4. Appuyer sur la touche > ou < pour régler CC1~CC4 et TT1 et TT4.
5. Appuyer sur la touche “MENU” pour quitter le menu de Sous-titres fermés ou appuyer sur la touche ou
pour régler d’autres options
Vous pouvez également appuyer sur la touche “Caption” de la télécommande, entrez directement dans le
menu Sous-titres fermés, puis appuyez sur étape 4 pour effectuer les réglages.
Mode sous-titres : CC1~CC4
Des dialogues (et descriptions) de l’action sur les programmes de télévision sous-titrés apparaissent à
l’écran.
Mode texte: TT1~TT4
Souvent utilisé pour les guides de chaînes, les grilles de programmes, les informations de tableaux
d’affichage pour les programmes à sous-titres fermés, les nouvelles, les prévisions météorologiques ou les
cours de la bourse.
Tous les modes de sous-titres fermés ne sont pas nécessairement utilisés par une chaîne de télévision
pendant la transmission d’un programme à sous-titres fermés.
VERROUILLAGE DES CHAÎNES
Puce V
C’est la fonction de contrôle parental (Puce V). Elle s’utilise pour bloquer la vision d’un programme sur la
base de classification par le diffuseur. Le réglage par défaut permet que tous les programmes soient visibles.
On peut bloquer un programme selon des types et des catégories de programmes choisis pour être bloqués.
Il est également possible de bloquer tous les programmes pendant un certain temps.
1. Appuyer sur la touche” MENU’’ pour ouvrir le menu d’affichage à l’écran
2. Appuyer sur la touche > ou < pour sélectionner l’option de “TV SETUP“ (RÉGLAGE DE LA TÉLÉVISION’)
3. Appuyer sur la touche ou pour sélectionner l’option “V_Chip “ ( Puce V )
4. Appuyer sur la touche > ou < pour entrer le mot de passe du menu de validation de la Puce V.
Vous pouvez appuyer sur la touche V-Chip de la télécommande pour entrer directement dans le menu.
Û²º±½«- ͱº¬©¿®» ó Ý«-¬±³»® Í«°°±®¬
15
Page 48

Appuyer sur les touches numériques de la télécommande; entrer le mot de passe pour accéder au menu de
contrôle de la Puce V (Le mot de passe de la Puce V: 0711 et doit être saisi deux fois)
Si votre mot de passe comporte une erreur, alors l’écran affichera “MAUVAIS PIN”.
5. Après être entré dans le menu Puce V, appuyer sur la touche ou pour sélectionner, si vous voulez
régler la Puce V, vous devez régler l “status“ ( état ) sur la condition “ON”.
1) Appuyer sur la touche > ou < pour sélectionner l’option “status“ ( État )
2) Appuyer sur la touche > ou < pour sélectionner “ON’’ ou “OFF”
6. Réglage du guide de la télévision
1) Appuyer sur la touche ou pour sélectionner l’option “TV Guideline“ ( Guide de la télévision )
2) Appuyer sur la touche > ou < pour entrer dans le menu de “TV Guideline“ ( Guide de la télévision )
3) Appuyer sur la touche ou pour sélectionner le blocage d’un élément.
4) Appuyer sur la touche > ou < pour sélectionner D ou B; sélectionner D signifie “Unlock“ ( Débloquer ),
sélectionner B signifie “Block“ ( Bloquer ).
5) Si le réglage est bon, appuyer sur la touche “MENU” pour quitter le menu de Guide de la télévision.
Û²º±½«- ͱº¬©¿®» ó Ý«-¬±³»® Í«°°±®¬
16
Page 49

7. Réglage du Guide de films
1) Appuyer sur la touche ou pour sélectionner l’option de “Movie Guideline" ( Guide de films ) .
2) Appuyer sur la touche > ou < pour entrer dans le menu de Guide de films.
3) Appuyer sur la touche ou pour sélectionner le blocage d’un élément.
4) Appuyer sur la touche > ou < pour sélectionner D ou B; sélectionner D signifie
“Unlock“( Débloquer ), sélectionner B signifie “Block“ ( Bloquer ).
5) Si le réglage est bon, appuyer sur la touche “MENU” pour quitter le menu de Guide de films.
8. Changer de PIN
1) Appuyer sur la touche ou pour sélectionner l’option “Change PIN“ ( Changer de PIN )
2) Appuyer sur la touche > ou < pour entrer dans le menu Changer de PIN.
3) Appuyer sur les touches numériques de la télécommande, puis entrer le nouveau mot de passe.
4) Ré-entrer le nouveau mot de passe, si le réglage est bon, l’information ci-dessous s’affiche, puis vous
quitterez automatiquement du menu Changer de PIN.
Û²º±½«- ͱº¬©¿®» ó Ý«-¬±³»® Í«°°±®¬
17
Page 50

Revenir aux réglages par défaut
1. Appuyer sur la touche “MENU” pour ouvrir le menu d’affichage à l’écran.
2. Appuyer sur la touche > ou < pour sélectionner des options de réglage
3. Appuyer sur la touche ou pour sélectionner l’option “Reset to Default“ ( Revenir aux réglages par
défaut ).
4. Appuyer sur la touche > ou < pour effectuer un nouveau réglage.
Revenir aux réglages par défaut est pratique dans tous les réglages d’affichage à l’écran de l’utilisateur pour
se rappeler des informations par défaut de l’usine.
Note: La fonction de retour aux réglages par défaut dans chaque élément de fonction est la même sous la
source du signal de AV/TV/S-VIDEO.
Quand on sélectionne le retour aux réglages par défaut dans chaque élément de fonction sous la
source du signal de l’ordinateur, non seulement il y rappel des informations par défaut, mais aussi
un ajustement se fait automatiquement.
Û²º±½«- ͱº¬©¿®» ó Ý«-¬±³»® Í«°°±®¬
18
Page 51

MENU DE RÉGLAGE DU SON
1. Appuyer sur la touche “MENU” pour ouvrir le menu d’affichage à l’écran.
2. Appuyer sur la touche > ou < pour sélectionner l’option de “Réglage Audio”
3. Appuyer sur la touche ou pour sélectionner un sous-menu.
Volume
1. Appuyer sur la touche “MENU” pour ouvrir le menu d’affichage à l’écran.
2. Appuyer sur la touche > ou < pour sélectionner l’option de “Sound Setup“ ( Réglage son ) .
3. Appuyer sur la touche ou pour sélectionner l’option “Volume”
4. Appuyer sur la touche > ou < pour ajuster les informations de Volume.
Vous pouvez également appuyer sur la touche volume ou et > ou < de la télécommande pour ajuster
le volume.
5. Appuyer sur la touche “MENU” pour quitter ou appuyer sur la touche ou pour régler d’autres options.
Graves
1. Appuyer sur la touche “MENU” pour ouvrir le menu d’affichage à l’écran.
2. Appuyer sur la touche > ou < pour sélectionner l’option “Sound Setup“ ( Réglage son )
3. Appuyer sur la touche ou pour sélectionner l’option “Bass“ (Graves ).
4. Appuyer sur la touche > ou < pour ajuster les informations sur les sons graves.
5. Appuyer sur la touche “MENU” pour quitter ou appuyer sur la touche ou pour régler d’autres options.
Aigus
1. Appuyer sur la touche “MENU” pour ouvrir le menu d’affichage à l’écran.
2. Appuyer sur la touche > ou < pour sélectionner l’option “Sound Setup“ ( Réglage son )
3. Appuyer sur la touche ou pour sélectionner l’option “Treble“ ( Aigus ).
4. Appuyer sur la touche > ou < pour ajuster les informations sur les sons aigus.
5. Appuyer sur la touche “MENU” pour quitter ou appuyer sur la touche ou pour régler d’autres options.
Balance
1. Appuyer sur la touche “MENU” pour ouvrir le menu d’affichage à l’écran.
2. Appuyer sur la touche > ou < pour sélectionner l’option “Sound Setup“ ( Réglage son )
3. Appuyer sur la touche ou pour sélectionner l’option “Balance”.
4. Appuyer sur la touche > ou < pour ajuster les informations sur la balance.
5. Appuyer sur la touche “MENU” pour quitter ou appuyer sur la touche ou pour régler d’autres options.
Û²º±½«- ͱº¬©¿®» ó Ý«-¬±³»® Í«°°±®¬
19
Page 52

Muet
1. Appuyer sur la touche “MENU” pour ouvrir le menu
d’affichage à l’écran.
2. Appuyer sur la touche > ou < pour sélectionner l’option
“Sound Setup“ ( Réglage son )
3. Appuyer sur la touche ou pour sélectionner l’option“Muet”.
4. Appuyer sur la touche > ou < pour sélectionner ON/OFF.
Vous pouvez également appuyer sur la touche de la télécommande pour sélectionner muet.
Après sélection, vous pouvez ajuster le volume ou appuyer sur pour annuler la fonction Muet.
5. Appuyer sur la touche “MENU” pour quitter ou appuyer sur la touche ou pour régler d’autres
options.
Û²º±½«- ͱº¬©¿®» ó Ý«-¬±³»® Í«°°±®¬
20
Page 53

MENU DE RÉGLAGE IMAGE
1.Appuyer sur la touche “MENU” pour ouvrir le menu d’affichage à l’écran.
2. Appuyer sur la touche > ou < pour sélectionner l’option “Pc Setup“ ( Réglage d’ordinateur )
3. Appuyer sur la touche ou pour sélectionner un sous-menu.
Note: Le menu de réglage image peut aussi se sélectionner sous la source du signal de AV/TV/S-VIDEO.
Luminosité
1. Appuyer sur la touche “MENU” pour ouvrir le menu d’affichage à l’écran.
2. Appuyer sur la touche > ou < pour sélectionner l’option de “Picture Setup“ ( Réglage Image )
3. Appuyer sur la touche ou pour sélectionner l’option “Brightness“ ( Luminosité ).
4. Appuyer sur la touche > ou < pour ajuster les informations de luminosité.
5. Appuyer sur la touche “MENU” pour quitter ou appuyer sur la touche ou pour régler d’autres options.
Contraste
1. Appuyer sur la touche “MENU” pour ouvrir le menu d’affichage à l’écran.
2. Appuyer sur la touche > ou < pour sélectionner l’option de “Picture Setup“ ( Réglage Image )
3. Appuyer sur la touche ou pour sélectionner l’option “Contrast” (Contraste).
4. Appuyer sur la touche > ou < pour ajuster les informations de contraste.
5. Appuyer sur la touche “MENU” pour quitter ou appuyer sur la touche ou pour régler d’autres options.
Teinte
1. Appuyer sur la touche “MENU” pour ouvrir le menu d’affichage à l’écran.
2. Appuyer sur la touche > ou < pour sélectionner l’option de “Picture Setup“ ( Réglage Image )
3. Appuyer sur la touche ou pour s électionner l’option “Hue“ ( Teinte ).
4. Appuyer sur la touche > ou < pour ajuster les informations de teinte.
5. Appuyer sur la touche “MENU” pour quitter ou appuyer sur la touche ou pour régler d’autres options.
Saturation
1. Appuyer sur la touche “MENU” pour ouvrir le menu d’affichage à l’écran.
2. Appuyer sur la touche > ou < pour sélectionner l’option de “Picture Setup“ ( Réglage Image )
3. Appuyer sur la touche ou pour sélectionner l’option “Saturation”.
4. Appuyer sur la touche > ou < pour ajuster les informations de saturation.
5. Appuyer sur la touche “MENU” pour quitter ou appuyer sur la touche ou pour régler d’autres options.
Û²º±½«- ͱº¬©¿®» ó Ý«-¬±³»® Í«°°±®¬
21
Page 54

Définition
1. Appuyer sur la touche “MENU” pour ouvrir le menu d’affichage à l’écran.
2. Appuyer sur la touche > ou < pour sélectionner l’option de “Picture Setup“ ( Réglage Image )
3. Appuyer sur la touche ou pour s électionner l’option “Sharpness“ ( Définition ).
4. Appuyer sur la touche > ou < pour ajuster les informations de définition.
5. Appuyer sur la touche “MENU” pour quitter ou appuyer sur la touche ou pour régler d’autres options.
Couleurs
1. Appuyer sur la touche “MENU” pour ouvrir le menu d’affichage à l’écran.
2. Appuyer sur la touche > ou < pour sélectionner l’option de “Picture Setup“ ( Réglage Image )
3. Appuyer sur la touche ou pour sélectionner l’option “Color Tone“ ( Couleurs ).
4. Appuyer sur la touche > ou < pour ajuster les informations de couleurs.
5. Appuyer sur la touche “MENU” pour quitter ou appuyer sur la touche ou pour régler d’autres options.
Niveau de gris
1. Appuyer sur la touche “MENU” pour ouvrir le menu d’affichage à l’écran.
2. Appuyer sur la touche > ou < pour sélectionner l’option de “Picture Setup“ ( Réglage Image )
3. Appuyer sur la touche ou pour sélectionner l’option “Black Level“ ( Niveau de gris ).
4. Appuyer sur la touche > ou < pour ajuster les informations de niveau de gris.
5. Appuyer sur la touche “MENU” pour quitter ou appuyer sur la touche ou pour régler d’autres options.
Û²º±½«- ͱº¬©¿®» ó Ý«-¬±³»® Í«°°±®¬
22
Page 55

MENUDE RÉGLAGE D’UN ORDINATEUR
1. Appuyer sur la touche “MENU” pour ouvrir le menu d’affichage à l’écran.
2. Appuyer sur la touche > ou < pour sélectionner l’option “Ordinateur”
3. Appuyer sur la touche ou pour sélectionner un sous-menu
Note: Le menu de réglage d’un ordinateur ne peut être sélectionné sous la source du signal de l’ordinateur.
Luminosité
1. Appuyer sur la touche “MENU” pour ouvrir le menu d’affichage à l’écran.
2. Appuyer sur la touche > ou < pour sélectionner l’option de “PC Setup“ ( Réglage de l’ordinateur )
3. Appuyer sur la touche ou pour sélectionner l’option “Brightness“ ( Luminosité ).
4. Appuyer sur la touche > ou < pour ajuster les informations de luminosité.
5. Appuyer sur la touche “MENU” pour quitter ou appuyer sur la touche ou pour régler d’autres options.
Contraste
1. Appuyer sur la touche “MENU” pour ouvrir le menu d’affichage à l’écran.
2. Appuyer sur la touche > ou < pour sélectionner l’option de “PC Setup“ ( Réglage de l’ordinateur )
3. Appuyer sur la touche ou pour sélectionner l’option “Contrast” (Contraste).
4. Appuyer sur la touche > ou < pour ajuster les informations de contraste.
5. Appuyer sur la touche “MENU” pour quitter ou appuyer sur la touche ou pour régler d’autres options.
Position H
1. Appuyer sur la touche “MENU” pour ouvrir le menu d’affichage à l’écran.
2. Appuyer sur la touche > ou < pour sélectionner l’option de “PC Setup“ ( Réglage de l’ordinateur )
3. Appuyer sur la touche ou pour sélectionner l’option “Position H”.
4. Appuyer sur la touche > ou < pour ajuster les informations de position H.
5. Appuyer sur la touche “MENU” pour quitter ou appuyer sur la touche ou pour régler d’autres options.
Position V
1. Appuyer sur la touche “MENU” pour ouvrir le menu d’affichage à l’écran.
2. Appuyer sur la touche > ou < pour sélectionner l’option de “PC Setup“ ( Réglage Image )
3. Appuyer sur la touche ou pour sélectionner l’option “V_Position“ ( Saturation ).
4. Appuyer sur la touche > ou < pour ajuster les informations de saturation.
5. Appuyer sur la touche “MENU” pour quitter ou appuyer sur la touche ou pour régler d’autres
options.
Û²º±½«- ͱº¬©¿®» ó Ý«-¬±³»® Í«°°±®¬
23
Page 56

Horloge
1. Appuyer sur la touche “MENU” pour ouvrir le menu d’affichage à l’écran.
2. Appuyer sur la touche > ou < pour sélectionner l’option de “PC Setup“ ( Réglage de l’ordinateur )
3. Appuyer sur la touche ou pour sélectionner l’option “Clock“ ( Horloge ).
4. Appuyer sur la touche > ou < pour ajuster les informations de l’horloge.
5. Appuyer sur la touche “MENU” pour quitter ou appuyer sur la touche ou pour régler d’autres options.
Phase
1. Appuyer sur la touche “MENU” pour ouvrir le menu d’affichage à l’écran.
2. Appuyer sur la touche > ou < pour sélectionner l’option de “PC Setup“ ( Réglage de l’ordinateur )
3. Appuyer sur la touche ou pour sélectionner l’option “Phase”.
4. Appuyer sur la touche > ou < pour ajuster les informations de phase.
5. Appuyer sur la touche “MENU” pour quitter ou appuyer sur la touche ou pour régler d’autres options.
Ajustement automatique
1. Appuyer sur la touche “MENU” pour ouvrir le menu d’affichage à l’écran.
2. Appuyer sur la touche > ou < pour sélectionner l’option de “PC Setup“ ( Réglage de l’ordinateur )
3. Appuyer sur la touche ou pour sélectionner l’option “Auto Adjustment“ ( Ajustement automatique ).
4. Appuyer sur la touche > ou < pour effectuer l’ajustement automatique, puis l’ordinateur s’ajustera
automatiquement; si l’ajustement est bon, vous quitterez automatiquement le menu d’affichage à l’écran
Couleur
1. Appuyer sur la touche “MENU” pour ouvrir le menu d’affichage à l’écran.
2. Appuyer sur la touche > ou < pour sélectionner l’option de “PC Setup“ ( Réglage de l’ordinateur )
3. Appuyer sur la touche ou pour sélectionner l’option “Color“ ( Couleur ).
4. Appuyer sur la touche > ou < pour sélectionner Couleur
Si vous utilisez Couleur en tant qu’Utilisateur, vous pouvez ajuster R/V/B selon vos besoins
1) Appuyer sur la touche “MENU” pour entrer dans le menu Couleur d’Utilisateur.
2) Appuyer sur la touche ou pour sélectionner l’option Rouge/Vert/Bleu.
3) Appuyer sur la touche > ou < pour régler les informations de Rouge/Vert/Bleu
4) Appuyer sur la touche “MENU” pour quitter le menu Couleur
5) Appuyer sur la touche ou pour sélectionner d’autres éléments de réglage, puis appuyer sur
la touche “MENU” pour quitter
24
Û²º±½«- ͱº¬©¿®» ó Ý«-¬±³»® Í«°°±®¬
Page 57

Informations Générales
Astuces
Entretien de l’écran
Ne pas frotter ou frapper l’écran avec quoi que ce soit de dur, sous peine de le rayer ou de l’endommager
définitivement.
Débrancher l’écran avant de le nettoyer. Dépoussiérer la télévision en passant un tissu doux et propre sur
l’écran et le boîtier. Si l’écran nécessite plus de nettoyage, utiliser un tissu propre et humide. Ne pas utiliser
de nettoyants liquides ou de produits aérosol.
Avertissement sur les téléphones mobiles
Pour éviter des perturbations dans les images et le son, des défauts de fonctionnement, voire des dégats sur
votre télévision, éloigner votre téléphone mobile de la télévision.
Directives de fin de vie
Nous portons une grande attention à la protection de l’environnement dans les régions locales “vertes”. Votre
nouveau récepteur contient des matériaux qui peuvent être recyclés et réutilisés.
À la fin de sa vie, des sociétés spécialisées peuvent démonter le récepteur pour récupérer les matériaux
réutilisables et minimiser la quantité de matériaux à jeter.
Veuillez vous assurer que vous jetez votre vieux récepteur en respect avec les lois locales.
Û²º±½«- ͱº¬©¿®» ó Ý«-¬±³»® Í«°°±®¬
25
Page 58

Avant d’appeler les services
Veuillez effectuer ces vérifications simples avant d’appeler les services. Ces astuces peuvent pour faire
gagner du temps et de l’argent, puisque les frais d’installation du récepteur et de réglage du contrôle client ne
sont pas couverts par votre garantie.
Symptômes Éléments à vérifier et procédures à suivre
“ Fantôme“ ou image double
Absence de tension
Absence d’image
Image bonne, mais absence
de son
Son bon, mais couleurs
médiocres
Image médiocre
Neige sur l’écran et bruits
Lignes pointillées
horizontales
*Ceci peut être causé par une obstruction de l’antenne due à des
immeubles de grande hauteur ou à des collines. L’utilisation d’une
antenne hautement directionnelle peut améliorer l’image.
*Vérifier que le fil d’alimentation en c.a. de la télévision est branché
dans la prise principale.
*Débrancher la télévision, attendre 60 secondes. Puis ré-insérer la prise
dans la prise principale et rallumer la télévision.
*Vérifier les connexions de l’antenne à l’arrière de la télévision pou voir
si elles sont bien connectées à la télévision.
*Le problème peut venir de la station du diffuseur. Essayer une autre
chaîne.
*Ajuster les réglages de contraste et de luminosité.
*Vérifier le contrôle des sous-titres fermés. Des modes TEXTE peuvent
bloquer l’écran.
*Vérifier la connexion du câble
*Augmenter le VOLUME.
*Vérifier que la télévision n’est pas en mode muet; appuyer sur le
bouton de la télécommande.
*Ajuster les réglages de contraste, de couleur et de luminosité.
*Parfois la qualité d’image est médiocre lorsqu’une caméra S-VHS ou
un caméscope a été activé et connecté et s’est connecté en même
temps sur un autre périphérique. Dans ce cas, veuillez brancher les
cordons électriques des autres périphériques sur une prise de courant
différente.
*Vérifier la connexion de l’antenne
*Ceci peut provenir d’une interférence électrique (par exemple :
sèche-cheveux, néons à proximité, etc.)
* Éteignez l’équipement.
La télévision ne répond pas
à la télécommande
Û²º±½«- ͱº¬©¿®» ó Ý«-¬±³»® Í«°°±®¬
*Vérifier si les piles marchent. Les remplacer s’il y a lieu
*Nettoyer les lentilles du capteur de la télévision.
*Utiliser les boutons à l’avant de votre télévision.
26
Page 59

GLOSSAIRE
Entrées Audio / Vidéo
Situés à l’arrière et à l’avant du récepteur, ces connecteurs (prise de type photo RCA ) s’utilisent pour l’entrée
des signaux audio et vidéo. Ils sont conçus pour une utilisation avec des magnétoscopes (et d’autres
accessoires) afin de recevoir une meilleure résolution d’image et offrent des options de connexion de son.
Entrée S-Vidéo
Elle permet une connexion directe avec des sources vidéo de haute résolution, telles qu’un enregistreur de
cassette vidéo Super VHS, un lecteur de disques laser, etc. Elle apporte une résolution d’image, une
définition et une clarté meilleures.
Entrée Mode Composite
Elle permet la connexion directe de sources vidéo de haute résolution, telles qu’un lecteur DVD, une
télévision numérique, etc, et apporte une résolution d’image, une définition et une clarté meilleures.
Sortie Audio
Elle fournit la sortie de son, peut être connectée à une enceinte externe et souligne la qualité du son.
Menu
Une liste de fonctions de contrôle apparaît sur l’écran de télévision pour les réglages utilisateur.
Son MTS
Le standard de diffusion qui permet qu’un son stéréo soit transmis avec l’image de télévision.
FR
Fréquence Radio ou concept de signal modulé utilisé pour porter les diffusions télévisuelles.
SAP
Une chaîne audio supplémentaire fournie grâce au standard de diffusion de son MTS. Une bande son
monaurale incluse dans le signal enregistré ou vidéo (contenant généralement une seconde langue de
traduction pour le programme affiché).
Temporisation de Mise en Sommeil
La fonction par laquelle vous pouvez régler une durée avant que la télévision ne s’éteigne.
Û²º±½«- ͱº¬©¿®» ó Ý«-¬±³»® Í«°°±®¬
27
Page 60

DESCRIPTION DU PRODUIT
15MF400T/37
Élément Description
Taille d’écran 15"
Format d’image 4:3
Résolution 1024x768
Panneau
à écran plasma
Fonction
télévision
Entrée Vidéo
Entrée
Ordinateur
Sortie Audio
Tension
Caractéristiques
Vidéo
Luminosité 250cd/m² (typ.)
Rapport de contraste 400:1
Temps de réponse 16ms
Champ de visée gauche/droite = 60°/60°
Haut/bas = 40°/60°
Couleurs d’affichage 16.7M
Syntoniseur de télévision NTSC M
Système de Couleurs NTSC
Système de son MTS + SAP
Sous-titres fermés& Puce-V Oui
Mode Composite x1
S-Vidéo x1
Closed-Caption & V-chip Oui
Système de Couleurs NTSC/PAL
Signal Analogue
Fréquence Horizontale (kHz) 31.5~60
Fréquence Verticale (Hz) 56~75
Plug & Play DDC2B
Résolution maximale 1024x768 @ 75Hz
Résolution recommandée 1024x768 @ 60Hz
Enceintes incorporées 2x 2W (L/R)
Sortie écouteur Oui (3.5mm )
Alimentation électrique Entrée +12V CC
Adaptateur 100-240VAC, 50/60Hz
Alluméä50W
Consommation électrique (Max.)
Désentrelaceur 2D désentrelaceur
Filtre-peigne Séparation 4H Y/C adaptive
Reprise du déroulement 3-2 Oui
Éteintä2W
Û²º±½«- ͱº¬©¿®» ó Ý«-¬±³»® Í«°°±®¬
28
Page 61

Autres
caractéristiques
Dimensions
Poids
Accessoires
Emplacement mural VESA 100mm x 100mm
Télécommande à fonctions
multiplesOui
Temporisation avant mise en
sommeilOui
Angle d’inclinaison
(devant/derrière)
5°/15°
Anglais / Français(de type Canadien ) /
Langue de l’affichage à l’écran
Espagnol
Avec Pied (W x H x D) 371.6mm x 346 mm x 147.5mm
Sans Pied (W x H x D) 371.6mm x 324mm x 49.5mm
Carton d’emballage (W x H x D) 434mm x 407mm x 192mm
Net en kg 3.5kg
Démonté, emballage compris 5.0kg
Télécommande de contrôle, 2 piles, Adaptateur CA, QSG, cordon électrique
Manuel d’utilisateur<Anglais/Français (de type Canadien) /Espagnol >,
Garantie Limitée <en anglais seulement>,
Û²º±½«- ͱº¬©¿®» ó Ý«-¬±³»® Í«°°±®¬
29
Page 62

Û²º±½«- ͱº¬©¿®» ó Ý«-¬±³»® Í«°°±®¬
íð
Page 63

INSTRUCCIONES DE SEGURIDAD IMPORTANTES
El actual sistema había sido diseñado y fabricado para asegurar seguridad personal. El uso incorrecto puede
dar lugar a descarga eléctrica o a riesgo de incendios. Las salvaguardias incorporaron con la actual unidad le
protegerán si usted observa los procedimientos siguientes cuando instalación, funcionamiento y mantenimiento.
La actual unidad está transistorizada y no contiene completamente ningún elemento que se pueda reparar por el
usuario.
Leer antes de utilizar el equipo
1. Guarde las instrucciones para futuras referencias.
2. Preste atención a todas las advertencias.
3. Siga todas las instrucciones.
4. No utilice este aparato cerca del agua.
5. Límpielo únicamente con un paño seco.
6. No bloquee ninguna de las aperturas de ventilación. Instale el aparato siguiendo las instrucciones del
fabricante.
7. No lo instale cerca de ninguna fuente de calor, como por ejemplo, radiadores, estufas, cocinas u otros
aparatos (incluyendo amplificadores) que produzcan calor.
8. No ignore el objetivo de seguridad del enchufe con toma de tierra o polarizado. El polo ancho o el tercer polo
se incluye por su seguridad. Cuando el enchufe suministrado no encaje en su toma de corriente, consulte con
un electricista para reemplazar la toma de corriente obsoleta.
9. Evite que se pise el cable de alimentación, especialmente en la toma de corriente, adaptadores y el
punto donde sale del aparato.
10. Utilice únicamente accesorios especificados por el fabricante.
11. Coloque el aparato solamente en un carro, base, trípode, soporte o mesa especificados por el fabricante o
vendidos junto al aparato. Cuando se utiliza un carro, preste atención cuando lo desplace para evitar daños
por caída.
12. El televisor debe alimentarse solamente con el tipo de fuente de alimentación indicado. Si no está seguro del
tipo de suministro eléctrico disponible en su domicilio, consulte con su proveedor o con la compañía de
electricidad local.
13. Desconecte este aparato durante las tormentas eléctricas o cuando no vaya a utilizarse durante un
período largo de tiempo.
14. Remita todas las reparaciones a personal de reparaciones cualificado. Se requiere servicio técnico
siempre que se dañe de forma alguna el aparato, por ejemplo, cuando se dañe la fuente de alimentación
o el enchufe, cuando se haya derramado líquido o hayan caído objetos dentro del aparato, cuando el
aparato se haya visto expuesto a la lluvia o la humedad, no funcione normalmente o se haya caído.
15. Este producto puede contener plomo o mercurio. La eliminación de estos materiales puede estar
regulada debido a consideraciones medioambientales. Para obtener información acerca del reciclaje,
póngase en contacto con las autoridades locales o Electronic Industries Alliance: www.eiae.org
16. Daños que requieren reparación – El dispositivo debe ser reparado por personal de reparaciones
cualificado cuando:
A. El cable de fuente de alimentación o el enchufe ha resultado dañado; o
B. Se han caído objetos o se ha salpicado líquido dentro del dispositivo; o
Û²º±½«- ͱº¬©¿®» ó Ý«-¬±³»® Í«°°±®¬
1
Page 64

C. El dispositivo se ha visto expuesta a lluvia o humedad.
D. El dispositivo no parece funcionar con normalidad o exhibe un cambio significativo en el
rendimiento o
E. El dispositivo se ha caído o la carcasa se ha dañado.
17. Inclinación/Estabilidad: Todos aparatos de televisión deben cumplir con los estándares de seguridad
global internacionales sobre inclinación y estabilidad de los diseños de sus carcasas.
No ignore el objetivo de estos estándares de diseño aplicando una tensión excesiva en la parte
frontal o superior de la carcasa que podría hacer volcar el producto.
Además, no se ponga en peligro, o a los niños, colocando equipamiento electrónico o juguetes en
la parte superior de la carcasa. Estos elementos podrían caer inesperadamente de la parte
superior y causar daños personales o materiales.
18. Montaje en el techo o la pared: El dispositivo debe montarse en la pared o el techo solamente de la
forma recomendada por el fabricante.
19. Líneas de tensión: Las antenas exteriores deben colocarse alejadas de las líneas de tensión.
20. Toma de tierra de antenas exteriores: Si se conecta una antena exterior al receptor, asegúrese de que
el sistema de la antena dispone de toma de tierra para proporcionar protección contra las subidas de
voltaje y cargas de electricidad estática.
La sección 810 de National Electric Code, ANSI/NFPA No. 70-1984, proporciona información relacionada
con la aplicación de una toma de tierra adecuada de las alfombrillas y estructura de soporte del cableado
a la unidad de descarga, el tamaño de las conexiones de toma de tierra, la ubicación de la unidad de
descarga, la conexión con electrodos de toma de tierra y los requisitos del electrodo de toma de tierra.
Véase la figura siguiente.
EJEMPLO DE TOMA DE TIERRA DE ANTENAS SEGÚN EL CÓDIGO DE NATIONAL ELECTRICAL
Nota al instalador del sistema de CATV: Este recordatorio se incluye para llamar la atención del instalador del
sistema de CATV sobre el artículo 820-40 de NEC que proporciona indicaciones acerca de una toma de tierra
adecuada y, en particular, especifica que el cable de la toma de corriente debe conectarse al sistema de toma de
tierra del edificio, tan cerca de la entrada de cable como sea posible.
Asegúrese de conectar el enchufe de alimentación en una toma de corriente tras conectar el aparato de TV al
adaptador.
21. Entrada de objetos y líquidos: Se debe tener cuidado de que no caigan objetos ni líquidos en el interior por las
aberturas.
Û²º±½«- ͱº¬©¿®» ó Ý«-¬±³»® Í«°°±®¬
2
Page 65

ÍNDICE DE CONTENIDO
INTRODUCCIÓN
INSTRUCCIONES DE SEGURIDAD IMPORTANTES-------------------------------------------------------1
ÍNDICE DE CONTENIDO--------------------------------------------------------------------------------------------3
INSTALACIÓN
PRESENTACIÓN DE LA TV DE LCD--------------------------------------------------------------------------4-5
ACCESORIOS INCLUIDOS-----------------------------------------------------------------------------------------6
OPERACIÓN DEL CONTROL REMOTO------------------------------------------------------------------------7
INSTALACIÓN DE LA TV DE LCD EN LA PARED------------------------------------------------------------8
COMIENZO--------------------------------------------------------------------------------------------------------------9
CONFIGURACIÓN DEL OSD-------------------------------------------------------------------------------------10
CONECTAR LA GRABADORA DE VIDEO --------------------------------------------------------------------11
CONECTAR LA CÁMARA / GRABADORA DE VIDEO/
APARATO DE JUEGO DE VIDEO-------------------------------------------------------------------------------11
CONECTAR LA REPRODUCTORA DE DVD----------------------------------------------------------------12
CONECTAR EL DECODIFICADOR DIGITAL-----------------------------------------------------------------12
MENÚ DE CONFIGURACIÓN DE LA TV
INSTALACIÓN DE CANALES DE TV---------------------------------------------------------------------------13
EDICIÓN DE CANALES--------------------------------------------------------------------------------------------14
APAGADO AUTOMÁTICO-----------------------------------------------------------------------------------------14
SUBTÍTULOS---------------------------------------------------------------------------------------------------------15
BLOQUEO DE CANALES--------------------------------------------------------------------------------------15-18
MENÚ DE CONFIGURACIÓN DE SONIDO-----------------------------------------------------19-20
MENÚ DE CONFIGURACIÓN DE IMAGEN ----------------------------------------------------21-22
MENÚ DE CONFIGURACIÓN DE PC--------------------------------------------------------------23-24
INFORMACIÓN GENERAL
CONSEJOS------------------------------------------------------------------------------------------------------------25
ANTES DE LLAMAR AL SERVICIO-----------------------------------------------------------------------------26
GLOSARIO-------------------------------------------------------------------------------------------------------------27
ESPECIFICACIÓN DEL PRODUCTO----------------------------------------------------------------------28-29
ЩЯОЯТМЯ ФЧУЧМЯЬЯ ----------------------------------------------------------------------уууууууууууууууууууууууу нрÍ
MUCHAS GRACIAS POR SELECCIONAR LA TV DE LCD.
LE RECOMENDAMOS QUE TOME UNOS MINUTOS PARA LEER CON ATENCIÓN ESTE MANUAL
ANTES DE INSTALAR Y ENCENDER LA TV. POR FAVOR CONSERVE ESTE MANUAL EN UN LUGAR
SEGURO PARA FUTURAS REFERENCIAS.
Û²º±½«- ͱº¬©¿®» ó Ý«-¬±³»® Í«°°±®¬
3
Page 66

INSTALACIÓN
PRESENTACIÓN DE LA TV DE LCD
Botones de Control del Panel Frontal
Tecla de Fuente
Tecla < / >
Tecla /
Tecla de MENÚ
Tecla de
Encendido
Pulse para seleccionar su fuente de entrada.
Pulse para confirmar su selección de función y ajustar el volumen
Pulse para realizar la función de selección y el canal de TV
Pulse para mostrar el menú de OSD y salir del menú de OSD en la TV.
Pulse para encender o apagar la TV.
Û²º±½«- ͱº¬©¿®» ó Ý«-¬±³»® Í«°°±®¬
4
Page 67

Preparación
Retire la placa trasera en la parte posterior de la TV como se muestra en la ilustración. Coloque la TV DE
LCD con la pantalla hacia abajo en una mesa, ya que así será más fácil conectar su equipo periférico. Por
favor tenga precaución para no dañar la pantalla..
Audio R/L
COMP VIDEO Entrada deКЧЬЫС
S-VIDEO
D-SUB Entrada de PC
DC IN Entrada de Alimentación de 12V CD
Û²º±½«- ͱº¬©¿®» ó Ý«-¬±³»® Í«°°±®¬
Entrada de TV
Entrada de audífonos
Entrada de canal derecho/ izquierdo de audio
Entrada de S-VIDEO
5
Page 68

ACCESORIOS INCLUIDOS
Adaptador de alimentación Control remoto
Rápidamente Guía De la Disposición
Manual del usuario Tarjeta de garantía
6
Û²º±½«- ͱº¬©¿®» ó Ý«-¬±³»® Í«°°±®¬
Page 69

OPERACIÓN DE CONTROL REMOTO
video
Botón de ENCENDIDO:
Pulse para encender/apagar la TV
Botón de CANAL
Pulse para subir o bajar de canal.
Botón de VOLUMEN
Pulse para ajustar el nivel de sonido
Botón dePC
Pulse para encender su señal de PC.
Botón de APAG. AUTOM.
Pulse para configurar que la TV de
LCD se apague en un tiempo fijo.
Botón de DESPLIEGUE
Pulse para "mostrar” el número de
canal en la pantalla
Botón de SILENCIO
Pulse para eliminar o restablecer el
sonido de la TV de LCD
Botón de NÚMERO
Pulse para seleccionar canales de TV
Botón de R
Pulse para mostrar el canal de TV
seleccionado previamente
Botón de TV/VIDEO
Seleccione su fuente de entrada de
Botón de MENÚ
Pulse repetidamente para mostrar el
menú principal y para salir de la
función de OSD
Botón de V-CHIP
Pulse este botón para configurar el
control para menores.
Botón de PIP/POP
No aplicable
Botón de MTS /SAP
Pulse para seleccionar el modo de
sonido si está disponible con el
programa de TV: Mono, estéreo o SAP
Botón de SUBTÍTULOS
Pulse para "activar" subtítulos.
Botón de TAMAÑO/
MOVIMIENTO
No aplicable
7
Û²º±½«- ͱº¬©¿®» ó Ý«-¬±³»® Í«°°±®¬
Page 70

INSTALACIÓN DE LA TV DE LCD EN LA PARED
Antes de que pueda instalar su TV DE LCD en la pared, primero DEBE retirar la base usando los
pasos a continuación:
1. Coloque el aparato de cara hacia abajo en una superficie planta con un paño o material protector en la TV.
2. Retire los dos tornillos de la base, sujétela y jálela.
Al instalar la TV de LCD en la pared, por favor consulte a un técnico profesional para su instalación
adecuada.
El fabricante no tendrá responsabilidad alguna por instalaciones no realizadas por un técnico profesional.
Û²º±½«- ͱº¬©¿®» ó Ý«-¬±³»® Í«°°±®¬
8
Page 71

COMIENZO
1. Coloque la TV en una superficie resistente.
Mínimo
1m
Nota: Asegúrese que la TV esté colocada en una posición que permita el flujo libre de aire. No cubra las
aberturas de ventilación en la parte trasera.
Para evitar cualquier situación insegura, no coloque fuentes de flamas abiertas, tales como velas
encendidas sobre el aparato en cerca del mismo.
Evite el calor, la luz solar directa y la exposición a la lluvia o agua. El equipo no se debe exponer a
salpicaduras o goteo.
2. Conecte la antena en el conector de TV en la parte posterior de la TV DE LCD
Señal de Antena de
TVo Cable
3. Instalación de las baterías:
Retire la tapa del compartimiento de baterías. Coloque 2 baterías AAA en el control remoto.
Û²º±½«- ͱº¬©¿®» ó Ý«-¬±³»® Í«°°±®¬
9
Page 72

4. Conecte el adaptador de CD en el conector de Entrada de 12 V CD en la TV DE LCD
Conecte el cable de alimentación en una toma de corriente y encienda la TV.
5. Pulse el botón de encendido para encender la TV
6. Ejecute la función de exploración automática para instalar los canales de su TV DE
LCD (Por favor consulte la página 15)
CONFIGURACIÓN DE OSD
1. Pulse la tecla de “MENÚ’’ para abrir el menú de OSD
2. Pulse la tecla de > o < para seleccionar la opción de “CONFIGURACIÓN DE OSD’’
3. Pulse la tecla de o para seleccionar submenú
Configuración de OSD
Idioma
1. Pulse la tecla de o para seleccionar la opción de “Language” (Idioma)
2. Pulse la tecla de > o <para seleccionar el idioma, hay tres lenguajes para seleccionar : Inglés Francés
y Español
3. Después del ajuste, pulse la tecla de “MENU” (MENÚ)para salir o pulse la tecla de o para ajustar otras
opciones
Posición_H
1. Pulse la tecla de o para seleccionar la opción de “H Position” (Posición H)
2. Pulse > o < la tecla de para ajustar la posición horizontal de OSD
3. Después del ajuste, pulse la tecla de “MENÚ” para salir o pulse la tecla de o para ajustar otras
opciones
Posición_V
1. Pulse la tecla de o para seleccionar la opción de “Posición V”
2. Pulse la tecla de > o < para ajustar la posición vertical de OSD
3. Después del ajuste, pulse la tecla de “MENU” (MENÚ) para salir o pulse la tecla de o para ajustar
otras opciones
Tiempo_de_espera
1. Pulse la tecla de o para seleccionar la opción de “Tiempo de espera ”
2. Pulse la tecla de > o < para ajustar el tiempo de despliegue de OSD
3. Después del ajuste, pulse la tecla de “MENU” (MENÚ) para salir o pulse la tecla de o para ajustar
otras opciones
Fondo
1. Pulse la tecla de o para seleccionar la opción de “Fondo”
2. Pulse la tecla de > o < para ajustar el Fondo de OSD
3. Después del ajuste, pulse la tecla de “MENU” (MENÚ) para salir o pulse la tecla de o para ajustar
otras opciones
Û²º±½«- ͱº¬©¿®» ó Ý«-¬±³»® Í«°°±®¬
10
Page 73

Información Esta opción sólo se puede operar en una fuente de señal de PC
1. Pulse la tecla de o para seleccionar la opción de “Información”
2. Pulse la tecla de > o < entonces la pantalla mostrará la información de entrada actual
3. Pulse la tecla de “MENU” (MENÚ) para salir del menú de información
CONECTAR LA GRABADORA DE VIDEO
Como conectar:
1. Conecte la antena a la entrada de RF de VCR
2. Conecte el otro cable de RF de la salida de VCR a la entrada de TV ; si usted conecta la frecuencia
de video de la VCR al conector de entrada de AV de la TV, tendrá una mejor calidad de audio y video
3. El COMP VIDEO de entrada de AV de la TV no proporciona frecuencia de audio, así que necesita
conectar la salida de frecuencia de audio de la VCR al AUDIO de entrada de la frecuencia de audio de la
TV
Si su VCR está equipada con puerto de video S-VHS:
Para una calidad de imagen mejorada, conecte un cable de S-Video a la entrada de S-VIDEO en la TV, en
lugar de conectar la VCR al puerto de VIDEO.
S-Video no proporciona audio, los cables de audio se deben conectar para proporcionar sonido
Ver la VCR
1. Si usa conexión de TV, seleccione la búsqueda de canal de TV.
2. Si usa conexión de AV, seleccione AV
3. Si usa conexión de S-Video. Seleccione s-video
4. Inserte la cinta de video en la VCR y pulse el botón de REPRODUCIR
CONECTAR LA CÁMARA /GRABADORA DE VIDEO/ APARATO DE JUEGO DE VIDEO
1. Conecte el puerto de salida de video de la Cámara / Grabadora de Video/ Aparato de Juego de Video a la
entrada AV de la TV
2. Conecte los canales de audio izquierdo y derecho de la Cámara / Grabadora de Video/ Aparato de Juego
de Video a los canales izquierdo y derecho de la entrada de audio de la TV
Si su Cámara / Grabadora de Video/ Aparato de Juego de Video está equipado con puerto de video S-VHS:
Para una mejor calidad de imagen, por favor conecte el cable de S-Video a la entrada de S-Video de la TV.
Conecte los canales izquierdo y derecho de Cámara / Grabadora de Video/ Aparato de Juego de Video a los
canales izquierdo y derecho de la entrada de audio de la TV
Como reproducir
Si usa conexión de AV, por favor seleccione AV;
Si usa conexión de S-Video, por favor seleccione S-VIDEO;
Û²º±½«- ͱº¬©¿®» ó Ý«-¬±³»® Í«°°±®¬
11
Page 74

CONECTAR LA REPRODUCTORA DE DVD
1. Conecte el puerto de salida de video de la reproductora de DVD al puerto de entrada AV de la TV
2. Conecte los canales de audio izquierdo y derecho de DVD a los canales izquierdo y derecho de la entrada
de audio de la TV
Si su reproductor de DVD está equipado con puerto de video S-VHS:
Para una mejor calidad de imagen, por favor conecte el cable de S-Video a la entrada de S-Video de TV.
Conecte los canales izquierdo y derecho de DVD a los canales izquierdo y derecho de la entrada de audio
de la TV
Como reproducir
Si usa conexión de AV, por favor seleccione AV;
Si usa conexión de S-Video, por favor seleccione S-VIDEO;
CONECTAR EL DECODIFICADOR DIGITAL
Como conectar
1. Conecte el puerto de salida de video del Decodificador Digital a la entrada AV de TV
2. Conecte los canales de audio izquierdo y derecho del Decodificador Digital a los canales izquierdo y
derecho de la entrada de audio de la TV
Como usar
1. Seleccione AV.
2. Encienda el decodificador digital de DTV.
Nota: En caso de que nota imágenes que se muevan, colores incorrectos, falta de color o de
imagen o combinaciones de lo anterior en su pantalla, revise si las conexiones se realizaron
correctamente. Revise si los colores de los cables corresponden a los colores de conector de
Entrada.
Û²º±½«- ͱº¬©¿®» ó Ý«-¬±³»® Í«°°±®¬
12
Page 75

MENÚ DE CONFIGURACIÓN DE T
V
1. Pulse la tecla de “MENU” (MENÚ) para abrir el menú de OSD
2. Pulse la tecla de > o < para seleccionar la opción de “TV SETUP’’
(CONFIGURACIÓN DE TV)
3. Pulse o para seleccionar submenú
Nota: Aire/Cable, Exploración Automática, Programa Actual la opción de Desconexión
Automática sólo se puede mostrar en la Fuente de TV
INSTALACIÓN DE CANAL DE TV
AIRE/Cable
1. Pulse la tecla de “MENU” (MENÚ) para abrir el menú de OSD
2. Pulse la tecla de > o < para seleccionar la opción de “TV SETUP’’ (CONFIGURACIÓN DE TV)
3. Pulse la tecla de o para seleccionar la opción de “AIR/CATV” (AIRE/CATV)
4. Pulse la tecla de > o < para seleccionar el sistema de búsqueda automático que su TV necesita, existen
cuatro opciones:
CATV: Televisión de Antena de Comunidad
AIRE: Por aire
HRC: Portador relacionado armónicamente
IRC: Portador relacionado incrementalmente
5. Pulse la tecla de “MENU” (MENÚ) para salir del menú de AIRE/CATV o pulse la tecla de o para ajustar
otras opciones
Nota:Por favor corra la función de exploración automática para configurar la TV para los canales de cable o
transmisión disponibles en su área. Si no corre la función de exploración automática para configurar
los canales, su televisión puede no operar adecuadamente.
Exploración automática
Búsqueda automática de canal y memorización de todos los canales visibles.
1. Pulse la tecla de “MENU” (MENÚ)’ para abrir el menú de OSD
2. Pulse la tecla de > o < para seleccionar la opción de “TV SETUP’’ (CONFIGURACIÓN DE TV)
3. Pulse la tecla de o para seleccionar la opción de “Auto scan” (Exploración automática)
13
Û²º±½«- ͱº¬©¿®» ó Ý«-¬±³»® Í«°°±®¬
Page 76

4. Pulse la tecla de > o < para seleccionar búsqueda automática.
Nota: Por favor corra la función de exploración automática para configurar la TV para los canales de cable
o transmisión disponibles en su área. Si no corre la función de exploración automática para configurar los
canales, su televisión puede no operar adecuadamente.
EDICIÓN DE CANALES
Agregar/Borrar
1. Pulse la tecla de “MENU” (MENÚ) para abrir el menú de OSD
2. Pulse la tecla de > o < para seleccionar la opción de “TV SETUP’’(CONFIGURACIÓN DE TV)
3. Pulse la tecla de o para seleccionar la opción de “Add/Erase” (Agregar/Borrar)
4. Pulse la tecla de > o < para seleccionar Agregar o Borrar.
5. Pulse la tecla de “MENU” (MENÚ) para salir del menú de Agregar/Borrar o pulse la tecla de o para
ajustar otras opciones
Programa actual
Programa actual es el canal establecido por la TV actual, usted puede pulsar la tecla de “mostrar” para
desplegar el canal actual en la parte superior derecha de la pantalla.
1. Pulse la tecla de “MENU” (MENÚ) para abrir el menú de OSD
2. Pulse la tecla de > o < para seleccionar la opción de “TV SETUP’’ (CONFIGURACIÓN DE TV)
3. Pulse la tecla de o para seleccionar la opción de “Current program” (Programa actual)
4. Pulse la tecla de > o < para seleccionar el canal.
5. Pulse la tecla de “MENU” (MENÚ) para salir del menú de Programa actual o pulse la tecla de o para
ajustar otras opciones
Usted también puede pulsar las teclas digitales 0-9/100 o canal o en el control remoto para seleccionar
canal
APAGADO AUTOMÁTICO
1. Pulse la tecla de “MENU” (MENÚ) para abrir el menú de OSD
2. Pulse la tecla de > o < para seleccionar la opción de “TV SETUP’’ (CONFIGURACIÓN DE TV)
3. Pulse la tecla de o para seleccionar la opción de “Sleep time” (Apagado automático)
4. Pulse la tecla de > o < para seleccionar el tiempo de apagado automático que desee establecer, usted
puede seleccionar tiempos de apagado automático de 30/60/90/120 minutos.
5. Pulse la tecla de “MENU” (MENÚ) para salir del menú de apagado automático o pulse la tecla de o
para ajustar otras opciones
Nota: Usted también puede pulsar “SLEEP” (APAGADO AUTOMÁTICO) en el control remoto, el tiempo de
apagado automático se mostrará en la parte superior derecha de la pantalla.
14
Û²º±½«- ͱº¬©¿®» ó Ý«-¬±³»® Í«°°±®¬
Page 77

SUBTÍTULOS
1. Pulse la tecla de “MENU” (MENÚ) para abrir el menú de OSD
2. Pulse la tecla de > o < para seleccionar la opción de “TV SETUP’’ (CONFIGURACIÓN DE TV)
3. Pulse la tecla de o para seleccionar la opción de “Closed caption” (Subtítulos)
4. Pulse la tecla de > o < para establecer CC1~CC4 y TT1 y TT4.
5. Pulse la tecla de “MENU” (MENÚ) para salir del menú Subtítulos o pulse la tecla de o para ajustar
otras opciones
Usted también puede pulsar “Caption” (Subtítulos) en el control remoto, entrar al menú de Subtítulos
directamente, y después pulsar el paso 4 para ajustar.
Modo de subtítulos: CC1~CC4
El diálogo (y descripciones) de la acción en el programa de TV con subtítulos se muestra en la pantalla.
Modo de texto: TT1~TT4
Se usa con frecuencia para guía de canales, programación, boletín de información para programas con
subtítulos, noticias, información del clima o informes del mercado accionario.
No todos los modos de Subtítulos son usados necesariamente por un canal de TV durante la transmisión de
un programa con Subtítulos.
BLOQUEO DE CANALES
V-Chip
Es la función de control para menores (V-chip). Se usa para bloquear el despliegue de programas
basándose en las clasificaciones del transmisor. La configuración predeterminada es permitir ver todos los
programas. El despliegue se puede bloquear de acuerdo al tipo de programa y a las categorías
seleccionadas para bloquearse. También es posible bloquear el despliegue de todos los programas por un
periodo de tiempo.
1. Pulse la tecla de “MENU” (MENÚ) para abrir el menú de OSD
2. Pulse la tecla de > o < para seleccionar la opción de “TV SETUP’’ (CONFIGURACIÓN DE TV)
3. Pulse la tecla de o para seleccionar la opción de “V _Chip”
4. Pulse la tecla de > o < para entrar al menú de validación de contraseña de V _Chip.
Usted puede pulsar la tecla de V-CHIP en el control remoto para entrar al menú directamente.
Û²º±½«- ͱº¬©¿®» ó Ý«-¬±³»® Í«°°±®¬
15
Page 78

Pulse las teclas digitales en el control remoto; escriba la contraseña para entrar al menú de control V-CHIP
(El código de contraseña predeterminado para V-Chip es: 0711 y se debe pulsar dos veces)
Si su contraseña es incorrecta, entonces la pantalla desplegará “PIN ERROR” (ERROR DE PIN)
5. Después de entrar al menú de V-CHIP, pulse la tecla de o para seleccionar, si desea configurar
V-CHIP, necesita establecer el “estado” en la condición de “ON” (ENCENDIDO)
1) Pulse la tecla de > o < para seleccionar la opción de “Status’’ (Estado)
2) Pulse la tecla de > o < para seleccionar “ON’’(ENCENDIDO)o “OFF”(APAGADO)
6. Configuración de Guía de TV
1) Pulse la tecla de o para seleccionar la opción de “TV Guideline”(Guía de TV)
2) Pulse la tecla de > o < para entrar al menú de “TV Guideline” (Guía de TV)
3) Pulse la tecla de o para seleccionar el elemento de bloqueo
4) Pulse la tecla de > o < para seleccionar U o B, seleccionar U significa “Desbloquear”, seleccionar B
significa “Block” (Bloquear)
5) Si la configuración es correcta, pulse la tecla de “MENU” (MENÚ) para salir del menú de Guía de TV.
Û²º±½«- ͱº¬©¿®» ó Ý«-¬±³»® Í«°°±®¬
16
Page 79

7. Configuración de Guía de Películas
1) Pulse la tecla de o para seleccionar la opción de “Movie Guideline” (Guía de Películas)
2) Pulse la tecla de > o < para entrar al menú de Guía de Películas.
3) Pulse la tecla de o para seleccionar el elemento de bloqueo.
4) Pulse la tecla de > o < para seleccionar U o B, seleccionar U significa “Unlock” (Desbloquear),
seleccionar B significa “Block” (Bloquear)
5) Si la configuración es correcta, pulse la tecla de “MENU” (MENÚ) para salir del menú de Guía de
Películas.
8. Cambiar PIN
1) Pulse la tecla de o para seleccionar la opción de “Change PIN” (Cambiar PIN)
2) Pulse la tecla de > o < para entrar al menú de Cambiar PIN.
1) Pulse las teclas digitales en el control remoto , entonces escriba la nueva contraseña.
2) Escriba la nueva contraseña de nuevo, si la configuración es correcta, se despliega la siguiente
información, y el menú de Cambiar PIN se cerrará automáticamente.
Û²º±½«- ͱº¬©¿®» ó Ý«-¬±³»® Í«°°±®¬
17
Page 80

Restablecer valores predeterminados
1. Pulse la tecla de “MENU” (MENÚ) para abrir el menú de OSD.
2. Pulse la tecla de > o < para seleccionar cualquier opción de Configuración
3.Pulse la tecla de o para seleccionar la opción de “Reset to Defefault” (Restablecer valores
predeterminados)
4. Pulse la tecla de > o < para restablecer.
Restablecer valores predeterminados es conveniente para que todas las configuraciones en el OSD del usuario
regresen a los datos preestablecidos en fábrica.
Nota: La función de restablecer valores predeterminados en cada elemento de función es la misma que
bajo la fuente de señal de AV/TV/S-VIDEO.
Cuando seleccionamos Restablecer valores predeterminados en cada elemento de función bajo la fuente de
señal de PC, no sólo se regresan todos los datos predeterminados, sino también se tiene un ajuste
automáticamente
Û²º±½«- ͱº¬©¿®» ó Ý«-¬±³»® Í«°°±®¬
18
Page 81

MENÚ DE CONFIGURACIÓN DE SONIDO
1. Pulse la tecla de “MENU” (MENÚ) para abrir el menú de OSD.
2. Pulse la tecla de > o < para seleccionar la opción de “Configuración de audio”
3. Pulse la tecla de o para seleccionar submenú.
Volumen
1. Pulse la tecla de “MENU” (MENÚ) para abrir el menú de OSD.
2. Pulse la tecla de > o < para seleccionar la opción de “Sound setup” (Configuración de sonido)
3. Pulse la tecla de o para seleccionar la opción de “Volume ” (Volumen)
4. Pulse la tecla de > o < para ajustar los datos de Volumen.
Usted también puede pulsar la tecla de Volumen o y la tecla de > o < en el control remoto para ajustar el
volumen.
5. Pulse “MENU” (MENÚ) para salir o pulse la tecla de o para ajustar otros valores
Graves
1. Pulse la tecla de “MENU” (MENÚ) para abrir el menú de OSD.
2. Pulse la tecla de > o < para seleccionar la opción de “Sound setup” (Configuración de sonido)
3. Pulse la tecla de o para seleccionar la opción de “Bass” (Graves)
4. Pulse la tecla de > o < para ajustar los datos de Graves .
5. Pulse “MENU” (MENÚ) para salir o pulse la tecla de o para ajustar otros valores.
Agudos
1. Pulse la tecla de “MENU” (MENÚ) para abrir el menú de OSD.
2. Pulse la tecla de > o < para seleccionar la opción de
3. Pulse la tecla de o para seleccionar la opción de “Treble” (Agudos)
4. Pulse la tecla de > o < para ajustar los datos de Agudos .
5. Pulse “MENU” (MENÚ) para salir o pulse la tecla de o para ajustar otros valores.
Balance
1. Pulse la tecla de “MENU” (MENÚ) para abrir el menú de OSD.
2. Pulse la tecla de > o < para seleccionar la opción de “Sound setup” (Configuración de sonido)
3. Pulse la tecla de o para ajustar la opción de “Balance” (Balance)
4. Pulse la tecla de > o < para ajustar los datos de “Balance” (Balance)
5. Pulse “MENU” (MENÚ) para salir o pulse la tecla de o para ajustar otros valores.
19
Û²º±½«- ͱº¬©¿®» ó Ý«-¬±³»® Í«°°±®¬
Page 82

Silencio
1. Pulse la tecla de “MENU” (MENÚ) para abrir el menú de OSD.
2. Pulse la tecla de > o < para seleccionar la opción de “Sound Setup”
(Configuración de sonido)
3. Pulse la tecla de o para seleccionar la opción de “Mute” (Silencio)
4. Pulse la tecla de > o < para seleccionar ENCENDIDO/APAGADO.
Usted también puede pulsar la tecla de en el control remoto
para seleccionar silencio. Después de la selección usted puede ajustar el volumen o pulsar para
cancelar el silencio
5. Pulse “MENU” (MENÚ) para salir o pulse la tecla de o para ajustar otros valores.
Û²º±½«- ͱº¬©¿®» ó Ý«-¬±³»® Í«°°±®¬
20
Page 83

MENÚ DE CONFIGURACIÓN DE IMAGEN
1. Pulse la tecla de “MENU” (MENÚ) para abrir el menú de OSD.
2. Pulse la tecla de > o < para seleccionar la opción de “Pc Setup”(Configuración de PC)
3. Pulse la tecla de o para seleccionar submenú.
Nota: El menú de Configuración de Imagen sólo se puede seleccionar bajo la fuente de señal de
AV/TV/S-VIDEO.
Brillo
1. Pulse la tecla de “MENU” (MENÚ) para abrir el menú de OSD.
2. Pulse la tecla de > o < para seleccionar la opción de “Picture Setup” (Configuración de Imagen)
3. Pulse la tecla de o para seleccionar la opción de “Brightness” (Brillo)
4. Pulse la tecla de > o < para ajustar los datos de Brillo .
5. Pulse “MENU” (MENÚ) para salir o pulse la tecla de o para ajustar otros valores
Contraste
1. Pulse la tecla de “MENU” (MENÚ) para abrir el menú de OSD.
2. Pulse la tecla de > o < para seleccionar la opción de “Picture Setup”(Configuración de Imagen)
3. Pulse la tecla de o para seleccionar la opción de “Contrast” (Contraste)
4. Pulse la tecla de > o < para ajustar los datos de Contraste .
5. Pulse “MENU” (MENÚ) para salir o pulse la tecla de o para ajustar otros valores
Tono
1. Pulse la tecla de “MENU” (MENÚ) para abrir el menú de OSD.
2. Pulse la tecla de > o < para seleccionar la opción de “Picture Setup”(Configuración de Imagen)
3. Pulse la tecla de o para seleccionar la opción de “Hue” (Tono)
4. Pulse la tecla de > o < para ajustar los datos de Tono .
5. Pulse “MENU” (MENÚ) para salir o pulse la tecla para ajustar otros valores.
Saturación
1. Pulse la tecla de “MENU” (MENÚ)para abrir el menú de OSD.
2. Pulse la tecla de > o < para seleccionar la opción de “Picture Setup”(Configuración de Imagen)
3. Pulse la tecla de o para seleccionar la opción de “Saturation” (Saturación)
4. Pulse la tecla de > o < para ajustar los datos de Saturación .
5. Pulse “MENU” (MENÚ) para salir o pulse la tecla de para ajustar otros valores.
21
Û²º±½«- ͱº¬©¿®» ó Ý«-¬±³»® Í«°°±®¬
Page 84

Nitidez
1. Pulse la tecla de “MENÚ” para abrir el menú de OSD.
2 Pulse la tecla de > o < para seleccionar la opción de “Picture Setup”(Configuración de Imagen)
3. Pulse la tecla de o para seleccionar la opción de “Sharpness”(Nitidez)
4. Pulse la tecla de > o < para ajustar los datos de nitidez .
5. Pulse “MENÚ” para salir o Pulse la tecla para ajustar otros valores.
Tono de Color
1. Pulse la tecla de “MENU” (MENÚ) para abrir el menú de OSD.
2. Pulse la tecla de > o < para seleccionar la opción de “Picture Setup”(Configuración de Imagen)
3. Pulse la tecla de
4. Pulse la tecla de > o < para seleccionar color cálido o frío
5. Pulse “MENU” (MENÚ) para salir o pulse la tecla de o para ajustar otros valores.
Nivel de Negro
1. Pulse la tecla de “MENU” (MENÚ) para abrir el menú de OSD.
2 Pulse la tecla de > o < para seleccionar la opción de “Picture Setup”(Configuración de Imagen)
3. Pulse la tecla de o para seleccionar la opción de ”Black Level“ (Nivel de Negro)
4. Pulse la tecla de > o < para ajustar los datos de Nivel de Negro.
5. Pulse “MENU” (MENÚ) para salir o pulse la tecla de o para ajustar otros valores.
o para seleccionar la opción de “Color Tone” (Tono de Color)
Û²º±½«- ͱº¬©¿®» ó Ý«-¬±³»® Í«°°±®¬
22
Page 85

MENÚ DE CONFIGURACIÓN DE PC
1. Pulse la tecla de “MENU” (MENÚ) para abrir el menú de OSD.
2. Pulse la tecla de > o < para seleccionar la opción de “PC” (PC)
3. Pulse la tecla de o para seleccionar submenú
Nota: El menú de Configuración de PC sólo se puede seleccionar bajo la fuente de señal de PC
Brillo
1. Pulse la tecla de “MENU” (MENÚ) para abrir el menú de OSD.
2. Pulse la tecla de > o < para seleccionar la opción de “PC Setup” (Configuración de PC)
3. Pulse la tecla de o para seleccionar la opción de “Brightness” (Brillo)
4. Pulse la tecla de > o < para ajustar los datos de Brillo .
5. Pulse “MENU” (MENÚ) para salir o pulse la tecla de
o para ajustar otros valores.
Contraste
1. Pulse la tecla de “MENU” (MENÚ) para abrir el menú de OSD.
2. Pulse la tecla de > o < para seleccionar la opción de “PC Setup” (Configuración de PC)
3. Pulse la tecla de o para seleccionar la opción de “Contrast” (Contraste)
4. Pulse la tecla de > o < para ajustar los datos de contraste .
5. Pulse “MENU” (MENÚ) para salir o pulse la tecla de o para ajustar otros valores.
Posición_H
1. Pulse la tecla de “MENU” (MENÚ) para abrir el menú de OSD.
2. Pulse la tecla de > o < para seleccionar la opción de “PC Setup” (Configuración de PC)
3. Pulse la tecla de o para seleccionar la opción de “H_Posotion” (Posición_H)
4. Pulse la tecla de > o < para ajustar los datos de Posición_H .
5. Pulse “MENU” (MENÚ) para salir o pulse la tecla de o para ajustar otros valores.
Posición_V
1. Pulse la tecla de “MENU” (MENÚ) para abrir el menú de OSD.
2. Pulse la tecla de > o < para seleccionar la opción de “PC Setup” (Configuración de PC)
3. Pulse la tecla de o para seleccionar la opción de “V_Posotion” (Posición_H)
4. Pulse la tecla de > o < para ajustar los datos de “V_Posotion” (Posición_H)
5. Pulse “MENU” (MENÚ) para salir o pulse la tecla de o para ajustar otros valores.
23
Û²º±½«- ͱº¬©¿®» ó Ý«-¬±³»® Í«°°±®¬
Page 86

Reloj
1. Pulse la tecla de “MENU” (MENÚ) para abrir el menú de OSD.
2. Pulse la tecla de > o < para seleccionar la opción de “PC Setup” (Configuración de PC)
3. Pulse la tecla de o para seleccionar la opción de “Clock” (Reloj)
4. Pulse la tecla de > o < para ajustar los datos de Reloj
5. Pulse “MENU” (MENÚ) para salir o pulse la tecla de o para ajustar otros valores.
Fase
1. Pulse la tecla de “MENU” (MENÚ) para abrir el menú de OSD.
2. Pulse la tecla de > o < para seleccionar la opción de “PC Setup” (Configuración de PC)
3. Pulse la tecla de o para seleccionar la opción de “Fase” (Reloj)
4. Pulse la tecla de > o < para ajustar los datos de Reloj
5. Pulse “MENU” (MENÚ) para salir o pulse la tecla de o para ajustar otros valores.
Ajuste Automático
1. Pulse la tecla de “MENU” (MENÚ) para abrir el menú de OSD.
2. Pulse la tecla de > o < para seleccionar la opción de “PC Setup” (Configuración de PC)
3. Pulse la tecla de o para seleccionar la opción de “Auto Adjustment” (Ajuste Automático)
4. Pulse la tecla de > o < para llevar a cabo el Ajuste Automático, entonces la PC se ajustará
automáticamente, si el ajuste es correcto, el menú de OSD se cerrará automáticamente
Color
1. Pulse la tecla de “MENU” (MENÚ) para abrir el menú de OSD.
2. Pulse la tecla de > o < para seleccionar la opción de “PC Setup” (Configuración de PC)
3. Pulse la tecla de o para seleccionar la opción de “Color” (Color)
4. Pulse la tecla de > o < para seleccionar Color
Si selecciona Color como Usuario, usted puede ajustar el R/G/B (rojo/verde/azul) de acuerdo a su
necesidad
1) Pulse la tecla de “MENU” (MENÚ) para entrar al menú de Color de Usuario.
2) Pulse la tecla de o para seleccionar la opción de Rojo/Verde/Azul.
3) Pulse la tecla de > o < para ajustar Rojo/Verde/Azul
4) Pulse MENÚ para salir del menú de Color
5) Pulse la tecla de o para seleccionar otros elementos de ajuste, entonces pulse MENÚ para salir
Û²º±½«- ͱº¬©¿®» ó Ý«-¬±³»® Í«°°±®¬
24
Page 87

Información General
Consejos
Cuidado de la pantalla
No frote o golpee la pantalla con cualquier cosa que sea dura y pueda dañar, afectar o rayarla
permanentemente.
Desconecte la pantalla antes de limpiarla. Retire el polvo de la TV limpiando la pantalla y el gabinete con un
paño suave y limpio. Si la pantalla requiere limpieza adicional, use un paño limpio y húmedo. No use
limpiadores líquidos o en aerosol.
Advertencia de teléfono móvil
Para evitar afectaciones en la imagen y sonido, mal funcionamiento de su TV o incluso daños a la misma,
mantenga su teléfono móvil alejado de la TV.
Directivas de fin de vida útil
Estamos poniendo mucho cuidado en producir ecológicamente en áreas focales verdes. Su nuevo receptor
contiene materiales que se pueden reciclar y re-usar.
Al final de su vida útil, compañías especializadas pueden desmantelar el receptor desechado para
concentrar los materiales que se pueden volver a usar y minimizar la cantidad de materiales que se tienen
que desechar finalmente.
Por favor asegúrese de desechar su receptor viejo de acuerdo a los reglamentos locales.
Û²º±½«- ͱº¬©¿®» ó Ý«-¬±³»® Í«°°±®¬
25
Page 88

Antes de llamar a Servicio
Por favor lleve a cabo estas simples revisiones antes de llamar al servicio. Estos consejos pueden ahorrarle
tiempo y dinero ya que los cargos por instalación del receptor y ajustes de los controles del usuarios no
están cubiertos en su garantía.
Síntomas Elementos a revisar y acciones a realizar
Imagen doble o “Fantasma” *Esto puede ser causado por una obtrucción de la antena debido a
edificios o montañas altas. El uso de una antena altamente direccional
puede mejorar la imagen.
No hay energía *Revise que el cable de alimentación de CA de la TV esté conectado a
la toma de corriente principal.
*Desconecte la TV, espere 60 segundos. Después vuelva a insertar la
clavija a la toma de corriente principal y encienda la TV de nuevo.
No hay imagen *Revise las conexiones de la antena en la parte trasera de la TV para
ver que estén conectadas correctamente a la TV.
*posible problema de la estación de transmisión. Intente con otro canal.
*Ajuste las configuraciones de contraste y brillo.
*Revise el control de Subtítulos. Algunos modos de TEXTO pueden
bloquear la pantalla.
Buena imagen pero no
sonido
Buen sonido pero mal color *Ajuste las configuraciones de contraste, color y brillo.
*Revise la conexión de cable
*Incremente el VOLUMEN.
*Revise que la TV no esté puesta en silencio; pulse el botón en el
control remoto.
Mala imagen *Algunas veces, la mala calidad de imagen ocurre al tener activada una
Imagen con nieve y ruido *Revise la conexión de la antena
Línea interrumpida
horizontal
La televisión no responde al
control remoto
Û²º±½«- ͱº¬©¿®» ó Ý«-¬±³»® Í«°°±®¬
cámara de S-VHS o una grabadora de video conectada y otro
periférico al mismo tiempo, por favor conecte los cables de
alimentación de otros periféricos a una toma de corriente diferente.
*Esto puede ser causado por interferencia eléctrica (por ejemplo,
secadora de pelo, luces de neón cercanas, etc.)
*Apague el equipo.
*Revise si las baterías están funcionando. Reemplácelas si es
necesario
*Limpie el lente del sensor del control remoto en la TV.
*Use los botones en el frente de su TV.
26
Page 89

GLOSARIO
Entradas de Audio / Video
Estos conectores (clavija tipo foto RCA) se encuentran en la parte posterior y frontal del receptor y se usan
para la entrada de señales de audio y video. Están diseñadas para usarse con VCRs (u otros accesorios)
para recibir mayor resolución de imagen y ofrecer opciones de conexión de sonido.
Entrada de S-Video
Permite la conexión directa de fuentes de video de alta resolución, tales como grabadora de videocasete
Super VHS, reproductora de discos láser, etc. proporciona una resolución, nitidez y claridad mejoradas de la
imagen.
Entrada Compuesta
Permite la conexión directa de fuentes de video de alta resolución, tal como reproductora de DVD, TV digital,
etc., proporciona una resolución, nitidez y claridad mejoradas de la imagen.
Salida de audio
Proporciona salida de sonido, se puede conectar a un altavoz externo y mejora la calidad del sonido.
Menú
Una lista en pantalla de control de funciones se muestra en la pantalla de TV que está disponible para
ajustes del usuario.
Sonido de Televisión de Múltiples Canales (MTS)
El estándar de transmisión que permite transmitir sonido estéreo con la imagen de TV.
RF
Diseño de señal modulada o de Radio Frecuencia usada como portadora para transmisiones de televisión.
Segundo Programa de Audio (SAP)
Canal de audio adicional o diferente proporcionado por el estándar de transmisión de Sonido de Televisión
de Múltiples Canales(MTS). Una banda sonora mono-aural incluida en la señal grabada o de video (que
contiene usualmente una traducción del segundo lenguaje para el programa desplegado).
Apagado automático
La función que con la cual usted puede establecer un periodo de tiempo para que se apague la TV.
Û²º±½«- ͱº¬©¿®» ó Ý«-¬±³»® Í«°°±®¬
27
Page 90

ESPECIFICACIÓN DEL PRODUCTO
15MF400T/37
Elemento Especificación
Tamaño de la pantalla 15"
Relación de aspecto 4:3
Resolución 1024x768
Brillo 250cd/m² (típico)
Panel de LCD
Función de TV
Entrada
de video
Entrada de PC
Salida de Audio
Alimentación
Función
de video
Relación de contraste 400:1
Tiempo de respuesta 16ms
Ángulo de vista izquierda/ derecha = 60°/60°
Arriba/abajo = 40°/60°
Colores de despliegue 16.7M
Sintonizador de TV NTSC M
Sistema de color NTSC
Sistema de sonido MTS + SAP
Subtítulos y V-chip Sí
Compuesta x1
S-Video x1
Subtítulos y V-chip Sí
Sistema de Color NTSC/PAL
Señal Análoga
Frecuencia Horizontal (kHz) 31.5~60
Frecuencia Vertical (Hz) 56~75
Conectar y usar DDC2B
Máx. Resolución 1024x768 @ 75Hz
Resolución recomendada 1024x768 @ 60Hz
Altavoces integrados 2x 2W (L/R)
Salida para audífonos Sí (3.5mm )
Alimentación de energía Entrada de +12V CD
Adaptador 100-240VCA, 50/60Hz
Encendido<50W
Consumo de energía (Máx.)
Des-intercalador 2D de-intercalador
Filtro tipo peine Separación adaptadora 4H Y/C
Recuperación desplegable 3-2 Sí
Modo apagado<2W
Û²º±½«- ͱº¬©¿®» ó Ý«-¬±³»® Í«°°±®¬
28
Page 91

Otras funciones
Dimensión
Peso
Accesorio
Montaje de pared VESA 100mm x 100mm
Multi-Función Remota Sí
Apagado automático Sí
Ángulo de Inclinación (frente/
atrás)5°/15°
Idioma OSD Inglés/Francés (tipo canadiense)/Español
Con base (W x H x D) 371.6mm x 346 mm x 147.5mm
Sin base (W x H x D) 371.6mm x 324mm x 49.5mm
Cartón (W x H x D) 434mm x 407mm x 192mm
Neto, kg 3.5kg
Total, incluyendo empaque 5.0kg
Control remoto, Baterías x 2, Adaptador de alimentación CA, QSG,
cable dealimentación, Garantía limitada <Sólo en inglés>
Manual del usuario< Inglés/ Francés (tipo canadiense)/ Español >
Û²º±½«- ͱº¬©¿®» ó Ý«-¬±³»® Í«°°±®¬
29
Page 92

Û²º±½«- ͱº¬©¿®» ó Ý«-¬±³»® Í«°°±®¬
íð
 Loading...