

Page 1

Page 2
Enfocus Software - Customer Support
2
Page 3
IMPORTANT SAFETY INSTRUCTIONS
The present set had been designed and manufactured to assure personal safety. Improper use can
result in electric shock or fire hazard. The safeguards incorporated with the present unit will protect
you if you observe the following procedures when installation, operating and servicing. The present
unit is fully transistorized and does not contain any element that can be repaired by user.
Read Before Operating Equipment
1. Keep these instructions.
2. Read all warnings.
3. Follow all instructions.
4. Do not use this apparatus near water.
5. Clean only with a dry cloth.
6. Do not block any of the ventilation openings. Install in accordance with the manufacturers instructions.
7. Do not install near any heat sources such as radiators, heat registers, stoves, or other apparatus
(including amplifiers) that produce heat.
8. Do not defeat the safety purpose of the polarized or grounding type plug. A polarized plug has two
blades with one wider than the other. A grounding type plug has two blades and third grounding prong.
The wide blade or third prong is provided for your safety. When the provided plug does not fit into your
outlet, consult an electrician for replacement of the obsolete outlet.
9. Protect the power cord from being walked on or pinched particularly at plugs, convenience receptacles,
and the point where they exit from the apparatus.
10. Only use attachments/accessories specified by the manufacturer.
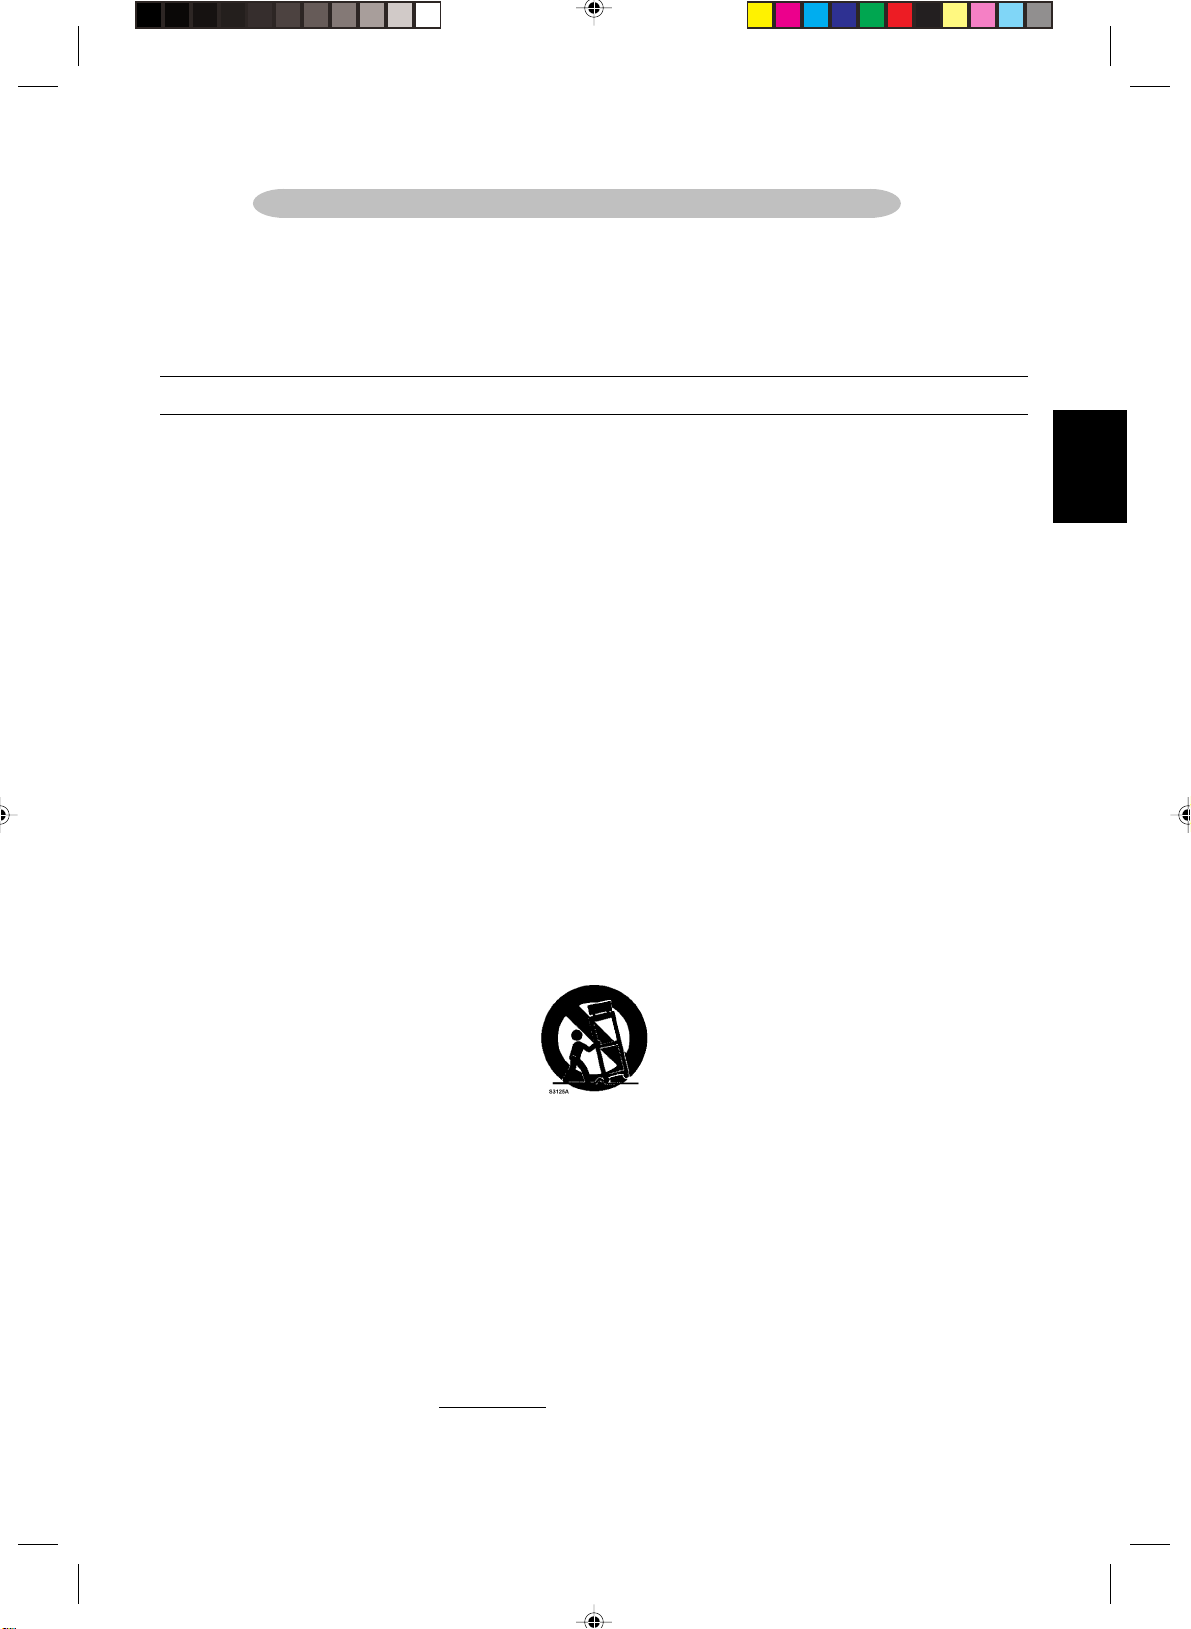
11. Use only with a cart, stand, tripod, bracket, or table specified by the manufacturer, or sold with the
apparatus. When a cart is used, use caution when moving the cart/apparatus combination to avoid injury
from tip-over.
English
12. The TV should be operated only from the type of power source indicated on the label. If you are not sure
of the type of power supplied to your home, consult your dealer or local power company.
13. Unplug this apparatus during lightning storms or when unused for long periods of time.
14. Refer all servicing to qualified service personnel. Servicing is required when the apparatus has been
damaged in any way, such as power-supply cord or plug is damaged, liquid has been spilled or objects
have fallen into apparatus, the apparatus has been exposed to rain or moisture, does not operate
normally, or has been dropped.
15. This product may contain mercury. Disposal of these materials may be regulated due to environmental
considerations. For disposal or recycling information, please contact your local authorities or the
Electronic Industries Alliance: www.eiae.org
Enfocus Software - Customer Support
3
Page 4
16. Damage Requiring Service – The appliance should be serviced by qualified service personnel when:
A. The power supply cord or the plug has been damaged; or
B. Objects have fallen, or liquid has been spilled into the appliance; or
C. The appliance has been exposed to rain; or
D. The appliance does not appear to operate normally or exhibits a marked change in performance;
or
E. The appliance has been dropped, or the enclosure damaged.
17. Tilt/Stability – All televisions must comply with recommended international global safety standards for
tilt and stability properties of its cabinets design.
Do not compromise these design standards by applying excessive pull force to the front, or top, of
the cabinet, which could ultimately overturn the product.
Also, do not endanger yourself, or children, by placing electronic equipment/toys on the top of the
cabinet. Such items could unsuspectingly fall from the top of the set and cause product damage
and/or personal injury.
18. Wall or Ceiling Mounting – The appliance should be mounted to a wall or ceiling only as recommended
by the manufacturer.
19. Power Lines – An outdoor antenna should be located away from power lines.
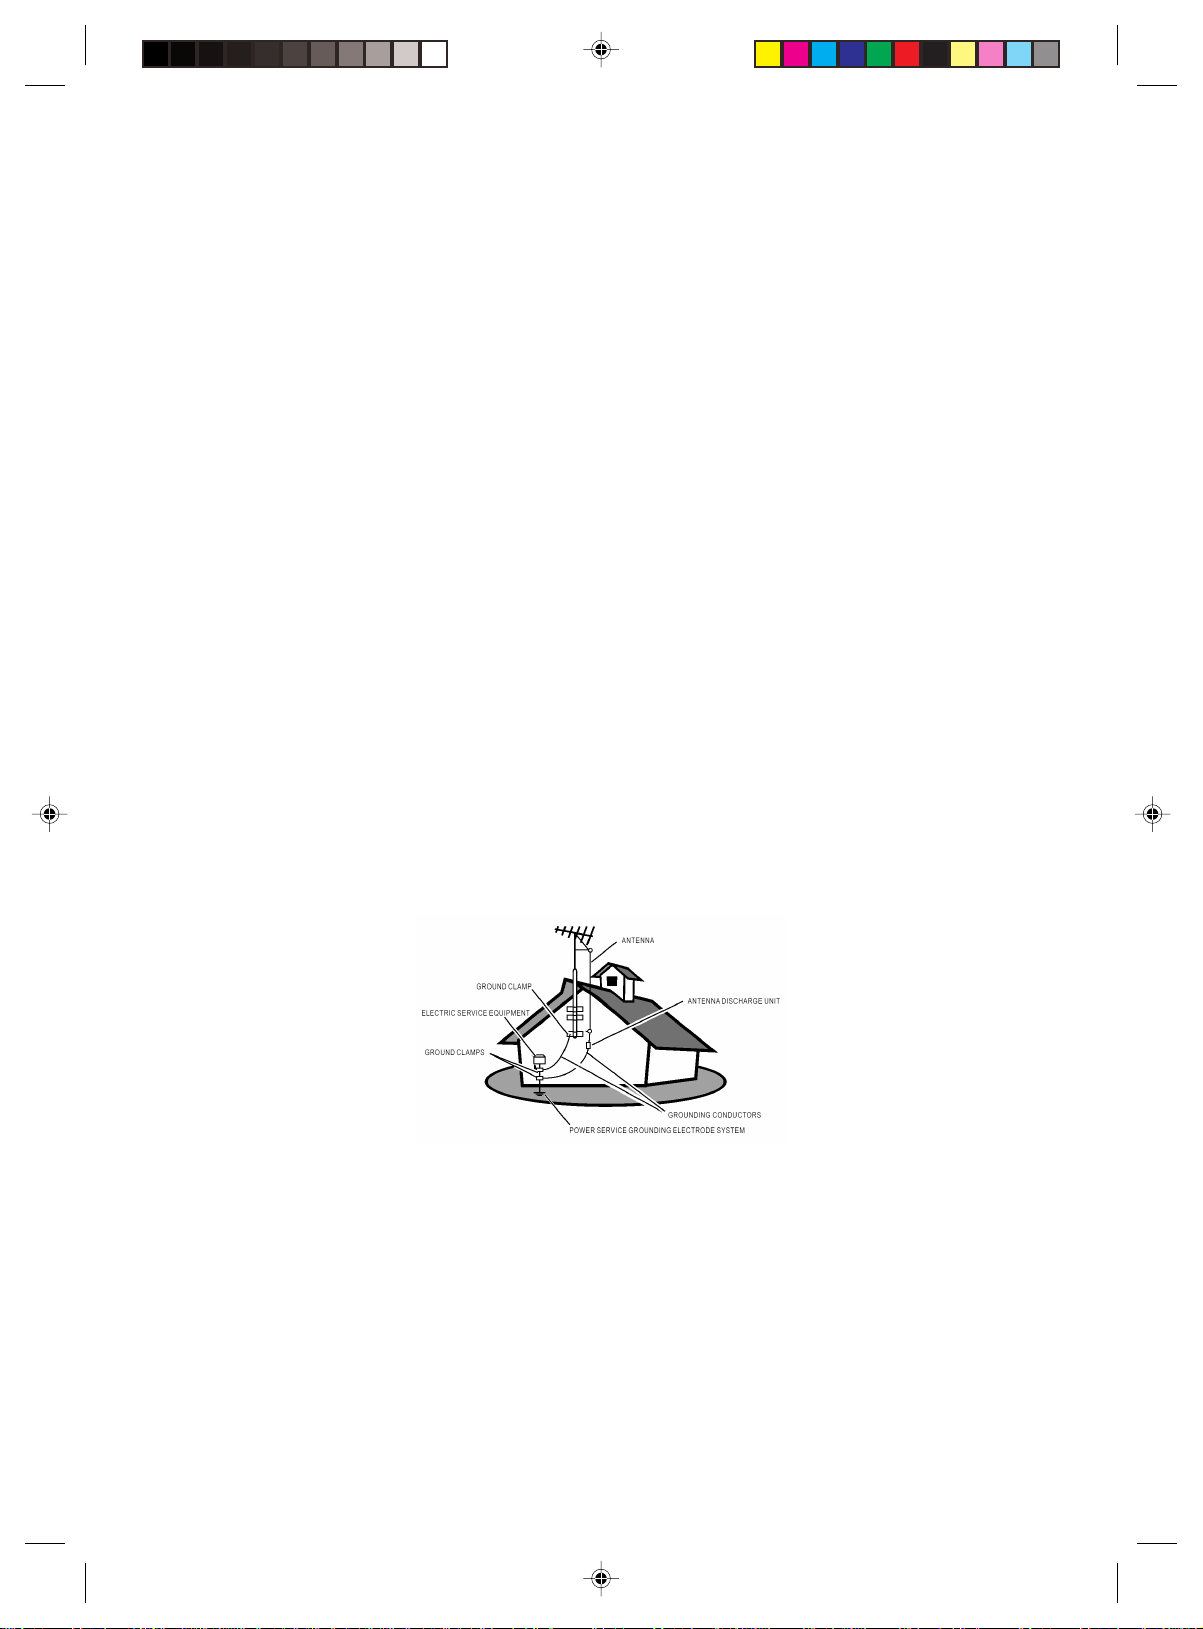
20. Outdoor Antenna Grounding – If an outside antenna is connected to the receiver, be sure the antenna
system is grounded so as to provide some protection against voltage surges and built up static charges.
Section 810 of the National Electric Cord, ANSI/NFPA No. 70-1984, provides information with respect to
proper grounding of the mats and supporting structure grounding of the lead-in wire to an
antenna-discharge unit, size of grounding connectors, location of antenna-discharge unit, connection to
grounding electrodes and requirements for the grounding electrode. See Figure below.
EXAMPLE OF ANTENNA GROUNDING AS PER NATIONAL ELECTRICAL CODE
Note to the CATV system installer: This reminder is provided to call the CATV system installer’s attention
to Article 820-40 of the NEC that provides guidelines for proper grounding and, in particular, specifies
that the cable ground shall be connected to the grounding system of the building, as close to the point of
cable entry as practical.
21. Objects and Liquid Entry – Care should be taken so that objects do not fall and liquids are not spilled
into the enclosure through openings.
Enfocus Software - Customer Support
4
Page 5

TABLE OF CONTENT
INSTRODUCTION
WELCOME/REGISTRATION OF YOUR TV ---------------------------------------------------------------- 2
IMPORTANT SAFETY INSTRUCTIONS -------------------------------------------------------------------- 3
TABLE OF CONTENT -------------------------------------------------------------------------------------------- 5
INSTALLATION
PRESENTATION OF THE LCD TV --------------------------------------------------------------------------- 6-7
SUPPLIED ACCESSORIES ------------------------------------------------------------------------------------ 8
REMOTE CONTROL OPERATION --------------------------------------------------------------------------- 9
INSTALLING LCD TV ON THE WALL ------------------------------------------------------------------------ 10
GETTING STARTED --------------------------------------------------------------------------------------------- 11
OSD SETTING ----------------------------------------------------------------------------------------------------- 12
CONNECT VIDEO RECORDER ------------------------------------------------------------------------------ 13
CONNECT CAMERA /CAMCORDER/ VIDEO GAME SET --------------------------------------------- 13
CONNECT DVD PLAYER --------------------------------------------------------------------------------------- 14
CONNECT DIGTAL SET TOP BOX --------------------------------------------------------------------------- 14
TV SETUP MENU
TV CHANNEL INSTALLATION --------------------------------------------------------------------------------- 15
CHANNEL EDIT --------------------------------------------------------------------------------------------------- 16
SLEEP TIMER ------------------------------------------------------------------------------------------------------ 16
CLOSED CAPTION ---------------------------------------------------------------------------------------------- 17
CHANNEL LOCK -------------------------------------------------------------------------------------------------- 17-20
SOUND SETUP MENU ------------------------------------------------------------------------- 21-22
PICTURE SETUP MENU ---------------------------------------------------------------------- 23-24
PC SETUP MENU ------------------------------------------------------------------------------- 25-26
GENERAL INFORMATION
TIPS ------------------------------------------------------------------------------------------------------------------- 27
CALL BEFORE SERVICE --------------------------------------------------------------------------------------- 28
GLOSSARY --------------------------------------------------------------------------------------------------------- 29
PRODUCT SPECIFICATION ----------------------------------------------------------------------------------- 30-31
LIMITED WARRANTY ---------------------------------------------------------------------------------------------32
English
THANK YOU VERY MUCH FOR CHOOSING THE LCD TV.
WE RECOMMEND THAT YOU TAKE A FEW MINUTES TO READ CAREFULLY THROUGH THIS MANUAL
BEFORE INSTALLING AND SWITCHING ON THE TV. PLEASE KEEP THIS MANUAL IN A SAFE PLACE
FOR YOUR FUTURE REFERENCE.
The present set had been designed and manufactured to assure personal safety. Improper use can result in
electric shock or fire hazard. The safeguards incorporated with the present unit will protect you if you observe
the following procedures when installation, operating and servicing. The present unit is fully transistorized
and does not contain any element that can be repaired by user.
LAMP(S) INSIDE THIS PRODUCT CONTAIN MERCURY AND MUST BE RECYCLED OR DISPOSED
OF ACCORDING TO LOCAL, STATE OR FEDERAL LAWS. FOR MORE INFORMATION, CONTACT THE
ELECTRONIC INDUSTRIES ALLIANCE AT WWW.EIAE.ORG
Enfocus Software - Customer Support
5
Page 6
INSTALLATION
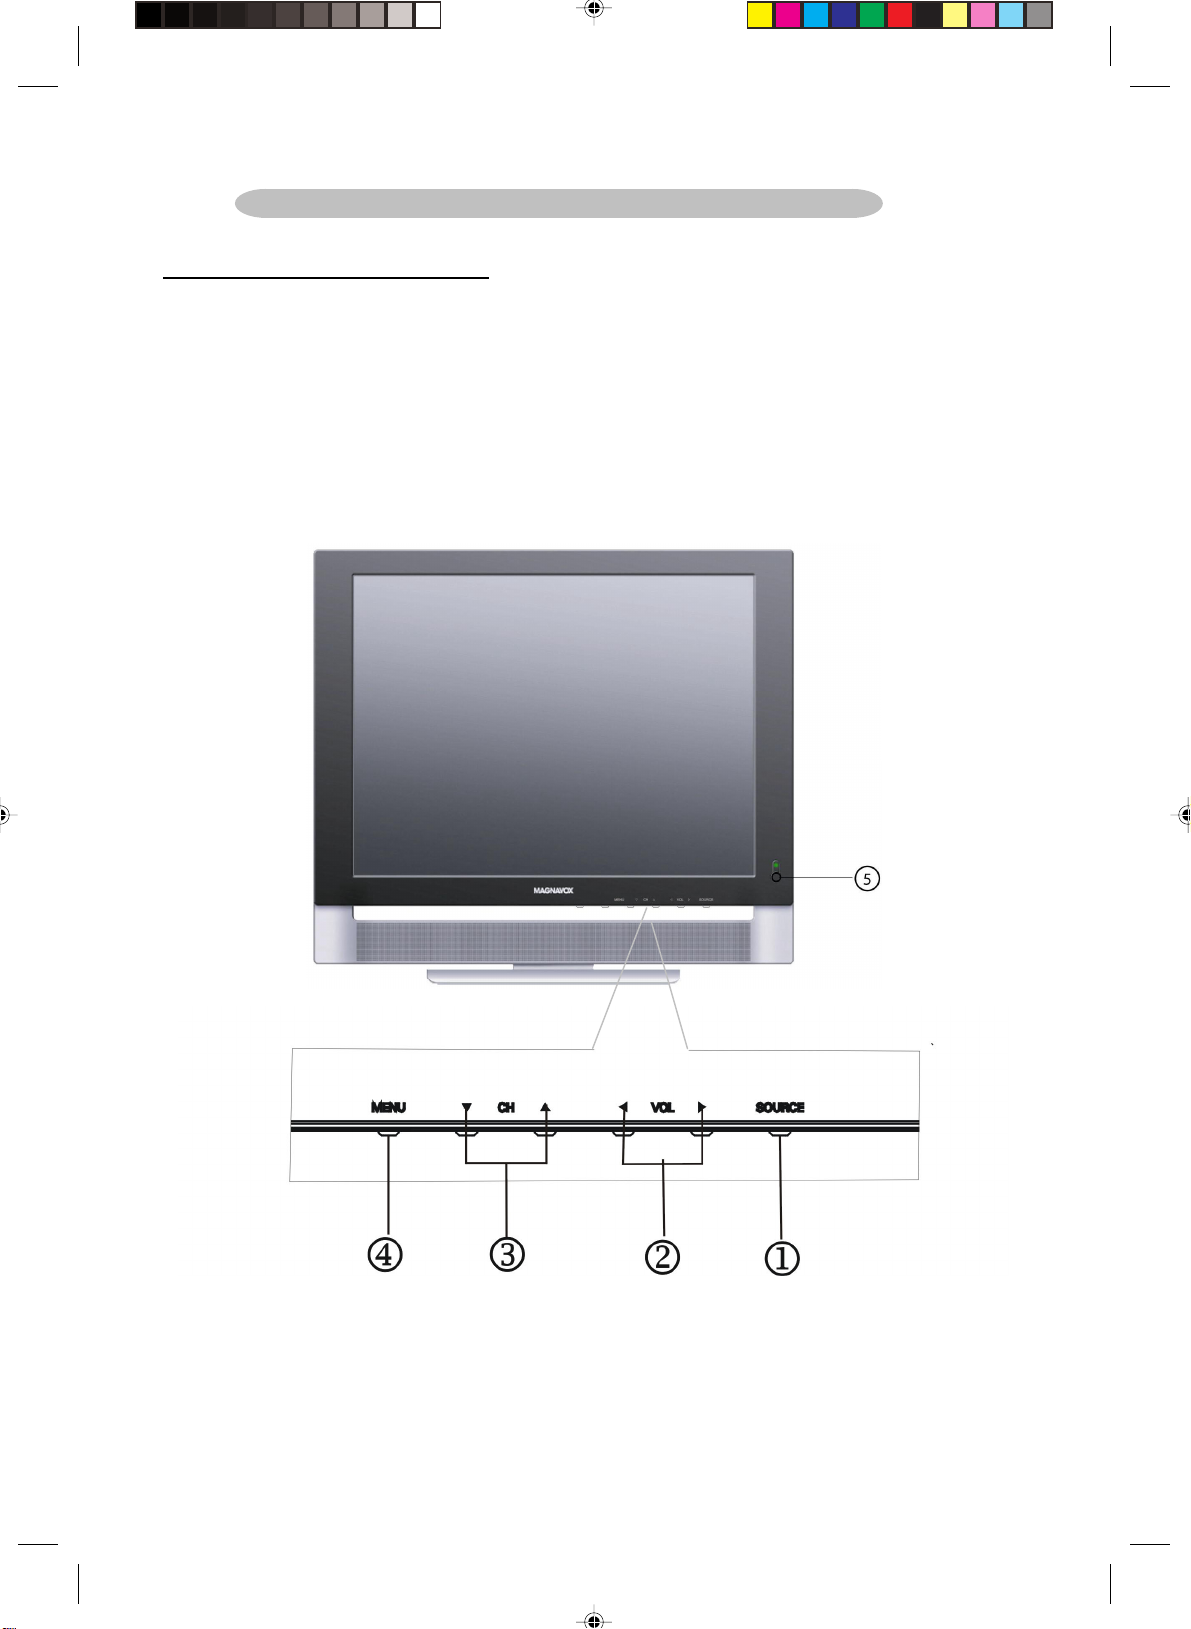
PRESENTATION OF THE LCD TV
ƒ Front Panel Control Knobs
ķ Source Key
ĸ
> or < Key
Ĺġ or Ģ Key
ĺ MENU Key
Ļ Power Key
Press to select your input source.
Press to confirm your function selection and adjust the volume
Press to confirm your function selection and adjust TV channel
Press to show the OSD menu and exit OSD menu at the TV.
Press to turn on or off the TV.
Enfocus Software - Customer Support
6
Page 7
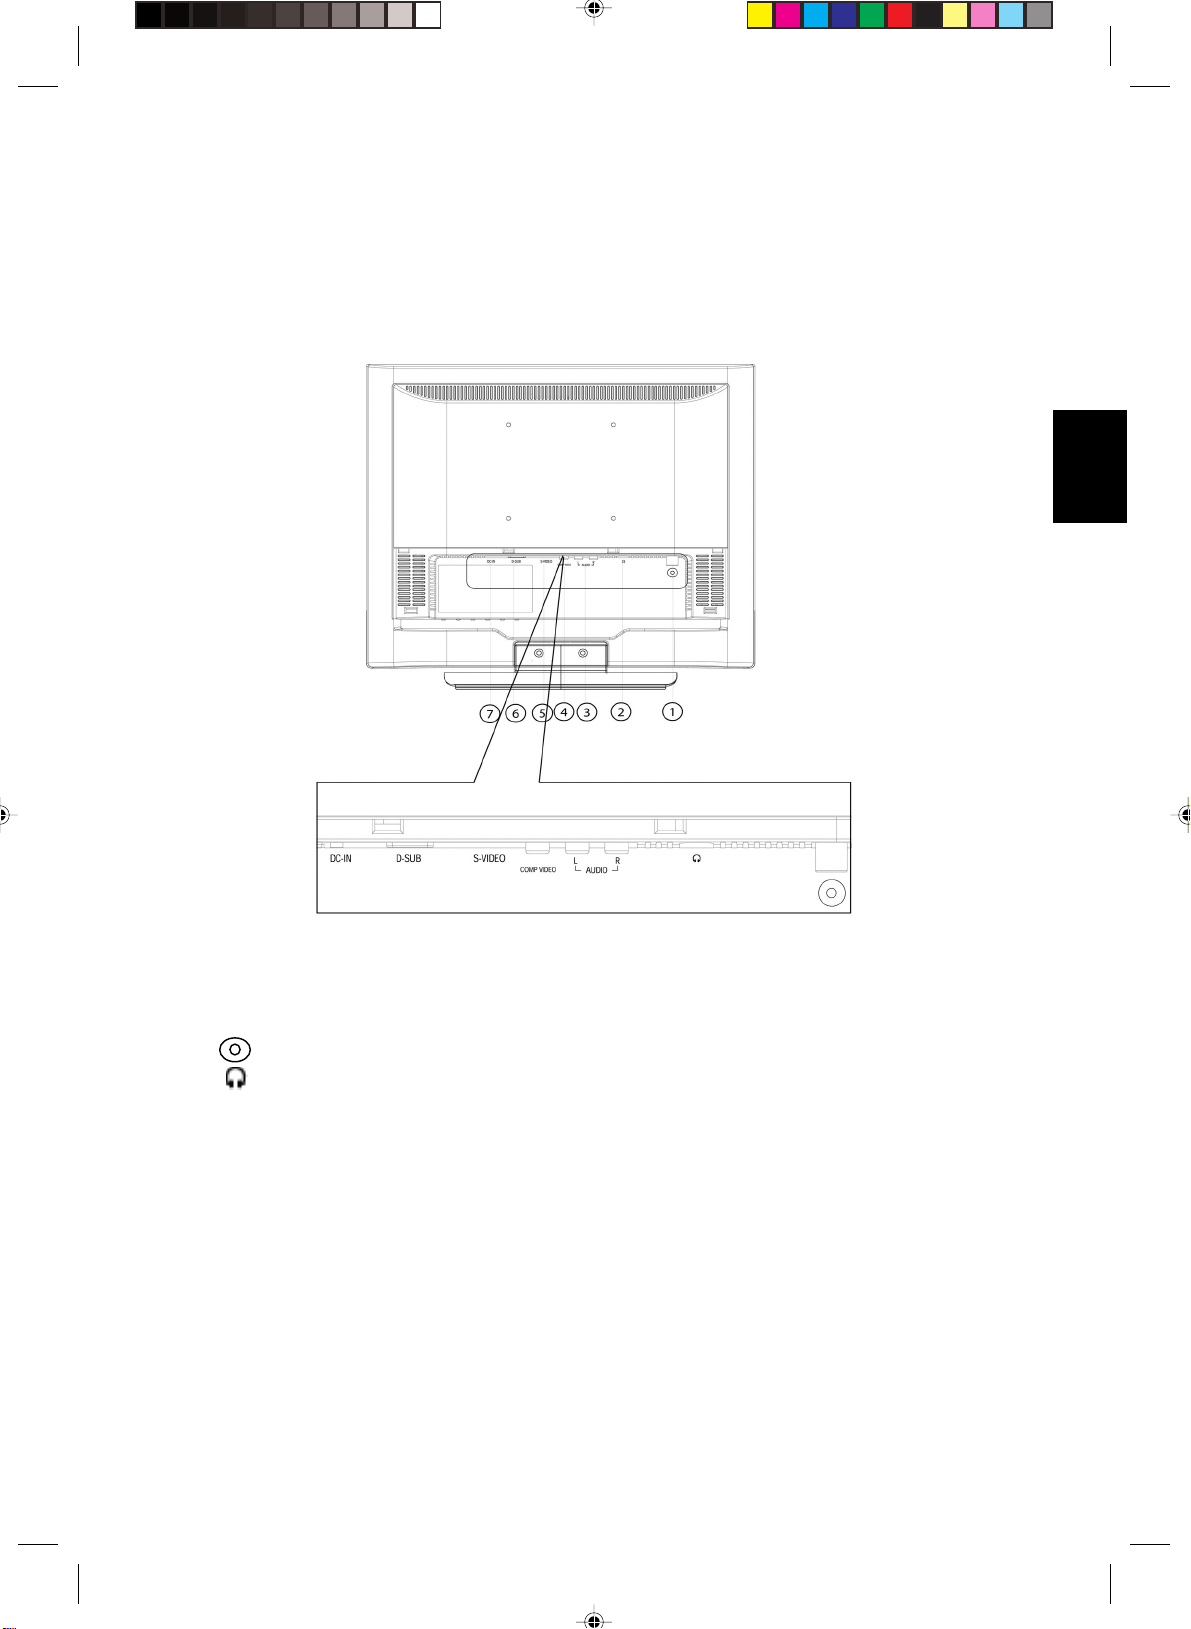
ƒ Preparation
Remove the back plate at the back of the TV as shown on the illustration opposite. Lay the LCD TV with the
screen down on a table, as it will be easier to connect your peripheral equipment. Please take precaution not
to damage the screen.
English
ķ
ĸ
Ĺ Audio R/L
ĺ COMP VIDEO
Ļ S-VIDEO
ļ D-SUB
Ľ DC IN
Enfocus Software - Customer Support
TV input
Earphone jack
Audio Right /Left Channel input
Video Input
S-VIDEO Input
PC Input
12V DC Power Input
7
Page 8
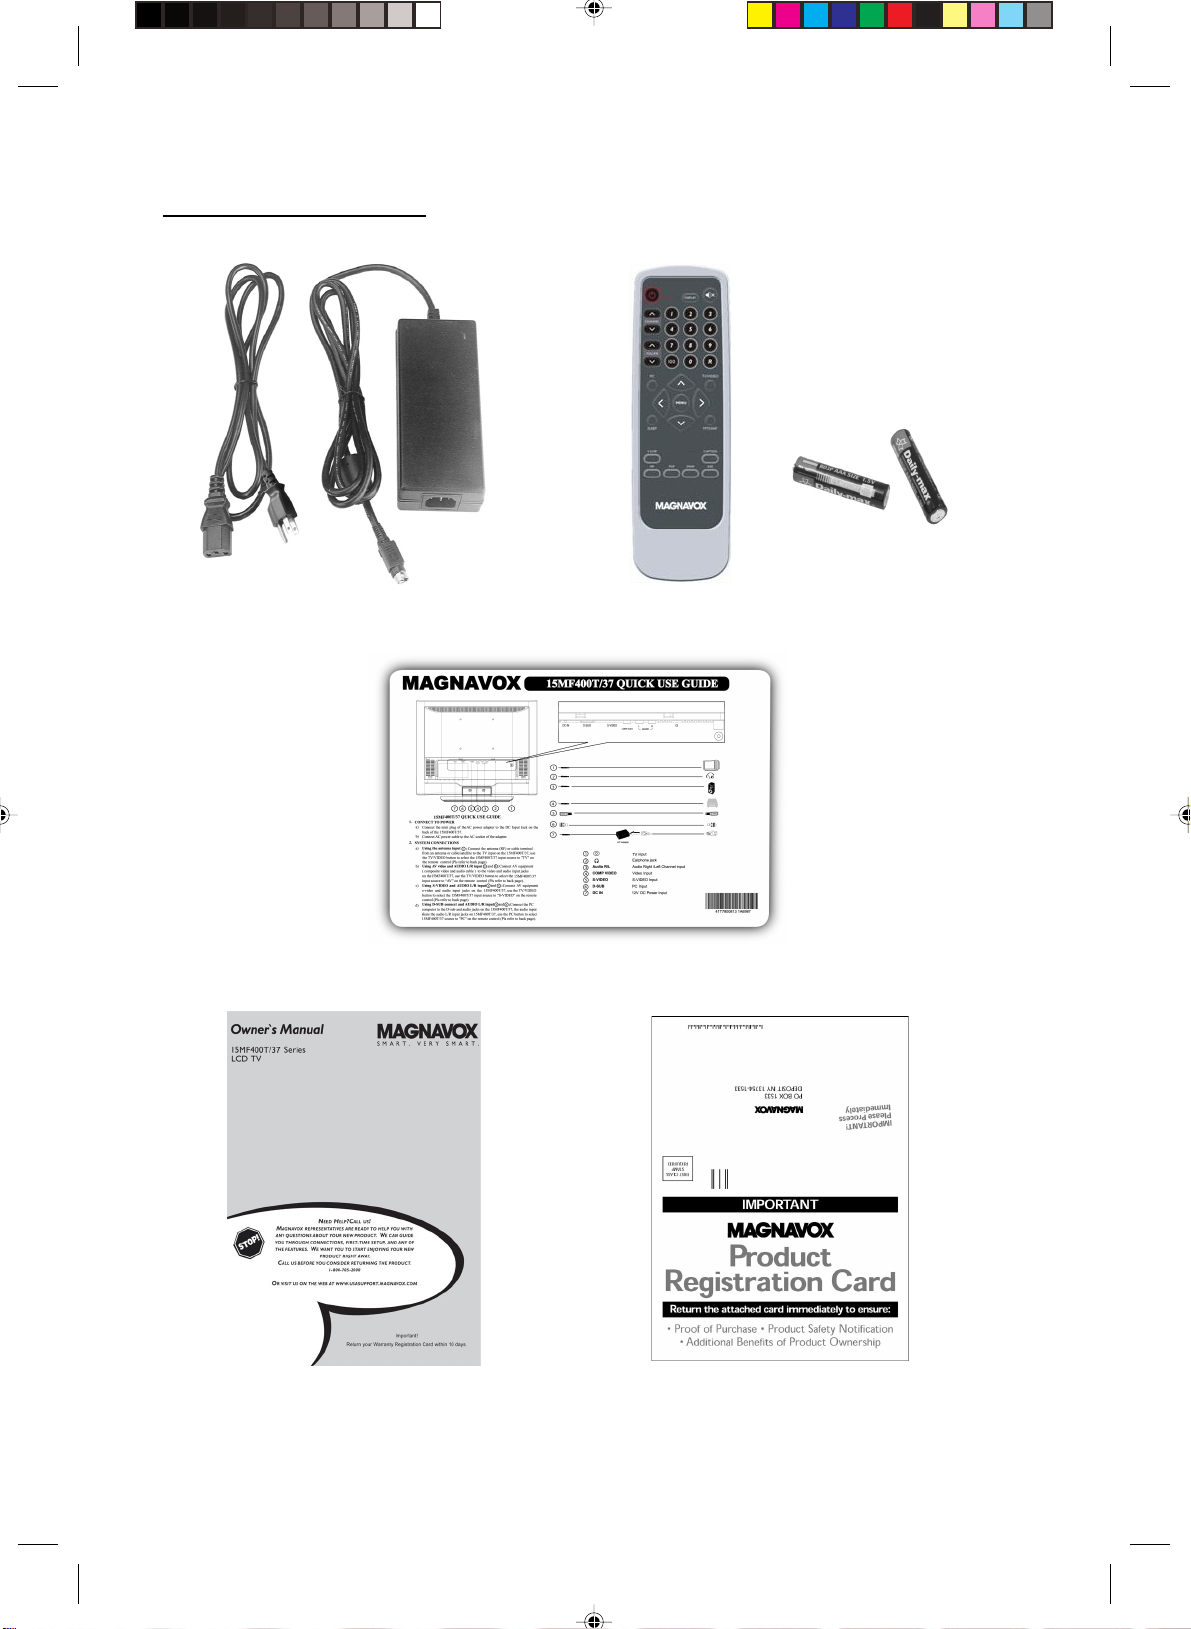
SUPPLIED ACCESSORIES
Power adapter Remote control
Quick Setup Guide
Owner’s Manual Warrant Card
8
Enfocus Software - Customer Support
Page 9
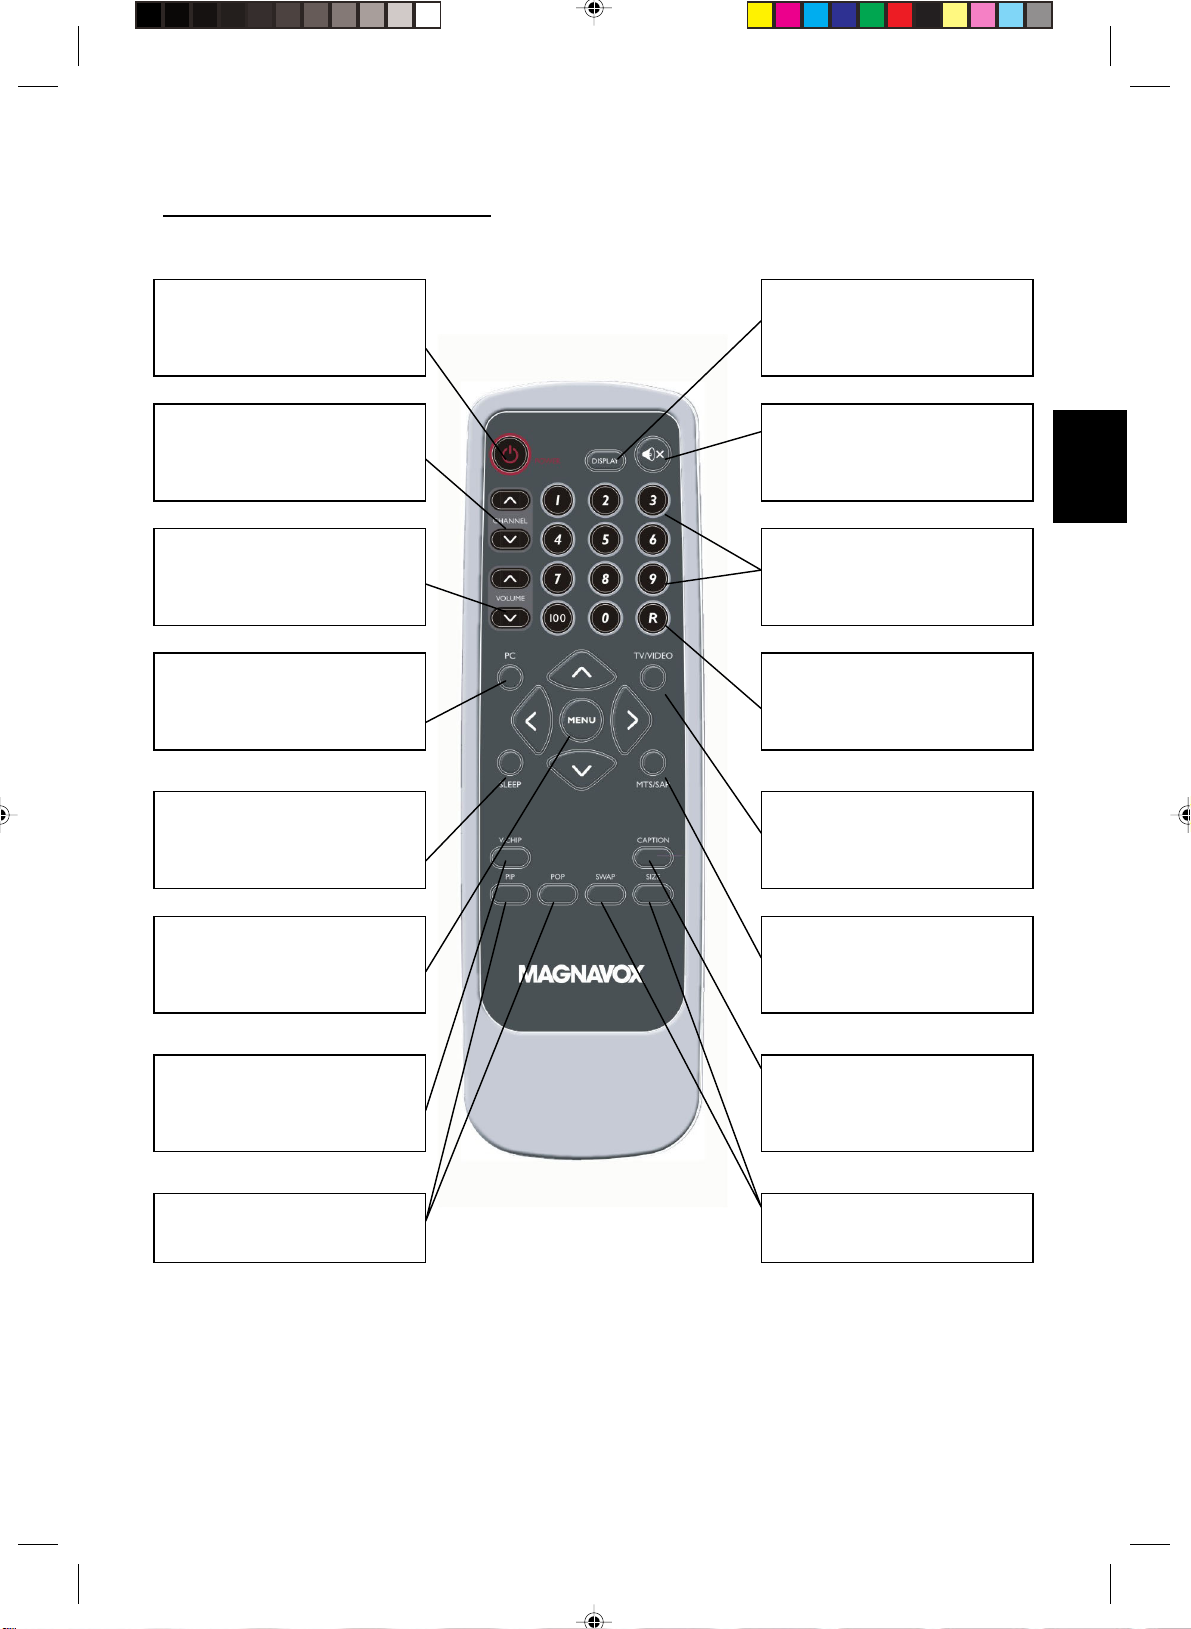
REMOTE CONTROL OPERATION
f
f
p
POWER button
Press to turn on/off the TV
CHANNEL button
Press to adjust the channel up or
down.
VOLUME button
Press to adjust the sound level
PC button
Press to switch on your PC signal.
SLEEP button
Press to set the LCD TV to turn of
Itself within a certain time.
DISPLAY button
Press to "Display” channel
number on
MUTE button
Press to eliminate or restore the
LCD
NUMBER button
Press to select TV channels
R button
Press to display the previously
selected TV channel
TV/VIDEO button
Select your video input source
English
MENU button
Press repeatedly to display main
menu and exit OSD function
V-CHIP button
Press this button to setup parental
control.
PIP/POP button
Not applicable
MTS /SAP button
Press to select sound mode i
available
CAPTION button
Press to "activate" closed
tion.
Ca
SIZE/SWAP button
Not applicable
9
Enfocus Software - Customer Support
Page 10
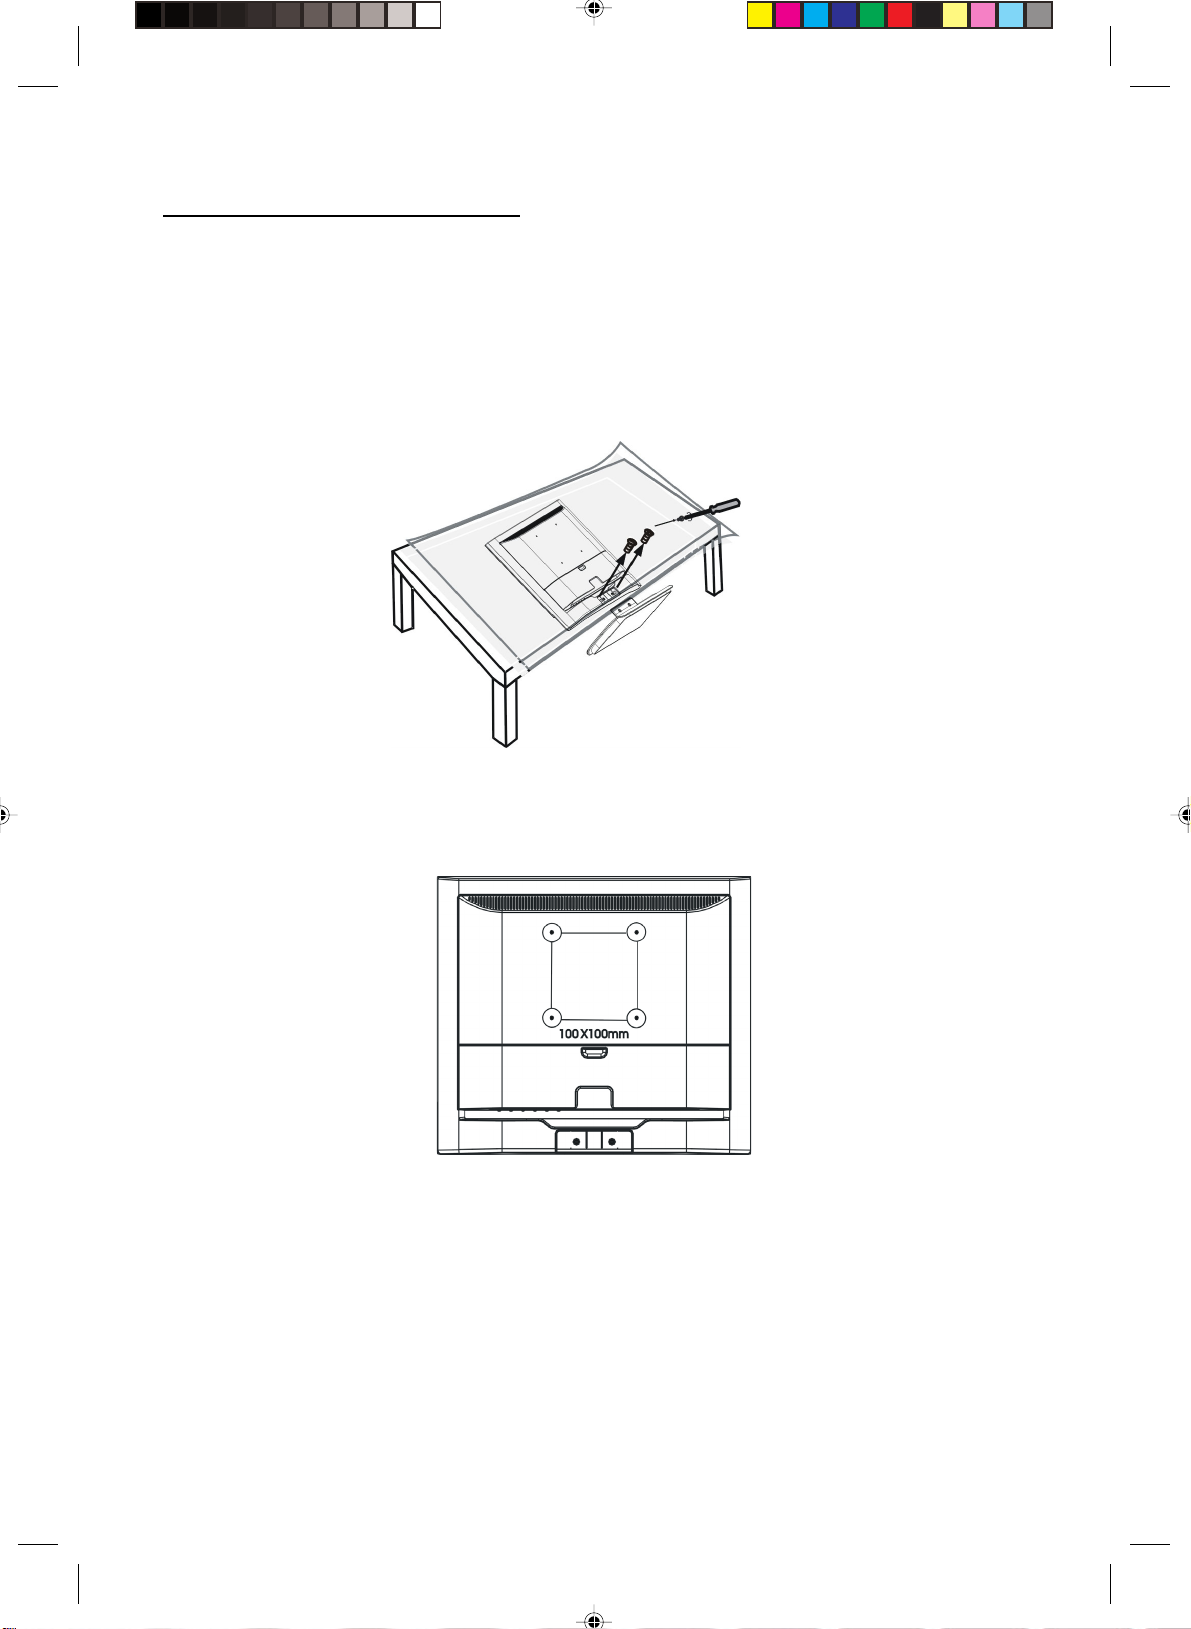
INSTALLING LCD TV ON THE WALL
Before you can install your LCD TV on the wall, you MUST first remove the base using
the steps below:
1. Place the set facing down on a flat surface with a protective sheet or cloth the TV.
2. Remove two screws from the base, grasp the base and pull it out.
When installing the LCD TV on the wall, please consult a professional technician for proper installing.
The manufacture accepts no liability for installations not performed by professional technician.
Enfocus Software - Customer Support
10
Page 11

GETTING STARTED
1. Place the TV on a sturdy surface.
Note: Ensure that the TV is placed in a position to allow free flow of air. Do not cover the ventilation
openings on the back cover.
To prevent any unsafe situations, no naked flame sources, such as lighted candles, should be placed on or
in the vicinity.
Avoid heat, direct sunlight and exposure to rain or water. The equipment shall not be exposed to dripping
or splashing.
2. Connect the antenna to the TV jack on the rear of LCD TV
3. Battery Installation:
Remove the battery compartment lid. Place 2 AAA batteries in the remote.
English
4. Plug the DC adaptor into DC IN 12V jack on the LCD TV
Plug the power cable into an outlet and switch TV set on.
5. Press the POWER button to turn on the TV
6. Run the Auto Scan function to install your LCD TV channels (Refer to Page15)
Enfocus Software - Customer Support
11
Page 12

OSD SETTING
1. Press “MENU’’ key to open OSD menu
2. Press
3. Press
OSD Setup
ƒ Language
1. Press ġ or Ģ key to select “Language” option
2. Press > or < key to select language
3. After adjustment, press “MENU” key to exit or press ġ or Ģ key to adjust other options
ƒ H_Position
1. Press ġ or Ģ key to select “H Position” option
2. Press > or < key to adjust OSD horizontal position
3. After adjustment, press “MENU” key to exit or press ġ or Ģ key to adjust other options
ƒ V_Position
1. Press ġ or Ģ key to select “V_Position” option
2. Press > or < key to adjust OSD vertical position
3. After adjustment, press “MENU” key to exit or press ġ or Ģ key to adjust other options
ƒ Time_out
1. Press ġ or Ģkey to select “Time_out” option
2. Press > or < key to adjust OSD display time
3. After adjustment, press “MENU” key to exit or press ġ or Ģ key to adjust other options
ƒ Background
1. Press ġ or Ģ key to select “Background” option
2. Press > or < key to adjust OSD background
3. After adjustment, press “MENU” key to exit or press ġ or Ģ key to adjust other options
ƒ Information ˖This option can only be operated on PC signal source
1. Press ġ or Ģ key to select “Information” option
2. Press > or < key then the screen will display the current input information
3. Press “MENU” key to exit information menu
> or < key to select “OSD Setup’’ option
ġ or Ģ key to select submenu
There are three kinds of language to select :EnglishǃFrench and Spanish
Enfocus Software - Customer Support
12
Page 13

CONNECT VIDEO RECORDER
How to connect:
1. Connect the antenna to VCR RF input
2. Connect the other RF cable from VCR output to TV input port ( ); if you connect the VCR to TV’s
AV input port (COMP VIDEO), you will get the better quality of video and audio
3. TV’s AV input does not include audio; please connect VCR audio output to TV’s audio input at
AUDIO L/R
If your VCR is equipped with S-VHS video port:
For better picture quality, connect an S-Video signal with the S-VIDEO input on the TV instead of connecting
to the AV input port (COMP VIDEO)
S-Video does not include audio, audio cables must be connected to TV audio input at AUDIO L/R
Watching VCR
1. If you use TV connection, select the TV channel search
2. If you use AV connection, select AV
3. If you use S-Video connection. Select s-video
4. Insert videotape in the VCR and press the PLAY button
CONNECT CAMERA /CAMCORDER/ VIDEO GAME SET
1. Connect the video output port of Camera /Camcorder/ Video Game Set to the TV’s AV input port
(COMP VIDEO)
2. Connect the left and right audio channels of Camera /Camcorder/ Video Game Set to the left and right
channels of audio input at AUDIO L/R of TV
If your Camera /Camcorder/ Video Game Set is equipped with S-VHS video port:
For better picture quality, please connect the S-Video cable to the S-Video input of TV. Connect the left and
right channels of Camera /Camcorder/ Video Game Set to the left and right channels of audio input at AUDIO
L/R of TV
How to play
If you use AV connection, please select AV;
If you use S-Video connection, please select S-VIDEO;
English
Enfocus Software - Customer Support
13
Page 14

CONNECT DVD PLAYER
1. Connect the video output port of DVD player to the AV input port (COMP VIDEO) of TV
2. Connect the left and right audio channels of DVD to the left and right channels of audio input at
AUDIO L/R of TV
If your DVD player is equipped with S-VHS video port:
For better picture quality, please connect the S-Video cable to the S-Video input of TV. Connect the left and
right channels of DVD to the left and right channels of audio input at AUDIO L/R of TV
How to play
If you use AV connection, please select AV;
If you use S-Video connection, please select S-VIDEO;
CONNECT DIGTAL SET TOP BOX
How to connect
1. Connect the video output port of Digital Set Top Box to the AV input port (COMP VIDEO) of TV
2. Connect the left and right audio channels of Digital Set Top Box to the left and right channels of audio
input at AUDIO L/R of TV
How to use
1. Select AV.
2. Turn on the DTV Set Top Box set.
Note: In case you notice scrolling images, wrong colors or no color, no picture or even combinations of
these, on your screen, check if the connections are done in the right way. Check if the cable colors match
with the Input connector colors.
Enfocus Software - Customer Support
14
Page 15

TV SETUP MENU
1ǃ Press” MENU’’ key to open OSD menu
2ǃ Press > or < key to select “TV Setup’’ option
3ǃ Press
Note: Air/Cable, Auto Scan, Current ProgramˈSleep Timer options can only display on
TV Source
TV CHANNEL INSTALLATION
ġ orĢ key to select submenu
English
ƒ Air/Cable
1. Press” MENU’’ key to open OSD menu
2. Press > or < key to select “TV Setup’’ option
3. Press ġ or Ģ key to select “AIR/CATV” option
4. Press > or < key to select the automatic search system that your TV need, there are four options:
CATV: Community Antenna Television
AIR: Over the Air
HRC: Harmonically Related Carrier
IRC: Incrementally Related Carrier
5. Press “MENU” key to exit AIR/CATV menu or press
ġ or Ģ key to adjust other options
Note: Please run the auto scan function to setup the TV for the broadcast or cable channels available in
your area. If you do not run the auto scan function to setup the channels, your television may not operate
properly.
ƒ Auto scan
Channel auto search and memorize all viewable channel.
1. Press “MENU’’ key to open OSD menu
2. Press > or < key to select “TV Setup’’ option
3. Press ġ or Ģ key to select “Auto scan” option
4. Press > or < key to start auto scan.
Note: Please run the auto scan function to setup the TV for the broadcast or cable channels available in
your area. If you do not run the auto scan function to setup the channels, your television may not operate
properly.
Enfocus Software - Customer Support
15
Page 16

CHANNEL EDIT
ƒ Add/Erase
1. Press” MENU’’ key to open OSD menu
2. Press
3. Press
4. Press > or < key to select Add or Erase.
5. Press “MENU” key to exit Add/Erase menu or press
ƒ Current Program
Current program is the channel set by the current TV, you can press “DISPLAY” key to display the current
channel on the top right of the screen.
> or < key to select “TV Setup’’ option
ġ or Ģ key to select “Add/Erase” option
ġ or Ģ key to adjust other options
1. Press” MENU’’ key to open OSD menu
2. Press > or < key to select “TV SETUP’’ option
3. Press
ġ or Ģ key to select “Current Program” option
4. Press > or < key to select the channel.
5. Press “MENU” key to exit Current Program menu or press
You can also press the digital keys 0-9/100 or channel
ġ or Ģ key to adjust other options
ġ or Ģ on the remote control to select channel
SLEEP TIMER
1. Press” MENU’’ key to open OSD menu
2. Press > or < key to select “TV Setup’’ option
3. Press
ġ or Ģ key to select “Sleep Timer” option
4. Press > or < key to select the sleep timer that you need to set, you can select 30/60/90/120 minutes sleep
timer.
5. Press “MENU” key to exit sleep timer menu or press ġ or Ģ key to adjust other options
Note: You can also press “SLEEP” on the remote control, the sleep timer will display on the top right of the
screen.
Enfocus Software - Customer Support
16
Page 17

CLOSED CAPTION
1. Press MENU’’ key to open OSD menu
2. Press > or < key to select “TV SETUP’’ option
3. Press
4. Press > or <key to set CC1~CC4 and TT1 and TT4.
5. Press “MENU” key to exit Closed Caption menu or press
You can also press “CAPTION” on the remote control, enter Closed Caption menu directly, then press step 4
to adjust.
Caption Mode: CC1~CC4
Dialogue (and descriptions) for the action on the captioned TV program shows on screen.
Text Mode: TT1~TT4
Often used for channel guide, schedules, bulletin board information for Closed Caption programs, news,
weather information or stock marker reports.
“
ġ or Ģ key to select “Closed Caption” option
ġ or Ģ key to adjust other options
Note: Not all Closed Caption modes are necessarily being use by a TV channel during the transmission of a
Closed Caption program.
English
CHANNEL LOCK
ƒ V-Chip
It is the parental control function (V-chip). It is used to block program viewing based on the ratings by the
broadcaster. The default setting is to allow all programs to be viewed. Viewing can be blocked by the type of
program and by the categories chosen be blocked. It is also possible to block all program viewing for a time
period.
1. Press
2. Press
3. Press
4. Press > or < key to enter V _CHIP password validation menu.
You can press V-CHIP key on the remote control to enter the menu directly.
“
MENU’’ key to open OSD menu
> or < key to select “TV Setup’’ option
ġ or Ģ key to select “V _CHIP” option
Enfocus Software - Customer Support
17
Page 18

Press digital keys on the remote control; enter the password to go into V-CHIP control menu
(Default pass code for V-Chip: 0711 and should press twice time)
If your password is error, then the screen will display “PIN ERROR”.
5. After enter the V-CHIP menu, press ġ or Ģ key to select, if you want to set V_CHIP, you need to set the
“Status” on the condition of “ON”.
1) Press ġ or Ģ key to select “Status’’ option
2) Press
6. TV Guidelines Setting
1) Press
2) Press
3) Press
> or < key to select “ON’’ or “OFF”
ġ or Ģ key to select “TV Guidelines” option
> or < key to enter “TV Guidelines” menu
ġ or Ģ key to select block item.
4) Press > or < key to select U or B, selecting U means “Unlock”, selecting B means “Block”.
5) If the setting is OK, press “MENU” key to exit TV Guidelines menu.
Enfocus Software - Customer Support
18
Page 19

7. Movie Guidelines Setting
1) Press
ġ or Ģ key to select “Movie Guidelines” option.
2) Press > or < key to enter Movie Guidelines menu.
3) Press
ġ or Ģ key to select block item.
4) Press > or < key to select U or B, selecting U means “Unlock”, selecting B means “Block”.
5) If the setting is OK, press “MENU” key to exit Movie Guidelines menu.
8. Change PIN
1) Press
ġ or Ģ key to select “Change PIN” option
2) Press > or < key to enter Change PIN menu.
3) Press digital keys on the remote control, and then enter the new password.
English
4) Enter the new password again, if the setting is OK, the display information as below, then it will exit
the Change PIN menu automatically.
Enfocus Software - Customer Support
19
Page 20

ƒ Reset To Default
1. Press “MENU” key to open OSD menu.
2. Press > or < key to select any Setup options
3. Press
4. Press > or < key to reset.
Reset To Default is convenient for all settings in the user OSD to recall to factory default data.
ġ or Ģ key to select “Reset To Default” option.
Note: The reset to default function in each function item is the same under the signal source of
AV/TV/S-VIDEO. When we select the Reset To Default in each function item under the PC signal source, it
not only recall all data to default data, but also have an adjustment automatically.
Enfocus Software - Customer Support
20
Page 21

SOUND SETUP MENU
1. Press “MENU” key to open OSD menu.
2. Press > or < key to select “Sound Setup” option
3. Press ġ or Ģ key to select submenu.
ƒ Volume
1. Press “MENU” key to open OSD menu.
2. Press > or < key to select “Sound Setup” option.
3. Press ġ or Ģ key to select “Volume” option
4. Press > or < key to adjust Volume data.
You can also press Volume > or < key on the remote control to adjust volume.
5. Press “MENU” to exit or press ġ or Ģ key to adjust others
English
ƒ Bass
1. Press “MENU” key to open OSD menu.
2. Press > or < key to select “Sound Setup” option
3. Press ġ or Ģ key to select “Bass” option.
4. Press > or <key to adjust Bass data.
5. Press “MENU” to exit or press ġ or Ģ key to adjust others.
ƒ Treble
1. Press “MENU” key to open OSD menu.
2. Press > or < key to select “Sound Setup” option
3. Press ġ or Ģ key to select “Treble” option.
4. Press > or <key to adjust Treble data.
5. Press “MENU” to exit or press ġ or Ģ key to adjust others.
ƒ Balance
1. Press “MENU” key to open OSD menu.
2. Press > or < key to select “Sound Setup” option
3. Press ġ or Ģ key to adjust “Balance” option.
4. Press > or < key to adjust “Balance” data.
5. Press “MENU” to exit or press ġ or Ģ key to adjust others.
Enfocus Software - Customer Support
21
Page 22

ƒ Mute
1. Press “MENU” key to open OSD menu.
2. Press
3. Press
> or < key to select “Sound Setup” option
ġ or Ģ key to select “Mute” option.
4. Press > or <key to select ON/OFF.
You can also press key on remote control to select mute,
after the selection you can adjust the volume or press to cancel the Mute
5. Press “MENU” to exit or press
ġ or Ģ key to adjust others.
Enfocus Software - Customer Support
22
Page 23

PICTURE SETUP MENU
1. Press “MENU” key to open OSD menu.
2. Press > or < key to select “Picture Setup” option
3. Press ġ orĢ key to select submenu.
Note: Picture Setup menu can only be selected under the signal source of AV/TV/S-VIDEO.
ƒ Brightness
1. Press “MENU” key to open OSD menu.
2. Press > or < key to select “Picture Setup” option
3. Press ġ or Ģ key to select “Brightness” option.
4. Press > or < key to adjust Brightness data.
5. Press “MENU” to exit or press ġ or Ģ key to adjust others
English
ƒ Contrast
1. Press “MENU” key to open OSD menu.
2. Press > or < key to select “Picture Setup” option
3. Press ġ or Ģ key to select “Contrast” option.
4. Press > or <key to adjust Contrast data.
5. Press “MENU” to exit or press ġ or Ģ key to adjust others
ƒ Hue
1. Press “MENU” key to open OSD menu.
2. Press > or < key to select “Picture Setup” option
3. Press ġ or Ģ key to select “Hue” option.
4. Press > or < key to adjust Hue data.
5. Press “MENU” to exit or press ġ or Ģ key to adjust others.
ƒ Saturation
1. Press “MENU” key to open OSD menu.
2. Press > or <key to select “Picture Setup” option
3. Press ġ or Ģ key to select “Saturation” option.
4. Press > or < key to adjust Saturation data.
5. Press “MENU” to exit or press ġ or Ģ key to adjust others.
Enfocus Software - Customer Support
23
Page 24

ƒ Sharpness
1. Press “MENU” key to open OSD menu.
2 Press
3. Press
> or <key to select “Picture Setup” option
ġ or Ģ key to select “Sharpness” option.
4. Press > or < key to adjust sharpness data.
5. Press “MENU” to exit or Press
ġ or Ģ key to adjust others.
ƒ Color Tone
1. Press “MENU” key to open OSD menu.
2. Press > or < key to select “Picture Setup” option
3. Press
ġ or Ģ key to select “Color Tone” option.
4. Press > or < key to select warm or cool color
5. Press “MENU” to exit or press
ġ or Ģ key to adjust others.
ƒ Black Level
1. Press “MENU” key to open OSD menu.
2 Press > or < key to select “Picture Setup” option
3. Press
ġ or Ģ key to select “Black Level” option.
4. Press > or < key to adjust Black level data.
5. Press “MENU” to exit or press
ġ or Ģ key to adjust others.
Enfocus Software - Customer Support
24
Page 25

PC SETUP MENU
1. Press “MENU” key to open OSD menu.
2. Press > or <key to select “PC Setup” option
3. Press ġ orĢ key to select submenu
Note: PC Setup menu can only be selected under the PC signal source
ƒ Brightness
1. Press “MENU” key to open OSD menu.
2. Press
3. Press
4. Press > or < key to adjust Brightness data.
5. Press “MENU” to exit or press
> or < key to select “PC Setup” option
ġ or Ģ key to select “Brightness” option.
ġ or Ģ key to adjust others.
English
ƒ Contrast
1. Press “MENU” key to open OSD menu.
2. Press
3. Press ġ or Ģ key to select “Contrast” option.
4. Press
5. Press “MENU” to exit or press
ƒ H_Position
1. Press “MENU” key to open OSD menu.
2. Press
3. Press
4. Press
5. Press “MENU” to exit or press ġ or Ģ key to adjust others.
ƒ V_Position
1. Press “MENU” key to open OSD menu.
2. Press
3. Press
4. Press > or <key to adjust “V_Position” data
5. Press “MENU” to exit or press
> or < key to select “PC Setup” option
> or < key to adjust contrast data.
ġ or Ģ key to adjust others.
> or < key to select “PC Setup” option
ġ or Ģ key to select “H_position” option.
> or < key to adjust H_Position data.
> or < key to select “PC Setup” option
ġ or Ģ key to select “V_Position” option.
ġ or Ģ key to adjust others.
25
Enfocus Software - Customer Support
Page 26

ƒ Clock
1. Press “MENU” key to open OSD menu.
2. Press
3. Press ġ or Ģ key to select “Clock” option.
4. Press
5. Press “MENU” to exit or press ġ or Ģ key to adjust others.
ƒ Phase
1. Press “MENU” key to open OSD menu.
2. Press > or <key to select “PC Setup” option
3. Press ġ or Ģ key to select “Phase” option.
4. Press > or < key to adjust Phase data
5. Press “MENU” to exit or press ġ or Ģ key to adjust others.
ƒ Auto Adjustment
1. Press “MENU” key to open OSD menu.
2. Press > or <key to select “PC Setup” option
3. Press ġ or Ģ key to select “Auto Adjustment” option.
4. Press > or <key to conduct Auto Adjustment, then PC will adjust automatically, if the adjustment is OK, it
> or < key to select “PC Setup” option
> or < key to adjust Clock data
will exit OSD menu automatically
ƒ Color
1. Press “MENU” key to open OSD menu.
2. Press > or < key to select “PC Setup” option
3. Press ġ or Ģ key to select “Color” option.
4. Press > or <key to select Color
If you choose Color as User, you can adjust R/G/B according to your need
1) Press “MENU” key to enter User Color menu.
2) Press ġ or Ģ key to select Red/Green/Blue option.
3) Press > or < key to adjust Red/Green/Blue data
4) Press MENU TO exit to Color menu
5) Press ġ or Ģ key to select other adjustment items, then press MENU to exit
Enfocus Software - Customer Support
26
Page 27

General Information
Tips
Care of the screen
Do not rub or strike the screen with anything hard as this may scratch, mar, or damage the screen
permanently.
Unplug the screen before cleaning the screen. Dust the TV by wiping the screen and the cabinet with a soft,
clean cloth. If the screen requires additional cleaning, use a clean, damp cloth. Do not use liquid cleaners or
aerosol cleaners.
Mobile telephone warning
To avoid disturbances in picture and sound, malfunctioning of your TV or even damage to the TV, keep away
your mobile telephone from the TV.
End of life directives
We are paying a lot of attention to produce environmentally friendly in green focal areas. Your new LCD TV
contains materials which can be recycled and reused.
At the end of its life specialized companies can dismantle the discarded LCD TV to concentrate the reusable
materials and to minimize the amount of materials to be disposed of.
When you replace your existing equipment, please find out about the local regulation regarding disposal of
your old television, batteries, and packing materials.
English
Enfocus Software - Customer Support
27
Page 28

Before Call Service
Please make these simple checks before calling service. These tips may save you time and money since
charges for receiver installation and adjustments of customer controls are not covered under your warranty.
Symptoms Items to Check and Actions to follow
“Ghost ” or double image *This may be caused by obstruction to the antenna due to high rise
buildings or hills. Using a highly directional antenna may inprove the
picture.
No power *Check that the TV’s AC power cord is plugged into the mains socket.
*Unplug the TV, wait for 60 seconds. Then re-insert plug into the mains
socket and turn on the TV again.
No picture *Check antenna connections at the rear of the TV to see if it is properly
connected to the TV.
*possible broadcast station trouble. Try another channel.
*Adjust the contrast and brightness settings.
*Check the Closed Captions control. Some TEXT modes could block the
screen.
Good picture but no sound *Check the cable connection
*Increase the VOLUME.
*Check that the TV is not muted; press the button on the remote control.
Good sound but poor color *Adjust the contrast, color and brightness settings.
Poor picture *Sometimes, poor picture quality occurs when having activated an
S-VHS camera or camcorder connected and having connected
another peripheral at the same time. In this case, please connect
power cords of other peripherals to a different power outlet.
Snowy picture and noise *Check the antenna connection
Horizontal dotted line *This may be caused by electrical interference (e.g. hairdryer, nearby
neon lights, etc.)
*Turn off the equipment.
Television not responding
to remote control
*Check whether the batteries are working. Replace if necessary
*Clean the remote control sensor lens on the TV.
*Use the buttons at the front of your TV.
28
Enfocus Software - Customer Support
Page 29

GLOSSARY
Audio / Video Inputs
Located on the rear and the front of the receiver these connectors (RCA photo type plug) are used for the
input of audio and video signals. Designed for use with VCRs (or other accessories) in order to receive higher
picture resolution and offer sound connection options.
S-Video Input
Allow directly connection of high-resolution video sources, such as a Super VHS videocassette recorder,
Laser Disc player, etc. Provide improved picture resolution, sharpness, and clarity.
Composite Input
Allows direct connector of high-resolution video sources, such as DVD player, digital TV, etc, provides
improved picture resolution, sharpness and clarity.
Audio output
Provide sound output, it can be connected external speaker, and enhance the sound quality.
English
Menu
An on-screen listing of feature control shows on the TV screen which is available for user adjustments.
Multichannel Television sound (MTS)
The broadcast standard that allow stereo sound to be transmitted with the TV picture.
RF
Radio Frequency or modulated signal design used as the carrier for television broadcasts.
Second Audio Program (SAP)
Another or additional audio channel provided for in the Multichannel Television Sound (MTS) broadcast
standard. A monaural soundtrack included within the recorded or video signal (usually containing a second
language translation for the displayed program).
Sleep Timer
The function which you can set a time period after the TV turns off.
Enfocus Software - Customer Support
29
Page 30

PRODUCT SPECIFICATION
15MF400T/37
Item
LCD Panel
TV Function
Video Input
Specification
Screen Size 15"
Aspect Ratio 4:3
Resolution 1024x768
Brightness 250cd/m² (typ.)
Contrast Ratio 400:1
Response Time 16ms
Viewing Angle left/right = 60°/60°
Display Colors 16.7M
TV Tuner NTSC M
Color System NTSC
Sound System MTS + SAP
Closed-Caption & V-chip Yes
Composite x1
S-Video x1
Color System NTSC/PAL
PC Input
Audio Output
Power
Video Feature
Signal Input Analog
Horizontal Frequency (kHz) 31.5~60
Vertical Frequency (Hz) 56~75
Max. Resolution 1024x768 @ 75Hz
Recommended Resolution 1024x768 @ 60Hz
Built-in Speakers 2 x 2W (L/R)
Headphone Output Yes (3.5mmφ)
Power Supply +12V DC Input
Adapter 100-240V AC, 50/60Hz
Power Consumption (Max.)
De-interlacer 2D de-interlacer
Comb Filter Adaptive 4H Y/C Separation
3-2 Pull Down Recovery Yes
30
Power on<50W,
Off mode<2W
Enfocus Software - Customer Support
Page 31

Other Features
Dimension
Weight
Accessory
Wall Mount VESA 100mm x 100mm
Multi-Function Remote Yes
Sleep Timer Yes
Tilt Angle (front/back) 5°/15°
English/French(Canadian
OSD language
with Stand(W x H x D) 371.6mm x 346 mm x 147.5mm
without Stand (W x H x D) 371.6mm x 324mm x 47.5mm
Carton (W x H x D) 434mm x 407mm x 192mm
Net, kg 3.5kg
Loose, including package 5.0kg
Remote controller, Batteriesx2, AC Power adapter, Power Cord
User manual<English/French(Canadian type)/Spanish>, QSG
Warranty Card <English only>,
type)/Spanish
English
Enfocus Software - Customer Support
31
Page 32

This warranty gi ve s you specific le gal rights. You ma y have oth er rights which vary from state/ province to state /provin ce .
Magnavox, P.O. Box 671539, Marietta, Ga. 30006-0026
LIMITED WARRANTY
LCD TV
90 Days Free Labor
One Year Parts Exchange
This product must be carried in for service.
WHO IS COVERED ?
You must have proof of purchase to receive warranty service.
A sales receipt or other document showing that you purchased the product is considered proof of purchase.
WHAT IS COVE RED?
Warranty coverage begins the day you buy your product .
For 90 days thereafter, all par ts will be repaired or replaced
free, and labor is free. From 90 days to one year from the day
of purchase, all parts will be repaired or replaced free, but
you pay for all labor charges. After one year from the day of
purchase, you pay for the replacement or repair of all parts,
and for all labor charges.
All parts, including repaired and replaced parts, are covered
only for the original warranty period. When the warranty on
the product expires, the warranty on all replaced and repaired
parts also expires.
WHAT IS EXCLUDED?
Your warranty does not cover:
• labor charges for installation or setup of the product, adjustment of customer controls on the product, and installation or
repair of antenna systems outside of the product.
• product repair and/or part replacement because of misuse,
accident, unauthorized repair or other cause not within the
control of Magnavox.
• reception problems caused by signal conditions or cable or
antenna systems outside the unit.
• a product that requires modification or adaptation to enable
it to operate in any country other than the countr y for which
it was designed, manufactured, approved and /or authorized,
or repair of products damaged by these modifications.
• incidental or consequential damages resulting from the
product.(Some states do not allow the exclusion of incident al
or consequential damages, so the above exclusion may not
apply to you. This includes, but is not limited to, prerecorded
material, whether copyrighted or not copyrighted.)
• a product used for commercial or institutional purposes.
WHERE IS SERVICE AVAILABLE ?
Warranty service is available in all countries where the
product is officially distributed by Magnavox. In countries
where Magnavox does not distribute the product , the local
Magnavox service organization will attempt to provide service
(although there may be a delay if the appropriate spare parts
and technical manual(s) are not readily available).
MAKE SUR E YOU KEEP...
Please keep your sales receipt or other document showing proof
of purchase. Attach it to this owner’s manual and keep both
nearby. Also keep the original box and packing material in case you
need to return your product.
BEFORE REQUESTING SERVICE ...
Please check your owner’s manual before requesting ser vice.
Adjustments of the controls discussed there may save you a
service call.
TO GET WARRANTY SERVICE IN U.S. A.,
PUERTO RICO, OR U. S. VIRGIN IS LANDS...
Contact a Magnavox factor y ser vice center (see enclosed list) or
authorized ser vice center to arrange repair.
(In U.S.A ., Puerto Rico, and U.S. Virgin Islands, all implied
warranties, including implied warranties of merchant ability and
fitness for a particular purpose, are limited in duration to the
duration of this express warranty. But, because some states do not
allow limit ations on how long an implied warrant y may last , this
limitation may not apply to you.)
TO GET WARRA NTY SERVICE IN CANADA ...
Please contact Magnavox at :
1-800-705-2000
(In Canada, this warranty is given in lieu of all other warranties.
No other warranties are expressed or implied, including any implied
warr anties of merchant ability or fitness for a particular purpose.
Magnavox is not liable under any circumst ances for any direct,
indirect , special, incidental or consequential damages, howsoever
incurred, even if notified of the possibilit y of such damages.)
REM EMBER ...
Please record below the model and serial numbers found on the
product. Also, please fill out and mail your warranty registration card
promptly. It will be easier for us to notify you if necessar y.
MODEL # ______________________________________
SERIAL # ________________________________________
32
Enfocus Software - Customer Support
 Loading...