

Page 1
ANT.
IN
OUT
OR
3
CABLE BOX
CABLE TV SIGNAL
RF COAXIAL
CABLE
ANTENNA or
CABLE TV SIGNAL
2
4
ANT.
1
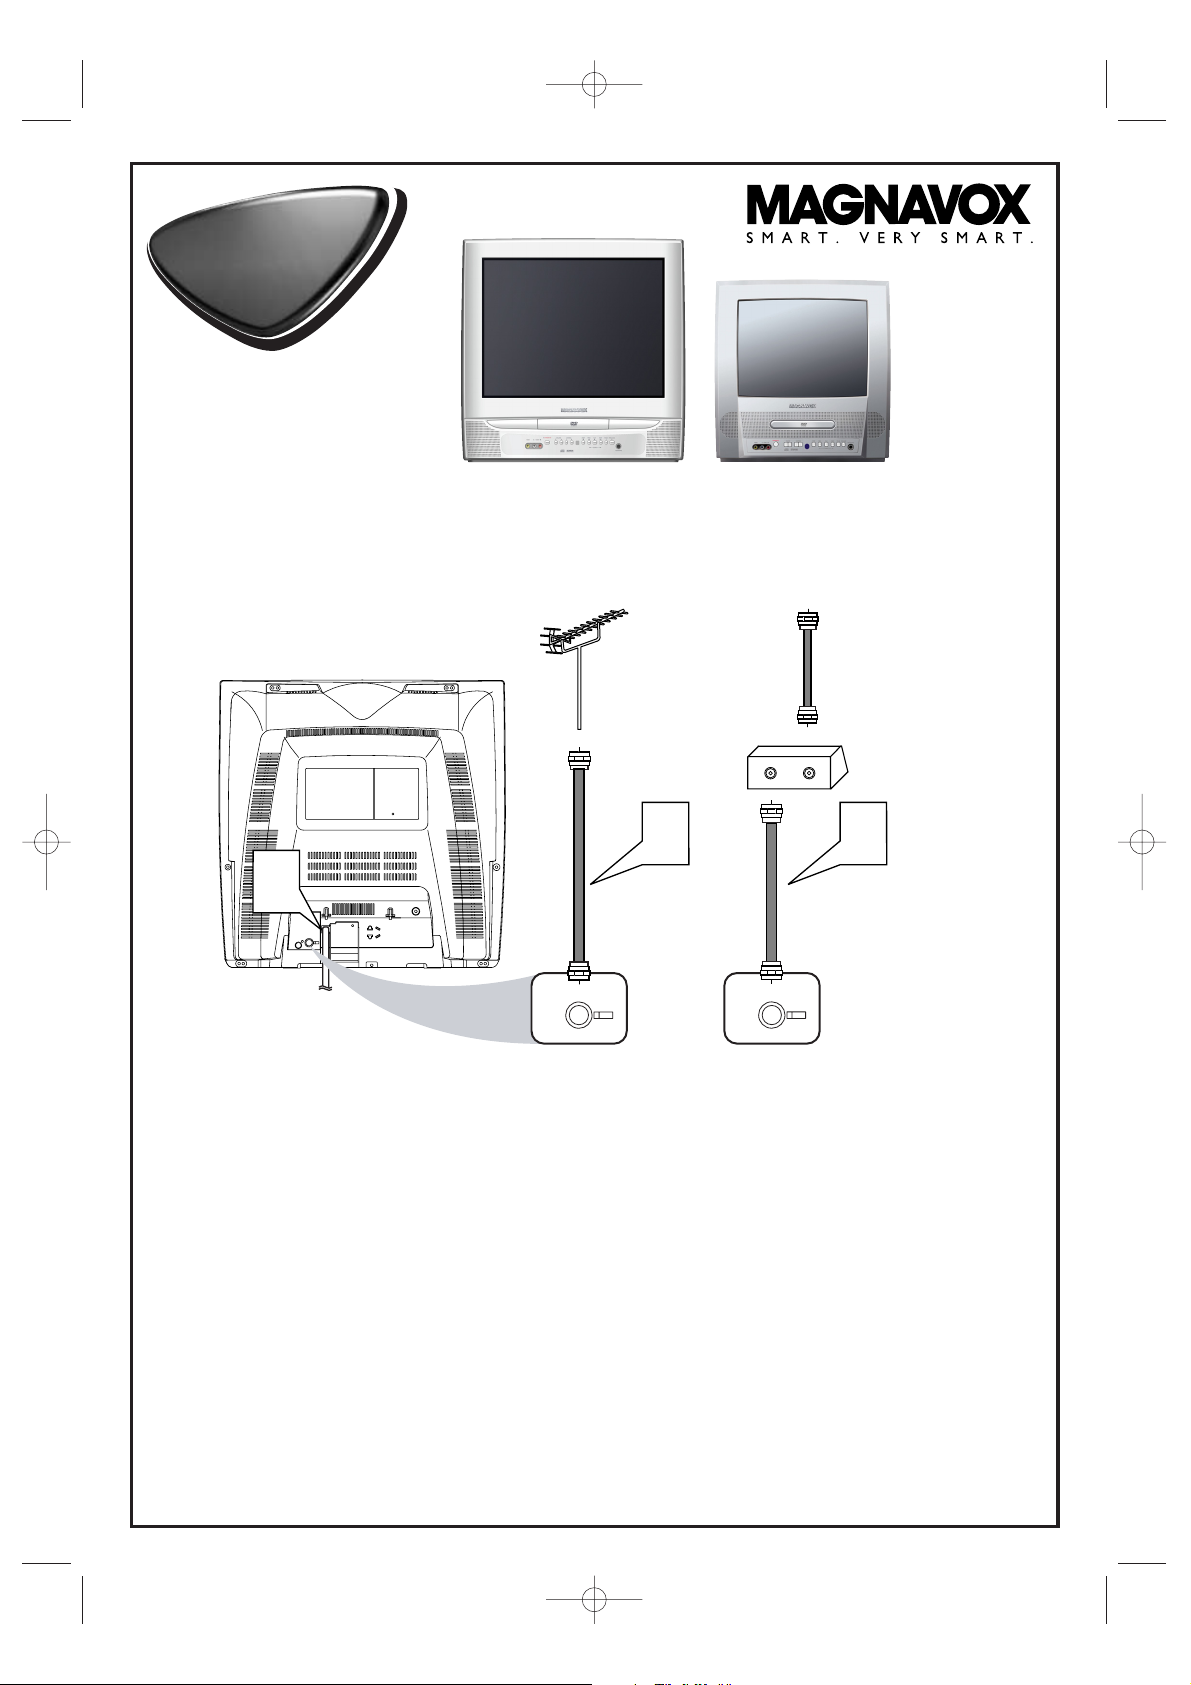
Disconnect all equipment from the power outlets. Connect the equipment to the power outlets only after you
have finished hooking up everything. Never make or change connections with equipment connected to the power outlet.
2
If you do not have a Cable Box, simply connect your Antenna or Cable TV signal directly to the ANT(enna)
jack on the rear of the TV/DVD.
3
If you do have a Cable Box or Satellite Receiver, first connect the Cable TV or Satellite signal to the IN jack
on the Cable Box or Satellite Receiver. Then, use an RF coaxial cable (not supplied) to connect the OUT
jack of the Cable Box or Satellite Receiver to the ANT(enna) jack on the TV/DVD. To view any channel, set the
TV/DVD to the output channel of the Cable Box or Satellite Receiver (channel 3 or 4).Then, select channels at the Cable
Box or Satellite Receiver.
4
When all connections are complete, plug the power cord of the TV/DVD into an active power outlet.
5
Press STANDBY-ON on the TV/DVD or its remote to turn on the unit.
20MC4204
13MDTD20
Quick-Use
Guide
Quick-Use
Guide
There are many ways to connect your new TV/DVD to your other equipment.This Quick-Use Guide shows the
easiest, most common connections for the TV/DVD.
T9103UD_QUG_EN_0407 4/7/05 12:19 PM Page 1
Page 2
Quick-Use Guide (cont’d)
Quick-Use Guide (cont’d)
Detailed playback features and additional functions are described in the
accompanying owner’s manual.
Watching TV
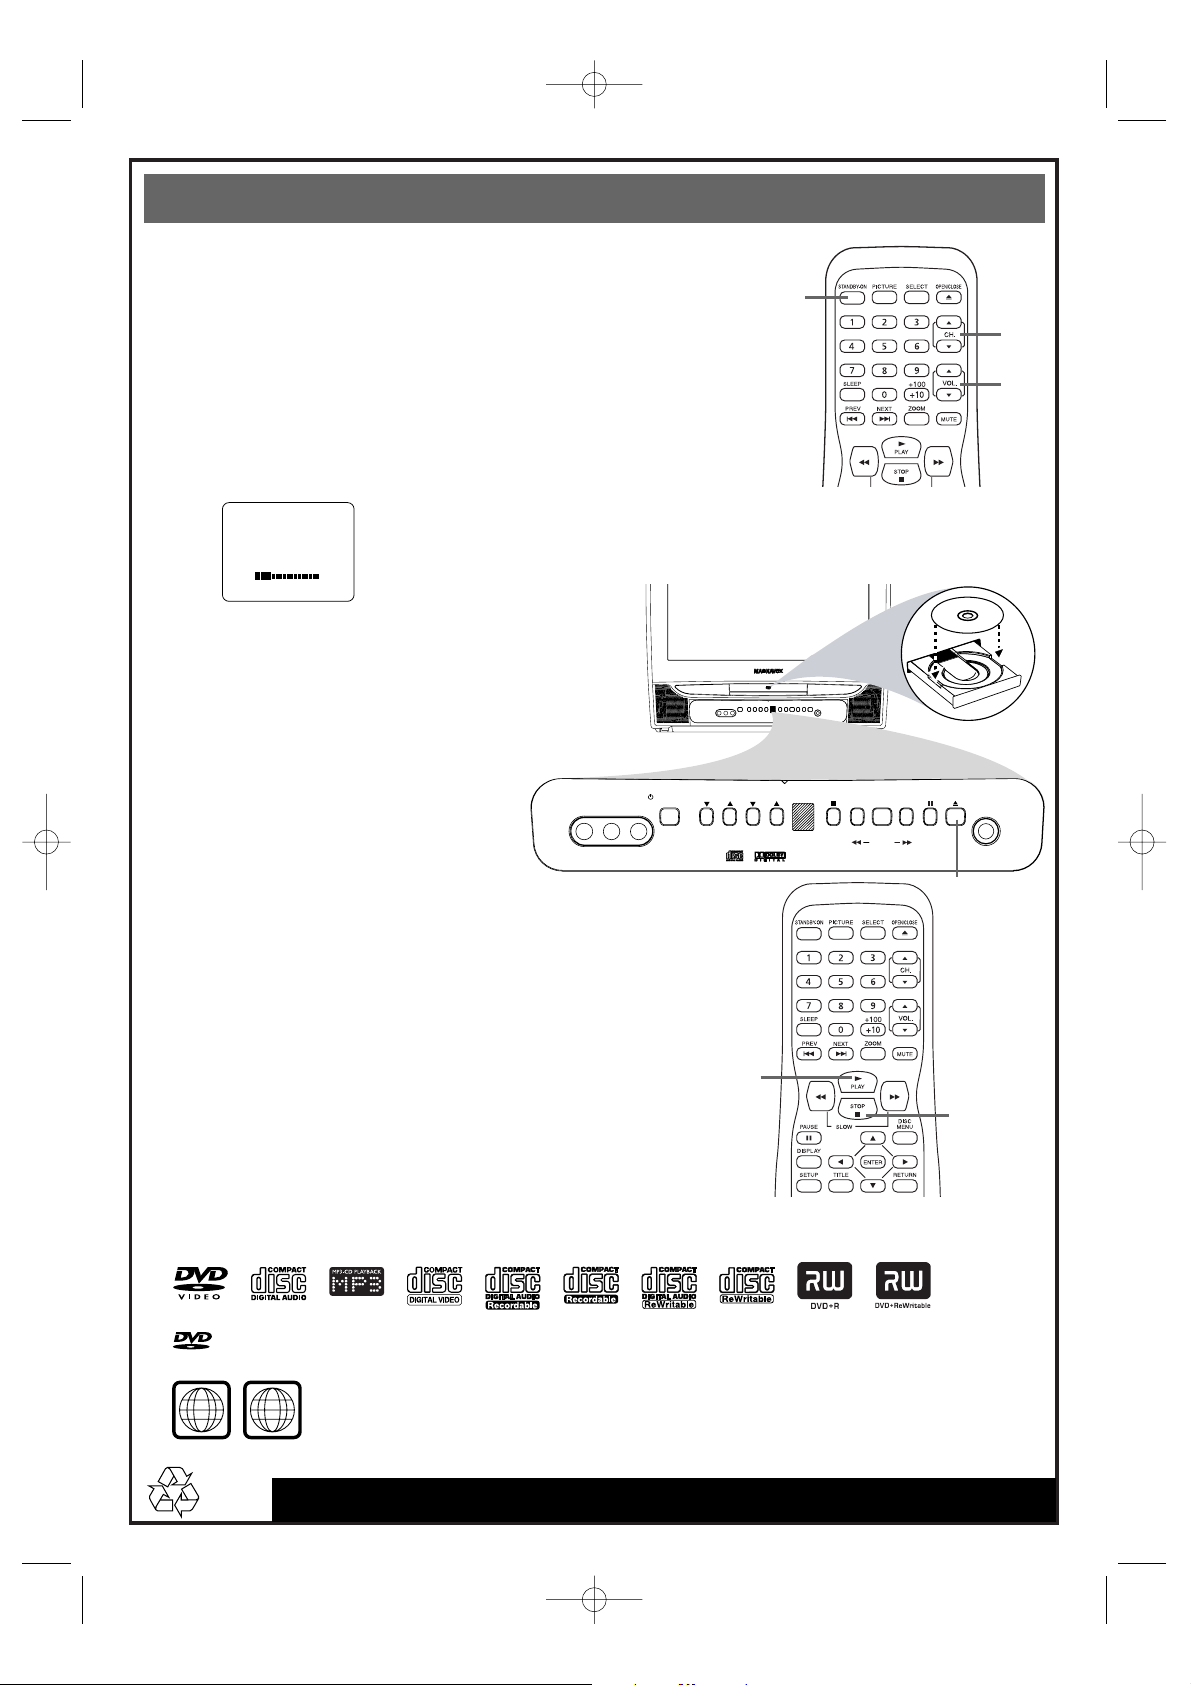
1
Press STANDBY-ON to turn on the TV/DVD.
2
This unit memorizes TV channels when you connect an Antenna or
Cable TV signal as described in this Quick-Use Guide.
To watch TV, use CH. ▲/▼ to select memorized channels. If a channel
is skipped, use the Number buttons to select it.To update your channels
later, refer to the owner’s manual.
3
Press VOL. ▲/▼ to adjust the volume.
Playable Discs
The TV/DVD will play the following discs.
is a trademark of DVD Format/Logo Licensing Corporation.
DVDs must have a Region Code of ALL regions or Region 1.
DVDs must be recorded in the NTSC Color System.
1
2
3
1
2
3
4
Printed in Malaysia
8239 300 40251
1EMN20353
T9103UD/T8103UD*****
Playing a DVD
1
With the unit on, press OPEN/CLOSE A
to open the disc tray. The unit will switch to
DVD mode automatically.
2
Place a disc on the tray, with the label
facing up and the shiny side facing down.
3
Press PLAY B. The tray will close and
playback will begin. If playback does not
start, press PLAY B again. If a disc menu
appears instead, use the KL
s B
, ENTER
and Number buttons to choose
features or start play from the menu.
4
Press STOP C to stop playback.
T9103UD_QUG_EN_0407 4/7/05 12:19 PM Page 2
VOLUME 20
VIDEO
L - AUDIO - R
STANDBY-ON
VOLUME
CHANNEL
LABEL
B
SEARCH
PAUSESTOP NEXTPLAYPREV
G
HEADPHONE
H
OPEN/CLOSE
ALL
1
Page 3

ANT.
32
O
SEÑAL DE ANTENA o
DE TELEVISIÓN
POR CABLE
CAJA DE CABLE
SEÑAL DE
TELEVISIÓN
POR CABLE
CABLE
COAXIAL RF
ANT.
IN
OUT
4
1
Desconecte todos los equipos de sus tomacorrientes. Conecte los equipos a los tomacorrientes sólo después de
que haya terminado de interconectar todo. Nunca efectúe ni modifique las conexiones con los equipos conectados al
tomacorriente.
2
Si usted no cuenta con una caja de TV por cable, simplemente conecte su señal de antena o TV por cable
directamente al conector hembra ANT(ena) situado en la parte trasera del televisor/DVD.
3
Si usted cuenta con una caja de TV por cable o un receptor satelital, primero conecte la señal de TV por
cable o de satélite al conector hembra IN de la caja de TV por cable o receptor satelital. Luego, utilice un
cable coaxial de RF (no provisto) para conectar el conector hembra OUT de la caja de TV por cable o
receptor satelital al conector hembra ANT(ena) del televisor/DVD. Para ver cualquier canal, sintonice el
televisor/DVD al canal de salida de la caja de TV por cable o receptor satelital (canal 3 o 4). Luego, seleccione los canales en
la caja de TV por cable o el receptor satelital.
4
Cuando estén completadas todas las conexiones, enchufe el cable de alimentación del televisor/DVD a un
tomacorriente activo.
5
Para encender el equipo presione STANDBY-ON en el televisor/DVD o en su control remoto.
20MC4204
13MDTD20
Existen muchas maneras de conectar su nuevo TV/DVD a sus demás equipos. Esta Guía para uso rápido
muestra las conexiones más sencillas y comunes para el TV/DVD.
T9103UD_QUG_SP_0411 4/11/05 11:16 AM Page 1
Page 4

Guía para uso rápido (continuación)
Guía para uso rápido (continuación)
Las funciones detalladas de reproducción y las funciones adicionales se describen
en el manual del propietario que viene adjunto.
Viendo TV
1
Para encender el televisor/DVD presione STANDBY-ON.
2
Este equipo memoriza los canales de TV cuando usted conecta una señal
de antena o de TV por cable tal como se describe en esta Guía para uso
rápido.
Para mirar televisión,utilice CH. ▲/▼ para seleccionar los canales
memorizados. Si el equipo se salta un canal, utilice los botones
numéricos para seleccionarlo. Para actualizar sus canales más adelante,
consulte el manual del propietario.
3
Para ajustar el volumen presione VOL. ▲/▼.
Discos reproducibles
El televisor/DVD reproducirá los siguientes discos.
es una marca registrada de formato DVD de Logo Licensing Corporation.
Los discos DVD deben tener un código regional que indique TODAS (ALL) las regiones o Región 1.
Los discos DVD deben estar grabados en el sistema de color NTSC.
1
2
3
1
2
3
4
T9103UD/T8103UD
Reproducción de un DVD
1
Con el equipo encendido, presione
OPEN/CLOSE A para abrir la bandeja de
discos. El equipo pasará al modo DVD
automáticamente.
2
Coloque un disco en la bandeja, con el
rótulo hacia arriba y la cara brillante hacia
abajo.
3
Presione PLAY B. La bandeja se cerrará y
comenzará la reproducción. Si la reproducción
no se iniciara, presione PLAY B de nuevo.
Si en cambio apareciera un menú de disco,
utilice los botones KL
s B
,ENTER y los
botones numéricos para seleccionar las
funciones o iniciar la reproducción desde el
menú.
4
Para detener la reproducción presione
STOP C.
T9103UD_QUG_SP_0411 4/11/05 11:16 AM Page 2
VOLUMEN 20
ETIQUETA
VIDEO
L - AUDIO - R
STANDBY-ON
VOLUME
CHANNEL
B
SEARCH
PAUSESTOP NEXTPLAYPREV
G
HEADPHONE
H
OPEN/CLOSE
ALL
1
 Loading...