

Page 1

MC 100
DAB+/FM/CD RECEIVER
Wichtige Hinweise zur Installation / Garantieurkunde
Important notes for installation / warranty card
Mode d’emploi / certificat de garantie
Avvertenze importanti per l’installazione / certifcato di garanzia
Notas importantes sobre la instalación / certificado de garantía
Важная информация по инсталляции / гарантия
Page 2

The
Bluetooth
Inc. and any use of such marks by Magnat Audio-Produkte GmbH is under license. Other
trademarks and trade names are those of their respective owners.
Qualcomm is a trademark of Qualcomm Incorporated, registered in the United States and other
countries, used with permission. aptX is a trademark of Qualcomm Technologies International,
Ltd., registered in the United States and other countries, used with permission.
aptX is a product of Qualcomm Technologies International, Ltd.
Bitte führen Sie das Gerät am Ende seiner Lebensdauer den zur Verfügung stehenden Rückgabe- und Sammelsystemen zu.
At the end of the product’s useful life, please dispose of it at appropriate collection points
provided in your country.
Une fois le produit en n de vie, veuillez le déposer dans un point de recyclage approprié.
® word mark and logos are registered trademarks owned by Bluetooth SIG,
Page 3
4
14
24
34
44
54
Page 4
INHALT
4 Zubehör
4 Vor Inbetriebnahme
4 Wichtige Sicherheitshinweise
5 Entsorgungshinweise
5 Konformitätserklärung
5 Bestimmungsgemäßer Gebrauch
6 – 9 Bedienungselemente und Anschlüsse
Vorderseite
Rückseite
Fernbedienung
10 Inbetriebnahme
10 Das Menü des MC 100
11 Verbinden des Geräts mit einer Bluetooth-Audioquelle
11 Senderspeicher
11 RDS-Funktion des Tuners
11 DAB-Funktionen des Tuners
11 Service und technische Probleme
12 Technische Daten
ZUBEHÖR
1) Bedienungsanleitung
2) Fernbedienung inkl. Batterie (2x AAA)
3) Netzkabel
4) DAB/FM-Antenne
VOR INBETRIEBNAHME
Sehr geehrter Kunde,
vielen Dank, dass Sie sich für den Magnat MC 100 entschieden haben.
Bitte lesen Sie unsere folgenden Hinweise vor Inbetriebnahme des MC 100 genau durch.
WICHTIGE SICHERHEITSHINWEISE
Bitte lesen Sie die Bedienungsanleitung vor der Inbetriebnahme aufmerksam durch. Die Bedienungsanleitung enthält wichtige Hinweise zum Betrieb und zur Sicherheit. Befolgen Sie unbedingt
alle Hinweise. Bewahren Sie die Bedienungsanleitung gut auf.
• WARNHINWEISE: Alle Warnzeichen auf dem Gerät, dem Zubehör und in der Bedienungsanleitung
müssen beachtet werden.
• WÄRMEEINWIRKUNG: Betreiben Sie das Gerät mit Zubehör nur im Temperaturbereich von 10°C
bis 40°C.
Das Gerät sollen nicht in der Nähe von Wärmequellen aufgestellt werden (Heizkörper, Öfen,
Heizstrahler, offene Flammen). Beim Aufstellen in Nähe von Verstärken sollte ein Mindestabstand
von 10 cm nicht unterschritten werden.
Stellen Sie keine offenen Flammen, wie z. B. Kerzen, auf das Gerät.
Achten Sie auf eine ausreichende Belüftung des Gerätes. Das Gerät darf nicht abgedeckt sein, z. B.
durch Vorhänge, Gardinen. Halten Sie ausreichend (ca. 20 cm) Abstand zu Wänden.
• EINFLUSS VON FEUCHTIGKEIT: Das Gerät darf nicht Tropf- oder Spritzwasser ausgesetzt werden.
Ebenfalls darf es nicht zum Abstellen von Vasen oder anderen mit Feuchtigkeit gefüllten Behältern
benutzt werden. Setzen Sie das Gerät weder Wasser noch hoher Luftfeuchtigkeit aus. Es besteht
die Gefahr eines Stromschlags. Bei Kontakt mit Feuchtigkeit oder Flüssigkeiten trennen Sie das
Gerät sofort vom Netz.
• FREMDKÖRPER: Achten Sie darauf, dass keine Fremdkörper durch die Öffnungen des Gerätes ins
Innere gelangen. Sie könnten Kurzschlüsse auslösen und auch einen Stromschlag und Brand.
• REINIGUNG: Bitte verwenden Sie ein trockenes und weiches Tuch und keine Reinigungsmittel,
Sprays oder chemische Lösungsmittel, da sonst die Oberäche beschädigt werden könnte.
• STROMANSCHLUSS: Bitte beachten Sie die Spannungswerte auf den Hinweisschildern. Das Gerät
darf nur mit den auf den Schildern angegebenen Spannungswerten und Frequenzwerten betrieben
werden.
• BLITZSCHUTZ/VORSICHTSMASSNAHMEN: Wird das Gerät längere Zeit (z. B. im Urlaub) nicht
benutzt, sollte es durch Ziehen des Netzsteckers vom Netz getrennt werden. Das Gerät sollte
auch bei Gewitter vom Netz getrennt werden. Somit wird eine Beschädigung durch Blitzschlag und
Überspannung verhindert.
• NETZKABEL: Das Netzkabel muss immer betriebsbereit sein und sollte nur so verlegt sein, dass
niemand auf das Netzkabel treten kann. Auch darf es nicht durch Gegenstände eingeklemmt sein,
die das Kabel beschädigen können. Bei Verwendung von Steckern und Mehrfachsteckdosen ist
darauf zu achten, dass das Kabel an der Stelle, wo es aus der Steckdose kommt, nicht geknickt
wird. Das Netzkabel nicht mit feuchten Händen anschließen oder entfernen.
Der Netzstecker dient als Abschalteinrichtung und muss immer frei zugänglich sein.
• ÜBERLASTUNG: Steckdosen, Mehrfachsteckdosen und Verlängerungskabel sollten nicht überlastet
werden. Bei Überlastung besteht Stromschlag- und Brandgefahr.
• AUFSTELLUNG: Bitte beachten Sie die Montageanweisung.
Das Gerät sollte nur auf festem Untergrund und nicht auf bewegliche Untergestelle gestellt oder
montiert werden, da sonst Verletzungsgefahr besteht.
• Benutzen Sie nur das beigepackte oder vom Hersteller speziziertes Originalzubehör.
• BATTERIEN UND AKKUS dürfen nicht großer Hitze ausgesetzt werden, wie z. B. Sonnenschein,
Feuer o. ä.
Es besteht Explosionsgefahr, wenn die Batterie falsch eingesetzt wird. Ersetzen Sie die Batterie nur
durch den selben oder gleichwertigen Typ.
4
Page 5

• GEFAHR DES VERSCHLUCKENS VON BATTERIEN!
• Das Gerät/die Fernbedienung können eine münzförmige/Knopf-Batterie enthalten, die verschluckt werden kann. Halten Sie die Batterie zu jeder Zeit außerhalb der Reichweite von Kindern.
Wird die Batterie verschluckt, kann dies zu schweren Verletzungen oder zum Tod führen. Schwere
innere Verbrennungen können innerhalb von 2 Stunden nach dem Verschlucken auftreten.
• Suchen Sie umgehend einen Arzt auf, wenn der Verdacht besteht, dass eine Batterie verschluckt
oder in einen Teil des Körpers eingeführt wurde.
• Wenn die Batterien gewechselt werden, halten Sie alle neuen und gebrauchten Batterien außerhalb der Reichweite von Kindern. Vergewissern Sie sich, dass das Batteriefach nach einem
Batteriewechsel wieder vollständig geschlossen ist.
• Kann das Batteriefach nicht vollständig geschlossen werden, verwenden Sie das Produkt nicht
weiter. Halten Sie das Produkt außerhalb der Reichweite von Kindern und kontaktieren Sie den
Hersteller.
SCHÄDEN, DIE VOM FACHMANN BEHOBEN WERDEN MÜSSEN:
Bei den folgenden Schäden sollte das Gerät sofort vom Netz getrennt werden und ein Fachmann mit
der Reparatur beauftragt werden:
· Bei sichtbaren Beschädigungen des Netzkabels darf das Gerät nicht mehr betrieben werden. Ein
beschädigtes Kabel darf nicht repariert, sondern muss ausgetauscht werden.
· Beschädigungen der Netzbuchse am Gerät.
· Wenn Feuchtigkeit oder Wasser in das Gerät gelangt ist oder Gegenstände in das Gerät gefallen
sind.
· Wenn das Gerät heruntergefallen ist und das Gehäuse beschädigt ist
· Wenn das Gerät nicht richtig funktioniert, obwohl man alle Hinweise in der Bedienungsanleitung
beachtet hat.
Es dürfen nur nachträgliche Änderungen vorgenommen werden, die vom Hersteller genehmigt sind.
Es dürfen zur Reparatur nur Originalersatzteile verwendet werden.
Nach einer Reparatur sollte das Gerät auf Sicherheit überprüft werden, um eine ordnungsgemäße und
sichere Funktion sicherzustellen.
Reparaturen müssen immer qualizierten Fachkräften überlassen werden, da man sich sonst
gefährlichen Hochspannungen oder anderen Gefahren aussetzt.
Das Dreieck mit Blitzsymbol warnt den Benutzer, dass innerhalb des Gerätes hohe
Spannungen verwendet werden, die gefährliche Stromschläge verursachen können.
NIcht öffnen! Gefahr des elektrischen Schlages!
Um die Gefahr von Feuer oder eines elektrischen Schlages zu verringern,
darf das Gerät nicht Regen oder Feuchtigkeit ausgesetzt werden.
Gerät der Schutzklasse II mit doppelter Isolation. Kein Schutzerdungsanschluss vorhanden.
ENTSORGUNGSHINWEISE
Gemäß der europäischen Richtlinie 2012/19/EU müssen alle elektrischen und elektronischen Geräte
über lokale Sammelstellen getrennt entsorgt werden. Bitte beachten Sie die lokalen Vorschriften und
entsorgen Sie Ihre Altgeräte nicht mit dem normalen Hausmüll.
Batterie-Entsorgung
Alt-Batterien sind Sondermüll und müssen gemäß den aktuellen Vorschriften entsorgt werden.
KONFORMITÄTSERKLÄRUNG
Hiermit erklärt die Firma Magnat Audio-Produkte GmbH, dass sich das Gerät Magnat MC 100 in
Übereinstimmung mit den grundlegenden Anforderungen und anderen relevanten Vorschriften der
Richtlinie 2014/53/EU befindet. Die Konformitätserklärung finden Sie unter www.magnat.de im
Downloadbereich des Gerätes.
BESTIMMUNGSGEMÄSSER GEBRAUCH
Dieses Gerät ist nur für die Verwendung im Haus konzipiert.
Das Dreieck mit Ausrufezeichen macht den Benutzer darauf aufmerksam, dass in der
beigefügten Bedienungsanleitung wichtige Betriebs- und Wartungsanweisungen
(Reparatur) enthalten sind, die unbedingt beachtet werden müssen.
5
Page 6
BEDIENUNGSELEMENTE UND ANSCHLÜSSE - VORDERSEITE
16
15
1
2
3
4
5 6 7
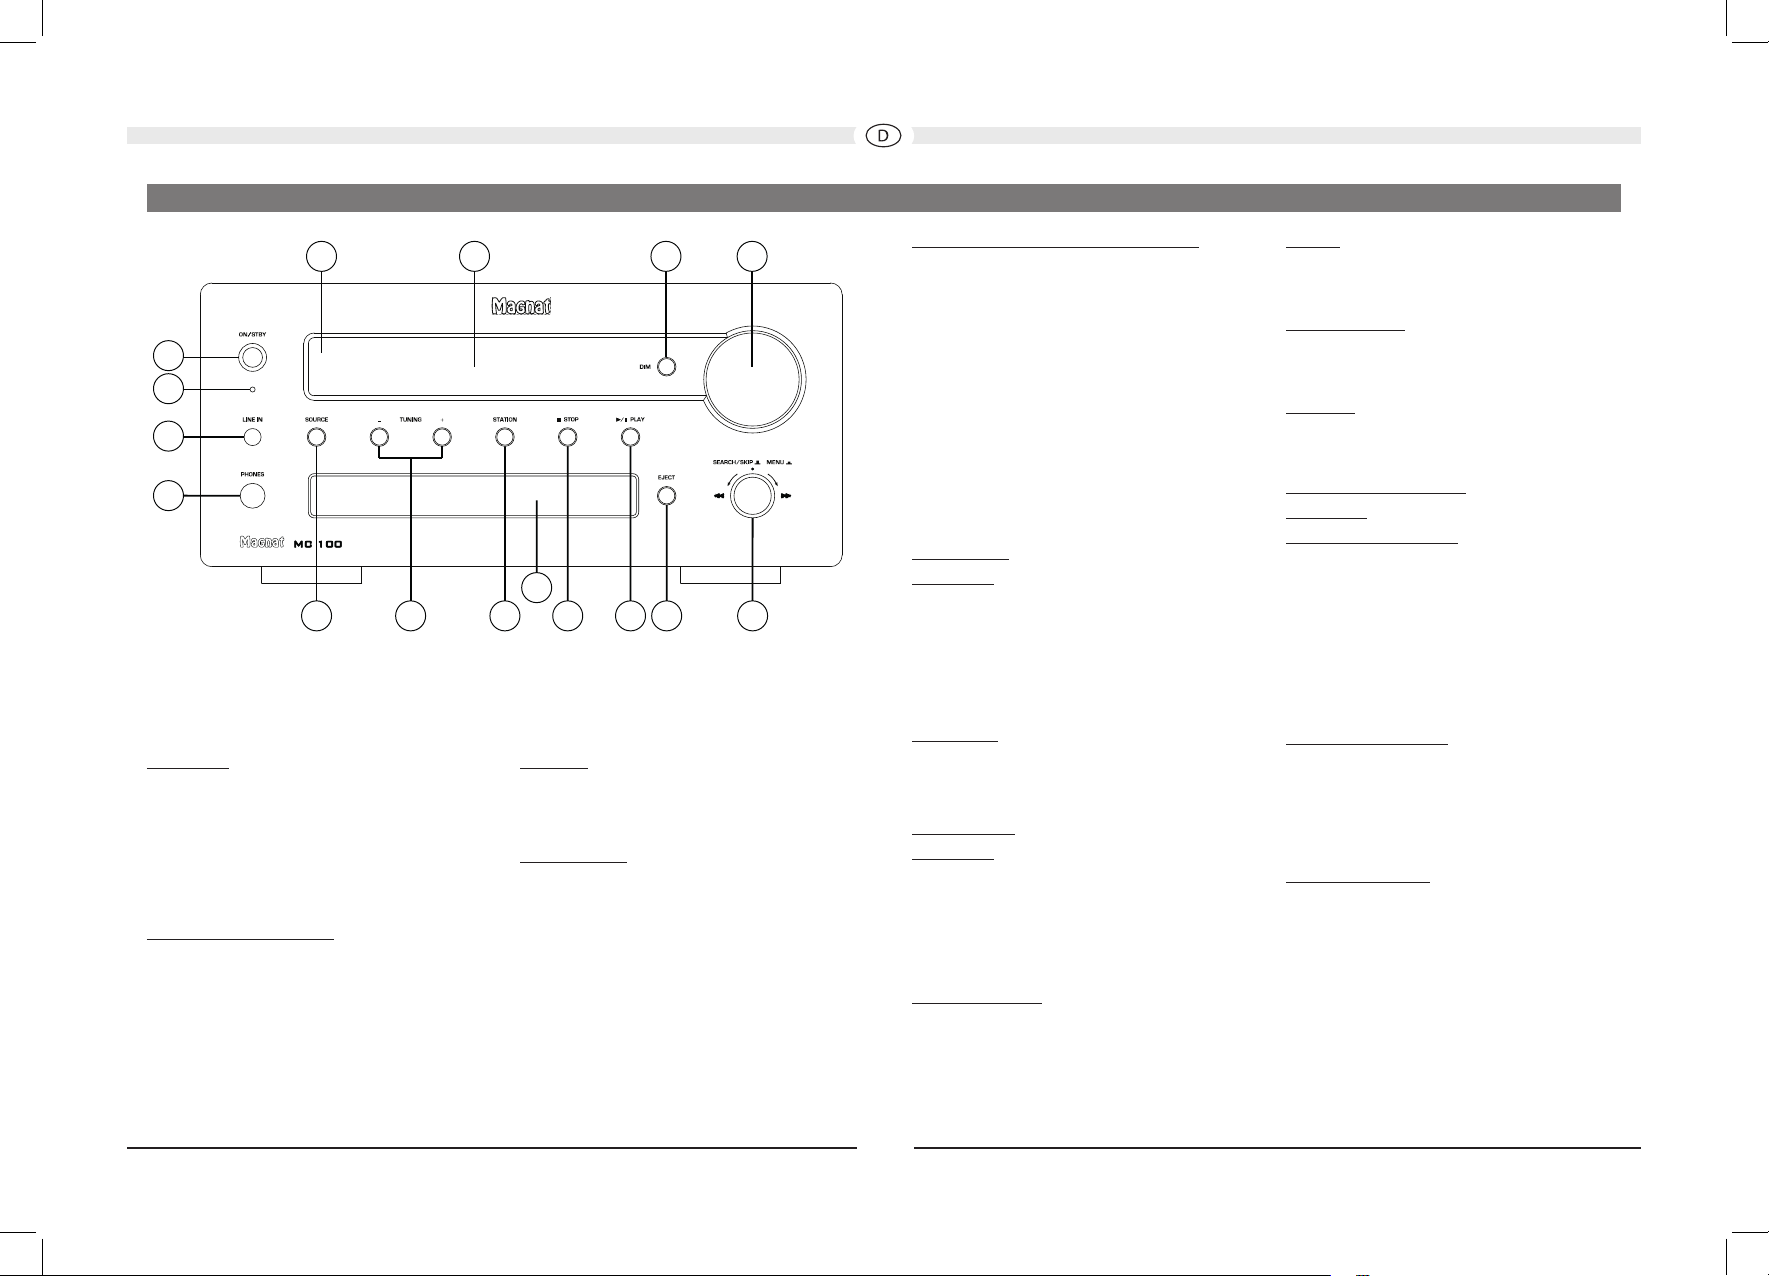
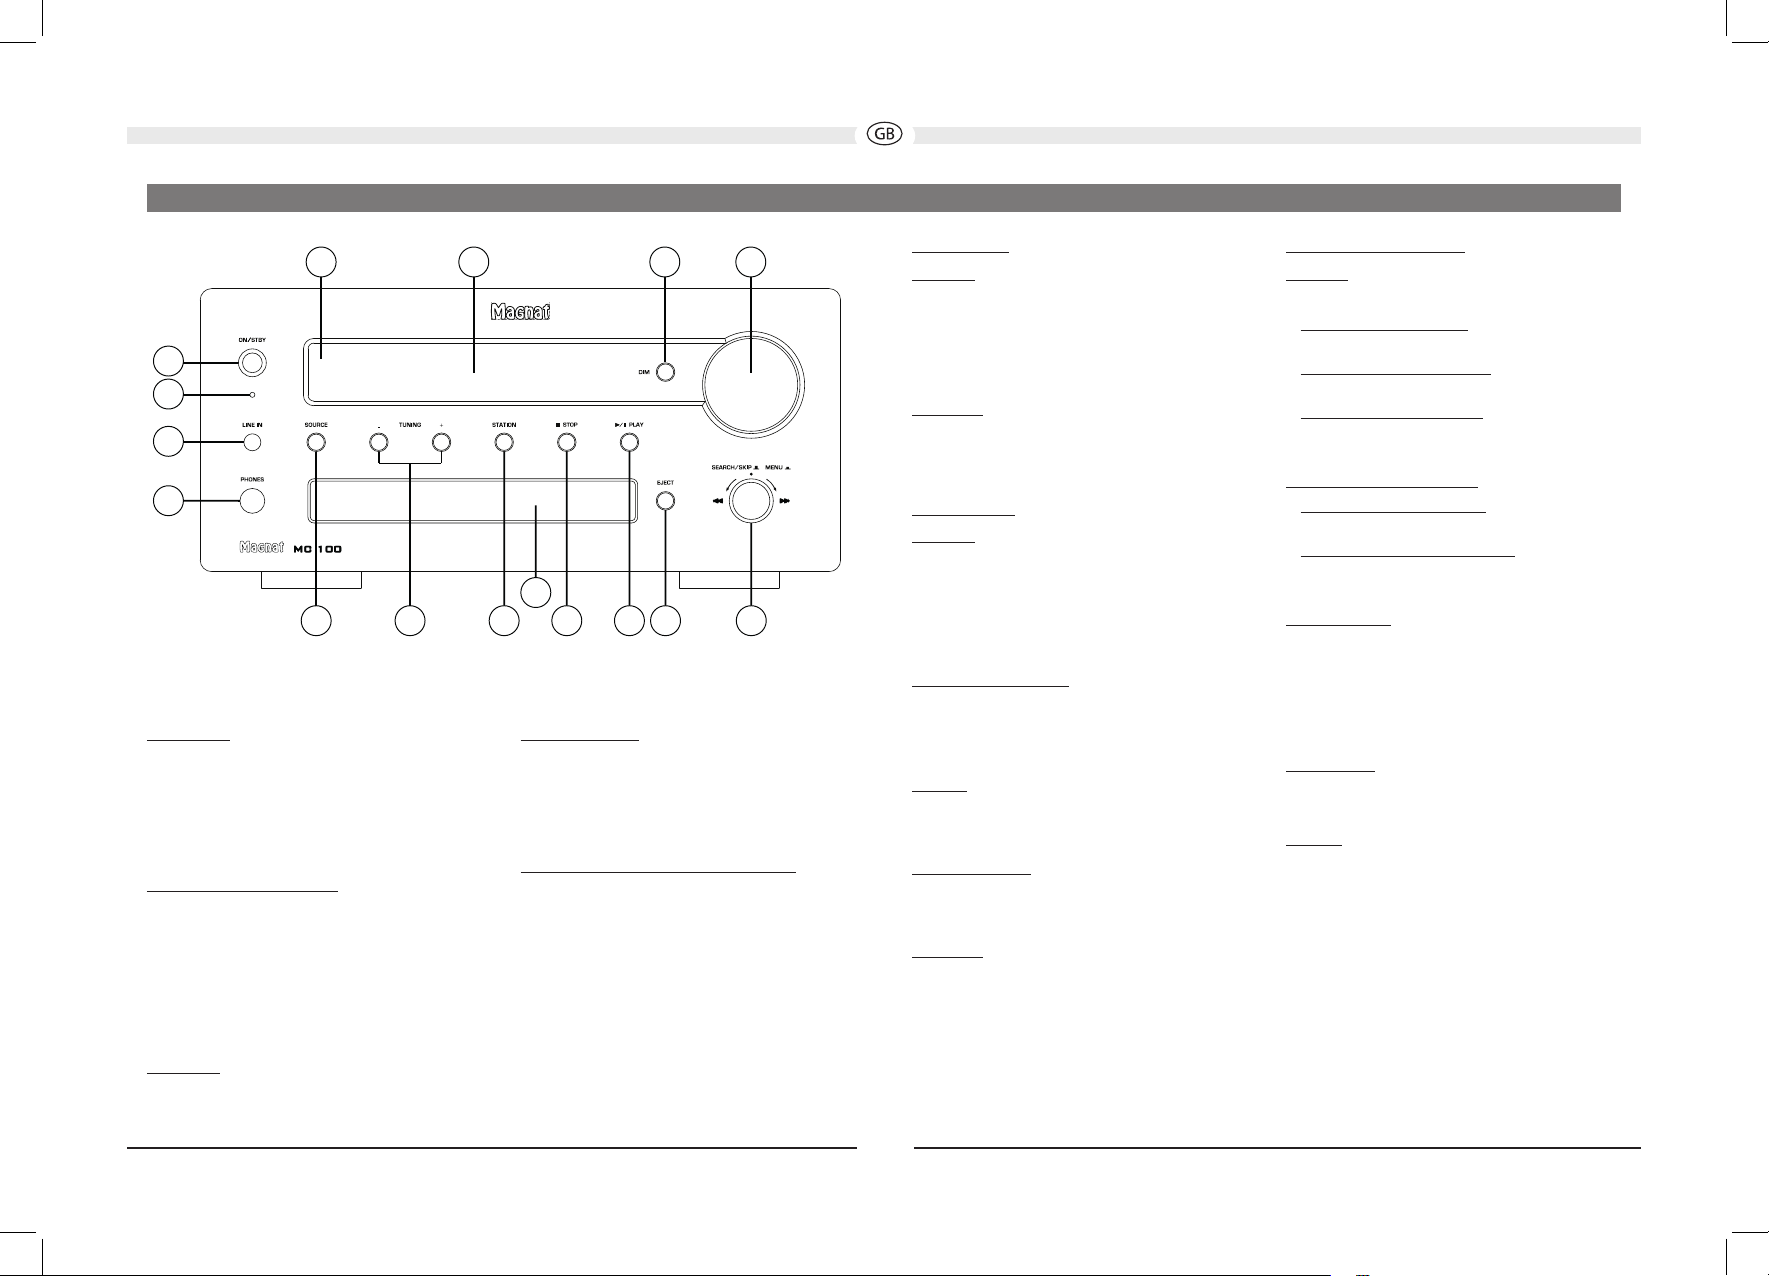
1 ON/STBY
Schaltet das Gerät ein, wenn es sich im StandbyModus befindet. Leuchtet die LED nicht, müssen
Sie den Netzschalter auf der Rückseite des
Gerätes einschalten. Umgekehrt kann das Gerät
vom Power-Betrieb auf Standby geschaltet
werden.
2 LED-ZUSTANDSANZEIGE
Diese Leuchtanzeige zeigt 2 Zustände an, in
denen sich der eingeschaltete MC 100 befinden
kann:
• LED leuchtet grün: Der MC 100 ist
eingeschaltet. Das Gerät ist betriebsbereit.
• LED leuchtet rot: Der MC 100 befindet sich im
Standby-Modus.
1314
8
9 10 11 12
3 LINE IN
3,5 mm Stereo-Klinkeneingang für eine
zusätzliche Audioquelle (MP3-Player o. ä.).
4 KOPFHÖRER
6,3 mm Stereo-Klinkenausgang für Kopfhörer.
Bei Benutzung schalten sich die Lautsprecher
aus. Stellen Sie die Lautstärke niedrig, bevor Sie
einen Kopfhörer anschließen.
5 SOURCE (EINGANGSWAHLSCHALTER)
Schaltet zwischen den verschiedenen Audioquellen um:
• CD: CD-Spieler.
• BT: Verbindung mit einem Bluetooth-Quellgerät
• DAB INPUT: Auswahl des DAB/DAB+
Tuners
• FM INPUT: Auswahl des FM-Tuners
• AUX1/2: Weitere Audiogeräte
• DIGITAL OPT, DIGITAL COAX:
Anschluss an digitale Audioquellen
• LINE IN: Fronteingang für mobile Geräte
6 TUNING -/+
FM-Betrieb:
• Kurzer Druck: Ändert die Empfangsfrequenz
in 50-kHz-Schritten (FM) (manuelle
Sendereinstellung).
• Langer Druck: Sucht den nächsten Sender
(automatische Sendereinstellung).
DAB-Betrieb:
Wählt den nächsten bzw. vorigen Sender im DAB-
Band.
7 STATION -/+
FM-Betrieb:
• Kurzer Druck: Wählt den nächsten Sender im
Senderspeicher.
• Langer Druck: Wählt den vorigen Sender im
Senderspeicher.
8 CD-SCHUBLADE
Legen Sie die CD mit der Beschriftung nach oben
in diese Schublade.
9 STOP
Stoppt eine laufende CD.
10 PLAY/PAUSE
Startet bzw. unterbricht die Wiedergabe einer CD.
11 EJECT
Öffnet oder schließt die CD-Schublade.
12 SEARCH/SKIP/MENU:
CD-Betrieb:
Search/Skip (rückwärts)
• Kurzer Dreh nach links: Die Wiedergabe
beginnt am Anfang des aktuellen Titels
• Zweimaliger kurzer Dreh nach links: Die
Wiedergabe beginnt am Anfang des vorigen
Titels
• Langer Dreh nach links: Schneller Rücklauf.
Bleibt aktiv, solange der Knopf gehalten wird.
Search/Skip (vorwärts)
• Kurzer Dreh nach rechts: Die Wiedergabe
beginnt am Anfang des nächsten Titels
• Langer Dreh nach rechts: Schneller Vorlauf.
Bleibt aktiv, solange der Knopf gehalten wird.
MENU Einstellungen
Drücken Sie den Knopf, um das Menü zur
Klangeinstellung und zur Einstellung weiterer
Parameter aufzurufen. Die Navigation durch das
Menü erfolgt durch Drehen am Knopf. Drücken
Sie den Knopf erneut, um die eingestellten
Parameter zu bestätigen.
Siehe auch das Kapitel DAS MENÜ DES MC 100.
6
Page 7
BEDIENUNGSELEMENTE UND ANSCHLÜSSE - VORDERSEITE
BEDIENUNGSELEMENTE UND ANSCHLÜSSE - RÜCKSEITE
13 VOLUME
Hiermit können Sie die Gesamtlautstärke der
Musikwiedergabe einstellen.
14 DIM
Mit dieser Taste kann die Helligkeit des Displays
in drei Stufen eingestellt werden.
15 DISPLAY
Im Display werden folgende Informationen
angezeigt:
• gewählter Audioeingang
• Lautstärke-Information
• Sender- und Empfangsinformationen im FMund DAB-Modus. Siehe hierzu auch Taste
DISPLAY der Fernbedienung.
• Nachdem der CD-EIngangs gewählt wurde
(keine CD eingelegt):
NO disC
• Nachdem eine CD eingelegt und eingelesen
wurde:
Gesamtanzahl der Titel auf der CD, Gesamte
Spielzeit der CD in Minuten und Sekunden,
z. B.: Cd 15 46:32
• Befinden sich auf der CD MP3- oder WMA-
Dateien, werden Datei-Typ und Anzahl der Files
auf der CD angezeigt:
MP3 15 FiLEs
• Bei der Wiedergabe einer CD:
Aktuell gespielter Titel, gespielte Zeit des Titels,
z. B.: 02 03:45
• Des weiteren wird durch folgende Symbole der
Betriebszustand angezeigt:
► Wiedergabe
II Pause
• CD-Text, ID3-Tags
Unterstützt die CD CD-Text oder beinhalten die
MP3- bzw. WMA-Files ID3-Tag-Informationen,
werden diese in der 2. Zeile des Displays
angezeigt. Siehe hierzu auch den Abschnitt
FERNBEDIENUNG.
16 SENSOR FÜR FERNBEDIENUNG
Um die Fernbedienung zu benutzen, zielen Sie
bitte auf diese Stelle.
10
1
2
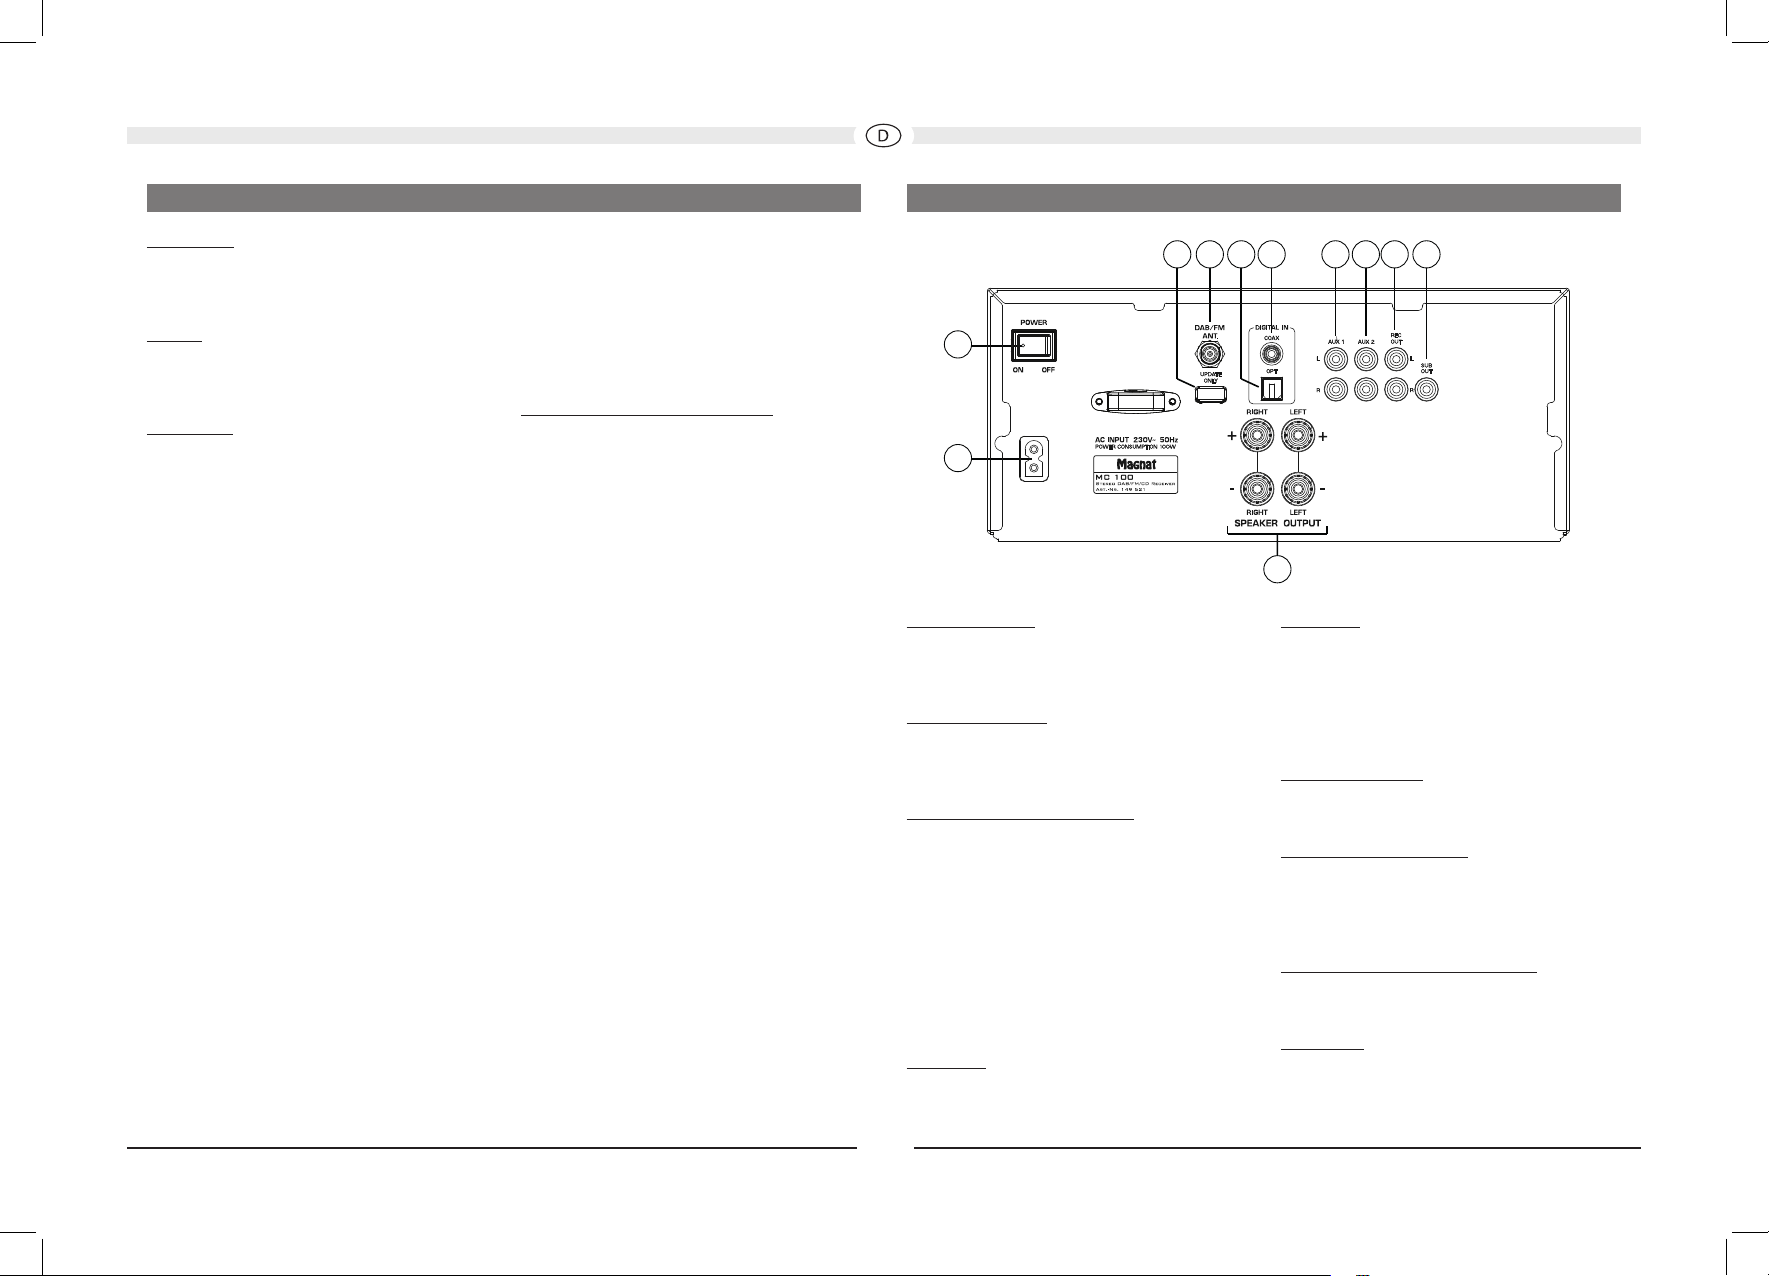
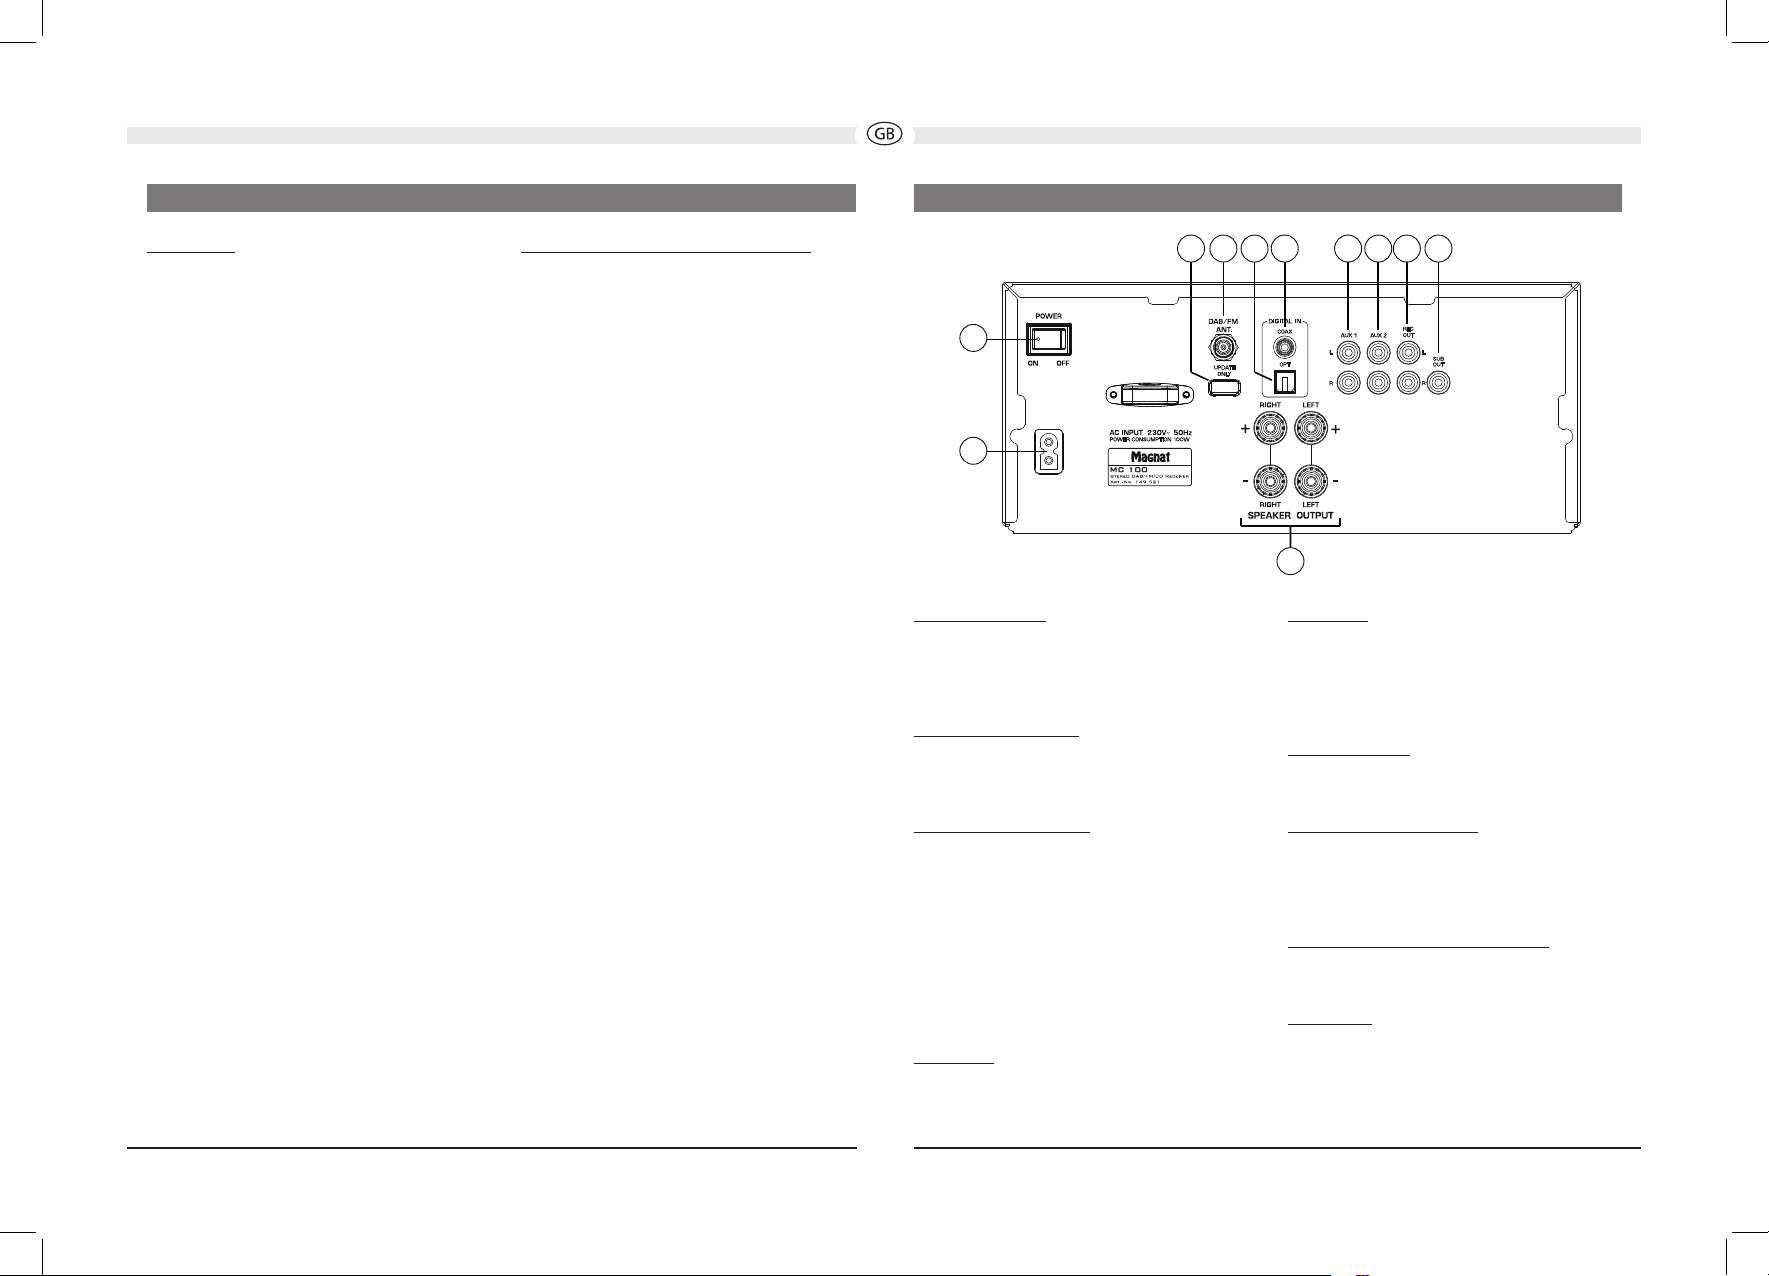
1 NETZSCHALTER
Schaltet das Gerät ein und bringt es in den
Standby-Modus. Ist der Schalter in Position
“OFF”, ist das Gerät vom Netz getrennt.
2 NETZANSCHLUSS
Zum Anschluss des mitgelieferten Netzkabels.
Die Sicherung darf nur von qualifiziertem
Servicepersonal gewechselt werden.
3 LAUTSPRECHERANSCHLÜSSE
Zum Anschluss eines Stereo-Lautsprecherpaares
mit einer Impedanz von 4-8 Ohm unter
Beachtung der richtigen Polarität. Siehe auch
das Kapitel INBETRIEBNAHME.
ANALOGE CINCH-ANSCHLÜSSE (4 - 7)
Zum Anschluss analoger Audioquellen. Bitte
beachten Sie die farbliche Kennzeichnung der
Buchsen und Stecker. Rot ist immer der rechte
Kanal.
4 SUB OUT
Ausgang zum Anschluss eines aktiven
Subwoofers
8911
47 6 5
3
5 REC OUT
Zum Anschluss von Geräten für die analoge
Tonaufzeichnung (z. B. Tonbandgerät,
Kassettenrecorder). An diesem Ausgang liegt
das Signal der gewählten Audioquelle mit festem
Pegel an, also unabhängig von der Stellung des
Lautstärkereglers.
6, 7 AUX-EINGÄNGE
Anschluss weiterer Audioquellen (z. B. MP3- oder
Minidisk-Spieler).
8, 9 DIGITAL IN OPT, COAX
Schließen Sie den MC 100 mit einem optischen
oder koaxialen Digital-Audiokabel an den
Digitalausgang Ihres CD-Players/Computers/
Spielekonsole/Netzwerkspielers an.
10 DAB/FM-ANTENNENANSCHLUSS
Zum Anschluss der beigefügten DAB/FM-Antenne
oder an eine Hausantennenanlage.
11 UPDATE
Dieser Anschluss ist ausschließlich für
Systemupdates vorgesehen.
7
Page 8
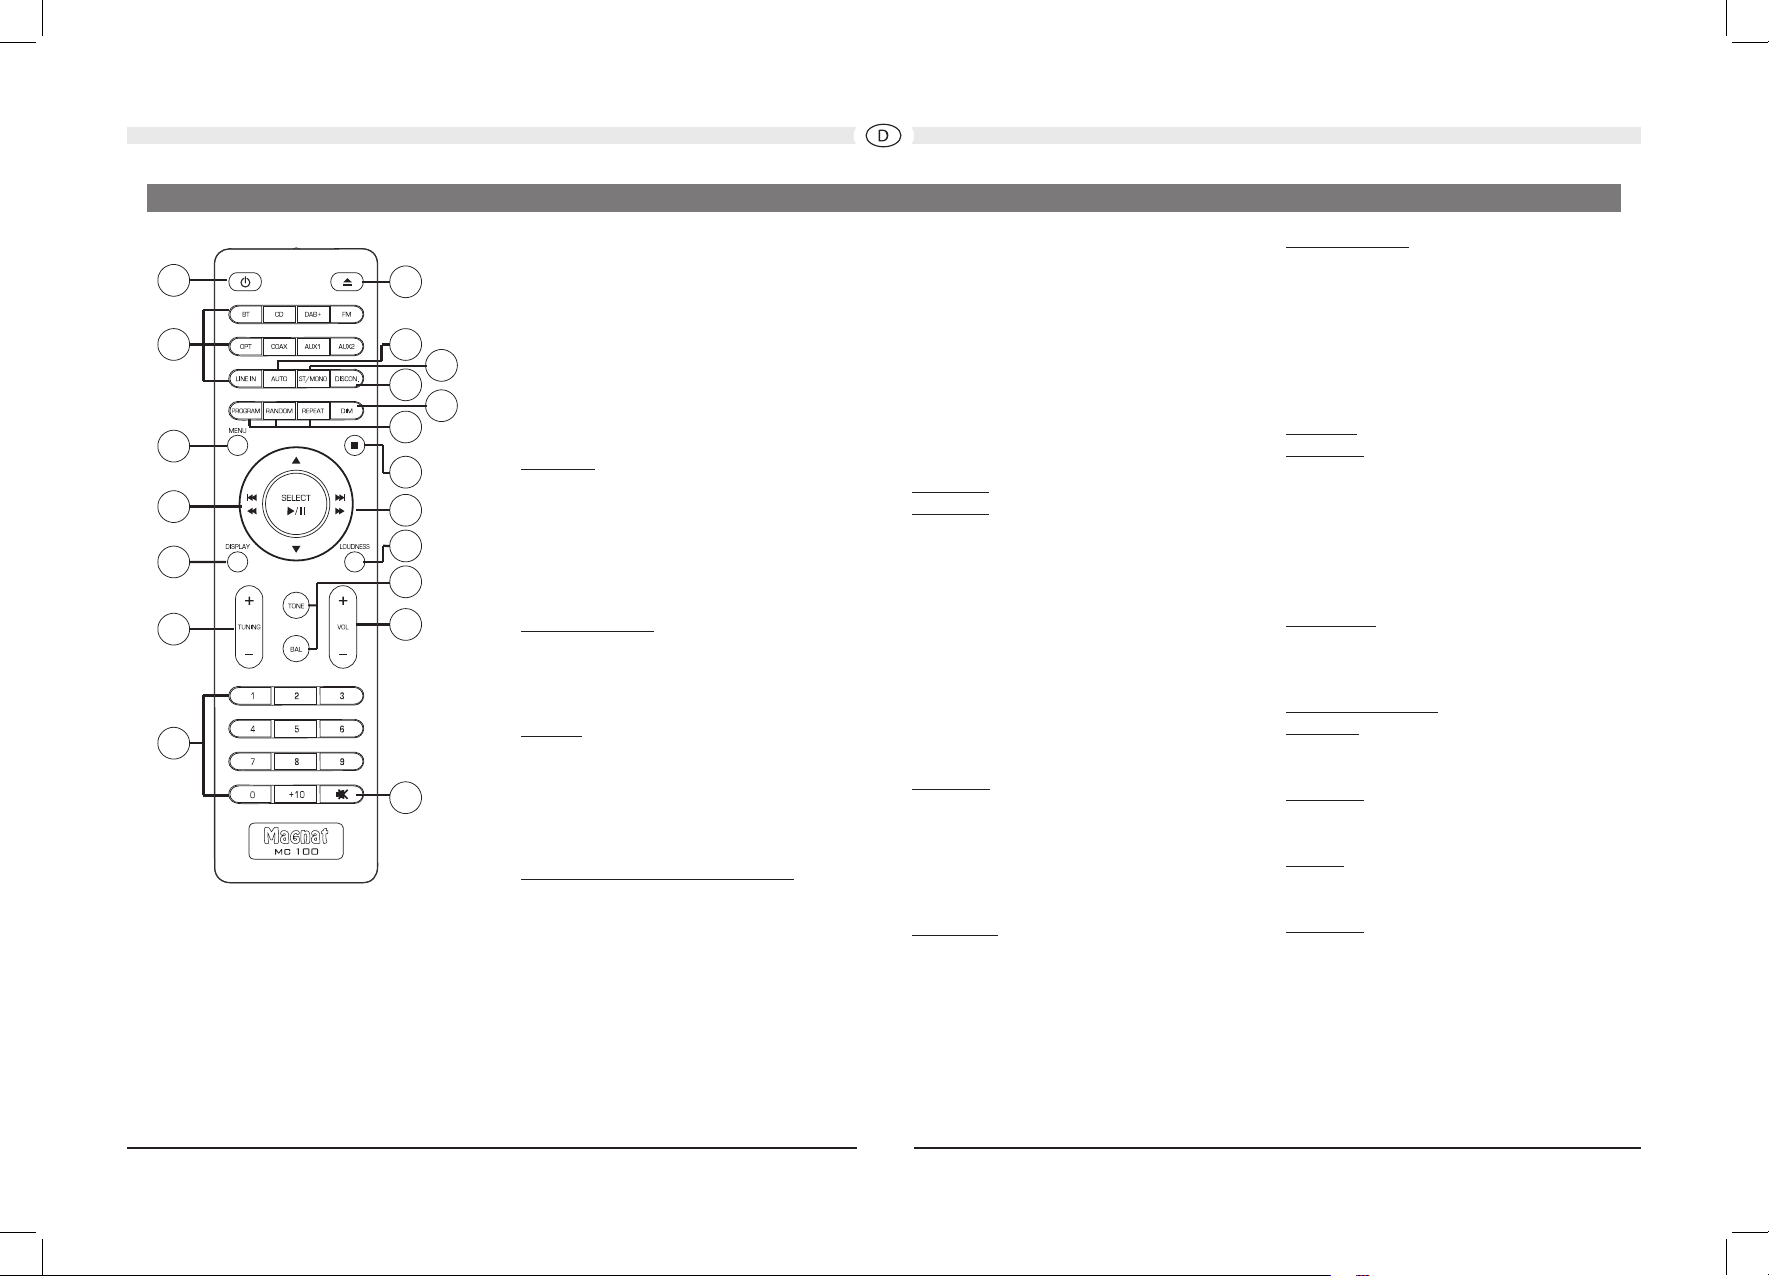
BEDIENUNGSELEMENTE UND ANSCHLÜSSE - FERNBEDIENUNG
• Vor Benutzung der Fernbedienung müssen die
mitgelieferten Batterien in das Batteriefach
1
2
19
18
17
16
15
14
3
13
4
5
12
11
10
6
9
7
8
auf der Rückseite der Fernbedienung
eingesetzt werden.
• Sollten sich die Batterien nach längerem
Betrieb entleert haben, so wechseln Sie sie
bitte aus (Typ AAA).
• Um Schäden an der Fernbedienung zu
vermeiden, entfernen Sie bitte die Batterien,
wenn das Gerät längere Zeit nicht benutzt wird.
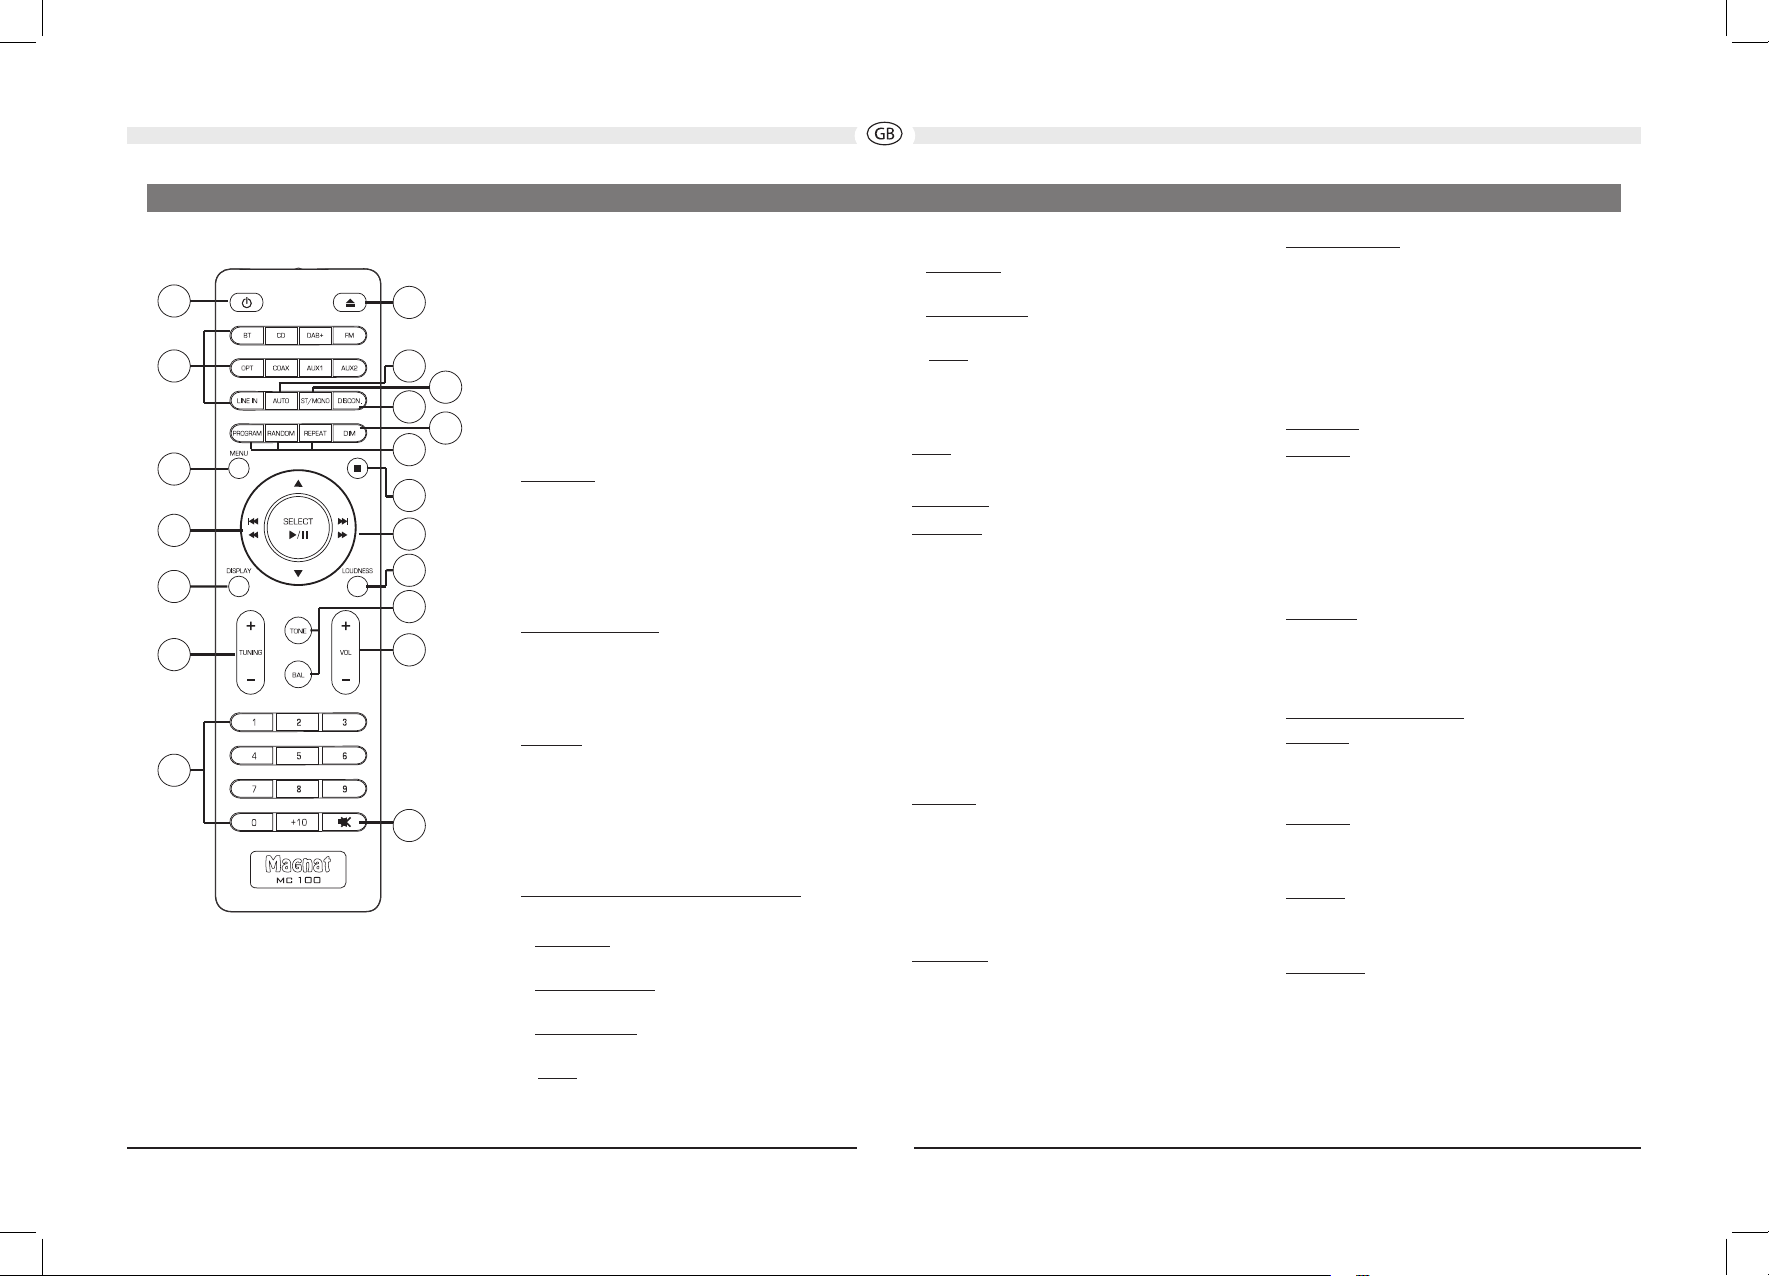
1 POWER
Schaltet das Gerät ein, wenn es sich im StandbyModus befindet. Leuchtet die LED nicht, müssen
Sie den Netzschalter auf der Rückseite des
Gerätes einschalten. Umgekehrt kann das Gerät
vom Power-Betrieb auf Standby geschaltet
werden.
2 EINGANGSWAHL
Mit diesen Tasten können die einzelnen AudioEingänge direkt angewählt werden. Der aktive
Eingang wird im Display angezeigt.
3 MENU
Ruft das Systemmenü auf. Die Navigation
durch das Menü erfolg mit den Tasten ◄◄, ►►,
▲und▼. Drücken Sie die Taste SELECT (12), um
die eingestellten Parameter zu bestätigen.
Siehe auch das Kapitel DAS MENÜ DES MC 100.
4 SKIP/SEARCH/NAVIGATIONSTASTEN
Search/Skip (rückwärts)
• Kurzer Druck: Die Wiedergabe beginnt am
Anfang des aktuellen Titels
• Zweimaliger kurzer Druck: Die Wiedergabe
beginnt am Anfang des vorigen Titels
• Langer Druck: Schneller Rücklauf. Bleibt aktiv,
solange die Taste gedrückt bleibt.
• Menü: Navigation / Einstellung der Parameter.
Search/Skip (vorwärts)
• Kurzer Druck: Die Wiedergabe beginnt am
Anfang des nächsten Titels
• Langer Druck: Schneller Vorlauf. Bleibt aktiv,
solange die Taste gedrückt bleibt.
• Menü: Navigation und Einstellung der
Parameter.
▲und▼
Menü: Einstellung der Parameter.
5 DISPLAY
CD-Betrieb:
Anzeige des CD-Textes bzw. ID3-Tag (falls von der
CD unterstützt):
In der 2. Displayzeile wird die gesamte CD-Text/
ID3-Tag Information angezeigt. Durch Druck auf
diese Taste werden die einzelnen Informationen
in folgender Reihenfolge angezeigt:
Titel – Interpret – Album – keine Anzeige
Bei MP3- und WMA-Files werden zusätzlich der
Dateiname und die Datenrate des aktuellen Titels
angezeigt.
FM-Betrieb:
Abrufen von RDS-Informationen (sofern vom
Sender unterstützt).
Weitere Informationen zu den RDS-
Senderinformationen finden Sie im Abschnitt
“RDS-Funktionen des Tuners”.
DAB-Betrieb:
Abrufen von DAB Senderinformationen (sofern
vom Sender unterstützt).
Weitere Informationen zu den DAB-
Senderinformationen finden Sie im Abschnitt
“DAB-Funktionen des Tuners”.
Bluetooth-Betrieb:
Im Display wird die Gerätekennung des
gekoppelten Gerätes, die Datenrate und die ID3Tag Informationen des aktuellen Titels angezeigt.
Durch Druck auf diese Taste werden die einzelen
ID3-Tag Informationen in folgender Reihenfolge
angezeigt:
Titel- Interpret - Album – keine Anzeige
6 TUNING
FM-Betrieb:
• Kurzer Druck: Ändert die Empfangsfrequenz
in 50-kHz-Schritten (FM) (manuelle
Sendereinstellung).
• Langer Druck: Sucht den nächsten
Sender im gewählten Band (automatische
Sendereinstellung).a
DAB-Betrieb:
Wählt den nächsten bzw. vorigen Sender im DAB-
Band.
7 Numerische Tasten
CD-Betrieb:
Direkte Anwahl eines Titels.
FM-Betrieb:
Direkte Anwahl eines voreingestellten Senders.
8 MUTE
Schaltet den Ton stumm und wieder ein.
9 VOLUME
Erhöht (+) oder verringert (-) die Lautstärke.
8
Page 9
BEDIENUNGSELEMENTE UND ANSCHLÜSSE - FERNBEDIENUNG
10 TONE/BAL
TREBLE (einmaliger Druck auf TONE):
Die Hochtonwiedergabe kann jeweils in 7
Schritten angehoben bzw. abgesenkt werden. Zur
Einstellung des Wertes verwenden Sie die Tasten
▲und▼.
BASS (zweimaliger Druck auf TONE):
Die Basswiedergabe kann jeweils in 7 Schritten
angehoben bzw. abgesenkt werden. Zur
Einstellung des Wertes verwenden Sie die Tasten
▲und▼.
BALANCE:
Der Stereomittelpunkt kann nach links bzw.
rechts in jeweils 10 Schritten eingestellt werden.
Zur Einstellung des Wertes verwenden Sie die
Tasten ◄◄ und ►►.
11 LOUDNESS
Auswahl der Loudness-Funktion (gehörrichtige
Lautstärkekorrektur).
12 PLAY/PAUSE/SELECT
CD-Betrieb:
Startet bzw. unterbricht die Wiedergabe einer CD.
Menü:
Bestätigung der Eingabe.
13 STOP
Stoppt die CD-Wiedergabe.
14 CD-STEUERUNG: PROGRAM/RANDOM/
REPEAT
PROGRAM
Programmierung von Titeln einer CD in beliebiger
Reihenfolge.
Zum Programmieren muss sich das Gerät im
Stop-Modus befinden.
• Drücken Sie die PROG-Taste.
Anzeige:
• Weisen Sie nun den gewünschten Titel
dem Programmplatz 01 zu, indem Sie die
Titelnummer über die numerische Tastatur
oder die SKIP-Tasten auswählen.
Anzeige z. B.:
• Drücken sie erneut die PROG-Taste.
Anzeige:
• Geben Sie nun den gewünschten Titel für den
Programmplatz 02 ein.
• Wiederholen Sie die beiden Schritte, bis alle
gewünschten Titel programmiert sind. Drücken
Sie nach dem letzten Titel die Taste STOP. Es
werden die Anzahl der programmierten Titel
und die gesamte Spielzeit der Programmliste
angezeigt:
• Starten Sie die Wiedergabe der Programmliste
mit PLAY. Es erscheint links ein ‚P‘, aktueller
Titel und gespielte Zeit dieses Titels werden
dahinter angezeigt.
Anzeige z. B.:
• Mit SKIP, SEARCH und PAUSE/PLAY können Sie
die Wiedergabe innerhalb der Programmliste
steuern.
• Nach Betätigen der EJECTTaste wird der
Programmspeicher gelöscht.
PRG 01-00
PRG 01-08
PRG 02-00
P 08-00:07
RANDOM
Wiedergabe der Titel einer CD in zufälliger
Reihenfolge.
• Einmaliger Druck: Schaltet die Funktion ein.
Im Display erscheint
• Erneuter Druck: Schaltet die Funktion aus.
Im Display erscheint
REPEAT
Titel/CD-Wiedergabewiederholung (Repeat):
• Eimaliger Druck: Der aktuelle Titel wird
wiederholt.
Im Display erscheint:
• Zweimaliger Druck: Die komplette CD wird
wiederholt.
Im Display erscheint:
• Erneuter Druck: Die Wiederholfunktion wird
deaktiviert.
Im Display erscheint:
15 DIM
Mit dieser Taste kann die Helligkeit des Displays in
drei Stufen eingestellt werden.
16 DISCONNECT (BLUETOOTH-BETRIEB)
Trennt eine bestehende Bluetooth Verbindung und
startet den Pairing Modus.
17 ST/MONO (NUR IM FM-MODUS)
Schaltet bei UKW-Empfang zwischen FM Stereo
und FM Mono um.
Bei schwachem Empfangssignal schaltet
das Gerät im Stereo-Modus automatisch auf
Mono-Empfang um, um den Rauschabstand zu
verbessern.
RANdOM-ON
RANdOM-OFF
REPEAT ONE
REPEAT ALL
REPEAT OFF
18 AUTO (DAB-BETRIEB)
Diese Funktion durchsucht den DABFrequenzbereich (Band III) nach Sendern. Diese
sind dann über die TUNING-Tasten abrufbar.
19 EJECT
Öffnet die CD-Schublade.
9
Page 10

INBETRIEBNAHME
DAS MENÜ DES MC 100
• Stellen Sie den MC 100 auf eine ebene Unterlage. Beachten Sie die Abstände, die unter
“Sicherheitshinweise” aufgeführt wurden.
WICHTIG: Legen Sie keine Gegenstände (Zeitschriften, CD/Plattenhüllen o.ä) auf das Gerät. Die
Lüftungsschlitze auf der Geräteoberseite müssen immer frei bleiben!
• Schließen Sie Ihre Lautsprecher an:
Das Stereo-Lautsprecherpaar (Impedanz 4 bis 8 Ohm) wird wie folgt auf der Rückseite angeschlossen:
Verwenden Sie nur hochwertige Audio-Lautsprecherkabel mit einem Leiterquerschnitt von
min. 1,5 – 2,5 mm². Isolieren Sie die Kabel ca. 10 mm ab und verdrillen Sie die Enden. Lösen Sie
nacheinander die Klemmschrauben und stecken die abisolierten Enden in die seitliche Bohrungen.
Ziehen Sie die Klemmschrauben wieder fest an. Auf richtige Polung ist unbedingt zu achten. Sie können
auch vorkonfektionierte Kabel mit 4 mm Bananenstecker oder Gabelschuhen verwenden.
Bitte beachten Sie auch die Bedienungsanleitung der Lautsprecher.
• Schließen Sie Ihre Audioquellen an.
• Schließen Sie die DAB/FM-Antenne an den Antennenanschluss auf der Rückseite des Gerätes an.
Beim späteren Betrieb sollte dann die Position der Antenne ermittelt werden, bei der der Empfang
am besten ist. Das Ende der Antenne sollte dann an der entsprechenden Position, z. B. mit einer
Heftzwecke, befestigt werden.
Eine geeignete Hausantennenanlage oder Außenantenne kann bei ungünstiger Empfangssituation den
Empfang verbessern.
• Schließen Sie auf der Rückseite das beigefügte Netzkabel an, und danach das andere Ende an eine
230 V Steckdose.
• Schalten Sie zunächst den Netzschalter auf der Rückseite ein, das Gerät befindet sich nun im StandbyModus.
• Schalten Sie das Gerät nun mit der ON/STBY-Taste auf der Front oder über die Fernbedienung ein.
• Nach der Vorheizphase der Röhre ist das Gerät betriebsbereit.
• Wählen Sie die von Ihnen gewünschte Audioquelle mit dem Eingangswahlschalter.
Die Klangeinstellungen und Einstellung weiterer Parameter können bequem über ein Menü vorgenommen
werden.
• Das Menü wird über die Taste MENU auf der Fernbedienung oder durch Druck auf den Knopf
SEARCH/SKIP/MENU auf der Front aufgerufen.
• Die Navigation innerhalb des Menüs und die Änderung der Einstellungen erfolgen über die Tasten ◄◄,
►► , ▲und▼auf der Fernbedienung oder durch Drehen am Knopf SEARCH/SKIP/MENU.
• Bestätigung der einzelnen Menüpunkte über die Taste SELECT auf der Fernbedienung oder durch
Druck auf den Knopf SEARCH/SKIP/MENU.
Folgende Einstellungen sind möglich:
• Basseinstellung:
Wählen Sie im Menü BASS aus. Die Basswiedergabe kann jeweils in 7 Schritten angehoben bzw.
abgesenkt werden.
• Hochtoneinstellung:
Wählen Sie im Menü TREBLE aus. Die Hochtonwiedergabe kann jeweils in 7 Schritten angehoben bzw.
abgesenkt werden.
• Balance Einstellung:
Wählen Sie im Menü BALANCE aus. Der Stereomittelpunkt kann nach links bzw. rechts in jeweils 10
Schritten eingestellt werden.
• Loudness (gehörrichtige Lautstärkekorrektur):
Wählen Sie im Menü LOUDNESS aus. Die Funktion kann nun ein- bzw. ausgeschaltet werden.
• Auto-Standby-Funktion:
Das Gerät verfügt über eine Auto-Standby-Funktion, die das Gerät automatisch ca. 3,5 Stunden nach der
letzten Bedienung (über die Bedienelemente am Gerät oder über die Fernbedienung) in den StandbyModus schaltet. Diese Funktion setzt eine EU-Verordnung zur Energieeinsparung um (1275/2008 EG)
und verringert den Stromverbrauch, falls das Gerät versehentlich nach der Nutzung nicht ausgeschaltet
wird.
Wählen Sie im Menü APO SETTING aus. Die Funktion kann nun ein- bzw. ausgeschaltet werden. Im
Auslieferzustand ist die Funktion eingeschaltet.
• Sleep-Funktion:
Wählen Sie im Menü SLEEP TIME aus. Diese Funktion ermöglicht es Ihnen, eine Zeit einzustellen, nach
der sich das Gerät ausschaltet und von allein in den Standby-Betrieb wechselt. Die Zeit kann mit den
Tasten ▲und ▼zwischen 5 und 240 Minuten eingestellt werden. Nach Verlassen des Menüs wird die
aktive Sleep-Funktion durch ein Symbol im Display unten rechts dauerhaft angezeigt.
• Systeminformation:
Wählen Sie im Menü SYSTEM INFO aus. Mit den Tasten ◄◄ und ►► können für Servicezwecke die
einzenen Firmware-Versionen des Gerätes angezeigt werden.
• Reset:
Über den Menüpunkt RESET werden die Grundeinstellungen wiederhergestellt (alle Senderspeicher
löschen, alle Klangregler auf 0, Loudness-Funktion und Sleep Timer aus, Auto-Standby an).
Über den Menüpunkt EXIT verlassen Sie das Menü.
10
Page 11
VERBINDEN DES GERÄTS MIT EINER BLUETOOTH-AUDIOQUELLE
Wählen Sie den Bluetooth-Eingang. Wenn vorher bereits eine Kopplung mit einem Bluetooth-Quellgerät
bestand, wird selbsttätig versucht, die Verbindung mit diesem Gerät wiederherzustellen. Dabei kann es
vorkommen, dass Sie die Wiederaufnahme der Verbindung am Quellgerät manuell bestätigen müssen.
Wenn keine vorherige Kopplung bestand oder die Verbindung nicht wiederhergestellt werden kann,
aktiviert der MC 100 automatisch den Kopplungs-Modus, auch Pairing-Modus genannt. Im Display
blinkt die Anzeige „BT“.
Schalten Sie nun den Bluetooth-Modus Ihres Quellgeräts ein. Der MC 100 wird in der Liste mit
Bluetooth-Geräten als „MC 100“ angezeigt. Falls es nicht in der Liste angezeigt wird, aktivieren Sie am
Quellgerät manuell die Suche nach Bluetooth-Geräten und stellen Sie sicher, dass sich der MC 100 im
Pairing-Modus bendet.
Je nach Quellgerät kann es vorkommen, dass während des Kopplungsvorgangs gefragt wird, ob das
Passwort angenommen werden soll. Das können Sie einfach mit „Annehmen“ bestätigen. Wenn
weiterhin nach einem Passwort gefragt wird, benutzen Sie die Standard-Passwörter „0000“ oder
„1234“. Falls nach erfolgter Kopplung gefragt wird, ob Sie eine Verbindung herstellen möchten,
beantworten Sie dies ebenso mit „Ja“. Nach erfolgreicher Kopplung und Verbindung leuchtet die
Displayanzeige „BT“ dauerhaft.
Der MC 100 unterstützt den besonders hochwertigen Audio-Übertragungsstandard „Qualcomm®
aptX™“. Wenn Ihr Quellgerät diese Technik ebenfalls unterstützt, wird beim Herstellen einer BluetoothVerbindung automatisch „Qualcomm® aptX™“ als Übertragungsmodus gewählt.
SENDERSPEICHER
Das Gerät ist mit zwei voneinander unabhängigen Senderspeichern für FM- und DAB-Sender ausgerüstet.
Jeder Speicher kann bis zu 40 Sender aufnehmen.
RDS (RADIO DATA SYSTEM)-FUNKTION DES TUNERS (NUR FM)
RDS ist ein System, mit dem Informationen über UKW-Sendungen zusammen mit dem Signal des
Senders ausgestrahlt werden. Der MC 100 kann diese Informationen (über den Sender, die Sendung
usw.) im Display anzeigen.
Die RDS-Informationen können durch wiederholtes Drücken der DISPLAY-Taste (Fernbedienung) in
folgender Reihenfolge abgerufen werden:
• PS (Program Service Name): Zeigt den Namen des Senders an.
• RT (Radio Text): Zeigt Informationen und Meldungen des Senders an.
• PTY (Program Type): Zeigt den Typ des Senders an.
• Uhrzeit/Datum
DAB-FUNKTIONEN DES TUNERS (NUR DAB)
Das DAB-Übertragungssystem hält weitere Daten und Informationen bereit, die über die DISPLAY-Taste
(Fernbedienung) in folgender Reihenfolge abgerufen werden können:
• Sendername
• DLS (Dynamic Label Segment): Zeigt Informationen und Meldungen des Senders an (z. B. Titel und
Interpret des aktuellen Musikstücks, News-Meldungen, weitere Informationen der aktuellen Sendung
oder des Senders)
• Programm-Typ (z. B. Pop, News, Klassik)
• DAB-Multiplex-Nummer und Frequenz des aktuellen Senders
• Uhrzeit / Datum
• Bitrate des aktuellen Audiosignals
• DAB-Multiplex-Name
Abspeichern von Sendern:
Stellen Sie den gewünschten DAB- oder FM-Sender mit den TUNING-Tasten am Gerät oder über die
Fernbedienung ein.
• Wählen Sie den gewünschten Speicherplatz durch langen Druck auf die jeweilige Taste der Numerischen
Tastatur.
• Bei zweistelligen Speicherplatznummern (10 – 40) muss zuerst die Taste +10 lange gedrückt und
danach die gewünschten Ziffern eingegeben werden.
• Die erfolgreiche Speicherung wird im Display durch die Anzeige STORED PRESET bestätigt. In der ersten
Zeile wird vor der Senderfrequenz die Speicherplatznummer dauerhaft angezeigt.
Wählen eines Senders aus der Senderliste:
Wählen Sie den gewünschten Speicherplatz über die numerische Tastatur (kurzer Druck).
SERVICE UND TECHNISCHE PROBLEME
Sollten technische Probleme auftauchen, wenden Sie sich bitte an Ihren Fachhändler oder an
Magnat Audio-Produkte GmbH, Tel.: 02234 807-0.
Technische Änderungen vorbehalten.
11
Page 12

TECHNISCHE DATEN
Tuner
Frequenzbereich UKW: 87,5 - 108 MHz
DAB/DAB+: 174.928 – 239.200 MHz (Band III)
Empfindlichkeit UKW: -108 dBm
DAB/DAB+: -100 dBm
CD-Spieler
Abspielbare Formate: CD-Audio, CD-R, CD-RW, MP3, WMA
Verstärker
Ausgangsleistung:
Nennleistung 20 Hz – 20 kHz, THD < 1.0%, 4 Ohm 2 x 35 W
20 Hz – 20 kHz, THD < 1.0%, 8 Ohm 2 x 25 W
Impulsleistung 1 kHz, 4 Ohm 2 x 70 W
Frequenzgang:
CD/AUX/Line 10 Hz – 80 kHz (-3 dB)
20 Hz – 20 kHz (+/- 0,5 dB)
Geräuschspannungsabstand:
CD/AUX/Line 98 dB
Eingangsempfindlichkeit/-Impedanz:
AUX/Line 470 mV / 100 kOhm
Maximale ausgestrahlte Leistung
gemäß EN 62479: 7,34 dBm
Leistungsaufnahme: Maximal 130 W
Standby < 0,5 W
Abmessungen (BxHxT):
Hauptgerät: 277 x 132 x 330 mm
Hauptgerät inkl. Bedienelementen
und Anschlussklemmen: 277 x 132 x 370 mm
Fernbedienung: 45 x 175 x 20 mm
Gewicht: 5,8 kg
Technische Änderungen vorbehalten.
Für weitere Informationen besuchen Sie bitte unsere Webseite: http://www.magnat.de.
Digitale Eingänge: 1x optisch (Toslink™)
1x koaxial (Cinch)
Unterstützte Abtastfrequenzen: 44.1/48/88.2/96/176.4/192kHz
Unterstützte Bit-Tiefen: 16/24Bit
Bluetooth®Eingang: Bluetooth® 4.0 / Qualcomm® aptX™
Betriebsfrequenz: 2402 – 2480 MHz
12
Page 13

13
Page 14
TABLE OF CONTENTS
14 Accessories
14 Before starting
14 Important Safety precautions
15 Instructions for disposal
15 Declaration of conformity
15 Use as directed
16 – 19 Operational elements and connections
Front panel
Rear panel
Remote control
20 Initial Operation
20 The MC 100‘s menu
21 Connecting the device to a Bluetooth audio source
21 Preset Memory
21 RDS function of the tuner
21 DAB function of the tuner
21 Service and technical problems
22 Specifications
ACCESSORIES
1) Instruction manual
2) Remote control incl. battery (2x AAA)
3) Mains cable
4) DAB/FM antenna
BEFORE STARTING
Dear customer,
Thank you for choosing the Magnat MC 100. Please read the following information carefully before
starting to use the MC 100.
IMPORTANT SAFETY PRECAUTIONS
Please read through the instruction manual carefully before starting to use the device. This manual
contains important information concerning operation and safety aspects. It is imperative you observe
all of the information. Keep the manual in a safe location.
• WARNING NOTICES: All of the warning symbols on the device, accessories and in the instruction
manual itself must be adhered to.
• EXPOSURE TO HE AT: Only operate the device and accessories in a temperature range from 10°C to
40°C.
• The device should not be positioned near heat sources (heaters, ovens, radiant heaters, naked
ames, etc.). When setting up close to an amplier a minimum distance of 10 cm must be
maintained.
• No naked ame sources, such as lighted candles, should be placed on the device.
• Pay attention to a sufcient ventilation of the device. The device may not be covered, e.g. by drapes,
curtains. Maintain a distance of 20 cm to walls.
• EFFECT OF MOISTURE: The device should not be exposed to dripping or splash water. Neither
should it be used to support vases or other containers lled with liquid. Do not expose the device
to water or high levels of humidity. There is a danger of electric shock. In the event of contact with
moisture or liquids the device should be disconnected from the mains immediately..
• FOREIGN MATERIAL: Ensure that no foreign material enters through the device openings and into
the interior. This could trigger short circuits and even result in electric shock and re.
• CLEANING: Please use a soft, dry cloth with no cleaning agents, sprays or chemical solvents, as
these could damage the surfaces.
• ELECTRICAL CONNECTION: Please note the voltage levels on the information signs. The device
should only be operated with the voltage and frequency values specied on the signs.
• LIGHTNING PROTECTION/PREVENTIVE MEASURES: If the device is not going to be used for a
prolonged period (e.g. when on holiday), it should be disconnected from the mains by removing the
plug. The device should also be disconnected from the mains in the event of a thunderstorm. Doing
this will prevent damage caused by lightning and overvoltage.
• MAINS CABLE: The mains cable must always be suitable for operation and it should only ever be
laid out in a manner that prevents it from being trodden on. It should not be pinched by objects
either, as this can damage the cable. When using plugs and power strips it must be ensured that
the cable is not kinked at the point where it emerges from the socket. Do not connect or remove the
mains cable with damp hands.
• The mains plug is used as the disconnecting device. Disconnecting devices shall remain readily
operable.
• OVERLOAD: Sockets, power strips and extension cables should not be overloaded. If an overload
occurs, there is a risk of electric shock and re.
• SETTING UP: Please read the installation instructions.
• The device should only be positioned or mounted on a solid surface and not on moving base frames,
otherwise there is a risk of injury.
• Only use attachments/accessories specied by the manufacturer.
• BATTERIES (battery pack or batteries installed) shall not be exposed to excessive heat, such as
sunshine, re and the like.
• CAUTION: Danger of explosion if battery is incorrectly replaced. Replace only with the same or
equivalent type.
14
Page 15
• RISK OF SWALLOWING BATTERIES!
· The product/remote control may contain a coin/button type battery, which can be swallowed. Keep
the battery out of reach of children at all times! If swallowed, the battery can cause serious injury or
death. Severe internal burns can occur within two hours of ingestion.
• If you suspect that a battery has been swallowed or placed inside any part of the body, seek
immediate medical attention.
• When you change the batteries, always keep all new and used batteries out of reach of children.
Ensure that the battery compartment is completely secure after you replace the battery.
• If the battery compartment cannot be completely secured, discontinue use of the product. Keep
out of reach of children and contact the manufacturer.
DAMAGE THAT MUST BE RECTIFIED BY A SPECIALIST:
If any of the following damage occurs, disconnect the device from the mains immediately and contact a
specialist to conduct the repair work:
• The device should not continue to be operated if there is visible damage to the mains cable. A
damaged cable should not be repaired, but must be replaced.
• Damage to the mains socket at the device.
• If moisture or water has entered the device or foreign objects have fallen into the device.
• If the device has fallen and the housing is damaged.
• If the device does not work properly, even though all of the information in the instruction manual
has been observed.
Only those subsequent alterations approved by the manufacturer may be conducted.
Only original spare parts should be used for repair.
After conducting any repairs the safety of device should be checked to ensure it is functioning correctly
and safely.
Repairs must always be conducted by qualied specialists, as you might otherwise be exposed to
dangerous high voltage levels or other hazards.
WARNING:DO NOT OPEN! RISK OF ELECTRIC SHOCK!
To reduce the risk of fire or electric shock, do not expose this unit to rain
or moisture.
This is Class II apparatus with double insulation, and no protective earth provided.
INSTRUCTIONS FOR DISPOSAL
In accordance with European Directive 2012/19/EU all electrical and electronic appliances must be
disposed of separately via local collection points. Please observe the local regulations and do not
dispose of your old appliances with normal household waste.
Battery disposal
Old batteries are hazardous waste and must be disposed of in accordance with current regulations.
DECLARATION OF CONFORMITY
Hereby, Magnat Audio-Produkte GmbH declares that the device Magnat MC 100 is in compliance with
the essential requirements and other relevant provisions of directive 2014/53/EU. The Declaration of
Conformity can be found at www.mac-audio.de in the download area of the device.
This symbol warns the user that high voltage is used within the device which can result
in electric shock.
This symbol makes the user aware that there are important notes in the enclosed
instruction manual which must be observed.
USE AS DIRECTED
This device is designed for indoor use only.
15
Page 16
OPERATIONAL ELEMENTS AND CONNECTIONS – FRONT PANEL
16
15
1
2
3
4
5 6 7
1 ON/STBY
Switches the device on when it is in the standby
mode. If the LED does not illuminate, actuate the
power switch located on the rear of the device.
Conversely the device can be switched from
power operation to the standby mode.
2 LED STATUS INDICATION
This illuminated display indicates the MC 100‘s
2 possible states:
• LED is illuminated green: The MC 100 is
switched on. The device is ready for use.
• LED is illuminated red: The MC 100 is in the
standby mode.
3 LINE IN
3.5 mm stereo input jack for an auxiliary audio
device (e.g. MP3 player, etc.).
1314
8
9 10 11 12
4 HEADPHONES
6.3 mm stereo output jack for headphones. The
speakers are deactivated when this jack is used.
Set the volume to a low level before connecting
headphones.
5 SOURCE (INPUT SELECTOR SWITCH)
Switches between the different audio sources:
• CD: CD player.
• BT: Connection to a Bluetooth device
• DAB INPUT: Selection of the DAB/DAB+ tuner
• FM INPUT: Selection of the FM tuner
• AUX 1/2: Other audio devices.
• DIGITAL OPT, DIGITAL COAX:
Connecting to digital audio sources.
• LINE IN: Front input for portable devices
6 TUNING -/+
FM mode:
• Brief press: Changes the receiving frequency
in 50kHz increments (FM) (manual station
search).
• Press and hold: Searches for the next station
(automatic station search).
DAB mode:
• Selects the next or previous station in the DAB
band.
7 STATION -/+
FM mode:
• Brief press: Selects the next station from the
preset stations.
• Press and hold: Selects the previous station
from the preset stations.
8 CD COMPARTMENT
Insert the CD into the compartment with the label
facing upwards.
9 STOP
Stops a CD that is playing.
10 PLAY/PAUSE
Starts or pauses the playback from a CD.
11 EJECT
Opens or closes the CD compartment.
12 SEARCH/SKIP/MENU
CD mode:
Search/Skip backwards
• Rotated brief ly to the left: Playback star ts at the
beginning of the current track.
• Rotated briefly to the left x2: Playback starts at
the beginning of the previous track.
• Rotated to the left and held: High-speed rewind.
Remains active for as long as the knob is held.
SEARCH/SKIP FORWARDS
• Rotated briefly to the right: Playback starts at
the beginning of the next track
• Rotated to the right and held: Fast forward.
Remains active for as long as the knob is held.
MENU settings
Press the knob to access the menu for setting
the sound and adjusting further parameters. Turn
the knob to navigate through the menu. Press the
knob again to confirm the set parameters.
See also THE MC 100‘S MENU.
13 VOLUME
For adjusting the overall volume of the music.
14 DIM
This button can be used to adjust the brightness
of the display (3 levels).
16
Page 17
OPERATIONAL ELEMENTS AND CONNECTIONS – FRONT PANEL
OPERATIONAL ELEMENTS AND CONNECTIONS – REAR PANEL
15 DISPLAY
The following information is indicated in the
display:
• Selected audio input
• Volume information
• Station and reception information in FM and
DAB mode. See also the DISPLAY button on
the remote control in this regard.
• When the CD input has been selected (no CD
inserted):
NO disC
• After a CD has been inserted and read: T o t a l
number of tracks on the CD, total playing time
of the CD in minutes and seconds
Cd 15 46:32
• If there are MP3 or WMA files on the CD, the file
type and number of files on the CD are displayed:
MP3 15 FiLEs
• When playing a CD:
Currently played track, elapsed time of the
track:
02 03:45
• The operating status is also indicated by the
following symbols:
► Playback
II Pause
• CD text, ID3 tags
If the CD supports CD text or the MP3 or WMA
files contain ID3 tag information, these are
displayed in the 2nd line of the display. See also
the REMOTE CONTROL section in this regard.
16 SENSOR FOR THE REMOTE CONTROL
Please aim at this sensor when using the remote
control.
10
1
2
1 POWER SWITCH
Switches the device on and sets it in the standby
mode. If the switch is set to the “OFF” position,
the device is disconnected from the mains
supply.
2 MAINS CONNECTION
For connecting the supplied mains cable. The
safety fuse should only be changed by qualified
service personnel.
3 SPEAKER TERMINALS
For the connection of stereo speakers with
an impedance rating of 4-8 ohms (the correct
polarity must be taken into account). (See also
INITIAL OPERATION).
ANALOGUE RCA CONNECTIONS (4 - 7)
For connecting analogue audio sources. Please
observe the coloured marking of the sockets and
connectors. Red is always the right channel.
4 SUB OUT
Output for connecting an active subwoofer.
8911
47 6 5
3
5 REC OUT
For connecting devices for analogue sound
recording (e.g. tape recorder). The signal for the
selected audio source with fixed level applies for
this output, i.e. it is independent of the position
of the volume knob.
6, 7 AUX INPUTS
Connecting other audio sources (e.g. MP3 or
Minidisc player).
8, 9 DIGITAL IN OPT, COAX
Connect the MC 100 to the digital output on your
CD player/computer/games console/network
player, etc. by using an optical or coaxial digital
audio cable.
10 DAB/FM ANTENNA CONNECTION
For connecting the supplied DAB/FM antenna or
a house antenna.
11 UPDATE
This connection is intended exclusively for system
updates.
17
Page 18
OPERATIONAL ELEMENTS AND CONNECTIONS - REMOTE CONTROL
• Before using the remote control the supplied
batteries must be inserted into the battery
compartment located at the rear of the
1
2
19
18
17
16
15
remote control.
• If the batteries have run out after prolonged
use, please replace them (type AAA).
• To prevent causing damage to the remote
control please remove the batteries if the
device is not going to be used for a prolonged
period.
14
3
13
4
5
12
11
10
6
9
7
8
1 POWER
Switches the device on when it is in the standby
mode. If the LED does not illuminate, actuate the
power switch located on the rear of the device.
Conversely the device can be switched from
power operation to the standby mode.
2 INPUT SELECTON
These buttons enable direct selection of the
individual audio inputs. The active input is
indicated in the display.
3 MENU
Calls up the system menu. Use the ◄◄, ►►, ▲
and▼ buttons to navigate through the menu.
Press the SELECT button (12) to confirm the set
parameters.
See also THE MC 100‘S MENU.
4 SKIP/SEARCH/NAVIGATION BUTTONS
Search/Skip backwards
• Brief press: Playback starts at the beginning of
the current track.
• Two brief presses: Playback starts at the
beginning of the previous track.
• Press and hold: High-speed rewind. Remains
active as long as the button is depressed.
• Menu: Navigation and adjustment of
parameters.
Search/Skip forwards
• Brief press: Playback starts at the beginning of
the next track
• Press and hold: Fast forward. Remains active
as long as the button is depressed.
• Menu: Navigation and adjustment of
parameters.
▲and▼
Menu: Adjustment of parameters.
5 DISPLAY
CD mode:
Display of the CD text or ID3 tag (if supported by
the CD):
The 2nd line of the display shows the entire CD
text/ID3 tag information. Pressing this button
displays the individual items of information in the
following order:
Title – performer – album – no display
For MP3 and WMA files, the file name and data
rate of the current title are displayed additionally.
FM mode:
Retrieving RDS information (if supported by the
station).
Further details about the RDS station informa-
tion can be found in the “RDS functions of the
tuner” section.
DAB mode:
Retrieving DAB station information (if supported
by the station).
Further details about the DAB station informa-
tion can be found in the “DAB functions of the
tuner” section.
Bluetooth mode:
The display shows the device ID of the paired
device, the data rate and the ID3 tag information
of the current title.
Pressing this button displays the individual ID3
tag information items in the following order:
Title – performer – album – no display
6 TUNING
FM mode:
• Brief press: Changes the receiving frequency
in 50kHz increments (FM) (manual station
search).
• Press and hold: Searches for the next station
(automatic station search).
DAB mode:
Selects the next or previous station in the DAB
band.
7 NUMERICAL BUTTONS
CD mode:
Direct selection of a track.
FM mode:
Direct selection of a preset station.
8 MUTE
Switches the sound on and off.
9 VOLUME
Increases (+) or decreases (-) the volume.
18
Page 19

OPERATIONAL ELEMENTS AND CONNECTIONS - REMOTE CONTROL
10 TONE/BAL
TREBLE (TONE pressed once):
The treble setting may be ramped either up or
down in 7 steps. Use the ▲and▼ buttons to
adjust the value.
BASS (TONE pressed twice):
Bass playback may be ramped either up or
down in 7 steps. Use the ▲and▼ buttons to
adjust the value.
BALANCE:
The stereo balance may be adjusted either to the
right or left in 10 steps. Use the ◄◄ and ►►
buttons to adjust the value.
11 LOUDNESS
Selection of the Loudness function (aurally
compensated volume correction).
12 PLAY/PAUSE/SELECT
CD mode:
Starts or pauses the playback from a CD.
Menu:
Confirm the entry.
13 STOP
Stops a CD that is playing.
14 CD CONTROL: PROGRAM/RANDOM/
REPEAT
PROGRAM
Programming tracks on a CD in a particular
order.
The Stop mode must be activated to programme
tracks.
• Press the PROG button.
Display:
• Now assign the desired track to memory
Display e.g.:
• Press the PROG button again.
Display:
• Now enter the desired track for memory
• Repeat these steps until all of the desired
• Start playing the programmed list by pressing
Display e.g.:
• You can manipulate playback within the
• The programme is erased after pressing the
PRG 01-00
location 01 by selecting the track number via
the numeric keypad or the SKIP button.
PRG 01-08
PRG 02-00
location 02.
tracks have been programmed. After the last
title, press the STOP button. The number of
programmed titles and the total playing time
of the programme list are displayed.
PLAY. A “P” appears to the left of the display,
followed by the current track and elapsed
time.
P 08-00:07
programmed list by pressing SKIP, SEARCH
and PAUSE/PLAY.
STOP or EJECT button.
RANDOM
Plays the titles of a CD in random order.
• Press once: The function is deactivated.
The following appears in the display:
RANdOM-ON
• Press again: The function is activated.
The following appears in the display:
RANdOM-OFF
REPEAT
Track/CD repeat playback (repeat function):
• Press once: The current track is repeated.
The following appears in the display:
REPEAT ONE
• Press twice: The entire CD is repeated.
The following appears in the display:
REPEAT ALL
• Press again: The repeat function is
deactivated. The following appears in the
display:
REPEAT OFF
15 DIM
This button can be used to adjust the brightness
of the display (3 levels).
16 DISCONNECT (BLUETOOTH OPERATION)
Closes an existing Bluetooth connection and
starts the pairing mode.
17 ST/MONO (in FM mode only)
Switches between FM-Stereo and FM-Mono for
FM stations.
In stereo mode, the system will automatically
switch to mono reception when the signal is weak
in order to improve signal-to-noise ratios.
Stereo reception is indicated by the ‚ST.‘ Symbol
in the display.
18 AUTO (DAB MODE)
This function scans the DAB frequency range
(band III) for stations. These can then be
accesses via the TUNING buttons.
19 EJECT
Opens the CD compartment.
19
Page 20

INITIAL OPERATION
THE MC 100‘S MENU
• Place the MC 100 on an even surface. Observe the relevant clearance gaps as specified under
“Important safety instructions”.
IMPORTANT: Do not place any objects on top of the device (magazines, CD/record cases, etc.).
The ventilation slots located on top of the device must be unobstructed at all times!
• Connect your speakers:
The stereo speakers (impedance of 4 to 8 ohms) are connected to the rear as follows:
Only use high-quality audio speaker cables with a conductor cross section of min. 1.5 - 2.5 mm². Strip
approx. 10 mm from the cables and twist the ends. Loosen the terminal screws one after the other and
insert the stripped ends into the holes. Re-tighten the terminal screws. Make sure you pay attention to
the correct polarity.
You can also use prefabricated cables with 4mm banana plugs or forked fittings.
Also observe the operating instructions for the speakers you are using.
• Connect your audio sources.
• Connect the DAB/FM antenna to the antenna connection point at the rear of the device. For later
operation, the position of the antenna should then be determined according to where the best
reception is. The end of antenna should then be secured in the appropriate position, e.g. using a
drawing pin.
Reception can be improved by a suitable indoor or outdoor household antenna if the reception is not
so good.
• Connect the supplied mains cable to the rear and then insert the other end into a 230V socket.
• Actuate the on/off switch on the rear side, the device is now in the standby mode.
• Now switch on the device using the remote control or with the ON/STBY key on the front.
• When the tube has heated up the device is ready for use.
• Select your desired audio source using the input selector switch.
The tone and further parameters may be comfortably adjusted via a menu.
• The menu is launched with the MENU key on the remote control or by pressing the knob SEARCH/SKIP/
MENU on the front.
• The menu may be navigated and settings changed with the keys ◄◄, ►► , ▲and▼ on the remote control
or by turning the knob SEARCH/SKIP/MENU.
• The individual menu items may be confirmed with the SELECT key on the remote control or by pressing
the knob SEARCH/SKIP/MENU.
The following settings are possible:
• Bass adjustment:
Select BASS in the menu. Bass playback may be ramped either up or down in 7 steps.
• Treble adjustment:
Select TREBLE in the menu. The treble setting may be ramped either up or down in 7 steps.
• Balance adjustment:
Select BALANCE in the menu. The stereo balance may be adjusted either to the right or left in ten steps.
• Loudness (aurally compensated volume correction):
Select LOUDNESS in the menu. The function may now be activated or deactivated.
• Auto standby function:
The unit has an auto standby function that automatically switches the device to standby mode around 3
1/2 hours after the last time it was operated (via the controls on the unit or via the remote control). This
function implements an EU energy-saving regulation (1275/2008 EC), reducing power consumption if
the device is accidentally left turned on after use.
Select APO SETTING in the menu. The function can now be activated or deactivated. When leaving the
factory, the function is activated.
• Sleep function:
This function enables you to set a time after which the device will switch off automatically and change to
the standby mode. The time can be set between 5 and 240 minutes by using the ▲and▼ buttons. After
exiting the menu, the active Sleep function is permanently indicated by a symbol at the bottom right of
the display.
• System information:
Select SYSTEM INFO in the menu. The individual firmware versions of the device can be displayed for
service purposes by pressing the ◄◄ and ►► buttons.
• Reset:
The RESET menu item will restore the basic settings ((clear all station presets, set all tone controls to 0,
disable loudness function and sleep timer, auto standby on).
You can leave the menu via EXIT.
20
Page 21

CONNECTING THE DEVICE TO A BLUETOOTH AUDIO SOURCE
RDS (RADIO DATA SYSTEM)-FUNCTION OF THE TUNER (FM ONLY)
Select Bluetooth input. If you have previously connected a Bluetooth device, the MC 100 will
automatically attempt to re-establish a connection with this device. If this is the case, you may be
required to manually reconrm the connection on the source device.
If a connection has not already been made or the connection cannot be re-established, the MC 100 will
automatically activate the ‚pairing mode‘. „BT“ will ash on the display.
Now activate the Bluetooth mode on your source device. The MC 100 will appear in the list of Bluetooth
devices as „MC 100“. If it is not displayed in the list, set your source device to search for Bluetooth
devices manually and make sure that the MC 100 has been switched to the pairing mode.
Depending on the source device, you may be asked whether the password is to be accepted during
the pairing procedure. You can conrm this by simply pressing „Accept“. If you are still asked for a
password, use the default passwords „0000“ or „1234“. If you are asked if you want to establish
a connection after pairing, please select „Yes“. When the device has been paired and connected
successfully the „BT“ indicator will illuminate continuously.
The MC 100 supports the „Qualcomm® aptX™“ high quality audio transmission standard. If your
source device also supports this standard, „Qualcomm® aptX™“ will be selected automatically as the
transfer mode when establishing a Bluetooth connection.
PRESET MEMORY
The device is equipped with two independent PRESET memories for FM and DAB stations. Each memory
can store up to 40 stations.
Storing stations:
Set the desired DAB or FM stations using the TUNING buttons on the unit or via the remote control.
• Select the desired storage location by holding down the corresponding key on the numeric keypad.
• In the case of two-digit storage location numbers (10 – 40), the +10 key first has to be pressed for a
longer time and the desired digits then entered.
• Successful storage is confirmed on the display with the appearance of STORED PRESET. In the first
line, the storage location number is played permanently before the station frequency.
Select a station from the list of stations:
Select the desired storage location via the numerical keyboard (by pressing briefly).
RDS is a system which provides information about FM stations that is broadcast together with the
station‘s signal. The MC 100 can present this information (about the station, broadcast, etc.) in the
display.
The RDS information can be retrieved by repeatedly pressing the DISPLAY button (remote control) in the
following order:
• PS (Program Service Name): Displays the name of the programme.
• RT (Radio Text): Shows station information and messages.
• PTY (Program Type): Displays the type of programme.
• Time / Date
If one of these functions is not supported despite reception of an RDS signal, „N/A“ will appear in the
display.
DAB FUNCTIONS OF THE TUNERS (DAB ONLY)
The DAB transmission system provides further data and information that can be accessed via the
DISPLAY button (remote control) in the following order:
• Station name
• DLS (Dynamic Label Segment): Shows station information and messages (e.g. title and artist of the
current song, news messages, other information about the current programme or station)
• Programme type (e.g. pop, news, classical)
• DAB multiplex number and frequency of the current station
• Time / Date
• Bit rate of the current audio signal
• DAB multiplex name
SERVICE AND TECHNICAL PROBLEMS
If you should encounter any technical problems, please contact your specialist dealer or
Magnat Audio-Produkte GmbH, Tel.: 02234807-0.
21
Page 22

SPECIFICATIONS
FM Tuner
Frequency range: FM: 87.5 – 108 MHz
DAB/DAB+: 174.928 – 239.200 MHz (Band III)
Sensitivity FM: -108 dBm
DAB/DAB+: -100 dBm
Dimensions (wxhxd):
Main device: 277 x 132 x 330 mm
Main device incl. operational
elements/connecting terminals: 277 x 132 x 370 mm
Remote Control: 45 x 175 x 20 mm
CD Player
Playable formats: CD-Audio, CD-R, CD-RW, MP3, WMA
Amplifier
Power output:
Rated power 20 Hz – 20 kHz, THD < 1.0%, 4 ohm 2 x 35 W
20 Hz – 20 kHz, THD < 1.0%, 8 ohm 2 x 25 W
Peak power: 1 kHz, 4 ohm 2 x 70 W
Frequency response:
CD/AUX/Line 10 Hz – 80 kHz (-3 dB)
20 Hz – 20 kHz (+/- 0.5 dB)
Signal to noise ratio:
CD/AUX/Line 98 dB
Input sensitivity/impedance:
AUX/Line 470 mV / 100 kohm
Digital inputs 1x optical (Toslink™)
1x coaxial (cinch)
Supported sampling frequencies: 44.1/48/88.2/96/176.4/192kHz
Supported bit depths: 16/24bits
Bluetooth® input Bluetooth® 4.0 / Qualcomm® aptX™
Operating frequency: 2402 – 2480 MHz
Weight: 5.8 kg
Subject to technical change.
For further information please visit our website: http://www.magnat.de.
Maximum emitted power according
to EN 62479: 7.34 dBm
Electricity consumption: Max. 130 W
Standby <0.5 W
Subject to technical change.
22
Page 23

23
Page 24

SOMMAIRE
CONSIGNES DE SÉCURITÉ IMPORTANTES
24 Accessoires
24 Avant la mise en marche
24 Consignes de sécurité importantes
25 Instructions pour la mise au rebut
25 Utilisation conforme
25 Déclaration de conformité
26 – 29 Éléments de commande et connexions
Panneau frontal
Face arrière
Télécommande
30 Mise en marche
30 Le menu du MC 100
31 Connexion de l‘appareil avec une source audio Bluetooth
31 Mémoire des stations
31 RDS fonctions du tuner
31 DAB fonctions du tuner
31 Service and technical problems
32 Caractéristiques techniques
ACCESSOIRES
1) Manuel d’instruction
2) Télécommande, pile incluse (2x A AA)
3) Câble secteur
4) Antenne DAB/FM
AVANT LA MISE EN MARCHE
Cher client,
Nous vous remercions d‘avoir opté pour le MC 100 de Magnat. Avant de mettre en marche votre
MC 100, veuillez lire attentivement les consignes suivantes.
Veuillez lire attentivement la notice d’utilisation avant la mise en marche de l’appareil. La notice
d’utilisation comporte des consignes de fonctionnement et de sécurité importantes. Respectez impérativement toutes les consignes. Conservez soigneusement la notice d’utilisation.
• AVERTISSEMENTS : Impérativement respecter tous les symboles d’avertissement sur l’appareil, les
accessoires et dans la notice d’utilisation.
• EFFET DE LA CHALEUR : Utilisez uniquement l’appareil à une température comprise entre 10°C et
40°C.
Ne pas installer l’appareil à proximité de sources de chaleur (radiateurs, poêles, radiateurs
infrarouges, ammes nues). En cas d’installation à proximité d’amplicateurs, observez une
distance minimale de 10 cm
• Tenez l‘appareil éloigné des ammes nues, des bougies par exemple.
• Veillez à une aération sufsante de l’appareil. Il est interdit de recouvrir l’appareil, par ex. avec des
rideaux ou stores. Observez une distance sufsante (env. 20 cm) par rapport aux murs.
• INFLUENCE DE L’HUMIDITÉ : L’appareil ne doit pas être exposé à des gouttes ou projections d’eau.
De même, il ne doit pas être utilisé comme support pour des vases ou des récipients contenant
un liquide. N’exposez l’appareil ni à l’eau ni à une humidité importante de l’air. Cela risquerait
d’entraîner une décharge électrique. En cas de contact avec des objets humides ou des liquides,
mettez-le sous tension en débranchant le cordon d’alimentation
• CORPS ÉTRANGERS : Veillez à ce qu’aucun corps étranger ne pénètre à l’intérieur de l’appareil à
travers les orices. Leur présence risquerait de provoquer des courts-circuits mais également une
décharge électrique ou un incendie.
• NETTOYAGE : Veuillez employer un chiffon sec et doux et évitez d’appliquer tout produit de
nettoyage, spray ou solvant chimique an de ne pas endommager la surface de l’appareil.
• RACCORDEMENT ÉLECTRIQUE : Veuillez respecter les valeurs de tension indiquées sur les
étiquettes. L’appareil doit uniquement fonctionner avec les tensions et fréquences indiquées sur les
étiquettes.
• PROTECTION CONTRE LA FOUDRE / MESURES DE PRÉCAUTION : Si l’appareil n’est pas utilisé
pendant une période prolongée (par ex. en vacances), mettez-le sous tension en débranchant le
cordon d’alimentation. En cas d’orage, l’appareil doit également être mis sous tension an d’éviter
tout risque d’endommagement dû à un coup de foudre ou à une surtension.
• CORDON D’ALIMENTATION : Le cordon d’alimentation doit toujours être en état de fonctionner
et posé de manière à ce que personne ne puisse marcher dessus. Pour éviter tout risque
d’endommagement du cordon, veiller à ce qu’il ne soit coincé par aucun objet. En cas d’utilisation
de ches et de prises multiples, veillez à ce que le cordon ne soit pas plié à l’endroit où il sort de la
prise. Ne pas toucher le câble d‘alimentation avec des mains mouillées.
• La prise secteur permet d‘arrêter l‘appareil et doit donc toujours être facilement accessible.
• SURCHARGE : Les prises, prises multiples et rallonges ne devraient pas être surchargées. En cas
de surcharge, il y a danger d’électrocution et d’incendie.
• MONTAGE : Veuillez observer les instructions de montage.
• L’appareil devrait uniquement être posé ou monté sur un support xe et non pas sur des châssis
mobiles an d’éviter tout risque de blessure.
• Utilisez uniquement les accessoires d’origine fournis ou agréés par le fabricant.
• LES BATTERIES ET LES PILES ne doivent pas être exposées à des chaleurs importantes, comme
celle générées par le soleil ou le feu.
• Risque d’explosion en cas de mauvaise installation de la batterie. Remplacez la batterie unique-
ment par une batterie du même type ou similaire.
24
Page 25

• RISQUE D‘INGESTION DES PILES !
• L‘appareil/la télécommande peuvent contenir une pile en forme de pièce/pile bouton qui présente
un risque élevé d‘ingestion. Veuillez tenir les piles hors de la portée des enfants à tout moment. Si
la pile est ingérée, elle peut causer des blessures graves ou la mort. De graves brûlures internes
peuvent survenir 2 heures après l‘ingestion.
• Veuillez contacter un médecin si vous pensez qu‘une pile a été ingérée ou qu‘elle a pénétré une
partie du corps.
• Si les piles doivent être changées, veuillez tenir les nouvelles piles et les piles usagées hors de la
portée des enfants. N‘oubliez pas que le compartiment à piles doit être soigneusement refermé
après chaque changement de pile.
• S‘il est impossible de refermer complètement le compartiment à piles, veuillez ne plus utiliser le
produit. Veuillez tenir le produit hors de la portée des enfants et contacter le fabricant.
DOMMAGES DEVANT ÊTRE RÉPARÉS PAR UN SPÉCIALISTE :
En présence d’un ou plusieurs des dommages mentionnés ci-dessous, mettez immédiatement
l‘appareil sous tension et conez la réparation à un spécialiste :
• En cas d’endommagement visible du cordon d’alimentation, l’appareil ne doit plus être utilisé. Tout
cordon d’alimentation endommagé ne doit pas être réparé mais remplacé.
• Détériorations de la prise secteur sur l’appareil.
• Présence d’humidité ou d’eau dans l’appareil ou chute d’objets dans l’appareil.
• Chute de l‘appareil et endommagement du boîtier.
• Dysfonctionnement de l’appareil bien que toutes les consignes gurant dans la notice d‘utilisation
aient été respectées.
N’effectuez des interventions ultérieures sur l’appareil que si celles-ci sont autorisées par le fabricant.
Ne procédez à des réparations qu’avec des pièces d’origine.
Suite à une réparation, vériez que l‘appareil est conforme aux normes de sécurité an de garantir un
fonctionnement correct et sûr.
Conez systématiquement toute réparation à un personnel qualié sous peine de vous exposer à des
risques de haute tension ou à d’autres dangers.
ATTENTION! NE PAS OUVRIR, RISQUE D‘ÉLECTROCUTION!
Afin de reduire les risques d’incendie ou de décharge électricque, ne pas
exposer cet appareil à la pluie ou à l’humidité.
Appareil de classe de protection II avec
INSTRUCTIONS POUR LA MISE AU REBUT
Conformément à la directive européenne 2012/19/EU, tous les appareils électriques et électroniques
usagés doivent être triés et déposés dans des points de collecte locaux. Veuillez respecter les
réglementations locales et ne pas jeter vos appareils usagés avec les déchets ménagers.
Mise au rebut de la pile
Les piles usagées sont des déchets dangereux et doivent être mises au rebut conformément aux
réglementations en vigueur.
DÉCLARATION DE CONFORMITÉ
Magnat Audio-Produkte GmbH déclarons que le produit Magnat MC 100 est conforme aux exigences
essentielles et aux autres dispositions pertinentes de la Directive 2014/53/EU. Une copie de la
Déclaration de conformité est disponible à l‘adresse http://www.magnat.de (espace de téléchargement
du produit).
Ce symbole avertit l‘utilisateur que l‘appareil est traversé par des tensions élevées
pouvant entraîner des décharges électriques dangereuses.
Ce symbole indique à l‘utilisateur de l‘appareil que la notice d‘utilisation jointe avec
l‘appareil contient des consignes importantes devant impérativement être
respectées.
UTILISATION CONFORME
Cet appareil a exclusivement été conçu pour une utilisation dans la maison.
25
Page 26

ÉLÉMENTS DE COMMANDE ET CONNEXIONS – PANNEAU FRONTAL
16
1
2
3
4
5 6 7
1 ON/STBY
Permet d‘allumer l‘appareil lorsque celui-ci se
trouve en mode de veille. Si la LED ne s‘allume
pas, mettez en marche l‘appareil à l‘aide de
l‘interrupteur d‘alimentation situé sur la face
arrière de l‘appareil. À l‘inverse, ce bouton
permet de mettre en veille l‘appareil lorsque
celui-ci est en marche.
2 LED - TÉMOIN D‘ÉTAT
Ce témoin affiche 2 états dans lesquels le
MC 100 peut se trouver lorsqu‘il est allumé:
• La LED clignote de couleur verte: le MC 100
est en marche. L‘appareil est prêt à
fonctionner.
• La LED clignote de couleur rouge: Le MC 100
se trouve en mode de veille.
15
8
9 10 11 12
3 LINE IN
Entrée jack stéréo 3,5 mm permettant de
connecter une source audio supplémentaire
(lecteur MP3 ou autre).
4 CASQUE
Sortie jack stéréo 6,3 mm pour casque. Lorsque
cette sortie est utilisée, les haut-parleurs sont
désactivés. Baissez le volume sonore avant de
brancher un casque à cette sortie.
1314
5 SOURCE (SÉLECTEUR D‘ENTRÉE)
Permet de commuter entre les différentes
sources audio:
• CD: lecteur de CD.
• B T: Connexion à un appareil source Bluetooth.
• DAB INPUT: Sélection du tuner DAB/DAB+.
• FM INPUT: Sélection du tuner FM.
• AUX 1/2: autres appareils audio
• DIGITAL OPT, DIGITAL COAX:
Connexion aux sources audio numériques.
• LINE IN: Entrée avant pour appareils
portables.
6 TUNING -/+
Mode FM:
• Brève pression: modifie la fréquence de
réception par pas de 50kHz (FM) (réglage
manuel des stations de radio).
• Longue pression: recherche la prochaine
station de radio disponible (réglage
automatique des stations de radio).
Mode DAB:
• Sélectionne la station suivante ou précédente
sur la bande DAB.
7 STATION -/+
Mode FM:
• Brève pression: Sélectionne la station suivante
sur la mémoire des stations.
• Longue pression: Sélectionne la station
précédente sur la mémoire des stations.
8 TIROIR DE CD
Insérez le CD dans le tiroir, face imprimée vers
le haut.
9 STOP
Stoppe la lecture d‘un CD.
10 PLAY/PAUSE
Permet de démarrer ou d‘interrompre la lecture
d‘un CD.
11 EJECT
Permet d‘ouvrir ou de fermer le tiroir de CD.
12 SEARCH/SKIP/MENU
Mode CD:
Search/Skip (retour)
• Brève rotation vers la gauche: la lecture
commence au début de la plage actuelle.
• Double brève rotation vers la gauche: la
lecture commence au début de la plage
précédente.
• Longue rotation vers la gauche: retour rapide.
Fonction activée aussi longtemps que le
bouton est enfoncé.
Search/Skip (avance)
• Brève rotation vers la droite: la lecture
commence au début de la plage suivante.
• Longue rotation vers la droite: avance rapide.
Fonction activée aussi longtemps que le
bouton est enfoncé.
Réglages du menu
Appuyez sur le bouton afin d‘ouvrir le menu
destiné au réglage audio et à la configuration
de divers paramètres. Pour naviguer dans ce
menu, il faut faire tourner le bouton. Appuyer
une nouvelle fois sur le bouton afin de valider les
réglages effectués.
Voir également la section LE MENU DU MC 100.
26
Page 27

ÉLÉMENTS DE COMMANDE ET CONNEXIONS – PANNEAU FRONTAL
ÉLÉMENTS DE COMMANDE ET CONNEXIONS – FACE ARRIÈRE
13 VOLUME
Permet de régler le volume sonore général de la
restitution audio.
14 DIM
Cette touche permet de régler la luminosité de
l’écran (3 niveaux de luminosité disponibles).
15 ÉCRAN
Les informations suivantes sont affichées à
l‘écran:
• Entrée audio sélectionnée
• Information sur le volume
• Station et informations sur la réception en
mode FM et DAB. À cet effet, voir également
Touche DISPLAY de la télécommande.
• Une fois l‘entrée CD sélectionnée (aucun CD
inséré) :
NO disC
• Après qu‘un CD a été inséré et lu:
Nombre total de plages sur le CD, durée de
lecture totale du CD en minutes et secondes:
Cd 15 46:32
• Si le CD contient des fichiers MP3 ou WMA, le
type et le nombre de fichiers enregistrés sur le
fichier sont affichés:
MP3 15 FiLEs
• Pendant la lecture d‘un CD :
Plage actuellement restituée, durée déjà lue
de la plage:
02 03:45
• L‘état de fonctionnement est par ailleurs
indiqué par les symboles suivants:
► Lecture
II Pause
• CD-Text, métadonnées ID3
Si le CD est compatible avec l’extension
« CD-Text » ou si les fichiers MP3 et WMA
contiennent des métadonnées ID3, ces
informations sont affichées dans la 2e ligne sur
l’écran. À ce propos, voir également la section
TÉLÉCOMMANDE.
16 CAPTEUR DE TÉLÉCOMMANDE
Pour pouvoir utiliser la télécommande, orientez-
la vers ce point.
10
1
2
1 INTERRUPTEUR D‘ALIMENTATION
Permet d‘allumer l‘appareil et de le mettre en
veille. Si l‘interrupteur est en position “ OFF “,
l‘appareil n‘est plus sous tension.
2 PRISE SECTEUR
Permet de brancher le cordon d‘alimentation
fourni avec l‘appareil. Le fusible peut
uniquement être remplacé par du personnel de
maintenance qualifié.
3 PRISES POUR HAUT-PARLEURS
Permettent de brancher une paire de haut-
parleurs stéréo d‘une impédance de 4 à 8 ohms.
Respecter la bonne polarité. Voir également la
section MISE EN MARCHE.
PRISES CINCH ANALOGIQUES (4 - 7)
Permettent de raccorder des sources audio
analogiques. Respectez le marquage de couleur
des prises et des connecteurs. La couleur rouge
correspond toujours au canal de droite.
4 SUB OUT
Sortie permettant de brancher un subwoofer
actif.
8911
47 6 5
3
5 REC OUT
Permet de brancher des appareils
d‘enregistrement analogique (par ex.
magnétophone ou lecteur de cassettes). Le
signal de la source audio sélectionnée est
présent à cette sortie avec un niveau fixe, c‘està-dire indépendant de la position du
bouton de réglage du volume sonore.
6, 7 ENTRÉES AUX
Branchement d’autres sources audio (par ex. un
lecteur MP3 ou Minidisc).
8, 9 DIGITAL IN OPT, COAX
Raccordez le MC 100 à la sortie numérique
de votre lecteur CD / ordinateur / console de
jeux / lecture réseau à l’aide d’un câble audio
numérique optique ou coaxial.
10 PRISE D‘ANTENNE DAB/FM
Permet de brancher l‘antenne DAB/FM livrée
avec l‘appareil ou à un système d‘antennes
domestique.
11 UPDATE
Ce port est strictement réservé aux mises à jour
du système.
27
Page 28

ÉLÉMENTS DE COMMANDE ET CONNEXIONS – TÉLÉCOMMANDE
• Avant d’utiliser la télécommande, les piles
fournies avec l’appareil doivent être insérées
1
2
19
18
17
16
15
14
3
dans le compartiment situé au dos de la
télécommande
• Si les piles se sont vidées après une
utilisation prolongée de l‘appareil, remplacez-
les (type AAA).
• Afin d’éviter tout endommagement de la
télécommande, retirez les piles lorsque
l’appareil n’est pas utilisé pendant une
période prolongée.
13
4
5
12
11
10
6
9
7
8
1 POWER
Permet d‘allumer l‘appareil lorsque celui-ci se
trouve en mode de veille. Si la LED ne s‘allume
pas, mettez en marche l‘appareil à l‘aide de
l‘interrupteur d‘alimentation situé sur la face
arrière de l‘appareil. À l‘inverse, ce bouton
permet de mettre en veille l‘appareil lorsque
celui-ci est en marche.
2 SÉLECTION DE L‘ENTRÉE
Ces touches permettent de sélectionner
directement les entrées audio. L’entrée active est
affichée à l’écran.
3 MENU
Le menu système s‘ouvre. La navigation dans le
menu se fait avec les touches ◄◄, ►►, ▲et▼.
Appuyer une nouvelle fois sur la touche SELECT
(12) afin de valider les réglages effectués.
Voir également la section LE MENU DU MC 100.
4 SKIP/SEARCH/TOUCHES DE NAVIGATION
Search/Skip (avance)
• Brève pression: la lecture commence au début
de la plage actuelle.
• Brève pression double: la lecture commence
au début de la plage précédente.
• Longue pression: retour rapide. Reste actif
tant que la touche est enfoncée.
• Menu: navigation et configuration des
paramètres.
Search/Skip (retour)
• Brève pression: la lecture commence au début
de la plage suivante.
• Longue pression: avance rapide. Reste actif
tant que la touche est enfoncée.
• Menu: navigation et configuration des
paramètres.
▲et▼
Menu: configuration des paramètres.
5 DISPLAY
Mode CD:
Affichage « CD-Text » ou métadonnées ID3 (à
condition que le CD soit compatible):
Les informations « CD-Text » et les métadonnées
ID3 sont affichées dans la 2e ligne sur l’écran.
Après une pression sur cette touche, les
différentes informations s’affichent dans l’ordre
suivant :
Titre – Interprète – Album – sans affichage
Avec les fichiers MP3 et WMA, le nom du fichier
et le débit binaire du titre actuel sont également
affichés sur l’écran.
Mode FM:
Affichage des informations RDS (à condition
que cette fonction soit prise en charge par la
station).
Pour en savoir plus à propos des informations
RDS émises par les stations, consultez la
section « Fonctions RDS du tuner ».
Mode DAB:
Affichage des informations DAB (à condition
que cette fonction soit prise en charge par la
station).
Pour en savoir plus à propos des informations
DAB émises par les stations, consultez la
section « Fonctions DAB du tuner ».
Mode Bluetooth:
L’identifiant du périphérique jumelé, le débit
binaire et les métadonnées ID3 du titre actuel
sont affichés sur l’écran.
Après une pression sur cette touche, les
différentes métadonnées ID3 s’affichent dans
l’ordre suivant :
Titre – Interprète – Album – sans affichage
6 TUNING
Mode FM:
• Brève pression: modifie la fréquence de
réception par pas de 50kHz (FM) (réglage
manuel des stations de radio).
• Longue pression: recherche la prochaine
station de radio disponible (réglage
automatique des stations de radio).
Mode DAB:
Sélectionne la station suivante ou précédente
sur la bande DAB.
7 TOUCHES NUMÉRIQUES
Mode CD:
Sélection directe d‘une plage.
Mode FM:
Sélection directe d‘une station de radio
préréglée.
28
Page 29

ÉLÉMENTS DE COMMANDE ET CONNEXIONS – TÉLÉCOMMANDE
8 MUTE
Permet de mettre en sourdine l‘appareil ou de
désactiver la sourdine.
9 VOLUME
Augmente (+) ou réduit (-) le volume sonore.
10 TONE/BAL
TREBLE (appuyer une fois sur TONE):
Vous pouvez augmenter ou abaisser de 7 niveaux
la restitution des aigus. Pour régler cette valeur, il
faut utiliser les touches ▲et▼.
BASS (appuyer deux fois sur TONE):
Vous pouvez augmenter ou abaisser de 7 niveaux
la restitution des basses. Pour régler cette valeur,
il faut utiliser les touches ▲et▼.
BALANCE:
Vous pouvez décaler le point central du mode
stéréo de 10 niveaux vers la gauche ou vers la
droite. Pour régler cette valeur, il faut utiliser les
touches ◄◄ et ►►
11 LOUDNESS
Sélection de la fonction Loudness (correction du
volume avec compensation auditive).
12 PLAY/PAUSE/SELECT
Mode CD:
Permet de démarrer ou d‘interrompre la lecture
d‘un CD.
Menu:
Validation de la saisie.
.
13 STOP
Stoppe la lecture d‘un CD.
14 COMMANDE CD : PROGRAM/RANDOM/
REPEAT
PROGRAM
Programmation des plages d‘un CD dans un
ordre quelconque.
Pour la programmation, l‘appareil doit se trouver
en mode Stop.
• Appuyez sur la touche PROG
Affichage:
• Attribuez maintenant la plage souhaitée à
l‘emplacement 01 en sélectionnant le numéro
du titre à l‘aide du clavier numérique ou des
touches SKIP.
Affichage, par ex.:
• Appuyez une nouvelle fois sur la touche PROG.
Affichage:
• Affectez à présent la plage souhaitée à
l‘emplacement 02.
• Répétez ces deux opérations jusqu‘à ce que
tous les titres souhaités soient programmés.
Après le dernier titre, appuyez sur le bouton
STOP. Le nombre de titres programmés
et la durée de lecture totale de la liste du
programme s’affichent sur l’écran.
• Lancez la lecture de la liste des plages
programmées en appuyant sur PLAY: la lettre
« P » apparaît à gauche, suivie de la plage
actuellement restituée et de la durée déjà lue
de cette piste.
Affichage, par ex.:
PRG 01-00
PRG 01-08
PRG 02-00
P 08-00:07
• Les touches SKIP, SEARCH et PAUSE/PLAY
permettent de modifier la lecture des plages
programmées.
• Lorsque vous actionnez la touche STOP ou la
touche EJECT, la mémoire de programmation
des plages s‘efface.
RANDOM
Lecture des titres d’un CD dans un ordre
aléatoire.
• Simple pression: la fonction est activée.
Le message suivant s‘affiche à l‘écran:
RANdOM-ON
• Nouvelle pression: la fonction est désactivée.
Le message suivant s‘affiche à l‘écran:
RANdOM-OFF
REPEAT
Répétition de la lecture d’une plage/du CD
(Repeat):
• Simple pression: la plage actuelle est répétée.
Le message suivant s‘affiche à l‘écran:
REPEAT ONE
• Double pression: tout le CD est répété.
Le message suivant s‘affiche à l‘écran:
REPEAT ALL
• Nouvelle pression: la fonction de répétition est
désactivée.
Le message suivant s‘affiche à l‘écran:
REPEAT OFF
15 DIM
Cette touche permet de régler la luminosité de
l’écran (3 niveaux de luminosité disponibles).
16 DISCONNECT (MODE BLUETOOTH)
Fermer une connexion Bluetooth existante puis
démarrer le mode jumelage.
17 ST/MONO (uniquement en mode FM)
Permet de passer de la réception FM-Stereo à la
réception FM-Mono.
Si le signal de réception est faible, l‘appareil passe
automatiquement du mode stéréo en mode mono
pour améliorer le rapport signal/bruit pondéré.
La réception est signalée à l‘écran par le symbole
ST.‘.
18 AUTO (MODE DAB)
Cette fonction recherche les stations dans la
gamme de fréquences DAB (bande III). Ces
stations sont ensuite accessibles à partir des
touches TUNING.
19 EJECT
Permet d‘ouvrir le tiroir de CD.
29
Page 30

MISE EN MARCHE
• Posez le MC 100 sur une surface plane. Respectez les écartements spécifiés dans les “ Consignes
de sécurité importantes “.
IMPORTANT: Ne posez pas d’objets sur l’appareil (journaux, boîtiers de CD/pochettes de disques,
etc.). Les grilles d’aération situées sur la face supérieure de l’appareil doivent être dégagées en
permanence !
• Raccordez vos haut-parleurs:
La paire de haut-parleurs stéréo (impédance comprise entre 4 et 8 ohms) est connectée sur la face
arrière de la manière suivante:
Utilisez uniquement des câbles audio pour haut-parleurs de haute qualité possédant une section de
conducteur d‘au moins 1,5 - 2,5 mm². Dénudez les câbles sur env. 10 mm et torsadez les extrémités.
Dévissez l‘une après l‘autre les vis des bornes et insérez les extrémités dénudées dans les alésages
latéraux. Resserrez les vis des bornes. Respectez impérativement la bonne polarité.
Vous pouvez également utiliser des câble confectionnés au préalable avec des fiches banane de 4 mm
ou des godets à fourche.
Tenez également compte de la notice d’utilisation des haut-parleurs utilisés.
• Raccordez vos sources audio.
• Branchez l’antenne DAB/FM sur la prise d’antenne au dos de l’appareil. Au cours de l’utilisation
ultérieure, il est recommandé de déterminer la position de l’antenne afin de garantir une réception
optimale. L’extrémité de l’antenne devrait alors être fixée dans la position correspondante, par ex. à
l’aide d’une punaise.
En cas de mauvaise réception, un système d’antenne de toit approprié ou une antenne extérieure
peuvent améliorer la réception.
• Branchez sur la face arrière le câble d‘alimentation fourni avec l‘appareil puis l‘autre extrémité du
câble à une prise de 230 V.
• Mettez d’abord l’interrupteur d’alimentation situé au dos de l’appareil sur « ON ». L’appareil est
maintenant en mode de veille.
• Mettez maintenant l‘appareil en marche depuis la télécommande ou la touche ON/STBY en façade.
• Après la phase de chauffage de la tube, l‘appareil est prêt à fonctionner.
• Sélectionnez la source audio souhaitée à l‘aide du sélecteur d‘entrée.
LE MENU DU MC 100
Le menu permet de procéder facilement aux réglages du son et à la configuration de divers paramètres.
• Ce menu est accessible à l‘aide de la touche MENU de la télécommande ou en appuyant sur le bouton
SEARCH/SKIP/MENU en façade.
• La navigation dans le menu et la modification des réglages sont possibles à l‘aide des touches ◄◄,
►► , ▲et▼ de la télécommande et en faisant tourner le bouton SEARCH/SKIP/MENU.
• Confirmation des différentes options de menu à l‘aide de la touche SELECT de la télécommande ou en
appuyant sur le bouton SEARCH/SKIP/MENU.
Les réglages suivants sont possibles:
• Réglage des basses:
Sélectionnez BASS dans le menu. Vous pouvez augmenter ou abaisser de 7 niveaux la restitution des
basses.
• Réglage des aigus:
Sélectionnez TREBLE dans le menu. Vous pouvez augmenter ou abaisser de 7 niveaux la restitution des
aigus.
• Réglage de la balance:
Sélectionnez BALANCE dans le menu. Vous pouvez décaler le point central du mode stéréo de 10 niveaux
vers la gauche ou vers la droite
• Loudness (correction du volume avec compensation auditive) :
Sélectionnez LOUDNESS dans le menu. Vous pouvez activer ou désactiver cette fonction.
• Fonction Veille automatique
L’appareil dispose d’une fonction Veille automatique, qui bascule automatiquement l’appareil en mode
veille au bout d’env. 3,5 heures après la dernière pression sur une touche (à partir des éléments de
commande sur l’appareil ou de la télécommande). Cette fonction met en application un règlement
européen (CE 1275/2008) relatif à la consommation d’énergie et réduit la consommation d’électricité
lorsque l’utilisateur oublie d’éteindre l’appareil.
Sélectionnez APO SETTING dans le menu. La fonction peut maintenant être activée ou désactivée. Lors
de la livraison, la fonction est activée par défaut.
• Fonction SLEEP:
Sélectionnez SLEEP TIME dans le menu. Cette fonction permet de paramétrer une durée au bout de
laquelle l‘appareil doit s‘éteindre et passer automatiquement en mode de veille. La durée peut être
réglée entre 5 et 240 minutes à l‘aide des touches ▲et ▼. Après avoir quitté le menu, la fonction Sleep
activée est indiquée par un symbole situé en bas à droite de l‘écran.
• Information système:
Sélectionnez SYSTEM INFO dans le menu. Avec les touches ◄◄ et ►►, il est possible d‘afficher les
différentes versions du logiciel de l‘appareil à des fins de maintenance.
• Reset:
L‘option de menu RESET permet de rétablir les réglages de base (supprimer toutes les stations
enregistrées, mettre tous les paramètres audio sur 0, éteindre la fonction Loudness et le Sleep Timer,
allumer la veille automatique).
L‘option EXIT permet de quitter le menu.
30
Page 31

CONNEXION DE L‘APPAREIL AVEC UNE SOURCE AUDIO BLUETOOTH
Veuillez sélectionner l‘entrée Bluetooth. Si un couplage a déjà été réalisé précédemment avec un
appareil source Bluetooth, alors le système essayera de rétablir automatiquement cette connexion. Il
peut arriver lors de ce processus que vous deviez conrmer manuellement la reconnexion au niveau de
l‘appareil source.
S‘il n‘existe aucun couplage ou que la connexion n‘a pas pu être rétablie, le MC 100 active automatiquement le mode « Couplage », également appelé mode « Pairing ». L‘annonce « BT » clignote sur l‘écran.
Activez à présent le mode Bluetooth de votre appareil source. Le MC 100 s‘afche sur la liste des ap-
pareils Bluetooth sous « MC 100 ». S‘il n‘apparaît pas dans la liste, activez manuellement la recherche
des appareils Bluetooth sur votre appareil source et assurez-vous que le MC 100 se trouve bien en
mode « Pairing ».
En fonction de l’appareil source, il peut arriver que l’on vous demande si le mot de passe doit être
accepté pendant le processus de couplage. Conrmez simplement en appuyant sur « Accepter ». Si
un mot de passe vous est demandé, employer les mots de passe standard « 0000 » ou « 1234 ». Si le
système vous demande après le couplage si vous souhaitez établir une connexion, répondez également
par « Oui ». Une fois le couplage et la connexion établis, le témoin « BT » reste allumé en permanence
sur l’écran.
Le MC 100 prend en charge la norme de transmission haut de gamme « Qualcomm® aptX™ ». Si votre
appareil source prend également cette technique en charge, le mode de transmission « Qualcomm®
aptX™ » est sélectionné par défaut lors de l‘établissement de la connexion Bluetooth.
MÉMOIRE DES STATIONS
L’appareil est équipé de deux mémoires des stations indépendantes l’une par rapport à l’autre pour les
stations FM et DAB. Chaque mémoire permet d’enregistrer jusqu’à 40 stations.
Enregistrement de stations:
Sélectionnez la station DAB ou FM souhaitée à l’aide des touches TUNING de l’appareil ou à l’aide de la
télécommande.
• Choisissez l‘espace de stockage souhaité en appuyant longtemps sur la touche correspondant sur le
clavier numérique.
• Pour saisir un numéro d‘espace de stockage à deux chiffres (10-40), effectuez d‘abord une longue
pression sur la touche +10 puis saisissez les chiffres souhaités.
• Le succès de la sauvegarde est confirmé à l‘écran par le message STORED PRESET. Sur la première
ligne, le numéro de l‘espace de stockage est affiché avant la fréquence de l‘émetteur.
RDS (RADIO DATA SYSTEM) - FONCTIONS DU TUNER (UNIQUEMENT FM)
Le système RDS est un système avec lequel des informations sur les émissions FM sont diffusées
avec le signal de la station de radio. Le MC 100 est capable d‘afficher à l‘écran ces informations (sur la
station de radio, l‘émission, etc.).
Les informations RDS peuvent être affichées dans l’ordre suivant en appuyant plusieurs fois sur la
touche DISPLAY (télécommande):
• PS (Program Service Name): affiche le nom de la station de radio.
• RT (Radio Text): affiche les informations et messages de la station.
• PTY (Program Type): affiche le type d‘émission.
• Heure / Date
FONCTIONS DAB DU TUNER (UNIQUEMENT DAB)
Le système de transmission DAB fournit des données et informations qui peuvent être affichées dans
l’ordre suivant en appuyant sur la touche DISPLAY (télécommande):
• Nom de la station
• DLS (Dynamic Label Segment): affiche les informations et messages de la station (par ex. titre et
interprète du morceau actuellement diffusé, actualités, autres informations de l’émission actuelle ou
de la station)
• Type de programme (par ex. pop, actualités, classique)
• N° multiplex DAB et fréquence de la station actuelle
• Heure / Date
• Débit binaire du signal audio actuel
• Nom multiplex DAB
SERVICE ET PROBLÈMES TECHNIQUES
Si des problèmes techniques font leur apparition, adressez-vous à votre revendeur spécialisé ou à
Magnat Audio-Produkte GmbH, tél.: 02234807-0.
Sélection d’une station à partir de la liste des stations:
Sélectionnez la plage de mémoire souhaitée à partir du clavier numérique (pression brève).
31
Page 32

CARACTÉRISTIQUES TECHNIQUES
Tuner
Gamme de fréquence: FM: 87,5 – 108 MHz
DAB/DAB+: 174.928 – 239.200 MHz (bande III)
Sensibilité FM: -108 dBm
DAB/DAB+: -100 dBm
Lecteur CD
Formats compatibles: CD-Audio, CD-R, CD-RW, MP3, WMA
Amplificateur
Puissance de sortie:
Puissance nominale 20 Hz – 20 kHz, THD < 1.0%, 4 Ohm 2 x 35 W
20 Hz – 20 kHz, THD < 1.0%, 8 Ohm 2 x 25 W
Puissance d’impulsion: 1 kHz, 4 Ohm 2 x 70 W
Réponse en fréquence:
CD/AUX/Line 10 Hz – 80 kHz (-3 dB)
20 Hz – 20 kHz (+/- 0,5 dB)
Ecart signal/bruit:
CD/AUX/Line 98 dB
Sensibilité / impédance d’entrée:
AUX/Line 470 mV / 100 kOhm
Fréquence de service : 2402 - 2480 MHz
Puissance maximale rayonnée selon
EN 62479: 7,34 dBm
Consommation de courant: Max.: 130 W
Veille: <0,5 W
Dimensions (LxHxP):
Appareil principal: 277 x 132 x 330 mm
Appareil principal, éléments
de commande et bornes de
raccordements inclus: 277 x 132 x 370 mm
Télécommande: 45 x 175 x 20 mm
Poids: 5,8 kg
Sous toutes réserves de modifications techniques.
Pour obtenir de plus amples informations, consultez notre site Internet à l‘adresse suivante:
http://www.magnat.de.
Entrées numériques: 1x optique (Toslink™)
1x coaxiale (Cinch)
Fréquences d‘échantillonnage
soutenues: 44.1/48/88.2/96/176.4/192kHz
Profondeurs de bits pris en charge: 16/24Bit
Entrées Bluetooth: Bluetooth® 4.0 / Qualcomm® aptX™
Sous toutes réserves de modifications techniques.
32
Page 33

33
Page 34

INDICE
IMPORTANTI AVVERZENZE DI SICUREZZA
34 Accessori
34 Prima della messa in servizio
34 Importanti avvertenze di sicurezza
35 Avvertenze per lo smaltimento
35 Dichiarazione di conformità
35 Uso conforme alle disposizioni
36 – 39 Elementi di comando ed attacchi
Pannello frontale
Lato posteriore
Telecomando
40 Messa in funzione
40 Il menu del MC 100
41 Collegare l’apparecchio alla sorgente audio Bluetooth
41 Memorizzazione delle stazioni
41 Funzioni RDS del sintonizzatore
41 Funzioni DAB del sintonizzatore
41 Assistenza e problemi tecnici
42 Dati tecnici
ACCESSORI
1) Manuale d’uso
2) Telecomando incl. batteria (2x AAA)
3) Cavo di alimentazione
4) Antenna DAB/FM
PRIMA DELLA MESSA IN SERVIZIO
Gentile cliente,
La ringraziamo per aver deciso di acquistare il Magnat MC 100. La preghiamo di leggere accuratamente
le seguenti avvertenze prima di mettere in funzione il MC 100.
Prima della messa in esercizio si prega di leggere attentamente le istruzioni per l’uso. Le presenti
istruzioni per l’uso comprendono avvisi importanti relativi al funzionamento e la sicurezza. Si prega di
rispettare tutte le avvertenze. Si prega inoltre di conservare con cura le presenti istruzioni per l’uso.
• AVVERTENZE: Tutti i segnali di avviso presenti sul dispositivo, gli accessori e nelle istruzioni per
l’uso devono essere rispettati.
• INFLUENZA TERMICA: Utilizzare il dispositivo e gli accessori solo a temperature compresa tra i
10°C e i 40°C.
Il dispositivo non deve essere posizionato vicino a fonti di calore (termosifoni, forni, stufe, amme
libere). In caso di montaggio nelle vicinanze di amplicatori è necessaria una distanza non inferiore
a 10 cm.
• Non avvicinare a amme libere, come ad es. candele.
• Accertarsi che il dispositivo sia sufcientemente aerato. Il dispositivo non deve essere coperto, ad
es. con tende. Mantenere una distanza sufciente (ca. 20 cm) dalle pareti.
• INFLUSSO DELL’UMIDITÀ: Il dispositivo non deve essere esposto a gocce o spruzzi d’acqua. Inoltre
non deve essere utilizzato per poggiare vasi o altri contenitori pieni d’acqua. Il dispositivo non deve
essere esposto né all’acqua né all’umidità. Altrimenti sussiste il pericolo di scosse elettriche. In
caso di contatto con l’umidità o liquidi è necessario scollegare l’apparecchio dalla rete elettrica.
• CORPI ESTRANEI: Accertarsi che nelle aperture del dispositivo non si inltrino corpi estranei.
Potrebbero provocare cortocircuiti, scosse elettriche ed incendi.
• PULIZIA: Si prega di utilizzare un panno asciutto e morbido e non utilizzare detergenti, spray o
solventi chimici poiché altrimenti si potrebbe danneggiare la supercie.
• COLLEGAMENTO ELETTRICO: Si prega di osservare i valori di tensione riportati sui segnali di
avviso. Il dispositivo può essere fatto funzionare solo con i valori di tensione e di frequenza riportati
sulle targhette.
• PROTEZIONE DAI FULMINI/MISURE CAUTELARI: Se l’apparecchio non è utilizzato per un periodo
prolungato (ad es. vacanze) si consiglia di staccare la spina dalla presa di corrente. Anche in caso
di temporale è necessario scollegare l’apparecchio dalla rete elettrica. In questo modo si evita il
danneggiamento da fulmine o sovratensione.
• CAVO DI RETE: Il cavo di rete deve essere sempre pronto per l’uso e disposto in modo tale che
nessuno possa calpestarlo. Inoltre non deve essere stretto da oggetti che potrebbero danneggiarlo.
Quando si utilizzano spine e prese multiple è necessario accertarsi che il cavo non venga piegato
nel punto in cui giunge alla presa elettrica. Non toccare o collegare il cavo di alimentazione con
mani umide.
• Lo spinotto funge da dispositivo di spegnimento e deve sempre essere accessibile.
• SOVRACCARICO: Le prese elettriche, le prese multiple e le prolunghe non devono essere
sovraccaricate. In caso di sovraccarico sussiste il rischio di scosse elettriche e di incendio.
• MONTAGGIO: Si prega di rispettare le istruzioni di montaggio.
• Il dispositivo deve essere posizionato e montato su una supercie resistente e non mobile altrimenti
sussiste il rischio di infortuni.
• Utilizzare solo accessori originali in dotazione o indicati dal produttore.
• BATTERIE: Non esporre le batterie a fonti di calore elevate, come ad es. luce del sole, fuoco o simili.
• Vi è il rischio di esplosione se la batteria non viene inserita nel modo corretto. Sostituire la batteria
solo con una batteria equivalente o dello stesso tipo.
34
Page 35

• PERICOLO DI INGESTIONE DELLE BATTERIE!
• Il dispositivo/il telecomando può contenere una batteria a bottone (a forma di moneta) che può
essere ingerita. Tenere sempre la batteria fuori dalla portata dei bambini. L’ingestione della
batteria può causare lesioni gravi o risultare persino letale. Può provocare gravi ustioni interne
nell’arco delle due ore successive all’ingestione.
• Rivolgersi immediatamente a un medico nel caso in cui si sospetti che una batteria sia stata
ingerita o introdotta in una parte del corpo.
• Al momento della sostituzione delle batterie, tenere le pile nuove e quelle esaurite fuori dalla portata dei bambini. Assicurarsi di aver chiuso correttamente il vano batterie dopo la sostituzione.
• Qualora non sia possibile chiudere correttamente il vano batterie, non continuare a utilizzare il
prodotto. Tenere il prodotto fuori dalla portata dei bambini e contattare il produttore.
DANNI CHE DEVONO ESSERE RISOLTI DA UN ADDETTO SPECIALIZZATO:
Nel caso dei seguenti danni è necessario che l‘apparecchio venga scollegato immediatamente dalla
rete elettrica contattando per la riparazione un addetto specializzato:
• Qualora il cavo di alimentazione risulti visibilmente danneggiato, cessare immediatamente l’utilizzo
dell’apparecchio. Sostituire, e non riparare, il cavo danneggiato.
• Danni alla presa di alimentazione del dispositivo.
• Nel caso in cui nell’apparecchio si dovesse inltrare dell’umidità o acqua oppure nel caso in cui
nell’apparecchio siano caduti corpi estranei.
• Quando l’apparecchio è caduto e l’alloggiamento è danneggiato.
• Quando l’apparecchio non funziona correttamente nonostante si siano rispettate tutte le avvertenze
riportate nelle istruzioni per l’uso.
È permesso effettuare delle modiche susseguenti solo se queste sono approvate dal produttore.
Per la riparazione è possibile impiegare solo pezzi di ricambio originali.
Dopo gli interventi di riparazione è necessario che venga vericata la sicurezza dell’apparecchio per
poter garantire un funzionamento perfetto e sicuro.
Gli interventi di riparazione devono essere afdati sempre ad addetti specializzati poiché altrimenti ci si
espone ad alte tensioni pericolose o altri rischi.
Attenzione! Non aprire il dispositivo!
Evitare di esporre questo apparecchio alla pioggia o all‘umidità onde
prevenire il rischio di incendio e scosse elettriche.
Dispositivo con classe di protezione II e doppio isolamento. Collegamento a massa assente.
AVVERZENZE PER LO SMALTIMENTO
Secondo quanto prescri tto dalla direttiva europea 2012/19/EU è necess ario che tutti i dispo sitivi elettrici
ed elettronici vengano smaltiti separatamente dai centri di raccolta preposti. Si prega di rispettare le
regolamentazioni locali e smaltire i dispositivi usati non insieme ai normali rifiuti domestici.
Smaltimento della batteria
Le batterie esauste sono da considerarsi rifiuti speciali e devono essere smaltite secondo le
regolamentazioni attuali.
DICHIARAZIONE DI CONFORMITÀ
Con la presente la ditta Magnat Audio-Produkte GmbH dichiara che l’apparecchio MC 100 è conforme
ai requisiti di base e alle altre prescrizioni rilevanti della Direttiva 2014/53/UE. La dichiarazione di
conformità è disponibile al sito www.magnat.de nell’area download dell’apparecchio.
Questo segnale avvisa l‘utente che all‘interno dell‘apparecchio sono presenti tensioni
elevate che possono provocare scariche elettriche pericolose.
Questo segnale indica all‘utente dell‘apparecchio che nel manuale d‘uso compreso nella
fornitura sono presenti avvertenze importanti che devono essere assolutamente
rispettate.
USO CONFORME ALLE DISPOSIZIONI
Questo apparecchio è studiato esclusivamente per l’utilizzo domestico.
35
Page 36

ELEMENTI DI COMANDO ED ATTACCHI – PANNELLO FRONTALE
16
15
1
2
3
4
5 6 7
1 ON/STBY
Attiva l‘apparecchio quando si trova in modalità
Standby. Quando il LED non è acceso è
necessario attivare l‘interruttore di rete sulla
parte posteriore dell‘apparecchio. Viceversa,
l‘apparecchio può essere attivato dalla modalità
Power alla modalità Standby.
2 INDICATORE DI STATO LED
Questo indicatore luminoso mostra 2 stati nei
quali l‘MC 100 acceso può trovarsi:
• Il LED è verde: L‘MC 100 è acceso.
L‘apparecchio è pronto al funzionamento.
• Il LED è rosso: Il dispositivo MC 100 si trova in
modalità di Standby.
1314
8
9 10 11 12
3 LINE-IN
Ingresso stereo a jack da 3,5 mm per una fonte
audio supplementare (lettore MP3 o sim.).
4 CUFFIE
Uscita stereo a jack 6,3 mm per cuffie. Quando
utilizzate, disattivare gli altoparlanti. Quando si
collegano le cuffie, abbassare il volume.
5 SOURCE (SELETTORE DI INGRESSO)
Passa tra le diverse fonti audio:
• CD: Lettore CD.
• BT: Connexion à un appareil source Bluetooth.
• DAB INPUT: Selezione del sintonizzatore DAB/
DAB+
• FM INPUT: Selezione del sintonizzatore FM.
• AUX 1/2: Altre dispositivi audio.
• DIGITAL OPT, DIGITAL COAX:
Connexion aux sources audio numériques
• LINE IN: Ingresso frontale per dispositivi
portatili.
6 TUNING -/+
Modalità FM:
• Pressione breve: Modifica la frequenza di
ricezione a scatti 50kHz (FM) (impostazione
manuale della stazione).
• Pressione lunga: Cerca la stazione successiva
(impostazione automatica della stazione).
Modalità DAB:
Seleziona la stazione precedente o successiva
nella banda DAB.
7 STATION -/+
Modalità FM:
• Breve pressione: Seleziona la stazione
successiva memorizzata.
• Pressione lunga: Seleziona la stazione
precedente memorizzata.
8 SCOMPARTO CD
Inserire in questo scomparto il CD con la parte
stampata rivolta verso l‘alto.
9 STOP
Arresta la riproduzione del CD in corso.
10 PLAY/PAUSE
Avvia o interrompe la riproduzione di un CD.
11 EJECT
Apre o chiude lo scomparto del lettore CD.
12 SEARCH/SKIP/MENU
Modalità CD:
Search/Skip (indietro)
• Breve rotazione a sinistra: La riproduzione
inizia all’inizio della traccia attuale
• Doppia breve rotazione a sinistra: La
riproduzione inizia all’inizio della traccia
precedente
• Rotazione prolungata a sinistra:
Riavvolgimento rapido Resta attivo finché si
mantiene la manopola.
Search/Skip (avanti)
• Breve rotazione a destra: La riproduzione inizia
all’inizio della traccia successiva
• Rotazione prolungata a destra: Avanzamento
rapido. Resta attivo finché si mantiene la
manopola.
Impostazioni MENU
Premere il pulsante per accedere al menu
delle impostazioni del suono e impostare altri
parametri. Ruotare la manopola per scorrere le
voci del menu. Premere di nuovo il pulsante per
confermare i parametri impostati.
Vedere anche IL MENU DEL MC 100.
36
Page 37

ELEMENTI DI COMANDO ED ATTACCHI – PANNELLO FRONTALE
ELEMENTI DI COMANDO ED ATTACCHI – LATO POSTERIORE
13 VOLUME
Per la regolazione generale del volume della
riproduzione musicale.
14 DIM
Con questo tasto è possibile impostare la
luminosità del display in 3 livelli.
15 DISPLAY
Sul display vengono visualizzate le seguenti
informazioni:
• Ingresso audio selezionato
• Informazione volume
• Stazioni e informazioni di ricezione in modalità
FM e DAB. Si veda a tal proposito anche il tasto
DISPLAY del telecomando.
• Dopo aver selezionato l’ingresso CD (nessun CD
inserito):
NO disC
• Dopo l‘inserimento e la lettura di un CD:
Numero complessivo di brani sul CD, durata di
ascolto del CD in minuti e secondi
Cd 15 46:32
• Se il CD contiene file MP3 o WMA, vengono
visualizzati il tipo di file e il numero dei file sul
CD:
MP3 15 FiLEs
• Durante la riproduzione di un CD:
Brano attualmente riprodotto, durata del brano:
02 03:45
• In più, i seguenti simboli visualizzano la
modalità di funzionamento:
► Riproduzione
II Pausa
• CD-Text, tag ID3
Se il CD supporta l’estensione CD-Text oppure
se i file MP3 e WMA contengono informazioni
tag ID3, queste vengono visualizzate nella
seconda riga del display. Si veda a tal proposito
anche il paragrafo TELECOMANDO.
16 SENSORE PER IL TELECOMANDO
Per poter utilizzare il telecomando, puntare su
questo punto.
10
1
2
1 INTERRUTTORE DI RETE
Attiva l‘apparecchio e lo porta in modalità
Standby. Quando l‘interruttore si trova in
posizione “OFF”, l‘apparecchio è scollegato dalla
rete.
2 COLLEGAMENTO ALLA RETE
Per il collegamento del cavo di alimentazione
compreso nella fornitura. Il fusibile può
essere sostituito solo da personale di servizio
qualificato.
3 ATTACCHI PER ALTOPARLANTI
Per il collegamento di una coppia di altoparlanti
Stereo con un‘impedenza di 4-8 Ohm
osservando la polarità corretta. Vedere anche
MESSA IN FUNZIONE.
ATTACCHI ANALOGICI CINCH (4 - 7)
Per il collegamento di fonti audio analogici. Si
prega di rispettare il contrassegno a colori degli
attacchi e delle spine. Rosso è sempre il canale
destro.
4 SUB OUT
Uscita per il collegamento di un subwoofer
attivo.
8911
47 6 5
3
5 REC OUT
Per il collegamento di apparecchi per
la registrazione audio analogica (ad es.
magnetofono, registratore a cassette). A
questa uscita è presente il segnale della fonte
audio selezionata con un livello fisso, quindi
indipendente dalla posizione del regolatore del
volume.
6, 7 INGRESSI AUX
Collegamento di altre sorgenti audio (ad es.
lettore MP3 o Minidisk).
8, 9 DIGITAL IN OPT, COAX
Collegare il MC 100 con un cavo audio digitale
ottico o coassiale all’uscita digitale del lettore
CD/computer/console per videogiochi/lettore
di rete.
10 ATTACCO ANTENNA DAB/FM
Per il collegamento dell‘antenna DAB/FM
compresa nella fornitura o di un‘antenna
esterna.
11 UPDATE
Questo collegamento è destinato
esclusivamente all’aggiornamento del sistema.
37
Page 38

ELEMENTI DI COMANDO ED ATTACCHI – TELECOMANDO
• Prima di utilizzare il telecomando è
necessario introdurre le batterie comprese
nella fornitura nell’apposito alloggiamento sul
1
2
19
18
17
16
15
14
retro del telecomando
• Se dopo un utilizzo prolungato si dovessero
scaricare le batterie, si prega di sostituirle
(Tipo AAA).
• Per prevenire danni al telecomando si prega
di rimuovere le batterie nel caso in cui
l’apparecchio non venga utilizzato per un
periodo prolungato.
4 SEARCH/SKIP/TASTI DI NAVIGAZIONE
◄◄ Search/Skip (indietro)
• Breve pressione: La riproduzione inizia
all’inizio della traccia attuale
• Doppia breve pressione: La riproduzione inizia
all’inizio della traccia precedente
• Pressione lunga: Riavvolgimento rapido Resta
attivo fino a quando si tiene premuto il tasto.
• Menu: navigazione e impostazione parametri.
3
13
4
5
12
11
10
6
9
7
8
1 POWER
Attiva l‘apparecchio quando si trova in modalità
Standby. Quando il LED non è acceso è
necessario attivare l‘interruttore di rete sulla
parte posteriore dell‘apparecchio. Viceversa,
l‘apparecchio può essere attivato dalla modalità
Power alla modalità Standby.
2 SELEZIONE INGRESSO
Con questi tasti è possibile selezionare
direttamente i singoli ingressi audio. L’ingresso
attivo viene visualizzato sul display.
3 MENU
Apre il menu di sistema. Premere i tasti ◄◄, ►►,
▲ e ▼ per scorrere le voci del menu. Premere
il tasto SELECT (12) per confermare i parametri
impostati.
Vedere anche IL MENU DEL MC 100.
►► Search/Skip (avanti)
• Breve pressione: La riproduzione inizia
all’inizio della traccia successiva
• Pressione lunga: Avanzamento rapido. Resta
attivo fino a quando si tiene premuto il tasto.
• Menu: navigazione e impostazione parametri.
▲ e ▼
Menu: impostazione parametri.
5 DISPL AY
Modalità CD:
Visualizzazione di CD-Text o tag ID3 (se
supportato dal CD):
Nella seconda riga del display viene visualizzata
l’intera informazione CD-Text / tag ID3.
Premere questo tasto per visualizzare le singole
informazioni nella sequenza seguente:
titolo – interprete – album – nessuna indicazione
Per i file MP3 e WMA vengono visualizzati in
aggiunta anche il nome del file e la velocità di
trasmissione dati del titolo attuale.
Modalità FM:
Visualizzazione delle informazioni RDS (se
supportate dalla stazione).
Ulteriori indicazioni sulle informazioni RDS delle
stazioni sono riportate al paragrafo “Funzioni
RDS del tuner”.
Modalità DAB:
Visualizzazione delle informazioni DAB delle
stazioni (se supportate dalla stazione).
Ulteriori indicazioni sulle informazioni delle
stazioni DAB sono riportate al paragrafo
“Funzioni DAB del tuner”.
Modalità Bluetooth:
Nel display vengono visualizzati il nome del
dispositivo collegato, la velocità dati e le
informazioni tag ID3 del titolo attuale.
Premere questo tasto per visualizzare le singole
informazioni tag ID3 nella sequenza seguente:
titolo – interprete – album – nessuna
indicazione
6 TUNING
Modalità FM:
• Pressione breve: Modifica la frequenza di
ricezione a scatti 50kHz (FM) (impostazione
manuale della stazione).
• Pressione lunga: Cerca la stazione successiva
(impostazione automatica della stazione).
Modalità DAB:
Seleziona la stazione precedente o successiva
nella banda DAB.
38
Page 39

ELEMENTI DI COMANDO ED ATTACCHI – TELECOMANDO
7 TASTI NUMERICI
Modalità CD:
Selezione diretta di un titolo.
Modalità FM:
Selezione diretta di una stazione preimpostata.
8 MUTE
Disattiva e riattiva il volume
9 VOLUME
Aumenta (+) o riduce (-) il volume.
10 TONE/BAL
TREBLE (premere una volta TONE):
La riproduzione dei toni alti può essere aumentata
o ridotta in 7 passaggi. Utilizzare i tasti ▲ e ▼ per
impostare i parametri.
BASS (premere due volte TONE):
La riproduzione dei toni bassi può essere
aumentata o ridotta in 7 passaggi. Utilizzare i tasti
▲ e ▼ per impostare i parametri.
BALANCE:
Il centro stereo può essere spostato a sinistra o a
destra in 10 passaggi. Utilizzare i tasti ◄◄ e ►►
per impostare i parametri.
11 LOUDNESS
Selezione della funzione Loudness (correzione
della sonorità adeguata).
12 PLAY/PAUSE/SELECT
Modalità CD:
Avvia o interrompe la riproduzione di un CD.
Menu:
Conferma immissione.
13 STOP
Arresta la riproduzione del CD in corso.
14 REGOLAZIONE CD: PROGRAM/RANDOM/
REPEAT
PROGRAM
Programmazione di brani su un CD in ordine a
piacere.
Prima di procedere alla programmazione,
passare con l‘apparecchio in modalità Stop.
• Premere il tasto PROG.
Display:
• Assegnare quindi al brano d‘interesse il posto
Display ad es.:
• Premere di nuovo il tasto PROG.
Display:
• Inserire il brano d‘interesse cui si vuole
• Ripetere i due passaggi fino a quando tutti i
PRG 01-00
di memoria 01 selezionando il numero del
brano tramite tastierino numerico o tasti SKIP.
PRG 01-08
PRG 02-00
assegnare il posto di memoria 02.
titoli risultano programmati. Premere il tasto
STOP dopo l’ultimo titolo. Vengono visualizzati
il numero dei titoli programmati e la durata
di riproduzione complessiva dell’elenco di
programmazione.
• Avviare la riproduzione della lista programmi
con PLAY. A sinistra sul display appare ‚P‘,
mentre il brano riprodotto e la durata del brano
sono visualizzati subito dopo.
Display ad es.:
• Con SKIP, SEARCH e PAUSE/PLAY è possibile
gestire la riproduzione all‘interno della lista
programmi.
• Se si preme il tasto STOP o EJECT, la memoria
programmi è cancellata.
RANDOM
Riproduzione delle tracce di un CD in sequenza
casuale.
• Una pressione: Si attiva la funzione.
Sul display appare:
• Nouvelle pression: Si disattiva la funzione.
Sul display appare:
REPEAT
Riproduzione del titolo/CD (Repeat):
• Una pressione: Si ripete il titolo attuale.
Sul display appare:
• Due pressioni: Viene riprodotto l’intero CD.
Sul display appare:
• Nuova pressione: Si disattiva la funzione di
riproduzione.
Sul display appare:
15 DIM
Con questo tasto è possibile impostare la
luminosità del display in 3 livelli.
P 08-00:07
RANdOM-ON
RANdOM-OFF
REPEAT ONE
REPEAT ALL
REPEAT OFF
16 DISCONNECT (MODALITÀ BLUETOOTH)
Disattiva una connessione Bluetooth esistente e
avvia la modalità Pairing.
17 ST/MONO (solo in modalità FM)
Passaggio tra FM stereo e FM mono durante la
ricezione FM.
Con segnale di ricezione debole l’apparecchio
passa automaticamente dalla modalità stereo alla
ricezione mono migliorando il rapporto segnale/
rumore.
La ricezione stereo è visualizzata dal simbolo ‚ST.‘
sul display.
18 AUTO (MODALITÀ DAB)
Questa funzione esegue una ricerca delle
stazioni nella gamma di frequenza DAB (banda
III). Esse potranno poi essere selezionate
mediante i tasti TUNING.
19 EJECT
Apre lo scomparto del lettore CD.
39
Page 40

MESSA IN FUNZIONE
IL MENU DEL MC 100
• Posizionare l‘MC 100 su un fondo piano. Rispettare le distanze come indicato in “Importanti
avvertenze di sicurezza”.
IMPORTANTE:Non appoggiare alcun oggetto sull’apparecchio (riviste, copertine di CD/dischi o sim.).
Le prese d’aria sul lato superiore dell’apparecchio devono restare sempre libere!
• Collegare gli altoparlanti:
La coppia di altoparlanti Stereo (impedenza da 4 ad 8 Ohm) viene collegata sul lato posteriore nel
modo seguente:
Utilizzare solo cavi per altoparlanti audio di elevata qualità con una sezione del conduttore di almeno
1.5 - 2.5mm². Isolare i cavi per ca. 10 mm e torcere le estremità. Sbloccare in successione le viti di
arresto ed inserire le estremità isolate nei fori laterali. Stringere nuovamente le viti di arresto. Prestare
attenzione all‘esatta polarizzazione.
È possibile impiegare anche cavi preconfezionati con una spina unipolare da 4 mm o attacchi ad U.
Inoltre, rispettare quando indicato nelle istruzioni per l’uso degli altoparlanti impiegati.
• Collegare le fonti audio.
• Collegare l’antenna DAB/FM all’ingresso antenna sul retro dell’apparecchio. Durante l’utilizzo
individuare la posizione nella quale la ricezione dell’antenna è ottimale. Fissare quindi la parte
terminale dell’antenna nella posizione desiderata, ad es, con una puntina da disegno.
Un impianto di antenna esteriore appropriato o un’antenna esterna può migliorare la ricezione in
caso di scarso segnale.
• Collegare sulla parte posteriore il cavo di alimentazione compreso nella fornitura e successivamente
l‘altra estremità ad una presa da 230V.
• Attivare prima l’interruttore di rete sul retro, l’apparecchio a questo punto si trova in modalità di
Standby.
• Inserire l’apparecchio tramite telecomando o tasto ON/STBY presente sulla parte frontale.
• Dopo la fase di preriscaldamento della valvola l‘apparecchio è pronto al funzionamento.
• Selezionare la fonte audio desiderata con il selettore di ingresso.
Le impostazioni del suono e di altri parametri possono essere eseguite comodamente tramite menu.
• Il menu si apre tramite tasto MENU sul telecomando oppure premendo il regolatore SEARCH/SKIP/
MENU sulla parte frontale.
• La navigazione all’interno del menu e la modifica delle impostazioni sono svolte tramite tasti ◄◄, ►► ,
▲e▼ sul telecomando oppure girando il regolatore SEARCH/SKIP/MENU.
• Azionamento delle singole voci di menu tramite tasto SELECT sul telecomando o premendo il
regolatore SEARCH/SKIP/MENU.
Sono possibili le seguenti impostazioni:
• Impostazione dei suoni bassi:
Selezionare nel menu BASS. La riproduzione dei toni bassi può essere aumentata o ridotta in 7
passaggi.
• Impostazione dei suoni alti:
Selezionare nel menu TREBLE. La riproduzione dei toni alti può essere aumentata o ridotta in 7
passaggi.
• Impostazione del bilanciamento:
Selezionare nel menu BALANCE. Il centro stereo può essere spostato a sinistra o a destra in 10
passaggi.
• Loudness (correzione del volume corretto per l’udito):
Selezionare nel menu LOUDNESS. Fatto questo, la funzione può essere attivata o disattivata.
• Funzione auto-standby
L’apparecchio dispone di una funzione auto-standby che attiva automaticamente la modalità standby
dopo ca. 3 ore e mezza dall’ultimo utilizzo (tramite i comandi dell’apparecchio o telecomando). Questa
funzione è conforme al regolamento EU sul risparmio energetico (1275/2008 CE) e limita il consumo
energetico qualora l’apparecchio resti inavvertitamente acceso dopo l’utilizzo.
Selezionare nel menu APO SETTING. Fatto questo, la funzione può essere attivata o disattivata.
L’impianto viene fornito con la funzione attiva.
• Funzione Sleep:
Selezionare nel menu SLEEP TIME. Questa funzione consente di impostare un tempo trascorso il quale
l‘apparecchio si spegne e passa automaticamente alla modalità di funzionamento standby. Impostare
una durata compresa tra 5 e 240 minuti mediante i tasti ▲ e ▼ Una volta usciti dal menu, la funzione
Sleep verrà indicata sul display mediante un simbolo fisso in basso a destra.
• Informazione di sistema:
Selezionare nel menu SYSTEM INFO. Con i tasti ◄◄ e ►► è possibile visualizzare le singole versioni
Firmware dell’apparecchio per scopi di assistenza.
• Reset:
La voce di menu RESET provvede al ripristino della configurazione iniziale (cancellazione di tutte le
stazioni memorizzate, tutti i regolatori del suono impostati su 0, disattivazione della funzione Loudness
e del timer Sleep, modalità auto-standby accesa).
Per uscire la menu, selezionare la voce di menu EXIT.
40
Page 41

COLLEGARE L’APPARECCHIO ALLA SORGENTE AUDIO BLUETOOTH
FUNZIONI RDS (RADIO DATA SYSTEM) DES SINTONIZZATORE (SOLO FM)
Selezionare l‘ingresso Bluetooth. Se in precedenza era già stato impostato un collegamento a una
sorgente Bluetooth, l’apparecchio cercherà automaticamente di collegarsi a quel dispositivo. Potrebbe
anche risultare necessario confermare manualmente la riconnessione alla sorgente.
Qualora non sia stato effettuato alcun collegamento precedente o la connessione non possa essere
ripristinata, il MC 100 attiva in automatico la modalità collegamento, detta anche modalità pairing. Sul
display la sigla „BT“ inizierà a lampeggiare.
Selezionare ora la modalità Bluetooth dell’apparecchio sorgente. Il MC 100 verrà visualizzato nella lista
dei dispositivi Bluetooth come „MC 100“. Qualora non comparisse nella lista, attivare manualmente la
ricerca dei dispositivi Bluetooth dall’apparecchio sorgente e assicurarsi che il MC 100 sia impostato
sulla modalità pairing.
A seconda degli apparecchi sorgente, durante la procedura di collegamento può essere richiesto di
inserire una password. Confermare con „Accetta“. Se successivamente verrà richiesta una password,
inserire le password standard „0000“ o „1234“. Qualora dopo il collegamento venga richiesto se si
vuole stabilire una connessione, rispondere con „Sì“. Una volta che gli apparecchi sono connessi, nel
display verrà visualizzato in modo permanente il messaggio „BT“.
Il MC 100 supporta il valido standard di trasmissione audio „Qualcomm® aptX™“. Se anche
l’apparecchio sorgente supporta questa tecnica, al momento della connessione Bluetooth verrà selezionata automaticamente la modalità di trasmissione „Qualcomm® aptX™“.
MEMORIZZAZIONE DELLE STAZIONI
L’apparecchio è dotato di due memorie indipendenti l’una dall’altra per le stazioni FM e DAB. Ogni
memoria può contenere fino a 40 stazioni.
Memorizzare le stazioni:
Impostare le stazioni DAB o FM desiderate con i tasti TUNING dell’apparecchio o tramite telecomando.
• Selezionare la posizione di memoria desiderata premendo a lungo il tasto corrispondente sul
tastierino numerico.
• Per selezionare una posizione di memoria a due cifre (10 – 40) è necessario prima premere a lungo
il tasto +10 e successivamente inserire le cifre desiderate.
• La scritta STORED PRESET sul display confermerà la corretta esecuzione dell’operazione. La
posizione di memoria è sempre visualizzata nella prima riga davanti alla frequenza dell’emittente.
Selezionare una stazione dalla lista delle emittenti:
Selezionare la posizione di memoria desiderata attraverso il tastierino numerico (premere brevemente).
RDS è un sistema con il quale vengono trasmesse delle informazioni attraverso delle trasmissioni
FM con il segnale del trasmettitore. L‘MC 100 può visualizzare queste informazioni (attraverso il
trasmettitore, la trasmissione ecc.) sul display.
Le informazioni RDS possono essere visualizzate premendo ripetutamente il tasto DISPLAY
(telecomando) nella sequenza seguente:
• PS (Program Service Name): Mostra il nome del trasmettitore.
• RT (Radio Text): mostra tutte le informazioni e gli avvisi della stazione.
• PTY (Program Type): Visualizza il tipo di trasmissione.
• Ora / Data
Se nonostante il segnale RDS una di queste funzioni non è supportata dal trasmettitore, sul display
viene visualizzato „N/A“.
FUNZIONI DAB DEL TUNER (SOLO DAB)
Il sistema di trasmissione DAB fornisce altri dati e informazioni che possono essere visualizzati
mediante il tasto DISPLAY (telecomando) nella sequenza seguente:
• Nome stazione
• DLS (Dynamic Label Segment): mostra informazioni e avvisi della stazione (ad es. titoli e cantanti del
brano musicale trasmesso, notizie, altre informazioni della trasmissione attuale o della stazione)
• Tipo di programma (ad es. pop, news, classico)
• Numero multiplex DAB e frequenza dell’attuale emittente
• Ora / Data
• Velocità di trasmissione dati dell’attuale segnale audio
• Nome multiplex DAB
ASSISTENZA E PROBLEMI TECNICI
Nel caso in sui si dovessero verificare dei problemi tecnici, si prega di contattare il proprio rivenditore
specializzato o direttamente a Magnat Audio-Produkte GmbH, Tel.: 02234807-0.
41
Page 42

DATI TECNICI
Sintonizzatore
Gamme de fréquence: FM: 87,5 – 108 MHz
DAB/DAB+: 174.928 – 239.200 MHz (banda III)
Sensibilità: FM: -108 dBm
DAB/DAB+: -100 dBm
Lettore CD
Formati riproducibili: CD-Audio, CD-R, CD-RW, MP3, WMA
Amplificatore
Potenza di uscita:
Potenza nominale 20 Hz – 20 kHz, THD < 1.0%, 4 Ohm 2 x 35 W
20 Hz – 20 kHz, THD < 1.0%, 8 Ohm 2 x 25 W
Potenza massima 1 kHz, 4 Ohm 2 x 70 W
Risposta in frequenza:
CD/AUX/Line 10 Hz – 80 kHz (-3 dB)
20 Hz – 20 kHz (+/- 0,5 dB)
Rapporto segnale rumore:
CD/AUX/Line 98 dB
Frequenza di funzionamento: 2402 – 2480 MHz
Potenza massima emessa in
conformità alla norma EN 62479: 7,34 dBm
Alimentazione: Massimo: 130 W
Modalità di attesa: <0,5 W
Dimensioni (l x a x p):
Unità principale: 277 x 132 x 330 mm
Unità principale inclusi componenti
operativi/terminali di connessione: 277 x 132 x 370 mm
Telecomando: 45 x 175 x 20 mm
Peso: 5,8 kg
Con riserva di apportare modifiche tecniche
Per ulteriori informazioni si prega di visitare il nostro sito Web: http://www.magnat.de.
Sensibilità / Impedenza d’ingresso:
AUX/Line 470 mV / 100 kOhm
Ingressi digitali: 1x ottico (Toslink™)
1x coassiale (RCA)
Frequenze di campionamento
supportate: 44.1/48/88.2/96/176.4/192kHz
Profondità di bit supportate: 16/24bits
Bluetooth® input: Bluetooth® 4.0 / Qualcomm® aptX™
Con riserva di apportare modifiche tecniche
42
Page 43

43
Page 44

ÍNDICE
PRECAUCIONES IMPORTANTES DE SEGURIDAD
44 Accesorios
44 Antes de empezar
44 Precauciones importantes de seguridad
45 Instrucciones de eliminación
45 Declaración de conformidad
45 Uso conforme a su finalidad
46 – 49 Elementos operativos y conexiones
Panel frontal
Panel posterior
Control remoto
50 Primeros pasos
50 El menú del MC 100
51 Conexión del aparato con una fuente de audio Bluetooth
51 Memoria de emisoras
51 Funciones RDS del sintonizador
51 Funciones DAB del sintonizador
51 Mantenimiento y problemas técnicos
52 Especificaciones
ACCESSORIOS
1) Manual de instrucciones
2) Batterias para control remoto (2 x AAA)
3) Cable de alimentación
4) Antena DAB/FM
ANTEZ DE EMPEZAR
Estimado cliente,
Gracias por escoger el Magnat MC 100. Lea la siguiente información detenidamente antes de
comenzar a utilizar su MC 100.
Por favor lea atentamente el manual de instrucciones antes de utilizar el producto. El manual de instrucciones contiene indicaciones importantes para el funcionamiento y la seguridad del producto. Siga
absolutamente todas las indicaciones. Guarde en un lugar seguro este manual de instrucciones.
• ADVERTENCIAS: Todos los símbolos de advertencia en el dispositivo, los accesorios y en las
instrucciones de funcionamiento deben tenerse en cuenta.
• EFECTO DEL CALOR: Opere únicamente el dispositivo con accesorios en un rango de temperaturas
comprendido entre 10 °C y 40 °C.
El dispositivo no debe instalarse cerca de fuentes de calor (elementos térmicos, hornos, radiadores,
llamas abiertas). Cuando la instalación se realiza cerca de amplicadores no debería superarse una
distancia mínima de 10 cm.
• No exponga el dispositivo a llamas directas como p. ej., velas.
• Garantice una ventilación suciente del dispositivo. El dispositivo no debe estar cubierto, por
ejemplo por cortinas). Mantenga una distancia suciente (aprox. 20 cm) respecto a paredes.
• INFLUENCIA DE LA HUMEDAD: El dispositivo no debe estar expuesto a gotas o salpicaduras de
agua. Tampoco debe utilizarse para la colocación de jarrones u otros recipientes llenos de líquido.
No exponga el dispositivo al agua o a una alta humedad. Existirá el peligro de descarga eléctrica. En
caso de contacto con humedad o líquidos debe retirar el enchufe de alimentación del tomacorriente
• CUERPOS EXTRAÑOS: Preste atención a que no entren cuerpos extraños en el interior del
dispositivo a través de las aberturas del mismo. Estos podrían provocar cortocircuitos y también
descargas eléctricas e incendios.
• LIMPIEZA: Utilice un paño seco y suave y no emplee productos de limpieza, esprays o disolventes
químicos, ya que estos pueden dañar la supercie.
• TOMA DE CORRIENTE: Preste atención a los valores de tensión en las placas indicadoras. El
dispositivo solo debe operar con los valores de tensión y frecuencia indicados en las placas.
• PROTECCIÓN CONTRA RAYOS/MEDIDAS DE PRECAUCIÓN: En caso de que no se utilicen el
aparato y sus componentes por un largo tiempo (por ejemplo, al ir de vacaciones) debe retirar el
enchufe de alimentación del tomacorriente. Asimismo debe desenchufarse el aparato en caso de
tormentas eléctricas, para evitar daños por la caída de rayos y subidas de voltaje.
• CABLE DE RED: El cable de red debe estar siempre preparado para el servicio y solo debe tenderse
de tal mono que nadie lo pueda pisar. Tampoco debe estar aprisionado por objetos que lo puedan
dañar. Si se utilizan conectores y cajas de enchufe múltiples hay que prestar atención a que el
cable no se retuerza en el lugar en el que sale de la toma de corriente. No tocar ni enchufar el cable
de conexión eléctrica con las manos húmedas.
• El enchufe sirve de unidad de desconexión y siempre tiene que estar libre y accesible.
• SOBRECARGA: Las tomas de corriente las cajas de enchufe múltiples y los cables de prolongación
no deben sobrecargarse. La sobrecarga entraña un peligro de descarga eléctrica e incendio.
• INSTALACIÓN: Preste atención a las instrucciones de montaje.
• El dispositivo solo debe instalarse o montarse sobre una base rme y sobre bastidores no móviles,
ya que, de lo contrario, existirá un peligro de lesión.
• Utilice únicamente los accesorios originales adjuntos o especicados por el fabricante.
• LAS PILAS Y BATERÍAS no deben exponerse a temperaturas elevadas como p. ej., las emitidas por
los rayos solares, el fuego, etc.
• Si la pila no se instala correctamente, existe riesgo de explosión. Sustituya la pila solo por una del
mismo tipo o de un tipo equivalente.
44
Page 45

• ¡PELIGRO POR INGESTIÓN ACCIDENTAL DE LAS PILAS!
• El equipo/mando a distancia puede contener pilas planas/de botón que constituyen un serio
riesgo si son ingeridas. Manténgalas siempre lejos del alcance de los niños. En caso de ingesta,
podrían provocar lesiones muy graves e incluso la muerte. En menos de 2 horas producen quemaduras internas graves una vez ingeridas.
• Acuda rápidamente a un médico si tiene la sospecha de que se ha ingerido una pila o se ha introducido en alguna parte del cuerpo.
• Mantenga las pilas nuevas y las usadas lejos del alcance de los niños cuando vaya a hacer un
cambio de pilas.
Asegúrese de que el compartimento de las pilas queda bien cerrado una vez realizado el cambio.
• No utilice el producto si no es posible cerrar totalmente el compartimento de las pilas. En ese
caso, mantenga el producto lejosdel alcance de los niños y póngase en contacto con el fabricante.
DAÑOS QUE TIENEN QUE SER REPARADOS POR TÉCNICOS ESPECIALIZADOS:
En caso de que ocurran los siguientes daños se deben desconectar inmediatamente el aparato de la
toma de corriente, y consultar a un técnico especializado:
• No continúe utilizando el dispositivo si existen señales visibles de deterioro en el cable de alimenta-
ción. Un cable deteriorado no debe ser reparado, sino reemplazado.
• Daños en la toma de conexión de red en el dispositivo.
• Si le ha entrado humedad o agua al aparato, o han caído objetos dentro de él.
• Si se ha caído el aparato y se dañó la carcasa.
• Si el aparato no funciona correctamente, pese a haber seguido todas las instrucciones del manual
de uso.
Sólo se permite efectuar cambios posteriores que hayan sido autorizados por el fabricante.
Sólo se permite utilizar repuestos originales para la reparación.
Por seguridad, revise el aparato después de una reparación, así podrá cerciorarse de que funciona
adecuada y correctamente.
Las reparaciones tienen que ser hechas siempre por técnicos especializados, ya que el usuario corre el
peligro de exponerse a altos voltajes o a otros tipos de riesgos.
¡Atención! No abra es dispositivo!
Para evitar riesgos de incendio y descarga electrica, rogamos no
exponer este aparato a la lluvia o la humedas.
Aparato del nivel de protección II con
INSTRUCCIONES DE ELIMINACIÓN
De acuerdo con la Directiva Europea 2012/19/EU, todos los aparatos eléctricos y electrónicos deben
ser eliminados por medio de puntos de recogida locales e independientes. Respete la normativa local y
no elimine los aparatos usados junto a los residuos domésticos.
Eliminación de la batería
Las baterías usadas son un residuo peligroso y deben ser eliminadas de acuerdo con las normativas
actuales.
DECLARACIÓN DE CONFORMIDAD
Por la presente, la empresa Magnat Audio-Produkte GmbH declara que el aparato MC 100 cumple
los requisitos básicos y demás normas relevantes de la Directiva 2014/53/UE. Esta declaración de
conformidad está disponible en el área de descargas del aparato dentro de nuestra web www.magnat.de.
Este símbolo advierte al usuario de la presencia de altos niveles de tensión utilizados
en el dispositivo, que podrían provocar descargas eléctricas.
Este símbolo advierte al usuario de la existencia de notas importantes en el manual de
instrucciones adjunto que deben respetarse.
USO CONFORME A SU FINALIDAD
Este aparato ha sido diseñado exclusivamente para uso doméstico.
45
Page 46

ELEMENTOS OPERATIVOS Y CONEXIONES – PANEL FRONTAL
16
1
2
3
4
5 6 7
1 ON/STBY
Enciende el dispositivo si se encuentra en el
modo de suspensión. Si el LED no se ilumina,
accione el interruptor de alimentación que se
encuentra en la parte posterior del dispositivo.
De igual forma, le permite apagar el dispositivo
si está encendido.
2 INDICADOR LED DE ESTADO
Esta pantalla iluminada indica 2 posibles
estados del MC 100:
• LED iluminado en verde: El MC 100 está
encendido. Los tubos han alcanzado la
temperatura correcta. El dispositivo está listo
para su uso.
• LED iluminado en rojo: El MC 100 se
encuentra en modo standby.
15
1314
8
9 10 11 12
3 LINE-IN
Conector de entrada estéreo de 3,5 mm
para un dispositivo de audio auxiliar (p. ej. un
reproductor MP3, etc).
4 AURICULARES
Conector de salida estéreo de 6,3 mm para
auriculares. Los altavoces se desactivarán
durante el uso de este conector. Baje el volumen
antes de conectar los auriculares.
5 SOURCE (CONMUTADOR DE SELECCIÓN DE
ENTRADA)
Conmuta entre las distintas fuentes de audio:
• CD: reproductor de CD.
• BT: Unión con un dispositivo de origen
Bluetooth.
• DAB INPUT: Selección del sintonizador DAB/
DAB+.
• FM INPUT: Selección del sintonizador FM.
• AUX 1/2: otros dispositivos de audio
• DIGITAL OPT, DIGITAL COAX:
Conexión a fuentes de audio digitales.
• LINE IN: Entrada frontal para dispositivos
portátiles.
6 TUNING -/+
Modo FM:
• Pulsación breve: Cambia la frecuencia
de sintonización en pasos de 50kHz (FM)
(búsqueda manual de emisoras).
• Pulsación prolongada: Busca la siguiente
emisora (búsqueda automática de emisoras).
Modo DAB:
Selecciona la emisora siguiente o anterior en
banda DAB.
7 STATION -/+
Modo FM:
• Presionar brevemente: Seleccione la siguiente
emisora en la memoria programable.
• Presionar en forma prolongada: Seleccione la
emisora anterior en la memoria programable.
8 COMPARTIMENTO DEL CD
Inserte el CD en el compartimento con la
etiqueta orientada hacia arriba.
9 STOP
Detiene un CD en reproducción.
10 PLAY/PAUSE
Inicia o pausa la reproducción de un CD.
11 EJECT
Abre o cierra el compartimento de CD.
12 SEARCH/SKIP/MENU
Modo CD:
SEARCH/SKIP (Buscar/Saltear) (hacia atrás):
• Giro corto hacia la izquierda: la reproducción
comienza al principio del título actual
• Dos veces giro corto hacia la izquierda: la
reproducción comienza al principio del título
anterior.
• Giro largo hacia la izquierda: rebobinado
rápido. Permanece activo mientras se
sostenga el botón.
SEARCH/SKIP (Buscar/Saltear) (hacia
adelante):
• Giro corto hacia la derecha: la reproducción
comienza al principio del título siguiente.
• Giro largo hacia la derecha: avance rápido.
Permanece activo mientras se sostenga el
botón.
Ajustes del MENÚ
Presione el botón para ingresar al menú
para ajustar el sonido y para configurar otros
parámetros. La navegación a través del menú se
realiza haciendo girar el botón. Para confirmar
los parámetros ajustados presione nuevamente
el botón.
Consulte EL MENÚ DEL MC 100.
46
Page 47

ELEMENTOS OPERATIVOS Y CONEXIONES – PANEL FRONTAL
ELEMENTOS OPERATIVOS Y CONEXIONES – PANEL POSTERIOR
13 VOLUMEN
Para ajustar el volumen general de la música.
14 DIM
Este botón permite graduar el brillo del display
en 3 niveles.
15 PANTALLA
El display muestra la siguiente información:
• Entrada de audio seleccionada.
• Información del volumen
• Información de emisor y receptor en modo
FM y DAB. Véase para ello también la tecla
DISPLAY del mando a distancia.
• Después de que se haya seleccionado la
entrada de CD (no se insertó ningún CD):
NO disC
• Después de la inserción y lectura de un CD:
Número total de pistas almacenadas en el
CD y tiempo total de reproducción del CD en
minutos y segundos:
Cd 15 46:32
• Si hay archivos MP3 o WMA en el CD, se
mostrará el tipo de archivo y el número de
archivos en el CD:
MP3 15 FiLEs
• Durante la reproducción de un CD:
Pista en reproducción y tiempo transcurrido de
la misma:
02 03:45
• Es posible también conocer el estado de
funcionamiento del equipo por medio de los
siguientes indicadores:
► Reproducción
II Pausa
• CD-Text y etiquetas ID3
Si el CD es compatible con CD-Text o si los
archivos MP3 o WMA contienen información de
etiquetas ID3, la información se muestra en la
2ª línea del display. Para más información al
respecto, véase también el apartado CONTROL
REMOTO.
16 SENSOR DEL CONTROL REMOTO
Apunte a este sensor durante el uso del control
remoto.
1
2
1 BOTÓN DE ENCENDIDO
Enciende el dispositivo si se encuentra en el
modo de suspensión. Si el interruptor está en
la posición “OFF”, el dispositivo se desconecta
de la alimentación principal.
2 CONEXIÓN DE ALIMENTACIÓN
Para conectar el cable de alimentación
suministrado. El fusible de seguridad debe
cambiarlo únicamente un profesional
capacitado.
3 TERMINALES DE ALTAVOZ
Para la conexión de altavoces estéreo con
una impedancia nominal de 4-8 ohmios (debe
considerarse la polaridad correcta). Consulte
PRIMEROS PASOS.
CONEXIONES RCA ANALÓGICAS (4 - 7)
Para conectar fuentes de audio analógicas.
Respete las marcas de colores de los
conectores y terminales. El rojo es siempre el
canal derecho.
4 SUB OUT
Salida para la conexión de subwoofers activos.
47
10
8911
47 6 5
3
5 REC OUT
Para conectar dispositivos de grabación
analógica de sonido (p. ej. un grabador
de cinta). La señal de la fuente de audio
seleccionada de nivel fijo es aplicable a
esta salida, es decir, es independiente de la
posición del mando de volumen.
6, 7 ENTRADAS AUX
Conexión de otras fuentes de audio (p. ej. un
reproductor MP3 o Minidisc).
8, 9 DIGITAL IN OPT, COAX
Conecte el MC 100 mediante un cable óptico o
cable de audio digital coaxial a la salida digital
de su reproductor de CD/ordenador/consola de
juegos/reproductores de audio.
10 CONEXIÓN DE ANTENA DAB/FM
Para conectar la antena DAB/FM, o una antena
doméstica.
11 UPDATE
Esta conexión está prevista exclusivamente
para actualizaciones del sistema..
Page 48

ELEMENTOS OPERATIVOS Y CONEXIONES – CONTROL REMOTO
• Antes de comenzar a utilizar el control remoto
se deben colocar en el compartimento
1
2
19
18
17
16
15
ubicado en la parte posterior las pilas que
vienen con el equipo.
• Si las baterías se agotan después de un uso
prolongado, cámbielas (tipo AAA).
• A fin de evitar daños, se recomienda retirar
las pilas cuando no se vaya a emplear el
equipo por un período prolongado.
14
3
13
4
5
12
11
10
6
9
7
8
1 POWER
Enciende el dispositivo si se encuentra en el
modo de suspensión. Si el LED no se ilumina,
accione el interruptor de alimentación que se
encuentra en la parte posterior del dispositivo.
De igual forma, le permite apagar el dispositivo
si está encendido.
2 SELECCIÓN DE ENTRADA
Estos botones permiten seleccionar directamente
cada una de las entradas de sonido en forma
individual. En el display aparece la entrada activa.
3 MENU
Accede al menú del sistema. La navegación a
través del menú se realiza con las teclas ◄◄,
►►, ▲y▼. Para confirmar los parámetros
ajustados presione la tecla SELECT (12).
Consulte EL MENÚ DEL MC 100.
Presionar en forma prolongada: rebobinado
rápido. Se mantiene activo mientras se aprieta
el botón.
Menú: Navegación y ajuste de los parámetros.
►► Search/Skip (hacia adelante)
Presionar brevemente: la reproducción comienza
al principio del título siguiente
Presionar en forma prolongada: avance rápido.
Se mantiene activo mientras se aprieta el botón.
Menú: Navegación y ajuste de los parámetros.
▲y▼
Menú: Ajuste de los parámetros.
5 DISPLAY
Modo CD:
Indicación del CD-Text o la etiqueta ID3 (en caso
de que el CD sea compatible):
En la 2ª línea del display se muestra la
información completa de CD-Text/etiqueta ID3.
Pulsando esta tecla se muestra la información
individual en el siguiente orden:
Título– Intérprete – Álbum – Ninguna indicación
En archivos MP3 y WMA, se muestra
adicionalmente el nombre de archivo y la
velocidad de transmisión de datos de la pista
actual.
En el apartado “Funciones DAB del sintonizador”
encontrará información detallada sobre los datos
de emisora DAB.
Modo Bluetooth:
En el display se muestra la identificación del
dispositivo acoplado, la velocidad de transmisión
de datos y la información de etiqueta ID3 de la
pista actual.
Pulsando esta tecla se muestra la información
individual de etiquetas ID3 en el siguiente orden:
Título– Intérprete – Álbum – Ninguna indicación
6 TUNING
Modo FM:
Pulsación breve: Cambia la frecuencia
de sintonización en pasos de 50kHz (FM)
(búsqueda manual de emisoras).
Pulsación prolongada: Busca la siguiente
emisora (búsqueda automática de emisoras).
Modo DAB:
Selecciona la emisora siguiente o anterior en
banda DAB.
7 TECLADO NUMÉRICO
Modo CD:
Selección directa de una pista.
Modo FM:
Selección directa de una emisora predefinida.
4 SEARCH/SKIP/TECLAS DE NAVEGACIÓN
◄◄ Search/Skip (hacia atrás)
Presionar brevemente: la reproducción comienza
al principio del título actual
Presionar dos veces brevemente: la
reproducción comienza al principio del título
anterior.
Modo FM:
Activar los datos RDS (siempre que la emisora
los soporte).
En el apartado “Funciones RDS del sintonizador”
encontrará información detallada sobre los
datos de emisora RDS.
Modo DAB:
Activar los datos de emisora DAB (siempre que
la emisora los soporte).
48
8 MUTE
Activa o desactiva el dispositivo.
9 VOLUME
Aumenta (+) o riduce (-) el volumen.
Page 49

ELEMENTOS OPERATIVOS Y CONEXIONES – CONTROL REMOTO
10 TONE/BAL
TREBLE (presione una vez en TONE):
La reproducción de agudos se puede reforzar
o atenuar en 7 niveles. Para ajustar los valores
presione las teclas ▲y▼.
BASS (presione dos veces en TONE):
La reproducción de bajos se puede reforzar o
atenuar en 7 niveles. Para ajustar los valores
presione las teclas ▲y▼.
BALANCE:
El punto medio estéreo se puede ajustar
hacia la izquierda o la derecha en 10 niveles,
respectivamente. Para ajustar los valores presione
las teclas ◄◄ y ►►
11 LOUDNESS
Selección de función de loudness (ajuste del
volumen con corrección auditiva).
12 PLAY/PAUSE/SELECT
Modo CD:
Inicia o pausa la reproducción de un CD.
Menú:
Confirmación de la entrada.
13 STOP
Detiene un CD en reproducción.
14 CONTROL DEL CD: PROGRAM/RANDOM/
REPEAT
PROGRAM
Programación de la reproducción de las pistas de
un CD en un orden determinado.
Para poder programar pistas, el equipo debe
encontrarse en el modo de parada.
.
• Pulse el botón PROG (PROGRAMAR)
Aspecto de la pantalla:
• Seleccione ahora la pista que desee asignar
al espacio de memoria 01 introduciendo su
número a través del teclado numérico o el
botón SKIP (Omitir).
Aspecto de la pantalla (ejemplo):
PRG 01-08
• Pulse de nuevo el botón PROG (PROGRAMAR).
Aspecto de la pantalla
• Introduzca ahora el número de la pista que
desee asignar al espacio de memoria 02.
• Repita los pasos anteriores hasta que haya
programado todas las pistas que desee; Pulse
la tecla STOP después de la última pista. Se
muestra el número de pistas programadas y
el tiempo de reproducción total de la lista de
programas.
• Pulse el botón PLAY (Reproducir) para iniciar
la reproducción de la lista programada.
Aparecerá el indicador “P”, seguido de la pista
en reproducción y el tiempo transcurrido, en la
parte izquierda de la pantalla.
Aspecto de la pantalla (ejemplo):
PRG 01-00
PRG 02-00
P
08-00:07
• Puede intervenir en la reproducción de la
lista programada pulsando los botones SKIP
(Omitir), SEARCH (Buscar) y PAUSE/PLAY
(Pausa/Reproducir).
• El programa se elimina al pulsar los botones
Stop (Detener) o Eject (Expulsar).
RANDOM
Reproduce aleatoriamente los títulos de un CD.
• Presionar una vez: Activa la función.
Aparecerá lo siguiente en la pantalla:
RANdOM-ON
• Volver a presionar: Desactiva la función.
Aparecerá lo siguiente en la pantalla:
RANdOM-OFF
REPEAT
Repetición de la reproducción del CD/título
(Repeat):
• Presionar una vez: se repite el título actual.
Aparecerá lo siguiente en la pantalla:
REPEAT ONE
• Presionar dos veces: se repite todo el CD.
Aparecerá lo siguiente en la pantalla:
REPEAT ALL
• Volver a presionar: se desactiva la función de
repetición.
Aparecerá lo siguiente en la pantalla:
REPEAT OFF
15 DIM
Este botón permite graduar el brillo del display
en 3 niveles.
16 DISCONNECT (MODO BLUETOOTH)
Se desconecta la conexión Bluetooth existente y
se inicia el modo de enlace.
17 STEREO/MONO (sólo en modo FM)
En la frecuencia FM cambia entre FM-Stereo
y FM-Mono.
Si la señal de recepción es débil, el equipo
pasa automáticamente del modo estéreo
a la recepción monoaural para mejorar la
relación señal/ruido.
La recepción estéreo se muestra en el display
mediante el símbolo “ST”.
18 AUTO (MODO DAB)
Esta función sintoniza emisoras dentro del
rango de frecuencias DAB (Banda III). Después,
estas se pueden reproducir pulsando las teclas
TUNING.
19 EJECT
Abre el compartimento del CD.
49
Page 50

PRIMEROS PASOS
EL MENÚ DEL MC 100
• Coloque el MC 100 sobre una superficie uniforme. Respete las separaciones de seguridad según lo
especificado en “Instrucciones importantes de seguridad”.
Importante: No colocar ningún objeto sobre el equipo (revistas, cajas de CD o discos, etc.). No
bloquear nunca la rejilla de ventilación de la parte superior del equipo.
• Conecte sus altavoces:
Conecte los altavoces estéreos (impedancia de 4 a 8 ohmios) al panel posterior de la siguiente forma:
Utilice sólo cables de altavoces de alta calidad, con una sección mínima de 1,5 - 2,5 mm². Pele
aproximadamente 10 mm de cable y trence los extremos. Afloje los tornillos del terminal e inserte
los extremos pelados en los orificios. Vuelva a apretar los tornillos del terminal. Asegúrese de que
mantiene la polaridad correcta.
También puede utilizar cables prefabricados con conectores banana o cocodrilo de 4 mm.
Respete además las instrucciones de uso de los altavoces que esté utilizando.
• Conecte sus fuentes de audio.
• Conecte la antena DAB/FM al conector de antena situado en la parte posterior del equipo. Al ponerlo
en funcionamiento más tarde, hay que encontrar la posición de la antena en la que tiene la mejor
recepción. Después, el extremo de la antena debería fijarse en la posición correspondiente, p. ej.:
con una chincheta.
En caso de tener unas condiciones de recepción problemáticas, una antena doméstica adecuada o
una antena exterior podrían mejorar la recepción.
• Conecte el cable de alimentación suministrado al panel posterior e inserte el otro extremo en una
toma de 230V.
• En primer lugar, encender el conmutador de alimentación ubicado en la parte posterior. El equipo
pasa al modo standby.
• Encender el equipo con el control remoto o la tecla ON/STBY del frente.
• Una vez que se ha calentado el tubo, el dispositivo estará listo para su uso.
• Seleccione la fuente de audio que desee utilizando el selector de entradas.
Es posible ajustar cómodamente el sonido y para configurar otros parámetros mediante un menú.
• El menú se abre presionando la tecla MENU del control remoto o el botón SEARCH/SKIP/MENU
ubicado en el frente.
• Es posible navegar por el menú y modificar los ajustes utilizando las teclas ◄◄, ►► , ▲y▼ del control
remoto o girando el botón SEARCH/SKIP/MENU.
• Las opciones del menú se pueden confirmar en forma individual con la tecla SELECT del control
remoto o presionando el botón SEARCH/SKIP/MENU.
Se pueden efectuar los siguientes ajustes:
• Ajuste de bajos:
Seleccionar BASS en el menú. La reproducción de bajos se puede reforzar o atenuar en 7 niveles.
• Ajuste de agudos:
Seleccionar TREBLE en el menú. La reproducción de agudos se puede reforzar o atenuar en 7 niveles.
• Ajuste del balance:
Seleccionar BALANCE en el menú. El punto medio estéreo se puede ajustar hacia la izquierda o la
derecha en 10 niveles, respectivamente.
• Loudness (sonoridad):
Seleccionar LOUDNESS en el menú. Es posible encender o apagar la función.
• Función Auto-Standby (modo de espera automático)
El equipo dispone de una función Auto-Standby, la cual pasados 3,5 segundos tras el último manejo
(mediante los elementos de manejo del equipo o el control remoto), pone automáticamente el equipo
en modo Standby (de espera). Esta función lleva a la práctica una directiva europea para promover el
ahorro energético (1275/2008 CE) y reduce el consumo de energía, en caso de que tras el uso, el equipo
se quede conectado por descuido.
Seleccione APO SETTING del menú. Ahora la función ya se puede activar o desactivar. La función viene
activada en el momento de la entrega.
• Función Sleep:
Seleccionar SLEEP TIME en el menú. Esta función le permite fijar un tiempo después del cual el dispositivo
se apagará automáticamente y se suspenderá. Con las teclas ▲y▼ es posible ajustar el tiempo entre
5 y 240 minutos. Después de salir del menú, la función ‚sleep‘ (apagar) se indica permanentemente
mediante un icono en la parte inferior derecha del display.
• Información del sistema:
Seleccionar INFO en el menú. Con las teclas ◄◄ y ►► se pueden mostrar cada una de las versiones de
firmware del dispositivo para fines de servicio.
• Reset:
Con la opción RESET del menú se recuperan los ajustes iniciales (borra todos los ajustes preestablecidos
de la memoria programable, todos los controles de sonido a 0, la función de volumen y el temporizador
de apagados, la espera automática encendida).
Con la opción EXIT se sale del menú.
50
Page 51

CONEXIÓN DEL APARATO CON UNA FUENTE DE AUDIO BLUETOOTH
FUNCIONES RDS (SERVICIO DE DATOR DE RADIO) DEL SINTONIZADOR (SÓLO FM)
Escoja la entrada de Bluetooth. Si anteriormente ya existía un acoplamiento con un dispositivo de
origen Bluetooth, se intenta restablecer automáticamente la conexión con este dispositivo. Puede
suceder que usted tenga de conrmar manualmente el restablecimiento de la conexión en el dispositivo de origen.
Cuando no existe ningún acoplamiento anterior o la conexión no puede restablecerse, el MC 100 activa
automáticamente el modo de acoplamiento, también denominado, modo de emparejamiento. En la
pantalla parpadea la indicación „BT“.
Conecte ahora el modo Bluetooth de su dispositivo de origen. El MC 100 se mostrará en la lista de
dispositivos Bluetooth como „MC 100“. En caso de que no aparezca en la lista, active manualmente
en el dispositivo de origen la búsqueda de dispositivos Bluetooth y asegúrese de que el MC 100 se
encuentra en el modo de emparejamiento.
En función del dispositivo de origen puede suceder que durante el proceso de acoplamiento se
pregunte si se debe aceptar la contraseña. Puede conrmarlo fácilmente con „Aceptar“. Si continúa
preguntándose por una contraseña, utilice las contraseñas estándar „0000“ o „1234“. En caso de que
después de realizado el acoplamiento se le pregunte si desea establecer una conexión, responda a la
pregunta con „Sí“. Después de realizado el acoplamiento y la conexión, el indicador de la pantalla „BT“
se ilumina permanentemente.
El MC 100 admite el estándar de transmisión de audio de alta calidad „Qualcomm® aptX™“. Si su
dispositivo de origen admite también esta tecnología , se seleccionará automáticamente „Qualcomm®
aptX™“ como modo de transmisión durante el establecimiento de una conexión Bluetooth.
MEMORIA DE EMISORAS
El equipo viene dotado de dos memorias de emisoras para emisoras FM y DAB independientes entre sí.
Cada memoria puede almacenar hasta 40 emisoras.
Guardar emisoras:
Sintonice la emisora FM o DAB que desee, utilizando las teclas TUNING situadas en el equipo o en el
control remoto.
• Seleccione la posición de memoria deseada mediante una pulsación larga de la tecla
correspondiente del teclado numérico.
• En caso de números de posición de memoria de dos dígitos (10 – 40), debe pulsarse primero la tecla
+10 prolongadamente y, a continuación, introducirse las cifras deseadas.
• El almacenamiento exitoso se confirma en el display mediante la indicación STORED PRESET. En
la primera línea se muestra permanentemente el número de posición de memoria antes de la
frecuencia del emisor.
RDS es un sistema que ofrece información acerca de emisoras FM, y que se emite junto con la señal de
la emisora. El MC 100 puede mostrar dicha información (de emisora, emisión, etc.) en la pantalla.
Si se pulsa repetidamente la tecla DISPLAY (control remoto) se activan los datos RDS en el orden
siguiente:
• PS (Program Service Name): muestra el nombre del programa.
• RT (Radio Text): Muestra datos y mensajes de la emisora.
• PTY (Program Type): muestra el tipo de programa.
• Hora / Fecha
FUNCIONES DAB DEL SINTONIZADOR (SÓLO DAB)
El sistema de transmisión DAB proporciona una serie de datos adicionales que se pueden activar
mediante la tecla DISPLAY (control remoto) en el orden siguiente:
• Nombre de la emisora
• DLS (Dynamic Label Segment): Muestra información y mensajes de la emisora (p. ej.: título e
intérprete de la pieza musical actual, mensajes de noticias, información adicional relacionada con la
emisora o con el programa del momento)
• Tipo de programa (p. ej.: pop, noticias, clásico)
• Número y frecuencia de multiplex DAB de la emisora actual
• Hora / Fecha
• Velocidad binaria de la señal de audio actual
• Nombre de multiplex DAB
MANTENIMIENTO Y PROBLEMAS TÉCNICOS
Si encuentra algún problema técnico, póngase en contacto con su distribuidor especializado o con
Magnat Audio-Produkte GmbH, Tel.: 02234807-0.
Seleccionar una emisora de la lista de emisoras:
Seleccione el espacio de memoria deseado mediante el teclado numérico (pulsación breve).
51
Page 52

ESPECIFICACIONES
Sintonizador
Respuesta de frecuencia: FM: 87,5 – 108 MHz
DAB/DAB+: 174.928 – 239.200 MHz (banda III)
Sensibilidad: FM: -108 dBm
DAB/DAB+: -100 dBm
Reproductor de CD
Formatos de reproducción: CD-Audio, CD-R, CD-RW, MP3, WMA
Amplificador
Potencia de salida:
Potencia nominal 20 Hz – 20 kHz, THD < 1.0%, 4 Ohmios 2 x 35 W
20 Hz – 20 kHz, THD < 1.0%, 8 Ohmios 2 x 25 W
Potencia de pico 1 kHz, 4 Ohmios 2 x 70 W
Respuesta de frecuencia:
CD/AUX/Line 10 Hz – 80 kHz (-3 dB)
20 Hz – 20 kHz (+/- 0,5 dB)
Distancia de voltaje sofométrico:
CD/AUX/Line 98 dB
Nivel/impedancia de entrada:
AUX/Line 470 mV / 10 kOhmios
Potencia máxima emitida según la
norma UNE-EN 62479: 7,34 dBm
Potencia de entrada: Máximo 130 W
Suspensión <0,5 W
Dimensiones (A x H x P):
Dispositivo principal: 277 x 132 x 330 mm
El dispositivo principal incluye
elementos operativos/
terminales de conexión: 277 x 132 x 370 mm
Control remoto: 45 x 175 x 20 mm
Peso: 5,8 kg
Reservados los derechos de realizar cambios técnicos.
Para más información, visite nuestra web: http://www.magnat.de
Entradas digitales: 1x óptica (Toslink™)
1x coaxial (RCA)
Frecuencias de muestreo admitidas: 44.1/48/88.2/96/176.4/192kHz
Profundidades de bits admitidas: 16/24bits
Bluetooth® input: Bluetooth® 4.0 / Qualcomm® aptX™
Frecuencia de funcionamiento: 2402 – 2480 MHz
Reservados los derechos de realizar cambios técnicos.
52
Page 53

53
Page 54

СОДЕРЖАНИЕ
ВАЖНЫЕ УКАЗАНИЯ ПО БЕЗОПАСНОСТИ
54 Принадлежности
54 Перед включением
54 Важные указания по безопасности
55 Указания по утилизации
55 Декларация соответствия
55 Надлежащее использование
56 – 59 Элементы управления и разъемы
Передняя панель
Задняя сторона
Пульт дистанционного управления
60 Включение
60 Меню MC 100
61 Соединение устройства с аудиоисточником Bluetooth
61 Запоминающее устройство для станций
61 RDS функции тюнера
61 DAB функции тюнера
61 Сервис и технические проблемы
62 Технические данные
ПРИНАДЛЕЖНОСТИ
1) Руководство по эксплуатации
2) Аккумуляторные батареи для пульта дистанционного управления (2 x AAA)
3) сетевом кабеле
4) Антенна DAB/FM
ВКЛЮЧЕНИЕМ
Уважаемый покупатель!
Благодарим Вас за решение ресивер Magnat MC 100. Пожалуйста, внимательно прочитайте
следующ ую информацию перед включением MC 100.
Руководство по эксплуатации содержит важные указания по режиму работы и безопасности.
Обязательно соблюдать все указания. Хранить Руководство по эксплуатации в надежном
месте.
• ПРЕДУПРЕДИТЕЛЬНЫЕ УКАЗАНИЯ: Следует принимать во внимание все предупредительные
обозначения на устройстве, принадлежностях и в Руководстве по эксплуатации.
• ВЛИЯНИЕ ТЕМПЕРАТУРЫ: Эксплуатируйте устройство с принадлежностями в диапазоне
температур от 10°C до 40°C.
Устройство не должно устанавливаться вблизи источников тепла (нагреватели, печи,
электрокамины, открытое пламя). При монтаже вблизи усилителей нельзя уменьшать
минимальное расстояние 10 см
• Не допускайте контакта устройства с открытым пламенем, например, со свечами.
• Обратите внимание на достаточную вентиляцию устройства. Нельзя накрывать устройство,
например, шторами, гардинами. Устанавливать на достаточном расстоянии (прим. 20 см) от
стен.
• ВЛИЯНИЕ ВЛАЖНОСТИ: Устройство не должно подвергаться воздействию водяных капель или
брызг. Также его нельзя использовать в качестве подставки для ваз или других заполненных
жидкостью сосудов. Не подвергайте устройство воздействию воды или воздуха с высокой
влажностью. Существует опасность поражения током. В случае контакта с влагой или
жидкостью немедленно отсоединить устройство от сети питания.
• ПОСТОРОННИЕ ПРЕДМЕТЫ: Следует обращать внимание на то, чтобы через отверстия
устройства не попадали внутрь посторонние предметы. Они могут стать причиной
возникновения коротких замыканий, поражения током или пожара.
• ЧИСТКА: Следует применять сухую и мягкую ткань и не использовать чистящие средства, спреи
или химические растворители, иначе поверхность может получить повреждения.
• ПОДСОЕДИНЕНИЕ ПИТАНИЯ: Следует соблюдать параметры напряжения, указанные на
заводских табличках. Блок питания устройства можно эксплуатировать только с указанными на
заводских табличках параметрами напряжения и частоты.
• ЗАЩИТА ОТ МОЛНИИ/МЕРЫ ПРЕДОСТОРОЖНОСТИ: Если прибор длительное время (напр., в
отпуске) не используется, следует отсоединить сетевой штекер от сети питания. Прибор следует
также отсоединять от сети питания во время грозы. Тем самым предотвращается повреждение
от удара молнией и повышенного напряжения.
• СЕТЕВОЙ КАБЕЛЬ: Сетевой кабель должен быть всегда готов к эксплуатации и укладываться
только таким образом, чтобы никто не мог на него наступить. Также нельзя зажимать
кабель предметами, которые могут повредить его. При применении штепсельных вилок и
удлинительных штепсельных розеток следует обращать внимание на то, чтобы кабель не был
надломлен в месте выхода из штепсельной розетки. Не дотрагиваться до сетевого кабеля и не
подключать его влажными руками.
• Сетевой штепсель используется как отключающее устройство, и к нему должен быть обеспечен
свободный доступ в любое время.
• ПЕРЕГРУЗКА: Штепсельные розетки, удлинительные штепсельные розетки и удлинители не
должны работать с превышением нагрузки. При перегрузке существует опасность поражения
током и пожара.
• УСТАНОВКА: Обратите внимание на инструкцию по монтажу.
• Устройство должно устанавливаться или монтироваться только устойчивом основании и
неподвижных подставках, так как иначе существует опасность травматизма.
54
Page 55

• Используйте только входящие в комплект поставки или указанные производителем
оригинальные принадлежности.
• Батареи и аккумуляторы не должны подвергаться воздействию высоких температур, например,
солнечного света, огня и т.п.
• Существует опасность взрыва, если батарея заменена неправильно. Замените батарею только
на такую же и аналогичную.
• ОПАСНОСТЬ ПРОГЛАТЫВАНИЯ БАТАРЕЙ!
• Устройство/пульт дистанционного управления могут содержать пуговичные/дисковые
батарейки, которые можно проглотить. Храните батареи в недоступном для детей месте.
Проглатывание батарей может привести к тяжелым травмам или смерти. Через 2 часа после
проглатывания батарей могу т возникнуть тяжелые внутренние ожоги.
• При подозрении на проглатывание или попадания батарей в организм немедленно
обратитесь за медицинской помощью.
• При замене батарей храните новые и использованные батареи в недоступном для детей
месте.
После замены батарей убедитесь в том, что отсек для батарей полностью закрыт.
• Если отсек для батарей невозможно полностью закрыть, не используйте изделие.
Поместите изделие в недоступное
для детей место и обратитесь к производителю.
Этот символ предупреждает пользователя о том, что внутри устройства используется
высокое напряжение, которое может привести к опасным ударам тока.
Этот символ указывает пользователю устройства на то, что в прилагаемом руководстве по
эксплуатации имеются важные указания, которым обязательно нужно следовать.
Не открывать! Опасность электрического удара!
Чтобы уменьшить опасность возгорания или электрического удара,
необходимо защищать устройство от дождя или влаги.
Устройство класса защиты II с двойной изоляцией. Контакт защитного заземления
отсутствует.
ПОВРЕЖДЕНИЯ, КОТОРЫЕ ДОЛЖНЫ УСТРАНЯТЬСЯ СПЕЦИАЛИСТОМ:
При следующих повреждениях, прибор необходимо немедленно отсоединить от сети питания и
передать специалисту на проведение ремонта:
• Если на сетевом кабеле будут обнаружены повреждения, эксплуатировать устройство больше
нельзя. Поврежденный кабель ремонтировать нельзя, его нужно заменить.
• Повреждения разъема питания на устройстве.
• Если внутрь устройства попала влага или посторонние предметы.
• Если устройство опрокинулось и при этом повредился корпус.
• Если устройство неправильно функционирует, хотя соблюдены все указания Руководства по
эксплуатации.
Допустимо предпринимать только те дополнительные изменения, которые разрешены
изготовителем.
Для ремонта необходимо использовать только оригинальные запасные детали.
После ремонта необходимо проверить устройство на безопасность, чтобы обеспечить надлежащее
и надежное функционирование.
Ремонтные работы должны всегда выполняться квалифицированными специалистами, так как
иначе может возникнуть опасное высокое напряжение или другие виды опасности.
УКАЗАНИЯ ПО УТИЛИЗАЦИИ
Согласно европейской директиве 2012/19/EU все электрические и электронные приборы для
утилизации должны сдаваться отдельно в местные сборные пункты. Пожалуйста, выполняйте местные
предписания и не выбрасывайте старые устройства вместе с обычным домашним мусором.
Утилизация батареек
Старые батарейки относятся к особым отходам и подлежат утилизации согласно действующим
предписаниям.
ДЕКЛАРАЦИЯ СООТВЕТСТВИЯ
Данным компания Magnat Audio-Produkte GmbH удостоверяет, что устройство MC 100 отвечает
основным требованиям и другим релевантным нормам Директивы 2014/53/EU. Декларация
соответствия находится на сайте www.magnat.de в разделе Downloads (материалы для скачивания)
каждого устройства..
НАДЛЕЖАЩЕЕ ИСПОЛЬЗОВАНИЕ
Это устройство предназначено только для домашнего использования.
55
Page 56

ЭЛЕМЕНТЫ УПРАВЛЕНИЯ И РАЗЪЕМЫ – ПЕРЕДНЯЯ ПАНЕЛЬ
16
1
2
3
4
5 6 7
1 ON/STBY
Включает устройство, если оно находится в
режиме ожидания. Если светодиод не горит,
нужно включить сетевой выключатель на
задней стороне устройства. И наоборот,
устройство можно переключить из режима
Power в режим ожидания.
2 СИД ИНДИКАЦИИ СОСТОЯНИЯ
Этот индикатор показывает 2 состояния,
в которых может находиться включенный
MC 100:
• СИД горит зеленым цветом: MC 100
включен. Устройство готово к эксплуатации.
• СИД горит красным цветом: MC 100
находится в режиме ожидания.
15
8
9 10 11 12
3 LINE-IN
Вход для контактного штекера 3,5 мм стерео
для дополнительного аудиоисточника МР3проигрыватель и т.п.
4 НАУШНИКИ
Выход для контактного штекера 6,3 мм стерео
от наушников. При использовании наушников
динамики самостоятельно отключаются.
Если Вы подключаете наушники, установите
громкость на низкий уровень.
1314
5 SOURCE (ПЕРЕКЛЮЧАТЕ ЛЬ ВХОДНЫХ
ИСТОЧНИКОВ)
Производит переключение между разными
аудиоисточниками:
• CD: Проигрыватель CD.
• BT: Соединение устройства с
аудиоисточником Bluetooth:
• DAB INPUT: Выбор DAB/DAB+ тюнера.
• FM INPUT: Выбор FM тюнера.
• AUX 1/2: Еще один аудиоприбор.
• DIGITAL OPT, DIGITAL COAX:
Подключение к цифровым аудиоисточникам
• LINE IN: Передний вход для переносных
устройств.
6 TUNING -/+
Режим FM:
• Короткое нажатие: Изменяет частоту приема
шагами в 50 кГц (FM) (ручная настройка
станции)
• Продолжительное нажатие: Ищет
следующую станцию (автоматическая
настройка станции).
Режим DAB:
Выбирает следующую или предыдущую
станцию в диапазоне DAB.
7 STATION -/+
Режим FM:
• Краткое нажатие: Выбор следующей станции
в ЗУ.
• Нажатие с удержанием: Выбор предыдущей
станции в ЗУ.
8 ЛОТОК ДЛЯ CD
Положите CD стороной с надписью вверх на
этот лоток.
9 STOP
Останавливает воспроизводящийся CD.
10 PLAY/PAUSE
Начинается или останавливается
воспроизведение CD.
11 EJECT
Открывает или закрывает лоток для CD.
12 SEARCH/SKIP/MENU
Режим CD:
Search/Skip (Поиск/пропустить) (назад):
• Краткий поворот налево: Воспроизведение
начинается с начала текущей дорожки.
• Двукратный краткий поворот налево:
Воспроизведение начинается с начала
предыдущей дорожки.
• Продолжительный поворот налево: Быстрая
перемотка назад. Остается активным до тех
пор, пока удерживается кнопка.
Search/Skip (Поиск/пропустить) (вперед)
• Краткий поворот направо: Воспроизведение
начинается с начала следующей дорожки.
• Продолжительный поворот направо: Быстрая
перемотка вперед. Остается активным до тех
пор, пока удерживается кнопка.
56
Page 57

ЭЛЕМЕНТЫ УПРАВЛЕНИЯ И РАЗЪЕМЫ – ПЕРЕДНЯЯ ПАНЕЛЬ
ЭЛЕМЕНТЫ УПРАВЛЕНИЯ И РАЗЪЕМЫ – ЗАДНЯЯ СТОРОНА
МЕНЮ-Настройки
Нажмите на кнопку для того, чтобы вызвать
меню для регулирования звучания и настройки
дополнительных параметров. Навигация в
меню осуществляется нажатием на кнопку.
Нажмите кнопку еще раз, чтобы подтвердить
установленные параметры.
Смотри также МЕНЮ MC 100
13 VOLUME
Для регулирования общей громкости
воспроизведения музыки.
14 DIM
Эту кнопку можно использовать для регулировки
яркости дисплея (3 уровня).
15 DISPLAY
На дисплее отображается следующая
информация:
• Выбранный аудиовход.
• Информация об уровне громкости.
• Передатчик и сведения о приеме в режиме
FM и DAB. Для этого воспользуйтесь кнопкой
DISPLAY дистанционного управления.
• После этого выбирается CD-вход (без
компакт-диска):
NO disC
• После вложения и считывания CD:
Общее количество композиций на CD,
общее время проигрывания CD в минутах и
секундах:
Cd 15 46:32
• Если файлы MP3 или WMA находятся на
компакт-диске, отображается тип файлов и
количество файлов на компакт-диске:
MP3 15 FiLEs
• При воспроизведении CD:
Проигрываемая композиция, проигранное
время композиции:
02 03:45
• Кроме того, следующие символы указывают
на режим:
► Воспроизведение
II Пауза
• CD-текст, ID3-теги
Если компакт диск поддерживает CD-текст
или ID3-теги файлов MP3 или WMA, они
отображаются во второй строке дисплея. Для
этого см. также раздел ПУЛЬТ ДУ.
16 ДАТЧИК ДЛЯ ДИСТАНЦИОННОГО
УПРАВЛЕНИЯ
Чтобы использовать пульт дистанционного
управления, цельтесь им в эту точку.
10
1
2
1 СЕТЕВОЙ ВЫКЛЮЧАТЕЛЬ
Включает устройство и переводит его в режим
ожидания. Если выключатель находится в
положении “OFF”, устройство отделено от сети.
2 ПОДК ЛЮЧЕНИЕ К СЕТИ
Для подключения входящего в комплект сетевого
кабеля. Предохранитель должен менять только
квалифицированный сервисный техник.
3 РАЗЪЕМЫ ДЛЯ ПОДКЛЮЧЕНИЯ
ДИНАМИКОВ
Для подключения пары стереодинамиков с
импедансом в 4-8 Ом с учетом правильной
полярности. Смотри также ВКЛЮЧЕНИЕ.
АНАЛОГОВЫЕ ТЮЛЬПАННЫЕ РАЗЪЕМЫ (4 - 7)
Для подключения аналоговых аудиоисточников.
Следите за цветовой маркировкой разъемов и
штекеров. Красный – это всегда правый канал.
4 SUB OUT
Выход для подключения активного сабвуфера.
8911
47 6 5
3
5 REC OUT
Для подключения приборов для аналоговой
звукозаписи (напр., ленточный магнитофон,
кассетный магнитофон). На этом выходе
сигнал выбранного аудиоисточника обладает
постоянным уровнем, то есть не зависит от
положения регулятора громкости.
6, 7 ВХОД AUX
Подключение иных аудиоисточников (напр.,
проигрывателя МР3 или минидисков).
8, 9 DIGITAL IN OPT, COAX
Подсоедините MC 100 с помощью оптического
или коаксиального цифрового аудиокабеля к
цифровому выходу проигрывателя компактдисков/компьютера/игровой приставки/
сетевого проигрывателя.
10 АНТЕННЫЙ ВВОД DAB/FM
Для подключения прилагаемой антенны DAB/
FM или домовой антенной установки.
11 UPDATE
Этот разъем предусмотрен исключительно для
обновления системы.
57
Page 58

ЭЛЕМЕНТЫ УПРАВЛЕНИЯ И РАЗЪЕМЫ – ПУЛЬТ ДУ
• Перед использованием пульта
дистанционного управления имеющиеся
1
2
19
18
17
16
15
14
3
13
4
5
12
11
10
6
9
7
в комплекте элементы питания следует
вставить в отделение для батареек,
расположенное на тыльной стороне пульта.
• Если батарейки после продолжительного
использования сядут, их нужно будет
заменить (тип ААA).
• В целях предотвращения порчи пульта
дистанционного управления вынимайте
элементы питания из устройства, если не
планируете использовать его длительное
время.
1 POWER
Включает устройство, если оно находится в
режиме ожидания. Если светодиод не горит,
нужно включить сетевой выключатель на
задней стороне устройства. И наоборот,
устройство можно переключить из режима
Power в режим ожидания.
2 ВЫБОР ВХОДА
При помощи этих кнопок можно напрямую
выбирать отдельные аудиовходы. Активный
вход будет отображаться на дисплее.
8
3 МЕНЮ
Откройте системное меню. Навигация в
меню осуществляется кнопками ◄◄, ►►,
▲и▼. Нажмите кнопку SELECT (12), чтобы
подтвердить установленные параметры.
Смотри также МЕНЮ MC 100
4 ПОИСК/ПРОПУСТИТЬ/
КНОПКИ НАВИГАЦИИ
◄◄ Поиск/пропустить (назад)
• Краткое нажатие: Воспроизведение
начинается с начала текущей дорожки.
• Двойное краткое нажатие:
• Воспроизведение начинается с начала
предыдущей дорожки.
• Нажатие с удержанием:
• Быстрая перемотка назад. Работает до тех пор,
пока кнопка удерживается нажатой.
• Меню: Навигация / Настройка параметров
►► Поиск/пропустить (вперед)
• Краткое нажатие: Воспроизведение
начинается с начала следующей дорожки.
• Нажатие с удержанием: Быстрая перемотка
вперед. Работает до тех пор, пока кнопка
удерживается нажатой.
• Меню: Навигация / Настройка параметров
▲и▼
Меню: Настройка параметров
5 DISPLAY
Режим CD:
Отображение CD-текстов или ID3-тегов (если
поддерживается компакт-диском):
Во второй строке дисплея отображается общая
информация CD-текст/ID3-тег. При нажатии
на эту кнопку отдельные сведения будут
отображаться в следующем порядке:
Композиция – Исполнитель – Альбом – Нет
данных
Для файлов MP3 и WMA дополнительно
отображаются имя файла и скорость обработки
данных текущей композиции.
Режим FM:
Вызов информации RDS (если поддерживается
станцией).
Подробные сведения об информации RDS вы
найдете в разделе “RDS функции тюнера”.
Режим DAB:
Вызов информации DAB (если поддерживается
станцией).
Подробные сведения об информации DAB вы
найдете в разделе “DAB функции тюнера”.
Режим Bluetooth:
На дисплее отображается идентификатор
подсоединенных устройств, скорость обработки
данных и сведения о ID3-тегах текущей
композиции.
При нажатии на эту кнопку отдельные сведения
о ID3-тегах будут отображаться в следующем
порядке:
Композиция – Исполнитель – Альбом – Нет
данных
6 TUNING
Режим FM:
• Короткое нажатие: Изменяет частоту приема
шагами в 50 кГц (FM) (ручная настройка
станции)
• Продолжительное нажатие: Ищет следующую
станцию (автоматическая настройка
станции).
Режим DAB:
Выбирает следующую или предыдущую станцию
в диапазоне DAB.
58
Page 59

ЭЛЕМЕНТЫ УПРАВЛЕНИЯ И РАЗЪЕМЫ – ПУЛЬТ ДУ
7 КНОПКИ С ЦИФРАМИ
Работа с CD:
Прямой выбор композиции.
Радио:
Прямой выбор предварительно настроенной
станции.
8 MUTE
Отк лючает и снова включает звук.
9 VOLUME
Увеличивает (+) или уменьшает (-) громкость.
10 TONE/BAL
TREBLE (однократное нажатие на кнопку
TONE)
Воспроизведение высоких частот можно
соответственно повышать или уменьшать
7 шагами. Чтобы установить значение,
используйте кнопки ▲и▼.
BASS (двукратное нажатие на кнопку TONE)
Воспроизведение низких частот можно
соответственно повышать или уменьшать
7 шагами. Чтобы установить значение,
используйте кнопки ▲и▼.
BALANCE
Центр стереозвучания можно устанавливать
влево или вправо соответственно 10 шагами.
Чтобы установить значение, используйте
кнопки ◄◄ и ►►.
11 LOUDNESS
Выбор функции тонкомпенсации
(автоматической корректировки тембра).
12 PLAY/PAUSE/SELECT
Режим CD:
Начинается или останавливается
воспроизведение CD.
Меню:
Подтверждение введенных данных.
13 STOP
Останавливает воспроизводящийся CD.
14 УПРАВЛЕНИЕ CD: PROGRAM/RANDOM/
REPEAT
PROGRAM
Программирование композиций CD в любой
последовательности.
Для программирования устройство должно
находиться в режиме Stop.
• Нажмите кнопку PROG.
Индикация:
• Теперь присвойте нужной композиции
номер в памяти 01, для этого нужно выбрать
номер композиции при помощи клавиатуры
с цифрами или кнопок SKIP.
Индикация, напр.:
• Еще раз нажмите кнопку PROG.
Индикация:
• Теперь присвойте нужной композиции
номер в памяти 02.
• Повторите оба шага для программирования
всех нужных композиций. Нажмите
после последней композиции кнопку
STOP. Отображается количество
запрограммированных композиций и
общее время воспроизведения плейлиста.
PRG 01-00
PRG 01-08
PRG 02-00
• Начните воспроизведение
запрограммированного списка нажатием
кнопки Play. Слева появляется ‚P‘, текущая
композиция и проигранное время этой
композиции выводятся позади этого
символа.
Индикация, напр.:
• Воспроизведением в пределах
запрограммированного списка можно
управлять при помощи кнопок SKIP, SEARCH
и PAUSE/PLAY.
• После нажатия кнопки STOP или EJECT
содержимое памяти удаляется.
RANDOM
Воспроизведение треков CD в случайном
порядке.
• Однократное нажатие: Включает функцию.
На дисплее появляется:
P 08-00:07
RANdOM-ON
• Повторное нажатие: Отключает функцию.
На дисплее появляется:
RANdOM-OFF
REPEAT
Многократное воспроизведение дорожки/CD
(функция повтора):
• Однократное нажатие: Повтор текущей
дорожки.
На дисплее появляется:
REPEAT ONE
• Двукратное нажатие: Повтор всего
CD-диска.
На дисплее появляется:
REPEAT ALL
• Повторное нажатие: Отключение функции
повтора.
На дисплее появляется:
REPEAT OFF
15 DIM
Эту кнопку можно использовать для
регулировки яркости дисплея (3 уровня).
16 DISCONNECT (РЕЖИМ BLUETOOTH)
Отключите существующее соединение
Bluetooth и запустите режим Pairin
17 ST/MONO (только в режиме FM)
Переключается при приеме УКВ между
режимами FM-стерео и FM-моно.
При слабом сигнале приема устройство
автоматически переключает стереорежим
в монорежим, чтобы улучшить отношение
сигнал/шум.
Стереоприем показывается на дисплее
символом „ST“.
18 AUTO (РЕЖИМ DAB)
С помощью этой функции просматривается
диапазон частот DAB (диапазон III) в поисках
станций. Они доступны с помощью кнопок
TUNING.
19 EJECT
Открывает лоток для CD.
59
Page 60

ВКЛЮЧЕНИЕ
МЕНЮ MC 100
• Установите MC 100 на ровном месте. Соблюдайте расстояния, которые указаны в «Важных
указаниях по безопасности».
Очень важно:Не размещайте никаких предметов (журналов, коробок с компакт-дисками или
пластинками и т. п.) сверху на устройстве. Ни в коем случае нельзя перекрывать доступ воздуха
через вентиляционные отверстия, расположенные в его верхней части!
• Подключите динамики:
Стереодинамики (импеданс от 4 до 8 Ом) подключаются на задней стороне устройства
следующим образом:
Используйте только качественные аудиокабели для динамиков с сечением минимум 1,5 – 2,5 мм².
Зачистите изоляцию на кабелях на участке примерно в 10 мм и скрутите концы. Ослабьте по
очереди зажимные винты и вставьте концы без изоляции в отверстия по бокам. Снова затяните
зажимные винты. Обязательно следите за правильной полюсностью.
Вы также можете воспользоваться заранее разделанным кабелем с банановым штекером на 4 мм
или зажимами.
Соблюдайте также руководство по эксплуатации используемых динамиков.
• Подключите аудиоисточники.
• Подключите антенну DAB/FM к антенному входу на обратной стороне устройства. При
последующей работе должна быть определена позиция антенны, при которой будет наилучший
прием. Затем конец антенны должен быть закреплен в соответствующей позиции, например, с
помощью канцелярской кнопки.
Соответствующая домашняя антенна или внешняя антенна могут при неблагоприятных условиях
улучшить прием.
• Подключите сетевой кабель к задней стороне устройства, а затем вставьте его в сетевую
розетку на 230 В.
• Для переведения прибора в режим ожидания переведите выключатель электропитания на его
тыльной стороне в положение “ВКЛ”.
• Включите устройство через пульт дистанционного управления или с помощью кнопки ON/STBY
на передней панели.
• После фазы прогревания лампы устройство готово к эксплуатации.
• Выберите нужный Вам аудиоисточник с помощью переключателя.
Регулирование звучания и настройки дополнительных параметров могут удобно выполняться через
меню.
• Меню вызывается через кнопку MENU на пульте дистанционного управления или путем нажатия
кнопки SEARCH / SKIP / MENU на передней панели.
• Навигация в пределах меню и изменение установок осуществляются через кнопки ◄◄, ►►, ▲и▼
на пульте дистанционного управления или вращением регулятора SEARCH / SKIP / MENU.
• Подтверждение отдельных пунктов меню через кнопку SELECT на пульте дистанционного
управления или поверните ручку SEARCH / SKIP / MENU.
Возможны следующие установки:
• Базовая установка:
Выберите в меню BASS. Воспроизведение низких частот можно соответственно повышать или
уменьшать 7 шагами.
• Установка воспроизведения высоких частот:
Выберите в меню TREBLE. Воспроизведение высоких частот можно соответственно повышать или
уменьшать 7 шагами.
• Установка баланса:
Выберите в меню BALANCE. Центр стереозвучания можно устанавливать влево или вправо
соответственно 10 шагами
• Тонкомпенсация (автоматическая корректировка тембра):
Выберите в меню LOUDNESS. Функция может включаться или выключаться.
• Функция автоматического ожидания:
Устройство снабжено функцией автоматического ожидания, которая автоматически переключает
устройство примерно через 3,5 часа в случае отсутствия команд (с помощью элементов управления
на устройстве или с помощью дистанционного управления) в режим ожидания. Эта функция
соответствует Предписанию ЕС об энергосбережении (1275/2008 EG) и уменьшает потребление
электроэнергии, в случае если устройство не отключено по недосмотру после использования.
Выберите в меню APO SETTING (автоматическое ожидание). Функция может включаться или
выключаться. Устройство поставляется с включенной функцией.
• Функция засыпания
Выберите в меню SLEEP TIME. Эта функция позволяет установить время, после которого устройство
выключается и автоматически переходит в режим ожидания. Время может быть установлено
кнопками ▲и ▼ в диапазоне от 5 до 240 минут. После выхода из меню активная функция
автоматического отключения постоянно отображается значком в правом нижнем углу дисплея.
• Информация о системе:
Выберите в меню SYSTEM INFO. С помощью кнопок ◄◄ и ►► для целей обслуживания могут
отображаться отдельные версии прошивки устройства.
• Reset:
Через пункт меню RESET восстанавливаются основные настройки (полностью очистить ЗУ для
станций, установить все регуляторы звучания на 0, выключить функцию тонкомпенсации и таймер
автоматического выключения, включить функцию автоматического ожидания).
Через пункт меню EXIT выполняется выход из меню.
60
Page 61

СОЕДИНЕНИЕ УСТРОЙСТВА С АУДИОИСТОЧНИКОМ BLUETOOTH
Выберите подключение по Bluetooth. Если раньше связь с этим устройством Bluetooth уже
устанавливалась, предпринимается автоматическая попытка восстановления соединения. При
этом может потребоваться вручную подтвердить восстановление соединения на устройствеисточнике.
Если раньше соединение не устанавливалось или оно не может быть восстановлено, MC 100
автоматически включает режим соединения, который также называется режимом спаривания. На
дисплее будет мигать индикатор «BT»
Теперь включите режим Bluetooth устройства-источника. MC 100 выводится в списке устройств
Bluetooth как „MC 100“. Если он не выводится в списке устройств, активируйте вручную поиск
устройств Bluetooth на устройстве-источнике и проверьте, включен ли на MC 100 режим
спаривания.
В зависимости от устройства-источника во время процесса установления соединения может быть
задан вопрос, следует ли принять пароль. Ответить на вопрос можно просто нажатием кнопки
„Принять“. Если вопрос о пароле повторится, используйте стандартные пароли „0000“ или „1234“.
Если соединение устанавливалось ранее, может задаваться вопрос, хотите ли вы установить
соединение. На него также отвечайте „Да“. После успешного установления соединения загорается
индикатор ‚BT‘ на дисплее и горит, не мигая.
MC 100 поддерживает особо качественный стандарт передачи аудио „Qualcomm® aptX™“. Если
устройство-источник также поддерживает эту технологию , при установлении соединения Bluetooth
в качестве режима передачи автоматически выбирается „Qualcomm® aptX™“.
ЗАПОМИНАЮЩЕЕ УСТРОЙСТВО ДЛЯ СТАНЦИЙ
Устройство оборудовано двумя независимыми друг от друга запоминающими устройствами для
станций FM и DAB. Каждое запоминающее устройство может вмещать до 40 станций.
Сохранение станций:
Установите желаемую станцию DAB или FM с помощью кнопок TUNING на устройстве или с помощью
дистанционного управления.
• Выберите желаемую ячейку долгим нажатием на соответствующую кнопку цифровой
клавиатуры.
• При двузначных номерах ячейки (10 – 40) необходимо сначала нажать и удерживать кнопку +10,
а затем ввести желаемые цифры.
• Успешное сохранение подтверждается на дисплее появлением надписи STORED PRESET. В
первой строке перед частотой станции постоянно отражается номер ячейки.
ФУНКЦИИ RDS (RADIO DATA SERVICE) ТЮНЕРА (ТОЛЬКО FM)
RDS – это система, с помощью которой во время передач в диапазоне УКВ вместе с сигналом
станции передается дополнительная информация. На MC 100 эта информация (о станции,
передаче и т.д.) может выводиться на дисплей.
RDS информация может быть вызвана повторным нажатием кнопки DISPLAY (дистанционное
управление) в следующем порядке:
• PS (Program Service Name): Показывает название станции.
• RT (Radio Text): Показывает информацию и сообщения станции.
• PTY (Program Type): Показывает тип передачи.
• Время/дата
DAB ФУНКЦИИ ТЮНЕРА (ТОЛЬКО DAB)
Система передачи DAB содержит готовые данные и информацию, которые могут быть вызваны
кнопкой DISPLAY (дистанционное управление) в следующем порядке:
• Название станции
• DLS (динамический сегмент метки): Показывает информацию и сообщения станции (например,
название и исполнитель текущего музыкального произведения, новостные сообщения,
подробная информация о новостях дня или станции)
• Тип программ (например, поп, новости, классика)
• Мультиплексный номер DAB и частота текущей станции
• Время/дата
• Скорость передачи в битах текущего аудиосигнала
• Мультиплексное имя DAB
СЕРВИС И ТЕХНИЧЕСКИЕ ПРОБЛЕМЫ
Если возникнут технические проблемы, обратитесь в специализированный магазин или на фирму
Magnat Audio-Produkte GmbH, тел.: 02234807-0.
Выбор станции из списка станций:
Выберите желаемую ячейку через цифровую клавиатуру (короткое нажатие).
61
Page 62

ТЕХНИЧЕСКИЕ ХАРАКТЕРИСТИКИ
Тюнер
Диапазон частот: FM: 87,5 – 108 МГц
DAB/DAB+: 174.928 – 239.200 МГц (диапазон III)
Чувствительность: FM: -108 дБм
DAB/DAB+: -100 дБм
CD-плеер
Воспроизводимые форматы: CD-Audio, CD-R, CD-RW, MP3, WMA
Усилитель
Выходная мощность:
Номинальная мощность 20 Гц – 20 кГц, THD < 1.0%, 4 Ом 2 x 35 Вт
20 Гц – 20 кГц, THD < 1.0%, 8 Ом 2 x 25 Вт
Импульсная мощность 1 кГц, 4 Ом 2 x 70 Вт
Частотная характеристика:
CD/AUX/Line 6 Гц – 90 кГц (-3 дБ)
20 Гц – 20 кГц (+/- 0,5 дБ)
Относительный уровень шумов:
CD/AUX/Line 98 дБ
Рабочая частота: 2402 – 2480 МГц
Максимальная излучаемая мощность
согласно EN 62479: 7,34 дБм
Потребляемая мощность:
макс. 130 Вт
Режим ожидания <0,5 Вт
Габаритные размеры (ШxВxГ):
Основное устройство: 277 x 132 x 330 мм
Основное устройство, вкл. элементы
управления и соединительные зажимы: 277 x 132 x 370 мм
Пульт дистанционного управления: 45 x 175 x 20 мм
Вес: 5,8 кг
ВОЗМОЖНЫ ТЕХНИЧЕСКИЕ ИЗМЕНЕНИЯ.
С дополнительной информацией можно ознакомиться на нашем сайте: http://www.magnat.de.
Чувствительность на входе / Входное полное сопротивление:
AUX/Line 470 мВ / 100 кОм
Цифровые входы: 1x Оптический (Toslink™)
1x коаксиальный (RCA)
Поддерживаемые частоты дискретизации: 44.1/48/88.2/96/176.4/192кГц
Поддерживаемые битовые глубины: 16/24 биты
Вход Bluetooth®: Bluetooth® 4.0 / Qualcomm® aptX™
Возможны технические изменения.
62
Page 63

Wir gratulieren Ihnen! Durch Ihre kluge Wahl sind Sie B esitzer eines MAGNAT HiFi-Produk tes geworden.
Garantiek arte
Warr anty Card
beachten Sie bitte folgendes:
1. Die Gewährleistungszeit b eginnt mit dem Kauf des Produk tes und gilt nur für den Erstbesitzer.
2. Während der Gewährleistungszeit beseitigen wir etwaige Mängel, die nachweislich auf Material - oder Fabrikations fehler beruhen,
nach unserer Wahl durch Austausch oder Nachbesserung der defekten Teile. Weitergehende Ansprüche, insbesondere auf Minderung,
Wandlung, S chadenersat z oder Folgeschäden sind ausgeschlo ssen.
3. Am Produkt dürfen keine unsac hgemäßen Eingriffe vorgenommen worden sein.
4. Bei Inan spruchnahme d er Gewährleis tung wenden Sie si ch bitte zunä chst an Ihren Fac hhändler. Sollte e s sich als notw endig erweis en,
das Produkt an uns einzuschicken, so sorgen Sie bitte dafür, dass • das Produkt in einwandfreier Originalverpackung verschickt wird,
• die Kaufqui ttung beigefüg t ist.
5. Von der Gewährleistung ausgenommen sind: • Leuchtmittel • Röhren • Batterien/Akkus • Verschleißteile • Transportschäden,
sichtbar oder unsichtbar (Reklamationen für solche Schäden müssen umgehend bei der Transportfirma, Bahn oder Post eingereicht
werden.) • Kratzer in Metallteilen, Frontab deckungen u.s.w. (Diese Defekte müssen innerhalb von 5 Tagen nach Kauf direkt bei
Ihrem Händler reklamiert werden.) • Fehler, die durch fehlerhafte Aufstellung, falschen Anschluss, unsachgemäße Bedienung (siehe
Bedienungsanleitung), Beanspruchung oder äußere gewaltsame Einwirkung entstanden sind. • Unsachgemäß reparierte oder
geänderte Geräte, die von anderer Seite als von uns geöffnet wurden. • Folgeschäden an fremden Geräten • Kostenerstattung bei
Schadensbehebung durch Dritte ohne unser vorheriges Einverständnis.
your MAGNAT HiFi equipmen t, kindly obser ve the following:
1. The warranty period commences wit h the purchase of the component and is applic able only to the orig inal owner.
2. During the warranty period we will rectify any defects due to faulty material or workmanship by replacing or repairing the defective
part at our discretion. Further claims, and in particular those for price reduction, cancellation of sale, compensation for damage s or
subsequential damages, are excluded.
3. Unauthorized tampering with the equipment will invalidate this warranty.
4. Consult your authorized dealer first , if warranty service is nee ded. Should it prove necessary to return the component to the factory,
please insure that • the component is packed in original factory packing in good condition • your enclose your receipt as proof of
purchase.
5. Excluded from the warranty are: • Illuminates • Valves • Batterie s • Wear parts • Shipping damages, either readily apparent or
concealed (claims for such damage s must be lodged immediately with forwarding agent, the railway express of fice or post office).
• Scratches in cases, metal components, front panels, etc. (You mus t notify your dealer directly of such defects within three days of
purchase.) • Defect s caused by incorrect installation or connection, by operation errors (see operating instructions), by overloading or
external force. • Equipments which have been repaired incorrectly or modified or where the case has been opened by persons other
than us. • C onsoquenti al damages to other e quipments. • Re imbursement of c ools, withou t our prior conse nt, when repairin g damages
by third par ties.
Die Produkte werden während des gesamten Fertigungsvorganges laufend kontrolliert und geprüft. Im Servicefall
Congratulations! You have made a wise selection in bec oming the owner of a MAGNAT HiFi equipment.
The equip ments are chec ked and tested c ontinously dur ing the entire pr oduction pro cess. In ca se you have proble ms with
Typ/Type
Serien-Nr./Serial-No.
Name und Anschrift des Händlers /Stempel
Name and address of the dealer/stamp
Käufer/Customer
Name/Name
Straße/Street
Toutes nos félicitations!
Les appareils sont soumis pendant toutes les opérations de fabrications à des contrôles et vérifications constants. Si, pourtant, vous
rencontrez des difficulés avec votre appareil MAGNAT veuillez tenir compte de ce qui suit :
1. La garant ie débu te avec l’achat de l’appareil et est valable uniquement pour le premier pro priétaire.
2. Pendant la période de garantie nous réparons les dommages provenant des défauts de matériel ou de fabrication et nous procédons,
à notre guise, à l’échange ou à la réparat ion des pièces défectueuse s.
3. Aucune réparati on impropre ne doit avoir été ef fectuée à l’appareil.
4. Lo rs d’ une dem ande de g ar ant ie , ve uil lez vo us ad ress er en pr emi er lie u à vot re dis trib ute ur. Si ce de rni er déc ide qu e l’app are il doi t nous
être retourné, veui llez tenir compte que: • l’appareil soi t expédié dans son ermballage d’origine, • le bon d’achat soit joint.
5. Ne sont pas compris dans la garantie: • Matériel d´eclairage • Tubes • Batteries • Pièces d’usure • Avaries de transport, visibles ou
non (de telles réclamations doivent être faites immédiatement auprès du transporteur, du chermin de fer ou de la poste). • Des rayures
sur le boîtier, pièces métalliques, couvercles etc. (ces dommages doivent être signalés direc tement à votre distributeur dans les trois
jours suivant l’achat). • Dommages résultant d’un raccordement incorrect, maniement incorrect (voir instructions de service), surcharge
ou application de force extérieure.
• Appareils réparés non conformément ou modifiés et qui ont été ouverts par une per sonne autre que nous. • Dommages ultérieurs à
d’autres appareils. • Remboursement des frais à des tiers ay ant effec tué les réparations sans notr e accord préalable.
Vouz avez bien choisi et êtes le propriétaire heureux d’un produit MAGNAT.
PLZ, Or t/City
Land/Country
Kaufdatum/buying date
Nur gültig in Verbindung mit Ihrer Kaufquittung!
No warranty without receipt!
Page 64

Magnat Audio-Produkte GmbH
Lise-Meitner-Str. 9 • D-50259 Pulheim • Germany
Tel. +49 (0) 2234 / 807 - 0 • Fax +49 (0) 2234 / 807 - 399
Internet: http://www.magnat.de
Manual_v1.0
 Loading...