

Page 1

MA 400
RÖHRENVERSTÄRKER
VACUUM TUBE AMPLIFIER
Wichtige Hinweise zur Installation / Garantieurkunde
Important notes for installation / warranty card
Mode d’emploi / certificat de garantie
Avvertenze importanti per l’installazione / certifcato di garanzia
Notas importantes sobre la instalación / certificado de garantía
Важная информация по инсталляции / гарантия
Page 2
3
D
GB
F
I
E
RUS
7
11
15
19
23
Gewährleistung / Warranty
27
Page 3
INHALT
D
3 Zubehör
3 Vor Inbetriebnahme
Wichtige Sicherheitshinweise
Entsorgungshinweise
4/5 Bedienungselemente und Anschlüsse
Front Panel
Rückseite
Fernbedienung
5 Inbetriebnahme
6 Das Menü des MA 400
6 Röhrenaustausch
6 Service und technische Probleme
6 Technische Daten
ZUBEHÖR
1) Bedienungsanleitung
2) Fernbedienung inkl. Batterie (CR2025)
3) Netzkabel
VOR INBETRIEBNAHME
• Ebenfalls darf das Gerät nicht zum Abstellen von Vasen oder anderen mit Feuchtigkeit gefüllten
Behältern benutzt werden.
• Bei Kontakt mit Feuchtigkeit oder Flüssigkeiten sofort den Netzstecker ziehen.
• Reinigen Sie das Gerät nur mit einem trockenen Tuch.
• Verwenden Sie keine Reinigungsmittel oder chemische Lösungsmittel, da sonst die Oberfläche
beschädigt werden könnte.
• Öffnen Sie niemals das Gerät.
• Dem Gerät ist ein Netzkabel beigelegt. Verwenden Sie nur dieses Originalzubehör zur
Stromversorgungoder ein auf Sicherheit geprüftes Stromkabel (z. B.mit TÜV- oder VDE-Zertifikat).
• Das Netzkabel muss immer betriebsbereit sein. Bei sichtbaren Beschädigungen des Netzkabels
darf das Gerät nicht mehr betrieben werden. Ein beschädigtes Kabel darf nicht repariert, sondern
muss ausgetauscht werden.
• Netzkabel nicht mit feuchten Händen anschließen oder entfernen.
• Überlassen Sie Wartungs- und Reparaturarbeiten immer qualifiziertem Fachpersonal.
• Wird das Gerät längere Zeit nicht benutzt, ist das Gerät mittels des Netzschalters (POWER) auf
der Rückseite des Gerätes auszuschalten.
• Bei Gewitter bitte den Netzstecker ziehen.
Das Dreieck mit Blitzsymbol warnt den Benutzer, dass innerhalb des Gerätes hohe
Spannungen verwendet werden, die gefährliche Stromschläge verursachen können.
Das Dreieck mit Ausrufezeichen macht den Benutzer darauf aufmerksam, dass in der
beigefügten Bedienungsanleitung wichtige Hinweise enthalten sind, die unbedingt
beachtet werden müssen.
Nicht öffnen! Gefahr des elektrischen Schlages!
Um die Gefahr von Feuer oder eines elektrischen Schlages zu
verringern, darf das Gerät nicht Regen oder Feuchtigkeit ausgesetzt
werden.
Sehr geehrter Kunde,
vielen Dank, dass Sie sich für den Magnat MA400 Röhrenverstärker entschieden haben.
Bitte lesen Sie unsere folgenden Hinweise vor Inbetriebnahme des MA 400 genau durch.
WICHTIGE SICHERHEITSHINWEISE
ENTSORGUNGSHINWEISE
Gemäß der europäischen Richtlinie 2002/96/EC müssen alle elektrischen und elektronischen Geräte
über lokale Sammelstellen getrennt entsorgt werden. Bitte beachten Sie die lokalen Vorschriften und
entsorgen Sie Ihre Altgeräte nicht mit dem normalen Hausmüll.
• Bitte die Bedienungsanleitung vor Inbetriebnahme sorgfältig durchlesen und aufbewahren.
• Dieses Gerät ist ausschließlich geeignet für den Betrieb mit 230 V / 50 Hz Wechselspannung.
• Betreiben Sie das Gerät nur bei einer Umgebungs-/Raumtemperatur von 5°C bis 40°C.
• Sorgen Sie für eine ausreichende Belüftung des Gerätes. Ein Mindestabstand von 10 cm zu
Batterie-Entsorgung:
Alt-Batterien sind Sondermüll und müssen gemäß den aktuellen Vorschriften entsorgt werden.
Gegenständen seitlich, nach hinten und oben sollte nicht unterschritten werden.
• Die Belüftungslöcher dürfen nicht mit Gegenständen bedeckt werden (z. B. Vorhänge, Zeitung),
um eine ausreichende Belüftung des Gerätes zu gewährleisten. Bitte keine Hitzequellen, wie
Radiatoren, Öfen, offene Flammen oder andere Geräte, die Hitze erzeugen, in die Nähe des
Gerätes stellen.
• Das Gerät und die Fernbedienung dürfen weder Tropf- oder Spritzwasser noch Wasser oder hoher
Luftfeuchtigkeit ausgesetzt werden.
3
Page 4
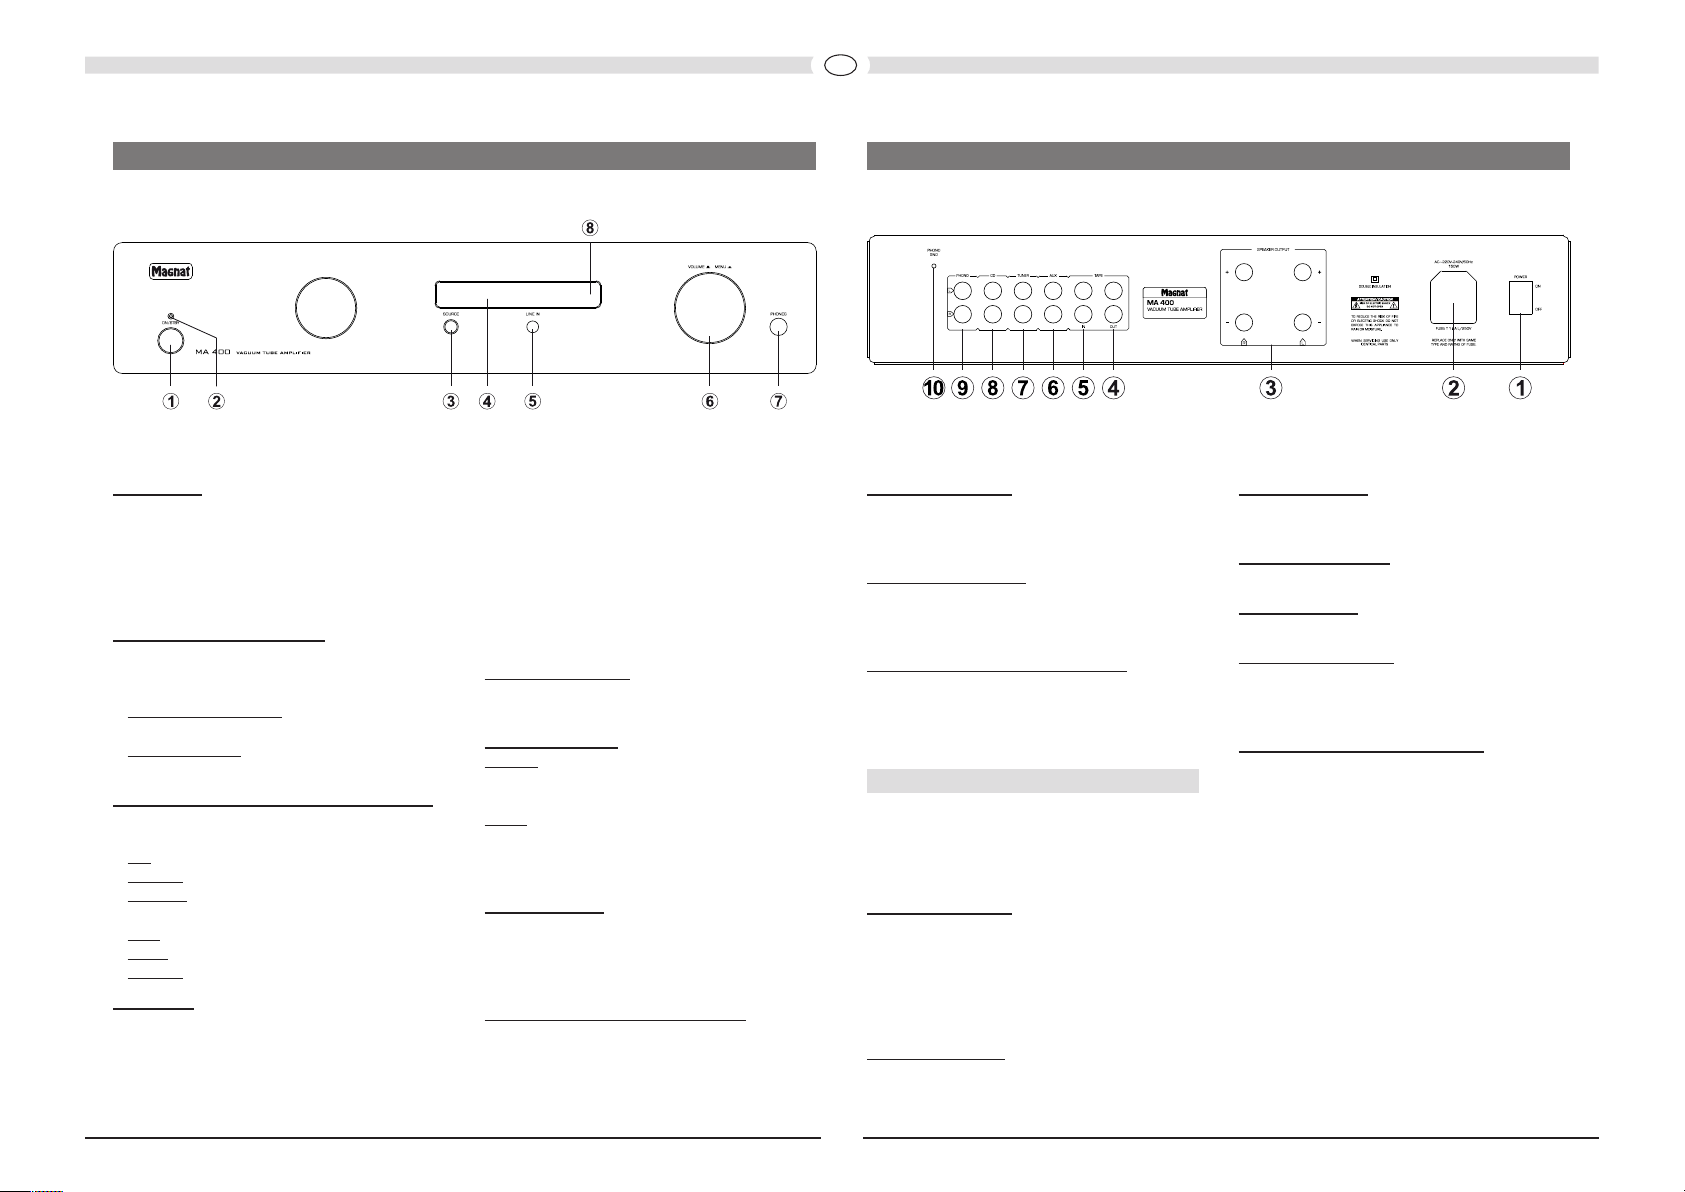
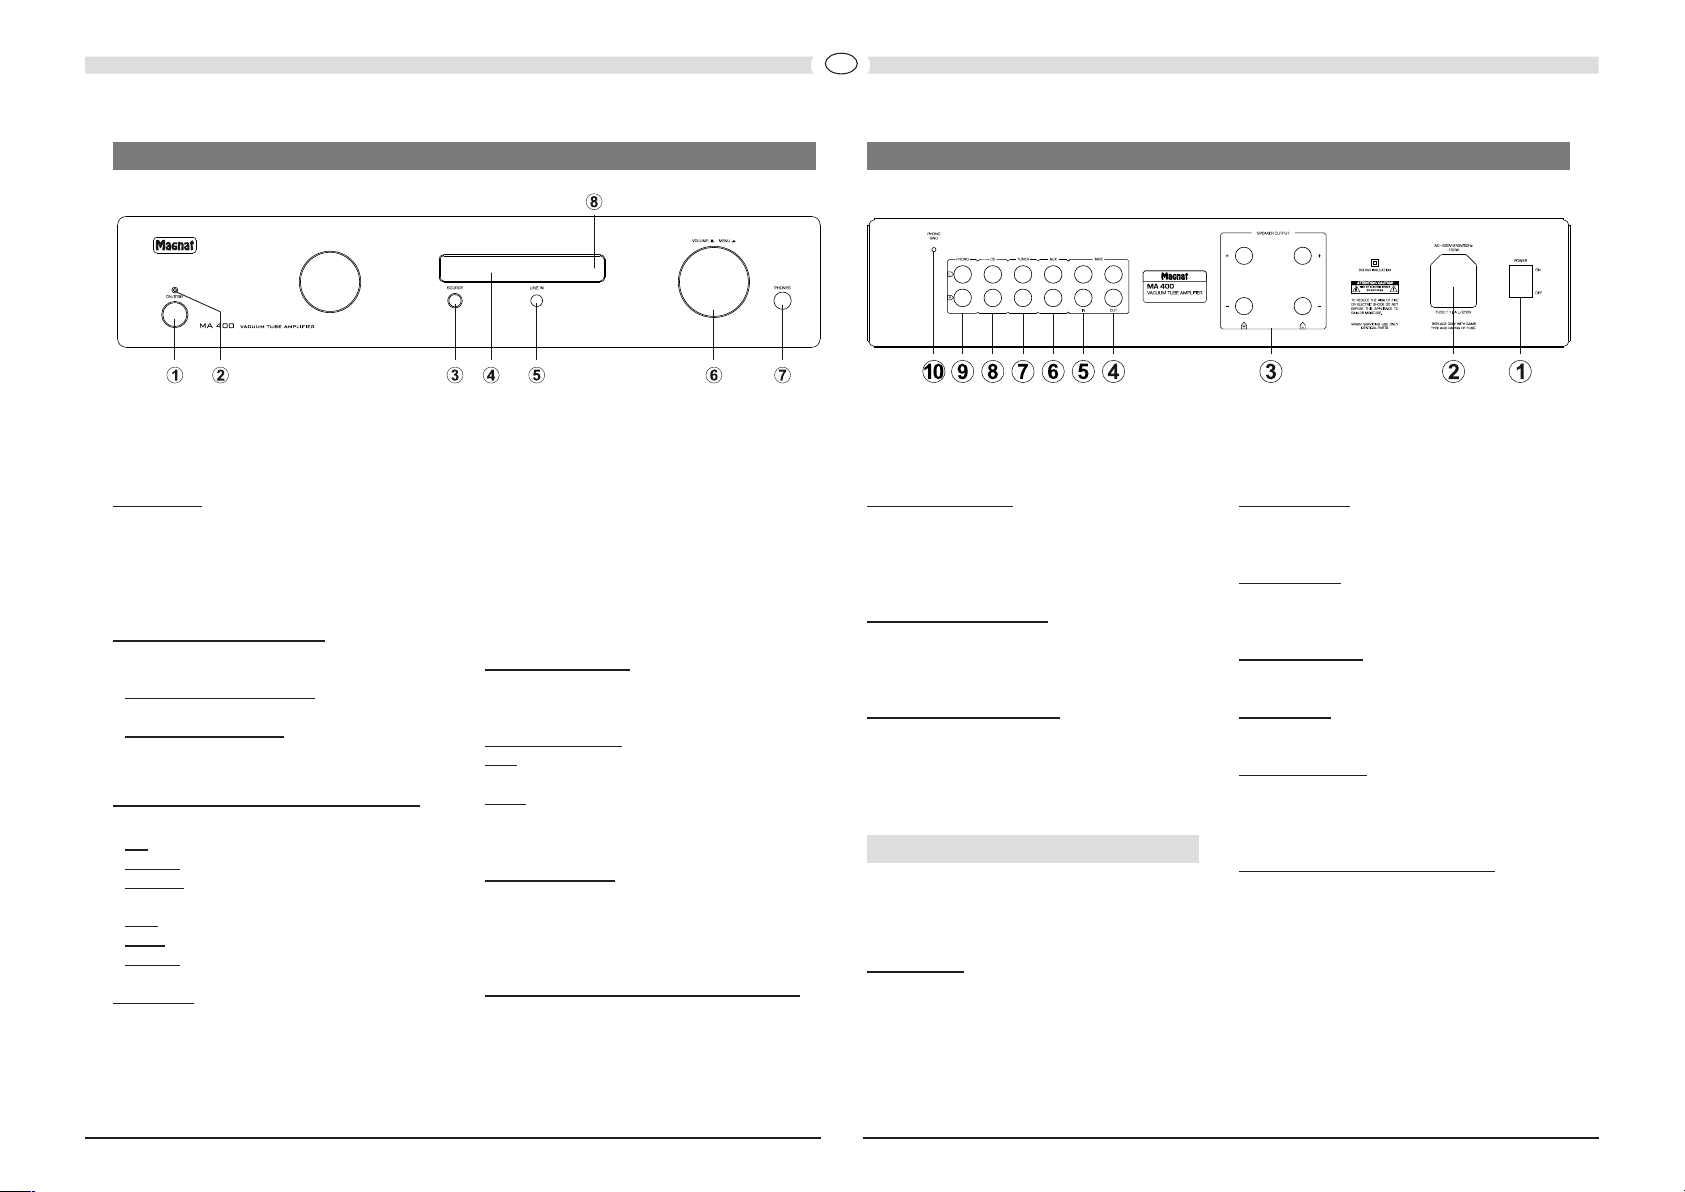
BEDIENUNGSELEMENTE UND ANSCHLÜSSE – FRONT PANEL BEDIENUNGSELEMENTE UND ANSCHLÜSSE – RÜCKSEITE
D
1 ON/STBY
Schaltet das Gerät ein, wenn es sich im
Standby-Modus befindet. Leuchtet die LED
nicht, müssen Sie den Netzschalter auf der
Rückseite des Gerätes einschalten. Umgekehrt
kann dasGerät vomPower-Betrieb aufStandby
geschaltet werden.
2 LED-ZUSTANDSANZEIGE
Diese Leuchtanzeige zeigt 2 Zustände an, in
denen sich der eingeschaltete MA400 befinden
kann:
• LED leuchtet grün
eingeschaltet. Das Gerät ist betriebsbereit.
• LED leuchtet rot: Der MA 400 befindet sich im
Standby-Modus.
3 SOURCE (EINGANGSWAHLSCHALTER)
Schaltet zwischen den verschiedenen
Audioquellen um:
• CD: CD-Spieler.
• TUNER
• PHONO: Plattenspieler mit Magnet-System
• AUX: Weiteres Audiogerät (z. B. MD-Spieler).
• TAPE
• FRONT: Fronteingang for portable Geräte
4
Im Display werden folgende Informationen
angezeigt:
• Aufheizphase der Röhre:
: Radioempfangsgerät.
(MM).
: Tonbandgerätoder Kassettenrecorder.
DISPLAY
Diese dauert ca. 20 Sekunken.
: Der MA 400 ist
WWAARRMM UUPP 1155
• gewählter Audioeingang:
CCDD TTUUNNEERR PPHHOONNOO AAUUXX TTAAPPEE
FFRROONNTT
• Lautstärke Stummschaltung:
VVOOLL 1155
MMUUTTIINNGG
• Menü-Einstellungen (s. Seite 6
5 LINE-IN (FRONT)
3,5 mm Stereo-Klinkeneingang für eine
zusätzliche Audioquelle (MP3-Player o. ä.).
6 VOLUME/MENU
Drehen: Hiermit können Sie die
Gesamtlautstärke der Musikwiedergabe
einstellen.
: Ruft das Menü zur Klangeinstellung und
Druck
zur Konfiguration der Eingänge auf. Die
Navigation durch das Menü erfolgt durch
Drehen am Volume-Regler.
7 KOPFHÖRER
6,3 mm Stereo-Klinkenausgang für Kopfhörer.
Bei Benutzung schalten sich die Lautsprecher
aus. Stellen Sie die Lautstärke niedrig, bevor Sie
einen Kopfhörer anschließen.
8 SENSOR FÜR FERNBEDIENUNG
Um die Fernbedienung zu benutzen, zielen Sie
bitte auf diese Stelle.
).
1 NETZSCHALTER
Schaltet das Gerät ein und bringt es in den
Standby-Modus. Ist der Schalter in Position
“OFF”, ist das Gerät vom Netz getrennt.
2 NETZANSCHLUSS
Zum Anschluss des mitgelieferten Netzkabels.
Die Sicherung darf nur von qualifiziertem
Servicepersonal gewechselt werden.
3 LAUTSPRECHERANSCHLÜSSE
Zum Anschluss eines Stereo-Lautsprecherpaares mit einer Impedanz von 4-8 Ohm unter
Beachtung der richtigen Polarität. Siehe auch
Seite 5.
ANALOGE CINCH-ANSCHLÜSSE
Zum Anschluss analoger Audioquellen. Bitte
beachten Sie die farbliche Kennzeichnung der
Buchsen und Stecker. Rot ist immer der rechte
Kanal.
4 TAPE AUSGANG
Zum Anschluss von Geräten für die analoge
Tonaufzeichnung (z. B. Tonbandgerät,
Kassettenrecorder). An diesem Ausgang liegt
das Signal der gewählten Audioquelle mit
festem Pegel an, also unabhängig von der
Stellung des Lautstärkereglers.
5 TAPE EINGANG
Anschluss eines Kassettendecks oder
Tonbandgerätes.
6 AUX EINGANG
Anschluss einer weiteren Audioquelle
(z. B. MP3- oder Minidisk-Spieler).
7 TUNER EINGANG
Anschluss eines Rundfunkempfangsgerätes.
8 CD EINGANG
Anschluss eines CD-Spielers.
9 PHONO EINGANG
Anschluss eines Plattenspielers mit
Magnetsystem (MM) oder MC System mit
hohem Ausgangspegel (High Output MC).
10 PHONO MASSEANSCHLUSS
Anschluss der Masseader am Phonokabel, um
Brummen zu verhindern.
4
Page 5
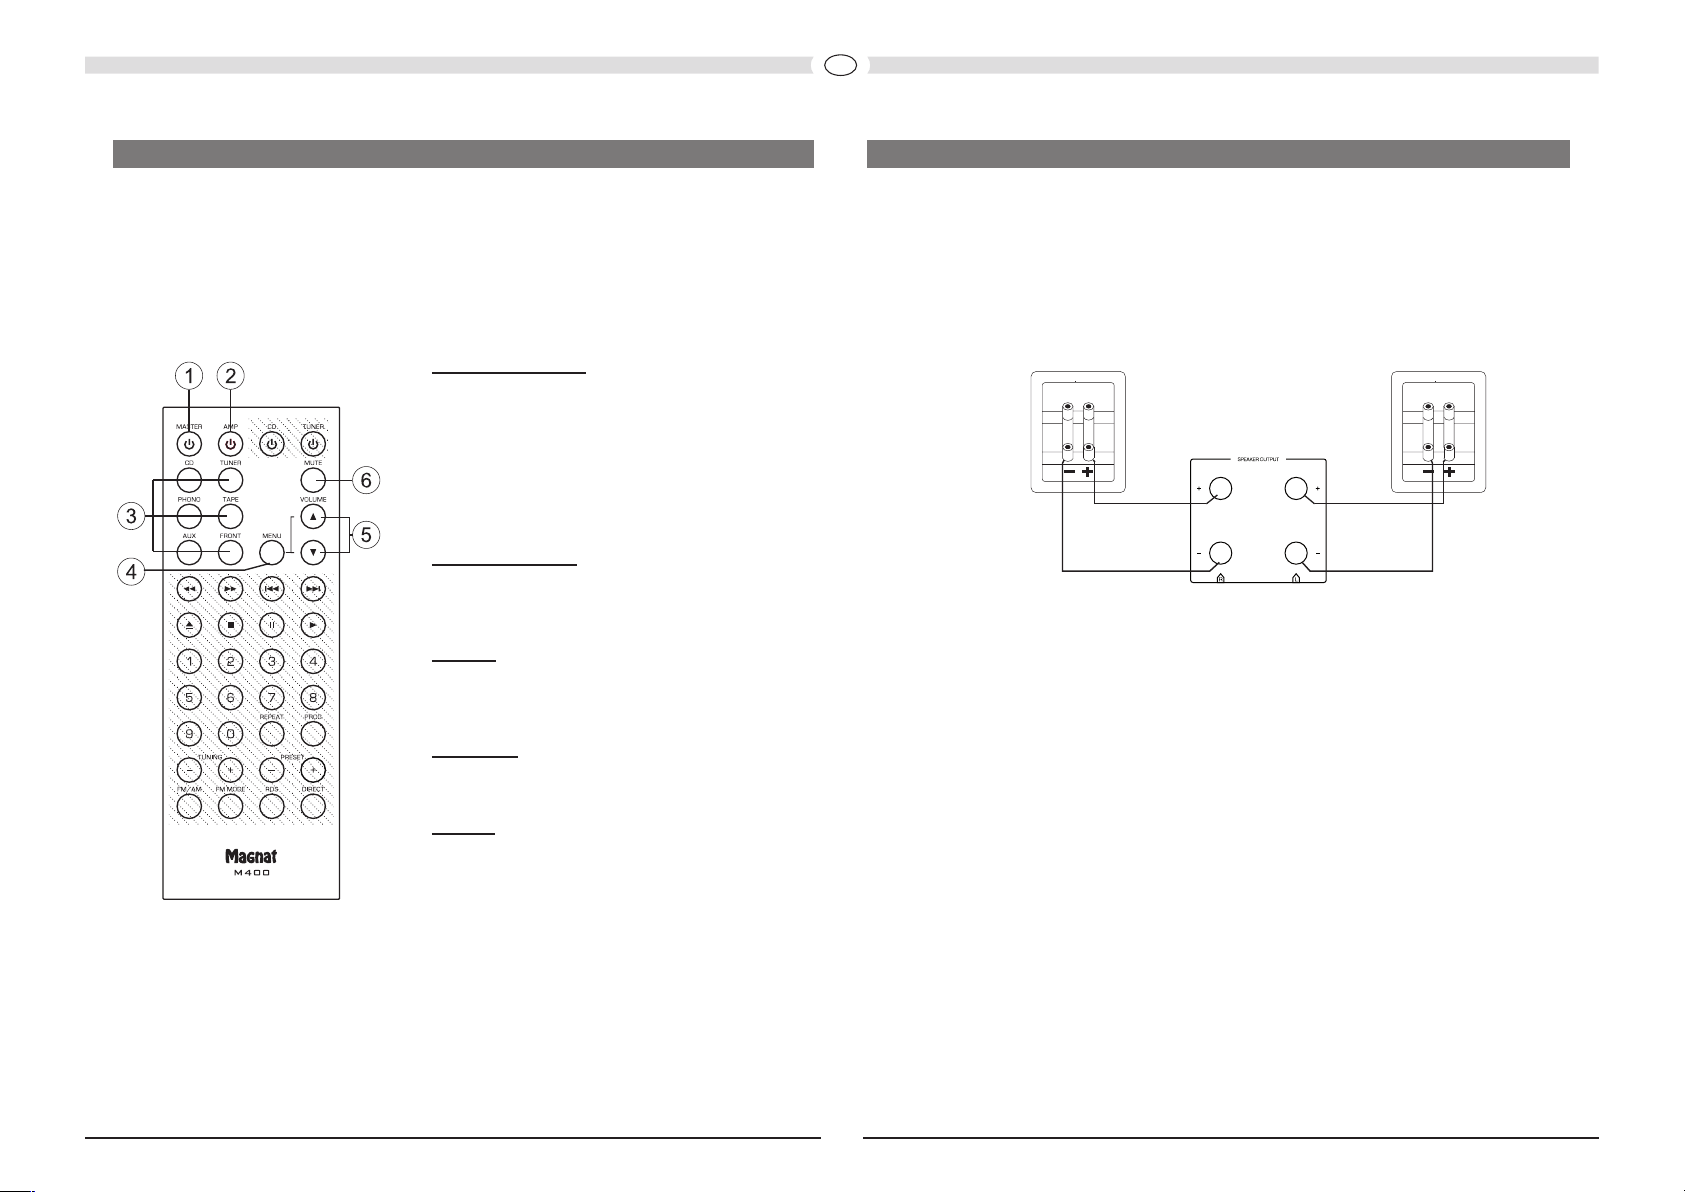
BEDIENUNGSELEMENTE UND ANSCHLÜSSE –FERNBEDIENUNG
D
INBETRIEBNAHME
• Vor Benutzung der Fernbedienung muss die transparente Schutzlasche am unteren Rand des
Batteriefachs herausgezogen werden.
• Sollte sich die Batterie nach längerem Betrieb entleert haben, so wechseln Sie sie bitte aus (Typ
CR2025).
• Um Schäden an der Fernbedienung zu vermeiden, entfernen Sie bitte die Batterie, wenn das Gerät
längere Zeit nicht benutzt wird.
1 MASTER / 2 AMP
Schaltet das Gerät ein, wenn es sich im StandbyModus befindet. Leuchtet die LED nicht, müssen Sie
den Netzschalter auf der Rückseite des Gerätes
einschalten. Umgekehrt kann das Gerät vom PowerBetrieb auf Standby geschaltet werden.
Die MASTER-Taste schaltet auch die anderen Geräte
der Magnat M400-Serie (MCD 450, MT 420) ein bzw.
aus.
EINGANGSWAHL
3
Mit diesen Tasten können die einzelnen AudioEingänge direkt angewählt werden. Der aktive Eingang
wird im Display angezeigt.
4 MENU
Ruft das Menü zur Klangeinstellung und zur
Konfiguration der Eingänge auf. Die Navigation durch
das Menü erfolgt über die Volume-Tasten.
5 VOLUME
Erhöht () oder verringert () die Lautstärke.
6 MUTE
Schaltet den Ton stumm und wieder ein.
Die nicht durch Nummern gekennzeichneten Tasten
sind für Bedienung des Magnat CD-Players MCD 450
und des Magnat Tuners MT 420 reserviert und haben
für den MA 400 keine Funktion.
• Stellen Sie den MA 400 auf eine ebene Unterlage. Beachten Sie die Abstände, die unter
"Sicherheitshinweise" aufgeführt wurden.
WICHTIG: Legen Sie keine Gegenstände (Zeitschriften, CD/Plattenhüllen o.ä) auf das Gerät. Die
Lüftungsschlitze auf der Geräteoberseite müssen immer frei bleiben!
• Schließen Sie Ihre Lautsprecher an:
Das Stereo-Lautsprecherpaar (Impedanz 4 bis 8 Ohm) wird wie folgt auf der Rückseite
angeschlossen:
Verwenden Sie nur hochwertige Audio-Lautsprecherkabel mit einem Leiterquerschnitt von min.
1,5 – 2,5 mm². Isolieren Sie die Kabel ca. 10 mm ab und verdrillen Sie die Enden. Lösen Sie
nacheinander die Klemmschrauben und stecken die abisolierten Enden in die seitliche Bohrungen.
Ziehen Sie die Klemmschrauben wieder fest an. Auf richtige Polung ist unbedingt zu achten. Sie
können auch vorkonfektionierte Kabel mit 4 mm Bananenstecker oder Gabelschuhen verwenden.
Bitte beachten Sie auch die Bedienungsanleitung der Lautsprecher.
• Schließen Sie Ihre Audioquellen an die analogen Anschlüsse an.
• Schließen Sie auf der Rückseite das beigefügte Netzkabel an, und danach das andere Ende an
eine 230 V Steckdose.
• Schalten Sie zunächst den Netzschalter auf der Rückseite ein, das Gerät befindet sich nun im
Standby-Modus.
• Schalten Sie das Gerät nun mit der ON/STBY-Taste auf der Front oder über die Fernbedienung
ein.
• Nach der Vorheizphase der Röhre ist das Gerät betriebsbereit.
• Wählen Sie die von Ihnen gewünschte Audioquelle mit dem Eingangswahlschalter.
5
Page 6

DAS MENÜ DES MA 400
D
TECHNISCHE DATEN
Die Klangeinstellungen und eine Anpassung der Eingangsempfindlichkeit der Eingänge können
bequem über ein Menü vorgenommen werden.
• Das Menü wird über die Taste MENU auf der Fernbedienung oder durch Druck auf den
Lautstärkeregler auf der Front aufgerufen.
• Die Navigation innerhalb des Menüs und die Änderung der Einstellungen erfolgen über die
VOLUME-Tasten auf der Fernbedienung oder durch Drehen am Lautstärkeregler.
• Bestätigung der einzelnen Menüpunkte über die Taste MENU auf der Fernbedienung oder durch
Druck auf den Lautstärkeregler.
Folgende Einstellungen sind möglich:
• Basseinstellung:
Wählen Sie im Menü BASS aus. Die Basswiedergabe kann jeweils in 5 Schritten angehoben bzw.
abgesenkt werden.
• Hochtoneinstellung:
Wählen Sie im Menü TREBLE aus. Die Hochtonwiedergabe kann jeweils in 5 Schritten angehoben
bzw. abgesenkt werden.
• Balance Einstellung:
Wählen Sie im Menü BALANCE aus. Der Stereomittelpunkt kann nach links bzw. rechts in jeweils
10 Schritten eingestellt werden.
• Loudness (gehörrichtige Lautstärkekorrektur):
Wählen Sie im Menü LOUDNESS aus. Die Funktion kann nun ein- bzw. ausgeschaltet werden.
• Eingangsempfindlichkeit:
Wählen Sie im Menü INPUTGAIN aus. Nun kann die Eingangsempfindlichkeit des aktuell
gewählten Eingangs in 4 Schritten erhöht werden. Sie können so Audioquellen mit geringerem
Ausgangspegel an andere Audioquellen anpassen.
Über den Menüpunkt RESET werden die Grundeinstellungen wiederhergestellt (alle Klangregler auf
0, Loudness-Funktion aus und Eingangsempfindlichkeit aller Eingänge 0dB).
Über den Menüpunkt EXIT verlassen Sie das Menü.
RÖHRENAUSTAUSCH
Das Gerät verfügt über eine hochwertige Vorverstärkerstufe, die mit einer Röhre bestückt ist.
Die Röhre hat unter normalen Betriebsbedingungen eine sehr lange Lebensdauer
(min. 20000 – 50000 Stunden).
Ist ein Austausch der Röhre dennoch notwendig, wenden Sie sich bitte an den qualifizierten
Fachhandel.
SERVICE UND TECHNISCHE PROBLEME
Verstärker
Ausgangsleistung:
Nennleistung 20 Hz – 20 kHz, THD < 1.0%, 4 Ohm 2 x 40 W
20 Hz – 20 kHz, THD < 1.0%, 8 Ohm 2 x 32 W
Impulsleistung 1 kHz, 4 Ohm
150 W
Frequenzgang:
CD/Tuner/Aux/Line/Tape 8 Hz – 120 kHz (-3 dB)
20 Hz – 20 kHz (+/- 0,2 dB)
Phono 20 Hz – 20 kHz (+/- 0,3 dB)
Subsonic-Filter: 16 Hz, 18 dB/Oktave
Geräuschspannungsabstand:
CD/Tuner/Aux/Line/Tape 95 dB
Phono 80 dB
Eingangsempfindlichkeit/-Impedanz:
CD/Tuner/Aux/Line/Tape 550 mV / 10 kOhm
Phono 5 mV / 47 kOhm
Bestückung:
Vorverstärker: 1 x ECC 88
Sonstiges
Netzspannung: 230 VAC / 50 Hz
Leistungsaufnahme: Maximal 150 W
Standby < 1,0 W
Abmessungen (BxHxT):
Hauptgerät:: 430 x 91 x 287 mm
Hauptgerät inkl. Bedienelementen
und Anschlussklemmen: 430 x 91 x 330 mm
Fernbedienung: 54 x 140 x 11 mm
Gewicht: 5,8 kg
Sollten technische Probleme auftreten, wenden Sie sich bitte an Ihren Fachhändler oder an
Technische Änderungen vorbehalten.
Magnat Audio-Produkte GmbH, Tel.: 02234 807-0.
Für weitere Informationen besuchen Sie bitte unsere Webseite: http://www.magnat.de.
6
Page 7
TABLE OF CONTENTS
GB
7 Accessories
7 Before starting
Safety precautions
Instructions for disposal
8/9 Operational elements and connections
Front panel
Rear
Remote control
9 Initial Operation
10 The MA400's menu
10 Tube replacement
10 Service and technical problems
10 Specifications
• In the event of contact with moisture or liquids remove the mains adapter immediately.
• Only clean the device using a dry cloth.
• Do not use any cleaning agents or chemical solvents when cleaning, as these could damage the
surface of the device.
• Never open the device.
• A mains cable is included in delivery. Only use this original accessory for the power supply or a
power cable that has been examined with regards to its safety (e.g. with a TÜV or VDE certificate).
• The mains cable must always be operational. The device should not continue to be operated if there
is visible damage to the mains cable. A damaged cable should not be repaired, but must be
replaced.
• Do not connect or remove the mains cable with damp hands.
• Always refer to a qualified specialist for any maintenance or repair work.
• If the device is not going to be used for a prolonged period, switch it off by using the power switch
located on the rear of the device (see the section entitled "Rear").
• Please remove the mains plug in the event of thunderstorms.
This symbol warns the user that high voltage is used within the device which can
result in electric shock.
ACCESSORIES
1) Instruction manual
2) Remote control incl. battery (CR2025)
3) Mains cable
BEFORE STARTING
Dear customer,
Thank you for choosing the Magnat MA 400 vacuum tube amplifier.
Please read the following information carefully before starting to use the MA 400.
IMPORTANT SAFETY PRECAUTIONS
• Please read the instruction manual carefully before use and keep it in a safe place.
• This device is only intended for use with 230 V/50 Hz AC voltage.
• Only operate the device at an ambient/room temperature between 5°C and 40°C.
• Make sure there is sufficient ventilation for the device. There must be a minimum gap of 10 cm
between objects to the side, to the rear and above the device.
• The ventilation slots should not be covered by any items (e.g. curtains, newspaper, etc.) in order
to ensure sufficient ventilation for the device. Please do not position any sources of heat, such as
radiators, ovens, naked flames or other devices that generate heat in close proximity to the device.
• The device and the remote control should not be exposed to dripping or splash water or high levels
of humidity.
• No objects filled with liquids, such as vases, shall be places on the unit.
This symbol makes the user aware that there are important notes in the enclosed
instruction manual which must be observed.
Warning:
Do not open! Risk of electric shock!
To reduce the risk of fire or electric shock, do not expose this unit to
rain or moisture.
INSTRUCTIONS FOR DISPOSAL
In accordance with European Directive 2002/96/EC all electrical and electronic appliances must be
disposed of separately via local collection points. Please observe the local regulations and do not
dispose of your old appliances with normal household waste.
Battery disposal
Old batteries are hazardous waste and must be disposed of in accordance with current regulations.
7
Page 8
OPERATIONAL ELEMENTS AND CONNECTIONS – FRONT PANEL
GB
OPERATIONAL ELEMENTS AND CONNECTIONS – REAR
1 ON/STBY
Switches the device on when it is in the standby
mode. If the LED does not illuminate, actuate
the power switch located on the rear of the
device. Conversely the device can be switched
from power operation to the standby mode.
2 LED STATUS INDICATION
This illuminated display indicates the
MA 400's 2 possible states:
• LED is illuminated green
switched on. The device is ready for use.
• LED is illuminated red: The MA 400 is in the
standby mode.
3 SOURCE (INPUT SELECTOR SWITCH)
Switches between the different audio sources:
• CD
: CD player.
• TUNER: Radio reception device.
• PHONO: Record players with a magnet
system (MM).
: Other audio device (e.g. MD player).
• AUX
• TAPE: Tape or cassette recorder.
• FRONT: Front input for portable devices
4 DISPLAY
The following information is indicated in the
display:
• Heating phase of the tube:
This lasts for around 20 seconds after the
device has been switched on.
: The MA 400 is
WWAARRMM UUPP
• Selected audio input:
CCDD TTUUNNEERR PPHHOONNOO AAUUXX TTAAPPEE FFRROONNTT
• Volume muting:
VVOOLL 1155
MMUUTTIINNGG
• Menu settings (see page 10).
5 LINE-IN (FRONT)
3.5 mm stereo input jack for an auxiliary audio
device (e.g. MP3 player, etc.).
6 VOLUME/MENU
Turn: For adjusting the overall volume of the
music.
: Launches the menu for adjusting tone
Press
and for configuring the inputs. Turning the
VOLUME knob navigates through the menu.
7 HEADPHONES
6.3 mm stereo output jack for headphones. The
speakers are deactivated when this jack is used.
Set the volume to a low level before connecting
headphones.
SENSOR FOR THE REMOTE CONTROL
8
Please aim at this sensor when using the remote
control.
1 POWER SWITCH
Switches the device on and sets it in the standby
mode. If the switch is set to the "OFF" position,
the device is disconnected from the mains
supply.
2 MAINS CONNECTION
For connecting the supplied mains cable. The
safety fuse should only be changed by qualified
service personnel.
3 SPEAKER TERMINALS
For the connection of stereo speakers with an
impedance rating of 4-8 ohms (the correct
polarity must be taken into account). (See also
page 9).
ANALOGUE RCA CONNECTIONS
For connecting analogue audio sources. Please
observe the coloured marking of the sockets
and connectors. Red is always the right channel.
4 TAPE OUT
For connecting devices for analogue sound
recording (e.g. tape recorder). The signal for the
selected audio source with fixed level applies for
this output, i.e. it is independent of the position
of the volume knob.
5 TAPE INPUT
For the connection of a cassette deck or tape
recorder.
6 AUX INPUT
Connection of another audio source (e.g. MP3
or Minidisc player).
7 TUNER INPUT
Connection of a radio reception device.
8 CD INPUT
Connection of a CD player.
9 PHONO INPUT
Connection of a record player with a magnet
system (MM) or MC system with high output
level (high output MC).
10 PHONO EARTH CONNECTION
Connection of the phono cable's earth wire in
order to prevent humming.
8
Page 9

OPERATIONAL ELEMENTS AND CONNECTIONS – REMOTE CONTROL
GB
• The transparent protective tab on the underside of the battery compartment must be removed before
using the remote control.
• If the batteries have run out after prolonged use, please replace them (type CR2025).
• To prevent causing damage to the remote control please remove the batteries if the device is not
going to be used for a prolonged period.
INITIAL OPERATION
• Place the MA 400 on an even surface. Observe the relevant clearance gaps as specified under
"Important safety instructions".
IMPORTANT: Do not place any objects on top of the device (magazines, CD/record cases, etc.).
The ventilation slots located on top of the device must be unobstructed at all times!
• Connect your speakers:
1 MASTER / 2 AMP
Switches the device on when it is in the standby mode.
If the LED does not illuminate, actuate the power switch
located on the rear of the device. Conversely the device
can be switched from power operation to the standby
mode.
The MASTER button also switches other units in
Magnat's M400 series (MCD 450, MT 420) on and off.
3 INPUT SELECTON
These buttons enable direct selection of the individual
audio inputs. The active input is indicated in the display.
4 MENU
Launches the menu for adjusting tone and for
configuring the inputs. Navigate through the menu with
the VOLUME keys.
5 VOLUME
Increases () or decreases () the volume.
6 MUTE
Switches the sound on and off.
The non-numbered buttons are reserved for operating
the Magnat CD player MCD 450 and the Tuner MT 420
and have no function for the MA 400.
The stereo speakers (impedance of 4 to 8 ohms) are connected to the rear as follows:
Only use high-quality audio speaker cables with a conductor cross section of min. 1.5 - 2.5 mm².
Strip approx. 10 mm from the cables and twist the ends. Loosen the terminal screws one after the
other and insert the stripped ends into the holes. Re-tighten the terminal screws. Make sure you
pay attention to the correct polarity.
You can also use prefabricated cables with 4mm banana plugs or forked fittings.
Also observe the operating instructions for the speakers you are using.
• Connect your audio sources to the analogue connections.
• Connect the supplied mains cable to the rear and then insert the other end into a 230V socket.
• Actuate the on/off switch on the rear side, the device is now in the standby mode.
• Now switch on the device using the remote control or with the ON/STBY key on the front.
• When the tube has heated up the device is ready for use.
• Select your desired audio source using the input selector switch.
9
Page 10

THE MA 400'S MENU
GB
The tone and the inputs' input sensitivity may be comfortably adjusted via a menu.
• The menu is launched with the MENU key on the remote control or by pressing the volume control
on the front.
• The menu may be navigated and settings changed with the VOLUME keys on the remote control
or by turning the volume control.
• The individual menu items may be confirmed with the MENU key on the remote control or by
pressing the volume control.
SPECIFICATIONS
Amplifier
Power output:
Rated power 20 Hz – 20 kHz, THD < 1.0%, 4 ohm 2 x 40 W
20 Hz – 20 kHz, THD < 1.0%, 8 ohm 2 x 32 W
Peak power: 1 kHz, 4 ohm 150 W
The following settings are possible:
• Bass adjustment:
Select BASS in the menu. Bass playback may be ramped either up or down in five steps.
• Treble adjustment:
Select TREBLE in the menu. The treble setting may be ramped either up or down in five steps.
• Balance adjustment:
Select BALANCE in the menu. The stereo balance may be adjusted either to the right or left in ten
steps.
• Loudness (aurally compensated volume correction):
Select LOUDNESS in the menu. The function may now be activated or deactivated.
• Input sensitivity:
Select INPUTGAIN in the menu. Now the input sensitivity for the currently selected input may be
increased in four steps. This enables you to adapt audio sources with lower output levels to other
audio sources.
The RESET menu item will restore the basic settings (all tone settings to 0, loudness function off and
input sensitivity for all inputs to 0 dB).
You can leave the menu via EXIT.
TUBE REPLACEMENT
The device has a high quality preamplifier stage which is equipped with a tube. The tube has a very
long service life when used under normal operating conditions (min. 20,000-50,000 hours).
If it is necessary to replace the tube, please refer to a specialist dealer.
SERVICE AND TECHNICAL PROBLEMS
If you should encounter any technical problems, please contact your specialist dealer or
Magnat Audio-Produkte GmbH, Tel.: 02234807-0.
Frequency response :
CD/Tuner/Aux/Line/Tape 8 Hz – 120 kHz (-3 dB)
20 Hz – 20 kHz (+/- 0,2 dB)
Phono 20 Hz – 20 kHz (+/- 0,3 dB)
Subsonic filter: 16 Hz, 18 dB/octave
Signal to noise ratio:
CD/Tuner/Aux/Line/Tape 95 dB
Phono 80 dB
Input sensitivity/impedance:
CD/Tuner/Aux/Line/Tape 550 mV / 10 kohm
Phono 5 mV / 47 kohm
Fitted with:
Phono Preamplifier: 1 x ECC 88
Miscellaneous
Mains voltage: 230 VAC / 50 Hz
Electricity consumption: Max. 150 W
Standby <1,0 W
Dimensions (wxhxd):
Main device: 430 x 91 x 287 mm
Main device incl. operational
elements/connecting terminals: 430 x 91 x 330 mm
Remote Control: 54 x 140 x 11 mm
Weight: 5,8 kg
Subject to technical change.
For further information please visit our website: http://www.magnat.de.
10
Page 11

SOMMAIRE
F
11 Accessoires
11 Avant la mise en marche
Consignes de sécurité
Consignes d'élimination
12/13 Éléments de commande et connexions
Panneau frontal
Face arrière
Télécommande
13 Mise en marche
14 Le menu du MA 400
14 Remplacement des tubes
14 Service and technical problems
14 Caractéristiques techniques
• En cas de contact avec un milieu humide ou liquide, retirer l'adaptateur secteur immédiatement.
• Nettoyer l'appareil avec un chiffon sec uniquement.
• Ne pas utiliser d'agents nettoyants ou de solvants chimiques, ceux-ci pouvant endommager la
surface de l'appareil.
• Ne jamais ouvrir l'appareil.
• Un cordon d'alimentation est fourni avec l'appareil. Utilisez uniquement cet accessoire pour
alimenter l'appareil en courant ou un câble électrique certifié conforme en matière de sécurité (par
ex. certifié TÜV ou VDE).• Le cordon d'alimentation doit toujours être en état de fonctionner. Ne
pas continuer à utiliser l'appareil en cas de dommage visible sur le câble secteur. Un câble
endommagé ne doit pas être réparé mais doit être remplacé.
• Ne pas brancher ou débrancher le cordon d'alimentation avec les mains humides.
• Toujours demander conseil à un spécialiste pour tout travail de maintenance ou de réparation.
• En cas de non utilisation prolongée, éteindre l'appareil à l'aide de l'interrupteur d'alimentation situé
sur la face arrière de l'appareil (cf. le chapitre "Face arrière").
• En cas d'orage, débranchez le cordon d'alimentation.
Ce symbole avertit l'utilisateur que l'appareil est traversé par des tensions élevées
pouvant entraîner des décharges électriques dangereuses.
ACCESSOIRES
1) Manuel d’instruction
2) Télécommande, pile incluse (CR2025)
3) Câble secteur
AVANT LA MISE EN MARCHE
Cher client,
Nous vous remercions d'avoir opté pour l'amplificateur à tubes MA 400 de Magnat.
Avant de mettre en marche votre MA 400, veuillez lire attentivement les consignes suivantes.
CONSIGNES DE SECURITE IMPORTANTES
• Avant l'utilisation de l'appareil, lisez attentivement la notice d'utilisation et conservez-la.
• Cet appareil est exclusivement conçu pour une utilisation avec une tension alternative de 230 V /
50 Hz.
• Utilisez uniquement l'appareil à une température ambiante comprise entre 5°C et 40°C.
• S'assurer que l'appareil est placé dans un endroit suffisamment ventilé. Ne placer aucun objet à
moins de 10 cm des faces latérales, arrière et supérieure de l'appareil.
• Les trous d'aération ne doivent pas être recouverts par des objets (par ex. des rideaux, journaux)
afin de garantir une aération suffisante de l'appareil. Ne placez pas de sources de chaleur, telles
que des radiateurs, des poêles, des flammes nues ou d'autres appareils produisant de la chaleur,
à proximité de l'appareil.
• L'appareil et la télécommande ne doivent être exposés ni aux gouttes d'eau et projections d'eau ni
à l'eau ni à une humidité de l'air importante.
• Ne posez jamais des vases ou d’autres récipients contenant des liquides sur l’appareil.
Ce symbole indique à l'utilisateur de l'appareil que la notice d'utilisation jointe avec
l'appareil contient des consignes importantes devant impérativement être respectées.
Attention! Ne pas ouvrir, risque d'électrocution!
Afin de reduire les risques d’incendie ou de décharge électricque,
ne pas exposer cet appareil à la pluie ou à l’humidité.
INSTRUCTIONS POUR LA MISE AU REBUT
Conformément à la directive européenne 2002/96/CE, tous les appareils électriques et électroniques
usagés doivent être triés et déposés dans des points de collecte locaux. Veuillez respecter les
réglementations locales et ne pas jeter vos appareils usagés avec les déchets ménagers.
Mise au rebut de la pile
Les piles usagées sont des déchets dangereux et doivent être mises au rebut conformément aux
réglementations en vigueur.
11
Page 12

F
ELEMENTS DE COMMANDE ET CONNEXIONS – PANNEAU FRONTAL
ELEMENTS DE COMMANDE ET CONNEXIONS – FACE ARRIERE
1 ON/STBY
Permet d'allumer l'appareil lorsque celui-ci se
trouve en mode de veille. Si la LED ne s'allume
pas, mettez en marche l'appareil à l'aide de
l'interrupteur d'alimentation situé sur la face
arrière de l'appareil. À l'inverse, ce bouton
permet de mettre en veille l'appareil lorsque
celui-ci est en marche.
2 LED - TÉMOIN D'ÉTAT
Ce témoin affiche 2 états dans lesquels le
MA 400 peut se trouver lorsqu'il est allumé:
• La LED clignote de couleur verte
est en marche. L'appareil est prêt à
fonctionner.
• La LED clignote de couleur rouge
MA 400 se trouve en mode de veille.
3 SOURCE (SÉLECTEUR D'ENTRÉE)
Permet de commuter entre les différentes
sources audio:
• CD
: lecteur de CD.
• TUNER: récepteur radio.
• PHONO: tourne-disque à système
magnétique (MM).
: autre appareil audio (par ex. lecteur
• AUX
MP3).
• TAPE: magnétophone ou lecteur de cassettes.
• FRONT: Entrée avant pour appareils
portables.
ÉCRAN
4
Les informations suivantes sont affichées à
l'écran:
: le MA 400
: Le
• Phase de chauffage de la tube:
Après la mise en marche de l'appareil, celle-
ci dure environ 20 secondes.
• Entrée audio sélectionnée:
CCDD TTUUNNEERR PPHHOONNOO AAUUXX TTAAPPEE FFRROONNTT
• Volume sourdine:
VVOOLL 1155
MMUUTTIINNGG
• Réglages des menus (voir page 14).
5 LINE-IN (FRONT)
Entrée jack stéréo 3,5 mm permettant de
connecter une source audio supplémentaire
(lecteur MP3 ou autre).
6 VOLUME/MENU
Tourner: Permet de régler le volume sonore
général de la restitution audio.
Pression
et de configuration des entrées. Vous pouvez
naviguer dans ce menu en faisant tourner le
bouton de réglage VOLUME.
7 CASQUE
Sortie jack stéréo 6,3 mm pour casque. Lorsque
cette sortie est utilisée, les haut-parleurs sont
désactivés. Baissez le volume sonore avant de
brancher un casque à cette sortie.
8 CAPTEUR DE TÉLÉCOMMANDE
Pour pouvoir utiliser la télécommande, orientezla vers ce point.
: appelle le menu de réglage du volume
WWAARRMM UUPP
1 INTERRUPTEUR D'ALIMENTATION
Permet d'allumer l'appareil et de le mettre en
veille. Si l'interrupteur est en position " OFF ",
l'appareil n'est plus sous tension.
2 PRISE SECTEUR
Permet de brancher le cordon d'alimentation
fourni avec l'appareil. Le fusible peut
uniquement être remplacé par du personnel de
maintenance qualifié.
3 PRISES POUR HAUT-PARLEURS
Permettent de brancher une paire de hautparleurs stéréo d'une impédance de 4 à 8 ohms.
Respecter la bonne polarité. Voir également
page 13.
PRISES CINCH ANALOGIQUES
Permettent de raccorder des sources audio
analogiques. Respectez le marquage de
couleur des prises et des connecteurs. La
couleur rouge correspond toujours au canal de
droite.
4 TAPE OUT
Permet de brancher des appareils
d'enregistrement analogique (par ex.
magnétophone ou lecteur de cassettes). Le
signal de la source audio sélectionnée est
présent à cette sortie avec un niveau fixe, c'està-dire indépendant de la position du bouton de
réglage du volume sonore.
12
5 ENTRÉE TAPE
Permet de raccorder une platine à cassettes ou
un magnétophone.
6 ENTRÉE AUX
Permet de raccorder une autre source audio
(par ex. un lecteur MP3 ou Minidisc)
7 ENTRÉE TUNER
Permet de raccorder un récepteur radio.
8 ENTRÉE CD
Permet de raccorder un lecteur de CD
9 ENTRÉE PHONO
Permet de raccorder un tourne-disque à
système magnétique (MM) ou à système à
cadre mobile doté d'une sortie de haut niveau
(High Output MC).
10 MISE À LA TERRE PHONO
Permet de raccorder le fil de masse du câble
Phono afin d'éviter les bourdonnements.
Page 13

ELEMENTS DE COMMANDE ET CONNEXIONS – TELECOMMANDE
MISE EN MARCHE
• Avant d'utiliser la télécommande, il est nécessaire de retirer la languette de protection transparente
située sur le rebord inférieur du compartiment à piles.
• Si les piles se sont vidées après une utilisation prolongée de l'appareil, remplacez-les (type
CR2025).
• Afin d’éviter tout endommagement de la télécommande, retirez les piles lorsque l’appareil n’est pas
utilisé pendant une période prolongée.
1 MASTER / 2 AMP
Permet d'allumer l'appareil lorsque celui-ci se trouve en
mode de veille. Si la LED ne s'allume pas, mettez en
marche l'appareil à l'aide de l'interrupteur d'alimentation
situé sur la face arrière de l'appareil. À l'inverse, ce
bouton permet de mettre en veille l'appareil lorsque
celui-ci est en marche.
La touche MASTER permet également
d'allumer/éteindre les autres appareils de la série
Magnat M400 (MCD 450, MT 420).
SÉLECTION DE L'ENTRÉE
3
Ces touches permettent de sélectionner directement
les entrées audio. L’entrée active est affichée à l’écran.
5 MENU
Appelle le menu de réglage du volume et de
configuration des entrées. Vous pouvez naviguer dans
ce menu à l'aide des touches VOLUME.
5 Volume
Augmente () ou réduit () le volume sonore.
• Posez le MA 400 sur une surface plane. Respectez les écartements spécifiés dans les " Consignes
de sécurité importantes ".
IMPORTANT: Ne posez pas d’objets sur l’appareil (journaux, boîtiers de CD/pochettes de disques,
etc.). Les grilles d’aération situées sur la face supérieure de l’appareil doivent être dégagées en
permanence !
• Raccordez vos haut-parleurs:
La paire de haut-parleurs stéréo (impédance comprise entre 4 et 8 ohms) est connectée sur la face
arrière de la manière suivante:
Utilisez uniquement des câbles audio pour haut-parleurs de haute qualité possédant une section
de conducteur d'au moins 1,5 - 2,5 mm². Dénudez les câbles sur env. 10 mm et torsadez les
extrémités. Dévissez l'une après l'autre les vis des bornes et insérez les extrémités dénudées dans
les alésages latéraux. Resserrez les vis des bornes. Respectez impérativement la bonne polarité.
Vous pouvez également utiliser des câble confectionnés au préalable avec des fiches banane de
4 mm ou des godets à fourche.
Tenez également compte de la notice d’utilisation des haut-parleurs utilisés.
6 Mute
Permet de mettre en sourdine l'appareil ou de
désactiver la sourdine.
Les touches qui ne sont pas repérées par des numéros
sont réservées à la commande du lecteur CD Magnat
MCD 450 et le tuner Magnat MT 420 ne sont pas utiles
pour le MA 400.
• Raccordez vos sources audio aux prises analogiques.
• Branchez sur la face arrière le câble d'alimentation fourni avec l'appareil puis l'autre extrémité du
câble à une prise de 230 V.
• Mettez d’abord l’interrupteur d’alimentation situé au dos de l’appareil sur « ON ». L’appareil est
maintenant en mode de veille.
• Mettez maintenant l'appareil en marche depuis la télécommande ou la touche ON/STBY en façade.
• Après la phase de chauffage de la tube, l'appareil est prêt à fonctionner.
• Sélectionnez la source audio souhaitée à l'aide du sélecteur d'entrée.
13F14
Page 14

F
LE MENU DU MA 400
Le menu permet de procéder facilement aux réglages du son et au réglage de la sensibilité des
entrées.
• Ce menu est accessible à l'aide de la touche MENU de la télécommande ou en appuyant sur le
bouton de réglage du volume en façade.
• La navigation dans le menu et la modification des réglages sont possibles à l'aide des touches
VOLUME de la télécommande et en faisant tourner le bouton de réglage du volume.
• Confirmation des différentes options de menu à l'aide de la touche MENU de la télécommande
ou en appuyant sur le bouton de réglage du volume.
CARACTERISTIQUES TECHNIQUES
Amplificateur
Puissance de sortie:
Puissance nominale 20 Hz – 20 kHz, THD < 1.0%, 4 Ohm 2 x 40 W
20 Hz – 20 kHz, THD < 1.0%, 8 Ohm 2 x 32 W
Puissance d’impulsion: 1 kHz, 4 Ohm 150 W
Les réglages suivants sont possibles:
• Réglage des basses:
Sélectionnez BASS dans le menu. Vous pouvez augmenter ou abaisser de 5 niveaux la restitution
des basses.
• Réglage des aigus:
Sélectionnez TREBLE dans le menu. Vous pouvez augmenter ou abaisser de 5 niveaux la
restitution des aigus.
• Réglage de la balance:
Sélectionnez BALANCE dans le menu. Vous pouvez décaler le point central du mode stéréo de 10
niveaux vers la gauche ou vers la droite
• Loudness (correction du volume avec compensation auditive) :
Sélectionnez LOUDNESS dans le menu. Vous pouvez activer ou désactiver cette fonction.
• Sensibilité des entrées:
Sélectionnez INPUTGAIN dans le menu. Vous pouvez augmenter de 4 niveaux la sensibilité de
l'entrée sélectionnée. Vous pouvez ainsi adapter des sources audio de faible volume aux autres
sources audio.
L'option de menu RESET permet de rétablir les réglages de base (toutes les corrections de son sur
0, fonction Loudness désactivée et sensibilité de toutes les entrées 0dB).
L'option EXIT permet de quitter le menu.
REMPLACEMENT DE LA TUBE
L’appareil dispose d’un étage préamplificateur de haute qualité doté d’une tube. Dans des conditions
d’utilisation normales, la tube a une très longue durée de vie (au moins 20000-50000 heures).
Si le remplacement de la tube est nécessaire, adressez-vous à votre revendeur spécialisé.
SERVICE ET PROBLEMES TECHNIQUES
Réponse en fréquence:
CD/Tuner/Aux/Line/Tape 8 Hz – 120 kHz (-3 dB)
20 Hz – 20 kHz (+/- 0,2 dB)
Phono 20 Hz – 20 kHz (+/- 0,3 dB)
Filtre subsonique: 16 Hz, 18 dB par octave
Ecart signal/bruit::
CD/Tuner/Aux/Line/Tape 95 dB
Phono 80 dB
Sensibilité / impédance d’entrée:
CD/Tuner/Aux/Line/Tape 550 mV / 10 kOhm
Phono 5 mV / 47 kOhm
Equipement :
Préamplificateur Phono: 1 x ECC 88
Divers
Tension secteur: 230 VAC / 50 Hz
Consommation de courant : Max.: 150 W
Veille: <1,0 W
Dimensions (LxHxP): Appareil principal: 430 x 91 x 287 mm
Appareil principal, éléments de commande et bornes de
raccordements inclus: 430 x 91 x 330 mm
Télécommande: 54 x 140 x 11 mm
Poids: 5.8 kg
Si des problèmes techniques font leur apparition, adressez-vous à votre revendeur spécialisé ou à
Magnat Audio-Produkte GmbH, tél. : +49 (0) 2234807-0.
Sous toutes réserves de modifications techniques.
Pour obtenir de plus amples informations, consultez notre site Internet à l'adresse suivante:
http://www.magnat.de.
Page 15

I
INDICE
15 Accessori
15 Prima della messa in servizio
Avvertenze di sicurezza
Avvertenze per lo smaltimento
16/17 Elementi di comando ed attacchi
Pannello frontale
Lato posteriore
Telecomando
17 Messa in funzione
18 Il menu del MA 400
18 Sostituzione valvole
19 Assistenza e problemi tecnici
19 Dati tecnici
• L'apparecchio ed il telecomando non devono essere esposti all'acqua o un tasso di umidità elevato.
• Non vi devono nemmeno essere appoggiati vasi o altri contenitori contenenti liquidi.
• In caso di contatto con l'umidità o liquidi è necessario scollegare immediatamente la spina di rete.
• Pulire il dispositivo solo con uno straccio asciutto.
• Non utilizzare detergenti o solventi chimici poiché altrimenti si potrebbe danneggiare la superficie.
• Non aprire mai il dispositivo.
• La fornitura include un cavo di rete. Usare solo questi accessori originali per l'alimentazione elettrica
o un cavo elettrico testato per la sicurezza (ad es. con certificato TÜV o VDE).
• Il cavo di alimentazione deve essere sempre pronto all'uso. In caso di danneggiamenti visibili del
cavo di alimentazione è necessario non usare più il dispositivo. Un cavo danneggiato non deve
essere riparato, ma sostituito.
• Non collegare o rimuovere il cavo di alimentazione con mani umide.
• Gli interventi di manutenzione o di riparazione devono essere affidati sempre a personale qualificato.
• Se l'apparecchio non è utilizzato per un periodo prolungato, si consiglia di disattivarlo con
l'interruttore di rete presente sul lato posteriore dell'apparecchio (vedi capitolo "Lato posteriore").
• In caso di temporale, tirare la spina di alimentazione.
Questo segnale avvisa l'utente che all'interno dell'apparecchio sono presenti tensioni
elevate che possono provocare scariche elettriche pericolose.
ACCESSORI
1) Manuale d’uso
Questo segnale indica all'utente dell'apparecchio che nel manuale d'uso compreso
nella fornitura sono presenti avvertenze importanti che devono essere
assolutamente rispettate.
2) Telecomando incl. batteria (CR2025)
3) Cavo di alimentazione
Attenzione! Non aprire il dispositivo!
Evitare di esporre questo apparecchio alla pioggia o all'umidità onde
PRIMA DELLA MESSA IN FUNZIONE
prevenire il rischio di incendio e scosse elettriche.
Gentile cliente,
La ringraziamo per aver deciso di acquistare l'amplificatore valvolare Magnat MA 400.
La preghiamo di leggere accuratamente le seguenti avvertenze prima di mettere in funzione il
MA 400.
AVVERTENZE PER LO SMALTIMENTO
Secondo quanto prescritto dalla direttiva europea 2002/96/EC è necessario che tutti i dispositivi
elettrici ed elettronici vengano smaltiti separatamente dai centri di raccolta preposti. Si prega di
rispettare le regolamentazioni locali e smaltire i dispositivi usati non insieme ai normali rifiuti domestici.
IMPORTANTI AVVERTENZE DI SICUREZZA
Smaltimento della batteria
• Prima dell'uso si prega di leggere attentamente il manuale d'uso e di conservarlo accuratamente.
• Questo apparecchio è esclusivamente adatto per il funzionamento a corrente alternata da 230 V /
50 Hz.
Le batterie esauste sono da considerarsi rifiuti speciali e devono essere smaltite secondo le
regolamentazioni attuali.
• Usare l'apparecchio solo ad una temperatura ambiente/ambientale compresa tra 5°C e 40°C.
• Accertarsi che il dispositivo sia ben aerato. La distanza dagli oggetti laterali, posteriori e superiori
non deve essere inferiore a 10 cm.
• I fori di aerazione non devono essere coperti con degli oggetti (ad es. tende, giornale) per poter
garantire una sufficiente aerazione dell'apparecchio. Non posizionare vicino all'apparecchio fonti di
calore quali radiatori, forni, fiamme libere o altre apparecchiature che generano calore.
15
Page 16

ELEMENTI DI COMANDO ED ATTACCHI – PANNELLO FRONTALE
I
ELEMENTI DI COMANDO ED ATTACCHI – LATO POSTERIORE
1 ON/STBY
Attiva l'apparecchio quando si trova in modalità Standby. Quando il LED non è acceso è necessario attivare l'interruttore di rete sulla parte
posteriore dell'apparecchio. Viceversa, l'apparecchio può essere attivato dalla modalità
Power alla modalità Standby.
2 INDICATORE DI STATO LED
Questo indicatore luminoso mostra 2 stati nei
quali l'MA 400 acceso può trovarsi:
• Il LED è verde: L'MA 400 è acceso. L'apparec-
chio è pronto al funzionamento.
• Il LED è rosso
modalità di Standby.
3 SOURCE (SELETTORE DI INGRESSO)
Passa tra le diverse fonti audio:
• CD: Lettore CD.
• TUNER: Dispositivo di ricezione radio.
• PHONO: Giradischi con sistema a magnete
(MM).
: Altro dispositivo audio (ad es. lettore
• AUX
MD).
• TAPE: Magnetofono o registratore a cassette.
• FRONT
portatili.
4 DISPLAY
Sul display vengono visualizzate le seguenti
informazioni:
• Fase di riscaldamento della valvola:
: Il dispositivo MA 400 si trova in
: Ingresso frontale per dispositivi
WWAARRMM UUPP
Questa fase, dopo aver attivato l'apparecchio,
dura circa 20 secondo.
• Ingresso audio selezionato:
CCDD TTUUNNEERR PPHHOONNOO AAUUXX TTAAPPEE
FFRROONNTT
• Disattivazione del volume:
VVOOLL 1155
MMUUTTIINNGG
• Impostazioni di menu (vedere pagina 18).
5 LINE-IN (FRONT)
Ingresso stereo a jack da 3,5 mm per una fonte
audio supplementare (lettore MP3 o sim.).
6 VOLUME/MENU
Girare: Per la regolazione generale del volume
della riproduzione musicale.
Premere: Richiama il menu per l'impostazione
del suono e la configurazione degli ingressi. La
navigazione attraverso il menu si svolge girando
il regolatore VOLUME.
7 CUFFIE
Uscita stereo a jack 6,3 mm per cuffie. Quando
utilizzate, disattivare gli altoparlanti. Quando si
collegano le cuffie, abbassare il volume.
8 SENSORE PER IL TELECOMANDO
Per poter utilizzare il telecomando, puntare su
questo punto.
1 INTERRUTTORE DI RETE
Attiva l'apparecchio e lo porta in modalità
Standby. Quando l'interruttore si trova in
posizione "OFF", l'apparecchio è scollegato
dalla rete.
2 COLLEGAMENTO ALLA RETE
Per il collegamento del cavo di alimentazione
compreso nella fornitura. Il fusibile può essere
sostituito solo da personale di servizio
qualificato.
3 ATTACCHI PER ALTOPARLANTI
Per il collegamento di una coppia di altoparlanti
Stereo con un'impedenza di 4-8 Ohm
osservando la polarità corretta. Vedere anche a
pagina 17.
ATTACCHI ANALOGICI CINCH
Per il collegamento di fonti audio analogici. Si
prega di rispettare il contrassegno a colori degli
attacchi e delle spine. Rosso è sempre il canale
destro.
4 TAPE OUT
Per il collegamento di apparecchi per la
registrazione audio analogica (ad es.
magnetofono, registratore a cassette). A questa
uscita è presente il segnale della fonte audio
selezionata con un livello fisso, quindi
indipendente dalla posizione del regolatore del
volume.
5 INGRESSO TAPE
Per il collegamento di un registratore a cassette
o del magnetofono.
6 INGRESSO AUX
Attacco per un'ulteriore sorgente audio (ad es.
lettore MP3 o Minidisk).
7 INGRESSO TUNER
Attacco per dispositivo di radioricezione.
8 INGRESSO CD
Attacco per un lettore CD.
9 INGRESSO PHONO
Attacco per un giradischi con sistema a
magnete (MM) o sistema MC con livello di uscita
alto (High Output MC).
10 ATTACCO DI MASSA PHONO
Attacco dei fili di massa sul cavo audio per
impedire fruscii.
16
Page 17

ELEMENTI DI COMANDO ED ATTACCHI – TELECOMANDO
I
MESSA IN FUNZIONE
• Prima di utilizzare il telecomando è necessario rimuovere la linguetta di protezione trasparente
presente all'interno del vano di alloggiamento batterie.
• Se dopo un utilizzo prolungato si dovessero scaricare le batterie, si prega di sostituirle (Tipo
CR2025).
• Per prevenire danni al telecomando si prega di rimuovere le batterie nel caso in cui l’apparecchio
non venga utilizzato per un periodo prolungato.
1 MASTER / 2 AMP
Attiva l'apparecchio quando si trova in modalità Standby. Quando il LED non è acceso è necessario attivare
l'interruttore di rete sulla parte posteriore dell'apparecchio. Viceversa, l'apparecchio può essere attivato dalla
modalità Power alla modalità Standby.
Il tasto MASTER inserisce o disinserisce anche gli altri
apparecchi Magnat della serie M400 (MCD 450,
MT 420).
SELEZIONE INGRESSO
3
Con questi tasti è possibile selezionare direttamente i
singoli ingressi audio. L’ingresso attivo viene
visualizzato sul display.
4 MENU
Richiama il menu per l'impostazione del suono e la
configurazione degli ingressi. La navigazione attraverso
il menu si svolge con i tasti VOLUME.
5 VOLUME
Aumenta () o riduce () il volume.
• Posizionare l'MA 400 su un fondo piano. Rispettare le distanze come indicato in "Importanti
avvertenze di sicurezza".
IMPORTANTE:Non appoggiare alcun oggetto sull’apparecchio (riviste, copertine di CD/dischi o
sim.). Le prese d’aria sul lato superiore dell’apparecchio devono restare sempre libere!
• Collegare gli altoparlanti:
La coppia di altoparlanti Stereo (impedenza da 4 ad 8 Ohm) viene collegata sul lato posteriore nel
modo seguente:
Utilizzare solo cavi per altoparlanti audio di elevata qualità con una sezione del conduttore di
almeno 1.5 - 2.5mm². Isolare i cavi per ca. 10 mm e torcere le estremità. Sbloccare in successione
le viti di arresto ed inserire le estremità isolate nei fori laterali. Stringere nuovamente le viti di arresto.
Prestare attenzione all'esatta polarizzazione.
È possibile impiegare anche cavi preconfezionati con una spina unipolare da 4 mm o attacchi
ad U.
Inoltre, rispettare quando indicato nelle istruzioni per l’uso degli altoparlanti impiegati.
6 MUTE
Disattiva e riattiva il volume
• Collegare le fonti audio agli attacchi analogici.
• Collegare sulla parte posteriore il cavo di alimentazione compreso nella fornitura e
successivamente l'altra estremità ad una presa da 230V.
I tasti non contrassegnati da numeri sono riservati per
il funzionamento del lettore CD Magnat MCD 450 e del
tuner MT 420; per il modello MA 400 non hanno alcuna funzione.
• Attivare prima l’interruttore di rete sul retro, l’apparecchio a questo punto si trova in modalità di
Standby.
• Inserire l’apparecchio tramite telecomando o tasto ON/STBY presente sulla parte frontale.
• Dopo la fase di preriscaldamento della valvola l'apparecchio è pronto al funzionamento.
• Selezionare la fonte audio desiderata con il selettore di ingresso.
17
Page 18

I
IL MENU DEL MA 400
DATI TECNICI
Le impostazioni del suono e la regolazione della sensibilità d’entrata degli ingressi possono essere
eseguite comodamente tramite menu.
• Il menu si apre tramite tasto MENU sul telecomando oppure premendo il regolatore del volume
sulla parte frontale.
• La navigazione all’interno del menu e la modifica delle impostazioni sono svolte tramite tasti
VOLUME sul telecomando oppure girando il regolatore del volume.
• Azionamento delle singole voci di menu tramite tasto MENU sul telecomando o premendo il
regolatore del volume.
Sono possibili le seguenti impostazioni:
• Impostazione dei suoni bassi:
Selezionare nel menu BASS. La riproduzione dei toni bassi può essere aumentata o ridotta in 5
passaggi.
• Impostazione dei suoni alti:
Selezionare nel menu TREBLE. La riproduzione dei toni alti può essere aumentata o ridotta in 5
passaggi.
• Impostazione del bilanciamento:
Selezionare nel menu BALANCE. Il centro stereo può essere spostato a sinistra o a destra in 10
passaggi.
• Loudness (correzione del volume corretto per l’udito):
Selezionare nel menu LOUDNESS. Fatto questo, la funzione può essere attivata o disattivata.
• Sensibilità d’entrata:
Selezionare nel menu INPUTGAIN. La sensibilità d'entrata dell’ingresso attualmente selezionato
può essere aumentata in 4 passaggi. Le sorgenti audio con livelli di uscita inferiori possono essere
in tal modo adeguate ad altre sorgenti audio.
La voce di menu RESET provvede al ripristino della configurazione iniziale (tutti i regolatori del suono
su 0, funzione Loudness disattivata e sensibilità d’entrata di tutti gli ingressi su 0dB).
Per uscire la menu, selezionare la voce di menu EXIT.
Amplificatore
Potenza di uscita:
Potenza nominale 20 Hz – 20 kHz, THD < 1.0%, 4 Ohm 2 x 40 W
20 Hz – 20 kHz, THD < 1.0%, 8 Ohm 2 x 32 W
Potenza massima 1 kHz, 4 Ohm 150 W
Risposta in frequenza:
CD/Tuner/Aux/Line/Tape 8 Hz – 120 kHz (-3 dB)
20 Hz – 20 kHz (+/- 0,2 dB)
Phono 20 Hz – 20 kHz (+/- 0,3 dB)
Filtro subsonic: 16 Hz, 18 dB per ottava
Rapporto segnale rumore:
CD/Tuner/Aux/Line/Tape 95 dB
Phono 80 dB
Sensibilità / Impedenza d’ingresso:
CD/Tuner/Aux/Line/Tape 550 mV / 10 kOhm
Phono 5 mV / 47 kOhm
Dotazione :
Preamplificatore fono: 1 x ECC 88
Varie
Tensione di alimentazione: 230 VAC / 50 Hz
Alimentazione : Massimo: 150 W
Modalità di attesa: <1,0 W
SOSTITUZIONE VALVOLE
L’apparecchio dispone di un ottimo livello di preamplificatore di una valvola.
In condizioni di esercizio normali la valvola ha una lunga durata (min. 20000-50000 ore).
Nel caso in cui si dovessero sostituire la valvola, si prega di rivolgersi ad un negozio specializzato.
ASSISTENZA E PROBLEMI TECNICI
Nel caso in sui si dovessero verificare dei problemi tecnici, si prega di contattare il proprio rivenditore
Dimensioni (l x a x p): Unità principale: 430 x 91 x 287 mm
Unità principale inclusi componenti operativi/terminali di
connessione: 430 x 91 x 330 mm
Telecomando: 54 x 140 x 11 mm
Peso: 5,8 kg
Con riserva di apportare modifiche tecniche
Per ulteriori informazioni si prega di visitare il nostro sito Web: http://www.magnat.de.
specializzato o direttamente a Magnat Audio-Produkte GmbH, Tel.: 02234807-0.
18
Page 19

E
ÍNDICE
19 Accesorios
19 Antes de empezar
Precauciones de seguridad
Instrucciones de eliminación
20/21 Elementos operativos y conexiones
Panel frontal
Panel posterior
Control remoto
21 Primeros pasos
22 El menú del MA 400
22 Reemplazar los tubos
22 Mantenimiento y problemas técnicos
22 Especificaciones
• No utilice productos de limpieza o disolventes químicos durante la limpieza. Ello podría dañar la
superficie del dispositivo.
• No abra el dispositivo.
• El paquete incluye un cable de alimentación. Utilice únicamente accesorios originales para la fuente
de alimentación o un cable de alimentación que haya sido examinado con respecto a su seguridad
(p. ej. con un certificado TÜV o VDE).
• El cable de alimentación debe funcionar correctamente. No continúe utilizando el dispositivo si
existen señales visibles de deterioro en el cable de alimentación. Un cable deteriorado no debe
ser reparado, sino reemplazado.
• No conecte ni extraiga el cable de alimentación con las manos húmedas.
• Consulte siempre con un especializar cualificado para cualquier operación de mantenimiento o
reparación.
• Si no piensa utilizar el dispositivo durante un periodo prolongado de tiempo, apáguelo utilizando
el interruptor de encendido que se encuentra en la parte posterior del dispositivo (consulte la
sección llamada "Panel posterior").
• Extraiga la toma de alimentación si se producen tormentas.
Este símbolo advierte al usuario de la presencia de altos niveles de tensión utilizados
en el dispositivo, que podrían provocar descargas eléctricas.
ACCESSORIOS
1) Manual de instrucciones
2) Control remoto con batería incluída (CR2025)
3) Cable de alimentación
ANTEZ DE EMPEZAR
Estimado cliente,
Gracias por escoger el amplificador a válvulas Magnat MA 400.
Lea la siguiente información detenidamente antes de comenzar a utilizar su MA 400.
PRECAUCIONES IMPORTANTES DE SEGURIDAD
• Lea detenidamente el manual de instrucciones antes del uso y manténgalo en un lugar seguro.
• Este dispositivo debe utilizarse únicamente con voltaje de 230 V / 50 Hz AC.
• Utilice el dispositivo únicamente a temperatura ambiente, entre 0ºC y 40ºC.
• Asegúrese de que existe ventilación suficiente para el dispositivo. Debe existir un espacio mínimo
de 10 cm. entre los objetos situados en los laterales y las partes frontal y posterior del dispositivo.
• No cubra las ranuras de ventilación con ningún objeto (p. ej. cortinas, periódicos, etc.) para
asegurar la ventilación suficiente en el dispositivo. No coloque fuentes de calor, como radiadores,
hornos, llamas desnudas u otros dispositivos que generen calor en las proximidades del dispositivo.
• No exponga el dispositivo y el control remoto a derrames o salpicaduras de agua, o altos niveles
de humedad.
• El dispositivo tempoco debe utilizarse para colocar floreros u otros recipientes llenados de díquido.
• En caso de contacto con humedad o líquidos, retire inmediatamente el adaptador principal.
• Limpie el dispositivo utilizando únicamente un paño seco.
Este símbolo advierte al usuario de la existencia de notas importantes en el manual
de instrucciones adjunto que deben respetarse.
¡Atención! No abra es dispositivo!
Para evitar riesgos de incendio y descarga electrica, rogamos no
exponer este aparato a la lluvia o la humedas.
INSTRUCCIONES DE ELIMINACIÓN
De acuerdo con la Directiva Europea 2002/96/EC, todos los aparatos eléctricos y electrónicos deben
ser eliminados por medio de puntos de recogida locales e independientes. Respete la normativa local
y no elimine los aparatos usados junto a los residuos domésticos.
Eliminación de la batería
Las baterías usadas son un residuo peligroso y deben ser eliminadas de acuerdo con las normativas
actuales.
19
Page 20

ELEMENTOS OPERATIVOS Y CONEXIONES – PANEL FRONTAL ELEMENTOS OPERATIVOS Y CONEXIONES – PANEL POSTERIOR
E
1 ON/STBY
Enciende el dispositivo si se encuentra en el
modo de suspensión. Si el LED no se ilumina,
accione el interruptor de alimentación que se
encuentra en la parte posterior del dispositivo.
De igual forma, le permite apagar el dispositivo
si está encendido.
2 INDICADOR LED DE ESTADO
Esta pantalla iluminada indica 2 posibles
estados del MA 400:
• LED iluminado en verde
encendido. Los tubos han alcanzado la
temperatura correcta. El dispositivo está listo
para su uso.
• LED iluminado en rojo
encuentra en modo standby.
3 SOURCE (CONMUTADOR DE SELECCIÓN
DE ENTRADA)
Conmuta entre las distintas fuentes de audio:
CD: reproductor de CD.
: dispositivo de recepción de ondas de
TUNER
radio.
PHONO: reproductores con sistema magnético
(MM).
: otros dispositivos de audio (p. ej.
AUX
reproductores MD).
TAPE: grabador de cinta o cassette.
FRONT: Entrada frontal para dispositivos
portátiles
4 PANTALLA
El display muestra la siguiente información:
• Fase de calentamiento del tubo:
: El MA 400 está
: El MA 400 se
WWAARRMM UUPP
Esta fase durará aproximadamente 20
segundos, después de los cuales el
dispositivo se encenderá.
• Entrada de audio seleccionada:
CCDD TTUUNNEERR PPHHOONNOO AAUUXX TTAAPPEE
FFRROONNTT
• Silenciador de volumen:
VVOOLL 1155
MMUUTTIINNGG
• Ajuste del menú (consulte la página 22).
5 LINE-IN (FRONT)
Conector de entrada estéreo de 3,5 mm para un
dispositivo de audio auxiliar (p. ej. un
reproductor MP3, etc).
6 VOLUMEN/MENU
Girar: Para ajustar el volumen general de la
música.
Presionar: Abre el menú de ajuste del sonido y
configuración de las entradas. Para navegar por
el menú se debe girar el control VOLUME.
7 AURICULARES
Conector de salida estéreo de 6,3 mm para
auriculares. Los altavoces se desactivarán
durante el uso de este conector. Baje el
volumen antes de conectar los auriculares.
8 SENSOR DEL CONTROL REMOTO
Apunte a este sensor durante el uso del control
remoto.
1 BOTÓN DE ENCENDIDO
Enciende el dispositivo si se encuentra en el
modo de suspensión. Si el interruptor está en la
posición "OFF", el dispositivo se desconecta de
la alimentación principal.
2 CONEXIÓN DE ALIMENTACIÓN
Para conectar el cable de alimentación
suministrado. El fusible de seguridad debe
cambiarlo únicamente un profesional
capacitado.
3 TERMINALES DE ALTAVOZ
Para la conexión de altavoces estéreo con una
impedancia nominal de 4-8 ohmios (debe
considerarse la polaridad correcta). Consulte la
página 21.
CONEXIONES RCA ANALÓGICAS
Para conectar fuentes de audio analógicas.
Respete las marcas de colores de los
conectores y terminales. El rojo es siempre el
canal derecho.
4 SALIDA TAPE
Para conectar dispositivos de grabación
analógica de sonido (p. ej. un grabador de
cinta). La señal de la fuente de audio
seleccionada de nivel fijo es aplicable a esta
salida, es decir, es independiente de la posición
del mando de volumen.
20
5 ENTRADA TAPE
Para la conexión de un reproductor de cassette
o de cinta.
6 ENTRADA AUX
Conexión para otra fuente de audio (p. ej. un
reproductor MP3 o Minidisc).
7 ENTRADA TUNER
Conexión de un dispositivo de recepción de
radio.
8 ENTRADA DE CD
Conexión de un reproductor de CD.
9 ENTRADA PHONO
Conexión para un reproductor de grabación con
un sistema magnético (MM) o sistema MC con
salida de nivel alto (MC de salida alta).
10 CONEXIÓN A MASA DE PHONO
Conexión del cable de masa de phono para
evitar zumbidos.
Page 21

ELEMENTOS OPERATIVOS Y CONEXIONES – CONTROL REMOTO
E
• Retire la película protectora transparente situada en la parte inferior del compartimento de las pilas
antes de usar el control remoto por primera vez.
• Si las baterías se agotan después de un uso prolongado, cámbielas (tipo CR2025).
• A fin de evitar daños, se recomienda retirar las pilas cuando no se vaya a emplear el equipo por
un período prolongado.
PRIMEROS PASOS
• Coloque el MA 400 sobre una superficie uniforme. Respete las separaciones de seguridad según
lo especificado en "Instrucciones importantes de seguridad".
Importante: No colocar ningún objeto sobre el equipo (revistas, cajas de CD o discos, etc.). No
bloquear nunca la rejilla de ventilación de la parte superior del equipo.
• Conecte sus altavoces:
1 MASTER / 2 AMP
Enciende el dispositivo si se encuentra en el modo de
suspensión. Si el LED no se ilumina, accione el
interruptor de alimentación que se encuentra en la parte
posterior del dispositivo. De igual forma, le permite
apagar el dispositivo si está encendido.
El botón MASTER (Maestro) también permite encender
y apagar otros equipos pertenecientes a la gama M400
de Magnat (MCD 450, MT 420).
SELECCIÓN DE ENTRADA
3
Estos botones permiten seleccionar directamente cada
una de las entradas de sonido en forma individual. En
el display aparece la entrada activa.
MENU
4
Abre el menú de ajuste del sonido y configuración de las
entradas. Para navegar por el menú se utilizan las
teclas VOLUME.
5 VOLUME
Aumenta () o riduce () el volumen.
6 MUTE
Activa o desactiva el dispositivo.
Las teclas que no están marcadas con números se
reservan para el mando del reproductor CD Magnat
MCD 450 y del sintonizador Magnat MT 420, y no tienen
ninguna función relacionada con el MA 400.
Conecte los altavoces estéreos (impedancia de 4 a 8 ohmios) al panel posterior de la siguiente
forma:
Utilice sólo cables de altavoces de alta calidad, con una sección mínima de 1,5 - 2,5 mm². Pele
aproximadamente 10 mm de cable y trence los extremos. Afloje los tornillos del terminal e inserte
los extremos pelados en los orificios. Vuelva a apretar los tornillos del terminal. Asegúrese de que
mantiene la polaridad correcta.
También puede utilizar cables prefabricados con conectores banana o cocodrilo de 4 mm.
Respete además las instrucciones de uso de los altavoces que esté utilizando.
• Conecte sus fuentes de audio a las conexiones analógicas.
• Conecte el cable de alimentación suministrado al panel posterior e inserte el otro extremo en una
toma de 230V.
• En primer lugar, encender el conmutador de alimentación ubicado en la parte posterior. El equipo
pasa al modo standby.
• Encender el equipo con el control remoto o la tecla ON/STBY del frente.
• Una vez que se ha calentado el tubo, el dispositivo estará listo para su uso.
• Seleccione la fuente de audio que desee utilizando el selector de entradas.
21
Page 22

E
EL MENÚ DEL MA 400
ESPECIFICACIONES
Es posible ajustar cómodamente el sonido y la sensibilidad de las entradas mediante un menú.
• El menú se abre presionando la tecla MENU del control remoto o el control de volumen ubicado
en el frente.
• Es posible navegar por el menú y modificar los ajustes utilizando las teclas VOLUME del control
remoto o girando el control de volumen.
• Las opciones del menú se pueden confirmar en forma individual con la tecla MENU del control
remoto o presionando el control de volumen.
Se pueden efectuar los siguientes ajustes:
• Ajuste de bajos:
Seleccionar BASS en el menú. La reproducción de bajos se puede reforzar o atenuar en 5 niveles.
• Ajuste de agudos:
Seleccionar TREBLE en el menú. La reproducción de agudos se puede reforzar o atenuar en 5
niveles.
• Ajuste del balance:
Seleccionar BALANCE en el menú. El punto medio estéreo se puede ajustar hacia la izquierda o
la derecha en 10 niveles, respectivamente.
• Loudness (sonoridad):
Seleccionar LOUDNESS en el menú. Es posible encender o apagar la función.
• Sensibilidad de entrada:
Seleccionar INPUTGAIN en el menú. Con esta función se puede aumentar la sensibilidad de la
entrada seleccionada en 4 niveles. Esto permite adaptar fuentes de sonido con bajo nivel de salida
a otras fuentes de sonido.
Con la opción RESET del menú se recuperan los ajustes iniciales (todos los controles de sonido en
0, función de loudness apagada y sensibilidad de todas las entradas en 0 dB).
Con la opción EXIT se sale del menú.
CAMBIAR EL TUBO
Amplificador
Potencia de salida:
Potencia nominal 20 Hz – 20 kHz, THD < 1.0%, 4 Ohmios 2 x 40 W
20 Hz – 20 kHz, THD < 1.0%, 8 Ohmios 2 x 32 W
Potencia de pico 1 kHz, 4 Ohmios 150 W
Respuesta de frecuencia :
CD/Tuner/Aux/Line/Tape 8 Hz – 120 kHz (-3 dB)
20 Hz – 20 kHz (+/- 0,2 dB)
Phono 20 Hz – 20 kHz (+/- 0,3 dB)
Filtro subsónico: 16 Hz, 18 dB por octava
Distancia de voltaje sofométrico:
CD/Tuner/Aux/Line/Tape 95 dB
Phono 80 dB
Nivel/impedancia de entrada:
CD/Tuner/Aux/Line/Tape 550 mV / 10 kOhmios
Phono 5 mV / 47 kOhmios
Componentes:
Preamplificador de audio: 1 x ECC 88
Miscelánea
Voltaje de alimentación: 230 VAC/50 Hz
Potencia de entrada: Máximo 150 W
Suspensión <1,0 W
El equipo cuenta con un preamplificador de alta calidad formada por un tubo. Bajo condiciones
normales de uso, el tubo tiene una vida útil muy prolongada (entre 20.000 y 50.000 horas, como
mínimo).
Si es necesario de cambiar el tubo, consulte con un especialista.
Dimensiones (A x H x P):
Dispositivo principal: 430 x 91 x 287 mm
El dispositivo principal incluye elementos
operativos/ terminales de conexión: 430 x 91 x 330 mm
Control remoto: 54 x 140 x 11 mm
MANTENIMIENTO Y PROBLEMAS TÉCNICOS
Si encuentra algún problema técnico, póngase en contacto con su distribuidor especializado o con
Magnat Audio-Produkte GmbH, Tel.: 02234807-0.
Peso: 5,8 kg
Reservados los derechos de realizar cambios técnicos.
Para más información, visite nuestra web: http://www.magnat.de
22
Page 23

RUS
СОДЕРЖАНИЕ
23 Принадлежности
23 Перед включением
Важные указания по безопасности
Указания по утилизации
24/25 Элементы управления и разъемы
Передняя панель
Задняя сторона/разъемы
Пульт дистанционного управления
25 Включение
26 Меню MA 400
26 Замена ламп
26 Сервис и технические проблемы
26 Технические данные
ПРИНАДЛЕЖНОСТИ
1) Руководство по эксплуатации
2) Блок дистанционного управления, включая аккумуляторную батарею (CR2025)
3) сетевом кабеле
ВКЛЮЧЕНИЕМ
Уважаемый покупатель!
Благодарим Вас за решение приобрести ламповый усилитель Magnat MA 400.
Пожалуйста, внимательно прочитайте следующую информацию перед включением MA 400.
ВАЖНЫЕ УКАЗАНИЯ ПО БЕЗОПАСНОСТИ
• Перед использованием устройства внимательно прочитайте руководство по эксплуатации и
сохраните его.
• Это устройство предназначено исключительно для эксплуатации от переменного напряжения
230 В / 50 Гц.
• Эксплуатируйте устройство только при температуре окружающей среды/в помещении в
диапазоне от 5°C до 40°C.
• Позаботьтесь о достаточной вентиляции устройства. Необходимо соблюдать минимальное
расстояние от устройства к другим предметам в 10 см по бокам, сзади и сверху.
• Вентиляционные отверстия не должны закрываться предметами (например, занавесками,
газетой), чтобы обеспечить достаточную вентиляцию устройства. Не располагать вблизи
устройства источники тепла, такие как радиаторы, плиты, открытое пламя, которые
генерируют тепло.
• Не подвергать устройство и пульт ДУ воздействию воды, а также водяных капель и брызг и
высокой влажности воздуха.
• Кроме того, на устройство ни в коем случае не следует ставить вазы или другие сосуды,
наполненные жидкостью.
• В случае контакта с влагой или жидкостью немедленно отсоедините устройство от сети
питания.
• Вытирать устройство можно только сухой салфеткой.
• Не используйте чистящие средства или химические растворители, так как они могут
повредить поверхность.
• Никогда не открывайте устройство.
• В объем поставки входит сетевой кабель. Используйте только эти оригинальные
принадлежности для подачи питания или сетевой кабель, проверенный на предмет
безопасности (напр., сертификат ТЮФ или СНЭ).
• Сетевой кабель должен быть всегда готов к эксплуатации. Если на сетевом кабеле будут
обнаружены повреждения, эксплуатировать устройство больше нельзя. Поврежденный
кабель ремонтировать нельзя, его нужно заменить.
• Не присоединять и не отсоединять сетевой кабель влажными руками.
• Работами по техническому обслуживанию и ремонту устройства должны заниматься только
квалифицированные специалисты.
• Если устройство не используется в течение продолжительного времени, его следует
выключить с помощью сетевого выключателя на задней стороне устройства (см. главу
«Задняя сторона»).
• Во время грозы вынимать сетевой выключатель из розетки.
Этот символ предупреждает пользователя о том, что внутри устройства используется
высокое напряжение, которое может привести к опасным ударам тока.
Этот символ указывает пользователю устройства на то, что в прилагаемом
руководстве по эксплуатации имеются важные указания, которым обязательно
нужно следовать.
Не открывать! Опасность электрического удара!
Чтобы уменьшить опасность возгорания или электрического
удара, необходимо защищать устройство от дождя или влаги.
УКАЗАНИЯ ПО УТИЛИЗАЦИИ
Согласно европейской директиве 2002/96/EC все электрические и электронные приборы для
утилизации должны сдаваться отдельно в местные сборные пункты. Пожалуйста, выполняйте
местные предписания и не выбрасывайте старые устройства вместе с обычным домашним
мусором.
Утилизация батареек
Старые батарейки относятся к особым отходам и подлежат утилизации согласно действующим
предписаниям.
23
Page 24

ЭЛЕМЕНТЫ УПРАВЛЕНИЯ И РАЗЪЕМЫ – ПЕРЕДНЯЯ ПАНЕЛЬ ЭЛЕМЕНТЫ УПРАВЛЕНИЯ И РАЗЪЕМЫ – ЗАДНЯЯ СТОРОНА
RUS
1 ON/STBY
Включает устройство, если оно находится в
режиме ожидания. Если светодиод не горит,
нужно включить сетевой выключатель на
задней стороне устройства. И наоборот,
устройство можно переключить из режима
Power в режим ожидания.
2 СИД ИНДИКАЦИИ СОСТОЯНИЯ
Этот индикатор показывает 2 состояния, в
которых может находиться включенный
MA 400:
• СИД горит зеленым цветом: MA 400
включен. Устройство готово к эксплуатации.
• СИД горит красным цветом
находится в режиме ожидания.
SOURCE (ПЕРЕКЛЮЧАТЕЛЬ ВХОДНЫХ
3
ИСТОЧНИКОВ)
Производит переключение между разными
аудиоисточниками:
: Проигрыватель CD.
• CD
• TUNER: Радиоприемник.
• PHONO: Проигрыватель пластинок
магнитной системой (ММ).
: Еще один аудиоприбор (напр.,
• AUX
проигрыватель MD).
• TAPE: Ленточный или кассетный
магнитофон.
•FRONT: Передний вход для переносных
устройств.
4 DISPLAY
На дисплее отображается следующая
информация:
• Фаза нагрева лампы:
WWAARRMM UUPP
: MA 400
Эта фаза после включения устройства
продолжается в течение примерно 20
секунд.
• Выбранный аудиовход:
CCDD TTUUNNEERR PPHHOONNOO AAUUXX TTAAPPEE
FFRROONNTT
• Приглушение громкости:
VVOOLL 1155
MMUUTTIINNGG
• Установки меню (cмотри также стр. 26).
5 LINE-IN (FRONT)
Вход для контактного штекера 3,5 мм стерео
для дополнительного аудиоисточника МР3проигрыватель и т.п.
VOLUME/MENU
6
Вращение: Для регулирования общей
громкости воспроизведения музыки.
Нажатие: Вызывает меню для настройки
звучания и конфигурации входов. Навигация
в меню осуществляется вращением
регулятора VOLUME.
7 Наушники
Выход для контактного штекера 6,3 мм
стерео от наушников. При использовании
наушников динамики самостоятельно
отключаются. Если Вы подключаете
наушники, установите громкость на низкий
уровень.
8 ДАТЧИК ДЛЯ ДИСТАНЦИОННОГО
УПРАВЛЕНИЯ
Чтобы использовать пульт дистанционного
управления, цельтесь им в эту точку.
1 СЕТЕВОЙ ВЫКЛЮЧАТЕЛЬ
Включает устройство и переводит его в
режим ожидания. Если выключатель
находится в положении "OFF", устройство
отделено от сети.
2 ПОДКЛЮЧЕНИЕ К СЕТИ
Для подключения входящего в комплект
сетевого кабеля. Предохранитель должен
менять только квалифицированный
сервисный техник.
3 РАЗЪЕМЫ ДЛЯ ПОДКЛЮЧЕНИЯ
ДИНАМИКОВ
Для подключения пары стереодинамиков с
импедансом в 4-8 Ом с учетом правильной
полярности. Смотри также стр. 25.
АНАЛОГОВЫЕ ТЮЛЬПАННЫЕ РАЗЪЕМЫ
Для подключения аналоговых
аудиоисточников. Следите за цветовой
маркировкой разъемов и штекеров. Красный
– это всегда правый канал.
4
TAPE OUT
Для подключения приборов для аналоговой
звукозаписи (напр., ленточный магнитофон,
кассетный магнитофон). На этом выходе
сигнал выбранного аудиоисточника
обладает постоянным уровнем, то есть не
зависит от положения регулятора громкости.
5 ВХОД TAPE
Для подключения кассетного или ленточного
магнитофона.
24
6 ВХОД AUX
Подключение еще одного аудиоисточника
(напр., проигрывателя МР3 или минидисков).
7 Вход TUNER
Подключение радиоприемника.
8 ВХОД
Подключение проигрывателя CD.
9 ВХОД
Подключение проигрывателя пластинок с
магнитной системой (ММ) или системой МС
с высоким уровнем выхода (High Output MC).
10 ПОДКЛЮЧЕНИЕ НА МАССУ
Подключение массы на фонокабеле, для
предотвращения искажения звучания.
CD
PHONO
PHONO
Page 25

ЭЛЕМЕНТЫ УПРАВЛЕНИЯ И РАЗЪЕМЫ – ПУЛЬТ ДУ
RUS
ВКЛЮЧЕНИЕ
• Перед использованием пульта ДУ нужно вытащить прозрачный защитный язычок на нижнем
краю отсека для батареек.
• Если батарейки после продолжительного использования сядут, их нужно будет заменить (тип
CR2025).
• В целях предотвращения порчи пульта дистанционного управления вынимайте элементы
питания из устройства, если не планируете использовать его длительное время.
1 MASTER / 2 AMP
Включает устройство, если оно находится в режиме
ожидания. Если светодиод не горит, нужно включить
сетевой выключатель на задней стороне
устройства. И наоборот, устройство можно
переключить из режима Power в режим ожидания.
Кнопка MASTER включает и выключает также
другие устройства Magnat серии M400 (MCD 450,
MT 420).
ВЫБОР ВХОДА
3
При помощи этих кнопок можно напрямую выбирать
отдельные аудиовходы. Активный вход будет
отображаться на дисплее.
MENU
4
Вызывает меню для настройки звучания и
конфигурации входов. Навигация в меню
осуществляется кнопками VOLUME.
5 VOLUME
Увеличивает (▲)или уменьшает (▼) громкость..
6 MUTE
Отключает и снова включает звук.
Непронумерованные кнопки зарезервированы для
управления Magnat MCD 450 и MT 420 и не
задействованы на плеере MA 400.
• Установите MA 800 на ровном месте. Соблюдайте расстояния, которые указаны в «Важных
указаниях по безопасности».
Очень важно:Не размещайте никаких предметов (журналов, коробок с компакт-дисками или
пластинками и т. п.) сверху на устройстве. Ни в коем случае нельзя перекрывать доступ
воздуха через вентиляционные отверстия, расположенные в его верхней части!
• Подключите динамики:
Стереодинамики (импеданс от 4 до 8 Ом) подключаются на задней стороне устройства
следующим образом:
Используйте только качественные аудиокабели для динамиков с сечением минимум
1,5 – 2,5 мм². Зачистите изоляцию на кабелях на участке примерно в 10 мм и скрутите концы.
Ослабьте по очереди зажимные винты и вставьте концы без изоляции в отверстия по бокам.
Снова затяните зажимные винты. Обязательно следите за правильной полюсностью.
Вы также можете воспользоваться заранее разделанным кабелем с банановым штекером на
4 мм или зажимами.
Соблюдайте также руководство по эксплуатации используемых динамиков.
• Подключите аудиоисточники к аналоговым выходам.
• Подключите сетевой кабель к задней стороне устройства, а затем вставьте его в сетевую
розетку на 230 В.
• Для переведения прибора в режим ожидания переведите выключатель электропитания на
его тыльной стороне в положение "ВКЛ".
• Включите устройство через пульт дистанционного управления или с помощью кнопки
ON/STBY на передней панели.
• После фазы прогревания лампы устройство готово к эксплуатации.
• Выберите нужный Вам аудиоисточник с помощью переключателя.
25
Page 26

RUS
МЕНЮ MA 400
ТЕХНИЧЕСКИЕ ХАРАКТЕРИСТИКИ
Регулирование звучания и согласование входной чувствительности входов могут удобно
выполняться через меню.
• Меню вызывается через кнопку MENU на пульте дистанционного управления или
нажатием на регулятор громкости на передней панели.
• Навигация в пределах меню и изменение установок осуществляются через кнопки
VOLUME на пульте дистанционного управления или вращением регулятора громкости.
• Подтверждение отдельных пунктов меню через кнопку MENU на пульте дистанционного
управления или нажатием на регулятор громкости.
Возможны следующие установки:
• Базовая установка:
Выберите в меню BASS. Воспроизведение низких частот можно соответственно повышать
или уменьшать 5 шагами.
• Установка воспроизведения высоких частот:
Выберите в меню TREBLE. Воспроизведение высоких частот можно соответственно
повышать или уменьшать 5 шагами.
• Установка баланса:
Выберите в меню BALANCE. Центр стереозвучания можно устанавливать влево или вправо
соответственно 10 шагами
• Тонкомпенсация (автоматическая корректировка тембра):
Выберите в меню LOUDNESS. Функция может включаться или выключаться.
• Чувствительность входа:
Выберите в меню INPUTGAIN. Теперь можно увеличить чувствительность выбранного в
данный момент входа 4 шагами. Таким образом, можно согласовать источники звука с малым
уровнем выхода с другими источниками звука.
Через пункт меню RESET восстанавливаются основные настройки (все регуляторы тембра на
0, функция тонкомпенсации выключена и входная чувствительность всех входов 0 дБ).
Через пункт меню EXIT выполняется выход из меню.
ЗАМЕНА ЛАМП
Устройство оснащено высококачественным предварительным усилителем, собранным на
одной лампе. При эксплуатации в нормальных условиях срок службы ламп очень
продолжителен (мин. 20000 - 50000 часов).
Если необходимо все же заменить лампу, обратитесь в специализированный магазин.
Усилитель
Выходная мощность:
Номинальная мощность 20 Гц – 20 кГц, THD < 1.0%, 4 Ом 2 x 40 Вт
20 Гц – 20 кГц, THD < 1.0%, 8 Ом 2 x 32 Вт
Импульсная мощность 1 кГц, 4 Ом 150 Вт
Частотная характеристика:
CD/Tuner/Aux/Line/Tape 8 Гц – 120 кГц (-3 дБ)
20 Гц – 20 кГц (+/- 0,2 дБ)
Phono 20 Гц – 20 кГц (+/- 0,3 дБ)
Subsonic фильтр: 16 Гц, 18 дБ на октаву
Относительный уровень шумов:
CD/Tuner/Aux/Line/Tape 95 дБ
Phono 80 дБ
Чувствительность на входе / Входное полное сопротивление:
CD/Tuner/Aux/Line/Tape 550 mV / 10 кОм
Phono 5 mV / 47 кОм
Комплектация:
Предварительный усилитель проигрывателя пластинок: 1 x ECC 88
Прочее
Номинальное напряжение: 230 В перем. тока / 50 Гц
Потребляемая мощность:
макс. 550 Вт
Режим ожидания <1,0 Вт
Габаритные размеры (ШxВxГ): Основное устройство: 430 x 91 x 287 мм
Основное устройство, вкл. элементы управления
и соединительные зажимы: 430 x 91 x 330 мм
Пульт дистанционного управления: 54 x 140 x 11 мм
Вес: 5,8 кг
СЕРВИС И ТЕХНИЧЕСКИЕ ПРОБЛЕМЫ
Если возникнут технические проблемы, обратитесь в специализированный магазин или на
фирму Magnat Audio-Produkte GmbH, тел.: 02234807-0.
ВОЗМОЖНЫ ТЕХНИЧЕСКИЕ ИЗМЕНЕНИЯ.
С дополнительной информацией можно ознакомиться на нашем сайте: http://www.magnat.de.
26
Page 27

Wir gratulieren Ihnen! Durch Ihre kluge Wahl sind Sie Besitzer eines MAGNAT HiFi-Produktes geworden.
F
GB
D
Die Produkte werden während des gesamten Fertigungsvorganges laufend kontrolliert und geprüft. Im Servicefall beachten Sie bitte
folgendes:
1. Die Gewährleistungszeit beginnt mit dem Kauf des Produktes und gilt nur für den Erstbesitzer.
2. Während der Gewährleistungszeit beseitigen wir etwaige Mängel, die nachweislich auf Material- oder Fabrikationsfehler beruhen,
nach unserer Wahl durch Austausch oder Nachbesserung der defekten Teile. Weitergehende Ansprüche, insbesondere auf Minderung,
Wandlung, Schadenersatz oder Folgeschäden sind ausgeschlossen. Die Gewährleistungszeit wird von einer Garantieleistung durch
uns nicht berührt.
3. Am Produkt dürfen keine unsachgemäßen Eingriffe vorgenommen worden sein.
4. Bei Inanspruchnahme der Gewährleistung wenden Sie sich bitte zunächst an Ihren Fachhändler. Sollte es sich als notwendig
erweisen, das Produkt an uns einzuschicken, so sorgen Sie bitte dafür, dass • das Produkt in einwandfreier Originalverpackung
verschickt wird, • die Kontrollkarte ausgefüllt dem Produkt beiliegt • die Kaufquittung beigefügt ist.
5. Von der Gewährleistung ausgenommen sind: • Leuchtmittel • Röhren • Batterien/Akkus • Verschleißteile • Transportschäden, sichtbar
oder unsichtbar (Reklamationen für solche Schäden müssen umgehend bei der Transportfirma, Bahn oder Post eingereicht werden.)
• Kratzer in Metallteilen, Frontabdeckungen u.s.w. (Diese Defekte müssen innerhalb von 5 Tagen nach Kauf direkt bei Ihrem Händler
reklamiert werden.) • Fehler, die durch fehlerhafte Aufstellung, falschen Anschluss, unsachgemäße Bedienung (siehe
Bedienungsanleitung), Beanspruchung oder äußere gewaltsame Einwirkung entstanden sind. • Unsachgemäß reparierte oder
geänderte Geräte, die von anderer Seite als von uns geöffnet wurden. • Folgeschäden an fremden Geräten • Kostenerstattung bei
Schadensbehebung durch Dritte ohne unser vorheriges Einverständnis.
Congratulations! You have made a wise selection in becoming the owner of a MAGNAT HiFi equipment.
The equipments are checked and tested continously during the entire production process. In case you have problems with your
MAGNAT HiFi equipment, kindly observe the following:
1. The warranty period commences with the purchase of the component and is applicable only to the original owner.
2. During the warranty period we will rectify any defects due to faulty material or workmanship by replacing or repairing the defective
part at our discretion. Further claims, and in particular those for price reduction, cancellation of sale, compensation for damages or
subsequential damages, are excluded. The warranty period is not altered by the fact that we have carried out warranty work.
3. Unauthorized tampering with the equipment will invalidate this warranty.
4. Consult your authorized dealer first, if warranty service is needed. Should it prove necessary to return the component to the factory,
please insure that • the component is packed in original factory packing in good condition • the quality control card has been filled out
and enclosed with the component • your enclose your receipt as proof of purchase.
5. Excluded from the warranty are: • Illuminates • Valves • Batteries • Wear parts • Shipping damages, either readily apparent or
concealed (claims for such damages must be lodged immediately with forwarding agent, the railway express office or post office). •
Scratches in cases, metal components, front panels, etc. (You must notify your dealer directly of such defects within three days of
purchase.) • Defects caused by incorrect installation or connection, by operation errors (see operating instructions), by overloading or
external force. • Equipments which have been repaired incorrectly or modified or where the case has been opened by persons other
than us. • Consoquential damages to other equipments. • Reimbursement of cools, without our prior consent, when repairing damages
by third parties.
Toutes nos félicitations!
Vouz avez bien choisi et êtes le propriétaire heureux d’un produit MAGNAT.
Les appareils sont soumis pendant toutes les opérations de fabrications à des contrôles et vérifications constants. Si, pourtant, vous
rencontrez des difficulés avec votre appareil MAGNAT veuillez tenir compte de ce qui suit:
1. La garantie débute avec l’achat de l’appareil et est valable uniquement pour le premier propriétaire.
2. Pendant la période de garantie nous réparons les dommages provenant des défauts de matériel ou de fabrication et nous procédons,
à notre guise, à l’échange ou à la réparation des pièces défectueuses.
3. Aucune réparation impropre ne doit avoir été effectuée à l’appareil.
4. Lors d’une demande de garantie, veuillez vous adresser en premier lieu à votre distributeur. Si ce dernier décide que l’appareil doit
nous être retourné, veuillez tenir compte que: • l’appareil soit expédié dans son ermballage d’origine, • la carte de contrôle dûment
remplie soit jointe, • le bon d’achat soit joint.
5. Ne sont pas compris dans la garantie: • Matériel d´eclairage • Tubes • Batteries • Pièces d’usure • Avaries de transport, visibles ou
non (de telles réclamations doivent être faites immédiatement auprès du transporteur, du chermin de fer ou de la poste). • Des rayures
sur le boîtier, pièces métalliques, couvercles etc. (ces dommages doivent être signalés directement à votre distributeur dans les trois
jours suivant l’achat). • Dommages résultant d’un raccordement incorrect, maniement incorrect (voir instructions de service), surcharge
ou application de force extérieure.
• Appareils réparés non conformément ou modifiés et qui ont été ouverts par une personne autre que nous. • Dommages ultérieurs à
d’autres appareils. • Remboursement des frais à des tiers ayant effectué les réparations sans notre accord préalable.
GARANTIEKARTE
WARRANTY CARD
Typ/Type
Serien-Nr./Serial-No.
Name und Anschrift des Händlers/Stempel
Name and address of the dealer/stamp
Käufer/Customer
Name/Name
Straße/Street
PLZ, Ort/City
Land/Country
Kaufdatum/buying date
Nur gültig in Verbindung mit Ihrer Kaufquittung!
No warranty without receipt!
Page 28

Magnat Audio-Produkte GmbH
Lise-Meitner-Str. 9 • D-50259 Pulheim • Germany
Tel. +49 (0) 2234 / 807 - 0 • Fax +49 (0) 2234 / 807 - 399
Internet: http://www.magnat.de
 Loading...