

Page 1

CSB1000
Wichtige Hinweise zur Installation / Garantieurkunde
Important notes for installation / warranty card
Mode d’emploi / certicat de garantie
Avvertenze importanti per l’installazione / certifcato di garanzia
Notas importantes sobre la instalación / certicado de garantía
Важная информация по инсталляции / гарантия
Page 2

®
The
Bluetooth
such marks by Magnat Audio-Produkte GmbH is under license. Other trademarks and trade names are those of
their respective owners.
Qualcomm aptX is a product of Qualcomm Technologies International, Ltd.
Qualcomm is a trademark of Qualcomm Incorporated, registered in the United States and other countries,
used with permission.
aptX is a trademark of Qualcomm Technologies International, Ltd., registered in the United States and other
countries, used with permission.
Qualcomm is a trademark of Qualcomm Incorporated, registered in the United States and other countries,
used with permission.
AllPlay and the AllPlay icon are trademarks of Qualcomm Connected Experiences, Inc., and used with
permission.
Manufactured under license from Dolby Laboratories. Dolby, Dolby Audio, and the double-D symbol are
trademarks of DolbyLaboratories.
The terms HDMI and HDMI High-Denition Multimedia Interface, and the HDMI Logo are trademarks or registered
trademarks of HDMI Licensing LLC in the United States and other countries.
® word mark and logos are registered trademarks owned by Bluetooth SIG, Inc. and any use of
Bitte führen Sie das Gerät am Ende seiner Lebensdauer den zur Verfügung stehenden Rückgabe- und
Sammelsystemen zu.
At the end of the product’s useful life, please dispose of it at appropriate collection points provided in your
country.
Une fois le produit en n de vie, veuillez le déposer dans un point de recyclage approprié.
This symbol means that the product contains batteries covered by European Directive 2013/56/EU which
cannot be disposed of with normal household waste. Inform yourself about the local separate collection system
for electrical and electronic products and batteries. Follow local rules and never dispose of the product and
batteries with normal household waste. Correct disposal of old products and batteries helps prevent negative
consequences for the environment and human health.
Your product is designed and manufactured with high quality materials and components, which can be recycled
and reused.
Page 3
12
20
28
36
44
4
Abbildungen/Illustrations
52
Page 4

Sehr geehrter MAGNAT-Kunde,
vielen Dank dafür, dass Sie sich für ein Magnat-Produkt entschieden haben. Wir möchten Ihnen hierzu von unserer Seite recht
herzlich gratulieren. Durch Ihre kluge Wahl sind Sie Besitzer eines Qualitätsproduktes geworden, das weltweite Anerkennung
ndet.
WICHTIGE SICHERHEITSHINWEISE:
Bitte lesen Sie die Bedienungsanleitung vor der Inbetriebnahme aufmerksam durch. Die Bedienungsanleitung enthält wichtige
Hinweise zum Betrieb und zur Sicherheit. Befolgen Sie unbedingt alle Hinweise. Bewahren Sie die Bedienungsanleitung gut auf.
• WARNHINWEISE: Alle Warnzeichen auf dem Gerät, dem Zubehör und in der Bedienungsanleitung müssen beachtet werden.
• WÄRMEEINWIRKUNG: Betreiben Sie das Gerät mit Zubehör nur im Temperaturbereich von 10°C bis 45°C.
Das Gerät sollen nicht in der Nähe von Wärmequellen aufgestellt werden (Heizkörper, Öfen, Heizstrahler, offene Flammen). Beim
Aufstellen in Nähe von Verstärken sollte ein Mindestabstand von 10cm nicht unterschritten werden.
Stellen Sie keine offenen Flammen, wie z. B. Kerzen, auf das Gerät.
Achten Sie auf eine ausreichende Belüftung des Gerätes. Das Gerät darf nicht abgedeckt sein, z.B. durch Vorhänge, Gardinen.
Halten Sie ausreichend (ca. 20 cm) Abstand zu Wänden.
• EINFLUSS VON FEUCHTIGKEIT: Das Gerät darf nicht Tropf- oder Spritzwasser ausgesetzt werden. Ebenfalls darf es nicht zum
Abstellen von Vasen oder anderen mit Feuchtigkeit gefüllten Behältern benutzt werden. Setzen Sie das Gerät weder Wasser noch
hoher Luftfeuchtigkeit aus. Es besteht die Gefahr eines Stromschlags. Bei Kontakt mit Feuchtigkeit oder Flüssigkeiten sofort den
Netzstecker ziehen.
• FREMDKÖRPER: Achten Sie darauf, dass keine Fremdkörper durch die Öffnungen des Gerätes ins Innere gelangen. Sie könnten
Kurzschlüsse auslösen und auch einen Stromschlag und Brand.
• REINIGUNG: Bitte verwenden Sie ein trockenes und weiches Tuch und keine Reinigungsmittel, Sprays oder chemische
Lösungsmittel, da sonst die Oberäche beschädigt werden könnte.
• STROMANSCHLUSS: Bitte beachten Sie die Spannungswerte auf den Hinweisschildern. Das Netzteil des Gerätes darf nur mit den
auf den Schildern angegebenen Spannungswerten und Frequenzwerten betrieben werden.
• BLITZSCHUTZ/VORSICHTSMASSNAHMEN: Wird das Gerät längere Zeit (z. B. im Urlaub) nicht benutzt, sollte es durch Ziehen
der Netzstecker vom Netz getrennt werden. Das Gerät sollte auch bei Gewitter vom Netz getrennt werden. Somit wird eine
Beschädigung durch Blitzschlag und Überspannung verhindert.
• NETZKABEL: Das Netzkabel muss immer betriebsbereit sein und sollte nur so verlegt sein, dass niemand auf das Netzkabel treten
kann. Auch darf es nicht durch Gegenstände eingeklemmt sein, die das Kabel beschädigen können. Bei Verwendung von Steckern
und Mehrfachsteckdosen ist darauf zu achten, dass das Kabel an der Stelle, wo es aus der Steckdose kommt, nicht geknickt wird.
Das Netzkabel nicht mit feuchten Händen anschließen oder entfernen.
Der Netzstecker dient als Abschalteinrichtung und muss immer frei zugänglich sein.
• ÜBERLASTUNG: Steckdosen, Mehrfachsteckdosen und Verlängerungskabel sollten nicht überlastet werden. Bei Überlastung
besteht Stromschlag- und Brandgefahr.
• AUFSTELLUNG: Bitte beachten Sie die Montageanweisung.
Das Gerät sollte nur auf festem Untergrund und nicht auf bewegliche Untergestelle gestellt oder montiert werden, da sonst
Verletzungsgefahr besteht.
• Benutzen Sie nur das beigepackte oder vom Hersteller speziziertes Originalzubehör.
• Das Gerät darf nur mit dem mitgelieferten Netzteil („Dongguan Dongsong Electronic Co., Ltd., DYS602-210309W“) betrieben
werden.
• Batterien und Akkus dürfen nicht großer Hitze ausgesetzt werden, wie z. B. Sonnenschein, Feuer o. ä.
• Es besteht Explosionsgefahr, wenn die Batterie falsch eingesetzt wird. Ersetzen Sie die Batterie nur durch den selben oder
gleichwertigen Typ.
• GEFAHR DES VERSCHLUCKENS VON BATTERIEN!
• Das Gerät/die Fernbedienung können eine münzförmige/Knopf-Batterie enthalten, die verschluckt werden kann. Halten Sie die
Batterie zu jeder Zeit außerhalb der Reichweite von Kindern. Wird die Batterie verschluckt, kann dies zu schweren Verletzungen
oder zum Tod führen. Schwere innere Verbrennungen können innerhalb von 2 Stunden nach dem Verschlucken auftreten.
• Suchen Sie umgehend einen Arzt auf, wenn der Verdacht besteht, dass eine Batterie verschluckt oder in einen Teil des Körpers
eingeführt wurde.
• Wenn die Batterien gewechselt werden, halten Sie alle neuen und gebrauchten Batterien außerhalb der Reichweite von Kindern.
Vergewissern Sie sich, dass das Batteriefach nach einem Batteriewechsel wieder vollständig geschlossen ist.
• Kann das Batteriefach nicht vollständig geschlossen werden, verwenden Sie das Produkt nicht weiter. Halten Sie das Produkt
außerhalb der Reichweite von Kindern und kontaktieren Sie den Hersteller.
SCHÄDEN, DIE VOM FACHMANN BEHOBEN WERDEN MÜSSEN:
Bei den folgenden Schäden sollte das Gerät sofort vom Netz getrennt werden und ein Fachmann mit der Reparatur beauftragt werden:
· Bei sichtbaren Beschädigungen des Netzkabels darf das Gerät nicht mehr betrieben werden. Ein beschädigtes Kabel darf nicht
repariert, sondern muss ausgetauscht werden.
· Beschädigungen der Netzbuchse am Gerät.
· Wenn Feuchtigkeit oder Wasser in das Gerät gelangt ist oder Gegenstände in das Gerät gefallen sind.
· Wenn das Gerät heruntergefallen ist und das Gehäuse beschädigt ist
· Wenn das Gerät nicht richtig funktioniert, obwohl man alle Hinweise in der Bedienungsanleitung beachtet hat.
Es dürfen nur nachträgliche Änderungen vorgenommen werden, die vom Hersteller genehmigt sind.
Es dürfen zur Reparatur nur Originalersatzteile verwendet werden.
Nach einer Reparatur sollte das Gerät auf Sicherheit überprüft werden, um eine ordnungsgemäße und sichere Funktion
sicherzustellen.
Reparaturen müssen immer qualizierten Fachkräften überlassen werden, da man sich sonst gefährlichen Hochspannungen oder
anderen Gefahren aussetzt.
4
Page 5
Das Dreieck mit Blitzsymbol warnt den Benutzer, dass innerhalb des Gerätes hohe Spannungen verwendet werden, die
gefährliche Stromschläge verursachen können.
Das Dreieck mit Ausrufezeichen macht den Benutzer darauf aufmerksam, dass in der beigefügten Bedienungsanleitung
wichtige Betriebs- und Wartungsanweisungen (Reparatur) enthalten sind, die unbedingt beachtet werden müssen.
Nicht öffnen! Gefahr des elektrischen Schlages!
ACHTUNG: Weder das Gehäuse/Netzteile öffnen noch Abdeckungen entfernen, um Stromschläge
zu vermeiden. Keine Reparatur durch den Benutzer. Reparatur nur durch qualizierte Techniker!
Keine Steckdosen oder Verlängerungskabel benutzen, die den Stecker des Gerätes nicht vollständig
aufnehmen.
Verwenden Sie nur das in der Bedienungsanleitung angegebene Netzteil.
Wechselspannung.
Gleichspannung.
Polarität des DC-Steckernetzteils
Gerät der Schutzklasse II mit doppelter Isolation. Kein Schutzerdungsanschluss vorhanden.
ENTSORGUNGSHINWEISE
Gemäß der europäischen Richtlinie 2012/19/EU müssen alle elektrischen und elektronischen Geräte über lokale Sammelstellen
getrennt entsorgt werden. Bitte beachten Sie die lokalen Vorschriften, und entsorgen Sie Ihre Altgeräte nicht mit dem normalen
Hausmüll.
BATTERIE-ENTSORGUNG:
Alt-Batterien sind Sondermüll und müssen gemäß den aktuellen Vorschriften entsorgt werden.
KONFORMITÄTSERKLÄRUNG
Hiermit erklärt die Firma Magnat Audio-Produkte GmbH, dass sich das Gerät Magnat CSB1000 in Übereinstimmung mit den
grundlegenden Anforderungen und anderen relevanten Vorschriften der Richtlinie 2014/53/EU befindet. Die Konformitätserklärung finden
Sie unter www.magnat.de im Downloadbereich des Gerätes.
BESTIMMUNGSGEMÄSSER GEBRAUCH
Dieses Gerät ist nur für die Verwendung im Haus konzipiert.
INHALT:
(A) 1 St. Soundbar
(B) 1 St. Subwoofer
(C) 1 St. Netzteil für die Soundbar inkl. Netzkabel
(D) 1 St. Netzkabel für den Subwoofer
(E) 1 St. Fernbedienung einschließlich Batterie (Knopfzelle CR 2025)
(F) 1 St. Stereo-Audiokabel, beidseitig 3,5 mm Klinkenstecker, 1 m
(G) 1 St. Optisches Digitalkabel, 1,5 m
(H) 1 St. Wandhalterung mit Befestigungsmaterial
(I) 1 St. Bedienungsanleitung
5
Page 6

AUSPACKEN DES SETS
Bitte die Lautsprecher und das Zubehör vorsichtig auspacken und den Inhalt des Originalkartons anhand der Liste oben überprüfen.
Im Falle eines Transportschadens wenden Sie sich bitte an Ihren Lieferanten. Bewahren Sie das Verpackungsmaterial gut auf. Die
Originalverpackung ermöglicht bei einem späteren Umzug oder im Servicefall einen problemlosen Transport.
AUFSTELLEN DER SYSTEMKOMPONENTEN
Soundbar (A): Die Soundbar sollte direkt unter dem Fernseher mittig platziert werden. Steht der Fernseher auf einem Regal oder
Sideboard, kann die Soundbar direkt vor dem Gerät aufgestellt werden. Ist das Fernsehgerät an der Wand montiert, sollte auch der
Soundbar mit der mitgelieferten Wandhalterung direkt unterhalb des Bildschirms angebracht werden.
Subwoofer (B): Der Subwoofer sollte auf dem Boden in der Nähe des Soundbars aufgestellt werden, üblicherweise rechts oder
links vom Fernsehgerät. Der Abstand zum Bildschirm sollte bei Röhrenfernsehern 100 cm und bei Flachbildschirmen 50 cm nicht
unterschreiten.
Die Verwendung der mitgelieferten Wandhalterungen für den Soundbar verdeutlicht Abb. 1.
a. Montieren Sie den Wandhalterungsbügel wie gezeigt unterhalb des TV-Gerätes. Bitte verwenden Sie für das Wandmaterial
geeignete Befestigungsschrauben und Dübel (nicht im Lieferumfang enthalten).
b. Hängen Sie nun die Soundbar mit den vormontierten Befestigungsbolzen in die passenden Aussparungen des
Wandhalterungsbügels.
Wichtiger Hinweis / Sicherheitshinweis: Für die Verwendung anderer Wandhalterungen / Befestigungen ist allein der Kunde
verantwortlich. Ebenso ist der Kunde alleinverantwortlich für die sichere Befestigung der Halterung an der Wand und die Auswahl des
passenden Montagematerials (z. B. Schrauben, Dübel) unter Berücksichtigung des Gewichtes und der Konstruktion des Soundbars
und der Beschaffenheit der Wand.
SYSTEMINSTALLATION
Anschluss eines Fernsehgerätes (Abb. 2):
Das System CSB1000 ist zum direkten Anschluss an ein TV-Gerät konzipiert.
Hierzu stehen drei Möglichkeiten zur Auswahl:
a) Anschließen des Fernsehgerätes an den HDMI®-Anschluss HDMI / ARC (Abb. 5, Pos. 14):
Schließen Sie Ihr Fernsehgerät an diesen Anschluss an, wenn er über einen HDMI®-Anschluss mit ARC-Funktion verfügt (Audio
Return Channel, HDMI®-1.4-Standard).
Wenn der HDMI®-Anschluss Ihres Fernsehgeräts zusätzlich die CEC-Funktion beherrscht (Consumer Electronics Control), können
grundlegende Funktionen der Soundbar wie Ein- und Ausschalten, Lautstärke und Stummschalten über die Fernbedienung Ihres
Fernsehgeräts gesteuert werden. Welche CEC-Funktionen zur Verfügung stehen ist von Fernseher zu Fernseher unterschiedlich
und im Einzelfall zu prüfen. Lesen Sie hierzu bitte die Bedienungsanleitung Ihres Fernsehgeräts. Die meisten Hersteller nutzen
einen eigenen Namen für die CEC-Funktion, er endet meist auf den Begriff „Link“. Achtung: die CEC-Funktion steht aus technischen
Gründen nur beim Anschluss über HDMI® zur Verfügung.
Eventuell müssen diese Funktionen im Menü des Fernsehgerätes aktiviert werden. Durch die eingebauten Dolby®-Dekoder können
auch Dolby®-Digital-codierte Signale wiedergegeben werden. Das notwendige Anschlusskabel ist nicht im Lieferumfang enthalten.
b) Anschließen des Fernsehgerätes an den optischen Digitaleingang DIGITAL IN (Abb. 5, Pos. 9):
Verwenden Sie das mitgelieferte optische Kabel und verbinden Sie den digitalen Audioausgang Ihres Fernsehgerätes mit dem
Audioeingang DIGITAL IN (Abb. 5, Pos. 9) der Soundbar. Durch die eingebauten Dolby®-Dekoder können auch Dolby®-Digital
codierte Signale wiedergegeben werden.
c) Anschließen des Fernsehgerätes an den Audioeingang AUX IN (Abb. 5, Pos. 10):
Verwenden Sie das mitgelieferte Audiokabel und verbinden Sie den Audioausgang Ihres Fernsehgerätes mit dem Audioeingang
AUXIN (Abb. 5, Pos. 10). Sollte Ihr Fernsehgerät über einen Audioausgang mit Festpegel verfügen, ist dieser dem Audioausgang mit
variablem Pegel vorzuziehen.
Anschluss weiterer Geräte an die Soundbar (Abb. 3):
Anschließen einer analogen oder digitalen Audioquelle an die Soundbar:
An den analogen Eingang AUX IN (Abb. 5, Pos. 10) und an den digitalen Eingängen DIGITAL IN (Abb. 5, Pos. 9) der Soundbar können
auch weitere Audioquellen angeschlossen werden, wie z. B. CD-Player, MP3-Player, Sat-Receiver. Verfahren Sie hierzu wie in den
obigen Abschnitten b) und c) beschrieben.
6
Page 7

Anschließen von HDMI-Quellen (Audio/Video) an die Soundbar:
An die HDMI-Eingänge HDMI1, HDMI2 und HDMI3 (Abb. 5, Pos. 11, 12, 13) können bis zu drei weitere HDMI-Quellen
angeschlossen werden (z.B. BD/DVD-Player, SAT-Receiver, Spielekonsole). Das Audiosignal der jeweiligen HDMI-Quelle wird
über das CSB1000-System wiedergegeben, das Videosignal wird an den HDMI-Ausgang (HDMI OUT (ARC), Abb. 5, Pos. 14)
weitergeleitet.
In dieser Konguration muss am Fernsehgerät der HDMI-Eingang ausgewählt werden, der mit dem HDMI-Ausgang der Soundbar
(Abb. 5, Pos. 14) verbunden ist.
Wichtig: Der USB-Anschluss (Abb. 5, Pos. 8) ist ausschließlich für System-Updates vorgesehen und hat darüber hinaus keine
Funktion.
Anschließen der Stromversorgung der Soundbar:
Zum Lieferumfang gehört ein universelles, externes Netzteil (C), das mit 110 – 240 V/AC 50/60 Hz arbeitet. Das in Ihrem Land
verwendete Netzkabel könnte jedoch anders sein. Falls das Netzkabel nicht zu Ihren Steckdosen passen sollte oder Sie sich nicht
sicher sind, wenden Sie sich bitte an Ihren Magnat-Fachhändler.
1. Verbinden Sie das Ausgangskabel (Klinkenkupplung) des externen Netzteils mit der Stromversorgungsbuchse der Soundbar
(Abb. 5, Pos. 7).
2. Stecken Sie das Netzkabel in die Buchse am Netzteil.
3. Stecken Sie das Netzkabel in die Steckdose. Achten Sie darauf, dass Sie den zur Steckdose passenden Netzstecker ver wenden
(siehe Hinweis oben).
Anschließen der Stromversorgung des Subwoofers:
Zum Lieferumfang gehört das am weitesten verbreitete Netzkabel. Das in Ihrem Land verwendete Netzkabel könnte jedoch anders
sein. Falls das Netzkabel nicht zu Ihren Steckdosen passen sollte oder Sie sich nicht sicher sind, wenden Sie sich bitte an Ihren
Magnat-Fachhändler.
1. Stecken Sie das 2polige Netzkabel in die Netzbuchse am Verstärker des Subwoofers (Abb. 6b, Pos. 16).
2. Stecken Sie das Netzkabel in die Steckdose. Achten Sie darauf, dass Sie den zur Steckdose passenden Netzstecker verwenden
(siehe Hinweis oben).
ERSTE INBETRIEBNAHME, DRAHTLOSE KOPPLUNG DER SOUNDBAR MIT DEM SUBWOOFER:
Nachdem alle Signalkabel und die Stromversorgungen für Soundbar und Subwoofer angeschlossen sind, schalten Sie bitte die
Soundbar mit der Fernbedienung (Abb. 7, Pos. 18) oder am seitlichen Bedienfeld (Abb. 4b, Pos. 4) ein.
Bei jedem Einschalten verbindet sich die Soundbar automatisch mit dem Subwoofer:
Die LED-Zustandsanzeige an der Soundbar (Abb. 4a, Pos. 1) erlischt. Die LED-Zustandsanzeige des Subwoofers (Abb. 6a, Pos. 15)
wechselt von rot auf grün.
Schaltet sich der Subwoofer nicht automatisch ein, oder blinkt die LED-Zustandsanzeige am Subwoofer grün, ist die Verbindung
fehlgeschlagen. In diesem Fall muss die Verbindung manuell hergestellt werden. Gehen Sie wie folgt vor:
- Wählen Sie mit der Fernbedienung den Eingang AUX (Abb. 7, Pos. 24)
- Drücken Sie auf der Fernbedienung die Taste NIGHT (Abb. 7, Pos. 27) für 5 sec. Im Display erscheint WPAIR.
- Drücken Sie nun die Taste CONNECT auf der Rückseite des Subwoofers (Abb. 6b, Pos. 17). Die LED-Zustandsanzeige am Subwoofer
blinkt während des Verbindungsaufbaus grün.
- Bei erfolgreicher Kopplung erscheint SUCCE im Display und die LED-Zustandsanzeige am Subwoofer leuchet dauerhaft grün.
- Erscheint im Display FAIL, muss der Vorgang wiederholt werden.
BEDIENUNG
Bedienelemente der Soundbar (Frontseite) (Abb. 4a):
(1) LED-Zustandsanzeige: Diese LED leuchtet rot, wenn sich das Gerät im Standby-Modus bendet.
(2) LED Display: Im Display werden diverse Informationen angezeigt:
- Gewählter Audio Eingang
- Sound- und Menu-Einstellungen
- Tonformat: Wird ein Dolby Digital Signal dekodiert, erscheint im Display kurz DOLBY. Bei inkompatiblen Tonformaten wird im
Display ERROR angezeigt, es erfolgt keine Wiedergabe.
Das Display schaltet sich ca. 5 Sec. nach der letzten Bedienung aus.
(3) Sensor für Fernbedienung: Um die Fernbedienung zu benutzen, zielen Sie bitte auf diese Stelle
7
Page 8

Bedienelemente der Soundbar (Seite) (Abb. 4b):
(4) ON/STBY: Schaltet das Gerät ein, wenn es sich im Standby-Modus bendet. Umgekehrt kann das Gerät vom Betriebsmodus auf
Standby geschaltet werden.
Ist das Gerät vor dem Ausschalten über WLAN mit einem Netzwerk verbunden, schaltet die Soundbar bei kurzem Druck in den
Netzwerk-Bereitschaftsmodus. Im Display wird NET STBY angezeigt. Bei erneutem Einschalten ist dann die Netzwerkverbindung
sofort verfügbar. Zudem kann das Gerät auch über die App durch Abspielen einer verfügbaren Quelle automatisch eingeschaltet
werden.
Ein langer Druck der Taste schaltet das Gerät in den ECO Standby-Modus. Die Netzwerkverbindung wird dadurch getrennt.
Wird das Gerät längere Zeit nicht benutzt, sollte das Gerät in den ECO Standby-Modus geschaltet werden, da hier die Standby-
Leistungsaufnahme geringer ist. Nach dem erneuten Einschalten aus dem ECO Standby-Modus steht das Gerät erst nach ca. 45
Sekunden wieder im Netzwerk zur Verfügung.
Ist das Gerät vor dem Ausschalten nicht mit einem Netzwerk verbunden, wird die Soundbar immer in den ECO Standby-Modus
geschaltet.
(5) VOLUME: Erhöht (+) oder verringert (-) die Lautstärke.
(6) SOURCE: Wählt den Eingang.
Bedienelemente des Subwoofers (Frontseite, Abb. 6a):
(15) LED-Zustandsanzeige: Diese LED leuchtet rot, wenn sich das Gerät im Standby-Modus bendet. Die LED leuchtet grün, wenn sich
der Subwoofer im Betriebsmodus bendet. Siehe auch Abschnitt „Erste Inbetriebnahme“.
Bedienelemente des Subwoofers (Rückseite, Abb. 6b):
(17) CONNECT: Startet den manuellen Kopplungsmodus des Subwoofers. Siehe auch Abschnitt „Erste Inbetriebnahme“.
Bedienung mit der System-Fernbedienung (Abb.7):
(18) ON/STBY: Schaltet das Gerät ein, wenn es sich im Standby-Modus bendet. Umgekehrt kann das Gerät vom Betriebsmodus auf
Standby geschaltet werden.
Ist das Gerät vor dem Ausschalten über WLAN mit einem Netzwerk verbunden, schaltet die Soundbar bei kurzem Druck in den
Netzwerk-Bereitschaftsmodus. Im Display wird NET STBY angezeigt. Bei erneutem Einschalten ist dann die Netzwerkverbindung
sofort verfügbar. Zudem kann das Gerät auch über die App durch Abspielen einer verfügbaren Quelle automatisch eingeschaltet
werden.
Ein langer Druck der Taste schaltet das Gerät in den ECO Standby-Modus. Die Netzwerkverbindung wird dadurch getrennt.
Wird das Gerät längere Zeit nicht benutzt, sollte das Gerät in den ECO Standby-Modus geschaltet werden, da hier die Standby-
Leistungsaufnahme geringer ist. Nach dem erneuten Einschalten aus dem ECO Standby-Modus steht das Gerät erst nach ca. 45
Sekunden wieder im Netzwerk zur Verfügung.
Ist das Gerät vor dem Ausschalten nicht mit einem Netzwerk verbunden, wird die Soundbar immer in den ECO Standby-Modus
geschaltet.
(19) HDMI/ARC: Wählt den Audio-Eingang HDMI/ARC.
(20) HDMI 1/2/3: Wählt die zusätzlichen Audio/Video-Eingänge HDMI 1, 2, 3.
(21) BT: Wählt den Audio-Eingang BLUETOOTH. Ein langer Druck auf diese Taste schaltet das Gerät in den Bluetooth Pairing-Modus.
(22) WL AN: Wählt den Netzwerk-Eingang. Bitte beachten Sie den Abschnitt „Verbinden des Gerätes mit einem Netzwerk“.
(23) DIGITAL: Wählt den Audio-Eingang DIGITAL IN.
(24) ANALOG: Wählt den Audio-Eingang AUX IN.
(25) MU TE: Schaltet den Ton stumm und wieder ein.
(26) VOLUME: Erhöht (+) oder verringert (-) die Lautstärke.
(27) NIGHT: Schaltet einen Wiedergabemodus mit reduzierter Dynamik und angepasstem Frequenzgang für lautstärkeempndliche
Situationen (z.B. später Abend o.ä.) ein bzw. aus.
(28) SU RR: Schaltet die 3D-Surroundsound-Funktion ein bzw. aus.
(29) SOUND: Wählt unterschiedliche Soundeinstellungen:
LINEAR: Lineare Frequenzgang-Einstellung
MUSIC: Optimiert den Frequenzgang des Gerätes für die Musikwiedergabe.
MOVIE: Optimiert den Frequenzgang des Gerätes für die Filmtonwiedergabe.
VOCAL: Hebt den Stimmenbereich für besonders gute Sprachverständlichkeit hervor.
(30) MENU: Öffnet das Einstellungsmenu der Soundbar
Folgende Einstellungen können gewählt und mit den VOL+/- Tasten (26) geändert werden. Ein erneuter Druck auf Menu bestätigt
die Einstellung.
SUB: Erhöht (+) oder verringert (-) die Lautstärke des Subwoofers.
EQ: Klanganpassung an unterschiedliche Platzierungen der Soundbar
WALL: Diese Einstellung optimiert den Klang, wenn die Soundbar an der Wand montiert ist.
DESK: Diese Einstellung optimiert den Klang, wenn die Soundbar auf einem Regal vor oder unter dem Fernseher platziert ist.
8
Page 9

ASTBY: Um Strom zu sparen schaltet sich das Gerät nach ca. 15 Min. ohne Eingangssignal automatisch ab. Diese Funktion kann
ausgeschaltet werden, bei Auslieferung ist sie eingeschaltet.
RE SET: Setzt alle Einstellungen auf Werkseinstellung zurück.
EXIT: Beendet das Einstellungsmenu.
Wiedergabesteuerung im WLAN-/Bluetooth-Modus:
(31) TITELSPRUNG ZURÜCK: Einmaliges Drücken startet den aktuell abgespielten Titel von vorne. Durch mehrmaliges Drücken
springt die Wiedergabe zu vorherigen Titeln.
(3 2) PL AY/ PAU SE : Pausiert den aktuell abgespielten Titel bzw. setzt die Wiedergabe fort.
(33) TITELSPRUNG VOR: Wählt die nächsten Titel aus.
Verbinden des Geräts mit einer Bluetooth-Audioquelle:
Schalten Sie die Soundbar mittels Fernbedienung auf den Bluetooth-Modus. Wenn vorher bereits eine Kopplung mit einem BluetoothQuellgerät bestand, wird selbsttätig versucht, die Verbindung mit diesem Gerät wiederherzustellen. Dabei kann es vorkommen, dass
Sie die Wiederaufnahme der Verbindung am Quellgerät manuell bestätigen müssen.
Wenn keine vorherige Kopplung bestand oder die Verbindung nicht wiederhergestellt werden kann, aktiviert die Soundbar automatisch
den Kopplungs-Modus, auch Pairing-Modus genannt. Um die Soundbar manuell in den Pairing-Modus zu schalten, halten Sie die Taste
BT (Abb. 7, Pos. 22) auf der Fernbedienung gedrückt. Solange der Pairing-Modus aktiv ist, blinkt die Displayanzeige BT.
Schalten Sie nun den Bluetooth-Modus Ihres Quellgeräts ein. Das Soundbar wird in der Liste mit Bluetooth-Geräten als
„MAGNATCSB1000“ angezeigt. Falls es nicht in der Liste angezeigt wird, aktivieren Sie am Quellgerät manuell die Suche nach
Bluetooth-Geräten und stellen Sie sicher, dass sich die Soundbar im Pairing-Modus bendet.
Je nach Quellgerät kann es vorkommen, dass während des Kopplungsvorgangs gefragt wird, ob das Passwort angenommen werden
soll. Das können Sie einfach mit „Annehmen“ bestätigen. Wenn weiterhin nach einem Passwort gefragt wird, benutzen Sie die
Standard-Passwörter „0000“ oder „1234“. Falls nach erfolgter Kopplung gefragt wird, ob Sie eine Verbindung herstellen möchten,
beantworten Sie dies ebenso mit „Ja“. Nach erfolgreicher Kopplung und Verbindung wird im Display der Eingang BT dauerhauft
angezeigt.
Die Soundbar unterstützt den besonders hochwertigen Audio-Übertragungsstandard „Qualcomm® aptX™“. Wenn Ihr Quellgerät
diese Technik ebenfalls unterstützt, wird beim Herstellen einer Bluetooth-Verbindung automatisch „Qualcomm® aptX™“ als
Übertragungsmodus gewählt.
VERBINDEN DES GERÄTES MIT EINEM NETZWERK:
a) WLAN-Verbindung über WPS-Modus
Wenn Ihr Router eine WPS-Taste besitzt, können Sie den Lautsprecher einfach und bequem mit dem Netzwerk verbinden:
- Wählen Sie mit der Fernbedienung den WLAN-Eingang. Im Display blinkt WLAN um anzuzeigen, dass noch keine Verbindung zu
einem Netzwerk besteht.
- Drücken Sie die WPS-Taste am Router. Drücken Sie dann die WLAN-Taste auf der Fernbedienung für ca. 5 Sekunden, um die
Verbindung zu bestätigen.
Das Gerät stellt eine Verbindung mit dem Netzwerk her. Während dieses Vorgangs blinkt im Display WPS.
- Sobald die Verbindung hergestellt ist, wird im Display WPS OK angezeigt. Die Anzeige WLAN leuchtet danach dauerhaft.
- Das Gerät kann nun Audiosignale vom Netzwerk wiedergeben.
- Da das Gerät die Verbindungsdaten speichert, brauchen sie beim nächsten Einschalten nicht erneut eingegeben zu werden.
Hinweis: Die Wartezeit des WPS-Modus beträgt 2 min. Nach einer Überschreitung dieses Zeitlimits müssen Sie möglicherweise
neu beginnen und die WPS-Taste noch einmal drücken.
Hinweis: Lesen Sie hierzu auch die Anleitung für den Router.
b) Verbinden mit einem Netzwerk über die Webschnittstelle
Falls das Herstellen der Verbindung zu einem Netzwerk über WPS nicht möglich ist, können Sie die Webschnittstelle der Soundbar
verwenden. Dazu benötigen Sie ein Gerät mit einem Funknetzwerkadapter, auf dem Sie einen Internet-Browser aufrufen können (z. B.
ein Computer/Smartphone).
• Schalten Sie die Soundbar ein und suchen Sie in der Liste der verfügbaren Netzwerke auf dem Computer/Smartphone nach dem
offenen WLAN-Netzwerk „MAGNAT CSB 1000XX-XX-XX“.
Hinweis: XX-XX-XX in der SSID der Soundbar steht für die letzten 6 Zeichen der MAC-Adresse der betreffenden Soundbar.
• Auf dem Bildschirm wird dann automatisch die Seite mit den Einstellungen angezeigt. Wenn dies nicht der Fall ist, dann öffnen Sie
den Webbrowser, geben 172.19.42.1 in der Adressleiste des Browsers ein und drücken Sie dann die EINGABETASTE.
9
Page 10
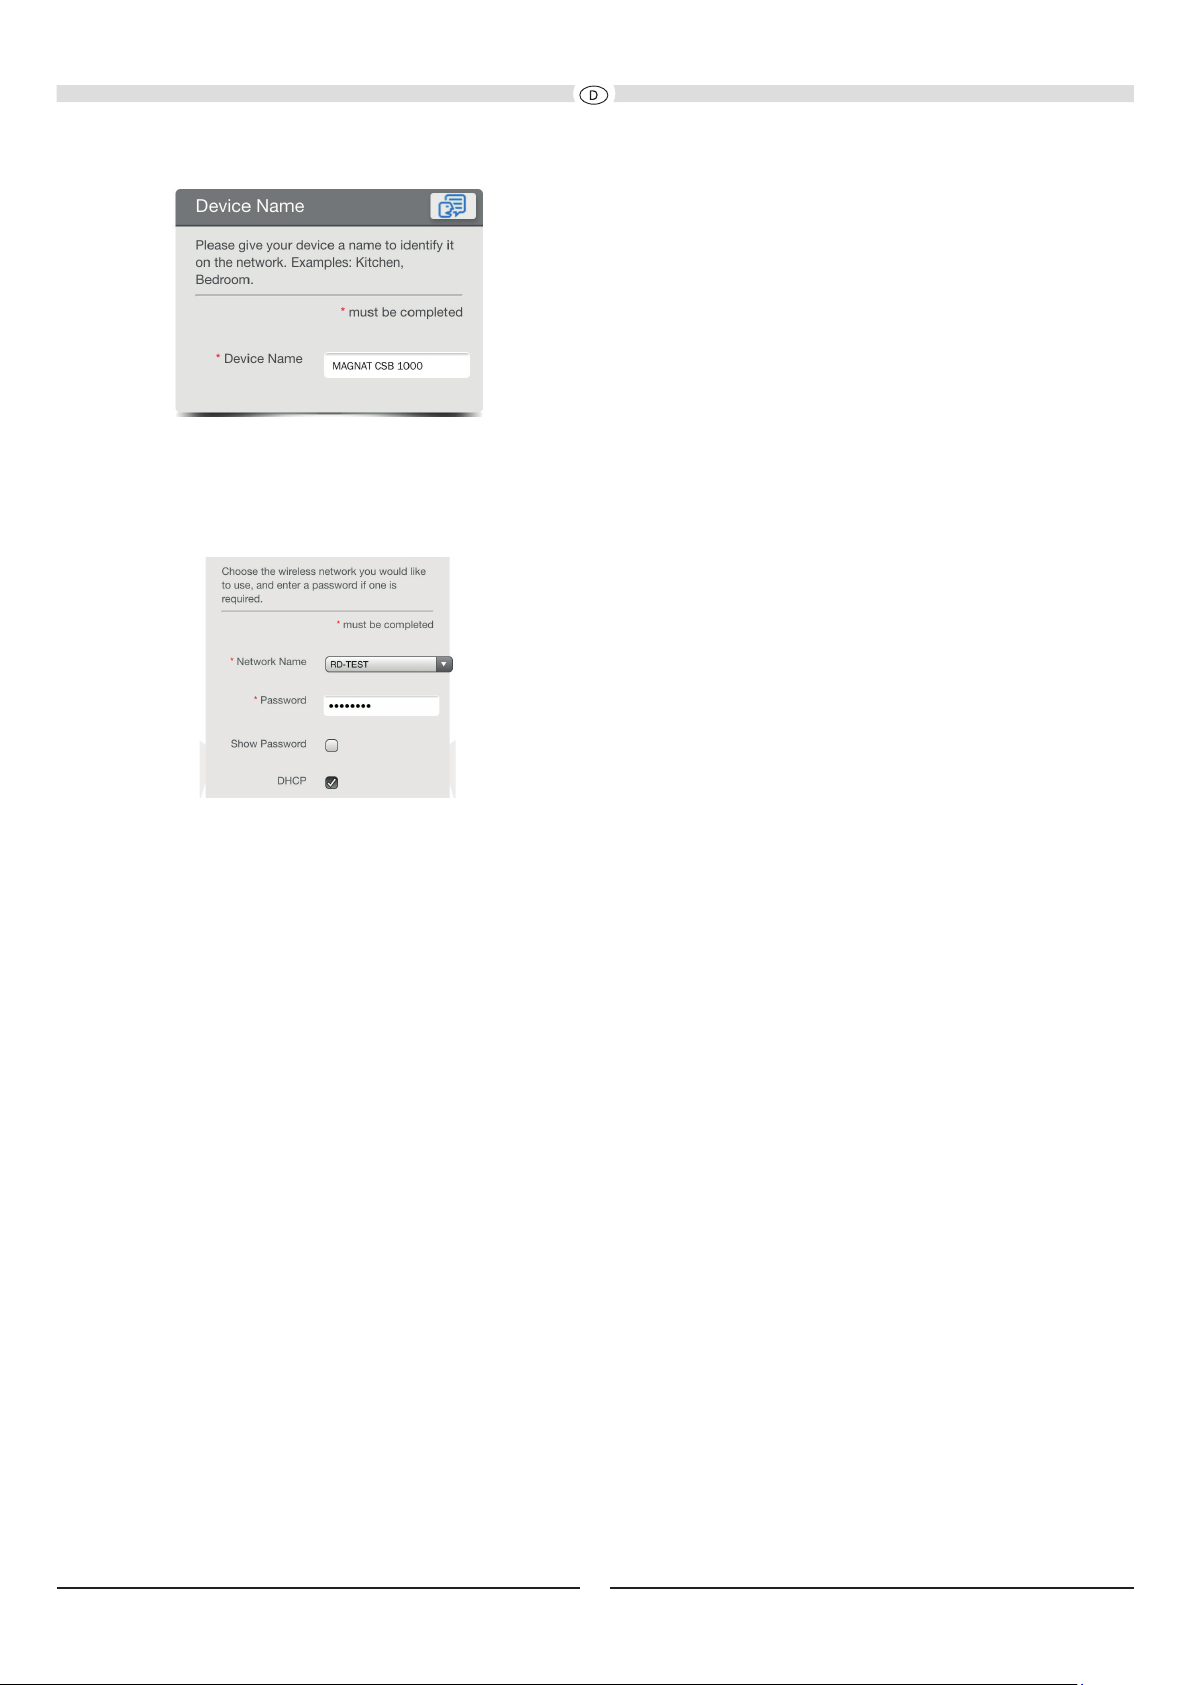
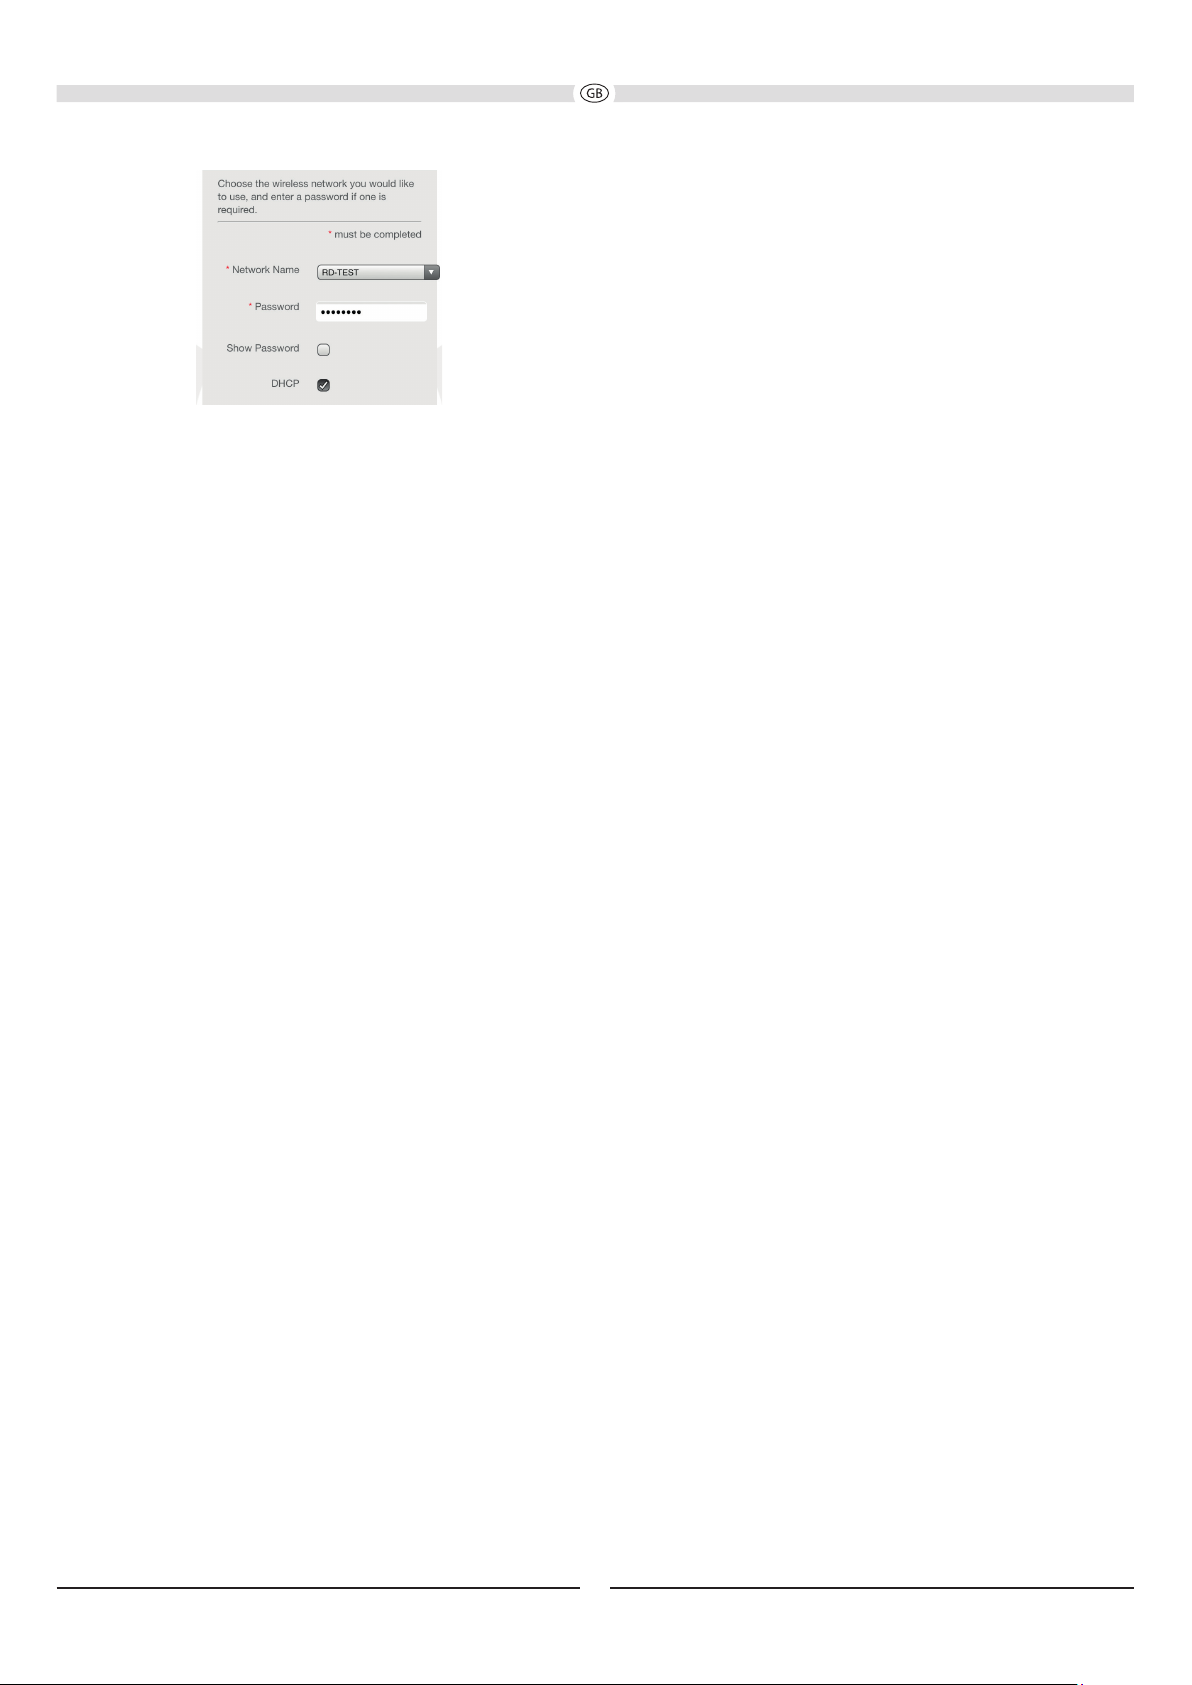
Die Webschnittstelle des WLAN wird angezeigt:
• Geben Sie für den Lautsprecher einen Namen ein, an dem Sie ihn in der Liste der verfügbaren Lautsprecher erkennen können (z. B.
„Wohnzimmer“ oder „Küche“).
• Suchen Sie in der Liste der verfügbaren Netzwerke im Dropdownmenü „network name“ (Netzwerkname) und wählen Sie das
Netzwerk aus, mit dem Sie den Lautsprecher verbinden möchten.
• Wenn der Netzwerkrouter keine IP-Adressen zuweist, dann schalten Sie hier die DHCP-Funktion aus und geben Sie dann die IP-
Adresse manuell in den unteren Feldern ein.
• Geben Sie dann den erforderlichen Netzwerkschlüssel (Passwort) ein und klicken Sie auf
„CONNECT“ (VERBINDEN).
• Auf der Webseite erhalten Sie mit der Meldung „network was connected successfully“ die Information, dass die Verbindung zum
Netzwerk erfolgreich hergestellt wurde.
Das Produkt stellt eine Verbindung mit dem Netzwerk her.
Hinweis:
1. Das Produkt unterstützt das Sicherheitsprotokoll „WEP“ nicht.
2. Das Smartgerät kann nach dem Einrichten der Verbindung zwischen Lautsprecher und Router zu
einem gültigen Netzwerk navigieren. Wenn dies nicht der Fall ist, dann müssen Sie selbst
sicher stellen, dass das Smartgerät die Verbindung zu dem Netzwerk herstellt, mit dem der
Lautsprecher verbunden ist.
Das Produkt kann nun Audiosignale vom Netzwerk wiedergeben. Da die Verbindungsdaten gespeicher t werden, brauchen sie beim
nächsten Einschalten nicht erneut eingegeben werden.
MUSIKWIEDERGABE IM WLAN-MODUS
Über Ihren Lautsprecher können Sie Musik vom Netzwerk oder von einem Gerät, das über Direktmodus verbunden ist, wiedergeben.
a) Installieren der App auf einem Android/Apple-Smartphone/Tablet-PC
Um die Funktion zur Steuerung der Musikwiedergabe über den Lautsprecher auf einem Tablet-PC oder Smartphone verwenden zu können,
müssen Sie zuerst die entsprechenden Apps (Allplay Radio und Jukebox) für Ihren Tablet-PC bzw. das Smartphone aus dem Play Store
(Android) oder App Store (Apple) installieren.
Folgend eine kurze Beschreibung der beiden verfügbaren Apps was Sie mit welcher bedienen können:
- AllPlay Radio (eMbience Inc.) = Internetradio App
- AllPlay Jukebox (eMbience Inc.) = Allgemeine Steuerapp für Musikdienste, Musikwiedergabe von Netzwerkfestplatten, Musikwiedergabe
vom Telefon usw.
10
Page 11

Die AllPlay Jukebox-App bietet die folgenden Wiedergabeoptionen:
Partymodus:
Hier werden mit der App von mehreren Smartgeräten Musiktitel aus einer gemeinsamen Wiedergabeliste über den Lautsprecher
wiedergegeben.
Mehrzonenmodus:
Hier werden mit der App von mehreren Smartgeräten Musiktitel aus unterschiedlichen Wiedergabelisten über einen jeweils anderen
Lautsprecher wiedergegeben.
Mehrraummodus:
Hier wird mit der App eine Gruppe aus mehreren Lautsprechern gebildet, über die dann von einem Smartgerät die Musiktitel aus einer
Wiedergabeliste wiedergegeben werden.
Hinweis: Im Apple Store sind ggf. nicht beide Apps für jedes Apple Tablet verfügbar.
SERVICE UND TECHNISCHE PROBLEME
Sollten technische Probleme auftreten, wenden Sie sich bitte an Ihren Fachhändler oder an Magnat Audio-Produkte GmbH, Tel.:
+49(0)2234807-0.
TECHNISCHE DATEN
Konfiguration: 2 x 2-Wege, aktiv
Aktiver Bassreflex-Subwoofer
Ausgangsleistung RMS/Max.: 4 x 20 /40 Watt (L+R-Kanal)
100/200 Watt (Subwoofer)
Frequenzbereich: 25 – 28 000 Hz
Trennfrequenzen: 180 / 3100 Hz
Abtastraten der digitalen Eingänge: bis zu 96kHz / 24Bit
Betriebsfrequenz: BT: 2402 – 2480 MHz
Wireless: 5740 – 5814 MHz
WLAN: 2412 – 2472 MHz
5150 – 5250 MHz
5250 – 5350 MHz
5470 – 5725 MHz
In allen EU-Mitgliedstaaten ist der Betrieb von 5150–5350MHz
ausschließlich auf den Innenbereich beschränkt.
Maximale ausgestrahlte Leistung gemäß EN 62479: BT: 9,5 dBm
Wireless: 9 dBm
WLAN: 2,4 GHz: 20 dBm
5 GHz: 22 dBm
Leistungsaufnahme:
Betriebsmodus Soundbar: 65 W
Betriebsmodus Subwoofer: 100 W
Standby-Modus Soundbar: 3 W (Funkverbindung ein)
<0,5 W (Funkverbindung aus)
Standby-Modus Subwoofer: <0,5 W
Maße Soundbar (BxHxT): 1000 x 79 x 60 mm
Maße Subwoofer (BxHxT): 230 x 382 x 418 mm
Gewicht Soundbar: 2,5 kg
Gewicht Subwoofer: 9,4 kg
Netzteil: Dongguan Dongsong Electronic Co., Ltd., DYS602-210309W
USB: 5 V
TECHNISCHE ÄNDERUNGEN VORBEHALTEN
, 1A
11
Page 12

Dear MAGNAT Customer,
Congratulations on your ne new loudspeakers and thank you very much for choosing MAGNAT! You have made an excellent choice.
The high-quality speakers produced by MAGNAT are renowned all over the world.
Please study the instructions and information below carefully before using your new loudspeakers.
IMPORTANT SAFETY NOTICE
Please read through the instruction manual carefully before starting to use the device. This manual contains important information
concerning operation and safety aspects. It is imperative you observe all of the information. Keep the manual in a safe location.
• WARNING NOTICES: All of the warning symbols on the device, accessories and in the instruction manual itself must be adhered to.
• EXPOSURE TO HEAT: Only operate the device and accessories in a temperature range from 10°C to 45°C.
• The device should not be positioned near heat sources (heaters, ovens, radiant heaters, naked ames, etc.). When setting up close
to an amplier a minimum distance of 10 cm must be maintained.
• No naked ame sources, such as lighted candles, should be placed on the device.
• Pay attention to a sufcient ventilation of the device. The device may not be covered, e.g. by drapes, curtains. Maintain a distance
of 20 cm to walls.
• EFFECT OF MOISTURE: The device should not be exposed to dripping or splash water. Neither should it be used to support vases
or other containers lled with liquid. Do not expose the device to water or high levels of humidity. There is a danger of electric
shock. In the event of contact with moisture or liquids remove the mains adapter immediately.
• FOREIGN MATERIAL: Ensure that no foreign material enters through the device openings and into the interior. This could trigger
short circuits and even result in electric shock and re.
• CLEANING: Please use a soft, dry cloth with no cleaning agents, sprays or chemical solvents, as these could damage the surfaces.
• ELECTRICAL CONNECTION: Please note the voltage levels on the information signs. The mains adapter for the device should only
be operated with the voltage and frequency values specied on the signs.
• LIGHTNING PROTECTION/PREVENTIVE MEASURES: If the device is not going to be used for a prolonged period (e.g. when on
holiday), it should be disconnected from the mains by removing the plug. The device should also be disconnected from the mains in
the event of a thunderstorm. Doing this will prevent damage caused by lightning and overvoltage.
• MAINS CABLE: The mains cable must always be suitable for operation and it should only ever be laid out in a manner that prevents
it from being trodden on. It should not be pinched by objects either, as this can damage the cable. When using plugs and power
strips it must be ensured that the cable is not kinked at the point where it emerges from the socket. Do not connect or remove the
mains cable with damp hands.
• The mains plug is used as the disconnecting device. Disconnecting devices shall remain readily operable.
• OVERLOAD: Sockets, power strips and extension cables should not be overloaded. If an overload occurs, there is a risk of electric
shock and re.
• SETTING UP: Please read the installation instructions.
• The device should only be positioned or mounted on a solid surface and not on moving base frames, otherwise there is a risk of
injur y.
• Only use attachments/accessories specied by the manufacturer.
• Use only the following power supply adapter: „Dongguan Dongsong Electronic Co., Ltd., DYS602-210309W“
• Batteries (battery pack or batteries installed) shall not be exposed to excessive heat, such as sunshine, re and the like.
• CAUTION: Danger of explosion if battery is incorrectly replaced. Replace only with the same or equivalent type.
• RISK OF SWALLOWING BATTERIES!
· The product/remote control may contain a coin/button type battery, which can be swallowed. Keep the battery out of reach of
children at all times! If swallowed, the battery can cause serious injury or death. Severe internal burns can occur within two hours
of ingestion.
• If you suspect that a battery has been swallowed or placed inside any part of the body, seek immediate medical attention.
• When you change the batteries, always keep all new and used batteries out of reach of children. Ensure that the battery compart-
ment is completely secure after you replace the battery.
• If the battery compartment cannot be completely secured, discontinue use of the product. Keep out of reach of children and
contact the manufacturer.
DAMAGE THAT MUST BE RECTIFIED BY A SPECIALIST:
If any of the following damage occurs, disconnect the device from the mains immediately and contact a specialist to conduct the
repair work:
• The device should not continue to be operated if there is visible damage to the mains cable. A damaged cable should not be
repaired, but must be replaced.
• Damage to the mains socket at the device.
• If moisture or water has entered the device or foreign objects have fallen into the device.
• If the device has fallen and the housing is damaged.
• If the device does not work properly, even though all of the information in the instruction manual has been observed.
Only those subsequent alterations approved by the manufacturer may be conducted.
Only original spare parts should be used for repair.
After conducting any repairs the safety of device should be checked to ensure it is functioning correctly and safely.
Repairs must always be conducted by qualied specialists, as you might otherwise be exposed to dangerous high voltage levels or
other hazards.
12
Page 13

The triangle with a lightning symbol warns the user that high voltage is used within the device which can result in electric
shock.
The triangle with an exclamation mark informs the user that important operating and maintenance instructions (repair) are
contained in the accompanying instruction manual, which must be observed.
Do not open! Risk of electric shock!
CAUTION: In order to avoid electric shock do not open the speaker housing/mains adapters or remove
the covers. The user is not to conduct any repairs him/herself. Repairs should only be conducted by
qualied technicians! Do not use any sockets or extension cables that do not fully accommodate the
plug of the device.
Use only the power supplies listed in the user manual.
AC Voltage.
DC Voltage.
Polarity of the DC power connector
This is Class II apparatus with double insulation, and no protective earth provided.
INSTRUCTIONS FOR DISPOSAL
In accordance with European Directive 2012/19/EU all electrical and electronic appliances must be disposed of separately via local
collection points. Please observe the local regulations and do not dispose of your old appliances with normal household waste.
Battery disposal
Old batteries are hazardous waste and must be disposed of in accordance with current regulations.
DECLARATION OF CONFORMITY
Hereby, Magnat Audio-Produkte GmbH declares that the device Magnat CSB1000 is in compliance with the essential requirements and other
relevant provisions of directive 2014/53/EU. The Declaration of Conformity can be found at www.mac-audio.de in the download area of the device.
USE AS DIRECTED
This device is designed for indoor use only.
CONTENTS
(A) 1 pc. Soundbar
(B) 1 pc. Subwoofer
(C) 1 pc. Mains adapter for the soundbar incl. mains cable
(D) 1 pc. Mains cable for the subwoofer
(E) 1 pc. Remote control including battery (button cell CR2025)
(F) 1 pc. Stereo audio cable, 3.5 mm stereo jacks on both sides, 1m
(G) 1 pc. Optical digital cable, 1.5m
(H) 1 pc. Wall bracket with securing material
(I) 1 pc. Instruction manual
13
Page 14

UNPACKING THE SET
Please unpack the speakers and accessories carefully and check the contents of the box using the list above. In the event of any
transport damage, please contact your supplier. Keep the packing material in a safe location. The original packaging enables troublefree transportation for any subsequent relocation or servicing requirements.
SETTING UP THE SYSTEM COMPONENTS
Soundbar (A): The soundbar should be positioned directly underneath the centre of the TV. If the TV is located on a shelf or sideboard,
the soundbar can be positioned directly in front of the device. If the TV is mounted on the wall, the soundbar should be mounted
directly below the screen by using the supplied wall bracket.
Subwoofer (B): The subwoofer should be positioned on the floor near the Soundbar, usually to the left or right-hand side of the TV. The
distance to the screen should not be less than 100 cm for CRT TVs and 50 cm for flat screen TVs.
Use of the supplied wall bracket for the soundbar is illustrated in Fig.1.
a. Fit the wall bracket under the TV as shown. Please use securing screws and wall plugs (not supplied) suitable for the wall material.
b. Now hang the soundbar in the matching recesses of the wall bracket using the pre-assembled securing bolts.
Important information / safety instructions: The customer is solely responsible for the use of other wall brackets / attachments.
The customer is also solely responsible for the secure attachment of the Soundbar bracket to the wall and the selection of suitable
mounting material (e.g. screws, wall plugs, etc.), while taking account of the weight and construction of the Soundbar and the
condition of the wall.
SYSTEM INSTALLATION
Connecting a television (g. 2):
The CSB1000 is designed to be connected directly to a TV. It can be connected in three different ways:
a) Connecting the TV to the HDMI® port HDMI/ARC (g. 5, pos. 14):
Connect your TV to this port if it has an HDMI® socket with ARC functionality (Audio Return Channel, HDMI® 1.4 standard).
If the HDMI® port on your TV also supports CEC functionality (Consumer Electronics Control), then basic functions of the
soundbar such as switching on/off, volume and mute can be controlled via your TV‘s remote control. The CEC functions that are
available vary from T V to TV and should be checked in each individual case. Please refer to the operating instructions supplied
with your TV for further information. Most manufacturers have their own name for the CEC function, however, most end in the term
„Link“. Note: for reasons of a technical nature the CEC function is only available via HDMI® ports.
These functions may need to be activated in the TV‘s settings. Dolby® Digital encoded signals can also be reproduced via the
built-in Dolby®. The necessary connecting cable is not included in delivery.
b) Connecting the TV to the optical digital input DIGITAL IN (g. 5, pos. 9):
Use the supplied optical cable (G) and connect the digital audio output of your TV to the audio input DIGITAL IN (g. 5, pos. 9) of
the soundbar. Dolby® Digital encoded signals can also be reproduced via the built-in Dolby® decoders. The necessary connecting
cable is not included in delivery.
c) Connecting the TV to audio input AUX IN (g. 5, pos. 10):
Use the supplied audio cable and connect the audio output on your TV to audio input AUX IN (g. 5, pos. 10). If your TV has an
audio output with xed level, this is preferable to the audio output with variable level.
Connecting additional devices to the soundbar (g. 3)
Connecting an analogue or digital audio source to the soundbar:
Additional audio sources such as CD players, MP3 players and satellite receivers can also be connected to the analog input AUX
IN (g. 5, pos. 10) and to the digital inputs DIGITAL IN (Fig. 5, Pos. 9) on the soundbar. When doing this proceed as described in
the previous sections b) and c).
Connecting HDMI sources (audio/video) to the soundbar:
Up to 3 other HDMI sources (e.g. BD/DVD player, SAT receiver, games console) can be connected to the HDMI inputs HDMI1,
HDMI2 and HDMI3 (Fig. 5, pos. 11, 12, 13). The audio signal of the respective HDMI source is reproduced via the CSB1000
system, with the video signal forwarded to the HDMI output (HDMI OUT (ARC), Fig. 5, pos. 14).
In this conguration, the HDMI input connected to the HDMI output of the soundbar (Fig. 5, pos. 14) has to be selected on the TV.
Important: The USB port (Fig. 5, pos. 8) is provided exclusively for system updates and does not have any other function.
14
Page 15

Connecting the power supply of the soundbar:
Included in delivery is a universal, external mains adapter (C) (110 - 240 V / AC 50/60 Hz). The mains cable used in your country,
however, may be different. If the mains cable is not compatible with your power sockets or if you are in any doubt, please contact your
Magnat dealer.
1. Connect the output cable (jack connector) of the external mains adapter to the power supply jack of the soundbar (g. 5, pos. 7).
2. Insert the mains cable into the jack on the mains adapter.
3. Insert the mains cable into the socket. Make sure that you are using the mains plug that is compatible with the socket (refer to the
information above).
Connecting the power supply to the subwoofer:
Included in delivery is the most commonly used mains cable. The mains cable used in your country, however, may be different. If the
mains cable is not compatible with your power sockets or if you are in any doubt, please contact your Magnat dealer.
1. Plug the 2-pole mains cable into the mains socket on the subwoofer amplier (g. 6b, pos. 16).
2. Insert the mains cable into the socket. Make sure that you are using the mains plug that is compatible with the socket (refer to the
information above).
INITIAL START-UP, WIRELESS PAIRING OF THE SOUNDBAR WITH THE SUBWOOFER
After all the signal cables and power supplies for the soundbar and subwoofer have been connected, switch the soundbar on using the
remote control (Fig. 7, pos. 18) or via the control panel on the side (Fig. 4b, pos. 4).
The soundbar will connect to the subwoofer automatically every time it is switched on.
The LED status display on the soundbar (Fig. 4a, pos. 1) goes off. The LED status display of the subwoofer (Fig. 6a, pos. 15) changes
from red to green.
If the subwoofer does not switch on automatically or the LED status display on the subwoofer ashes green, the connection has failed.
In this case, the connection has to be established manually. Proceed as follows:
- Select the AUX input (Fig. 7, pos. 24) using the remote control.
- Press the NIGHT button (Fig. 7, pos. 27) on the remote control for 5 seconds. WPAIR then appears in the display.
- Now press the CONNECT button at the rear of the subwoofer (Fig. 6b, pos. 17). The LED status display on the subwoofer ashes
green while the connection is being established.
- When pairing is successful, SUCCE appears in the display and the LED status indicator on the subwoofer lights up green.
- If FAIL appears in the display, the process has to be repeated.
OPERATION
Operating elements of the Soundbar (front) (Fig. 4a)
(1) LED-status indication: This LED illuminates red when the device is in standby mode.
(2) LED Display: Various information is shown on the Display:
- Selected audio source
- Sound and menu settings
- Audio format: if a Dolby digital signal is decoded, DOLBY appears on the display briey.
In the event of incompatible audio formats, ERROR appears on the display; there is no playback.
When not used, the display turns itself off after 5 seconds.
(3) Sensor for remote control: Please aim at this sensor when using the remote control.
Operating elements of the Soundbar (side) (Fig. 4b)
(4) O N/STBY: Switches the device on when it is in the standby mode. Conversely the device can be switched from power operation to
the standby mode.
If the device is connected to a network via WLAN before being switched off, the soundbar will switch to the network standby
mode when the button is pressed briey. NET STBY appears in the display. When switched on again, the network connection will
be reestablished immediately. In addition, the device can also be switched on automatically via the app by playing an available
source.
Pressing and holding the button will switch the device to the ECO standby mode. This will disconnect the network connection.
If the device is not going to be used for a prolonged period, it should be switched to the ECO standby mode, as this consumes
the lowest power. When it is switched on from the ECO standby mode, the device will only be available in the network again after
approx. 45 seconds.
If the device is not connected to a network before it is switched off, the soundbar will always switch to the ECO standby mode.
(5) VOLUME: Increases (+) or decreases (-) the volume.
(6) SOURCE: Selects the input.
15
Page 16

Operating elements of the Subwoofer (front) (Fig. 6a)
(15) LED-status indication: This LED illuminates red when the device is in standby mode. The LED lights up green when the subwoofer
is in operating mode. See the „Initial start-up“ section.
Operating elements of the Subwoofer (rear) (Fig. 6b)
(17) CONNECT: Starts the manual pairing mode on the subwoofer. See the „Initial start-up“ section.
Operation with the system remote control (fig. 7):
(18) ON/STBY: Switches the device on when it is in the standby mode. Conversely the device can be switched from power operation to
the standby mode.
If the device is connected to a network via WLAN before being switched off, the soundbar will switch to the network standby
mode when the button is pressed briey. NET STBY appears in the display. When switched on again, the network connection will
be reestablished immediately. In addition, the device can also be switched on automatically via the app by playing an available
source.
Pressing and holding the button will switch the device to the ECO standby mode. This will disconnect the network connection.
If the device is not going to be used for a prolonged period, it should be switched to the ECO standby mode, as this consumes
the lowest power. When it is switched on from the ECO standby mode, the device will only be available in the network again after
approx. 45 seconds.
If the device is not connected to a network before it is switched off, the soundbar will always switch to the ECO standby mode.
(19) HDMI/ARC: Selects the audio input HDMI/ARC:
(20) HDMI 1/2/3: Selects the additional audio / video inputs HDMI 1, 2, 3
(21) BT: Selects the audio input BLUETOOTH. Press and hold this button to switch the device to the paring mode.
(22) WLAN: Selects the network input (see also CONNECTING THE DEVICE TO A NETWORK)
(23) DIGITAL: Selects the audio input DIGITAL IN:
(24) ANALOG: Selects the audio input AUX IN:
(25) MU TE: Switches the sound on and off.
(26) VOLUME: Increases (+) or decreases (-) the volume.
(27 ) NI GHT: Activates or deactivates a playback mode with reduced dynamics and a frequency response that is adapted for sound-
sensitive situations (e.g. late at night).
(28) SURR: Switches the 3D surround sound function on or off.
(29) SOUND: Selects various sound settings:
LINEAR: Linear sound setting
MUSIC: Optimises the frequency response of the unit for music playback.
MOVIE: Optimises the frequency response of the unit for lm sound reproduction.
VOCAL: Emphasises the vocal range for particularly good speech intelligibility.
(30) MENU: Opens the settings of the Soundbar
The following settings can be selected and changed with the VOL +/- buttons. (26). Pressing the menu button again will set these
changes:
SUB: Increases (+) / decreases (-) the volume of the subwoofer.
EQ: Sound adjustment for different positioning of the soundbar.
WALL: This setting optimises the sound when the soundbar is tted to the wall.
DESK: This setting optimises the sound when the soundbar is positioned on a shelf in front of or under the TV.
ASTBY: This device switches off automatically after approx. 15 minutes to save energy. This function can be manually disabled.
The factory setting is enabled.
RE SET: Sets all settings back to default settings.
EXIT: Exits the setting menu.
Control playback in WLAN/Bluetooth mode
(31) SKIP TRACK BACKWARDS: Pressing this once starts the track currently being played from the beginning. Repeatedly pressing the
button allows you to skip to previous tracks.
(3 2) P L AY/ PAU S E: Pauses the current track or resumes playback.
(33) SKIP TRACK FORWARDS: Pressing the button allows you to skip to subsequent tracks.
16
Page 17
CONNECTING THE DEVICE TO A BLUETOOTH AUDIO SOURCE:
Use the remote control to switch the soundbar to the Bluetooth mode. If you have previously connected a Bluetooth device, the
soundbar will automatically attempt to re-establish a connection with this device. If this is the case, you may be required to manually
reconrm the connection on the source device.
If a connection has not already been made or the connection cannot be re-established, the soundbar will automatically activate the
‚pairing mode‘. To switch the soundbar to the pairing mode manually, press and hold the BT button (g. 7, pos. 22) on the remote
control. The display will ash, when the pairing mode is active.
Now activate the Bluetooth mode on your source device. The soundbar will appear in the list of Bluetooth devices as
„MAGNATCSB1000“. If it is not displayed in the list, set your source device to search for Bluetooth devices manually and make sure
that the soundbar has been switched to the pairing mode.
Depending on the source device, you may be asked whether the password is to be accepted during the pairing procedure. You can
conrm this by simply pressing „Accept“. If you are still asked for a password, use the default passwords „0000“ or „1234“. If you
are asked if you want to establish a connection after pairing, please select „Yes“. When the device has been paired and connected
successfully, BT is displayed continuously.
The soundbar supports the Qualcomm® aptX™ high quality audio transmission standard. If your source device also supports this
standard, Qualcomm® aptX™ will be selected automatically as the transfer mode when establishing a Bluetooth connection.
CONNECTING THE DEVICE TO A NETWORK
a) WLAN connection via WPS Mode
If your router has a WPS button, this is a simple and convenient way of connecting the speaker to the network:
• Press the WLAN button on the remote control to select the WLAN input. WLAN will flash on the display to indicate that there is no
connection to a network.
• Press the WPS button on the router. Press and hold the WLAN button on the remote control for approx. 5 seconds to confirm the
connection.
• The device will now establish a connection with the network. WPS will flash on the display during this process.
• Once the connection has been made, WPS OK will appear on the display and WLAN will illuminate continuously.
• The device can now play back audio signals from the network.
• The device saves the connection data therefore they do not need to be re-entered the next time it is switched on.
Note: The waiting time of WPS mode is 2 mins. You might need to re-start and press WPS button once again when time out.
Note: Please also refer to the instruction for the router.
b) Connecting to a network via the web interface
If it is not possible to connect to a network via WPS, you can use the web interface of the Soundbar. You will need a device with a wireless
network adapter on which you can access an internet browser (e.g. a computer/ smartphone).
• Power on the Soundbar and search for the “MAGNAT CSB 1000XX-XX-XX” open WLAN network in the list of available networks on the
computer/ Smartphone.
Note: XX-XX-XX in the SSID of the Soundbar stands for the last 6 characters of the MAC address of the respective speaker.
• The screen will navigate to the setting page automatically. If not, Please open the web browser and enter 172.19.42.1 in the address
bar of the browser then press ENTER to confirm.
The web interface of the WLAN will appear:
• Enter a name for the speaker by which you will be able to identify it in the list of available speakers (e.g. “lounge” or “kitchen”).
• Sear ch in the list of avail able network s in the “network n ame” drop- down menu and s elect the net work to which you w ant to connect t he speaker.
17
Page 18
• If the network router does not assign IP addresses, switch the DHCP function off here and then enter the IP address manually in the
bottom boxes.
• Then enter the network key, included password if required, and click on “ CONNECT”.
• The web page will inform you “network was connected successfully”. The product will now establish a connection with the network
Note:
1. The product does not support “WEP” security protocol.
2. The smart device might navigate to a valid network after setting up the connection between speaker and router. If not, please make
sure the smart device connect to the same network as the speaker connected to.
The product can now play back audio signals from the network. The connection data are saved therefore they do not need to be re-entered
the next time it is switched on.
MUSIC PLAYBACK IN WLAN MODE
You can play music from the network over your speaker and you can also play music from device connected via direct mode.
a) Installing the app on an Android/ Apple smartphone/ tablet PC
In order to be able to use the music playback control function on the speaker on a tablet PC or smartphone, you first need to install
the relevant app (Allplay Radio and Jukebox) for your tablet PC/smartphone available from the Play Store (Android) or App Store (Apple).
The AllPlay Jukebox app offers the following playback options:
Party mode: Various smart devices add music tracks via the app from a shared playlist which is played on the speaker.
Multizone mode: Various smart devices add music tracks via the app from different playlists which are played on different speaker.
Multiroom mode: Several speaker are combined via the app to form a group and a playlist is played from a smart device on all the
speakers in this group.
Note: You can select more than one speaker for the playback. Please refer to the app for details.
Note: The Apple Store may not have both apps available for each Apple tablet.
SERVICE AND TECHNICAL PROBLEMS
If you should encounter any technical problems, please contact your specialist dealer or Magnat Audio-Produkte GmbH,
Tel.: + 49 (0) 2234807-0.
18
Page 19

SPECIFICATIONS
Conguration: 2 x 2-ways, active
Powered bassreflex subwoofer
Output power RMS/Max.: 4 x 20 /40 watts (L+R-channel)
100/200 watts (subwoofer)
Frequency range: 25 – 28 000 Hz
Cross-over frequency: 180 / 3100 Hz
Sampling rates of the digital inputs: up to 96kHz / 24Bit
Operating frequency: BT: 2402 – 2480 MHz
Wireless: 5740 – 5814 MHz
WLAN: 2412 – 2472 MHz
5150 – 5250 MHz
5250 – 5350 MHz
5470 – 5725 MHz
The device is restricted to indoor use only when operating in the
5150 to 5350 MHz frequency range for all EU Member States.
Maximum emitted power according to EN 62479: BT: 9.5 dBm
Wireless: 9 dBm
WLAN: 2.4 GHz: 20 dBm
5 GHz: 22 dBm
Power consumption:
Operation mode Soundbar: wireless network disabled
(standby mode):
Operation mode Subwoofer: wireless network enabled
(operation mode, no audio signal):
Standby mode Soundbar: 3 W (wireless network enabled)
Standby mode Subwoofer: < 0.5 W
Dimensions Soundbar (wxhxd): 1000 x 79 x 60 mm
Dimensions Subwoofer (wxhxd): 230 x 382 x 418 mm
Weight Soundbar: 2,5 kg
Weight Subwoofer: 9,4 kg
Power supply adapter: Dongguan Dongsong Electronic Co., Ltd., DYS602-210309W
USB: 5 V
65 W
100 W
< 0.5 W (wireless network disabled)
, 1A
SUBJECT TO TECHNICAL CHANGE.
19
Page 20

Très cher client,
Félicitations: vous venez d’acquérir de nouvelles enceintes d’excellente qualité et nous vous remercions d’avoir choisi MAGNAT!
Votre choix est excellent: les enceintes produites par MAGNAT ont en effet d’une réputation mondiale.
AVIS IMPORTANT DE SÉCURITÉ
Veuillez lire attentivement la notice d’utilisation avant la mise en marche de l’appareil. La notice d’utilisation comporte des consignes
de fonctionnement et de sécurité importantes. Respectez impérativement toutes les consignes. Conservez soigneusement la notice
d’utilisation.
• AVERTISSEMENTS : Impérativement respecter tous les symboles d’avertissement sur l’appareil, les accessoires et dans la
notice d’utilisation.
• EFFET DE LA CHALEUR : Utilisez uniquement l’appareil à une température comprise entre 10 et 45 °C.
Ne pas installer l’appareil à proximité de sources de chaleur (radiateurs, poêles, radiateurs infrarouges, ammes nues). En cas
d’installation à proximité d’amplicateurs, observez une distance minimale de 10 cm
• Tenez l‘appareil éloigné des ammes nues, des bougies par exemple.
• Veillez à une aération sufsante de l’appareil. Il est interdit de recouvrir l’appareil, par ex. avec des rideaux ou stores. Obser vez
une distance sufsante (env. 20 cm) par rapport aux murs.
• INFLUENCE DE L’HUMIDITÉ : L’appareil ne doit pas être exposé à des gouttes ou projections d’eau. De même, il ne doit pas être
utilisé comme support pour des vases ou des récipients contenant un liquide. N’exposez l’appareil ni à l’eau ni à une humidité
importante de l’air. Cela risquerait d’entraîner une décharge électrique. En cas de contact avec des objets humides ou des
liquides, débranchez immédiatement la che d’alimentation.
• CORPS ÉTRANGERS : Veillez à ce qu’aucun corps étranger ne pénètre à l’intérieur de l’appareil à travers les orices. Leur
présence risquerait de provoquer des courts-circuits mais également une décharge électrique ou un incendie.
• NETTOYAGE : Veuillez employer un chiffon sec et doux et évitez d’appliquer tout produit de nettoyage, spray ou solvant chimique
an de ne pas endommager la surface de l’appareil.
• RACCORDEMENT ÉLECTRIQUE : Veuillez respecter les valeurs de tension indiquées sur les étiquettes. Le bloc d’alimentation de
l’appareil doit uniquement fonctionner avec les tensions et fréquences indiquées sur les étiquettes.
• PROTECTION CONTRE LA FOUDRE / MESURES DE PRÉCAUTION : Si l’appareil n’est pas utilisé pendant une période prolongée
(par ex. en vacances), mettez-le sous tension en débranchant le cordon d’alimentation. En cas d’orage, l’appareil doit également
être mis sous tension an d’éviter tout risque d’endommagement dû à un coup de foudre ou à une surtension.
• CORDON D’ALIMENTATION : Le cordon d’alimentation doit toujours être en état de fonctionner et posé de manière à ce que
personne ne puisse marcher dessus. Pour éviter tout risque d’endommagement du cordon, veiller à ce qu’il ne soit coincé par
aucun objet. En cas d’utilisation de ches et de prises multiples, veillez à ce que le cordon ne soit pas plié à l’endroit où il sort de
la prise. Ne pas toucher le câble d‘alimentation avec des mains mouillées.
• La prise secteur permet d‘arrêter l‘appareil et doit donc toujours être facilement accessible.
• SURCHARGE : Les prises, prises multiples et rallonges ne devraient pas être surchargées. En cas de surcharge, il y a danger
d’électrocution et d’incendie.
• MONTAGE : Veuillez observer les instructions de montage.
• L’appareil devrait uniquement être posé ou monté sur un support xe et non pas sur des châssis mobiles an d’éviter tout risque
de blessure.
• Utilisez uniquement les accessoires d’origine fournis ou agréés par le fabricant.
• L’appareil doit uniquement être utilisé avec le bloc d’alimentation fourni «DongguanDongsongElectronicCo.,Ltd.,
DYS602-210309W».
• Les batteries et les piles ne doivent pas être exposées à des chaleurs importantes, comme celle générées par le soleil ou le feu.
• Risque d’explosion en cas de mauvaise installation de la batterie. Remplacez la batterie uniquement par une batterie du même
type ou similaire.
• RISQUE D‘INGESTION DES PILES !
• L‘appareil/la télécommande peuvent contenir une pile en forme de pièce/pile bouton qui présente un risque élevé d‘ingestion.
Veuillez tenir les piles hors de la portée des enfants à tout moment. Si la pile est ingérée, elle peut causer des blessures graves
ou la mort. De graves brûlures internes peuvent survenir 2 heures après l‘ingestion.
• Veuillez contacter un médecin si vous pensez qu‘une pile a été ingérée ou qu‘elle a pénétré une partie du corps.
• Si les piles doivent être changées, veuillez tenir les nouvelles piles et les piles usagées hors de la portée des enfants. N‘oubliez
pas que le compartiment à piles doit être soigneusement refermé après chaque changement de pile.
• S‘il est impossible de refermer complètement le compartiment à piles, veuillez ne plus utiliser le produit. Veuillez tenir le produit
hors de la portée des enfants et contacter le fabricant.
DOMMAGES DEVANT ÊTRE RÉPARÉS PAR UN SPÉCIALISTE :
En présence d’un ou plusieurs des dommages mentionnés ci-dessous, mettez immédiatement l‘appareil sous tension et conez la
réparation à un spécialiste :
• En cas d’endommagement visible du cordon d’alimentation, l’appareil ne doit plus être utilisé. Tout cordon d’alimentation
endommagé ne doit pas être réparé mais remplacé.
• Détériorations de la prise secteur sur l’appareil.
• Présence d’humidité ou d’eau dans l’appareil ou chute d’objets dans l’appareil.
• Chute de l‘appareil et endommagement du boîtier.
• Dysfonctionnement de l’appareil bien que toutes les consignes gurant dans la notice d‘utilisation aient été respectées.
N’effectuez des interventions ultérieures sur l’appareil que si celles-ci sont autorisées par le fabricant.
20
Page 21

Ne procédez à des réparations qu’avec des pièces d’origine.
Suite à une réparation, vériez que l‘appareil est conforme aux normes de sécurité an de garantir un fonctionnement correct et sûr.
Conez systématiquement toute réparation à un personnel qualié sous peine de vous exposer à des risques de haute tension ou à
d’autres dangers.
Le triangle comportant le symbole d‘un éclair avertit l’utilisateur que l’appareil est traversé par des tensions élevées
pouvant entraîner des décharges électriques dangereuses.
Le triangle comportant le point d‘exclamation indique à l’utilisateur de l’appareil que la notice d’utilisation jointe avec
l’appareil contient des consignes d’utilisation et d’entretien importantes devant impérativement être respectées.
Attention! Ne pas ouvrir, risque d‘électrocution!
ATTENTION : Veillez à ne pas ouvrir le boîtier/les blocs d’alimentation du haut-parleur ni à retirer
les caches de protection an d‘éviter tout risque de décharge électrique. Aucune réparation ne doit
être effectuée par l’utilisateur de l’appareil. Toute réparation doit être conée exclusivement à un
personnel qualié ! N‘utilisez ni prises ni rallonges dans lesquelles il n’est pas possible d‘enfoncer
complètement le connecteur.
Utilisez exclusivement le bloc d‘alimentation indiqué dans le mode d‘emploi.
Tension alternative.
Tension continue.
Polarité du bloc d’alimentation (tension continue)
Appareil de classe de protection II avec double isolation. Aucune connexion de protection à la terre.
INSTRUCTIONS POUR LA MISE EN REBUT
Conformément à la directive européenne 2012/19/EU, tous les appareils électriques et électroniques usagés doivent être triés et
déposés dans des points de collecte locaux. Veuillez respecter les réglementations locales et ne pas jeter vos appareils usagés avec
les déchets ménagers.
MISE AU REBUT DE LA PILE
Les piles usagées sont des déchets dangereux et doivent être mises au rebut conformément aux réglementations en vigueur.
DÉCLARATION DE CONFORMITÉ
Magnat Audio-Produkte GmbH déclarons que le produit Magnat CSB 1000 est conforme aux exigences essentielles et aux autres
dispositions pertinentes de la Directive 2014/53/EU. Une copie de la Déclaration de conformité est disponible à l‘adresse http://www.
magnat.de (espace de téléchargement du produit).
UTILISATION CONFORME
Cet appareil a exclusivement été conçu pour une utilisation dans la maison.
CONTENU:
(A) 1 pc. Barre de son
(B) 1 pc. Subwoofer
(C) 1 pc. Bloc d‘alimentation de la barre de son et cordon d’alimentation
(D) 1 pc. Câble secteur pour le subwoofer
(E) 1 pc. Télécommande, pile incluse (pile ronde CR2025)
(F) 1 m Câble audio stéréo, fiche Jack 3,5 mm des deux côtés
(G) 1,5 m Câble optique numérique
(H) 1 pc. Support mural avec matériel de fixation
(I) 1 pc. Notice d’utilisation
21
Page 22

DÉBALLAGE DU KIT DE HAUT-PARLEURS
Déballez les haut-parleurs et les accessoires avec précaution et vériez le contenu du carton d’origine à l’aide de la liste ci-dessus.
Veuillez signaler tout dommage de transport à votre fournisseur. Conservez soigneusement le matériel d‘emballage. L’emballage
d’origine vous permet de transporter l’appareil en toute sécurité en cas de déménagement ou lorsque une intervention après-vente
est nécessaire.
MONTAGE DES ÉLÉMENTS DU SYSTÈME
Barre de son (A): Le système Soundbar doit être placé au centre, directement sous le téléviseur. Si le téléviseur se trouve sur une
étagère ou un buffet, le système Soundbar peut être placé directement devant l‘appareil. Si le téléviseur est fixé au mur, le système
Soundbar doit également être monté directement sous l‘écran à l‘aide du support mural fourni.
Subwoofer (B): Le subwoofer doit être placé au sol, proche de la barre de son, généralement à droite ou à gauche du téléviseur.
L‘écart minimal entre le subwoofer et un téléviseur à tube est de 100 cm. Il n‘est que de 50 cm entre le subwoofer et un téléviseur à
écran plat.
L‘utilisation du support mural fourni avec le système Soundbar est illustrée à la Fig. 1.
a. Montez l‘étrier de support mural comme indiqué, sous le téléviseur. Veuillez utiliser des vis de fixation et des chevilles adaptées
au mur (non fournies).
b. Accrochez la barre de son avec les boulons de fixation prémontés dans les orifices de l‘étrier de support mural.
Consigne importante / consigne de sécurite: Le client assume seul la responsabilité quant à l‘utilisation d‘autres supports muraux/
fixations. De même, le client porte seul la responsabilité quant à la bonne fixation du support de la barre de son au mur ainsi qu’au
choix du matériel de montage adéquat (par ex. vis, chevilles) en prenant en considération le poids et la composition de la barre de son
ainsi que la structure du mur.
INSTALLATION DU SYSTÈME
Connexion d‘un téléviseur (g. 2) :
Le système CSB1000 a été conçu pour être connecté directement à un téléviseur. Trois possibilités s‘offrent à vous:
a) Connexion du téléviseur à la prise HDMI® HDMI/ARC (g. 5, pos. 14) :
Connectez votre téléviseur à cette prise s‘il est doté d‘une prise HDMI® avec fonction ARC (Audio Return Channel, HDMI®-1.4Standard).
Lorsque la prise HDMI® de votre téléviseur prend également en charge la fonction CEC (Consumer Electronics Control), vous
pouvez contrôler les fonctions fondamentales de la barre de son, comme les fonctions Marche et Arrêt, les fonctions du volume
et la fonction Muet, à partir de la télécommande de votre téléviseur. Les fonctions CEC disponibles varient d’un téléviseur à
l’autre et doivent être testées au cas par cas. Lisez, à ce propos, le mode d’emploi de votre téléviseur. La plupart des fabricants
emploient leur propre dénomination pour la fonction CEC. Celle-ci se termine généralement par le terme «Link». Attention: pour
des raisons d’ordre technique, la fonction CEC est uniquement disponible en cas de raccordement via la prise HDMI®.
Il se peut que vous deviez activer cettes fonctions de la menu du téléviseur. Grâce au décodeur Dolby® intégré, des signaux
numérique Dolby® codés peuvent également être restitués. Le câble de raccordement requis n‘est pas fourni.
b) Raccordement du téléviseur à l‘entrée numérique optique DIGITAL IN (g. 5, pos. 9) :
Veuillez utiliser le câble optique fourni et relier la sortie audio numérique de votre téléviseur avec l‘entrée audio DIGITAL IN (g.
5, pos. 9) de la barre de son. Grâce au décodeur Dolby® intégré, des signaux numérique Dolby® codés peuvent également être
restitués.
c) Connexion du téléviseur à l‘entrée audio AUX IN (g. 5, pos. 10) :
Utilisez le câble audio fourni (E) et raccordez la sortie audio de votre téléviseur à la sortie audio AUX IN (g. 5, pos. 10). Si votre
téléviseur est équipé d‘une sortie audio sans fading, la privilégier par rapport à la sortie audio à niveau variable.
Connexion d‘autres appareils à la barre de son (g. 3):
Connexion d‘une source audio analogique ou numérique à la barre de son :
Sur l‘entrée analogique AUX IN (g. 5, pos. 10) et sur les entrées numériques DIGITAL IN (g. 5, pos. 9) de la barre de son,
d‘autres sources audio peuvent être branchées, comme un lecteur CD, un lecteur MP3 ou un récepteur satellite. Pour ce faire,
procédez comme décrit dans le point ci-avant.
Raccordez la source HDMI (audio/vidéo) à la barre de son :
Sur les entrées HDMI1, HDMI2 et HDMI3 (g. 5, pos. 11, 12, 13), il est possible de brancher jusqu‘à trois autres sources HDMI
(lecteur BD/DVD, récepteur satellite, console de jeu). Le signal audio de la source HDMI raccordée est transmis via le système ;
le signal vidéo est transmis à la sortie HDMI (HDMI OUT (ARC), g. 5, pos. 14).
Pour cette conguration, il faut sélectionner l‘entrée HDMI du téléviseur qui est raccordée à la sortie HDMI de la barre de son (g.
5, pos. 14).
Important : le raccord USB (g. 5, pos. 8) est prévu exclusivement pour les mises à jour du système et n‘a aucune autre fonction.
22
Page 23

Branchement de l’alimentation électrique de la barre de son
Un bloc d’alimentation externe universels de 110 – 240 V/AC 50/60 Hz (C) est fourni avec l’appareil. Il se peut toutefois que ce cordon
d‘alimentation soit différent de ceux utilisés dans votre pays. Si le cordon d’alimentation n’est pas compatible avec vos prises ou si
vous avez des doutes, veuillez vous adresser à votre revendeur spécialisé de Magnat.
1. Branchez le câble de sortie (coupleur jack) du bloc d’alimentation externe sur la prise d’alimentation de la barre de son
(g. 5, pos. 7).
2. Branchez le câble d’alimentation dans la prise du bloc d’alimentation.
3. Branchez le câble d’alimentation sur la prise électrique. Veillez à utiliser un cordon d’alimentation qui soit compatible avec la prise
électrique (voir consigne ci-dessus).
Branchement de l‘alimentation électrique du subwoofer :
Un cordon d’alimentation de modèle courant est fourni avec l’appareil. Il se peut toutefois que ce cordon d‘alimentation soit différent
de ceux utilisés dans votre pays. Si le cordon d’alimentation n’est pas compatible avec vos prises ou si vous avez des doutes, veuillez
vous adresser à votre revendeur spécialisé de Magnat.
1. Branchez le câble d‘alimentation à 2 pôles sur la prise d‘alimentation de l‘amplicateur du subwoofer (g. 6b, pos. 16).
2. Branchez le câble d’alimentation sur la prise électrique. Veillez à utiliser un cordon d’alimentation qui soit compatible avec la prise
électrique (voir consigne ci-dessus).
PREMIÈRE MISE EN SERVICE, COUPLAGE SANS FIL DE LA BARRE DE SON AVEC LE SUBWOOFER :
Une fois le câble de signaux et l‘alimentation électrique de la barre de son et du subwoofer raccordés, veuillez allumer la barre de son
avec la télécommande (g. 7, pos. 18) ou à l‘aide du panneau de commande latéral (g. 4b, pos. 4).
À chaque mise en service, la barre de son se connecte automatiquement avec le subwoofer :
le témoin d‘état LED de la barre de son (g. 4a, pos. 1) s‘éteint. Le témoin d‘état LED du subwoofer (g. 6a, pos. 15) passe du rouge
au vert.
Si le subwoofer ne s‘allume pas automatiquement, ou si le témoin d‘état LED du subwoofer clignote en vert, c‘est que le raccordement
est incorrect. Dans ce cas, il faut raccorder les appareils manuellement. Veuillez suivre les étapes suivantes :
• Avec la télécommande, veuillez sélectionner l‘entrée AUX (g. 7, pos. 24)
• Appuyez sur la touche NIGHT de la télécommande (g. 7, pos. 27) pendant 5 secondes. WPAIR s‘afche sur l‘écran.
• Appuyez ensuite sur la touche CONNECT située à l‘arrière du subwoofer (g. 6b, pos. 17). Le témoin d‘état LED du subwoofer
clignote pendant la connexion.
• Si le couplage est effectué correctement, la mention SUCCE s‘afche sur l‘écran et le témoin d‘état LED du subwoofer s‘allume en
vert.
• Si la mention FAIL s‘afche sur l‘écran, il faut recommencer la procédure.
UTILISATION
Commandes de la barre de son (façade) (g. 4a) :
(1) Témoin d‘état DEL: ce témoin DEL s‘allume en rouge quand l‘appareil est en mode veille.
(2) Afchage DEL: Sur l‘écran, diverses informations sont afchées :
- Entrée audio sélectionnée
- Réglages audio et menu
- Format audio : lors du décodage d’un signal Dolby numérique, DO LBY s’afche rapidement sur l’écran. En cas de format audio
non compatible, ERROR sera afché sur l’écran et aucune lecture ne sera effectuée.
L‘écran s‘éteint environ 5 secondes après la dernière utilisation.
(3) Capteur de télécommande: Pour pouvoir utiliser la télécommande, orientez-la vers ce point.
Commandes de la barre de son (latéral) (g. 4b) :
(4) O N/STBY: Permet d‘allumer l‘appareil lorsque celui- ci se trouve en mode de veille. À l‘inverse, ce bouton permet de mettre en
veille l‘appareil lorsque celui-ci est en marche.
Si l‘appareil est connecté à un réseau via le WiFi avant sa mise hors service, une légère pression sur la touche fait passer la
Soundbar en mode veille réseau. L‘écran afche NET STBY. Lors de la prochaine mise en service, la connexion au réseau sera
ainsi immédiatement disponible. En outre, l‘appareil peut être mis en service automatiquement via l‘application en lançant la
lecture d‘une source disponible.
Une longue pression sur la touche fait passer l‘appareil en mode veille ECO. Cela interrompt la connexion au réseau.
Si l‘appareil n‘est pas utilisé pendant un long moment, il faut le mettre en mode veille ECO car la consommation de ce mode est
plus faible. Lors de la mise en service et donc la sortie du mode veille ECO, l‘appareil se connecte au réseau après environ 45
secondes.
Si l‘appareil n‘est connecté à aucun réseau avant sa mise hors service, la Soundbar passe toujours en mode veille ECO.
(5) VOLUME: Augmente (+) / baisse (-) le volume sonore
(6) SOURCE: sélectionne l‘entrée.
23
Page 24

Commandes du subwoofer (façade) (g. 6a) :
(15) Témoin d‘état DEL: ce témoin DEL s‘allume en rouge quand l‘appareil est en mode veille. La LED s‘allume en vert quand le
subwoofer est en fonctionnement. Voir également section « Première mise en service ».
Commandes du subwoofer (dos de l‘appareil) (g. 6b):
(17) CONNECT: lance le mode de couplage manuel du subwoofer. Voir également section « Première mise en service ».
Commande à l‘aide de la télécommande (fig. 7):
(18) ON/STBY: Permet d‘allumer l‘appareil lorsque celui-ci se trouve en mode de veille. À l‘inverse, ce bouton permet de mettre en
veille l‘appareil lorsque celui-ci est en marche.
Si l‘appareil est connecté à un réseau via le WiFi avant sa mise hors service, une légère pression sur la touche fait passer la
Soundbar en mode veille réseau. L‘écran afche NET STBY. Lors de la prochaine mise en service, la connexion au réseau sera
ainsi immédiatement disponible. En outre, l‘appareil peut être mis en service automatiquement via l‘application en lançant la
lecture d‘une source disponible.
Une longue pression sur la touche fait passer l‘appareil en mode veille ECO. Cela interrompt la connexion au réseau.
Si l‘appareil n‘est pas utilisé pendant un long moment, il faut le mettre en mode veille ECO car la consommation de ce mode est
plus faible. Lors de la mise en service et donc la sortie du mode veille ECO, l‘appareil se connecte au réseau après environ 45
secondes.
Si l‘appareil n‘est connecté à aucun réseau avant sa mise hors service, la Soundbar passe toujours en mode veille ECO.
(19) HD MI/A RC: sélectionne l‘entrée audio HDMI/ARC.
(20) HDMI 1/2/3: sélectionne les entrées HDMI audio/vidéo supplémentaires 1, 2, 3.
(21) BT: sélectionne l‘entrée audio BLUETOOTH. Une longue pression sur cette touche met l‘appareil en mode jumelage Bluetooth.
(22) WL AN: Sélectionne l‘entrée réseau. Voir également la section CONNEXION DE L‘APPAREIL AVEC UN RESEAU.
(23) DIGITAL: sélectionne l‘entrée audio DIGITAL IN.
(24) ANALOG: sélectionne l‘entrée audio AUX IN.
(25) MU TE: Permet de mettre en sourdine l‘appareil ou de désactiver la sourdine.
(26) VOLUME: Augmente (+) / baisse (-) le volume sonore
(27 ) NI GHT: Active ou désactive un mode de lecture à dynamique réduite et une fréquence en réponse adaptée pour les situations
nécessitant un volume adapté (parex. en n de soirée, etc.).
(28) SU RR: Active ou désactive la fonction son 3D Surround.
(29) SOUND: Sélectionne différentes réglages audio :
LINEAR:
MUSIC: Optimise la réponse en fréquence de l’appareil pour la lecture de musique.
MOVIE: Optimise la réponse en fréquence de l’appareil pour la lecture de la bande sonore d’un lm.
VOCAL: accentue les fréquences vocales an d’améliorer la netteté de la parole.
(30) MENU: ouvre le menu de réglage de la barre de son.
Les réglages suivants peuvent être sélectionnés et modiés avec les touches VOL+/- (26). Appuyer une nouvelle fois sur le menu
permet de valider les réglages.
SUB: Augmente (+) / baisse (-) le volume sonore du subwoofer.
EQ: adaptation du son aux différents placements de la barre de son.
WALL: ce réglage optimise le son quand la barre de son est xée au mur.
DESK: ce réglage optimise le son quand la barre de son est installée sur une étagère ou sous un téléviseur.
réglage réponse en fréquence linéaire
ASTBY: an d‘économiser de l‘énergie, l‘appareil s‘éteint automatiquement après environ 15 minutes sans signal d‘entrée. Cette
fonction peut être désactivée. Elle est activée par défaut à la livraison.
RESET: réinitialise tous les réglages pour revenir aux paramètres d‘usine.
EXIT: ferme le menu de réglage.
Commande de la lecture en mode WiFi/Bluetooth:
(31) SAUT AU TITRE PRÉCÉDENT: une simple pression relance la lecture du titre en cours depuis le début. Lorsque vous appuyez
plusieurs fois sur cette touche, la lecture saute aux titres précédents.
(32) PLAY/ PAUSE: met en pause le titre actuellement en cours de lecture ou reprend la lecture d’un titre en pause.
(33) SAUT AU TITRE SUIVANT: Sélectionne le prochain titre.
Connexion de l‘appareil avec une source audio Bluetooth :
Placez la barre de son sur le mode Bluetooth à l‘aide de la télécommande. Si un couplage a déjà été réalisé précédemment avec
un appareil source Bluetooth, alors le système essayera de rétablir automatiquement cette connexion. Il peut arriver lors de ce
processus que vous deviez conrmer manuellement la reconnexion au niveau de l‘appareil source.
S‘il n‘existe aucun couplage ou que la connexion n‘a pas pu être rétablie, la barre de son active automatiquement le mode
«couplage», également appelé mode « Pairing ». Pour passer la barre de son en mode « Pairing » manuel, maintenez appuyé sur la
touche BT (g. 7, pos. 22) de la télécommande. Quand le mode « Pairing » est actif, le témoin BT clignote.
24
Page 25

Activez à présent le mode Bluetooth de votre appareil source. La la barre de son s‘afche sur la liste des appareils Bluetooth sous
«Magnat CSB1000». S‘il n‘apparaît pas dans la liste, activez manuellement la recherche des appareils Bluetooth sur votre appareil
source et assurez-vous que la barre de son se trouve bien en mode « Pairing ».
En fonction de l‘appareil source, il peut arriver que l‘on vous demande si le mot de passe doit être accepté pendant le processus de
couplage. Conrmez simplement en appuyant sur « Accepter ». Si un mot de passe vous et demandé ultérieurement, utilisez des mots
de passe standard tels que « 0000 » ou « 1234 ». Si, une fois le couplage effectué, il vous est demandé si vous souhaitez procéder à
la connexion, répondez « Oui ». Une fois le couplage et la connexion réalisés, l‘entrée BT reste afchée sur l‘écran.
La barre de son prend en charge la norme de transmission haut de gamme « Qualcomm® aptX™ ». Si votre appareil source
prend également cette technique en charge, le mode de transmission « Qualcomm® aptX™ » est sélectionné par défaut lors de
l‘établissement de la connexion Bluetooth.
CONNEXION DE L‘APPAREIL AVEC UN RESEAU
a) Connexion WiFi via le mode WPS
Si votre routeur à un bouton WPS, l‘utiliser est la manière la plus simple et la plus pratique de connecter le haut-parleur au réseau:
• Sélectionnez l‘entrée WiFi avec la télécommande. Sur l‘écran, le mot «WLAN» clignote pour indiquer qu‘aucune connexion au réseau
n‘a encore été effectuée.
• Appuyer sur le bouton WPS du routeur. Appuyez ensuite sur la touche WLAN (WiFi) de la télécommande pendant 5 secondes afin de
confirmer la connexion.
• L‘app a r e i l va établir la connexion avec le réseau. Pendant la connexion, le mot «WPS» clignote sur l‘écran.
• Une fois la connexion effectuée, le message «WPS OK» s‘affiche sur l‘écran. Le témoin du WLAN (WiFi) reste ensuite allumé.
• L‘app a r e i l peut désormais restituer les signaux audio du réseau.
• L‘app a r e i l enregistre les données de connexion. Il est donc inutile de les ressaisir à chaque fois qu‘il est allumé.
Remarque: Le délai d‘attente du mode WPS est de 2 mn. Vous aurez peut-être besoin de redémarrer et d‘appuyer à nouveau sur le
bouton WPS si le délai est dépassé.
Remarque: Veuillez consulter les instructions du routeur.
b) Connexion à un réseau via l‘interface web
Si la connexion WPS échoue, vous pouvez utiliser l‘interface web de la barre de son. Vous aurez besoin d‘un appareil doté d‘une carte
de connexion sans fil sur lequel vous pouvez accéder à un navigateur internet (comme un ordinateur / un smartphone).
• Mettre le haut-parleur en service et rechercher le réseau WiFi ouvert «MAGNAT CSB 1000XX-XX-XX » dans la liste des réseaux
disponibles de l‘ordinateur / du smartphone.
• Remarque: XX-XX-XX sur le SSID du haut-parleur correspond aux 6 derniers caractères de l‘adresse MAC du haut-parleur.
• L‘écran ouvre les pages de paramétrage automatiquement. Le cas contraire, ouvrir le navigateur web et entrer 172.19.42.1 dans la
barre du navigateur et appuyer sur Entrée pour valider.
L‘interface web du WiFi apparaît.
• Donner au haut-parleur un nom qui vous permettra de le reconnaître dans la liste des haut-parleurs disponibles (comme salon ou
cuisine).
• Rechercher parmi les réseaux disponibles du menu déroulant et sélectionner le réseau qui sera connecté avec le haut-parleur.
25
Page 26

• Si le routeur n‘associe aucune adresse IP, éteindre la fonction DHCP et entrer l‘adresse IP manuellement dans les cases du bas.
• Entrer la clé réseau si nécessaire et cliquer sur « CONNECT ».
• La page web vous informera quand le réseau sera connecté. Le produit va établir la connexion avec le réseau
Remarque:
1. Le produit n‘est pas compatible avec le protocole de sécurité WEP.
2. L‘appareil intelligent doit utiliser un réseau valide après le paramétrage de la connexion entre le haut-parleur et le routeur. Si ce n‘est
pas le cas, s‘assurer que l‘appareil intelligent soit connecté au même réseau que celui auquel le haut-parleur est connecté.
Le produit peut désormais restituer les signaux audio du réseau. Les données de connexion sont enregistrées. Il est donc inutile de les
ressaisir à chaque fois que l‘appareil est allumé.
LECTURE DE MUSIQUE EN MODE WIFI
Vous pouvez écouter de la musique disponible sur le réseau avec le haut-parleur. Vous pouvez également écouter de la musique d‘un
appareil connecté via le mode direct.
a) Installation de l‘application sur smartphone Android/ Apple / tablette PC
Afin d‘utiliser la fonction de commande de la lecture de musique du haut-parleur sur une tablette ou un smartphone, il faut télécharger
une application (Allplay radio et jukebox) pour tablette ou smartphone disponible sur Play Store (Android) ou App Store (Apple).
L‘application AllPlay Jukebox offre les options de lecture suivantes:
Mode fête: différents appareils intelligents ajoutent via l‘application des morceaux d‘une playlist partagée, lue sur le haut-parleur.
Mode multizones: différents appareils intelligents ajoutent via l‘application des morceaux de plusieurs playlists lues sur différents
haut-parleurs.
Mode multipièces: différents haut-parleurs sont associés via l‘application pour former un groupe et une playlist est lue à partir d‘un
appareil intelligent sur tous les haut-parleurs de ce groupe.
Remarque: Vous pouvez sélectionner plus qu‘un haut-parleur pour la lecture. Consulter l‘application pour plus détails.
Remarque: Il est possible que les deux applications ne soient pas disponibles pour toutes les tablettes Apple sur l‘Apple store.
SERVICE ET PROBLEMES TECHNIQUES
Si des problèmes techniques font leur apparition, adressez-vous à votre revendeur spécialisé ou à Magnat Audio-Produkte GmbH, tél.:
+49 (0) 2234807- 0.
26
Page 27

SPÉCIFICATIONS TECHNIQUES
Configuration: 2 x 2 voies, actif
Subwoofer bassreflex actif
Puissance de sortie RMS/Max.: 4 x 20 /40 watts (canal G+D)
100/200 Watt (Subwoofer)
Bande passante: 25 – 28 000 Hz
Fréquence séparatrice: 180 / 3100 Hz
Taux d‘échantillonnage des entrées numériques jusqu‘à 96 kHz / 24 Bit
Fréquence de service: BT: 2402 – 2480 MHz
Wireless: 5740 – 5814 MHz
WLAN: 2412 – 2472 MHz
5150 – 5250 MHz
5250 – 5350 MHz
5470 – 5725 MHz
Dans tous les pays membres de l‘Union Européenne, le fonctionnement de
5150-5350 MHz est exclusivement limité aux espaces intérieurs.
Puissance maximale rayonnée selon EN62479: BT: 9,5 dBm
Wireless: 9 dBm
WLAN: 2,4 GHz: 20 dBm
5 GHz: 22 dBm
Consommation de courant:
Mode de service Barre de son: 65 W
Mode de service Subwoofer: 100 W
Mode veille Barre de son: 3 W (réseau sans l acitvé)
<0,5 W (réseau sans l désacitvé)
Mode veille Subwoofer <0,5 W
Dimensions Soundbar (lxhxp): 1000 x 79 x 60 mm
Dimensions Subwoofer (lxhxp): 230 x 382 x 418 mm
Poids barre de son: 2,5 kg
Poids Subwoofer: 9,4 kg
Bloc d’alimentation: Dongguan Dongsong Electronic Co., Ltd., DYS602-210309W
USB: 5 V
, 1A
SOUS TOUTES RÉSERVES DE MODIFICATIONS TECHNIQUES
27
Page 28

Egregio cliente MAGNAT,
innanzi tutto La ringraziamo per aver scelto un prodotto MAGNAT. Ci congratuliamo con Lei. Scegliendo questo prodotto ha
acquistato un articolo di qualità riconosciuto in tutto il mondo.
INDICAZIONE IMPORTANTE AI FINI DELLA SICUREZZA
Prima della messa in esercizio si prega di leggere attentamente le istruzioni per l’uso. Le presenti istruzioni per l’uso comprendono
avvisi importanti relativi al funzionamento e la sicurezza. Si prega di rispettare tutte le avvertenze. Si prega inoltre di conservare con
cura le presenti istruzioni per l’uso.
• AVVERTENZE: Tutti i segnali di avviso presenti sul dispositivo, gli accessori e nelle istruzioni per l’uso devono essere rispettati.
• INFLUENZA TERMICA: Utilizzare il dispositivo e gli accessori solo a temperature compresa tra i 10°C e i 45°C.
Il dispositivo non deve essere posizionato vicino a fonti di calore (termosifoni, forni, stufe, amme libere). In caso di montaggio
nelle vicinanze di amplicatori è necessaria una distanza non inferiore a 10 cm.
• Non avvicinare a amme libere, come ad es. candele.
• Accertarsi che il dispositivo sia sufcientemente aerato. Il dispositivo non deve essere coperto, ad es. con tende. Mantenere una
distanza sufciente (ca. 20 cm) dalle pareti.
• INFLUSSO DELL’UMIDITÀ: Il dispositivo non deve essere esposto a gocce o spruzzi d’acqua. Inoltre non deve essere utilizzato per
poggiare vasi o altri contenitori pieni d’acqua. Il dispositivo non deve essere esposto né all’acqua né all’umidità. Altrimenti sussiste
il pericolo di scosse elettriche. In caso di contatto con l’umidità o liquidi è necessario scollegare immediatamente la spina di rete.
• CORPI ESTRANEI: Accertarsi che nelle aperture del dispositivo non si inltrino corpi estranei. Potrebbero provocare cortocircuiti,
scosse elettriche ed incendi.
• PULIZIA: Si prega di utilizzare un panno asciutto e morbido e non utilizzare detergenti, spray o solventi chimici poiché altrimenti si
potrebbe danneggiare la supercie.
• COLLEGAMENTO ELETTRICO: Si prega di osservare i valori di tensione riportati sui segnali di avviso. L’alimentatore del dispositivo
può essere fatto funzionare solo con i valori di tensione e di frequenza riportati sulle targhette.
• PROTEZIONE DAI FULMINI/MISURE CAUTELARI: Se l’apparecchio non è utilizzato per un periodo prolungato (ad es. vacanze) si
consiglia di staccare la spina dalla presa di corrente. Anche in caso di temporale è necessario scollegare l’apparecchio dalla rete
elettrica. In questo modo si evita il danneggiamento da fulmine o sovratensione.
• CAVO DI RETE: Il cavo di rete deve essere sempre pronto per l’uso e disposto in modo tale che nessuno possa calpestarlo.
Inoltre non deve essere stretto da oggetti che potrebbero danneggiarlo. Quando si utilizzano spine e prese multiple è necessario
accertarsi che il cavo non venga piegato nel punto in cui giunge alla presa elettrica. Non toccare o collegare il cavo di alimentazione
con mani umide.
• Lo spinotto funge da dispositivo di spegnimento e deve sempre essere accessibile.
• SOVRACCARICO: Le prese elettriche, le prese multiple e le prolunghe non devono essere sovraccaricate. In caso di sovraccarico
sussiste il rischio di scosse elettriche e di incendio.
• MONTAGGIO: Si prega di rispettare le istruzioni di montaggio.
• Il dispositivo deve essere posizionato e montato su una supercie resistente e non mobile altrimenti sussiste il rischio di infortuni.
• Utilizzare solo accessori originali in dotazione o indicati dal produttore.
• Il dispositivo va utilizzato solo con l’alimentatore „Dongguan Dongsong Electronic Co., Ltd., DYS602-210309W“ fornito in
dotazione.
• Non esporre le batterie a fonti di calore elevate, come ad es. luce del sole, fuoco o simili.
• Vi è il rischio di esplosione se la batteria non viene inserita nel modo corretto. Sostituire la batteria solo con una batteria
equivalente o dello stesso tipo.
• PERICOLO DI INGESTIONE DELLE BATTERIE!
• Il dispositivo/il telecomando può contenere una batteria a bottone (a forma di moneta) che può essere ingerita. Tenere sempre la
batteria fuori dalla portata dei bambini. L’ingestione della batteria può causare lesioni gravi o risultare persino letale. Può provo care gravi ustioni interne nell’arco delle due ore successive all’ingestione.
• Rivolgersi immediatamente a un medico nel caso in cui si sospetti che una batteria sia stata ingerita o introdotta in una parte
del corpo.
• Al momento della sostituzione delle batterie, tenere le pile nuove e quelle esaurite fuori dalla portata dei bambini. Assicurarsi di
aver chiuso correttamente il vano batterie dopo la sostituzione.
• Qualora non sia possibile chiudere correttamente il vano batterie, non continuare a utilizzare il prodotto. Tenere il prodotto fuori
dalla portata dei bambini e contattare il produttore.
DANNI CHE DEVONO ESSERE RISOLTI DA UN ADDETTO SPECIALIZZATO:
Nel caso dei seguenti danni è necessario che l‘apparecchio venga scollegato immediatamente dalla rete elettrica contattando per la
riparazione un addetto specializzato:
• Qualora il cavo di alimentazione risulti visibilmente danneggiato, cessare immediatamente l’utilizzo dell’apparecchio. Sostituire, e
non riparare, il cavo danneggiato.
• Danni alla presa di alimentazione del dispositivo.
• Nel caso in cui nell’apparecchio si dovesse inltrare dell’umidità o acqua oppure nel caso in cui nell’apparecchio siano caduti corpi
estranei.
• Quando l’apparecchio è caduto e l’alloggiamento è danneggiato.
• Quando l’apparecchio non funziona correttamente nonostante si siano rispettate tutte le avvertenze riportate nelle istruzioni per
l’uso.
È permesso effettuare delle modiche susseguenti solo se queste sono approvate dal produttore.
28
Page 29

Per la riparazione è possibile impiegare solo pezzi di ricambio originali.
Dopo gli interventi di riparazione è necessario che venga vericata la sicurezza dell’apparecchio per poter garantire un funzionamento
perfetto e sicuro.
Gli interventi di riparazione devono essere afdati sempre ad addetti specializzati poiché altrimenti ci si espone ad alte tensioni
pericolose o altri rischi.
Questo triangolo con il simbolo del fulmine avvisa l’utente che all’interno dell’apparecchio sono presenti tensioni elevate che
possono provocare scariche elettriche pericolose.
Il triangolo con punto esclamativo indica all’utente dell’apparecchio che nel manuale d’uso compreso nella fornitura sono
presenti avvertenze importanti (di riparazione) che devono essere assolutamente rispettate.
Attenzione! Non aprire!
Attenzione: Per evitare scosse elettriche non è consentito aprire l’alloggiamento degli altoparlanti/
alimentatori ne rimuovere le coperture. All’utente non è consentito effettuare alcun intervento di
riparazione. Gli interventi di riparazione possono essere eseguiti solo da tecnici qualicati! Non utilizzare
alcuna presa elettrica o prolunga che non possa essere inserita completamente nell’apparecchio.
Utilizzare esclusivamente l’alimentatore indicato nel manuale d‘uso.
Tensione alternata.
Tensione continua.
Polarità dell‘alimentatore (tensione continua)
Dispositivo con classe di protezione II e doppio isolamento. Collegamento a massa assente.
AVVERTENZE PER LO SMALTIMENTO
Secondo quanto prescritto dalla direttiva europea 2012/19/EU è necessario che tutti i dispositivi elettrici ed elettronici vengano
smaltiti separatamente dai centri di raccolta preposti. Si prega di rispettare le regolamentazioni locali e smaltire i dispositivi usati non
insieme ai normali riuti domestici.
SMALTIMENTO DELLA BATTERIA
Le batterie esauste sono da considerarsi riuti speciali e devono essere smaltite secondo le regolamentazioni attuali.
DICHIARAZIONE DI CONFORMITÀ
Con la presente la ditta Magnat Audio-Produkte GmbH dichiara che l’apparecchio CSB1000 è conforme ai requisiti di base e alle altre
prescrizioni rilevanti della Direttiva 2014/53/UE. La dichiarazione di conformità è disponibile al sito www.magnat.de nell’area download
dell’apparecchio.
USO CONFORME ALLE DISPOSIZIONI
Questo apparecchio è studiato esclusivamente per l’utilizzo domestico.
CONTENUTO:
(A) 1 x Soundbar
(B) 1 x Subwoofer
(C) 1 x Alimentatore per la soundbar e cavo di alimentazione
(D) 1 x Cavo di alimentazione per il subwoofer
(E) 1 x Telecomando incl. batteria (pila a bottone CR2025)
(F) 1 m Cavo audio stereo, connettore jack da 3,5 mm su entrambi i lati
(G) 1,5 m Cavo ottico digitale (1,5 m)
(H) 1 x Supporto da parete con materiale di fissaggio
(I) 1 x Istruzioni per l’uso
29
Page 30

DISIMBALLAGGIO DELL’ALTOPARLANTE
Si prega di disimballare con cautela gli altoparlanti e gli accessori e di vericare il contenuto del cartone originale consultando
la lista precedentemente riportata. In caso di un danno dovuto al trasporto si prega di contattare il proprio fornitore. Conservare
accuratamente il materiale di imballaggio. La confezione originale consente in caso di successivo trasferimento ed in caso di
interventi di servizio di poter effettuare un trasporto in tutta sicurezza.
INSTALLAZIONE DEI COMPONENTI DEL SISTEMA
Soundbar (A): La soundbar va posizionata al centro direttamente sotto al televisore. Se il televisore si trova su uno scaffale o su un
mobile credenza, la soundbar è in tal caso anche posizionabile direttamente davanti al televisore. Se il televisore è montato a parete,
si consiglia di installare anche la soundbar direttamente sotto lo schermo utilizzando il sostegno a parete fornito a corredo.
Subwoofer (B): il subwoofer va posizionato sul pavimento vicino a la soundbar, normalmente a destra o a sinistra del televisore. La
distanza rispetto allo schermo non dovrebbe essere inferiore ai 100 cm con televisori a tubo catodico e ai 50 cm con schermi piatti.
L’uso dei sostegni a parete per la soundbar forniti a corredo è illustrato in fig.1.
a. Montare la staffa da parete, come indicato, al di sotto del televisore. Per il montaggio alla parete si prega di utilizzare viti e
tasselli adeguati (non forniti in dotazione).
b. Appendere la soundbar utilizzando i bulloni di fissaggio premontati nei relativi fori della staffa.
Avviso importante / avvertenza di sicurezza: Per l’utilizzo di altri sostegni a parete / fissaggi alla parete è ritenuto responsabile il
cliente. Il cliente è allo stesso modo responsabile per il fissaggio sicuro del sostegno dell’altoparlante alla parete e per la scelta del
materiale di montaggio adatto (ad es. viti, tasselli) considerando il peso e la costruzione della soundbar e la qualità della parete.
INSTALLAZIONE DEL SISTEMA
Collegamento a un televisore (g. 2):
Il sistema CSB1000 è progettata per il collegamento diretto a un apparecchio TV. È possibile scegliere tra tre opzioni:
a) Collegare il televisore alla porta HDMI/ARC (g. 5, pos. 14):
Collegare l’apparecchio TV a questa porta, se il televisore dispone di un collegamento HDMI® con funzione ARC (Audio Return
Channel, HDMI® 1.4 Standard).
Nel caso in cui la porta HDMI® della TV utilizzata suppor ti la funzione CEC (Consumer Electronics Control), diverse funzioni
del dispositivo soundbar (es: accensione/spegnimento, volume e modalità silenziosa) possono essere comandate tramite il
telecomando della TV. Quale tipo di funzione CEC sia effettivamente disponibile dipende dal modello di televisore e va pertanto
vericato. A tal ne, si raccomanda la lettura delle istruzioni d‘uso del televisore. La maggior parte dei produttori abbina una
propria denominazione alla funzione CEC, che include spesso il termine „link“. Attenzione: per motivi tecnici, la funzione CEC è
disponibile solo tramite la connessione HDMI®.
In alcuni casi, sarà necessario attivare tali funzioni dal menù del televisore. I decodicatori Dolby® integrati consentono altresì la
riproduzione di segnali codicati Dolby®Digital. Il cavo di collegamento richiesto non è compreso nella dotazione.
b) Collegare il televisore all’ingresso digitale ottico DIGITAL IN (g. 5, pos. 9):
Utilizzare il cavo ottico in dotazione per collegare l’uscita audio digitale del televisore all’ingresso audio DIGITAL IN (g. 5, pos. 9)
della soundbar. I decodicatori Dolby® integrati consentono altresì la riproduzione di segnali codicati Dolby®Digital.
c) Collegare il televisore all’ingresso audio AUX IN (g. 5, Pos. 10):
Utilizzare il cavo audio (E) in dotazione e collegare l’uscita audio del televisore con l’ingresso audio AUX IN (g. 5, Pos. 10). Se il
televisore è dotato di un’uscita audio a livello sso, scegliere quest’ultima piuttosto che l’uscita audio a livello variabile.
Collegamento di altri apparecchi alla soundbar (g. 3):
Collegare una sorgente audio analogica o digitale alla soundbar:
All’ingresso analogico AUX IN (g. 5, pos. 10) e agli ingressi digitali DIGITAL IN (g. 5, pos. 9) della soundbar è possibile collegare
anche altre sorgenti audio come ad es. lettori CD, lettori MP3, ricevitori satellitari. Seguire le istruzioni descritte al paragrafo
summenzionato.
30
Page 31

Collegare sorgenti HDMI (audio/video) alla soundbar:
È possibile collegare no a tre sorgenti HDMI (ad es. lettori BD/DVD, ricevitori satellitare, console per videogiochi) agli ingressi
HDMI1, HDMI2 e HDMI3 (g. 5, pos. 11, 12, 13). Il segnale audio delle sorgenti HDMI viene riprodotto dal sistema CSB1000,
mentre il segnale video viene trasmesso all’uscita HDMI (HDMI OUT (ARC), g. 5, pos. 14).
Per la congurazione occorre selezionare l’ingresso HDMI del televisore che è collegato all’uscita HDMI della soundbar
(g. 5, pos. 14).
Importante: il collegamento USB (g. 5, pos. 8) è previsto esclusivamente per gli aggiornamenti del sistema e non ha altre
funzioni.
Collegamento dell’alimentazione elettrica della soundbar:
La fornitura comprende un alimentatore esterno universale (C) che opera con 110 – 240 V/AC 50/60 Hz. Tuttavia il cavo di rete
utilizzato nel paese dell’utente potrebbe essere diverso. Nel caso in cui il cavo di rete non dovesse essere adatto per le prese
elettriche oppure non si è certi del modello adatto si prega di contattare il proprio rivenditore Magnat.
1. Collegare il cavo di uscita (giunto a jack) del alimentatore esterno all’attacco dell’alimentazione elettrica del trasmettitore
(g. 5, pos. 7).
2. Inserire il cavo di rete nell’attacco dell’alimentatore.
3. Inserire il cavo di rete nella presa elettrica. Accertarsi di utilizzare la spina di rete adatta per la presa elettrica (vedi avvertenza
precedente).
Collegare l’alimentazione elettrica del subwoofer:
La fornitura comprende il cavo di rete più diffuso. Tuttavia il cavo di rete utilizzato nel paese dell’utente potrebbe essere diverso.
Nel caso in cui il cavo di rete non dovesse essere adatto per le prese elettriche oppure non si è certi del modello adatto si prega di
contattare il proprio rivenditore Magnat.
1. Inserire il cavo di rete a due poli nella presa di alimentazione dell’amplicatore del subwoofer (g. 6b, pos. 16).
2. Inserire il cavo di rete nella presa elettrica. Accertarsi di utilizzare la spina di rete adatta per la presa elettrica (vedi avvertenza
precedente).
PRIMA MESSA IN FUNZIONE, COLLEGAMENTO WIRELESS DELLA SOUNDBAR AL SUBWOOFER:
Dopo aver collegato tutti i cavi di segnale e di alimentazione della soundbar e del subwoofer, accendere la soundbar col telecomando
(g. 7, pos. 18) o dal pannello di comando laterale (g. 4b, pos. 4).
Una volta accesa, la soundbar si collega automaticamente con il subwoofer:
Il LED di stato sulla soundbar si spegne (g. 4a, pos. 1). Il LED di stato del subwoofer (g. 6a, pos. 15) passa da rosso a verde.
Se il subwoofer non si accende automaticamente o il LED di stato del subwoofer diventa verde e inizia a lampeggiare signica che il
collegamento non è riuscito. In questo caso occorre stabilire manualmente il collegamento. Procedere come segue:
- Dal telecomando selezionare l’ingresso AUX (g. 7, pos. 24).
- Premere per 5 secondi il tasto NIGHT sul telecomando (g. 7, pos. 27). Nel display comparirà WPAIR.
- Premere quindi il tasto CONNECT sul retro del subwoofer (g. 6b, pos. 17). Durante il tentativo di connessione il LED di stato del
subwoofer diventa verde e lampeggia.
- A connessione avvenuta, nel display compare la dicitura SUCCE e il LED di stato verde del subwoofer resta acceso.
- Se sul display compare la dicitura FAIL, occorre ripetere la procedura.
FUNZIONAMENTO
Elementi di comando della soundbar (parte anteriore) (g. 4a):
(1) Indicatore di stato LED: il LED è rosso quando il dispositivo si trova in modalità standby.
(2) Display L ED: nel display vengono visualizzate diverse informazioni:
- ingresso audio selezionato
- impostazioni sonore e del menu
- Formato audio: se viene decodicato un segnale Dolby Digital, nel display viene visualizzata per un momento l‘indicazione
DOLBY.
In caso di formati audio non compatibili nel display viene visualizzata l‘indicazione ERROR e il brano non viene riprodotto.
Il display si spegne circa 5 secondi dopo l’ultimo utilizzo.
(3) Sensore per telecomando: Per poter utilizzare il telecomando, puntare su questo punto.
31
Page 32

Elementi di comando della soundbar (lato) (g. 4b):
(4) O N/STBY: Attiva l‘apparecchio quando si trova in modalità Standby. Viceversa, l‘apparecchio può essere attivato dalla modalità
Power alla modalità Standby.
Se prima dello spegnimento il dispositivo è collegato a una rete tramite WI-FI, con una leggera pressione la soundbar entra
in modalità stand-by Rete. Nel display viene visualizzata la dicitura NET STBY. Una volta che l’apparecchio viene riacceso, la
connessione alla rete sarà subito disponibile. Inoltre il dispositivo viene riacceso automaticamente anche attraverso l’app
avviando la riproduzione di una sorgente disponibile.
Premendo il tasto a lungo il dispositivo entra in modalità stand-by ECO. La connessione alla rete viene quindi annullata.
Se il dispositivo non viene utilizzato per un lungo periodo, occorrerebbe impostare la modalità stand-by ECO in quanto
l’assorbimento di potenza è inferiore. Una volta riacceso dalla modalità stand-by ECO il dispositivo è di nuovo disponibile in rete
dopo circa 45 secondi.
Se prima dello spegnimento il dispositivo non è connesso a una rete, la soundbar entrerà sempre in modalità stand-by ECO.
(5) VOLUME: Aumenta (+) / riduce (-) il volume.
(6) SOURCE: per selezionare l’ingresso.
Elementi di comando del subwoofer (parte anteriore) (g. 6a):
(15) Indicatore di stato LED: il LED è rosso quando il dispositivo si trova in modalità standby. Il LED è verde quando il subwoofer è in
modalità operativa. Cfr. anche paragrafo “Prima messa in funzione”.
Elementi di comando del subwoofer (parte posteriore) (g. 6b):
(17) CONNECT: attiva la modalità di collegamento manuale del subwoofer. Cfr. anche paragrafo “Prima messa in funzione”.
Utilizzo con il telecomando del sistema (g. 7):
(18) ON/STBY: Attiva l‘apparecchio quando si trova in modalità Standby. Viceversa, l‘apparecchio può essere attivato dalla modalità
Power alla modalità Standby.
Se prima dello spegnimento il dispositivo è collegato a una rete tramite WI-FI, con una leggera pressione la soundbar entra
in modalità stand-by Rete. Nel display viene visualizzata la dicitura NET STBY. Una volta che l’apparecchio viene riacceso, la
connessione alla rete sarà subito disponibile. Inoltre il dispositivo viene riacceso automaticamente anche attraverso l’app
avviando la riproduzione di una sorgente disponibile.
Premendo il tasto a lungo il dispositivo entra in modalità stand-by ECO. La connessione alla rete viene quindi annullata.
Se il dispositivo non viene utilizzato per un lungo periodo, occorrerebbe impostare la modalità stand-by ECO in quanto
l’assorbimento di potenza è inferiore. Una volta riacceso dalla modalità stand-by ECO il dispositivo è di nuovo disponibile in rete
dopo circa 45 secondi.
Se prima dello spegnimento il dispositivo non è connesso a una rete, la soundbar entrerà sempre in modalità stand-by ECO.
(19) HDMI/ARC: per selezionare l’ingresso audio HDMI/ARC.
(20) HDMI 1/2/3: seleziona gli altri ingressi audio/video HDMI 1, 2, 3.
(21) BT: per selezionare l’ingresso audio BLUETOOTH. Tenendo premuto questo tasto più a lungo si accende il dispositivo in modalità
Pairing Bluetooth.
(22) WLAN: Selezionare l’ingresso di rete. Vedere anche COLLEGARE IL DISPOSITIVO A UNA RETE.
(23) DIGITAL: per selezionare l’ingresso audio DIGITAL IN.
(24) ANALOG: per selezionare l’ingresso audio AUX IN.
(25) MU TE: Disattiva e riattiva il volume.
(26) VOLUME: Aumenta (+) / riduce (-) il volume.
(27 ) NI GHT: Attiva o disattiva la modalità di riproduzione con una dinamica ridotta e una risposta in frequenza adattata per le
circostanze in cui è richiesto un attenuamento del volume (es: tarda sera).
(28) SU RR: attiva o disattiva la funzione audio 3D-Surround.
(29) SOUND: per selezionare le diverse impostazioni sonore
LINEAR: impostazione di risposta in frequenza lineare
MUSIC: ottimizza la risposta in frequenza del dispositivo per la riproduzione di brani musicali.
MOVIE: ottimizza la risposta in frequenza del dispositivo per la riproduzione dell‘audio dei lm.
VOcal: alza la gamma vocale per una migliore comprensione dei dialoghi
(30) MENU: apre il menu delle impostazioni della soundbar
È possibile selezionare le seguenti impostazioni e modicarle con i tasti VOL+/- (26). Per confermare l’impostazione premere di
nuovo il tasto Menu.
SUB: Aumenta (+) / riduce (-) il volume del subwoofer.
EQ: modica del suono in base al diverso posizionamento della soundbar
WALL: questa impostazione ottimizza il suono se la soundbar è montata alla parete.
DESK: questa impostazione ottimizza il suono se la soundbar è collocata su un ripiano davanti o al di sotto del televisore.
32
Page 33

ASTBY: il dispositivo si spegne automaticamente per risparmiare energia dopo ca. 15 minuti senza segnale d’ingresso. Questa
funzione può essere disattivata; al momento della consegna del prodotto l’impostazione è attiva.
RE SET: per ripristinare tutte le impostazioni predenite.
EXIT: per uscire dal menu delle impostazioni.
Controllo riproduzione in modalità WLAN/Bluetooth:
(31) BRANO PRECEDENTE: premendo una volta, il brano in esecuzione ricomincia da capo. Premendo più di una volta, vengono
selezionati i brani precedenti.
(3 2) PL AY/ PAU SE : PLAY/PAUS E: mette in pausa il brano in esecuzione o ne riavvia la riproduzione.
(33) BRANO SUCCESSIVO: Selezionare il titolo successivo.
Collegare l’apparecchio alla sorgente audio Bluetooth:
Selezionare la modalità Bluetooth della soundbar utilizzando il telecomando. Se in precedenza era già stato impostato un
collegamento a una sorgente Bluetooth, l’apparecchio cercherà automaticamente di collegarsi a quel dispositivo. Potrebbe anche
risultare necessario confermare manualmente la riconnessione alla sorgente.
Qualora non sia stato effettuato alcun collegamento precedente o la connessione non possa essere ripristinata, la soundbar attiva in
automatico la modalità collegamento, detta anche modalità pairing. Per azionare manualmente la modalità pairing del Soundcheck,
premere e tenere premuto il pulsante BT (g. 7, pos. 22) del telecomando. L’indicazione BT nel display lampeggia per tutta la durata
della modalità pairing.
Selezionare ora la modalità Bluetooth dell’apparecchio sorgente. La soundbar verrà visualizzato nella lista dei dispositivi Bluetooth
come „MAGNATCSB1000“. Qualora non comparisse nella lista, attivare manualmente la ricerca dei dispositivi Bluetooth
dall’apparecchio sorgente e assicurarsi che la soundbar sia impostata sulla modalità pairing.
A seconda degli apparecchi sorgente, durante la procedura di collegamento può essere richiesto di inserire una password. Confermare
con „Accetta“. Se successivamente verrà richiesta una password, inserire le password standard „0000“ o „1234“. Qualora dopo il
collegamento venga richiesto se si vuole stabilire una connessione, rispondere con „Sì“. Una volta che gli apparecchi sono connessi,
l’indicazione BT nel display si accende e smette di lampeggiare.
La soundbar supporta il valido standard di trasmissione audio „Qualcomm® aptX™“. Se anche l’apparecchio sorgente suppor ta
questa tecnica, al momento della connessione Bluetooth verrà selezionata automaticamente la modalità di trasmissione „Qualcomm®
ap tX™“.
COLLEGARE IL DISPOSITIVO A UNA RETE
a) Connessione WLAN con la modalità WPS
Se presente sul router, il pulsante WPS rappresenta un modo semplice e comodo per connettere l’altoparlante alla rete:
• Selezionare con il telecomando l’ingresso WLAN. Nel display lampeggia la scritta WLAN a indicare che non è stata ancora stabilita
alcuna connessione alla rete.
• Premere il pulsante WPS sul router. Premere il tasto WLAN sul telecomando per circa 5 secondi per stabilire la connessione.
Il prodotto stabilirà quindi una connessione con la rete. Durante questa operazione sul display lampeggia la scritta WPS.
• Non appena si stabilisce la connessione, sul display viene mostrato il messaggio WPS OK. A questo punto, il menu WLAN resta
acceso.
• L’apparecchio può ora riprodurre segnali audio provenienti dalla rete.
• L’apparecchio memorizza i dati di connessione che quindi non dovranno essere reinseriti all’utilizzo successivo.
Attenzione: Il tempo di attesa per la modalità WPS è di 2 minuti. Allo scadere dei 2 minuti potrebbe essere necessario riprovare e
premere di nuovo il pulsante WPS.
Attenzione: Si prega di leggere le istruzioni del router.
b) Connessione a una rete tramite interfaccia web
Se non si riesce a connettersi a una rete tramite WPS, è possibile utilizzare l’interfaccia web della Soundbar. Sarà necessario un
dispositivo con un adattatore di rete wireless dal quale accedere a un browser internet (ad es. computer/smartphone).
• Accendere l’altoparlante e cercare nella lista delle reti disponibili sul computer/smartphone la rete WLAN aperta
“MAGNATCSB1000XX-XX-XX”.
• Attenzione: XX-XX-XX nell’SSID dell’altoparlante equivale agli ultimi 6 caratteri dell’indirizzo MAC del relativo altoparlante.
• La pagina di configurazione verrà visualizzata automaticamente. In caso contrario, aprire il browser web e immettere 172.19.42.1
nella barra dell’indirizzo del browser, quindi premere INVIO per confermare.
Apparirà l’interfaccia web della WLAN.
33
Page 34

• Immettere un nome per l’altoparlante con il quale indentificarlo successivamente nella lista di altoparlanti disponibili (ad es. “salotto”
o “cucina”).
• Cercare nella lista delle reti disponibili nel menu a tendina “network name” (nome della rete) e selezionare la rete con la quale si
desidera collegare l’altoparlante.
• Se il router di rete non assegna alcun indirizzo IP, disattivare la funzione DHCP e inserire manualmente l’indirizzo IP nei campi in basso.
• Inserire quindi la chiave di rete (password), se richiesta, e cliccare su “CONNECT” (connettere).
• La pagina web ti informerà che la connessione è avvenuta correttamente visualizzando la dicitura “network was connected
successfully”. Il prodotto stabilirà quindi una connessione con la rete.
Attenzione:
1. Il prodotto non supporta il protocollo di sicurezza “WEP”.
2. Lo smart device può navigare su una rete valida dopo aver configurato la connessione tra altoparlante e router. In caso contrario
assicurarsi che lo smar t device sia connesso alla stessa rete a cui è connesso l’altoparlante.
L’apparecchio può ora riprodurre segnali audio provenienti dalla rete. I dati di connessione vengono memorizzati e non dovranno essere
quindi reinseriti all’utilizzo successivo.
RIPRODUZIONE MUSICALE IN MODALITÀ WLAN
Tramite l’altoparlante è possibile riprodurre musica dalla rete o anche da un dispositivo connesso in modalità diretta.
a) Installare l’app su uno smartphone/tablet Android/Apple
Per poter utilizzare la funzione di comando di riproduzione musicale mediante altoparlante su un tablet o uno smartphone, occorre
innanzitutto installare l’app corrispondente (Allplay radio e jukebox) per tablet / smartphone disponibile su Play Store (Android) o App
Store (Apple).
L’app AllPlay Jukebox offre le seguenti opzioni di riproduzione:
Modalità Party: Diversi smart device aggiungono tracce musicali tramite l’app da una playlist condivisa che viene riprodotta
sull’altoparlante.
Modalità Multizone: Diversi smart device aggiungono tracce musicali tramite l’app da playlist diverse che vengono riprodotte su
altoparlanti diversi.
Modalità Multiroom: Molti altoparlanti sono combinati tramite l’app per formare un gruppo e una playlist viene riprodotta da uno smart
device su tutti gli altoparlanti di questo gruppo.
Attenzione: È possibile selezionare più di un altoparlante per la riproduzione. Maggiori informazioni sono disponibili sull’app.
Attenzione: È possibile che sull’App Store di Apple le due app non siano disponibili per ogni tablet Apple.
34
Page 35

ASSISTENZA E PROBLEMI TECNICI
Nel caso in sui si dovessero vericare dei problemi tecnici, si prega di contattare il proprio rivenditore specializzato o direttamente a
Magnat Audio-Produkte GmbH, Tel.: +49 (0) 2234807-0.
DATI TECNICI
Congurazione: 2 x 2 vias, attivo
Subwoofer attivo, bassreflex
Potenza d’uscita RMS/max.: 4 x 20 /40 Watt (canale L+R)
100/200 Watt (subwoofer)
Gamma di frequenza: 25 – 28 000 Hz
Frequenza di taglio: 180 / 3100 Hz
Frequenza di campionamento degli ingressi digitali: no a 96 kHz / 24 bit
Frequenza di funzionamento: BT: 2402 – 2480 MHz
Wireless: 5740 – 5814 MHz
WLAN: 2412 – 2472 MHz
5150 – 5250 MHz
5250 – 5350 MHz
5470 – 5725 MHz
In tutti gli Stati membri UE, l’utilizzo delle bande di frequenza
5150-5350 MHz è limitato esclusivamente in ambienti al chiuso.
Potenza massima emessa in conformità alla norma EN 62479: BT: 9,5 dBm
Wireless: 9 dBm
WLAN: 2,4 GHz: 20 dBm
5 GHz: 22 dBm
Potenza assorbita:
Modalità operativa Soundbar 65 W
Modalità operativa Subwoofer 100 W
Modalità standby Soundbar: 3,0 W (collegamento radio acceso)
<0,5 W (collegamento radio spento)
Modalità standby Subwoofer: <0,5 W
Dimensioni soundbar (L x H x P): 1000 x 79 x 60 mm
Dimensioni subwoofer (L x H x P): 230 x 382 x 418 mm
Peso soundbar: 2,5 kg
Peso subwoofer: 9,4 kg
Alimentatore: Dongguan Dongsong Electronic Co., Ltd., DYS602-210309W
USB: 5 V
, 1A
CON RISERVA DI APPORTARE MODIFICHE TECNICHE
35
Page 36

Muy estimado cliente de MAGNAT:
En primer lugar, quisiéramos agradecerle por haber optado por un producto de MAGNAT. Por nuestra parte deseamos felicitarle
muy cordialmente. Gracias a su prudente selección es usted propietario de un producto de calidad renombrado en todo el mundo.
INDICACIÓN DE SEGURIDAD IMPORTANTE
Por favor lea atentamente el manual de instrucciones antes de utilizar el producto. El manual de instrucciones contiene indicaciones
importantes para el funcionamiento y la seguridad del producto. Siga absolutamente todas las indicaciones. Guarde en un lugar
seguro este manual de instrucciones.
• ADVERTENCIAS: Todos los símbolos de advertencia en el dispositivo, los accesorios y en las instrucciones de funcionamiento
deben tenerse en cuenta.
• EFECTO DEL CALOR: Opere únicamente el dispositivo con accesorios en un rango de temperaturas comprendido entre 10°C y
45°C.
El dispositivo no debe instalarse cerca de fuentes de calor (elementos térmicos, hornos, radiadores, llamas abiertas). Cuando la
instalación se realiza cerca de amplicadores no debería superarse una distancia mínima de 10cm.
• No exponga el dispositivo a llamas directas como p. ej., velas.
• Garantice una ventilación suciente del dispositivo. El dispositivo no debe estar cubierto, por ejemplo por cortinas). Mantenga una
distancia suciente (aprox. 20 cm) respecto a paredes.
• INFLUENCIA DE LA HUMEDAD: El dispositivo no debe estar expuesto a gotas o salpicaduras de agua. Tampoco debe utilizarse
para la colocación de jarrones u otros recipientes llenos de líquido. No exponga el dispositivo al agua o a una alta humedad.
Existirá el peligro de descarga eléctrica. En caso de contacto con humedad o líquidos retirar inmediatamente el enchufe de red.
• CUERPOS EXTRAÑOS: Preste atención a que no entren cuerpos extraños en el interior del dispositivo a través de las aberturas del
mismo. Estos podrían provocar cortocircuitos y también descargas eléctricas e incendios.
• LIMPIEZA Utilice un paño seco y suave y no emplee productos de limpieza, esprays o disolventes químicos, ya que estos pueden
dañar la supercie.
• TOMA DE CORRIENTE: Preste atención a los valores de tensión en las placas indicadoras. La fuente de alimentación del
dispositivo solo debe operar con los valores de tensión y frecuencia indicados en las placas.
• PROTECCIÓN CONTRA RAYOS/MEDIDAS DE PRECAUCIÓN: En caso de que no se utilicen el aparato y sus componentes por
un largo tiempo (por ejemplo, al ir de vacaciones) debe retirar el enchufe de alimentación del tomacorriente. Asimismo debe
desenchufarse el aparato en caso de tormentas eléctricas, para evitar daños por la caída de rayos y subidas de voltaje.
• CABLE DE RED: El cable de red debe estar siempre preparado para el servicio y solo debe tenderse de tal mono que nadie lo
pueda pisar. Tampoco debe estar aprisionado por objetos que lo puedan dañar. Si se utilizan conectores y cajas de enchufe
múltiples hay que prestar atención a que el cable no se retuerza en el lugar en el que sale de la toma de corriente. No tocar ni
enchufar el cable de conexión eléctrica con las manos húmedas.
• El enchufe sirve de unidad de desconexión y siempre tiene que estar libre y accesible.
• SOBRECARGA: Las tomas de corriente las cajas de enchufe múltiples y los cables de prolongación no deben sobrecargarse. La
sobrecarga entraña un peligro de descarga eléctrica e incendio.
• INSTALACIÓN: Preste atención a las instrucciones de montaje.
• El dispositivo solo debe instalarse o montarse sobre una base rme y sobre bastidores no móviles, ya que, de lo contrario, existirá
un peligro de lesión.
• Utilice únicamente los accesorios originales adjuntos o especicados por el fabricante.
• El dispositivo solo se debe operar con la fuente de alimentación „Dongguan Dongsong Electronic Co., Ltd., DYS602-210309W“
suministrada.
• Las pilas y baterías no deben exponerse a temperaturas elevadas como p. ej., las emitidas por los rayos solares, el fuego, etc.
• Si la pila no se instala correctamente, existe riesgo de explosión. Sustituya la pila solo por una del mismo tipo o de un tipo
equivalente.
• ¡PELIGRO POR INGESTIÓN ACCIDENTAL DE LAS PILAS!
• El equipo/mando a distancia puede contener pilas planas/de botón que constituyen un serio riesgo si son ingeridas. Mantén-
galas siempre lejos del alcance de los niños. En caso de ingesta, podrían provocar lesiones muy graves e incluso la muerte. En
menos de 2 horas producen quemaduras internas graves una vez ingeridas.
• Acuda rápidamente a un médico si tiene la sospecha de que se ha ingerido una pila o se ha introducido en alguna parte del
cuerpo.
• Mantenga las pilas nuevas y las usadas lejos del alcance de los niños cuando vaya a hacer un cambio de pilas.
Asegúrese de que el compartimento de las pilas queda bien cerrado una vez realizado el cambio.
• No utilice el producto si no es posible cerrar totalmente el compartimento de las pilas. En ese caso, mantenga el producto lejosdel alcance de los niños y póngase en contacto con el fabricante.
DAÑOS QUE TIENEN QUE SER REPARADOS POR TÉCNICOS ESPECIALIZADOS:
En caso de que ocurran los siguientes daños se deben desconectar inmediatamente el aparato de la toma de corriente, y consultar a
un técnico especializado:
• No continúe utilizando el dispositivo si existen señales visibles de deterioro en el cable de alimentación. Un cable deteriorado no
debe ser reparado, sino reemplazado.
• Daños en la toma de conexión de red en el dispositivo.
• Si le ha entrado humedad o agua al aparato, o han caído objetos dentro de él.
• Si se ha caído el aparato y se dañó la carcasa.
• Si el aparato no funciona correctamente, pese a haber seguido todas las instrucciones del manual de uso.
Sólo se permite efectuar cambios posteriores que hayan sido autorizados por el fabricante.
Sólo se permite utilizar repuestos originales para la reparación.
Por seguridad, revise el aparato después de una reparación, así podrá cerciorarse de que funciona adecuada y correctamente.
Las reparaciones tienen que ser hechas siempre por técnicos especializados, ya que el usuario corre el peligro de exponerse a altos
voltajes o a otros tipos de riesgos.
36
Page 37

El triángulo con el símbolo de un rayo advierte al usuario que en el interior del aparato circula alto voltaje el que puede
provocar peligrosas descargas eléctricas.
El triángulo con el símbolo de exclamación le señala al usuario que en el manual de instrucciones adjuntado, se pueden
encontrar importantes consejos para el funcionamiento y la mantención (reparaciones) del producto los que en todo caso
tienen que considerarse.
Peligro de descarga electrica. No abrir!
ATENCIÓN: Para evitar descargas eléctricas no abrir la carcasa de los altavoces/enchufe ni retirar
las cubiertas. Ninguna reparación debe ser hecha por el usuario. ¡Las reparaciones deben realizarlas
sólo técnicos especializados! No utilizar tomas de corriente o cables alargadores que no se acoplen
integramente con el enchufe del aparato.
Utilice solo la fuente de alimentación indicada en el manual de instrucciones.
Tensión alterna.
Tensión continua.
Polaridad de la fuente de alimentación (tensión continua).
Aparato del nivel de protección II con doble aislamiento. No incluye conexión de puesta a tierra.
INSTRUCCIONES DE ELIMINACIÓN
De acuerdo con la Directiva Europea 2012/19/EU, todos los aparatos eléctricos y electrónicos deben ser eliminados por medio
de puntos de recogida locales e independientes. Respete la normativa local y no elimine los aparatos usados junto a los residuos
domésticos.
ELIMINACIÓN DE LA BATERÍA
Las baterías usadas son un residuo peligroso y deben ser eliminadas de acuerdo con las normativas actuales.
DECLARACIÓN DE CONFORMIDAD
Por la presente, la empresa Magnat Audio-Produkte GmbH declara que el aparato CSB1000 cumple los requisitos básicos y demás
normas relevantes de la Directiva 2014/53/UE. Esta declaración de conformidad está disponible en el área de descargas del aparato
dentro de nuestra web www.magnat.de.
USO CONFORME A SU FINALIDAD
Este aparato ha sido diseñado exclusivamente para uso doméstico.
CONTENIDO:
(A) 1 x Barra de sonido
(B) 1 x Subwoofer
(C) 1 x Fuente de alimentación para la barra de sonido y cable de alimentación
(D) 1 x Cable de alimentación para el subwoofer
(E) 1 x Mando a distancia con batería incluída (Pila CR2025)
(F) 1 m Cable de audio estéreo, en ambos lados clavija de trinquete 3,5 mm
(G) 1,5 m Cable óptico digital
(H) 1 x Soporte de pared con material de fijación
(I) 1 x Manual de instrucciones
37
Page 38

DESEMPACAR EL CONJUNTO DE ALTAVOCES
Por favor, desempacar con cuidado los altavoces y sus componentes, y controlar el contenido del paquete original mediante la
lista especicada más arriba. En caso de daños ocasionados por el transporte diríjase a su proveedor. Guarde bien el material de
empaque. El material de empaque original permite un transporte libre de problemas en caso de futuras mudanzas o requerimiento de
servicio técnico.
INSTALACIÓN DE LOS COMPONENTES DEL SISTEMA
Barra de sonido (A): La barra de sonido debe ponerse justo debajo del televisor, situándolo al centro. En caso de que el televisor se
encuentre sobre una estantería o un aparador, entonces se podrá poner la barra de sonido directamente delante del aparato. Ahora,
si el televisor está montado a la pared, se deberá montar también la barra de sonido justo debajo de la pantalla, usando para ello los
soportes incluidos.
Subwoofer (B): El subwoofer se debe poner sobre el piso, cerca de la barra de sonido, por lo general a la derecha o a la izquierda del
televisor. La distancia hacia la pantalla, en caso de televisores de tubos, no debe estar por debajo de los 100 cm, mientras que para
pantallas planas no debe bajar de 50 cm.
El uso de los soportes para fijar la barra de sonido a la pared, se explica en la fig. 1.
a. Monte la placa de sujeción del soporte debajo del televisor, tal y como se muestra. Por favor, utilice los tornillos y tacos
adecuados para su tipo de pared (no incluidos).
b. Cuelgue a continuación la barra de sonido con los pasadores de fijación premontados dentro de los huecos de la placa de
sujeción.
Indicación importante / Indicación de seguridad: El cliente se hace responsable individual, en caso de utilizar otros fijadores /
sujetadores. Asimismo es el cliente el único responsable de que la sujeción del fijador de la barra de sonido sea segura y de que la
elección del material para el montaje sea la adecuada (por ejemplo, tornillos, tacos de anclaje) considerando el peso y la construcción
de la barra de sonido, y las características de la pared.
INSTALACIÓN DEL SISTEMA
Conexión de un televisor (g. 2):
El sistema CSB1000 está concebida para la conexión directa a un aparato de TV. Para ello se puede elegir entre tres posibilidades:
a) Conexión del televisor a la conexión HDMI® HDMI/ARC (g. 5, ref. 14):
Conecte su televisor a esta conexión cuando disponga de una conexión HDMI® con función ARC (Audio Return Channel, HDMI®-
1.4-Standard).
Si la conexión HDMI® de su televisor dispone también de la función CEC (Consumer Electronics Control), con el mando a
distancia del televisor podrá controlar funciones básicas de la barra de sonido: encendido, apagado, volumen y modo silencio. El
tipo de funciones CEC disponibles depende del televisor y puede ser diferente en cada caso. Para informarse, lea el manual de
instrucciones de su televisor. Generalmente los fabricantes crean su propio nombre para la función CEC, un nombre que suele
acabar con el término „Link“. Atención: Por razones técnicas, la función CEC solo se encuentra disponible al conectarse vía
H D MI®.
Eventualmente, estas funciónes pueden activarse en el menú del televisor.Con el descodicador Dolby® incorporado, también
pueden reproducirse las señales Dolby®-Digital codicadas. No se incluye el cable necesario para dicha conexión.
b) Conexión del televisor a la entrada digital óptica DIGITAL IN (g. 5, ref. 9):
Utilice el cable digital óptico suministrado y conecte la salida digital de audio de su televisor con la entrada de audio DIGITAL IN
(g. 5, ref. 9) de la barra de sonido. Con el descodicador Dolby incorporado, también pueden reproducirse las señales Dolby®Digital codicadas.
c) Conexión del televisor a la entrada de audio AUX IN (g. 5, ref. 10):
Utilice el cable de audio adjunto y conecte la salida de audio de su televisor con la entrada de audio AUX IN (g. 5, ref. 10). Si su
aparato de televisión dispone de una salida de audio con nivel jo, deberá preferir ésta a la salida de audio con nivel variable.
Conexión de otros equipos a la barra de sonido (g. 3):
Conexión de una fuente de audio analógica o digital a la barra de sonido:
Se pueden conectar otras fuentes de audio a la entrada analógica AUX IN (g. 5, ref. 10) y a la entrada digital DIGITAL IN (g.5,
pos. 9) de la barra de sonido, p. ej. reproductor de CD, reproductor MP3 y receptor de satélite. Proceda para ello como se
describe en la sección anterior.
38
Page 39

Conexión de las fuentes HDMI (audio/vídeo) a la barra de sonido:
En las entradas HDMI1, HDMI2 y HDMI3 (Fig. 5, pos. 11, 12, 13) es posible conectar hasta otras tres fuentes HDMI (p. ej.
reproductor de Blue-Ray/DVD, receptor de satélite, consola de juegos). La señal audio de las fuentes HDMI correspondientes se
transmite a través del sistema CSB1000, mientras que la señal de vídeo se transmite a la salida HDMI (HDMI OUT (ARC), Fig. 5,
pos. 14).
Con esta conguración hay que seleccionar en el televisor la entrada HDMI conectada con la salida HDMI de la barra de sonido
(Fig 5, pos. 14).
¡Importante!: la conexión de USB (g. 5, pos. 8) está prevista exclusivamente para el sistema de actualización y no tiene ninguna
otra función más.
Conexión del alimentador de corriente de la barra de sonido
Como parte de la entrega, se incluye una fuente de alimentación externa universal (C), que funciona con 110 – 240 V/AC 50/60 Hz.
Sin embargo podría ser que el cable de alimentación que se utiliza en su país sea distinto. En caso de que el cable de alimentación
no sea compatible con su toma de corriente o que Usted no esté seguro, contáctese por favor con su vendedor especializado en
Magnat.
1. Conecte el cable de salida (conector Jack de acoplado) de la fuente de alimentación externa con la hembrilla de alimentación de
corriente de la barra de sonido (g. 5, pos. 7).
2. Enchufe el cable de alimentación en la hembrilla de la fuente de alimentación.
3. Enchufe el cable de alimentación a la toma de corriente. Ponga atención a que el enchufe utilizado sea el apropiado a la toma de
corriente (Ver las instrucciones más arriba).
Conexión del suministro de corriente del Subwoofer:
Como parte de la entrega, se incluye el cable de alimentación más generalizado. Sin embargo podría ser que el cable de alimentación
que se utiliza en su país sea distinto. En caso de que el cable de alimentación no sea compatible con su toma de corriente o que
Usted no esté seguro, contáctese por favor con su vendedor especializado en Magnat.
1. Inserte el cable de red de 2 polos en la toma de conexión de red del amplicador del subwoofer (g. 6b, pos. 16).
2. Enchufe el cable de alimentación a la toma de corriente. Ponga atención a que el enchufe utilizado sea el apropiado a la toma de
corriente (Ver las instrucciones más arriba).
PRIMERA PUESTA EN MARCHA, ACOPLAMIENTO INALÁMBRICO DE LA BARRA DE SONIDO CON
SUBWOOFER:
Una vez conectados todos los cables de señal y las alimentaciones de corriente para la barra de sonido y el subwoofer, encienda la
barra de sonido con el mando a distancia (g. 7, pos. 18) o en el panel de mando lateral (g. 4b, pos. 4).
La barra de sonido se conecta automáticamente con el subwoofer cada vez que se enciende:
El indicador de estado LED en la barra de sonido (Fig. 4a, pos. 1) se apaga. El indicador de estado LED del subwoofer (g. 6a,
pos.15) cambia de color rojo a verde.
Si el subwoofer no se enciende automáticamente o el indicador de estado LED del subwoofer parpadea en verde, es que ha habido un
fallo de conexión. En este caso habrá que establecer la conexión manualmente. Para ello, siga estos pasos:
- Seleccione la entrada AUX con el mando a distancia (g. 7, pos. 24).
- Pulse en el mando a distancia el botón NIGHT (g. 7, pos. 27) durante 5 s. En la pantalla aparecerá WPAIR.
- Ahora pulse el botón CONNECT en la parte trasera del subwoofer (g. 6b, pos. 17). El indicador de estado LED del subwoofer
parpadea en verde mientras se establece la conexión.
- Si la conexión se ha establecido correctamente, aparecerá SUCCE en la pantalla y el indicador de estado LED del subwoofer dejará
de parpadear y la luz verde pasará a ser ja.
- Si en la pantalla aparece FAIL, se deberá volver a repetir el proceso.
MANEJO
Elementos de mando de la barra de sonido (frontal) (g. 4a):
(1) Indicación del estado de LED: Este LED está iluminado en rojo cuando el dispositivo se encuentra en modo stand-by.
(2) Pantalla de LED: En la pantalla aparece la siguiente información:
- Entrada de audio seleccionada
- Ajustes de menú y sonido
- Formato de sonido: Al descodicar una señal Dolby Digital, en la pantalla aparece brevemente DOLBY. Si los formatos de sonido
son incompatibles aparece ERROR y no se produce ninguna reproducción.
Al dejar de usar la pantalla, se apagará después de 5 seg.
3) Sensor para control remoto: Para utilizar el control remoto, señale con él hacia este punto.
39
Page 40

Elementos de mando de la barra de sonido (parte lateral) (g. 4b):
(4) O N/STBY: Enciende el dispositivo si se encuentra en el modo de suspensión. De igual forma, le permite apagar el dispositivo si
está encendido.
Si el dispositivo está conectado a una red a través de WLAN antes de desconectarse, la barra de sonido cambia al modo
de espera de red con una pulsación breve. En el display se muestra NET STBY. La conexión de red estará inmediatamente
disponible cuando se vuelva a conectar. Además, el dispositivo también puede encenderse automáticamente a través de la
aplicación mediante la reproducción de una fuente disponible.
Una pulsación larga de la tecla, conmuta el dispositivo al modo ECO Standby. De este modo la conexión de red se desconecta.
Si el dispositivo no se va a utilizar durante un tiempo prolongado, deberá conmutarse al modo ECO Standby, ya que el consumo
de energía en espera es menor en este caso. Después de una nueva conexión desde el modo ECO Standby, el dispositivo no
estará disponible en la red hasta después de unos 45 segundos.
Si el dispositivo no está conectado a una red antes de la desconexión, la barra de sonido siempre cambia al modo ECO Standby.
(5) VOLUME: Aumenta (+) / reduce (-) el volumen.
(6) SOURCE: Selecciona la entrada.
Elementos de mando del Subwoofer (frontal) (g. 6a):
(15) Indicación del estado de LED: Este LED está iluminado en rojo cuando el dispositivo se encuentra en modo stand-by. El LED está
en verde cuando el subwoofer se encuentra en modo funcionamiento. Ver también el apartado „Primera puesta en marcha“.
Elementos de mando del Subwoofer (parte trasera) (g. 6b):
(17) CONNECT: Inicia el modo manual de conexión del subwoofer. Ver también el apartado „Primera puesta en marcha“.
Uso del mando a distancia del sistema (g. 7):
(18) ON/STBY: Enciende el dispositivo si se encuentra en el modo de suspensión. De igual forma, le permite apagar el dispositivo si
está encendido.
Si el dispositivo está conectado a una red a través de WLAN antes de desconectarse, la barra de sonido cambia al modo
de espera de red con una pulsación breve. En el display se muestra NET STBY. La conexión de red estará inmediatamente
disponible cuando se vuelva a conectar. Además, el dispositivo también puede encenderse automáticamente a través de la
aplicación mediante la reproducción de una fuente disponible.
Una pulsación larga de la tecla, conmuta el dispositivo al modo ECO Standby. De este modo la conexión de red se desconecta.
Si el dispositivo no se va a utilizar durante un tiempo prolongado, deberá conmutarse al modo ECO Standby, ya que el consumo
de energía en espera es menor en este caso. Después de una nueva conexión desde el modo ECO Standby, el dispositivo no
estará disponible en la red hasta después de unos 45 segundos.
Si el dispositivo no está conectado a una red antes de la desconexión, la barra de sonido siempre cambia al modo ECO Standby.
(19) HDMI/ARC: Selecciona la entrada de audio HDMI/ARC.
(20) HDMI 1/2/3: Selecciona la entrada de audio/vídeo HDMI 1, 2, 3.
(21) BT: Selecciona la entrada de audio BLUETOOTH. Una pulsación larga de este botón inicia el modo de emparejamiento de
Bluetooth.
(22) WLAN: Selecciona la entrada de red. Consulte „CONEXIÓN DEL DISPOTIVO CON UNA RED“.
(23) DIGITAL: Selecciona la entrada de audio DIGITAL IN.
(24) ANALOG: Selecciona la entrada de audio AUX IN.
(25) MU TE: Activa o desactiva el dispositivo.
(26) VOLUME: Aumenta (+) / reduce (-) el volumen.
(27) NIGHT: Activa o desactiva un modo de reproducción con dinámica reducida y respuesta de frecuencia adaptada, pensado para
situaciones en las que es importante controlar el volumen (por ej. de noche, etc.)
(28) SU RR: Enciende o apaga la función sonido envolvente 3D.
(29) SOUND: Selecciona diversos ajustes de sonido:
LINEAR: Ajuste de frecuencia linear.
MUSIC: Mejora la respuesta de frecuencia del aparato en la reproducción de música.
MOVIE: Mejora la respuesta de frecuencia del aparato en la reproducción de imagen y sonido.
VOCAL: Realza la sonoridad para mejorar la inteligibilidad del lenguaje.
(30) MENU: Abre el menú de ajustes de la de la barra de sonido.
Los siguientes ajustes pueden seleccionarse, y cambiarse con los botones VOL+/- (26). Al pulsar el botón Menú otra vez, se
conrmarán los ajustes.
SUB: Aumenta (+) / reduce (-) el volumen del altavoz subwoofer.
EQ: Ajuste de sonido para las distintas ubicaciones de la barra de sonido.
WALL: Este ajuste optimiza el sonido cuando la barra de sonido está montada en la pared.
DESK: Este ajuste optimiza el sonido cuando la barra de sonido está ubicada sobre una estantería o debajo del televisor.
ASTBY: Con el n de ahorrar energía, el dispositivo se desconecta automáticamente después de aproximadamente 15minutos
sin recibir señales. Esta función puede desactivarse. De fábrica viene activada.
RE SET: Devuelve todos los ajustes a su conguración predeterminada.
EXIT: Para salir del menú de ajustes.
40
Page 41

Control de reproducción de música en modo de WLAN/Bluetooth:
(31) RETROCESO DE PISTA: Con pulsar una vez, se vuelve a reproducir desde el principio la pista que acaba de sonar. Con pulsar
varias veces, la reproducción salta a la pista anterior.
(32) PLAY/PAUSE: Pausa la pista que está sonando de un dispositivo de origen Bluetooth o sigue con la reproducción.
(33) AVANCE DE PISTA: La reproducción salta a la pista siguiente.
Conexión del aparato con una fuente de audio Bluetooth:
Conecte la barra de sonido mediante el control remoto al modo Bluetooth. Si anteriormente ya existía un acoplamiento con un
dispositivo de origen Bluetooth, se intenta restablecer automáticamente la conexión con este dispositivo. Puede suceder que usted
tenga de conrmar manualmente el restablecimiento de la conexión en el dispositivo de origen.
Cuando no existe ningún acoplamiento anterior o la conexión no puede restablecerse, la barra de sonido activa automáticamente el
modo de acoplamiento, también denominado, modo de emparejamiento. Para cambiar la barra de sonido al modo de emparejamiento
de forma manual, pulse y mantenga pulsado el botón BT (g. 7, ref. 22) del mando a distancia. Mientras el modo de emparejamiento
está activo, parpadea el indicador de la pantalla BT.
Conecte ahora el modo Bluetooth de su dispositivo de origen. La barra de sonido se mostrará en la lista de dispositivos Bluetooth
como „MAGNATCSB1000“. En caso de que no aparezca en la lista, active manualmente en el dispositivo de origen la búsqueda de
dispositivos Bluetooth y asegúrese de que la barra de sonido se encuentra en el modo de emparejamiento.
En función del dispositivo de origen puede suceder que durante el proceso de acoplamiento se pregunte si se debe aceptar la
contraseña. Puede conrmarlo fácilmente con „Aceptar“. Si continúa preguntándose por una contraseña, utilice las contraseñas
estándar „0000“ o „1234“. En caso de que después de realizado el acoplamiento se le pregunte si desea establecer una conexión,
responda a la pregunta con „Sí“. Una vez realizados el acoplamiento y la conexión correctamente la entrada BT permanece iluminada
en la pantalla.
La barra de sonido admite el estándar de transmisión de audio de alta calidad „Qualcomm® aptX™“. Si su dispositivo de origen
admite también esta tecnología , se seleccionará automáticamente „Qualcomm® aptX™“ como modo de transmisión durante el
establecimiento de una conexión Bluetooth.
CONEXIÓN DEL DISPOTIVO CON UNA RED
Conexión WLAN a través de modo WPS
Si su enrutador tiene un botón WPS, existe un modo sencillo y eficaz de conectar el altavoz a la red:
• Seleccione la entrada de WLAN con el mando a distancio. En la pantalla parpadea el indicador de WLAN para indicar que no hay
una conexión a una red.
• Pulse el botón WPS en el enrutador. Luego mantenga pulsado el botón WLAN del mando a distancia por aproximadamente 5
segundos, para confirmar la conexión.
El dispotivo establecerá ahora la conexión con la red. Durante el proceso parpadea el indicador de WPS en la pantalla.
• Cuando se establezca la conexión, aparece OK en la pantalla. Despues el indicador WLAN permanece iluminado.
• El dispotivo puede reproducir ahora señales de audio desde la red.
• El dispotivo guarda los datos de conexión, por tanto, no se necesitará volver a introducirlos la próxima vez que se encienda el equipo.
Nota: el tiempo de espera del modo WPS es de 2 minutos. En caso de superarse este tiempo límite, puede que necesite reiniciar el
equipo y pulsar el botón WPS de nuevo.
Nota: consulte para ello las instrucciones del enrutador.
Conexión a una red a través de interfaz web
Si no es posible conectar a una red a través de WPS, puede usar la interfaz web de la barra de sonido. Necesitará un dispositivo con
una adaptador de red inalámbrico con el que pueda acceder a un navegador web (p. ej. un ordenador/ teléfono inteligente).
• Encienda el altavoz y busque la red WLAN abierta «MAGNATCSB1000XX-XX-XX» en la lista de redes disponibles del ordenador/
teléfono inteligente.
• Nota: XX-XX-XX en la SSID del altavoz indica los últimos 6 caracteres de la dirección MAC del altavoz correspondiente.
• En la pantalla se mostrará automáticamente la página de ajuste. De no ser así, abra el navegador web e introduzca 172.19.42.1 en
la barra de dirección del navegador y, a continuación, pulse ENTER para confirmar.
Aparecerá la interfaz web de la WLAN.
41
Page 42

• Introduzca un nombre para el altavoz por medio del cual sea capaz de identificarlo en la lista de altavoces disponibles (p. ej. «sala»
o «cocina»).
• Busque en la lista de redes disponibles en el menú desplegable «nombre de la red» y seleccione la red a la que desea conectar el
altavoz.
• Si el enrutador de red no asigna direcciones IP, apague la función DHCP aquí y, a continuación, introduzca la dirección IP manualmente
en las casillas inferiores.
• Introduzca luego la contraseña de red, si se le solicita, y haga clic en «CONNECT».
• La página web le informará con el mensaje «network was connected successfully» de que la conexión se ha establecido con éxito. El
producto establecerá ahora una conexión con la red.
Nota:
1. El producto no es compatible con el protocolo de seguridad «WEP».
2. El dispositivo inteligente puede navegar hasta una red válida después de establecer la conexión entre altavoz y enrutador. De no ser
así, asegúrese de que el dispositivo inteligente se conecta a la misma red a la que está conectado el altavoz.
El producto puede reproducir ahora señales de audio desde la red. Los datos de conexión se guardan y, por tanto, no se necesita volver
a introducirlos la siguiente vez que se encienda el equipo.
REPRODUCCIÓN DE MÚSICA EN MODO DE WLAN
Puede reproducir música desde la red a través de su altavoz y también desde un dispositivo conectado a través del modo directo.
Instalación de la aplicación en un teléfono inteligente/ tablet PC Android/ Apple
Con el fin de poder utilizar la función de control de reproducción de música a través del altavoz en una tablet PC o teléfono inteligente,
tendrá primero que instalar la aplicación correspondiente (Allplay radio y Jukebox) para su tablet PC/ smartphone disponibles en Play
Store (Android) o App Store (Apple).
La aplicación AllPlay Jukebox ofrece las siguientes opciones de reproducción:
Modo Fiesta: Distintos dispositivos inteligentes añaden títulos musicales a través de la aplicación desde una lista de reproducción
compartida que se reproduce en el altavoz.
Modo Multizona: Distintos dispositivos inteligentes añaden títulos musicales a través de la aplicación desde diferentes listas de
reproducción que se reproducen en altavoces diferentes.
Modo Multiespacio: Se combinan varios altavoces a través de la aplicación para formar un grupo y se reproduce una lista de reproducción
desde un dispositivo inteligente en todos los altavoces de este grupo.
Nota: puede seleccionar más de un altavoz para la reproducción. Dispone de más información en la aplicación.
Nota: puede ser que en Apple store no estén disponibles ambas aplicaciones para cada tablet de Apple.
MANTENIMIENTO Y PROBLEMAS TÉCNICOS
Si encuentra algún problema técnico, póngase en contacto con su distribuidor especializado o con Magnat Audio-Produkte GmbH, Tel.:
+49 (0) 2234807- 0.
42
Page 43

DADOS TÉCNICOS
Conguración: 2 x 2 vias, activo
Subwoofer activo, bassreflex
Potencia de salida RMS/máx.: 4 x 20 /40 vatios (canal L+R)
100/200 vatios (Subwoofer)
Rango de frecuencia: 25 – 28 000 Hz
Frecuencia de crossover: 180 / 3100 Hz
Tasas de muestreo de las entradas digitales: hasta 96 kHz / 24 bits
Frecuencia de funcionamiento: BT: 2402 – 2480 MHz
Wireless: 5740 – 5814 MHz
WLAN: 2412 – 2472 MHz
5150 – 5250 MHz
5250 – 5350 MHz
5470 – 5725 MHz
En todos los Estados miembros de la UE, el funcionamiento de
5150-5350MHz se limita al uso en interiores.
Potencia máxima emitida según la norma UNE-EN 62479: BT: 9,5 dBm
Wireless: 9 dBm
WLAN: 2,4 GHz: 20 dBm
5 GHz: 22 dBm
Consumo de potencia:
Modo de funcionamiento Barra de sonido: 65 vatios
Modo de funcionamiento Subwoofer: 100 vatios
Modo standby Barra de sonido: 3,0 vatios (conexión inalámbrica conectada)
Conexión inalámbrica desconectada (modo standby): <0,5 vatios (conexión inalámbrica desconectada)
Modo standby Subwoofer: <0,5 vatios
Dimensiones barra de sonido (AnxAlxPr): 1000 x 79 x 60 mm
Dimensiones Subwoofer (AnxAlxPr): 230 x 382 x 418 mm
Peso barra de sonido: 2,5 kg
Peso Subwoofer: 9,4 kg
Fuente de alimentación: Dongguan Dongsong Electronic Co., Ltd., DYS602-210309W
USB: 5 V
RESERVADO EL DERECHO A REALIZAR MODIFICACIONES TÉCNICAS.
, 1A
43
Page 44

Уважаемый потребитель продукции MAGNAT!
Прежде всего, позвольте поблагодарить Вас за то, что Вы сделали выбор в пользу изделий MAGNAT. Со своей стороны
мы поздравляем Вас с этим шагом. Благодаря сделанному выбору Вы стали владельцем качественной продукции,
получившей международное признание.
ВАЖНОЕ УКАЗАНИЕ ПО БЕЗОПАСНОСТИ
Руководство по эксплуатации содержит важные указания по режиму работы и безопасности. Обязательно соблюдать все
указания. Хранить Руководство по эксплуатации в надежном месте.
• ПРЕДУПРЕДИТЕЛЬНЫЕ УКАЗАНИЯ: Следует принимать во внимание все предупредительные обозначения на
устройстве, принадлежностях и в Руководстве по эксплуатации.
• ВЛИЯНИЕ ТЕМПЕРАТУРЫ: Эксплуатируйте устройство с принадлежностями в диапазоне температур от 10°C до 45°C.
Устройство не должно устанавливаться вблизи источников тепла (нагреватели, печи, электрокамины, открытое пламя).
При монтаже вблизи усилителей нельзя уменьшать минимальное расстояние 10 см
• Не допускайте контакта устройства с открытым пламенем, например, со свечами.
• Обратите внимание на достаточную вентиляцию устройства. Нельзя накрывать устройство, например, шторами,
гардинами. Устанавливать на достаточном расстоянии (прим. 20 см) от стен.
• ВЛИЯНИЕ ВЛАЖНОСТИ: Устройство не должно подвергаться воздействию водяных капель или брызг. Также его нельзя
использовать в качестве подставки для ваз или других заполненных жидкостью сосудов. Не подвергайте устройство
воздействию воды или воздуха с высокой влажностью. Существует опасность поражения током. В случае контакта с
влагой или жидкостью немедленно отсоединить устройство от сети питания.
• ПОСТОРОННИЕ ПРЕДМЕТЫ: Следует обращать внимание на то, чтобы через отверстия устройства не попадали
внутрь посторонние предметы. Они могут стать причиной возникновения коротких замыканий, поражения током или
пожара.
• ЧИСТКА: Следует применять сухую и мягкую ткань и не использовать чистящие средства, спреи или химические
растворители, иначе поверхность может получить повреждения.
• ПОДСОЕДИНЕНИЕ ПИТАНИЯ: Следует соблюдать параметры напряжения, указанные на заводских табличках. Блок
питания устройства можно эксплуатировать только с указанными на заводских табличках параметрами напряжения и
частоты.
• ЗАЩИТА ОТ МОЛНИИ/МЕРЫ ПРЕДОСТОРОЖНОСТИ: Если прибор длительное время (напр., в отпуске) не
используется, следует отсоединить сетевой штекер от сети питания. Прибор следует также отсоединять от сети питания
во время грозы. Тем самым предотвращается повреждение от удара молнией и повышенного напряжения.
• СЕТЕВОЙ КАБЕЛЬ: Сетевой кабель должен быть всегда готов к эксплуатации и укладываться только таким образом,
чтобы никто не мог на него наступить. Также нельзя зажимать кабель предметами, которые могут повредить его.
При применении штепсельных вилок и удлинительных штепсельных розеток следует обращать внимание на то,
чтобы кабель не был надломлен в месте выхода из штепсельной розетки. Не дотрагиваться до сетевого кабеля и не
подключать его влажными руками.
• Сетевой штепсель используется как отключающее устройство, и к нему должен быть обеспечен свободный доступ в
любое время.
• ПЕРЕГРУЗКА: Штепсельные розетки, удлинительные штепсельные розетки и удлинители не должны работать с
превышением нагрузки. При перегрузке существует опасность поражения током и пожара.
• УСТАНОВКА: Обратите внимание на инструкцию по монтажу.
• Устройство должно устанавливаться или монтироваться только устойчивом основании и неподвижных подставках, так
как иначе существует опасность травматизма.
• Используйте только входящие в комплект поставки или указанные производителем оригинальные принадлежности.
• Устройство может эксплуатироваться только с блоком питания „Dongguan Dongsong Electronic Co., Ltd., DYS602-
210309W“ из комплекта поставки.
• Батареи и аккумуляторы не должны подвергаться воздействию высоких температур, например, солнечного света, огня
и т.п.
• Существует опасность взрыва, если батарея заменена неправильно. Замените батарею только на такую же и
аналогичную.
• ОПАСНОСТЬ ПРОГЛАТЫВАНИЯ БАТАРЕЙ!
• Устройство/пульт дистанционного управления могут содержать пуговичные/дисковые батарейки, которые можно
проглотить. Храните батареи в недоступном для детей месте. Проглатывание батарей может привести к тяжелым
травмам или смерти. Через 2 часа после проглатывания батарей могут возникнуть тяжелые внутренние ожоги.
• При подозрении на проглатывание или попадания батарей в организм немедленно обратитесь за медицинской
помощью.
• При замене батарей храните новые и использованные батареи в недоступном для детей месте.
После замены батарей убедитесь в том, что отсек для батарей полностью закрыт.
• Если отсек для батарей невозможно полностью закрыть, не используйте изделие. Поместите изделие в недоступное
для детей место и обратитесь к производителю.
ПОВРЕЖДЕНИЯ, КОТОРЫЕ ДОЛЖНЫ УСТРАНЯТЬСЯ СПЕЦИАЛИСТОМ:
При следующих повреждениях, прибор необходимо немедленно отсоединить от сети питания и передать специалисту на
проведение ремонта:
• Если на сетевом кабеле будут обнаружены повреж дения, эксплуатировать устройство больше нельзя. Поврежденный
кабель ремонтировать нельзя, его нужно заменить.
• Повреждения разъема питания на устройстве.
• Если внутрь устройства попала влага или посторонние предметы.
• Если устройство опрокинулось и при этом повредился корпус.
• Если устройство неправильно функционирует, хотя соблюдены все указания Руководства по эксплуатации.
44
Page 45

Допустимо предпринимать только те дополнительные изменения, которые разрешены изготовителем.
Для ремонта необходимо использовать только оригинальные запасные детали.
После ремонта необходимо проверить устройство на безопасность, чтобы обеспечить надлежащее и надежное
функционирование.
Ремонтные работы должны всегда выполняться квалифицированными специалистами, так как иначе может возникнуть
опасное высокое напряжение или другие виды опасности.
Треугольник с символом молнии предупреждает пользователя о том, что внутри устройства используется
высокое напряжение, которое может вызывать опасные удары электрическим током.
Треугольник с восклицательным знаком обращает внимание пользователя на то, что в прилагаемом
Руководстве по эксплуатации содержатся важные указания по эксплуатации и техническому обслуживанию
(ремонту), которые должны обязательно соблюдаться.
Не открывать! Опасность электрического удара!
ВНИМАНИЕ: Не открывать корпус громкоговорителей/сетевые блоки и не снимать крышки,
чтобы избежать удара током. Пользователю запрещено проводить какой-либо ремонт. Ремонт
должен выполняться только квалифицированным техническим специалистом! Не использовать
штепсельные розетки или удлинители, которые не принимают полностью штекер устройства.
Используйте только указанный в руководстве по эксплуатации блок питания.
Напряжение переменного тока
Напряжение постоянное тока
Полярность разъема питания (напряжение постоянное тока).
Устройство класса защиты II с двойной изоляцией. Контакт защитного заземления отсутствует.
УКАЗАНИЯ ПО УТИЛИЗАЦИИ
Согласно европейской директиве 2012/19/EU все электрические и электронные приборы для утилизации должны
сдаваться отдельно в местные сборные пункты. Пожалуйста, выполняйте местные предписания и не выбрасывайте старые
устройства вместе с обычным домашним мусором.
УТИЛИЗАЦИЯ БАТАРЕЕК
Старые батарейки относятся к особым отходам и подлежат утилизации согласно действующим предписаниям.
ДЕКЛАРАЦИЯ СООТВЕТСТВИЯ
Данным компания Magnat Audio-Produkte GmbH удостоверяет, что устройство CSB 1000 отвечает основным требованиям и
другим релевантным нормам Директивы 2014/53/EU. Декларация соответствия находится на сайте www.magnat.de в разделе
Downloads (материалы для скачивания) каждого устройства.
НАДЛЕЖАЩЕЕ ИСПОЛЬЗОВАНИЕ
Это устройство предназначено только для домашнего использования.
СОДЕРЖИМОЕ:
(A) 1 x Акустическая система Soundbar
(B) 1 x Сабвуфер
(C) 1 x Сетевой блок для акустической системы Soundbar, вкл. сетевой кабель
(D) 1 x Сетевой кабель для сабвуфера
(E) 1 x Блок дистанционного управления, включая аккумуляторную батарею (миниатюрный элемент питания CR2025)
(F) 1 м Стерео-аудиокабель, с двух сторон тюльпанный штекер на 3,5 мм
(G) 1,5 м Оптический цифровой кабель
(H) 1 x Настенный кронштейн с крепежными материалами
(I) 1 x Руководство по эксплуатации
45
Page 46

РАСПАКОВКА КОМПЛЕКТА ГРОМКОГОВОРИТЕЛЕЙ
Осторожно распаковать громкоговорители и принадлежности и проверить содержимое оригинальной картонной коробки
на основе вышеупомянутого списка. В случае транспортного повреждения следует обратиться к поставщику. Хранить
упаковочный материал в надежном месте. Оригинальная упаковка позволяет осуществлять беспроблемную перевозку при
позднейшем переезде и в случае сервисного обслуживания.
УСТАНОВКА СИСТЕМНЫХ КОМПОНЕНТОВ
Soundbar (A): Soundbar должен размещаться непосредственно под телевизором посередине. Если телевизор стоит на
полке или в шкафу-серванте, акустическая система Soundbar может устанавливаться непосредственно перед устройством.
Если телевизор смонтирован на стене, акустическая система Soundbar должен размещаться с помощью входящих в
комплект стеновых кронштейнов непосредственно под экраном.
Сабвуфер (B): Сабвуфер следует устанавливать на полу недалеко от акустической системы Soundbar, обычно справа или
слева от телевизора. Расстояние от экрана телевизора для ламповых телевизоров не должно быть меньше 100 см, а для
телевизоров с плоским экраном – не должно быть меньше 50 см.
Применение входящих в комплект стеновых кронштейнов для акустической системы Soundbar разъясняет Рисунок 1.
a. Прикрепите настенный кронштейн к стене под телевизором, как показано на рисунке. Используйте подходящие к
материалу стены крепежные винты и дюбели (не входят в комплект поставки).
b. Навесьте звуковую панель со смонтированными крепежными болтами в подходящие пазы настенного кронштейна.
Важное указание / указания по технике безопасности: За применение других настенных держателей / креплений
ответственность несет только клиент. Также клиент единолично несет ответственность за надежное крепление
держателей на стене и выбор соответствующего монтажного материала (напр., винты, дюбели) с учетом веса и
конструкции акустической системы Soundbar и свойств стены.
ИНСТАЛЛЯЦИЯ СИСТЕМЫ
Подключение телевизора (рис. 2):
CSB 1000 предназначен для прямого подключения к телевизору. Для этого имеется три возможности:
a) Подключение телевизора к HDMI®-присоединению HDMI/ARC (рис. 5, поз. 14):
Подключайте телевизор к этому присоединению, если на нем имеется разъем HDMI® с функцией ARC (реверсивный
звуковой канал, стандарт HDMI® 1.4).
Если HDMI®-разъем телевизора дополнительно имеет функцию CEC (Consumer Electronics Control), основными
функциями Soundbar, такими как включение/выключение, громкость и отключение звука, можно управлять с пульта
ДУ телевизора. Какие именно функции CEC доступны, зависит от конкретной модели телевизора. По этому поводу
следует прочитать руководство пользователя на телевизор. Большинство производителей используют собственное
название для функции CEC, оно преимущественно заканчивается на слово „Link“. Внимание: по техническим причинам
функция CEC доступна только при подключении через HDMI®.
Возможно, эти функции нужно включить в меню телевизора. Благодаря встроенному декодеру Dolby® могут также
воспроизводиться сигналы в кодировке Dolby® Digital. Кабель для этого в комплект поставки не входит.
b) Подключение телевизора к оптическому цифровому входу DIGITAL IN (рис. 5, поз. 9):
Воспользуйтесь оптическим кабелем из комплекта поставки и соедините цифровой аудиовыход телевизора
с аудиовходом DIGITAL IN (рис. 5, поз. 9) Soundbar. Благодаря встроенному декодеру Dolby® могут также
воспроизводиться сигналы в кодировке Dolby® Digital.
c) Подсоединение телевизора к аудиовходу AUX IN (рис. 5, поз. 10):
Используйте аудиокабель из комплекта поставки и соедините аудиовыход телевизора с аудиовходом AUX IN (рис. 5,
поз. 10). Если ваш телевизор оснащен аудиовыходом с неизменным уровнем, его следует предпочесть аудиовыходу с
переменным уровнем.
Подключение других устройств к Soundbar (рис. 3):
Подключение аналогового или цифрового аудиоисточника к Soundbar:
К аналоговому входу AUX IN (рис. 5, поз. 10) и цифровым входам DIGITAL IN (рис. 5, поз. 9) Soundbar могут
подключаться и другие аудиоисточники, например, проигрыватели компакт-дисков, MP3-плееры, спутниковые
ресиверы. Для этого пользуйтесь описанной выше процедурой.
Подключение источников HDMI-сигнала (аудио/видео) к звуковой панели:
Ко входам HDMI — HDMI1, HDMI2 и HDMI3 (рис. 5, поз. 11, 12, 13) можно подключить до трех источников HDMI
(например, проигрыватель BD/DVD, приемник SAT, игровая консоль). Аудиосигнал источника HDMI предается через
систему CSB 1000, видеосигнал передается на выход HDMI (HDMI OUT (ARC), рис. 5, поз. 14).
46
Page 47

В этой конфигурации на телевизоре необходимо выбрать вход HDMI, который подключен к выходу HDMI звуковой
панели (рис. 5, поз. 14).
Важно: Разъем USB (рис. 5, поз. 8) предназначен иск лючительно для обновления системы и для других целей не
используется.
Подсоединение источника питания акустической системы Soundbar:
В объем поставки входит универсальной внешной сетевой блок (C), которые работают с напряжением 110 – 240 В/AC
50/60 Гц. Используемый в вашей стране сетевой кабель может иметь иную конструкцию. Если сетевой кабель не подходит
к вашим штепсельным розеткам или вы не уверены в качестве его подсоединения, следует обращаться в торговую
организацию компании Magnat.
1. Соедините выходной кабель (храповая муфта) внешнего сетевого блока с питающим разъемом акустической системы
Soundbar (рис. 5, поз. 7).
2. Вставить сетевой кабель в разъем на сетевом блоке.
3. Вставить сетевой кабель в штепсельную розетку. Обращать внимание на применение соответствующего штепсельной
розетке сетевого штекера (смотри Примечание выше).
Подсоединение источника питания акустической системы Subwoofer
В объем поставки входит самый распространенный сетевой кабель. Используемый в вашей стране сетевой кабель может
иметь иную конструкцию. Если сетевой кабель не подходит к вашим штепсельным розеткам или вы не уверены в качестве
его подсоединения, следует обращаться в торговую организацию компании Magnat.
1. Вставьте двухполюсный кабель сетевого питания в разъем (3) на усилителе сабвуфера (рис. 6b, поз. 16).
2. Вставить сетевой кабель в штепсельную розетку. Обращать внимание на применение соответствующего штепсельной
розетке сетевого штекера (смотри Примечание выше).
ПЕРВЫЙ ВВОД В ЭКСПЛУАТАЦИЮ, БЕСПРОВОДНОЕ ПОДКЛЮЧЕНИЕ ЗВУКОВОЙ ПАНЕЛИ К
САБВУФЕРУ:
После подключения всех сигнальных кабелей и кабелей питания к звуковой панели и сабвуферу включите звуковую панель
с помощью пульта дистанционного управления (рис. 7, поз. 18) или на боковой панели управления (рис. 4b, поз. 4).
При каждом включении звуковая панель автоматически подключается к сабвуферу:
светодиодный индикатор состояния на звуковой панели (рис. 4a, поз. 1) гаснет. Светодиодный индикатор состояния
сабвуфера (рис. 6a, поз. 15) изменяет цвет с красного на зеленый.
Если сабвуфер не включился автоматически, или если, светодиодный индикатор состояния сабвуфера мигает зеленым
цветом, произошла ошибка соединения. В этом случае необходимо установить соединение вручную. Порядок действий:
- С помощью пульта дистанционного управления выберите вход AUX (рис. 7, поз. 24)
- На пульте дистанционного управления нажмите кнопку NIGHT (рис. 7, поз. 27) на 5 сек. На дисплее появится WPAIR.
- Нажмите кнопку CONNECT на задней панели сабвуфера (рис. 6b, поз. 17). Во время установки соединения
светодиодный индикатор состояния сабвуфера мигает зеленым цветом.
- В случае успешного соединения на дисплее появляется сообщение SUCCE светодиодный индикатор состояния
сабвуфера постоянного горит зеленым цветом.
- Если на дисплее появилось сообщение FAIL, необходимо повторить процедуру.
УПРАВЛЕНИЕ
Элементы управления Soundbar (передняя сторона) (рис. 4a):
(1) СИД индикации состояния: Этот СИД горит красным, если устройство находится в режиме ожидания.
(2) Светодиодный дисплей: На дисплее показывается различная информация:
- Выбранный аудиовход
- Звуковые настройки и меню
- Звуковой формат: Если декодируется сигнал Dolby Digital, на дисплее на некоторое время появляется надпись
DOLBY. При несовместимых звуковых форматах на дисплее выводится ERROR , воспроизведение не производится.
Дисплей гаснет примерно через 5 с после последнего действия по управлению.
(3) Датчик дистанционного управления: чтобы воспользоваться пультом ДУ, направьте его на это место.
Элементы управления Soundbar (cторона) (рис. 4b):
(4) ON/STBY: Включает устройство, если оно находится в режиме ожидания. И наоборот, устройство можно переключить
из режима Power в режим ожидания.
Если устройство до выключения подключено к сети через WLAN, короткое нажатие переключает звуковую панель в
режим сетевого ожидания. На дисплей выводится символ NET STBY При повторном включении сетевое соединение
будет сразу же доступно. Кроме того, устройство также может быть включено автоматически через приложение
посредством воспроизведения доступного источника.
Продолжительное нажатие кнопки переключает устройство в режим ECO Standby (экономия энергии в режиме
ожидания). Вследствие этого отключается сетевое соединение.
47
Page 48

Если устройство не используется в течение длительного времени, устройство следует переключить в режим ECO
Standby, так как потребление энергии в режиме ожидания ниже. После повторного включения из режима ECO Standby
устройство будет снова в сети только через прим. 45 секунд.
Если устройство до выключения не подключено к сети, звуковая панель всегда будет переключатся в режим ECO
Standby.
(5) VOLUME: Увеличивает (+) / уменьшает (-) громкость
(6) SOURCE: Выбирает вход.
Элементы управления сабвуфера (передняя сторона) (рис. 6a):
(15) СИД индикации состояния: Этот СИД горит красным, если устройство находится в режиме ожидания. Светодиод горит
зеленым, если сабвуфер находится в рабочем режиме. См. также раздел «Первый ввод в эксплуатацию».
Элементы управления сабвуфера (тыльная сторона) (рис. 6b):
(17) CONNECT: Запускает режим ручного подключения сабвуфера. См. также раздел «Первый ввод в эксплуатацию».
Управление с пульта ДУ системы (рис. 7):
(18) ON/STBY: Включает устройство, если оно находится в режиме ожидания. И наоборот, устройство можно переключить
из режима Power в режим ожидания.
Если устройство до выключения подключено к сети через WLAN, короткое нажатие переключает звуковую панель в
режим сетевого ожидания. На дисплей выводится символ NET STBY При повторном включении сетевое соединение
будет сразу же доступно. Кроме того, устройство также может быть включено автоматически через приложение
посредством воспроизведения доступного источника.
Продолжительное нажатие кнопки переключает устройство в режим ECO Standby (экономия энергии в режиме
ожидания). Вследствие этого отключается сетевое соединение.
Если устройство не используется в течение длительного времени, устройство следует переключить в режим ECO
Standby, так как потребление энергии в режиме ожидания ниже. После повторного включения из режима ECO Standby
устройство будет снова в сети только через прим. 45 секунд.
Если устройство до выключения не подключено к сети, звуковая панель всегда будет переключатся в режим ECO
Standby.
(19) HDMI/ARC: Выбирает аудиовход HDMI/ARC.
(20) HDMI 1/2/3: Выбирает дополнительные аудио- / видеовходы HDMI 1, 2, 3.
(21) BT: WäВыбирает аудиовход BLUETOOTH. Продолжительное нажатие этой кнопки переключает устройство в режим
сопряжения Bluetooth.
(22) WLAN: Выбор сетевого входа. Смотри также ПОДКЛЮЧЕНИЕ УСТРОЙСТВА К СЕТИ.
(23) DIGITAL: Выбирает аудиовход DIGITAL IN.
(24) ANALOG: Выбирает аудиовход AUX IN.
(25) MUTE: Отк лючает и снова включает звук.
(26) VOLUME: Увеличивает (+) / уменьшает (-) громкость
(27) NIGHT: Включает и выключает режим воспроизведения с уменьшенной динамикой и оптимизированными частотными
характеристиками для ситуаций, когда не нужна большая громкость (напр., поздним вечером и т.д.).
(28) SURR: Включает или вык лючает функцию объемного звучания 3D-Surround.
(29) SOUND: Выбирает различные звуковые настройки:
LINEAR: Линейная настройка полосы частот
MUSIC: Оптимизирует частотные характеристики устройства для воспроизведения музыки.
MOVIE: Оптимизирует частотные характеристики устройства для воспроизведения звука фильмов.
VOCAL: Выделяет диапазон голоса для обеспечения очень хорошего понимания, что говорят.
(30) MENU: Открывает меню настроек Soundbar
Можно выбирать и изменять с помощью кнопок VOL+/- (26) следующие настройки. Повторное нажатие меню
подтверждает настройку.
SUB: Увеличивает (+) / уменьшает (-) громкость сабвуфера.
EQ: Hастройка звука для различных вариантов размещения звуковой панели
WALL: Эта настройка оптимизирует звук при размещении звуковой панели на стене.
DESK: Эта настройка оптимизирует звук при размещении звуковой панели на стеллаже или под телевизором.
ASTBY: Для экономии электроэнергии устройство автоматически отключается примерно через 15 минут, если на него
не поступает сигнал. Эту функцию можно выключить, при поставке она включена.
RESET: Сброс всех настроек на заводские.
Exit: Выход из меню настроек.
Управление воспроизведением в режиме WLAN/Bluetooth:
(31) ПЕРЕХОД НА ТРЕК НАЗАД: Нажмите один раз, чтобы начать воспроизведение текущей композиции сначала. При
многократном нажатии выполняется переход к предыдущим записям.
(32) PLAY/PAUSE: Приостанавливает или возобновляет воспроизведение текущей дорожки.
(33) ПЕРЕХОД НА ТРЕК ВПЕРЕД: выбор следующей композиции.
48
Page 49

Соединение устройства с аудиоисточником Bluetooth:
Переключите Soundbar в режим Bluetooth с помощью пульта ДУ. Если раньше связь с этим устройством Bluetooth уже
устанавливалась, предпринимается автоматическая попытка восстановления соединения. При этом может потребоваться
вручную подтвердить восстановление соединения на устройстве-источнике.
Если раньше соединение не устанавливалось или оно не может быть восстановлено, Soundbar автоматически включает
режим соединения, который также называется режимом спаривания. Чтобы переключить Soundbar в режим Pairing
вручную, нажмите и удерживайте кнопку BT (рис. 7, поз. 22) на пульте ДУ. Пока режим Pairing активен, на дисплее мигает
индикатор BT.
Теперь включите режим Bluetooth устройства-источника. Soundbar выводится в списке устройств Bluetooth как
„MAGNAT CSB 1000“. Если он не выводится в списке устройств, активируйте вручную поиск устройств Bluetooth на
устройстве-источнике и проверьте, включен ли на Soundbar режим спаривания.
В зависимости от устройства-источника во время процесса установления соединения может быть задан вопрос, следует
ли принять пароль. Ответить на вопрос можно просто нажатием кнопки „Принять“. Если вопрос о пароле повторится,
используйте стандартные пароли „0000“ или „1234“. Если соединение устанавливалось ранее, может задаваться вопрос,
хотите ли вы установить соединение. На него так же отвечайте „ Да“. После успешного соединения на дисплее загорается
символ входа BT и не гаснет.
Soundbar поддерживает особо качественный стандарт передачи аудио „Qualcomm® aptX™“. Если устройство-источник
также поддерживает эту технологию , при установлении соединения Bluetooth в качестве режима передачи автоматически
выбирается „Qualcomm® aptX™“.
ПОДКЛЮЧЕНИЕ УСТРОЙСТВА К СЕТИ:
a) Подключение к WLAN в режиме WPS
Если ваш маршрутизатор имеет кнопку WPS, вы можете легко и удобно подключить громкоговоритель к сети:
- С помощью пульта дистанционного управления выберите вход WLAN. На дисплее мигает надпись WLAN, чтобы
показать, что соединение с сетью еще не установлено.
- Нажмите кнопку WPS на маршрутизаторе. Затем нажмите кнопку WLAN на пульте дистанционного управления примерно
на 5 секунд для подтверждения соединения.
Выполняется подключение устройства к сети. В это время на дисплее мигает надпись WPS.
- Как только соединение будет установлено, появится сообщение WPS OK. После этого индикатор WLAN горит
постоянно.
- Теперь устройство может воспроизводить аудиосигналы из сети.
- Поскольку устройство сохраняет данные соединения, их не нужно повторно вводить при следующем включении.
Указание: Время ожидания режима WPS составляет 2 мин. В случае превышения этого времени может потребоваться
начать заново и снова нажать кнопку WPS.
Указание: Также прочтите инструкцию к маршрутизатору.
б) Подключение к сети через веб-интерфейс
Если не удается подключиться к сети через WPS, можно использовать веб-интерфейс звуковой панели. Для этого к вам
понадобится устройство с беспроводным сетевым адаптером, на котором можно вызвать Интернет-браузер (например,
компьютер/смартфон).
- Включите звуковую панель и найдите открытую сеть WLAN «MAGNAT CSB 1000XX-XX-XX» в списке доступных сетей на
компьютере/смартфоне.
Указание: XX-XX-XX в SSID звуковой панели означает последние 6 символов MAC-адреса звуковой панели.
- Затем экран автоматически отобразит страницу настроек. Если это не так, откройте веб-браузер, введите 172.19.42.1 в
адресной строке браузера, а затем нажмите кнопку ввода.
Откроется веб-интерфейс WLAN:
• Введите имя громкоговорителя, чтобы вы могли распознать его в списке доступных громкоговорителей (например,
«Гостиная» или «Кухня»).
• В списке доступных сетей в раскрывающемся меню network name («Имя сети») выберите сеть, к которой вы хотите
подключить громкоговоритель.
49
Page 50

• Если сетевой маршрутизатор не назначает IP-адреса, отключите функцию DHCP, а затем вручную введите IP-адрес в
нижнем поле.
• Затем введите требуемый сетевой ключ (пароль) и нажмите CONNECT (ПОДКЛЮЧИТЬ).
• На веб-странице появится сообщение network was connected successfully («сеть была успешно подключена»), которое
информирует о том, что соединение с сетью было успешно установлено.
Выполняется подключение устройства к сети.
Указание:
1. Изделие не поддерживает протокол безопасности WEP.
2. После настройки соединения между динамиком и маршрутизатором смарт-устройство может подключиться к
действующей сети. Если это не так, убедитесь в том, что смарт-устройство подключается к сети, к которой подключен
громкоговоритель.
Теперь устройство может воспроизводить аудиосигналы из сети. Поскольку данные соединения сохранены, их не нужно
повторно вводить при следующем включении.
ВОСПРОИЗВЕДЕНИЕ МУЗЫКИ В РЕЖИМЕ WLAN
Через громкоговоритель можно воспроизводить музыку из сети или с устройства, подключенного напрямую.
a) Установка приложения на Android/смартфон Apple/планшетный ПК
Чтобы использовать функцию управления воспроизведением музыки через громкоговоритель на планшете или смартфоне,
необходимо сначала выбрать и установить соответствующие приложения (Allplay Radio и Jukebox) для планшетного ПК или
смартфона из Play Store (Android) или App Store (Apple).
Ниже приведено краткое описание двух доступных приложений, которыми вы можете воспользоваться:
- AllPlay Radio (eMbience Inc.) = приложение для интернет-радио
- AllPlay Jukebox (eMbience Inc.) = об ще е пр иложение для управления музыкальными сервисами, воспрои зв едением музыки
с сетевых дисков, телефона и т. п.
Приложение AllPlay Jukebox имеет следующие опции воспроизведения:
Режим вечеринки:
в этом режиме приложение воспроизводит музыку из общего списка воспроизведения нескольких смарт-устройств через
громкоговоритель.
Многозонный режим:
в этом режиме приложение воспроизводит музыкальные композиции из разных плейлистов с нескольких смарт-устройств
на другом динамике
Режим нескольких помещений:
в этом режи ме прил ожени е ис пол ьзуется для соз дания группы из н еск ольких гр омк оговорит елей, кот орые затем исполь зуютс я
смарт-устройством для воспроизведения музыкальных композиций из списка воспроизведения.
Указание: В Apple Store может не быть обоих приложений для всех планшетов.
50
Page 51

СЕРВИС И ТЕХНИЧЕСКИЕ ПРОБЛЕМЫ
Если возникнут технические проблемы, обратитесь в специализированный магазин или на фирму Magnat Audio-Produkte
GmbH, тел.: +49 (0) 2234807-0.
TEХНИЧЕСКИЕ ДАННЫЕ
Конфигурация: 2 x 2 полосы, активный
Сабвуфер: Bassreflex
Выходная мощность RMS/макс.: 4 x 20 /40 Ватт (канал L+R)
100/200 Ватт (сабвуфер)
Диапазон частот: 25 – 28 000 Гц
Разделительная частота: 180 / 3100 Гц
Частота дискредитации цифровых входов: до 96 кГц/24 бит
Рабочая частота: BT: 2402 – 2480 М Гц
Wireless: 5740 – 5814 М Гц
WLAN: 2412 – 2472 М Гц
5150 – 5250 М Гц
5250 – 5350 М Гц
5470 – 5725 МГц
Во всех государствах-членах ЕС режим 5150-5350 МГц
ограничивается исключительно закрытыми помещениями.
Максимальная излучаемая мощность согласно EN 62479:
Потребляемая мощность :
Рабочий режим Soundbar: 65 Ватт
Рабочий режим Subwoofer: 100 Ватт
Режим ожидания Soundbar: 3,0 Ватт (Радиосвязь вкл.)
Режим ожидания Subwoofer: <0,5 Ватт
Размеры Soundbar (Ш x В x Г): 1000 x 79 x 60 мм
Размеры сабвуфер (Ш x В x Г): 230 x 382 x 418 мм
Вес Soundbar: 2,5 кг
Вес сабвуфер: 9,4 кг
Блоком питания: Dongguan Dongsong Electronic Co., Ltd., DYS602-210309W
USB: 5 V
BT: 9,5 dBm
Wireless: 9 dBm
WLAN: 2,4 GHz: 20 dBm
5 GHz: 22 dBm
<0,5 Ватт (Радиосвязь выкл.)
, 1A
ПРАВО НА ТЕХНИЧЕСКИЕ ИЗМЕНЕНИЯ ЗА НАМИ.
51
Page 52

1
a
b
52
Page 53

2
a)
HDMI/ARCb)DIGITAL OUT
TV
c)
ANALOG OUT
53
Page 54

3
BD/DVD Player
MP 3 Player
CD
Game Console
4a
4b
Sat Receiver
1
2
3
5
4 6
54
Page 55

5
14
13
10
11
9
8
12
7
6a
15
55
Page 56

6b
RISK OF ELECTRIC SHOCK
DO NOT OPEN
CONNECT
17
7
18
19
20
21
22
23
24
220-240V~ 50-60Hz
Power Consumption: 100 W
31
32 33
25
26
30
16
27
28
29
56
Page 57

Wir gratulieren Ihnen! Durch Ihre kluge Wahl sind Sie Besitzer eines MAGNAT HiFi-Produktes geworden.
MAGNAT HiFi-Produkte erfreuen sich aufgrund der hohen Qualität eines ausgezeichneten Rufes weltweit. Dieser hohe
Qualitätsstandard ermöglicht es für MAGNAT HiFi-Lautsprecher 5 Jahre und für Magnat HiFi-Elektronik 2 Jahre Garantie zu
gewähren.
Die Produkte werden während des gesamten Fertigungsvorganges laufend kontrolliert und geprüft. Im Servicefall beachten Sie bitte
folgendes:
1. Die Garantiezeit beginnt mit dem Kauf des Produktes und gilt nur für den Erstbesitzer.
2. Während der Garantiezeit beseitigen wir etwaige Mängel, die nachweislich auf Material- oder Fabrikationsfehler beruhen, nach
unserer Wahl durch Austausch oder Nachbesserung der defekten Teile. Weitergehende Ansprüche, insbesondere auf Minderung,
Wandlung, Schadenersatz oder Folgeschäden sind ausgeschlossen. Die Garantiezeit wird von einer Garantieleistung durch uns nicht
berührt.
3. Am Produkt dürfen keine unsachgemäßen Eingriffe vorgenommen worden sein.
4. Bei Inanspruchnahme der Garantie wenden Sie sich bitte zunächst an Ihren Fachhändler. Sollte es sich als notwendig erweisen, das
Produkt an uns einzuschicken, so sorgen Sie bitte dafür, dass • das Produkt in einwandfreier Originalverpackung verschickt wird, • die
Kontrollkarte ausgefüllt dem Produkt beiliegt, • die Kaufquittung beigefügt ist.
5. Von der Garantie ausgenommen sind: • Leuchtmittel • Verschleißteile • Transportschäden, sichtbar oder unsichtbar (Reklamationen
für solche Schäden müssen umgehend bei der Transportrma, Bahn oder Post eingereicht werden.) • Kratzer in Metallteilen,
Frontabdeckungen u.s.w. (Diese Defekte müssen innerhalb von 5 Tagen nach Kauf direkt bei Ihrem Händler reklamiert werden.) • Fehler,
die durch fehlerhafte Aufstellung, falschen Anschluss, unsachgemäße Bedienung (siehe Bedienungsanleitung), Beanspruchung oder
äußere gewaltsame Einwirkung entstanden sind. • Unsachgemäß reparierte oder geänderte Geräte, die von anderer Seite als von uns
geöffnet wurden. • Folgeschäden an fremden Geräten • Kostenerstattung bei Schadensbehebung durch Dritte ohne unser vorheriges
Einverständnis.
Congratulations! You have made a wise selection in becoming the owner of a MAGNAT HiFi equipment. Due to high quality
MAGNAT products have earned an excellent reputation through the western world. And this high quality standard enables us to
grant a 5-years warranty for MAGNAT HiFi speakers and a 2-years warranty for Magnat HiFi-electronic components.
The equipments are checked and tested continously during the entire production process. In case you have problems with your
MAGNAT HiFi equipment, kindly observe the following:
1. The guarantee period commences with the purchase of the component and is applicable only to the original owner.
2. During the guarantee period we will rectify any defects due to faulty material or workmanship by replacing or repairing the defective
part at our discretion. Further claims, and in particular those for price reduction, cancellation of sale, compensation for damages or
subsequential damages, are excluded. The guarantee period is not altered by the fact that we have carried out guarantee work.
3. Unauthorized tampering with the equipment will invalidate this guarantee.
4. Consult your authorized dealer rst, if guarantee service is needed. Should it prove necessary to return the component to the factory,
please insure that • the component is packed in original factory packing in good condition • the quality control card has been lled out
and enclosed with the component, • your enclose your receipt as proof of purchase.
5. Excluded from the guarantee are: • Illuminates • Wear parts • Shipping damages, either readily apparent or concealed (claims for
such damages must be lodged immediately with forwarding agent, the railway express ofce or post ofce). • Scratches in cases, metal
components, front panels, etc. (You must notify your dealer directly of such defects within three days of purchase.) • Defects caused by
incorrect installation or connection, by operation errors (see operating instructions), by overloading or by external force. • Equipments
which have been repaired incorrectly or modied or where the case has been opened by persons other than us. • Consoquential
damages to other equipments. • Reimbursement of cools, without our prior consent, when repairing damages by third parties.
Toutes nos félicitations!
Vouz avez bien choisi et êtes le propriétaire heureux d’un produit MAGNAT. Les produits MAGNAT ont une excellente réputation
pour leur bonne qualité. Pour cette raison, nous accordons 5 ans de garantie sur les haut-parleurs MAGNAT et 2 ans de garantie sur les
amplicateurs MAGNAT.
Les appareils sont soumis pendant toutes les opérations de fabrications à des contrôles et vérications constants. Si, pourtant, vous
rencontrez des difculés avec votre appareil MAGNAT veuillez tenir compte de ce qui suit:
1. La garantie débute avec l’achat de l’appareil et est valable uniquement pour le premier propriétaire.
2. Pendant la période de garantie nous réparons les dommages provenant des défauts de matériel ou de fabrication et nous procédons,
à notre guise, à l’échange ou à la réparation des pièces défectueuses.
3. Aucune réparation impropre ne doit avoir été effectuée à l’appareil.
4. Lors d’une demande de garantie, veuillez vous adresser en premier lieu à votre distributeur. Si ce dernier décide que l’appareil doit
nous être retourné, veuillez tenir compte que: • l’appareil soit expédié dans son ermballage d’origine, • la carte de contrôle dûment
remplie soit jointe, • le bon d’achat soit joint.
5. Ne sont pas compris dans la garantie: • Matériel d’eclairage • Pièces d’usure • Avaries de transport, visibles ou non (de telles
réclamations doivent être faites immédiatement auprès du transporteur, du chermin de fer ou de la poste). • Des rayures sur le
boîtier, pièces métalliques, couvercles etc. (ces dommages doivent être signalés directement à votre distributeur dans les trois jours
suivant l’achat). • Dommages résultant d’un raccordement incorrect, maniement incorrect (voir instructions de service), surcharge ou
application de force extérieure. • Appareils réparés non conformément ou modiés et qui ont été ouverts par une personne autre que
nous. • Dommages ultérieurs à d’autres appareils. • Remboursement des frais à des tiers ayant effectué les réparations sans notre
accord préalable.
Page 58

Typ/Type
Serien-Nr./Serial-No.
GARANTIEKARTE
WARRANTY CARD
Name und Anschrift des Händlers/Stempel
Name and address of the dealer/stamp
Käufer/Customer
Name/Name
Straße/Street
PLZ, Ort/City
Land/Country
Kaufdatum/buying date
Nur gültig in Verbindung mit Ihrer Kaufquittung!
No warranty without receipt!
Page 59

Page 60

Magnat Audio-Produkte GmbH
Lise-Meitner-Str. 9 • D-50259 Pulheim • Germany
Tel. +49 (0) 2234 / 807 - 0 • Fax +49 (0) 2234 / 807 - 399
Internet: http://www.magnat.de
Manual_v1.0
 Loading...