

Page 1
User Manual
Wi Mini Projector
PP72
Thank you for your purchase of this Magnasonic product. Please read this
instruction manual carefully before using product to ensure proper use.
Keep this manual in a safe place for future reference.
magnasonic.com/support
Page 2

CONTENTS
CAUTION ............................................................................................................. 3
IMPORTANT SAFETY INSTRUCTIONS ....................................................... 3
FCC INFORMATION ......................................................................................... 5
LOCATION OF PARTS AND CONTROLS .................................................6
SPECIFICATIONS ............................................................................................... 7
PROJECTOR COMPATIBILITY ...................................................................... 8
OPERATING THE PROJECTOR.......................................................................9
CHARGING WITH THE PROJECTOR .........................................................12
TROUBLESHOOTING ..................................................................................... 13
WARRANTY.......................................................................................................14
- 2 -
Page 3
CAUTION
WARNING:
TO REDUCE THE RISK OF FIRE OR ELECTRIC
SHOCK, DO NOT EXPOSE THIS APPARATUS TO
RAIN OR MOISTURE
CAUTION:
TO REDUCE THE RISK OF ELECTRIC SHOCK,
DO NOT REMOVE COVER (OR BACK). NO USER
SERVICEABLE PARTS INSIDE. REFER SERVICING TO
QUALIFIED SERVICE PERSONNEL.
WARNING
RISK OF ELECTRIC SHOCK
DO NOT OPEN
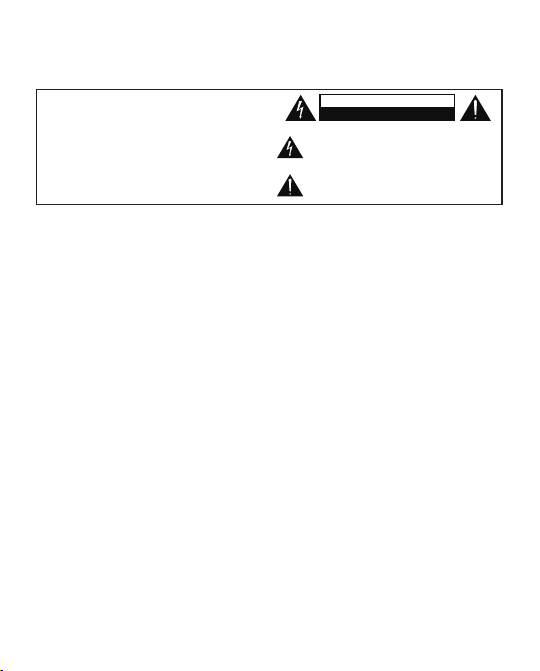
The lightning ash with arrowhead symbol within an equilateral triangle is intended to alert the user to the presence of
uninsulated dangerous voltage within the product’s enclosure
that may be of sufcient magnitude to constitute a risk of
electric shock to persons.
The exclamation point within an equilateral triangle is intended to alert the user to the presence of important operating
and maintenance (servicing) instructions in the literature
accompanying the appliance.
IMPORTANT SAFETY INSTRUCTIONS
All of the safety and operating instructions should be read, adhered to,
and followed before the unit is used. Please save these instructions.
DANGER
To reduce the risk of electric shock, burns, re or injury:
1. Do not use while bathing or in a shower.
2. Do not place or store unit where it can fall or be pulled into a tub or sink.
3. Do not place in, drop, or submerge into water or other liquids.
4. Do not reach for a unit that has fallen into water. Unplug it immediately.
5. Care should be taken so that objects and liquids are not dropped or spilled
onto the unit.
6. Close supervision is necessary when this appliance product is used by
or near children.
7. Use this unit only for its intended use as described in this manual.
8. Unplug this unit during lightning storms or when unused for long periods
of time.
9. Never drop or insert an object into any opening.
10. Protect the adapter cord from being walked on or pinched, particularly at
plug outlets, and the point where it exits the unit.
- 3 -
Page 4

11. Do not allow adapter cord to touch hot surfaces. Wrap cord loosely
around the unit when storing.
12. The unit should be situated away from direct sunlight or heat sources such
as radiators, electric heaters, heat registers, stoves, or other units (including
ampliers) that produce heat. Avoid placing on top of stereo equipment
that radiates heat.
13. Never block the air openings of the unit with materials such as clothing,
plastic bags, or papers. Never place it on a soft surface such as a bed or
couch where openings may be blocked.
14. Do not overload electrical outlets. Use only the power source as indicated.
15. Do not carry this unit by the cord or use the cord as a handle.
16. Never operate this unit if it has a damaged cord or plug, if it is not working
properly, or if it has been dropped or damaged. If the unit’s power supply
cord or plug is damaged, do not attempt to x it yourself.
17. To avoid the risk of electric shock, do not disassemble or attempt to repair
the unit. Incorrect repair can cause risk of electric shock or injury to
persons when unit is used.
18. Do not operate in the presence of explosive and/or ammable fumes.
19. Never remove the plug from the socket by pulling the power cord.
WARNING! This product contains a rechargeable battery.
• Do not store this product in high temperatures, damp areas, or in direct
sunlight.
• Never disassemble the product.
• Never dispose of the product in re or water, which may result in explosion
and/or injury.
• Keep product out of reach of children. Do not touch product with damp
hands.
• Dispose of the product properly.
• The product must not be discarded with ordinary household waste.
• Contact your local recycling center for proper disposal.
- 4 -
Page 5

FCC INFORMATION
This device complies with part 15 of the FCC rules. Operation is subject to the
following two conditions:
1. This device may not cause harmful interference.
2. This device must accept any interference received including interference
that may cause undesired operation.
WARNING: Changes or modications to this unit not expressly approved by
the party responsible for compliance could void the user’s authority to operate
the equipment.
CAUTION: To maintain compliance with the FCC’s RF exposure guidelines,
place the product at least 8 inches from nearby persons.
NOTE: This equipment has been tested and found to comply with the limits
for a Class B digital device, pursuant to Part 15 of the FCC Rules. These limits
are designed to provide reasonable protection against harmful interference in a
residential installation. This unit generates, uses, and can radiate radio frequency
energy and if not installed and used in accordance with the instructions, may cause
harmful interference to try and correct the interference by one or more of the
following measures:
• Reorient or relocate the receiving antenna.
• Increase the separation between the equipment and receiver.
• Connect the equipment to an outlet on a circuit different from that to
which the reciever is connected.
• Consult the dealer or an experienced radio/TV technician for help.
Shielded cables must be used with this unit to ensure compliance with the
Class B FCC limits.
CAUTION: The radiated output power of the Wi-Fi technology is below the
FCC radio frequency exposure limits. Nevertheless, it is advised to use the
wireless equipment in such a manner that the potential for human contact during
normal operation is minimized.
- 5 -
Page 6
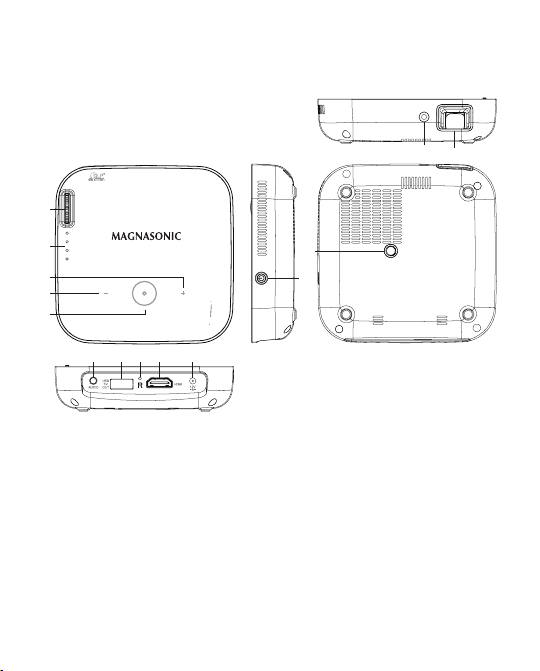
LOCATION OF PARTS AND CONTROLS
11 12
1
2
3
4
5
6789 10
1. Focus wheel
2. Battery indicator lights
3. Volume up control
4. Volume down control
5. Mode control
6. 3.5mm audio out
7. USB out (5V/1A)
13
14
8. Reset button
9. HDMI compatible Input
10. DC input (12V/2A)
11. Ambient light sensor
12. Lens
13. Tripod dock
14. Power button
- 6 -
Page 7

SPECIFICATIONS
Product Dimensions 4.1 x 4.1 x 4.0 inches
Brightness Up to 100 Lumens*
Lamp Life LED lamp with up to 20,000
hours
Image Size Up to 80 inches
Distance 3 feet to 10 feet
Throw Ratio 1.3
Contrast Ratio 1000:1*
Native Resolution 854 x 480 (WVGA)
Aspect Ratio 16:9
Built-in Speaker 2 x 1-watt speakers
Power DC 12V/2A
Auto Keystone +/- 40 degrees auto vertical
keystone correction
Battery Li-polymer, 3800 mAh
Battery Life Up to 1.5 hours**
*TI’s DLP® IntelliBright™ technology dynamically adjusts the projector brightness range for
each individual pixel based on image content and ambient room light level.
**Battery life will be reduced when using wireless mode.
- 7 -
Page 8

PROJECTOR COMPATIBILITY
Compatible
Device
Android
Devices
®
Apple
Devices Not available Not applicable
HDMI™
compatible
devices
Apple, iPad, iPhone, and iPod touch are trademarks of Apple Inc., registered in the U.S. and other
countries. Samsung is a trademark of Samsung Electronics, registered in the U.S. and other countries.
Wireless
Connection
Devices that have
Android™ OS 4.4
™
or later and wireless
screen mirroring
capability
Not available Not applicable
Examples
Samsung Galaxy
S® 6, Samsung
Galaxy Note®
4, Samsung
Galaxy Note® 3,
Samsung Galaxy
S® 5, Samsung
Galaxy S® 4,
Nexus 6P, HTC
One A9, Huawei
G8, LG G4
Wired
Connection
Not available Not applicable
™
HDMI
to HDMI™
cable (included) +
Apple® lightning™
digital AV adapter
(not included)
™
to HDMI™
HDMI
cable (included) +
Apple® 30-pin digital
AV adapter (not
included)
™
to HDMI™
HDMI
cable (included) +
Mini DisplayPort to
HDMI™ Adapter (not
included)
HDMI
HDMI™cable
(included)
HDMI™ to HDMI™
cable (included) +
mini HDMI™ adapter
(not included)
HDMI™ to HDMI™
cable (included)
+ micro HDMI™
adapter (included)
None Required
iPhone® 6 Plus, iPhone® 6, iPhone® 5,
iPod® touch 4th gen, iPad® mini 1st gen,
Macbook Air®, MacBook Pro®, iMac
Devices with standard HDMI™ ports -
™
to
DVD/Blu Ray players, games consoles,
laptops with HDMI™ port, computers,
Laptops with micro HDMI™ ports,
Asus® VivoTab, Sony Vaio T®, Acer®
Aspire S7, Lenovo
U845W, Acer® Aspire v5, Blackberry®
Google
other streaming media players that plug
- 8 -
Examples
iPad® 4th gen
iPhone® 4s, iPad® 3rd gen,
iPad® 2nd gen, iPhone® 4,
iPod® touch 2nd gen,
iPad®1st gen
Apple®TV, Roku®, U-verse
Laptops with mini HDMI™ ports,
®
GoPro
®
Twist, Toshiba®
Z10
™
Chromecast, Roku® stick,
directly into an HDMI™ port
®
®
Page 9

OPERATING THE PROJECTOR
SETUP
The projector can be powered using the included AC adapter or the
built-in battery.
• To power the projector with AC power, connect the AC adapter
to the projector’s DC input and plug the other end into an outlet.
Once connected, the battery indicator lights will illuminate on the
projector showing the amount of battery power remaining.
• To power the projector with the built-in battery, simply turn the
projector on. To check the remaining battery life of the projector
press the power button briey.
IMPORTANT: Fully charge the battery before rst use
(approx. 4-5 hours).
CONNECT A SOURCE DEVICE
The projector can be connected to a variety of HDMI compatible
devices via a wired connection and to some smartphones and tablets
via a wireless connection.
IMPORTANT:
Before you power on the projector, please be sure to check that
there is nothing blocking the ambient light sensor on the front of the
projector (the location of this sensor can be seen on the Location
and Parts diagram). Blocking this sensor may impact the Intellibright
adjustments the projector makes which optimizes the projected image.
- 9 -
Page 10

WIRED CONNECTION
1. To connect via a wired connection, plug in the HDMI compatible
cable (included in the box) to the HDMI compatible port on the
projector and to your device.
NOTE: Some devices may require an adapter to connect to your device. To determine what type of
adapter you need to use, please reference the compatibility section of this manual on page 8.
2. Power on the projector by pressing and holding the power button
for 3 seconds.
3. Allow the projector 15 to 30 seconds to fully start up, sync with
your device, and make image adjustments.
NOTE : After syncing with the projector, you may see your device’s screen being mirrored by the
projector. Some devices may not have this ability, but they can still be used with the projector to project
videos and photo slide shows.
4. Choose the media you would like to view from the menu on your
device and play as you normally would.
WIRELESS CONNECTION
1. To connect wirelessly, power the projector on by pressing and
holding the power button for 3 seconds.
2. Allow the projector 15 to 30 seconds to fully start up. The
projector will automatically start in wired mode.
3. Change the projector to wireless mode by pressing the mode
button. On screen, the projector will display wireless information
on how to connect your Android device.
- 10 -
Page 11

ANDROID DEVICES
1. Keep pressing the mode button until you see Screen Mirroring
Mode.
2. From the quick menu on your Android device, launch screen
mirroring (some devices have a Quick Connect button for this
functionality).
3. Select the WProJ-53a7bc projector from the device list.
4. Choose the media you would like to view from the menu on your
device and play as you normally would.
UPDATING PROJECTOR FIRMWARE
NOTE : You will need to access to your Wi-Fi network for this process.
1. Connect the projector to a power adapter to ensure it does not
turn off during the update due to low power.
2. Turn on the projector and press the mode button until you see
the “Firmware Updating” screen displayed.
3. Scan the QR code to launch the update or open the internet
browser on your device and type in 192.168.49.1 to access the
“Make projector connect to WiFi AP” webpage shown below.
4. Click the Wi-Fi logo -> Scan -> Select your Wi-Fi -> Enter your
Wi-Fi’s password -> Hit connect.
- 11 -
Page 12

5. Once connected to Wi-Fi, your device will connect to the
projector automatically. You will see your network’s name on
the “Firmware Updating” screen of the projector once connected.
6. On the projector’s “Firmware Updating” screen, if it says “The
current version is the latest version” at the bottom, you do not
need any new updates.
7. If it indicates that a new version is available, it will update via
OTA (over the air). This process will take approximately
10 minutes.
8. Once the update is complete, turn off the projector. Once you
turn the projector back on, the new update will be complete and
you can use as normal.
AUDIO
If desired, connect a speaker to the 3.5mm audio out jack. If no external
speaker is connected, the projector’s two internal 1-watt speakers will
be used for audio.
ADJUSTING THE VOLUME
Touch the mode control area to activate the volume controls. Use the
volume up and volume down control areas to adjust to the preferred
volume level.
- 12 -
Page 13

IMAGE ADJUSTMENTS
ADJUSTING THE FOCUS
Simply roll the focus wheel control forwards and backwards to
ne-tune the projected image.
ADJUSTING THE VERTICAL KEYSTONE
The projector will automatically adjust the display screen to the best
condition (+/- 40 degrees automatic vertical keystone correction).
ADJUSTING INTELLIBRIGHT
WHAT IS INTELLIBRIGHT?
TI’S DLP® IntelliBright™Technology dynamically adjusts the projector
brightness range for each individual pixel based on image content and
the ambient room light level.
When the projector starts up IntelliBright™ will automatically optimize
the projected image settings for the room environment.
CHARGING WITH THE PROJECTOR
The projector has one USB out jack which can be utilized to charge a
variety of smart phones.
• Connect your device to fully-charged projector with a USB cable
(not included).
• Your device’s screen will let you know your device is charging and
when it’s fully charged.
- 13 -
Page 14

TROUBLESHOOTING
Q. The projected image is blurry.
A. Adjust the focus wheel on the projector to ne-tune the picture.
Also check that the surface you are projecting on is smooth.
Q. The projected image is too small.
A. Move the projector farther away from the projection surface.
Q. The projector is not projecting.
A. Here are several things to check if your projector is not projecting:
• If on battery power, check the battery life remaining by pressing
the power button. If battery power is low, plug into AC power.
• If on AC power, check that the AC power is plugged into the
correct port on the projector and the AC adapter is securely
plugged into a powered outlet.
• If using a wired connection, check the compatibility section of this
manual to ensure you are using any necessary adapters to connect
your device. If an adapter is required, power down the projector,
add the adapter, and then turn the projector back on. Also check
with your device manufacturer to ensure your device supports
video out.
• If using a wireless connection, check the compatibility section
of this manual for instructions. Also check with your device
manufacturer to ensure your device supports wireless screen
mirroring.
- 14 -
Page 15

WARRANTY
Thank you for choosing Magnasonic® Consumer Electronics Products!
Magnasonic gives the following express warranty to the original
consumer purchaser or gift recipient for this Magnasonic product, when
shipped in its original container and sold or distributed by Magnasonic
or by an Authorized Magnasonic Dealer: Magnasonic warrants that this
product is free, under normal use and maintenance, from any defects in
material and workmanship. If any such defects should be found in this
product within the applicable warranty period, Magnasonic shall, at its
option, repair or replace the product as specied herein. Replacement
parts furnished in connection with this warranty shall be warranted for a
period equal to the unexpired portion of the original equipment warranty.
This warranty shall not apply to:
Any defects caused or repairs required as a result of abusive operation,
negligence, accident, improper installation or inappropriate use as
outlined in the owner’s manual.
Any Magnasonic product tampered with, modied, adjusted or repaired
by any party other than Magnasonic or Magnasonic Authorized Service
Centres.
Damage caused or repairs required as a result of the use with items not
specied or approved by Magnasonic, including but not limited to head
cleaning tapes and chemical cleaning agents.
Any replacement of accessories, glassware, consumable or peripheral
items required through normal use of the product including but not
limited to earphones, remote controls, AC adapters, batteries, stylus, trays,
lters, cables, paper, cabinet, cabinet parts, knobs, buttons, baskets, stands
and shelves.
- 15 -
Page 16

Any cosmetic damage to the surface or exterior that has been defaced or
caused by normal wear and tear.
Any damage caused by external or environmental conditions, including
but not limited to transmission line/power line voltage or liquid spillage.
Any product received without appropriate model, serial number and CSA
/cUL /cULus /cETL /cETLus markings.
Any products used for rental or commercial purposes. Any installation,
setup and/or programming charges. Should this Magnasonic product fail
to operate during the warranty period, warranty service may be obtained
upon delivery of the Magnasonic product together with proof of purchase
and a copy of this LIMITED WARRANTY statement to an Authorized
Magnasonic Service Centre. In-home warranty service may be provided
at Magnasonic’s discretion on any Magnasonic television with the screen
size of 40” or larger. This warranty constitutes the entire express
warranty granted by Magnasonic and no other dealer, service centre
or their agent or employee is authorized to extend, enlarge or transfer
this warranty on behalf of Magnasonic. To the extent the law permits,
Magnasonic disclaims any and all liability for direct or indirect damages or
losses or for any incidental, special or consequential damages or loss of
prots resulting from a defect in material or workmanship relating to the
product, including damages for the loss of time or use of this Magnasonic
product or the loss of information. The purchaser will be responsible for
any removal, re-installation, transportation and insurance costs incurred.
Correction of defects, in the manner and period of time described herein,
constitute complete fulllment of all obligations and responsibilities of
Magnasonic Electronics to the purchaser with respect to the product and
shall constitute full satisfaction of all claims, whether based on contract,
negligence, strict liability or otherwise.
1 YEAR PARTS & LABOUR WARRANTY PERIODS
- 16 -
Page 17

www.magnasonic.com
 Loading...