

Page 1
20" Colour TV
Instruction Manual
Model - MCT2008
Thank you for your purchase of this Magnasonic product. Please read this
Instruction Manual carefully before using this Magnasonic product to ensure
proper use. After reading this manual, please keep it in a safe place and refer
to it when necessary.
For additional information on this product or for help with set-up
please call the Customer Help Line at 1-800-287-4871
Visit www.magnasonic.ca for more information about our great products
1
Page 2
Instruction Manual Manual
W ARNING
To reduce the risk of fire or electric shock, do not expose this product to rain or moisture.
The apparatus shall not be exposed to dripping or splashing and that no objects filled with liquids, such as
vases, shall be placed on the apparatus.
CAUTION
RISK OF ELECTRIC SHOCK
DO NOT OPEN
This symbol indicates "dangerous voltage"
inside the product that presents a risk of
electric shock or personal injury .
Caution: To prevent electric shock, match wide blade of plug to wide slot, fully insert.
Refer to the identification/rating label located on the back panel of your product for its proper operating
voltage.
Caution: Using video games or any external accessory with fixed images for extended periods of
time can cause them to be permanently imprinted on the picture tube (or projection TV picture
tubes). ALSO, some network/program logos, phone numbers, etc. may cause similar damage. This
damage is not covered by your warranty.
Cable TV Installer: This reminder is provided to call your attention to Article 820-40 of the National
Electrical Code (Section 54 of the Canadian Electrical Code, Part 1) which provides guidelines for proper
grounding and, in particular , specifies that the cable ground shall be connected to the grounding system of
the building as close to the point of cable entry as practical.
Customer Record
You will find the model number and serial number of your TV on the back of your TV set. Record these
numbers in the spaces provided below. Refer to them whenever you call customer service or your dealer
regarding this product.
Caution: To reduce the risk of electric shock, do not
remove cover (or back). No user serviceable parts
inside. Refer servicing to qualified service personnel.
This symbol indicates important
instructions accompanying the product.
Model Number:
Serial Number:
PACKING LIST
Parts
Color TV
Remote Control
Operation Manual
AAAAlkaline Batteries
1
QTY
1
1
1
2
Page 3

Instruction Manual
Manual
IMPORTANT SAFETY INSTRUCTIONS
1. Read these instructions.
2. Keep these instructions.
3. Heed all warnings.
4. Follow all instructions.
5. Do not use this apparatus near water.
6. Clean only with dry cloth.
7. Do not block any ventilation openings. Install in accordance with the manufacturer’s instructions.
8. Do not install near any heat sources such as radiators, heat registers, stoves, or other apparatus
(including amplifiers) that produce heat.
9. Do not defeat the safety purpose of the polarized or grounding-type plug. A polarized plug has two
blades with one wider than the other. A grounding type plug has two blades and a third grounding prong.
The wide blade or third prong is provided for your safety. If the provided plug does not fit into your outlet,
consult an electrician for replacement of the obsolete outlet.
10.Protect the power cord from being walked on or pinched particularly at plugs, convenience receptacles,
and the point where they exit from the apparatus.
11.Only use attachments/accessories specified by the manufacturer .
12.Use only the cart, stand, tripod, bracket, or table specified by the manufacturer , or sold with
the apparatus. When a cart is used, use caution when moving the cart/apparatus combination
to avoid injury from tip-over .
13.Unplug this apparatus during lightning storms or when unused for long periods of time.
14.Refer all servicing to qualified service personnel. Servicing is required when the apparatus has been
damaged in any way, such as power-supply cord or plug is damaged, liquid has been spilled or objects
have fallen into the apparatus, the apparatus has been exposed to rain or moisture, does not operate
normally, or has been dropped.
15. W arning - This TV should only be serviced by an authorized and properly trained technician.
Opening the cover or other attempts by the user to service this TV may result in serious injury or
death from electrical shock, and may increase the risk of fire.
FCC Warning
Information to User
This equipment has been tested and found to comply with the limits for a Class B Digital Device pursuant
to part 15 of FCC Rules. These limits are designed to provide reasonable protection against harmful
interference in a residential installation. This equipment generates, uses, and can radiate radio frequency
energy and, if not installed and used in accordance with the instructions, may cause harmful interference to
radio communications. However, there is no guarantee that interference will not occur in a particular
installation. lf this equipment receives interference while of f and on, the user is encouraged to try to correct
the interference by one or more of the following measures:
1) Reorient or relocate the receiving antenna.
2) lncrease the separation between the equipment and TV.
3) Connect the equipment into an outlet on a circuit dif ferent from that to which the TV is connected.
4) Consult the dealer or an experienced radio/TV technician for help and for additional suggestions.
The user may find the following booklet prepared by the Federal Communications Commission helpful:
"How to Identify and Resolve Radio - TV Interference Problems". This booklet is available from the US
Government Printing Of fice. W ashington, D.C. 20402, Stock No. 004-000-00345-4.
FCC Warning
The user is cautioned that changes or modifications not expressly approved by the manufacturer could void
the user’s autho rity to operate the equipment.
NOTE: In order for an installation of the product to maintain compliance with the limits for a Class B
Device, shielded cables must be used.
2
Page 4
Instruction Manual
INTRODUCTION
Safety Instructions .......................................................................................................................... 1
Specifications .................................................................................................................................. 3
Feature Descriptions ...................................................................................................................... 4
Front and Rear Unit Profiles .......................................................................................................... 4
Remote Control Features ................................................................................................................ 5
INSTALLATION
Connecting the Antenna .................................................................................................................. 6
Installing the Remote Control Batteries .......................................................................................... 6
Connecting A/V Equipment
Input from Device to TV............................................................................................................ 7
Output from TV to Device ........................................................................................................ 7
FUNCTIONS & FEATURES
Turn On/Off...................................................................................................................................... 8
Basic Functions .............................................................................................................................. 8
Function Selection Menus
Picture Menu ............................................................................................................................ 8
T uner Menu .............................................................................................................................. 9
T imer Menu .............................................................................................................................. 9
System Menu ............................................................................................................................ 9
Useful Remote Control Features .................................................................................................. 1 1
Manual
TABLE OF CONTENTS
TROUBLESHOOTING GUIDE............................................................................................................. 12
MAGNASONIC HOME ENTERTAINMENT WARRANTY................................................................... 13
SPECIFICATIONS
MODEL MCT2008
Television System NTSC-M
Channel Coverage VHF 2-13, UHF 14~69
Mid Band (A-8~A-1, A~I);
Cable TV Coverage
Channels Preset 181
Antenna Input 75 ohm (unbalanced)
Power Source ~120Vac 60Hz
Super Band (J~W)
Hyper Band (AA~ZZ, AAA, BBB)
Ultra Band (65~94, 100~125)
Unit Weight 55 lbs. (25 kg)
Unit Dimensions 22.28 x 17.72 x 18.78 in.
Packaged Dimensions 25.20 x 21.10 x 21.26 in.
Power Consumption 90W
566 x 450 x 477 mm
640 x 536 x 540 mm
3
Page 5
Instruction Manual Manual
Feature Descriptions
181 Channel Tuner - total number of channels the TV can receive: 2-69 in Air mode, or 1-125 in Cable mode
A V Input (Rear) - input designed for use with A/V devices, such as a VCR or DVD player
V Input (Side)
A
- input designed for infrequent use, such as with a camcorder or video game unit
A V Output (Rear) - output signals from TV to devices such as VCR’s
Channel Recall - instant return to the last channel viewed
Closed Caption Display - feature that displays the closed caption or text of a TV broadcast
On/Off Timer - feature that allows the user to set a time to turn on/of f the TV
Parental Control - feature that allow parents to block out selected type of programming
ideo Input
S-V
- input designed for greater clearity and sharpness
Selectable Picture Modes - preset standards for TV display: User, Normal, Movie and Sports
Trilingual On Screen Display (OSD) - TV’s on screen display can be either English, French or Spanish
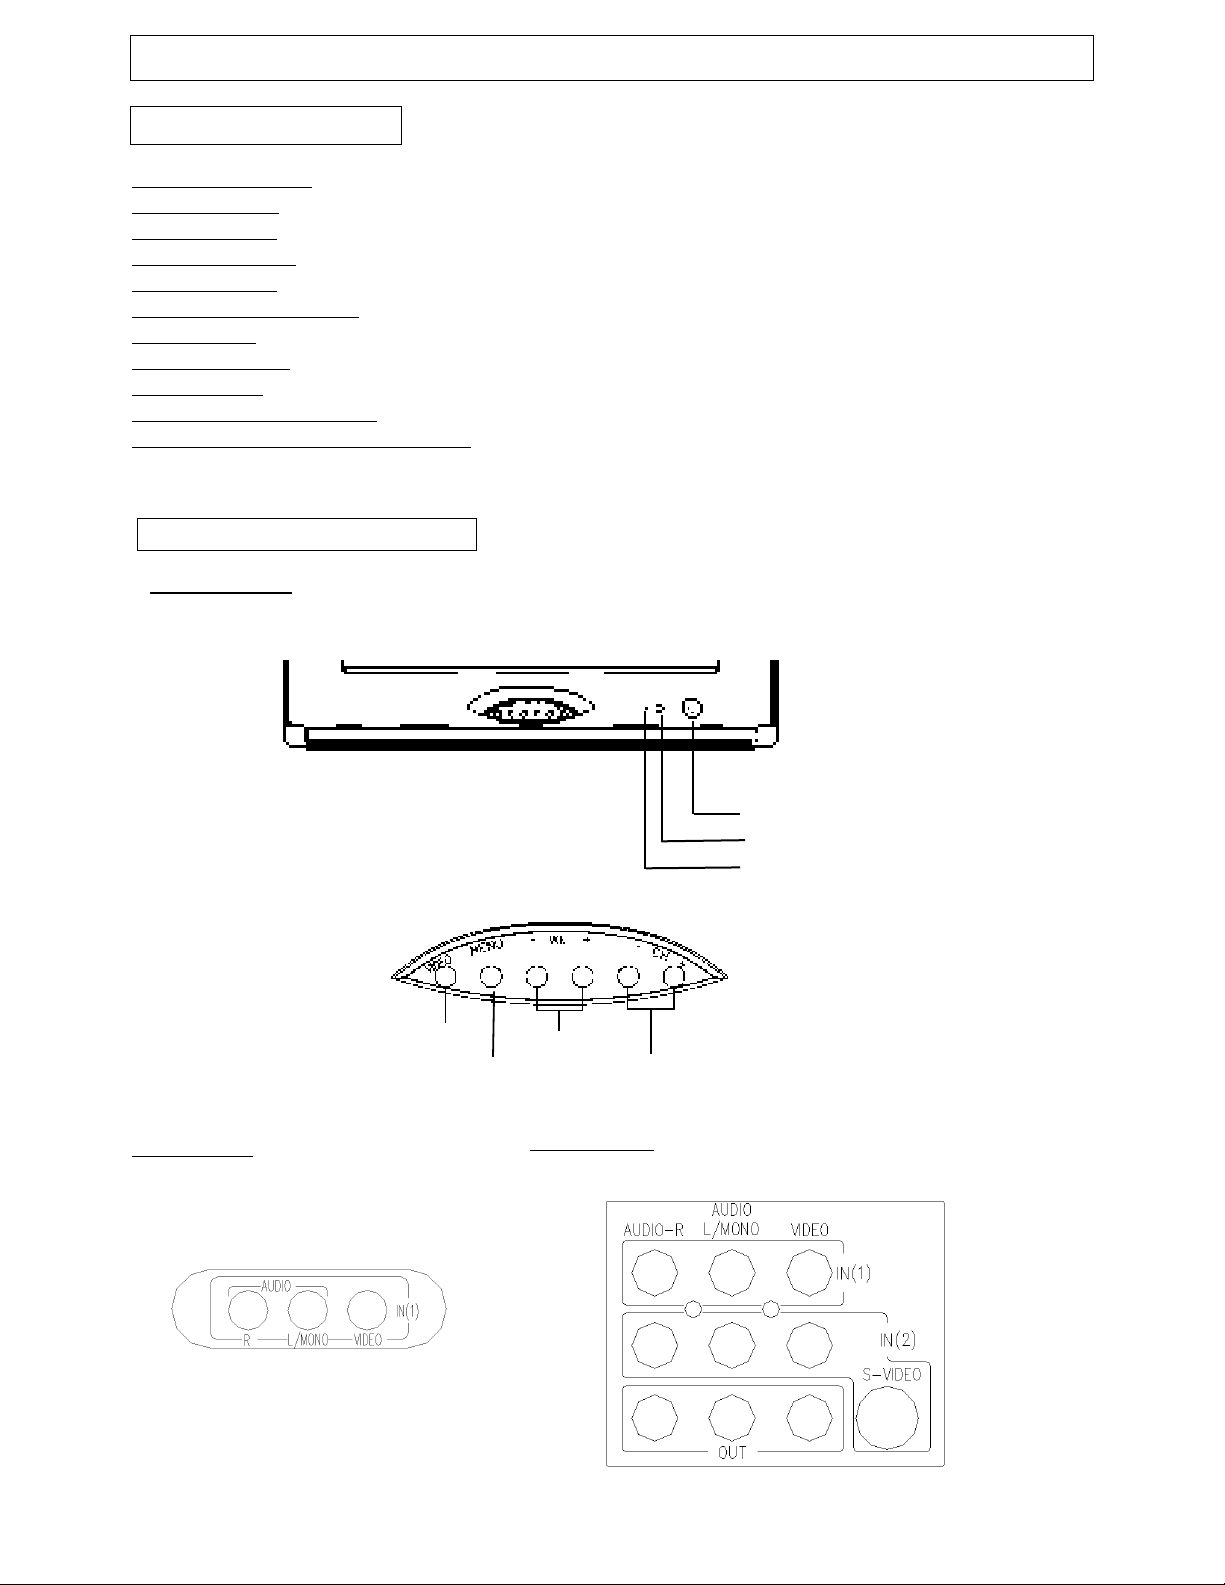
Front and Rear Unit Profiles
Front panel
Side panel
TV/VIDEO MODE SELECT
MENU SELECT
VOLUME
DOWN/UP
CHANNEL DOWN/UP
Rear panel
STANDBY / POWER BUTTON
INFRARED SENSOR
POWER INDICATOR
4
Page 6
Instruction Manual
Manual
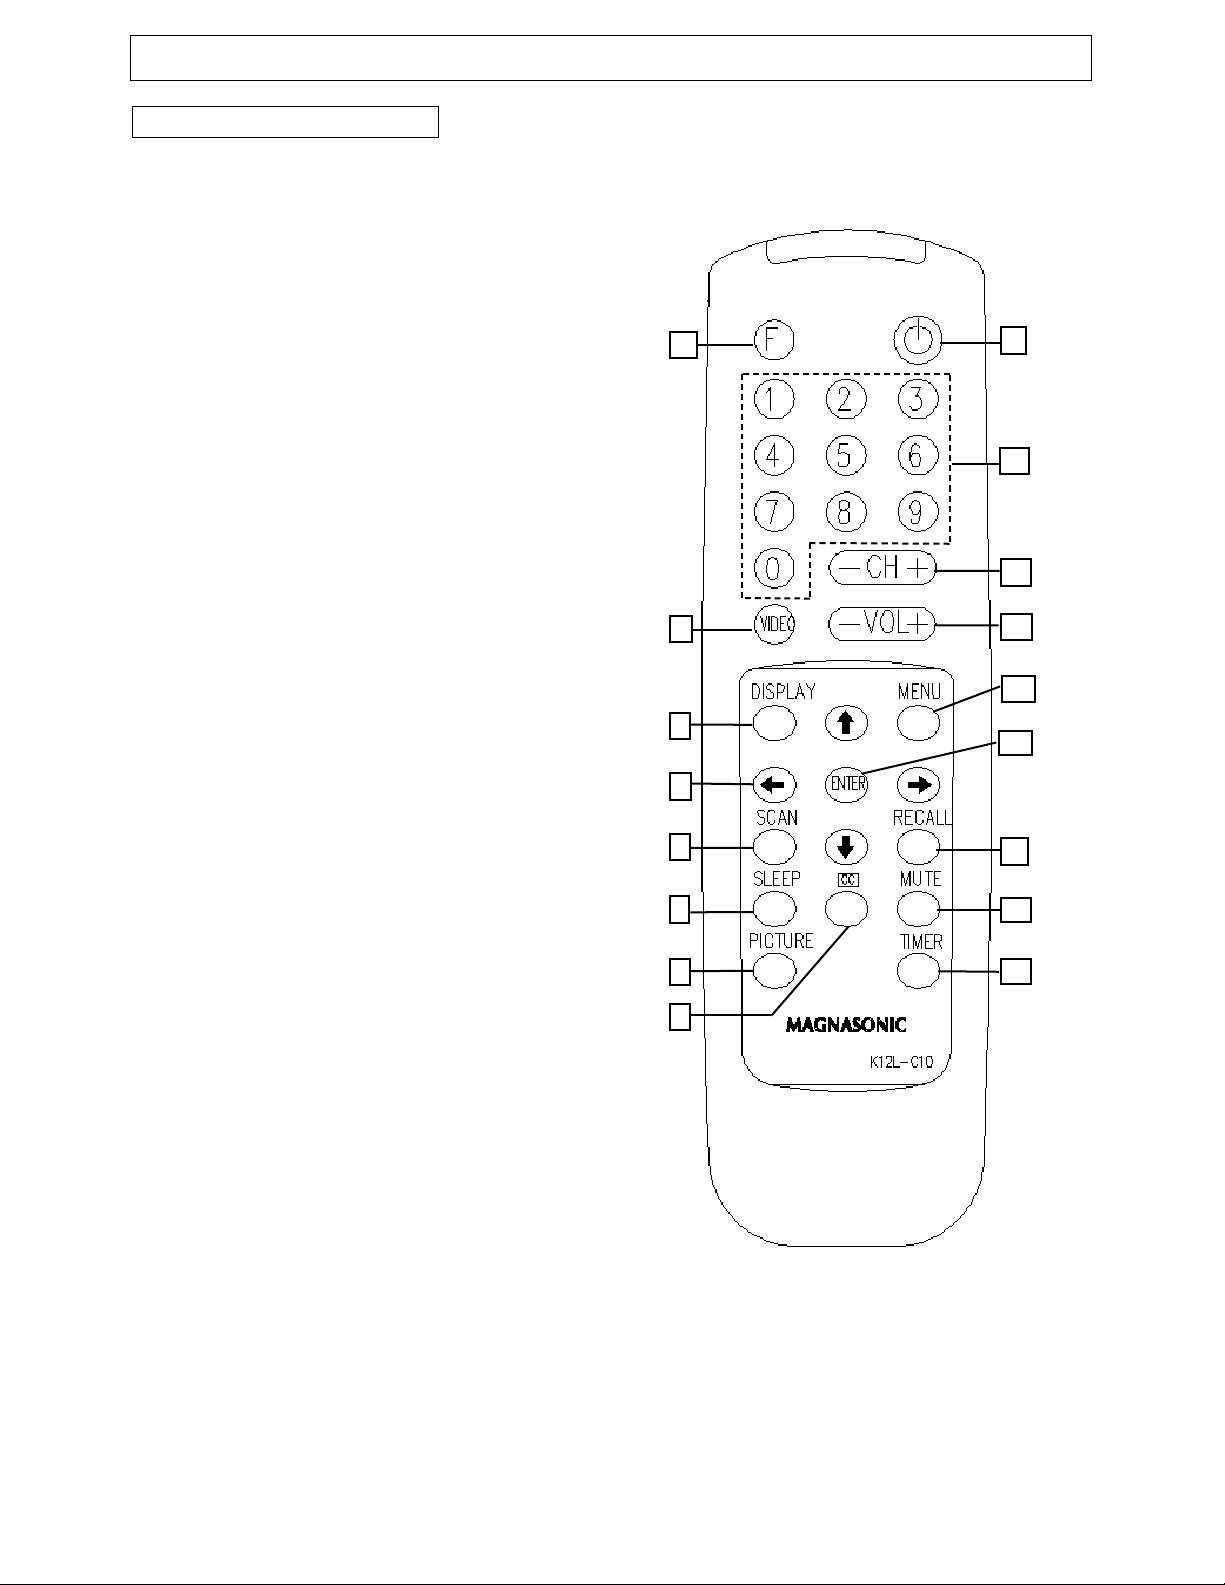
Remote Control Features
1_FUNCTION
Used for volume control and child lock functions
2_VIDEO
Cycles through the V ideo/TV modes
3_DISPLAY
Brings up the TV/Video display
4_ARROWS
Used to navigate the TV menus
5_SCAN
Scans all active channels
6_SLEEP
Used to set the Sleep Of f time
7_PICTURE
Selects among the various Picture Modes
8_CC
Activates Closed Captioning
9_STANDBY
Turns on/of f the TV
10_KEYPAD
Used to select channels by number
11_CH + / -
Used to change the current channel
12_VOL + / -
Used to adjust the volume level
13_MENU
Accesses the TV menus
14_ENTER
Confirm menu selection / Access sub menu
15_RECALL
Returns to the last channel viewed
16_MUTE
Mutes or restores the TV volume
17_TIMER
Accesses the T imer menu
1
2
3
4
5
6
7
8
9
10
11
12
13
14
15
16
17
5
Page 7
Instruction Manual Manual
INSTALLATION
- Please read the safety instructions in this manual completely before installation.
- Install your TV in an area where direct sunlight will not fall upon the screen.
- Soft, indirect light is best for television viewing.
- Allow enough space (at least 4 in.) between the TV and any walls or enclosures for proper ventilation.
- Optimum television viewing distance is 3-5 times the screen’s size.
Auto-Degaussing
A color television can be easily af fected by magnetism, which shows up as color distortion on the screen. If your TV is
af fected by nearby magnetic components or appliances, turn it of f for a few minutes. The built-in auto-degaussing
circuit will eliminate the magnetic interference.
Auto off when NO SIGNAL
is received
The TV set will automatically enter into Standby mode when the following conditions are met.
1.TV is in antenna mode.
2.Current channel has no signal.
3.No key is pressed within 15 minutes.
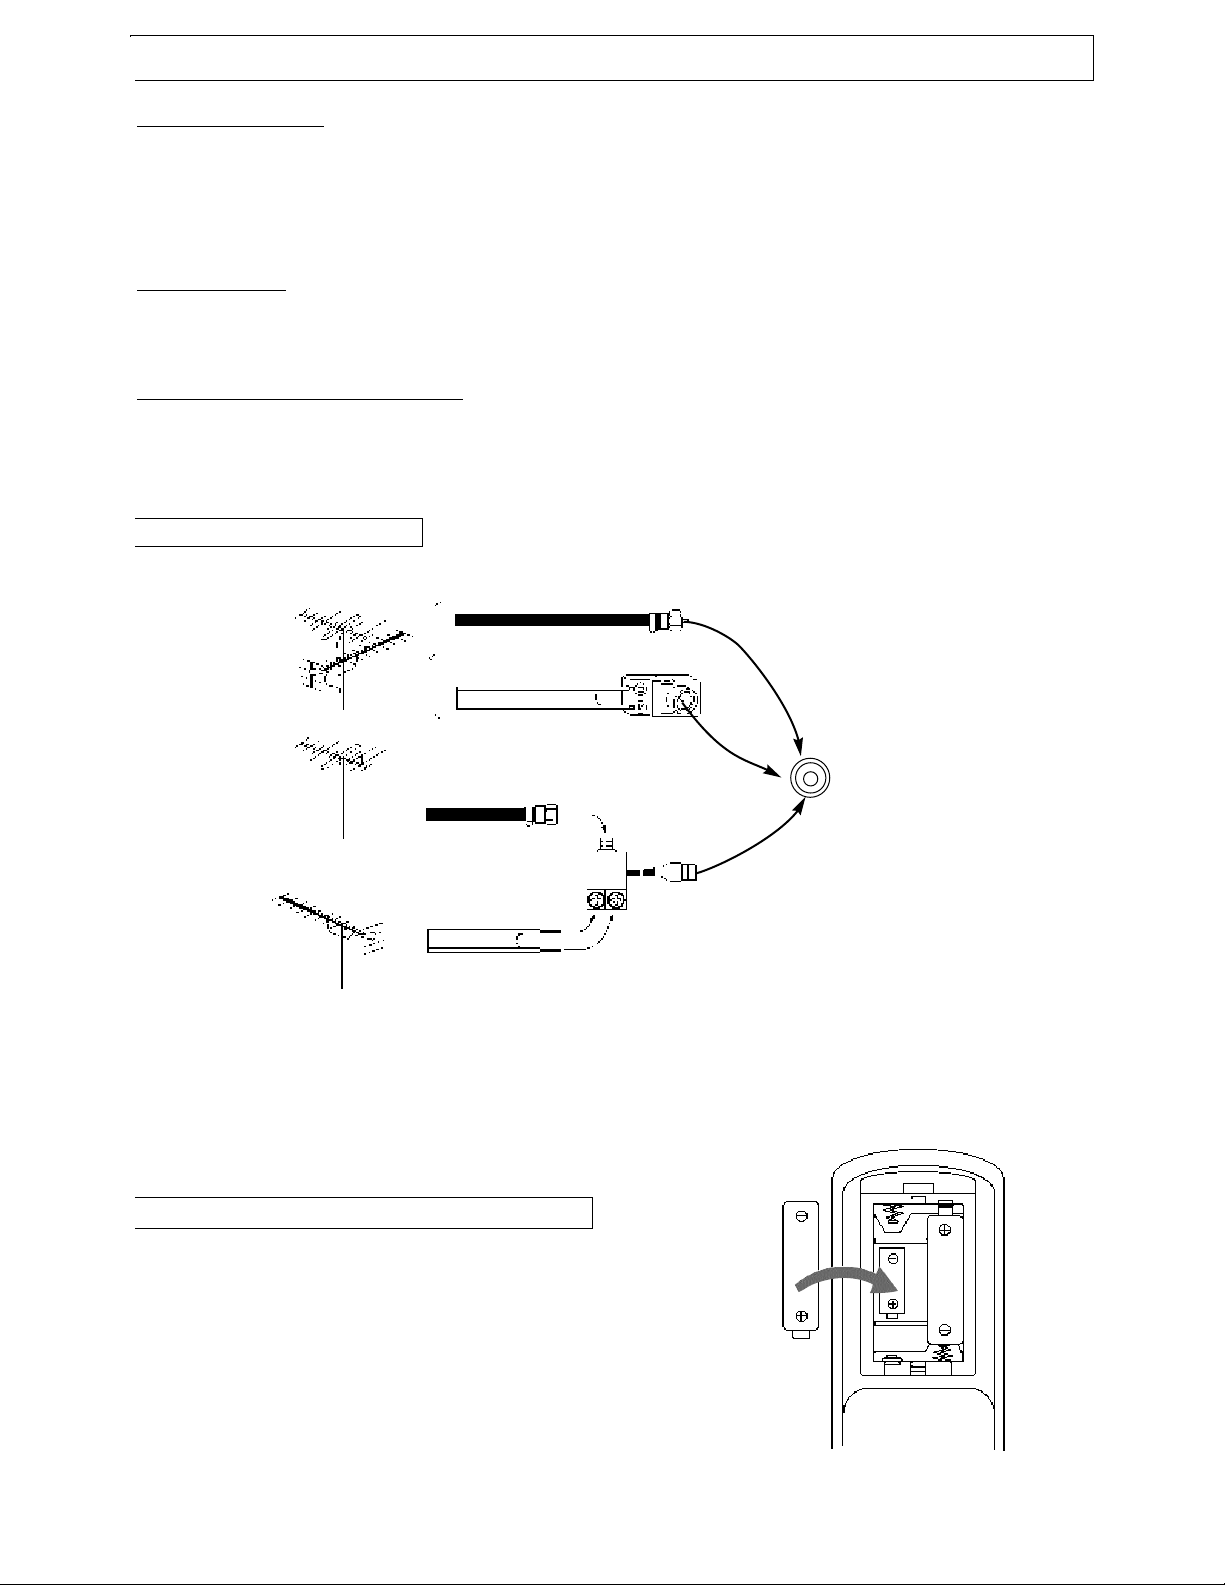
Connecting the Antenna
75-ohm coaxial cable (not supplied)
VHF
UHF
or Cable
VHF
UHF
300-ohm twin-lead cable (not supplied)
OR
OR
U/V mixer
(not supplied)
Antenna adapter
(not supplied)
RF Input
(back of TV unit)
Notes:
1. It is recommended that a 75 ohm coaxial cable be used in order to
eliminate interference and noise which may occur due to nearby
radio
transmissions.
2. The antenna cable should not be tied together with other wiring.
3. Set up a lightning rod and check it regularly when an outdoor
antenna
is used.
Installing the Remote Control Batteries
1. Remove the battery compartment lid.
2. Insert two AAA batteries (included). Make sure the positive (+) and
negative (-) polarities are correctly aligned.
3. Reattach the battery lid.
Notes:
1. Alkaline batteries are recommended for longer life.
2. Always replace both batteries at the same time.
3. Do not expose batteries to fire or break them open.
4. T o avoid battery leakage, remove batteries from the remote control
when it is not being used for a long period of time.
6
Page 8
Instruction Manual
Manual
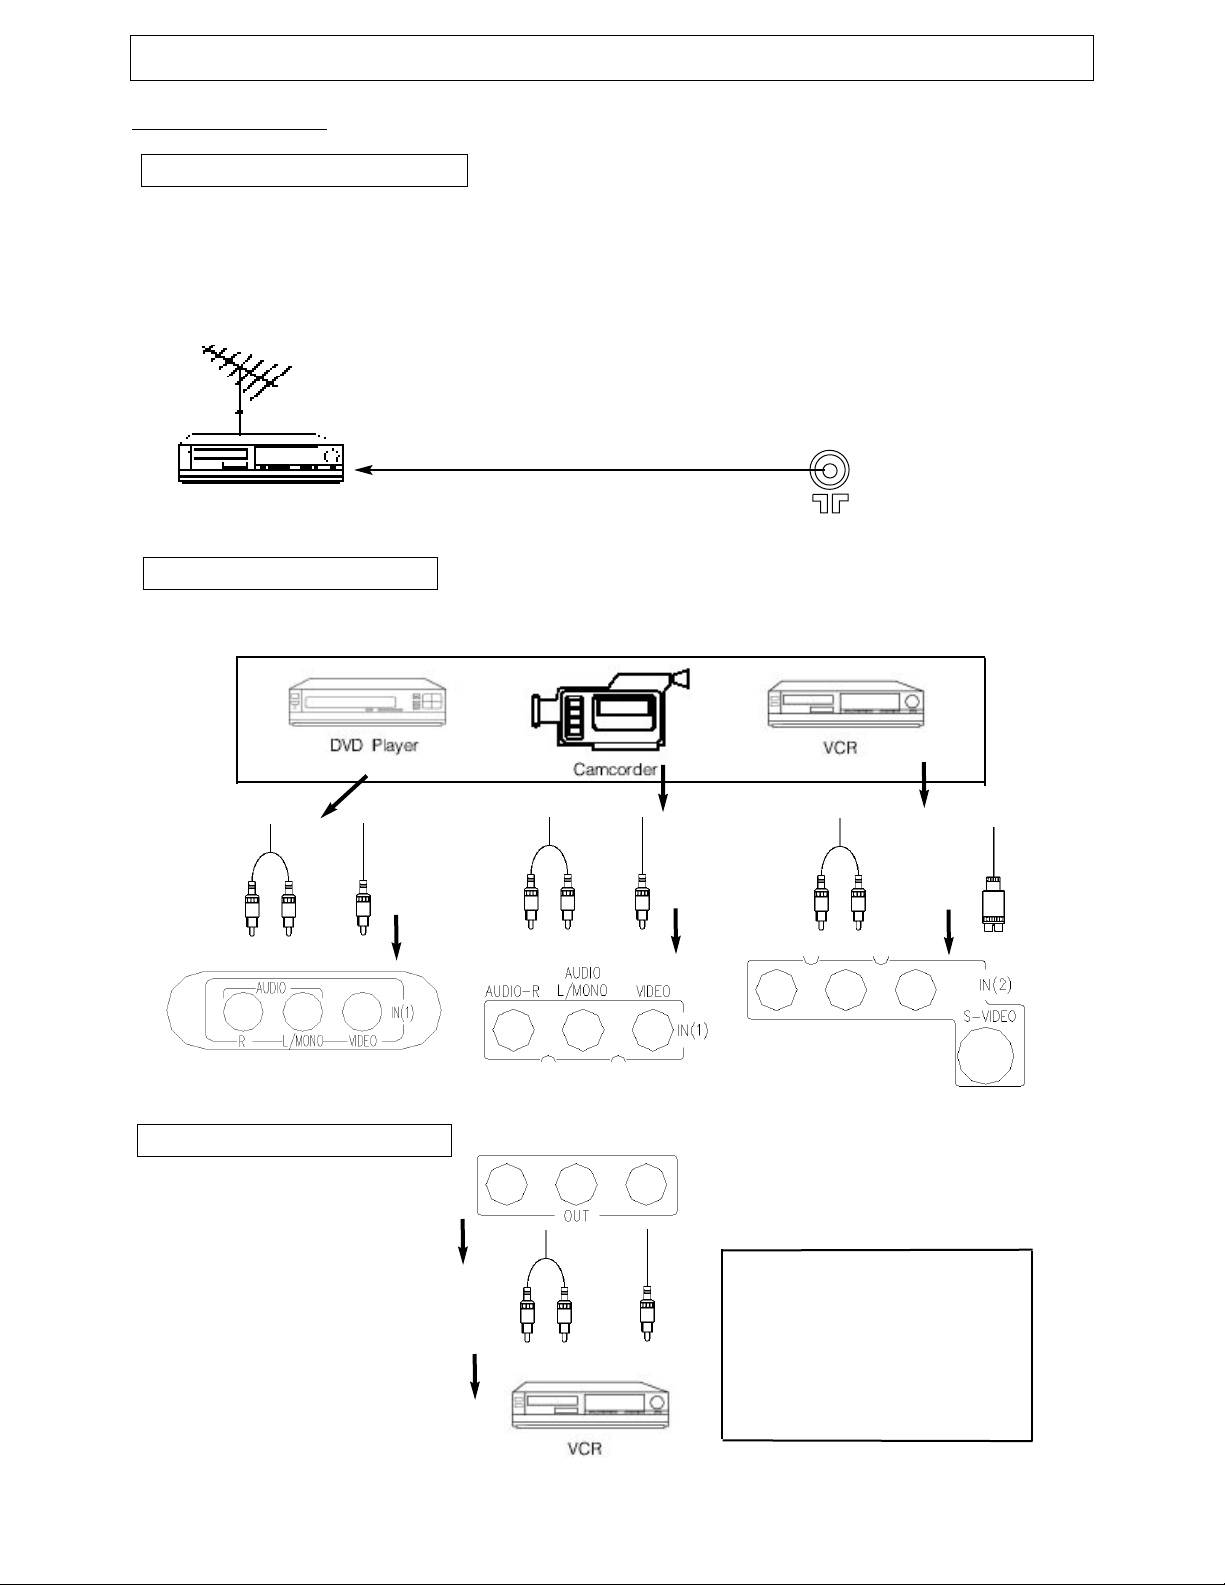
INSTALLATION (continued)
Connecting A/V Equipment
The following are diagrams showing basic instructions for attaching external equipment, like a VCR or
DVD player , to your TV set. Please refer to operation manuals of external audio/video equipment that will
be connected to your set for additional instructions. PLEASE TURN OFF ALL POWER BEFORE
CONNECTING DEVICES TO EACH OTHER.
Connect VCR’s RF OUT terminal to the RF IN jack located on the rear panel of the TV.
VCR
Input from Device to TV
AUDIO/VIDEO OUT
OUT
Audio Cable
(not supplied)
Red
White
Video Cable
(not supplied)
Yellow
Coaxial Cable
OUT
White
IN
Red
Yellow
IN
Red
RF IN
White
OUT
IN
Side panel
Output from TV to Device
AUDIO/VIDEO IN
OUT
Rear panel
Rear panel
Rear panel
Note:
1) DO NOT connect both composite
(yellow video terminal) and S-V ideo
terminal. Use only one of the two.
Also, remember to connect the
White
Red
IN
Yellow
audio cables when using S-Video.
2)The side terminals may be easier to
use with a camcorder.
The connections are identical.
7
Page 9
Instruction Manual Manual
FUNCTIONS & FEATURES
Turn On/Off
1. T urn On
Plug in the power cord, and the TV should enter into Standby mode. Pressing STANDBY key will turn on
the TV and its power indicator light.
2. Standby
While the TV is on, press the STANDBY key to put the TV in Standby or of f mode. The power indicator
light on the TV set will turn of f.
Basic Functions
Changing the Channel
While in T uner mode, press the CH +/ - keys to change the channel, or use the numeric keypad to enter a
new channel.
Adjusting the V
To adjust the volume, press the VOL +/ - keys. Also, you may press the FUNCTION (F) key along with the
VOL +/ - keys to adjust the volume in increments or decrements of 4.
Muting the V
To mute the volume, press the MUTE key. T o restore the volume, press MUTE again or press the VOL +
key.
olume
olume
Function Selection Menus
To change the setting of any function, press the MENU key to bring up the main menu. Press the up or
down arrow key to highlight the desired sub-menu and press the left or right arrow key (or ENTER key) to
access. While in the sub-menu, use the up or down arrow key to select the item and the left or right arrow
to adjust the setting. Press the MENU key to return to the main menu and exit.
While in setup menu, CH-/+ and VOL-/+ key on the front panel will function as the down/up/left/right arrow
keys on the remote control.
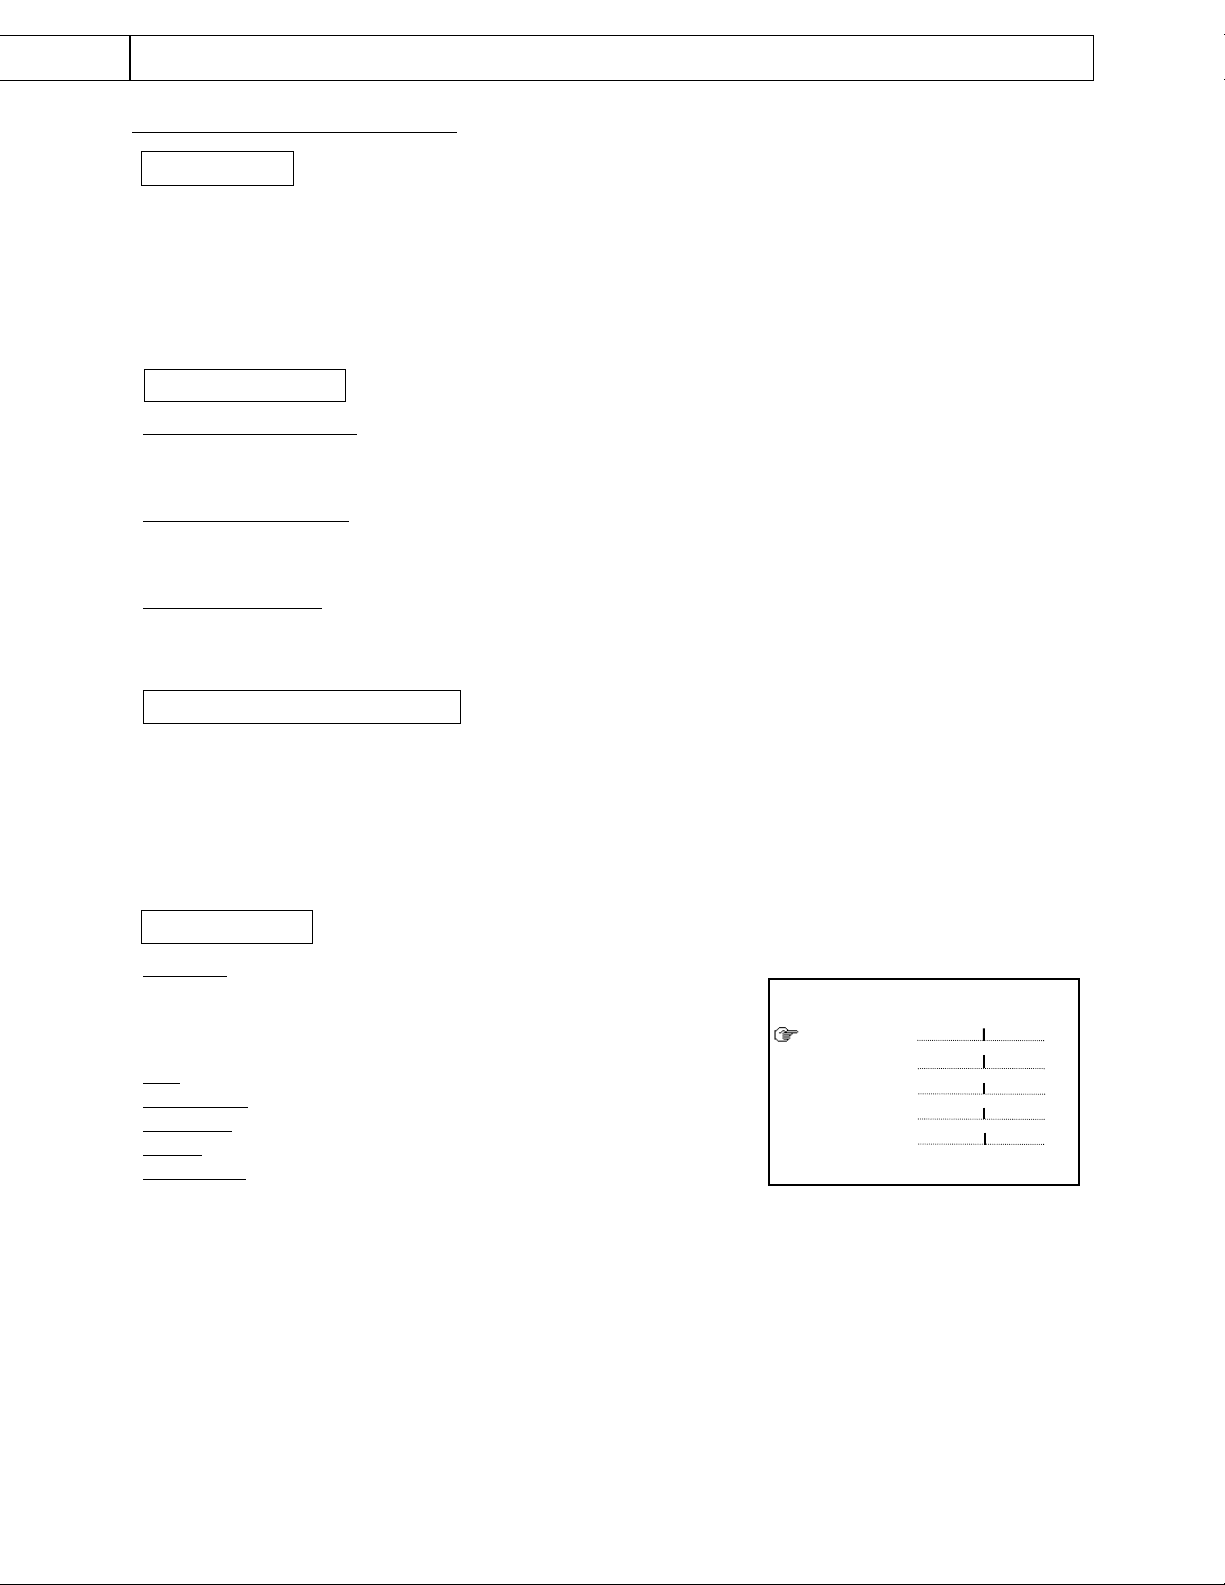
Picture Menu
Features
This menu allows you to adjust the various picture settings. Use the
up or down arrow key to move between the various settings, and the
left or right arrow key to adjust them.
T
int : -31 (more purplish to +31 (more greenish)
Brightness: 0 (dimmest) to 63 (brightest)
Contrast: 0 (minimum contrast) to 63 (maximum contrast)
Color: 0 (minimum color) to 63 (maximum color)
Sharpness: 0 (minimum sharpness) to 63 (maximum sharpness)
Picture
Tint
Brightness
Contrast
Color
Sharpness
00
32
32
32
32
8
Page 10

Instruction Manual
Manual
FUNCTIONS & FEATURES (continued)
Tuner Menu
Note: This menu is only accessible while the TV is in Tuner mode.
Channel:This feature allows you to change the channel being displayed.
Use the left or right arrow key or the numeric keypad to change the
channel.
Add/Erase: This feature allows you to add or remove a channel currently
being displayed on screen to the "active channel list" . The active channel
list is the list of channels that is available by pressing the CH+/- keys. Use
the left or right arrow key to add or erase.
Antenna: This feature allows you to choose between input from an Air
antenna or a Cable antenna. Please use Air mode when using an overthe-air antenna; use Cable mode for a cable hookup. Use the left or right
arrow key to select between the two options.
Auto Program: This feature will setup the Active channel list for you by
scanning for all available channels.The list will include only the channels
with an active signal. Press the right arrow key to begin and the left arrow
key to stop the process.
Timer Menu
T uner
Channel
Add/Erase
Antenna
Auto Program
Stop Start
2
Add
Air
Press the TIMER key on the remote control to access this menu.
ime
T
This feature allows you to set the clock on the TV.
On Time
This feature allows you to preset a time when the TV set will turn on.
On Channel
This feature allows you to preset the channel that the TV is tuned
into when the On T ime is activated.
Off T ime
This feature allows you to preset a time when the TV set will turn of f.
T imer
Timer can be set to Once or Always(Every day).
Timer
Time --:-On Time --:-On Channel Of f T ime --:-T imer Once
System Menu
Language
This feature allows you to pick a language used for the on screen display
(OSD). Use the left or right arrow key to select the language of your
choice - English (Eng.), French (Fra.) or Spanish (Esp.).
Blue Back(ground)
This feature gives you the option to display a blue background on the TV
screen when there is no signal present. Use the left or right arrow key to
toggle between on and of f.
Closed Captioning
Allows you to view specially labeled (cc) TV programs, movies, news,
prerecorded tapes, etc. with either a dialogue caption or text display
added to the program. Usually the first caption channel (CC1) displays
narration in a second language (i.e. French). The remaining caption
channels might contain narration in other languages, perhaps other
program information or alternatively nothing. There is nine dif ferent
setting for closed captioning. Y ou can set it to one of the 4 Closed Caption
settings (CC1-4), one of the 4 Text settings (T1-4), or set this feature to of f
(CCD/Text of f).
Notes: A Closed Caption signal may not be displayed under the following conditions:
-When there is no Closed Caption/Text signal to decode
-When the signal is weak or altered (due to interference or poor reception)
-When viewing a dubbed video tape
System
Language
Blue Back
CCD/Text
Parental Guide
MPAA - X
Eng.
Fra. Esp.
On
Of f
On
TV - MA
9
Page 11

Instruction Manual Manual
FUNCTIONS & FEATURES (continued)
System Menu (continued)
Parental Guide
This feature allows parents to block certain programs from being
viewed, based on the programs’ rating. In order to access this
menu, you must first enter a password. The factory default
password is 6688. Enter the password while the Parental Guide is
highlighted. Now, with Parental Guide set to On, press the right
arrow key to access the TV Rating grid.
TV Rating
Using the up or down arrow key to navigate between the
ratings, press the MENU key to block out a particular rating
completely. Or , if you wish, press the down arrow key to
highlight an individual rating (anywhere a U is displayed in
the middle of the grid.) Pressing the MENU key when one of
these individual ratings is highlighted will block only
programs that feature that particular aspect. See the TV
rating diagram at right for an example. TV ratings are defined
in the charts below:
Age Defined as
TV - Y All Children
TV - Y7 Directed to Older Children (over 7)
TV - G General Audience
TV - PG Parental Guidance Suggested
TV - 14 Parents Strongly Cautioned
TV - MA Mature Audience Only
MPAARating
Press the right arrow key while in the TV Rating grid to
access this grid. Use the up or down arrow key to navigate
between the MPAA ratings. Pressing the MENU key with a
rating highlighted will block that particular rating from being
shown on this TV. A B will show in red next to the blocked
rating. Please note that blocking a lower rating (for example,
PG) will block all higher ratings (PG-13, R, NC-17, X.)
Contents Defined as
FV Fantasy Violence
D Sexual Dialogue
L Adult Language
S Sexual Situations
V V iolence
System
Language Fra. Esp.
Eng.
Blue Back On
CCD/Text Of f
Parental Guide On
MPAA-X TV-MA
Enter Pass Code - - - -
TV-Rating
Rating FV D L S V
TV-Y U
TV-Y7 U U
TV-G U
TV-PG U U U U U
TV-14 B B B B B
TV-MA B B B B
Age Based Rating
MPAA- Rating
Movie Rating
G U
PG U
PG-13 U
R U
NC-17 U
X U
Age Based Rating
Password Menu
This menu allows you to change the access code for the
Parental Guide functions of the TV set. Press the MENU key
when Pass Code Control is highlighted. This will turn on or
of f the Pass Code function. W ith the Pass Code function ON,
you can also change the Pass Code. Use the down arrow
key to highlight Pass Code , then enter the new Pass Code
using the numeric keypad.
Note:
The factory pre-set password is 6688. The initial password
will be replaced when the new one is used. Please contact
the service centre in case you forget the password.
10
Pass Code Menu
Pass Code Control
Pass Code 6688
Enter Pass Code - - - -
Page 12

Instruction Manual
Manual
FUNCTIONS & FEATURES (continued)
Useful Remote Control Features
DISPLAY
This key allows you to display current information on the TV screen in the upper right hand corner of the
screen. (channel number, antenna mode, current time, video source and other information).
TIMER
This key allows you to directly access the T imer menu. For an explanation of the timer menu options, please
see page 9.
SCAN
Press the SCAN key twice, and the TV will begin to scan through all active channels. T o stop the scanning
process, press any key on the remote control. Please note that scan function will only work in Antenna
mode.
PICTURE
Your TV has factory preset picture modes that allow you to optimize your TV viewing. To activate these
picture modes, press this key, and you can choose among User, Normal, Movie and Sports picture modes.
Each mode has different settings for , tint, color , brightness etc. according to optimal conditions for the type
of programming you are viewing.
RECALL
This key will allow you to return to the last channel you were viewing. Pressing it again will return you to the
channel you just left.
CC
Pressing the CC key will activate the currently selected Closed Captioning or Text channel you have
selected in the System Menu. Pressing it again will turn of f the Closed Captioning or Text function.
VIDEO
This key allows you to toggle between antenna and dif ferent video input modes. When you connect external
A/V equipment, use this button to access the external equipment on this TV.
Child Lock
The Child Lock feature prevents unauthorized viewing of the TV. T o activate, press and hold the F key , and
then press MUTE. Y ou should see a key symbol appear on the screen. This will lock out all remote control
functions (except for Standby). To unlock the TV, press and hold the F key and press MUTE. This will unlock
the TV. Please note that the only way to activate or deactivate the Child Lock feature is via remote control
- please insure that it is stored securely .
SLEEP
Press the SLEEP key repeatedly to switch the TV to one of the following modes :
-- 15 30 45 60 90 120 150 180 (Unit: Minutes)
The TV will automatically enter the Standby mode when the preset Sleep time is up.
The TV will display a message one minute before the Sleep timer runs out.
0-9
Press the 0-9 keys to enter channel numbers directly (2-69 in the Air mode or 1-125 in the Cable mode).
Press the corresponding Number key(s) to enter a channel number.
Each digit should be entered at 3 second intervals.
11
Page 13

Instruction Manual Manual
TROUBLESHOOTING GUIDE
Check the following guide for a possible correction to a problem before contacting customer support.
Symptoms Correction
No power
Dark, Poor or No picture
No sound
No TV signal
Connect the power plug into the wall outlet securely.
V erify that the connection from external A/V equipment outputs to the TV video
input is secure.Then switch TV to the appropriate V ideo mode by pressing
TV/VIDEO button.
Adjust picture setting for tint, color brightness, sharpness etc.
V erify coaxial cable from antenna is connected to RF IN.
Connect the audio cables into the audio inputs securely.
V erify the connection from external A/V equipment outputs to the TV audio input.
Then switch to the appropriate mode on the receiver. Refer to your audio
amplifier owner’s manual.
V erify the volume is at an appropriate level and the mute feature is not on.
If television is connected through a stereo receiver use its volume control to
adjust stereo speaker sound.
V erify the TV is set to Antenna mode.
Make sure the antenna is securely connected to the RF in jack.
Unplug the TV from the wall for 30 seconds, then plug in and try again.
Unplug the antenna connection from the back of the TV, unplug the TV from the
wall, wait for 30 seconds, then try again.
Stripe or purple interfe-
rence appears on the
screen.
Picture becomes snowy
Picture Ghosting
Cannot receive certain
TV channel
Black box appears on
screen.
Remote control
doesn’t operate.
V erify that external speakers located close to the TVare shielded otherwise
move them at least 6 inches away.
V erify the antenna lead wire is in working condition.
V erify the antenna is connected securely to the RF in jack.
Use an omni directional outdoor antenna.
Move the antenna around to minimize picture ghosting.
Make sure the Air/Cable setting is correct.
Channel may be locked with block channel feature, such as Parental Control.
Check parental control feature to see if settings you have inputted are causing
the channel to be blocked.
Check Add/Erase feature, as channel may be have been erased during set up.
V erify Closed Caption feature is of f.
Batteries may be weak. Replace batteries.
Recheck the batteries are installed correctly with the correct +/- polarity .
Make sure nothing is in between the remote and the remote sensor.
12
Page 14

MAGNASONIC HOME ENTERTAINMENT WARRANTY
W e appreciate your purchase of a Magnasonic Home Entertainment product. W e take pride in the quality of
our products and have manufactured your new Home Entertainment unit to exacting quality standards. W e
feel confident that in normal use, it will provide you with satisfactory performance. However , should you
experience dif ficulty , you are protected under the provisions of this warranty.Magnasonic Home Entertainment
products are warranted against manufacturing defects in materials and workmanship in normal use for the
following periods from the date of purchase by the original user , and is conditional upon the unit being
installed and used as directed in the instruction manual.
Product Labour Parts Picture Tube
Colour Televisions 1 Y ear 1 year 3 Y ears
Remote Control 90 Days 90 Days ---
Magnasonic’s obligation under this warranty shall be limited to the repair , including all necessary parts and
the cost of the labour
connected therewith, or at our option the exchange of any Home Entertainment product which shows
evidence of a manufacturing defect within the warranty period.
Replacement parts, furnished in connection with this warranty shall be warranted for a period equal to the
unexpired portion of the original equipment warranty.
CUSTOMER OBLIGATIONS
This warranty applies to the product from the original date of purchase at retail. Therefore, the owner must
provide a copy of the
original, dated bill of sale. No warranty service will be performed without a bill of sale. T ransportation to and
from the service depot is the responsibility of the owner .
W ARRANTY EXCLUSIONS
This warranty is extended to Magnasonic Home Entertainment products purchased and used in Canada. This
warranty shall not apply to appearance or accessory items including but not limited to: antenna, cabinet,
cabinet parts, knobs, batteries, connecting cables. This warranty shall, in addition, not apply to damages due
to handling, transportation, unpacking, set-up, installation, customer adjustments that are covered in the
instruction book, repair or replacement of parts supplied by other than the Magnasonic authorized service
depot, any malfunction or failure caused by or resulting from abnormal environmental conditions, improper
unauthorized service, improper maintenance, modifications or repair by the consumer, abuse, misuse,
neglect, accident, fire, flood, or other Acts of God, and incorrect line voltage.
This Home Entertainment product is only warranted to the original retail purchaser. This warranty becomes
void in the event of
commercial or rental use. This warranty becomes void in the event serial numbers are altered, defaced or
removed.
Magnasonic reserves the right to make changes in design or to make additions to or improvements upon this
product without incurring any obligation to install the same on products previously manufactured. The
foregoing is in lieu of all other warranties expressed or implied and Magnasonic neither assumes nor
authorizes any person to assume for it any other obligation or liability in connection with the sale or service
of this product. In no event shall Magnasonic or its Magnasonic dealers be liable for special or consequential
damage arising from the use of this product, or for any delay in the performance of this warranty due to cause
beyond our control.
The purchaser may have other rights under existing provincial or federal laws, and where any terms of this
warranty are prohibited by such laws, they are deemed null and void, but the remainder of the warranty shall
remain in ef fect.
HOW TO OBTAIN SERVICE
Should this product require service, you may obtain specific information on how to obtain service by
contacting the Magnasonic
Dealer from whom this product was purchased, or by contacting us directly:
SONIGEM SERVICE
300 Alden Road
Markham, Ontario
L3R 4C1
PHONE: (905) 940-5089 FAX: (905) 940-2303
1 - 800 - 287- 4871
13
Page 15

Téléviseur couleur de 20 po.
Guide d’utilisation
Modèle - MCT2008
Nous vous remercions d’avoir acheté cet appareil de Magnasonic. Afin d’ut iliser adéquatement votre nouvel
appareil, et ce, en toute sécurité, veuillez lire attentivement ce guide d’utilisation avant de procéder à son
fonctionnement. Après avoir lu ce guide, veuillez le conserver en lieu sûr afin de pouvoir y référer
ultérieurement.
Pour plus de renseignements sur cet appareil ou si vous avez besoin d’aide pour l’installer, veuillez
communiquer avec notre département de soutien technique : 1-800-287-4871.
Visitez notre site www.magnasonic.ca pour plus de renseignements sur nos autres excellents produits.
Page 16

Guide d’utilisation
A
t
AVERTISSEMENT
Afin de réduire le risque d’incendie et d’électrocution, ne pas exposer ce produit à la pluie ou l’humidité.
On doit éviter d’exposer l’appareil à des situations où il y a risque d’éclaboussures ou de liquides qui se
renversent, et aucun objet rempli de liquide, par exemple des vases, ne devrait être déposé sur l’appareil
RISQUES D’ÉLECTROCUTION
MISE EN GARDE
DE PAS OUVRIR
Ce symbole indiquela présence de «voltage
dangereux dans l’appareil qui présente un
risque d’électrocution ou de
Ce symbole prévient l'utilisateur de la présence, à l'intérieur de l'appareil, de "tension dangereuse" non isolée
d'une importance suffisante pour constituer un risque d'électrocution.
ttention: Afin de réduire les risques d’électrocution, ne
pas enlever le couvercle (ou l’arrière). Ne contien
aucune pièce pouvant être réparée par l’utilisateur.
Confiez l’entretien de l’appareil à un technicien qualifié.
Ce symbole prévient l'utilisateur de la présence de
directives importantes de fonctionnement et d'entretien
(service) de l'appareil dans le guide accompagnant ce
produit.
Attention : Pour réduire les risques d’électrocution, introduire la lame la plus large de la fiche dans la borne
correspondante de la prise et pousser jusqu’au fond.
Se reporter à l’étiquette d’identification/capacité nominale située sur le panneau arrière du produit pour connaître
le voltage de fonctionnement adéquat.
Attention : L’utilisation de jeux vidéo ou de tout autre accessoire projetant des images fixes pendant des périodes
prolongées peut entraîner une impression permanente sur l’écran (ou sur l’écran des téléviseurs à projection).
DE PLUS, certains logos de réseaux/programmes, numéros de téléphone, etc., peuvent entraîner des
dommages similaires. Ces dommages ne sont pas couverts par votre garantie.
À l’installateur de la câblodistribution : Ce rappel à pour but d’attirer attention sur l’article 54 du Code
canadien de l’électricité, partie 1 (article 820-40 du code de l’électricité des États-Unis) qui énonce des directives
de mise à la terre et stipule que le fil de terre du câble doit être connecté au système de mise à la terre de
l’édifice, aussi près que possible du point d’entrée.
Dossier du client
Le numéro de modèle et le numéro du boîtier sont inscrits à l’arrière de votre téléviseur. Nous vous
recommandons de les noter dans les espaces ci-dessous ; veuillez vous y référer lorsque vous communiquez
avec le service à la clientèle de ou avec votre détaillant concernant ce produit.
Numéro de modèle :
Numéro du boîtier :
Liste d’emballage
Pièces Quantité
Téléviseur couleur 1
Télécommande 1
Guide d’utilisation 1
Piles alcalines de type ‘AAA’ 2
1
Page 17

Guide d’utilisation
MESURES DE SÉCURITÉ IMPORTANTES
1. Lire ces instructions.
2. Conserver ces instructions.
3. Tenir compte de tous les avertissements.
4. Suivre toutes les instructions.
5. Ne pas utiliser cet appareil près de l’eau.
6. Nettoyer seulement avec un chiffon sec.
7. Ne bloquer aucune ouverture de ventilation. Installer selon les instructions du fabricant.
8. Ne pas installer près d’une source de chaleur, comme des radiateurs, des registres de chaleur, des poêles ou autres appareils
(comme des amplificateurs) qui produisent de la chaleur.
9. Ne pas modifier les éléments de sécurité de la fiche polarisée ou de la fiche avec mise à la terre. Une fiche polarisée est
composée de deux lames dont l’une est plus large. Une fiche de type mise à la terre comporte deux lames et une troisième
sous forme de broche. La lame la plus large ou la troisième broche sont fournies pour votre sécurité. Si la fiche fournie ne
rentre pas dans votre prise, consultez un électricien pour qu’il remplace la prise désuète.
10. Protéger le cordon d’alimentation de manière à ce qu’on ne puisse marcher dessus ou le pincer, surtout au niveau de la fiche,
de la prise ou à la sortie du cordon de l’appareil.
11. N’utiliser que les raccords ou les accessoires spécifiés par le fabricant.
12. Utiliser seulement un chariot, un pied, un trépied, un support ou une table recommandés ou vendus par le
fabricant. Si un chariot est utilisé, déplacer avec précaution l’ensemble chariot / appareil afin d’éviter qu’il
ne bascule et entraîne des blessures.
13. Débrancher cet appareil pendant les orages électriques ou s’il n’est pas utilisé pendant de longues périodes.
14. Confier l’entretien à du personnel qualifié. Faire réparer l’appareillage s’il a été endommagé de quelque manière, comme un
cordon d’alimentation ou fiche endommagé, du liquide versé ou des objets tombés sur l’appareil, une exposition à la pluie ou
à l’humidité, s’il ne fonctionne pas normalement ou s’il est tombé.
15. Mise en garde – L’entretien doit être effectué seulement par du personnel autorisé et des techniciens adéquatement formés.
Si l’utilisateur tente d’ouvrir le boîtier ou de procéder à d’autres manœuvres pour effectuer lui-même l’entretien sur ce
téléviseur, il peut en résulter des blessures graves, voire même la mort, des suites d’électrocution, et cela peut aussi
augmenter les risques d’incendie.
Avertissement de la FCC
Informations à l’intention de l’utilisateur
Cet équipement a été testé et il satisfait aux limitations d’un appareil numérique de classe B, conformément à la partie 15 des
Règlements du FCC. Ces limitations ont été conçues afin de fournir une protection raisonnable contre l’interférence nuisible lors
d’une installation résidentielle. Cet équipement génère, utilise et peut émettre des fréquences radio et, s’il n’est pas installé et
utilisé conformément aux instructions, il peut causer de l’interférence nuisible aux communications radio. Toutefois, il n’y a
aucune garantie que cette interférence ne se produira pas lors d’une installation donnée. Si cet équipement reçoit de
l’interférence lorsqu’il est éteint ou allumé, on encourage l’utilisateur à essayer de corriger cette interférence avec l’une ou l’autre
de ces mesures :
1. Réorienter l’antenne ou la changer d’endroit;
2. Éloigner l’équipement du téléviseur;
3. Brancher l’équipement dans une prise située dans un circuit différent de celui avec lequel le téléviseur est branché;
4. Consulter le dépositaire ou demander l’assistance et les conseils d’un technicien radio/télé d’expérience.
L’utilisateur peut aussi consulter la brochure suivante : How to Identify and Resolve Radio-TV Interference Problems, rédigée par
la Commission fédérale des communications. Cette brochure est disponible auprès de : US Government Printing Office,
Washington D.C. 20402 Numéro de stock : 004-000-00345-4.
Avertisse me nt de la FCC
FCC met l’utilisateur en garde que des changements ou des modifications qui ne sont pas expressément approuvés par le
fabricant peuvent annuler l’autorisation de l’utilisateur de le faire fonctionner.
REMARQUE : Afin que l’installation de l’appareil soit conforme avec les limitations d’un appareil de classe B, des câbles de
garde doivent être utilisés.
2
Page 18

Guide d’utilisation
TABLE DES MATIÈRES
INTRODUCTION
Précautions de sécurité··································································································································1
Spécifications···············································································································································3
Description des caractéristiques·······················································································································4
Profils avant et arrière de l’unité·······················································································································4
Caractéristiques de la télécommande.································································· ··············································5
INSTALLATION
Branchement de l’antenne······························································································································6
Installation des piles de la télécommande··· ··········································································· ····························6
Branchement des appareils A/V
Entrée d’un appareil vers le téléviseur···············································································································7
Sortie du téléviseur vers un appareil ·················································································································7
FONCTIONS ET CARACTÉRISTIQUES
Mise en/hors fonction·····································································································································8
Fonctions de base········································································································································8
Menus de sélection des functions
Menu de l’image················································································································ ···················8
Menu de l’amplificateur··························································································································9
Menu de la minuterie·····························································································································9
Menu du système·································································································································9
Caractéristiques utiles de la télécommande ········································································································11
GUIDE DE DÉPANNAGE ··································································································································12
GARANTIE DES APPAREILS DE DIVERTISSEMENT
DOMESTIQUE DE MAGNASONIC
13
SPÉCIFICAT IONS
MODÈLE MCT2008
Téléviseur NTSC-M
Couverture des canaux
d’antenne
Couverture de la
câblodistribution
Canaux préréglés 181
Entrée de l’antenne 75 ohm (non balancée)
Source d’alimentation 120 V~, CA 60 Hz
Poids de l’appareil 55 kg (25 kg)
Dimension de l’appareil
Dimensions de l’emballage
Consommation électrique 90 W
VHF 2-13, UHF 14~69
Bande moyenne (A-8~A-1, A~I)
Bande supérieure (J~W)
Hyper bande (AA~ZZ, AAA, BBB)
Bande ultra (65~94, 100~125)
22,28 x 17,72 x 18,78 po.
566 x 450 x 477 mm
25,20 x 21.10 x 21.26 po.
640 x 536 x 540 mm
3
Page 19

Guide d’utilisation
Description des caractéristiques
Syntoniseur de 181 canaux – nombre total de canaux que le téléviseur peut capter: 2-69 en mode antenne ou 1-125 en mode
de câblodistribution.
Entrée A/V (arrière) – entrée standard composite conçue pour utilisation avec des appareils A/V, comme des magnétoscopes ou
lecteurs DVD.
Entrée A/V (côté) entrée conçue pour des utilisations moins fréquentes, comme l’utilisation de caméscope ou de jeux vidéo.
Sortie A/V (arrière) – signaux de sortie du téléviseur vers des appareils, par exemple un magnétoscope.
Rappel de canal – retour instantané au dernier canal visionné.
Décodeur de sous-titres – fonction qui affiche les sous-titres ou le texte d’une émission de télé.
Minuterie en/hors fonction – fonction qui permet à l’utilisateur de régler une minuterie afin de mettre le téléviseur en ou hors
fonction et de syntoniser un canal préétabli à un moment également préétabli.
Contrôle parental – fonction qui permet aux parents de bloquer certains types d’émissions.
Entrée S-vidéo – entrée conçue pour assurer clarté et contraste de meilleure qualité
Modes d’image possibles – préréglage des standards pour l’affichage du téléviseur: Usager, Normal, Mouvements et Sports.
Affichage trilingue à l’écran (OSD) – l’affichage à l’écran peut se faire soit en anglais, en français ou en espagnol.
Arrière et avant de l’appareil
Devant de l’appareil
TOUCHE DE MISE EN ATTENTE/TOUCHE D’ALIMENTATION
CAPTEUR INFRAROUGE
VOYANT D’ALIMENTATION
SÉLECTION DU MODE TV/VIDÉO
Panneau de côté
Panneau arrière
SÉLECTION DU MENU
AUGMENTATION/DIMINUTION
AUGMENTATION/DIMINUTION
4
Page 20

Guide d’utilisation
Caractéristiques de la télécommande
1- FUNCTION
Contrôle du volume et aux fonctions de verrouillage parental
2- VIDEO
Parcourir les modes vidéo/TV
3- DISPLAY
Faire apparaître l’affichage TV/Vidéo
4- FLÈCHES
Naviguer dans les menus du téléviseur
5- SCAN
Balayage des canaux actifs
6- SLEEP
Activer/désactiver la minuterie-sommeil
7- PICTURE
Sélectionner parmi les différents modes d’image
8- CC
Décodeur de sous-titres
9- STANDBY
Mettre le téléviseur en/hors fonction
10- KEYPAD
Sélectionner les canaux par les touches numériques
11- CH + / -
Changer de canal
12- VOL + / -
Ajuster le niveau du volume
13- MENU
Avoir accès au menu principal
14- ENTER
Confirmer les sélections ou avoir accès aux sous-menus
15-RECALL
Revenir au dernier canal visionné
16-MUTE
Mettre le son en sourdine
17-TIMER
Accède au menu de la minuterie
1
2
3
4
5
6
7
8
9
10
11
12
13
14
15
16
17
5
Page 21

Guide d’utilisation
INSTALLATION
- Veuillez lire entièrement les instructions de sécurité de ce guide avant l’installation.
- Installer votre téléviseur dans un endroit où la lumière du soleil ne frappera pas directement l’écran.
- Une lumière douce et indirecte est le meilleur environnement de visionnement.
- Veuillez laisser suffisamment d’espace (au moins 4 po) entre le téléviseur et le mur ou tout espace clos, afin d’assurer une
bonne ventilation.
- La distance de visionnement optimale est de 3 à 5 fois la dimension de l’écran.
Démagnétisation automatique
Un téléviseur couleur peut facilement être affecté par le magnétisme, ce qui se manifeste par la distorsion de la couleur à l’écran.
Si votre téléviseur est affecté par des composants ou appareils magnétiques, éteignez le téléviseur pour quelques minutes. Le
circuit intégré de démagnétisation automatique éliminera l’interférence magnétique.
Mise hors fonction automatique
Le téléviseur passera automatiquement au mode d’attente lorsque les conditions suivantes se produiront :
1. Le téléviseur est en mode d’antenne.
2. Le canal sélectionné n’aura pas de signal.
3. Aucune touche n’est enfoncée pendant 15 minutes
BRANCHEMENT DE L’ANTENNE
ou câblodistribution
VHF
UHF
VHF
UHF
Remarques :
1. Il est conseillé d’utiliser un câble coaxial de 75 ohms afin d’éliminer l’interférence et le bruit causés par des transissions radio.
2. Le câble de l’antenne ne doit pas être attaché avec un autre fil.
3. En cas d’utilisation d’une antenne extérieure, il faut installer un paratonnerre et le vérifier régulièrement.
Installation des piles dans la télécommande
1. Ouvrir le compartiment des piles de la télécommande
2. Placer deux piles de type “AAA” (incluses). Assurez-vous de respecter la polarité (+) et (-)
des piles.
3. Refermer le compartiment des piles.
Remarques :
1. Les piles alcalines sont recommandées car leur autonomie est plus longue.
2. Toujours remplacer les deux piles en même temps.
3. Ne pas exposer les piles au feu ou les ouvrir.
4. Pour éviter que les piles ne coulent, retirez-les de la télécommande lorsque celle-ci n’est pas utilisée pendant longtemps.
.
Câble coaxial de 75 ohms (non inclus)
Câble coaxial de 300 ohms à deux fils (non inclus)
Adaptateur d’antenne (non inclus)
Mélangeur U/V (non inclus)
OU
OU
Entrée RF (arrière du téléviseur)
6
Page 22

Guide d’utilisation
2
INSTALLATION (suite)
Branchement de l’équipement A/V
Voici des diagrammes qui vous fournissent les instructions de base sur la manière de raccorder l’équipement externe comme un
lecteur VCR ou DVD à votre téléviseur. Veuillez consulter le manuel d’instructions de l’équipement audio/vidéo externe qui sera
raccordé à votre téléviseur pour des instructions supplémentaires. VEUILLEZ COUPER TOUTE SOURCE D’ALIMENTATION
AVANT DE RACCO RDER LES APPAREILS
Raccordez la borne de sortie RF du magnétoscope à la prise d’entrée RF située à l’arrière du téléviseur.
Magnétoscope
Entrée d’un appareil au téléviseur
SORTIE AUDIO/VIDÉO
Lecteur DVD Caméscope Magnétoscope
SORTIE
Câble audio
(non inclus)
Rouge Blanc Jaune ENTRÉE Rouge Blanc Jaune ENTRÉE Rouge Blanc ENTRÉE
Panneau du côté
Sortie de téléviseur à l’appareil
ENTRÉE AUDIO/VIDÉO
.
Câble video
(non inclus)
SORTIE
ENTRÉE
Câble coaxial
Entrée RF
SORTIE
SORTIE
Panneau arrière
Panneau arrière
Panneau arrière
Remarques :
1. Ne banchez PAS les deux câbles
à composites (bornes vidéo
jaunes) et S-vidéo. Utilisez
seulement l’un des deux.
Rappelez-vous de brancher les
câbles audio lorsque vous utilisez
Rouge Blanc Jaune
le branchement S-vidéo.
. Les bornes de côté peuvent être
plus faciles à utiliser avec un
caméscope. Les connexions sont
Magnétoscope
identiques.
7
Page 23

Guide d’utilisation
I
FONCTIONS ET CARACTÉRISTIQUES
Mise en/hors fonction de l’appare il
1. Mise en fonction
Brancher le cordon d’alimentation ; le téléviseur devrait accéder au mode Standby (en attente). Appuyez sur la touche STANDBY
sur la télécommande ou TV pour mettre le téléviseur en fonction. Le voyant lumineux du téléviseur s’allumera également.
2. Standby (en attente)
Pendant que le téléviseur est en fonction, presser la touche STANDBY. Ceci mettra le téléviseur en mode d’attente. Le voyant
lumineux du téléviseur s’éteindra.
Fonctions de base
Changer de canal
En mode syntoniseur, appuyez sur les touches CH +/ - pour changer de canal, ou utiliser la touche FUNCTION (F) ainsi que la
touche VOL +/- pour régler le niveau de volume par incréments de 4.
Suppression du son
Pour la suppression du son, appuyez sur la touche MUTE. Pour rétablir le volume, appuyez à nouveau sur la touche MUTE.
MENUS DE SÉLECTION DES FONCTIONS
Vous pouvez avoir accès à tous les menus des fonctions en pressant la touche MENU de la télécommande ou du panneau avant
du téléviseur. Vous pouvez naviguer dans le menu en utilisant les flèches et la touche ENTER de la télécommande et les
touches - CH + et - VOL + du panneau avant. Sortir à l’aide de la touche MENU.
Vidéo Menu (Menu de réglage vidéo)
Ce menu vous permet d’ajuster les différents réglages de l’image. Appuyez sur la to uche de déplacement vers le haut ou le
bas et sur la touche de déplacement vers la gauche et la droite pour défiler entre les différents réglages et les régler.
Menu de Image
Caractère
Ce menu est pour régler les installations de l’image. Les touches haut/bas pour choisir,
les touches gauche/droite pour régler.
Teinte : -31 (plus pourpre) à +31 (plus verdâtre)
Luminosité : 0 (le plus sombre) à 100 (le plus lumineux)
Constraste : 0 (contraste minimum) à 63 (contraste maximum)
Couleur : 0 (minimum) à 63 (maximum)
Netteté : 0 (netteté minimum) à 63 (netteté maximum)
mage
Te i n t e . . . . . ! . . . . . 00
Brillance . . . . . ! . . . . . 32
Contraste
Couleur . . . . . ! . . . . . 32
Netteté . . . . . ! . . . . . 32
. . . . . ! . . . . . 32
8
Page 24

Guide d’utilisation
P
S
FONCTIONS ET CARACTÉRISTIQUES (suite)
Menu du syntoniseur
Remarque : Ce menu est uniquement accessible lorsque le téléviseur est en mode de Syntoniseur.
Canal :
Cette fonction vous permet de changer le canal affiché. Utilisez la touche de
déplacement vers la gauche ou la droite ou les touches numériques pour changer le canal.
Ajout/Supprimer :
Cette fonction vous permet d’ajouter ou supprimer un canal affiché à
l’écran de “la liste de canaux actifs”. La liste des canaux actifs est la liste des canaux
disponibles en appuyant sur la touche CH+/CH-. Utilisez la flèche de gauche ou de droite
pour ajouter ou supprimer des canaux.
Antenne :
Cette fonction vous permet de choisir entre l’entrée de l’antenne ou la
câblodistribution. Veuillez utiliser le mode de l’antenne lorsque vous utilisez une antenne le mode du câble lorsque vous utilisez
la câblodistribution. Utilisez les touches de déplacement vers la gauche ou la droite pour sélectionner l’une de ces deux options.
Programmation automatique :
Cette fonction vous permettra de régler la liste de canaux actifs en effectuant un balayage
des canaux disponibles. La liste comprendra seulement les canaux dont le signal est actif. Appuyez sur la touche de
déplacement de droite pour débuter et la touche de déplacement vers la gauche pour arrêter le processus.
Menu de la minuterie-sommeil
Appuyez sur la touche TIMER de la télécommande pour accéder à ce menu.
Heure
Cette fonction vous permet de régler l’heure sur le téléviseur.
Heure de mise en fonction
Cette fonction vous permet de prérégler l’heure de mise en fonction du téléviseur.
Canal lors de la mise en fonction
Cette fonction vous permet de prérégler le canal qui sera sélectionné lorsque de la mise en
fonction par la minuterie-sommeil.
Heure de mise hors fonction
Cette fonction vous permet de prérégler l’heure à laquelle le téléviseur sert mis hors fonction.
Minuterie-sommeil
Cette fonction vous permet de prérégler la minuterie-sommeil pour qu’elle s’active à tous les jours (quotidiennement).
Menu du système
Langage
Cette fonction vous permet de choisir le langage utilisé pour l’affichage à l’écran. Utilisez la
touche de déplacement vers la gauche et la droite pour sélectionner le langage désiréanglais, français ou espagnol.
Fond d’écran bleu
Cette fonction vous permet d’afficher un fond d’écran bleu à l’écran du téléviseur
lorsqu’aucun signal n’est présent. Utilisez la touche de déplacement vers la gauche ou la
droite pour permuter entre la mise en ou hors fonction.
Sous-titres
C’est une fonction qui permet à votre téléviseur d’afficher le signal de circuit fermé sur votre écran. Il vous permet d’afficher le
signal du télétexte. Il y a neuf différents réglages de circuit fermé. Vous pouvez régler le téléviseur à l’un des quatre réglages de
Closed Caption (CC1-4), à l’un des 4 Text settings (T1-4), ou régler cette fonction à Non (hors fonction ) (CCD/Text non).
Remarques : Un signal de sous-titres peut ne pas être affiché dans les conditions suivantes :
- Lorsqu’aucun signal de sous-titres/texte n’est décodé.
- Lorsque le signal est faible ou altéré (à cause des interférences ou d’une mauvaise réception).
- Lorsque vous visionnez une vidéocassette copiée.
rogramme
Canal 2
Ajo/Effacer Ajo
Antenne Air
Progr. Auto
Arrêter Débuter
△
Minuterie
Temps - - : - -
On Minuterie - - : - On Canal
Off Minuterie - - : - Minuterie Once
ystème
Langage Eng. Fra. Esp.
Fond Bleu
CCD/Texte
Guide Parental
MPAA-X TV-MA
Oui
Non
Oui
△
-
9
Page 25

Guide d’utilisation
S
FONCTIONS ET CARACTÉRISTIQUES (suite)
Menus de sélection des fonctions (suite)
Menu du guide de contrôle parental
Cette fonction permet aux parents de bloquer le visionnement de certaines émissions, selon
la cote accordée à l’émission. À partir de l’affichage du menu principal, appuyez sur la touche
de déplacement de gauche ou de droite jusqu’à ce que Contrôle parental soit en surbrillance.
Afin d’avoir accès à ce menu, vous devez d’abord entrer un mot de passe. Le mot de passe
par défaut est 6688. Lorsque le guide de contrôle parental est activé, appuyez sur la touche
ystème
Langage Eng. Fra. Esp.
Fond Bleu Oui
CCD/Texte Non
Guide Parental Oui
MPAA-X TV-MA
Entrer Code Passe - - - -
de déplacement vers la droite pour accéder à la grille de classement.
Classement des télédiffusions
À l’aide des touches de déplacement vers le haut ou le bas, permutez entre les réglages et
appuyez sur la touche MENU pour bloquer complètement un classement spécifique. Ou, si
désiré, appuyez sur les touches de déplacement vers le bas ou le haut pour mettre un
classement spécifique en surbrillance (Un U est affiché au milieu du tableau). Appuyez sur la
touche MENU sur l’un de ces classements individuels pour le mettre en surbrillance et
bloquer l’émission qui diffuse cet aspect particulier. Consultez le tableau de classement
ci-contre pour un exemple. Le classement des télédiffusions est défini tel qu’indiqué
ci-dessous :
TV-Classement
Classe
FV
D L S
TV-Y
TV-Y7 U U
TV-G
TV-PG
TV-14
TV-MA
Classement d’âge
U
U
U U U U U
U U U U U
U U U
V
U
Age Description
TV-Y tous les enfants
TV-Y7 les enfants plus de 7 ans
TV-G
foule normale
TV-PG
sous guide des parents
TV-14 age de &’ ans, attention spéciale
TV-MA
de parents
ne conforme qu’aux adultes
Article Description
FV
D
L
S
violence de fantaisie
dialogue suggestive
langage d’adulte
situations sexuelles
V violence
MPAA-classement
Classement de Film
G U
PG U
PG-13 U
R U
NC-17 U
X U
Classement d’âge
Classement MPAA
Appuyez sur la touche de déplacement vers la droite lorsque la grille de classement est affichée pur accéder à la grille. Utilisez
la touche de déplacement vers le haut ou le bas afin vous déplacer entre les classements MPAA. Appuyez sur la touche MENU
lorsqu’un classement est en surbrillance bloquera ce classement et il ne pourra être visualisé sur ce téléviseur. L’inscription A B
sera affichée en rouge à côté du classement bloqué. Veuillez noter que le blocage d’un classement inférieur (par exemple, PG)
bloquera également les classements supérieurs (PG-13, R, NC-17, X).
Menu du mot de passe
Ce menu vous permet de changer le code d’accès pour les fonctions du guide parental du
téléviseur. Appuyez sur la touche MENU lorsque la fonction de réglage du mot de passe est
activée. Lorsque la fonction du mot de passe est activée (ON), vous pourrez également
changer le mot de passe. Utilisez la touche de déplacement vers le bas et mettez l’option mot
de passe en surbrillance. Utilisez la flèche de déplacement vers le bas pour mettre l’option
Menu de Code passe
Contrôle de Code passe
Code de Passe 6688
Entrer Code Passe - - - -
mot de passe en surbrillance puis entrez le nouveau mot de passe à l’aide du clavier
numérique.
Remarque :
Le mot de passe préréglé est 6688. Ce mot de passe sera remplacé par le nouveau code programmé. veuillez contacter le
centre de service lorsque vous avez oublié votre mot de passe
.
10
Page 26

Guide d’utilisation
FONCTIONS ET CARACTÉRISTIQUES (suite)
Caractéristiques utiles de la télécommande
Display (affichage)
Cette fonction vous permet d’afficher l’information en cours sur l’écran de votre téléviseur (canal, mode d’antenne, heure, vidéo,
etc).
Timer (Minuterie-sommeil)
Cette touche vous permet d’accéder directement le menu de la minuterie. Pour plus de détails en rapport avec les options du
menu de la minuterie-sommeil, veuillez consulter la page 9.
Scan (Balayage)
Appuyez deux fois sur la touche et le téléviseur débutera le balayage de tous les canaux actifs. Pour arrêter le balayage,
appuyez sur n’importe quelle touche de la télécommande. Veuillez noter que la fonction de balayage fonctionnera uniquement en
mode d’antenne.
Picture (Image)
Le mode de visionnement est optimisé à l’usine. Pour activer les modes de l’image, appuyez sur cette touche et choisissez parmi
les réglages suivants : User, Normal, Movie et Sport). Chaque mode a des réglages différents pour la teinte, la couleur, la
luminosité, etc. correspondant aux conditions optimales du type de programmation que vous visionnez.
Recall (Rappel)
Cette touche vous permettra de retourner au canal précédent. Appuyez sur cette touche pour retourner au canal que vous
visionniez précédemment.
CC (Sous-titres)
Appuyez sur la touche CC pour activer les sous-titres ou le texte pour le canal sélectionné au menu du système. Appuyez de
nouveau sur la touche pour désactiver les sous-titres et la fonction du texte.
Vidéo
Cette touche vous permettra de permuter entre l’antenne et les différents modes d’entrée vidéo. Lorsque vous branchez un
appareil A/V externe, utilisez cette touche pour accéder à l’appareil sur ce téléviseur.
Verrouillage à l’épreuve des enfants
La fonction de verrouillage à l’épreuve des enfants empêche le visionnement des télédiffusions non autorisées. Pour activer cette
fonction, appuyez sur la touche F et maintenez-la enfoncée puis appuyez sur la touche MUTE. Vous devriez voir le symbole de la
clé à l’écran. Ceci verrouillera toutes les fonctions de la télécommande (à l’exception de la mise en attente). Pour déverrouiller le
téléviseur, appuyez sur la touche F et la touche MUTE et maintenez-la enfoncée. Ceci déverrouillera le téléviseur. Veuillez noter
que la seule manière d’activer ou de désactiver la fonction de verrouillage est par la télécommande – veuillez vous assurer que
celle-ci est placée dans un endroit sécuritaire.
SLEEP (Minuterie-sommeil)
Appuyez successivement sur la touche SLEEP pour accéder aux modes suivants.
- -→15→30→45→60→90→120→150→180 (unité: minute)
Le téléviseur entrera automatiquement en mode d’attente lorsque l’heure préréglée sera atteinte.
Le téléviseur affichera un message une minute avant que la minuterie-sommeil s’active.
0-9
Appuyez sur les touches 0-9 pour entrer le numéro de canal directement (2-69 en mode d’antenne ou 1-125 en mode de
câblodistribution). Apuyez sur la touche numérique correspondant au numéro de canal.
Chaque chiffre doit être entré dans un délai de 3 secondes.
11
Page 27

Guide d’utilisation
GUIDE DE DÉPANNAGE
Avant de communiquer avec le service à la clientèle, veuillez consulter le tableau ci-dessous pour tenter de corriger le problème.
Problèmes Corrections possibles
Pas d’alimentation
électrique
Image foncée, de mauvaise
qualité ou pas d’image
Pas de son
Pas de signal TV
Interférence pourpre ou
sous forme de rayures à
l’écran
L’image est enneigée
Images multiples
Pas de réception d’un canal
Une boîte noire apparaît à
l’écran
La télécommande ne
fonctionne pas
Vérifier si le cordon d’alimentation est bien branché dans une prise ayant de l’électricité.
Vérifier si la connexion de la sortie vidéo du lecteur DVD/VCR à l’entrée vidéo du téléviseur
est bien en place ; faire ensuite passer le téléviseur au mode vidéo approprié.
Ajustez les réglages de l’image pour la teinte, la luminosité, la netteté, etc.
Vérifiez que le câble coaxial de l’antenne est connecté à la prise d’entrée RF.
Bien brancher les câbles audio dans les bornes.
Vérifier si la connexion de la sortie audio du DVD ou du magnétoscope à l’entrée audio du
téléviseur est bien en place ; faire ensuite passer le téléviseur au mode approprié sur le
récepteur. Veuillez vous référer au guide d’utilisation de l’amplificateur.
Vous assurer que le niveau du volume est approprié, et que la fonction mute (muet) n’est
pas en fonction.
Vous assurer que la fonction MTS est bien réglée.
Vous assurer que le téléviseur est réglé au mode Antenne.
Vous assurer que l’antenne est bien connectée à la prise RF.
Débrancher le téléviseur de la prise murale pendant 30 secondes, et le rebrancher de
nouveau.
Débrancher la connexion de l’antenne de l’arrière du téléviseur, débrancher le téléviseur de
la prise murale, attendre 30 secondes et réessayer.
Vous assurer que les hauts parleurs autour du téléviseur sont couverts.
Vous assurer que le câble de l’antenne est en bon état de fonctionnement.
Vous assurer que l’antenne est bien connectée à la prise RF.
Modifier l’orientation de l’antenne pour minimiser les images multiples.
La fréquence vidéo émise par votre téléviseur peut être reflétée par des édifices ou des tours
de haute taille.
Vous assurer que l’installation antenne/câblodistribution est adéquate.
La chaîne peut avoir été verrouillée avec la fonction de contrôle parental.
Vérifier la fonction Ajouter/supprimer, puisque le canal peut avoir été effacé durant le
réglage.
Vérifier si la fonction du décodeur de sous-titres est bien hors fonction.
Les piles peuvent être faibles. Changer les piles.
Vous assurer qu’il n’y a pas d’obstacle entre la télécommande et le capteur.
12
Page 28

Guide d’utilisation
GARANTIE DES APPAREILS DE DIVERTISSEMENT DOMESTIQUE D’EMERSON
Nous vous remercions d'avoir acheté cet appareil de divertissement domestique d’EMERSON. Votre nouvel appareil, comme
tous ceux de notre production, est conforme à des normes de qualité très rigoureuses. Dans des conditions d’utilisation
normales, nous sommes certains qu 'il vous donnera entière satisfaction, et ce, pendant de nombreuses années. Cependant, s’il
survient u n problème, vous êtes protégé en vertu des clauses de cette garantie. Les appareils de divertissement domestique
d’EMERSON sont garantis contre tout défaut, tant dans les matériaux que la fabrication, pendant les périodes spécifiées
ci-dessous, à condition que lesdits appareils aient été installés et utilisés selon les directives du guide d’utilisation.
PRODUIT
Téléviseurs couleur 1 an 1 an 3 ans
Télécommande 990 jours 90 jours ---
L'obligation d’EMERSON, en vertu des clauses de cette garantie, est limitée à la réparation, y compris le remplacement des pièces
et le coût de la main-d'oeuvre pertinente, ou à no tre discrétion, au remplacement de tout ap pareil de divertissement domestique
qui présente des défauts de fabrication pendant la période de garantie.
Les pièces de rechange fournies en rapport a vec cette garantie son t couvertes pendant une pério de égale à la portion résid uelle
de la garantie de l'équipement original.
L'apparei l e st co uv ert p ar la ga r an ti e à p ar ti r d e la da te de l'ac hat initial au dé tail. Par conséquent, le propriétaire de l'appar eil do it
présenter la facture originale affichant clairement la date.
Aucun service ne sera effectué sans présentation de la facture. Le propriétaire est seul responsable de l'expédition de l'appareil
à destination et en provenance du centre de service.
Cette garant ie ne s'appliq ue qu'aux appar eils de divertis sement domestique d’EMERSON achetés et utilisés au Canada. Cette
garantie ne s'applique ni à l'apparence ni aux accessoires y compris, mais ne s’y limitant pas, aux antennes, boîtier, pièces du
boîtier, boutons, piles, couvercles, câbles de raccord, cassettes et disques compacts. En outre, cette garantie ne s'applique pas
non plus aux dommages causés par ou su rvenus lors de la manutention, le transport, le déballage, l'installation, les rég lages
effectués par le client et mentionnés dans le guide d’utilisatio n, les réparations ou le remplacement des pièces fournies par un
service autre que le Centre de Service et de Réparations de EMERSON, à tout mauvais fonctionnement ou toute panne causée
par ou résultant de conditions environnementales anormales, de réparations inadéquates effectuées par un service non autorisé,
un entretien inadéquat, des réparations ou modifications effectuées par le client, de mauvais traitements ou un fonctionnement
inadéquat, la négligence, un accident, un incendie, une inondation ou tout autre cas de force majeure, incluant le branchement à
un circuit à tension incorrecte.
La garantie de cet appareil de divertissement domestique ne s'applique qu'à l'acheteur au détail initial. Cette garantie est nulle
en cas d'utilisation commerciale de l'appareil ou à des fins de location, ou si les numéros de séri e ont été modifiés, égratign és ou
effacés.
EMERSON se réserve le droit de changer le concept, de faire des modificati ons ou des améliorations à cet appareil, sans avoir
l'obligation d'effectuer les mêmes changements aux appareils fabriqués auparavant. Ce qui précède remplace toute autre
garantie explicite ou implicite et EMERSON n'assume aucune responsabilité ni n ’autorise quiconque à accepter en so n nom toute
obligation ou responsabilité liée à la vente, à l'entretien ou aux réparations de ce produit. En aucune circonstance, EMERSON et
MAIN-D’OEUVRE PIÈCE TUBE
OBLIGATIONS DU CLIENT
EXCLUSIONS DE LA GARANTIE
13
Page 29

Guide d’utilisation
ses détaillants EMERSON ne seront responsables des dommages spéciaux ou indirects résultant de l'utilisation de ce produit ni de
tout retard dans l'application de cette garantie attribuable à des causes indépendantes de notre volonté.
En vertu de certaines lois provinciales ou fédérales, l'acheteur peut avoir d'autres droits spécifiques et, si ce rtaines clauses de
cette garantie sont interdites en vertu de ces lois, ces clauses seront nulles et non avenues, mais les autres clauses de cette
garantie resteront en vigueur.
COMMENT OBTENIR LES SERVICES OU RÉPARATIONS
En cas de besoin, vous pouvez obtenir tous les renseignements sur les services et réparations en vous adressa nt au marchand
EMERSON qui vous a vendu cet appareil, ou en communiquant directement avec nous :
SERVICE SONIGEM
300 Alden Road
Markham, Ontario
L3R 4C1
TÉLÉPHONE : (905) 940-5089
TÉLÉCOPIEUR : (905) 940-2303
1-800-287-4871
14
 Loading...