

Page 1
For Customer Assistance, please send your
email to :
Pour joindre le Soutien à la clientèle, veuillez
envoyer votre courriel à :
MM178K
MM178K
MM178KMM178K
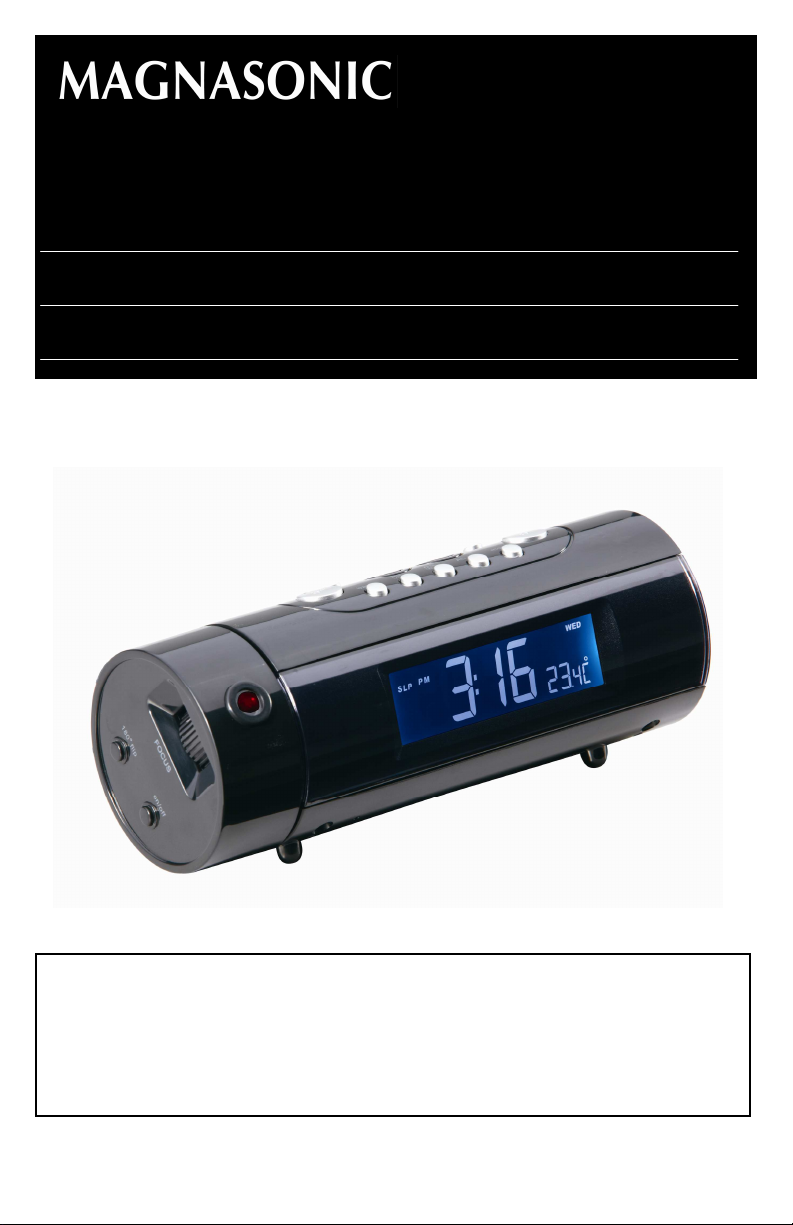
Auto Time Set Dual Alarm Projection Clock Radio
support@magnasonic.com
Radio Réveil – Double Alarme – Projection Heure
U
SER’S GUIDE
GUIDE DE L’UTILISATEUR
Thank you for your purchase of this Magnasonic product. Please read this Instruction
Manual carefully before using product to ensure proper use. Keep this manual in a
safe place for future reference.
Merci d’avoir fait l’achat de cet appareil Magnasonic. Veuillez lire le présent guide
attentivement avant de faire fonctionner l’appareil pour vous assurer de l’utiliser
correctement. Conservez le présent guide dans un endroit sûr afin de pouvoir vous y
référer au besoin.
www.magnasonic.com
Page 2
- 2 -
Page 3

TABLE OF CONTENTS
rnings
Wa
hat’s Included
W
mportant Safety Information
I
duct Illustration
Pro
wer Connection
Po
peration
O
Setting the Time Zone
Changing Time Zone
Setting Time and Date
Setting Alarm Time
Setting Alarm ON / OFF and Type
Alarm Duration / Snooze Button
Changing Display Content Sleep
Function
Daylight Savings Time Function
Changing Temperature Display Format
Radio Operation
Reset Function
ojection Unit
Pr
Infrared Sensor Operation 8
Specifications
Warnings
Magnasonic Warranty
WHAT’S INCLUDED
2
3
4
5
6
6
6
6
6
6
6
7
7
7
7
7
7
7
8
9
9
10
Clock Radio
-
- User Manual
- 1 x CR2032 Battery
- 3 -
Page 4

IMPORTANT SAFETY INFORMATION
WARNING
TO PREVENT ELECTRIC SHOCK; DO NOT USE THIS PLUG WITH AN
EXTENSION CORD RECEPTACLE OR OTHER OUTLET UNLESS THE BLADES
CAN BE FULLY INSERTED TO PREVENT BLADE EXPOSURES. TO PREVENT
FIRE OR SHOCK HAZARD; DO NOT INSTALL THIS PRODUCT IN A CONFINED
SPACE SUCH AS A BOOK CASE OR SIMILAR UNIT.
CAUTION: RETAIN THIS MANUAL FOR FUTURE REFERENCE
1. Read these instructions.
2
. Keep these instructions.
3. Read all warnings.
4. Follow all instructions.
5. Do not use this product near water.
6. Clean only with a dry cloth.
7. Clean the screen only with a dry cloth, moistened slightly if needed. Do not clean
the inside of the product.
Auto Time Set Dual Alarm Projection Clock Radio
- 4 -
Page 5
PRODUCT ILLUSTRATION
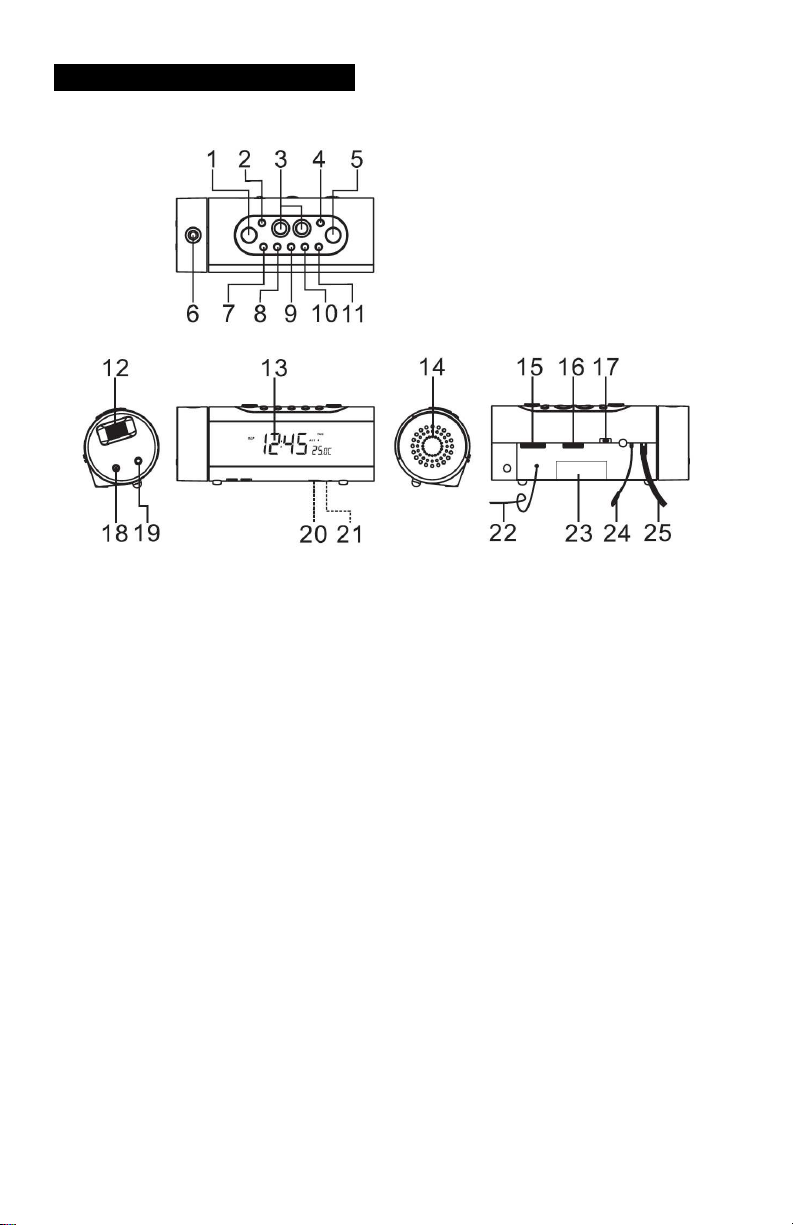
1
. SNOOZE / SLEEP / TIMEZONE button
2. << / MONTH – DAY / °C °F button
3. INFRARED SENSOR
4. >> / YEAR / DST button
5. ON / OFF button
6. PROJECTION UNIT
7. AM / FM BAND button
8. ALARM 1 RADIO / BUZZ button
9. ALARM 2 RADIO / BUZZ button
10. ALARM SET button
11. MODE button
12. FOCUS ADJUSTMENT for PROJECTION
13. LCD DISPLAY
14. SPEAKER
15. TUNING knob
16. VOLUME knob
17. DISPLAY AUTO OFF / LOW / HIGH switch
18. PROJECTION TIME 180° FLIP button
19. PROJECTION ON / OFF button
20. BATTERY COMPARTMENT
21. RESET button
22. FM ANTENNA
23. RATING label
24. TEMPERATURE SENSOR (INSIDE DOOR)
25. AC POWER CORD
- 5 -
Page 6

POWER CONNECTION
u
1.Pl
g the AC power cord into an appropriate wall outle
t to power on the unit.
OPERATION
Setting the Time Zone
plugging in the unit, the number 3 will appear on the screen. This number
Upon
indicated the time zone that the clock is currently set to. The unit will default to 3
every time the unit is powered off and on again.
The times zones are numbered as follows:
Zone 1 – Newfoundland Zone 2 – Atlantic Time
Zone 3 – Eastern Time Zone 4 – Central Time
Zone 5 – Mountain Time Zone 6 – Pacific Time
To Change the Time Zone Setting
1.
Press the << or >> buttons on the unit to switch between the time zones.
2. When your own time zone number appears on the LCD display, press the MODE
button to save.
Manually Set the Clock Time and Date
1. Press and hold the MODE button in normal mode to enter the set mode.
2. Press the MODE button repeatedly to cycle through the available settings in this
order:
Year → Month → Day → 12/24 Hr → RTC Hour → RTC Minute
3. Once you see the setting you wish to adjust on the LCD screen, press the << or
>> buttons on the unit to adjust the value of the setting.
4. Press and hold the << or >> button on the unit to quickly adjust the values.
Setting the Alarm Time
1. Press and hold the ALARM button in normal mode to enter the set mode.
2. Press the ALARM button repeatedly to cycle through the available settings in this
order:
Alarm1 Hour → Alarm1 Minute → Alarm 1 Weekend → Alarm 2 Hour →
Alarm 2 Minute → Alarm 2 Weekend
3. Once you see the setting you wish to adjust on the LCD screen, press the << or
>> buttons on the unit to adjust the value of the setting.
4. Press and hold the << or >> button on the unit to quickly adjust the values.
Setting Alarm On/Off and Alarm Type
1. Press the ALARM 1 or ALARM 2 button to select the radio alarm or press
twice to select the buzzer alarm. Press three times to turn the alarm mode off
again.
2. The alarm will sound at your chosen alarm time.
Use the DISPLAY AUTO / ON / OFF switch to choose either to automatically
.
3
display the time when the alarm sounds, to always show the time, or to not
display the time on the LCD display.
- 6 -
Page 7

4.To stop the alar
m press the ON / OFF button.
Alarm Duration and Snooze Function
The alar
m
Snooze function
1.
2. The snooze interval is 9 minutes and the alarm will sounds again after this
3. To stop the snooze function and disable the alarm you press the ON / OFF
m will sound for 30 minutes if no key is pressed. It will shut off after 30
inutes and wait until the next day at the same alarm time to sound again.
Once the alarm sounds, you can press the SNOOZE button on the unit to stop
the alarm.
amount of time.
button.
Changing Display Content
Press the YEAR button to display the current year, after 5 seconds the time will
1.
appear on the display again.
2.
Press the MONTH – DAY button to display the current month and day, after 5
seconds the time will appear on the display again.
Sleep Function
1. When the radio is on, press SLEEP button to turn on the sleep function.
2. The sleep time will flash for 5 seconds
3. During this time press the SLEEP button until your chosen time (90 – 15 min) is
displayed.
4. The radio will turn off after this time has elapsed.
Daylight Saving Time Function
1. Press the DST button and hold for 3 seconds to toggle on or off the daylight
savings time function.
2.
The time will move forward or back one hour at 2 am that night.
Changing Temperature Display Format
Press and hold the << button on the unit for 3 seconds to toggle between
C° or F°. The temperature will be displayed in the bottom right-hand
corner of the LCD display
Radio Operation
1.
ess the ON / OFF button to turn the radio on.
Pr
2
.
ct the AM / FM BAND button to switch between AM or FM transmission.
Sele
3. Select your preferred station using the TUNING knob.
4. You can adjust the volume of the music by using t
5. Press the ON / OFF button to turn the radio off.
Note: The AM band uses an internal directional antenna, rotate the radio to improve
reception. For best FM reception, ensure the antenna is untied and fully
exte
nded.
he VOLUME knob.
Reset Function
The reset button is located on the back of the unit. Press this button with a pen or
small object when you replace the batteries in the clock, or the clock is not performing
as expected. You will lose any saved data like alarm times.
- 7 -
Page 8

PROJECTION UNIT
1
. Press the PROJECTION ON / OFF button on the side of the unit to turn the
projection on.
2. The projection will display the time on the wall or ceiling in a darkened room.
3. Optimal display distance is between 3 and 9 feet.
4. To focus the display, adjust the FOCUS ADJUSTMENT wheel on the side of the
unit.
5. To flip the image, PRESS the PROJECTION TIME 180° FLIP button and the
display will be flipped upside down.
6. To turn off the projection, press the PROJECTION ON / OFF button on the side
of the unit.
Infrared Sensor Operation
1. In radio off mode, hold you hand above the sensor fo
alarm 1 and 2 time.
2. In radio on mode, hold your hand above the sensor for 2 seconds to turn on the
sleep function, the word SLP will appear on the display. To adjust the sleep time,
see the Sleep Function section on Page 5. Press the ON / OFF button to cancel
the sleep timer.
r one second to display the
3. When alarm is sounding, hold your hand above the sensor for 1 second to turn
the SNOOZE function on, the alarm will sounds again in 9 minutes.
- 8 -
Page 9

4. When the radio is playing, hold your hand above the sensor for 1 second to show
the current radio frequency being played.
5. In radio off mode, select the DISPLAY AUTO OFF / LOW / HIGH switch to
AUTO. The LCD display will automatically go off in 15 seconds. Hold your hand
over the sensor for 1 second to show the time.
Note: You may also press any button on the clock to see the time displayed.
SPECIFICATIONS
Frequency AM 530 – 1700 kHz
FM 88 – 108 MHz
Battery Backup 1 – 3V CR2032 flat lithium ion battery (not included)
Power Source 120 V AC ~ 60 Hz, 5 W
WARNING
• No open flame or heat source should be placed on the apparatus
• Do not place the product on closed bookcases or racks without proper ventilation
• Do not plug the adapter into a wall outlet that is not open and readily available for
disconnection
• Do not cover the apparatus with a cloth or blanket, product must be able to
ventilate
• Do not spill or expose apparatus to water, no vases or wet objects should be
placed on top of the apparatus
• The unit should not be exposed to direct sunlight, very high or low temperatures,
moisture, vibrations, or placed in a dusty environment
• Do not use abrasive, benzene, thinner or other solvents to clean the surface of
the unit Use only a mild cleaning solution and a clean soft cloth
• Never attempt to insert wires, pins or other small objects into the vents or
openings on the unit
• Danger of corrosion of battery if the battery is not correctly replaced with the
correct type and/or configuration
- 9 -
Page 10

-
Consumer Electronics Products and Home Appliances
Thank you for choosing MAGNASONIC® Consumer Electronics Products!
MAGNASONIC gives the following express warranty to the original consumer purchaser or gift recipient for
this MAGNASONIC product, when shipped in its original container and sold or distributed in Canada by
MAGNASONIC or by an Authorized MAGNASONIC Dealer:
MAGNASONIC warrants that this product is free, under normal use and maintenance, from any defects in
material and workmanship. If any such defects should be found in this product within the applicable warranty
period, MAGNASONIC shall, at its option, repair or replace the product as specified herein. Replacement parts
furnished in connection with this warranty shall be warranted for a period equal to the unexpired portion of the
original equipment warranty.
This warranty shall not apply to:
a. Any defects caused or repairs required as a result of abusive operation, negligence, accident, improper
installation or inappropriate use as outlined in the owner’s manual.
b. Any MAGNASONIC product tampered with, modified, adjusted or repaired by any party other than
MAGNASONIC or MAGNASONIC’s Authorized Service Centres.
c. Damage caused or repairs required as a result of the use with items not specified or approved by
MAGNASONIC, including but not limited to head cleaning tapes and chemical cleaning agents.
d. Any replacement of accessories, glassware, consumable or peripheral items required through normal use
of the product including but not limited to earphones, remote controls, AC adapters, batteries, temperature
probe, stylus, trays, filters, cables, paper, cabinet, cabinet parts, knobs, buttons, baskets, stands, shelves,
cookware and cooking utensils.
e. Any cosmetic damage to the surface or exterior that has been defaced or caused by normal wear and tear.
f. Any damage caused by external or environmental conditions, including but not limited to transmission
line/power line voltage or liquid spillage.
g. Any product received without appropriate model, serial number and CSA /cUL /cULus /cETL /cETLus
markings.
h. Any products used for rental or commercial purposes.
i. Any installation, setup and/or programming charges.
Should this MAGNASONIC product fail to operate during the warranty period, warranty service may be
obtained upon delivery of the MAGNASONIC product together with proof of purchase and a copy of this
LIMITED W ARRANTY statement to an Authorized MAGNASONIC Service Centre. In-home warranty service
may be provided at MAGNASONIC’s discretion on any MAGNASONIC television with the screen size of 27” or
larger. This warranty constitutes the entire express warranty granted by MAGNASONIC and no other dealer,
service centre or their agent or employee is authorized to extend, enlarge or transfer this warranty on behalf of
MAGNASONIC. To the extent the law permits, MAGNASONIC disclaims any and all liability for direct or
indirect damages or losses or for any incidental, special or consequential damages or loss of profits resulting
from a defect in material or workmanship relating to the product, including damages for the loss of time or use
of this MAGNASONIC product or the loss of information. The purchaser will be responsible for any removal,
reinstallation, transportation and insurance costs incurred. Correction of defects, in the manner and period of
time described herein, constitute complete fulfillment of all obligations and responsibilities of MAGNASONIC
Electronics to the purchaser with respect to the product and shall constitute full satisfaction of all claims,
whether based on contract, negligence, strict liability or otherwise.
CARRY-IN PARTS & LABOUR WARRANTY PERIODS:
• Audio / Communications Products: 1 Year (Remote Control, if applicable – 90 Days)
• DVD Products: 1 Year (Remote Control – 90 Days)
• LCD & Plasma Display TV: 1 Year (Remote Control – 90 Days)
• Television Products: 1 Year (Remote Control – 90 Days)
• VCR Products: 1 Year (Remote Control – 90 Days, Video Heads – 6 Months)
• Home Appliances: 1 Year
o Microwave Magnetron parts only additional 3 Years
o Refrigerator / Freezer Compressor parts only, additional 4 years
To obtain the name and address of the nearest Authorized MAGNASONIC Service Centre or for more
information on this warranty
• visit www.magnasonic.com
• Email support@magnasonic.com
• Or mail your inquiry to:
MAGNASONIC Customer Service, 4080 Montrose Road, Niagara Falls, ON L2H 1J9
MAGNASONIC is a registered trade-mark of Circus World Displays Limited 06.2012
MAGNASONIC® WARRANTY
- 10
Page 11

AVERTISSEMENT : AFIN D’EVITER UN INCENDIE OU UN RISQUE DE CHOC, NE PAS
EXPOSER CET APPAREIL A LA PLUIE OU L’HUMIDITE.
ATTENTION : AFIN DE REDUIRE LE RISQUE D’ELECTROCUTION, VEUILLEZ NE PAS
RETIRER L’AVANT OU L’ARRIERE. IL N’EXISTE AUCUNE PIECE DANS CET APPAREIL QUI
SOIT COMMODE POUR L’UTILISATEUR. CONSULTEZ UN PERSONNEL QUALIFIE POUR
TOUTE REPARATION.
TTENTION - RISQUE D’ELECTROCUTION - NE PAS OUVRIR
A
Le symbole de l’éclair en pointe de flèche dans un triangle équilatéral est un
avertissement alertant l’utilisateur de « voltage dangereux » à l’intérieur de l’appareil
qui puisse être suffisamment ample pour constituer un risque de choc électrique
auprès d’une personne.
Le point d’exclamation dans un triangle est un avertissement alertant l’utilisateur de
consignes importantes accompagnant le produit qui figurent dans ce guide.
2 -
-
Page 12

SOMMAIRE
e
rtissements
Av
qui est inclus
Ce
nsignes de sécurité importantes
Co
lustration du Produit
Il
chements et Alimentation
Bran
glages
Ré
Régler le Fuseau Horaire
Modifier le Fuseau Horaire
Régler l’Heure et le Date
Régler l’Heure du Réveil
Allumer et éteindre le Réveille-matin/Type d’alarme
Durée du réveille-matin / Touche Snooze
Modifier le contenu d’affichage
Fonction Sleep
Fonction de l’Heure d’Été
Changer le format d'affichage de la température
Réglages de la Radio
Réinitialiser
Unité de Projection 8
Réglages du détecteur infrarouge
Spécifications
Avertissements
ANTIE MAGNASONIC
GAR
10
10
11
CE QUI EST INCLUS
2
3
4
5
6
6
6
6
6
6
7
7
7
7
7
7
7
8
8
adio Réveil
- R
- Guide d’utilisateur
- Pile 1 x CR2032
- 3
-
Page 13

CONSIGNES DE SECURITÉ IMPORTANTES
La conception et fabrication de cet appareil assure votre sécurité personnelle lorsqu’il
est utilisé selon les bonnes instructions. Cependant, une utilisation inappropriée peut
résulter en une potentielle électrocution ou risque d’incendie. Veuillez lire toutes les
consignes de sécurité avant l’installation et l’utilisation de cet appareil. Gardez des
consignes pour une référence future. Prenez note de tous les avertissements décrits
dans ce guide d’utilisateur et sur l’appareil.
1. L’appareil ne devrait pas être utilisé proche de l’eau.
2. L’appareil devrait être placé de façon à ce que sa localisation ou position ne gêne
pas son aération. Ne le couvrez pas avec un tissu ou une couverture, et ne le
placez pas sur une étagère à livres ou une armoire fermée.
3. Cet appareil devrait être situé loin de sources de chaleur, telles que les radiateurs,
gazinières, sources de chaleurs diverses, ou d’autres appareils ménagers qui
produisent de la chaleur. Ne pas placer directement à la lumière du soleil.
4. L’appareil devrait être branché à une source de courant uniquement telle que décrit
dans ce guide, ou inscrit sur l’appareil.
5. Les fils de branchements devraient être placés de façon à ce qu’ils ne soient pas
écrasés ou pincés par des objets situés autour de l’appareil. Il est toujours mieux
d’avoir un espace vide entre l’appareil et la prise de courant sur laquelle ce dernier
est branché.
6. L’appareil devrait être nettoyé uniquement en fonction des conseils donnés.
N’utilisez pas de produits ou solvants nocifs, tels que le benzène ou un diluant pour
nettoyer la surface de l’appareil. N’utilisez uniquement une solution nettoyante
douce et un chiffon doux et propre.
7. Faîtes attention à ce qu’aucun objet ou liquide ne tombe sur l’appareil ou dans les
parties ouvertes de l’appareil. Aucun vase ou objet mouillé ne devrait être placé sur
l’appareil.
8. Ne chargez pas les prises murales ou rallonges électriques car cela pourrait créer
un choc électrique.
9. Si l’appareil n’est pas utilisé pendant une longue période de temps, le fil
d’alimentation devrait être débranché afin de prévenir tout dégât ou corrosion.
10. L’utilisateur ne devrait pas tenter de réparer l’appareil au-delà des mesures
décrites dans ce guide d’utilisateur. Veuillez vous référer à un personnel qualifié
pour toute réparation.
4 -
-
Page 14

ILLUSTRATION DU PRODUIT
. Touche SNOOZE / SLEEP / TIMEZONE
1
2. Touche << / MONTH – DAY / °C °F
3. DETECTEUR INFRAROUGE
4. Touche >> / YEAR / DST
5. Touche ON / OFF
6. UNITE DE PROJECTION
7. Touche AM / FM BAND
8. Touche ALARM 1 RADIO / BUZZ
9. Touche ALARM 2 RADIO / BUZZ
10. Touche ALARM SET
11. Touche MODE
12. AJUSTEMENT D’AFFICHAGE POUR PROJECTION
13. ÉCRAN LCD
14. HAUT-PARLEUR
15. Bouton TUNING
16. Bouton VOLUME
17. Interrupteur DISPLAY AUTO OFF / LOW / HIGH
18. Touche PROJECTION TIME 180° FLIP
19. Touche PROJECTION ON / OFF
20. COMPARTIMENT DE LA PILE
21. Touche RESET
22. ANTENNE FM
23. Étiquette d’évaluation
24. DÉTECTEUR DE TEMPÉRATURE (intérieur)
25. FIL D’ALIMENTATION C.A.
5 -
-
Page 15

BRANCHEMENTS ET ALIMENTATION
1. Branchez le fil d’alimentation C.A. dans une pris
l’appareil.
e murale appropriée pour alimenter
RÉGLAGES
Régler le fuseau horaire
Lorsque vous branchez l’appareil, le numéro 3 apparaîtra sur l’écran. Celui-ci
correspond au fuseau horaire actuellement programmé dans l’horloge. L’appareil se
remettra sur le fuseau horaire numéro 3 à chaque fois qu’il est éteint puis allumé à
nouveau.
Les fuseaux horaires sont numérotés comme il suit:
Zone 1 – Newfoundland
Zone 2 – Heure Atlantique
Zone 3 – Heure de l’Est
Zone 4 – Heure Centrale
Zone 5 – Heure de la Montagne
Zone 6 – Heure Pacifique
Pour changer les réglages du fuseau horaire
1. Appuyez sur les touches << ou >> de l’appareil pour basculer entre les fuseaux
horaires.
2. Lorsque le fuseau horaire désiré apparaît sur l’écran LCD, appuyez sur la touche
MODE pour sauvegarder.
Régler manuellement l’heure et la date
1. Appuyez sans lâcher sur la touche MODE dans le mode normal pour entrer dans le
mode réglages.
2. Appuyez sur la touche MODE plusieurs fois pour naviguer à travers les réglages
disponibles dans l’ordre suivant:
Année → Mois → Jour → 12/24 H → Heure RTC → Minute RTC
3. Lorsque vous voyez le réglage qui vous convient sur l’écran LCD, appuyez sur les
touches << ou >> de l’appareil pour ajuster la valeur du réglage.
4. Appuyez sans lâcher la touche << ou >> de l’appareil pour ajuster les valeurs
rapidement.
Régler l’heure du réveil
1. Appuyez sans lâcher la touche ALARM dans le mode normal pour entrer dans les
réglages.
2. Appuyez sur la touche ALARM plusieurs fois pour naviguer à travers les réglages
disponibles dans l’ordre suivant:
Heure Alarme1 → Minute Alarme1→ Weekend Alarme 1 → Heure Alarme 2 → Minute
Alarme 2 → Weekend Alarme 2
3. Lorsque vous voyez le réglage qui vous convient sur l’écran LCD, appuyez sur les
touches << ou>> de l’appareil pour ajuster la valeur du réglage.
4. Appuyez sans lâcher la touche << ou >> de l’appareil pour ajuster les valeurs
rapidement.
6 -
-
Page 16

Allumer et éteindre le réveille-matin/Type d’alarme
1. Appuyez sur la touche ALARM 1 ou ALARM 2 pour sélectionner l’alarme radio
ou appuyez deux fois pour sélectionner l’alarme vibreur Appuyez trois fois pour
éteindre le mode alarme.
2. Le réveille-matin sonnera à l’heure définie.
3. Utilisez l’interrupteur DISPLAY AUTO / ON / OFF pour choisir d’afficher l’heure
automatiquement lorsque le réveil sonne, d’afficher constamment l’heure, ou de ne
pas afficher l’heure du tout sur l’écran LCD.
4. Pour éteindre le réveil, appuyez sur la touche ON / OFF.
Durée du réveille-matin/Touche Snooze
Le réveille-matin sonnera pendant 30 minutes si aucune touche n’est appuyée. Il
s’éteindra après 30 minutes et attendra le jour prochain à la même heure pour sonner
de nouveau.
Fonction Snooze
1. Lorsque le réveil sonne, vous pouvez appuyer sur la touche SNOOZE de l’appareil
pour éteindre l’alarme.
2. L’intervalle de temps du snooze est de 9 minutes et le réveil sonnera de nouveau
après cette durée.
Pour arrêter la fonction snooze et éteindre l’alarme, appuyez sur la touche ON / OFF.
3.
Modifier le contenu d’affichage
Appuyez sur la touche YEAR pour afficher l’année actuelle, après 5 secondes,
1.
l’heure apparaîtra sur l’écran à nouveau.
2. Appuyez sur la touche MONTH – DAY pour afficher le mois et jour actuels, et après
5 secondes, l’heure apparaîtra sur l’écran à nouveau.
Fonction Sleep
Lorsque la radio est allumée, appuyez la touche SLEEP pour activer la fonction Sleep.
1.
2. L’heure de la fonction Sleep clignotera pendant 5 secondes.
3.
Pendant ce temps, appuyez sur la touche SLEEP jusqu’à ce que l’heure choisie
(90 – 15 min) s’affiche.
4. La radio s’éteindra après cette durée.
Fonction de l’heure d’été
Appuyez sur la touche DST sans lâcher pendant 3 secondes pour choisir d’activer
1.
ou de désactiver la fonction d’heure d’été.
L’heure avancera ou reculera d’une heure à 2 heures du matin, la nuit venue.
2.
Changer le format d'affichage de la température
Appuyez et maintenir appuyé le bouton << pour 3 secondes pour alterner entre
C° or F°. La température s'affiche dans le coin inférieur droit de l'écran ACL.
Réglages de la Radio
1. Appuyez sur la touche ON / OFF pour allumer la radio.
Appuyez la touche AM / FM BAND pour alterner entre une transmission AM ou FM.
2.
3.
Sélectionnez votre station préférée en vous servant du bouton TUNING.
4.
Vous pouvez ajuster le volume de la musique en vous servant du bouton VOLUME.
5.
Appuyez sur la touche ON / OFF pour éteindre la radio.
- 7 -
Page 17

Remarque: La bande AM utilise une antenne directionnelle interne, faîtes tourner la
radio pour améliorer la réception. Pour une meilleure réception FM,
assurez-vous que l’antenne est entièrement allongée.
Réinitialiser
La touche de réinitialisation est située sur le dos de l’appareil. Appuyez dessus avec un
stylo ou un petit objet lorsque vous remplacez les piles dans l’horloge, ou si l’horloge ne
fonctionne pas correctement. Vous perdrez toute donnée sauvegardée telle que les
heures de réveil.
UNITÉ DE PROJECTION
1. Appuyez sur la touche PROJECTION ON / OFF sur le côté de l’appareil pour
allumer la projection.
2. La projection affichera l’heure sur le mur ou le plafond d’une pièce non-éclairée.
3. La distance optimale d’affichage est entre 3 et 9 pieds.
4. Pour régler l’affichage, ajustez le bouton FOCUS ADJUSTMENT sur le côté de
l’appareil.
5. Pour basculer l’image, appuyez sur la touche PROJECTION TIME 180° FLIP et
l’affichage basculera à l’envers.
6. Pour éteindre la projection, appuyez sur la touche PROJECTION ON / OFF sur le
côté de l’appareil.
Réglages du détecteur infrarouge
1. Lorsque vous êtes dans le mode éteint de la radio, placez votre main au dessus du
détecteur pendant une seconde pour afficher l’alarme 1 et 2.
2. Lorsque vous êtes dans le mode radio, placez votre main au dessus du détecteur
pendant 2 secondes pour éteindre la fonction sleep, le mot SLP apparaîtra sur
l’écran. Pour ajuster le temps de veille, reportez vous à la section concernant la
fonction sleep à la Page 5. Appuyez sur la touche ON / OFF pour annuler la durée
de veille.
- 8 -
Page 18

3. Lorsque le réveil sonne, placez votre main au dessus du détecteur pendant 1
seconde pour allumer la fonction SNOOZE, le réveil sonnera de nouveau dans 9
minutes.
4. Lorsque la radio est en route, placez votre main au dessus du détecteur pendant 1
seconde pour afficher la fréquence radio actuellement en lecture.
5. Dans le mode radio éteint, sélectionnez l’interrupteur DISPLAY AUTO OFF / LOW /
HIGH pour basculer vers AUTO. L’écran LCD s’éteindra automatiquement dans 15
secondes. Placez votre main au dessus du détecteur pendant 1 seconde pour
afficher l’heure.
Remarque: Vous pouvez également appuyer sur n’importe quelle touche de
l’horloge pour afficher l’heure.
- 9 -
Page 19

SPÉCIFICATIONS
Fréquence AM 530 – 1700 kHz
FM 88 – 108 MHz
Pile de Rechange 1 – 3V CR2032 pile plate au lithium (non-incluse)
Alimentation 120 V C.A. ~ 60 Hz, 5 W
AVERTISSEMENT
• Aucune source de flamme ou de chaleur ne devrait être placée sur l’appareil.
• Ne placez pas le produit sur des étagères fermées ou des casiers sans ventilation
appropriée.
• Ne branchez pas l’adaptateur sur une prise murale qui ne soit pas fonctionnelle et
prête à être utilisée.
• Ne couvrez pas l’appareil avec un tissu ou une couverture, le produit doit être
capable de se ventiler.
• N’exposez pas l’appareil à l’eau, aucun vase ou objet humide ne devrait être placé
au dessus de l’appareil.
• L’appareil ne devrait pas être exposé au soleil, à des températures très élevées ou
très basses, à l’humidité, à des vibrations, ou placé dans un environnement
poussiéreux.
• N’utilisez pas de substances abrasives, de benzène, de diluant, ou d’autres
solvants pour nettoyer la surface de l’appareil. Utilisez uniquement une solution
nettoyante douce sur un chiffon propre et doux.
• Ne tentez jamais d’insérer des fils, des épingles, ou d’autres petits objets dans les
voies d’aération ou les ouvertures de l’appareil.
• Un danger de corrosion de la pile existe si la pile n’est pas correctement remplacée
avec le bon type de pile et/ou la bonne configuration.
- 10 -
 Loading...