

Page 1
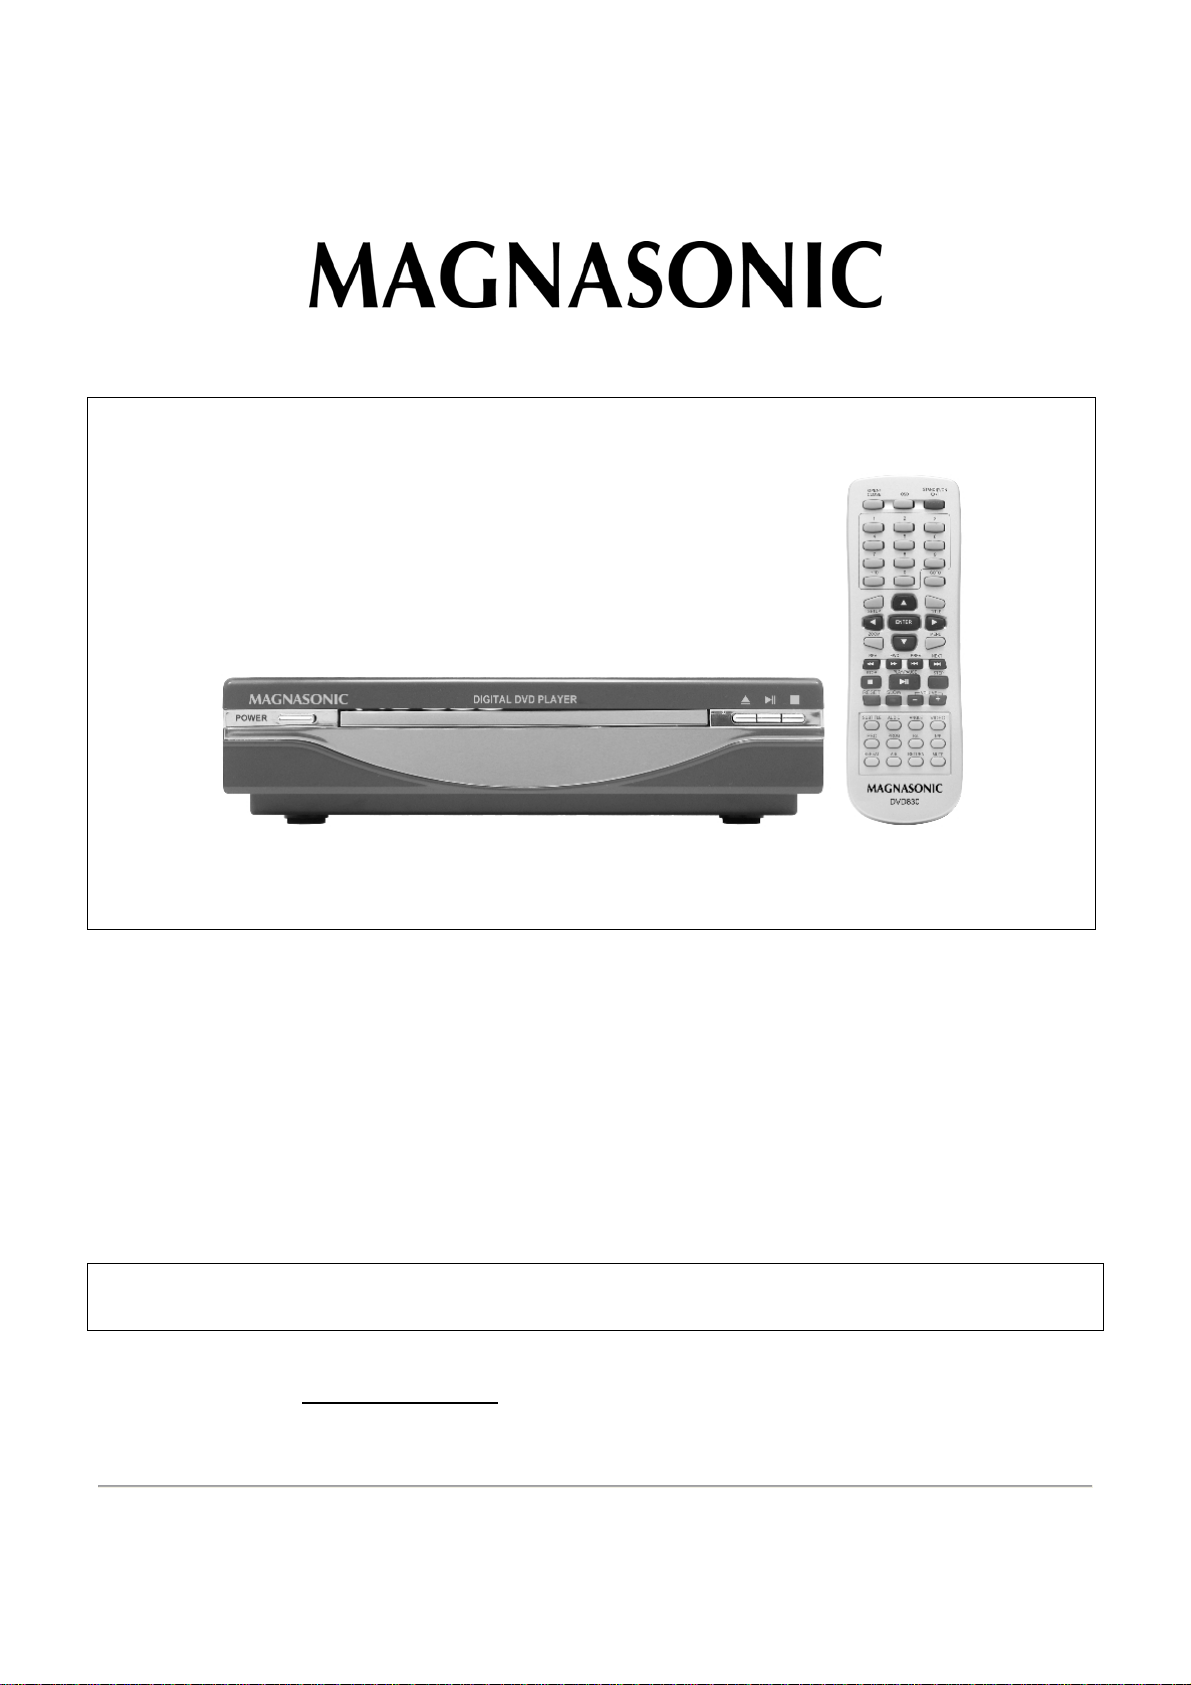
Space Saving DVD Player
Instruction Manual
Model DVD830
Thank you for your purchase of this Magnasonic product. Please read this Instruction Manual carefully
before using this Magnasonic product to ensure proper use. After reading this manual, please keep it in a
safe place and refer to it when necessary.
For additional information on this product or for help with set-up please call
the Customer Help Line at 1-800-287-4871
Visit www.magnasonic.ca
for more information about our great products
SKTM
Page 2

IMPORTANT INFORMATION
CAUTION
To reduce the risk of electric shock, do not remove cover. Refer servicing to qualified service personnel.
Please read the manual carefully before operating this player.
DVD PLAYER PLACEMENT
Please do not place the player in the following locations:
• In direct sunlight or near or on top of heat sources such as heaters, stoves, or other appliances that
produce heat.
• Locations which are badly ventilated, dusty, contain lots of moisture, or are unsteady.
• Do not expose the player to vibration or moisture (i.e. rain).
• Do not place any products on top of the player.
• Nearby high powered speakers or on the same stand as speakers.
• Don’t play discs that contain scratches, are bent or cracked to prevent the player from being damaged.
• Leave at least 2 inches of space behind and at the sides of the player for proper ventilation.
POWER SUPPLY INF ORMATION
• The power supply requires the following voltage: AC110V ~50Hz.
• When you plan not to use this player for long periods of time, disconnect the AC power plug from the power
outlet.
• To prolong the life of this player, please allow for at least 10 seconds in between switching the player ON
and then OFF.
DVD PLAYER INFORMATION
1. Fully compatible with DVD, SVCD, VCD, MP3, CD-R, and CD-RW discs.
2. Compatible with JPEG CD’s to allow for digital picture presentations.
3. Progressive scan function.
4. 10-Bit digital video converter – 500+ lines of resolution.
5. 24-Bit/96Khz digital audio converter - provides high quality sound.
6. Component, S-Video, Composite and Coaxial outputs.
7. Compatible with multilingual DVD menu systems, subtitles and multiple angles (depends on DVD disc
content.
8. Multiple screen size selection.
DIGITAL AUDIO OUTPUT
The coaxial output enables you to connect external multi-channel AV amplifiers/ receivers with built-in Dolby Digital
and DTS decoders by using only one cord so that you can enjoy various DVD and CD’s conveniently.
Component Video Output
Component video output (Y, Cr, Cb) enables you to enjoy high quality DVD image playback. Component output is
superior to S-Video or Composite (Analogue RCA) outputs. Note that you will need Component cables (not
included) which look like but are NOT the same as composite cables (included). Using composite cables with
component outputs might damage the player and void your warranty.
Laser Head Overcurrent Prot ection System
The laser head is the most important and critical part of the whole player. Its performance is directly linked to the
player’s service life and error correction capability. When a common player reads a scratched disc or a nonstandard disc, the laser intensity could be as high as 20 times the normal level, thus greatly reducing its service life.
This player is provided with an unique laser head overcurrent protection system which tries to ensure a constant
laser current and thus greatly extending the service life of the laser head.
Page 1
Page 3

Index
Important Information ------------------------------------------------------------------------------------ 1
Index--- ------------------------------------------------------------------------------------------------------ 2
Controls Overview
1. Back Panel / Front Panel Overview------------------------------------------------------------- 3
2. Remote Control Overview------------------------------------------------------------------------- 4
Connections Overview
1. Preparation ------------------------------------------------------------------------------------------- 5
2. Connecting the Player------------------------------------------------------------------------------ 5
Basic Operating Instructions
1. Turn on the TV and your DVD Player ---------------------------------------------------------- 6
2. Inserting a Disc--------------------------------------------------------------------------------------- 6
3. Playing a Disc ---------------------------------------------------------------------------------------- 6
A) Disc Menu ------------------------------------------------------------------------------------- 6-7
B) Title Menu-------------------------------------------------------------------------------------- 7
C) Sequence Playback------------------------------------------------------------------------- 7
D) Programmed Play --------------------------------------------------------------------------- 7-8
4. Selecting Tracks ------------------------------------------------------------------------------------- 8
5. Skipping Tracks -------------------------------------------------------------------------------------- 9
6. Multi-Speed Playback ------------------------------------------------------------------------------ 9
7. Multi-Speed Slow Motion Playback ------------------------------------------------------------- 9
8. Repeat Playback Modes-- ------------------------------------------------------------------------- 9
9. Using the OSD Feature ---------------------------------------------------------------------------- 10-11
10. Using the Search Feature ------------------------------------------------------------------------ 12
11. Changing the Audio Language ------------------------------------------------------------------ 12
12. Subtitles ------------------------------------------- --------------------------------------------------- 12
13. Changing the Camera Angle -------------------------------------------------------------------- 12
14. Changing the TV System ------------------------------------------------------------------------- 13
15. Muting Audio Output--- ---------------------------------------------------------------------------- 13
16. Zooming Feature----------- ------------------------------------------------------------------------- 13
17. Changing the Audio Mode------------------------------------------------------------------------- 13
18. Repeating a Specific Section on a Disc ------------------------------------------------------- 14
19. Volume Control ------------------------------------------------------------------------------------- 14
20. Playing WMA, MP3 and JPEG Disc ----------------------------------------------------------- 14
21. Restoring Factory Settings ----------------------------------------------------------------------- 14
System Setup
1. General Setup Menu Information---------------------------------------------------------------- 15
2. Setup Options Information------------------------------------------------------------------------- 15
A) General Setup --------------------------------------------------------------------------------- 15-17
B) Audio Setup ------------------------------------------------------------------------------------ 17-18
C) Dolby Setup ----------------------------------------------------------------------------------- 18
D) Video Setup ----------------------------------------------------------------------------------- 19-21
E) Preference Setup ---------------------------------------------------------------------------- 24
Trouble Shooting Guide-------------------------------------------------------------------------------- 24
Technical Specifications ------------------------------------------------------------------------------- 25
Magnasonic Product Warranty----------------------------------------------------------------------- 26
Page 2
Page 4
CONTROLS OVERVIEW
FRONT PANEL OVERVIEW
1. Power Button 2. Disc Tray 3. Open/Close Disc Tray
Button
4. Play/Pause Button 5. Stop Playback Button 6. Remote Control Sensor
BACK PANEL OVERVIEW
1. Audio Output – Left
Channel
4. Audio Output – Right
Channel
7. S-Video Output
2. Component Video Outputs 3. Power Cord
5. Digital Output – Coaxial 6. Composite Video Output
Page 3
Page 5
REMOTE CONTROL OVERVIEW
1. Standby/On 20. Return
2. Numerical Buttons 21. Mute
3. Goto 22. Repeat
4. Up 23. A-B
5. Title 24. PBC
6. Enter 25. Program
7. Right 26. Subtitle
8. Down 27. Audio
9. Menu 28. Reset
10. Prev 29. Slow
11. Next 30. Stop
12. Play/Pause 31. REV
13. Step 32. FWD
14. Volume - 33. Zoom
15. Volume + 34. Left
16. Angle 35. Setup
17. Video 36. Open/Close
18. R/L 37. OSD
19. N/P
Page 4
Page 6
CONNECTIONS OVERVIEW
1. PREPERATIONS
Accessories Included in the Box
1. Remote Control 2. Composite Audio/Video Cable 3. Instruction Manual
4. 2 x ‘AAA’ Size Batteries
Installing Remo te Contro l Bat t eries
Insert 2 x ‘AAA’ size batteries (included) into the battery compartment. Be sure to note the polarities
marked inside the battery compartment so the batteries can be inserted the proper way. There should be
no large obstacles in between the remote control and the player itself.
2. CONNECTING THE PLAYER
• When establishing a connection between the player and external components, make sure that all
the external components and this player are turned off.
• Composite and Component Audio/Video cables are connected according to the different color
identifications on the output connector and the input plugs. Note that they should be fitted firmly.
Yellow to Video Terminal
White to left Audio Terminal
Red to right Audio Terminal
Connections Diagram
Page 5
Page 7
INTRODUCTION TO BASIC OPERATION
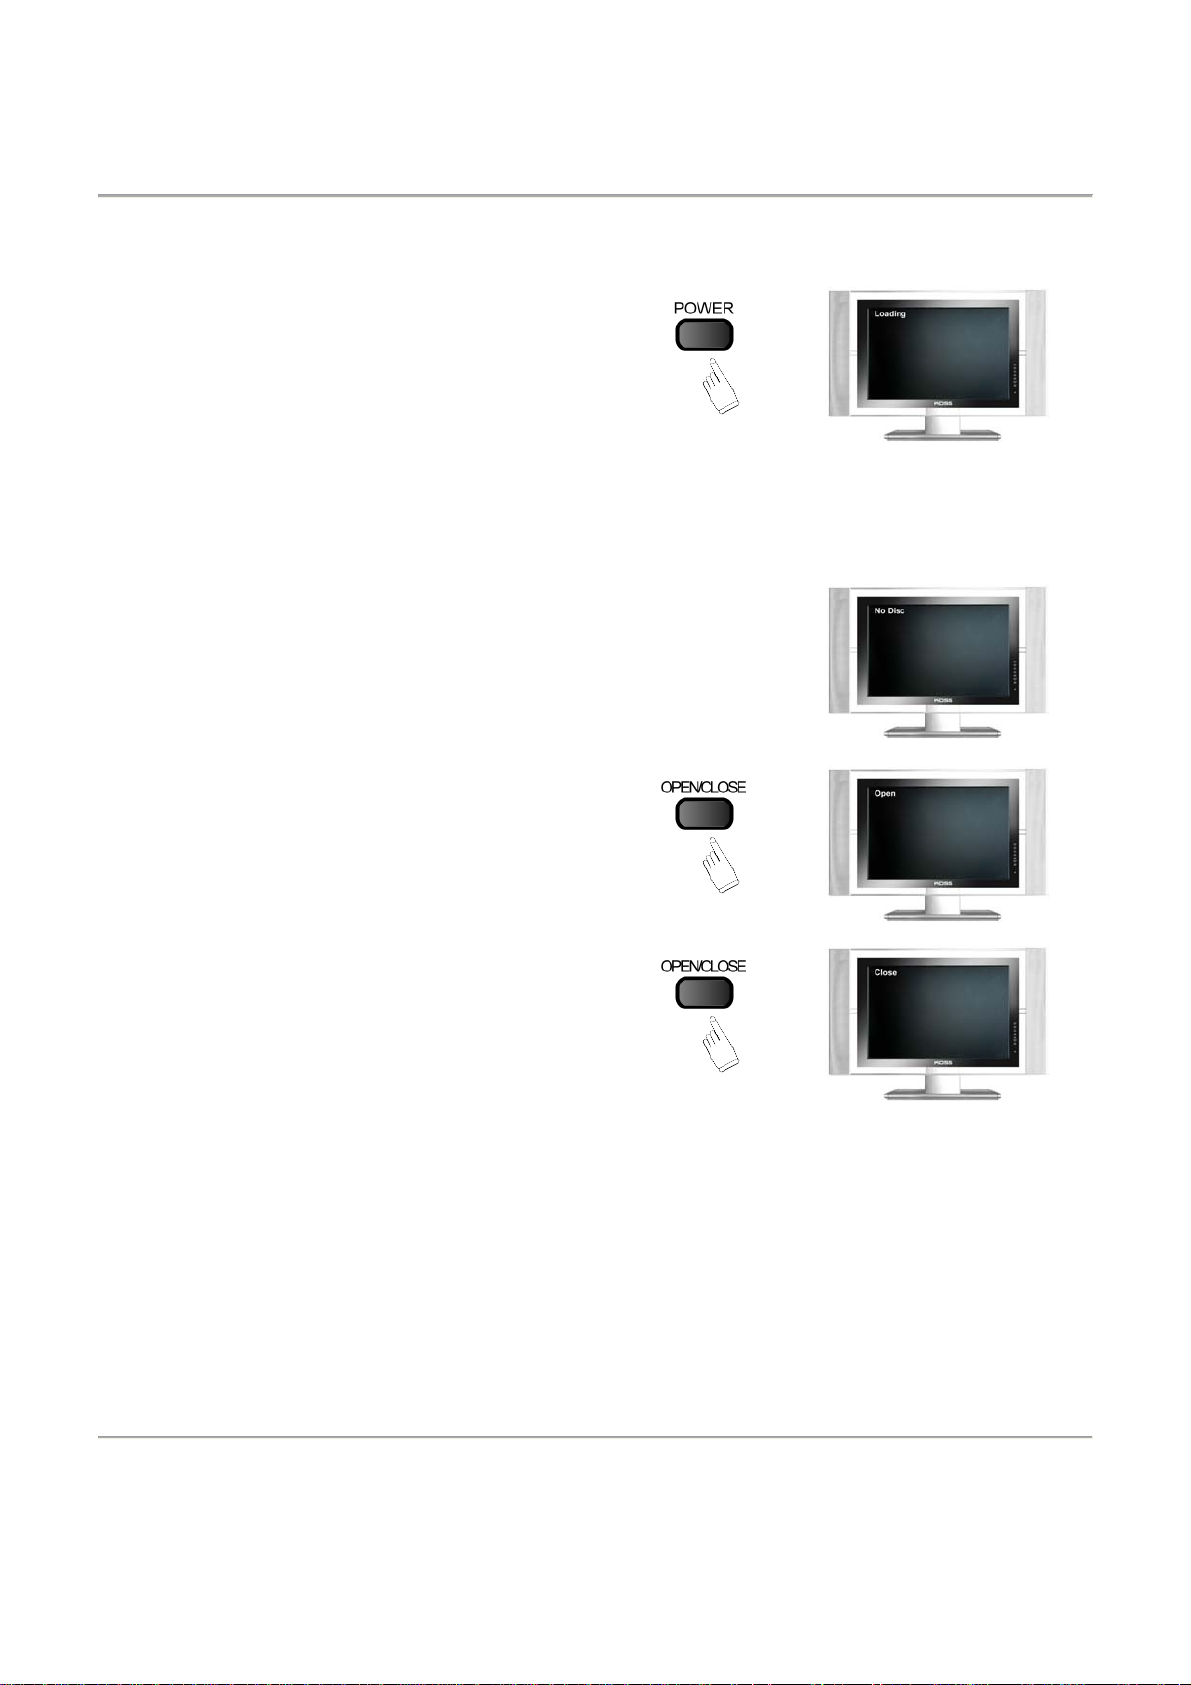
1. TURN ON THE TV AND YOUR DVD PLAYER
• Press the POWER button on the player to turn
on the power to the player. The player will start
searching for a disc.
NOTE: You cannot turn the power on using the
remote if the power is off. You can only turn the
player on and off using the remote when the
player is in Standby mode. In Standby mode the
display on the TV screen turns off and goes into
power saving mode. Access the Standby mode
by pressing POWER button on the player and
then only using the STANDBY/ON button on the
remote.
• If there is no disc in the player, “NO DISC” will appear on the
screen
2. INSERTING A DISC
• Press the OPEN/CLOSE button on the DVD
player or the remote , and “OPEN” appears on
the TV screen.
• Place a disc on the disc tray, label facing up and
press OPEN/CLOSE button. “CLOSE” appears
on the TV screen and the disc tray closes. Now
the player will proceed to read the disc
automatically.
3. PLAYING A DISC
• The contents of each disc menu (Root menu) varies according to who and how the disc was
created and what features were included. The disc menu will automatically appear once the
player has read the disc and all the warning screens have passed.
A) DISC MENU
a. Press MENU button once.
• The TV displays the DVD Root menu when a DVD disc is loaded. When a SVCD or
VCD2.0 disc is loaded, the VCD menu will be displayed on screen (when PBC is off).
Press the PBC button once to display current PBC state.
• PBC is only initialized when a SVCD of VCD2.0 disc is loaded.
b. When a DVD disc is loaded, press ◄ ►▲▼ buttons to highlight a menu item you want to select.
As for SVCD or VCD2.0 discs, you can press NUMERICAL buttons to select a track to play.
Page 6
Page 8
c. Press the ENTER or PLAY button to enter a menu you have selected or start an action you have
selected.
d. During DVD disc playback, press the MENU button to return to Root menu. As for SVCD or
VCD2.0 discs (with PBC function turned on), press PBC button to return to the menu.
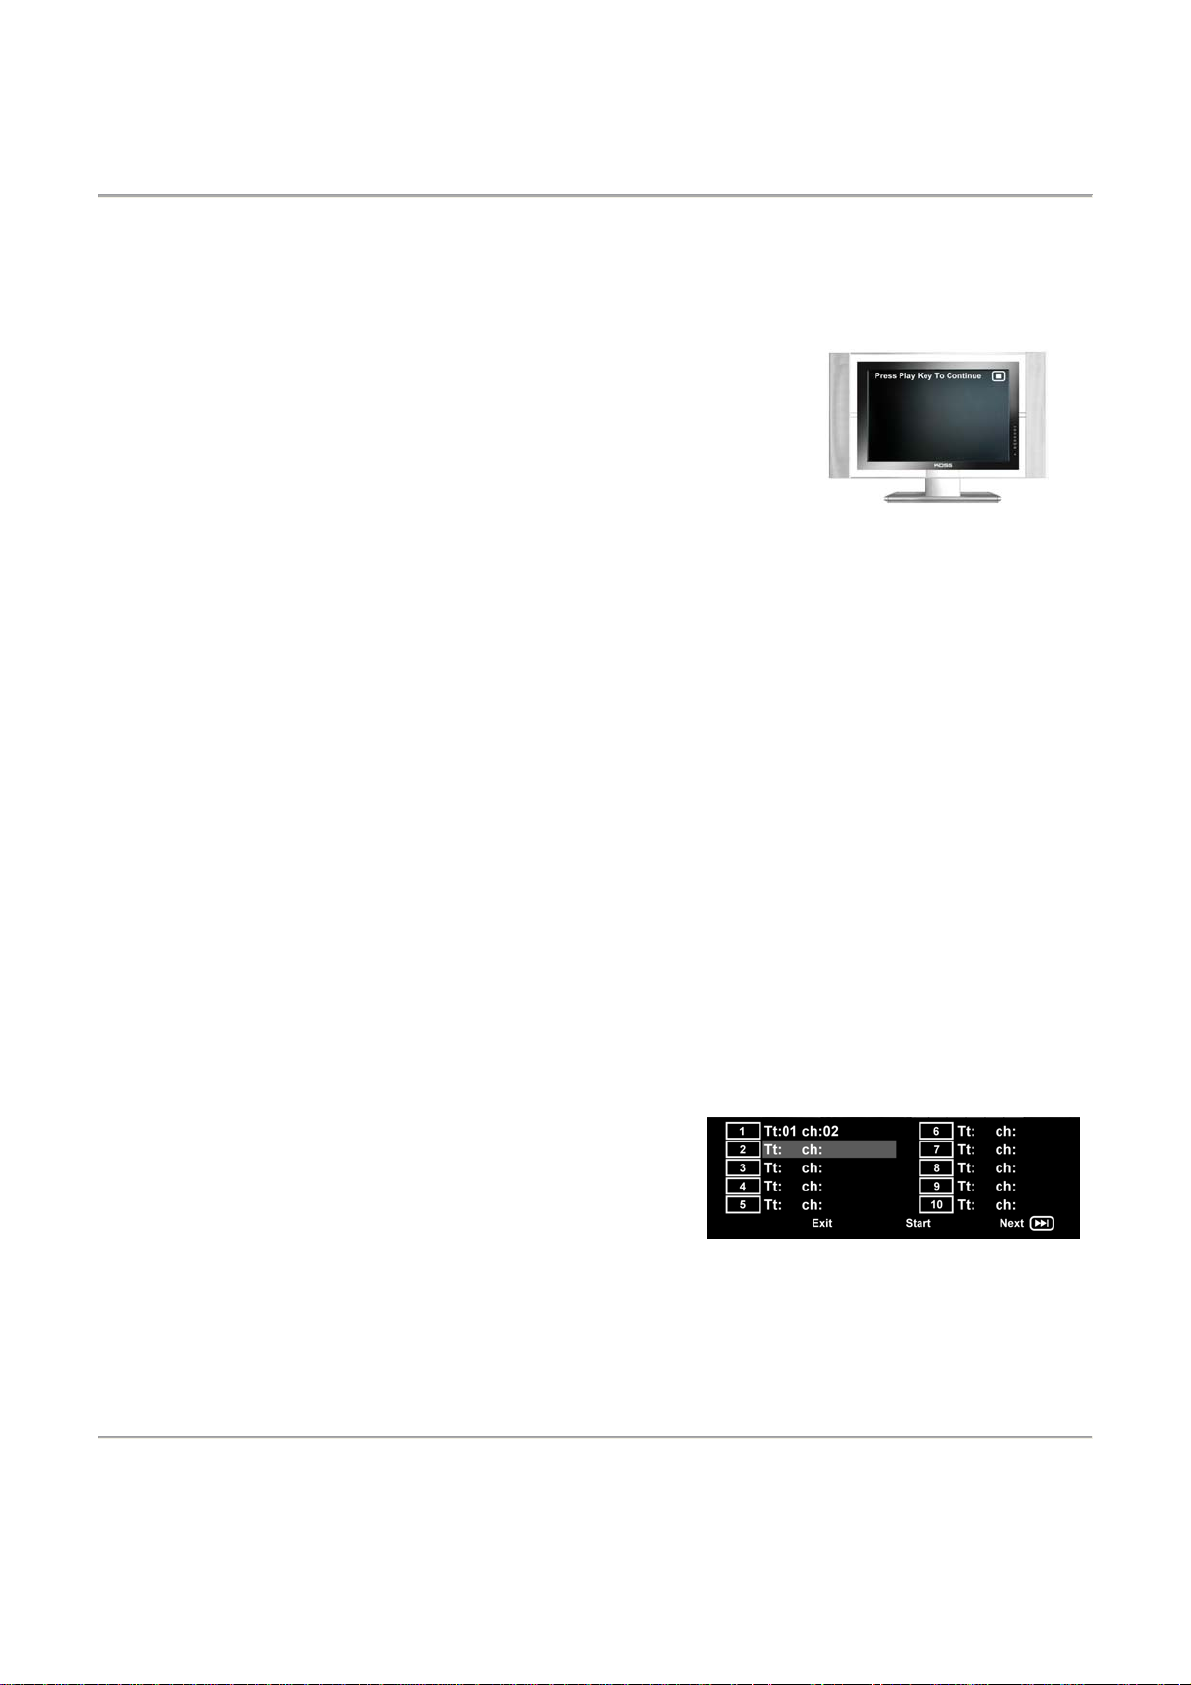
e. Press the STOP button to stop playback.
• When you press STOP button for the first time, the player
goes into PRE STOP state. At the same time, the OSD (On
Screen Display – DVD functions displayed on the TV
screen) will show “Press Play Key To Continue”. Press the
STOP button twice to enter into STOP state.
• In PRE STOP state, the player remembers where playback was stopped. Pressing the PLAY
button will cause the player to commence playback from the point at which you previously
stopped. Note that this function is cancelled if you turn off the players power or if you open the
disc tray at any point.
• In STOP state, when you press PLAY button, the player will start playback from the beginning
of the disc.
B) TITLE MENU (Compatible with DVD discs only)
a) During DVD playback, press TITLE button to display the DVD title content.
b) Press the ◄ ►▲▼ buttons to highlight the title you want to select and press ENTER button to
confirm your choice. You can also press NUMERICAL buttons to choose a title.
c) The DVD player begins at chapter 1 of the chosen title.
C) SEQUENCE PLAYBACK
a) When a SVCD or VCD2.0 disc is loaded and the PBC button has been pressed, the PBC function
is turned on. When the PBC button is pressed again, the PBC function is switched off. When the
PBC function is off, the player plays the discs in sequence playback mode. When PBC function is
button is pressed twice, PBC is switched on.
b) Except for SVCD of VCD disc, in the STOP state, when press PLAY button, the player will enter
the sequence playback mode. This feature is effective to all the compatible discs.
D) PROGRAMMED PLAYBACK
The Programmed playback option allows you to enter the order in which you want chapters or tracks
to play, up to a maximum of 16. Press the PROG button to enter the programmed playback menu.
• The programmed playback menu for DVD discs looks
like the screen image to the right. Note that ‘Tt’ stands
for Title and ‘ch’ stands for Chapter. Both the Title and
the Chapter number need to be entered for an entry to
be valid.
Page 7
Page 9
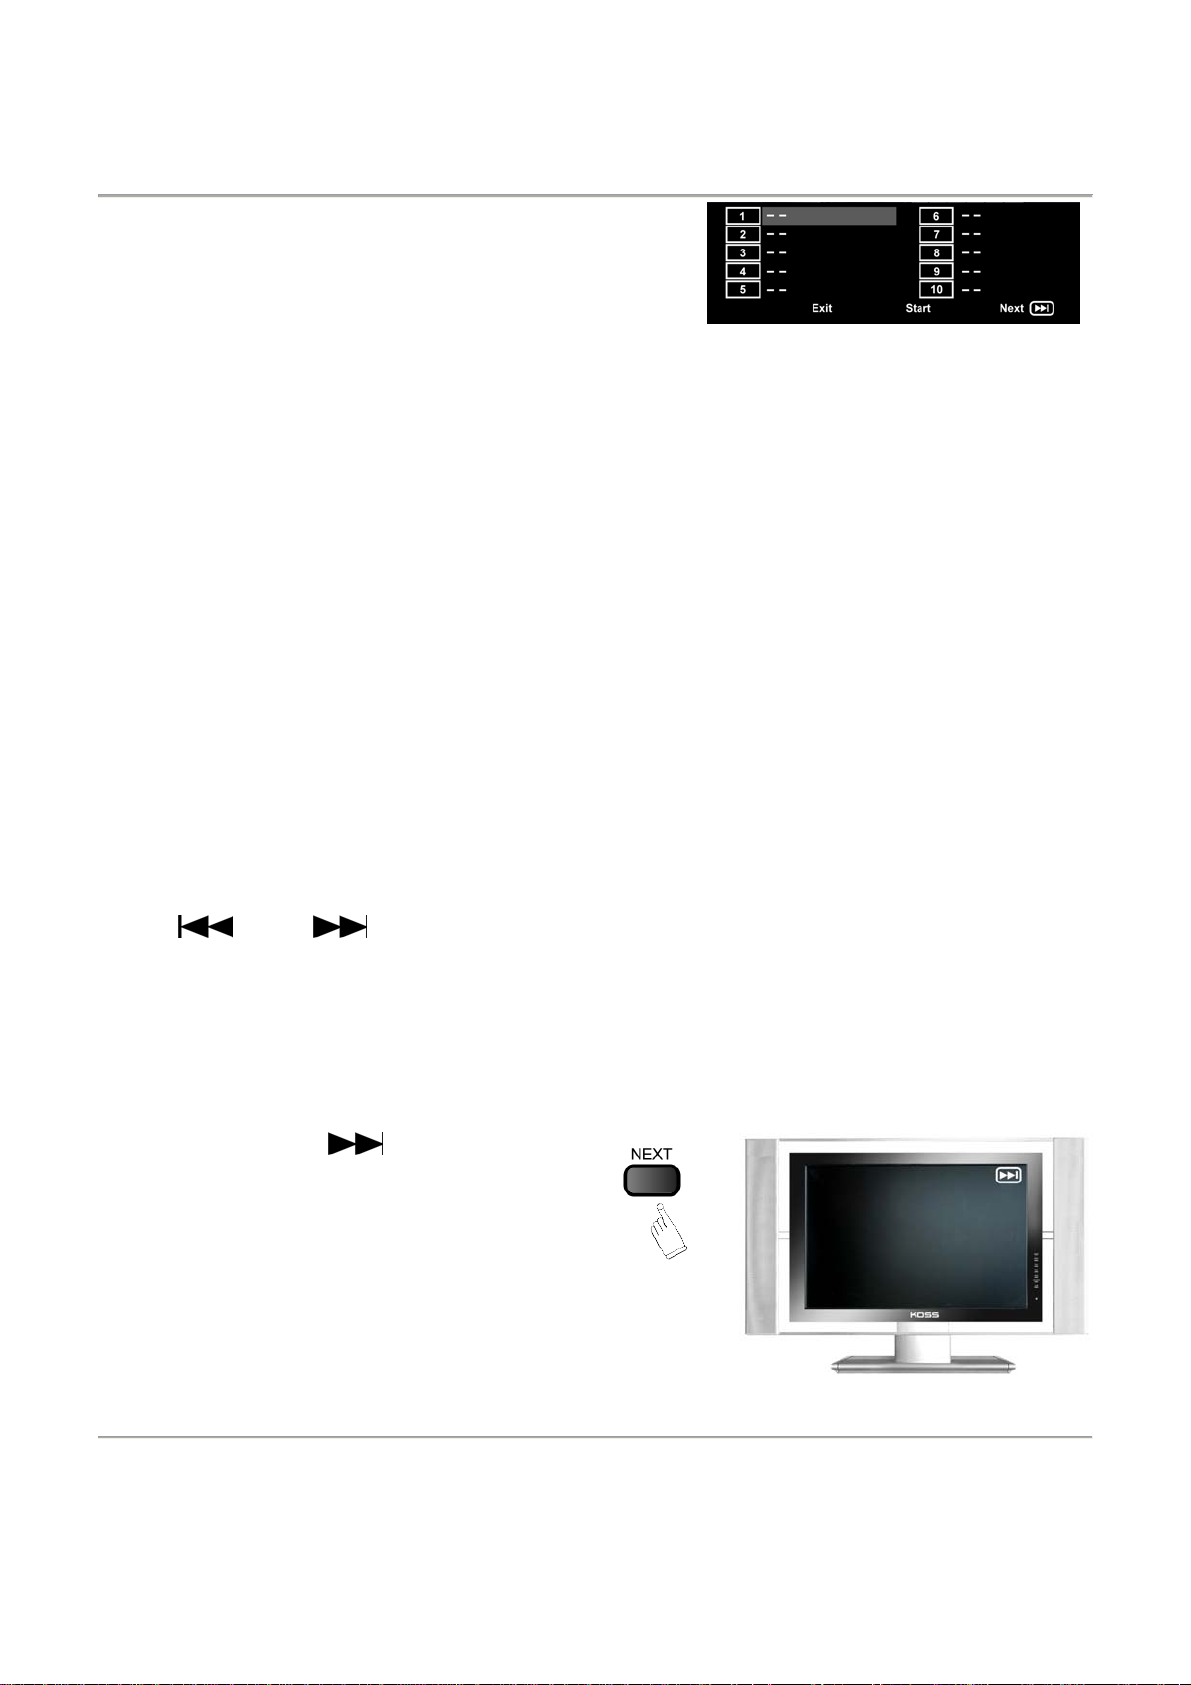
• The programmed playback menu for SVCD/VCD/CD
discs looks like the screen image to the right. Note
that only the track number needs to be entered for the
entry to be valid.
- If PBC function is on, this operation will turn PBC function off while the chapters/tracks are
played back in a programmed order.
• Using the ◄ ►▲▼ buttons, highlight a memory location. Press the NUMERICAL buttons to
enter the chapter/track numbers in the order you want them to play. Then, press ◄ ►▲▼
buttons to highlight START, located at the bottom of the screen. The chapters/tracks will be
played back in the programmed order.
• During Programmed playback, if the PROGRAM button is pressed, the programmed playback
menu appears showing the chapters/tracks in the order you have programmed them in. You
can press STOP to stop programmed playback and resume normal playback.
• Notes :
- To clear the programmed order, use ◄ ►▲▼ buttons to highlight “STOP” at the bottom of
the menu screen.
- To modify the programmed order, use ◄ ►▲▼ buttons to highlight the item you would like
to modify and then enter the new chapters/tracks you want to program using the NUMERICAL
buttons.
4. SELECTING TRACKS
• When playing a DVD disc, press NUMERICAL buttons in menu or title page to select a menu
or title item directly. During DVD playback, you can input desired title number directly by
pressing NUMERICAL buttons.
• When playing a SVCD or VCD disc, during sequence playback, press NUMERICAL buttons to
select tracks. (when programmed playback and PBC function is on, you can only press PREV
/ NEXT button to select a track).
• As for MP3 / JPEG discs, press NUMERICAL buttons to select different tracks on current track
list.
• Note :
To select tracks from 1-9, press corresponding NUMERICAL buttons (1-9).
To select track 10 and above, press 10+ button, then press 1-9 buttons.
5. SKIPPING TRACKS
• Press NEXT to skip to the
beginning of the next title/chapter/track on
a disc.
Page 8
Page 10

• Press PREV
previous title/chapter/track on a disc.
to beginning of the
6. MULTI-SPEED PLAYBACK
• Press FWD key repeatedly to toggle
between fast forward 2x, 4x, 8x, 16x, 32x
and 1x regular speed playback.
Alternatively, press the PLAY button to
return to regular playback speed.
• Press REV key repeatedly to toggle
between fast reverse 2x, 4x, 8x, 16x, 32x
and regular speed playback. Alternatively,
press the PLAY button to return to regular
playback speed.
7. MULTI-SPEED SLOW MOTION PLAYBACK
• Press SLOW button during playback to enter slow motion playback mode. Slow motion
playback has four speeds : 1/2, 1/4, 1/8, 1/16.
• Press PLAY button to resume normal playback.
8. REPEAT PLAYBACK MODES
During disc playback, press the REPEAT button repeatedly to access one of the various repeat
playback modes. The repeat mode you have accessed will show on the TV screen.
• During SVCD/VCD/CD/MP3/JPEG disc playback mode, press REPEAT button once to turn on
the REPEAT playback mode. Press REPEAT button repeatedly to toggle between the various
repeat modes. There are two repeat modes: Repeat Track and Repeat All. If you press the
REPEAT button three times, the repeat mode will return to the OFF mode and be cancelled.
• During DVD playback, press REPEAT button once to turn on repeat playback mode. There are
three repeat modes: Repeat Chapter, Repeat Title and Repeat All. If you press the REPEAT
button four times, the repeat mode will return to the OFF mode and be cancelled.
Page 9
Page 11

9. USING THE OSD (ON-SCREEN DISPLAY) F EATURE
• While loading and playing DVDs, press the
OSD button once. The following
information is displayed on the TV screen:
- Title Number / Total Number of
Titles
- Chapter Number / Total Number of
Chapters
- Current Playback Position (Time)
for that title on the Disc
• Press the OSD button a second time and
the following information is displayed on
the TV screen:
- Title Number / Total Number of
Titles
- Chapter Number / Total Number of
Chapters
- Total Time remaining for this title
on the Disc.
• Press the OSD button a third time and the
following information is displayed on the
TV screen:
- Title Number / Total Number of
Titles
- Chapter Number / Total Number of
Chapters
- Current Playback Position (Time) of
this chapter.
• Press the OSD button a fourth time and
the following information is displayed on
the TV screen:
- Title Number / Total Number of
Titles
- Chapter Number / Total Number of
Chapters
- Total Time remaining for the
current chapter.
• Press the OSD button a fifth time to cancel
the OSD menu. The OSD disappears.
Page 10
Page 12

• While loading and playing VCD’s, press
the OSD button once. The following
information is displayed on the TV screen:
- Track Number / Total Number of
Titles
- Current Playback Position (Time)
for that track.
• Press the OSD button a second time and
the following information is displayed on
the TV screen:
- Track Number / Total Number of
Titles
- Total Time lasts for that track.
• Press the OSD button a third time and the
following information is displayed on the
TV screen:
- Track Number / Total Number of
Titles
- Current Playback Position (Time)
on the Disc.
• Press the OSD button a fourth time and
the following information is displayed on
the TV screen:
- Track Number / Total Number of
Titles
- Total Time remaining on the Disc.
• Press the OSD button a fifth time to cancel
the OSD menu. The OSD disappears.
Page 11
Page 13

10. USING THE SEARCH FEATURE
• You can use the Search feature to select a title/track/chapter number or go to a specific
point in a title. To use this feature, press the GOTO button on the remote control to bring up
the search menu and enter the information edit status. Then press the GOTO button
repeatedly to highlight the title/chapter/track number or the time option. Then, use the
NUMERICAL buttons to enter the title/chapter/track you want to play or the elapsed time
you want to go to in a specific title. The player will now move to the chosen title / chapter /
track or time on the disc.
• Notes :
- This feature does not work in programmed playback mode.
- If PBC is on (VCD Only), it will turn off automatically when Search Playback starts.
- When playing MP3/JPEG discs, the search feature does not work.
- Press the GOTO button a second time to exit from this feature
11. CHANGING THE AUDIO LANGUAGE
• During disc playback, press the AUDIO button once to view the current audio language on
screen. Press the AUDIO button repeatedly to scroll through the available audio languages
on the disc.
• When a DVD or SVCD has been pre-recorded with multiple audio soundtracks, you can
use the language feature to change the audio language. Note that language availability
depends entirely on the disc content and not on the player. See DVD disc sleeve for details
on the included languages.
12. SUBTITLES (COMPATIBLE WITH DVD OR SVCD DISC S ONLY)
Press the SUBTITLE button on the remote controller once and the subtitle bar appears on screen.
• When a DVD or SVCD is pre-recorded with different subtitles, you can use the SUBTITLE
feature to view the subtitles on-screen. By default, subtitles are not displayed (off mode).
The info bar will display OFF.
• To display subtitles, press the SUBTITLE button again. The default language with its
corresponding sequence will be displayed in the info bar and subtitles appear in the chosen
language on the TV screen. Press the SUBTITLE button repeatedly to toggle between the
available subtitle languages. Note that subtitle availability depends entirely on the disc
content and not on the player. See DVD disc sleeve for details on the included subtitle
languages.
13. CHANGING THE CAMERA ANGLE (Compatible with DVD discs ONLY)
• During DVD disc playback, press the ANGLE
button and the angle icon appears on screen.
• Press the ANGLE button repeatedly to toggle
between the different available angles.
• Note that this feature ONLY works with DVDs
that contain film that was shot from multiple
angles. Also note that angle availability depends
entirely on the disc content and not on the
player. See DVD disc sleeve for details on
whether multiple angles are included.
Page 12
Page 14

14. CHANGING THE TV SYSTEM
• Press N/P button to display current TV
system.
• In North America the NTSC TV system is
used
• Press the N/P button repeatedly to toggle
between the different TV systems (PAL
etc.)
• Note that in order to view region 1 and
region ALL DVD discs, you do not need to
change this option as NTSC is the factory
default setting.
15. MUTING AUDIO OUTPUT
• Press the MUTE button once to mute
audio output.
• Press the MUTE button again to resume
previous audio output volume level.
16. ZOOMING FEATURE
• Press ZOOM button to activate this
function. Press the ZOOM button
repeatedly to toggle between the different
zoom factors : 2X, 3X, 4X, ZOOM OFF.
• Use the ◄ ►▲▼ buttons to pan across
the screen when zoom factor is ON.
17. CHANGING THE AUDIO MODE (Compatible with CD discs ONLY)
• Press R/L button once to view the current
audio output mode.
• Press R/L button repeatedly to toggle
between Stereo / Mono L / Mono R
audio output modes.
Page 13
Page 15

18. REPEATING A SPECIFIC SECTION ON A DISC
• Press A-B button one time to set the
starting point for the segment you want to
have repeated (Point A)
• Press A-B button a second time to set the
end point for the segment you want to
have repeated (Point B)
• Now the segment you have marked
between point A and B will be repeated
until you stop playback.
• Press A-B button a third time to cancel the
A-B repeat mode.
19. VOLUME CONTROL
• You can press the VOLUME buttons on the TV set or the amplifier to adjust the volume level.
• Alternatively, press the VOL+ button on the remote control to increase the volume level. Press
the VOL- button to lower the volume level.
Note : During DVD PCM output playback, this feature does not work.
20. PLAYING MP3, WMA AND JPEG DISCS
Insert a MP3/JPEG disc into the player and the player
will auto search the directories for MP3/JPEG files.
After searching, the player will automatically go to the
first directory of MP3 files and play the first song (MP3
Disc only). “01” is highlighted. After you insert a JPEG
disc, the player will automatically go to the first directory
of JPEG files. Press ◄ ►▲▼ buttons to highlight a
JPEG and press PLAY / ENTER button to start
slideshow. To view a particular JPEG, select a JPEG
using the arrow buttons and once it is displayed on the
screen, press the PLAY/PAUSE button. To return to
slideshow mode, press the PLAY/PAUSE button once
again. The player will now start the slideshow starting
with the first JPEG you have selected and then go
through the remaining JPEG’s in the current directory in
the order in which they appear. The screen will look like
the image to the right when a MP3 / JPEG disc is
inserted:
21. Restoring Factory Settings
If you have forgotten a password or if you have changed the audio / video settings to the extent that
you are not happy with audio / video output and you are not sure on how to change the settings
back, you have the option of restoring the settings to the original Factory settings.
To restore the settings to the original Factory settings, simply press the RESET button once. If you
press the RESET button by accident, you will have to change the settings back to where they were
by entering the SETUP menu and changing the settings back manually.
Page 14
Page 16

SYSTEM SETUP
1. GENERAL SETUP MENU INFORMATION
A) Press the SETUP button, the main SETUP menu appears.
• When the main menu is displayed, the DVD system
will auto pause.
B) Press the ◄ or ► button to highlight the desired options
page. Then press the ▲or▼ button to enter the options page
you have chosen. For example, if you want to enter the
VIDEO options page, press ► button repeatedly to highlight
the video icon. The VIDEO options page is displayed on the
screen. Press the ▼ button to enter the VIDEO options
page.
C) Press the ▼ button repeatedly to highlight the option you
want to adjust. Press ENTER or ► button to enter the option
adjustment menu (sub menu). The option choices of the
particular option menu you have entered appear on the right.
For example, press the ▼ button to highlight the
BRIGHTNESS option then press ENTER to enter the
BRIGHTNESS adjustment menu. Now press the ◄ or ►
button to adjust the BRIGHTNESS level.
D) Simply press the SETUP button again to exit from the setup menu.
Page 15
Page 17

2) SETUP OPTIONS INFORMATION
A) GENERAL SETUP
The GENERAL SETUP options are illustrated below:
z TV DISPLAY
Normal / PS (Pan & Scan)
DVD player is connected to a normal aspect ratio TV
(4:3). A standard edition movie (4:3) will fill the entire
screen of your TV. This might mean that parts of the
picture (the left and right edges) won’t be seen.
Normal / LB (Letter Box)
DVD player is connected to a normal aspect ratio TV
(4:3). You will see the movies in its original aspect ratio.
You will also see the entire frame of the movie but it
might appear with black bars at the top and bottom of the
screen.
Wide
: Choose this setting if your DVD player is
connected to a widescreen TV (15:9 or 16:9). If you have
selected this setting but you don’t have a wide screen
TV, the images on the screen may appear distorted due
to vertical compression.
z ANGLE MARK
Choose ANGLE MARK as ON, whenever the movie is
recorded with different angles, there will be an icon on
the TV screen so as to remind you that the movie under
currently playing is with different angles. Thus, you could
press the ANGLE button to view the movie in different
angles.
If you choose the ANGLE MARK as OFF, you have to
be sure about the moive whether it comes with different
angles or not as there would not be a reminder to you.
Note:ANGLE MARK is ONLY applicable to the movie disc
which is recorded with different angles.
z OSD LANG
Highlight the OSD LANGUAGE option and press ENTER
button to access the OSD LANGUAGE options menu.
Press ▲▼ buttons to choose the OSD language you
prefer. Press ENTER to confirm your selection and the
OSD content will now be displayed in the language you
have chosen.
: Choose this setting if your
: Choose this setting if your
Page 16
Page 18

z CAPTIONS
Select CAPTIONS as ON will display captions if the
moive disc has been recorded with captions. Choose
OFF to deactivate the captions shown.
z SCREEN SAVER
If the screen saver is on, when you DVD player is in
STOP, OPEN or NO DISC state, or there is a frame
frozen for more than 60 seconds, the screen saver will
be displayed. This feature can protect your screen from
image burn-in damage.
ON
: Choose this setting to activate the screen saver.
OFF
: Choose this setting to cancel the screen saver.
The default setting is ON.
z HDCD (High Definition CD)
When you are listening to a HDCD, choose the right
option to decode the HDCD audio signals.
OFF
: Choose this setting when you are not playing a
HDCD.
44.1K
: Choose this setting when your HDCD is encoded
using 44.1K sampling.
88.2K
: Choose this setting when your HDCD is encoded
using 88.2K sampling.
B) AUDIO SETUP
The AUDIO SETUP options are illustrated below:
z DOWNMIX
LT/RT
: Use this setting when connecting to a Dolby
Digital amplifier
STEREO
: Use this setting when connecting to a stereo
TV or amplifier.
Page 17
Page 19

z SPDIF OUTPUT
SPDIF/OFF
: Choose this setting if your DVD player is
connected to only audio signals from analog audio output
jacks. For the coaxial output jack, there will be no signal.
SPDIF/RAW
: Choose this setting if your DVD player is
connected to a power amplifier with a coaxial cable.
When playing a disc recorded with Dolby Digital, DTS
and/or MPEG audio formats, the corresponding digital
signals will be output from the coaxial output jack. This
player’s digital output jacks are designed for connection
to a Dolby Digital, DTS and/or MPEG receiver or
decoder.
SPDIF/PCM
: Choose this setting if your DVD player is
connected to a 2-channel digital stereo amplifier. When
playing a disc recorded with Dolby Digital and MPEG
audio formats, audio signals will be modulated into 2channel PCM signal and it will be output from the coaxial
output jack.
C) DOLBY SETUP
You could only benefit from changing the settings in this Dolby setup as long as you have a
digital connection to your Dolby digital amplifier/receiver.The DOLBY SETUP options are
illustrated below:
z DUAL MONO
If you have Dolby digital output in your
amplifier/decoder, you may select STEREO
, LEFT-
MONO, RIGHT-MONO and MIX-MONO sound
accordingly.
z DYNAMIC
Choose this setting to adjust
and loudest levels a source can produce without distortion.
When you set the dynamic range to
the range between the softest
FULL, the peak values
of the audio will be minimized, this is great for night time
viewing as you do not have to keep on changing the
volume level when you are listening to louder parts of a
movie or musical piece (i.e. explosions, rock concerts
etc.). When you change the setting to OFF, you will hear
the sound as it was recorded when it was being
produced. This means that some parts of a musical
piece or movie might be much louder then other parts
depending on the musical piece or movie.
Page 18
Page 20

D) VIDEO SETUP
The VIDEO SETUP options are illustrated below:
z COMPONENT
CVBS
: Choose this setting when your DVD player is
connected to your TV via the normal RCA or S-Video
output.
YUV
: Choose this setting when your DVD player is
connected to your TV via the COMPONENT output YUV.
RGB
: Choose this setting when your DVD player is
connected to your TV via the COMPONENT output RGB.
Warning
: If you are not sure about the connection,
please always select the CVBS. Otherwise, the output
screen to the TV/Monitor will be blank.
If you have wrongly selected the video output type
and you have a blank screen on your TV/Monitor,
please press the RESET button on the remote control to
restore all the settings to the pre-factory settings –
CVBS.
z TV MODE
P-Scan
: Choose this setting when your DVD player is
connected to your TV via the COMPONENT output –
YUV or RGB and your TV type should be Progressive
Scan type.
Interlace
: Choose this setting when your DVD player is
connected to your TV via the COMPONENT output –
YUV or RGB and your TV type should be normal
interlace type.
Warning
: If you are not sure about the connection,
please always select INTERLACE. Otherwise, the
picture output to the TV/Monitor will be distorted.
If you have wrongly selected and you got the
distorted picture on your TV/Monitor, please press the
RESET button on the remote control to restore all the
settings to the pre-factory settings – INTERLACE.
Note
:
This setting is only selectable as long as you have
selected YUV or RGB from the Component setup
sub-menu.
Page 19
Page 21

z SHARPNESS
You could adjust the SHARPNESS of the picture with the
range of HIGH
, MEDIUM and LOW.
z BRIGHTNESS
You could adjust the BRIGHTNESS of the picture from
to +20. Select a lower number for a darker picture.
-20
Select a higher number for a brighter picture.
You could press the ◄ or ► buttons to adjust the
BRIGHTNESS level.
z CONTRAST
You could adjust the CONTRAST of the picture from
-16
to +16. Select a lower number for a lower contrast
picture. Select a higher number for a higher contrast
picture.
Page 20
Page 22

You could press the ◄ or ► buttons to adjust the
CONTRAST level.
E) PREFERENCE SETUP
The PREFERENCE SETUP options are illustrated below:
Note that you can only access the preference setup menu while in STOP mode. (Not in PRE STOP
or PLAY mode)
z TV TYPE
Adjust to change the Color System of the TV (Note that
in North America the NTSC color system is used). You
can choose from the following TV SYSTEM options.
AUTO
: Choose this setting if your DVD player is
connected to a multi-system TV.
NTSC
: Choose this setting if your DVD player is
connected to a NTSC TV.
PAL
: Choose this setting if your DVD player is
connected to a PAL TV.
z AUDIO
Highlight the AUDIO LANG option and press ENTER
button to access the AUDIO options menu. Press ▲ or
▼ buttons to choose the audio language you prefer.
Press ENTER to confirm. If the disc you are playing has
that language available, it will output audio in the
language you have chosen.
NOTE: Audio language availability is subject to the
languages contained on the DVD disc.
z SUBTITLE
Highlight the SUBTITLE option and press ENTER button
to access the SUBTITLE options menu. Press ▲ or ▼
buttons to choose the subtitle language you prefer. Press
ENTER to confirm. If the disc you are playing has that
language available, it will display the subtitle language
you have chosen.
NOTE: Subtitle language availability is subject to the
languages contained on the DVD disc.
Page 21
Page 23

z DISC MENU
Highlight the DISC MENU option and press ENTER
button to access the DISC MENU options menu. Press
▲ or ▼ buttons to choose the menu language you
prefer. Press ENTER to confirm. If the disc you are
playing has that language available, it will display menu
content in that language.
NOTE:
If your preferred language is not available, the disc’s
default language will be played.
z PARENTAL
The PARENTAL feature is a parental control system that
allows you to block DVD content based on the rating
levels you have chosen. It only works with DVD discs
that have been assigned a rating. This helps you control
the types of DVDs that your family can watch.
The rating options are as follows: 1 Kid Saf, 2G, 3 PG, 4
PG13, 5 PGR, 6 R, 7 NC-17 and 8 Adult.
Select level 8 to cancel the rating limit.
The default setting is 8.
Notes:
If the password option is locked, you cannot set the
rating limit. The rating limit does not work when the
password option is unlocked.
Rating Limit Definitions
【1 Kid Saf】-for General Audiences - all ages admitted -
suitable for children
【2 G】-Rating limit between 【1 G】and 【3 PG】
【3 PG】-parental guidance - used for movies that do not
have cursing or violence and that are suitable for children
accompanied by adults
【4 PG13】-used for movies that have some cursing and
limited violence and are not suitable for children under the
age of 13
【5 PGR】-Rating limit between 【4 PG13】and 【6 R】.
【6 R】-used for movies in which there is an abundance of
cursing, violence, and sexual content suitable for viewers 17
and older
【7 NC17】-used for movies in which there is a abundance
of cursing, graphic violence, and sexual activity, and is
geared for mature viewers 17 and older
【8 Adult】-No Rating limit
Page 22
Page 24

z PASSWORD
The password option is initially locked and you cannot
set the parental control settings or change them without
a password. In order to access the PARENTAL menu,
the password mode must be turned on. If you want to set
the ratings options, you need to enter the default
password which is 8,8,8,8 and then press ENTER to
confirm the password. To change the password, you will
be prompted for the old password and then you will be
prompted to enter a new one. Enter a new 4-digit
number. (This will now be your new password)
Note
:
If you have forgotten your new password, you could
press the RESET button of the remote control to restore
all the settings to pre-factory settings – the original
default password (8888) would be valid again.
z DEFAULT
Choose this option to revert all the options to factory
default settings.
Page 23
Page 25

TROUBLE SHOOTING GUIDE
When there is a problem, it doesn’t necessarily mean that the player is malfunction. Before sending it for
repair, please check the troubleshooting guide below for a possible solution to the problem you are
having. Under no circumstances should you attempt to repair the player yourself. There are no user
serviceable parts inside and this will void your warranty.
PROBLEM SOLUTION
No power
No picture
Unable to start playback
Picture poor
No sound
The remote control does not work properly
Player does not respond to some
operating commands
Disc tray cannot be closed
Disc tray cannot be opened
• Make sure power cord is properly connected.
• Check if there is power at the AC outlet by plugging in
another appliance.
• Check the TV is switched on.
• Check the video connection.
• Check the appropriate video input mode of the TV.
• If no disc inserted, please insert a disc.
• Insert a compatible disc which is of a type that is
compatible with this player and the region code
should match this players region code.
• Ensure the disc label is facing up.
• Clean the disc.
• Check if the disc is defective by trying another disc.
• Check to see if the disc is defective, badly scratched
or damaged (e.g. not flat).
• Clean the disc by removing fingerprints or dust with a
soft cloth, wiping from the center to the edge of the
disc in a circular clockwise direction.
• Check the audio connection.
• Select the correct input mode of the audio receiver.
• Point the remote controller at the remote sensor of
the DVD player.
• Operate the remote control within 23ft (7m) of the
player.
• Inspect and / or replace the batteries.
• Operations may not be permitted by the disc itself.
• Please place the disc again in the center of the disc
tray.
• If the tray is locked by an obstacle or disc, please use
a thin stick into emergency opening hole and move
the inside bar on the bottom of the player manually.
Page 24
Page 26

TECHNICAL SPECIFICATIONS
Type
Model
Play Mode
Disc Mode
Video Characteristic
Resolution
Video S/N Ratio
Audio Characteristic
Frequency Response
Audio S/N Ratio
Dynamic Range
Distortion
D/A Converter
Output Characteristic
Video Output
S-Video Output
Audio Output
Audio Output – Channel
Digital Audio Output
Power Voltage
Power Consumption
Size
Weight
DIGITAL DVD Player
DVD830
NTSC / PAL / AUTO
DVD, VCD, SVCD, CD, MP3, DVD+R, DVD+RW, JPEG, WMA
≥500 lines
≥56dB
fs 192KHz : 4Hz-44KHz : +/- 1dB
≥90dB
≥90dB
‹ 0.01%
192KHz / 24-Bit
1Vp-p (75Ω)
Y:1Vp-p (75Ω) C:0.3Vp-p (75Ω)
2.0V +/- 0.0V-1.0V
2 Channels
Coaxial
AC 110V ~ 50Hz
≤25W
220x60x250mm
1.2kg
Specifications are subject to change without prior notice.
Page 25
Page 27

MAGNASONIC HOME ENTERTAINMENT WARRANTY
We appreciate your purchase of a MAGNASONIC Home Entertainment product. We take pride in the quality of our products
and have manufactured your new Home Entertainment unit to exacting quality standards. We feel confident that in normal use,
it will provide you with satisfactory performance. However, should you experience difficulty, you are protected under the
provisions of this warranty.
MAGNASONIC Home Entertainment products are warranted against manufacturin g defects in materials and workmanship in
normal use for the following period from the date of purchase by the original user, and is conditional upon the unit being
installed and used as directed in the instruction manual.
PRODUCT PARTS AND LABOUR
DVD Players 1 year
Portable DVD Players 1 year
Remote Control 90 days
MAGNASONIC's obligation under this warranty shall be limited to the repair, including all necessary parts and the cost of the
labour connected therewith, or at our option the exchange of any Home Entertainment product which shows evidence of a
manufacturing defect within the warranty period.
Replacement parts, furnished in connection with this warranty shal l be warranted for a period equal to the une xpired portion of
the original equipment warranty.
CUSTOMER OBLIGATIONS
This warranty applies to the product from the original date of purchase at retail. Therefore, the owner must provide a copy of the
original, dated bill of sale. No warranty service will be performed without a bill of sale. Transportation to and from the service
depot is the responsibility of the owner.
WARRANTY EXCLUSIONS
This warranty is extended to MAGNASONIC Home Entertainment products purchased and used in Canada. This warranty shall
not apply to appearance or accessory items including but not limited to: antenna, cabinet, cabinet parts, knobs, batteries,
connecting cables, cassette tapes, compact discs. This warranty shall, in addition, not apply to damages due to handling,
transportation, unpacking, set-up, installation, customer adjustments that are covered in the instruction book, repair or
replacement of parts supplied by other than the MAGNASONIC authorized service depot, any malfunction or failure caused by
or resulting from abnormal environmental conditions, improper unauthorized service, improper maintenance, modifications or
repair by the consumer, abuse, misuse, neglect, accident, fire, flood, or other Acts of God, and incorrect line voltage.
This Home Entertainment product is only warranted to the original retail purchaser. This warranty becomes void in the event of
commercial or rental use. This warranty becomes void in the event serial numbers are altered, defaced or removed.
MAGNASONIC reserves the right to make changes in design or to make additions to or improvements upon this product
without incurring any obligation to install the same on products previously manufactured. The foregoing is in lieu of all other
warranties expressed or implied and MAGNASONIC neither assumes nor authorizes any person to assume for it any other
obligation or liability in connection with the sale or service of this product. In no event shall MAGNASONIC or its
MAGNASONIC dealers be liable for specia l or consequential damage ari sing from the use of this pro duct, or for any delay in
the performance of this warranty due to cause beyond our control.
The purchaser may have other rights under existing provincial or federal laws, and where any terms of this warranty are
prohibited by such laws, they are deemed null and void, but the remainder of the warranty shall remain in effect.
HOW TO OBTAIN SERVIC E
Should this product require service, you may obtain specific information on how to obtain service by contacting the
MAGNASONIC Dealer from whom this product was purchased, or by contacting us directly:
SONIGEM SERVICE
300 Alden Road
Markham, Ontario, L3R 4C1
PHONE: (905) 940-5089 TOLL FREE: 1-800-287-4871 FAX: (905) 940-2303
Page 26
 Loading...