

Page 1
07MF117
7” Leather Digital Photo Frame
For Customer Assistance Call:
1-800-663-5954
Instruction Manual
Thank you for your purchase of this Magnasonic product. Please read this Instruction Manual carefully
before using product to ensure proper use. Keep this manual in a safe place for future reference.
www.magnasonic.ca
Page 2
Introduction
Precautions and Maintenance
For indoor use only
To avoid risk of fire or electric shock, do not expose this appliance to moisture.
To avoid overheating, do not block the ventilation holes on the back of this digital photo frame at any time.
Keep this Multimedia Digital Photo Frame out of sunlight. Direct sunlight may cause damage.
Always use the eject buttons on the memory storage card slots to remove the memory storage cards.
Do not dismantle this Digital Photo Frame. There is a risk of electric shock, and there are no user
serviceable parts inside. Dismantling your Multimedia Digital Photo Frame will void your warranty.
Do not use this Multimedia Digital Photo Frame if conditions could allow condensation to occur, this may result
in damage.
Cleaning the LCD Screen
Treat the screen gently. The screen on this Digital Photo Frame is made of glass and can be
easily scratched or broken.
If fingerprints or dust accumulate on the LCD screen, use a soft, non-abrasive cloth such as a camera lens cloth
to clean the LCD screen.
If you use an LCD cleaning Kit sold at various retail outlets, do not apply the cleaning liquid directly to the
LCD screen. Moisten the cleaning cloth with the cleaning solution and apply the cloth to the screen.
WARNING:
Please STOP the unit before inserting or removing a memory card or USB Drive. Failure to do
so may cause damage to the card/USB and the unit.
1
Page 3
Table of Content s
Int ro du ct io n
Precautions and Maintenance
Cleaning the LCD
Important Safety Instructions
Inserting Memory Cards
Remote Control Function Buttons
Installing and replacing
Player Overview
Getting Started
Connection to a TV (Optional)
Main Menu
Play Music File
Play Photo File
Combo Play
Play Video File
Setup Menu
Calender
Clock
Alarm
Auto-Power
Edit
Troubleshooting Guide
Specifications
Screen
the Remote Control
Battery
1
1
1
3
4
5
7
8
9
10
11
11
12
13
13
14
18
19
20
21
22
23
24
2
Page 4
Importa nt Safety Preca utions
· Read these instructions.
· Keep these instructions.
· Heed all warnings.
· Follow all instructions.
· Do not use this Digital Photo Frame near water.
· Clean only with a dry cloth.
· Do not block any ventilation openings. Install in accordance with the manufacturer's instructions.
· Do not install near any heat sources such as radiators, heat registers, stoves or other apparatus
(including amplifiers) that produce heat.
· Do not defeat the safety purpose of the polarized or grounding-type plug. A polarized plug has
two blades with one wider than the other. A grounding type plug has two blades and a third
grounding prong. The wide blade or the third prong is provided for your safety. If the provided
plug does not fit into your outlet, consult an electrician for replacement of the obsolete outlet.
· Protect the power cord from being walked on or pinch particularly at plugs, convenience
receptacles, and the point where they exit from the Digital Photo Frame.
· Only use attachments/accessories specified by the manufacturer.
· Unplug this Digital Photo Frame during lightening storms or when unused for long periods of time.
· Refer all servicing to qualified service personnel. Servicing is required when the Digital Photo Frame has
been damaged in any way, such as power supply cord or plug is damaged. Liquid has been
exposed to rain or moisture, does not operate normally or has been dropped.
· This Digital Photo Frame shall not be exposed to dripping or splashing water and that no object filled with
liquid such as vases shall be placed on the Digital Photo Frame.
Thi s sy mb ol o n th e pr od uc t or i n th e in st ru ct io ns m ea ns t ha t yo ur e le ct ri ca l an d
ele ct ro ni c eq ui pm en t sh ou ld b e di sp os ed a t th e en d of i ts l if e se pa ra te ly f ro m yo ur
hou se ho ld w as te . Th er e ar e se pa ra te c ol le ct io n sy st em s fo r re cy cl in g.
For m or e in fo rm at io n, p le as e co nt ac t th e lo ca l au th or it y or y ou r re ta il er w he re y ou
pur ch as ed t he p ro du ct .
3
Page 5
Resourc e
Inserting Memory Cards
Your Digital Photo Frame is compatible with the following memory cards:
- Secure Digital Card (SD)
- Multimedia Card (MMC)
- Memory Stick (MS)
- USB Drive
Insert the memory card with the screen and slots all facing yourself. Do not force the card into the slot.
If you are not able to easily insert the memory card completely, you may have inserted it in the wrong direction.
4
Page 6

Remote Co ntrol Functio n Buttons
1. COMBO KEY: Pressing this the button will select
combo mode to play.
2. POWER BUTTON ( ): This is used to turn
ON/OFF the player.
3. MUSIC BUTTON: Music file will play.
4. PHOTO BUTTON: Photo File will play.
5. PLAY / PAUSE BUTTON ( ): This button is used
to PLAY or PAUSE the current photo or audio file.
6. UP BUTTON ( ): Up cursor selection function.
7. LEFT SHIFT BUTTON( ): Left cursor selecting
function.
8. SETUP BUTTON: Used to enter the photo frame
setup options.
9. VOLUME+/- BUTTON:
up or down.
10. MENU BUTTON: Used to revert back to the photo
frames Main Menu.
11. PREV BUTTON ( ): Used to revert back to the
previous file.
Used to adjust the volume
5
1
2
3
4
5
6
7
8
9
10
12. MODE BUTTON: Set the screen Aspect Ratio.
13. NEXT BUTTON ( ): Used to fast forward to the
next file.
14. DOWN BUTTON ( ): Down cursor selection
function.
15. ZOOM BUTTON: Used to zoom into the image. Each
press advances the zoom one seetting at a time.
20
19
18
17
16
15
14
13
12
11
Page 7
Remote Co ntrol Functio n Buttons (cont inued)
16. ENTER BUTTON: Used to confirm your current.
17. RIGHT SHIFT BUTTON ( ): Right cursor
selecting function.
18. STOP BUTTON: Used to stop playback of current file.
19. MOVIE BUTTON: Play movie file format.
20. MUTE BUTTON: Press once to silence audio playback.
Press again to resume audio playback.
6
Page 8
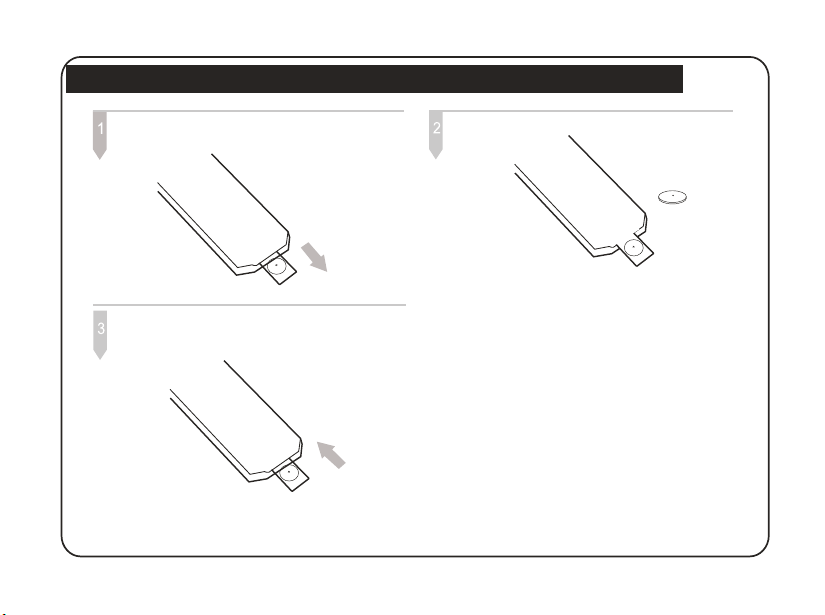
Install ing and replaci ng the Rem ote Control Bat tery:
1. Rota te t he r em ot e co nt ro l so i t is f ac e do wn a nd
pop o ut t he b at te ry t ra y.
3. Close the battery tray..
.
2. Insert the batteries.
CR2025
Insert the batteries according
(+)(-) polarity.
1. Insert the battery matching the correct polarity.
2. Do not expose the battery to heat/fire and do not
short-circuit the battery.
3. Do not leave dead batteries in the remote control.
4. If you do not use the remote control for a long period of
time, remove the battery.
5. If the remote control does not function correctly or
the operating range becomes reduced, replace the
battery.
Note:
1. Point the remote control directly at the digital frame
remote sensor.
2. Do not leave the remote control in an extremely hot or
humid place.
3. Do not spill water or put anything wet on the remote
control.
4. Battery life is 1 year under normal operating conditions.
7
to the correct
Page 9

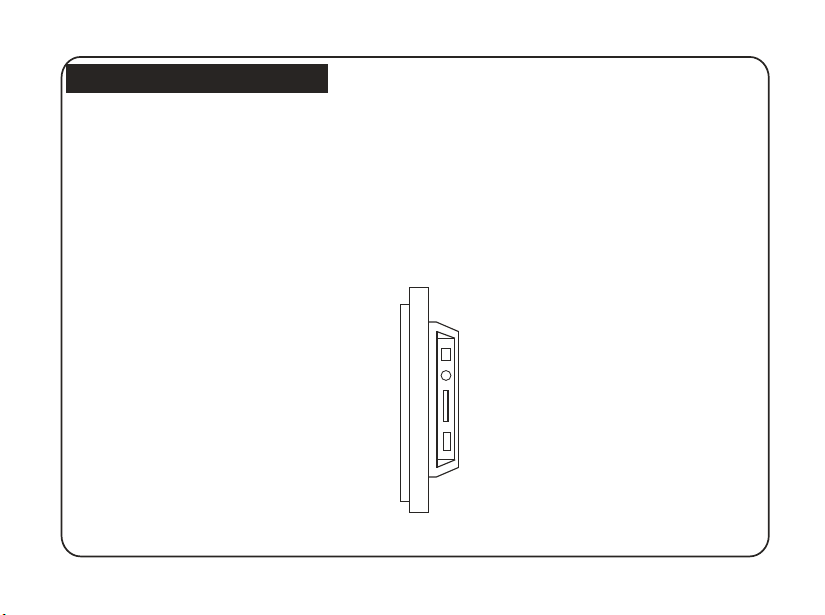
Player Ov erview
Key Co nt rol and K ey F unc ti on s:
1 2 3 4 5 6 7
MENUENTER
8
DC 9V
AV OUT
9
10
11
SD/MS/MM C
USB
STANDBY
12
1. ENTER BUTTON: Used to confirm your current
selection.
2. LEFT SHIFT BUTTON ( ): Left cursor selecting
function.
3. RIGHT SHIFT BUTTON ( ): Right cursor selecting
function.
4. MENU BUTTON: Used to revert back to the photo
frames Main Menu.
5. UP BUTTON ( ): Up cursor selection function.
6. DOWN BUTTON ( ): Down cursor selection
function.
7. STANDBY BUTTON: Used to power on and off the
Digital Photo Frame.
8. DC 9V: Input for the DC Power Adaptor into the DPF.
9. AV OUTPUT: Connect a TV set to output video.
10. SD/MS/MMC CARD SLOT: Insert memory cards here
11. USB: Connect to a USB Drive.
12. Bracket jack.
8
Page 10

Getting s tarted
Gett in g Start ed
1. Assemble the Multimedia Digital Photo Frame bracket to prop the unit up. Insert the DC Adaptor into
the DPF player first, then plug the power cord into a standard wall outlet.
Pow er Adapto r
Power Outlet
2. Press the STANDBY switch to turn ON and OFF the DPF. The following screen will display with the DPF is on.
9
Page 11

Connect ion to a TV (Optional)
Conn ec ting yo ur M ult im ed ia DP F to y our TV (F ig 1 )
Use the supplied TV Cable to connect the Multimedia DPF to your TV / AV jacks (usually yellow, red and white).
Turn off both the frame and the TV before making the connection. Once the connection is made, make sure that
your TV is in the right setting (usually option AV, Video or AUX).
VIDEO L R
AUDIO I NPUT
W
E
O
T
L
I
L
HW
RED
E
Y
Fig 1
10
Page 12

Main Menu
Play Musi c File
Func ti on
The Main Menu interface is the selection for all menu
options, such as Photo, Music, Photo+Music, Movie,
Favorite, Setup, Calendar, Clock, Alarm, Auto-Power,
and Edit (Fig 2).
Oper at ion
Press the Arrow buttons to choose the option,
press the ENTER key to confirm the selection.
Fig 2
You can insert a SD, MS, MMC card or a USB Drive. After
the unit reads the songs, you can select the content that
you want to play. Refer to the image below: ( Fig 3).
Operation
a)
List and highlight the desired directory. Then the
first track under it will start playback. Also, you can use
the Arrow ( ) buttons to enter the File List
and select the file you want to play.
b) If the automatic MUSIC playing function is
turned on, then MUSIC will automatically
be played when the system enters MUSIC MODE.
:
Use the Arrow ( ) buttons to enter the Directory
Fig 3
11
Page 13

Play Photo File
You can insert a SD, MS, MMC card or a USB Drive.
After the unit reads the picture, you can select the
content that you want to play. Refer to the image
below: (Fig 4)
Operation
a)
List and highlight the desired directory. Then the
first file under it will start playback. Also, you can use
the Arrow ( ) buttons to enter the File List
and select the file you want to play.
b) In the Setup Menu-Photo Setting, the user can
choose the picture display mode freely.
:
Use the Arrow ( ) buttons to enter the Directory
Fig 4
Phot o Ro tatio n
When playing or pausing, press the a
buttons to change the display angle:
Up ( ): Flip Horizontally
Down ( ): Flip Vertically
Left ( ): Rotate 90 counter-clockwise°
Right ( ): Rotate 90 clockwise°
12
rrow
Page 14

Combo Pla y
Play Video File
Oper at ion
Press the Arrow buttons to choose Photo +
Music in the Main Menu. Press the ENTER key to play
(Fig 5).
Pre ss V OL +/ VO L- k ey s to i nc re as e or d ec re as e
the v ol um e.
Press the MUTE key to mute the volume.
Fig 5
NOTE: Music and pictures must be put in the same
directory when choosing Photo+Music in the main menu.
If pressing the COMBO key on the remote control to play
music and pictures (it's unnecessary to put music and
picture in the same directory).
You can insert a SD, MS, MMC card or a USB Drive.
After the unit reads the picture, you can select the
content that you want to play. Refer to the image
below: (Fig 6).
Operation
a)
List and highlight the desired directory. Then the
first file under it will start playback. Also, you can use
the Arrow ( ) buttons to enter the File List
and select the file you want to play.
b) Press the STOP button to return to the File List.
:
Use the Arrow ( ) buttons to enter the Directory
Fig 6
13
Page 15

Setup Men u
The DPF setup menu allows you to configure the
Photo Setting, Auto-play, Display Setup, Custom Setup,
and Power off the DPF Player.
Operation:
Press the Arrow buttons to choose SETUP in the
Main Menu. Press the ENTER key to enter into the SETUP
interface (Fig 7). Press the key to choose the set item.
Press the key to open the corresponding menu.
3. Show Type
This function allows you to select the picture.
The available options are Fit Screen and Full
Screen.
4. Browse
There are two kinds of Photo modes, one is the
File Manager mode and the other is the Thumbnail
mode.
Photo Setting (Fig 8)
1. Interval Time
This option can be used to set the length of time for
each image displayed. There are six options: 5, 10,
15, 30 seconds, 1 minute, 3 minutes and off.
2. Transition Effect
This option is used to set the transition effect as
images change.
Fig 7
Fig 8
Operation:
Press the keys to choose the set item.
Press the key to open the corresponding
menu.
Press ENTER to confirm. Press to exit.
14
Page 16

Setup Men u
Auto- pl ay
1. Photo (Fig 9)
This setting can be set to either On or Off. This setting
decides whether or not to activate the automatic
display function after entering the Photo mode.
If this option is set to “On”, then the system will enter
slide show mode after you enter Photo. If it is set to
"Off", then the system will enter either File Manager
mode or Browser mode (according to the Browser
settings set by the user).
2. Music (Fig 10)
This setting can be set to either On or Off. This setting
decides whether or not to activate the automatic play
function after entering Music mode. If this setting is
set to “On”, then the system will enter file mode and
initiate automatic playback after entering Music mode.
If this setting is set to “Off”, then after entering Music
file mode, the user will have to manually press the Play
button.
3. Movie (Fig 11)
This setting can be set to either On or Off. This setting
decides whether or not to initiate the automatic play
function after entering Movie mode. If this setting is
set to “On”, the system will automatically play the video
after entering Movie mode. If this setting is set to off,
then after entering the Movie file mode, the user will be
allowed to manually browse the videos.
Fig 9
Fig 10
Fig 11
15
Page 17

Setup Men u
Display Setup (Fig 12)
1. TV Standard
The user can select according to their standard
television system. The options are: NTSC, PAL,
and Auto.
2. Brightness
This option allows the user to set the brightness of
the television screen. There are three different
options: Normal, Bright, and Soft.
3. Contrast
According to their individual preference. The contrast
is divided into 9 different levels, from -4~0~4, with
larger (positive) numbers representing greater contrast.
4. TFT Brightness
If an LCD display is used this option can be used to
set the screens brightness. The brightness is divided
into 15 levels, from -7~0~7, with the larger (positive)
numbers representing greater brightness.
5. TFT Contrast
If an LCD display is used, this option can be used to
set the screen contrast. The contrast is divided into
15 different levels, from -7~0~7, with larger (positive)
numbers representing greater contrast.
6. TFT Saturation
If the user uses an LCD display, this option can be
used to set the saturation of the display. The
saturation is divided into 15 levels, from -7~0~7,
with larger (positive) numbers representing a higher
degree of saturation.
Fig 12
16
Page 18

Setup Men u
Custo m Se tu p (F ig 1 3)
1. OSD Language
This option can be used to set the language for the
OSD (on screen display). The user can choose from:
English, French, German, Italian, Spanish, Dutch
Portuguese and Polish.
2. Style
This option allows the user to choose their preferred
operation style. There are four different styles for the
user to choose from: Style 1, Style 2, Style 3, and Style 4
3. LOGO Type
The user can choose the menu background freely:
Default and Favorite.
Operating Method:
First copy your favorite picture into the Favorite
Folder. Open the Favorite Folder, and press
the button to play their favorite photos.
4. Repeat Mode
This option allows the user to set the play repeat
mode. There are four available options: Off, One,
Folder, and All.
5. Media
The user can choose the media player freely:
USB, SD/MMC, MS.
6. Default
By setting this option, all settings will be reset to the
original system settings.
Exit (F ig 1 4)
Leaves the setup menu, and goes back to the main
menu.
Fig 13
Fig 14
17
Page 19

Calenda r
Calendar (Fig 15)
After selecting Calendar from the Main Menu, press
the PLAY button, and you will enter the date setting
mode.
1. Display (Fig 16)
This option provides the Calendar display function.
The date displayed in the calendar is the current
date set in the system.
In addition to displaying the current date, the user
can use the keys to browse different months, or
use the keys to browse different years.
2. Set Date (Fig 17)
This function allows the user to set the system date.
3. Exit
Exits date settings and reverts back to the Main Menu.
Fig 15
Fig 16
Fig 17
18
Page 20

Clock
Clock S et ti ng ( Fi g 18 )
After selecting Clock from the Main Menu, press the
ENTER key, and the system will enter time setting
mode.
1. Display (Fig 19)
This option allows the user to display the Clock or
Clock & Calendar. Select Time, and press the ENTER
key. Select Clock & Calendar, and press the PLAY key.
2. Set Time (Fig 20)
This function allows the user to set the system time.
3. Exit
Exits the time settings, and goes back to the Main
Menu.
Fig 18
Fig 19
Fig 20
19
Page 21

Alarm
Ala rm S et ti ng
After selecting Alarm from the Main Menu, press the
ENTER button, and the system will enter the alarm
setting mode.
1. Enable (Fig 21)
This function allows the user to activate (On)
or de-activate (Off) the alarm.
2. Set Time (Fig 22)
This function allows the user to set the alarm time.
When the alarm function has been activated,
a prompt will appear. Press any key to exit the
alarm mode.
3. Exit
Exits the alarm settings, and reverts back to the
Main Menu.
Fig 21
Fig 22
20
Page 22

Auto-Po wer
Auto-Power On/Off Setting
After selecting Auto-Power from the main menu,
press the ENTER button, and the system will enter
the automatic Power-on/Power-off settings mode.
1. Power On Enable (Fig 23)
This option allows the user to either activate (On) or
de-activate (Off) the automatic Power-on function.
2. Power Off Enable (Fig 24)
This function allows the user to activate (On) or
de-activate (Off) the automatic Power-off function.
3. Set Time (Fig 25)
This function allows the user to set the automatic
power-on/power-off times. The user can choose to
set the Power-on time or the Power-off time.
4. Exit
Exits the automatic Power-on/Power-off settings,
and goes back to the Main Menu.
Fig 24
Fig 25
Fig 23
21
Page 23

Edit
After selecting Edit from the Main Menu, press the
ENTER button, and the system will enter Edit mode.
In Edit mode, the user can choose to Copy, Delete,
or to Exit.
1. Copy (Fig 26)
The user can Copy image files from the storage
device, and use the images as screen saver images.
The user can use the keys to select images. After
choosing images, press the ENTER button, and the
selected images will display a red frame which
indicates that they have been selected. If the user
wishes to cancel a selection, they can accomplish
this by pressing the ENTER button again. After the
user completes the selection, they can press the
keys to go to the Save option, and then press Save
to save the selected images.The maximum number
of images this function can save is 15 (including the
default screen saver images).
2. Delete (Fig 27)
This function allows users to delete screen saver
images. The user can first go to the Delete option,
and then after entering the delete mode by pressing
the ENTER key, you can use the keys to select
the images you wish to delete; press ENTER and the
selected image will be deleted, or select Delete All
to delete all of the images. In addition to the Delete
option, the user can also select Sort to change the
sequence in which screen saver images are displayed.
First select the images for which you wish to change
sequencing. By pressing the ENTER button you will be
able to select a particular image, then, by pressing
the buttons, you can change the order of the
image. Finally, users can select the Slide Show option
to enter the screen saver mode to preview the images.
Fig 26
Fig 27
22
Page 24

Troubles hooting Guide
If you are experiencing problems with your Digital Photo Frame, please consult the following
Troubleshooting information. If you need further assistance, please contact Technical
Support at 1 800-663-5954.
No power:
Please check whether there is power, and that
the DC power cord is plugged in correctly.
Remote Control not functioning:
Please check that the battery has power, and
that it is inserted correctly matching the
polarities.
Can not read the CARD or USB:
Please check that there is content on the card
or USB disk.
No AV output:
Please check to ensure that all audio and video
cables are connected correctly.
Can not play the file:
Please confirm whether the file format can be
played by the player.
Display too bright or too dark:
Please adjust the brightness or contrast in the
setup menu.
The color is light or no color:
Please adjust the color setup.
No sound:
Please check that the volume is not at minimum
and is not in MUTE mode.
The picture can do display in full screen:
Please check the picture aspect ratio setup.
23
Page 25

Specifi cations
Spec if icati on s
Displ ay : 7 TFT LCD 480 (RGB ) x 23 4
Output: Audio / Video
Speaker: Stereo
Operation: Remote Control
Power: AC Adaptor; Input 100-240V~; Output 9V, 1.5A
Environmental operating ranges
Operating Temperature: -10~70 degrees celcius
Storage Temperature: -20~80 degrees celcius
Accessories:
Power Adapter
AV Cable (Optional)
Remote Control
User Manual
All specifications and instructions are subject to change without notice.
24
Page 26

75-70C71KY-01 R
 Loading...