

Page 1
OPERATING INSTRUCTIONS
For Magna-Matic
Precision Balancing Instruments
Covering Models:
MAG-1000 Original
MAG-1000G Gold Edition
MAG-1000GC Gold Edition
MAG-1060 SUPER
MAG-5000 Series
Protected By Patent #
2,987,924 - 2,992,388 -
5,398,550 -5,503,015
Visit us at www.magna-matic.com for more photos
of products & other helpful info.
Helping you get the most
out of your shop for the last 40 years.
Page 2

Model Descriptions
If you have further questions or do not understand any of the
instructions please contact us! We are happy to give any needed
extra explanation.
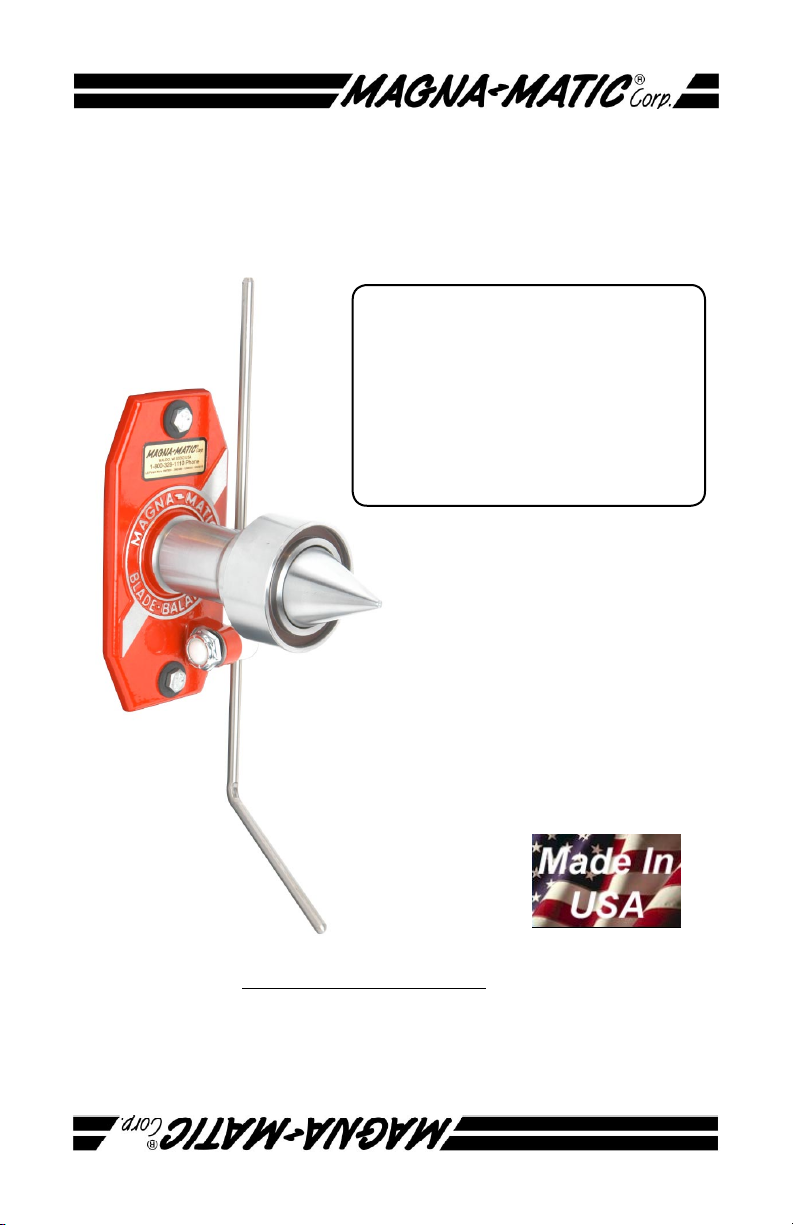
MAG-1000 Lawn Mower Blade Balancer
The industry original since 1958
Blade Hole Diameter Range of 5/16” to 1-1/2”
Can be used to balance objects that have a concentric center hole, and is made of a magnetic
material. The MAG-1000 uses a sliding magnetic
chuck to hold the blade.
MAG-1000G Gold Edition
MAG-1000GC Gold Edition (carbide support shaft)
(Signied by the gold base bracket)
A special edition version of the standard
MAG-1000. Made to perfection, and with ultraaccurate 8 ball - ball bearings.
Celebrating over 40 years of MAGNA-MATIC.
MAG-1050 SUPER
The MAG-1050 is a large application blade balancer. For
use with ywheels, circular saws, impellers, fan blades,
etc.. It has a interchangeable spring loaded cone insert
for extra versatility.
MAG-1060 SUPER
The MAG-1060 is a large application blade balancer. For
use with ywheels, circular saws, impellers, fan blades,
etc. Functioning like the MAG-1000
MAG-5000
The MAG-5000 is a large center hole diameter blade
balancer. (2-1/2” - 3”) Can also be used with large fan
blades and impellers.
MAG-7000 SERIES
The MAG-7000 Series balancers are designed for balancing hub type products, specically ATV and Snowmobile
primary and secondary variable clutches.
1
Page 3

!BEGIN HERE!
This instruction booklet will get you “up-and-running” with
the most basic usage of your MAGNA-MATIC balancer.
For more complete information on how to service a lawn
mower blade refer to the publication “Magna-Matic Guide
to Proper Lawn mower Blade Service.”
Unpack the Balancer
1
Be sure all items listed here were included with
your balancer.
1 - Blade Balancer
2 - Instruction Booklet (this booklet)
2
Page 4
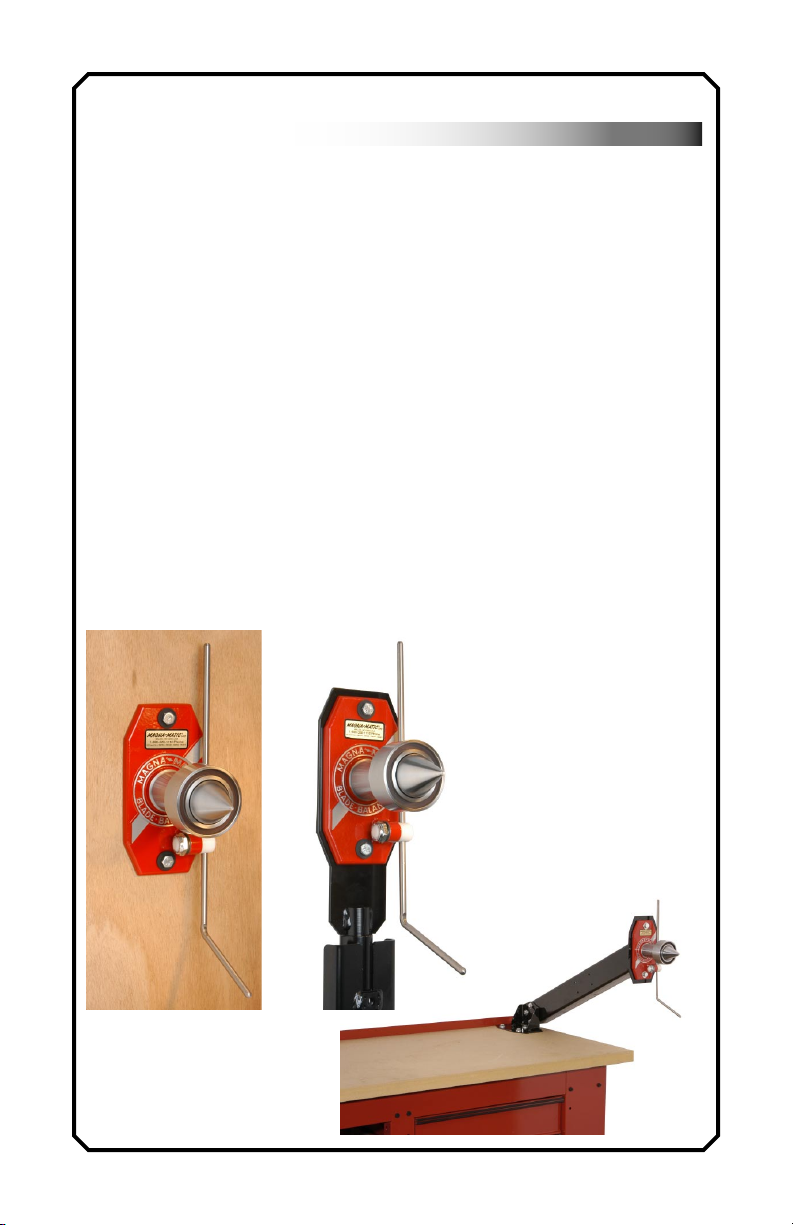
Mounting the Balancer
2
You can mount the balancer on a wall, the
MAG-10200 Service Center Stand (with your
Magna-Matic Lawn mower Blade Sharpener),
or the MAG-103 Balancer Test Stand/Mounting
Bracket. (see these various ways below)
Mounting Conditions:
A - Wall must be vertical ± 5º
B - Make sure there is enough clearance around
the balancer to allow the blade to freely
rotate without interference.
C - Balancer mounting location should not be
subjected to air ow (fans, wind, etc.). Bal ancer reading accuracy can be compromised
by wind/air movement.
D - Use (2) bolts 5/16 inch to mount the bal ancer in its (2) mounting holes.
E - See MAG-10200 or MAG-103 Instructions
for stand mounting instructions.
MAG-10200 Service
Center Stand Mounting
Wall Mounting
3
MAG-103 Test Stand/
Mounting Bracket
shown mounted on a
work bench
Page 5
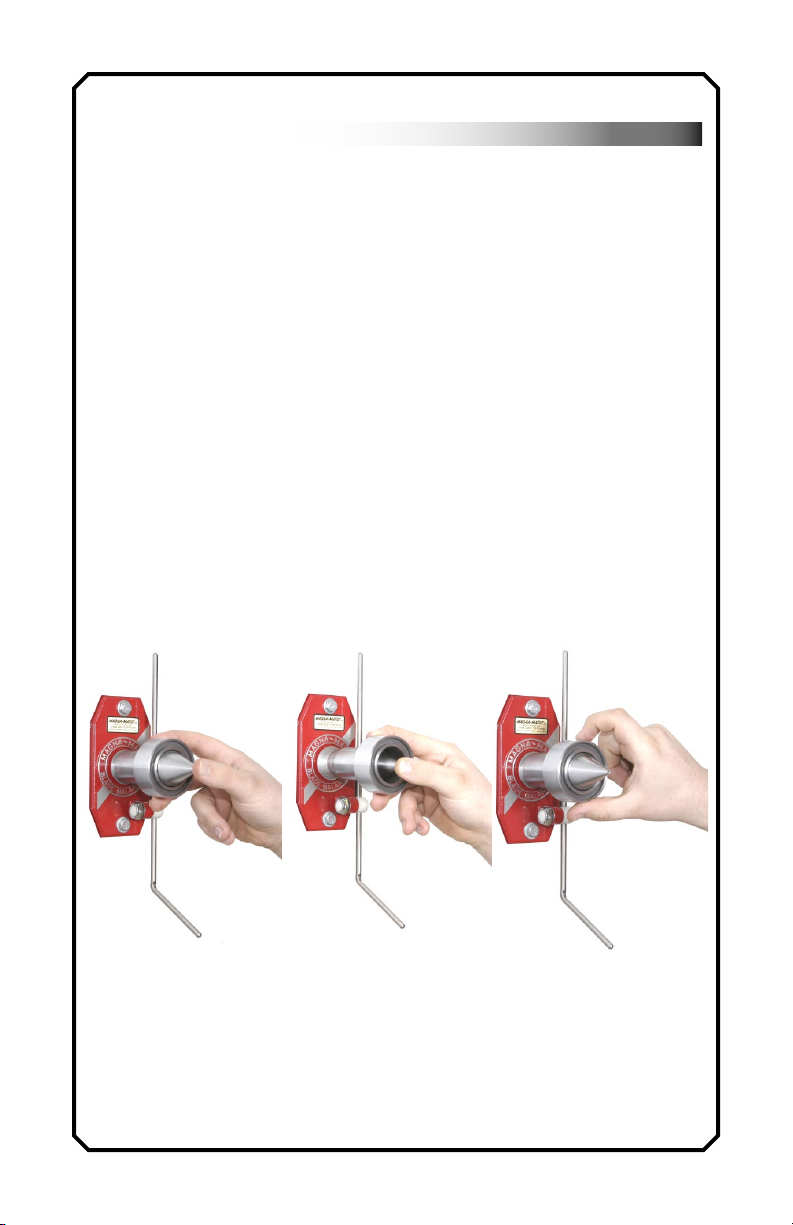
Inspecting the Balancer
3
Test the Magnet
Inspect the balancer for proper function. The
balancer must be rst mounted before inspection can be done.
A - The Magnet sleeve should slide smoothly
over the cone. Manual (hand) force is neces sary to move the magnet. With use, the
sliding force will decrease - warmer room
temperatures will also make the slide move
more easily. SEE BELOW IMAGES
B - Rotate the balancer - one revolution to
assure the bearings are free to rotate.
Only a 1/2 of a revolution is necessary to
check the balance of a blade.
Slide
DO NOT SPIN THE BALANCER
Test the Magnet
Slide
Test Balancer
Rotation
NOTE: Always wear protective gloves when handling lawn mower
blades - gloves were not worn in photos to show maximum detail
of hand positions.
4
Page 6

Safety FIRST
4
Lawn mower blade knives have sharp, cutting
edges. Wear protective clothing recommended by
MAGNA-MATIC magnets have a magnetic pull in
excess of 120 LBS (using a test place 3.5” x .25” x
3.5”.) Magnetic PULL is DRASTICALLY reduced by
surface dirt, rust, paint, thin metal, and irregular
Read the following safety notes
for your protection!
the blade manufacturer.
DO NOT BE INJURED
By The Cutting Edges
!DO NOT BE INJURED! - !SAFETY FIRST!
shapes.
DO NOT BE INJURED
By a FALLING BLADE
!DO NOT BE INJURED! - !SAFETY FIRST!
ADDITIONAL SAFETY NOTES - READ
MAGNA-MATIC balancers use a magnet to hold the lawn
mower blade. Blades made of non-magnetic materials
will not be held by the magnet.
Blades that do not have a CLEAN FLAT STEEL SURFACE
and at least 3” in diameter around the center hole; shall
not be mounted on the balancer.
These blades may not be held by the magnet and may
fall.
5
Page 7

Mounting the Blade
5
1 - Clean the blade of all dirt and vegetable material.
Make sure that the blade is clean down to the steel
at the mounting hole, where the magnet will contact
the blade. This will greatly improve the magnetic
“holding force” of the balancer, and the accuracy of the
reading.
Use a hand wire brush or the MAG-12000 lawn mower
blade cleaning machine to clean a lawn mower blade.
2- Hold the blade with two hands, and locate the center
hole of the lawn mower blade on the cone.
Now with your index ngers, pull the sliding magnetic
chuck towards the blade. The result should be that the
blade is now securely located on the cone, and held
there by the magnet. SEE BELOW the overhead view
of the balancer and blade
3 - Slowly remove your hands and check that the blade is
held rmly before completely removing your hands.
This will guide you through the process to properly mount a blade on the balancer.
1
3
NOTE: Always wear protective
gloves when handling lawn
mower blades - gloves were
not worn in photos to show
maximum detail of hand positions.
2
4
5
6
Page 8

Check Blade Straightness
6
1 - While the blade is mounted on the balancer. Turn
the blade on the balancer so that it is vertical on
the balancer (have one cutting edge pointing to the
sky, and one to the ground.
2 - Now position the gauge rod to almost touch the back side of the blade SEE IMAGES TO THE RIGHT
3 - Rotate the blade to compare the distances of one end
of the blade to the other. If they are the same - the
blade is “at” or “straight.”
4 - See your blade manufactures tolerance requirements
to determine if the blade should be discarded.
NOTE about BLADE STRAIGHTNESS
The longer the blade, the greater the deviation that can
be allowed between the two blade ends. Conversely,
the shorter the blade, the lesser the deviation that can
be allowed between the two blade ends.
This will guide you through the process to see if a
blade has become bent from use damage.
Do Not attempt to straighten a
hardened blade. You may create
WARNING
7
fractures not visible to the eye.
REPLACE ALL BENT BLADES
Page 9

6
Check Blade Straightness
General Guide:
18” - 24” long blades can allow up to 3/8” deviation
24” - 28” long blades can allow up to 1/2” deviation
28” - and larger blade can allow up to 5/8” deviation
Do Not attempt to straighten a
hardened blade. You may create
WARNING
fractures not visible to the eye.
REPLACE ALL BENT BLADES
8
Page 10

Check Blade Balance
7
1 - Have the blade mounted on the balancer.
2 - Rotate the blade to a horizontal attitude. SEE
BELOW. Then remove your hands and allow the blade
to freely rotate.
3 - If the blade remains HORIZONTAL the blade is “HORI ZONTALLY IN-BALANCE.”
4 - If one end of the blade rotates to the 6 o’clock
position of the clock face - THIS IS THE HEAVY
END. Material will need to be removed from this
end to bring the blade “IN-BALANCE.” Remove material
from the cutting edge during sharpening - USE a
MAGNA-MATIC [MAG-8000 or MAG-9000] to properly
sharpen a lawn mower blade.
NOTE: The blade will still be “IN-BALANCE-TOLARANCE” if
it moves slightly from the horizontal position. ALL MAGNAMATIC Balancers are delicate instruments that are to be
operated with manual force only. Do not misuse the balancer.
This will guide you through the process to gauge
a blade’s out-of-balance condition.
1
NOTE: Always
3
2
9
wear protective
gloves when
handling lawn
mower blades gloves were not
worn in photos
to show maximum detail of
hand positions.
Page 11

Check Blade Balance (cont)
7
RE-EXPLAINED - (clock face example)
Think of a “scale,” “balance,” or “see-saw.” As with any of
these, when there is an IMBALANCE of weight on one end
it will rotate toward the ground, because of gravity. This
is the same way MAGNA-MATIC Precision Static Balancers
work. After you have the blade mounted on the balancer,
look at the blade on the balancer and think of a CLOCK
FACE.
With your hand rotate the blade so that it is horizontal, with
one end pointing at 3 o’clock and the other end pointing
at 9 o’clock. Now let go of the blade, so that it will freely
rotate or remain stationary.
When a blade is “out-of-balance” the “heavy end” will
rotate to 6 o’clock. Take note of which end of the blade falls
to 6 o’clock AND how fast it falls. These two factors will
indicate which end of the blade is the “heavy end,” and how
“out-of-balance” the blade is.
This will guide you through the process to gauge
a blade’s out-of-balance condition.
With experience you will be able to quickly determine how
much steel you will need to grind off, by recognizing the
speed at which the “heavy end” rotates downward.
NOTE: Always wear protective gloves when handling lawn mower
blades - gloves were not worn in photos to show maximum detail
of hand positions.
10
Page 12

Blade Removal
8
After you have checked the straightness and the balance
of the blade you will need to remove the blade from the
balancer.
The best way to remove a blade from the balancer without
damaging the balancer is to twist the blade. This will
release the blade from the magnetic pull with the least
amount of force, preventing injury to the operator or
damage to the balancer. See BELOW showing the twisting
motion. Use the blade as a lever to remove it from the
balancer’s magnet.
This will guide you how to remove a blade from
your MAGNA-MATIC balancer.
NOTE: Always wear protective gloves when handling lawn mower
blades - gloves were not worn in photos to show maximum detail
of hand positions.
11
Page 13

Balancer CARE
9
This will guide you through the proper care of
your MAGNA-MATIC balancer.
CARE of your MAGNA-MATIC BALANCER
All MAGNA-MATIC balancers are precision, highly accurate
measuring instruments to measure the balance condition
of rotary blades, hub products, impellers, and the atness/
straightness between the cutting edges of lawn mower
blades. Note: run-out gauges can be attached to the guage
rod to get run-out readings.
!DO NOT DROP OR MISUSE!
FOR ALL BALACNERS WITH magnetic sliding chucks
BE SURE to always push the magnet (chuck) to the base
bracket after you are nished using it. IF DIRT and DUST
collect on the slide surface it will damage the slide. This
will signicantly reduce the usability of the balancer. If
possible cover the balancer with a plastic bag when not
in use.
DO NOT attempt to clean the greased slide surface. It is
greased with an engineered grease that will last the life of
the balancer. Using any other grease with damage/reduce
the usability of the balancer.
FOR ALL BALANCERS
DO NOT hit - hammer - drop or cause any other impact to
the balancer, it will denitely damage the balancer.
DO NOT attempt to replace the bearings.
MAGNA-MATIC balancers - if cared for properly will last a
lifetime under normal use.
12
Page 14

Balancer Calibration TEST
10
1 - Balancer must be mounted to test this.
2 - Make a mark on the face or magnet ring of the balancer
(use a felt marker).
3 - Rotate the mark to every position of the clock face (1
o’clock - 2 o’clock - etc.) then let go of the balancer
at every position very carefully - to see if it will rotate
on its own. Your mark should not move at any position,
this shows that the balancer itself is in balance.
4 - Be sure your hand or the mounted surface is not
moving, the balancer will pick up the slightest vibration
or motion. Air ow/wind will also affect this reading,
be sure you are indoors and not near a fan or open
window/door. Also make sure the magnet does not
have any metal chips in it to throw off the reading.
If the unit does not meet any of these requirements return
the unit to us for evaluation.
This will guide you through how can test the
calibration of your balancer.
RECONDITIONING SERVICE
MAGNA-MATIC can recondition your balancer if it has
become damaged. Send the balancer to us for a reconditioning evaluation and quote. Or call us 800.328.1110 or
920.564.2366
Balancer Reconditioning
Magna-Matic Corp.
W4599 County Road IW
Waldo WI 53093
USA
13
Page 15

guarantee
The MAG-1000, MAG-8000, & MAG-9000 Series
Products come with a *30 day 100% satisfaction
guarantee. In the event you are not satised with
any of the above products we will provide you
with a return authorization and a UPS call tag for
pick-up. You will be provided with 100% credit less
the shipping cost (to & from) your facility and one
grinding wheel. The returned product must be in
good order, or further charges will apply.
*30 days from invoice date
Magna-Matic Free Start-Up Service &
LIFETIME Toll Free Phone Support
Once you have any of our products ready to operate CALL US AT 800.328.1110 and we will instruct
you of the proper operating procedure. We want
you to be the most protable with any of our
high-performance tools. Also, you get LIFETIME
PHONE SUPPORT with all of our products. Call
our toll free number to talk to a real live person,
and get personalized help. Or visit our web site www.magna-matic.com - and read support info
or ask a question via E-mail.
14
Page 16

WARRANTY
This warranty is extended only to MAGNA-MATIC’s commercial customers. To protect the quality of this tool,
every step in its manufacture has been carefully controlled. It is constructed of only the nest materials by
skilled craftsmen who take pride in their work. MAGNAMATIC CORP. warrants the tools manufactured and/or
repaired to be free of defects in material and workmanship for a period of 365 days after purchase.
Any tool or part proved to MAGNA-MATIC’s satisfaction
to be defective during that period will be repaired
or replaced at MAGNA-MATIC’s option if returned prepaid. MAGNA-MATIC’s sole obligation and your exclusive
remedy under this warranty shall be limited to such
repair or replacement. In no event shall MAGNA-MATIC
be liable for any consequential or incidental damages.
This warranty does not apply to parts (motor & grinding
wheel) not manufactured by MAGNA-MATIC or failing due
to ordinary wear, subjected to abuse, accidental damage,
improper operations, maintenance or repair, or to other
damage by circumstances beyond MAGNA-MATIC’s control.
This warranty is exclusive and in lieu of all other
expressed or implied warranties including without limitation, the implied warranties of merchantability and t-
ness for a particular purpose.
Magna-Matic Corporation
W4599 County Road IW
Waldo WI 53093
USA
Phone: (920) 564-2366
FAX: (920) 564-2368
Toll Free USA & Canada
1-800-328-1110
© 2002-2003 Magna-Matic Corporation, all rights reserved.
http://www.magna-matic.com
sales@magna-matic.com
 Loading...