

Page 1
Compact Mobile DVD Player
Owner's Manual
Model: MV-DVD-PL2
For operational or technical assistance, after reading this manual,
please call us toll free at (800) 638-3600 or visit www.magnadyne.com.
Page 2

Contents
Safety Information . . . . . . . . . . . . . . . . 2-3
Features . . . . . . . . . . . . . . . . . . . . . . . . . . 3
Disc Handling Notes . . . . . . . . . . . . . . . . 4
Installation . . . . . . . . . . . . . . . . . . . . . . . . 5
Electric Connection. . . . . . . . . . . . . . . . 6-7
Front Panel Functions . . . . . . . . . . . . . . . 8
Specifications. . . . . . . . . . . . . . . . . . . . . . 8
Safety Information
Caution:
MOBILE DVD PLAYER IS A CLASS I
LASER PRODUCT. HOWEVER THIS
MOBILE DVD PLAYER USES A
VISIBLE/INVISIBLE LASER BEAM WHICH
COULD CAUSE HAZARDOUS RADIATION
EXPOSURE IF DIRECTED. BE SURE TO
OPERATE THE MOBILE DVD PLAYER CORRECTLY AS INSTRUCTED. USE OF CONTROLS OR ADJUSTMENTS OR PERFORMANCE OF PROCEDURES OTHER THAN
THOSE SPECIFIED HEREIN MAY RESULT
IN HAZARDOUS RADIATION EXPOSURE.
DO NOT OPEN COVERS AND DO NOT
REPAIR YOURSELF. REFER SERVICING TO
QUALIFIED PERSONNEL.
Warning:
• TO REDUCE THE RISK OF FIRE OR
ELECTRIC SHOCK, DO NOT EXPOSE
THIS EQUIPMENT TO RAIN OR MOISTURE.
• TO REDUCE THE RISK OF FIRE OR
ELECTRIC SHOCK, AND ANNOYING
INTERFERENCE, USE ONLY THE RECOMMENDED ACCESSORIES.
Remote Control . . . . . . . . . . . . . . . . . . . . 9
Remote Control Functions . . . . . . . . . . . 10
Basic Operations. . . . . . . . . . . . . . . . 11-14
System Setup . . . . . . . . . . . . . . . . . . 15-17
Troubleshooting. . . . . . . . . . . . . . . . . . . 18
Replacement Parts. . . . . . . . . . . . . . . . . 19
Warranty . . . . . . . . . . . . . . . . . . . . . . . . 20
This product incorporates copyright protection technology that is protected by
method claims of certain U.S. patents and
other intellectual property rights owned by
Magnadyne Corporation and other rights
owners. Use of this copyright protection
technology must be authorized by
Magnadyne Corporation, and is intended
for home and other limited viewing uses
only unless otherwise authorized by
Magnadyne Corporation. Reverse engineering or disassembly is prohibited.
Region Management Information:
This Mobile DVD Player is designed and
manufactured to respond to the Region
Management Information that is recorded
on a DVD disc. If the Region number
described on the DVD disc does not correspond to the Region number of this Mobile
DVD Player, this Mobile DVD Player cannot
play this disc.
2
Page 3

Using this Product Safely
Operation
Before installation and use of this DVD
player, please read this manual completely.
Proper Power Supply
This product is designed to operate with a
12 Volt DC, negative ground battery system.
Driving
Be aware of road and traffic conditions,
keep the volume at a low level.
Car Washing
Do not expose the product to water or
excessive moisture. This could cause electrical shorts, fire or other damage.
Parking
Parking in direct sunlight can produce very
high temperatures inside your vehicle. Give
the car interior a chance to cool down
before starting playback.
DVD Player Features
• This DVD player provides multi-media,
high resolutions images with high-quality
surround-sound effects.
• Supported formats include: DVD, DVDR, CD, CD-R/RW, MP3 and JPEG
Picture.
• Multi-Lingual On-Screen Display Menu
• Last Position Playback Memory
• Front Panel Second Source A/V Inputs.
Protecting the Disc Mechanism
Avoid inserting any foreign objects into the
slot of this player. Failure to observe this
precaution may cause malfunction of this
unit.
Repairs
Contact our customer service representatives. Do not attempt to disassemble or
adjust this product yourself.
Installation
The unit should be installed in a horizontal
or vertical position.
• Multi-Image ratio, which enables the
DVD player to match different TV
screens.
• Multi-Angle. Users can select different
viewing options (if this feature is included
on the disc).
• Anti-Shock Buffer
• Wireless Remote Control with External
IR Eye.
3
Page 4
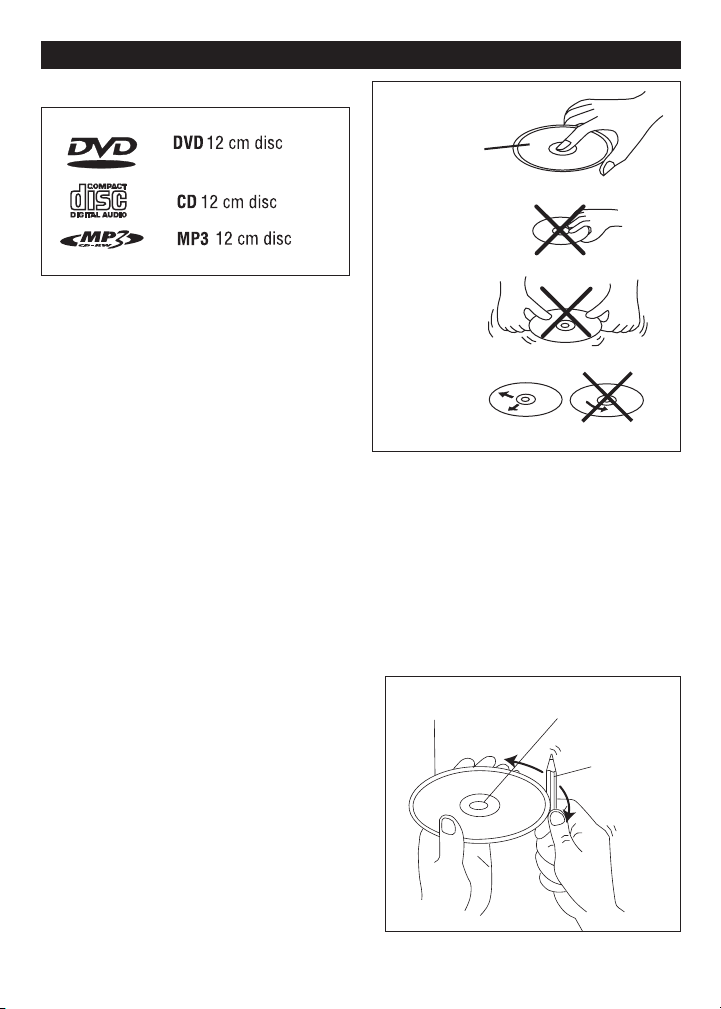
Disc Handling Notes
V
I
D
E
O
(Single-sided disc only)
Label side up
Do not touch
the underside
of the disc
Do not bend
Wipe the disc
from center
toward the
outside edge.
Rough spots
on inside edge
Ball point pen
or pencil
Rough spots on
outside edge
Disc Formats Supported by this Player:
Discs which cannot be played with this player:
• DVD-ROM
• DVD-R/DVD-RAM
• CDV
• CD-G
Disc Handling
• Dirt, dust, scratches and warping disc will
cause non operation.
• Do not place stickers on disc or scratch disc.
• Do not warp discs.
• A disc should always be kept in its case
when not in use to prevent damage.
•
Do not place discs in the following places:
1. Direct sunlight.
2. Dirty, dusty and damp areas.
3. Near car heaters.
4. Car seats or dashboard.
Preparing New Discs with Rough Spots
A new disc may have rough edges on its inside
and outside edges. If a disc with rough edges is
used, the proper setting will not be performed
and the player will not play the disc. Therefore,
remove the rough edges in advance by using a
ball point pen or pencil as shown. To do this,
press the side of the pen or pencil against the
inside and outside edges of the disc.
Disc Cleaning
Use a dry soft cloth to wipe the surface. If the
disc is quite dirty, use a soft cloth slightly moist
with isopropyl (rubbing) alcohol. Never use solvents such as benzine, thinner or conventional
record cleaners as they may mar the surface of
the disc.
Note: A disc may become somewhat scratched
(although not enough to make it unusable)
4
depending on handling and conditions in the
usage environment.
Page 5
Notes:
INP
UT
FF
REW
INPU
T
FF
REW
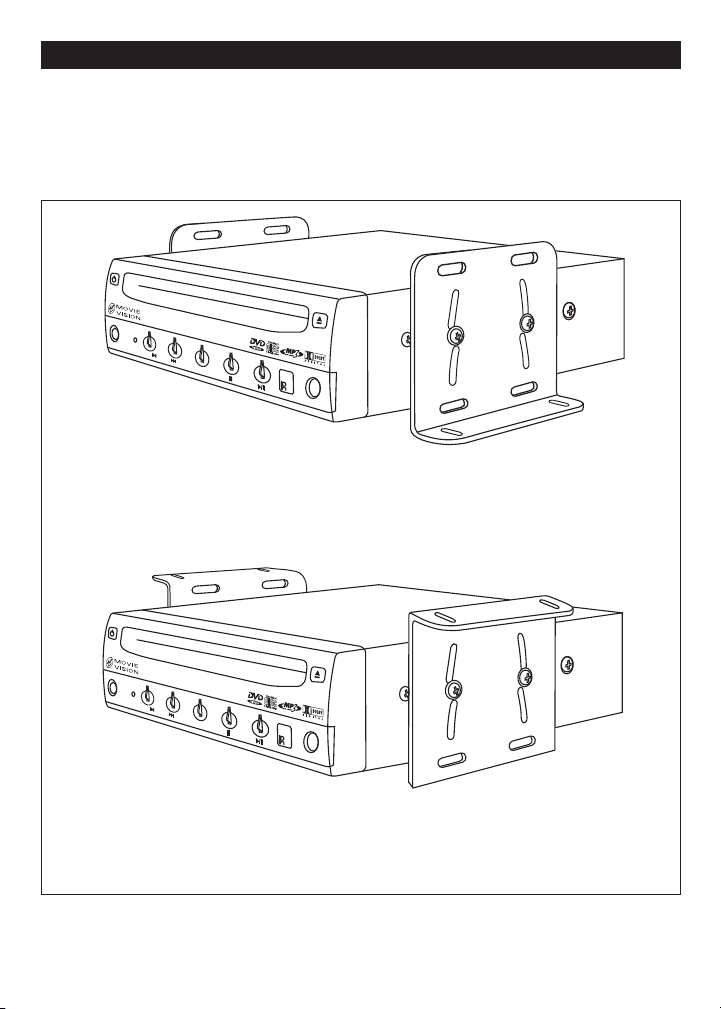
Floor Mount
Underdash Mount
• With the screws provided, attach the
brackets on both sides of unit as shown
in the illustration below.
Installation
• Install the unit as a floor mount or
underdash mount with the screws provided.
5
Page 6
MV-DVD-PL2
POWER
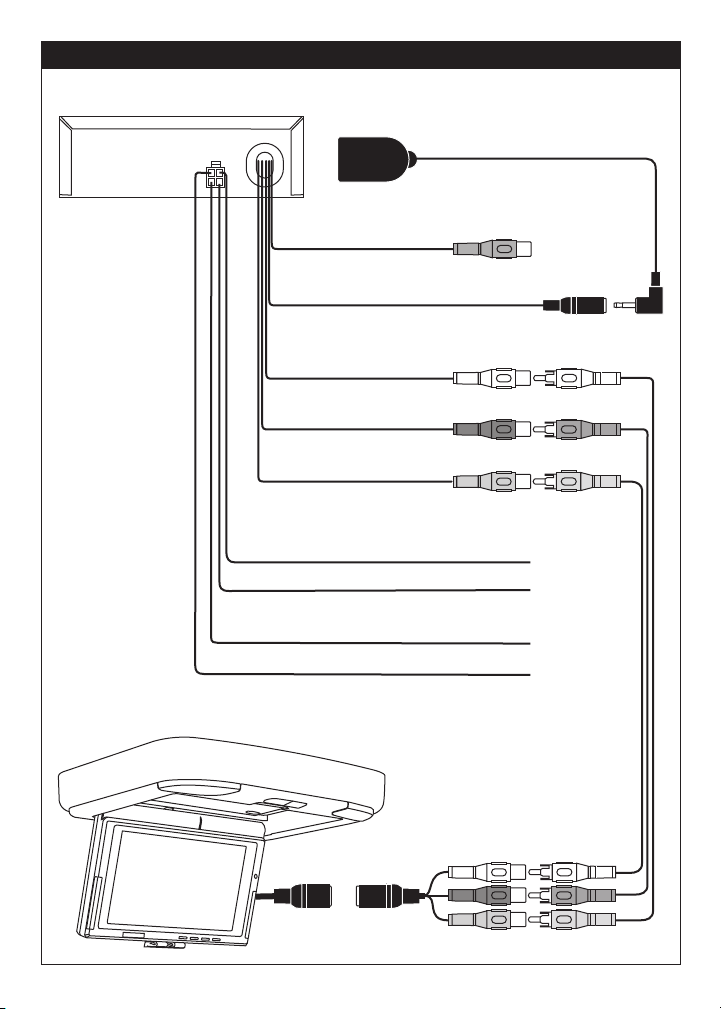
Connecting to a Monitor
Orange RCA
Digital Coaxial Audio Out
Black 3.5mm
Remote Infrared Sensor Input
White RCA
Audio Out - Right
Red RCA
Audio Out - Left
Yellow RCA
Video Out
Blue Wire
Remote Turn On +12 V Output (500ma Max)
Red Wire +12 V Accessory
Yellow Wire +12 V Constant
Black Wire Ground
MovieVision Pod
MV780
DIN Connector
External Infrared Sensor
Electric Connection
6
Page 7

MV-DVD-PL2
POWER
Connecting to a MovieVision System that uses a Separate Power Module as the Only Source
Orange RCA
Digital Coaxial Audio Out
Black 3.5mm
Remote Infrared Sensor Input
White RCA
Audio Out - Right
Red RCA
Audio Out - Left
Yellow RCA
Video Out
MV-PM710
Blue Wire
Remote Turn On +12 V Output (500ma Max)
Red Wire
Blue Wire
Black Wire
Red Wire +12 V Accessory
Yellow Wire +12 V Constant
Black Wire Ground
Red Wire +12 V Constant
Yellow Wire +12 V Accessory
Black Wire Ground
MV-2468IRA
IR Adapter Cable
(Not Supplied)
DIN Connector
MovieVision Pod
MV-POD10-2
MV-POD7
Electric Connection
7
Page 8

123
456789101112
Front Panel Functions
1. POWER
2. DISC SLOT
3. EJECT
4. HEADPHONE CONNECTION
5. REMOTE INFRARED SENSOR
6. PLAY / PAUSE
7. STOP
8. INPUT (SELECT)
FF / NEXT CHAPTER
9.
10. REW / PREVIOUS CHAPTER
11. RESET
12. AV IN
Specifications
Power Voltage: 12V DC
Power Consumption: 15W
Video Format: MPEG1, MPEG2
Audio Format: Dolby Digital
8
Signal Output: Video Signal: NTSC or PAL
Video: 1.0Vp-p
Audio: Mix Stereo 2.0Vp-p
Output Interface: RCA Output, Coaxial Digital Output
Frequency Response: DVD: 20 Hz-20 KHz
Weight: 1.6 kg (including package)
Dimensions: 160 x 44 x 165 (mm)
Page 9

3
1
1
2
3
4
5
6
7
8
9
10/0
10+
CLEAR
DISPLAY
SUBTITLE
SLOW
PROGRAM
ANGLE
AUDIO
MUTE
REPEAT
SETUP
ZOOM
CH
+
ENTER
CH
V
O
L
DVD/TV/GAME
1
POWER
MENU/PBC
TITLE
RC-PL4
6
4
5
7
8
10
11
9
2
14
12
15
17
16
18
19
20
22
23
24
25
21
13
Remote Control
Preparing the Remote Control
Inserting the Batteries:
Preparing/Using the Remote Control
1. Open the battery compartment cover.
2. Insert the 2 AAA size batteries. Make
sure that the (+) positive and (-) negative
terminals of the batteries are oriented
correctly.
3. Close the battery compartment cover.
Using the Remote Control
Point the remote control towards the
remote infrared sensor on the front panel
of the DVD Player.
9
Page 10

Remote Control Functions
1. MENU/PBC: Selects scenes available on the disc.
POWER: Turns the unit "On" or "Off".
2.
NUMBER: Numeric buttons used to enter number of desired track.
3.
SUBTITLE: Changes the subtitle language on multi-subtitle language discs.
4.
DISPLAY: Displays statistical disc information during playback.
5.
AUDIO: Changes the language on multi-language discs.
6.
ANGLE: Changes the view angle on multi-angle discs.
7.
SETUP: Displays the setup menu.
8.
ENTER/SELECT: Enter confirms the selected item. The four select buttons moves
9.
the curser to select items.
DVD/TV/GAME: Displays the auxiliary input.
10.
VOLUME: Decreases or increases the volume level.
11.
TITLE: Displays the title menu that is stored on the disc.
12.
EJECT: Ejects the disc.
13.
CLEAR: Cancels the entered number.
14.
SLOW: Plays DVD’s slow forward/reverse.
15.
PROGRAM: Plays CD tracks in the order programmed.
16.
MUTE: Mutes the sound.
17.
REPEAT: Repeats play of chapters, titles and discs.
18.
ZOOM: Enlarges or reduces size of picture.
19.
PLAY/PAUSE: Starts/Pauses play.
20.
STOP: Stops play.
21.
BACKWARD: Plays disc fast backwards.
22.
FORWARD: Plays disc fast forward.
23.
PREVIOUS: Skips to previous track/chapter.
24.
NEXT: Skips to next track/chapter.
25.
10
Page 11

Basic Operations
1/2 1/4 1/8 1/16 1/4 1/81/2 1/16
Loading a Disc
1. Turn the car ignition "On" to the accessory position.
2. Press the
POWER button.
3. Insert the disc with printed side facing
up into the disc slot.
4. The disc will then load, and disc playback will start automatically.
Ejecting a Disc
Press the EJECT button to eject the disc
from the DVD player (remove the disc or it
will reload automatically). Push
EJECT
again to reload the disc.
Playing a Disc
Press PLAY/PAUSE to start disc
playback.
Pausing a Disc
Press PLAY/PAUSE during disc
playback to stop play temporarily. Press
PLAY/PAUSE again to resume normal
playback speed.
Note: When the DVD player is in slow play,
fast forward or fast reverse mode, push
PLAY/PAUSE button to resume normal
playback speed.
Volume Control
Press the VOL+button to increase the volume level. To decrease the volume level
push the
VOL- button.
Muting the Sound Level
To lower the sound level while disc play
continues press the
remote control. Press
MUTE button on the
MUTE again to
resume sound to the previous level.
Remote Sensor
Depending on the placement of your DVD
player, you can control the DVD functions
either by pointing the remote control
directly at the DVD player or at the external
remote sensor.
Last Memory
After the engine is turned "Off" or the unit
is powered "Off", the unit will resume play
at the point play was interrupted when the
player is turned back on again.
Fast Forward
While a disc is playing, push the
FORWARD button to play fast forward. With
each press of the button you will scroll
through these five fast forward speeds: 2x,
4x, 8x, 16x and 32x. When maximum speed
is reached, pressing
FORWARD again will
return play to normal speed.
Fast Backward
While a disc is playing, push the
BACKWARD button to play fast backward.
With each press of the button you will
scroll through these five fast backward
speeds: 2x, 4x, 8x, 16x and 32x. When
maximum speed is reached, pressing
BACKWARD again will return play to normal speed.
Slow Play
While the disc is playing, push SLOW to
play disc in slow motion. There are four
slow forward speeds and four slow backwards speeds:
SLOW once, and the speed changes
Push
by one increment. Continue pushing SLOW
until disc play returns to normal speed.
11
Page 12

Basic Operations
1
2
3
4
5
6
7
8
9
10/0
10+
1
Stopping Play
While the disc is playing, push the STOP
button to stop play temporarily. Press
PLAY/PAUSE to resume play at the point
play was interrupted, or press the
ton again to completely stop disk playback.
PLAY/PAUSE to start playback from the
Press
beginning of disc.
Scene Selection
With the DVD in playback mode, follow these
steps:
MENU/PBC. The different scenes
1. Push
available on the disc will be displayed.
2. Use the
SELECTION buttons to
select a desired scene.
3. Push ENTER to confirm the selection.
The disc may also contain submenus. To
make a submenu selection use the
buttons. Then push the ENTER button
TION
to confirm the selection.
Skipping Tracks/Chapters
Push the NEXT button to skip to next
track/chapter on a disc. Push the PRE-
VIOUS
button to skip to previous track/chap-
ter on a disc.
STOP but-
SELEC-
Title Selection
If the DVD has multiple titles recorded
on the disc, a preferred title can be
selected from the title menu to start
playback.
1. Press
TITLE during playback. The title
menu is then displayed.
2. Use the SELECTION buttons to select a preferred title.
3. Confirm selection by the pressing the
ENTER button.
The disc may also contain submenus.
SELECTION buttons to make a
Use the
submenu selection. Then push the
ENTER button to confirm the selection.
Select Subtitle Language
(Only available on multi-subtitle language
discs). Press
SUBTITLE during playback
to display current subtitle language.
Continue pressing
SUBTITLE until
desired subtitle language is reached.
Multi-Audio Language Function
(Only available on multi-audio language
discs). Press AUDIO during playback to
display current audio language. Continue
pressing
AUDIO until desired audio lan-
guage is reached.
Selecting a Specific Track
For those discs with direct track numbers,
use the NUMBER buttons to select desired
track:
When the track is greater than 9, push the
10+ button, then the relative NUMBER button.
12
Auxiliary Sources
Push the DVD/TV/GAME button to
switch to an auxiliary source (i.e. VCR,
TV or game console). Push
DVD/TV/GAME again and the unit will
return to the DVD player.
Page 13

Basic Operations
Repeat Play
While a disc is playing, continue pushing
REPEAT to select from three repeat modes.
For DVD discs:
Push
REPEAT to repeat Chapter.
REPEAT again to repeat Title.
Push
REPEAT again to repeat All.
Push
Push
REPEAT once more to Exit.
For CD discs:
REPEAT to repeat Track.
Push
REPEAT again to repeat All.
Push
REPEAT once more to Exit.
Push
Zoom
While playing a disc, press the ZOOM button to increase or decrease the screen
image. There are magnification levels:
three levels of increased magnification X2,
X3, X4 and three levels of decreased magnification 1/2, 1/3, 1/4. Zoom toggles
through each of the six magnification levels, then returns to normal size on the seventh press of the button.
Function
The function only works for discs having
scenes recorded at different angles.
ANGLE during playback. Each time
Press
the button is pressed, the number of the
angle changes in sequential order.
Program Play
(Only available on certain types of discs)
When disc play is stopped:
1. Push the
PROGRAM button to displayed
the programming screen.
2. Use the
NUMBER buttons to enter the
desired chapter or track.
Example: To play Track 5, then Track 3,
and finally Track 16. Push 3, 5, 10+ 6 in
that order.
3. Use the
to select "Start" and then press
SELECTION buttons
ENTER
to start Program Play.
Note: When the symbol is displayed,
this signifies an invalid operation that is
not accepted by the DVD player.
13
Page 14

Basic Operations
Display Disc Playing Time
Continuously pressing the DISPLAY button
during playback will sequentially display:
Title Elapsed, Title Remain, Chapter
Elapsed, Chapter Remain, and Display Off.
Note: The information displayed is subject
to the type of the disc playing.
PAL/NTSC SETTING
If you find that the picture/audio is distorted, or there is no color (black and white)
check that the correct format (PAL or
NTSC) is selected for the disc playing was
recorded in:
1. There must be no disc in the player.
2. Press the
"Preferences Page".
3. Use the SELECTION buttons to go
to "TV Type" and push to enter the
submenu.
4. Select either PAL or NTSC.
5. Press the
SETUP button and use the
SELECTION buttons to go to the
SETUP button to confirm.
MP3 Operation
This DVD player supports MP3 discs. When
a MP3 disc is loaded, an image similar to
the one below will be displayed.
Use the
SELECTION buttons to move
the cursor through the MP3 directory. Then
ENTER to play desired track. To play
push
another MP3 track, push the
then use the
SELECTION buttons to select
the track. Then push
STOP button,
ENTER to play desired
track.
Note: While a disc is playing, you can push
the PREVIOUS or NEXT buttons
to select the previous track played or the
next track. Then push
ENTER to play that
track.
14
Page 15

Press the SETUP button to display the
Current Item
Explanation of
the current item.
General Setup Pag eGe ner al Setu p Pag e
Go T Ge neral Se p PageGGoo T Too G Geenn ee rr aa ll SSeettuupp P Paa gg ee
TV DISPLAY PSTV D ISPL AY PS
ANGLE MARK ONAN GLE M ARK ON
OSD LANGUAGE ENGOSD LAN GUAGE E NG
CAPTIONS OFFCAP TIONS OF F
SCREEN SAVER ONS CRE EN SAVE R O N
LAST MEMORY ONLAST ME MORY ON
GENERAL SETUP PAGEGEN ERAL SE TUP PAGE
TV DISPLAY PSTV DIS PLAY PS
ANGLE MARK ONANG LE MARK ON
OSD LANGUAGE ENGO SD LANG UAGE EN G
CAPTIONS OFFC APTION S OFF
SCREEN SAVER ONS CREE N SAVER ON
LAST MEMORY ONLAST ME MORY ON
SET TV DISPLAY MODESET TV DISPLAY MODE
4:3 PANSCAN4:3 PANS CAN
4:3 LETTERBOX4:3 LE TTERBO X
16:916:9
Video of Disc
Normal
4:3PS 4:3LB
16:9
4:3
16:9 16:9
System Setup Menu.
Use the
SELECTION buttons to navigate through the menu: General Setup
Page, Audio Setup Page, Video Setup
Page, and Password Setup Page. Confirm
your selection by pressing the
ENTER but-
ton.
In the submenus, use the
buttons to make your selection.
TION
Confirm your selection by pressing the
ENTER button. To navigate up and down
use the
your selection by pressing the
SELECTION buttons. Confirm
ENTER button.
Press to escape the submenu and
make another selection, or press the
SETUP button to exit the setup menu.
Below is an example of the General Setup
Page:
System Setup
SELEC-
Set Screen Ratio
Press the SETUP button to enter the
General Setup Page. Use the
SELECTION buttons to navigate to "TV DISPLAY". Press the
ENTER button to select.
Press the button to enter submenu on
the right. To change the screen settings,
use the
SELECTION buttons to navigate to desired setting. Confirm your selection by pressing the ENTER button.
Press the
SETUP button to exit the system
setup menu.
Note: There are three screen ratio available: (4:3 Panscan, 4:3 Letterbox, 16:9)
They enables user to select a screen ratio
to the match the disc. Below is a chart
showing the various formats.
15
Page 16

System Setup
General Setup Page
OnOn
OffOff
LAST MEMORY ONLAST MEMORY ON
Set Last Memory Function
TV DISPLAY PSTV DI SPLAY P S
ANGLE MARK ONANG LE MA RK ON
OSD LANGUAGE ENGOS D LAN GUAG E ENG
CAPTIONS OFFCAPT IONS OFF
SCREEN SAVER ONS CREE N SAVER ON
Set Last Memory Function
The DVD player can identify the last format
of the disc being used to store the last
frame shown in its memory prior to unit
being powered off. This function memorizes the point at which the disc was
stopped. The disc can be removed from
the unit. Then if the same disc is loaded
again, play will resume from the point at
which it was stopped, providing that no
other disc of the same format was loaded
in the interim.
The DVD player memorizes the two different disc formats (DVD and CD). Each type
of disc can be stopped, removed from the
tray and play can be resumed without
affecting the memory function of the other
two disc formats. If the DVD player is connected to the vehicle's lighter socket, the
last memory function will only operate
when the DVD is powered off by the power
button on the remote control or from the
power button on the unit's front panel.
To activate the Last Memory Function,
press the
General Setup Page. Press the
TION
submenu. Press the
SETUP button to access the
SELEC-
button to access the Last Memory
SELECTION button
to highlight "On". Confirm your selection by
pressing the ENTER button. To exit this
menu, press the
SETUP button.
16
Page 17

System Setup
Video Quality Setup
BrightnessBrigh tne ss
Hig hHig h
LowLow
SShhaarrpp nneessss
SaturationSatura tio n
Luma Dela yLuma Dela y
MediumMe diu m
ContrastCont rast
Gamm aGam ma
SharpnessSharpne ss
HueHue
LowLow
0000
0000
Non eNon e
0000
0000
1T1T
Preference Page
PBCPBC
SSeett PPaarree nntt aall CCoo nntrtrooll
PARENTALPARENTAL
DEFAULTDEFA ULT
TV/TYPETV/ TYPE 1 KID SAFE1 K ID SAFE
2G2 G
3PG3 PG
5 PGR5 PGR
4 PG134 PG1 3
6R6 R
7 NC177 NC1 7
8 ADULT8 AD ULT
PP aasssswwoo rrdd
OKO K
Video Quality Settings
Press the SETUP button to enter the
General Setup Page. Navigate to the Video
Setup Page using the
buttons and press the ENTER button to
select Color Setting.
Press then use the SELECTION buttons
to select between: Sharpness, Brightness,
Contrast, Gamma, Hue, Saturation, and
Luma Delay. Press to select the submenu. Then use the
adjust setting. Press
ting. Press
SETUP to exit the menu.
SELECTION
SELECTION buttons to
ENTER to confirm set-
Parental Control
To set Parental Control, there must
Note:
not be a disc in the player. Press the
SETUP button to enter the General Setup
Page. Navigate to the Preferences Page
using the
press the
Use the
SELECTION buttons and
ENTER button.
SELECTION buttons to select
"Parental". A submenu appears requesting
password. Enter the factory default password (123456) and press
ENTER. Select
suitable parental level by using the
SELECTION buttons and confirm by press-
ENTER button. Press SETUP to exit
ing the
the menu.
17
Page 18

Troubleshooting
Only qualified service personnel should
remove the cover or service this player.
Otherwise the warranty will become
invalid.
If it appears that your DVD unit is faulty,
first consult the list below.
No Power:
• Check to see if the player is set to "On".
• Check the power plug of the main unit
is properly connected.
• Check that power outlet is properly
working.
No Picture:
• Check to see the monitor or TV is
switched to "On".
• Select the correct AV input on the moni-
tor or TV.
• Check the video connection.
Distorted Picture:
• Check the disc for fingerprints and
clean with soft, dry, cloth, wiping from
center to edge.
• A small amount of picture distortion
may appear. This may not be a malfunction.
Completely Distorted Picture:
• The disc format is not according to the
TV used (PAL/NTSC).
No Color in Picture, Distorted or B/W
Picture or Distorted Sound from Hi-Fi
Amplifier:
• The disc format is not according to the
TV used (PAL/NTSC).
No Sound:
• Check audio connections.
• If using a Hi-Fi amplifier, try another
sound source.
Disc Does Not Play:
• Ensure the disc label is facing upwards.
• Clean the disc.
• Check to see if the disc is defective by
trying another disc.
No Return to Start-Up Screen when Disc
is Removed:
• Press POWER to turn "Off" the unit,
then press it again to turn "On" the unit.
• Press RESET button "On" the front panel
of the DVD player.
The Player Does Not Respond to the
Remote Control:
• Aim the remote control directly at the
sensor on the front of the player.
• Avoid all obstacles which may interfere
with the signal path.
• Inspect or replace the remote control
batteries.
No Audio at Digital Output:
• Check the digital connections.
• Check the Digital Audio menu to make
sure that the digital output is correctly set.
• Check if the audio format of the selected audio language matches your receiver’s capabilities.
Buttons Do Not Work:
• Press POWER to turn "Off" the unit,
then press it again to turn "On" the unit.
• Press RESET button on the front of the
DVD unit.
18
Page 19

Send Orders To: Magnadyne Corporation We Accept Checks, Money Orders, Visa and Master Card
ATTN: Consumer Parts Sales Make Checks Payable to: Magnadyne Corporation
P. O. Box 5365
Carson, CA 90749-5365
SHIP TO: (No P.O. Boxes)
LAST NAME FIRST NAME INITIAL
STREET ADDRESS (IF PAYING WITH A CREDIT CARD, YOUR BILLING ADDRESS IS REQUIRED)
CITY STATE ZIP CODE
DAY TIME PHONE NUMBER
CREDIT CARD INFORMATION:
CARD TYPE:
VISA MASTER CARD
CARD NUMBER EXP. MONTH YEAR
NAME - AS IT APPEARS
EXACTLY
ON YOUR CREDIT CARD
Part # Description Qty. Price Each TOTAL
RC-PL4
Subtotal = ________ . ______
California Residents Add Sales Tax = ________ . ______
Shipping and Handling (See Chart) = ________ . ______
TOTAL = ________ . ______
No C.O.D.’s
On regular orders please allow 4-5 weeks for delivery. Please give a shipping address where this order
may be delivered between the hours of 9 a.m. and 5 p.m. weekdays. If UPS is unable to deliver, your order will be
returned and additional shipping charges will be required.
Shipping and Handling
Subtotal + Tax Add
Up to $20.00 $5.00
20.01 to 30.00 5.95
30.01 to 45.00 6.50
45.01 to 70.00 6.95
Over 70.01 7.95
Remote Control
$39.95
Replacement Parts Order Form
19
Page 20

1
2
3
4
5
6
7
8
9
10/0
10+
CLEAR
DISPLAY
SUBTITLE
SLOW
PROGRAM
ANGLE
AUDIO
MUTE
REPEAT
SETUP
ZOOM
CH
+
ENTER
CH
V
O
L
DVD/TV/GAME
1
POWER
MENU/PBC
TITLE
RC-PL4
MovieVision Replacement Parts
DESCRIPTION MODEL # PRICE
DVD Remote Control RC-PL4 $39.95 Each
Warranty
ONE (1) YEAR LIMITED WARRANTY
Magnadyne Corporation or its authorized agents will within 1 year from the date of sale to you, repair,
replace or refund the retail sales price of said product or any part thereof, at the option of the
Magnadyne Corporation or its authorized agents, if said product or part is found defective in
materials or workmanship, when properly connected and operating on the correct power
requirements designated for the specific product. This warranty and Magnadyne Corporation or its
authorized agents obligations hereunder do not apply where the product was; damaged while in the
possession of the consumer, subjected to unreasonable or unintended use, not reasonably
maintained, utilized in commercial or industrial operations, or serviced by anyone other than
Magnadyne Corporation or its authorized agents, or where the warning seal on the product is broken or the power and/or plugs are detached from the unit. Magnadyne Corporation or any of its
authorized agents will not assume any labor costs for the removal and re-installation of any product
found to be defective, or the cost of transportation to Magnadyne Corporation or its authorized
agents. Such cost are the sole responsibility of the purchaser.
This warranty does not cover the cabinet appearance items or accessories used in connection with
this product, or any damage to recording or recording tape, or any damage to the products resulting
from improper installation, alteration, accident, misuse, abuse or acts of nature.
MAGNADYNE CORPORATION OR ITS AUTHORIZED AGENTS SHALL NOT BE LIABLE TO ANYONE
FOR CONSEQUENTIAL OR INCIDENTAL DAMAGES OR CLAIMS EXCEPT THOSE ACCORDED BY
LAW. NO EXPRESSED WARRANTY OR IMPLIED WARRANTY IS GIVEN EXCEPT THOSE SET FORTH
HEREIN. NO IMPLIED WARRANTY SHALL EXTEND BEYOND 1 YEAR FROM THE DATE OF SALE.
This warranty extends only to the original purchaser of the product and is not transferable.
Some states do not allow limitations on how long an implied warranty lasts, and some states do not
allow the exclusion or limitation of incidental or consequential damages, so the above limitations or
exclusion may not apply to you. This warranty gives you specific legal rights, and you may have other
rights that vary from state to state.
Defective merchandise should be returned to the original point of purchase or secondly, to
Magnadyne Corporation, 1111 W. Victoria Street, Compton CA 90220. Return Authorization must be
obtained before sending, or merchandise may be refused.
MV-DVD-PL2-UM Rev. A 2-10-06© Copyright 2006 Magnadyne Corporation
 Loading...