

Page 1
Owner's Manual
Mobile DVD/CD Player
with 8.5" TFT Monitor
Model: MV850
For operational or technical assistance, after reading this manual,
please call us toll free at (800) 638-3600 or visit www.magnadyne.com
Page 2

Features
• This unit can play compatible discs recorded in either
PAL or NTSC format.
• CD, DVD, CD-R, CD-RW, MP3 Compatible.
• Full-function remote control.
Use this Product Safely
Driving
Be aware of road and traffic conditions. Keep the volume at a low level.
Moisture
Do not expose the product to water or excessive moisture. This could cause electrical shorts, fire or other
damage.
Parking
Parking in direct sunlight can produce very high temperatures inside your vehicle. Give the car interior a
chance to cool down before starting playback.
Proper Power Supply
This product is designed to operate with a 12 Volt DC,
negative ground battery system.
• L/R stereo analog audio outputs for connection to
existing head unit auxiliary inputs.
• Composite video output.
Repairs
Contact our customer service representatives. Do not
attempt to disassemble or adjust this product yourself.
Installation
The unit should be installed in a horizontal position.
Cleaning
Use a soft cloth with some purified water to clean the
screen. Do not use any cleaner or chemical to clean the
screen. Usually, a dry cloth will do.
Warning
Be careful not to drop or apply undue pressure to the
front panel of monitor. If the screen cracks due to misuse, the warranty will be voided!
Protecting the Disc Mechanism
Avoid inserting any foreign objects into the slot of this
player. Failure to observe this precaution may cause
malfunction of this unit.
2
Page 3

Contents
Safety Information . . . . . . . . . . . . . . . . . . . . . . . . . . 3
Disc Notes. . . . . . . . . . . . . . . . . . . . . . . . . . . . . . . . 4
Screen and DVD/CD Functions . . . . . . . . . . . . . . 5-7
Location of Functions. . . . . . . . . . . . . . . . . . . . . . 5
Adjusting the Monitor. . . . . . . . . . . . . . . . . . . . . . 6
Inserting a DVD/CD . . . . . . . . . . . . . . . . . . . . . . . 6
Changing to an Auxiliary Input Source. . . . . . . . . 6
Screen’s Remote Control Sensor . . . . . . . . . . . . . 7
Screen’s Wireless Transmitter Module. . . . . . . . . 7
Screen’s Dome Lights . . . . . . . . . . . . . . . . . . . . . 7
Remote Control. . . . . . . . . . . . . . . . . . . . . . . . . . 8-9
Remote Control Functions . . . . . . . . . . . . . . . . 8-9
Safety Information
CAUTION:
THIS MOBILE DVD PLAYER IS A CLASS I LASER PRODUCT. HOWEVER, THIS MOBILE DVD PLAYER USES A
VISIBLE/INVISIBLE LASER BEAM WHICH COULD CAUSE
HAZARDOUS RADIATION EXPOSURE IF DIRECTED.
BE SURE TO OPERATE THE MOBILE DVD PLAYER
CORRECTLY AS INSTRUCTED. USE OF CONTROLS OR
ADJUSTMENTS OR PERFORMANCE OF PROCEDURES
OTHER THAN THOSE SPECIFIED HEREIN MAY RESULT IN
HAZARDOUS RADIATION EXPOSURE. DO NOT OPEN COVERS AND DO NOT REPAIR YOURSELF. REFER SERVICING
TO QUALIFIED PERSONNEL.
CAUTION:
FCC REGULATIONS STATE THAT ANY UNAUTHORIZED
CHANGES OR MODIFICATIONS TO THIS EQUIPMENT
MAY VOID THE USER’S AUTHORITY TO OPERATE IT.
WARNING:
• TO REDUCE THE RISK OF FIRE OR ELECTRIC SHOCK,
DO NOT EXPOSE THIS EQUIPMENT TO RAIN OR
MOISTURE.
• THIS DEVICE IS INTENDED FOR CONTINUOUS OPERATION.
• TO REDUCE THE RISK OF FIRE OR ELECTRIC SHOCK
AND ANNOYING INTERFERENCE, USE ONLY THE
RECOMMENDED ACCESSORIES.
Basic Operation and Special Functions . . . . . . 9-11
Turn the Unit On. . . . . . . . . . . . . . . . . . . . . . . . . . 9
Loading a DVD/CD Disc . . . . . . . . . . . . . . . . . . . 9
Ejecting a Disc . . . . . . . . . . . . . . . . . . . . . . . . . . 9
Play Function . . . . . . . . . . . . . . . . . . . . . . . . . 9-10
DVD Special Functions . . . . . . . . . . . . . . . . . 10-11
CD Special Functions . . . . . . . . . . . . . . . . . . . . . 11
MP3 Function . . . . . . . . . . . . . . . . . . . . . . . . . . 11
Setup Menu. . . . . . . . . . . . . . . . . . . . . . . . . . . 11-14
Installation . . . . . . . . . . . . . . . . . . . . . . . . . . . . . . 15
Wiring Diagram. . . . . . . . . . . . . . . . . . . . . . . . 16-17
Specifications. . . . . . . . . . . . . . . . . . . . . . . . . . . . 17
Troubleshooting . . . . . . . . . . . . . . . . . . . . . . . . . . 18
Replacement Parts . . . . . . . . . . . . . . . . . . . . . 19-20
Warranty . . . . . . . . . . . . . . . . . . . . . . . . . . . . . . . . 20
This product incorporates copyright protection technology
that is protected by method claims of certain U.S. patents
and other intellectual property rights owned by Magnadyne
Corporation and other rights owners. Use of this copyright
protection technology must be authorized by Magnadyne
Corporation and is intended for home and other limited
viewing uses only unless otherwise authorized by
Magnadyne Corporation. Reverse engineering or disassembly is prohibited.
Region Management Information:
This Mobile DVD Player is designed and manufactured to
respond to the Region Management Information that is
recorded on a DVD disc. If the Region number described
on the DVD disc does
ber of this Mobile DVD Player, this Mobile DVD Player
cannot play this disc.
not correspond to the Region num-
3
Page 4
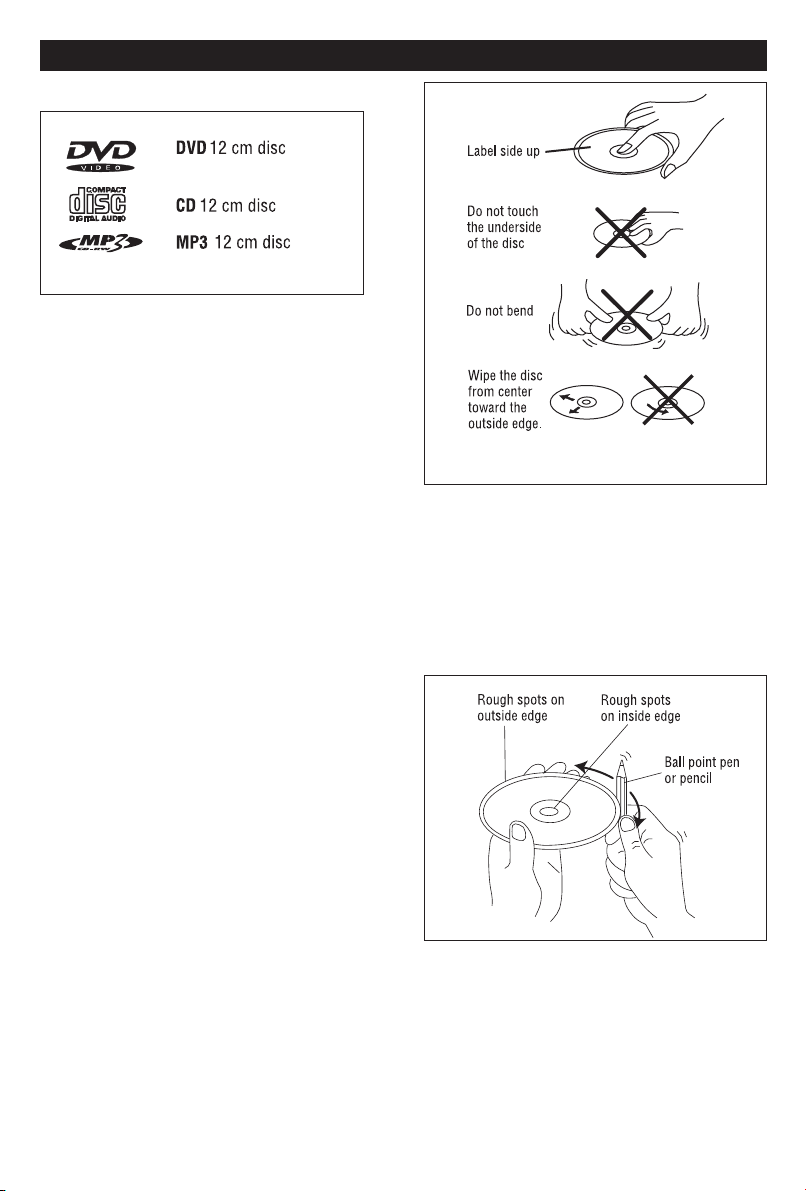
Disc Formats Supported by this Player:
DVD-R/DVD-RAM
Discs which cannot be played with this player:
• DVD-ROM
• CDV
• CD-G
Disc Handling
• Dirt, dust, scratches and warping disc will cause
non operation.
• Do not place stickers on disc or scratch disc.
• Do not warp discs.
• A disc should always be kept in its case when not
in use to prevent damage.
•
Do not place discs in the following places:
1. Direct sunlight.
2. Dirty, dusty and damp areas.
3. Near car heaters.
4. Car seats or dashboard.
Disc Notes
Preparing New Discs with Rough Spots
A new disc may have rough edges on its inside and
outside edges. If a disc with rough edges is used, the
proper setting will not be performed and the player will
not play the disc. Therefore, remove the rough edges
in advance by using a ball point pen or pencil as
shown. To do this, press the side of the pen or pencil
against the inside and outside edges of the disc.
Disc Cleaning
Use a dry soft cloth to wipe the surface. If the disc is
quite dirty, use a soft cloth slightly moist with isopropyl
(rubbing) alcohol. Never use solvents such as benzine,
thinner or conventional record cleaners as they may mar
the surface of the disc.
Note: A disc may become somewhat scratched
(although not enough to make it unusable) depending
on handling and conditions in the usage environment.
4
Page 5
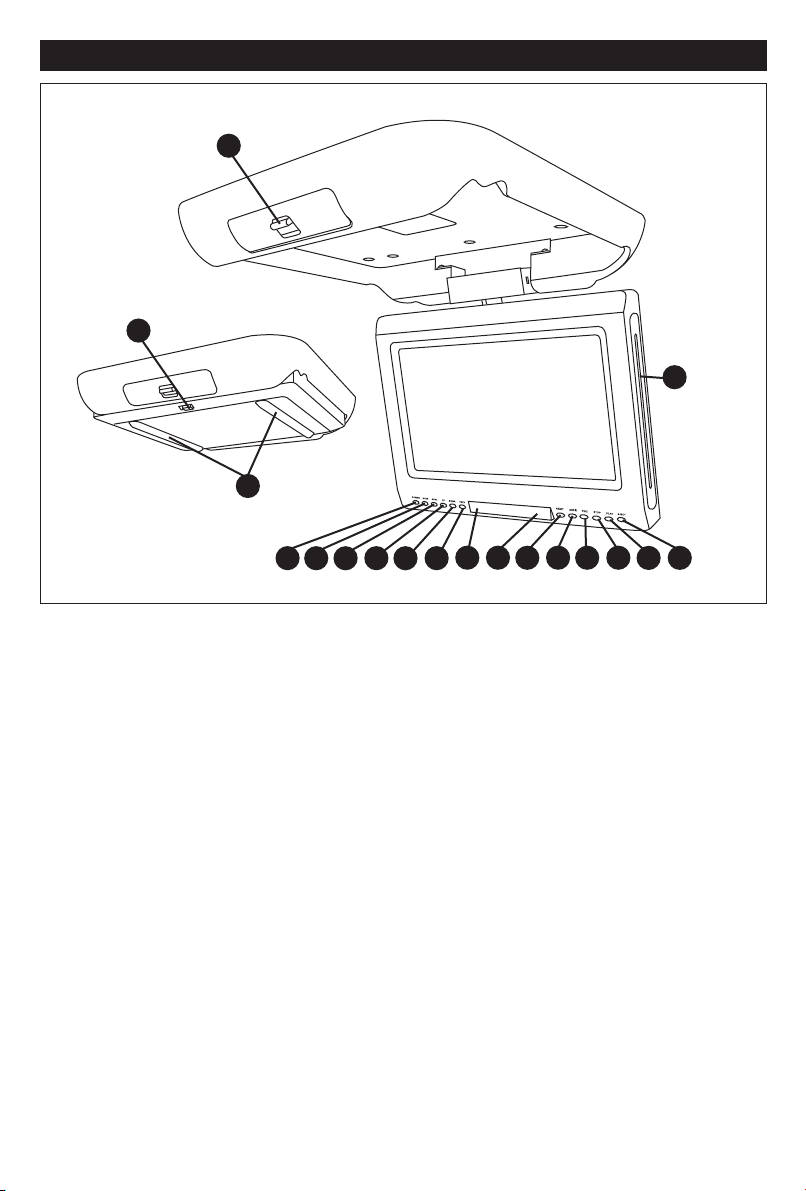
Screen and DVD/CD Functions
1
2
3
4
5
6
7
8
9
10
11
12
13
14
15
16
17
18
1. POWER Button: Press this button to turn the unit
On/Off.
2.
MODE Button: Press this button to change
source between DVD/CD player and an auxiliary input
source.
3. MENU Button: Activates the monitor adjustment
menu.
4. UP Button: Adjusts the monitor’s level in menu mode.
5. DOWN Button: Adjust the monitor’s level in menu
mode.
6. PREV Button: In DVD/CD mode, pressing this button
searches for the beginning of the previous track or
chapter.
7. Infrared Remote Sensor: This is the sensor
infrared remote.
8. Infrared Wireless Transmitter Module: The audio
signal is converted to an infrared light and transmitted to headphones.
the play
for the
9. NEXT Button: In DVD/CD mode, pressing this button
searches for the beginning of the next track or chapter.
10. AUDIO Button: Changes the audio soundtrack on
multi-audio soundtrack DVD disc.
11. PBC Button: Used for playback of video CDs.
12. STOP Button: Stops play of picture or audio.
13. PLAY Button: Press the button to play or stop tem-
porarily.
14. EJECT Button: Press to eject the disc.
15. Disc Slot: To play a DVD/CD, insert a disc into slot
with label facing forward.
16.
Viewing Screen Release: T
the tab then pull down the screen.
the desired viewing position.
17.
Dome Light Switch: Switch to the ON position to
activate the dome lights.
18.
Dome Lights
5
o release the screen, push
Place the screen to
Page 6
Screen and DVD/CD Functions
Turning the Unit On:
Press the POWER on either the remote or the screen
housing.
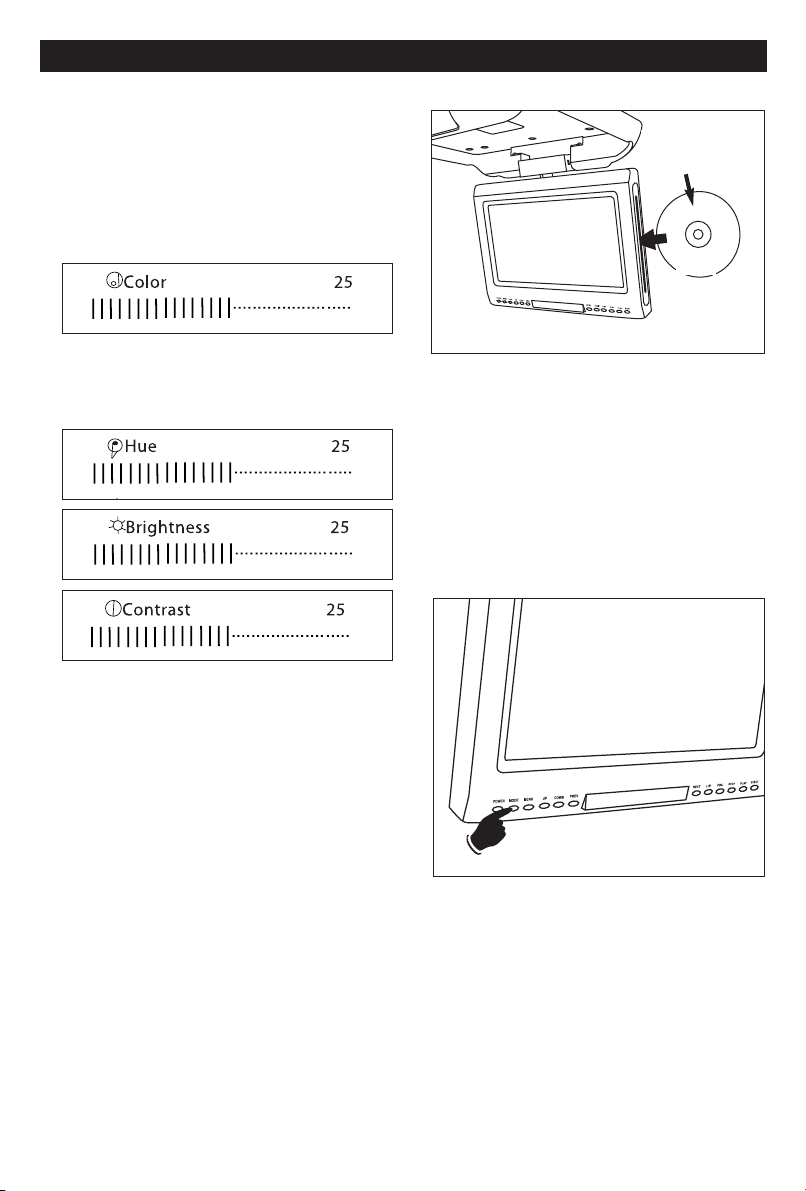
Adjusting the Monitor:
1. Press the MENU button to activate the monitor
adjustment menu. The following will be displayed
on the screen:
2. Use the UP and DOWN buttons on the screen
housing to adjust the screen color.
3. Press the MENU button again to select the next
desired monitor adjustment item.
Inserting a DVD/CD
Label Side
Facing Forward
Label
To play a DVD/CD, insert a disc into slot with label
side facing forward.
Last Memory
After the engine is turned “Off” or the unit is powered
“Off”, the unit will resume play at the point play was
interrupted when the unit is turned back on again.
Changing to an Auxiliary Input Source
Press the MODE button to change
between DVD/CD player and an auxiliary input
source. “GAME IN” will be displayed on the screen.
the play source
4. Press the MENU button again until the monitor
adjustment menu disappears or wait 10 seconds
and the menu will automatically disappear.
Note: When pressing the MENU button after the
Contrast screen “AV MODE DVD” appears on the
screen. If the UP or DOWN button is pushed either
“DVD” or “GAME IN” will appear permanently on the
screen. To eliminate the words from permanently
appearing on the screen press the MENU button 6
times.
6
Page 7

Screen and DVD/CD Functions
Screen’s Remote Control Sensor:
Screen’s Remote
Control Sensor
Screen’s remote control sensor receives the remote’s
infrared control signals.
Screen’s Wireless Transmitter Module:
Screen’s Dome Light:
Dome Light Switch
Dome Lights
To turn on the dome lights, slide the dome light
switch to the On position. Slide the dome light switch
to the Off position to turn them off.
Note: The dome lights will not automatically illuminate whenever the vehicle doors are open. The lights
must be activated manually.
Screen’s Wireless
Transmitter Module
Optional IR Headphone
Model: HP-400
The audio signal is transmitted via infrared light to
the headphones.
7
Page 8

POWER
AUDIO
ANGLE
SUBTITLE
DISPLAY
SETUP
PLAY/PAUSE
PROG
CLEAR
PREV
REV
SLOW
REPEAT
TITLE
NEXT
FWD
STEP
A-B
MODE
VOL–
ZOOM
PBC
MENU
SEARCH
ENTER
RETURN
STOP
EJECT
VOL+
TFT/POWER
TFT
FUNCTION
MENU
MUTE ROTATE
1
4
7
2
5
8
0
10+
3
6
9
1
9
10
6
18
19
11
13
22
23
24
14
15
17
5
2
3
4
16
20
21
8
12
7
25
1. POWER: Turns the unit On/Off.
2. AUDIO: Press the button to change audio
3. ANGLE: Press the button to change DVD’s
4. SUBTITLE: Press the button to change DVD’s
5. DISPLAY: Press the button to display disc
6. SETUP: Press the button to enter or cancel
7. ENTER: Press the button to enter setting.
languages.
picture angle.
subtitle languages.
information.
SETUP MENU.
Remote Control Locations
PROG: Press the button to program the play
8.
9. PREV/NEXT:
10. REV/FWD:
11. SLOW: Press the button to slow play DVD to
12. REPEAT: For DVD’s, press the button to repeat
13. TITLE: Display DVD’s title.
14. MODE: Select DVD and auxiliary inputs func-
15. EJECT: Ejects the disc.
16. 0 - 9: Press these buttons to input num-
17. SEARCH: Locate title, chapter, time and play.
18. MENU: Display DVD’s menu screen.
19. STOP: Stop play of picture or audio.
20. RETURN: Press the button to return to previ-
21. VOL-/VOL+: Press these buttons to decrease or
22. TFT ON/OFF: Turns LCD power On/Off.
23. MENU: Press the button to change the
24. ROTATE: Rotates the picture on the screen.
25. MUTE: Press the button during play to stop
8
order of CD tracks.
Press these buttons to search for
the beginning of track or chapter.
Scan backward and forward.
1/2, 1/4, 1/8, 1/16, or 1/32 speed.
title or chapter. For CD’s, press the
button to repeat a track or the entire
disc.
For MP3’s, press the button to
repeat file, directory or the entire disc.
tions.
bers.
ous item.
increase volume level.
screen’s settings: Color, Hue,
Brightness, Contrast. To adjust the
screen’s settings use the screen’s Up
and Down buttons or the remote
controls buttons.
audio.
Page 9

POWER
AUDIO
ANGLE
SUBTITLE
DISPLAY
SETUP
PLAY/PAUSE
PROG
CLEAR
PREV
REV
SLOW
REPEAT
TITLE
NEXT
FWD
STEP
A-B
MODE
VOL–
ZOOM
PBC
MENU
SEARCH
ENTER
RETURN
STOP
EJECT
VOL+
TFT/POWER
TFT
FUNCTION
MENU
MUTE ROTATE
1
4
7
2
5
8
0
10+
3
6
9
30
29
26
27
28
31
32
Remote Control Locations and Operation
26. Use CURSOR buttons when selecting
27. STEP: For DVD frame-by-frame play.
28. A-B: Press the button during play to set
29. PLAY/PAUSE: Press the button to play or stop tem-
30. CLEAR: Clear numbers which have been
31. ZOOM: Press the button during playback of
32. PBC: Video disc playback control. DVD’s
setting items or to move cursor up,
down, left or right.
point A and point B, then program A
and B will be played repeatedly.
Press the button again to cancel.
porarily.
input.
DVD to enlarge an area on the
screen.
subtitle languages.
BASIC OPERATION
Turn the Unit On
1. Turn the car ignition on to the accessory position.
2. Press the POWER button.
Loading a Disc
1.Insert the disc with printed side facing forward into
the disc slot. The player will automatically search
the disc.
Volume Level Adjustment
Press the VOL-or VOL+buttons on the remote to
increase or decrease volume level.
Muting the Sound Level
Press the MUTE button during play to stop audio.
Press the
MUTE button again to restore sound to the
previous level.
Ejecting a Disc
Press the EJECT button to eject disc.
PLAY FUNCTION
Stopping Play
Press the STOP button to stop the disc playback.
Press the PLAY/PAUSE button on the remote to con-
tinue with normal playback at the position it was
stopped. When the disc is removed or the
ton is pressed again, the resume function is cancelled.
Pausing Play
Press the PLAY/PAUSE button to pause disc during
playback. Press the button again to resume play.
Scan Forward and Backward
Press the REV or FWD button to scan backward or
forward.
Return to Previous Chapter or Track
Press the PREV button during playback and the play
returns to the beginning of the previous chapter or
track.
9
STOP but-
Page 10

PLAY FUNCTION (Continued)
Normal Playback 1/2 1/4 1/8 1/16 1/32
1
Basic Operation and Special Functions
DVD SPECIAL FUNCTIONS
Advance to Next Chapter or Track
Press the NEXT button during playback and the play
advances to the beginning of the next chapter or
track.
Removing Disc
Press the STOP button, then press the EJECT button
to eject the disc.
Searching for a Specific Chapter or Track
1. Press the SEARCH button on the remote.
2. Press numerical key to select track, chapter or
time.
3. Press ENTER or PLAY to play the selected track,
chapter or time.
Repeat Play
For DVD’s, press the REPEAT button to repeat title or
chapter.
For CD’s, press the REPEAT button to repeat a track or
the entire disc.
For MP3’s, press the REPEAT button to repeat file,
directory or all.
A-B Repeat
Press the A-B button during play to set point A then
press again to set point B. The system will repeatedly play the programmed section until the
is pressed again which cancels the function.
A-B button
Slow Play
Each time the SLOW button is pressed during DVD
play the speed is reduced as follows:
Step Play (Frame by Frame)
Pressing the STEP button will pause DVD play.
Pressing the STEP button again will advance play to
the next frame. Repeated pressing will advance the
DVD frame by frame. Press the
cel this feature.
Display DVD Menu Screen
1. Press the MENU button to display the menu
screen of the DVD.
2. Use the cursor button to select item.
3. Press ENTER or PLAY to play the selected.
View Angles of DVD
Press the ANGLE button to select the different angles
to view.
Note: If the DVD doesn’t have multi-angle function,
this function isn’t applicable.
PLAY button to can-
DVD Zoom
Press the ZOOM button during playback of DVD to
enlarge an area on the screen.
Note: In zoom mode, press the
move images up, down, left or right to find the desire
image to zoom in on.
10
CURSOR buttons to
Page 11

Special Functions and Setup Menu
DVD SPECIAL FUNCTIONS (Continued)
SETUP MENU
Multi-Subtitle Language Function
Press the SUBTITLE button during playback. Each
time the button is pressed the subtitle language on
the screen changes.
Multi-Audio Language Function
Press the AUDIO button during playback. Each time
the button is pressed the audio soundtrack language
on the screen changes.
CD SPECIAL FUNCTIONS
Program CD Play
1. While the CD is playing push the STOP button
twice (x2).
2. Use the CURSOR buttons to select the first
desired track. Then press ENTER button to confirm. For additional tracks repeat Step 2.
3. Press PLAY button to start Program Play.
Random CD Play
1. While the CD is playing push the STOP button
twice (x2).
2. Push the PROG buttons twice (x2) to bypass the
programming screen.
3. “CD Random” will be displayed, then push PLAY
button to start Random CD Play.
MP3 FUNCTION
This unit supports MP3 discs. Use the CURSOR buttons to move the cursor through the MP3 directory.
Then push ENTER to play desired file.
Note: While a disc is playing, push the
button to play the previous or next file on the disc.
PRE or NEXT
1. Press the SETUP button on the remote control, and
the setup menu will be displayed. Pressing SETUP
during disc play will pause play. Play will resume
when the setup screen is cancelled.
2. Use the
3. Press the ENTER button to confirm the selection.
Note:
• Setup the "DISC" function when there is no disc in
• Press the
Descriptions of the Setup Menu Functions:
DISC - Disc Setting
VIDEO - Video Setting
AUDIO - Audio Setting
DISPLAY - OSD Language Setting
OTHERS - Other Functions Setting
CURSOR buttons to select
desired function.
the DVD player. This function is not available during
disc playback.
RETURN button to go back to the last setting. For example, if you input the wrong password
in the "PARENTAL LOCK" function, press the
RETURN button to return to the last setting so the
password can be input again.
11
Page 12

Setup Menu
DISC SETTINGS
Use the CURSOR buttons to make DISC
setting selections. Press the ENTER button to confirm
the setting.
Menu Language Setting
Use this screen to setup the disc menu language.
Audio Setting
Use this screen to setup the audio language on multilanguage discs.
Subtitle Language Setting
Use this screen to setup the subtitle language on
multi-subtitle language discs.
Parental Lock Rating
Use this screen to setup the Parental Lock Rating. This
function helps restrict viewing movies with certain ratings (e.g., PG-13, R, etc.) as supported by each DVD.
Parental Lock Password Setting
Use this screen to setup a four-digit parental lock password. On the remote control, use this NUMERIC keys to
enter the password. Press the ENTER button to confirm the
password.
12
Page 13

Setup Menu
VIDEO SETTINGS
Use the CURSOR buttons to make
VIDEO setting selections. Press the ENTER button to
confirm the setting.
TV Aspect Setting
Use this screen to setup the desired TV Aspect
Ratio.
AUDIO SETTINGS
Use the CURSOR buttons to make
AUDIO setting selections. Press the ENTER button to
confirm the setting.
DISPLAY SETTINGS
Use the CURSOR buttons to make OSD
Language setting selections. Press the ENTER button
to confirm the setting.
Still Mode Setting
Use this screen to setup the mode to display still pictures. Choose between three modes: Auto, Field and
Frame.
OSD Language Setting
Use this screen to setup the desired OSD Language.
13
Page 14

Setup Menu
OTHER FUNCTION SETTINGS
Use the CURSOR buttons to make
OTHERS setting selections. Press the ENTER button
to confirm the setting.
JPEG Time Setting
Use this screen to setup the JPEG image display
time from 1 to 180 seconds.
Last Play Function
The Last Play function automatically bookmarks the
position on a DVD/CD disc and remembers the playback settings. Playback will resumes at the position
which the player was turned off, the disc was ejected,
or the power was cut off.
Turning Off Last Play Function
Press the SETUP button to display the main menu.
use the CURSOR buttons to select the OTHERS menu,
LAST PLAY and ON. Press the ENTER button to
then
confirm the setting.
Then
Default Settings
Use this screen to reset all menus to the factory
default setting
.
14
Page 15

Installation
Disassemble the metal support bracket from
the unit by unscrewing the six screws.
Mount support bracket using screws
(not supplied) with the “This Side Mounts
Against Roof/Ceiling” label against ceiling
support beam(s).
Warning: Take extra care to not penetrate the
roof of your car.
Ceiling
Support
Beams
This
Side
Mou
nts
Again
st
Roo
f/C
eil
ing
Optional:
Some vehicles may require an optional
custom MovieVision bracket. The long
slots in the MV850 mounting bracket
match up to the screw holes on the
MovieVision bracket.
Attach the screen housing to the metal support
bracket using the screws removed in Step 1.
1
2a
2b
3
Movievision Bracket
(not supplied)
MV850
Bracket
MV850
Bracket
15
Page 16

Yellow (Video Out)
White (L-Audio Out)
White (R-Audio Out)
Audio Video Output (Female RCA)
Mini DIN Connector
Black Wire - Ground
Red Wire - Ignition
Yellow Wire - Battery
Yellow (Video In)
Red (L-Audio In)
Red (R-Audio In)
Audio Video Input (Female RCA)
3 AMP
3 AMP
Wiring Diagram
16
Page 17

Wiring Instructions
Power Harness Wiring:
The 3 wire harness provides battery and ignition 12
volts as well as a chassis ground. Route the power
harness to the point in the vehicle that you will make
the connections.
Red Wire: The red wire in the harness should be con-
nected to a +12 volt power wire that is turned on
and of by the position of the ignition key.
Supply Voltage: 12V DC, Negative Ground
Current Consumption: 20 watts maximum
Screen Format: 16:9
Resolution: 480 x 234 pixels
A/V input: 1
A/V output: 1
Compatible Discs:
IR Transmitter:
Dimensions (mm): 260(w) x 245(d) x 48(h)
DVD-Video Disc: DVD 8cm or 12 cm disc
(single/double-sided discs)
Compact Disc: CD 12 cm disc
MP3: MP3 12 cm disc
Yes
Yellow Wire: The yellow wire in the harness should
be connected to a constant +12 volt wire that is
NOT turned on and off by the position of the ignition key.
Black Wire: The black wire in the harness should be
connected to the chassis of the vehicle using a
ring terminal and self tapping screw or bolt and
nut.
Specifications
17
Page 18

Troubleshooting
Only qualified service personnel can remove the
cover or service this player. Otherwise the warranty
will become invalid.
No Power:
• Check to see if the player is set to “On”.
• Check to see that the power plug of the main unit is
properly connected.
• Check to see if that power to the outlet is properly
working.
No Picture:
• Check to see that the monitor is switched to “On”.
• Check that the correct Mode is selected (DVD or AV)
by pushing the MODE button.
• Check the video connection.
Distorted Picture:
• Check the disc for fingerprints and clean with soft
dry cloth, wiping from center to edge.
• A small amount of picture distortion may appear. This
may not be a malfunction.
No Sound:
• Check audio connections.
• If using a Hi-Fi amplifier, try another sound source.
Disc Does Not Play:
• Ensure the disc label is facing forward.
• Clean the disc.
• Check to see if the disc is defective by trying another disc.
The Player Does Not Respond to the Remote Control:
• Aim the remote control directly at the sensor on the
front of the housing.
• Avoid all obstacles which may interfere with the signal path.
•
Inspect or replace the remote control batteries.
Buttons Do Not Work:
• Press POWER to turn “Off” the unit, then press it
again to turn “On” the unit.
Volume different for DVD and CD:
• This is due to different recording methods
18
Page 19

Replacement Parts Order Form
Send Orders To: Magnadyne Corporation We Accept Checks, Money Orders, Visa and Master Card
ATTN: Consumer Parts Sales Make Checks Payable to: Magnadyne Corporation
P.O. Box 5365
Carson, CA 90749-5365
SHIP TO: (No P.O. Boxes)
LAST NAME FIRST NAME INITIAL
STREET ADDRESS (IF PAYING WITH A CREDIT CARD, YOUR BILLING ADDRESS IS REQUIRED)
CITY STATE ZIP CODE
DAY TIME PHONE NUMBER
CREDIT CARD INFORMATION:
CARD TYPE: VISA MASTER CARD
CARD NUMBER EXP. MONTH YEAR
NAME - AS IT APPEARS
EXACTLY
ON YOUR CREDIT CARD
Part # Description Qty. Price Each TOTAL
MV1600RM
Subtotal = ________ . ______
California Residents Add Sales Tax = ________ . ______
Shipping and Handling (See Chart) = ________ . ______
TOTAL = ________ . ______
No C.O.D.’s
On regular orders please allow 4-5 weeks for delivery. Please give a shipping address where this order
may be delivered between the hours of 9 a.m. and 5 p.m. weekdays. If UPS is unable to deliver, your order will be
returned and additional shipping charges will be required.
Shipping and Handling
Subtotal + Tax Add
Up to $20.00 $5.00
20.01 to 30.00 5.95
30.01 to 45.00 6.50
45.01 to 70.00 6.95
Over 70.01 7.95
Remote Control
$39.95
Replacement Parts Order Form
19
Page 20

Order By Mail
1
4
7
2
5
8
0
10+
3
6
9
Replacement Parts for MovieVision
MovieVision Replacement Parts
®
DESCRIPTION MODEL # PRICE
DVD Remote Control MV1600RM $39.95 Ea.
Warranty
ONE (1) YEAR LIMITED WARRANTY
Magnadyne Corporation or its authorized agents will within 1 year from the date of sale to you, repair, replace or
refund the retail sales price of said product or any part thereof, at the option of the Magnadyne Corporation or its
authorized agents, if said product or part is found defective in materials or workmanship, when properly connected
and operating on the correct power requirements designated for the specific product. This warranty and
Magnadyne Corporation or its authorized agents obligations hereunder do not apply where the product was;
damaged while in the possession of the consumer, subjected to unreasonable or unintended use, not reasonably
maintained, utilized in commercial or industrial operations, or serviced by anyone other than Magnadyne
Corporation or its authorized agents, or where the warning seal on the product is broken or the power and/or plugs
are detached from the unit. Magnadyne Corporation or any of its authorized agents will not assume any labor costs
for the removal and re-installation of any product found to be defective, or the cost of transportation to Magnadyne
Corporation or its authorized agents. Such cost are the sole responsibility of the purchaser.
This warranty does not cover the cabinet appearance items or accessories used in connection with this product, or
any damage to recording or recording tape, or any damage to the products resulting from improper installation,
alteration, accident, misuse, abuse or acts of nature.
MAGNADYNE CORPORATION OR ITS AUTHORIZED AGENTS SHALL NOT BE LIABLE TO ANYONE
FOR CONSEQUENTIAL OR INCIDENTAL DAMAGES OR CLAIMS EXCEPT THOSE ACCORDED BY LAW.
NO EXPRESSED WARRANTY OR IMPLIED WARRANTY IS GIVEN EXCEPT THOSE SET FORTH HEREIN.
NO IMPLIED WARRANTY SHALL EXTEND BEYOND 1 YEAR FROM THE DATE OF SALE.
This warranty extends only to the original purchaser of the product and is not transferable.
Some states do not allow limitations on how long an implied warranty lasts and some states do not allow the
exclusion or limitation of incidental or consequential damages, so the above limitations or exclusion may not apply
to you. This warranty gives you specific legal rights and you may have other rights that vary from state to state.
Defective merchandise should be returned to the original point of purchase or secondly, to Magnadyne
Corporation, 1111 W. Victoria Street, Compton CA 90220. Return Authorization must be obtained before sending,
or merchandise may be refused.
© Copyright 2006 Magnadyne Corporation
MV850-UM Rev. A 3-9-06
 Loading...