


Magnadyne M4100CD User Manual
Installation and
Operations Manual
MODE SCAN
SHIFT
SEL
VOL
VOL
POWER
AM/FM/CD RECEIVER
1 2 MEM 3 PGM 4 RPT 5 RDM 6 INT AS/PS
LOUD/DIM
BAND
DISP
EJECT
OPEN
ELAPSE
MUTE
M4100CD
Water-Resistant
AM/FM/WB and CD Stereo Receiver
®
A Registered Trademark of Magnadyne Corporation
M4100CDUM.qxd 07/24/03 4:29 PM Page 1
Location and Function of Control at a Glance
2
21
22
4
3
1
20
2
19 18 17 16
15
14
5
MODE SCAN
SHIFT
SEL
VOL
VOL
POWER
AM/FM/CD RECEIVER
1 2 MEM 3 PGM 4 RPT 5 RDM 6 INT AS/PS
LOUD/DIM
BAND
DISP
EJECT
OPEN
ELAPSE
MUTE
6 7 8 9 10 11 12 13
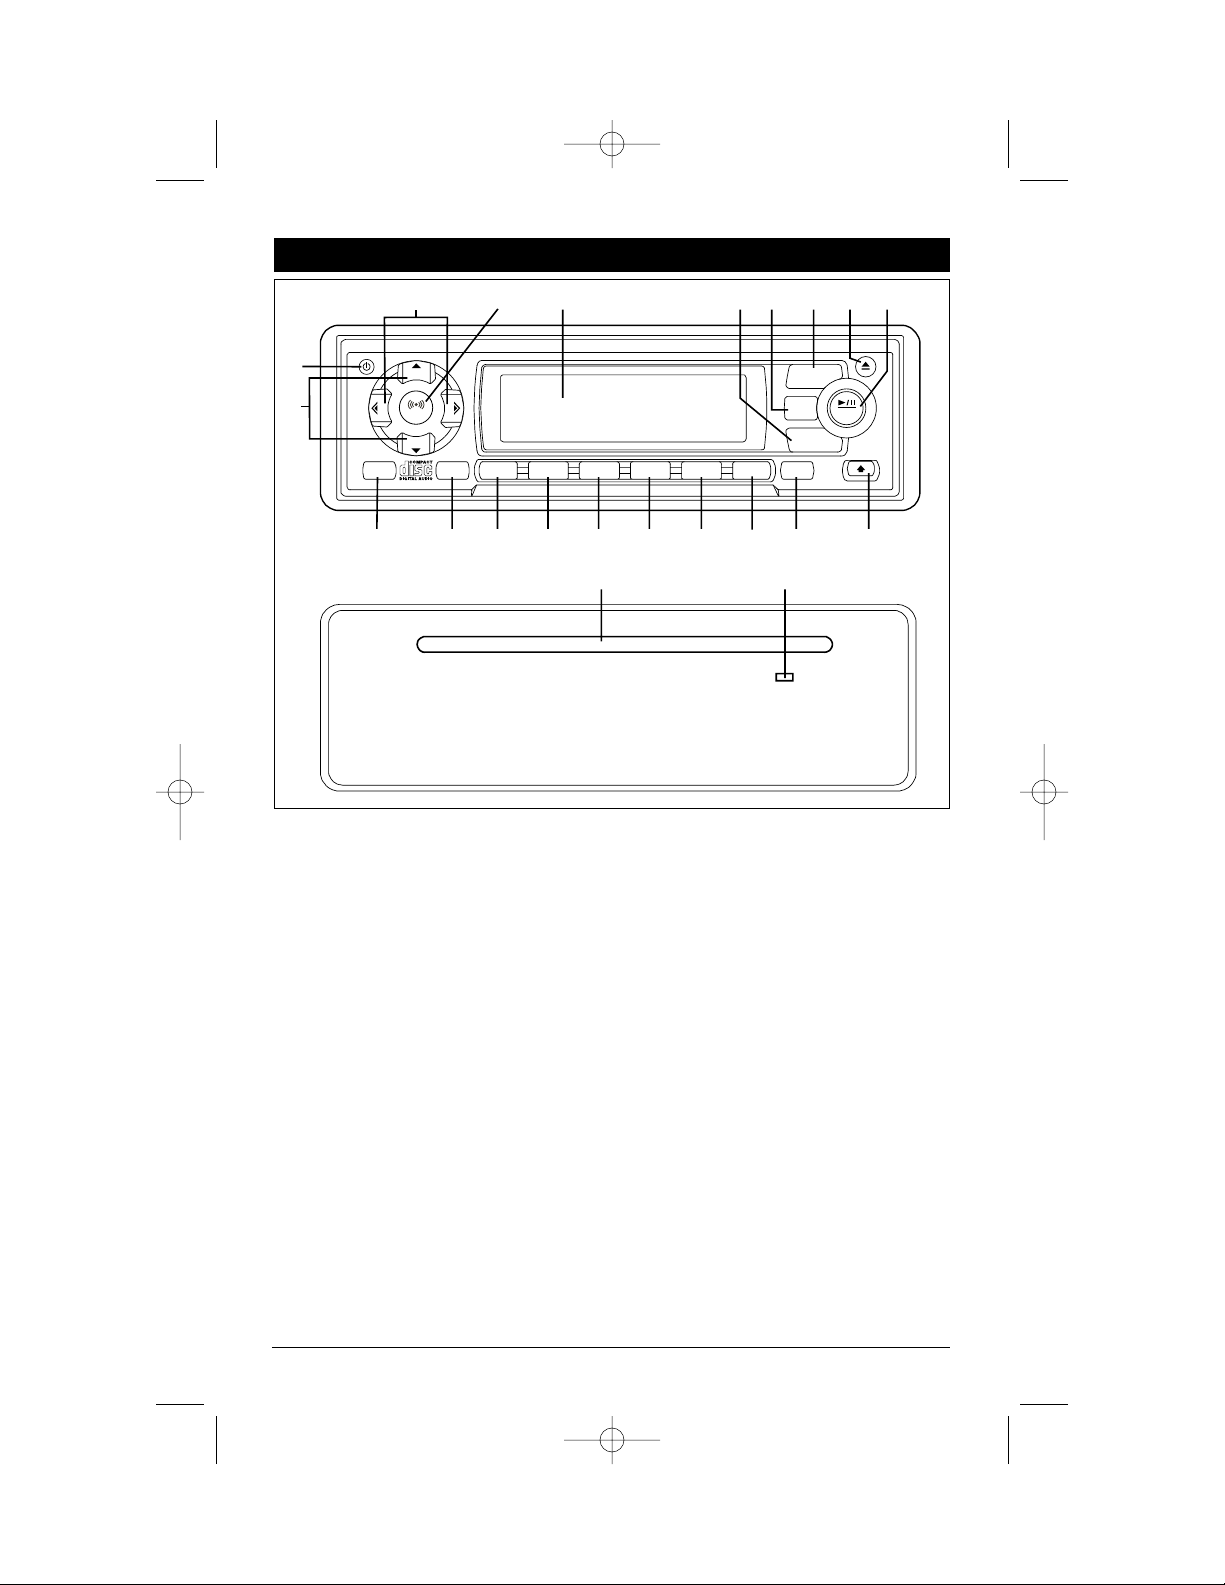
1. Power Button: Turns the unit On/Off.
2. Audio Control Buttons: Adjusts the Volume, Bass, Treble, Balance and Fader.
3. Multi-Function Buttons: Adjusts the radio frequency, sets the clock, and changes CD tracks.
4. Mode Button: Changes sequentially through the following sources:
Radio Tuner > CD > CD Changer > Auxiliary > Radio Tuner.
5. Radio Station Scan/Shift Button:
Radio: Scans through the strong stations in the current radio band.
CD: Press this button to access secondary function keys in CD mode.
6. Multi-Function Button 1:
Radio: Recalls a memorized radio station, and programs a radio station into memory (See Radio
Operation for more information).
7. Multi-Function Button 2/MEM:
Radio: Recalls a memorized radio station, and programs a radio station into memory (See Radio
Operation for more information).
CD: Programs a CD track into memory (See CD Operation for more information).
8. Multi-Function Button 3/PGM:
Radio: Recalls a memorized radio station, and programs a radio station into memory (See Radio
Operation for more information).
CD: Enters CD track program mode (See CD Operation for more information).
M4100CDUM.qxd 07/24/03 4:29 PM Page 2

9. Multi-Function Button 4/RPT:
Radio: Recalls a memorized radio station, and programs a radio station into memory (See Radio
Operation for more information).
C
D:
Enters CD track repeat mode (See CD Operation for more information).
10. Multi-Function Button 5/RDM:
Radio: Recalls a memorized radio station, and programs a radio station into memory (See Radio
Operation for more information).
C
D:
Plays all tracks on the current disc in random order (See CD Operation for more information).
11. Multi-Function Button 6/INT:
Radio: Recalls a memorized radio station, and programs a radio station into memory (See Radio
Operation for more information).
CD: Plays the first 10 seconds of each track on the current disc (See CD Operation for more information).
12. AS/PS/Elapse Button:
Radio: Automatic memory storing and preset scan (See Radio Operation for more information).
C
D:
Displays elapsed time of current CD track.
13. Open Button: Access the CD slot, or allows the removal of the detachable face.
14. Play/Pause and Mute Button:
Radio/Aux In: Mutes audio level.
C
D:
Pauses the CD player.
15. Eject Button: Ejects the disc from the CD Slot when the front panel is open.
16. Display Button: Displays either the clock, radio station or track number. (See setting the clock for more
information).
17. Band Button: Selects the radio band in the following order: FM1, FM2, AM, WX.
18. Loud Button: Enhances sound quality by boosting the bass and treble tones.
DIM Button: Adjusts the brightness of the LCD display backlight.
19. Display Area: Displays Radio, CD and Clock functions.
20. Audio Mode Selection Button: Selects the desired audio mode in the following order: Volume, Bass,
Treble, Balance and Fader.
Audio Beep: Press and hold the SEL button (20) for more then 2 seconds to turn beep on/off.
21. CD Slot: To access the CD Slot located behind the front panel, press the Open button.
22. Reset Button: The Reset Button is located behind the CD Door, below the CD Slot. It must be pressed
with either a ballpoint pen tip or paper clip for any of the following reasons:
• Initial installation of the unit when all wiring is completed.
• All the function buttons do not operate.
• Error symbol on the display.
If there is a disc in the slot when the reset button is pressed the disc will be ejected.
Location and Function of Control at a Glance
3
M4100CDUM.qxd 07/24/03 4:29 PM Page 3

To Detach the Front Panel
1. Press the OPEN button (13), and the front
panel will slide down to a flat position.
2. With the front panel down, press the bottom
button of the front panel upward and pull the
front panel out from the panel bracket.
3. For safekeeping, store the front panel in the
supplied protective case immediately after being
removed.
To Install the Front Panel
1. While the panel bracket is in the down posi-
tion, insert the front panel.
2. After the front panel is securely inserted on
the panel bracket, push he front panel into position, the unit is now ready for operation.
4
Open
Button
Bottom Button
Using the Detachable Front Panel
M4100CDUM.qxd 07/24/03 4:29 PM Page 4