

Page 1
Operation
and Installation
Manual
GP S
NAVIGATION BOX
M1-NAV
Navigation Module
M1-NAV 8/4/08 1:27 PM Page 1
Page 2

Please read this section carefully and follow all the instructions given. This will help ensure reliable operation and extend the service life of the unit.
Caution
1. You, as the driver, are solely responsible for the safe operation of your vehicle and the safety of your
passengers and pedestrians, and abiding all state and local traffic regulations. Do not use any features of this system to the extent it distracts you from safe driving. Your first priority while driving
should always be the safe operation of your vehicle. Magnadyne will not accept any responsibility
whatsoever for accidents and/or injuries resulting from failure to observe these precautions or safety
instructions.
2. Only look at the display when you are in a safe driving situation!
3. The road layout and driving rules take precedence over the instructions of the instructions of the navigation system. Only follow the instructions when circumstances and driving rules permit it!
4. The direction statements of the navigation system given do not release the driver of the vehicle from
his or her duty of care or personal responsibility.
5. Plan routes before your leave. If you want to plan a new route, pull over and stop driving.
WARNING!
Do not disassemble, modify the unit or attempt to repair the product yourself. If the product needs to be
repaired, consult your dealer.
Operating Environment
1. Mount in a safe location to avoid high temperatures (e.g. heater duct.). Do not install the unit in a
spot exposed to direct sunlight or excessive heat or humidity. Also avoid places with too much dust
or the possibility of water splashing.
2. Protect the unit from getting wet. If the unit gets wet, unplug the unit and bring it to an authorized
service department.
3. Avoid heavy vibrations and shaking.
4. Failure to follow these instructions may lead to damage to the unit.
Electromagnetic Compatibility
Please note that only the supplied shielded cable should be used with this unit. For optimal performance, maintain a distance of a least 10ft. from sources of high-frequency and magnetic interference
(televisions, loudspeaker systems, mobile telephone and so on). This will help avoid malfunctions and
loss of data.
Safety Instructions
2
• THIS DEVICE IS INTENDED FOR CONTINUOUS
OPERATION.
• TO REDUCE THE RISK OF FIRE OR ELECTRIC
SHOCK AND ANNOYING INTERFERENCE, USE
ONLY THE RECOMMENDED ACCESSORIES.
Caution
• FCC REGULATIONS STATE THAT ANY UNAUTHORIZED CHANGES OR MODIFICATIONS TO THIS
EQUIPMENT MAY VOID THE USER’S AUTHORITY
TO OPERATE IT.
• TO REDUCE THE RISK OF FIRE OR ELECTRIC
SHOCK, DO NOT EXPOSE THIS EQUIPMENT TO
RAIN OR MOISTURE.
M1-NAV 8/4/08 1:27 PM Page 2
Page 3

3
Index
Safety Instructions . . . . . . . . . . . . . . . . . . . . . . . . . . . . . . . . . . . . . . . . . . . . . . . . . . . . . . . . . . . . . . . . 2
Caution. . . . . . . . . . . . . . . . . . . . . . . . . . . . . . . . . . . . . . . . . . . . . . . . . . . . . . . . . . . . . . . . . . . . . . . . . 2
Voice Control Set-up . . . . . . . . . . . . . . . . . . . . . . . . . . . . . . . . . . . . . . . . . . . . . . . . . . . . . . . . . . . . . . 4
Selecting the Navigation Source . . . . . . . . . . . . . . . . . . . . . . . . . . . . . . . . . . . . . . . . . . . . . . . . . . . . . 4
Selecting a Different Source from Navigation Screen . . . . . . . . . . . . . . . . . . . . . . . . . . . . . . . . . . . . . 5
Calibrating the Screen . . . . . . . . . . . . . . . . . . . . . . . . . . . . . . . . . . . . . . . . . . . . . . . . . . . . . . . . . . . . . 5-6
Loading a Map . . . . . . . . . . . . . . . . . . . . . . . . . . . . . . . . . . . . . . . . . . . . . . . . . . . . . . . . . . . . . . . . . . 6-7
Getting Started . . . . . . . . . . . . . . . . . . . . . . . . . . . . . . . . . . . . . . . . . . . . . . . . . . . . . . . . . . . . . . . . . . 7-8
Main Map . . . . . . . . . . . . . . . . . . . . . . . . . . . . . . . . . . . . . . . . . . . . . . . . . . . . . . . . . . . . . . . . . . . . . . 9
Map Views . . . . . . . . . . . . . . . . . . . . . . . . . . . . . . . . . . . . . . . . . . . . . . . . . . . . . . . . . . . . . . . . . . . . . . 10
Point on the Map . . . . . . . . . . . . . . . . . . . . . . . . . . . . . . . . . . . . . . . . . . . . . . . . . . . . . . . . . . . . . . . . 10
Destinations Menu
Address Button . . . . . . . . . . . . . . . . . . . . . . . . . . . . . . . . . . . . . . . . . . . . . . . . . . . . . 11-13
Recent Location . . . . . . . . . . . . . . . . . . . . . . . . . . . . . . . . . . . . . . . . . . . . . . . . . . . . 13-14
My Favorites . . . . . . . . . . . . . . . . . . . . . . . . . . . . . . . . . . . . . . . . . . . . . . . . . . . . . . . 15-18
POI (Points of Interest) . . . . . . . . . . . . . . . . . . . . . . . . . . . . . . . . . . . . . . . . . . . . . . . 19-21
Cancel Route. . . . . . . . . . . . . . . . . . . . . . . . . . . . . . . . . . . . . . . . . . . . . . . . . . . . . . . 21
Route Manager Menu
Turn by Turn List . . . . . . . . . . . . . . . . . . . . . . . . . . . . . . . . . . . . . . . . . . . . . . . . . . . 22-23
Route Summary . . . . . . . . . . . . . . . . . . . . . . . . . . . . . . . . . . . . . . . . . . . . . . . . . . . . 23
Avoid Roads . . . . . . . . . . . . . . . . . . . . . . . . . . . . . . . . . . . . . . . . . . . . . . . . . . . . . . . 23-26
Route Playback . . . . . . . . . . . . . . . . . . . . . . . . . . . . . . . . . . . . . . . . . . . . . . . . . . . . . 26-27
Quick Navigation . . . . . . . . . . . . . . . . . . . . . . . . . . . . . . . . . . . . . . . . . . . . . . . . . . . . 28
Map Manager Menu . . . . . . . . . . . . . . . . . . . . . . . . . . . . . . . . . . . . . . . . . . . . . . . . . . . . . . . . . . . . . . 28-29
Extra Menu
Tutorial . . . . . . . . . . . . . . . . . . . . . . . . . . . . . . . . . . . . . . . . . . . . . . . . . . . . . . . . . . . 30
Multistop Planner . . . . . . . . . . . . . . . . . . . . . . . . . . . . . . . . . . . . . . . . . . . . . . . . . . . 30-32
Navigation Setting Menu
Prompts . . . . . . . . . . . . . . . . . . . . . . . . . . . . . . . . . . . . . . . . . . . . . . . . . . . . . . . . . . 32
Installation . . . . . . . . . . . . . . . . . . . . . . . . . . . . . . . . . . . . . . . . . . . . . . . . . . . . . . . . . . . . . . . . . . . . . 33
Connections . . . . . . . . . . . . . . . . . . . . . . . . . . . . . . . . . . . . . . . . . . . . . . . . . . . . . . . . . . . . . . . . . . . . . 34
Feature Locations . . . . . . . . . . . . . . . . . . . . . . . . . . . . . . . . . . . . . . . . . . . . . . . . . . . . . . . . . . . . . 35
Warranty . . . . . . . . . . . . . . . . . . . . . . . . . . . . . . . . . . . . . . . . . . . . . . . . . . . . . . . . . . . . . 36
M1-NAV 8/4/08 1:27 PM Page 3
Page 4
4
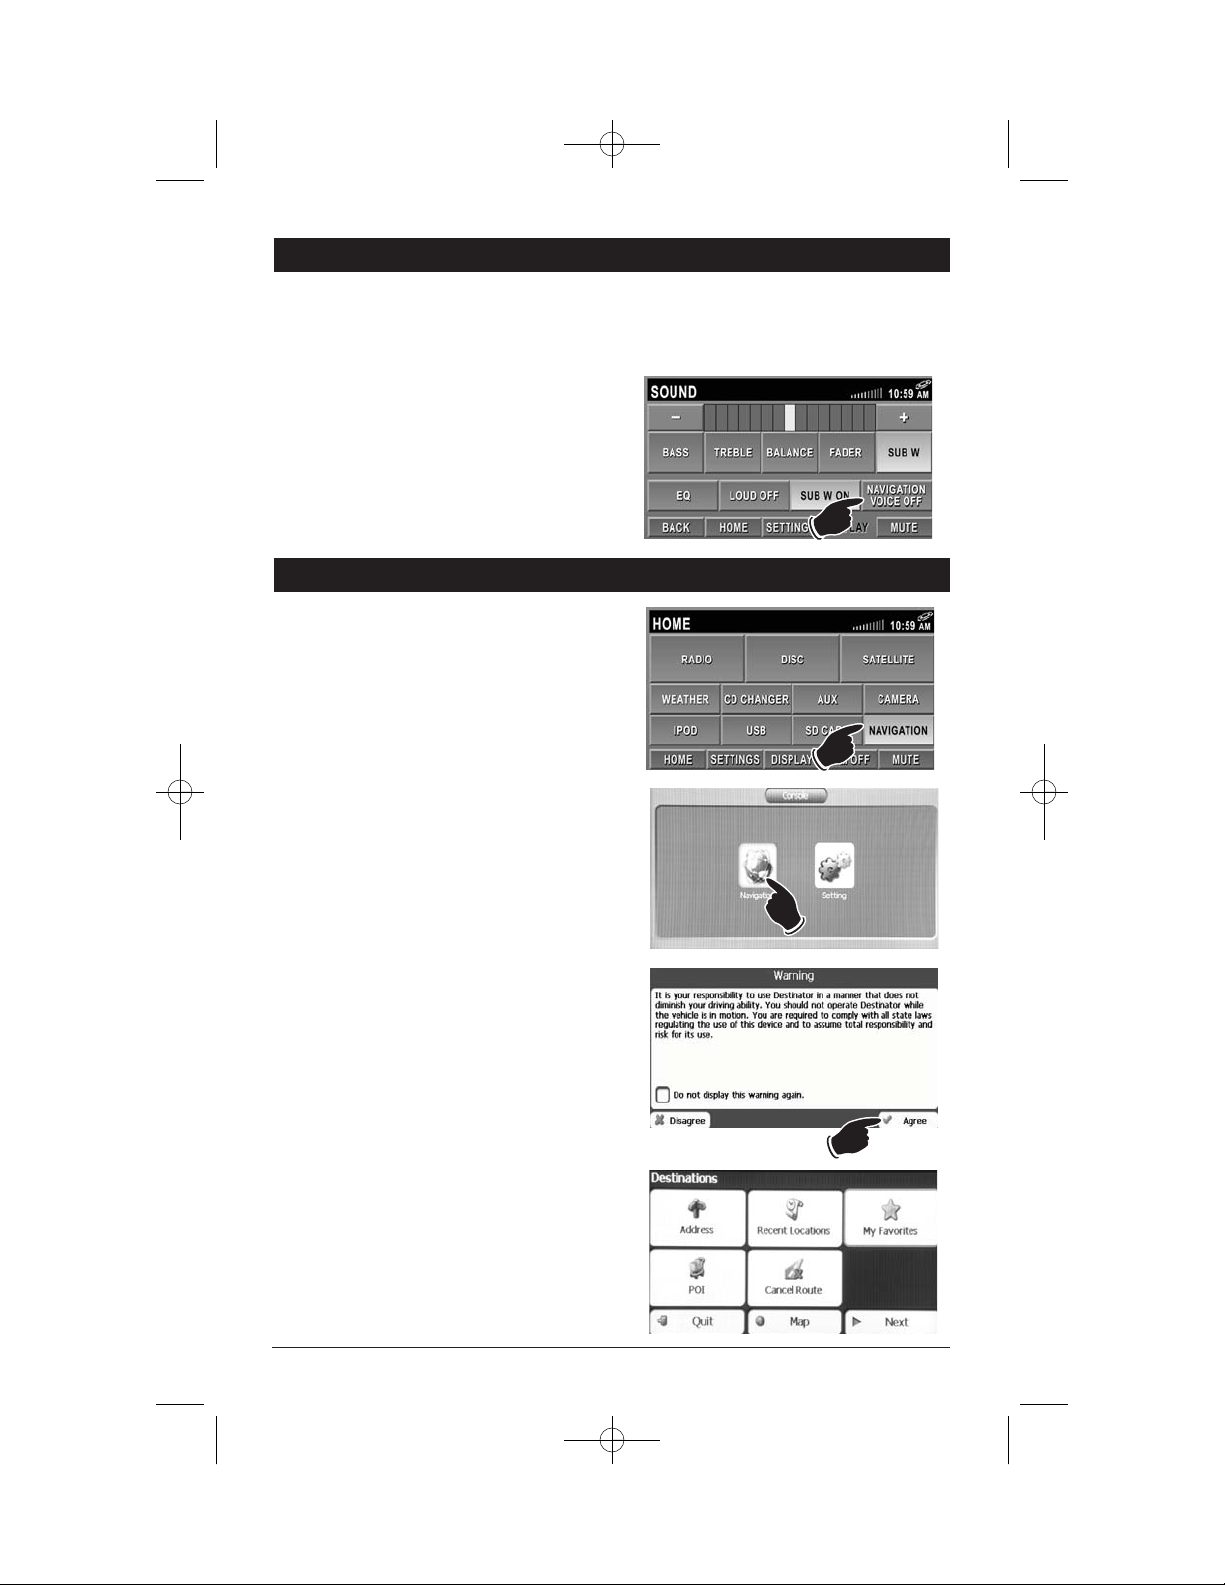
Navigation Voice Control: You can specify if you want the navigation’s voice to interrupt the audio of another
source and give turn directions. For example, with a navigation destination selected and the Navigation Voice
is On and you switch the source to the radio, the radio will be interrupted to give navigation turn directions.
Note: In the navigation source screen the navigation voice is always on and can not be turned off.
Voice Control Set-up
Selecting the Navigation Source
Selecting the Navigation Source:
Press the HOME button to select the source
screen. Then press the NAVIGATION button to
select the navigation source.
Selecting the Destinations Menu:
Press the Navigation button to select the
“Destinations” menu.
Read the Warning statement and if you acknowledge your responsibility press the Agree button.
The Destinations menu with the primary navigation features will be displayed. See “Getting
Started” page 7 for more information.
To access the Navigation Voice button press the
SETTINGS button in the Home Row then press
the SOUND button.
Turn the navigation voice on or off by touching
the NAVIGATION VOICE OFF/ON button.
M1-NAV 8/4/08 1:34 PM Page 4
Page 5
5
Selecting a Different Source from Navigation Screen
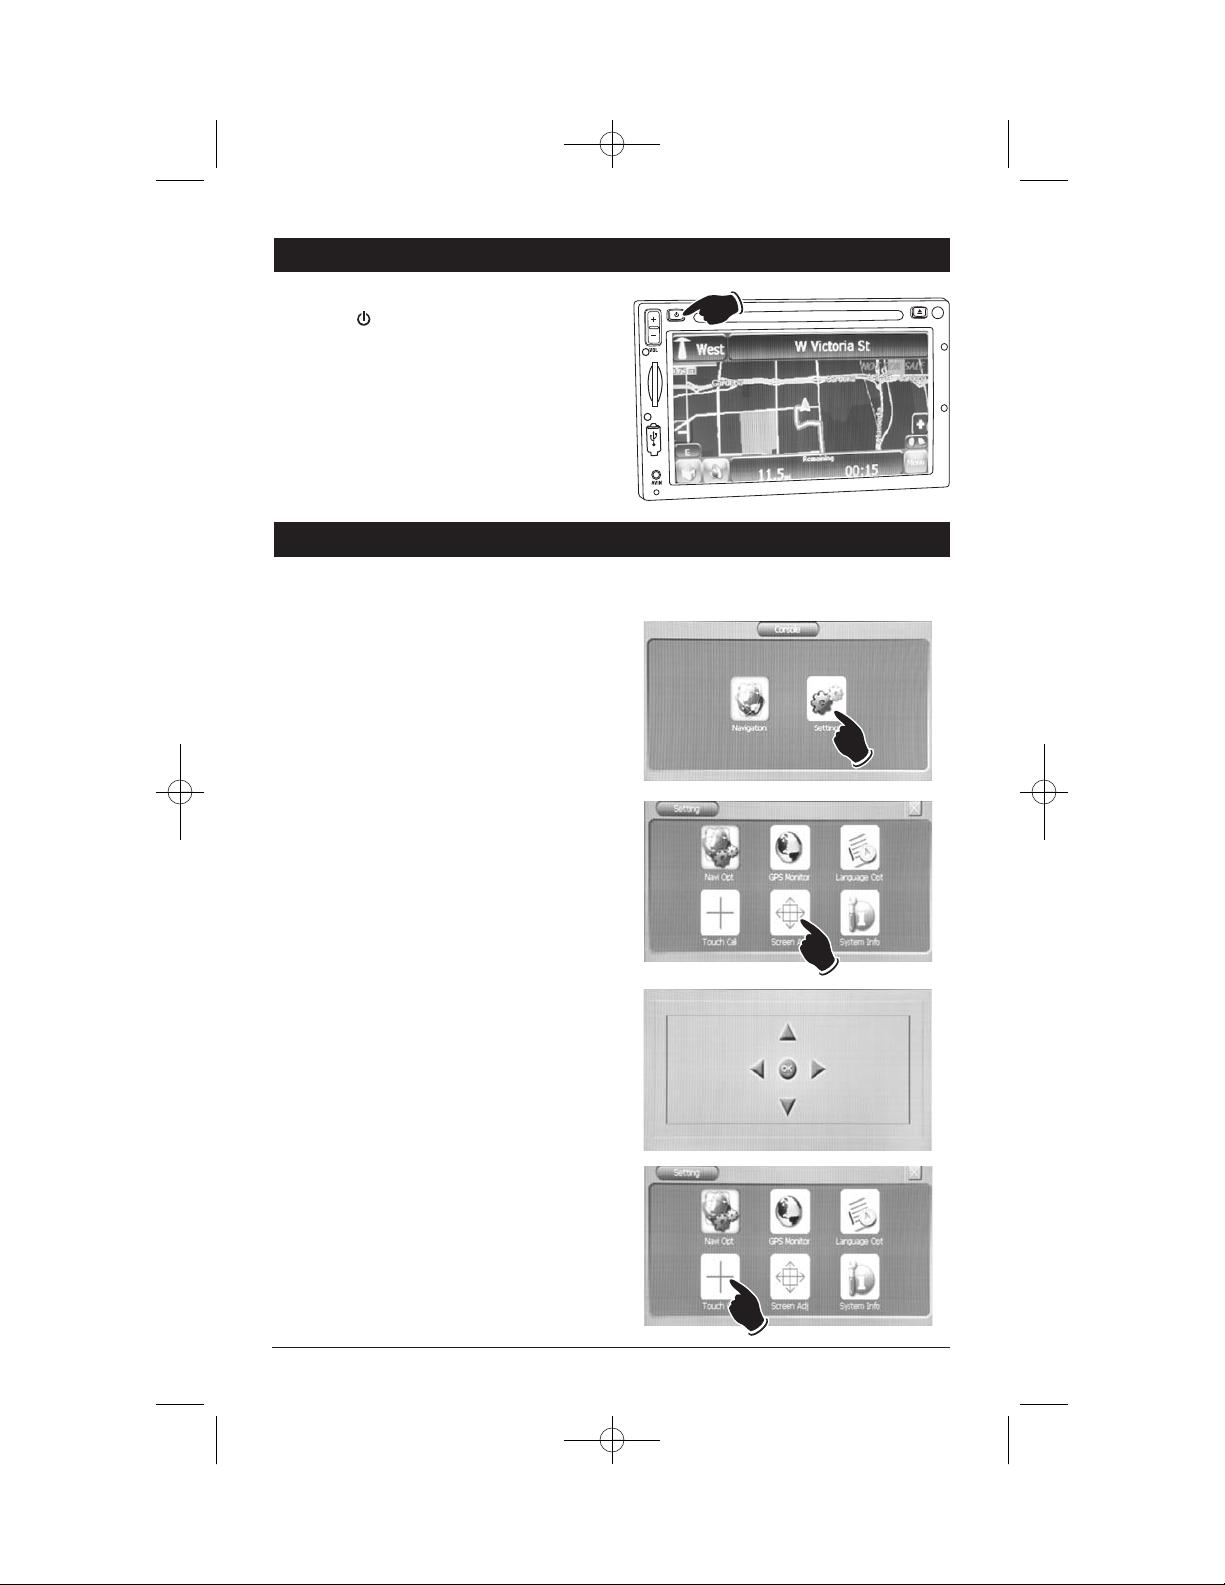
Selecting a Different Source:
Press the button to leave the navigation
source and return to the last selected source.
Calibrating the Screen
When you first connect the GPS box to the stereo receiver you should adjust the screen to the center
position and calibrate the touch screen.
1. When the navigation system starts up and the
Console menu is displayed, press the Setting
button.
2. Press the Screen Adjust button to enter the
Centering the Screen Adjustment mode.
3. Use the , , and buttons to move the
screen up/down and left/right to center the
screen. When the screen is centered press the
OK button to confirm the screen adjustment.
4. Press the Touch Cali button to enter the
screen’s Touch Calibration Adjustment mode.
M1-NAV 8/4/08 1:34 PM Page 5
Page 6
6
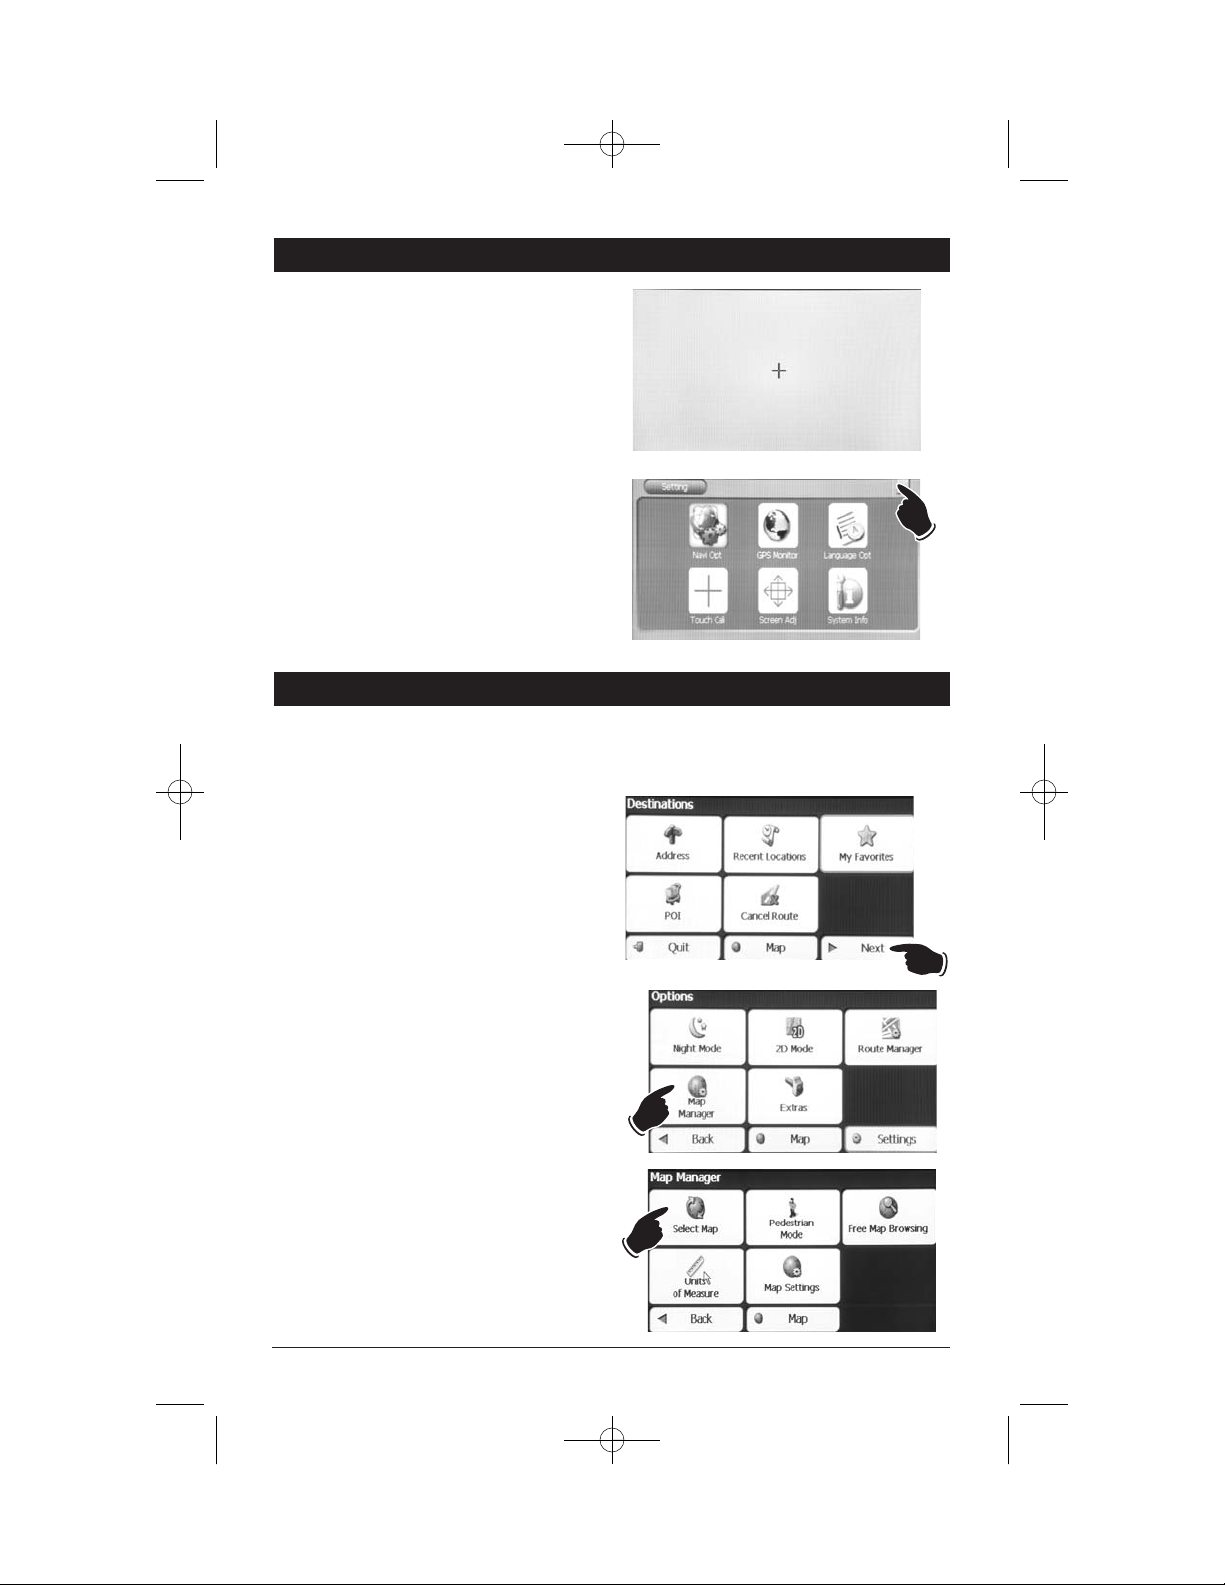
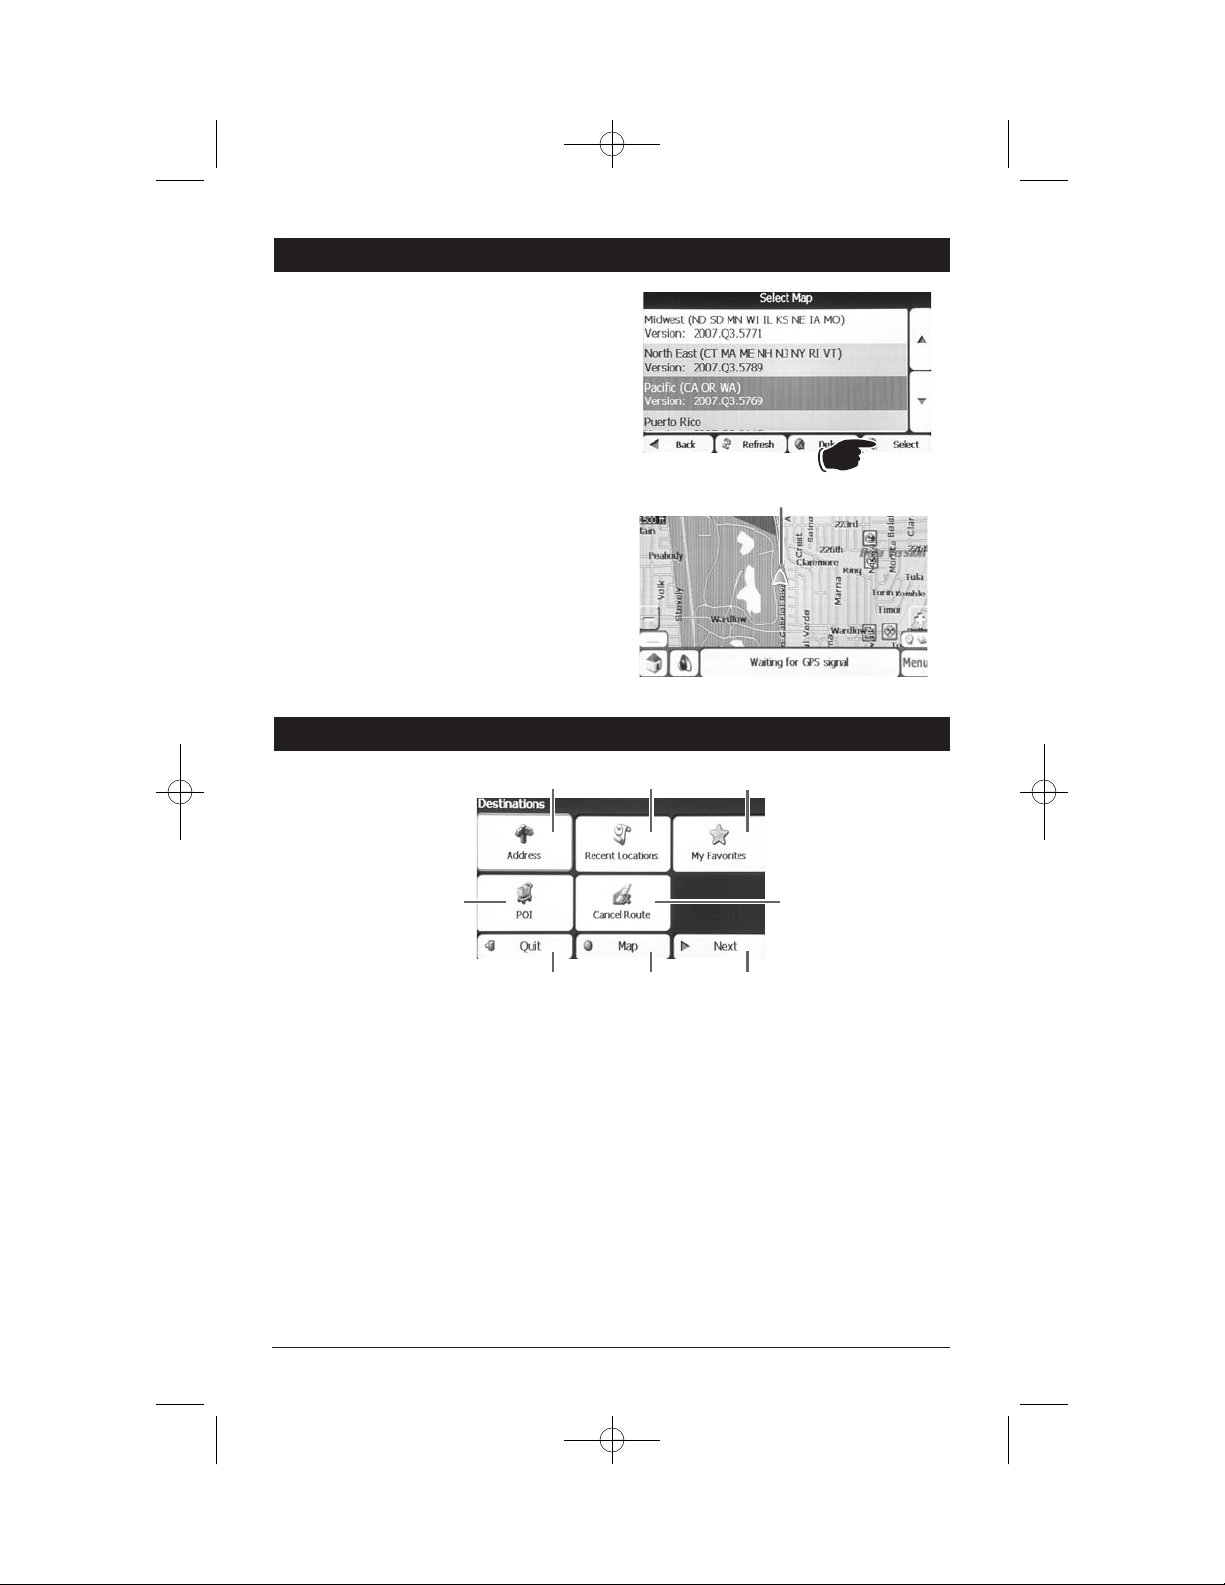
Loading a Map
Before you can use the navigation system you must load the appropriate map. For example, if you are
going to be using the navigation system in California you must load the PACIFIC map which includes CA,
OR and WA. Follow the procedure below to load the appropriate map:
1. From the Destinations menu press the Next
button.
2. From the Options menu press the Map
Manager button.
3. From the Map Manager menu press the
Select Map button.
Calibrating the Screen
5. You will see a + displayed on the screen.
Touch the + firmly, the + will continue to
move until the screen is aligned. Continue
to touch the + firmly until OK appears on
the screen. Press OK to exit the screen’s
Touch Calibration Adjustment mode.
6. Press the X to exit the screen’s calibration
screen.
Note: The Navi Opt, GPS Monitor,
Language Opt and System Info buttons
have no user adjustable settings.
M1-NAV 8/4/08 1:35 PM Page 6
Page 7
7
Getting Started
Destinations Menu:
1
2
3
6 7
8
4 5
1. Address:
The Address button lets you navigate to an
address by inputting an address. (See Address
Button on page 11).
2. Recent Location:
The Recent Locations button lets you navigate
to a previously visited destination. (See Recent
Locations on page 13).
3. My Favorites:
The My Favorites button lets you navigate to a
favorite location. (See My Favorites on page 15).
4. POI (Points of Interest):
The POI button lets you navigate to thousands
of interesting places. (See POI “Points of
Interest” on page 19).
5. Cancel Route:
The Cancel Route button stops the current
route navigation.
6. Quit:
The Quit button quits the navigation system.
7. Map:
The Map button activates the Main Map screen.
8. More:
The More button activates the Option menu.
4. Locate the map containing your state by using
the or buttons. Press the Select button
to load the map.
Your Location
5. The navigation unit will then automatically
display the Main Map screen and show your
location on the map.
Note: If the map is blank you have selected
the incorrect map. Follow the procedures
again to load the correct map.
Loading a Map
(Continued)
M1-NAV 8/4/08 1:35 PM Page 7
Page 8
8
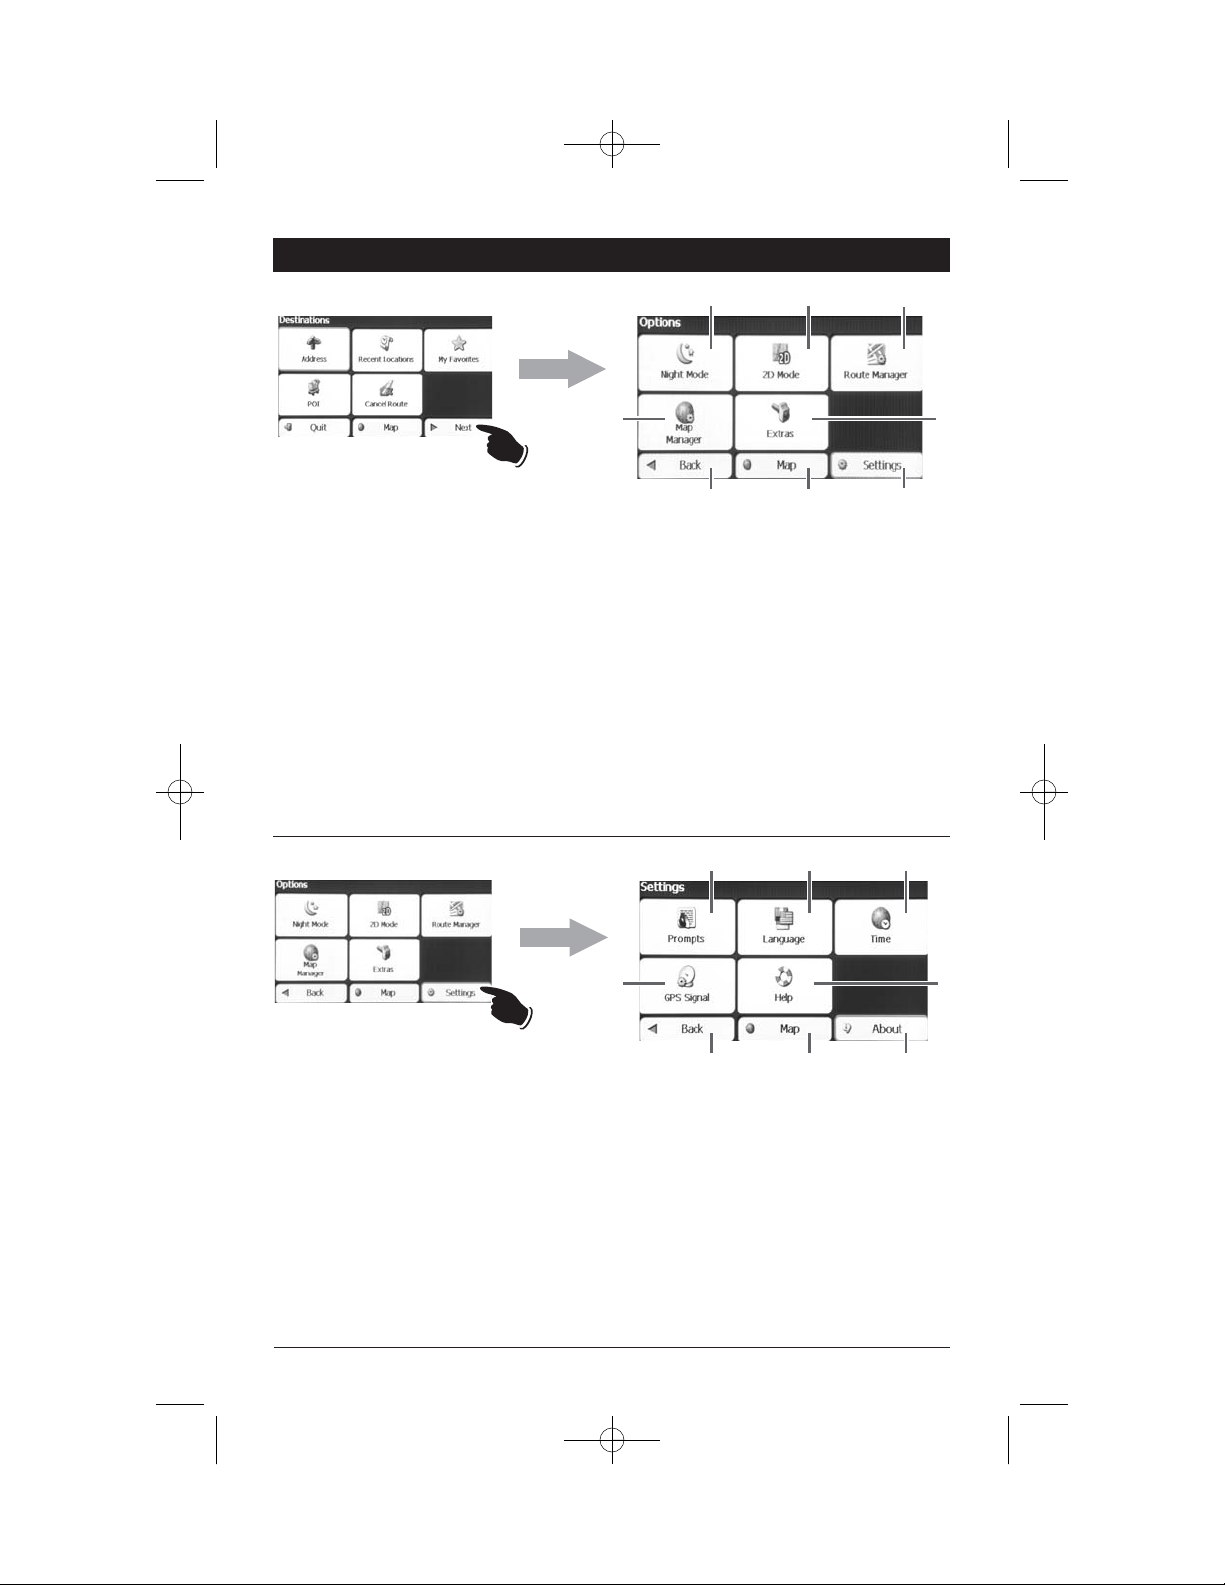
Settings Menu:
Getting Started
(Continued)
1 2
3
6 7
8
4 5
1. Day/Night Mode:
The Day/Night button adjusts the display for
either day or night driving. (See Maps Views on
page 10).
2. 2D/3D View Mode:
The 2D/3D button displays the map view in
either a 2-dimensional or 3-dimensional view.
(See Map Views on page 10).
3. Route Manager:
Pressing the Route Manager button selects a secondary menu. (See Route Manager on page 22).
4. Map Manager:
Pressing the Map Manager button selects a secondary menu. (See Map Manager on page 28).
5. Extras:
The Extra button button
selects a secondary
menu that contains a tutorial button which will
familiarize your with the navigation features. Also
included is a Multi-Stop Planner button (See
Multi-stop Planner on page 30).
6. Back:
The Back button returns you to the Destinations
menu.
7. Map:
The Map button activates the Main Map screen.
8. Settings:
The Settings button activates the Settings
menu.
Options Menu:
From the Destinations menu
press the Next button.
1 2
3
6 7
8
4 5
From the Option menu
press the Settings button.
1. Prompts:
Lets you specify the type of voice or visual
prompts. (See Prompts on page 32).
2. Language:
Lets you select the language text and voice
guidance language.
3. Time:
Use to select the time zone.
4. GPS Signal:
Provides information on location of available
GPS satellites.
5. Help:
Not applicable
.
6. Back:
The Back button returns you to the Options
menu.
7. Map:
The Map button activates the Main Map screen.
8. About:
Displays software version and copyright information.
M1-NAV 8/4/08 1:35 PM Page 8
Page 9
9
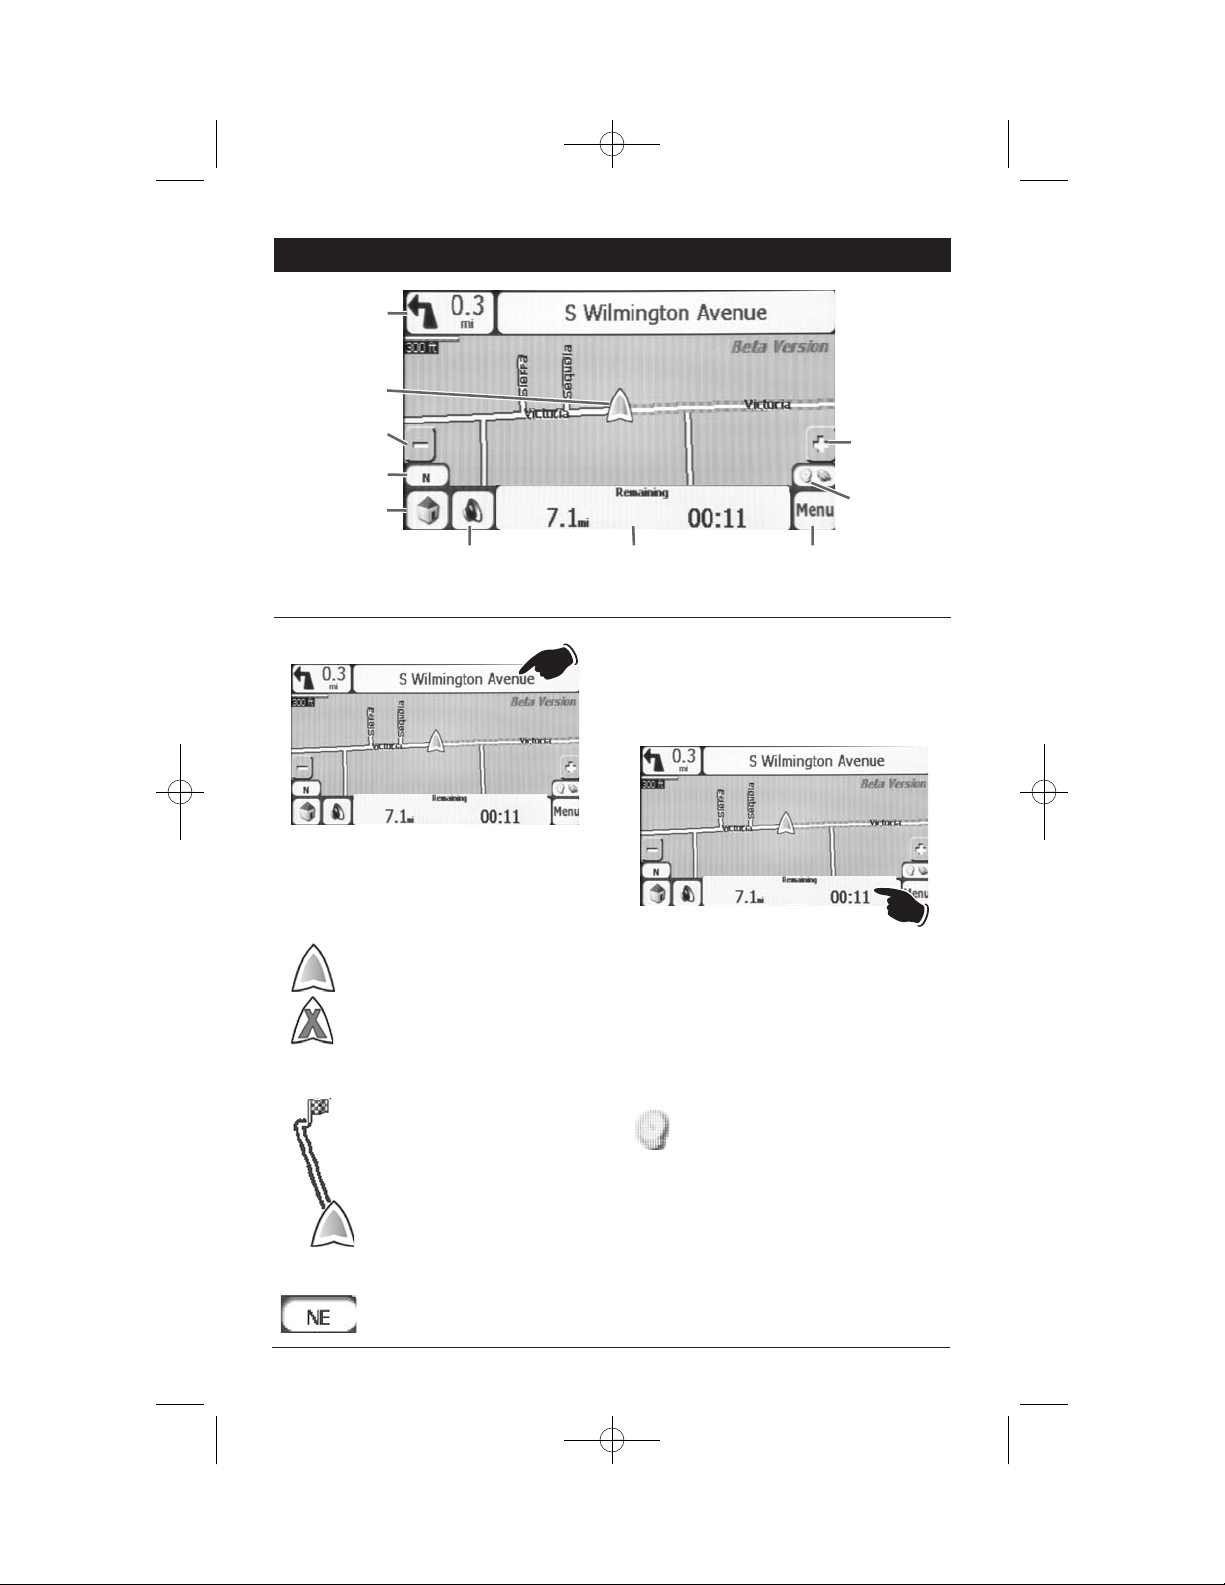
Main Map
Current Location:
Current Location
Zooms Display
Out
Compass
Quick Nav
GPS Status
No Function GPS Generated
Information Area
Destinations
Menu
Zooms Display
In
Direction Bar
Indicates current location.
Indicates last know location before GPS
signal was lost.
Generated Route:
Press the GPS Generate information Area to
display the following information:
Remaining Travel Time and Distance _>
Estimated Time of Arrival _> Current Street _>
Speed and Altitude _> Remaining Travel Time
and Distance.
Compass:
Indicates direction of travel.
GPS Status:
Green GPS receiver means reliable signal.
Red GPS receiver means unreliable signal.
GPS Generated Information Area:
When you have calculated a route, press the
Direction Bar to display the Turn-by-Turn
screen for a complete list of directions.
Direction Bar:
Note: When you first start the navigation system
you will hear the message “Signal too low”. This
message means that your navigation device hasn’t
yet located a reliable GPS signal. Depending on
your location it may take a few seconds to acquire
a reliable GPS signal. For example, if your car is
parked in the garage the navigation system may
not be able to acquire a reliable GPS signal. Move
your vehicle until you have a clear view of the sky.
Displays generated route by the
navigation system.
Quick Nav:
See Route Manager section for more information on page 28.
M1-NAV 8/4/08 1:40 PM Page 9
Page 10
10
Map Views
2D Views:
Day Map View
Night Map View
3D Views:
Day Map View
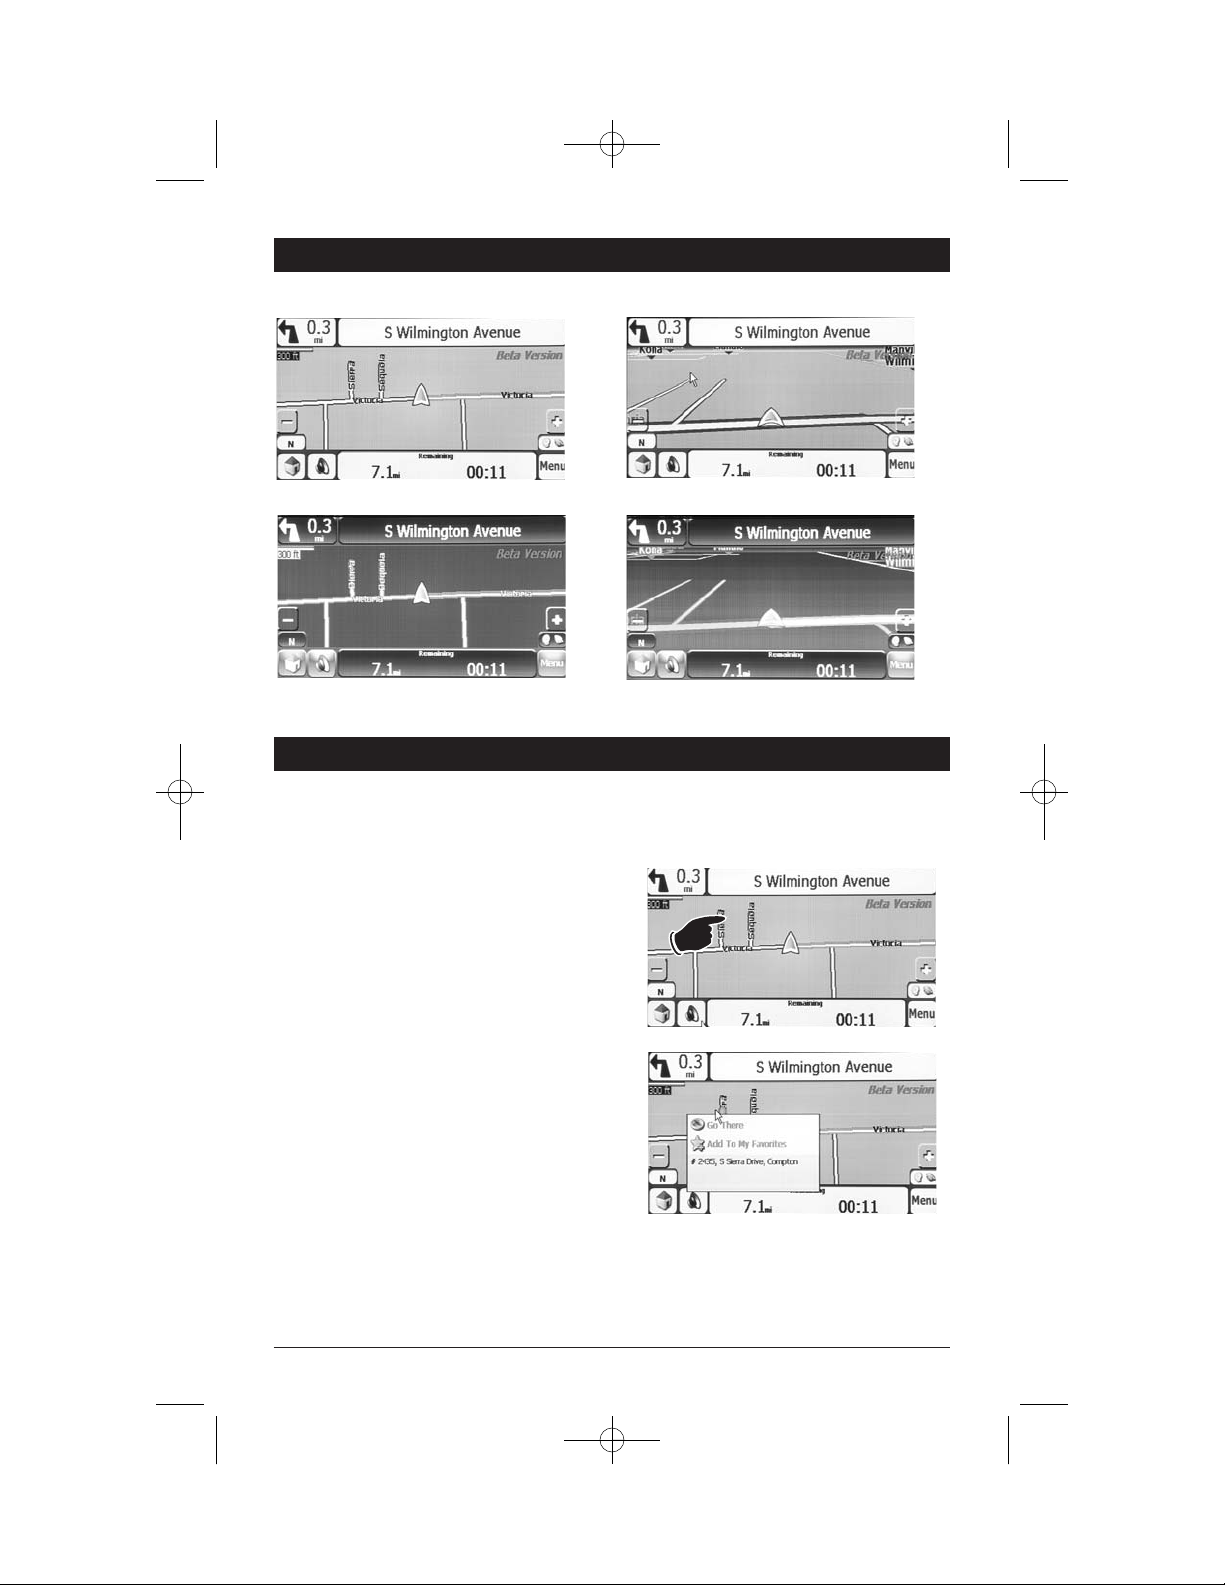
Point on the Map
You can navigate to any point by touching its location directly on the Main Map screen in both 2D and 3D
map views. This feature is especially helpful when you want to navigate to a specific point on the map, but
you don’t have the street address.
1. Press the map at a specific point on the map.
2. The context menu appear with the following
options:
Go There: This button lets you calculate a
route from the map point.
Add to My Favorites: This button lets you
save a point on the map as a favorite destination.
Night Map View
M1-NAV 8/4/08 1:40 PM Page 10
Page 11

11
Destinations Menu
Address:
The Address button lets you navigate to an
address by inputting an address.
1. Press the Address button.
2. Use the or buttons to select the state.
You can also select the state by entering the
first few letters of the state. Press the Next
button to confirm your selection.
Note: If you state does not appear in the
display you have the incorrect map loaded
into memory. See page 6 for the procedure
on loading a region specific map.
3. Use the or buttons to select the city.
You can also select the city by entering the
first few letters of the city. A list of cites will
be shown on the screen. Select the city you
want by pressing its name on the screen,
the city will become highlighted. Press the
Next button to confirm your selection.
4. Use the or buttons to select the
street. You can also select the street by
entering the first few letters of the street. If
the street is a number. For example, 51st
street), press the 123 button to access the
numbers keys. Select the street you want by
pressing its name on the screen, the street
will become highlighted. Press the Next but-
ton to confirm your selection.
5. Use the key pad to type in the street num-
ber. Finally press the Next button to confirm
your selection.
M1-NAV 8/4/08 1:40 PM Page 11
Page 12

12
Address Features:
Destinations Menu
(Continued)
Address: (continued)
6. Press the GO button and the navigation sys-
tem will calculate driving directions.
Note: The Quick option selects the route that
takes the least amount of time. Quick is the
default setting.
The Short option selects the route that is the
shorter distance. Remember, the shorter route
may not always be the quickest, as you are able
to travel faster on some roads than on others.
Hide/Display
Keyboard
Erase
Keyboard
Select**
Find*
Scroll
*
If the automatic search feature does not find the specified search entry, use the Find button to conduct
a sub-search, particularly useful when the address name consists of two or more words.
** The select key lets you display numeric and special characters.
Mode Button:
You can search for a location by using a different search criteria. Press the Mode button to
provide a variety of search options.
City-Street (default):
This mode searches for
locations in the following sequence: State, City,
Street and Address Number.
Street-City:
This mode searches for locations
in the following sequence: State, Street, City
and Address Number.
Cross Streets:
This mode searches for locations in the following sequence: State, City,
Street and Cross Street.
Zip Code:
This mode searches for locations in
the following sequence: State, Zip Code,
Street and Address Number.
M1-NAV 8/4/08 1:40 PM Page 12
Page 13

13
Destinations Menu
(Continued)
Action Button:
When you have specified an address, press the
Action button to select from the following commands.
Set as Origin:
Lets you designate the selected location as the route origin. You would use
this command when calculating a route from
a point other than your current location.
Show on Map:
Lets you see the selected
address on the map.
Add to My Favorites:
Lets you add an
address to your list of favorite locations.
Recent Locations:
The Recent Locations screen lets you select an existing destination from a list of destinations that you
have previously traveled to. The navigation system automatically stores the last 64 destination in memory.
As each new route is added to the top of the list, the older destinations at the bottom are erased. To navigate to a recent destination follow the instructions below:
1. Press the Recent Locations button.
2. Use the or buttons to the recent loca-
tion. Press the Next button to confirm your
selection.
3. Select either the Quick or Short button to
calculate your route.
Note: The Quick option selects the route that
takes the least amount of time. Quick is the
default setting.
The Short option selects the route that is the
shorter distance. Remember, the shorter route
may not always be the quickest, as you are able
to travel faster on some roads than on others.
Address: (continued)
M1-NAV 8/4/08 1:40 PM Page 13
Page 14

14
Destinations Menu
(Continued)
Recent Locations: (continued)
4. Press the Go button to calculate your route.
Show Button:
You can display the selected Recent Locations
by pressing the Show button. A map appears
showing the specified location. Press the Go
button to calculate the route.
Action Button:
When you have selected a recent location, press
the Action button to select from the following
commands.
Set as Origin:
Lets you designate the selected location as the route origin. You would use
this command when calculating a route from
a point other than your current location.
Add to My Favorites:
Lets you add an
address to your list of favorite locations.
Delete Item:
Lets you delete a recent loca-
tion.
Clear List:
Lets you clear all locations in the
Recent Locations screen.
Information:
This button displays the loca-
tion’s address information.
M1-NAV 8/4/08 1:43 PM Page 14
Page 15

15
Destinations Menu
(Continued)
My Favorites:
My Favorites is a group where you can store destination for easy retrieval. My Favorites group is the
default group where all favorites are stored unless you create another group. Creating other groups allow
for easy organizing of your favorite destinations. To create a new group follow these instructions:
Creating another “My Favorites” Group
1. Press the My Favorites button.
2. Press the Actions button.
3. Press the Add Group button.
4. Type in the name of the group. For example,
type in “FAMILY”.
5. Select the icon for the group.
M1-NAV 8/4/08 1:43 PM Page 15
Page 16

16
My Favorites: (continued)
Destinations Menu
(Continued)
6. Press the Save button.
7. Press the Back button to return to the
Destinations screen.
Adding a Location “My Favorites” Group
You can save a location to your favorite group
from the Address, Recent Locations or POI
menus. For more information see the “Actions”
section of each menu.
Note: The My Favorites group is the default
group where all favorites are stored if not
assigned to another group.
Note: Press the Action button to access a
screen to Add a Group, Edit a Group or Delete
a Group.
M1-NAV 8/4/08 1:44 PM Page 16
Page 17

17
My Favorites: (continued)
Destinations Menu
(Continued)
Favorite Alerts
Alerts let you know that you are within a certain distance of a favorite location.
2. Set the distances for the 1st and 2nd Alerts.
After the distances are selected press the
Back button.
Note: The 2nd Alert must be set to go off at
a closer distance than the 1st Alert.
Favorite Alerts
1. Press the Alerts button.
Alert On ()
Alert Off ( )
3. You can turn off the alerts for a particular
group by deselecting the mark next to
the selected group.
Note: Alerts can be turned on for a group
but not for individual locations. If you need
an alert for an individual location create a
group that has just one location.
Accessing a My Favorites
1. Press the My Favorites button.
M1-NAV 8/4/08 1:44 PM Page 17
Page 18

18
My Favorites: (continued)
Destinations Menu
(Continued)
2. Select your favorite location then press the
Next button.
3. Select either the Quick or Short button then
press the Go button to calculate your route.
Note: The Quick option selects the route
that takes the least amount of time. Quick is
the default setting.
The Short option selects the route that is the
shorter distance. Remember, the shorter
route may not always be the quickest, as you
are able to travel faster on some roads than
on others.
Action Button:
When you have selected a My Favorite location,
press the Action button to select from the following commands.
Set as Origin:
Lets you designate the selected location as the route origin. You would use
this command when calculating a route from
a point other than your current location.
Show on Map:
Lets you see the selected
address on the map.
Edit Favorite Location:
Lets you change the
name, comment or group location for the
selected location.
Delete Fav. Location:
Press the button to
remove the selected location.
Information:
This button displays additional
address information.
M1-NAV 8/4/08 1:44 PM Page 18
Page 19

19
POI (Points of Interest):
Destinations Menu
(Continued)
The Points of Interest is a collection of hundreds of interesting or useful places organized by easy-to-find
categories. For example, you can use the navigation system to guide you to a shopping center, hotel,
restaurant or gas station.
POI Button:
1. Press the POI button.
2. Use the or buttons to select the Point
of Interest category. Press the Next button
to confirm your selection.
3. Use the or buttons to select the Point
of Interest location. Press the Next button to
confirm your selection.
4. Select either the Quick or Short button then
press the Go button to calculate your route.
Note: The Quick option selects the route
that takes the least amount of time. Quick is
the default setting.
The Short option selects the route that is the
shorter distance. Remember, the shorter
route may not always be the quickest, as you
are able to travel faster on some roads than
on others.
M1-NAV 8/4/08 12:30 PM Page 19
Page 20

20
POI (Points of Interest): (continued)
Destinations Menu
(Continued)
Hide/Display
Keyboard
Find*
Scroll
Search Near a Location**
Icons
Displayed on
Main Map
()***
Icons Not
Displayed on
Main Map
Points of Interest Features:
*
If the automatic search feature does not find the specified search entry, use the Find button to conduct
a sub-search, particularly useful when the address name consists of two or more words.
**
The Search Near a Location determine the location where you want to search for a specific place, such
as a gas station, hotel or restaurant. Press the Near button to select from the following commands:
Current Location:
Lets you search near your current location. This is the default value.
Destination:
Lets you search near a specified destination. For example, you know your general destination, but not very much about interesting locations in the area. You can use navigation system to
locate the tourist attractions close to your destination.
Note: This button is enabled only when a destination is entered.
Other Address:
Lets you search near other address. For example, you have set a destination, but on
the way you want to stop at another location. You can use this feature to search near that location for
restaurants, lodging, historical sites, or other locations.
Search Radius:
Enter the location distance to search for a designated place. For example, if you enter
5 mile, navigation system only searches within a five mile radius.
When you select a large search radius, you risk the chance of finding too may locations, which makes
it harder to find the place that you are searching for. It is best to start with a small search radius size,
and then increase the radius size if necessary.
Note: If you don’t specify a search radius, navigation system searches the whole map and displays the
locations according to the distance from you.
***
You can turn off the Points of Interest symbols on the Main screen by deselecting the
mark next
to the selected group
M1-NAV 8/4/08 12:30 PM Page 20
Page 21

21
Destinations Menu
(Continued)
Action Button:
When you have selected a Points of Interest
location, press the Action button to select from
the following commands:
Set as Origin:
Lets you designate the selected location as the route origin. You would
use this command when calculating a route
from a point other than your current location.
Show on Map:
Lets you see the selected
address on the map.
Add to Favorites:
Lets you add an address
to your list of favorite locations.
Sort by ABC/Sort by Distance:
Press the
sort Points of Interest alphabetically or by
distance.
Information:
This button displays additional
address information.
POI (Points of Interest): (continued)
Subcategories:
Many categories have subcategories to provide
for an even greater list of choices. For example,
gas station, may have many subcategories each
representing a particular brand name. The same
is also true for hotels. Restaurants have subcategories that represent different types of food,
such as Indian, Italian and French.
Cancel Route:
The Cancel route button stops the current route
navigation.
M1-NAV 8/4/08 12:30 PM Page 21
Page 22

22
Route Manager Menu
Turn by Turn List:
1. In the Options menu press the Route
Manager button.
2. In the Route Manager menu press the Tur n
by Turn button.
3. The Turn-by-Turn directions will be displayed.
Use the or buttons to scroll through
the directions list. Press the Route button to
display the entire route. The Travel distance
and the estimated travel time remaining will
also be displayed.
4. Press the Back button to return to Turn-byTurn directions.
Note: Press the Tu rn button to the visually display
the next turn. Use the Previous and Next button
to visually scroll thru the Turn-by Turn directions.
M1-NAV 8/4/08 12:30 PM Page 22
Page 23

23
Route Manager Menu
Turn by Turn List: (continued)
Avoid Turn:
The Avoid button lets you avoid the selected
turn in the directions list. The navigation system will the automatically recalculate the route
excluding the selected turn.
Note: The recalculated route may take longer.
Route Summary:
The route Summary button lets you display an
overview of your complete route on the Map
Manager screen, the total driving distance to
your destination, the estimated travel time, and
the complete destination address.
Avoid Roads:
You can specify that certain roads be permanently excluded from your route calculations. Use this feature
when you want to avoid congested roads or unsafe streets.
Selecting a Specific Road to Avoid
1. In the Options menu press the Route
Manager button.
2. In the Route Manager menu press the Avoid
Roads button.
M1-NAV 8/4/08 12:30 PM Page 23
Page 24

24
Route Manager Menu
Avoid Roads: (continued)
Allow or Avoid Selection Button
3. You can avoid or allow the road categories by
pressing the Allow or Avoid button to include
or exclude all item located in the group.
Note 1: My Roads to Avoid is a default folder
that lets you store roads to avoid. Inside the
folder you can select specific roads to allow
or avoid. To avoid a road inside this folder the
folder must be set to the Avoid setting.
Note 2: Ferries and Toll Roads are avoided or
allowed as an entire group. You cannot allow
or avoid specific toll roads or ferry routes.
4. To add a road to My Roads to Avoid group
select “My Roads to Avoid” then press the
Next button.
6. Press the Add Road button.
Note: Along with adding a road, in the Action
screen you can:
Edit Road: Lets you rename the road and
select a different group.
Delete Road: Select a road to remove from
the group.
Show on Map: Lets you show the map with
the displayed destination for you to review
before creating a route.
Information: This button displays the loca-
tion’s address information.
5. Press the Action button.
M1-NAV 8/4/08 12:30 PM Page 24
Page 25

25
7. Select the State then press the Next button.
8. Select the City then press the Next button.
Route Manager Menu
Avoid Roads: (continued)
9. Select the Street then press the Next button.
10. Select the Street then press the Next button.
11. The road you have selected to avoid will
display on the map. Press the Avoid button
to add to the My Roads to Avoid group. The
road will now be displayed in the My Roads
to Avoid screen.
M1-NAV 8/4/08 12:31 PM Page 25
Page 26

26
Route Manager Menu
Avoid Roads: (continued)
Creating a New Group of Roads to Avoid Group:
1. Press the Action button in the “Select or Add
Avoid Groups” screen.
2. Press the Add Group button.
Note: Along with adding a group, in the
Action screen you can:
Edit Group: Lets you rename the group.
Delete Group: Select a group to remove.
3. Type in the name of the new group then press
the Save button.
Route Playback:
Recording a Route
1. Press the the Route Playback button in the
Options menu.
2. Press the the Record button to start recording the route. The navigation system will
show the Main Map screen and navigates you
to the selected destination.
This feature lets you record your route as you're driving and then plays it back on the Main Map screen.
M1-NAV 8/4/08 12:31 PM Page 26
Page 27

27
Route Manager Menu
Route Playback:
3. To stop recording, return to the Route
Playback screen and press the Stop button.
Playing Back a Recorded Route
1. Select the data file and press the Play but-
ton. The navigation system plays the recorded route on the Main Map screen.
2. To stop the playback, return to the Route
Playback screen and press the Stop button.
Action Button
Press the Action button to select from the following commands:
Delete Recording:
This button lets you
remove a selected recording.
Clear List:
This button removes all record-
ings.
Playback Speed:
Use the arrow keys to
adjust the playback speed.
M1-NAV 8/4/08 1:22 PM Page 27
Page 28

28
Route Manager Menu
Quick Navigation:
QuickNav
Defining the QuickNav Button
1. Press the QuickNav button in the Options
menu.
When the QuickNav button is pressed on the Main
Map screen you will navigate to a predetermined
location. For example, if you have selected your
home as the QuickNav destination, when you click
the QuickNav button on the Main Map screen, the
navigation creates a route to your home.
2. To define the QuickNav location you can either
select a Predefined address or the nearest POI
address (Points of Interest). For example, if
you have selected “Gasoline Stations” as the
QuickNav destination, when you press the
QuickNav button the navigation system creates a route to the closes gas station.
Map Manager Menu
From the Options menu press the Map Manager
button to display the map navigation features as
described in the sections below:
Select Map:
This feature lets you change the currently selected
map to another map saved on your SD memory
card. See “Loading a Map” on page 4 for more
information.
M1-NAV 8/4/08 1:22 PM Page 28
Page 29

29
Map Manager Menu
Vehicle Mode:
The default setting for the navigation system is
Vehicle Mode. When the Pedestrian Mode is visible
the navigation system is in the Vehicle Mode. The
Pedestrian Mode is not applicable to this navigation system.
Do Not Activate Pedestrian Mode
Free Map Browsing/GPS:
This feature lets you browse the map without the
GPS receiver returning you to your current location. Press the Free Map Browsing button to disconnect from the GPS receiver and press again to
reconnect to the GPS receiver.
Units of Measure:
You can press the Units of Measure button to
specify the measurement system you want to use.
You can select:
• Miles, Yards (UK)
• Miles, 10th of a Mile (US)
• Kilometers, Meters (Europe)
Map Settings:
You can press press the Map Settings button to
customize you map display.
The following map settings are:
Map Orientation:
Forward is up: This option orients the map so
that your forward direction is always at the top.
North is up:
This option orients the map so
that North is always at the top.
Use Automatic Zoom:
When this option is
selected, the zoom is speed dependent. The map
zooms out at higher speeds, displaying a larger
map area, and zooms in at slower speeds, displaying a small map area. If you manually
change the zoom, the Automatic Zoom returns to
a system defined zoom level after several seconds of inactivity.
Use Larger Labels:
This option increases the
size of street names to make the map easier to
read.
M1-NAV 8/4/08 1:23 PM Page 29
Page 30

30
Extras Menu
In the Options menu press the Extras button. A
secondary menu will appear that contains a tutorial
button which will familiarize you with operation of
the navigation system. Also the Multistop planner
button for planning a route with up to twelve stops.
Multistop Planner:
The Multistop Planner lets you plan a route with up
to twelve stops.
1. Press the Multistop Planner button.
2. Next you need to create a Multistop Route
Group. Press the Action button in the
Select/Add Multistop Route screen.
3. Press the Add Multistop Route button in the
Actions screen.
Note: Once a group have been created you
can Edit a Multistop Route and Delete a
Route in this screen.
4. Assign the Multistop Route Group a name
using the keypad. Press the Save button
when completed.
M1-NAV 8/4/08 1:23 PM Page 30
Page 31

31
Extras Menu
Multistop Planner: (continued)
5. With the newly created Multistop Route
Group visible in the list press the Next but-
ton.
6. Add stop to the Multistop Route Group by
selecting the Add Stop button.
Note: Once a stop has been created you can:
Set as Origin: Lets you designate the select-
ed address as the route origin.
Rename Stop: Lets you change the stop
information.
Delete Stop: Lets you delete a selected stop.
Optimize Route: Your trip itinerary is created
by the sequence of stops entered. This may
not be the most efficient route. When you
click Optimize Route the order of stops are
changed to create the most efficient route.
Information: This button displays the loca-
tion’s address information.
7. Select a stop from one of the following
menus: From an Address, From POI (Points
of Interest), From My Favorites or From
Recent Places.
8. Select a stop from one of the following
menus: From an Address, From POI (Points
of Interest), From My Favorites or From
Recent Places.
Note 1: Use the Up or Down buttons to
change the order of your itinerary.
Note 2: Select the Show button to view the
selected stop destination on the map.
Note 3: Select the Action button to add
another stop.
Note 4: Select the Next button to show the
stops on the map.
M1-NAV 8/4/08 1:23 PM Page 31
Page 32

32
Extras Menu
Multistop Planner: (continued)
9. Select either the Quick or Short button to calculate your route then press the Go button.
Note: The Quick option selects the route that
takes the least amount of time. Quick is the
default setting.
The Short option selects the route that is the
shorter distance. Remember, the shorter
route may not always be the quickest, as you
are able to travel faster on some roads than
on others.
Navigation Settings Menu
Prompts:
From the Settings menu, tap the Prompts button. You can select the type of voice and visual notifications
that you would like to use while navigating.
Voice Prompts:
Speed Warning:
Warns you when your car
exceeds the speed limit. This prompt is not
active by default.
Route Recalculation:
Activated when the navigation system recalculates a new route. This
prompt is not active by default.
Unreliable GPS Signal:
Warns that the GPS signal is too low and unreliable for navigation. This
prompt is automatically active by default.
Drive Carefully:
Reminder at the start of each
journey. This prompt is automatically active by
default.
Visual Prompts:
Text:
Directions are displayed as text.
Symbols:
Directions are displayed as symbols.
None:
Directions are not displayed.
M1-NAV 8/4/08 1:23 PM Page 32
Page 33

33
Installation
Navigation Box Installation
Use the four screw provided to mount the navigation box to a flat surface.
Sheet Metal Screws
Windshield Antenna
Warning! Do not mount in such a manner that
it obstructs the driver’s view.
• The windshield antenna mounts on the windshield (inside).
• We suggest you mount it on the lower lefthand side of the windshield.
• Try different positions in your vehicle in order
to find the best reception.
Installation:
1. Remove the protective tape backing.
2. Carefully align the antenna and apply to wind-
shield.
3. Route the cable behind the trim and connect
to the navigation box.
M1-NAV 8/4/08 1:23 PM Page 33
Page 34

34
Connections
Antenna Cable
Navigation
Connection Cable
to M1-LCD or
M1-LCD2
M1-NAV 8/4/08 1:23 PM Page 34
Page 35

35
Feature Locations
RGB VIDEO RESET PWR
SD
1
2
3 4
1. RGB/Video Switch: Leave the switch in the RGB
mode. Video mode has no function.
2. Reset Button: The navigation system may fail to
function normally due to the vehicle’s battery
condition, and could require resetting the navigation microprocessor if:
• The vehicle has been “jump started” from a
dead battery condition.
• The vehicle battery becomes very low and is
quick-charged.
• The vehicle battery is removed and replaced.
Should any of these conditions occur, simply
press and release the RESET button using the
tip of a ball point pen. This will reset the microprocessor to the original factory settings. After
pressing the RESET button, you should recheck
to see if the navigation system functions normally.
3. Power Indicator: Indicates when the navigation
system has power.
4. SD Card: The navigation system comes pre-
loaded with the navigation SD card. Do not
remove the memory card. This could result in
loss of data.
M1-NAV 8/4/08 1:23 PM Page 35
Page 36

© Copyright 2008
Magnadyne Corporation
M1-NAV-UM
Rev. A 8-4-08
Warranty
ONE (1) YEAR LIMITED WARRANTY
Magnadyne Corporation or its authorized agents will within one year from the date of sale
to you, repair, replace or refund the retail sales price of said product or any part thereof, at
the option of the Magnadyne Corporation or its authorized agents, if said product or part
is found defective in materials or workmanship, when properly connected and operating on
the correct power requirements designated for the specific product. This warranty and
Magnadyne Corporation or its authorized agent’s obligations hereunder do not apply where
the product was; damaged while in the possession of the consumer, subjected to unreasonable or unintended use, not reasonably maintained, utilized in commercial or industrial
operations, or serviced by anyone other than Magnadyne Corporation or its authorized
agents, or where the warning seal on the product is broken or the power and/or plugs are
detached from the unit. Magnadyne Corporation or any of its authorized agents will not
assume any labor costs for the removal and reinstallation of any product found to be defective, or the cost of transportation to Magnadyne Corporation or its authorized agents. Such
cost are the sole responsibility of the purchaser.
This warranty does not cover the cabinet appearance items or accessories used in connection with this product, or any damage to recording or recording tape, or any damage to
the products resulting from improper installation, alteration, accident, misuse, abuse or
acts of nature.
MAGNADYNE CORPORATION OR ITS AUTHORIZED AGENTS SHALL NOT BE LIABLE TO
ANYONE FOR CONSEQUENTIAL OR INCIDENTAL DAMAGES OR CLAIMS EXCEPT THOSE
ACCORDED BY LAW. NO EXPRESSED WARRANTY OR IMPLIED WARRANTY IS GIVEN
EXCEPT THOSE SET FORTH HEREIN. NO IMPLIED WARRANTY SHALL EXTEND BEYOND
ONE YEAR FROM THE DATE OF SALE.
This warranty extends only to the original purchaser of the product and is not
transferable. Some states do not allow limitations on how long an implied warranty lasts,
and some states do not allow the exclusion or limitation of incidental or consequential
damages, so the above limitations or exclusion may not apply to you. This warranty gives
you specific legal rights, and you may have other rights that vary from state to state.
“NOTE: The manufacturer is not responsible for any radio or TV interference caused by
unauthorized modifications to this equipment. Such modifications could void the User’s
authority to operate the equipment.”
Defective merchandise should be returned to the original point of purchase or
secondly, to Magnadyne Corporation, 1111 W. Victoria Street, Compton CA 90220.
Return Authorization must be obtained before sending, or merchandise may be refused.
M1-NAV 8/4/08 1:23 PM Page 36
 Loading...