

Page 1
Operation
and Installation
Manual
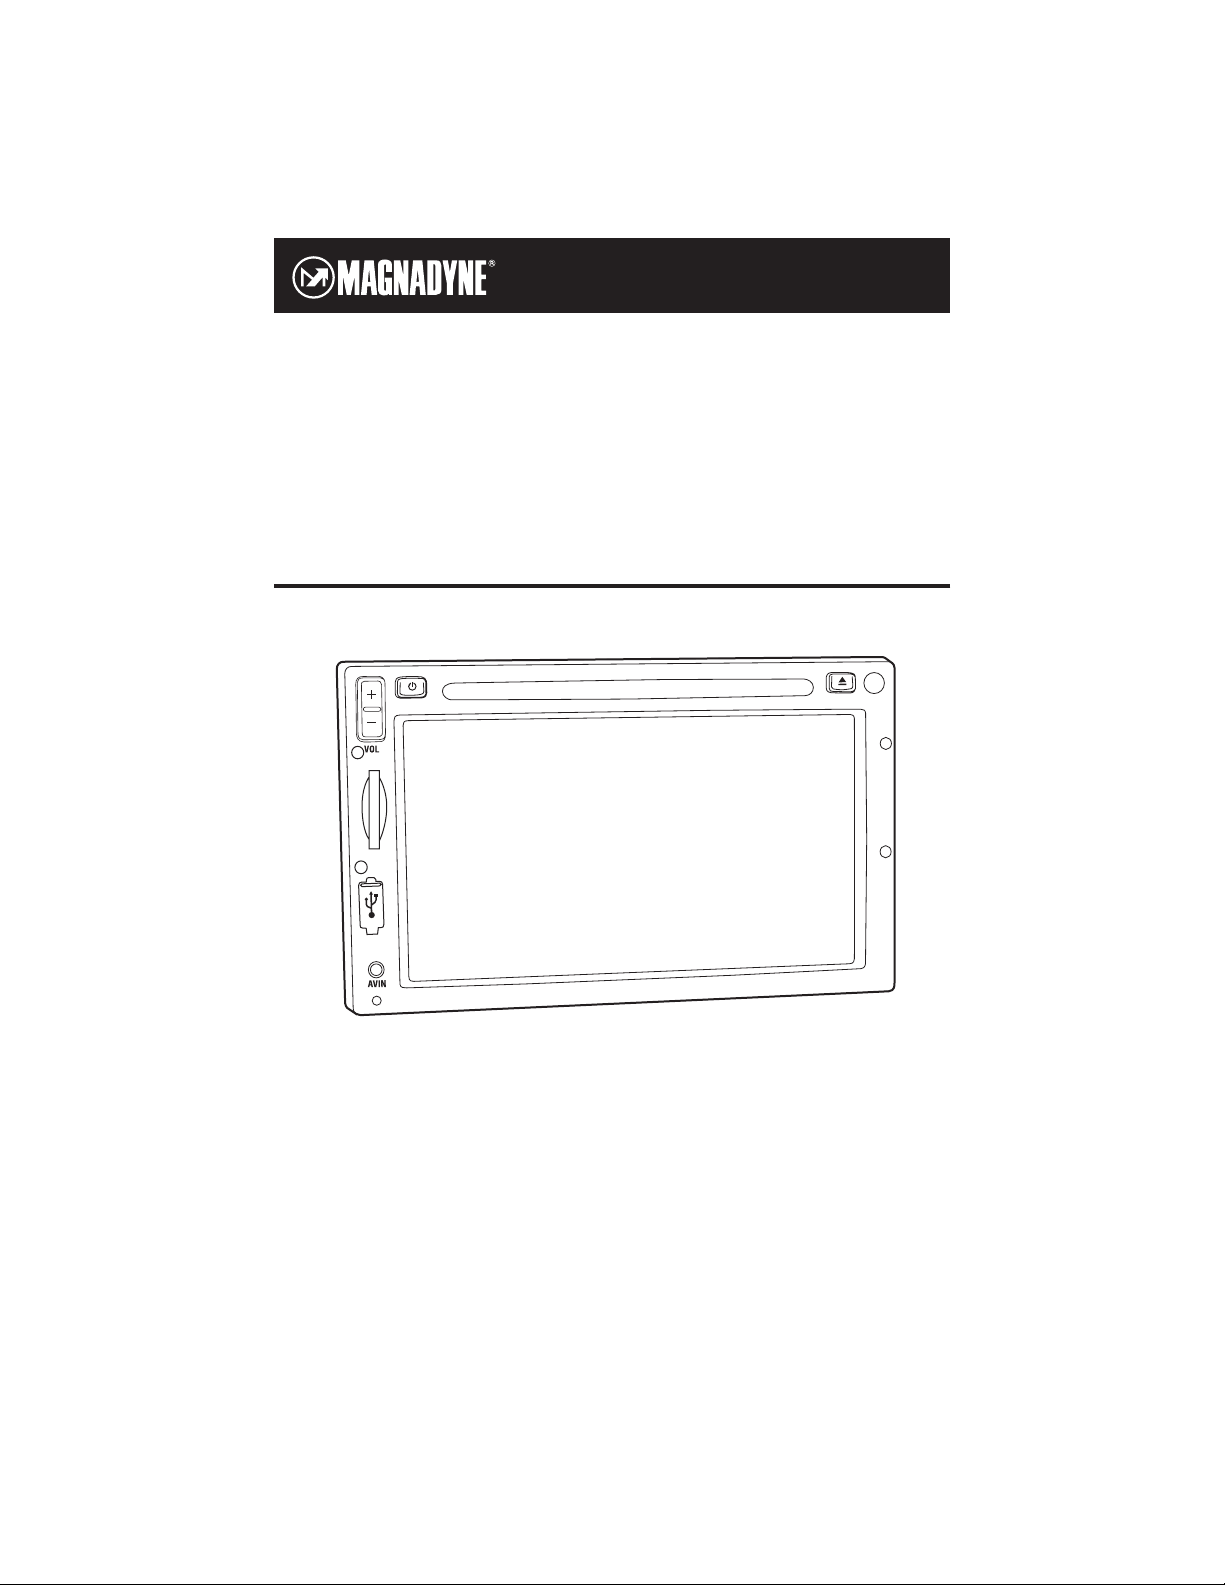
M1-LCD
AM / FM / WB Stereo Receiver with CD/DVD Player
and Touch Screen Controls
Page 2

Please carefully read all of the information in this manual. Familiarity with operation and installation procedures will help you obtain the best possible performance from your new AM/FM/WB Stereo Receiver and
CD/DVD Player with Touch Screen Controls.
WARNING! To prevent fire or electrical shock hazard, do not expose this product to moisture or remove
its cover or bottom screws. No user-serviceable parts inside. Refer servicing to qualified personnel.
Introduction
2
Index
Warnings and Cautions . . . . . . . . . . . . . . . . . . . . . . . . . . . . . . . . . . . . . . . . . . . . . . . . . . . . . . . . . . . . 3
Basics . . . . . . . . . . . . . . . . . . . . . . . . . . . . . . . . . . . . . . . . . . . . . . . . . . . . . . . . . . . . . . . . . . . . . . . . . 4
Button Locations and Functions . . . . . . . . . . . . . . . . . . . . . . . . . . . . . . . . . . . . . . . . . . . . . . . . . . . . . 5
Remote Control Button Locations and Functions. . . . . . . . . . . . . . . . . . . . . . . . . . . . . . . . . . . . . . . . . 5-6
System Setup Beep Tone. . . . . . . . . . . . . . . . . . . . . . . . . . . . . . . . . . . . . . . . . . . . . . . . . . . . . 6
Region . . . . . . . . . . . . . . . . . . . . . . . . . . . . . . . . . . . . . . . . . . . . . . . . . . . . . . . 7
Background Color . . . . . . . . . . . . . . . . . . . . . . . . . . . . . . . . . . . . . . . . . . . . . . . 7
Front Camera . . . . . . . . . . . . . . . . . . . . . . . . . . . . . . . . . . . . . . . . . . . . . . . . . . 7
Startup Volume. . . . . . . . . . . . . . . . . . . . . . . . . . . . . . . . . . . . . . . . . . . . . . . . . 7
RDS . . . . . . . . . . . . . . . . . . . . . . . . . . . . . . . . . . . . . . . . . . . . . . . . . . . . . . . . . 7
Standby Clock. . . . . . . . . . . . . . . . . . . . . . . . . . . . . . . . . . . . . . . . . . . . . . . . . . 7
Home Row Settings. . . . . . . . . . . . . . . . . . . . . . . . . . . . . . . . . . . . . . . . . . . . . . . . . . . . . . . 7
Sound . . . . . . . . . . . . . . . . . . . . . . . . . . . . . . . . . . . . . . . . . . . . . . . . . . . . . . 8
Monitor . . . . . . . . . . . . . . . . . . . . . . . . . . . . . . . . . . . . . . . . . . . . . . . . . . . . . 8
Time . . . . . . . . . . . . . . . . . . . . . . . . . . . . . . . . . . . . . . . . . . . . . . . . . . . . . . . 8-9
Display . . . . . . . . . . . . . . . . . . . . . . . . . . . . . . . . . . . . . . . . . . . . . . . . . . . . . . . 9
Dim . . . . . . . . . . . . . . . . . . . . . . . . . . . . . . . . . . . . . . . . . . . . . . . . . . . . . . . . . . 10
Mute . . . . . . . . . . . . . . . . . . . . . . . . . . . . . . . . . . . . . . . . . . . . . . . . . . . . . . . . . 10
Back . . . . . . . . . . . . . . . . . . . . . . . . . . . . . . . . . . . . . . . . . . . . . . . . . . . . . . . . . 10
Sound Controls . . . . . . . . . . . . . . . . . . . . . . . . . . . . . . . . . . . . . . . . . . . . . . . . . . . . . . . . . . . . . . . . . 11-12
RADIO and AM/FM Radio Operations . . . . . . . . . . . . . . . . . . . . . . . . . . . . . . . . . . . . . . . . . 13-15
WEATHER Weather Band Radio Operations . . . . . . . . . . . . . . . . . . . . . . . . . . . . . . . . . . . . 16
DISC, USB and Disc Warnings . . . . . . . . . . . . . . . . . . . . . . . . . . . . . . . . . . . . . . . . . . . . . . . . . 17
SD CARD CD Operation (Compact Disc). . . . . . . . . . . . . . . . . . . . . . . . . . . . . . . . . . . . . . 17-19
MP3 Operation (DISC, USB and SD CARD) . . . . . . . . . . . . . . . . . . . . . . . . . . . 19-23
DVD Operation . . . . . . . . . . . . . . . . . . . . . . . . . . . . . . . . . . . . . . . . . . . . . . . . . 24-26
DVD Setup Menu . . . . . . . . . . . . . . . . . . . . . . . . . . . . . . . . . . . . . . . . . . . . . . . 27
SATELLITE Sirius Satellite Radio Setup . . . . . . . . . . . . . . . . . . . . . . . . . . . . . . . . . . . . . . . 28
Sirius Satellite Radio Operation . . . . . . . . . . . . . . . . . . . . . . . . . . . . . . . . . . . . 29-33
CD CHANGER CD Changer Operation . . . . . . . . . . . . . . . . . . . . . . . . . . . . . . . . . . . . . . . . . . . 34-35
AUX Auxiliary Audio/Video Inputs Operation . . . . . . . . . . . . . . . . . . . . . . . . . . . . . . 36
CAMERA Camera Operation . . . . . . . . . . . . . . . . . . . . . . . . . . . . . . . . . . . . . . . . . . . . . . . 37
IPOD IPOD Operation. . . . . . . . . . . . . . . . . . . . . . . . . . . . . . . . . . . . . . . . . . . . . . . . . 38-39
NAVIGATION Navigation Operation . . . . . . . . . . . . . . . . . . . . . . . . . . . . . . . . . . . . . . . . . . . . 40
Installation . . . . . . . . . . . . . . . . . . . . . . . . . . . . . . . . . . . . . . . . . . . . . . . . . . . . . . . . . . . . . 41
Speaker Connections . . . . . . . . . . . . . . . . . . . . . . . . . . . . . . . . . . . . . . . . . . . . . . . . . . . . . . . . . . . . . 42
Input Connections . . . . . . . . . . . . . . . . . . . . . . . . . . . . . . . . . . . . . . . . . . . . . . . . . . . . . . . . . . . . . 43-45
Camera Connections . . . . . . . . . . . . . . . . . . . . . . . . . . . . . . . . . . . . . . . . . . . . . . . . . . . . . . . . . . . . . 46
Reset Button . . . . . . . . . . . . . . . . . . . . . . . . . . . . . . . . . . . . . . . . . . . . . . . . . . . . . . . . . . . . . 47
Replaceable Fuse . . . . . . . . . . . . . . . . . . . . . . . . . . . . . . . . . . . . . . . . . . . . . . . . . . . . . . . . . . . . . 47
Warranty . . . . . . . . . . . . . . . . . . . . . . . . . . . . . . . . . . . . . . . . . . . . . . . . . . . . . . . . . . . . . 48
Page 3

3
Warnings
• The driver should neither watch the display nor operate
the system while driving.
Watching the display or operating the system will distract
the driver from looking ahead of the vehicle and can cause
accidents. Always stop the vehicle in a safe location and
use the parking brake before watching the display or
operating the system. In some states and countries, pas-
sengers are also prohibited from watching the display.
• Never install the product in a location where it interferes
with your field of vision.
• This unit has a cooling fan to decrease the internal temperature. Do not mount the unit in a place where the cooling fan on the unit is blocked. Blocking these openings will
inhibit the cooling of the internal temperature and result in
damage to the unit.
• Use the proper power supply. This product is designed for
operation with a negative grounded 12V DC battery system. Never operate this product with other battery systems, especially a 24V DC battery system. If the product is
used with the improper system it may cause a fire or an
accident.
• Thi
s product must be installed and used in accordance
with this manual. Any alterations to this product that
enables it to be used in any way other than intended or
designed could distract the driver and result in an accident causing injury or death. Magnadyne Corporation
disclaims any and all liability that may result from failure
to install and operate in any other manner in which this
unit was intended.
• FCC REGULATIONS STATE THAT ANY UNAUTHORIZED CHANGES OR MODIFICATIONS TO THIS
EQUIPMENT MAY VOID THE USER’S AUTHORITY
TO OPERATE IT.
• TO REDUCE THE RISK OF FIRE OR ELECTRIC
SHOCK, DO NOT EXPOSE THIS EQUIPMENT TO
RAIN OR MOISTURE.
• THIS DEVICE IS INTENDED FOR CONTINUOUS
OPERATION.
• TO REDUCE THE RISK OF FIRE OR ELECTRIC
SHOCK AND ANNOYING INTERFERENCE, USE
ONLY THE RECOMMENDED ACCESSORIES.
Caution
•
Do not disassemble, modify the unit or attempt to repair the
product yourself. If the product needs to be repaired, consult your dealer.
• Do not install the unit in a place exposed to direct sunlight
or excessive heat or humidity. Avoid places with too much
dust or the possibility of water splashing.
• Backing Up Your Vehicle
Do not backup your vehicle while looking at the monitor.
Always look in the direction of your vehicle’s motion. Use
the monitor only as an aid in safety confirmation. The
actual distance may be different than it appears in the monitor. The range of the image in the monitor is limited.
Always be aware that blind spots may exist and not appear
at all times on your monitor.
The product is intended to assist in safe driving and
allows the driver to have a broader field of vision during backup. You, as the driver, are solely responsible
for the safe operation of your vehicle and the safety of
your passengers and pedestrians, and abiding all state
and local traffic regulations. Do not use any features of
this system to the extent it distracts you from safe driving. Your first priority while driving should always be
the safe operation of your vehicle. Magnadyne will not
accept any responsibility whatsoever for accidents
and/or injuries resulting from failure to observe these
precautions or safety instructions.
Liquid Crystal Panel
• Any harsh impacts may damage the liquid crystal panel.
• Usage temperature range: 320F to 1040F. When the temperature is very cold or very hot, the image may not
appear clearly or may move slowly. Also, movement of the
image may seem to be out of synchronization or the image
quality may decline in such environments. Note that this is
not a malfunction or problem.
• Sudden changes in the temperature inside the vehicle such
as those which occur immediately after the vehicle’s air
conditioner or heater has been turned on may cause the
inside of the liquid crystal panel to cloud over due to water
vapor or it may cause condensation (droplets of water) to
form and, as a result, the panel may not work properly. Do
not use the unit while these symptoms are evident.
Instead, leave the unit standing for about an hour, and
then resume or start use.
• If the screen of this unit is dirty, wipe the the dirt off with
a cloth moistened with a mild cleaner. Note: Applying
spray cleaner directly to the unit may affect its mechanical
parts or cause an electrical shock. Wiping the screen with
an abrasive cloth or using a volatile liquid such as thinner
or alcohol may scratch or damage the surface of the
screen.
Page 4
4
Basics
1
2
4
3
5
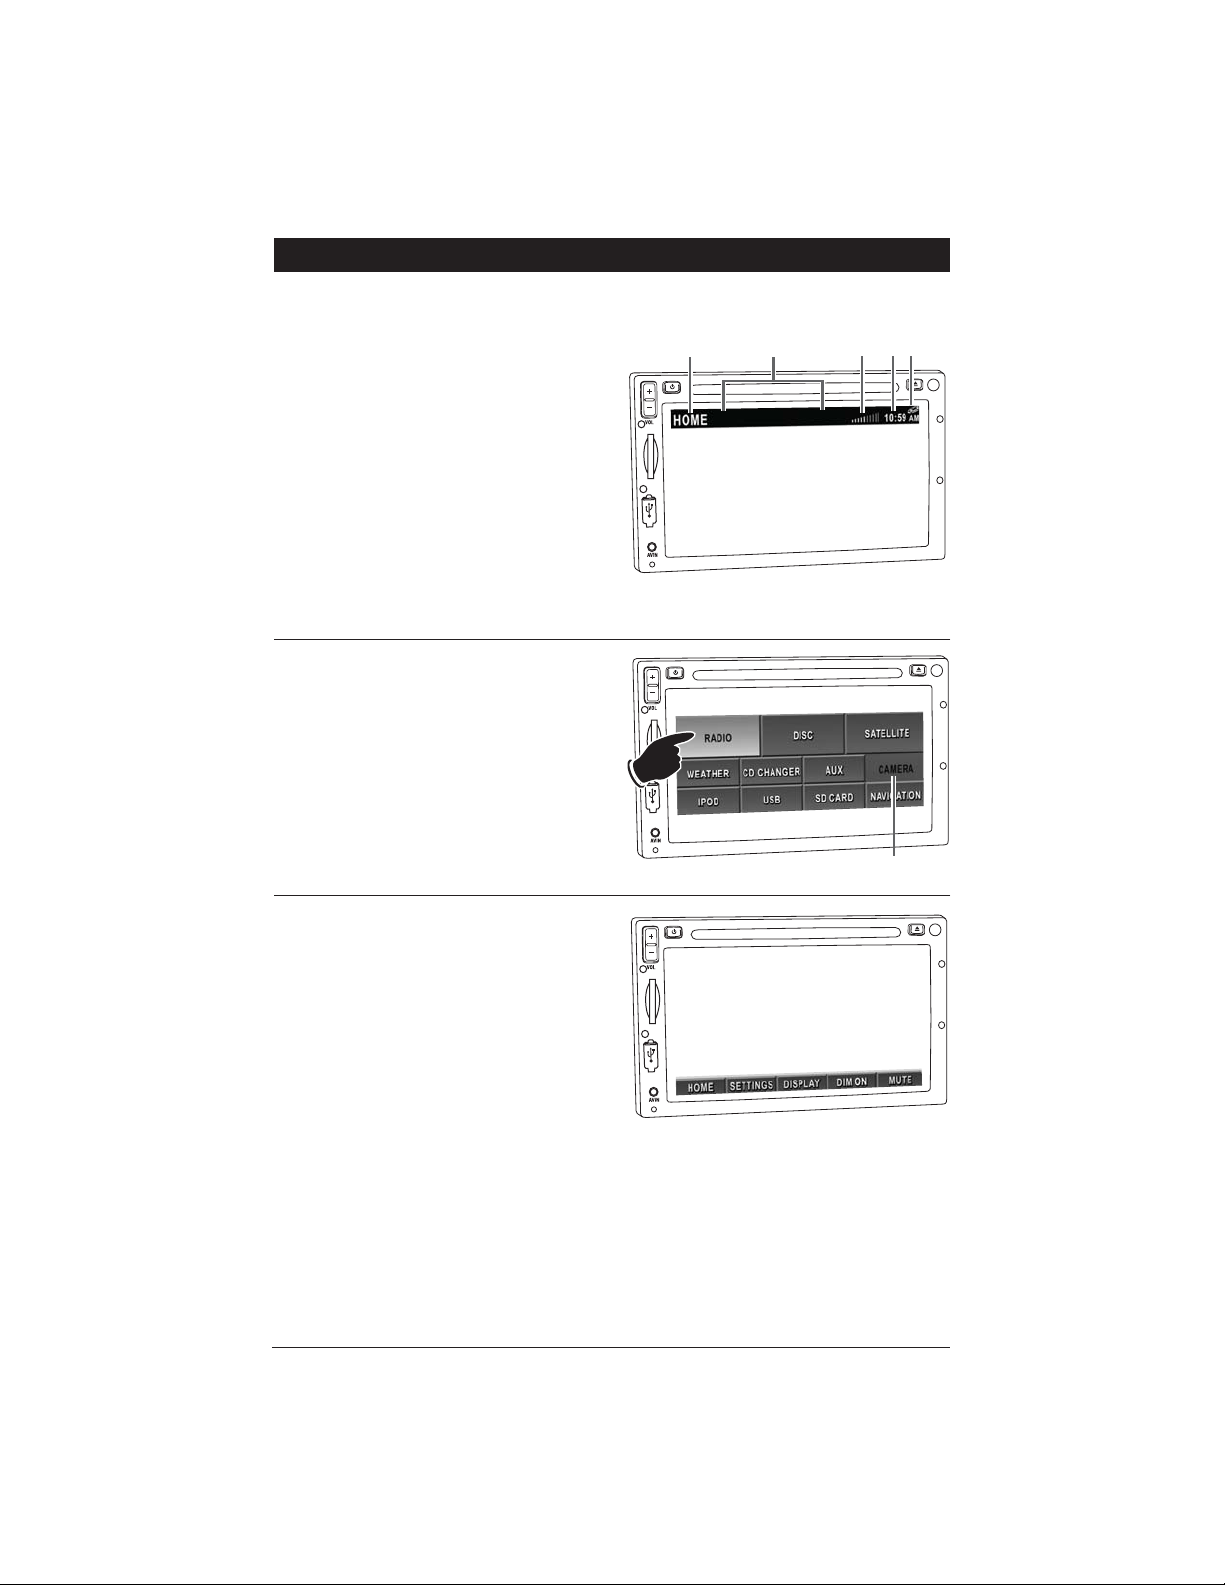
The M1-LCD screen has 3 specific areas: Display area, Source Selection area and Home Row area.
Familiarizing yourself with the 3 specific areas will help you obtain the best performance from the M1-LCD.
Display Area:
The display area is not touch activated, it only
displays information. The information displayed
includes:
1. Source: Orients the user to which source is
being used: Radio, Disc, Satellite, etc.
2. Source Information: Displays secondary information that relates to the source.
For example: In the radio mode, the station
number will be displayed in this area.
3. Volume Level.
4. Clock.
5. Inserted Disc Icon: If a disc is inserted into
the unit the inserted disc icon will be displayed.
Source Not Available
Source Selection Area:
The source selection area is touch activated. Use
your finger to select the desired source.
Note 1: When the source is selected the button
will become highlighted and the unit will switch
to the selected source’s screen.
Note 2: When the text is black the source is not
available for selection.
Home Row Area:
The home row area is touch activated. Use your
finger to select. These buttons include:
Home: Pressing this button returns the unit
back to the source selection screen.
Settings: Pressing this button activates a sec-
ondary screen containing buttons to change
settings for Sound, Monitor and Time.
Display: On some source screens, pressing this
button displays secondary information.
DIM On: Adjusts the screen’s illumination.
Mute: Mutes the volume level.
Back: Sometimes Back appears as a button to
select a previous screen.
Page 5

5
Remote Control Button Locations and Functions
Button Locations and Functions
1. Volume Button: Push (+) to increase or (-) to
decrease the volume level.
2. Power On/Off Button: Press to turn the unit On
or Off.
3. LCD Display: Touch to interact with the display
screen.
4. CD Slot: To play a CD/DVD, insert a disc into the
slot with the label facing up.
5. Eject Button: Press to eject a disc.
1
2
54
7
8
9
10
3 6
DI SC
AU XWEAT HE R
NAVIGATIO NUSBI PO D
DI SP LAYSETTINGSHOM E MU TE
DI M ON
SD C AR D
CD C HA NG ER
SATELLITE
6. Infrared Eye: Receives the signals from the
remote control.
7. SD Card Slot: Insert the SD card to play record-
ed music data.
Notes: This unit may not play all SD cards. The
manufacturer of this unit is not responsible for any
data loss. We suggest you back up your data.
8. USB Input: Plug in your USB device. “USB” will
appear in the display.
Note: This unit may not function with all MP3
players. The M1-LCD will control the USB audio
device. (See “USB Operation” for more details).
9. Audio/Video Input Jack: Plug in a device with a
3.5mm audio/input plug. The M1-LCD will not
control the device, it just allows the audio/video
to be played through the system.
10.
Reset Button: Press the reset button if the unit
freezes up or does not function correctly.
1. Power On/Off: Turn the unit On or Off.
2. Volume: Increase (+) or decrease (-) the volume
level.
3. Subtitle (SUB-T): Accesses DVD’s subtitle lan-
guages.
4. Equalizer (EQ): Choose between preset sound
equalization settings. Press and hold to turn the
subwoofer On and Off.
5. Zoom: Enlarges or reduces the size of DVD pic-
ture.
6. Home: Return unit back to the main source
screen.
7. Back: Selects previous screen.
8. Repeat: Repeats play of chapters, titles, tracks
and discs.
9. Shuffle: Plays all the tracks on the CD in random
order.
10. Angle: Changes the view angle on multi-angle
DVD discs.
11. Go to: Use in conjunction with the numeric key-
pad to skip to the desired chapter.
1
2
3
SUB-W
EQ
4
5
HOME
6
7
REPEAT
8
9
ANGLE
10
11
1
4
12
7
0
13
14
POWER
VOLUME
ZOOM
BACK TITLE SETUP
SHUFFLE
GO TO
2 3
DIR/CAT
5 6
8 9
ASM
15
EJECT
16
WB CAMERA MODE
17
18
SUB-T AUDIO
DISPLAY
19
20
21
22
23
DVD
MENU
OK
24
SEL
25
26
SLOW
TUN
-
TA PTY BAND
S-MOD
IPOD MENU
MUTE
TUN
LOUD
27
28
29
30
+
31
32
Page 6
6
Remote Control Button Locations and Functions
(Continued)
12. Numeric Keypad: Inputs the corresponding
number.
13. Automatic Station Memory (ASM): Press and
hold for automatic station memory storing.
Press and release for scanning memorized stations.
14. Traffic Announcement (TA): Activates the traf-
fic announcement function. (See the Radio
Operations section for more information).
15. Weather Band (WB): Press for direct access to
the weather band radio.
16. Eject: Ejects the loaded disc.
17. Camera: Press to change the source to camera
mode.
18. Mode: Scrolls through the available sources.
19. Audio: Changes the language on multi-lan-
guage DVD discs.
20. Display: Displays source information.
21. Title: Displays the title menu that is stored on
the DVD disc.
22. Setup: Access the Bass, Treble, Balance, Fader
and Subwoofer controls.
23. Ok: Confirms the selected item.
24. Cursor: Moves feature selection up, down, left
or right.
25. Select (SEL): Accesses the Sound menu.
26. DVD/Menu: Displays the DVD menu.
27. Play/Pause: Starts and pauses disc play.
28. Stop: Stops disc play.
29. Slow Motion: Slow motion forward or reverses
playback of DVD disc.
30. Tune/Track/Chapter:
Radio: Press and the tuner will scan to the
next strong station and stop. Press and hold
until “MANUAL” appears in the display then
release. Then press again until the desired
radio station is tuned-in.
CD: Press to change to a lower or higher track.
DVD: Press to change to a lower or higher
chapter.
31. Enter/Band and Loud Button:
Radio: Selects AM1, AM2, FM1, FM2 and FM3
radio bands.
Loudness: Press and hold button until “LOUD”
appears in the display to boost high and low
tones at low volume levels. To deactivate, press
and hold again until “LOUD OFF” appears in the
display.
IPOD Mode: See “IPOD Operation” for more
information.
29. Program Type (PTY): Activates the PTY screen
which scans FM radio stations according to
program type.
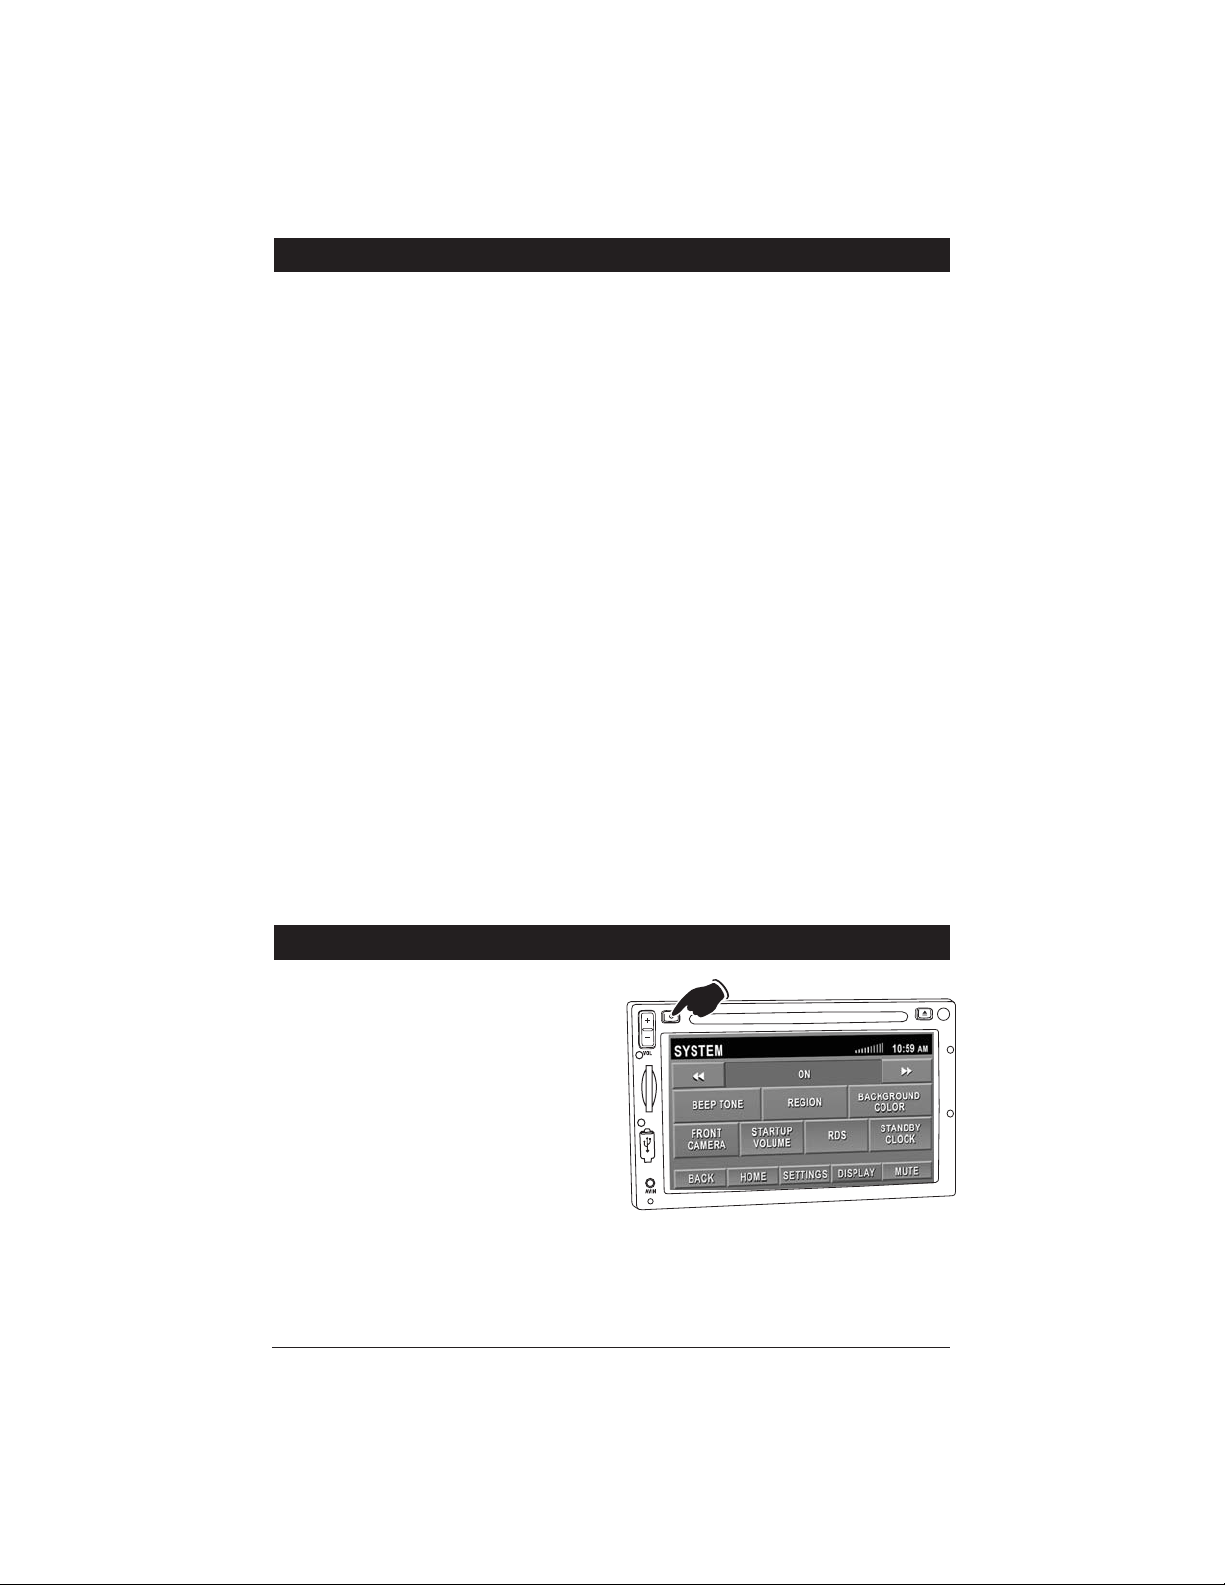
System Setup
System Setup provides special settings to fine-tune
the user experience. Press and hold the power
button for more than 10 seconds. The System
setup display will appear. Select each item you
wish to adjust by touching the item button. Touch
the
or arrow button to change the settings.
Press the back button to return to the previous
screen.
Beep Tone:
When the buttons are touched, the unit will emit
a beep
. To change this feature press the BEEP
TONE button which will highlight this feature then
touch the or buttons
to turn the beep
tone on or off.
Hold
Page 7
7
System Setup
(Continued)
Region:
The region button changes the tuner’s configuration so that it can receive frequencies from different regions. To change the region, press the
REGION button then use theor to select
different AM/FM tuning systems. The default
setting is U.S.A
.
Background Color:
The Background Color button allows you to
change the background color of the screen. To
change the background color press the BACK-
GROUND COLOR button then use theor
to select from GREY, GREEN, BLUE or AMBER
.
Front Camera:
If the vehicle has a front camera this feature will
need to be activated (ON). The default setting is
OFF.To turn on this feature press the FRONT
CAMERA button then use theor to turn
this feature on ON
. When the Camera source
screen is selected the front camera will be available for viewing.
Startup Volume:
The startup volume setting controls the initial
volume level each time the unit is turned on. The
default setting is 12. To adjust this feature press
the STARTUP VOLUME button then use the
or to adjust the startup volume level
.
RDS:
The RDS button (radio station data system) displays information such as the station’s name or
artist - title/song. The default setting is On. To
turn off this feature, press the RDS button then
use theor to select OFF
.
Note: If the RDS system is turned off, the Traffic
and PTY buttons will not function.
Standby Clock:
This feature displays a clock on the screen when
the ignition key is on but the M1-LCD unit is off.
The default setting is on. To turn off this feature,
press the STANDBY CLOCK button then use the
or to select OFF
.
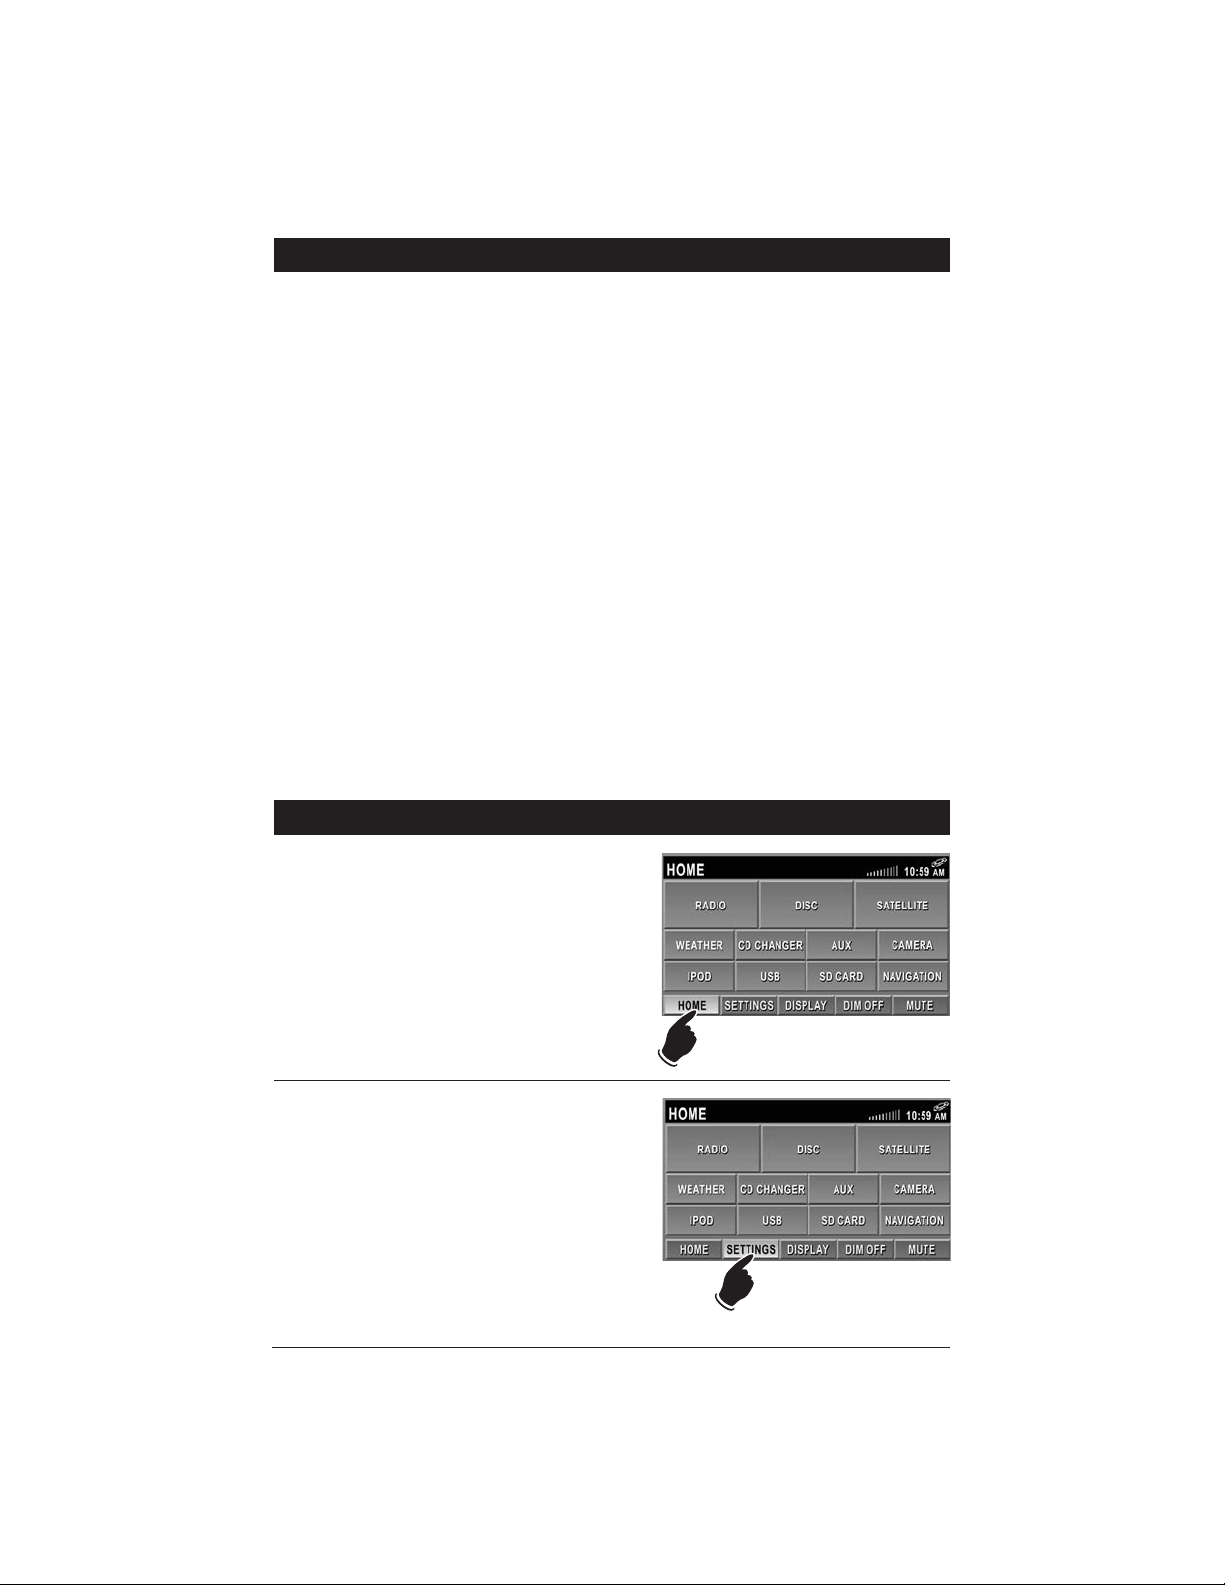
Home Row
Home Button:
Pressing the HOME button returns the unit back
to the source selection screen from any screen.
Note: When the HOME button is selected, the
screen will switch to the source selection screen
but continue to play the previous selected source
until a new source is selected.
Settings Button:
Pressing the SETTINGS button brings you to a
secondary screen containing buttons to change:
Sound, Monitor and Time.
Page 8
8
Home Row
(Continued)
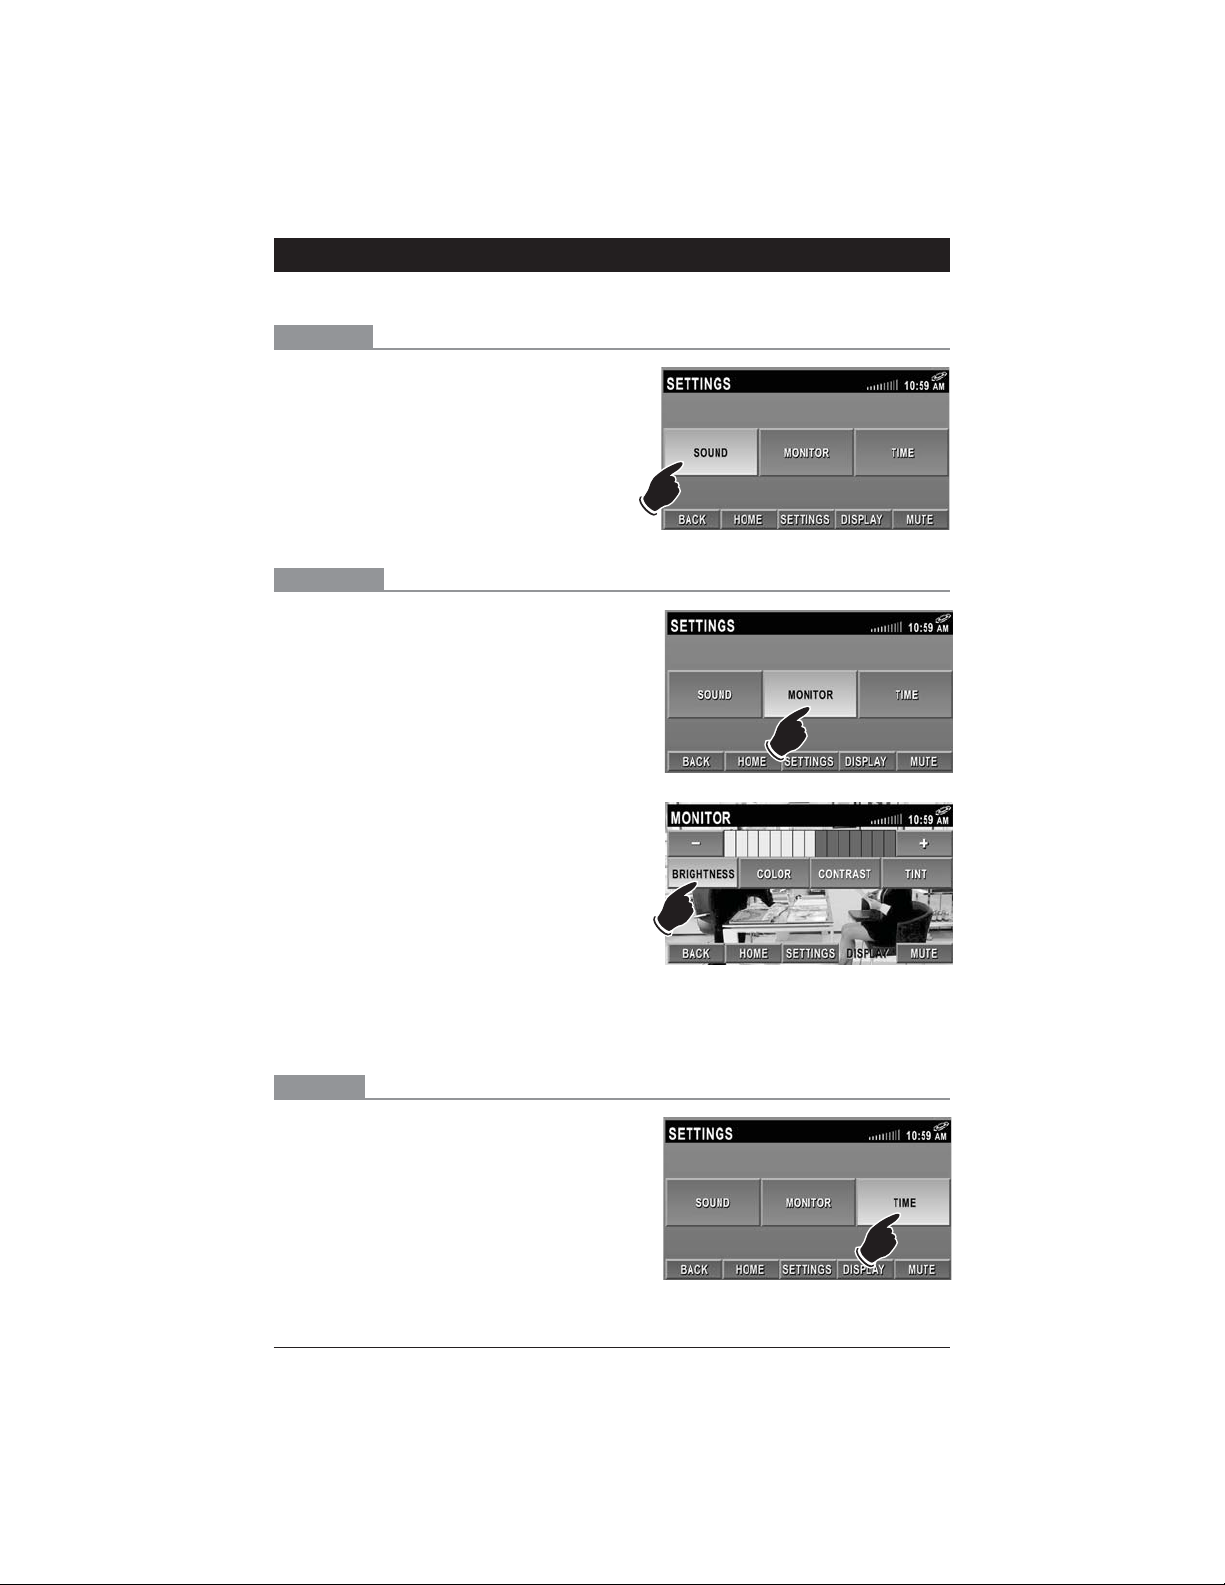
Sound Button:
Press the SOUND button to activate the sound
adjustment screen.
See “Sound Controls” (Page 11) for operation
instructions.
Sound Button
Monitor Button
Monitor Button:
Press the MONITOR button to activate the monitor adjustment screen. Then select from brightness, color, contrast or tint by touching the corresponding button. Use the - and + buttons to
adjust the monitor to achieve the desired picture.
Brightness: Press the BRIGHTNESS button to
adjust the amount of white light in the image.
Color: Press the COLOR button to adjust the
amount of color saturation in the image.
Contrast: Press the CONTRAST button to adjust
the difference between the lightest and darkest
portions of the image.
Tint: Press the TINT button to adjust the overall
color of the image of the screen by changing the
intensity of the primary green and primary red
colors.
Press the HOME button after adjustment.
Time Button
Time Button (Setting the Clock):
Press the TIME button to activate the clock
adjustment screen.
Settings Button (continued):
Page 9
9
Home Row
(Continued)
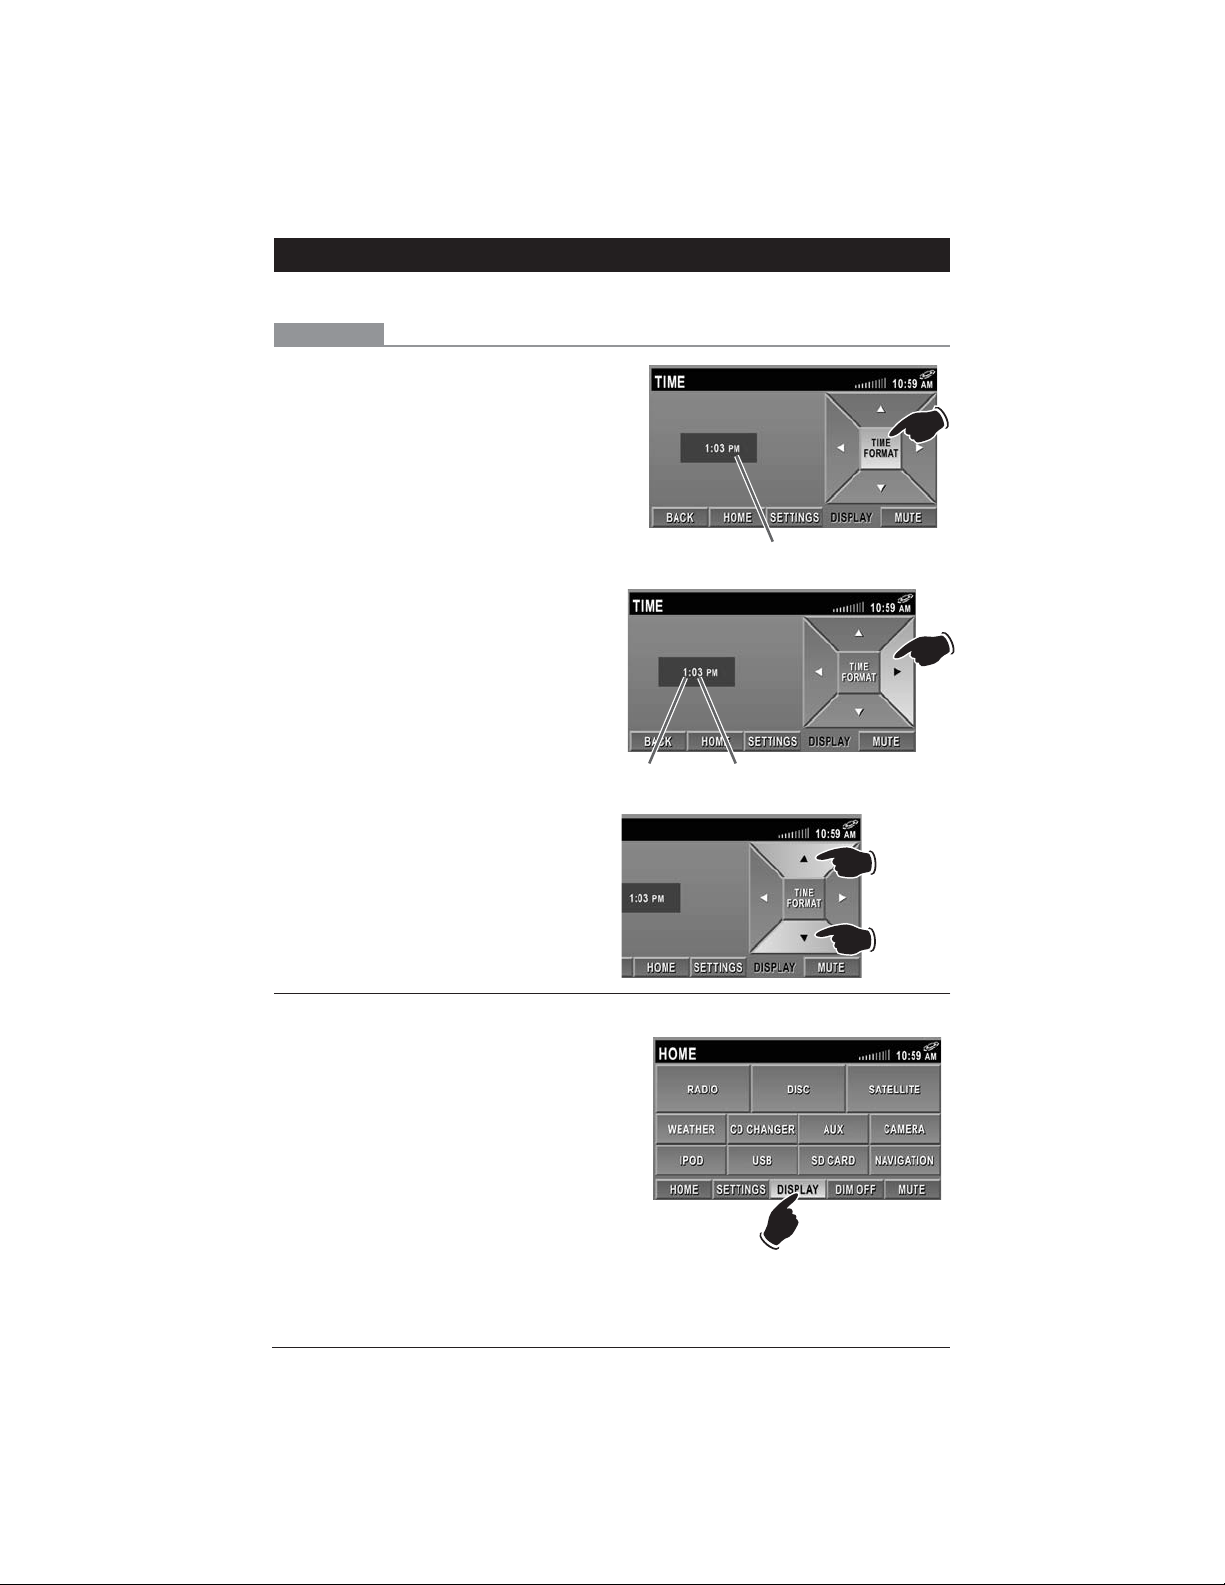
Time Button
1. 12 or 24-Hour Time Format:
Press the TIME FORMAT button to select the
time format. For a 12-hour clock (am and pm)
press the TIME FORMAT button until either AM
or PM appear in the display. For a 24-hour clock
(military time) press the TIME FORMAT button
until neither AM or PM appear in the display.
2. Selecting Hours or Minutes:
Press the button to select the hours or minutes. Hours has been selected when the hour
number flashes.
3. Adjusting the Hours or Minutes:
Press the or button until the correct
“Hours” appear in the display.
Note: When setting the 12-hour clock, make
sure to select the correct AM or PM indicator.
Repeat the same procedure to adjust the minutes.
When finished press HOME or BACK button.
Display Button:
Pressing the DISPLAY button when available will
display additional source information in the
information area.
Settings Button (continued):
12 or 24 Hour Indicator
MinutesHours
Increase
Decrease
Page 10
10
Home Row
(Continued)
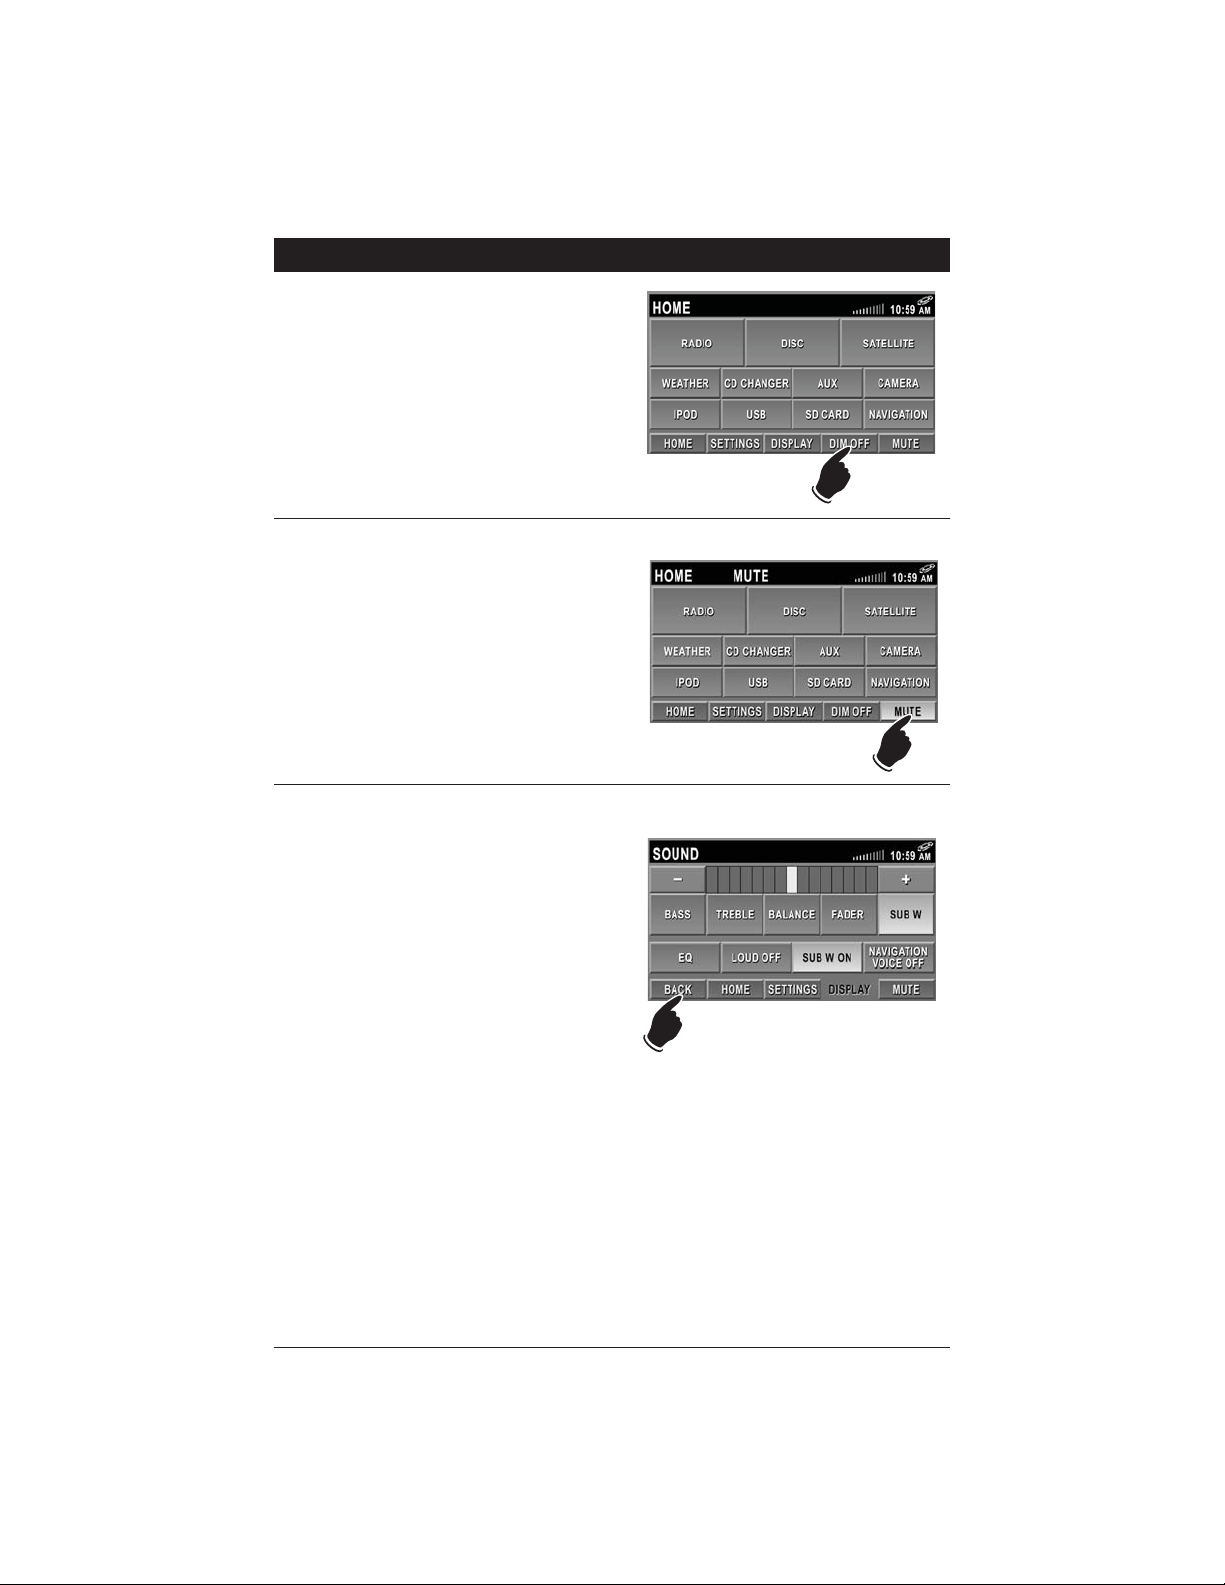
Dim Button:
Pressing the DIM OFF button will dim the display. The button will now be highlighted and
DIM ON will now appear on the button. Pressing
the button again will return the display to normal
brightness.
Mute Button:
Pressing the Mute button will mute the volume
level. “MUTE” will flash in the information area.
Pressing the MUTE button again will restore the
volume level.
Back Button:
In select screens, the BACK button will appear in
the Home Row. Pressing this button will select
the previous screen.
Page 11
11
Sound Controls
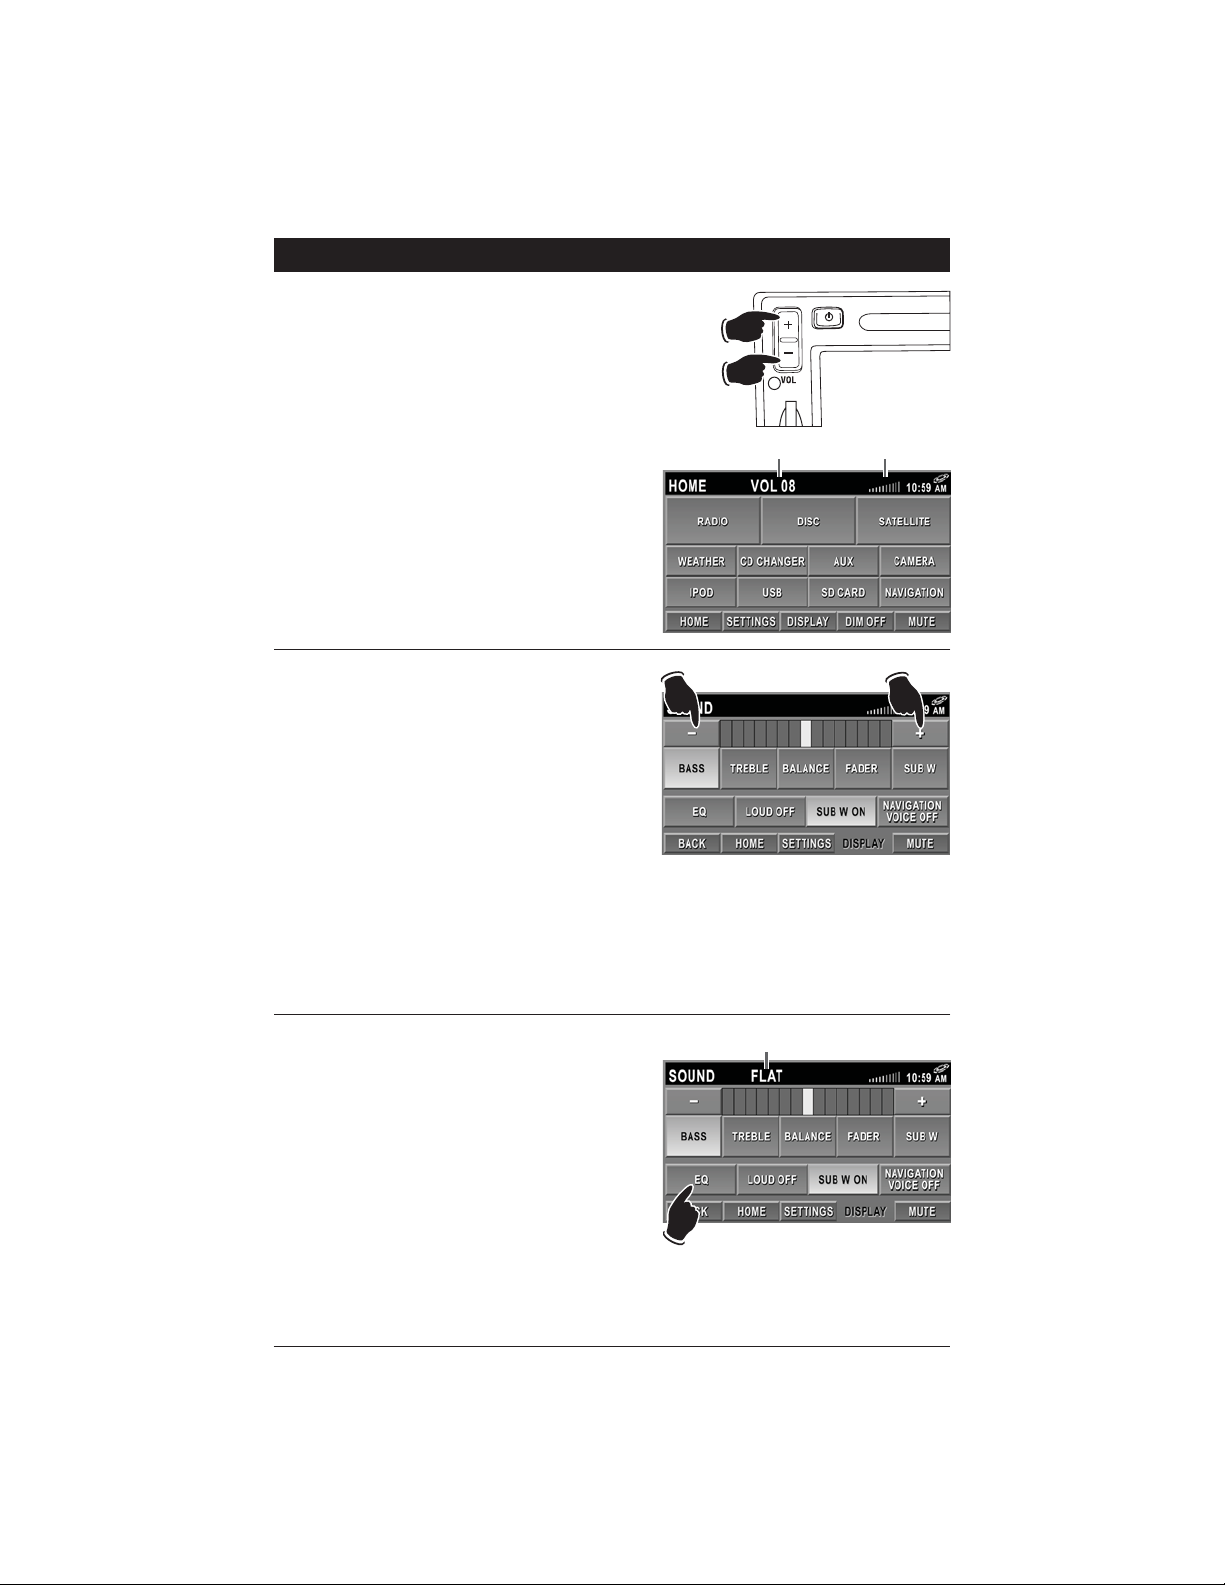
Volume:
Increase the volume by pressing the + side of
the button.
Decrease the volume by pressing the - side of
the button.
Note: See Startup Volume (page 7) on how to
adjust the initial startup volume level.
Increase
DI SP LAYSETTINGSHOM E MU TE
DI M ON
Bass, Treble, Balance and Fader Controls:
To access the Bass, Treble, Balance and Fader
buttons, press the SETTINGS button in the home
row then press the SOUND button.
Touch the button to activate the desired adjustment control. When the item is selected the button will become highlighted. Press the - button
to decrease the output and press the + button to
increase the output of Bass and Treble. The yellow bar will move to indicate the adjustment.
The highlighted bar in the middle of the scale
indicates a neutral position.
Note 1: Balance button adjusts the amount of
sound output to the left and right speakers.
Note 2: Fader button adjusts the amount of
sound output to the front and rear speakers.
Equalizer (EQ):
To access the EQ button, press the SETTINGS
button in the home row then press the SOUND
button.
Touch the EQ button to choose between the preset equalizer settings: DSP OFF, FLAT, CLASSICS, POP M, ROCK M and JAZZ as indicated in
the display area.
Note: “DSP OFF” setting reverts Bass and Treble
back to the last manually adjusted settings.
Decrease
Volume Level Indicators
Equalizer Setting
Page 12
12
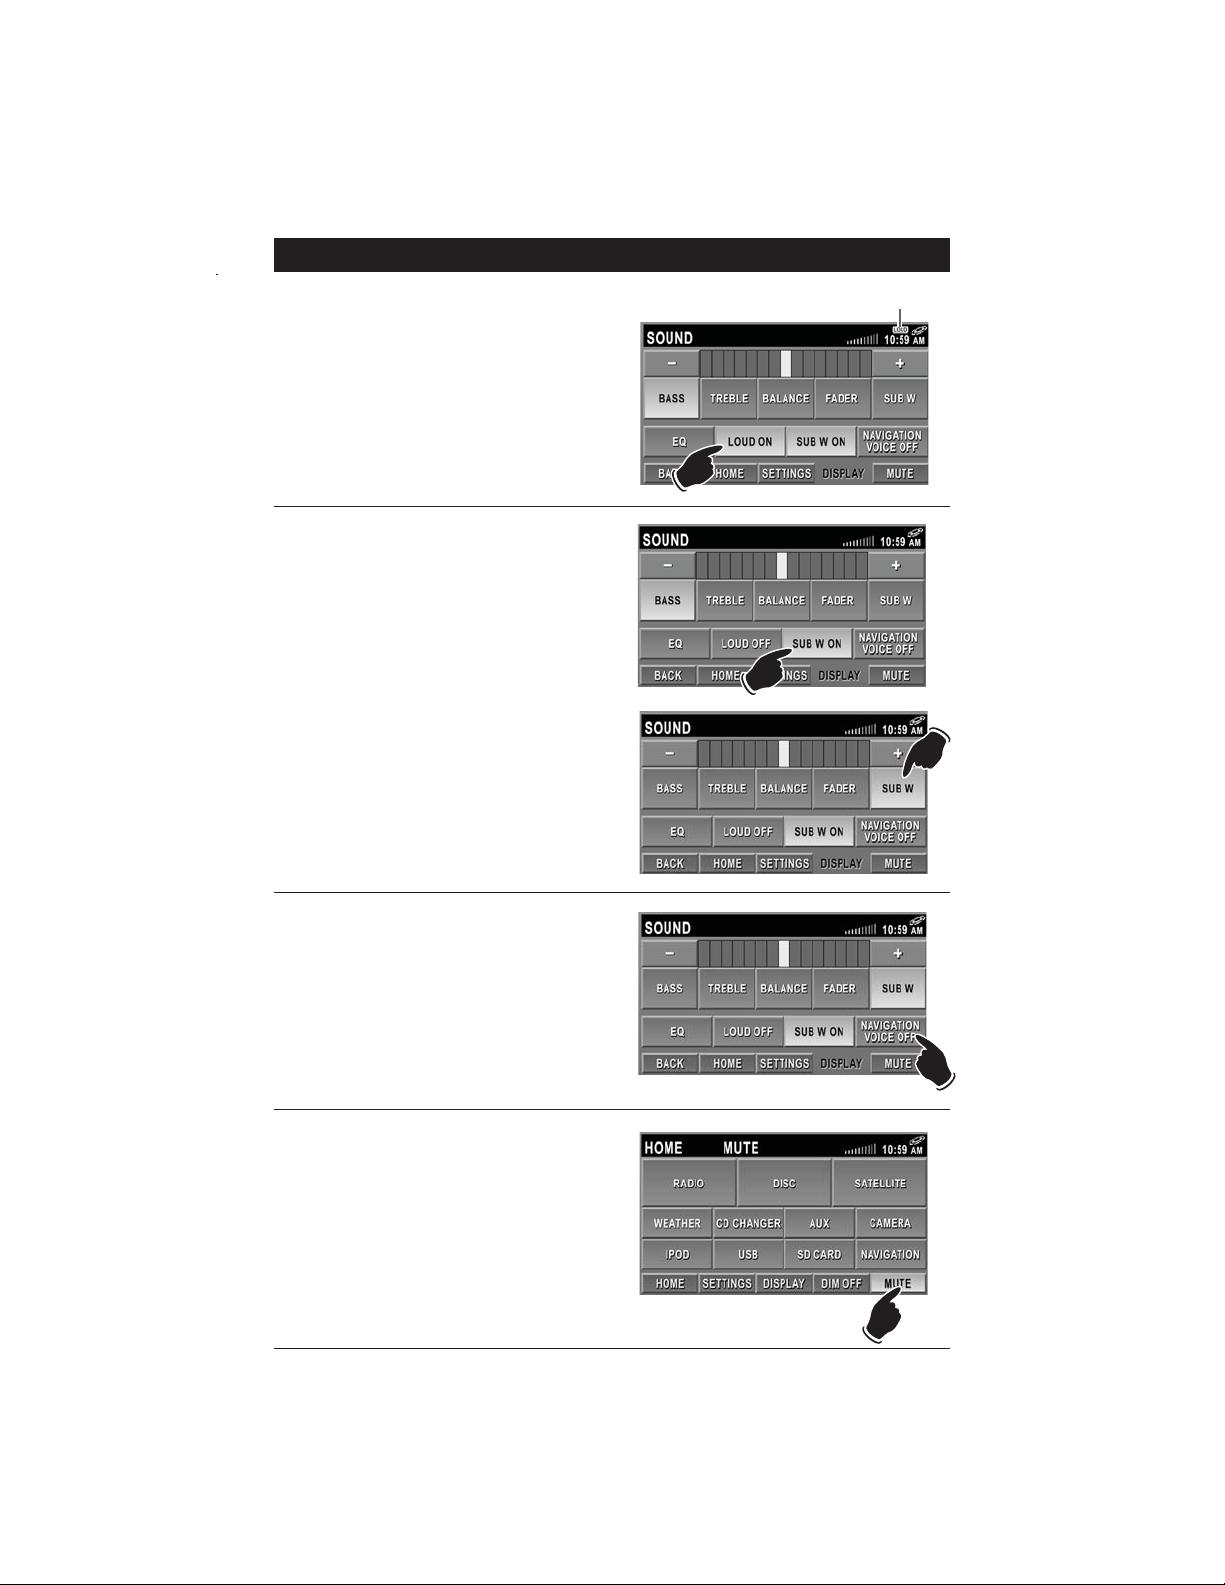
Sound Controls (Continued)
Subwoofer Output:
To access the Subwoofer button, press the SETTINGS button in the home row then press the
SOUND button.
To turn the subwoofer effect On or Off, touch the
SUB W OFF/ON button.
When the subwoofer is turned On the output level
can be adjusted. Touch the SUB W button and
use the + and - to adjust the subwoofer output.
Note 1: When the subwoofer is turned Off, the
output level can not be adjusted as indicated by
the deactivated SUB W button.
Note 2: Your vehicle may not be equipped with
a subwoofer, therefore this button will be nonfunctional.
Navigation Voice Control:
To access the Navigation Voice button, press the
SETTINGS button in the home row then press
the SOUND button.
Turn the navigation voice on or off by touching
the NAVIGATION VOICE OFF/ON button.
Note: If an optional navigation unit is not connected to the M1-LCD, this button has no effect.
Mute Button:
Pressing the MUTE button will partially mute the
volume level. “MUTE” will flash in the information area. Pressing the Mute button again will
restore the volume level.
Loudness:
To access the Loud button, press the SETTINGS
button in the home row then press the SOUND
button.
Touching the LOUD OFF button will boost high
and low tones at lower volume levels. When the
item is selected, the button will become highlighted and LOUD ON will appear on the button.
“LOUD” also appears in the display area. To
deselect, touch the LOUD ON button.
DI SP LAYSETTINGSHOM E MU TE
DI M ON
Loud Indicator
Page 13
13
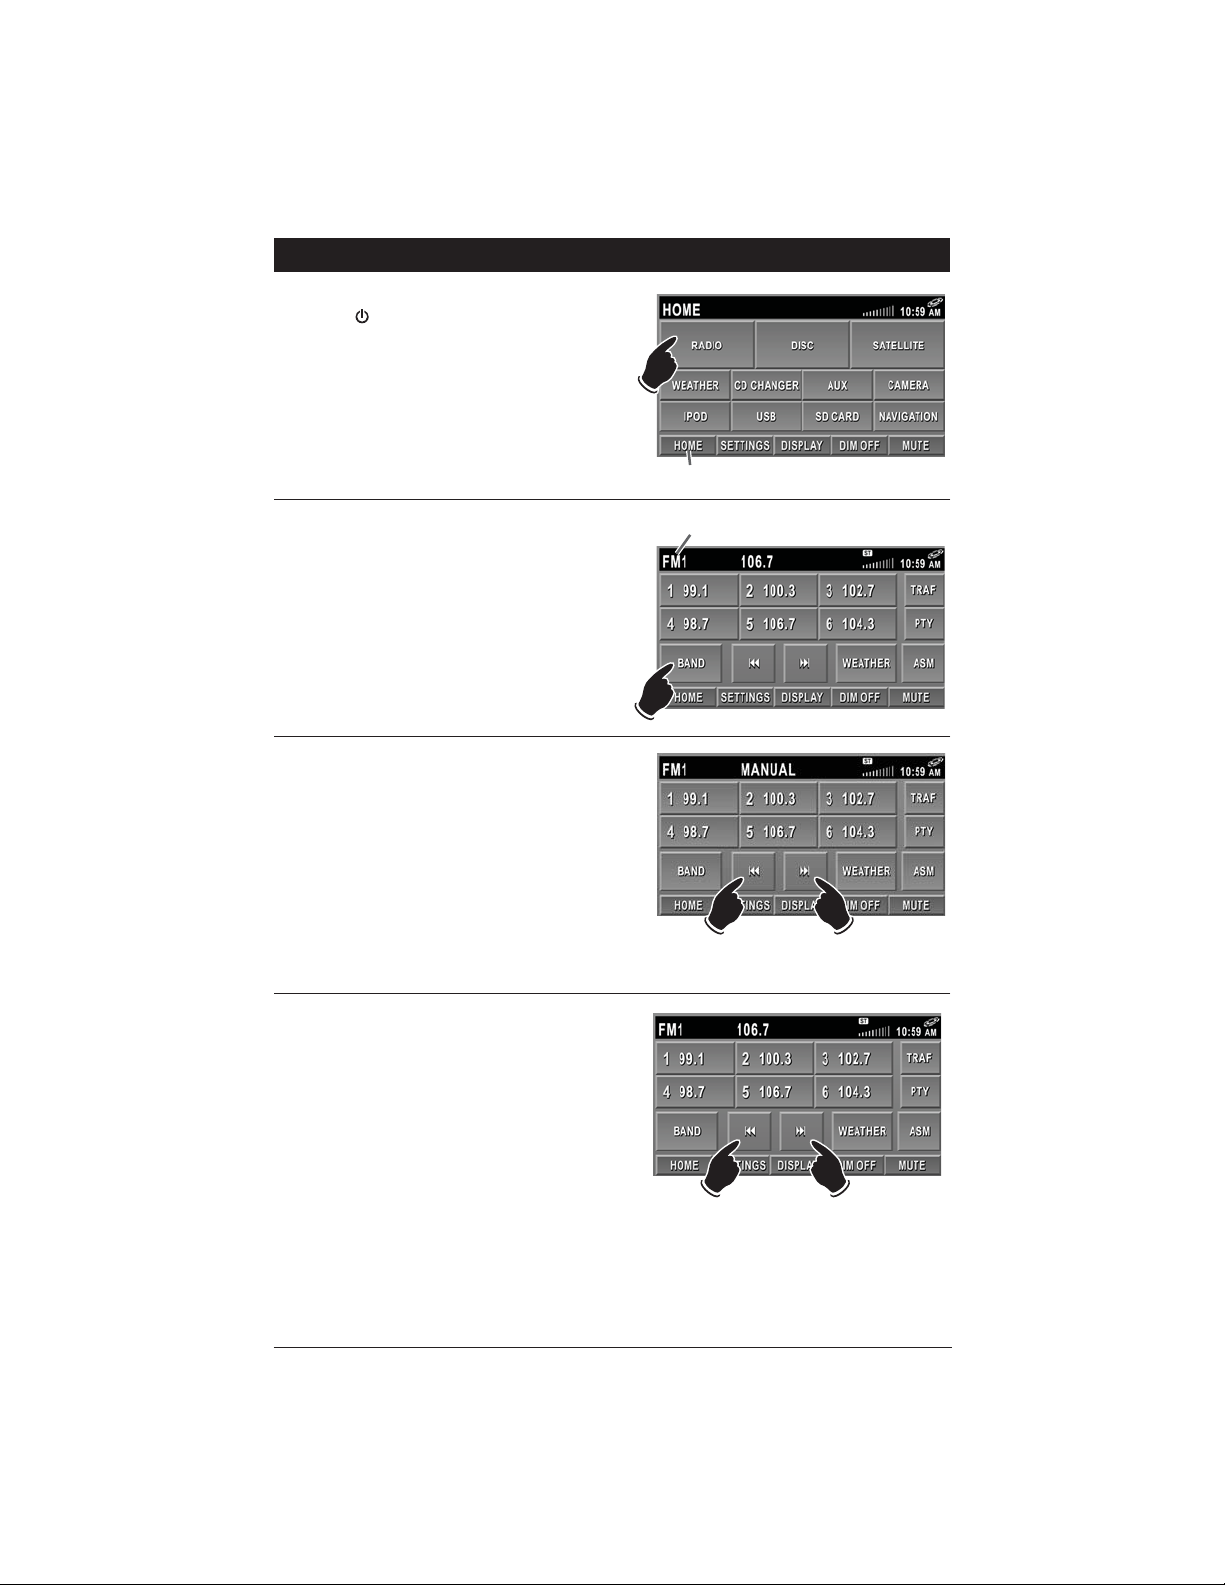
Radio Operation
Power On/Off:
Press the button to turn the unit 0n.
Selecting the Radio Source:
Touch the HOME button to activate the source
selection screen. Touch the RADIO button to
enter the radio operation screen.
Selecting the AM or FM Band:
Press the BAND button repeatedly and select
from AM1, AM2, FM1, FM2 or FM3.
Manually Tuning in a Radio Station:
Press and hold either the lor l button until
“MANUAL” appears in the display, then release.
Then press the lor l button until the desired
radio station appears in the display.
Note: The unit will automatically switch from FM
Mono to FM Stereo when the signal strength
increases to a stereo level. If the stereo signal
should become weak, the unit will switch back to
Mono. FM stereo reception is indicated when the
“ST” appears in the display.
Tuning in a Radio Station Using Seek:
Press either the lor l button and the tuner
will scan to the next strong station, then it will
stop seeking and start playing.
Home Button
Band Indicator
Lower
Frequency
Higher
Frequency
Lower
Frequency
Higher
Frequency
Page 14
14
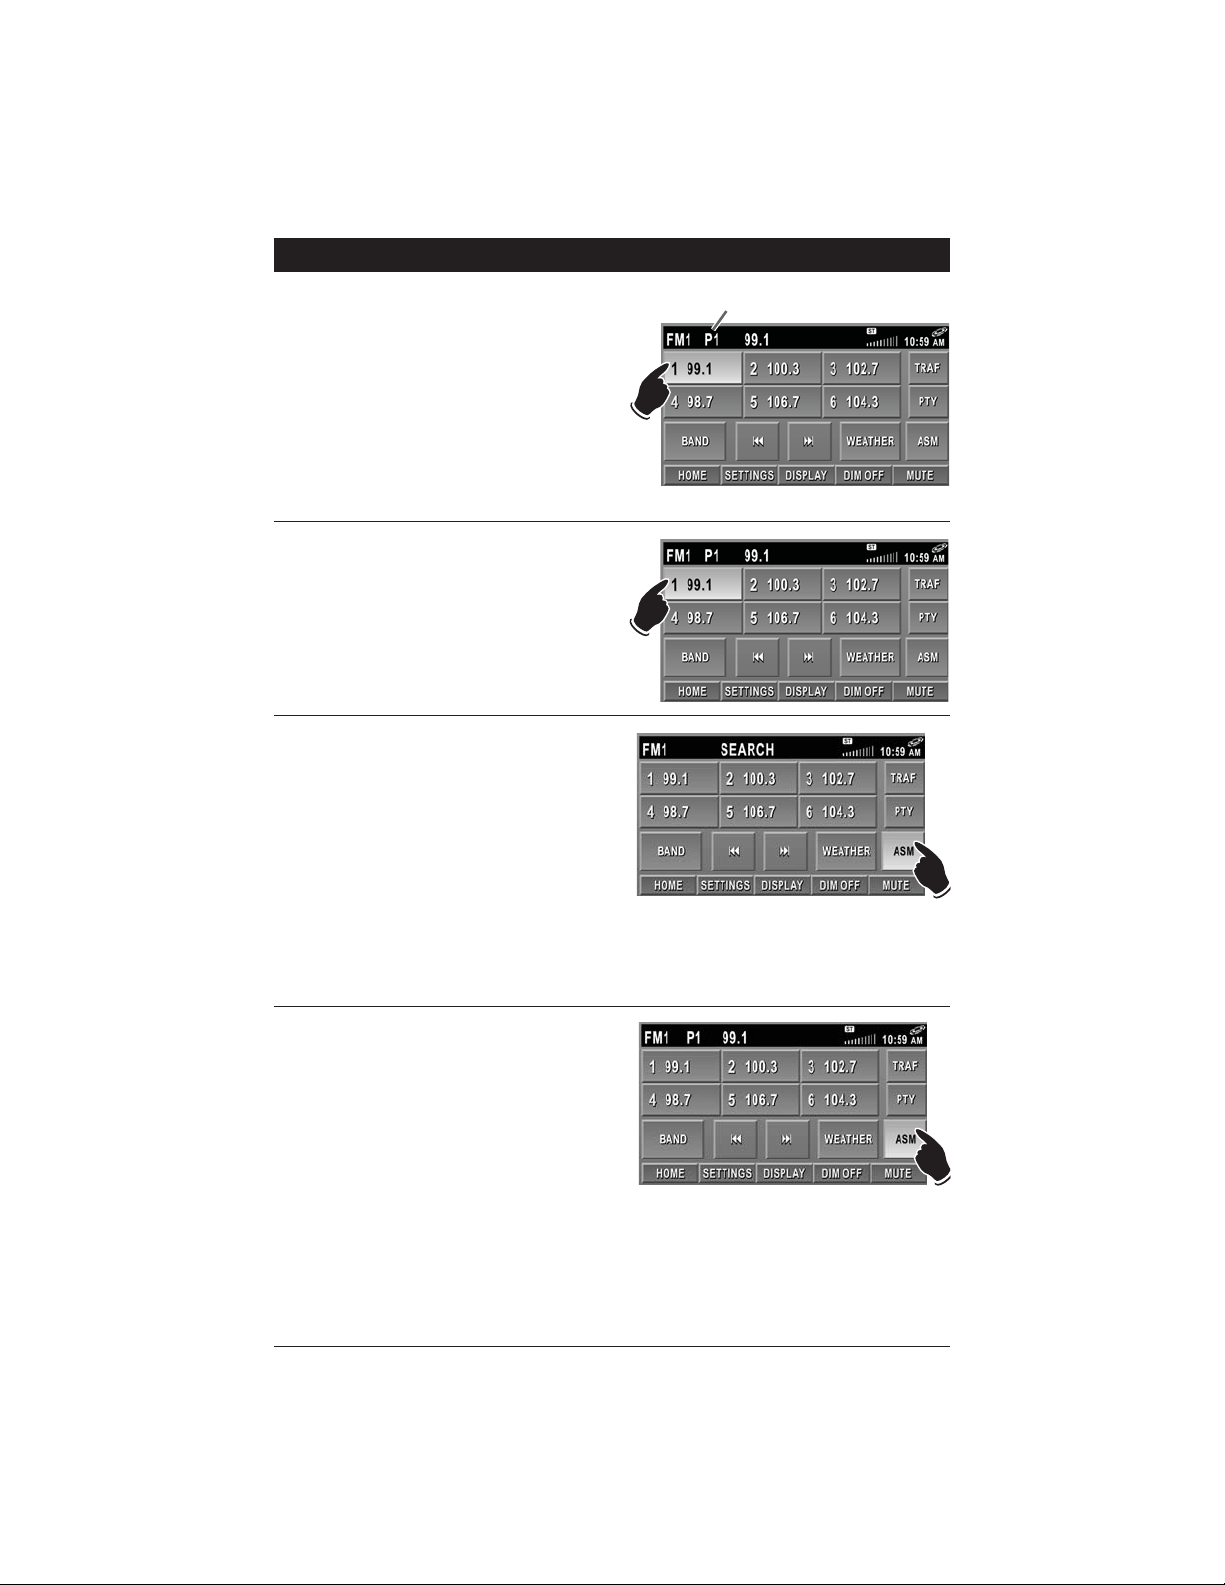
Radio Operation (Continued)
Memorized Radio Station Indicator
Programming Radio Stations:
1. Press the BAND button to select from the
AM1, AM2, FM1, FM2 or FM3 radio band.
2. Tune in the desired radio station.
3. To program the station, press and hold one of
the six Radio Station Recall buttons until you
hear a beep. The Radio Station Recall button
will now contain the programmed radio station frequency.
4. The Programmed Radio Station Recall
Indicator will appear in the display.
Recalling Programmed Radio Stations:
1. Press the BAND button to select from the
AM1, AM2, FM1, FM2 or FM3 radio band.
2. Press and release one of the six Radio Station
Recall buttons to select the programmed
radio station.
Automatically Store Radio Stations:
1. Press the BAND button to select from the
AM1, AM2, FM1, FM2 or FM3 radio band.
2.
Press and hold the AMS button until “SEARCH”
appears in the display. The tuner will search for
the strongest stations and store them into memory. The new stations will replace stations that
were previously stored in the current band.
Note: After the new stations are stored into
memory, the tuner will start scanning the
newly programmed stations.
3. When a desired station is reached, press the
ASM button to stop the scanning.
d
Scanning Stored Radio Stations:
1. Press the TUNE knob to select from the AM1,
AM2, F1, F2 or F3 radio band.
2. Press the ASM button and the tuner will scan
for preset stations stored in the current band
and pause for 5 seconds at each station.
When a desired station is reached, press the
ASM button again to stop scanning.
Hold
Hol
Page 15
15
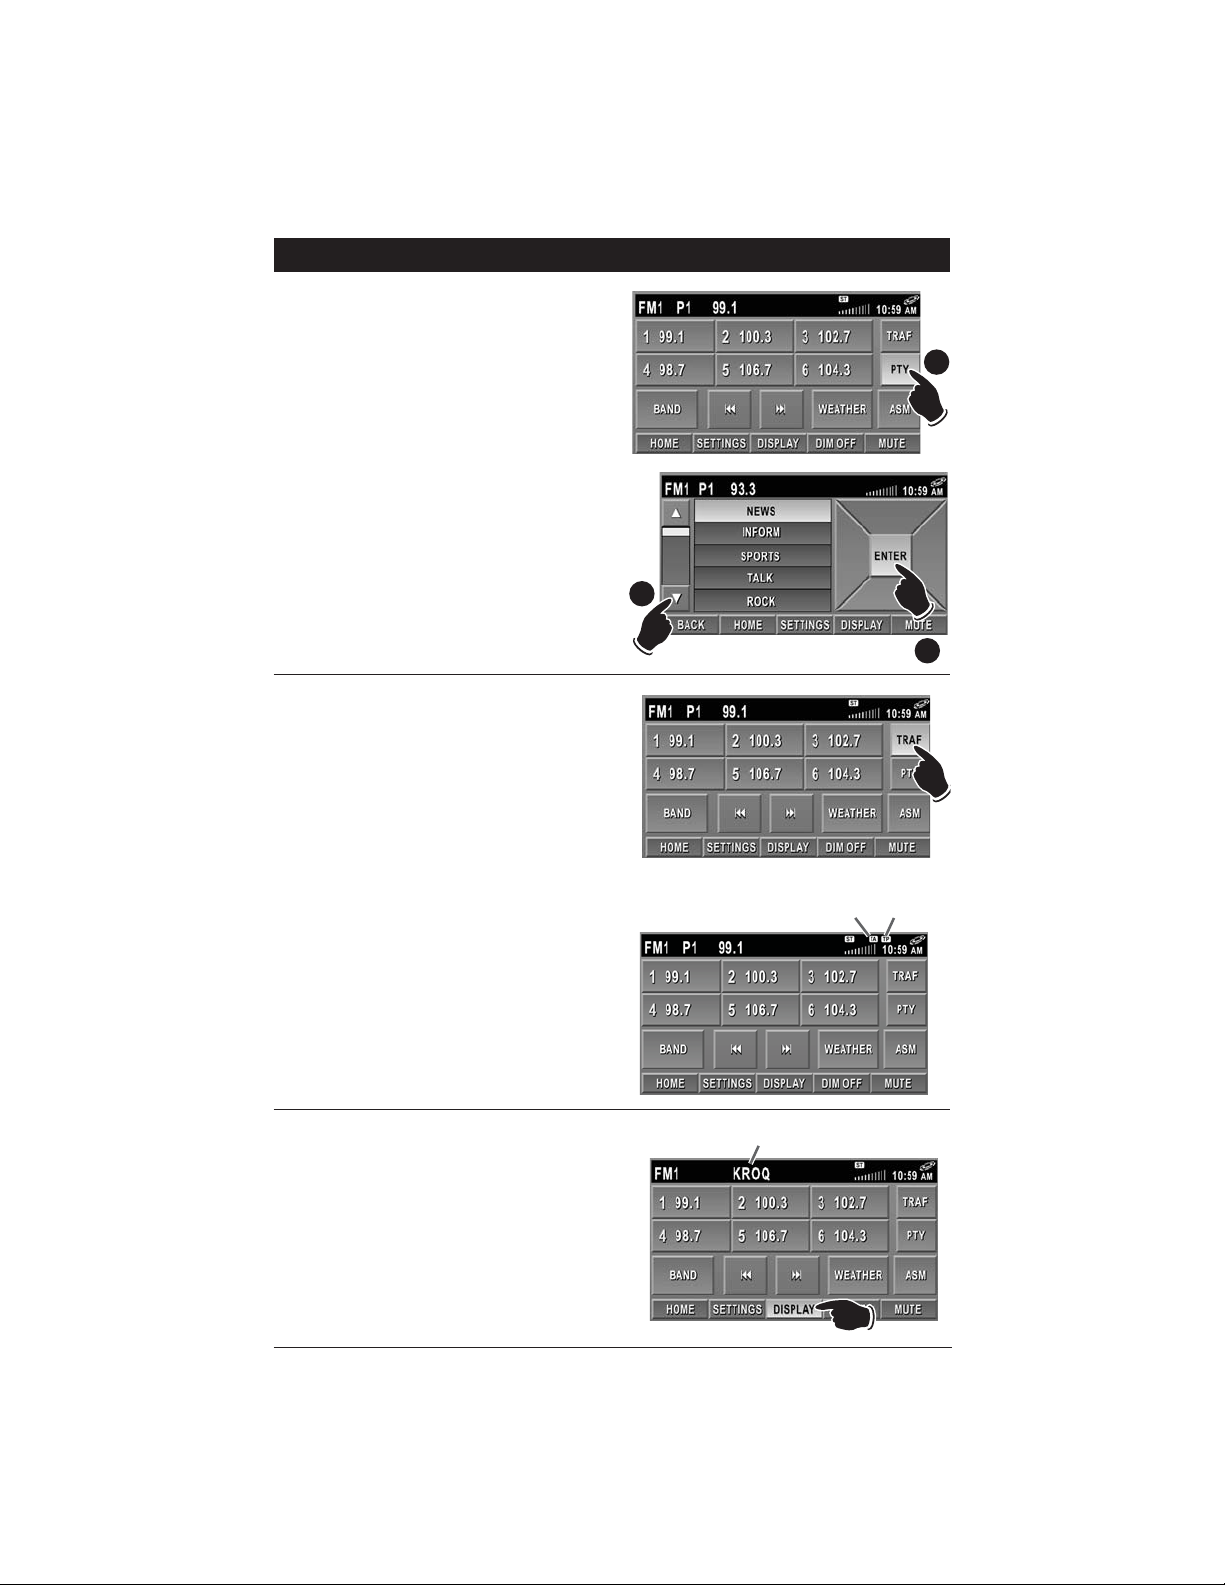
Radio Operation (Continued)
Scanning for FM Radio Stations According
to Program Type (PTY):
1. Press the BAND button to select from the
FM1, FM2 or FM3 radio band.
2. Press the PTY button to display the program
type screen.
3. Press the or button to select the desired
program type (PTY) (Example: News,
Information, Sports, etc.). The selected program type will be highlighted.
4. Press the ENTER button to search a station
with the selected program type (PTY). Once a
station has been found it will automatically
start playing.
5. To search for another station in the same PTY
category press either the lor l button.
Scanning for FM Radio Stations that
Broadcast Traffic Announcements:
1. Press the BAND button to select either the
FM1, FM2 or FM3 radio band.
2.
Press the TRAF button and the tuner will
search for a station that broadcasts traffic
announcements. “TA” will appear in the display.
Once a station has been found “TP” will appear
in the display and automatically start playing.
3. To search for another station that broadcasts
traffic announcements press either the lor
l button.
4. Press the TRAF button again to cancel this
feature. “TA” will disappear from the display.
Note: The Traffic Announcement feature
searches for stations that broadcast traffic
announcements; it does not mean that they are
presently broadcasting a traffic announcement.
Display Button:
Press the DISPLAY button repeatedly to display
radio station’s frequency, call letters or PTY
type, if available.
Note: This feature is not available for AM frequencies.
2
3
4
Traffic
Announcement
Display Information
Traffic
Program
Page 16

16
Weather Band Operation
Power On/Off:
Press the button to turn the unit 0n.
Selecting the Weather Band Source:
Touch the HOME button to activate the source
selection screen. Touch the WEATHER button to
enter the weather band screen.
The weather band can also be accessed through
the Radio screen. Touch the WEATHER button to
enter the weather band screen.
Automatic Weather Band Station Tuning:
The strongest weather band station will automatically be selected and start playing.
Notes:
1. The remaining weather band stations will be
stored in the Radio Station Recall buttons.
Touch any of the Radio Station Recall buttons
to select another weather band station.
2. To exit the weather band screen, touch the
BAND button to select the AM/FM radio station screen or press the HOME button to
select another source.
Page 17

17
Disc Warnings
Disc Formats Supported by this Player:
Label side up
Do not touch
the underside
of the disc
Do not bend
Wipe the disc from
the center toward
the outside edge
Disc Cleaning:
Use a dry, soft cloth to wipe the disc's surface. If the
disc is very dirty, use a soft cloth slightly moistened
with isopropyl (rubbing) alcohol. Never use solvents
such as benzine, thinner or conventional record
cleaners as they may mar the surface of the disc.
Note: A disc may become somewhat scratched
(although not enough to make it unusable)
depending
on handling and conditions in the usage
environment.
DVD
12cm disc
(Single-sided disc only)
CD
12cm disc
MP3
12cm disc
Handling:
• Dirt, dust, scratches and warping disc will cause
non-operation.
• Do not place stickers on disc or scratch disc.
• Do not place discs in the following places: Direct
sunlight, dirty, dusty or damp areas, near car
heaters, car seats or dashboard.
Preparing New Discs with Rough Spots:
A new disc may have rough edges on its inside and
outside edges. If a disc with rough edges is used,
the proper setting will not be performed and the
player will not play the disc. Therefore, remove the
rough edges in advance by using a ball point pen
or pencil as shown. To do this, press the side of
the pen or pencil against the inside and outside
edges of the disc.
Rough spots on
outside edge
Rough spots on
inside edge
Ball point pen
or pencil
CD Operation
General Operations:
1. Press the button to turn the unit On.
2. Gently insert the disc into the slot with the
label side up. The unit will automatically load
the disc.
Note: If a CD does not auto-load, DO NOT
FORCE it into the slot, as you may already have
a CD loaded indicated by the inserted disc icon.
Label Side Up
Inserted Disc Icon
Page 18

18
CD Operation (Continued)
Pausing a CD:
Press the ll button to pause the disc. Press it
again to resume play.
Ejecting a CD:
Press the button to eject a disc.
CD Track Selection:
Press the lbutton to select a lower track.
Press the l button to select a higher track.
Stopping a CD:
Press the button to stop the disc. to resume
play, press the button.
Press the button 2 times, then press the
button and the disc will start playing from the
beginning.
Selecting the CD Source:
Press the HOME button to select the source
screen. Next, press the DISC button to select the
CD player.
Lower
Track
Higher
Track
Page 19

19
CD Operation (Continued)
Repeating a CD Track:
The M1-LCD’s default setting is to repeat the
disc. When the CD mode is selected, “REPEAT
ALL” appears on the button and the entire disc
will play and then continually replay.
To repeat a CD track, press the REPEAT ALL but-
ton until “REPEAT ONE” appears on the button.
The CD track will now play repeatedly.
The repeat feature operates in the following
sequence: Disc Repeat (REPEAT ALL) _> Repeat
Off (REPEAT OFF) _> Track Repeat (REPEAT
ONE) _> Disc Repeat (REPEAT ALL) . . .
Preview CD Tracks:
Press the INTRO OFF button until “INTRO ON”
appears on the button. Each track on the disc
will play for 15 seconds. To cancel this function,
press the INTRO ON button until “INTRO OFF”
appears on the button.
Random CD Track Play Order:
Press the RANDOM OFF button until “RANDOM
ON” appears on the button. The tracks on the
disc will play in random order. To cancel this
function, press the RANDOM ON button until
“RANDOM OFF” appears on the button.
MP3 Operation (Disc, USB and SD Card)
Disc General Operations:
1. Press the button to turn the unit On.
2. Gently insert the disc into the slot with the
label side up. The unit will automatically load
the disc.
Note: If a disc does not auto-load DO NOT
FORCE it into the slot, as you may already have
a disc loaded indicated by the inserted disc
icon.
Label Side Up
Inserted Disc Icon
Page 20

20
MP3 Operation (Disc, USB and SD Card) (Continued)
USB General Operations:
1. Press the button to turn the unit On.
2. Pull back the rubber cover and insert the USB
device or cable into the USB port. The playback source will change to USB operation and
the Folder/Track panel will be displayed. Music
playback will start automatically.
Note: USB devices and cables can only be
inserted in one position. DO NOT FORCE it into
the slot. Reverse the orientation and try to
insert the device or cable again.
SD Card General Operations:
1. Press the button to turn the unit On.
2. Insert the SD Card into the SD card slot with
the angle key up. The playback source will
change to CARD operation and the
Folder/Track panel will be displayed. Music
playback will start automatically.
Note: SD cards can only be inserted in one
position (angle key up). DO NOT FORCE it into
the slot. Reverse the orientation and try to
insert the SD card again.
Multiple Folder Selection:
If your MP3 media has multiple folders that
contain music tracks, the Folder/Track panel will
display “Folders” on the left side of the screen
and “Music Tracks” on the right side of the
screen. There are two methods to select folders.
Method 1: Using the Touch Screen
Touch the screen to bring up the control button
panel. Repeatedly press the
l button to scroll
down through “Music Tracks” in the first
“Folder”. Pressing the
l button after the last
music track in the first folder will select the first
music track of the next folder.
Angle Key
CARD TRK 3 / 10 00 : 00 : 26
[ ASTROL ~ 1]SMASHM~1 . MP3
01 . ASTROL ~ 1
FUSHYU
02 .
AMERIC
03 .
CONSPI
04 .
TOBIEK
05 .
~ 1
~ 1
~ 1
~ 1
01 . SMASHM ~ 1
02 . SMASHM ~ 2
03 . SMASHM ~ 3
04 . SMASHM ~ 4
05 .
SMD9E6
06 .
SMBEAD
07 .
SM1930
08 .
SM19F8
09 .
SM4CE9
10 .
SMFDDE
~ 1
~ 1
~ 1
~ 1
~ 1
~ 1
Folder
CARD TRK 3 / 10 00 : 00 : 26
[ ASTROL ~ 1]SMASHM~1 . MP3
01 . ASTROL ~ 1
FUSHYU
AMERIC
CONSPI
TOBIEK
~ 1
~ 1
~ 1
~ 1
02 .
03 .
04 .
05 .
Music Tracks
01 . SMASHM ~ 1
02 . SMASHM ~ 2
03 . SMASHM ~ 3
04 . SMASHM ~ 4
05 .
SMD9E6
06 .
SMBEAD
07 .
SM1930
08 .
SM19F8
09 .
SM4CE9
10 .
SMFDDE
~ 1
~ 1
~ 1
~ 1
~ 1
~ 1
Page 21

21
MP3 Operation (Disc, USB and SD Card) (Continued)
Multiple Folder Selection (continued):
Method 2: Using the Remote Control
1. Press the button and the current “Folder” in
use will be highlighted.
2. Press the
or button to scroll up and
down through the folders.
3.
Press the OK button to select the desired folder.
4. Press the button and the first “Music Track”
will be highlighted.
5. Press the
or button to scroll up and
down through the music tracks on the screen.
6. Press the OK button to start playing the selected music track.
Track Selection:
Touch the screen to activate the control button
panel.
Press the l
button to select a lower track.
Press the
l button to select a higher track.
Fast Forward / Fast Rewind:
Touch the screen to activate the control button
panel.
Press the
or button once to start the fast
forward or fast rewind function speed of 2 times
normal speed (X 2). Repeated pressing of the
or button will increase the speed, X 4, X 8
and X 20. Touch the ll button to resume normal
MP3 playback.
Pause:
Touch the screen to activate the control button
panel.
Press the ll button to pause the disc. “PAUSE ll”
will display and the button icon will turn to the
“Play” icon. Touch the button to resume play.
VOLUME
WB CAMERA MODE
ZOOM
EQ
BACK TITLE SETUP
HOME
SHUFFLE
GO TO
2 3
1
DIR/CAT
5 6
4
8 9
7
~ 1
~ 1
~ 1
~ 1
SUB-T AUDIO
DVD
MENU
OK
SEL
MUTE
SLOW
TUN+
TUN
-
01 . SMASHM ~ 1
02 . SMASHM ~ 2
03 . SMASHM ~ 3
04 . SMASHM ~ 4
05 .
SMD9E6
06 .
SMBEAD
07 .
SM1930
08 .
SM19F8
09 .
SM4CE9
10 .
SMFDDE
~ 1
~ 1
~ 1
~ 1
~ 1
~ 1
SUB-W DISPLAY
REPEAT
ANGLE
CARD TRK 3 / 10 00 : 00 : 26
[ ASTROL ~ 1]SMASHM~1 . MP3
01 . ASTROL ~ 1
FUSHYU
02 .
AMERIC
03 .
CONSPI
04 .
TOBIEK
05 .
Scroll
Buttons
Lower
Track
CARD TRK 3 / 10 00 : 00 : 26
[ ASTROL ~ 1]SMASHM~1 . MP3
01 . ASTROL ~ 1
FUSHYU
AMERIC
CONSPI
TOBIEK
~ 1
~ 1
~ 1
~ 1
02 .
03 .
04 .
05 .
Higher
01 . SMASHM ~ 1
02 . SMASHM ~ 2
03 . SMASHM ~ 3
04 . SMASHM ~ 4
05 .
SMD9E6
06 .
SMBEAD
07 .
SM1930
08 .
SM19F8
09 .
SM4CE9
10 .
SMFDDE
Track
~ 1
~ 1
~ 1
~ 1
~ 1
~ 1
Fast
Rewind
CARD TRK 3 / 10 00 : 00 : 26
[ ASTROL ~ 1]SMASHM~1 . MP3
PAUSE ll
01 . ASTROL ~ 1
02 .
03 .
04 .
05 .
FUSHYU
AMERIC
CONSPI
TOBIEK
~ 1
~ 1
~ 1
~ 1
01 . SMASHM ~ 1
02 . SMASHM ~ 2
03 . SMASHM ~ 3
04 . SMASHM ~ 4
05 .
SMD9E6
06 .
SMBEAD
07 .
SM1930
08 .
SM19F8
09 .
SM4CE9
10 .
SMFDDE
~ 1
~ 1
~ 1
~ 1
~ 1
~ 1
Fast
Forward
Page 22

22
MP3 Operation (Disc, USB and SD Card) (Continued)
Display:
Touch the screen to activate the control button
panel.
Press the DISPLAY button for the following
sequence: Detail Display with elapse time_>
Detail Display with time remaining_> Detail
Display off.
Stop:
Touch the screen to activate the control button
panel.
Press the button to stop play. To resume play,
press the
button.
Press the button 2 times, then press the
button and the first track from the first folder will
start playing.
Repeating a Track:
The repeat function can only be changed using
the remote control. This function has 4 settings
Repeat Off, Repeat Song, Repeat Directory and
Repeat All. Press the REPEAT button on the
remote control while watching the radio display
panel for the setting indication.
CARD TRK 3 / 10 00 : 00 : 26
[ ASTROL ~ 1]SMASHM~1 . MP3
01 . ASTROL ~ 1
FUSHYU
02 .
03 .
AMERIC
CONSPI
04 .
TOBIEK
05 .
CARD TRK 3 / 10 00 : 00 : 26
[ ASTROL ~ 1]SMASHM~1 . MP3
PAUSE ll
01 . ASTROL ~ 1
FUSHYU
02 .
AMERIC
03 .
CONSPI
04 .
TOBIEK
05 .
~ 1
~ 1
~ 1
~ 1
~ 1
~ 1
~ 1
~ 1
01 . SMASHM ~ 1
02 . SMASHM ~ 2
03 . SMASHM ~ 3
04 . SMASHM ~ 4
05 .
SMD9E6
06 .
SMBEAD
07 .
SM1930
08 .
SM19F8
09 .
SM4CE9
10 .
SMFDDE
01 . SMASHM ~ 1
02 . SMASHM ~ 2
03 . SMASHM ~ 3
04 . SMASHM ~ 4
05 .
SMD9E6
06 .
SMBEAD
07 .
SM1930
08 .
SM19F8
09 .
SM4CE9
10 .
SMFDDE
~ 1
~ 1
~ 1
~ 1
~ 1
~ 1
~ 1
~ 1
~ 1
~ 1
~ 1
~ 1
Repeat Icon
CARD TRK 3 / 10 00 : 00 : 26
[ ASTROL ~ 1]SMASHM~1 . MP3
01 . ASTROL ~ 1
FUSHYU
02 .
AMERIC
03 .
CONSPI
04 .
TOBIEK
05 .
~ 1
~ 1
~ 1
~ 1
01 . SMASHM ~ 1
02 . SMASHM ~ 2
03 . SMASHM ~ 3
04 . SMASHM ~ 4
05 .
SMD9E6
06 .
SMBEAD
07 .
SM1930
08 .
SM19F8
09 .
SM4CE9
10 .
SMFDDE
~ 1
~ 1
~ 1
~ 1
~ 1
~ 1
Repeat
Off
1
Repeat
Song
VOLUME
ZOOMSUB-W DISPLAY
EQ
BACK TITLE SETUP
HOME
SHUFFLE
REPEAT
GO TO
ANGLE
1 2 3
DIR/CAT
4 5 6
7 8 9
0
ASM
D
Repeat
Directory
WB CAMERA MODE
SUB-T AUDIO
OK
DVD
MENU
SLOW
TUN
-
TA PTY BAND
A
Repeat
All
SEL
MUTE
TUN
+
Page 23

23
Ejecting a Disc:
Press the button to eject a disc.
Removing a USB Device or SD Card:
Remove a USB device or SD card at any time by
pulling the device out of the socket.
MP3 Operation (Disc, USB and SD Card) (Continued)
Random Track Play Order:
The random function can only be accessed by
using the remote control. This function has 2
settings: On and Off. Press the SHUFFLE button
on the remote control while watching the radio
display panel for the setting indication.
Random Indicator
CARD TRK 3 / 10 00 : 00 : 26
[ ASTROL ~ 1]SMASHM~1 . MP3
RANDOM [ON]
01 . ASTROL ~ 1
FUSHYU
02 .
AMERIC
03 .
CONSPI
04 .
TOBIEK
05 .
VOLUME
EQ
HOME
REPEAT
ANGLE
1 2 3
DIR/CAT
4 5 6
7 8 9
01 . SMASHM ~ 1
02 . SMASHM ~ 2
~ 1
03 . SMASHM ~ 3
~ 1
04 . SMASHM ~ 4
~ 1
05 .
~ 1
ZOOMSUB-W DISPLAY
BACK TITLE SETUP
SHUFFLE
GO TO
SMD9E6
06 .
SMBEAD
07 .
SM1930
08 .
SM19F8
09 .
SM4CE9
10 .
SMFDDE
WB CAMERA MODE
SUB-T AUDIO
OK
DVD
MENU
TUN
SLOW
-
~ 1
~ 1
~ 1
~ 1
~ 1
~ 1
SEL
MUTE
TUN+
Page 24

24
DVD Operation
(Continued)
DVD General Operations:
1. Press the button to turn the unit On.
2. Gently insert the DVD into the slot with the
label side up. The screen will change to the
DVD splash screen while the disc automatically loads.
Note: If a DVD does not auto-load, DO NOT
FORCE it into the slot, as you may already have
a disc loaded indicated by the inserted disc
icon.
Label Side Up
Moving Vehicle Warning:
If the vehicle is moving, this screen will be displayed. The sound of the DVD can be heard.
Once the vehicle is stopped and the parking
brake is engaged, the video will play on the
screen.
Menu Screen:
Touch the screen to activate the DVD control
button panel.
Press the MENU button to access the menu
screen of the DVD.
Press the arrow buttons to navigate to the
desired selection on the screen. Press the
ENTER button to make the selection.
Note: Normally the “Play Movie” function is
assigned to the ENTER button.
Inserted Disc Icon
Navigation Buttons
Page 25

25
DVD Operation
(Continued)
Selecting a Chapter:
Touch the screen to activate the DVD control
button panel.
Press the lbutton to select a previous chapter.
Press the l button to select a next chapter.
Pausing/Playing a DVD:
Touch the screen to activate the DVD control
button panel.
Press the ll button to pause the DVD disc.
“PAUSE ll” will appear in the display.
Note: The ll “Pause” button has changed into a
”Play” button.
To resume playing the DVD, press the
button.
PAUSE
Stopping a DVD:
Touch the screen to activate the control button
panel.
Press the button to stop play. To resume play,
press the
button.
Press the button 2 times, then press the
button and the DVD will start playing from the
beginning.
Fast Forwarding / Fast Rewinding a DVD:
Touch the screen to activate the control button
panel.
Press the
or button once to start the fast
forward or fast rewind function speed of 2 times
normal speed (X 2). “FORWARD X 2 or BACKWARD X 2” will appear in the display. Repeated
pressing of the
or button will increase the
speed, X 4, X 8 and X 20. Touch the ll button to
resume normal DVD playback.
ll
Previous
Chapter
Next
Chapter
Fast
Rewind
Fast
Forward
Page 26

26
DVD Operation
(Continued)
Title Screen:
Touch the screen to activate the DVD control
button panel.
The TITLE button functions differently depending on the characteristics of the DVD.
Note: In some DVDs, the Title function may be
invalid. This in not a malfunction.
Subtitle Language Menu:
Touch the screen to activate the DVD control
button panel.
Press the SUBTITLE button during playback.
Each time the button is pressed, the subtitle language changes in sequential order. The selection
of subtitle appears at the top of the screen.
Notes:
1. Some discs may contain only one subtitle
language.
2. Depending on the disc, the number of subti-
tle languages may be different.
Audio Language:
Touch the screen to activate the DVD control
button panel.
Press the AUDIO button during playback to select
the desired audio/language setup.
The audio languages to select from appear at the top of the
screen.
Ejecting a Disc:
Press the button to eject a disc.
....
:
[ 1 EN GL IS H]
:
[ 1 ENGLISH 5.1CH]
Page 27

27
DVD Setup Menu
Note: To access the DVD Setup Menu, a DVD disc has to be inserted.
System Setup Page:
Use the navigation buttons to scroll among the
menu items. Make a selection by pressing the
OK button.
• TV System: NTSC, PAL, Auto
• Screen Saver: On, Off
• TV Type: 4:3PS, 4:3LB, 16:9
• Password: _ _ _ _
• Rating: 1 Kid Safe
2 G
3 PG
4 PG13
5 PG-R
6 R
7 NC-17
8 Adult
• Default: Restore
• Exit Setup
Language Setup Page:
Use the navigation buttons to scroll among the
menu items. Make a selection by pressing the OK
button. Language Setup Options:
• OSD Language: English, German, Spanish,
French, Portuguese, Italian, Russian
• Audio Lang: English, German, Spanish,
French, Portuguese, Italian, Russian
• Subtitle Lang: English, German, Spanish,
French, Portuguese, Italian, Russian, Off
• Menu Lang: English, German, Spanish,
French, Portuguese, Italian, Russian, Off
• Exit Setup
Audio Setup Page:
Use the navigation buttons to scroll among the
menu items. Make a selection by pressing the OK
button. Audio Setup Options:
• Downmix: LT/RT, Stereo, USS, 5.1 CH ON
• Key: #, +3, +2, 0, -2, -4, b
• Exit Setup
Accessing the DVD Setup Menu:
Press the
SETUP button on the remote control to
display the Setup Menu.
System Setup
SYSTEM SETUP
TV SYSTEM
SCREEN SAVER
TV TYPE
PASSWORD
RATING
DEFAULT
EXIT SETUP
Language Setup
VOLUME
SUB-T AUDIO
ZOOMSUB-W DISPLAY
EQ
BACK TITLE SETUP
HOME
SHUFFLE
REPEAT
GO TO
ANGLE
MENU
2 3
1
DIR/CAT
5 6
4
WB CAMERA MODE
OK
DVD
Audio Setup
SEL
MUTE
Page 28

28
Sirius Satellite Radio Setup
(Option)
Note: The vehicle must be equipped with an optional Sirius tuner (SC-C1M) in order to receive a satellite signal.
If the Sirius tuner is not activated, call 1-888-539-7474 to activate. The Sirius Tuner ID Number (SID) is
required
during the activation process. Follow the steps below to access the Sirius Tuner ID Number (
SID
):
Accessing Your Sirius Tuner ID Number (SID):
1. From the Source Selection Screen press the
SATELLITE button.
2. Press the MENU button.
3. Press the DIRECT CH button.
4. Press the 000 then press the ENTER button.
5. The Sirius Identification Number (SID) is
located next to the “SONG TITLE” header.
Sirius ID Number
Page 29

29
Sirius Satellite Radio Operation
(Option)
Please note that satellite radio signal may be blocked by trees, buildings or other obstacles.
Channel Selection Modes:
Channels are selected by the following methods:
• Manual Tuning: Use the Manual Tuning method to scan thru the channels.
• Direct Tuning: Use the Direct Tuning methods when you know the desired channel.
• Category Tuning: Use the Category Tuning method when you know what category you want to scan
for a channel.
For details, see the following operation descriptions:
Information display during reception:
ANTENNA ERROR: When an antenna issue exists.
ACQUIRING SIGNAL: When a channel is being tuned-in (no signal is yet received).
INVALID CHANNEL: A channel without a broadcast has been selected or the receiver may not be activated.
CALL 888-539-SIRIUS TO SUBSCRIBE: A channel not covered by your contract or the Sirius tuner is not
activated. Call Sirius Service Center 1-888-539-7474 or visit them online at
www.siriusradio.com
.
Manual Tuning:
Press the CH-or CH+button until the desired
channel appears in the display.
Direct Tuning:
1. Press the MENU button.
2. Press the DIRECT CH button.
Page 30

30
Sirius Satellite Radio Operation
(Option)
(Continued)
Direct Tuning (continued):
3. Press the numbers of the channel then
press the ENTER button.
For example: For Sirius Channel 121, press
1, 2 and 1 then press the ENTER button.
4. Once the ENTER button is pressed the
channel will start playing.
Category Tuning:
1. Press the CATEGORY button.
2. Use the or buttons to select the
Category. The Category can also be selected
by touching the desired category on the
screen.
To select the Channel, use the or buttons. The channel can also be selected by
touching the desired channel on the screen.
3. Once the ENTER button is pressed, the
channel will start playing.
Category
Channels within Category
Page 31

31
Sirius Satellite Radio Operation
(Option)
(Continued)
Channel List:
1. Press the CH LIST button to access the
Master Channel List menu.
2. Scroll through the channels by pressing the
or button. When the desired channel is
highlighted, press the ENTER button and the
channel will start playing.
Programming Preset Sirius Channel:
1. Tune in the desired Sirius channel then press
the PRESET button to access the Preset
Channel menu.
2. To program the channel, press and hold any
one of the six channel recall buttons until you
hear a beep. The preset number will now be
displayed on the button and in the information
display.
3. To program additional channels, tune them in
using the CH- or CH+ button. Press and hold
any of the other five channel recall buttons
until you hear a beep. The preset number will
now be displayed on the button and in the
information display.
Preset Number
Lower Channel
Higher Channe
Page 32

32
Sirius Satellite Radio Operation
(Option)
(Continued)
Programming Preset Sirius Channel
(continued):
4. Additional Sirius channels can also be programmed in the different Sirius Preset Bands
(SIR1, SIR2 and SIR 3). Press the SIR BAND
button to access the different Sirius Preset
Bands.
Note: Each band can program 6 channels, so
18 Sirius channels can be programmed in the
radio’s memory.
Preset Band
Recalling Preset Sirius Channel:
1. Press the PRESET button to access the Preset
Channel menu.
2. To recall a Channel, press and release the preset number displaying the desired Channel
number on the button.
Note: Additional Sirius Channels can also be
recalled in the different Sirius Preset Bands
(SIR1, SIR2 and SIR 3). Press the SIR BAND
button to access the different Sirius Preset
Bands.
Preset Band
Page 33

33
Skipping a Channel:
1. Press the MENU button.
2. Press the SKIP CH button.
3. Select the Channel by highlighting the
Channel to be skipped and press the SKIP
button. “SKIPPED” will appear next to the
Channel.
Sirius Satellite Radio Operation
(Option)
(Continued)
Reinstating a Skipped a Channel:
Select the Channel to be reinstated by highlighting the Channel. “SKIPPED” will appear next to
the Channel. Press the UNSKIP button and
“SKIPPED” will disappear from the display. The
Channel is now reinstated.
Channel Skipped Indicator
Page 34

34
CD Changer Operation
(Option)
Pausing a Disc:
Press the ll button to pause the disc. Press it
again to resume play.
Track Selection:
Press the lbutton to select a lower track.
Press the l button to select a higher track.
Disc Selection:
Press the DISC DOWN button to select a lower
disc in the CD changer.
Press the DISC UP button to select a higher disc
in the CD changer.
Selecting the CD Changer Source:
Press the HOME button to select the source
screen. Then press the CD CHANGER button to
select the CD changer.
Lower
Disc
Lower
Higher
Higher
Disc
Page 35

35
CD Changer Operation
(Option)
(Continued)
Random Track Play Order:
To play the tracks on a disc in random order,
press and release the RANDOM OFF button until
“RANDOM TRACK” appears on the button. The
tracks on the disc will play in a random order. To
cancel this function, press the RANDOM TRACK
button until “RANDOM OFF” appears on the button.
To play all the tracks on every loaded disc in random order, press and hold the RANDOM OFF
button until “random DISC” appears on the button. All the tracks on every disc will play in random order. To cancel this function, press the
RANDOM DISC button until “RANDOM OFF”
appears on the button.
Repeating a Track:
The M1-LCD’s default setting is to repeat, in
order, every disc in the CD Changer. “REPEAT
OFF” appears on the button.
To repeat a track, press and release the REPEAT
OFF button until “REPEAT TRACK” appears on
the button. The track will now play repeatedly.
To repeat a disc, press and hold the REPEAT OFF
button until “REPEAT DISC” appears on the button. The disc will now play repeatedly.
To cancel this function the button until “REPEAT
OFF” appears on the button.
Preview Tracks:
To preview tracks on a disc, press and release
the INTRO OFF button until “INTRO TRACK”
appears on the button. Each track on the disc
will play for 10 seconds. To cancel this function,
press the INTRO TRACK button until “INTRO
OFF” appears on the button.
To preview the first tracks on every disc loaded
in the CD Changer, press and hold the INTRO
OFF button until “INTRO DISC” appears on the
button. The first track on every disc will play for
10 seconds. To cancel this function, press the
INTRO DISC button until “INTRO OFF” appears
on the button.
Page 36

36
Auxiliary Audio Video Inputs Operation
(Option)
Selecting the Auxiliary Audio/Video Source:
Press the HOME button to select the source
screen. Then press the AUX button to select the
Auxiliary Audio/Video source.
Note: The M1-LCD will not control the auxiliary
source, but can adjust the sound controls.
Refer
to the audio device’s owners manual for proper
operation.
Moving Vehicle Warning:
If the vehicle is moving, this screen will be displayed. The sound of the source can be heard.
Once the vehicle is stopped and the parking
brake is engaged, the video will play on the
screen.
Menu Screen:
Press the AUX 1/2 button to select the auxiliary
source. The display will indicate which Auxiliary
Source has been selected.
Auxiliary Input 1: Front Input.
Auxiliary Input 2: Rear Input.
Note: Touching the screen will activate the Home
Row screen.
Connecting an Auxiliary Audio/Video Device:
Auxiliary Input 1: Connect an auxiliary
audio/video device using a 3.5mm jack (not
supplied) into the
socket mounted on the front
of the unit
.
Auxiliary Input 2: Connect an auxiliary
audio/video device to the Auxiliary Input RCA
connectors coming from the rear of the unit.
Note: The M1-LCD will not control the auxiliary source, but can adjust the audio output.
Refer to the audio
device’s owners manual for proper playback operation.
Auxiliary Audio/Video Input (3.5mm Jack)
Auxiliary Source Indicator
Page 37

37
Camera Operation
(Option)
Manually Selecting the Camera View:
1. Press the HOME button to select the source
screen. Then press the CAMERA button to
select the camera source screen.
2. Select a camera view (FRONT, LEFT, RIGHT
or REAR) by pressing the button associated
with the camera view you want to display on
the screen.
Note: The front view camera may not be selectable depending if the system has a front view
camera. If the system has a front view camera
and is not available for selection go to “System
Setup” (page 7) to activate the front camera.
Automatic Camera Selection:
Rear View Camera:
The rear view camera will automatically activate when the ignition key is turned "On" and the vehicle is
put into reverse. The video image from the camera will appear on the screen and the audio from the
rear camera only can be heard through the vehicle’s speakers.
Note: This system only provides for one way audio, from the camera to the M1-LCD. The M1-LCD is
unable to transmit audio to the camera.
Side View Cameras (Left and Right)(if equipped):
The side view cameras will automatically activate when the ignition key is turned "On" and the vehicle’s
turn signal are used. The video image from the camera will appear on the screen.
Note: Side view cameras do not have audio.
Front View Camera
The front view camera can not be automatically activated. The front view camera can only be manually
selected, see “Manually Selecting the Camera View” below for more information.
Note: Front view camera does not have audio.
Rearview Camera (for motorized camera only):
If the rear view camera is motorized, there are
two adjustment features available: tilt control
and camera view presets. (Motorized cameras
are not installed on all units).
Tilt Control:
Push the
button to tilt the camera view up.
Push the button to tilt the camera view down.
Camera View Presets:
To program a tilt viewing angle, press and hold
either PRESET A or PRESET B button. To recall a
programmed preset, press and release the button and the camera will automatically adjust.
Note: Automatically activated camera views have priority over manually selected camera views.
For instance: When a vehicle is put into reverse gear the rear camera view will automatically be displayed
on the screen. A manually selected camera view can not override the rear camera view.
Tilt
Control
Camera Views
Camera Views
Presets
Page 38

38
General Operations:
1.
Press the button to turn the unit On.
2. Connect an IPOD to the cable attached to the
M1-LCD.
3. The unit will automatically switch to the IPOD
source screen and start playing.
Note: The controls on the IPOD will become inoperable and the M1-LCD will now control the
IPOD.
Selecting the IPOD Source:
Press the HOME button to select the source
screen. Then press the IPOD button to select the
IPOD source.
IPOD Operation
(Option)
IPOD Button Location and Functions:
1. PTY Button: Same operation as the MENU
button on an IPOD.
2. Previous and Next Buttons (l
and l):
Press the l
and l buttons to scroll through
the menu items, same operation as the IPOD’s
Click Wheel.
3. Play/Pause Button
ll: Same operation as the
ll button on an IPOD.
4. ENTER Button: Press the ENTER button for
same operation as the Center Select button on
an IPOD.
Browse for a Song:
1. Press the MENU button until the screen con-
taining PLAYLIST, ARTIST, ALBUM, GENRE
and SONGS appears in the display.
2. Press the SONGS section of the menu.
1
2
2
3
4
Page 39

39
IPOD Operation
(Option)
(Continued)
Browse for a Song (continued):
3. Press the ENTER button.
4. Press the or button to scroll through the
songs.
5. Press the ENTER button and the song will
start playing.
Pausing a Track:
Press thell button to pause the track. Press it
again to resume play.
Track Selection:
Press the lbutton to select a lower track.
Press the l button to select a higher track.
Lower
Track
Higher
Track
Page 40

40
Navigation Operation
(Option)
Selecting the Navigation Source:
Press the HOME button to select the source
screen. Then press the NAVIGATION button to
select the navigation source.
Note: See Navigation Owner’s Manual for operating instructions.
Selecting a Different Source:
Press the button to leave the navigation
screen and return to the last selected source.
Navigation Voice Control:
To access the Navigation Voice button, press the
SETTINGS button in the home row, then press
the SOUND button.
Turn the navigation voice on or off by touching
the NAVIGATION VOICE OFF/ON button.
Note: If the optional navigation unit is not connected to the M1-LCD this button has no effect.
Note: Not all vehicles are equipped with an optional navigation system.
Page 41

41
Installation
Step 1:
The radio chassis is designed to be “Sleeve Mounted” through an opening in the dashboard panel.
The required opening size is 182mm (7-3/16") x 84mm (3-5/16"). Cut or engage an opening in the
dashboard to accommodate the mounting sleeve.
Step 2:
Insert the mounting sleeve into the opening in the dashboard. Bend the metal tabs on the sleeve
to secure the mounting sleeve to the dashboard.
Step 3: Bring all wiring for the connection of the unit (including the antenna) through the center of the
mounting sleeve.
Nut
Washer
Sheet Metal
Screw
Metal Strap
Dashboard
Mounting Sleeve
Removing the Unit:
To remove the radio after installation, insert the removal keys straight back until they click. Then pull the
radio out.
Note: If the removal keys are inserted at an angle they will not release the radio.
Insert Removal
Keys Here
Insert Removal
Keys Here
Page 42

42
Speaker Connections
r
r
Left
Front
Speaker
_
White/Black Wire
+
White Wire
Brown/Black Wire
Brown Wire
Gray/Black Wire
Gray Wire
_
+
Center
Channel
Speaker
_
+
Right
Front
Speake
Left
Rear
Speaker
_
Green/Black Wire
+
Green Wire
Subwoofer
(Optional LS-SUB-75)
Violet/Black Wire
Violet Wire
_
+
Right
Rear
Speake
Page 43

43
Input Connections
This unit for use only with a 12 Volt DC power source with a negative ground.
Red Wire: (+) to 12 Volt Ignition
Yellow Wire:: (+) to 12 Volt Constant
Black Wire Ground
Orange Wire: Parking Brake Switch (-)
Blue/Black Wire: Dimmer Control (+)
Infrared Remote Sensor
(Optional)
iPod Cable
(Optional)
1 A Fuse
IPOD
(Optional)
ME
N
U
Page 44

44
Input Connections
(Continued)
Blue Wire: Power Antenna (12V Out)
Audio Input Left (White)
Audio Input Right (Red)
Video Input (Yellow)
External TV Receiver
(Optional)
CD Changer EAX540 (Optional)
Sirius
Antenna
M9SIR-ANT-WP
(Optional)
Sirius
Receiver
SC-C1M
(Optional)
External Automotive
Type Antenna
(Optional)
Page 45

45
Input/Output Connections
(Continued)
M1-NAV
(Optional M7-RGB)
M1-NAV
GPS Antenna
Video Output (Red)
Video Output (Green)
Video Output (Blue)
Sync (Brown)
RGB Monitor (Optional)
Audio Output Left (White)
Audio Output Right (Red)
Video Output (Yellow)
Note: Audio Output is not controlled
by the M1-LCD.
Video Output (Yellow)
TV or Monitor (Optional)
Video to Second Monitor (Optional)
Page 46

46
Camera Connections
(Continued)
13-Pin
Camera
Harness
C125 (Front)
White Wire: Left Trigger
Gray Wire: Right Trigger
Green Wire: Rear Trigger
C125 (Rearview)
C-SDR (Right Side)
C-SDL (Left Side)
CAM3
(Green Connector)
CAM2
(Gray Connector)
CAM1
(White Connector)
REAR TRIG
RIGHT TRIG
LEFT TRIG
Page 47

47
The LCD display may fail to function normally
due to the vehicle’s battery condition, and could
require resetting the radio’s microprocessor if:
• The vehicle has been “jump started” from a
dead battery condition.
• The vehicle battery becomes very low and is
quick-charged.
• The vehicle battery is removed and replaced.
Reset Button
If the fuse should blow, check that the wiring is correct. If the wiring is correct, replace the fuse with
the same amperage rating as the original (15 amp).
Replaceable Fuse
Should any of these conditions occur, simply
press and release the RESET button on the radio
front panel using the tip of a ball point pen. This
will reset the radio microprocessor to the original factory settings. After pressing the RESET
button, you should recheck to see if the radio
functions normally.
15 Amp Replaceable Fuse
Page 48

© Copyright 2008
Magnadyne Corporation
M1-LCD-UM
Rev. B 7-31-08
Warranty
ONE (1) YEAR LIMITED WARRANTY
Magnadyne Corporation or its authorized agents will within one year from the date of sale
to you, repair, replace or refund the retail sales price of said product or any part thereof, at
the option of the Magnadyne Corporation or its authorized agents, if said product or part
is found defective in materials or workmanship, when properly connected and operating on
the correct power requirements designated for the specific product. This warranty and
Magnadyne Corporation or its authorized agent’s obligations hereunder do not apply where
the product was; damaged while in the possession of the consumer, subjected to unreasonable or unintended use, not reasonably maintained, utilized in commercial or industrial
operations, or serviced by anyone other than Magnadyne Corporation or its authorized
agents, or where the warning seal on the product is broken or the power and/or plugs are
detached from the unit. Magnadyne Corporation or any of its authorized agents will not
assume any labor costs for the removal and reinstallation of any product found to be defective, or the cost of transportation to Magnadyne Corporation or its authorized agents. Such
cost are the sole responsibility of the purchaser.
This warranty does not cover the cabinet appearance items or accessories used in connection with this product, or any damage to recording or recording tape, or any damage to
the products resulting from improper installation, alteration, accident, misuse, abuse or
acts of nature.
MAGNADYNE CORPORATION OR ITS AUTHORIZED AGENTS SHALL NOT BE LIABLE TO
ANYONE FOR CONSEQUENTIAL OR INCIDENTAL DAMAGES OR CLAIMS EXCEPT THOSE
ACCORDED BY LAW. NO EXPRESSED WARRANTY OR IMPLIED WARRANTY IS GIVEN
EXCEPT THOSE SET FORTH HEREIN. NO IMPLIED WARRANTY SHALL EXTEND BEYOND
ONE YEAR FROM THE DATE OF SALE.
This warranty extends only to the original purchaser of the product and is not
transferable. Some states do not allow limitations on how long an implied warranty lasts,
and some states do not allow the exclusion or limitation of incidental or consequential
damages, so the above limitations or exclusion may not apply to you. This warranty gives
you specific legal rights, and you may have other rights that vary from state to state.
“NOTE: The manufacturer is not responsible for any radio or TV interference caused by
unauthorized modifications to this equipment. Such modifications could void the User’s
authority to operate the equipment.”
Defective merchandise should be returned to the original point of purchase or
secondly, to Magnadyne Corporation, 1111 W. Victoria Street, Compton CA 90220.
Return Authorization must be obtained before sending, or merchandise may be refused.
 Loading...