

Page 1
Operation
and Installation
Manual
BT-HFKP30
Bluetooth Wireless Hands Free Kit
with LCD Display
Page 2
• Never install the product in a location where it
interferes with your field of vision.
• Thi
s product must be installed and used in accordance with this manual. Any alterations to this
product that enables it to be used in any way
other than intended or designed could distract
the driver and result in an accident causing injury
or death. Magnadyne Corporation disclaims any
and all liability that may result from failure to
install and operate in any other manner in which
this was intended.
•
Do not disassemble, modify the unit or attempt to
repair the product yourself. If the product needs to
be repaired, consult your dealer.
• Do not install the unit in a place exposed to direct
sunlight or excessive heat or humidity. Avoid
places with excessive dust or the possibility of
water splashing.
• Check local laws regarding use of a mobile
handset and speakerphones while driving. If
you use the speakerphone while driving,
ensure your attention and focus remains on
your responsibility of driving safely.
•
Observe all signs that require an electrical device
or RF radio product to be switched off in designated areas. These could include hospitals, blasting
areas, and potentially explosive atmospheres.
•
Turn off your Speakerphone prior to boarding an aircraft. Do not use in aircraft.
FCC Compliance Statement:
This device complies with part 15 of the FCC
rules. Operation is subject to the following two
conditions:
1.
This device may not cause harmful interference.
2. This device must accept any interference
received, including interference that may
cause undesirable operation.
Safety and Caution
Bluetooth Speakerphone Introduction
2
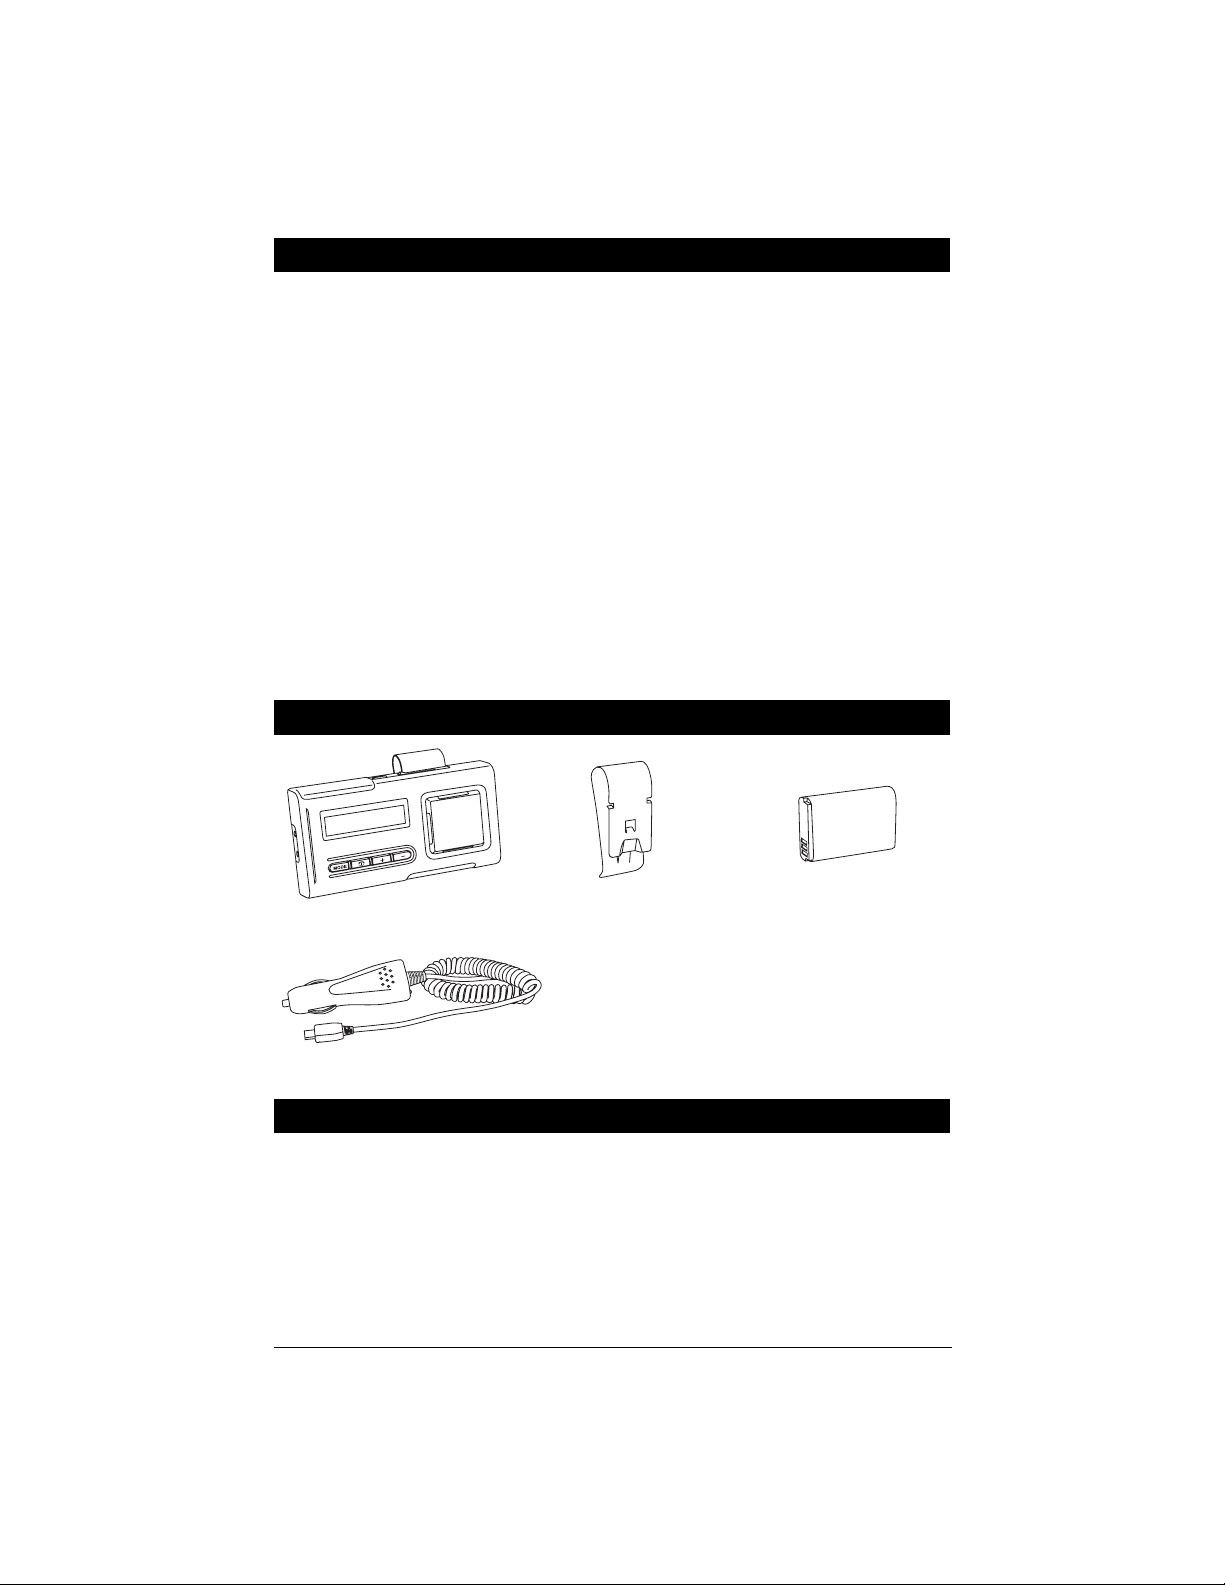
Kit Contents
VPA Charger
This portable Bluetooth Speakerphone is specially designed for the user to enjoy the convenience of wireless communication. Use in a vehicle like a hands free car kit or on a desk-top like a conference speakerphone. The built-In microphone with D.S.P. technology has echo cancellation along with noise suppression
to deliver impeccable sound quality.
Bluetooth Technology
Bluetooth wireless technology revolutionized personal connectivity by providing freedom from wired
connections and enabling connectivity between mobile computers, mobile phones, portable handheld
devices and other Bluetooth enables devices within 30 feet. Bluetooth wireless technology utilizes global
sound and digital data 2.4G ISM transmission.
Speakerphone BatteryMounting Clip
Page 3
3
Installing the Battery:
1. Remove the battery cover from the
Speakerphone.
2. Insert the battery into the Speakerphone paying particular attention to the - and + indicators on the battery.
3. Reinstall the battery cover on the speakerphone.
Charging the Speakerphone:
Insert the charger into a vehicle power outlet
and the charging plug into Speakerphone’s
charging socket. Charge the battery fully before
using for the first time. Normal charging time is
approximately 4 to 5 hours.
Charge Indication:
When the charger is plugged into the
Speakerphone, the LCD background will light
up. After the initial startup screens, the display will alternate between “Charging” and
“BLUETOOTH”. When the interior of the
Battery Power Icon stops moving, the
battery is fully charged.
Notes:
1. Low power indication: The LCD will show
“Low Battery” and beep every 30 seconds
whenever the battery is low. Charge the
Speakerphone immediately. If battery is not
charged the Speakerphone will automatically
shut off.
2. Charging indication may be delayed for a few
minutes if the Speakerphone has not been
used for a long time or the battery is drained.
3. Do not insert a SIM card during battery
charging.
Installation
Battery Cover
R
BA
3
U
CH
MUS
PR
M
D
DAM
D
CIRCUIT
E
S
.7V 800m
I
A
O NOT
T
SPO
CH
E
A
O
Y
T
R
EXP
T
P
S
E
AG
A
G
E
PE
R
B
SE
R
R
E
Y.
E
ED OR
G
SHO
R
C
LY
L
D O
D
E
I
OD
O
F
.
I
A
S
I
N
ED
B
P
F
E
R
L
L
O
Y
IN
T
E
I
F
.
S
F
L
E
A
i-
D
IR
i
o
h
O
E.
n
F
+
Indicator
-
Indicator
Battery Power Icon
Page 4
4
Installation
(Continued)
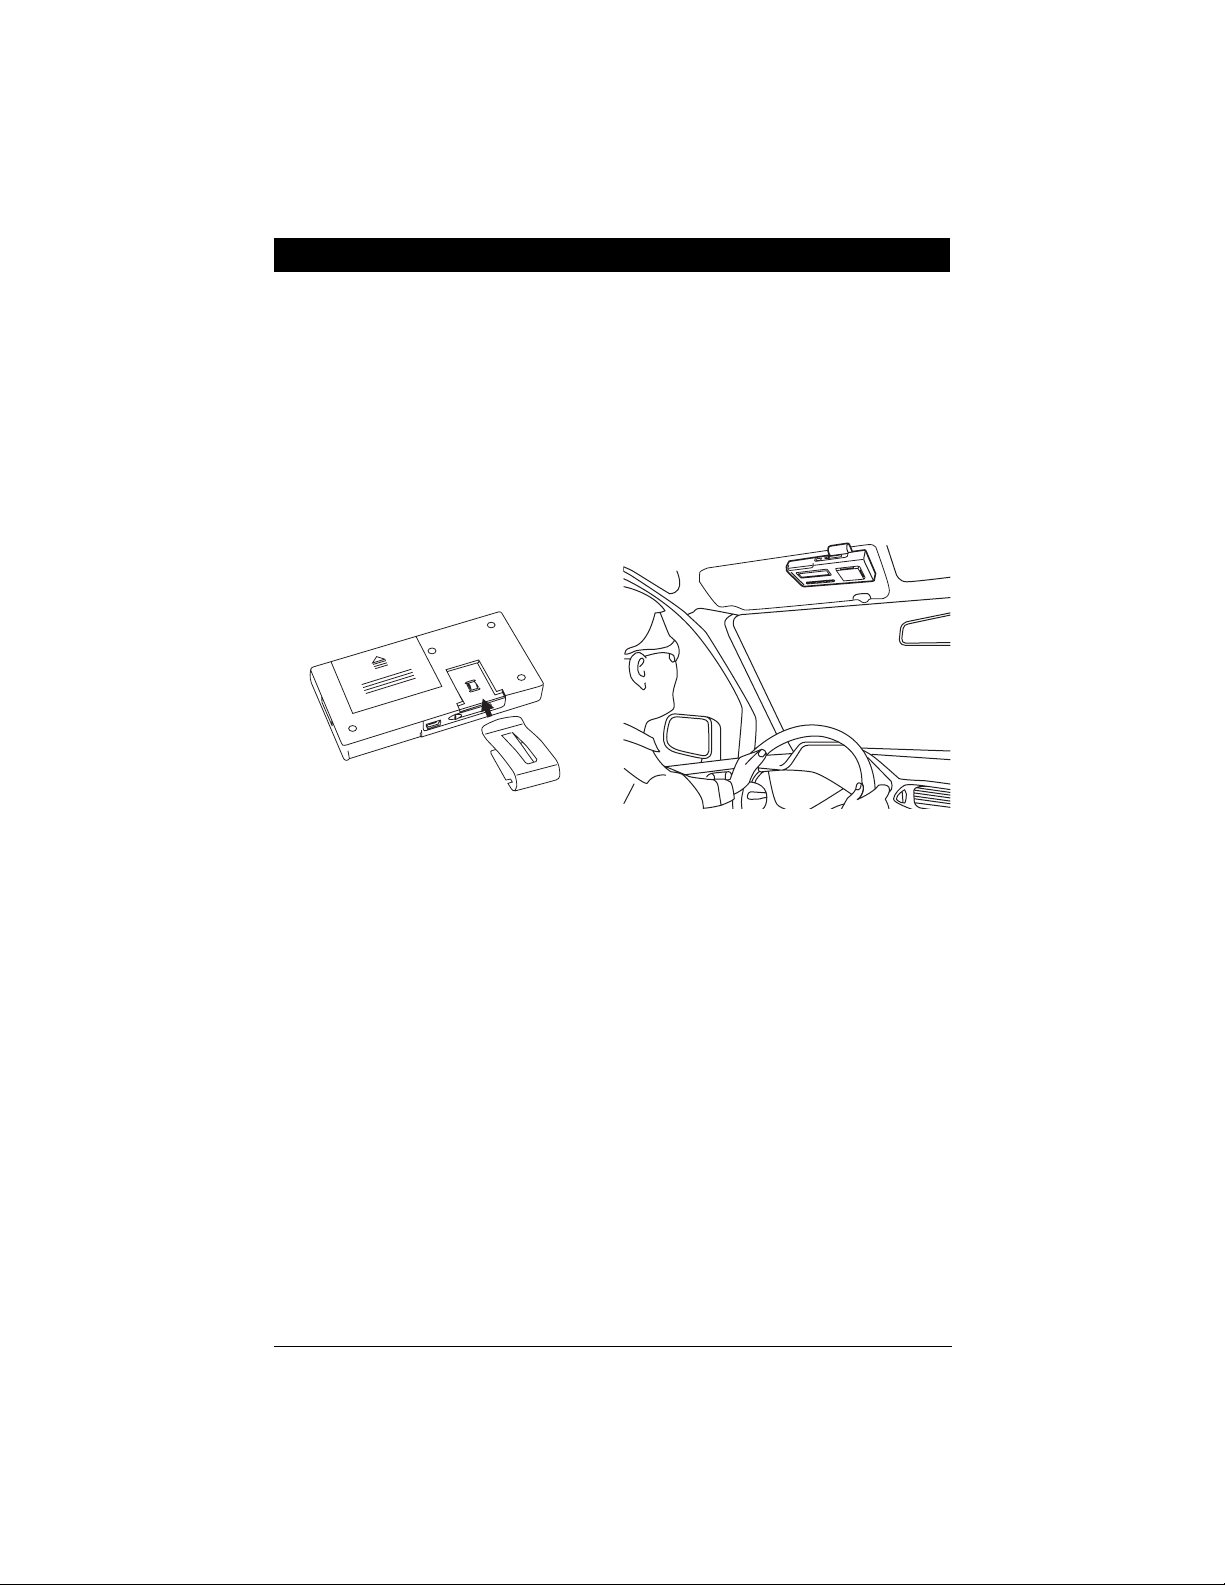
Mounting Speakerphone:
Insert the mounting clip into the speaker phone.
PLEASE READ PRIOR TO INSTALLATION
CAUTION: The majority of vehicles manufactured today include air bag systems that inflate with great force
during an accident. If necessary, contact the vehicle’s manufacturer for air bag information specific to the vehicle. DO NOT place an object, including all components, in the area over the air bag or in the air bag deployment area. If the components are improperly installed, serious injury could occur during inflation of the air
bag.
• Mount components securely to prevent shifting that could cause injury or interfere with the vehicle
being operated safely.
• This hands-free kit is intended for 12 Volt DC operation only.
Page 5

5
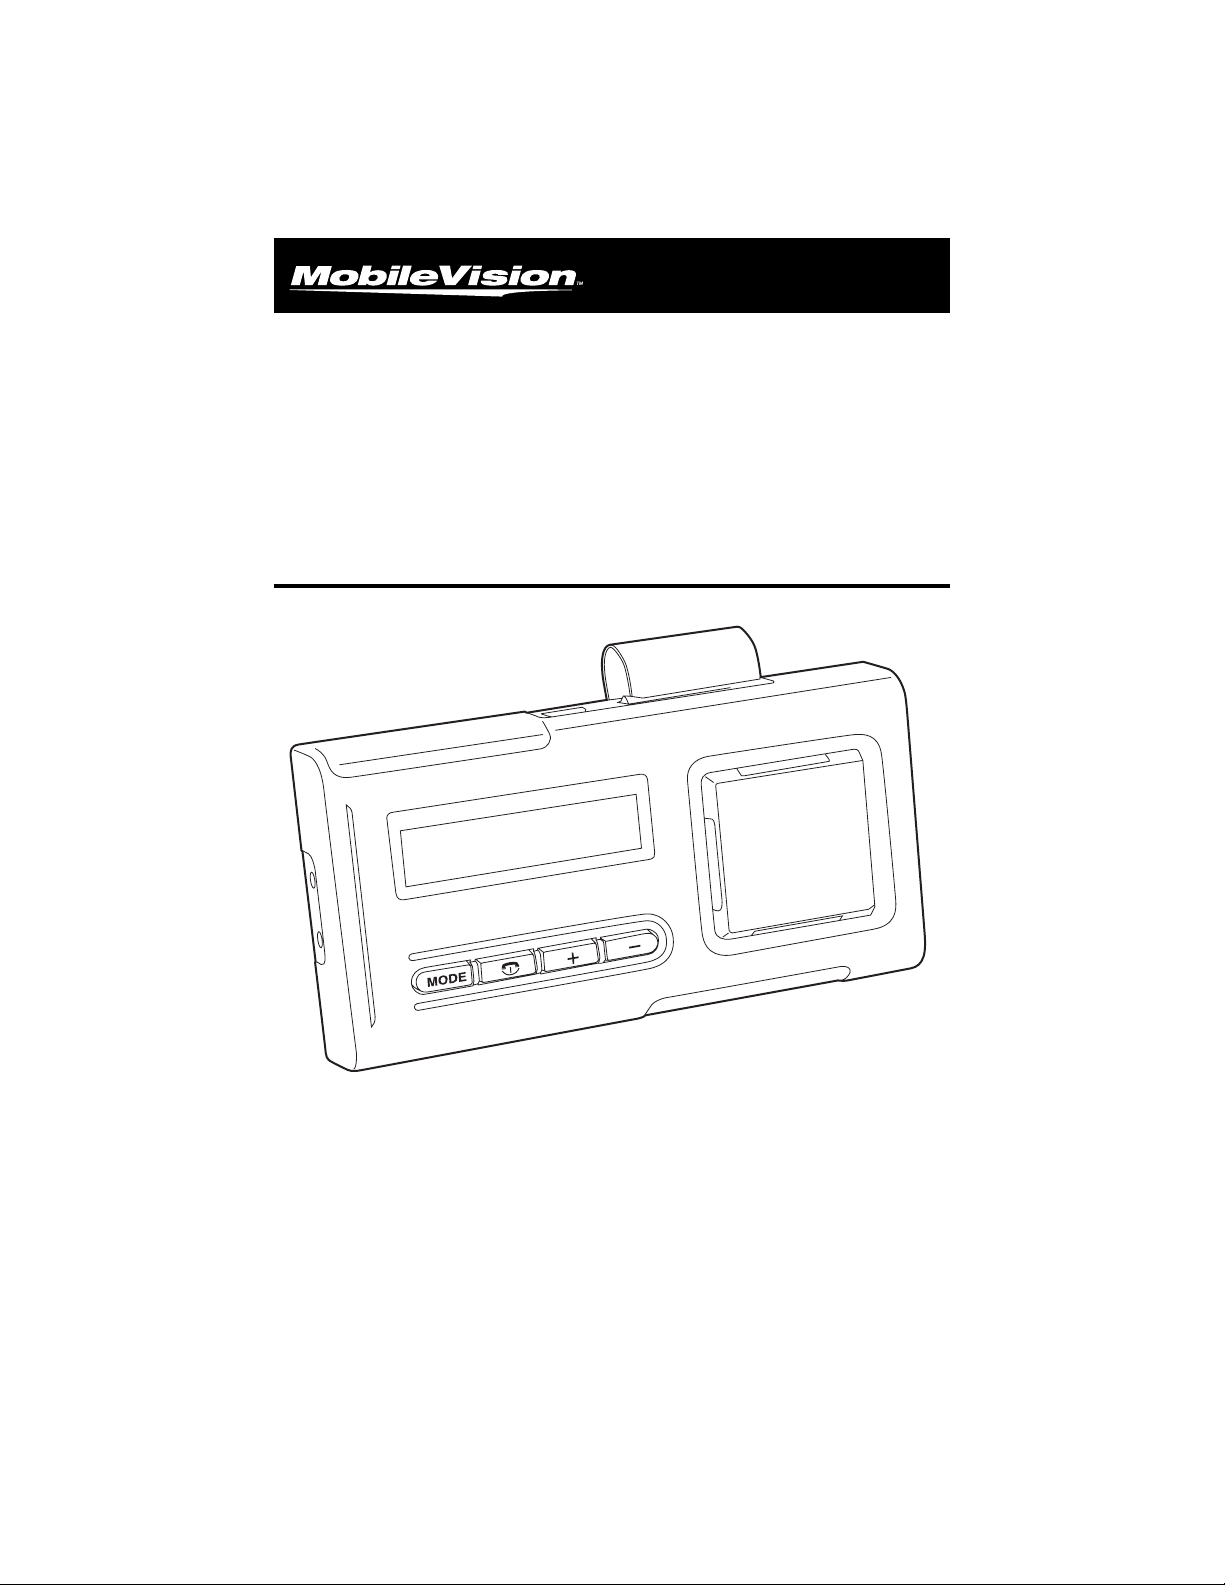
Button and Feature Locations
1. Microphone
2. LED indicator
3. LCD display
4. Charging socket
5. SIM Card socket
6. Speaker
7. Mode/ Multi-function button
Multi-function button. See Operation Instruction
for more information.
8. Power On/Off button
Press to turn the unit on and off.
9. Volume increase button
Press to increase the speaker’s output.
10. Volume decrease button
Press to decrease the speaker’s output.
1
2 3
4
5
8
7
9
10
6
Page 6

Turning On/Off the Speakerphone
Turning On: Speakerphone is in Off mode:
Press and hold the Power button for about 5 seconds until LCD lights up and shows “checking SIM” in
the display. When there’s no SIM Card in the Speakerphone, the LCD will show “no SIM” and
“BT-HFKP30” will show up in the display. The unit will beep twice and LED will flash every second.
Notes:
1. If the Speakerphone has not been paired with a Bluetooth device, “BLUETOOTH” will eventually
appear in the display. See “Pairing to a Mobile Handset” for more information.
2. If the Speakerphone has been paired with a Bluetooth device, the Speakerphone will search for the
last paired Bluetooth device and “Connecting” will appear in the display. When a connection is complete, the unit will go into standby mode and the LED will flash every 5 seconds.
Example: If the last paired Bluetooth device is Samsung SGH-A517 handset. The Speakerphone will
search for NOK SGH-A517 handset; when the device is connected, the LCD display show the following:
Operation Instructions
Turning Off:
Press and hold the Power button for about 5 seconds until you hear 2 long beeps from the speaker.
The LCD screen will display “Power Off” and speakerphone will be powered off in 2 seconds.
Pairing to a Mobile Handset
Prior to using the Speakerphone for the first time, you must pair it with a Bluetooth-enabled mobile
handset. The following steps describe pairing instruction for a typical Bluetooth-enabled mobile handset.
1. Place the Speakerphone and mobile handset no more than 3 feet apart.
2. Ensure the Speakerphone is in the Off mode.
3. Press and hold the Power button for 5 seconds until you hear a long beep. The LED will flash blue
every second and "Connecting" will appear in the LCD. After a few seconds, the Speakerphone will
return to standby. It’s now ready for pairing.
4. Activate your mobile handset’s Bluetooth accessing function by referring to your mobile handset
user guide for details. Meanwhile, the handset will search for accessible Bluetooth devices.
5. Select “BT-HFKP30” from the list.
6. Enter the pre-programmed passkey “0000” and press “OK” to pair the Speakerphone and the
handset. When pairing is complete, you may hear a long beep and LED will flash blue 3 times.
The Speakerphone has returned to standby mode when LED flashes blue every 3 seconds.
7. Press “Ok” to go back to your handset’s main menu. (For most mobile handset models, a headset
icon or some other connection icon will be shown on the screen.) You should now be able to
make and receive calls through the Speakerphone. Use the mobile handset no more than 30 feet
away from the Speakerphone . (Obstruction could cause shorter sensing distance.)
IMPORTANT: If the pairing cannot be completed within 2 minutes, the Speakerphone will return to
standby mode and the blue LED will flash every 5 seconds. Please repeat steps (2) to (7) to pair the
Speakerphone and mobile handset again.
6
Speakerphone Paired
with Handset
1
Handset Identification Number
Battery Power
Indicator
Page 7

Connection/Link to a Mobile Handset
When either the mobile handset or the Speakerphone is turned off, the two remain be paired. However,
the connection (which allows the two to interact) will be lost. To reconnect, follow these steps.
1. On your mobile handset, select "BT-HFKP30" from the paired list of options on your handset
screen.
2. On your speakerphone, press the multi-function button once and select "Accept" on your handscreen to complete connection. Some mobile handsets may automatically connect.
IMPORTANT: Bluetooth and Headset appear on the Speakerphone when it is connected to a
mobile handset.
Disconnect/Unlink from a Mobile Handset
To disconnect your mobile handset from the Speakerphone or to pair/connect another Bluetooth handset, follow these directions.
1. On the Speakerphone, press the "+" for 3 seconds. The device will beep and the LCD screen will
display "Bluetooth".
2. On your mobile handset, select "BT-HFKP30" and select disconnect. The disconnection process on
mobile handsets may vary slightly depending on model of phone.
How to use the SIM card reader
The SIM card reader allows the speakerphone to act as a caller ID and contact list by saving phone
numbers in the speakerphone's memory.
1. Insert the SIM card with the touch pin facing forwards and press the Power button for three seconds. The Speakerphone will display "Checking SIM" and begin reading the phone book contained
on the card. Once the Speakerphone is done reading and saving the contents of the card,
"Remove SIM" will appear on the LCD and the Speakerphone will shut off after 2 seconds. The
phone book is now saved into the Speakerphone's memory and it is safe to remove the card.
2. Turn the Speakerphone on again by pressing the Power button for 5 seconds. Make sure there is
a connection between the Speakerphone and the mobile handset (from which the SIM card
came).
3. Access the contacts by pressing and holding the "-" button until the letter "A" appears in the LCD.
Press "+" or "-" to scroll through the letters in the alphabet until you reach the letter your contact
name begins with.
4. Press the multi-function button to select the letter and view the contacts beginning with that letter.
5. Press "+" or "-" to scroll through the contacts and press MODE to call the selected contact.
Operation Instructions
(Continued)
7
Touch Pin faces same
direction as front of
Speakerphone
Page 8

Operation Instructions
(Continued)
How to use the speakerphone
Make sure the speakerphone is connected to your mobile handset and the battery is fully charged.
Answering a Call:
To answer a call, quickly press the multi-function button. "Active Call" will appear on the LCD screen.
Ending a Call:
To end a call, quickly press the On/Off button. The speakerphone will return to standby mode.
Reject a Call:
To reject a call, quickly press the On/Off button. "Reject" will appear on the LCD screen and the
speakerphone will return to standby mode in 10 seconds.
Last Number Re-Dialing:
When the speakerphone is in standby mode, press the multi-function button twice.
Adjusting the Volume:
Press the + (to increase) or the - (to decrease) until the desired volume level is reached.
Call Transfer:
During a conversation, you may transfer a call from the speakerphone to your mobile headset and
vice versa.
1. Speakerphone to Handset: Press and hold the multi-function button for about 3 seconds.
2. Handset to speakerphone: Press and hold the multi-function button for about 3 seconds or quick-
ly press the multi-function button. (Operation may vary.)
IMPORTANT: This function is only accessible with Hands-Free Profile mobile handsets.
Contact List:
You can search through the contact list saved in the speakerphone, choose a contact and dial the
number.
1. Press the "-" button for 2 seconds. Search through letters by pressing "+" or "-".
2. Press the multi-function button once select a contact ID.
3. Press the multi-function button again to select the number of the contact ID.
4. Press the multi-function button once more to dial the number or quickly press the multi-function
button twice to return to the previous screen.
8
Page 9

Operation Instructions
(Continued)
Functions Operation Sound Indication
Power On Press and hold for 5 seconds 2 long beeps
Power Off Press and hold for 5 seconds 2 long beeps
Call Reject Press and hold once
Call End Quickly press once
Pairing
Quickly press once
Call Answer Quickly press once
Last Number Redial Press twice
Call Transfer Press and hold for 3 seconds 1 beep
Reconnect/Link Quickly press once 1 beep
Volume Increase Quickly press once
Disconnect Press and hold for 3 seconds 1 beep
Volume Decrease Quickly press once
Contact List Press and hold for 3 seconds
Buttons
Power
On/Off
MultiFunction
Button
(MODE)
+
Buttons and Sound Indication
LCD, LED and Sound Indication
"Checking SIM"
"No SIM" On for 5 seconds 2 long beeps
"BT-HFKP30"
"BLUETOOTH" Flash on every 5 seconds
"Active Call"
Flash on every 5 seconds
"Power Off" Flash on every 5 seconds 2 long beeps
"Connecting" Flash on every 5 seconds
Bluetooth device ID Flash on every 5 seconds 1 beep
"Low Battery" Flash on every 5 seconds 1 beep
Speakerphone
Mode
Power On
LCD Indication LED Indication Sound Indication
Standby
Call in Progress
Power Off
Pairing in Progress
Pairing Completed
Low Voltage
NOTE: The LCD backlight will come on and stay on for 10 seconds when any button is pushed while
the unit is in standby mode.
NOTE: The speakerphone supports 6 languages - English, German, French, Italian, Spanish and
Dutch. Some available only on handsets that support a wide range of languages.
9
Page 10

Care and Maintenance
• Turn off when not in use.
• Do not expose the Speakerphone to liquid, moisture or humidity. It is not waterproof.
• Do not use abrasive cleaning solvents to clean the Speakerphone.
• Do not expose the Speakerphone to high temperatures.
• Do not attempt to disassemble the Speakerphone. It does not contain serviceable components.
• If you do not use the Speakerphone for long periods, store it in a dry place, free from extreme
temperature, humidity and dust.
• Only use the MobileVision supplied charger when charging the Speakerphone.
• Only charge the Speakerphone’s built-in battery in accordance with the instructions of this user guide.
• Avoid charging the Speakerphone in extremely high or low temperatures.
• Do not use charger outdoors or in damp areas.
• Do not disassemble the charger.
• Do not expose the Speakerphone to sharp objects which may cause scratching or other damage.
• Do not stick anything inside the Speakerphone which may cause damage to its internal components.
Trouble Shooting
Ensure the Speakerphone is paired with your mobile handset.
Ensure your mobile handset's Bluetooth feature is activated.
Please refer to your mobile handset user guide for specific instructions.
Ensure the Speakerphone is within a maximum of 30 feet of your mobile
handset(s) and there are no obstructions, such as walls or other
electrical devices in between as it may cause shorten or interfere
with transmission.
If all the above steps do not resolve your problem, remove the battery
for 10 minutes.
If you are unable to connect your Speakerphone
and mobile handset, try
the following:
The Bluetooth Speakerphone is compliant with and adopts the Bluetooth Specification V1.2. However,
interoperability between the device and other Bluetooth-enable products is not guaranteed because it
depends on compatibility. For more information on the compatibility between the device with other
Bluetooth-enabled products, please check with the manufacturer/importer.
10
Page 11

11
Specifications
Bluetooth Specifications: Version 1.2, Class 2, 10 Meters
Bluetooth Profile Supported: H.S.P. 1.1, H.F.P. 1.5
Operating Frequency Band : 2.402 to 2.4835 GHz unlicensed ISM band
Rechargeable Li-ion Battery: 3.7V DC, 800mAH
Multi-Pairing: Up to 7 Bluetooth devices
: DC 5 v to 6 v, 400 mA, mini USB connector
Normal Charge Time: 4 hrs.(approx..)
Talk Time: 8 to 10 hrs.(approx..)
Standby Time: 150 hrs.(approx..)
Dimension(L/M/S): 11 x 7 x 3.8 cm.
Weight: 80 g. with battery
Page 12

© Copyright 2008
Magnadyne Corporation
BT-HFKP30-UM/IM
Rev. A 7-17-08
Warranty
ONE (1) YEAR LIMITED WARRANTY
Magnadyne Corporation or its authorized agents will within one year from the date of sale
to you, repair, replace or refund the retail sales price of said product or any part thereof, at
the option of the Magnadyne Corporation or its authorized agents, if said product or part
is found defective in materials or workmanship, when properly connected and operating on
the correct power requirements designated for the specific product. This warranty and
Magnadyne Corporation or its authorized agent’s obligations hereunder do not apply where
the product was; damaged while in the possession of the consumer, subjected to unreasonable or unintended use, not reasonably maintained, utilized in commercial or industrial
operations, or serviced by anyone other than Magnadyne Corporation or its authorized
agents, or where the warning seal on the product is broken or the power and/or plugs are
detached from the unit. Magnadyne Corporation or any of its authorized agents will not
assume any labor costs for the removal and reinstallation of any product found to be defective, or the cost of transportation to Magnadyne Corporation or its authorized agents. Such
cost are the sole responsibility of the purchaser.
This warranty does not cover the cabinet appearance items or accessories used in connection with this product, or any damage to recording or recording tape, or any damage to
the products resulting from improper installation, alteration, accident, misuse, abuse or
acts of nature.
MAGNADYNE CORPORATION OR ITS AUTHORIZED AGENTS SHALL NOT BE LIABLE TO
ANYONE FOR CONSEQUENTIAL OR INCIDENTAL DAMAGES OR CLAIMS EXCEPT THOSE
ACCORDED BY LAW. NO EXPRESSED WARRANTY OR IMPLIED WARRANTY IS GIVEN
EXCEPT THOSE SET FORTH HEREIN. NO IMPLIED WARRANTY SHALL EXTEND BEYOND
ONE YEAR FROM THE DATE OF SALE.
This warranty extends only to the original purchaser of the product and is not
transferable. Some states do not allow limitations on how long an implied warranty lasts,
and some states do not allow the exclusion or limitation of incidental or consequential
damages, so the above limitations or exclusion may not apply to you. This warranty gives
you specific legal rights, and you may have other rights that vary from state to state.
“NOTE: The manufacturer is not responsible for any radio or TV interference caused by
unauthorized modifications to this equipment. Such modifications could void the User’s
authority to operate the equipment.”
Defective merchandise should be returned to the original point of purchase or
secondly, to Magnadyne Corporation, 1111 W. Victoria Street, Compton CA 90220.
Return Authorization must be obtained before sending, or merchandise may be refused.
 Loading...