

Page 1

OWNER’S
MANUAL
Model: 7919P
This device complies with part 15 of the FCC rules. Operation is subject to the following two conditions:
(1) This device may not cause harmful interference; and
(2) This device must accept any interference received, including interference that may cause undesired operation.
Note: The manufacturer is not responsible for any radio or TV interference caused by unauthorized modifications to this
equipment. Such modifications could void the user’s authority to operate the equipment.
Page 2
2
Congratulations on your purchase of a quality Silencer security system. Your new Silencer security system has
been designed to provide years of trouble free service when operated and maintained in the manor set forth in
this booklet. Your full knowledge of the features provided by your security system and their methods of
operation are essential for day-to-day usage. Please take a moment to read through this manual and become
familiar with the features that pertain to your security system. Located at the back of this booklet, we have
provided a listing of all the upgrade features available for your security system. Additional installed features vary
by dealership but any can be added at a later date. Contact your new car dealership for details.
The Model of your Silencer Security System is 7919P:
The basic function of this system is to provide an upgraded level of security to an existing manufacture
installed keyless entry system or security device. The 7919P can also be used as a stand alone Silencer
remote keyless entry and security system or a “remoteless” passive arm Security system. Please read
and follow the procedures enclosed to operate your system.
Determine the Control Device:
Your Silencer 7919P can be controlled from a variety of different devices. Determine which device is
controlling your system and proceed to that section of this manual. In some cases, the 7919P will have 2
different controllers. Read the information pertains to both controllers.
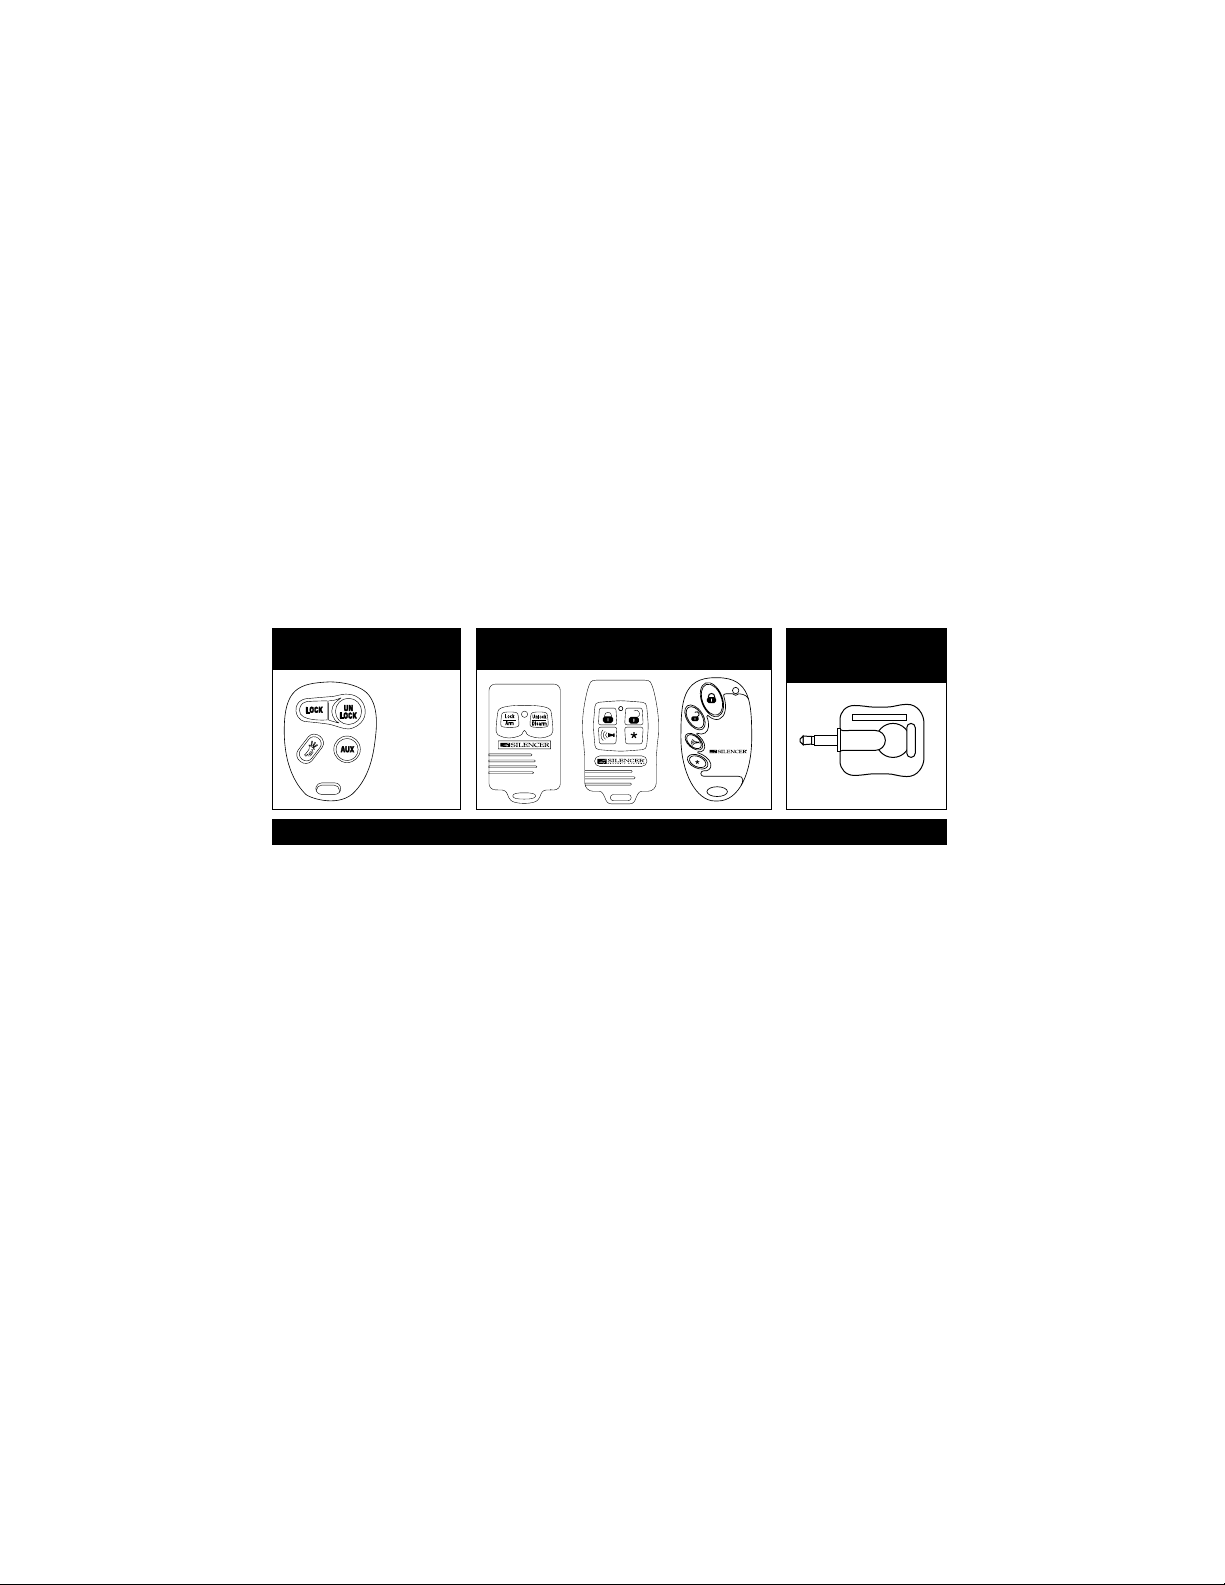
System Control by the Factory Keyless Entry Transmitter: (Basic Operation)
If the vehicle you purchased came with remote keyless entry transmitters, two of the buttons on the
transmitter will be used to lock and unlock your vehicle. These buttons will have the words “LOCK and
UNLOCK” printed or engraved on them or they will have pictures of a padlock in a locked and unlocked
position (see picture at above). Use the lock and unlock buttons on the transmitter to control your new
Silencer security system in the following manner.
Manual Arming and Disarming:
1. Exit the vehicle and close all of the entrances.
Note: After closing the last protected entrance, you will hear the siren or horn chirp. The reason for this
chirp is covered below in the “Automatic Arming” section of the manual. Proceed as follows:
2. Press the “LOCK” button on your keyless entry transmitter . Your Silencer Security system will respond
in the following manner.
A. The siren or vehicle horn will emit a single chirp*.
B. The parking lights may flash one time.
C. The LED indicator for the security system will start to flash.
The system is now armed.
3. Press the “UNLOCK” button on your keyless entry transmitter. Your Silencer security system will
respond in the following manner.
A. The siren or vehicle horn will emit 2 chirps*.
B. The parking lights may flash two times.
C. The LED indicator for the security system will start flashing fast indicating that the system will re-arm in
60 seconds. (Opening the driver’s door or turning on the ignition key will momentarily stop the auto
arming feature.)
The system is now disarmed.
Controlled by Factory
Supplied Keyless Transmitter
Controlled by
Silencer Remote Transmitter
Controlled by
Silencer Code Key
Example of
Factory
Transmitter
Page 3

* Some factory keyless entry systems have chirp confIrmation as a built in feature. If this is true for your
vehicle, when the doors are locked or unlocked with the factory keyless transmitter, you may get more than
1 or 2 chirps as indicated above. If this condition becomes undesirable, the chirp indication from the
7919P can be turned off allowing only the factory system chirp. Contact your dealer for more details.
Automatic Arming with Manual Disarming:
Note: When you take deliver y of your new vehicle and Silencer 7919P security system, the automatic
arming feature is active to protect your vehicle even if you forget to arm your security system. If the
feature becomes undesirable,it can be programmed off leaving manual arming your only method to
secure your vehicle. Contact your dealer for further information.
1. Exit the vehicle and close all protected entrances. Once the last protected entrance is closed, your
Silencer security system will respond in the following manner.
A. The siren or vehicle horn will chirp one time.
B. The LED indicator will begin to flash fast to indicate that the 30 second auto arm timer is counting down.
2. After 30 seconds has passed**, your silencer security system will respond as follows.
A. The siren or vehicle horn will chirp once again indicating that the security system is fully armed.
B. The parking lights may flash one time.
C. The LED indicator will resume a normal flash speed indicating an armed condition.
D. The doors will become locked.
Note: Auto arm door lock control is an optional feature described in the back of this manual.
** The dome lights in some vehicles have a delay before they turn completely off. If your vehicle has
this type of delayed dome lighting, the 30 second auto arm timer will start when the dome light is
completely off. Depending on the length of time it takes the dome light to turn off, auto arming may take
45 to 60 seconds or more.
What To Do if the Alarm is Sounding:
Press the UNLOCK button on your keyless entry transmitter.
A. The siren or vehicle horn will stop sounding.
B. The parking lights may stop flashing.
C. The LED indicator will begin a special tamper mode flash sequence to let you know that your alarm
had been triggered .
Notations on Basic Operating Procedures:
1. When you disarm the system while it is sounding, there are no disarm chirps.
2. After the security system has been triggered, the LED remains flashing even thought the security system
has been disarmed. This is a tamper indicator. Turning on the ignition key will reset this indicator.
3
System Control by the Factory Supplied Keyless Entry Transmitter: (Basic Operation)(cont)
System Control by the Silencer Remote Transmitter: (Basic Operation)
If you purchased the 7919P Silencer security system and your vehicle did not come with a factory keyless system,
your dealer would have supplied you with 2 Silencer remotes. Silencer remotes come in two styles, 2 button and 4
button as illustrated on page 2. Use the lock and unlock buttons on the transmitter to control your new Silencer
security system in the following manner:
Manual Arming and Disarming:
1. Exit the vehicle and close all of the entrances.
Note: After closing the last protected entrance, you will hear the siren or horn chirp. The reason for
this chirp is covered below in the “Automatic Arming” section of the manual. Proceed as follows:
Page 4

4
2. Press the “LOCK” button on your Silencer transmitter . Your Silencer security system will respond in
the following manner.
A. The siren or vehicle horn will emit a single chirp.
B. The parking lights may flash one time.
C. The LED indicator for the security system will start to flash.
The system is now armed.
3. Press the “UNLOCK” button on your Silencer remote transmitter. Your Silencer security system will
respond in the following manner.
A. The siren or vehicle horn will emit 2 chirps.
B. The parking lights may flash two times.
C. The LED indicator for the security system will start flashing fast indicating that the system will re-
arm in 60 seconds.
(Opening the drivers door or turning on the ignition key will momentarily stop the
auto arming feature.)
The system is now disarmed.
Automatic Arming with Manual Disarming:
Note: When you take deliver y of your new vehicle and Silencer 7919P security system, the automatic
arming feature is active to protect your vehicle even if you forget to arm your security system. If the
feature becomes undesirable,it can be programmed off leaving manual arming your only method to
secure your vehicle. Contact your dealer for further information.
1. Exit the vehicle and close all protected entrances. Once the last protected entrance is closed, your
Silencer security system will respond in the following manner.
A. The siren or vehicle horn will chirp one time.
B. The LED indicator will begin to flash fast to indicate that the 30 second auto arm timer is counting down.
2. After 30 seconds has passed**, your silencer security system will respond as follows.
A. The siren or vehicle horn will chirp once again indicating that the security system is fully armed.
B. The parking lights may flash one time.
C. The LED indicator will resume a normal flash speed indicating an armed condition.
D. The doors will become locked.
Note: Auto arm door lock control is an optional feature described in the back of this manual.
** The dome lights in some vehicles have a delay before they turn completely off. If your vehicle has
this type of delayed dome lighting, the 30 second auto arm timer will start when the dome light is
completely off. Depending on the length of time it takes the dome light to turn off, auto arming may take
45 to 60 seconds or more.
What To Do if the Alarm is Sounding:
Press the UNLOCK button on your Silencer transmitter.
1. The siren or vehicle horn will stop sounding.
2. If the parking lights are flashing they will stop flashing.
3. The LED indicator will begin a special tamper mode flash sequence to let you know that your alarm had been
triggered.
Notations on Basic Operating Procedures:
1. When you disarm the system while it is sounding, there are no disarm chirps.
2. After the security system has been triggered, the LED remains flashing even thought the security system has
been disarmed. This is a tamper indicator. Turning on the ignition key will reset this indicator.
System Control by the Silencer Remote Transmitter: (Basic Operation) (continued)
Page 5

5
If you purchased the 7919P Silencer security system and your vehicle did not come with a factory keyless
system and you chose not to purchase the remote transmitter control option, your dealer would have
supplied you with 2 Silencer code keys. Silencer code keys can be attached to your existing key ring and
are used for disarming your Silencer security system. Your new Silencer 7919P security system operates
in the following manner when using the Code Keys.
1. Exit the vehicle and close all of the entrances. After the last protected entrance is closed, the security
system will respond as follows:
A. The siren or vehicle horn will emit a single chirp.
B. The LED indicator for the security system will start to flash fast to indicate that the 30 second
timer* is counting down to arm the vehicle.
2. After the 30 seconds has passed*, the security system will respond in the following manner:
A. The siren or vehicle horn will emit another single chirp
B. The parking lights may flash once.
C. The LED indicator will return to a normal armed flashing mode.
The system is now armed.
3. Enter the vehicle through the drivers door and insert the Silencer Code Key into the LED receptacle
A. The siren or vehicle horn will emit 2 chirps.
B. The parking lights may flash two times.
C. The LED indicator for the security system will stop flashing.
D. Remove the Code Key and start the vehicle.
The system is now disarmed.
* The dome lights in some vehicles have a delay before they turn completely off. If your vehicle has this
type of delayed dome lighting, the 30 second auto arm timer will start when the dome light is completely
off. Depending on the length of time it takes the dome light to turn off, auto arming may take 45 to 60
seconds or more.
What To Do if the Alarm is Sounding:
Enter the vehicle and insert the Code Key into the LED receptacle.
1. The siren or vehicle horn will stop sounding.
2. If the parking lights are flashing they will stop flashing.
3. The LED indicator will begin a special tamper mode flash sequence to let you know that your alarm
had been triggered.
Notations on Basic Operating Procedures:
1. When you disarm the system while it is sounding, there are no disarm chirps.
2.
After the security system has been triggered, the LED remains flashing even thought the security system
has been disarmed. This is a tamper indicator. Turning on the ignition key will reset this indicator.
System Control by the Silencer Code Key: (Basic Operation)
7919P Primary Feature Operation:
Other than arming and disarming your security system, the 7919P has a host of non-option features that
enhance ownership and the level of security provided by the 7919P system. Please take moment to become
familiar with the operation of these features as you may need to use them at some point in time. To practice
operating these features, repeat the enclosed procedure for each feature as it is written or illustrated.
Take a moment to become familiar with the operation of the primary features provided by your new security
system as you may need to use them at some point in time. To test the primary features, repeat the
following procedures exactly as they
are listed:
System Override/Valet:
A patented removable switch is used to override the security system in the event that the transmitters
are lost or fail to operate and to put the security system in non-operational mode (valet) for vehicle
servicing etc.
Page 6

Override Operation: (Security system is Armed)
1. Enter the vehicle, the security systems will begin sounding at this point, and place the override
switch into the switch housing. Make sure that the switch button is in the OUT position.
2. Place the ignition key into the ignition switch and turn the ignition switch to the ON position.
3. Within 5 seconds of turning the ignition key ON, press the valet switch button IN until it locks.
4. The horn/siren will stop sounding.
5. The LED indicator will be solid red.
The security system is overridden and is now in the valet mode!
Valet Operation:
(The security system is already disarmed)
1. Place the valet switch into the switch holder making sure that the switch button is in the OFF
position. (Switch button is out)
2. Turn the ignition key to the ON position.
3. Within 5 seconds of turning the ignition key ON, push IN the valet switch.
4. The LED will be on solid indicating that the security system is in the valet mode.
Note 1: If the valet switch is already in the ON position when you turn ON the ignition key, the valet
function will be bypassed. Turn OFF the ignition key, set the switch to the OFF position and try again.
Note 2: If you fail to push IN the valet switch within 5 seconds of turning ON the ignition key, the valet
function will be locked out. Turn OFF the ignition key, set the switch to the OFF position and try again.
Starter Disable:
Your Silencer®security system has a built-in starter interrupt relay that will break the connection between
your ignition key and the starter on your vehicle. To test this feature, repeat the following procedure:
1. Enter the vehicle and close all the entrances.
2. Press the lock button on the transmitter.
3. Turn the ignition key to the start position. The engine will not crank over.
4. Turn the ignition key to the off position and press the unlock button on the transmitter.
5. Turn the ignition key back to the start position and the engine will crank over and start.
Remote Panic:
The 7919P provides a remote panic function which allows the user to trigger the alarm by remote in the
case of an emergency.
Factory Supplied Keyless Entry Transmitter:
1. Ignition key must be off.
2. Press the LOCK button 4 times.
3.The siren will begin to sound and the parking lights may begin to flash.
4. Press the UNLOCK button. The siren will stop sounding and if the parking lights are flashing they
will stop flashing.
Note: If the panic function is not turned off by the transmitter, the siren will continue to sound for 60
seconds and then turn off by itself.
2 Button Silencer Remote Transmitter:
1. The ignition key must be off.
2.
Press and hold the LOCK button for 3 seconds and your Silencer system will respond in the following manner.
A. The siren or vehicle horn will begin sounding.
B. The parking lights may begin flashing.
C. Press the UNLOCK button to turn off the panic feature.
Note: If the panic function is not turned off by the transmitter, the siren/horn will continue to sound
for 60 seconds and then reset by itself.
6
Note: The removable valet switch can only be inserted into the
valet switch housing one way. Do not force the switch or bend
the switch terminals.
7919P Primary Feature Operation: (continued)
Page 7

7
4 Button Silencer Transmitter:
1. The ignition key must be off.
2.
Press and hold the button for 3 seconds and your Silencer system will respond in the following manner.
A. The siren or vehicle horn will begin sounding.
B. The parking lights may begin flashing.
C. Press the button to turn off the panic feature.
Note: If the panic function is not turned off by the transmitter, the siren/horn will continue to sound
for 60 seconds and then reset by itself.
Silent Arming or Disarming from the Factory Keyless Transmitter:
From time to time, it may be necessary to arm or disarm your Silencer security system without hearing
the chirp indicator. To operate this function, repeat the following procedure:
Silent Arming: (Security system is disarmed)
1. Press the UNLOCK button on the factory keyless remote transmitter.
2. Within 3 seconds, Press the LOCK button on the factory keyless remote transmitter.
3. The system will become armed silently.
Silent Disarming: (Security system is armed)
1. Press the LOCK button on the factory keyless remote transmitter.
2. Within 3 seconds, Press the UNLOCK button on the factory keyless remote transmitter.
3. The system will become armed silently.
Silent Arming or Disarming from the Silencer Remote Transmitter:
Silent Arming: (Security system is disarmed)
1. Press the LOCK and UNLOCK buttons on the Silencer remote transmitter at the same time.
2. They system will become armed silently.
Silent Disarming: (Security system is armed)
1. Press the LOCK and UNLOCK buttons on the Silencer remote transmitter at the same time
2. The system will become disarmed silently.
Optional Features
C
hirp Delete:
The 7919P control module can be programmed by the dealer so there will be no arm/disarm status
chirps. The four chirp tamper disarm warning indicator will always be on for you safety.
Pathway Illumination:
If the pathway illumination function has been programmed on by your dealer your vehicles parking lights
will illuminate at the time the security system is disarmed by the remote transmitter. The parking lights
will remain on for 30 seconds after the security system is disarmed. Turing on the ignition key will turn
off the parking lights before 30 seconds.
Last Door Automatic Arming:
If your Silencer®security system was programmed to automatically arm without using the transmitter,
repeat the following procedures to test and operate this feature:
1. Enter the vehicle and close all the entrances.
2. Set the ignition key switch to the on position and wait for 5 seconds.
3. Set the ignition key switch to the off position and exit the vehicle. Upon closing the door, you will
hear a beep from the horn/siren. The beep is an indicator that the automatic arming timer has started
counting. You will also notice that the LED indicator is flashing fast. This is also an indicator that the
automatic arming timer is counting down.
4. Within 30 seconds, the horn/siren will beep once again. This is an indication that the security system
is now in the armed mode. The LED will begin flashing at a normal rate.
7919P Primary Feature Operation: (continued)
Page 8

Note: Once the ignition key switch is turned off, the automatic arming timer will start counting after the
last protected entrance is closed. Re-opening any protected entrance within the 30 second time will
stop the counter and reset it. Closing the entrance will start the counter once again but you will not get
a beep when closing the door for the second time.
Ignition Key Controlled Door Locking/Unlocking:
If the ignition key lock/unlock function has been programmed on by your dealer the doors will automatically
become locked 3 seconds after the ignition key is set to the on position or unlocked after ignition key is
turned off.
1. Enter the vehicle and close all protected entrances.
2. Turn the ignition key to the on position.
3. Within 3 seconds the door locks will become locked.
4. Turn off the ignition key. The door locks will become unlocked.
Notations About Ignition Controlled Locking.
A. If a protected door is open, the ignition door locking function is disabled.
B. If the door locks are manually locked, the alarm system will still unlock them when the ignition key is
turned off.
Automatic Arm Door Locking:
If the “Auto arm locking” feature has been programmed on by your dealer, your doors will become
locked 30 seconds after the last protected entrance is closed.
To test this feature, follow the testing instructions for “Last door automatic arming” above and the doors
will become locked when the system arms.
Note: leaving a door open or leaving the ignition key in the ON position will stop the auto arm/locking
timers. Closing the last protected entrance will re-start the timers.
WARNING ! - Do not leave your keys inside the vehicle at gas stations.
- Always use your valet switch to put your system in valet mode when you go to the car wash.
- If your vehicle has more than one driver, make sure everyone is familiar with the auto
arm/locking system to prevent the vehicle keys from being locked inside the vehicle.
Shock/ Impact Detectors:
Your Silencer 7919P is set up to accept “Single Zone” and “Dual Zone” type shock/ impact sensors.
These type devices will detect impacts to your vehicle that are related to forced entry.
“Single Zone” shock/impact sensors will detect hard impacts to your vehicle such as breaking a window
or using a slam hammer on the door key lock cylinder. If any of these level of impacts are detected the
siren or vehicle horn will start to sound
3 Year Warranty
Your new Silencer®Security Systems is warranted to be free of defects for 3 years. Silencer®or its authorized agents will within 3 years
from the date of sale to you, repair or replace said product or any part thereof, at the option of the Silencer
®
or its authorized agents, if said
product or part is found defective in materials or workmanship, when properly connected and operating on the correct power requirements
designated for the specific product. This warranty and Silencer
®
or its authorized agents obligations hereunder do not apply where the
product was; damaged while in the possession of the consumer, subjected to unreasonable or unintended use, not reasonably maintained,
or serviced by anyone other than Silencer
®
or its authorized agents, or where the warning seal on the product is broken or the power
and/ or plugs are detached from the unit. This warranty does not cover the cabinet appearance items or accessories used in connection
with this product, or any damage to the products resulting from improper installation, alteration, accident, misuse, abuse or acts of nature.
Silencer
®
OR ITS AUTHORIZED AGENTS SHALL NOT BE LIABLE TO ANYONE FOR CONSEQUENTIAL OR INCIDENTAL DAMAGES OR
CLAIMS EXCEPT THOSE ACCORDED BY LAW. NO EXPRESSED WARRANTY OR IMPLIED WARRANTY IS GIVEN EXCEPT THOSE SET
FORTH HEREIN. NO IMPLIED WARRANTY SHALL EXTEND BEYOND 3 YEARS FROM THE DATE OF SALE. Some states do not allow
limitations on how long an implied warranty lasts, and some states do not allow the exclusion or limitation of incidental or consequential
damages, so the above limitations or exclusion may not apply to you. This warranty gives you specific legal rights, and you may have other
rights that vary from state to state. Defective merchandise should be returned to the original point of purchase or secondly, to 1111 W.
Victoria Street, Compton CA 90220. Return Authorization must be obtained before sending, or merchandise may be refused. All claims
concerning your Silencer
®
Security System should be referred to your selling dealer. If you are away from the vicinity of the selling dealer
please call (800) 340-3200.
© 2001 Copyright Magnadyne Corp.
Optional Features
6-11-01 Rev. A 7919UM
 Loading...