

Page 1
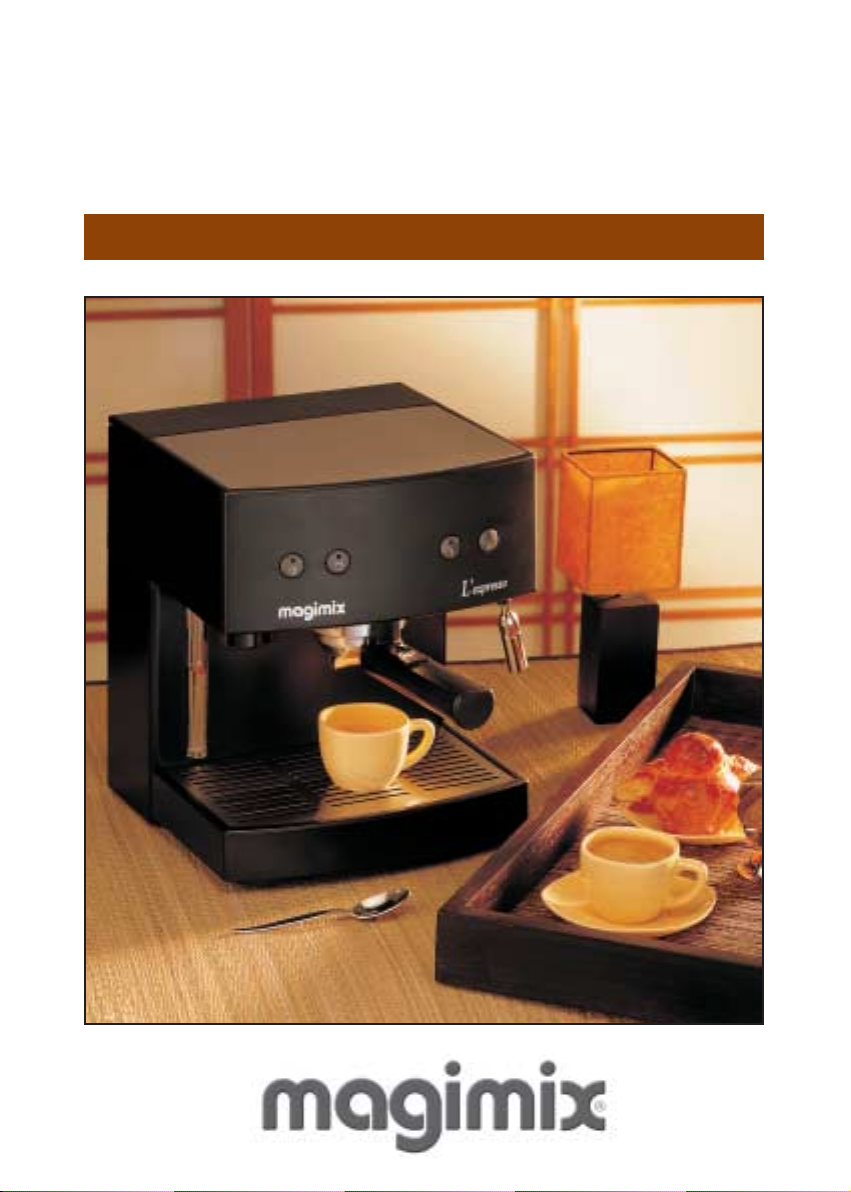
L’ e xpresso • L’ e xpresso Program
L’ e xpresso Program Automatic
Instructions for use
Page 2
Thank you for your loyalty and for the confidence you have shown in our brand.
You have just acquired a Magimix Expresso and we hope that it will give you
entire satisfaction. This appliance has been designed to produce genuine
espresso coffee.
Please read these instructions carefully before using your appliance
and keep them in a safe place.
Golden rules for making good espresso coffee
An espresso is a strong coffee with an extremely rich aroma, characterised
by its “chamois” coloured cream. To get the very best results, you must
follow four golden rules :
Quality of the ground coffee.
Use special espresso coffee that has been freshly roasted and ground.
To conserve all its freshness, avoid exposing it to air as much as possible.
Remember to push out as much air as possible each time you close the packet,
and keep it in an airtight container in the fridge.
Water quality.
A cup of coffee is more than 98% water! Chlorine, which is often present in
tap water, can spoil the taste of your coffee, while a build-up of limescale will
prevent your appliance from working properly. For these reasons, either use
bottled spring water (low mineral content) or filter your tap water.
Temperature.
The water which passes through the ground coffee should be simmering,
never boiling. The thermostat on your Magimix Expresso guarantees an
optimum brewing temperature.
Preparation.
You must preheat the empty filter holder. Before brewing the first cup of coffee,
allow the equivalent of a cupful of water to pass through it. Also remember to
preheat your cups. Place them on the cup heater tray or warm them through
using the hot-water pipe (cf. p. 12). That way, you will be able to enjoy your
espresso coffee in the best conditions, from the very first cup.
Espresso coffee should be served in a thick cup – conical, if possible, so that
all the cream rises to the surface.
2
Page 3

CONTENTS Pages
Description 4
Before you use your appliance for the first time
- Installation 6
- Setting the water hardness level 7
How to brew espresso coffee ?
- Preparing the machine 8
- Switching it on 9
- Manual/automatic switch-off 10
Extra functions
- Steam function 11
- Hot water function 12
Aftercare
- Cleaning 12
- Descaling 13
• Descaling the Expresso model
• Descaling the Expresso Program and
Program Automatic models
Troubleshooting ? 16
Recipes
- The different types of espresso coffee 18
- Coffees of the world 19
Safety instructions 21
Electrical instructions 22
3
Page 4
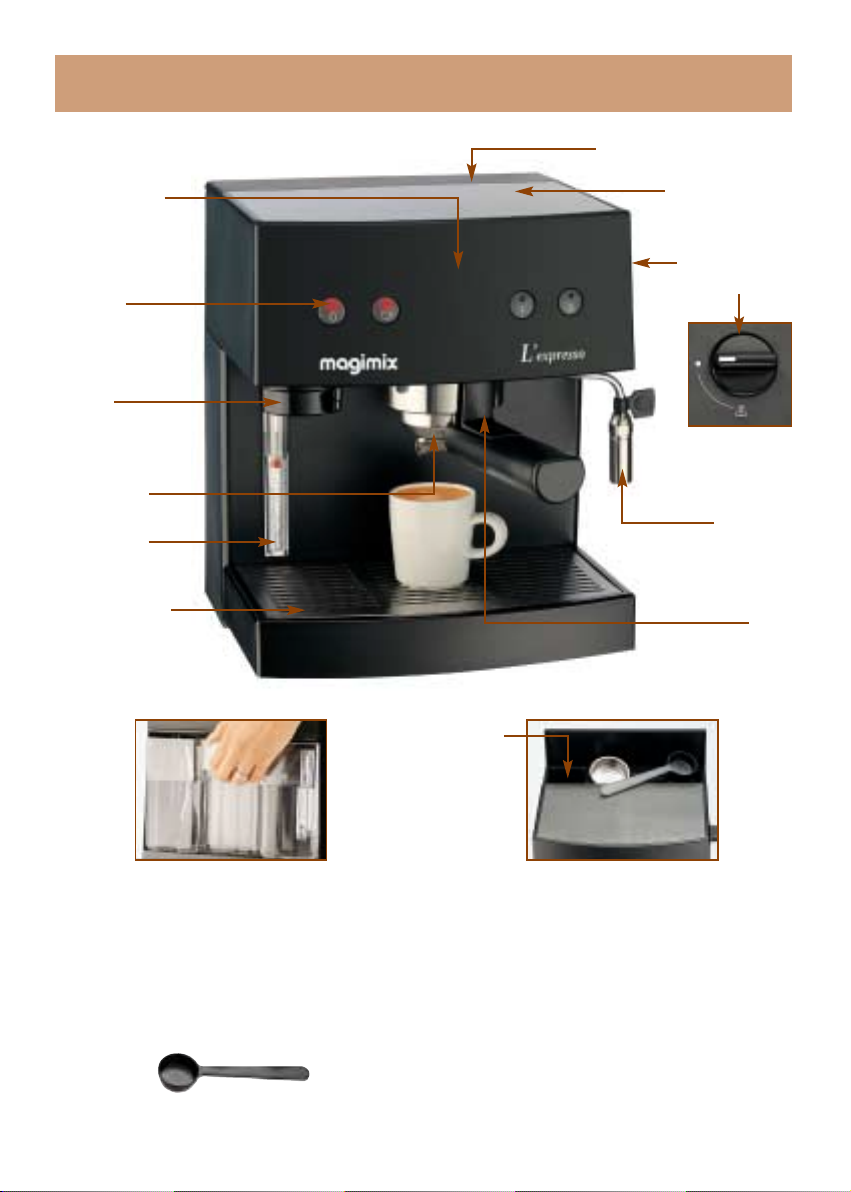
DESCRIPTION
Storage compartment lid
Control panel
Indicator
lights
Coffee
leveller
Filter holder
Water level
indicator
Drip tray with
removable grid
Cup heater tray
Function
selector
Hot water
/steam pipe
Filter
locking device
Water inlet
Removable water tank Storage compartment
Supplied with 2 “Extracrem” filters: - small filter: 1 cup espresso coffee pod (paper) or 1
cup espresso ground coffee.
- large filter: 2 cups ground coffee.
Measuring spoon (1 level spoonful = 7 g = 1 cup)
4
Page 5
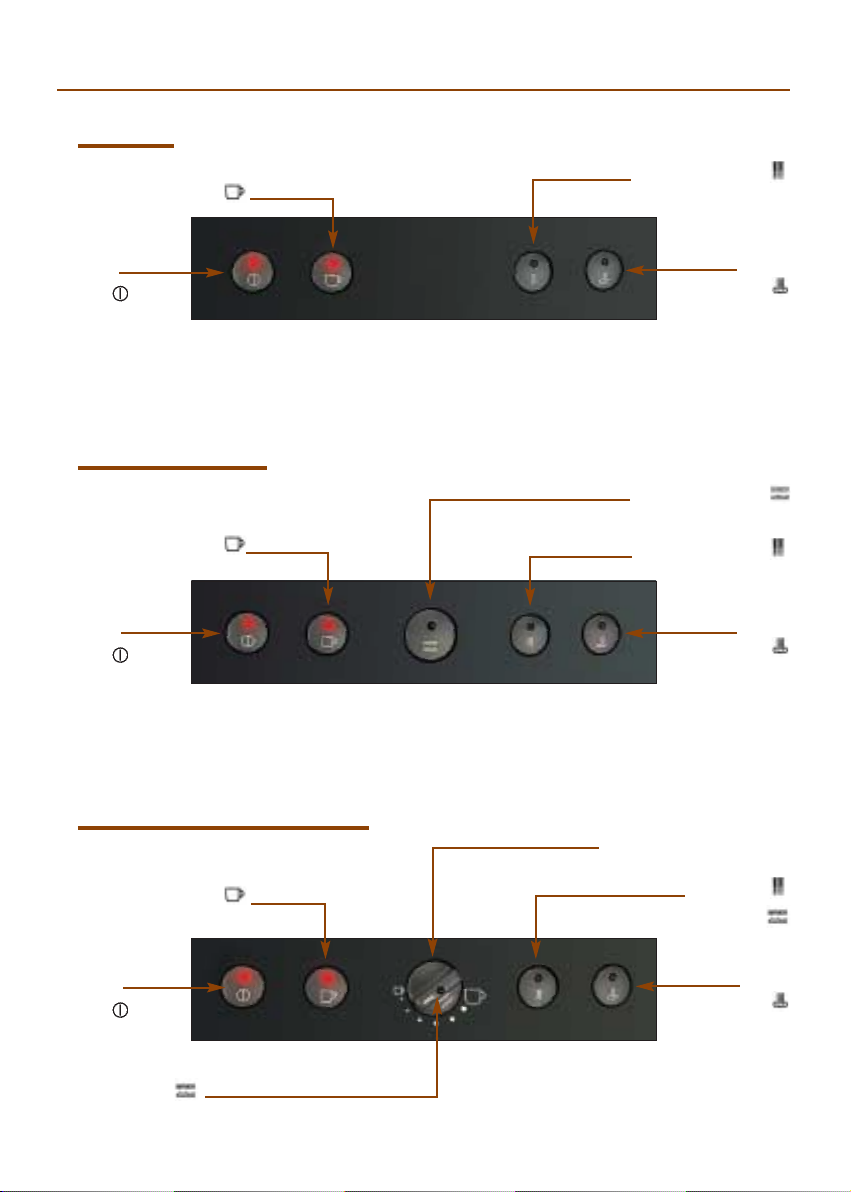
Control panels for each model
• L’expresso
Coffee control button
On/off
button
• L’expresso Program
Coffee control button
On/off
button
Hot water button
Steam
button
Descaling button
Hot water button
Steam
button
• L’expresso Program Automatic
Coffee control button
On/off
button
Descaling light
Water volume adjuster
Hot water
and descaling button
Steam
button
5
Page 6
BEFORE YOU USE YOUR APPLIANCE
FOR THE FIRST TIME
Every single Magimix appliance is tested before it leaves the factory, which is why you may find
traces of water when you unpack your coffee maker. This is perfectly normal.
Before you use it for the first time, or if the machine has been left idle for a long period, rinse out
the water circuit to eliminate any residual water in the system.
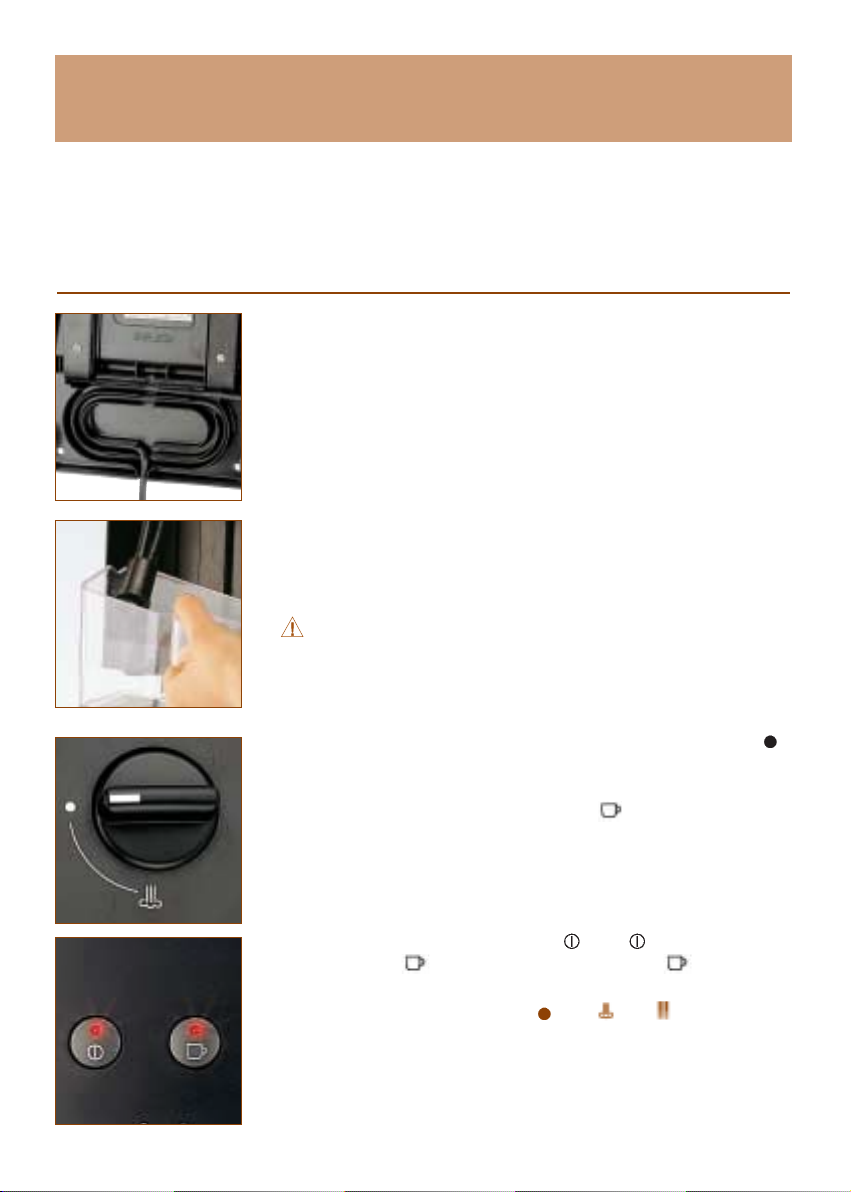
Installation
• Lift up the appliance and unwind the length of power cord you
require. Wedge the cord into the specially-provided notch.
• Lift the water tank right out from behind and fill it with freshly-drawn
water. When you put it back, place the flexible tube inside.
You can also fill the water tank directly via the inlet located in the
➣
storage compartment.
Never fill the tank with hot water.
• Plug your appliance into an earthed socket.
• Turn the function selector as far as it will go, so that it is pointing to .
• For the Expresso Program Automatic model, you must also move
the water volume adjuster to the maximum level by turning it in an
anti-clockwise direction as far as the large .
• Switch your appliance on by pressing . The indicator light will
come on and the light will start to flash. When stays on, the
appliance is ready to brew coffee.
NB : If the selector is not turned to
will flash.
6
, the
and indicator lights
Page 7
• Place a fairly wide container under the pipe, press , and turn the selector function to .
Allow the equivalent of a bowlful of water to flow through. To halt the flow, turn the function selector
back to .
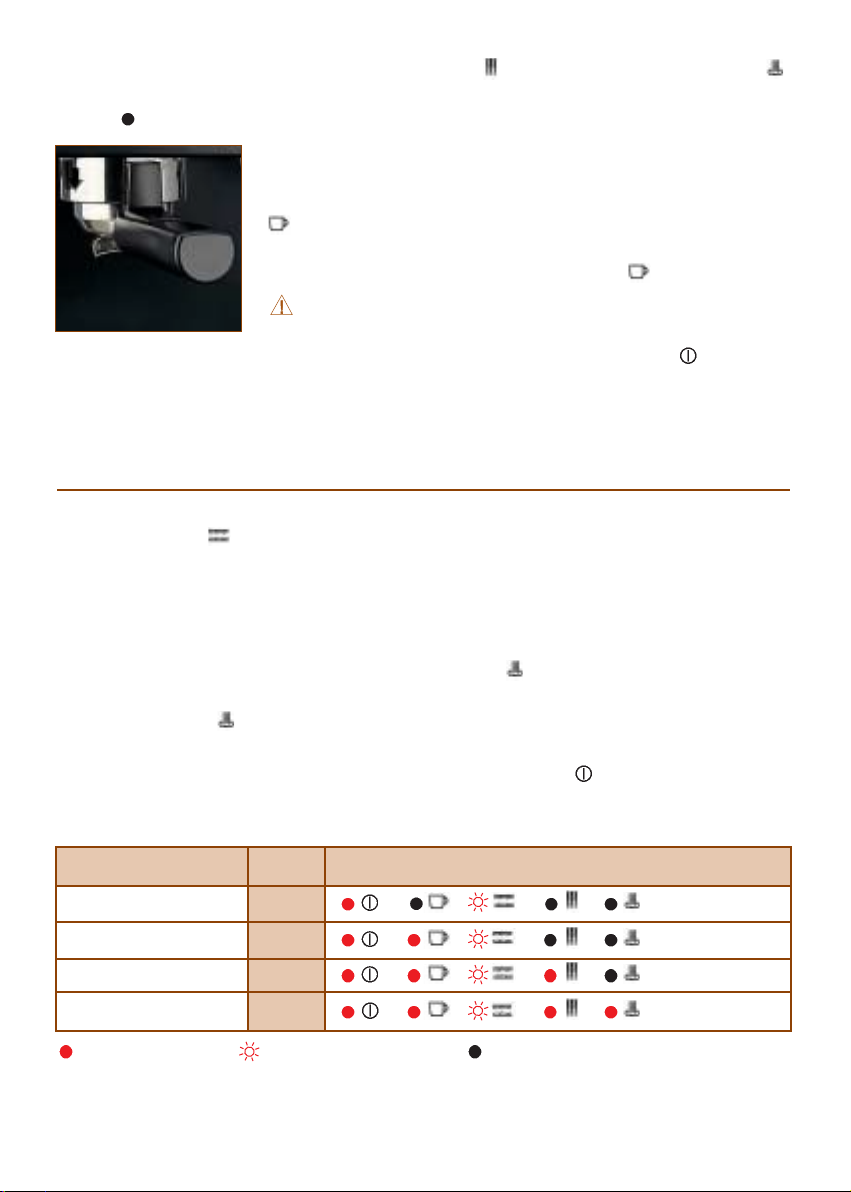
• Insert the empty filter holder (filter locking device at the back) in the
extractor head, opposite the arrow, and turn it towards the right.
• Place a sufficiently wide container under the filter holder and press
. The red indicator light will start to flash and the water will flow
into the bowl.
Stop the flow when the bowl is full by pressing again.
Wait for 10 to 15 seconds before removing the filter holder.
• Once the rinsing operation is finished, switch your appliance off by pressing , lift out the
water tank and empty it. Clean the tank, filter holder and filters. Fill the tank with freshly-drawn
water and put it back.
Setting the water hardness level
(Program and Program Automatic models only).
The Expresso Program and Expresso Program Automatic automatically tell you when they need
to be descaled (the indicator light will start to flash), but you must first adjust your appliance
according to the hardness of your water.
1- Measure the hardness of your water (cf. p.13).
2- Adjust the hardness setting on your appliance.
The Expresso has four hardness settings.
• Plug your appliance in but do not switch it on. Press for five seconds until the indicator
lights come on.
• Keep pressing briefly until you reach the right hardness setting. The hardness level
corresponds to the number of indicator lights that come on (cf. table below).
• To memorize the setting and exit the adjustment process, press . All the lights will go out.
NB : If no switch is activated for one minute, the process will automatically be interrupted (the
indicator lights will go out), without affecting the last memorized setting.
You water is… Level Level indicators
Very soft or soft 1
Average hardness 2
Hard 3
Very hard 4
Indicator light on. Flashing indicator light. Indicator light off.
NB : When the appliance is delivered, it is programmed to level 3.
7
Page 8
HOW TO BREW ESPRESSO COFFEE?
Preparing your appliance
• Fill the tank with freshly-drawn water.
• Press : The power indicator light will come on and stay on, while
the indicator will start to flash.
NB : If the function selector has not been turned to , both the
and indicators will flash.
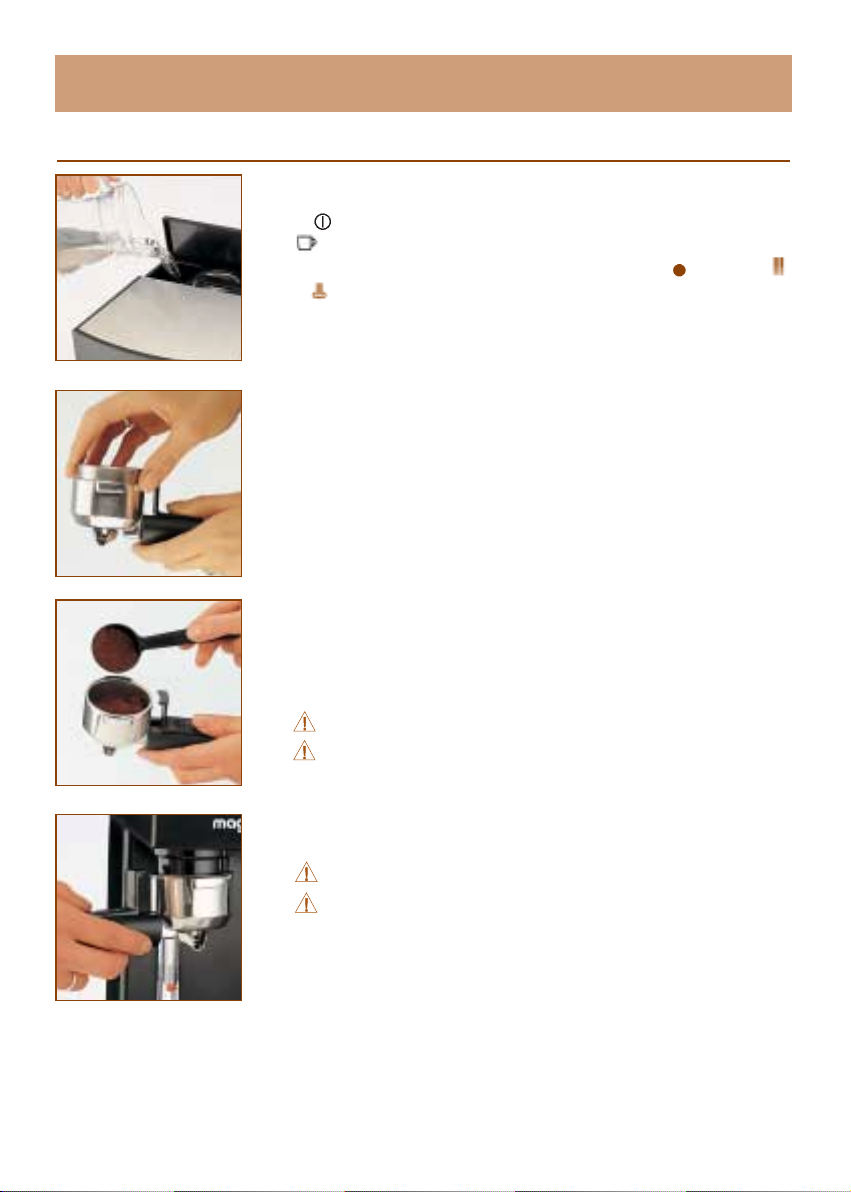
• Choose the filter according to the type of espresso coffee you wish
to brew.
• Place the filter you have chosen in the filter holder.
- 1 cup ground coffee or coffee pod = small filter.
- 2 cups ground coffee = large filter.
• Ground coffee
1 - Fill the filter using the measuring spoon :
1 level spoonful = 1 cup, 2 level spoonfuls = 2 cups.
NB : Level = full but not rounded.
overflow.
Too fine a grind of coffee may block the filter.
Too much ground coffee may cause the filter holder to
2 - Tamp down the coffee using the leveller (keep it horizontal in the
filter).
Do not compact the coffee.
Do not leave any ground coffee on the rim of the filter
holder.
8
Page 9

Switching it on
• Coffee pod
The 1 cup filter can cater for most types of espresso pods on the
market. Place the pod in the special filter. As the shape of the paper
may vary according to the brand, make sure that the pod is positioned
in the centre of the filter.
Fold over the edges of the filter paper to avoid them sticking out
of the filter.
• Insert the filter holder (filter locking device towards the back) in the
extractor head, opposite the arrow and turn it to the right.
NB : The handle should be off centre, pointing slightly to the right.
• Position one or two cups under the filter holder.
You can only brew one cup of coffee at a time using the pod filter.
• Check that the function selector has been turned to and that the
machine is ready ( and indicator lights on and no longer
flashing).
NB : The brewing takes place in two stages, as your appliance has
a system for pre-humidifying the ground coffee in order to bring out
its full flavour.
• For the Expresso and Expresso Program models : press : the red
indicator light will start to flash and the coffee will start to flow. Once
you have obtained the amount of coffee you want, press again.
The flow will stop and the red light will stay on.
• For the Expresso Program Automatic model :
Your model is programmed to halt the flow of coffee automatically,
once it has produced a preselected volume :
- Turn the volume adjuster to select the amount of coffee you wish to
brew.
- Press : the coffee will start to flow, then cease automatically.
NB :
The actual amount of coffee produced will depend on the type of coffee (ground or pod), the
fineness of the grind, the quantity of coffee and the compactness of the ground coffee.
9
Page 10

NB : During the brewing process, the pump will make a characteristic noise. This is nothing to
worry about.
Wait 10 to 15 seconds before removing the filter holder.
• Remove the filter holder by turning it to the left.
NB : After the coffee has been brewed, one or two drops may fall
from the filter holder (water still in the filter). This is quite normal.
• Discard the coffee pod or coffee grounds, tapping the filter holder
to dislodge them. Make sure you push the filter locking device
against the filter and hold it firmly in place to prevent the filter from
falling out along with the grounds or the coffee pod.
NB : You may find it useful to use a teaspoon.
• Rinse the filter holder under running water.
Put the filter holder back in the extractor head in order to brew your next cup of coffee at the
optimum temperature.
NB : When the appliance is switched on, it is quite normal for the indicator to go on and
off from time to time (temperature control).
Manual or automatic switch-off
• Manual :
Press the on/off switch : all the indicator lights will go out.
• Automatic :
For safety and energy-saving reasons, your Magimix Expresso is fitted with an automatic
switch-off device. It automatically turns itself off two hours after it was last used.
10
Page 11

EXTRA FUNCTIONS
The pipe is used to froth milk for cappuccinos and hot chocolate, as well as to heat liquids. You
can also use it to obtain hot water for making teas, tisanes or infusions.
Steam function
Never use the steam to heat flammable liquids such as strong alcohol.
• Check that there is fresh water in the tank.
• Once you have switched the appliance on and the indicator light has come on, press . The
red light will flash until the required temperature has been reached. When the indicator stays
on, this means that the appliance is ready.
• Place a tall, narrow container (e.g. small jug) holding the liquid you
wish to heat underneath the pipe.
• To obtain steam, turn the function selector to .
• Put the steam pipe in the container.
Make sure that the end of the pipe stays under the surface of the liquid
throughout the operation, but avoid touching the bottom of the
container. Make gentle, circular movements downwards. You can use
the function selector to adjust the production of steam to suit the
container.
• To halt the production of steam, turn the selector back to .
NB : If you want to produce more steam straightaway, simply turn the
selector back to .
If you leave the appliance idle for 6 minutes, it will automatically return to the coffee-brewing
temperature.
NB : If you wish to brew espresso coffee immediately afterwards, press in order to return
to the right temperature more quickly. The indicator light will continue to flash until the
temperature has dropped sufficiently to brew good espresso coffee.
11
Page 12

• To bring down the temperature more rapidly and to rinse the pipe, place an empty container
under the pipe, press and turn the selector to . As soon as water starts to flow continuously
from the pipe, turn the selector back to , then press . Wipe the pipe immediately after use,
with a damp sponge.
Do not touch the pipe, as it can become extremely hot.
Caution, steam can scald.
• Cappuccino recipe p. 19.
Hot water function
• Check that there is fresh water in the tank.
• Once the appliance has been switched on and the indicator light has come on, press . If
the appliance is not yet ready, the indicator light will flash. However, if it is sufficiently hot,
the light will stay on.
• Place a container under the pipe and turn the function selector to . Once you have obtained
the quantity of water you wish, turn the selector in an anti-clockwise direction to to stop the
flow. Press to return to the coffee function.
AFTERCARE
The efficient operation and lifespan of your appliance – as well as the application of the warranty depend on rigorous and regular aftercare.
Before performing any aftercare operation, make sure you have unplugged your appliance
and that it has cooled down.
Cleaning
12
• The body of the coffee maker from time to time, wipe the outside of
the machine with a damp cloth.
• The water tank : once a week, clean with non-abrasive washing-up
liquid.
• The drip tray and grid : once a week, clean with a mild detergent.
• The filter holder and the filters : always rinse them quickly under the
tap after use. From time to time, clean them with a mild detergent.
NB : The drip tray must be emptied regularly.
Page 13

• The pipe : always rinse and wipe clean after use, as described on
p. 12.
• Regularly, or if the pipe becomes blocked, unscrew it in an
anticlockwise direction and clear it with a needle.
• The extractor head : the ground coffee sometimes sticks to the seal
and the grid of the extractor head. Wipe it with a damp sponge.
Do not use alcohol, solvents or aggressive cleaning products.
NB : We advise you not to wash the removable parts in the dishwasher, as this may make them more fragile and cause their colour
to fade.
Descaling
• Limescale is the main cause of malfunction. The first sign of the build-up of scale is a change in
the quality of your coffee. It will also eventually damage your appliance. This is why you must
regularly descale your coffeemaker in order to ensure that it continues to function properly and
without any reduction in its lifespan. The speed at which your appliance is affected will depend
on the hardness of your water.
NB : problems due to failure to descale or descaling that has not been carried out according to
the instructions for use are not covered by the warranty.
How to gauge the hardness of your water ?
• Use the tester supplied with your machine.
• Dip it in cold water for one second, shake off any excess water and compare the result to the
table below.
Measure the hardness of your water
The test shows That your water is…
Very soft
Soft
Average hardness
Hard
Very hard
Descaling method :
We recommend you use a special descaling product for coffee makers (avoid powders which do
no dissolve well).
Never use vinegar.
13
Page 14

Descaling the Expresso model :
How often?
Water Water consumption
Hardness level 100 cups / month 200 cups / month
Very soft or soft Every 6 months Every 3 months
Average hardness or hard Every 4 months Every 2 months
Very hard Every 2 months Once a month
How long? Approx. 30 min..
How? Simply follow these steps
Phase 1 : descaling
1. Check that your appliance is switched off and has cooled down. Fill the tank with water and
then add the descaling product (never the other way round) according to the manufacturer’s
instructions on the packet. Place a fairly wide container (e.g. small bowl) under the extractor
head and the pipe. Remove the filter holder.
2. Switch the coffeemaker on by pressing .
3. Press and allow the mixture to pass through the extractor head for approx. 1 min.. You do
not need to wait for the indicator light to stop flashing.
4. Switch the machine off ( ) and wait for 5 min. to give the descaling product time to work.
5. Repeat steps 2 to 4.
6. Switch the appliance on by pressing . Press and turn the selector to . Allow the
mixture to pass through the pipe for approx. 1 min..
7. Switch the machine off ( ) and wait for 5 min. to give the descaling product time to work.
Turn the selector back to .
Phase 2 : rinsing
1. Rinse the water tank thoroughly and fill it with fresh water. Empty the bowl and put it back on
the grid of the drip tray.
2. Switch the appliance on by pressing .
3. Press and wait until half the water in the tank has passed through the extractor head. Press
again to stop the flow.
4. Press and turn the selector to . Wait for the rest of the water to flow through the pipe.
Turn the selector back to . Press again. Your coffeemaker is now ready to brew coffee
again.
14
Page 15

15
Descaling the Expresso Program & Program Automatic models :
How often? Your coffeemaker automatically warns you when it is time for it to be descaled :
the indicator light comes on.
How long? Approx. 30 min..
How ? Your appliance has an automatic descaling programme that is both simple and
effective. Simply follow these steps.
Phase 1 : descaling
1. Check that your appliance has cooled down and is switched off, then fill the tank with water.
Add the descaling product (never the other way round) according to the manufacturer’s
instructions on the packet. Remove the filter holder. Place a fairly wide container (e.g. small
bowl) under the pipe and the extractor head.
Phase 2 : rinsing
1. Rinse the water tank thoroughly and fill with fresh water. Empty the bowl and put it back on the
grid of the drip tray.
5. Empty completely once again the water tank.
NB : Some descaling products are more aggressive than others. If your coffee has an unpleasant
taste after the descaling program, rinse and fill the water tank with fresh water and flow the water,
half via the pipe and the other half via the filter holder.
NB : Should you make a mistake during this process, you can interrupt the automatic descaling
programme by unplugging your machine. When you plug it back in, the light will continue to
flash until you have carried out the full descaling programme. However, you can still use the
coffeemaking, hot water and steam functions.
Phase Action End of phase
2. Descaling
espresso side
Press for approx. 5 sec on the button :
- for the Expresso Program
- for the Expresso Program Automatic
3. Descaling
the pipe work
Turn
Time (approx.)
9 mn
intermittently
9 mn
intermittently
Indicator light off Flashing indicator light Indicator light on
3. Empty the water tank, and fill again with fresh water.
Phase Action End of phase
4. Rinsing
the espresso side
Turn
Time (approx.)
7 mn
intermittently
Phase Action End of phase
2. Rinsing the
pipe work
Press on the button :
- for the Expresso Program
- for the Expresso Program Automatic
Time (approx.)
7 mn
intermittently
Page 16

16
Problems
TROUBLESHOOTING
and flash and none of the
functions work
is flashing
is flashing
Your espresso has an unpleasant taste
There is little or no creamy top
The coffee is not hot enough
The cups are not filled equally
You cannot froth the milk
The coffee flows over the sides of the
filter holder
• Turn the selector back to
.
• Descale your appliance. Cf. pp. 13-15.
• Appliance switched off, press 5 sec. on .
Press again
on .
To quit, press on .
• Your ground coffee may be stale or too acidic.
Try a new batch. Always use freshly-ground coffee and
keep it in an airtight container in the fridge.
• Your tap water may contain chloride, which
spoils the taste of coffee. Use filtered water or
bottled spring water.
• Some descaling products are more aggressive than others.
If your coffee has an unpleasant taste after the descaling
program, rinse and fill the water tank with fresh water and
flow the water, half via the pipe and the other half via the
filter holder.
• The ground coffee is stale. Use freshly-ground
coffee and keep it in an airtight container in
the fridge.
• Use coffee with a finer grind. Try another brand
of coffee pod.
• Increase the amount of ground coffee you use
and tamp it down lightly.
• Wait until the indicator light stops flashing and stays on
(right temperature) before brewing your coffee.
• Preheat the cups and filter holder before brewing your cof-
fee. Cf. p. 2.
• The ground coffee has not been evenly spread in the filter.
Tamp it down to make it more homogeneous.
• Clean the filter holder.
• The pipe is blocked or clogged with limescale.
Cf. pp. 13-15.
• Use a tall, narrow container (e.g. small jug),
preferably metal.
• Use cold whole milk.
• Reduce the amount of ground coffee you use and tighten the
filter holder.
• The coffee pod has not been correctly positioned.
• Clean the extractor head and the rim of the filter before
inserting the filter holder.
Solutions
Page 17

17
Problems
There is water around the base of the
appliance
The espresso either flows too
slowly or not at all
There are coffee grounds
in the cup
The pump is abnormally noisy
The pipe leaks
The appliance is not working at all
• Empty the drip tray regularly.
• There is too much coffee.
• Choose a coarser grind of coffee and do not
tamp it down too much.
• Descale your appliance. Cf. pp. 13-15.
• The filter is blocked :
- filter with screw : unscrew it, clean it, finally screw it back
again to the maximum
- filter without screw : clean it or change it
• Wipe the grid of the extractor head with a
damp sponge. Cf. p. 13.
• Rinse the filter holder under running water.
• Fill your water tank.
• Turn the selector right round to .
• Check the connections.
• The pump was made to function without any water and the
safety system has been triggered. Wait
30 min. before switching your coffeemaker back on.
Solutions
If you cannot identify the cause of your problem, consult your retailer or contact our customer care
department, which will give you the address of a Magimix-approved after-sales service.
You must never attempt to dismantle your appliance.
Page 18

RECIPES
Different types of espresso coffee
The Espresso
Brewing a perfect espresso is quite an art, but also a real pleasure
for all the senses. Its colour, midway between russet and hazelnut, is
extremely appetizing, while its creamy, golden top invites us to
plunge our lips into the heart of the coffee and revel in its full flavour
and richness. An espresso represents roughly 4-5 cl of black coffee
served in a 6-cl cup.
The Ristretto
This is an espresso served in a 6-cl cup, but which has a volume of 2.5 cl at the most. The Ristretto
is strong, as it is made with the same quantity of ground coffee but only half the quantity of water.
The Macchiato
Macchiato, which means “spotted” in Italian, is an espresso with just a dash of frothed milk. It has
a far stronger and more flavoursome taste than Cappuccino.
Make a cup of espresso, then froth the milk (cf. p. 11) and add a teaspoonful of milk to the
coffee.
The Corretto
Make a cup of espresso and lace it with a tablespoonful of alcohol or liqueur. In Northern Italy,
grappa is used instead.
The Romano
This is an espresso served with a zest of lemon. The “cafezinho”, the
Brazilian equivalent of the espresso, is also often accompanied with
lemon.
18
Page 19

The Cappuccino
The famous drink associating espresso coffee with frothy milk.
Serves 2
• 2 cups hot, strong espresso coffee
• 15-25 cl cold whole milk
• Cocoa powder
Brew 2 cups of espresso in two cappuccino cups (10-15 cl.).
Froth the milk using the pipe (Cf. p. 11), then gently pour 2
tablespoonfuls of frothy milk on top of the coffee.
Dust with cocoa powder.
Coffees of the world
Irish Coffee*
Serves 2
• 4 cups hot espresso coffee
• 5 cl Irish whiskey
• 2 teaspoons sugar
• 3 teaspoons double cream
Heat the whiskey and sugar over a low heat. Divide the coffee between 2 glasses. Add the
whiskey. Lastly, pour the cream gently onto the coffee, over the back of a tablespoon, so that it
does not mix with the coffee.
Caribbean Coffee*
Serves 4
• 45 cl cold espresso coffee
• 5 cl Tequila or white rum
• 5 cl Malibu
• 10 cl coconut milk
1
•
/2teaspoon vanilla essence
• Crushed ice
• Whipped cream
Blend all the ingredients in a food processor except for the cream. Serve in
glasses and add a tablespoonful of whipped cream to each.
Decorate with toasted shavings of coconut.
* Excessive alcohol consumption damages your health.
19
Page 20

Mexican coffee
Serves 4
• 50 cl hot espresso coffee
• 10 cl single cream
• 2 tablespoons melted chocolate
• 2 tablespoons sugar
• Nutmeg, cinnamon
Whip the cream with the melted chocolate, sugar, pinch of cinnamon and pinch of nutmeg.
Pour the hot coffee into the mixture and stir. Divide between 4 glasses and top with a spoonful of
whipped cream (optional).
Norman coffee
Serves 4
• 50 cl espresso coffee
• 50 cl apple juice
• 2 tablespoons brown sugar, according to taste
• 3 finely-sliced oranges
• 2 small sticks cinnamon
• 1 pinch ground mixed spice
• 1 pinch ground cloves
• 4 extra cinnamon sticks for decoration
Place all the ingredients in a pan and bring to the boil over a moderate heat, reduce the heat and
allow to simmer for 10 min..
Strain the liquid into a preheated jug, then serve in cappuccino cups, decorated with a cinnamon
stick (optional).
20
Page 21

SAFETY INSTRUCTIONS
• Make sure that the voltage of your mains supply corresponds to
that shown on the identification plate of your appliance.
• Your appliance must always be plugged into an earthed socket,
using the power cord supplied by the manufacturer. If you use an
extension lead, this must be fitted with an earthed plug.
• Never use the appliance if the power cord has been damaged. In
order to avoid all risk of danger, any damaged cord must be
replaced either by the manufacturer, by a Magimix-approved
after-sales service or by a similarly qualified person.
• Always unplug your appliance before moving or cleaning it or in
the case of an anomaly. Never tug on the power cord to unplug it.
• Never place the appliance or power cord on or next to a very hot
surface. Never allow the cord to dangle over the edge of the
worktop.
• Avoid all contact with any parts of the appliance that are likely to
become extremely hot during use (filter holder head, filter,
steam/hot water pipe).
• Never use the pipe to heat flammable liquids.
• Never use your appliance out of doors.
• Never leave children near the appliance unattended.
• Never immerse the appliance in water.
• Make sure you only put cold water in the tank and never any other
type of liquid.
• Before removing the filter holder, wait 10 to 15 seconds after all
the coffee has gone through.
• This appliance is intended exclusively for use in the home and has
not been designed for professional/commercial use.
21
Page 22

ELECTRICAL INSTRUCTIONS
WARNING : Always replace the fuse cover of the fitted plug, never use the plug with the fuse cover
omitted. If a replacement fuse cover is required, ensure it is the same as the one visible on the pin face
of the plug (i.e. RED or ORANGE).
Fuse covers are available from : BBS Ltd
Po Box 110
Farnham Surrey GU104XL
Phone : 01252 727755
Use a 13 A fuse approved by ASTA to BS1362, marked thus
WARNING : a plug with a bared flexible cord is hazardous if engaged in a live socket. If the
fitted plug has been cut from the power supply cord, it should be destroyed and replaced with a three
pin plug in accordance with the following code : BLUE : neutral
The wire which is coloured BLUE must be connected to the terminal in the plug which is marked with
the letter “N” or coloured BLUE or BLACK.
The wire which is coloured BROWN must be connected to the terminal in the plug which is marked with
the letter “L” or coloured BROWN or RED which is connected to the fuse.
The wire which is coloured GREEN/YELLOW should be connected to the terminal marked with the
letter “E”, or by the earth symbol or coloured GREEN or GREEN/YELLOW.
•
ASA
T
BROWN : live
GREEN/YELLOW : earth
22
Page 23

For any additional information, please contact our Customer Care Department :
UNITED KINGDOM AND REPUBLIC OF IRELAND
19, Bridge Street
Godalming, Surrey GU7 1HY
Te lephone : 01 483 427 411
Fax : 01 483 427 414
We reserve the right to alter at any time without notice the technical specifications of this appliance.
None of the information contained in this document is of a contractual nature. Modifications may be made at any time.
© All rights reserved for all countries by : Magimix.
Page 24

Réf. : 460 115 - 04/2003 - L’expresso • L’expresso Program • L’expresso Program Automatic
 Loading...