

Page 1

RECIPE BOOK
INSTRUCTIONS FOR USE
Le Mini
Page 2

1
The Product 2
Standard accessories 3
Fitting the bowl 4
Fitting the accessories 5
Removing the bowls and accessories 7
Using the citrus press 8
Cleaning 9
How to work the MAGIMIX 10
Fundamental rules 11
Le Mini & Le Mini Plus 14
How to use the bowls: examples 15
How to use the discs: examples 16
Index to recipes 17
How to follow the recipes 20
Before using your appliance 80
ELECTRICAL INSTRUCTIONS
The warning regarding the fitting of a plug is applicable for UK only.
WARNING: Always replace the fuse cover of the fitted plug, never use the plug with the fuse
cover omitted. If a replacement fuse cover is required, ensure it is the same as the one visible
on the pin face of the plug (i.e. RED or ORANGE).
Fuse covers are available from:
BBS Ltd
Po Box 110
Farnham Surrey GU104XL
Phone : 01252 727755
Use a 13A fuse approved by ASTA to BS1362, marked thus
For chromed models only:
WARNING: a plug with a bared flexible cord is hazardous if engaged in a live socket. If the
fitted plug has been cut from the power supply cord, it should be destroyed and replaced with
a three pin plug in accordance with the following code:
BLUE: neutral BROWN: live GREEN/YELLOW: earth
The wire which is coloured BLUE must be connected to the terminal in the plug which is marked
with the letter “N” or coloured BLUE or BLACK.
The wire which is coloured BROWN must be connected to the terminal in the plug which is
marked with the letter “L” or coloured BROWN or RED.
The wire which is coloured GREEN/YELLOW should be connected to the
terminal marked with the letter “E”, or by the earth symbol or coloured
GREEN or GREEN/YELLOW.
T
ASA
•
CONTENTS
Page 3
2
WARNING
BEFORE USING YOUR APPLIANCE
• Please ensure that the voltage indicated on the base of
the machine corresponds with the mains voltage in your
home.
• For Chromed Mini Plus, the machine must always be
connected to an earthed socket.
• Always use the mains cord supplied by the manufacturer.
• If the supply cord is damaged, it must be replaced by the
manufacturer or its service agent or a similarly qualified
person in order to avoid a hazard.
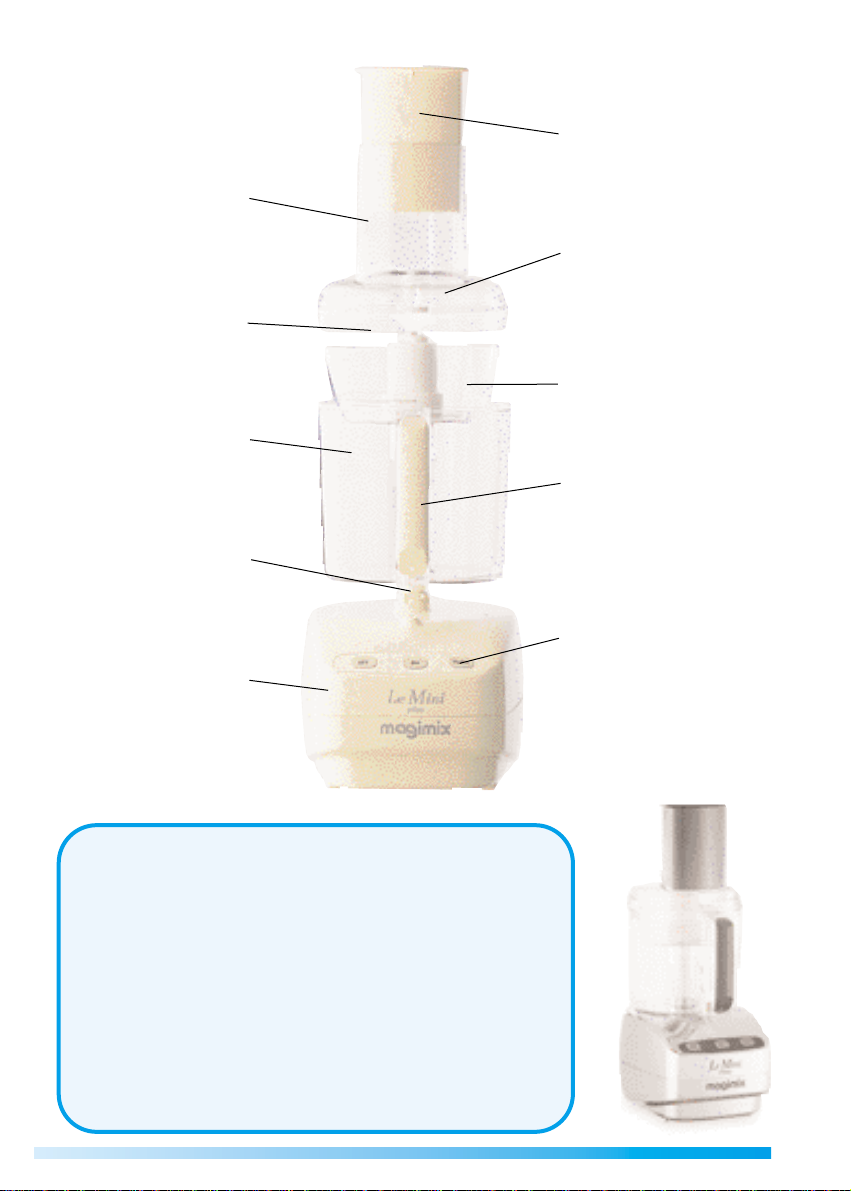
Pusher
Lid
MINI - BOWL
(on the Mini Plus)
Handle
Control panel
Feed tube
Locking mechanism
Bowl
Motor spindle
Motor unit
Page 4
3
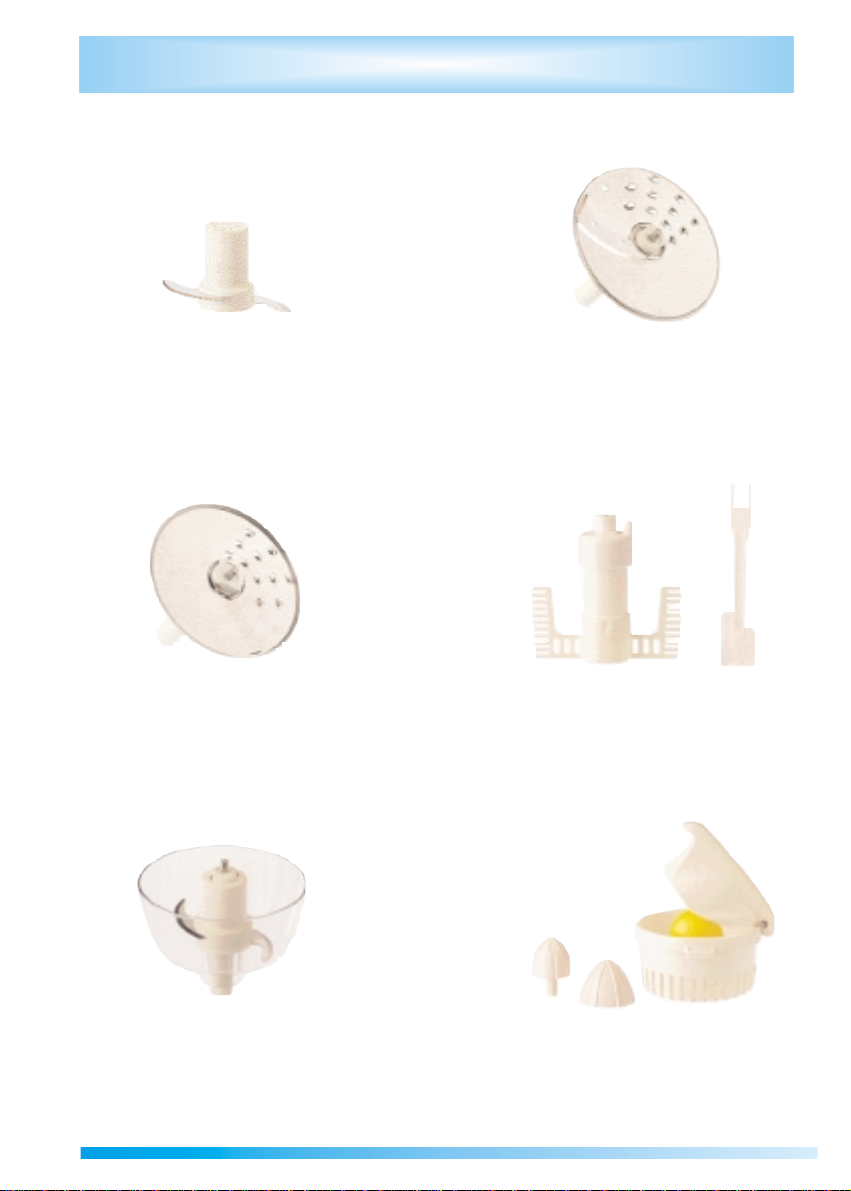
Stainless steel double-
bladed knife.
4 mm grating disc and disc
support.
(optional extra in UK)
Mini-Bowl with stainless steel
double-bladed knife (Mini Plus only)
Egg whisk / Spatula
Citrus press with anti-splash arm
and 2 cones for small and large
fruit (1 cone fits inside the other)
Reversible stainless steel slicing /
grating disc and disc support.
STANDARD ACCESSORIES
Page 5
4
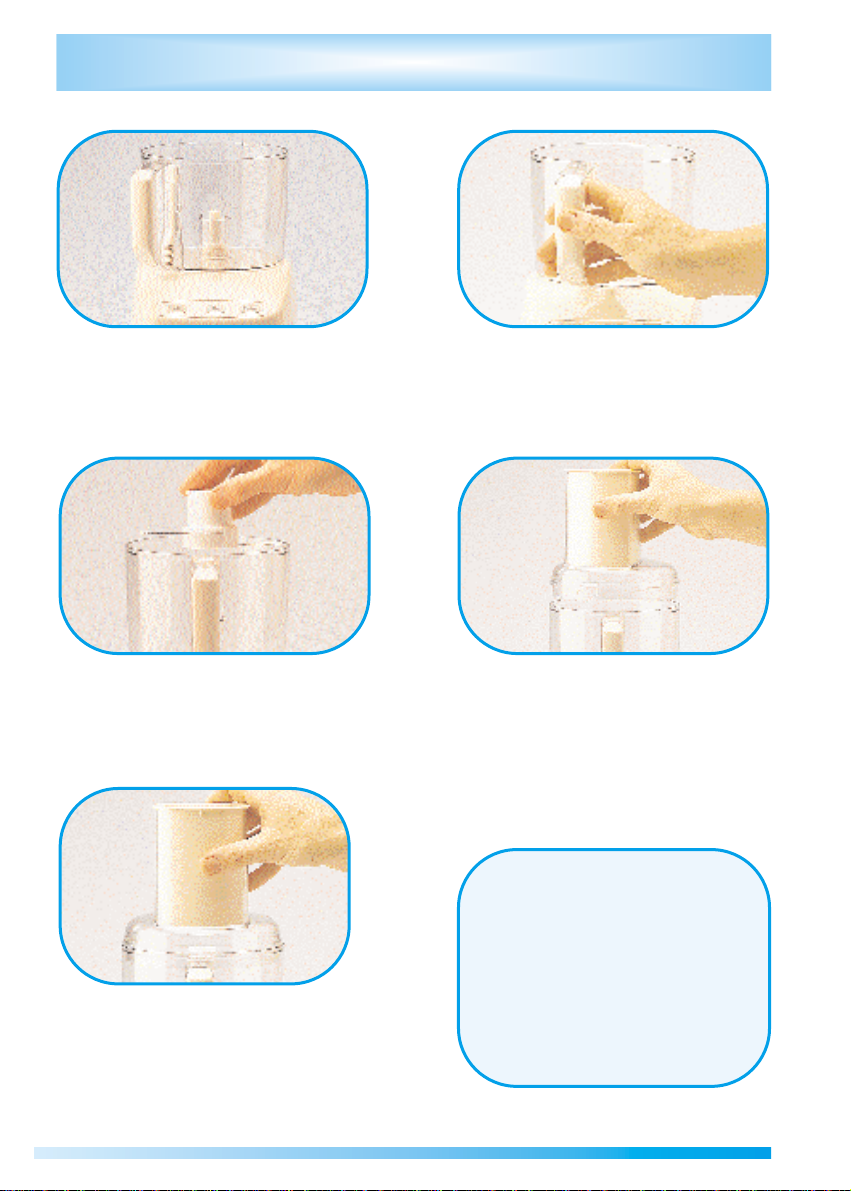
1. Place the bowl on the motor unit with
the handle to the left hand side.
3. Place the chosen accessory in the
bowl (see details on following page)
5. Turn the lid in an anticlockwise direction
until the locking device clicks into position
at the top of the handle.
The safety rod is now depressed and
in contact with the motor.
4. Position the lid, completely flat, by
placing the feed tube to the left of the
handle.
2. Turn the bowl anti-clockwise as far
as it will go making sure it firmly locks
in position. The handle will now be at
the centre of the motor unit.
The Mini is now ready to use.
IMPORTANT
If the lid is not properly locked
into position or if it is opened
during preparation, the appliance
will cease to function, even if the
ON switch has been pressed.
FITTING THE BOWL
Page 6

5
Stainless steel blade
Place the blade directly in the bowl,
over the motor spindle.
Put on the lid and lock into position.
To slice
Place the disc with its slicing edge
uppermost.
Lower the support, fitted with a disc,
onto the motor spindle in the centre of
the bowl. Put the lid on and lock into
position.
To grate
Place the disc with its grating edges
uppermost.
FITTING THE ACCESSORIES
Discs
Place the selected disc on the
support, turning it gently a little
way in an anticlockwise direction.
WARNING
Always handle the highly sharpened stainless steel blade and
discs with care.To mount or
separate the disc and support,
hold the disc at the hole at the
edge of the disc with the cutting edge facing away from
your fingers.
Page 7

6
FITTING THE ACCESSORIES
2.Mini-Bowl (on Mini-Plus model)
Fit over the central spindle inside
the large bowl.
Blade safe storage box
This compact box can hold a maxi-
mum of accessories in a minimum of
space and fits easily into a drawer.
Egg whisk
1. Place the egg whisk directly in the
bowl on the motor spindle.
Put the lid on and lock it into position.
3. The small metal blade also fits onto
the support and locks into place when
rotated slightly to the left/anticlockwise
direction.
4. Place the assembled accessories
on the motor spindle in the
Mini-bowl.
5. Put the lid on completely flat and
engage the locking mechanism at the
top of the handle.
Page 8

7
REMOVING THE BOWLS AND ACCESSORIES
1. Stop the motor and remove the lid
by turning it clockwise.
3.Carefully remove the Mini-blade,
before putting the Mini-bowl down.
5.Next, remove the support by rotating it,
retaining a firm grasp on the disc. The disc
can also be left fixed to the support for
cleaning.
4.Carefully remove the blade, holding
the rim away from the blades.
2 You can then lift out the Mini-Bowl,
keeping the Mini-blade inside.
N.B. : Before removing the blade or the egg whisk, free the bowl, lift it up,
keeping the accessory in the middle, then remove the accessory.
Blade-safe storage box
The accessories are stored horizontally
and kept in place in individual spaces.
Page 9

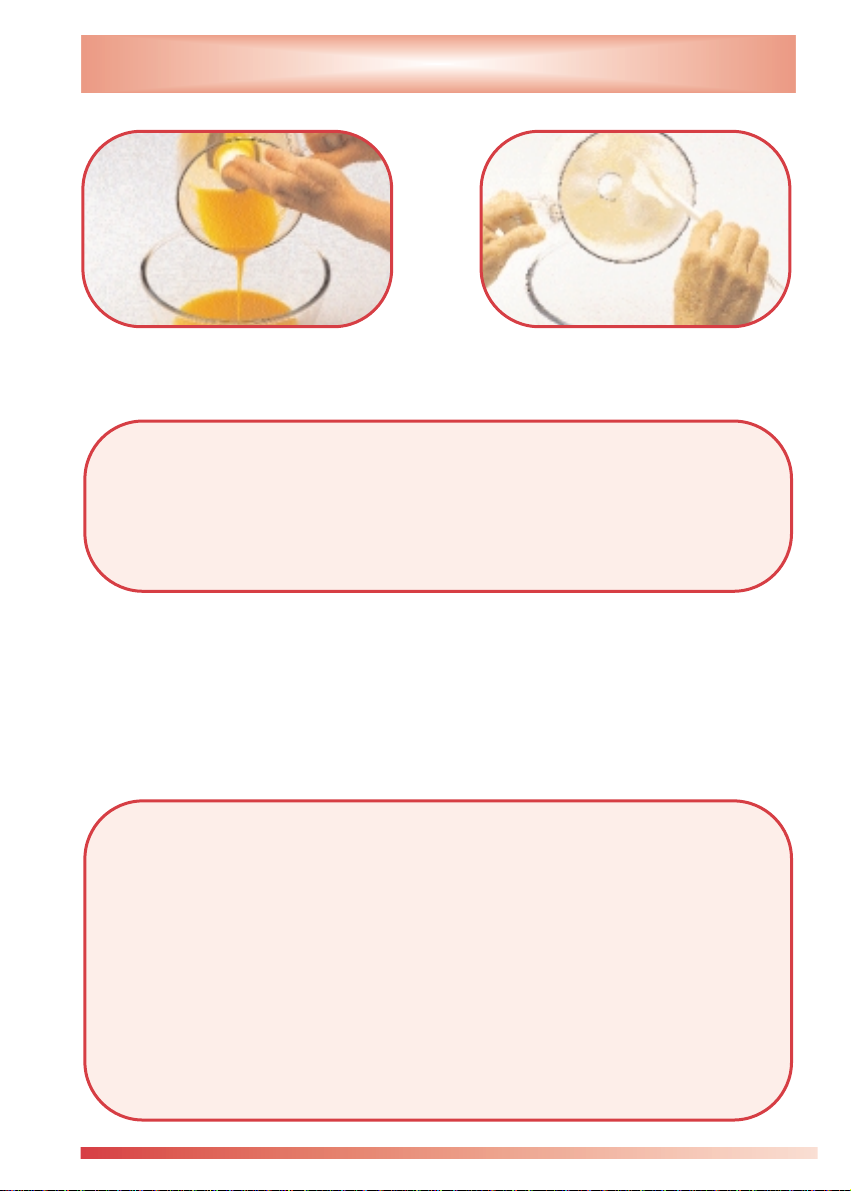
USING THE CITRUS PRESS
5. Switch on the machine and press
down gently on the arm untill all the
juice is extracted.
4. Place the fruit on the cone, pressing
down gently to position it, then lower
the arm.
6. Remove the citrus press by turning
it clockwise before lifting it off.
3. Lower the cone onto the motor
spindle. For lemons, use the small
cone. For oranges and grapefruits, fit
the large cone on top of the small one.
REMOVING THE ARM : RAISE THE ARM, THEN HOLD THE UPPER PART WITH ONE
HAND WHILE THE OTHER HAND PULLS THE BASE OF THE CLIP FREE AT THE BOT-
TOM OF THE BASKET. THE WHOLE ARM CAN THEN BE LIFTED OFF.
8
Citrus press
1. Place the hinged end of the anti-
splash arm on the rim of the filter basket
(to the right of the locking device), then
press firmly on the base of the clip at the
bottom of the basket, to fix it into position.
2. The citrus press fits on top of the bowl
and, like the lid, has a locking pin. Turn
the filter basket anti-clockwise until firmly
locked into position.
Page 10

9
CLEANING
Use a soft sponge with hot water and
washing-up liquid to clean the attach-
ments. If using a dishwasher, select a
short, low temperature programme.
To clean the disc, carefully twist off the
disc support, keeping a firm hold of the
disc.
The blade, spindle and top should
then be re-assembled and stored
together in the storage box.
Clean the citrus press immediately
after use with hot water and washing-
up liquid to prevent drying pulp
sticking to it.
To clean the bases of the stainless
steel blade and the egg whisk, use the
short side of the spatula.
WARNING
Always handle the highly sharpened stainless steel blade and discs with care.
The whole egg whisk comes apart for
easy cleaning.
Page 11

10
HOW TO WORK THE MAGIMIX
ON :
Press this switch for
continuous action. Use
when mincing, cutting
and thoroughly mixing.
Use also for pureeing,
kneading, beating egg
whites, slicing and grating.
OFF :
When the machine is “ on
” press this switch to stop
the motor running.
PULSE :
Press this switch for pulse
action. Keep the switch
pressed ; the motor stops
the moment pressure on
the switch is relaxed. Use
for mincing, cutting,
rough mixing or when you
need perfect control over
the final texture of the
food being processed.
WARNING
• The machine is fitted with a double safety mechanism. If the bowl and lid are not correctly locked into position the machine will not start.
• If you cannot twist the lid to close it it means that the bowl is not in the correct position. Remove the lid and, making sure the bowl is fitted correctly onto the base, turn it
anti-clockwise as far as it will go.
• Never remove the lid without having first pressed the “ off ” switch.
• A temperature control circuit breaker is included in the machine and motor will automatically stop if it has been running for too long or if the bowl is too full.
• If this happens press the “ stop ” switch and leave for 15-30 minutes. As soon as the
motor has cooled to a safe temperature it will operate normally.
WHEN NOT IN USE ALWAYS LEAVE THE LID IN THE UNLOCKED POSITION,
SWITCH OFF THE POWER AT THE MAINS, AND UNPLUG.
OFF
ON
PULSE
Page 12

11
FUNDAMENTAL RULES
Never use a hand to push the food
down the feed tube.
Never attempt to chop bones (even
small ones). The machine is not
intended for this purpose. You will
irretrievably damage your metal blade.
Solids : Never fill the bowl more than
two-thirds full.
Liquids : Never fill the bowl more than
one-third full. We recommend that you
fill it below the top of the central
spindle.
Never leave the pusher in the feed tube
when whisking egg whites as they will
not be properly aerated.
Never put any utensil or object down
the feed tube.
Maxi
Maxi
Page 13

12
FUNDAMENTAL RULES
You can slice and grate in one operation
without emptying the bowl. Simply
reverse the slicing/grating discs.
Never exert too much pressure on the
pusher when using the discs. If you
push too hard, the motor will slow down
then stop. If this happens, press on the
"Off" switch and wait a moment before
switching the appliance back on.
For small quantities you can in one
operation slice, grate and make a
vinaigrette or mayonnaise without
emptying your bowl. Simply position
the Mini-Bowl above the vegetables in
the main bowl. (NB: Mini Plus only)
The bowls have been designed to
withstand hot liquids.
The lid must be released before trying
to remove the bowl. If you can not
release the bowl it is because you have
not first released the lid.
When using the main bowl or the Mini-
Bowl you can add either liquids or
other ingredients through the feed tube.
Page 14
13
FUNDAMENTAL RULES
Hold the blade when tipping out the
contents of the bowl.
To wash the bowl, the lid and the Mini-Bowl, we recommend that you
use a soft sponge with hot water and washing-up liquid, as the detergents used in dishwashers are highly corrosive. It is normal that these
items will become marked and possibly opaque with frequent use.
The bowls, lid and blades are subject to wear and tear. All accessories
are available for purchase and can be replaced.
Never immerse the motor unit in water or place it in a dishwasher.
Clean it with a damp sponge or, in the case of the chrome version,
with windowcleaning fluid.
WARNING
• The "smooth" edge of the mini-bowl blade may become blunt if it frequently
comes into contact with certain herbs and hard foodstuffs such as hazelnuts.
• If this happens, simply sharpen this edge with a stone.
• Never sharpen the serrated edge of the large blade.
Use the spatula to scrape out the bot-
tom and the sides of the bowl.
IMPORTANT
 Loading...