

Page 1
Instructions for use
Important safeguards 2
Description 4
Control panel 5
Fitting the bowls 6
Removing the bowls 7
Standard accessories 8
Using the metal blade 9
Using the dough blade 10
Using the egg whisk 11
Using the grating/slicing discs 12
Optional accessories 14
Using the citrus press 15
Using the juicer 16
Using the optional discs 17
Using the extra large feed tube (XL models only) 18
Cleaning 19
Maximum processing capacities 20
Tips 20
Vitamines and mineral salts 22
Safety instructions 23
Recipes
How to read the recipes 24
The essentials 25
Hors-d’œuvres 37
Breadmaking 43
Soups 51
Appetizers 59
Vegetables 71
Seafood 81
Meat 91
Desserts 99
For the discerning baby 117
Non-alcoholic cocktails 121
Glossary 124
Recipe index 125
PLEASE READ THE SAFETY INSTRUCTIONS (P.2-3 AND 23) THROUGH
!
CAREFULLY BEFORE USING YOUR APPLIANCE.
Page 2

!
IMPORTANT SAFEGUARDS
When using electrical appliances, basic safety precautions should always be followed
including the following:
1. Read all instructions.
2. To protect against risk of electrical shock do not put the food processor in water
or other liquid.
3. Close supervision is necessary when any appliance is used by or near children.
4. Unplug from outlet when not in use, before putting on or taking off parts, and
before cleaning.
5. Avoid contacting moving parts.
6. Do not operate any appliance with a damaged cord or plug or after the
appliances malfunctions, or is dropped or damaged in any manner. Return
appliance to the nearest Authorized Service Facility for examination, repair or
electrical or mechanical adjustment.
7. The use of attachments not recommended or sold by the manufacturer may
cause fire, electric shock or injury.
8. Do not use outdoors.
9. Do not let cord hang over edge of table or counter or touch hot surfaces.
10. Keep hands and utensils away from moving blades or discs while processing
food to reduce the risk of severe injury to persons or damage the food processor.
A scraper may be used but must be used only when the food processor is not
running.
11. Blades are sharp. Handle carefully.
12. To reduce the risk of injury, never place cutting blade or discs on base without
first putting bowl properly in place.
13. Be certain cover is securely locked in place before operating appliance.
14. Never feed food by hand. Always use food pusher.
15. Do not attempt to defeat the cover interlock mechanism.
16. This product is designed for household use only.
17. Do not use the appliance if the rotating sieve is damaged.
18. Sharp blade - Always use food pusher.
19. Moving Parts - Keep fingers out of feed and discharge openings.
20. Unplug before cleaning and before assembling or removing parts.
21. Sharp Blade - Never use slicer unless completely assembled.
22. Do not place on or near a hot gas or electric burner or in a heated oven.
2
Page 3

IMPORTANT SAFEGUARDS
23. Always attach plug to appliance and check that the control is OFF before
plugging cord into wall outlet. To disconnect, turn the control to OFF, then
remove plug from wall outlet.
24. Do not use appliance for other than intented use.
25. Never add to container while appliance is operating.
26. Always make sure juicer is clamped securely in place before motor is turned
ON. Do not unfasten clamps while juicer is in operation.
27. Be sure to turn switch to OFF position after each use of your juicer. Make sure
the motor stops completely before disassembling.
28. Do not put your fingers or other objects into the juicer opening while it is in
operation. If food becomes lodged in opening, use food pusher or another
piece of fruit or vegetable to push it down. When this method is not possible,
turn the motor OFF and dissasemble the juicer to remove the remaining food.
!
SAVE THESE INSTRUCTIONS
ELECTRICAL REQUIREMENTS
FOR USA AND CANADA ONLY
For chrome plated models only: To reduce the risk of electric shock, this equipment
has a grounding type plug, with a third (grounding) pin. This plug will only fit into a
grounded outlet. If the plug do es not fit int o the ou tlet, contact a
qualified electrician to install the proper outlet. Do not change the plug in any way.
CAUTION : To ensure continued protection against risk of electric shock connect to
properly earthed outlets only
For all other models: To reduce the risk of electric shock, this equipment has a
polarized plug (one blade is wider than the other). This plug will fit in a polarized
outlet only in one way. If the plug does not fit fully in the outlet, reverse the plug. Do
not change the plug in any way. If it still does not fit, contact a qualified electrician.
The electrical rating listed on the unit is based on the attachment that draws the
greatest load.
Other attachments might draw significantly less power or current.
3
Page 4
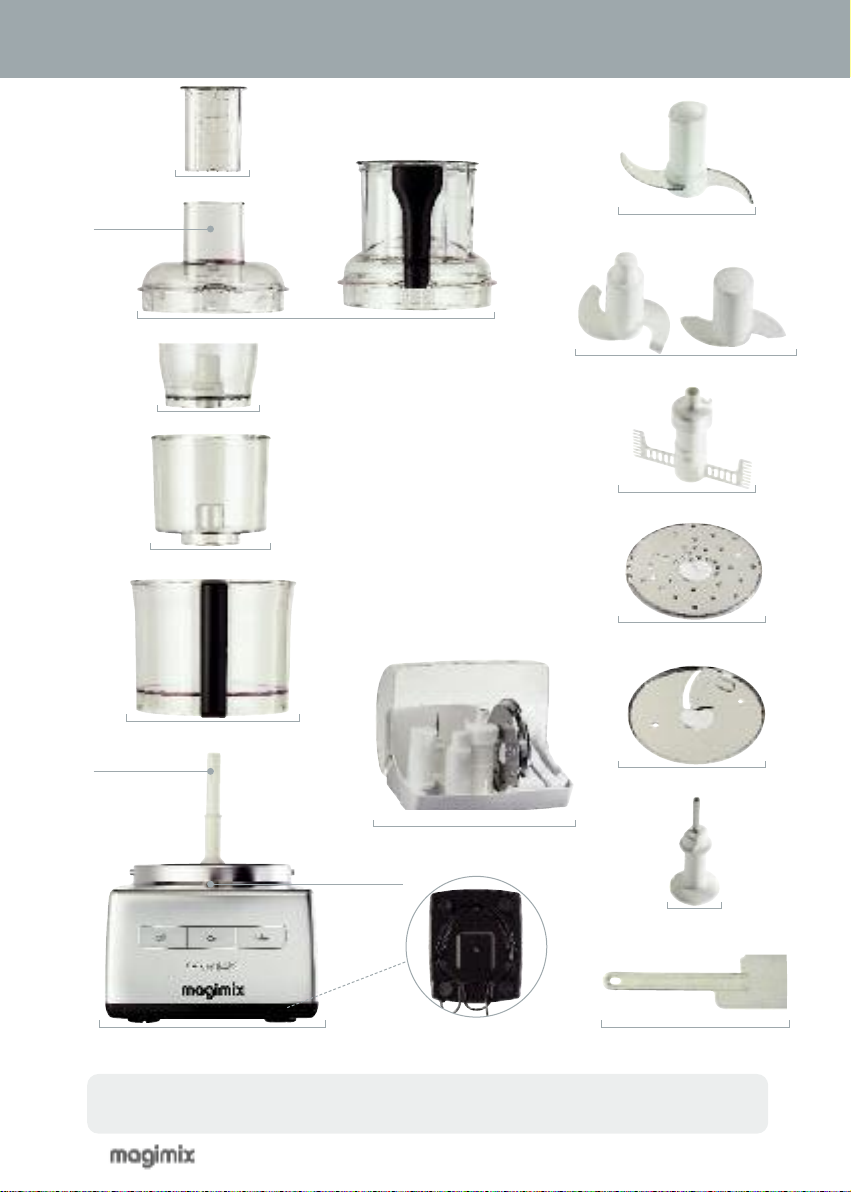
DESCRIPTION
Feed tube
Graduated pusher
Mini Bowl
Midi Bowl
Main Bowl
or
*
Metal blade
or
Lid
Dough blade
Egg whisk
Grating disc
Motor shaft
Storage box
Safety
mechanism
Motor unit
* Only on the XL models.
*
(1) For greater stability, thread the power cord through the special notches on the
underside of the motor unit.
4
(1)
Slicing disc
Extension
Spatula
Page 5

CONTROL PANEL
OFF: press this button to switch the machine off.
ON: press this button to process in continuous mode and achieve an even texture.
Ideal for chopping, processing and blending finely, as well as for kneading, beating
egg whites, slicing and grating.
PULSE: press this button for intermittent processing. The machine automatically
switches itself off as soon as you release this button, giving you complete control of
the task from start to finish. Ideal for rough chopping or processing.
For preparations such as soups and purées, start by pressing the pulse button, then
switch to continuous mode.
This way, you will achieve a smoother consistency.
Always press the “Off” button before releasing the lid.
!
The appliance is fitted with a failsafe which will automatically switch the
motor off if it starts to overheat due to prolonged use or overloading.
Press the “Off” button and wait for the appliance to cool completely
before switching it on again.
5
Page 6
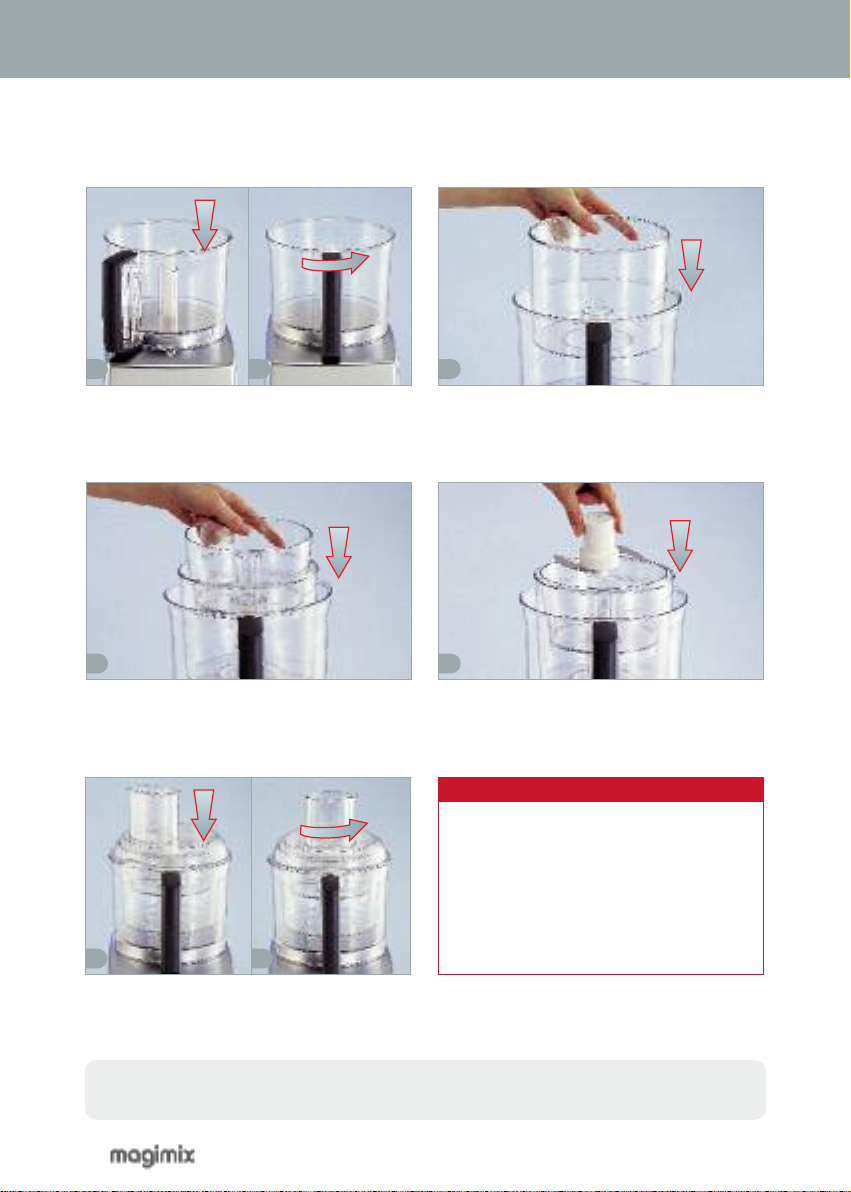
FITTING THE BOWLS
Before using your appliance for the first time, wash all the parts thoroughly
(except the motor unit).
1
Place the bowl on top of the motor unit and
turn to the right to lock it into position.
4
Slide the Mini Bowl onto the motor shaft. Fit the Mini Bowl metal blade onto the motor
6 7
Place the lid on top of the bowl and turn
until it locks into position.
2 3
Slide the Midi Bowl onto the motor shaft,
inside the Main Bowl.
5
shaft.
W A R N I N G
• Double failsafe: the machine will only
work if both the bowl and the lid are
correctly locked into position.
• Do not leave the lid in the locked
position when the appliance is not in
use.
For the C 3150 and CS 4150/5150, the bowl's locking device is located at the side of
the appliance and not at the front.
6
Page 7
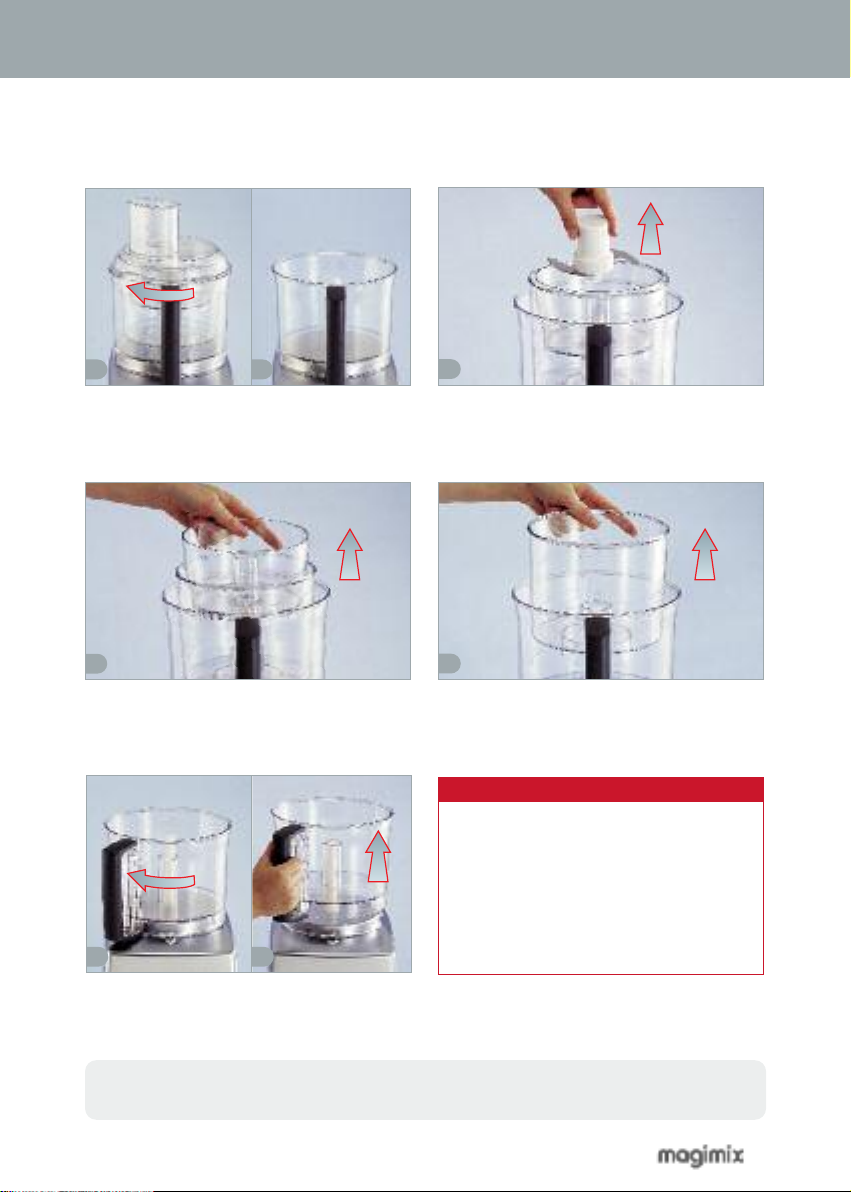
REMOVING THE BOWLS
1 2
Unlock the bowl lid and lift it off. Remove the blade from the Mini Bowl.
4
Remove the Mini Bowl.
6 7
Turn the bowl to the left to unlock it. You can
now remove it.
3
5
Remove the Midi Bowl, holding it by its
sides to lift it out.
W A R N I N G
• Always handle the discs and blades
with caution, as they are extremely
sharp.
• Always press the “Off” button before
unlocking the lid. If the bowl does not
move, check that the lid has been
properly unlocked.
For the C 3150 and CS 4150/5150, the bowl's release device is located at the side of
the appliance and not at the front.
7
Page 8
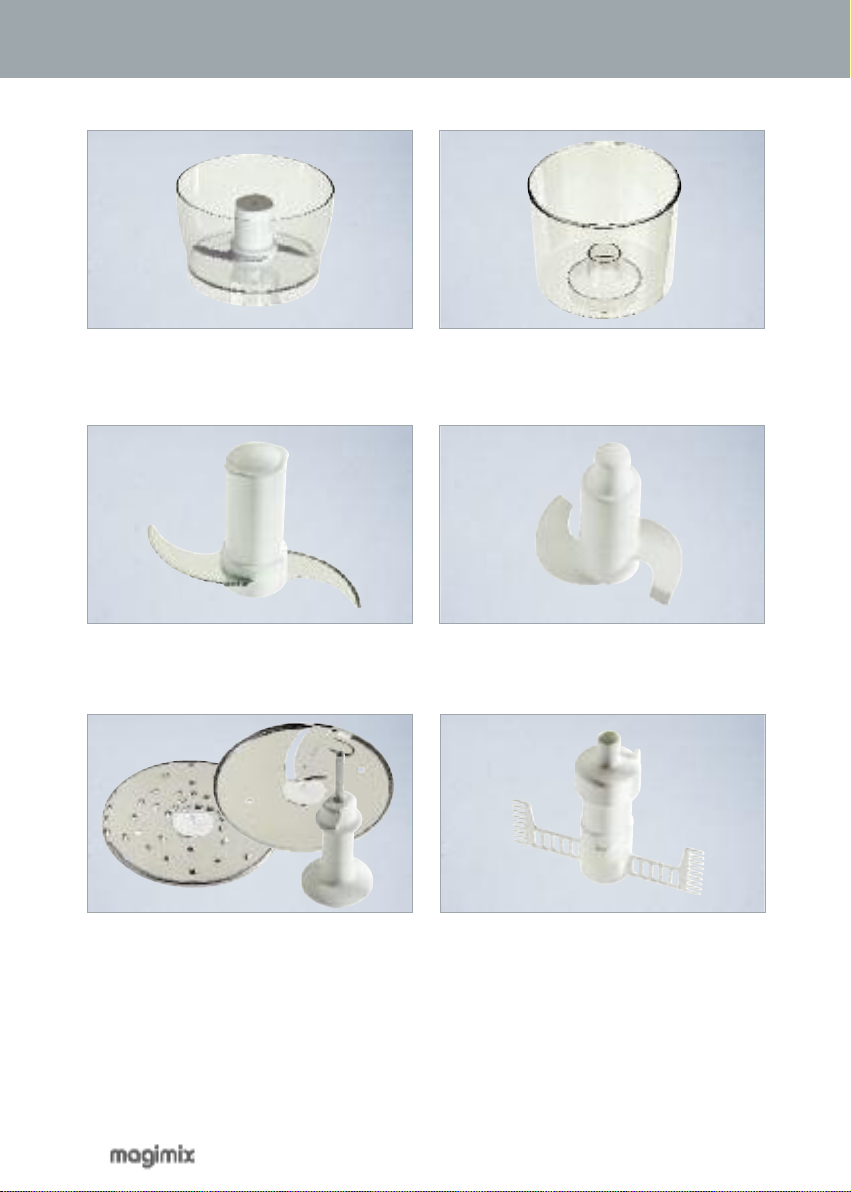
STANDARD ACCESSORIES
Mini Bowl fitted with a metal blade
for chopping, processing and blending
small quantities or baby food.
Metal blade: used in the Main Bowl for
chopping, processing, blending and
grinding.
Midi Bowl: both practical and easy to
clean. Specially designed for grating or
slicing cheese, fruit and vegetables.
Dough blade: used in the
kneading leavened and unleavened dough.
NB: the Compact model’s dough blade does not
have a cap.
Main Bowl
for
Discs: used in either the Midi or the Main
Bowl. At least 2 discs* for slicing and
grating cheese, fruit and vegetables in
different thicknesses (2 and 4 mm).
*according to model
8
Egg whisk: used in the Main Bowl to whip
cream or beat egg whites for meringues,
mousses and soufflés.
Page 9

USING THE METAL BLADE
1 2 3
Fit the metal blade onto the motor shaft. It
needs to be at the bottom of the bowl.
Place the ingredients in the bowl. Put the
lid on and turn until it locks into position.
Chopping meat, fish and herbs in either
pulse or continuous mode.
Blending cake mixes, milkshakes and
cocktails... Process in continuous mode for
1-4 minutes.
Caution! The metal blade is extremely sharp. Always hold it by the
!
Liquefying soups, purées and pancake
batter... Process in continuous mode for 1-4
minutes.
Grinding chocolate, making icing, crushing
ice and blending sauces in continuous
mode.
central hub.
Hold the metal blade in place when pouring out the contents of the bowl.
9
Page 10
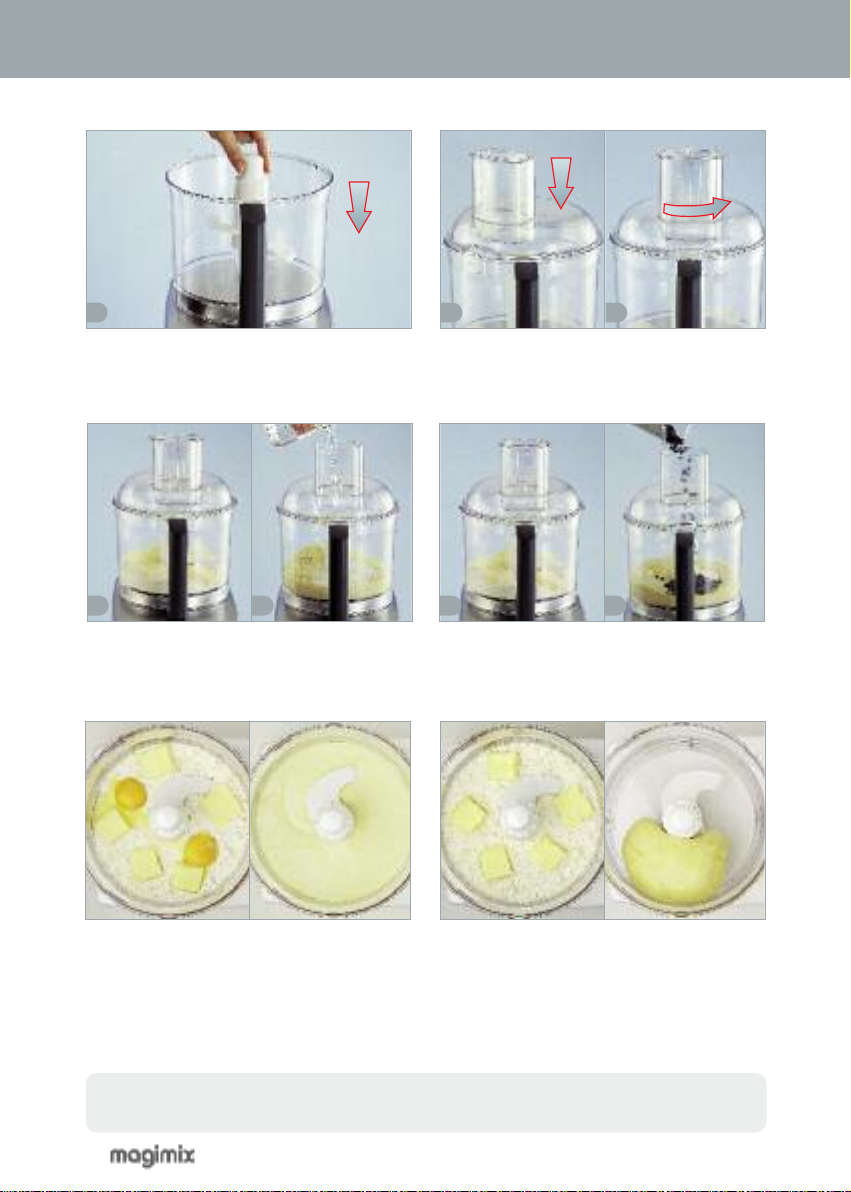
USING THE DOUGH BLADE
1 2 3
Fit the dough blade onto the motor shaft. It
needs to be at the bottom of the Main
Bowl.
Put the lid on and turn until it locks into
position.
4 5
Recommendations: put the solid ingredients
in the bowl first. Switch the machine on
and add the liquid ingredients via the feed
tube.
Kneading leavened dough for bread,
brioche, etc.
Never exceed the quantities recommended on p. 20.
Use the spatula to push the flour back down into the dough if necessary.
10
6 7
You can also use the dough blade to stir in
chocolate chips, dried fruit, etc.
Kneading unleavened dough for shortcrust
pastry, rich shortcrust pastry, etc.
Page 11

USING THE EGG WHISK
1
The egg whisk is composed of 3 sections,
so make sure they are properly assembled.
Check that the metal shaft is correctly
inserted.
2 3
Put the lid on, and turn until it locks into
position.
Fit the egg whisk onto the motor shaft.
It needs to be at the bottom of the bowl.
Remove the pusher from the feed tube
before beating egg whites, otherwise they
will not increase in volume.
Stiffly beaten egg whites: put the egg
whites in the bowl. Add a pinch of salt and
remove the pusher. Whisk continuously for
at least 5-10 minutes.
Featuring an exclusive Magimix design, the whisk beats the egg whites more gradually,
making them stiffer and giving them greater volume.
Whipped cream: an hour beforehand,
place all the ingredients in the fridge. Pour
the whipping cream into the bowl. Remove
the pusher. Whisk continuously for 8-10
minutes.
11
Page 12

USING THE GRATING/SLICING DISCS
We recommend that you use the discs in the Midi Bowl.
1 2
Slide the extension over the motor shaft.
R
/
G
4
3 4
Place the chosen disc with the relevant
reference facing upwards.
R
/
G
4
E
/
S
2
Slicing/grating disc: each side is engraved
with a reference code, e.g. R/G4 = 4-mm
grater, E/S 2 = 2-mm slicer.
Slide the disc onto the extension. Turn it so
that it slots on properly. This is a two-stage
process.
W A R N I N G
• Always handle the discs with care, as
the blades are extremely sharp.
• Never insert your fingers or a foreign
object into the feed tube. Always use
the pusher designed for that purpose.
For non-reversible discs, make sure you
place the disc right side up.
12
Page 13

USING THE GRATING/SLICING DISCS
Grating: for longer shreds, lay the fruit
and vegetables horizontally in the feed
tube.
Slicing: Place long fruit and vegetables
(e.g. leeks and carrots) upright in the feed
tube.
Fill the feed tube with upright pieces of
gruyere cheese.
If necessary, cut round fruit and vegetables
(e.g. tomatoes and apples) in half.
Cabbage: after removing the hard central
ribs, roll several leaves together, one inside
the other.
Do not be surprised to find small quantities of fruit and vegetables (stubs) on the discs.
This is quite normal.
Peppers: cut off both ends, make a cut from
top to bottom and roll the pepper into a
Swiss roll shape.
13
Page 14
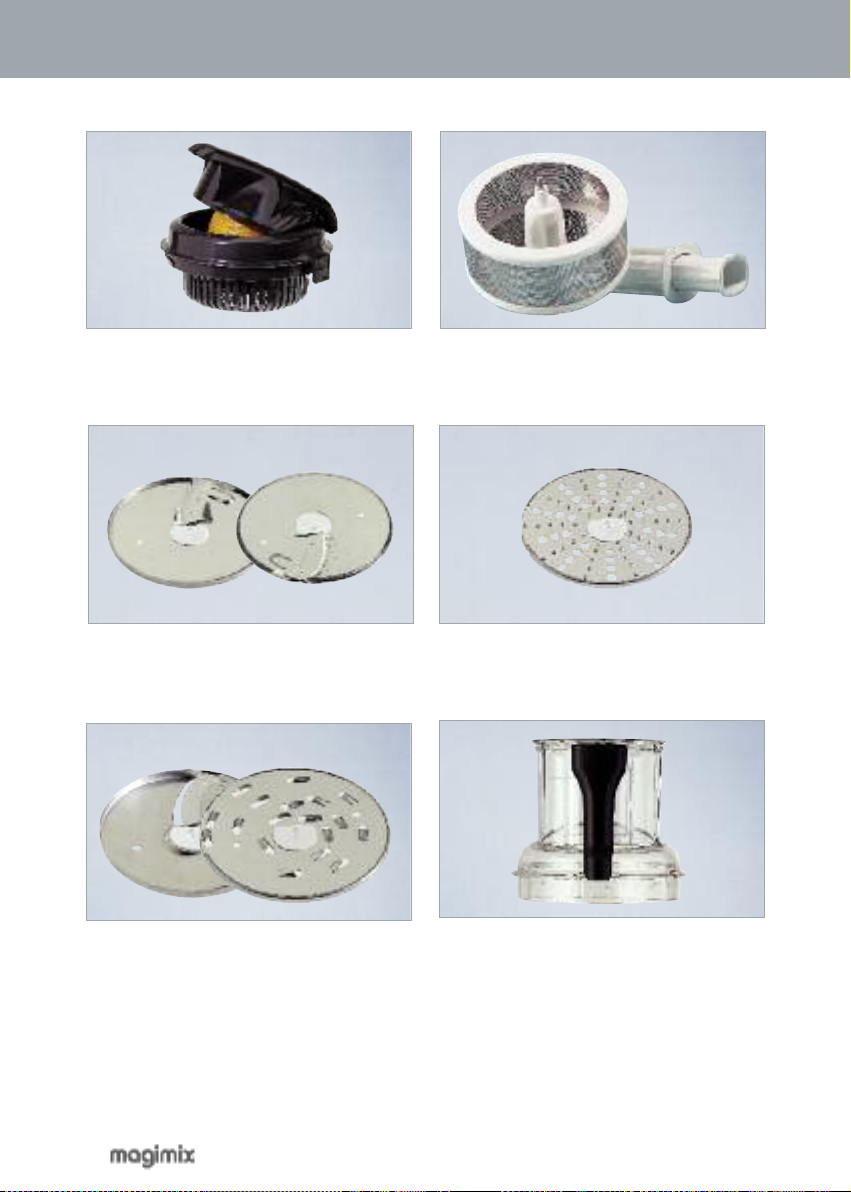
OPTIONAL ACCESSORIES
The list of accessories supplied with the appliance will vary from one model to another.
Citrus press with lever arm and 2 cones:
almost instant juice with no seeds and just
the right amount of pulp.
French fries/veggie stick disc: for cutting
French fries and fruit and vegetable sticks.
Shredding disc: ideal for shredding fruit
and vegetables.
Juicer made from stainless steel: can extract
a clear juice from most types of fruit and
vegetables.
Parmesan/chocolate grater: perfect for grating parmesan and plain chocolate.
6-mm slicer: for thicker slices of fruit
and vegetables.
6-mm grater: for grating fruit and
vegetables more thickly.
14
Extra large feed tube: for slicing or grating
fruit and vegetables (either left whole or cut
into large chunks) to professional standards.
Page 15

USING THE CITRUS PRESS
1
Fit the citrus press basket onto the bowl and
turn until it locks into position.
5 6
Slide the cone onto the motor shaft. Place
the lever arm opposite the locking system
and clip the tab onto the bottom of the
bowl.
3 42
Select the cone according to the size of
your citrus fruit. The large cone should
always be slotted onto the small one.
Place the fruit on top of the cone and press
down gently.
Excess pressure is unnecessary and may
cause damage
7 8
Lower the arm, switch the machine on and
exert a gentle pressure on the arm until all
the juice has been extracted.
In the case of grapefruit, gently release the pressure from time to time in order to
extract as much juice as possible.
Switch the machine off before raising the
arm, to avoid any splashing.
15
Page 16

USING THE JUICER
These instructions do not apply to the extra large feed tube (XL models).
1
Slide the juicer basket onto the motor shaft.
3 4
Place the lid on the bowl and turn until it
locks into position.
5 6
Insert the fruit or vegetables a few chunks
at a time, helping them down with the
pusher. When they have all gone through,
switch the processor off.
2
Insert the pusher into the feed tube as
shown. Check that the tabs are completely
locked to the feed tube.
Wash the fruit and vegetables and cut into
chunks. There is no need to peel them if
they have thin skin, or to remove the seeds.
You can juice any number of fruit and
vegetables, ranging from apples, peaches
and pineapple to beets, carrots, celery and
cucumber.
Never insert your fingers or a foreign object into the feed tube. Always use the
!
pusher designed for that purpose.
Wait until the juicer basket has stopped turning before you open the lid. Do not
use the juicer if the sieve has been damaged.
16
Page 17

USING THE OPTIONAL DISCS
To learn how to fit the discs, read the instructions on p.12.
1 2
French fries/veggies stick disc: to make
French fries, arrange the potatoes
horizontally in the feed tube.
To make fruit or vegetable sticks, lay them
horizontally in the feed tube.
Shredding disc: for finely shredded
vegetables, lay them horizontally in the
feed tube.
6-mm slicing disc: stand the fruit and vegetables vertically in the feed tube, either
whole or sliced lengthways.
Parmesan/chocolate grater: to grate
chocolate or parmesan cheese, stand the
pieces vertically in the feed tube.
6-mm grating disc: lay the fruit and
vegetables horizontally in the feed tube.
17
Page 18

USING THE EXTRA LARGE FEED TUBE
1
Place the lid on the bowl and turn until it
locks into position.
2
a narrower opening for liquids and small
solid ingredients.
The feed tube has two openings: an extra
large opening for grating and slicing fruit
and vegetables, either left whole or cut into
large chunks, to professional standards and,
The lid features a safety system which
permits the machine to work only if the
large pusher is properly engaged.
MAX
French fries/veggie stick disc: for making
French fries or cutting extra-long fruit and
vegetable sticks.
Caution: always handle the discs with care, as they are extremely sharp.
!
Do not pack the ingredients into the feed tube too tightly, as the pusher may
Slicing/grating disc: for grating or slicing
fruit and vegetables, either left whole or cut
into large chunks.
jam.
Do not be surprised to find small quantities of fruit and vegetable (stubs) on
the discs. This is entirely normal.
18
Page 19

Always unplug your appliance before cleaning it.
1 2
Always clean it immediately after use
(water + liquid detergent).
3 4
Juicer basket: insert the thin end of the
spatula into the basket and scrape it to
remove most of the pulp.
Accessories: use a bottle brush to clean out
the base of the accessories.
Dough blade: take off the removable cap*
for a more thorough cleaning.
Motor unit: wipe with a soft, damp cloth.
CLEANING
You must follow certain rules to avoid seriously damaging the removable parts:
• Dishwasher: select the minimum temperature (below 100°F) and avoid the drying
cycle (generally above 140°F)
• Washing by hand: do not leave the parts to soak in detergent for too long. Avoid
abrasive products (e.g. Brillo‚ pads).
• Detergents: read the instructions for use to check their compatibility with plastic items.
The blades may become blunt if they come into frequent contact with certain foodstuffs
(parsley, hazelnuts, etc.). You can sharpen them with a sharpening steel.
Some foodstuffs such as carrots tend to stain plastic. Rubbing with a piece of paper towel
and a little vegetable oil will remove most of the staining.
* NB: the Compact model’s dough blade does not have a cap.
Caution: always handle the blades and discs with care, as they are
!
extremely sharp.
Never immerse the motor unit in water.
19
Page 20

MAXIMUM PROCESSING CAPACITIES
C 3150 / 3200 CS 4150 / 4200 CS 5150 / 5200
Bread 1
1
/
lb 2 lb 2
3
Shortcrust pastry 2 lb 3 lb 3
Brioche 1 lb 1
3
/
lb 2
4
3
/
lb
4
3
/
lb
4
1
/
lb
2
Chopped meat 1 lb 2 lb 3 lb
Grated /
sliced foods
Soups 1 Quart 1
3
/
1
lb 2 lb 3 lb
4
1
/
Quarts 2 Quarts
3
Beaten egg whites 2 - 5 3 - 6 3 - 8
Capacities only for the Main Bowl.
TIPS
• In the case of liquids, never fill the bowl more than1/3full. In the case of solids, never fill
the bowl more than
• To make optimum use of your food processor and reduce cleaning to a minimum, use the
Mini Bowl first, then the Midi and finally the Main Bowl. Process hard or dry ingredients first
and liquid preparations last.
• Use the Pulse function to maintain complete control over the final result. You can also use it
for rough chopping or processing.
• Use the spatula to scrape the sides and bottom of the bowl.
• If your processor starts to vibrate, carefully clean and dry the feet.
• To achieve the very best results when chopping, grating or slicing soft foodstuffs (meat, fish,
soft cheese, etc.), put them in the freezer for a few minutes first. They should be firm but not
frozen !
2
/3full.
• Mini Bowl
The Mini Bowl is ideal for baby food, and it can double as a storage container
once you have removed the metal blade.
• Midi Bowl
The Midi Bowl is perfect for grating and slicing cheese, fruit and vegetables.
• Metal blade
When handling large quantities, cut the meat, vegetables, etc. into 1-inch cube.
For soups, sauces, pancake batter, etc., start by combining the solid ingredients.
Then, while the machine is running, gradually add the liquid via the feed tube.
20
Page 21

Vegetable purée: cut the cooked vegetables into large chunks, put these in the Main Bowl
and process with the metal blade. Pulse a few times to begin with, then blend continuously
to achieve the desired consistency.
Fresh herbs: before chopping fresh herbs, check that both the herbs and the bowl are
perfectly clean and dry. This way, you will obtain better results and the herbs will
keep longer.
Meat and fish: when mincing meat or fish, use the pulse function to monitor the
final result.
• Dough blade
Bread dough, shortcrust pastry, rich shortcrust pastry: begin by combining the solid
ingredients (flour, yeast, etc.). Next, while the machine is running, gradually add the
liquids (eggs, water, milk) via the feed tube.
Leavened dough: use fresh yeast if you can. You can purchase this from your local
baker’s or healthfood shop. For best results, always dissolve the yeast in cool liquid. If the
water is too hot, it will “kill” the yeast.
Dough: Leave your dough to rest or prove* at room temperature or in a warm place. That
way, it will rise more quickly.
• Egg whisk
Beaten egg whites: for maximum volume, use eggs at room temperature and add
a pinch of salt or a drop of lemon juice.
Whipped cream: do not use low fat cream as it will not whip properly. Always use full fat
whipping cream.
TIPS
• Discs
Mashed potatoes: process your peeled, boiled potatoes using the 4-mm grater.
The reversible discs should be stored in the middle of the storage box. As for the
non-reversible ones, make sure you arrange them with the Magimix name facing
outwards.
Some foodstuffs, such as carrots, tend to stain plastic. Rubbing with a paper
towel and a drop of vegetable oil will remove most of this staining.
• Juicer
It is a good idea to vary your consumption of fruit and vegetables, as they do not all
contain the same substances and are good for you in different ways.
The fresher the fruit and vegetables, the higher their vitamin content and the more juice
they will yield.
Use or drink the juice immediately, if possible, as certain vitamins are destroyed
by exposure to light or oxygen. If you have to store the juice for a while, add a
few drops of lemon juice to help it keep longer and put it in the fridge.
For optimum yield, press down gently to ensure that the fruit (or vegetable) is in
direct contact with the grater.
21
Page 22

VITAMINS AND MINERAL SALTS
Vitamins
Fruit
B1 CAD AE K
Apple
Apricot
Blackberry
Blackcurrant
Cherry
Grape
Grapefruit
Kiwi fruit
Lemon
Melon
Orange
Peach
Pear
Pineapple
Plum
Raspberry
Redcurrant
Strawberry
Mineral salts
Vegetables
B1/B6
Asparagus
Cabbage
Carrot
Celeriac
Celery
Chicory
Courgette
Cucumber
Fennel
Lettuce
Onion
Parsley
Spinach
Sweet pepper
Tomato
Turnip
Watercress
Which are the best sources ?*
Calcium
Iron
Iodine
Magnesium
Phosphorus
Potassium
Sodium
* For each mineral salt, we have classified the fresh fruit and vegetables in descending order according
to their average content per 100 g net. NB: dried fruit (walnuts, hazelnuts, dried apricots, etc.) are
also a good source of mineral salts, especially magnesium, phosphorous and potassium.
22
parsley, watercress, spinach, fennel, broccoli, blackcurrants,
french beans, green cabbage, etc.
ginger, parsley, watercress, spinach, fennel, blackberries, etc.
pineapple, leek, sorrel, garlic, melon, peach, asparagus, spinach, tomato, etc.
ginger, sorrel, spinach, fennel, parsley, etc.
garlic, ginger, coconut, cherries, etc.
ginger, parsley, spinach, garlic, fennel, etc.
celeriac, fennel, spinach, beetroot, turnip, parsley, etc.
Page 23

!
SAFETY INSTRUCTIONS
• Check that the voltage of your household current corresponds to that shown
on the identification plate.
• Your appliance must always be plugged into a grounded socket.
• This machine must never be left running unattended, even though you do
not need to keep your finger pressed on any of the buttons.
• Always press the “Off” button before unlocking the lid.
• Always lift the processor up by the base, using both hands, and never by
the handle, as it is extremely heavy.
• If the electrical cord is damaged, it must be replaced by the manufacturer
or its service agent or a similarly qualified person in order to avoid a
hazard.
• If a part or accessory develops a crack, becomes discolored or misshapen,
it must be replaced.
• Your machine should give you many years of trouble-free service, however,
we would recommend that it be taken to an authorized service agent at
least every five years in order that it may be thoroughly checked.
• Never install the blades or discs on the motor shaft before the bowl has
been properly installed.
• Never lift the accessory storage box by the lid.
• Ensure the safety mechanism is kept clean and free of food.
• The appliance is not intended for use by young children or infirm persons
unless they have been adequately supervised by a responsible person to
ensure that they can use the appliance safely.
• Young children should be supervised to ensure that they do not play with
the appliance.
SAVE THESE INSTRUCTIONS
23
Page 24

HOW TO READ THE RECIPES
Difficulty of recipe:
Measurements:
Use the metal blade
Use the dough blade
Use the egg whisk
Use the Mini Bowl
2 mm
Use the 2-mm grating disc
4 mm
Use the 4-mm grating disc
2 mm
Use the 2-mm slicing disc
4 mm
Use the 4-mm slicing disc
Use the juicer
very easy -
tsp = teaspoon - tbsp = tablespoon
easy - more sophisticated
Use the citrus press
The words in the recipes marked with an asterisk* are explained in the
glossary on p. 124.
In most of the recipes, we have included a table to help you automatically adapt
the recipe to the number of required servings and/or the nature of your appliance.
For instance, the maximum capacity of the C3200 is 4 servings.
Serves
Robot
Compact 3150 / 3200
Cuisine Système 4150 / 4200
Cuisine Système 5150 / 5200
24
2 4
•
•
•
6 8
•
•
•
•
••
 Loading...