

Page 1

Ma Cuisine
Page 2

INSTRUCTIONS FOR USE
Maximum processing capacities ..................5
Food processor description .........................6
Patissier description ....................................7
Accessories .........................................8 - 20
Useful hints and tips .................................21
Golden rules ............................................ 24
RECIPES
How to read the recipes ...........................26
Basic recipes .........................................125
Sauces & Appetisers .................................27
Bread & Baking ........................................37
Soups ......................................................57
Starters .................................................... 65
Vegetables ............................................... 75
Fish ......................................................... 81
Meat ....................................................... 89
Desserts ...................................................97
Cocktails................................................119
Glossary ............................................... 124
Recipe index ..........................................125
CONTENTS
Page 3

SAFETY INSTRUCTIONS
Whenever you use an electrical appliance, you must take some basic safety precautions,
including the following:
01. Read through all the instructions carefully before you start. To avoid the risk of electric
shock, never immerse your appliance in water or any other liquid.
02. This appliance can be used by persons with reduced physical, sensory or mental
capabilities or lack of experience and knowledge if they have been given supervision
or instruction concerning use of the appliance in a safe way and if they understand the
hazards involved. Children should not play with the appliance. This appliance shall not
be used by children. Keep the appliance and its cord out of reach of children.
03. Only for citrus press use: this appliance can be used by children aged from 8 years
and above if they have been given supervision or instruction concerning use of the
appliance in a safe way and if they understand the hazards involved. Cleaning and
user maintenance shall not be made by children unless they are aged from 8 years and
above and supervised. Keep the appliance and its cord out of reach of children aged
less than 8 years.
04. If the power cord has been damaged, it must be replaced by the manufacturer, a
Magimixapproved after-sales service agent or a similarly qualified person, in order to
avoid all risks. If the supply cord is damaged, it must be replaced by the manufacturer,
its service agent or similarly qualified persons in order to avoid a hazard.
05. Always unplug your appliance if you are leaving it unattended, and before cleaning it,
or fitting or removing parts.
06. Before plugging an appliance in, always check that the voltage indicated on the appliance
corresponds to the voltage of your mains supply.
07. Models with a chrome finish must always be connected to a grounding outlet with their
original power cord.
08. Never allow the power cord to dangle over the edge of your worktop or counter, and
make sure it never comes into contact with hot surfaces.
09. Never insert your hands – or a utensil - in the feed tube while the disc, blade or juicer is
moving, to prevent serious injury and avoid damaging the appliance
10. You may use a spatula, but only when the processor is not running.
11. Never put the processor bowls in your microwave oven.
12. Always handle the discs and blades with caution, as they are extremely sharp.
13. To avoid all risk of injury, never install the metal blades or discs on the motor shaft unless
the bowl has been locked into position first.
14. The blades are all extremely sharp: never use the slicing disc until all the parts have been
properly assembled.
2
Page 4

SAFETY INSTRUCTIONS
15. Do not use the appliance if the rotating sieve or the protecting cover is damaged or has
visible cracks.
16. Your appliance is equipped with a thermal protection that automatically switches the
motor off if it has been running for too long or is overloaded. If this happens, turn
your machine off and wait for it to cool down completely before switching it back
on again.
17. Never leave your appliance running unattended, even though you do not have to
keep the AUTO button pressed.
18. Check that the lid is correctly locked into position before switching your appliance on.
19. Never attempt to override the safety mechanisms.
20. Press the STOP button and wait for all the moving parts to come to a standstill before
turning the lid.
21. Never use your appliance outside.
22. This appliance is intended solely for domestic use.
23. The following usages are not covered by the warranty: in kitchen areas reserved
for personnel in shops, offices and other workplace environments, on farms, by the
patrons of hotels, motels and other commercial environments of a residential nature,
and in bed and breakfast-type environments.
KEEP THESE IMPORTANT SAFEGUARDS
IN A SAFE PLACE
FOR DOMESTIC USE ONLY
ENVIRONMENTAL PROTECTION
This symbol indicates that this product should not be treated as
regular household waste. It should be taken to a collection point for the
recycling of electrical and electronic equipment. For more details about
collection points, please contact your local council or your household waste disposal
service.
3
Page 5

Drawing on its wealth of experience,
Magimix has been designing and building
sturdy, efficient and easy-to-use kitchen appliances
in the heart of Burgundy for more than 40 years.
The inventor of the food processor, Magimix now proudly
presents the very latest generation.
We are delighted that you have chosen our Magimix food
processor to assist you in your everyday tasks
within your kitchen.
We very much hope that your appliance
will give you every satisfaction.
It will take all the drudgery out of cooking and put
the “haute” into your cuisine.
You will soon wonder how you ever managed without your
Magimix food processor, as it tirelessly chops, blends, kneads,
mixes, emulsifies, whisks,
grates and slices.
You will soon be making lump-free pancake batter, whipping
up a batch of mayonnaise and baking
delicious homemade bread.
Featuring everything from cream of courgette soup and
Provençal vegetable tian to shepherd’s pie and chocolate
mousse, our recipe book contains more than 100 simple but
delicious ideas that will have you using your
food processor every day.
4
Page 6

CONTROL PANEL
PULSE
STOP
AUTO
STOP : press this button to switch the machine off.
AUTO : press this button to process in continuous mode and obtain a more even
texture. Ideal for fine chopping, mixing or blending, as well as for kneading,
beating egg whites, slicing or grating.
PULSE : press this button for intermittent processing. The machine automatically
switches itself off as soon as you release this button, giving you complete control over
the task from start to finish. Ideal for coarse chopping or mixing.
For preparations such as soups and purées, start off using the pulse button, then switch
to continuous mode (AUTO).
You will achieve a smoother consistency.
1 pulse = keep the PULSE button pressed down for 1-2 seconds and release.
Never unlock the lid without pressing the STOP button first. Your appliance
is fitted with a thermal failsafe that automatically switches the motor off if
it is overloaded or has been running for too long.
If it is activated, press the STOP button and wait until the machine has
cooled down completely before switching it on again.
MAXIMUM PROCESSING CAPACITIES
C 3200 CS 4200 CS 5200 Patissier
Brioche 0.5 kg 0.8 kg 1 kg 1.3 kg
Bread dough 0.6 kg 1 kg 1.2 kg 1.6 kg
Shortcrust pastry 1 kg 1.2 kg 1.5 kg 1.8 kg
Soup 1 lgl 1.3 lgl 1.8 lgl 1.8 lgl
Minced meat 0.75 kg 1 kg 1.4 kg 1.4 kg
Carrots 0.8 kg 1 kg 1.4 kg 1.4 kg
Egg whites (beaten) 2 - 5 3 - 6 3 - 8 3 - 12
Total weight, amounts calculated for the main bowl.
5
Page 7

C 3200 - CS 4200 - CS 5200 DESCRIPTION
DESCRIPTION
Mini blade
Disc support Slicing disc/Grating disc
Double pusher
XL pusher
XL lid
Mini bowl
Midi bowl
Whisk
Metal blade
* depending on the model
(1) For greater stability, thread the power cord through the notches on the
6
6
underside of the motor unit.
Dough blade*
m
Blender
Spatula
ix
Motor shaft
Motor unitStorage box
Main bowl
(1)
Page 8
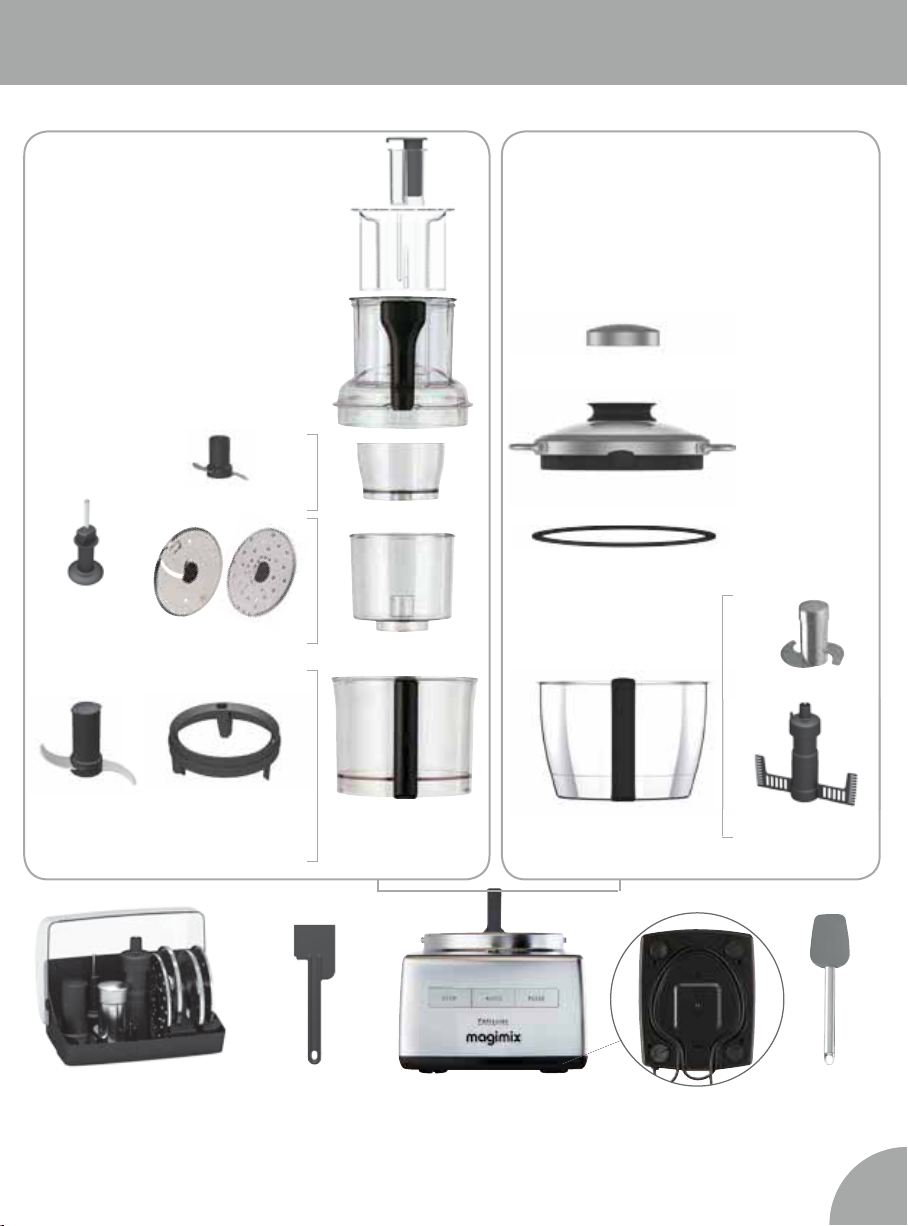
PATISSIER DESCRIPTION
Food processing bowls and accessories Patisserie bowl and accessories
Double pusher
XL pusher
Mini blade
Disc support Slicing disc/
Grating disc
Metal blade
Blender
m
XL lid
ix
Mini bowl
Midi bowl
Main bowl
Patisserie bowl
Motor shaft
Cap
Lid
Seal
Dough blade
Whisk*
(1)
Spatula
* depending on the model
(1) For greater stability, thread the power cord through the notches on the
underside of the motor unit.
Motor unitStorage box
Patisserie
spatula
7
7
Page 9

FITTING THE FOOD PROCESSING BOWLS
Wash all the parts thoroughly (except the motor unit) before using your appliance for
the first time.
1 2
Place the bowl on the motor unit and turn
in an anticlockwise direction to lock into
place.
3
Slide the midi bowl onto the motor shaft,
inside the main bowl.
4 5
Slide the mini bowl onto the motor shaft. Fit the mini blade onto the motor shaft
inside the mini bowl.
WARNING
• Triple protection: your appliance will
only work if both the bowl and lid are
correctly locked into place, and if the
bottom of the double pusher is level
with the MAX level indicator (p.17).
6 7
Place the lid on top of the bowl and turn
in an anticlockwise direction until it locks
into place.
• Do not leave the lid in the locked
position when the machine is not in
use.
The Patisserie bowl can be fitted in exactly the same way as the food
8
processing bowls.
Page 10

REMOVING THE FOOD PROCESSING BOWLS
1 2
Unlock the lid by turning clockwise and
lift it off.
3
Remove the blade from the mini bowl.
4 4
Lift the mini bowl out. Lift the midi bowl out, holding it by the
rim.
WARNING
• Always handle the discs and metal
blades with caution, as they are
extremely sharp.
• Never unlock the lid unless you have
pressed the STOP button first. If the
6 7
Release the main bowl by turning it
clockwise. You can now lift it off to
remove it.
bowl will not move, check that the lid
has been unlocked.
You can remove the Patisserie bowl in exactly the same way as the food
processing bowls.
9
Page 11

STANDARD ACCESSORIES
MINI BOWL: equipped with a metal
blade for blending, chopping, mixing and
emulsifying small amounts.
METAL BLADE: used in the main bowl for
mincing, blending, emulsifying, chopping.
m
Blender
smoother, creamier finish when blending
soups and other liquids.
ix: designed to ensure a
MIDI BOWL*: a practical, easy-clean
bowl specially designed for use with the
discs.
*
DOUGH BLADE: used in the main bowl
for mixing and kneading leavened or
unleavened dough. Patissier metal dough
blade not to be used in Food Processor
bowl.
*
*
10
DISCS: used in the midi bowl for grating
or slicing fruit, vegetables or cheese
in two different thicknesses (2mm and
4mm)*
* depending on the model
WHISK: used in the main bowl to whip
cream or beat egg whites for meringues,
mousses, soufflés, etc. Patissier whisk not
to be used in Food Processor bowl.
Page 12

METAL BLADE
METAL BLADE AND BLENDERMIX
CHOPS meat, fish and fresh herbs in
either PULSE or continuous mode (AUTO).
1
Place the metal blade on the motor shaft.
It needs to be at the bottom of the bowl.
m
Blender
BLENDS soups, milkshakes, cake mixtures,
pancake batter, etc.
Process in continuous mode for 1-4
minutes.
ix
EMULSIFIES sauces, crushes ice, and
chops chocolate and sugar to a powder
in continuous mode (AUTO).
2 3
Place the ingredients in the bowl, put the
lid on and turn it anticlockwise until it
locks into position.
1 2
Fit the metal blade on the motor shaft.
Put the ingredients in the bowl. Slot the
BlenderMix in the bowl. Turn the lid until
it locks into position.
The Blender
The metal blade is extremely sharp. Always hold it by the central hub. When
emptying the bowl, either remove the metal blade first or hold it in place by
placing a finger on the central hub.
m
ix attachment should only be used with the metal blade.
11
Page 13

DOUGH BLADE (FOOD PROCESSING BOWL)
For Food Processor only. Refer to p.13 for kneading in your Patissier.
MIXES and KNEADS leavened dough for
bread, brioche, etc.
Depending on the quantity, it usually takes less than a minute to knead a batch of
dough. Place all ingredients in the bowl and replace the lid before you switch your
appliance on.
1
Fit the dough blade on the motor shaft.
It needs to be at the bottom of the bowl.
MIXES and KNEADS unleavened dough
for shortcrust pastry, rich shortcrust
pastry, etc.
2 3
Place all the ingredients in the bowl. Put
the lid on and turn anticlockwise until it
locks into position.
12
54
Press AUTO.
Switch off as soon as the dough forms a
ball or the mixture is sufficiently kneaded.
The dough blade can also be used to stir
chocolate chips, dried fruit, etc., into the
dough without chopping them. Simply
pulse 2 or 3 times.
Never exceed the quantities recommended on p.5.
Check out our useful hints and tips on p.23.
Use the spatula to scrape any remaining flour off the sides of the bowl.
Page 14

For kneading in Patissier only.
DOUGH BLADE (PATISSERIE BOWL)
KNEADS leavened dough for bread,
brioche, etc.
Depending on the quantity, it usually takes less than a minute to knead a batch of
dough. Place all ingredients in the bowl and replace the lid before you switch your
appliance on.
KNEADS unleavened dough for
shortcrust pastry, rich shortcrust pastry,
etc.
1 2 3
Fit the dough blade on the motor shaft.
It needs to be at the bottom of the bowl.
Place all the ingredients in the bowl. Put
the lid on and turn it anticlockwise until it
locks into position.
4
Switch your appliance off as soon as
the dough forms a ball or the mixture is
sufficiently kneaded.
5
The dough blade can also be used to stir
chocolate chips, dried fruit, etc., into the
dough without chopping them. Simply
pulse 2 or 3 times.
Never exceed the quantities recommended on p.5.
Check out our useful hints and tips on p.23.
Use the spatula to scrape any remaining flour off the sides of the bowl.
13
Page 15

WHISK (FOOD PROCESSING BOWL)
For Food Processor only. Refer to p.15 for whisking in your Patissier.
Your bowl must be clean and dry. To allow enough air in, remove the double pusher
from the lid.
WHISKS egg whites
Put the egg whites in the bowl.
Whisk continuously for 5-8 minutes,
depending on the number of egg whites.
Make sure you fit the four sections
together correctly. Check that the metal
shaft has been correctly inserted. It should
protrude slightly from the top.
WHIPS cream
Before you begin, chill the bowl and
ingredients in the fridge for an hour. Pour
the whipping or double cream into the bowl.
Whisk continuously, keeping a close eye
on the cream so that it does not turn into
butter.
1
Slot the egg whisk onto the motor shaft.
Ensuring it is at the bottom of the bowl.
Add the ingredients.
14
2 3 4
Put the lid on and turn until it locks into
place.
When whisking egg whites or whipping
cream, remove the double pusher from
the feed tube to allow more air in.
Check out our useful hints and tips on p.23.
Built to an exclusive, patented Magimix design, the whisk beats the egg
whites very gradually, making them stiffer and giving them more volume.
Page 16

WHISK (PATISSERIE BOWL)
For whisking in Patissier only.
Your bowl must be clean and dry. To allow enough air in, remove the cap from the lid.
WHISKS egg whites
Put the egg whites in the bowl.
Whisk continuously for 5-10 minutes,
depending on the number of egg whites.
Make sure you fit the four sections
together correctly. Check that the metal
shaft has been correctly inserted. It should
protrude slightly from the top.
WHIPS cream
Before you begin, chill the bowl and
ingredients in the fridge for an hour. Pour
the whipping or double cream into the bowl.
Whisk continuously, keeping a close eye
on the cream so that it does not turn into
butter.
1
Slot the egg whisk onto the motor shaft.
It needs to be at the bottom of the bowl.
Add the ingredients.
2 3 4
Put the lid on and turn until it locks into
place.
When whisking egg whites or whipping
cream, remove the cap from the lid to
allow more air in.
Check out our useful hints and tips on p.23.
Built to an exclusive, patented Magimix design, the whisk beats the egg whites
very gradually, making them stiffer and giving them more volume.
15
Page 17

GRATING / SLICING DISCS
We recommend you use the discs in the midi bowl.
R
/
G
4
E
/
S
2
1 2
Lower the midi bowl into the main bowl.
Slide the disc support onto the motor
shaft.
R
/
G
4
4 5
Position your chosen disc so that the
relevant function and thickness code is
uppermost.
For nonreversible discs*, make sure
you put them the right way up. The
central plastic part should be pointing
downwards.
3
Slicing/grating discs:
each disc is engraved with a code, e.g.
R/G4: 4mm grater
E/S2: 2mm slicer
Slot the disc onto the disc support.
Turn it anticlockwise until it locks into
place (a two-stage process).
WARNING
• Always handle the discs with caution,
as the blades are extremely sharp.
• Never insert a foreign object - or
your fingers - into the feed tube.
Always use the pusher designed for
that purpose.
• Never exceed the recommended
quantities (p. 5).
16
* depending on the model
After grating or slicing, you will be left with tiny stubs of fruit or vegetables on
your discs. This is entirely normal and ensures a flawless end result.
Page 18

A) XL MODELS
1 2
GRATING / SLICING DISCS
MAX
The 2-in-1 feed tube comprises:
1) a large feed tube for round or bulky
fruit and vegetables.
2) a small feed tube for small or long
fruit and vegetables.
Large feed tube: fruit or vegetables for
slicing can be left whole.
The lid is equipped with a safety system
which means that your appliance will only
work if the bottom of the large pusher is
level with the MAX level indicator.
Small feed tube: when grating fruit or
vegetables, stack them horizontally for
longer shreds.
B) NON-XL MODELS
Small feed tube: to slice long fruit or
vegetables (e.g. leeks, carrots), stand them
upright and close together in the feed tube.
You may need to cut large fruit or
vegetables (e.g. apples, tomatoes) in half.
Check out our useful hints and tips on p.22.
After grating or slicing, you will be left with tiny stubs of fruit or vegetables
on your discs. This is entirely normal and ensures a flawless end result.
17
Page 19
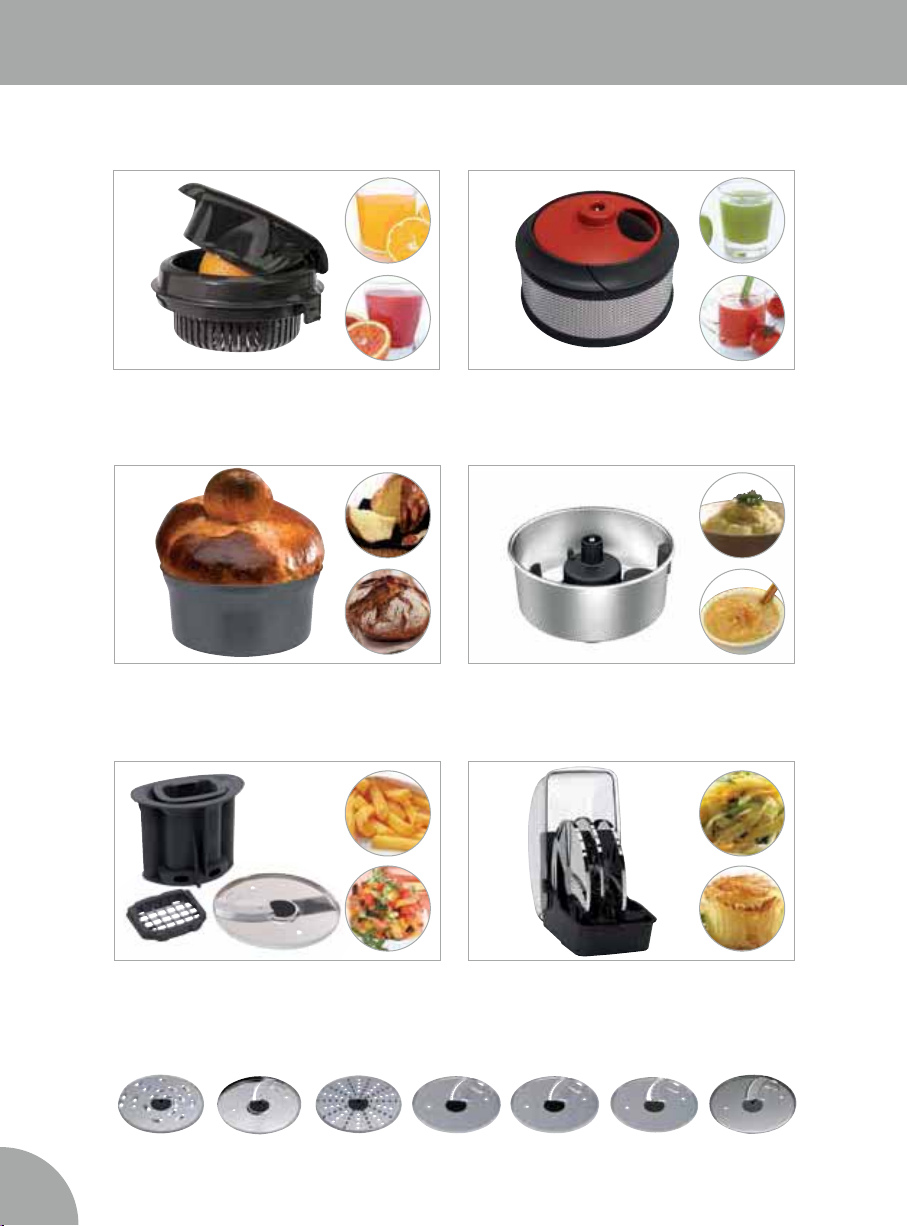
ADDITIONAL ACCESSORIES
The accessories you find in the box will vary depending on the model.
CITRUS PRESS: with a lever arm and 2
cones, yielding juice with no pips and just
the right amount of pulp.
JUICER AND SMOOTHIE
ideal for making juices, cocktails,
smoothies, nectars and coulis.
m
IX :
18
DOUGH BOWL KIT*: perfect for
hassle-free baking (bread, brioche,
cakes). The dough is kneaded, proved
and baked all in the same bowl.
DICING KIT (XL MODELS ONLY): as well
as dicing fruit and vegetables, you can
also cut them into sticks or french fries.
OPTIONAL DISCS
6mm
grater
*Incompatible with Patissier
6mm
slicer
Parmesan Wide
MASH & PUREE KIT: for totally natural
vegetable purées and fruit compotes.
CREATIVE DISC KIT: 3 novel discs for 3
creative cuts: fluted, julienne and extrawide julienne.
Fluted Julienne•••••• Extra-wide
julienne
julienne
Page 20

USING THE CITRUS PRESS
1 32
Slot the citrus press basket onto the bowl
and turn it anticlockwise until it locks into
position.
5
Slide the cone onto the motor shaft.
Position the lever arm opposite the
locking system and clip the tab to the
base of the basket.
4
Select the right cone for the size of your
citrus fruit. The larger cone should always
be clipped onto the smaller one.
6
Position the halved fruit on the cone,
pressing down gently.
7
Lower the lever arm, switch your processor
on, and apply gentle pressure to the arm
until all the juice has been extracted.
8
Switch your appliance off before
raising the lever arm, to avoid
splashing.
When juicing grapefruit, release the pressure very slightly from time to time,
to extract the maximum amount of juice.
Check out our useful hints and tips on p.23.
19
Page 21

CLEANING
Always unplug your appliance before you clean it.
Always clean it immediately after use (using water and washing up liquid).
1 2 3
PATISSIER: Remove the seal. If necessary,
use the handle of a spoon to gently prize
it off.
4
MOTOR UNIT: wipe with a soft, damp
cloth.
Never leave parts to soak. Dry them straight after washing.
Make sure you dry the stainless steel parts thoroughly to avoid oxidizing stains.
These are purely aesthetic and do not affect the quality of the blades, discs or bowls.
Some foodstuffs such as carrots tend to stain plastic. Rubbing with a piece of kitchen
paper and a little vegetable oil will remove most of this staining.
ACCESSORIES: use a bottle brush to
clean inside the accessories.
DOUGH BLADE: remove the detachable
cap* for a more thorough clean.
To preserve the appearance of the
detachable parts and make them last as
long as possible, make sure you follow
these recommendations:
• Dishwasher: select the minimum
temperature (< 40 °C) and avoid the
drying cycle (generally > 60 °C).
• Washing by hand: do not leave the
parts immersed in detergent for too
long. Avoid abrasive products (e.g.
stainless-steel scrubbers).
• Detergents: read the manufacturer’s
instructions to check their compatibility
with plastic items.
20
Please rinse immediately your bowl and your lid after using citrus fruits (lemons,
oranges, grapefruit ... )
* Insert a spoon handle into the dough blade hub to push the cap off from the inside.
The Compact model’s dough blade does not have a cap.
Warning: always handle the blades and discs with caution, as they are
extremely sharp.
Never immerse the motor unit in water.
Page 22

USEFUL HINTS & TIPS
SIMPLE
• AUTO button: the motor adapts its speed to the task at hand.
• PULSE button: for more control over the end result.
This is the setting you need for precision chopping or blending.
• Place soft foods (e.g. meat, fish or soft cheese) into the freezer for a few minutes to firm
them up before chopping, grating or slicing them in your food processor.
NB. they should be firm, not frozen!
PRACTICAL
• If you want to spend your time using your food processor, rather
than cleaning it, do the first task in the mini bowl, then move
on to the midi bowl, and finish off with the main bowl.
Always start with the hard or dry ingredients and end with the liquid
ones.
• If your appliance starts to vibrate, carefully wash and dry the feet,
and check that you have not exceeded the maximum capacities
shown on p.5.
XL LID
• The small feed tube is ideal for:
- slicing long fruit or vegetables (e.g. cucumbers, carrots, leeks).
Stand the fruit and vegetables upright and close together.
- slicing small fruit or vegetables (e.g. strawberries, kiwi fruit, turnips).
Introduce them into the small feed tube one at a time.
- grating long fruit or vegetables (e.g. carrots, courgettes) or pieces of cheese.
Stack them horizontally in the small feed tube.
• The large feed tube is ideal for:
- slicing round fruit or vegetables (e.g. oranges, pineapples, apples, pears, mangoes,
tomatoes, potatoes).
Either cut them into large pieces before introducing them into the feed tube, or leave
them whole.
Make sure you do not fill it beyond the MAX level indicator, otherwise your food
processor will not start.
MINI BOWL
• The mini bowl is ideal for processing small amounts. Use it to chop onions or herbs, mince
meat, or whiz up dips, salad dressings and mayonnaise.
• Before chopping fresh herbs, check that both the herbs and the bowl are perfectly clean
and dry. This will ensure you get the very best results. The herbs will also keep
for longer.
• Preferably remove the midi bowl to use the mini bowl.
21
Page 23

USEFUL HINTS & TIPS
MIDI BOWL AND DISCS
• The midi bowl is ideal for grating and slicing fruit, vegetables and cheese.
Cabbage: roll the leaves one inside the other after discarding the tough core and slice.
• Some foodstuffs, such as carrots, tend to stain plastic. Rubbing the part with a piece of
kitchen paper and a little vegetable oil will remove most of the staining.
MAIN BOWL
• Liquid ingredients: never fill the bowl more than a third full.
• Solid ingredients: never fill the bowl more than two-thirds full.
METAL BLADE
• When processing large amounts of meat or vegetables, cut the food into 2cm pieces.
• If your are chopping meat or fish, use the PULSE button to control the end result.
• For vegetable purées, cut the cooked vegetables into large pieces before
putting them in the bowl with the metal blade. Use the PULSE button
first, then switch to continuous mode (AUTO) until the purée reaches
the desired consistency.
22
BLENDERMIX
• Soups, pancake batters, cocktails: the metal blade goes in the bowl first, followed by
all the ingredients, then the Blender
m
The Blender
ix attachment gives a smooth volute finish.
m
ix. Your processor is now ready to run.
Page 24

USEFUL HINTS & TIPS
DOUGH BLADE
• Soft dough (brioche, choux pastry, etc.): Magimix food processors
work on the rapid kneading principle. Doughs are kneaded for just 30
seconds to 1 minute, the precise time depending on the amount and type
of dough. Follow the instructions carefully for each recipe.
• Normal dough: for faster results, leave the dough to rise or prove at (or slightly
above) room temperature. As flour is very light, you may sometimes notice a cloud of
flour escaping from the bowl. To avoid this happening, put all the non-liquid ingredients
(salt, flour, butter, eggs, etc.) in the bowl before adding the liquid ingredients (water,
milk, etc.). Only then switch your food processor on.
• You can store dough in the freezer for up to 2 months, providing you wrap it carefully
in cling film. Remember to take it out the day before you intend to use it.
EGG WHISK
• Make sure your bowl is clean and dry.
• Remember to remove the double pusher from the lid to let in enough air!
• Beaten egg whites: for fluffier egg whites, use eggs that are at room
temperature.
• Whipped cream: do not use fat-free or low-fat cream, as it will not whip!
Make sure the full-fat whipping or double cream you use is chilled.
Place the food processor bowl in the freezer for 10 minutes beforehand.
If you can track it down, add some powdered stabilizer (e.g. Whip
®
It
) to the cream, as this will keep it stiff for several hours in the fridge.
Keep a close eye on the cream while it is being whipped, to avoid over
processing and it turning into butter.
CITRUS PRESS
• There are 2 cones: a small one for lemons and limes, and a large one for oranges and
grapefruits. The small cone is stored inside the large cone.
23
Page 25

GOLDEN RULES
To get the very best out of our recipes, follow these few simple golden rules:
1. Always use the very best ingredients
Choose good-quality, fresh ingredients.
The fresher your fruit and vegetables, the more vitamins they will contain. Signs of
freshness include smooth skin, green leaves and no bruising.
Always use fresh meat and fish.
Pay attention to the type of flour indicated in the recipe. The choice of
flour is very important, not least because the amount of water you
need depends on which type you are using. Wholemeal flour, for
instance, contains more bran, which absorbs more water.
Plain flour, a very fine, white, all-purpose flour that is best for making
cakes, pastries, sauces and pancake batters.
Self-raising flour has low gluten content and contains a raising agent, usually baking
powder. It’s used in baking and cake-making.
Strong white flour has a higher gluten content and is therefore ideal for making bread
and brioche.
24
It is better to use caster sugar, rather than granulated sugar, which has coarser crystals.
Icing sugar is very fine and is commonly used for cake decoration.
Always use butter, never margarine or a low-fat spread.
Yeast comes in two forms – fresh or dried. In our recipes, we
have chosen to use fresh yeast, which you can get from your
local baker, as well as from specialist shops (or the bakery
section of your nearest supermarket). If you use dried yeast,
remember to use half the amount indicated for fresh yeast.
For the very best results, always dissolve the fresh yeast in a liquid heated to 35 °C.
Yeast is a living organism, and if the liquid is any hotter, it will kill it.
Salt regulates the rising action of the yeast and reinforces the structure of the gluten.
It is best to use pasteurised whole milk.
Double cream has a minimum fat content of 48% (35% for whipping cream), compared
with 15% for single cream and even less for “light” versions. It not only tastes better, but
holds air bubbles better when whipped.
Page 26

GOLDEN RULES
Eggs are sold in four different sizes, with medium eggs weighing 53-63g. For recipes
where the egg whites are to be beaten, bring them up to room temperature first. Eggs
must be fresh if they are to be eaten raw in mousses, etc. If you are using them for
home baking (e.g. meringues, macaroons), it is a good idea to separate them 2-3
days beforehand, storing the yolks and whites in separate airtight containers in the
fridge. For egg whites to whisk properly, your bowl must be clean, with no traces of fat.
2. Be prepared!
The following pieces of equipment always come in useful:
Measurement instruments: precise electronic kitchen scale (range:
from 2g to 2kg) is vital, as is a cooking thermometer that can measure
temperatures of up to 200 °C.
Baking tins: it is important to use a baking tin of the right shape, the right
quality and made from the right material. We specify which kind of tin
is required for each recipe.
Cake making accessories: cutters of different sizes, to vary the
presentation of cakes and pastries.
A piping bag is vital for filling cream puffs and eclairs, as well as
making meringues or macaroons.
You will need a rolling pin for rolling your pastry out and a brush for
buttering your tins and painting egg wash on your bread and brioche.
3. Precision
In some recipes, especially those for bread and cakes, the instructions must be followed
to the letter. Always weigh or measure the ingredients out carefully and respect the
kneading, resting and baking times.
4. Cooking - the grand finale
How well do you know your oven? The success of your recipe may well depend on it,
as the temperatures and cooking times in our recipes are merely there to guide you.
These times may vary according to your oven, but will also depend on how finely the
ingredients have been chopped. It will also depend on the size and material of the
container. This is why we recommend you keep a close eye on the baking process and
be ready to adjust the cooking time, if necessary.
Avoid opening the oven door while your dish is cooking.
25
Page 27

HOW TO READ THE RECIPES
Level of difficulty: very easy Measurements: tsp = teaspoon tbsp = tablespoon 1 bowl = 250-350g
1 pulse = one press on the PULSE button lasting 1-2 seconds
Metal blade
Blender
Dough blade
Whisk
Mini bowl
Citrus Press
• The words marked with an asterisk (*) in the recipes are explained in the glossary
on p.124.
• In some of the recipes, we have included a table to help you automatically adapt
the recipe to the number of required servings and/or the nature of your appliance.
For example, the maximum capacity of the C3200 is generally 4-6 servings.
m
ix
easy -
R2
R4
E2
E4
more sophisticated
2mm grater
4mm grater
2mm slicer
4mm slicer
Midi bowl
26
Serves
Compact 3200
Cuisine Système 4200
Cuisine Système 5200
Patissier
• The recipes without a table are suitable for all our food processors.
The quantities shown in these recipes can generally be increased if you are using a
CS4200, 5200 and Patissier model.
2-4 4-6 6-8 8 et +
••
•••
••••
••••
Page 28

SAUCES & APPETISERS
27
Page 29

MAYONNAISE
lighter mayonnaise, use whole
eg
gs
.
Preparation: 5 min
250ml sunflower oil
1 tbsp strong mustard
2 tbsp white vinegar (optional)
1 bowl
1 egg yolk
salt & pepper
1. Put the egg yolk, mustard and 1 tbsp of oil in the mini bowl.
2. Blend for 20 seconds. Then, while the machine is still running, add half the oil via the
feed tube, starting with a thin trickle and increasing the flow as the mixture starts to
thicken.
3. Add the seasoning, switch the processor back on and gradually add the rest of the oil
as before. If you are using vinegar, add it at the very end.
Chef’s tip: make sure all the ingredients are at room temperature before you begin.
For a lighter mayonnaise, use whole eggs.
a
28
28
Page 30

AÏOLI SAUCE
Preparation: 10 min
ingredients for 1 bowl of mayonnaise
3 garlic cloves
1 bowl
1. Peel the garlic cloves. Halve them lengthwise and discard the central shoots.
2. Blend the garlic for 20 seconds in the mini bowl.
3. Make the mayonnaise in the same bowl, on top of the garlic paste, following the
recipe on p.28.
Chef’s tip: makes a tasty dipping sauce for veggie sticks or meat fondue.
PESTO
Preparation: 10 min
50g pine nuts
50g freshly grated parmesan cheese
100ml olive oil
1 bowl
2 small garlic cloves
15g basil
1. Wash the basil, strip the leaves from the stalks and carefully pat dry. Peel the garlic
clove, halve it lengthwise and discard the central shoot.
2. Put all the ingredients except the oil in the mini bowl.
3. Pulse 10 times or until the mixture is smooth.
4. Switch to continuous mode and trickle the olive oil in via the opening in the lid.
Chef’s tip: delicious served with fresh pasta.
29
Page 31

BÉARNAISE SAUCE
Preparation: 10 min Cooking: 10 min
100g cold butter
30ml white wine vinegar
3 egg yolks
3 shallots
1 bowl1 bowl
2 sprigs tarragon
salt & pepper
1. Chop the shallots and tarragon in the mini bowl (4-5 pulses).
2. Transfer to a small, thick-bottomed saucepan and add the vinegar, salt and pepper.
Reduce* by half over a lower heat.
3. Pour this reduction back into the mini bowl. Add the egg yolks and pulse 3 times.
4. Add the butter, cut into dice. Pulse 8 times or until the sauce reaches the desired
consistency.
Chef’s tip: delicious with grilled red meat.
COCKTAIL SAUCE
Preparation: 10 min
1 bowl of mayonnaise
130ml tomato ketchup
1 tbsp cognac or calvados
1 tsp lemon juice
1 tbsp crème fraîche
2 drops Tabasco
®
1. Make the mayonnaise according to the recipe on p.28.
2. Add all the other ingredients. Pulse 5-6 times or until the mixture is smooth.
Chef’s tip: a classic accompaniment for prawns and avocados.
Page 32

MINT SAUCE
Preparation: 5 min
1 bunch fresh mint
3 tbsp boiling water
2 tbsp caster sugar
5 tbsp white wine vinegar
1. Trim the mint, place it in the mini bowl and process for 15 – 20 seconds or until it is
finely chopped.
2. Dissolve the sugar in the boiling water and add it and the vinegar to the bowl.
3. Process briefly to mix and leave to cool before serving.
TARTARE SAUCE
Preparation: 5 min
ingredients for 1 bowl of mayonnaise
5 small gherkins
1 red onion
2 tbsp capers
1 bowl 1 bowl
fresh parsley, chives and chervil
salt & pepper
1. Chop the gherkins, capers, onion and herbs in the mini bowl. Set aside.
2. Make the mayonnaise according to the recipe on p.28.
3. Add the chopped ingredients and pulse 2-3 times to incorporate them.
Season to taste.
Chef’s tip: delicious partnered with steak tartare, fish, fondues, etc.
SAUCES & APPETISERS
31
Page 33

TUNA DIP
Preparation: 5 min
tinned tuna in brine (190g net weight)
2 tbsp soft cheese
1 tsp mustard
juice of ½ lemon
15 chive leaves
1 bowl1 bowl
1 shallot
sea salt flakes & pepper
1. Drain the tuna and break into large flakes. Place in the mini bowl.
2. Add all the other ingredients, pulse 4-5 times, and hey presto!
Chef’s tip: also great as a spread on slices of toasted country bread.
TAPENADE
Preparation: 5 min
250g stoned black olives
5 anchovy fillets
1 tbsp olive oil
1 tbsp capers
2 tsp mustard
juice of ½ lemon
pepper
1. Put all the ingredients except the olive oil in the mini bowl. Blend for about 30 seconds
to achieve an even consistency.
2. Run the processor for a further 10-20 seconds, gradually adding the olive oil via the
opening until it is completely absorbed.
Chef’s tip: delicious with toasted slices of country bread.
For a more intense flavour, replace the standard black olives in brine with
herbed or Greek-style black olives, remembering to pit them first.
32 SAUCES & APPETISERS
Page 34

33
3
Page 35

DIJON DIP
Preparation: 5 min
2 slices cooked ham
2 tbsp crème fraîche
1 bowl1 bowl
1 tsp whole-grain mustard
1. Cut the ham into large pieces and put in the mini bowl. Pulse 4-5 times or until it is
finely chopped.
2. Add the crème fraîche and mustard.
3. Pulse 4 times, and hey presto!
Chef’s tip: especially good with carrot or courgette sticks and cauliflower florets.
GUACAMOLE
Preparation: 5 min
2 ripe avocados
2 tbsp crème fraîche
1 small onion (or spring onion)
juice of ½ lemon
1 tsp chilli powder
salt & pepper
1. Peel and quarter the onion and place in the mini bowl. Pulse 3 times.
2. Halve the avocados, discard the stones, scoop out the flesh and cut into large pieces.
Switch your food processor on and add the avocado to the onion via the feedtube,
together with the lemon juice, crème fraîche, chilli powder and a dash of olive oil.
3. Blend for about 1 minute to achieve a smooth purée. Season according to taste.
Chef’s tip: as a finishing touch, add some finely diced tomato.
34 SAUCES & APPETISERS
Page 36

HAM AND OLIVE CAKE
R2
Preparation: 10 min Baking: 45 min Equipment: 1 rectangular cake tin
Cake mixture
150g plain flour
100g gruyère cheese
125ml hot milk
1 cake
100ml olive oil
3 eggs
1 tbsp baking powder
1. Preheat your oven to 180 °C (gas mark 4).
2. Fit the 2mm grater disc in the midi bowl and grate the cheese. Set aside.
3. Put the olives in the mini bowl and pulse 2-3 times. Dice the ham.
4. Fit the metal blade in the main bowl and blend the flour and eggs for 40 seconds.
5. Press STOP and scrape. Via the opening, add the hot milk and olive oil while the
processor is still running. Scrape the flour off the bowl walls using the spatula provided.
Stir in the baking powder, olives, cheese, ham, salt and pepper. Pulse 2-3 times to
combine thoroughly.
6. Transfer the mixture to a buttered cake tin.
7. Bake in the oven for approx. 45 minutes. Check that the cake is done by inserting a
skewer. If it comes out clean, the cake is ready.
8. Allow the cake to cool in the oven with the door ajar. Turn out and serve.
Flavouring
200g cooked ham
75g pitted green olives
salt & pepper
Chef’s tip: you can use any flavours you like – the only limit is your imagination!
35
Page 37

CHEESE PUFFS
R2
Preparation: 15 min Baking: 20-25 min Equipment: piping bag* (optional)
Choux pastry
200ml water
150g plain flour
75g butter
4 eggs
1 egg yolk (for brushing)
30 cheese puffs
1 pinch of salt
1. Grate the cheese in the midi bowl using the 2mm grater disc. Set aside.
Flavouring
150g comté cheese
To make the choux pastry
2. Preheat your oven to 180 °C (gas mark 4). Pour the water into a saucepan. Add the
diced butter.
3. Bring to the boil. Remove from the heat and add the flour all in one go. Beat in
vigorously with a spatula. Return to the heat for about 1 minute, stirring constantly,
until the dough no longer sticks to the sides of the pan.
4. Remove from the heat and transfer the dough to the bowl with the dough blade.
Process for 15 seconds, then add the eggs one at a time via the feedtube, running for
a further 30 seconds.
5. Add three quarters of the cheese and process for 5 seconds.
6. Line a baking sheet with baking parchment. Spoon the dough into a piping bag* with
a plain nozzle. Pipe out buns measuring approx. 3cm across.
7. Brush the buns with egg yolk, flattening them very slightly. Scatter with the rest of the
grated cheese.
8. Bake in the oven for 20-25 minutes or until golden. Cool on a wire tray. They should
be served warm.
36
Chef’s tip: for sweet puffed pastry, omit the cheese and add 1 tbsp of sugar to the pan
with the water and butter.
Page 38

BREAD & BAKING
Page 39

COUNTRY LOAF
Preparation: 10 min Resting: 2hr30 min Baking: 30 min
Dough
250g strong white bread flour
160ml water
5g fresh yeast*
1 small loaf
5g salt
01. Stir the yeast into the water with a fork until it dissolves. Allow to rest for 1 minute.
02. Put the flour, salt and yeast liquid in the main bowl fitted with the dough blade.
03. Process for 1 minute or until the dough forms a ball.
04. With floured hands, take the dough out of the bowl, roll it into a ball and place it in
a large mixing bowl. Cover with cling film or a damp cloth. Allow to rise for approx.
2 hours.
05. Take the dough out of the bowl with floured hands and place it on a floured worktop.
Flatten it gently with the heel of your hand A. fold the two sides into the middle, and
turn it over
06. Transfer the dough to a baking tray lined with baking parchment. Cover with a damp
cloth and prove* for 1 hour.
07. 20 minutes before the end of the proving time, fill the dripping pan in the oven with
water. Preheat your oven to 220 °C (gas mark 7).
08. Dust the loaf lightly with flour and cut a deep cross in it with the wet blade of a sharp
C
knife
09. Bake for approx. 25 minutes or until golden.
10. To check that it is done, turn it over and give it a sharp knock. It should sound hollow.
Allow to cool on a wire tray.
B
.
.
You can double the amounts with the CS4200, CS5200 and Patissier models.
Chef’s tip: never allow yeast to come into direct contact with salt.
Different brands of flour require different amounts of water. Refer to the instructions on the
packet of flour for further advice on water quantity required.
A B C
38
Page 40

Page 41

BAGUETTES
Preparation: 20 min Resting: 1hr30 min Baking: 15-20 min
250g strong white bread flour
150ml water
5g fresh yeast*
5g salt
2 baguettes
01. Stir the yeast into the water with a fork until it dissolves. Allow to rest for 1 minute.
02. Place the salt, flour and yeast liquid in the main bowl fitted with the dough blade.
03. Process for 1 minute or until the dough forms a ball.
04. Take the dough out of the bowl with floured hands, roll it into a ball and place it in a
large mixing bowl. Cover with cling film or a damp cloth. Allow to rise for approx.
1 hour.
05. Flour your hands and knock back* the dough by giving it a few gentle punches
Transfer the dough to a floured worktop.
06. Cut the dough into two equal parts
07. Lay the baguettes on a baking tray lined with baking parchment and cover with a
damp cloth. Prove* for 40 minutes.
08. 20 minutes before the end of the proving time, fill the dripping pan in the oven with
water and preheat your oven to 220 °C (gas mark 7).
09. Dust the baguettes with flour and cut slashes in the top with the wet blade of a sharp
knife
10 . Bake for 15-20 minutes, keeping a close eye on them.
11. To check that the baguettes are done, turn them over and give them a sharp knock.
They should sound hollow. Cool on a wire tray.
.
D
. Roll each one into a thin baguette shape
B
A
C
.
.
You can double the amounts with the CS4200, CS5200 and Patissier models.
Chef’s tip: never allow yeast to come into direct contact with salt.
Different brands of flour require different amounts of water. Refer to the instructions on the
packet of flour for further advice on water quantity required.
A B C D
40
Page 42

Page 43

OLIVE AND CHORIZO BUNS
Preparation: 10 min Resting: 2hr Baking: 20 min
Dough
250g strong white bread flour
180ml water
6 buns
4g fresh yeast*
4g salt
01. Skin the chorizo and place it in the mini bowl. Process for 5 seconds, then add the
olives and pulse 3-5 times. Set aside.
02. Stir the yeast into the water with a fork until it dissolves. Allow to rest for 1 minute.
03. Place the salt, flour and yeast liquid in the main bowl fitted with the dough blade.
04. Run your processor for 1 minute or until the dough forms a ball.
05. Add the olives and chorizo, pressing the pulse button a few times to incorporate
them.
06. Take the dough out the bowl with floured hands, roll it into a ball and place it in a
large mixing bowl. Cover with cling film or a damp cloth and leave to rise for 1 hour.
07. With floured hands, knock back* the dough by giving it a few gentle punches
08. Turn the dough out onto a floured worktop and divide into 6 equal pieces (approx.
80 g each) with a sharp knife
09. Arrange the buns on a baking tray lined with baking parchment. Cover with a damp
cloth and prove* for 30 minutes.
10. 20 minutes before the end of the proving time, fill the dripping pan in the oven with
water and preheat your oven to 240 °C (gas mark 9).
11. Cut a deep cross in the top of each bun with the wet blade of a sharp knife
12. Lower the oven temperature to 200 °C (gas mark 6) and bake the buns for 20
minutes or until they are golden.
13. To check that the buns are done, turn them over and give them a sharp knock. They
should sound hollow. Leave them to cool on a wire tray.
Shape into small buns
B
Flavouring
40g stoned black olives
80g chorizo sausage
.
C
.
A
.
D
Chef’s tip: you can replace the olives and chorizo with figs and walnuts.
Never allow yeast to come into direct contact with salt.
Different brands of flour require different amounts of water. Refer to the instructions on the
packet of flour for further advice on water quantity required.
A B C D
42
Page 44

Page 45

SANDWICH LOAF
Preparation: 15 min Resting: 1hr30 min Baking: 30 min
Equipment: 1 loaf tin
350g strong white bread flour
275ml milk
30g butter
10g caster sugar
1 loaf
10g fresh yeast*
5g salt
1. Stir the yeast into the milk with a fork until it dissolves. Leave to rest for 1 minute.
2. Put the flour, sugar, butter, salt and yeast liquid in the main bowl fitted with the dough
blade. Process for 1 minute.
3. With floured hands, transfer the dough to a large, floured mixing bowl. Cover with
cling film or a damp cloth and leave to rise for 1 hour.
4. Shape the dough into a fat sausage shape
cover with a large bowl or cling film
5. Preheat your oven to 180 °C (gas mark 4).
6. Allow the dough to prove* for 30 minutes at room temperature.
7. Bake for 30 minutes. If the top starts to go brown, cover it with a piece of aluminium
foil.
8. Allow to cool slightly before turning out.
Different brands of flour require different amounts of water. Refer to the instructions on
the packet of flour for further advice on water quantity required.
.
C
, transfer to a buttered loaf tin
A
and
B
A B C
44
Page 46

Page 47

FOUGASSE
Preparation: 15 min Resting: 2hr30 min Baking: 15 min
Dough
250g strong white bread flour
150ml water
30ml olive oil
5g fresh yeast*
1 fougasse
5g salt
01. Stir the yeast into the water with a fork until it dissolves. Leave to rest for 1 minute.
02. Place the flour, salt, oil and yeast liquid in the main bowl fitted with the dough blade.
03. Process for 1 minute or until a soft dough has formed.
04. With floured hands, transfer the dough to an oiled dish. Cover with cling film and
leave to rise for 1 hour.
05. Gently fold the dough over twice
a damp cloth. Prove* for 30 minutes.
06. Meanwhile, preheat your oven to 240 °C (gas mark 9).
07. Gently lift the dough out of the dish and place it on a baking tray lined with baking
parchment, taking care not to squash the air bubbles.
08. Spread the dough out, flattening it with your fingertips
09. Scatter the olives and thyme over half the surface and fold the other half over C.
Brush with the oil.
10. Bake for approx. 15 minutes. Eat warm or cold.
Flavouring
100g pitted olives
with floured hands and cover with cling film or
A
Glazing
10ml olive oil
thyme
.
B
Chef’s tip: you can replace the olives with cherry tomatoes, cheese, etc.
Different brands of flour require different amounts of water. Refer to the instructions on
the packet of flour for further advice on water quantity required.
A B C
46
Page 48

Page 49

VEGGIE PIZZA
Preparation: 45 min Resting: 30 min to 1hr Baking: 15-20 min
E2
Dough
200g strong white bread flour
100ml water
2 tbsp olive oil
4g salt
5g fresh yeast*
1 large pizza
1 tsp dried oregano (optional)
Topping
300g mozzarella cheese
6 tbsp tomato coulis
1 small courgette
2 tomatoes
1 onion
fresh basil
chilli oil
To make the pizza dough
1. Stir the yeast into the water with a fork until it dissolves. Allow to rest for 1 minute.
2. Put the salt, flour, oregano, oil and yeast liquid in the main bowl fitted with the dough
blade.
3. Process for 1 minute or until the dough starts to form a ball. If necessary, scrape the
bowl walls clean with the spatula and run the processor for a further few seconds.
4. Lift the dough out of the bowl with floured hands and roll it into a ball. Place it in a
large mixing bowl and cover with cling film or a damp cloth. Leave to rise for approx.
1 hour.
5. With floured hands, knock back* the dough by giving it a few gentle punches
6. Fill the dripping pan in the oven with water and preheat your oven to 240 °C (gas
mark 9).
7. Roll the dough out B. on a floured worktop to form one large pizza base (or two
smaller ones). Prick it all over with a fork
Different brands of flour require different amounts of water. Refer to the instructions on the
packet of flour for further advice on water quantity required.
.
C
.
A
A B C
48
Page 50

To make the topping
1. Wash the vegetables and peel the onion. Fit the 2mm slicing disc in the midi bowl.
Slice the onions and set aside. Slice the courgette and tomatoes, transfer to a colander
and sprinkle with salt to get rid of the excess juices.
2. Fry the sliced onion in a little olive oil.
3. Spread the tomato coulis over the pizza base. Add the onions and the drained
courgette and tomato slices. Top with round slices of mozzarella. Season each layer
with salt and pepper.
4. Lower the oven temperature to 220 °C (gas mark 7) and bake the pizza for 15-20
minutes, depending on the thickness of the base. Check it at regular intervals.
5. As soon as you take it out of the oven, scatter with torn leaves of fresh basil and drizzle
with chilli oil.
Page 51

LEEK QUICHE
R2
E2
Preparation: 45 min Resting: 1h30 min Baking: 30 min
Equipment: quiche tin Ø 28-30cm
Puff pastry
250g plain flour
50g softened butter
130ml water
200g chilled butter
1 quiche
Filling
100ml crème fraîche
40g butter
40g gruyère cheese
50ml water
2 leeks
2 eggs
salt & pepper
To make the puff pastry
01. Put the flour, softened butter (cut into pieces) and water in the main bowl fitted with
the dough blade.
02. Process for 30 seconds or until the pastry forms a ball.
03. Take the pastry out of the bowl, wrap it in cling film and flatten it. Leave in the fridge
for 1 hour.
04. Remove the cling film and place the pastry on a floured worktop. Roll out from the
centre in four direction to form a cross
05. Place the chilled butter between two sheets of cling film. Flatten to form a 2cm thick
square. Remove the clingfilm and place the butter at the centre of the cross
fold the arms of the cross in towards the centre C.
06. Roll the pastry out to form a long rectangle
07. Turn the pastry 90° and roll the pastry out to form a long rectangle
like a wallet
08. Wrap the pastry in cling film and chill for 30 minutes in the fridge.
09. Repeat Steps 6, 7 and 8 twice.
10. Roll the pastry out into a circle to fit the quiche tin and leave it in a cool place for
30 minutes.
.
E
.
A
and
B
. Fold it in thirds like a wallet
D
F
. Fold it in thirds
.
E
50
A
D
B
E
C
F
Page 52

To make the filling
the packet of flour for further advice on water quantity required.
01. Preheat your oven to 210 °C (gas mark 6).
02. Fit the 2mm grater disc in the midi bowl, grate the cheese and set aside.
03. Wash the leeks. Discard the green part and cut the white part into thin slices using
the 2mm slicing disc in the midi bowl. Set aside.
04. Melt the butter in a sauté pan. Add the leeks, give them a stir, then pour in 50ml
water.
05. Soften the leeks over a low heat for 15 minutes, making sure they do not brown. If
necessary, add a little more water. Season with salt and pepper.
06. Prick the quiche base all over with a fork.
07. Either in the main bowl fitted with the metal blade or in the mini bowl, blend the
crème fraîche, eggs, salt and pepper for 30 seconds.
08. Arrange the leeks in the pastry case. Top with the creamy egg mixture.
09. Scatter with grated cheese and bake for approx. 30 minutes.
10. Serve piping hot.
Chef’s tip: you can replace the leeks with onions, diced bacon, tomatoes, etc.
Different brands of flour require different amounts of water. Refer to the instructions on
the packet of flour for further advice on water quantity required.
Page 53

PLAITED BRIOCHE
Preparation: 20 min Resting: 1hr 30 min Baking: 20 min
Equipment: 1 rectangular loaf tin
250g strong white bread flour
125ml milk
20g butter
40g sugar
10g fresh yeast*
1 egg
1 brioche loaf
1 beaten egg (for brushing)
4g salt
01. Stir the yeast into the milk with a fork until it dissolves. Leave to rest for 1 minute.
02. Put the flour, salt, sugar, butter and yeast liquid in the main bowl fitted with the dough
blade.
03. Process for 1 minute. If necessary, scrape the bowl walls with the spatula and process
for a few more seconds.
04. With floured hands, transfer the dough to a large, lightly floured mixing bowl. Cover
with cling film or a damp cloth and leave to rest for 30 minutes.
05. The dough is now ready to be plaited. Divide it into 3 equal parts
parts into thin sausage shapes of equal size on a floured worktop B and plait them
together
06. Prove* in a very low oven for 30 minutes.
07. Remove the tin from the oven and turn the oven up to 180 °C (gas mark 4).
08. Brush the brioche with beaten egg.
09. Bake for approx. 20 minutes. If the top starts to brown, cover it with a piece of
aluminium foil.
10. Allow to cool before turning out.
. Carefully transfer to a buttered and floured loaf tin
C
A
.
D
shape these
Different brands of flour require different amounts of water. Refer to the instructions on
the packet of flour for further advice on water quantity required.
A B C D
52
Page 54

Page 55

TRADITIONAL BRIOCHE
Preparation: 10 min Resting: 1h30 min Baking: 25 min
Equipment: fluted round brioche tin
Dough
250g strong white bread flour
100g softened butter
30g sugar
4g salt
1 brioche loaf
01. Stir the yeast into the milk with a fork until it dissolves. Allow to rest for 1 minute.
02. Put the salt, flour, butter, sugar, eggs and yeast liquid in that order in the main bowl
fitted with the dough blade.
03. Process for approx. 30 seconds.
04. Remove the dough blade from the bowl. Transfer the dough to a large, floured
mixing bowl using the spatula. Cover with cling film or a damp cloth and leave to
rest for 30 minutes.
05. With floured hands, knock back* the dough by giving it a few gentle punches.
06. Transfer the dough to the buttered tin. Pinch the head of the brioche
until it becomes detached. Run a floured finger between the ball and the rest of the
dough
07. Brush the brioche with beaten egg
08. Turn the oven up to 180 °C (gas mark 4) and bake the brioche for approx. 25
minutes.
09. If the top starts to brown, cover it with a piece of aluminium foil.
10. Allow to cool before turning out.
. Prove for 1 hour in an extremely low oven.
B
10g fresh yeast*
4 eggs
1 beaten egg (for brushing)
.
C
. and twist it
A
Chef’s tip: you can add chocolate chips, pink pralines (sugar-coated almonds), etc. to
your brioche.
Different brands of flour require different amounts of water. Refer to the instructions on
the packet of flour for further advice on water quantity required.
A B C
54
Page 56

Page 57

SCONES
5656565656565656
56
EADADADADADADDADADADADAADAA
&BB
B
A
A
GGG
G
Preparation: 15 min Baking: 15 min
250g plain flour
150ml milk
20g caster sugar
40g butter
Serves 4
½ tsp baking powder
1 pinch of salt
1. Fit the dough blade. Place the flour, baking powder and salt in the bowl and process
briefly to mix them.
2. Cut the butter into pieces and add it to the bowl with the sugar.
3. Process for 5 - 7 seconds, or until the mixture resembles fine breadcrumbs, then, with
the machine running, gradually pour the milk in through the opening.
4. Process for about 10 seconds or until a sticky mixture has formed.
5. On a well floured surface knead the dough lightly then roll out to 1.5cm thick and
using a 5cm pastry cutter, cut out the scones.
6. Place them on a greased baking tray and bake in a hot oven 220° C (gas mark 7) for
10 - 15 minutes or until well risen and browned.
7. Cool on a wire rack.
Variations:
Cheese Scones : Replace the sugar with 50g grated cheddar cheese to the dry ingredients
together with a pinch of dry mustard. Finish as above.
56
Sultana Scones : Add 50g sultanas to the processed ingredients and pulse to stir in, after
adding the milk. Finish as above.
BREAD & BAKING
Page 58

SOUPS
Page 59

COUNTRY SOUP
SERVES 2 4-6 6-8 8 +
FOOD PROCESSOR 3200 3200 4200
PREPARATION 15 min 15 min 20 min 20 min
COOKING 20 min 20 min 25 min 25 min
Leek
Carrots
Potatoes
Onion
Crushed garlic clove
Butter
Water
Salt & pepper
1. Peel and wash the vegetables. Slice them in the midi bowl fitted with the 2mm
slicing disc.
2. Soften the onion in the butter in a thick-bottomed pan. Add the other vegetables
and cook for 2 minutes, stirring constantly.
3. Add the water and season to taste. Simmer gently for 20-25 minutes.
4. Transfer the soup to the main bowl fitted with the main blade and the Blender
Blend until desired consistency is reached.
5. If necessary, reheat the soup in the pan over a low heat before serving.
½ 1 small 1 1
1122
1112
¼¼½½
½½1 1
10g 15g 20g 25g
500ml 700ml 850ml 1 l
E2
5200/Patissier
m
ix.
58
Chef’s tip: For an even tastier soup, fry some diced bacon with your onion.
SOUPS
Page 60

PUMPKIN SOUP
E2
SERVES 2 4-6 6-8 8 +
FOOD PROCESSOR 3200 3200 4200
5200/Patissier
PREPARATION 20 min 20 min 30 min 30 min
COOKING 15 min 15 min 20 min 20 min
Pumpkin
Onion
Fresh ginger (cm)
Curry powder
Butter
Water
350g 650g 800g 1kg
½½1 1
1123
½ tsp ½ tsp 1 tsp 1 tsp
20g 20g 25g 25g
400ml 600ml 800ml 1l
Salt & pepper
1. Peel and wash the pumpkin, onion and ginger.
2. Slice the onion in the midi bowl with the 2mm slicing disc. Set aside.
3. Slice the pumpkin, followed by the ginger. Set aside.
4. Soften the onion in the butter in a thick-bottomed pan. Add the pumpkin and
ginger and cook for 2 minutes, stirring constantly.
5. Add the water and season to taste. Simmer gently for 10-15 minutes.
6. Pour the soup into the main bowl fitted with the metal blade and the Blendermix.
Blend continuously for 1-2 minutes.
Chef’s tip: for a milder taste, add a little crème fraîche.
SOUPS
59
Page 61

CREAM OF COURGETTE
E4
SERVES 2 4-6 6-8 8 +
FOOD PROCESSOR 3200 3200 4200
PREPARATION 20 min 20 min 30 min 30 min
COOKING 15 min 15 min 20 min 20 min
Courgettes
Chicken stock cubes
Water
Fresh tarragon leaves
Liquid crème fraîche
Salt & pepper
1. Wash and top the courgettes. Slice them in the midi bowl with the 4mm slicing
disc. Bring the water to the boil with the stock cube(s) and cook the courgettes for
20 minutes.
2. Blend the courgettes in the main bowl fitted with the metal blade and the
m
Blender
tube while the machine is running.
3. Gradually add the cooking liquid via the feed tube until the soup reaches the
desired consistency.
4. Serve in bowls or soup dishes with a scattering of tarragon leaves. Season according
to taste.
ix for 1 minute. Add the tarragon, then the crème fraîche, via the feed
2456
½11 ½2
400ml 600ml 800ml 1l
1223
60ml 100ml 150ml 180ml
Chef’s tip: To make this soup vegetarian replace the chicken stock with vegetable stock.
5200/Patissier
60
CREAM OF CAULIFLOWER WITH
DICED BACON
SERVES 2 4-6 6-8 8 +
FOOD PROCESSOR 3200 3200 4200
PREPARATION 15 min 15 min 20 min 20 min
COOKING 20 min 20 min 30 min 30 min
Cauliflower head
Crème fraîche
Ground nutmeg
Diced bacon
Salt & pepper
1. Wash the cauliflower and separate into florets. Pour the water into a thick-bottomed
pan. Add the cauliflower, cover with a lid and cook for approx. 30 minutes.
2. Meanwhile, fry the bacon in a frying pan, then blend in the main bowl fitted with
the metal blade and the Blender
cauliflower and a little of the cooking liquid.
3. Once the cauliflower has been reduced to a smooth purée, add the crème
fraîche, nutmeg, salt and pepper.
4. Check the seasoning. Serve piping hot.
m
½11 ½2
100ml 200ml 300ml 400ml
½ tsp ½ tsp 1 tsp 1 tsp
50g 100g 150g 200g
ix. While the machine is still running, add the
5200/Patissier
Page 62

GAZPACHO
SERVES 2 4-6 6-8 8 +
FOOD PROCESSOR 3200 3200 4200
PREPARATION 15 min 15 min 20 min 20 min
RESTING 3 hr 3 hr 3 hr 3 hr
Ripe tomatoes
Cucumber
Red pepper
Garlic clove
Olive oil
Lemon
250g 500g 750g 1kg
1
/ 8
1
/ 8
1
/ 4
1
/ 4
1
/ 4
1
/ 2
1 tbsp 2 tbsp 3 tbsp 4 tbsp
1
/ 2
1
/ 2
Salt & pepper
1. Wash the vegetables.
2. Peel the cucumber. Destalk and deseed the pepper. Destalk the tomatoes.
3. Cut all the vegetables into large pieces. Together with the garlic, place them
in the main bowl fitted with the metal blade and the Blendermix and blend
continuously for 1 minute.
4. Open the lid. Season the soup with salt and pepper, freshly-squeezed lemon juice
and olive oil. Blend for a further 1-2 minutes.
5. Chill for at least 3 hours before serving.
Chef’s tips: for a more sophisticated starter, garnish with finely diced vegetables.
Serve with toasted bread and homemade pesto (recipe p.29). When making
gazpacho for two, use the mini bowl.
5200/Patissier
1
/ 3
1
/ 3
3
/ 4
1
/ 2
1
/ 2
1
11
SOUPS
61
Page 63

CHILLED CARROT SOUP
SERVES 2 4-6 6-8 8 +
FOOD PROCESSOR 3200 3200 4200
PREPARATION 30 min 30 min 40 min 40 min
RESTING 3 hr 3 hr 3 hr 3 hr
COOKING 20 min 20 min 25 min 25 min
Carrots
Oranges (untreated)
Onions
Chicken stock cubes
Water
Acacia honey
Ground cumin
Olive oil
Salt & pepper
1. Bring the water almost to the boil in a large pan and dissolve the stock cubes
in it.
2. Peel the carrots and slice them in the midi bowl using the 4mm slicing disc.
Cook them in the stock.
3. Cut a sliver of orange peel and add it to the carrots as there are cooking. Peel
the onions and chop them in the mini bowl. Fry them in olive oil. Set aside.
4. When the carrots are cooked, blend them with the onions, salt and pepper in
the main bowl fitted with the metal blade and the Blender
the cooking liquid via the feed tube. Allow to cool.
5. Juice the oranges using the citrus press and add the juice to the cold carrot
soup. Add the honey and ground cumin. Stir in well with the spatula.
6. Allow to chill for at least 3 hours in the fridge.
350g 700g 1kg 1.3kg
1234
½11 ½2
1234
400ml 650ml 800ml 1l
½ tbsp 1 tbsp 1½ tbsp 2 tbsp
½ tsp 1 tsp 1½ tsp 2 tsp
E4
5200/Patissier
m
ix. Gradually add
62
Chef’s tip: for a milder taste, add a little crème fraîche.
SOUPS
Page 64

63
Page 65

CHILLED PEPPER
AND MASCARPONE SOUP
E4
SERVES 2 4-6 6-8 8 +
FOOD PROCESSOR 3200 3200 4200
PREPARATION 20 min 20 min 30 min 30 min
RESTING 3 hr 3 hr 3 hr 3 hr
COOKING 30 min 30 min 35 min 35 min
Red peppers (deseeded)
Potatoes
Garlic cloves
Onions
Bouquet garni
Mascarpone
Water
Olive oil
Pinches ground ginger
Cayenne pepper & salt
1. Peel the potatoes, onions and peppers.
2. Slice the peppers in the midi bowl using the 4mm slicing disc, then the potatoes
and finally the onion. Set aside.
3. In a thick-bottomed pan, gently fry the onion in a little olive oil over a low heat
for 2 minutes.
4. Add the peppers and garlic and cook for 10 minutes, stirring regularly.
5. Pour in the water and season with salt. Add the potatoes, ginger and bouquet
garni. Simmer gently for the amount of time indicated in the table.
6. Discard the bouquet garni. Blend the vegetables with the mascarpone and olive
oil in the main bowl fitted with the metal blade and the Blender
add the cooking liquid via the feed tube. Season with the Cayenne pepper.
7. Allow to chill for at least 3 hours in the fridge.
8. Just before serving, sprinkle with mild chili powder.
2346
½122
½122
½½1 1
½111
50g 100g 150g 200g
400ml 600ml 800ml 1l
2 tbsp 3 tbsp 5 tbsp 6 tbsp
1234
5200/Patissier
m
ix. Gradually
64
SOUPS
Page 66

STARTERS
Page 67

SPRING VEGETABLE CLAFOUTIS
SERVES
FOOD PROCESSOR
PREPARATION
BAKING
EQUIPMENT
Eggs
Crème fraîche
Courgettes
Carrots
Turnips
Red pepper
Onions
Cherry tomatoes
Chives
Thyme sprigs
Pinches ground nutmeg
2 4-6 6-8 8 +
3200 3200 4200 5200/Patissier
20 min 20 min 30 min 30 min
40 min 40 min 50 min 50 min
Small cassolettes
1234
160ml 320ml 500ml 650ml
1
/2
1
/2
11½2 3
1
/4
1
/2
35810
2346
1122
1234
3
/4 11½
3
/4 11½
1
/3 ½1
1
/2 11½
R4
E4
Tart tin Ø 26-30cm
Salt & pepper
1. Wash the vegetables and peel the carrots and onions.
2. Grate the carrots, courgettes and turnips in the midi bowl using the 4mm grater
disc. Set aside.
3. Replace the grater disc with the 4mm slicing disc. Slice the pepper and onions.
Set aside.
4. Break the eggs into the main bowl fitted with the metal blade. Add the snipped
chives, crème fraîche and nutmeg. Season with salt and pepper. Blend for 30
seconds.
5. Butter the tart tin (or cassolettes) and arrange the vegetables on the bottom. Top
with the egg mixture. Add the halved cherry tomatoes and scatter with thyme.
6. Bake for the amount of time indicated in the table in an oven preheated to 180 °C
(gas mark 4).
66
Chef’s tip: this starter is delicious served with a garlic sauce.
Switch your processor on and drop two garlic cloves (peeled) into the mini bowl.
Open the machine, scrape the garlic off the bowl walls with the spatula and add
1 tsp smooth mustard. Switch the processor back on and trickle in 150ml olive oil
via the feed tube. Season to taste and add the juice of ½ lemon. This veg bake
is best eaten warm, accompanied by the garlic sauce and a green salad with a
walnut-oil dressing.
STARTERS
Page 68

COLESLAW
R2
E2
SERVES 2 4-6 6-8 8 +
FOOD PROCESSOR
PREPARATION 10 min 10 min 10 min 10 min
Head white cabbage
Onions
Carrots
Strong mustard
Mayonnaise
White wine vinegar
Salt, pepper & sugar
1. Make the mayonnaise according to the recipe on p.28, halving the amounts.
2. Wash the vegetables, peel the onions and carrots. Grate the carrots in the midi
bowl with the 2mm grater disc. Set aside.
3. Replace the grater disc with the 4mm slicing disc. Slice the cabbage and onions.
4. Transfer the vegetables to a mixing bowl. Add the mayonnaise, vinegar,
mustard, salt, pepper and sugar.
5. Check the seasoning.
6. Stir well and keep in the fridge till ready to serve.
Chef’s tips: for a sweet-and-sour starter, add raisins. For extra crunch, scatter
with walnuts just before serving.
3200 3200 4200 5200/Patissier
1
/6
1
/4
2346
½ tsp 1 tsp 1½ tsp 2 tsp
2 tbsp 4 tbsp 6 tbsp 8 tbsp
½ tbsp 1 tbsp 2 tbsp 3 tbsp
1
/4
1
/2 11½
1
/2 1
STARTERS
67
Page 69

CRUNCHY VEG
R4
E2
AND PASTA SALAD
SERVES 2 4-6 6-8 8 +
FOOD PROCESSOR
PREPARATION 15 min 15 min 20 min 20 min
RESTING 1 hr 1 hr 1 hr 1 hr
COOKING 10 min 10 min 10 min 10 min
Penne pasta
Pink radishes
Carrots
Red peppers
Red onions
Lemons
Sprigs basil
Sprigs flat-leaved parsley
Olive oil
Salt & pepper
1. Cook the pasta according to the instructions on the packet (approx. 10 minutes).
Drain and rinse under the cold tap. Transfer to a mixing bowl and sprinkle with
olive oil and freshly-squeezed lemon juice.
2. Set aside in the fridge for at least an hour.
3. After 30 minutes, chop the parsley and basil in the mini bowl. Add to the pasta
and return to the fridge.
4. Wash and peel the vegetables. Grate the carrots and courgettes in the midi
bowl with the julienne disc or, failing that, the 4mm grater disc. Set aside.
5. Replace the grater/julienne disc with the 2mm slicing disc. Slice the radishes,
stacking them vertically in the feed tube before switching the processor on. Set
aside.
6. Keep all these vegetables in a bowl of cold water in the fridge so that they retain
their full crunchiness.
7. Slice the onions and red peppers with the 2mm slicing disc and put them in their
own container in the fridge.
8. Just before serving, drain the vegetables thoroughly and add them to the pasta,
together with the onion and red pepper.
9. Season according to taste.
3200 3200 4200 5200/Patissier
170g 325g 500g 700g
36812
½112
½112
½112
½112
½112
½112
1246
35ml 65ml 100ml 125ml
68
STARTERS
Page 70

TOMATO AND MOZZARELLA
BRUSCHETTE
E2
SERVES 2 4-6 6-8 8 +
FOOD PROCESSOR
PREPARATION 10 min 10 min 10 min 10 min
GRILLING 5 min 5 min 5 min 5 min
Slices country loaf
Tomatoes
Tapenade
Mozzarella slices (1cm thick)
Garlic cloves
Fresh basil leaves
Salt & pepper
01. Bake a country loaf according to the recipe on p.38.
02. Make the tapenade according to the recipe on p.34, halving the amounts.
03. Very lightly toast the slices of bread in the toaster (or the oven) and rub them
with the halved garlic cloves.
04. Wash the tomatoes and slice them in the midi bowl with the 2mm slicing disc.
06. Transfer to a colander and sprinkle with salt to drain out the excess liquid.
07. Spread the bread slices with the tapenade. Top with the sliced tomato, followed
by the mozzarella. Season to taste.
08. Place under the oven grill for 3 minutes, or until the cheese has melted.
09. Decorate with a few fresh basil leaves.
10. Serve slightly warm.
3200 3200 4200 5200/Patissier
2468
½ 1 1½ 2
2 tbsp 4 tbsp 6 tbsp 8 tbsp
4 8 12 16
½½1 1
4 8 12 16
STARTERS
69
Page 71

PARMESAN SOUFFLÉ
R2
SERVES 2468
FOOD PROCESSOR
PREPARATION 20 min 20 min 30 min 30 min
BAKING 15 min 15 min 15 min 15 min
EQUIPMENT Straight-sided ramekins
Eggs
Parmesan cheese
Butter
Plain flour
Water
1. Grate the parmesan in the mini bowl with the parmesan grater or, failing that,
the 2mm grater disc. Set aside.
2. Make a roux* by melting the butter in a saucepan over a low heat and adding
the flour, stirring it in rapidly with a wooden spoon. Cook over a low heat,
stirring continuously. As soon as the mixture starts to thicken, gradually add
the hot water, still constantly stirring. Simmer for 3 minutes over a high heat,
stirring constantly. Stir in the grated parmesan.
3. Preheat your oven to 180 °C (gas mark 4).
4. Separate the eggs.
5. Gently incorporate the egg yolks into the mixture away from the heat, adding
them one by one.
6. Allow to cool.
7. Put the egg whites in the main bowl fitted with the whisk and beat for 5 minutes,
remembering to remove the pusher before you begin.
8. Fold the egg whites gently into the cooled mixture. Season with pepper.
9. Divide the mixture between the ramekins. Bake for 15 minutes and serve
immediately.
3200 3200 4200 5200/Patissier
2468
80g 160g 240g 320g
10g 15g 20g 30g
1 tbsp 1½ tbsp 2 tbsp 3 tbsp
100ml 200ml 300ml 400ml
70
Chef’s tip: serve on a bed of lamb’s lettuce or a mixed green salad.
STARTERS
Page 72

Page 73

COUNTRY PÂTÉ
SERVES 2 4-6 6-8 8 +
FOOD PROCESSOR
PREPARATION 10 min 10 min 10 min 10 min
BAKING 2 hr 2 hr 2½ hr 2½ hr
EQUIPMENT: TERRINE
Pork
Chicken livers
Veal escalopes
Eggs
Cognac
Pork caul* (optional)
Fresh thyme and bay leaves
Salt & pepper
1. Preheat your oven to 180 °C (gas mark 4). If you are using caul fat, soak it in
hot water.
2. Put the chicken livers, pork, salt and pepper in the main bowl fitted with the metal
blade.
3. Pulse a few times. Add the eggs and cognac via the feed tube. Pulse again 5-6
times. The meat should not be too finely minced.
4. Squeeze out the caul fat and line the terrine with it.
5. Transfer a third of the mixture to the terrine, add some of the veal, cut into thin
strips, and scatter with thyme. Repeat this process, ending with the final third.
6. Decorate with a few bay leaves and sprigs of thyme.
7. Pour some water into the oven’s drip tray (or another dish), place the terrine in it
and cook in the oven for the time indicated in the table.
8. Allow to cool, then transfer to the fridge.
3200 3200 4200 5200/Patissier
250g 500g 750g 1kg
125g 250g 375g 500g
60g 125g 190g 250g
1123
1 tbsp 2 tbsp 3 tbsp 4 tbsp
1111
72
Chef’s tip: serve with toasted country loaf and gherkins.
Page 74

SALMON RILLETTES
SERVES 2 4-6 6-8 8 +
FOOD PROCESSOR
PREPARATION 15 min 15 min 15 min 15 min
RESTING 2 hr 2 hr 2 hr 2 hr
COOKING 5-10 min 5-10 min 5-10 min 5-10 min
Fresh salmon steaks
Smoked salmon
Thick crème fraîche
Lemon
Cucumber
Chive leaves
Sprigs dill
Pine nuts (optional)
Salt & pepper
1. Steam the salmon steaks for 10 minutes.
2. During this time, wash and peel the cucumber. Cut into three sections. Fit the
dicing kit in the midi bowl, switch the processor on and dice the cucumber
sections one at a time, exerting a steady pressure on the pusher with both
hands. If you do not having the dicing kit, cut the cucumber into large dice
by hand. Transfer to a colander and sprinkle with salt to drain out the excess
liquid.
3. Put the fresh dill in the main bowl with the metal blade and pulse a few times.
4. Add the cooked salmon, broken up into large flakes, followed by the smoked
salmon, cut into pieces, and the crème fraîche. Blend for 30 seconds.
5. Open the lid and add the juice of the freshly-squeezed lemon, together with the
snipped chives. Season to taste.
6. Blend for a further 30 seconds. Check the seasoning.
7. Divide the diced cucumber between glasses and top with the salmon mixture.
Scatter with toasted pine nuts and a sprig of dill.
8. Chill in the fridge for 2 hours before serving.
3200 3200 4200 5200/Patissier
100g 200g 300g 400g
50g 100g 150g 200g
50g 100g 150g 200g
½½1 1
½½1 1
35710
1223
STARTERS
73
Page 75

SALMON BLINIS
Preparation: 10 min Resting: 1hr Cooking: 2 min per blini
Equipment: 9cm blini or frying pan
Blini batter
250g plain flour
250ml milk
25g thick crème fraîche
25g butter
14 blinis
7g fresh yeast*
3 eggs
1 pinch salt
Sauce
300g thick crème fraîche
200g St Moret® or Philadelphia® cream cheese
1 tsp salt
2 sprigs dill
juice of 1 lime
smoked salmon or salmon roe
To make the blini batter
01. Stir the yeast into the warm (35 °C) milk with a fork until it dissolves. Allow to rest
for 1 minute.
02. Separate the eggs.
03. Put the flour, salt, egg yolks and yeast liquid in the main bowl fitted with the dough
blade. Process for 30-60 seconds.
04. Beat the egg whites in the bowl with the whisk for 5 minutes, remembering to remove
the pusher before you begin.
05. Gently fold the crème fraîche into the dough, followed by the egg whites, using the
spatula.
06. Heat the blini pan, brush with butter and cook each blini for 1 minute on each side.
Different brands of flour require different amounts of water. Refer to the instructions
on the packet of flour for further advice on water quantity required.
To make the sauce
01. Put the crème fraîche in the mini bowl, followed by the
cream cheese, lemon juice, salt and dill in that order.
02. Blend for 30 seconds and set aside in the fridge.
03. To serve, top each blini with a spoonful of sauce and add
a morsel of smoked salmon or a heap of salmon roe.
74
STARTERS
Page 76

VEGETABLES
Page 77

PROVENÇAL VEGETABLE TIAN
E4
SERVES
FOOD PROCESSOR
PREPARATION
BAKING
Tomatoes
Red peppers
Green peppers
Courgettes
Aubergines
Black olives
Garlic cloves
Thyme, basil
Olive oil, salt & pepper
1. Preheat your oven to 210 °C (gas mark 6-7).
2. Wash and dry the vegetables. Carefully deseed the peppers. Set aside.
3. Slice the vegetables separately in the midi bowl, using the 4mm slicing disc.
4. Arrange the sliced vegetables and garlic (unpeeled) in separate layers in an oven
dish.
5. Scatter with olives, thyme and snipped basil leaves. Sprinkle generously with olive
oil. Season.
6. Bake in the oven, adding a glass of water halfway through to prevent the vegetables
from drying out.
2 4-6 6-8 8 +
3200 3200 4200
5200/Patissier
10 min 10 min 20 min 20 min
50 min 50 min 1h 1h
250g 350g 500g 650g
½123
½112
1222
½112
40g 75g 100g 150g
2345
76
SWEETCORN PANCAKES
SERVES
FOOD PROCESSOR
PREPARATION
COOKING
EQUIPMENT
250g sweetcorn
Eggs
Plain flour
Milk
1. Blend all the ingredients in the main bowl fitted with the metal blade for 1-2 minutes.
Season.
2. Heat a small frying pan brushed with oil. Ladle the batter into the frying pan to form
small pancakes. Cook for 1 minute on each side.
Chef’s tip: delicious with game and poultry.
VEGETABLES
2 4-6 6-8 8 +
3200 3200 4200
5 min 5 min 5 min 5 min
2 min 2 min 2 min 2 min
8-10cm frying pan
½11 ½2
2356
60g 100g 150g 200g
10ml 15ml 20ml 30ml
5200/Patissier
Page 78

POTATO RÖSTI
R2
SERVES
FOOD PROCESSOR
PREPARATION
COOKING
Potatoes
Garlic cloves
Butter
Oil
Parsley sprigs
Salt & pepper
1. Peel, rinse and dry the potatoes.
2. Peel the garlic, cut in half lengthways and remove the central shoot. Wash and
dry the parsley. Put the garlic and parsley in the mini bowl and pulse 4 times.
3. Grate the potatoes in the midi bowl with the 2mm grater disc.
4. Transfer the grated potatoes to a mixing bowl with the garlic-and-parsley
mixture. Combine thoroughly and season. You can either cook one large patty
or divide the mixture into small balls and flatten them to make individual patties.
5. Heat the oil and butter in a frying pan. Transfer the rösti(s) to the pan and cook
over a moderate heat for 15 minutes.
6. When the underside is golden brown, turn the rösti(s) over.
7. Cook for a further 15 minutes.
2 4-6 6-8 8 +
3200 3200 4200
5200/Patissier
20 min 20 min 25 min 30 min
30 min 30 min 30 min 30 min
600g 1kg 1.5kg 2kg
2345
25g 40g 60g 80g
2 tbsp 3 tbsp 5 tbsp 6 tbsp
46812
Chef’s tip: delicious with roast chicken or rib of beef.
VEGETABLES
77
Page 79

CELERIAC PURÉE
E4
SERVES
FOOD PROCESSOR
PREPARATION
COOKING
Celeriac
Thick crème fraîche
Olive oil
Salt
1. Peel and wash the celeriac. Cut into large pieces and grate in the midi bowl with
the 4mm grater disc.
2. Pour a litre of water into a large pan or pressure cooker. Add the celeriac. Put the lid
on and cook until the celeriac is very soft and easily pierced with the tip of a knife.
Drain and allow to cool slightly.
3. Blend the celeriac in the main bowl with the metal blade for 1-2 minutes.
4. When it has reached a smooth consistency, add the crème fraîche.
5. Switch the machine back on and slowly trickle the oil in via the feed tube. Season
with salt.
6. Reheat the purée for 5 minutes over a low heat.
Chef’s tip: you can make purées from a huge range of vegetables (carrots, courgettes, etc.).
2 4-6 6-8 8 +
3200 3200 4200
5200/Patissier
10 min 10 min 15 min 15 min
20 min 20 min 25 min 25 min
500g 750g 1kg 1.5kg
65ml 100ml 125ml 200ml
1 tbsp 2 tbsp 3 tbsp 4 tbsp
78
VEGETABLE CRISPS
SERVES
FOOD PROCESSOR
PREPARATION
FRYING
Potatoes
Courgettes
Turnips
Oil for frying, salt & pepper
1. Wash the vegetables.
2. Peel the potatoes and turnips. Top and tail the courgettes.
3. Slice the vegetables separately in the midi bowl with the 2mm slicing disc.
4. Heat the oil in your deep fryer. As soon as it is hot, fry the vegetable slices.
5. Drain on a wad of kitchen paper before transferring to a serving dish. Season with
salt and pepper.
6. Serve immediately.
VEGETABLES
2 4-6 6-8 8 +
3200 3200 4200
15 min 15 min 20 min 25 min
5 min 5 min 5 min 5 min
2468
2234
2468
E2
5200/Patissier
Page 80

RATATOUILLE
S
over a low heat without the lid for approx. 40 minutes, stirring frequently
withawooden spooon.
E4
SERVES
FOOD PROCESSOR
PREPARATION
COOKING
Courgettes
Tomatoes
Onions
Aubergines
Peppers
Garlic cloves
Bay leaves, fresh thyme
Olive oil, salt & pepper
1. Wash the vegetables. Halve and deseed the peppers. Peel the onions and garlic.
Halve the garlic lengthways and remove the central shoot.
2. Dice all the vegetables (apart from the garlic) separately in the midi bowl fitted with
the dicing kit or, failing that use the 4mm slicing disc.
3. Soften the onions and garlic in a thick-bottomed pan with a little olive oil. Add the
peppers. When cooked, lift the vegetables out with a slotted spoon and set aside.
4. Fry the courgettes and aubergines. Lift out and set aside.
5. Add the tomatoes to the pan and cook for 10 minutes. Return all the other vegetables
to the pan.
6. Season and add the herbs.
7. Simmer over a low heat without the lid for approx. 40 minutes, stirring frequently
with a wooden spoon.
2 4-6 6-8 8 +
3200 3200 4200
5200/Patissier
30 min 30 min 35 min 35 min
50 min 50 min 1hr 1hr
150g 250g 375g 500g
300g 500g 750g 1kg
1223
1
/2 122
1
/2 122
1234
Page 81

POTATO GRATIN
E2
R2
SERVES
FOOD PROCESSOR
PREPARATION
BAKING
Potatoes
Gruyère cheese
Thick crème fraîche
Butter
Milk
Garlic clove
Pinch ground nutmeg
Salt & pepper
1. Grate the cheese in the midi bowl with the 2mm grater disc. Set aside.
2. Peel, wash and dry the potatoes.
3. Replace the grater disc with the 2mm slicing disc. Slice the potatoes.
4. Preheat your oven to 180 °C (gas mark 4).
5. Peel and halve the garlic cloves. Rub the inside of a gratin dish with them. Butter
the dish. Arrange a layer of sliced potato on the bottom, add some grated
cheese, salt and pepper and a little crème fraîche. Repeat these steps until all the
ingredients have been used up, ending with the cheese.
6. Stir the ground nutmeg into the milk and pour over the potatoes.
7. Bake in the oven. The potatoes are cooked when they are easy to pierce with a
knife.
8. Serve immediately.
2 4-6 6-8 8 +
3200 3200 4200
5200/Patissier
20 min 20 min 25 min 35 min
1hr 1hr 1hr10 min 1¼ hr
600g 1kg 1.5kg 2kg
80g 150g 180g 200g
50ml 80ml 120ml 160ml
20g 30g 45g 60g
200ml 500ml 750ml 1l
1111
1111
80
Page 82

FISH
Page 83

HAKE AND VEGETABLE JULIENNE*
PARCELS
R4
E2
SERVES
FOOD PROCESSOR
PREPARATION
BAKING
EQUIPMENT
Hake fillets
Courgettes
Carrots
Turnips
Red peppers
White wine
Lemon
Sprigs of dill
2 4-6 6-8 8 +
3200 3200 4200
5200/Patissier
30 min 30 min 35 min 35 min
25 min 25 min 25 min 25 min
Kitchen string, baking parchment
2468
1234
2356
2356
1234
60ml 100ml 150ml 200ml
1111
2468
Olive oil, salt & pepper
1. Wash the vegetables. Peel the courgettes, carrots and turnips.
2. Grate the courgettes, carrots and turnips separately in the midi bowl fitted with
the julienne disc or, failing that, the 4mm grater disc, stacking them horizontally
in the feed tube.
3. Replace the julienne/grater disc with the 2mm slicing disc. Slice the peppers
and lemon. Set the lemon aside.
4. Fry the vegetables with a dash of olive oil for 5 minutes. Season.
5. Take a separate sheet of baking parchment for each fillet. Place a small mound
of vegetables in the middle of each one and lay the fish on top. Sprinkle with a
little white wine. Add a sprig of dill and a slice of lemon.
6. Season.
7. Wrap the parchment up like a boiled sweet, securing the ends with string.
8. Bake in a preheated oven at 180 °C (gas mark 4) for 20-25 minutes. The precise
time will vary, depending on the thickness of the fillets and the vegetables.
9. Open the parcels just before serving.
82
Chef’s tip: you can use other types of fish, such as salmon and perch.
FISH
Page 84

CRAB CAKES
SERVES
FOOD PROCESSOR
PREPARATION
COOKING
NUMBER OF CAKES
Crabmeat
Butter
Rusks
Eggs
Mustard
Pinches Cayenne pepper
Bunches of parsley
Worcestershire sauce
Mayonnaise
2 4-6 6-8 8 +
3200 3200 4200
5200/Patissier
15 min 20 min 20 min 20 min
10 min 10 min 10 min 10 min
6 121824
160g 240g 320g 500g
30g 45g 60g 80g
2246
1223
1 tsp 2 tsp 2 tsp 3 tsp
1223
½112
1 tbsp 2 tbsp 2 tbsp 3 tbsp
1 tbsp 2 tbsp 2 tbsp 3 tbsp
Homemade breadcrumbs
(stale bread)
Salt & pepper
To make the homemade breadcrumbs
1. Cut the bread into 2cm slices and leave to go stale.
2. Put the bread in the main bowl with the metal blade (process in several batches
for a better end result).
3. Process for 2 minutes.
4. For more flavoursome breadcrumbs, open the lid, add a selection of dried
herbs (thyme, sage, rosemary, summer savory, etc.) and pulse a few times.
5. Store in an airtight container.
To make the crab cakes
1. Make the mayonnaise according to the recipe on p.28, halving the amounts.
2. Break the rusks and put them in the main bowl with the metal blade.
3. Process until the rusks have been reduced to a fine crumb, then add the parsley,
Worcestershire sauce, mustard and mayonnaise.
4. Add the eggs via the feed tube while the machine is still running. Add the
crabmeat and pulse a few times to combine.
5. Season generously - the cakes must not be bland.
6. Shape the mixture into cakes measuring 3cm across. Refrigerate for 30 minutes.
7. Roll the cakes in the breadcrumbs, heat the butter in the frying pan and cook
the cakes for about 2-3 minutes on each side or until golden.
Chef’s tip: serve with lemon slices and green beans or a green salad.
FISH
83
Page 85

ORIENTAL FISHCAKES
SERVES
FOOD PROCESSOR
PREPARATION
COOKING
NUMBER OF CAKES
Cod
Nam pla fish sauce
Ground turmeric
Ground cumin
Ground ginger
Eggs
Sugar
Lemongrass stalks
Fresh green chilli peppers
2 4-6 6-8 8 +
3200 3200 4200
5200/Patissier
15 min 15 min 15 min 15 min
10 min 10 min 10 min 10 min
6 121824
230g 450g 680g 900g
1 tbsp 2 tbsp 3 tbsp 4 tbsp
½ tsp 1 tsp 2 tsp 2 tsp
½ tsp 1 tsp 2 tsp 2 tsp
½ tsp 1 tsp 2 tsp 2 tsp
1122
½ tsp 1 tsp 2 tsp 2 tsp
1234
½112
Salt & pepper
1. Remove the outer leaves of the lemongrass and discard the tough base. Slice the
soft inner core and set aside.
2. Deseed the chili peppers and set aside.
3. Process the lemongrass in the mini bowl for 40 seconds. Add the chilli peppers and
run for a further 5-10 seconds.
4. Put the fish in the main bowl with the metal blade, followed by the chili-lemongrass
mixture and all the other ingredients. Season to taste. Pulse 7-10 times to obtain an
even consistency.
5. Shape the mixture into balls measuring 3 cm across. Flatten with your hand.
6. Heat the oil in a frying pan and cook the cakes for about 2 minutes on each side.
84
Chef’s tip: delicious with a sweet-and-sour sauce. For a crunchier texture, add
raw green beans.
FISH
Page 86

Page 87

SALMON TARTARE
SERVES
FOOD PROCESSOR
PREPARATION
EQUIPMENT
Raw salmon
Lemons or limes
Olive oil
Bunches chives
Red and yellow peppers
Capers
Onions
2 4-6 6-8 8 +
3200 3200 4200
5200/Patissier
15 min 15 min 20 min 30 min
Food ring / cutter (optional)
400g 800g 1.1kg 1.5kg
1234
2 tbsp 4 tbsp 6 tbsp 8 tbsp
1122
1122
2 tbsp 4 tbsp 6 tbsp 8 tbsp
1233
Pepper
1. Peel the onions. Snip the chives. Set aside.
2. Put the onions in the main bowl with the metal blade and pulse 3 times.
3. Deseed the peppers, remove the white pith, and cut into pieces.
4. Add the peppers to the main bowl and pulse 4 times.
5. Chop the salmon into large pieces and add to the main bowl along with the capers
and chives. Pulse 4 times.
6. Open the lid and pour in the olive oil and freshly-squeezed lemon or lime juice.
Season with pepper. Pulse 1-2 times.
7. Lightly grease a mould, fill with the chopped salmon. Once set carefully remove
the mold.
8. Serve immediately with toast.
86
Page 88

FISH PIE
E2
SERVES
FOOD PROCESSOR
PREPARATION
BAKING
EQUIPMENT
Haddock fillets
Liquid crème fraîche
Parmesan cheese
Fresh spinach
Potatoes
Eggs
Onions
Carrots
Lemons
Mustard
Handfuls of parsley
Olive oil
01. Preheat your oven to 240 °C (gas mark 9).
02. Peel the potatoes. Slice them in the midi bowl with the 2mm slicing disc.
03. Transfer to a pan of boiling water. Bring back to the boil and cook for 2 minutes.
04. While the potatoes are cooking, cook the spinach for 1 minute in a sieve placed
over the pan. Drain and set aside.
05. Chop the onions, carrots and parsley in the mini bowl.
06. Fry in a little olive oil for 5 minutes.
07. Remove from the heat. Add half the parmesan, plus the lemon juice and mustard.
Set aside.
08. Blend the spinach, fish, eggs and crème fraîche in the main bowl with the metal
blade.
09. Arrange a layer of the fish and spinach mixture, then the onion and carrot mixture
in a large gratin dish. Cover with a layer of potatoes.
10. Between each layer, sprinkle a little olive oil and pepper. Top the gratin with the
remaining parmesan.
11. Bake until the top is golden brown.
2 4-6 6-8 8 +
3200 3200 4200
5200/Patissier
30 min 30 min 30 min 30 min
25 min 25 min 25 min 25 min
Gratin dish
150g 300g 450g 600g
40ml 75ml 100ml 150ml
70g 100g 150g 200g
150g 300g 450g 600g
35810
1234
1122
1122
1122
1 tbsp 1 tbsp 2 tbsp 2 tbsp
1122
Chef’s tip: you can use cod instead of haddock.
FISH
87
Page 89

SMOKED SALMON SOUFFLÉ
SERVES
FOOD PROCESSOR
PREPARATION
BAKING
EQUIPMENT
Smoked salmon
Rice flour
Egg yolks
Egg whites
Milk
Tomato ketchup
Vodka
Pinches Cayenne pepper
Pinches ground nutmeg
Plain flour
Knobs butter
2 4-6 6-8 8 +
3200 3200 4200
5200/Patissier
20 min 20 min 25 min 25 min
10 min 10 min 15 min 20 min
Straight-sided ramekins
50g 100g 150g 200g
15g 25g 40g 50g
1234
2357
80ml 100ml 150ml 200ml
1 tsp 1 tsp 1 ½ tsp 2 tsp
1 tbsp 1 tbsp 1 ½ tbsp 2 tbsp
1112
1234
1 tbsp 1 tbsp 2 tbsp 3 tbsp
1122
Salt & pepper
1. Cut the salmon into pieces and put in the mini bowl. Pulse twice, then run
continuously for 1 minute. Set aside.
2. Mix the milk and rice flour together and cook in a saucepan over a low heat,
gradually bring to boiling point. Remove from the heat.
3. Add the salmon in the saucepan, together with the egg yolks, ketchup, vodka,
Cayenne pepper, pepper and nutmeg.
4. Combine thoroughly.
5. Preheat your oven to 150 °C (gas mark 2).
6. Beat the egg whites in the main bowl with the whisk for 5 minutes, remembering
to remove the pusher or cap before you begin.
7. Butter the ramekins and dust with flour.
8. Gently fold the egg whites into the salmon mixture with the spatula. Divide the
mixture between the ramekins. They should not be more than three-quarters
full. Slide a knife blade between the sides of the ramekins and the mixture.
9. Bake for the time indicated in the table. Serve immediately.
88
FISH
Page 90

MEAT
Page 91

COTTAGE PIE
R2
E2
SERVES
FOOD PROCESSOR
PREPARATION
BAKING
Floury potatoes
Rump steak
Onions
Garlic cloves
Sprigs flat-leaved parsley
Eggs
Butter
Gruyere cheese
Oil
Milk
Salt & pepper
01. Grate the cheese in the midi bowl with the 2mm grater disc. Set aside.
02. Wash and peel the potatoes. Replace the grater disc with the 2mm slicing disc.
Slice half the potatoes, empty the bowl, then slice the other half. Cook in a pan
of water for 30-40 minutes (20 minutes in a pressure cooker).
03. Drain the potatoes. Place half of them in the main bowl with the metal blade.
Add a little milk and pulse 4-5 times. Add a little more milk if you prefer a softer
consistency. Set aside. Repeat these steps with the other half of the potatoes.
04. Transfer to a mixing bowl.
05. Add three-quarters of the butter. Season with salt and pepper. Wait for the
butter to melt, then stir in.
06. Preheat your oven to 210 °C (gas mark 6-7).
07. Peel and quarter the onions. Peel the garlic. Chop in the main bowl with the
metal blade, together with the parsley.
08. Cut the steak into large pieces and add to the onion and garlic mixture in the
main bowl. Pulse 3 times, then switch to continuous mode for 1 minute.
09. Heat the rest of the oil and butter in a frying pan. Fry the meat for 1 minute,
stirring constantly. Away from the heat, stir in the eggs and season.
10. Put the meat in a gratin dish and cover with the mashed potato. Smooth the
surface.
11. Scatter with grated cheese and dot with butter. Bake for 20 minutes.
12. Serve piping hot.
2 4-6 6-8 8 +
3200 3200 4200
5200/Patissier
40 min 40 min 45 min 50 min
50 min 50 min 50 min 50 min
800g 1.5kg 2kg 2.5kg
280g 550g 725g 1kg
1234
1122
2234
1123
40g 70g 100g 140g
30g 50g 70g 100g
90
MEAT
Page 92

CURRIED LAMB FILO PARCELS
SERVES
FOOD PROCESSOR
PREPARATION
RESTING
COOKING
Saddle of lamb
Curry powder
Bananas
Eggs
Garlic cloves
Filo sheets
Oil
Egg yolk
2 4-6 6-8 8 +
3200 3200 4200
5200/Patissier
25 min 25 min 35 min 40 min
2 hr 2 hr 2 hr 2 hr
20 min 20 min 30 min 30 min
300g 600g 900g 1.2kg
2 tsp 2 tsp 3 tsp 3 tsp
3
/4 11
1122
1 1 1½ 2
2468
1 tbsp 2 tbsp 3 tbsp 4 tbsp
1111
1
/2 2
Salt & pepper
01. Cut the lamb into large cubes. Combine thoroughly with the curry powder and
allow to marinade for 2 hours.
02. Slice the bananas. Peel the garlic and put it in the main bowl with the metal
blade, along with the lamb. Process for 45 seconds. Add the bananas and
pulse 2-3 times. Add the eggs via the feed tube. Season. Blend for a further
20 seconds.
03. Check the seasoning (it should be hot!).
04. Heat 2 tbsp oil in a frying pan. Fry the mixture, then cook for 5-10 minutes,
stirring constantly.
05. Preheat your oven to 180 °C (gas mark 4).
06. Peel the paper backing away from the sheets of filo pastry.
07. Lay a small heap of filling in the middle of each sheet. Fold the left side over,
then the right side. Next, fold the top and bottom sides up to form squares or
triangles. Brush the last flap of pastry with egg yolk to seal the parcel.
08. Place each parcel on a baking sheet lined with baking parchment, with the
join underneath. Brush the top with egg.
09. Bake in the oven for approx. 15 minutes.
10. If the pastry browns too quickly, turn the temperature down.
MEAT
91
Page 93

HAMBURGERS
Preparation: 10 min Resting: 1 hr Cooking: 10 min
E2
Bread buns
300g strong white flour
120ml hand-hot water
10g fresh yeast*
40g melted butter
25g caster sugar
3g salt
6 burgers
1 egg
1 egg yolk beaten with 3 tsp milk
(for brushing)
sesame seeds (optional)
Minced meat
400g lean beef
½ red onion
1 tbsp olive oil
salt & pepper
Garnish
2 tomatoes
½ red onion
1 ‘Little Gem’ lettuce
6 cheese slices
mayonnaise, tomato ketchup
To make the bread buns
01. Stir the yeast into the warm (35 °C) water with a fork until it dissolves. Allow to rest for
1 minute.
02. Put the salt, flour, sugar, butter, egg and yeast liquid in the main bowl fitted with the
dough blade.
03. Process for 30 seconds.
04. Transfer the dough to a floured mixing bowl using the spatula. Cover with cling film or
a damp cloth. Leave to rest for 30 minutes.
05. Knock the dough down by giving it a few gentle punches. Turn out onto a floured
worktop.
06. Divide into 6 equal pieces using a sharp knife
topped buns so that they have a uniform appearance after baking B.
07. Take a shelf out of the oven and line it with baking parchment. Arrange the buns on
top, cover with a damp cloth and prove for 30 minutes.
08. Preheat your oven to 220 °C (gas mark 7).
09. Brush the buns with the egg-and-milk mixture C.
10. Scatter with sesame seeds D.
11. Bake in the oven for 10 minutes, or until golden.
12. Allow to cool before eating.
. Shape the dough into smooth-
A
Chef’s tips: you can replace the sesame seeds with poppy or sunflower seeds. For people
with a healthy appetite, make four buns instead of six.
Different brands of flour require different amounts of water. Refer to the instructions on the
packet of flour for further advice on water quantity required.
A B C D
92
Page 94

To make the burgers and garnish
01. Wash the lettuce. Peel and halve the onion. Slice the tomatoes, one of the onion halves
and the lettuce in the midi bowl with the 2mm slicing disc. Set aside.
02. Cut the remaining half-onion into pieces, transfer to the main bowl with the metal blade
and pulse 5 times.
03. Cut the meat into large pieces. Add to the onion in the main bowl. Pulse a few times -
the meat should be minced, not hashed. Season. Pulse 2 more times.
04. Shape the hamburgers with your hands. Fry them in a frying pan with a little olive oil
for about 2 minutes on each side.
05. Top each hamburger with a cheese slice. Cover the frying pan until it is time to serve.
06. Make the mayonnaise according to the recipe on p.28, halving the amounts.
07. Split the buns, fill with tomato, lettuce, steak, mayonnaise and ketchup.
08. Eat while they are hot.
Chef’s tips: for even tastier hamburgers, add a slice of bacon to each one. Serve with
french fries.
93
Page 95

STUFFED TOMATOES
SERVES
FOOD PROCESSOR
PREPARATION
COOKING
Large tomatoes
Beef steak
Bread (crusts removed)
Milk
Garlic cloves
Onions
Sprigs parsley
Paprika
2 4-6 6-8 8 +
3200 3200 4200
5200/Patissier
30 min 30 min 40 min 50 min
40 min 40 min 45 min 45 min
4 8 12 16
225g 450g 675g 900g
60g 100g 130g 150g
2 tbsp 4 tbsp 4 tbsp 6 tbsp
1233
1122
35710
1 tsp 1 tsp 2 tsp 2 tsp
Salt & pepper
01. Preheat your oven to 180 °C (gas mark 4).
02. Wash the tomatoes. Remove the top third, or “hat”. Scoop out the flesh with a
teaspoon. Set aside, do not throw away. Sprinkle salt on the inside and place
them upside down on kitchen paper to drain out the excess liquid.
To make the stuffing
01. Soak the bread in lukewarm milk.
02. Peel and quarter the garlic and onions, removing the garlic’s bitter central shoot.
Wash and dry the parsley. Transfer to the main bowl with the metal blade. Pulse
3-4 times.
03. Cut the meat into large pieces and add to the main bowl. Process for 20 seconds.
Squeeze the bread out and add to the bowl, together with a little of the tomato
flesh, the paprika and the salt and pepper.
04. Pulse 4-5 times to achieve an even texture. Check the seasoning.
05. Fill the tomatoes with the meat stuffing. Put their “hats” back on. Arrange in an
oven dish and sprinkle with olive oil.
06. Bake for the time indicated in the table.
94
Chef’s tip: delicious served with rice or bulgur wheat.
Page 96

KEFTA KEBABS
SERVES
FOOD PROCESSOR
PREPARATION
COOKING
Lean beef
Onion
Sprigs fresh coriander
Sprigs fresh mint
Ground cumin
Paprika
Ras el hanout (Moroccan) spice mix
Olive oil
2 4-6 6-8 8 +
3200 3200 4200
5200/Patissier
20 min 20 min 20 min 20 min
10 min 10 min 10 min 10 min
250g 500g 700g 1kg
½½1 1
1133
1133
1 tsp 1 tsp 2 tsp 2 tsp
1 tsp 1 tsp 2 tsp 2 tsp
1 tsp 1 tsp 2 tsp 2 tsp
1 tsp 2 tsp 3 tsp 4 tsp
Salt & pepper
01. Strip the mint and coriander leaves from their stalks and put them in the main bowl
with the metal blade. Process for a few seconds.
02. Peel the onion and cut into large pieces. Add to the herbs in the main bowl and
pulse 5 times. Set aside.
03. Cut the meat into large pieces and transfer to the main bowl. Process for 20
seconds, or until the meat is chopped, but not hashed. Add the olive oil, onion,
herbs and spices. Season with salt and pepper. Pulse twice.
04. Shape the mixture into small meatballs with your hands. Thread them onto skewers,
about four to each one. Cook them under the oven grill, on your barbecue or in
a large nonstick frying pan.
05. The meatballs should take about 10 minutes to cook, but keep a close eye on
them.
Chef’s tip: serve with mashed or steamed potatoes, or bulgur wheat.
95
Page 97

STEAK TARTARE
SERVES
FOOD PROCESSOR
PREPARATION
Rump steak or sirloin steak
Shallots
Red onions
Capers
Bunches of chives
Bunches of flat-leaved parsley
2 4-6 6-8 8 +
3200 3200 4200
5200/Patissier
20 min 20 min 25 min 25 min
500g 700g 1kg 1.4kg
1234
2244
3 tbsp 4 tbsp 6 tbsp 8 tbsp
111 ½2
111 ½2
Salt & pepper
1. Wash the parsley and pat it dry with kitchen paper. Put it in the main bowl with
the metal blade and pulse a few times.
2. Peel and quarter the onions and shallots. Add them to the main bowl and pulse
5 times.
3. Cut the meat into pieces and snip the chives. Add the meat to the main bowl,
along with the capers and chives. Pulse a few times. The meat should be minced,
not hashed.
4. Serve immediately.
Chef’s tips: delicious served with a green salad and homemade french fries. You
can also serve it with Worcestershire sauce, tomato ketchup and Tabasco®.
96
Page 98

DESSERTS
Page 99

CHOCOLATE MOUSSE
Preparation: 20 min Cooking: 5 min Resting: 3 hr
200g chocolate
100g double cream
5 eggs
Serves 4
1. Separate the eggs.
2. Put the egg whites in the main bowl with the whisk and beat for 5 min, remembering to
remove the double pusher. Set aside.
3. Meanwhile, melt the chocolate in a bain marie* with the cream.
4. Stir the egg yolks into the melted chocolate.
5. Gently fold the egg whites into the chocolate mixture with the spatula.
6. Divide the mousse between four glass.
7. Refrigerate for at least 3 hours.
PEACH CLAFOUTIS
E4
Preparation: 15 min Baking: 30 min Equipment: individual tins
250ml lukewarm milk
50g plain flour
70g caster sugar
35g butter
2 eggs
Serves 4-6
3 peaches
1 pinch salt
1. Wash and stone the peaches. Slice them in the Midi bowl fitted with the 4mm slicing
disc. Set aside.
2. Preheat your oven to 180 °C (gas mark 4).
3. Melt the butter in a bain marie*.
4. Combine the flour, sugar and salt in the main bowl with the metal blade.
5. Add the eggs one by one via the feed tube or opening, followed by the melted butter.
6. While the machine is still running, add the milk via the opening to achieve a smooth
batter.
7. Pour the batter into a buttered tin and arrange the peach slices on top.
8. Bake for 30 minutes or until the batter shrinks from the sides of the tin.
Chef’s tip: you can also bake this clafoutis in individual ramekins.
98
DESSERTS
Page 100

TIRAMISU
Preparation: 30 min Resting: 6 to 24hr
400g mascarpone
60g caster sugar
200ml coffee
30 sponge fingers
Serves 6-8
1. Take the mascarpone out of the fridge one hour beforehand.
2. Separate the eggs.
3. Beat the sugar and egg yolks in the main bowl with the whisk until pale and fluffy. Add
the amaretto and mascarpone. Beat for 2 minutes. Set aside in a mixing bowl.
4. Wash and dry the bowl and whisk thoroughly.
5. Put the egg whites in the bowl with the whisk and beat for 5 minutes, remembering to
remove the pusher.
6. Gently fold the egg whites into the mascarpone mixture with the spatula.
7. Briefly dip half the sponge fingers in the coffee. Arrange them in a glass dish, then
cover with half the mixture. Sieve some cocoa powder on top. Repeat these steps with
the remaining sponge fingers and mascarpone mixture, finishing up with a dusting of
cocoa powder.
8. Refrigerate for at least 6 hrs.
4 tbsp cocoa powder
3 tbsp amaretto liqueur
5 eggs
Chef’s tips: if you do not have any cocoa powder, grate some chocolate with your
parmesan grater.
DESSERTS
99
 Loading...