

Page 1
20lb Tank Holder Field Upgrade
Instructions for the
Magicater Outdoor Grill
Models: LPG30 & LPG60
Magikitch’n
P.O. Box 501, Concord, NH 03302-0501
509 Route 3A, Bow, NH 03304
800-258-3708 603-225-6684 FAX: 603-225-8497
www.magikitchn.com
L25-013 Rev 0 (02/04)
Page 2
Parts Lists:
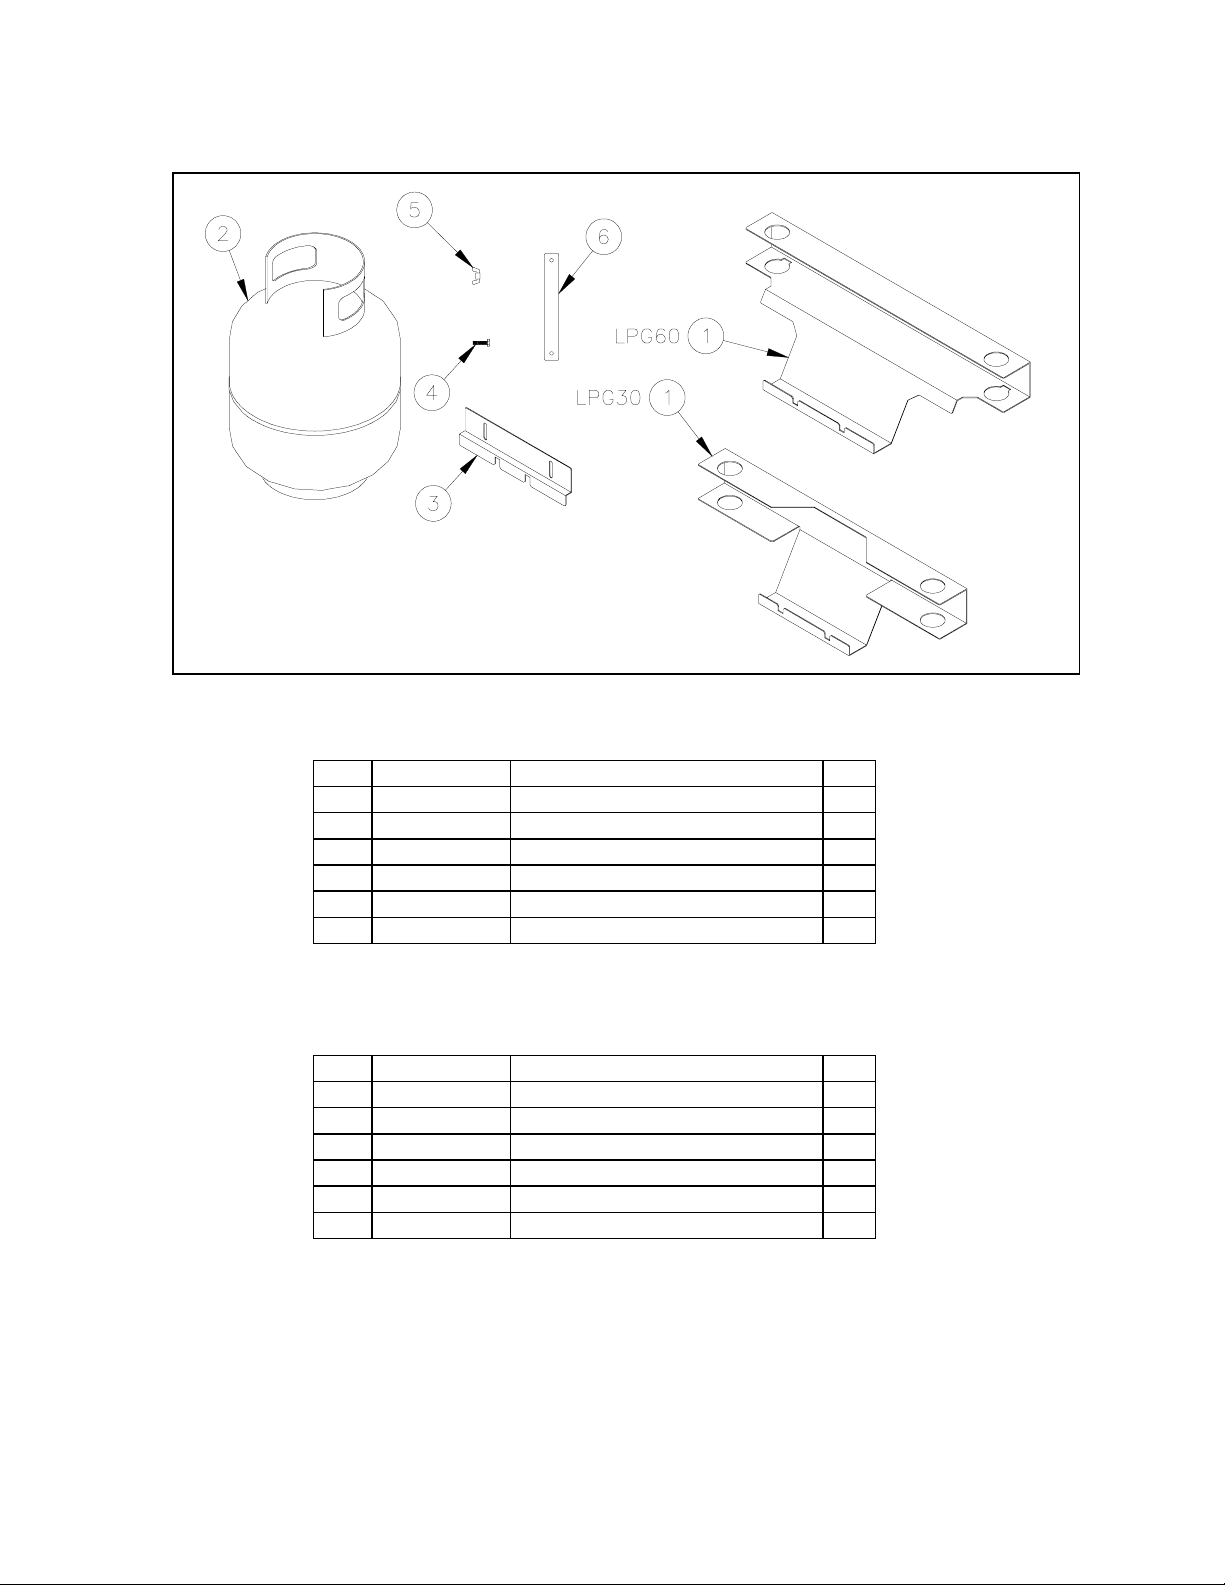
LPG60
Kit Part number: 5225-1528303-C
ITEM PART NO. DESCRIPTION QTY
1 5425-1528101 Lower Tank Holder LPG60 2
*2* 3905-0041300 20lb Vertical Propane Tank 2
3 5414-1117601 Upper Tank Holder 2
4 PP10670 1/2-20 x 1" Hex Head Cap Screw 4
5 4003-0295900 1/4-20 Wing Nut 4
6 5425-1528401 Tank Holder Retrofit Plate 2
*Item #2 is not included with this kit and must be purchased separately.
Tools needed:
1. 7/16 inch wrench
L25-013 Rev 0 (02/04)
LPG30
Kit Part number: 5225-1528304-C
ITEM PART NO. DESCRIPTION QTY
1 5425-1528201 Lower Tank Holder LPG30 1
*2* 3905-0041300 20lb Vertical Propane Tank 1
3 5414-1117601 Upper Tank Holder 1
4 PP10670 1/2-20 x 1" Hex Head Cap Screw 2
5 4003-0295900 1/4-20 Wing Nut 2
6 5425-1528401 Tank Holder Retrofit Plate 1
*Item #2 is not included with this kit and must be purchased separately.
Page 3

Installation
1. Disconnect the grill from its current gas supply.
2. Remove the upper portion of the grill from its base and set aside.
3. Turn the base over so the legs will be facing upward.
4. Remove 2 legs from one of the far sides of the base by pulling each leg
out of its socket while depressing the snap button located on the leg.
5. Slide the legs through the holes on the lower tank holder (item #1).
Reference illustration “B” for correct orientation of legs and holder.
6. Reinstall legs back into the base assuring that the flanges on the lower
tank holder are facing outward.
7. Inspect the holes located on the far side of the base. If the holes contain
threaded inserts then the tank holder plate (item #6) is not required to
complete the installation and may be discarded. If the holes are empty
then use the tank holder plate (item #6) in step 8.
8. Using a 7/16” wrench install the hex head cap screws (item #4) into the
base. (illustration “A”)
9. Slide the upper tank holder (item #3) though the threaded portion of the
hex head cap screws. Reference Illustration “B” for correct orientation.
10. Secure the upper tank holder to the base using wing nuts (item #5). The
wings nuts should be tightened loosely so the upper tank bracket is
allowed to slide up and down.
11. Repeat steps 4 through10 on the opposite side for LPG60 models.
12. Turn the base over so it is back to its original position.
13. Set the bottom ring of the propane tank(s) (item #2) into the notches of the
lower tank holder. Rotate the tank so the outlet valve is facing forward.
14. Position the upper ring of the propane tank(s) so it is inside the notches of
the upper tank holder.
15. Tighten the wing nuts until the propane tank(s) is secure.
Illustration A
Illustration B
L25-013 Rev 0 (02/04)
Page 4

WARRANTY
MagiKitch’n appliances are designed to give you long and satisfactory service if
installed and operated in accordance with our instructions. This machine has
been carefully tested, but in spite of such tests, there may be, in vary rare
cases, a defect not immediately noticeable. In such cases, the defect would
become apparent within a few weeks of operation. To protect you, we warrant
this appliance against defective workmanship and material for 1 year. See
warranty statement for specific details.
NOT WARRANTED:
* Accident to, misuse of harsh chemical cleaners or natural wear of this
appliance.
IMPORTANT:
* DO NOT destroy any defective part ---- IT MUST BE RETURNED FOR
REPLACEMENT under this warranty.
When writing, be sure to mention Serial Number and Model Number appearing
on the nameplate on the front of your equipment.
CALL TOLL FREE
800-258-3708
MAGIKITCH’N INC
509 Route 3A
Bow, NH 03304
603-225-6684
L25-013 Rev 0 (02/04)
FAX: 603-225-8497
www.magikitchn.com
 Loading...