

Page 1
Mod.: P0519ED
IL VERO SOTTOVUOTO
THE VACUUM PACKING SYSTEM FOR THE HOME
LE SYSTEME D'EMBALLAGE SOUS-VIDE POUR LA MAISON
DAS VAKUUMIER-SYSTEM FÜR DEN HAUSHALT
EL SISTEMA DE ENVASADO AL VACIO PARA EL HOGAR
DOMOWA ZGRZEWARKA DO PAKOWANIA PRÓŻNIOWEGO
ISTRUZIONI D’USO
EN
OPERATING MANUAL
FR
INSTRUCTIONS SUR LE FONCTIONNEMENT
DE
BETRIEBSANLEITUNG
ES
INSTRUCCIONES DE USO
PL
INSTRUKCJA OBSŁUGI
Page 2
1
1E
11
2
2
6
9
1E
10
5
4
14
3
8
7
10
14
13
12
1
Page 3
LOCK
PRESS
PRESS
LOCK
UNLOCK
UNLOCK
D E
PRESS
PRESS
LOCK
(15)
LOCK
BA
UNLOCK
C
F
UNLOCK
IHG
(16)
L M N
(17)
(19)
O
(18)
P Q
2
(20)
Page 4
I
Mod. P0519ED
IL SISTEMA DEL CONFEZIONAMENTO SOTTOVUOTO PER LA CASA
Vi consigliamo di leggere attentamente queste istruzioni in modo che possiate utilizzare correttamente
Siamo lieti per l’acquisto da voi effettuato e Vi ringraziamo per la fiducia.
il Mod. P0519ED al fine di ottenere i migliori risultati di conservazione.
Si consiglia inoltre di conservare il presente manuale per eventuali ulteriori consultazioni.
NOMENCLATURA E FUNZIONI MACCHINA
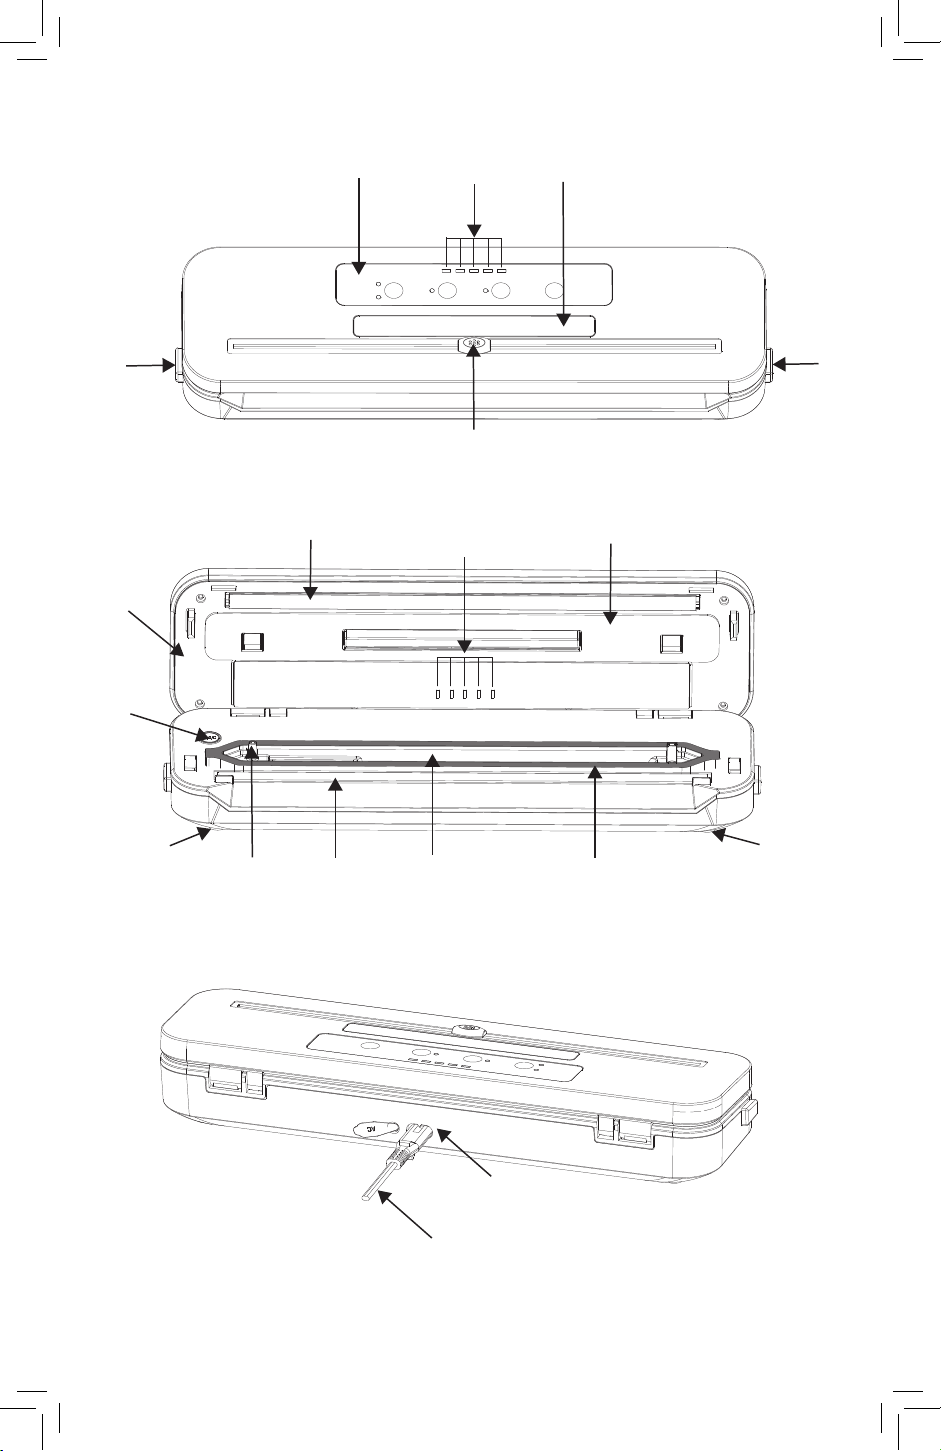
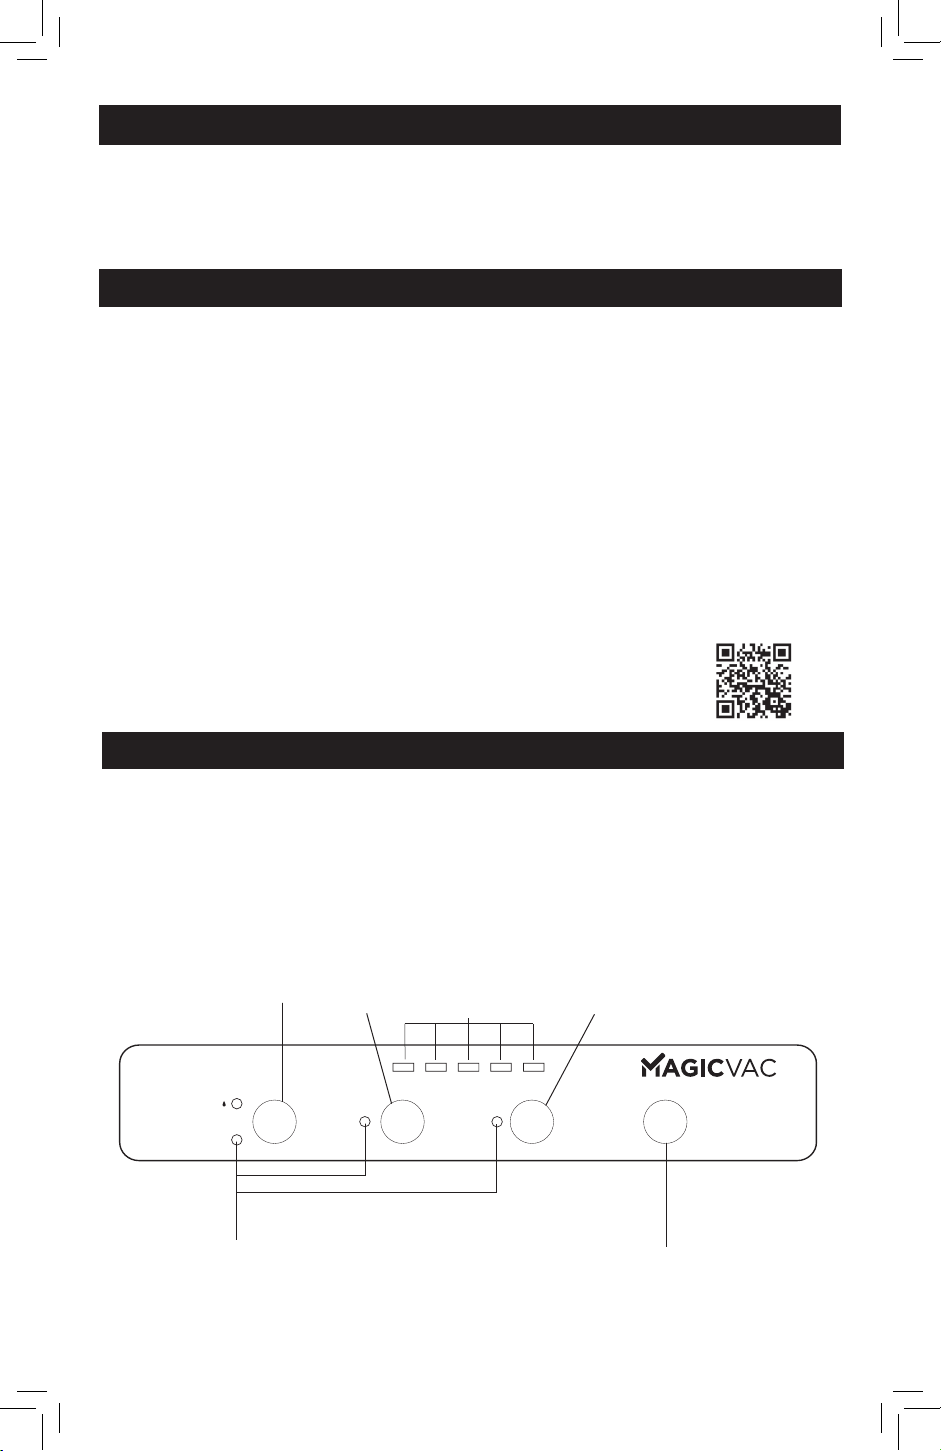
Consultare le illustrazioni di pagina 1.
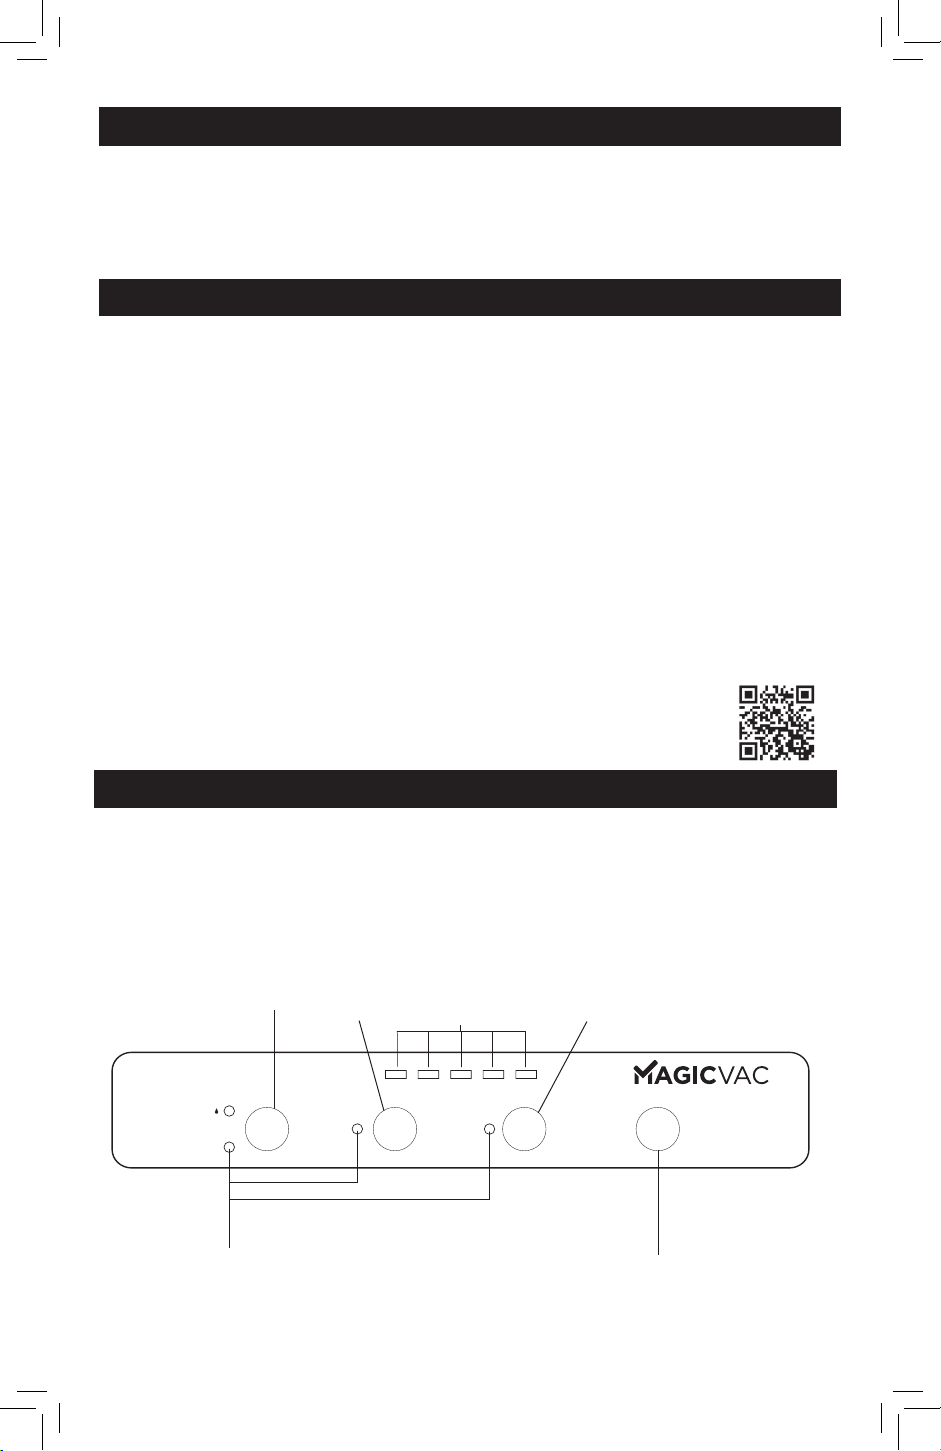
(1) Tastiera comandi - Per impostare le funzioni della macchina.
(2) Pulsanti LOCK/UNLOCK - Permettono l'aggancio e l’apertura del coperchio (5).
(3) Presa aria per il Tubetto - Per inserire il tubetto in modo da eseguire il sottovuoto in tutti i contenitori e con
tutti gli accessori MAGIC VAC®.
(4) Pulsante vuoto - Per eettuare il sottovuoto nei contenitori utilizzando il tubetto.
(5) Coperchio. La sua apertura con posizione ssa in alto, consente il posizionamento dei sacchetti prima di
procedere alle operazioni di confezionamento.
(6) Taglia-sacchetti bidirezionale.
(7) Camera del vuoto - Sede per il posizionamento del sacchetto e per l’evacuazione dell’aria.
(8) Barra saldante - Elemento riscaldante che permette la saldatura del sacchetto.
(9) Guarnizione sigillante - Preme il sacchetto sulla Barra Saldante.
(10) Guarnizioni di tenuta - Garantiscono la tenuta al vuoto nella camera consentendo l’evacuazione dell’aria
dai sacchetti.
(11) Oblò - Soluzione brevettata che consente di vedere il corretto posizionamento del sacchetto nella Camera
del vuoto.
(12) Presa per cavo di alimentazione.
(13) Cavo di Alimentazione - Per collegare la macchina alla tensione di rete elettrica.
(14) Piedini antislittamento - Impediscono lo slittamento della macchina durante l’utilizzo.
Per maggiori dettagli sull’uso con gli accessori e per la Guida al Sottovuoto, potete sca-
ricare gli approfondimenti dal sito www.magicvac.it
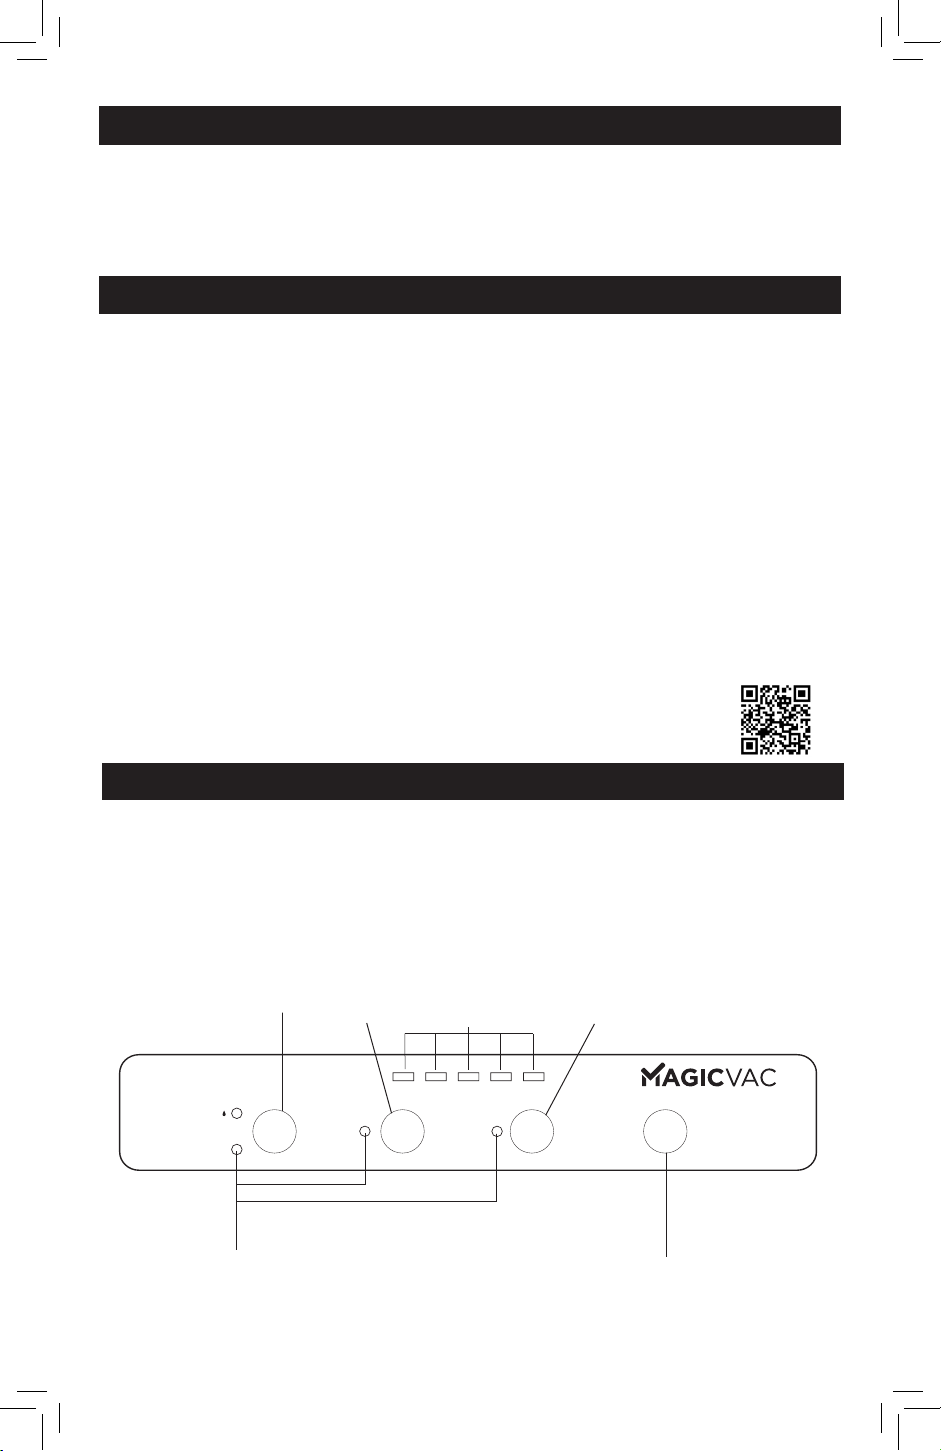
DESCRIZIONE COMANDI E FUNZIONI
(1A) SEAL MODE - Tasto per impostare la saldatura: Dry per il confezionamento di cibi secchi o Humid per il
confezionamento di cibi umidi.
(1B) SEAL - Tasto per l’avvio manuale della saldatura dei sacchetti. (attendere 30 secondi tra una saldatura e
l’altra per consentire al dispositivo di rareddarsi).
(1C) VAC SEAL - Tasto per avviare il ciclo di confezionamento automatico nei sacchetti, comprensivo di salda-
tura nale.
(1D) STOP - Tasto funzione Cancel, cioè arresto di qualsiasi fase di confezionamento in corso.
(1E) LED - Si accendono quando la macchina è in funzione.
1A
HUMID
Nota: Se dopo il funzionamento continuo lampeggiano più
spie contemporaneamente, la protezione da surriscaldamento
è attiva. Attendere 5-10 minuti che il dispositivo si rareddi e
torni in modalità normale.
DRY
SEAL
MODE
1B 1C
SEAL
1E
VAC
SEAL
3
STOP
1D
Page 5

AVVERTENZE IMPORTANTI
Il costruttore compie ogni sforzo necessario affinché ogni prodot-
to sia dotato della più alta qualità e sicurezza, tuttavia come per
ogni apparecchio elettrico, bisogna sempre osservare fondamentali
norme di sicurezza per evitare di costituire pericolo per persone,
animali e/o cose.
• L’apparecchio può essere utilizzato da bambini di età non inferiore a
8 anni e da persone con ridotte capacità fisiche, sensoriali o mentali, o
prive di esperienza o della necessaria conoscenza, purché sotto sorveglianza oppure dopo che le stesse abbiano ricevuto istruzioni relative
all’uso sicuro dell’apparecchio e alla comprensione dei pericoli ad esso
inerenti. I bambini non devono giocare con l’apparecchio. La pulizia
e la manutenzione destinata ad essere effettuata dall’utilizzatore non
deve essere effettuata da bambini senza sorveglianza.
• Precedentemente al primo uso, e periodicamente durante la vita del
prodotto, controllate il cavo di alimentazione, per accertarsi che non
vi siano danni; se il cavo di alimentazione è danneggiato, deve essere
sostituito dal produttore, dal suo agente di servizio o da una persona
altrettanto qualificata al fine di evitare eventuali rischi.
• Leggete con attenzione le istruzioni, prima di utilizzare la Vs. MAGIC
VAC® e tenetele a portata di mano per un riferimento futuro.
• Non è un apparecchio per uso continuo. Non effettuate più di un ciclo
completo ogni 60 secondi. La durata del ciclo operativo è di circa
20 secondi, cui deve seguire una pausa di 60 secondi. In condizioni
ambientali estreme l’uso intensivo dell’apparecchio può far intervenire
i sistemi automatici di protezione termica. In questo caso attendete
che l’apparecchio si raffreddi al punto da consentire il ripristino di detti
sistemi di protezione.
• Non utilizzate l’apparecchio vicino o sopra superfici calde.
•
L’involucro dell’apparecchio non è protetto contro la penetrazione di
liquidi.
• Evitate di aspirare liquidi nella camera del vuoto. Se ciò accadesse
asciugate immediatamente la camera del vuoto.
• Non immergete l’apparecchio in acqua e non utilizzatelo se il cavo o la
spina sono bagnati; se questo dovesse accadere durante l’utilizzo, staccate immediatamente la spina indossando guanti di gomma asciutti.
Non estraete né toccate l’apparecchio immerso nell’acqua prima di
aver disinserito la spina dalla presa. Non utilizzate dopo averlo rimosso
dall’acqua (inviatelo immediatamente ad un centro di assistenza autorizzato od al Vs. rivenditore di fiducia).
• Non toccate la barra saldante durante l’utilizzo dell’apparecchio, onde
evitare possibili scottature.
• Non utilizzate mai adattatori per tensioni di alimentazione diverse da
quelle riportate sul fondo dell’apparecchio (dati targa).
• Staccate sempre la spina dopo l’uso.
• Non aprite o modificate l’apparecchio. Le riparazioni devono essere
effettuate solo da personale autorizzato. Le Riparazioni non autorizzate
annullano la garanzia.
• Il fabbricante, il venditore e l’importatore si considerano responsabili
agli effetti della sicurezza, affidabilità e prestazioni soltanto se:
a) l’apparecchio è impiegato in conformità alle istruzioni d’uso;
4
Page 6

b) l’impianto elettrico dell’ambiente in cui l’apparecchio viene utilizzato
è conforme alle leggi vigenti.
• Si raccomanda l’utilizzo dei sacchetti originali. Nel caso in cui si utilizzino sacchetti diversi da quelli sopra citati per eseguire operazioni
multiple di confezionamento sottovuoto, il film liscio del sacchetto va
tenuto verso la barra saldante.
• Non utilizzate coperchi o contenitori incrinati o danneggiati!
Questo testo è per gli utenti al di fuori dell’Unione europea:
- Questo apparecchio non è destinato all’uso da parte di persone (bambini compresi) con ridotte capacità fisiche, sensoriali o mentali o prive
di esperienza e necessaria conoscenza a meno che, siano sotto sorveglianza oppure abbiano ricevuto le relative istruzioni per l’uso,da parte
della persona responsabile della loro sicurezza.
- I bambini dovranno essere sorvegliati per assicurarsi che non giochino
con l’apparecchio.
Utilizzate solo sacchetti e accessori originali.
ISTRUZIONI PER L’USO
Dopo svariati utilizzi le guarnizioni di tenuta (10) potrebbero usurarsi e la macchina potrebbe non eseguire
più il vuoto. In quel caso si deve procedere con la sostituzione delle stesse in quanto sono considerate
Prima di ogni utilizzo pulite accuratamente la Vs. macchina e gli accessori a contatto con il cibo (contenitori, coperchi, vasi, ect.) seguendo le istruzioni fornite nel paragrafo “ISTRUZIONI PER LA PULIZIA”
1 Posizionamento della macchina
Posizionate la macchina in un luogo asciutto su un piano orizzontale, avendo cura di lasciare la zona di lavoro
antistante la macchina stessa libera da ostacoli e sufficientemente ampia da consentire l’appoggio dei sacchetti con il cibo da confezionare.
2 Collegamento della macchina
Inserite il cavo di alimentazione (13) nella presa (12) e collegatelo poi ad una presa di rete elettrica di corrente
corrispondente alla tensione della macchina (vedete i dati tecnici). Il LED Dry del tasto 1A (SEAL MODE) sarà
acceso. Stand by: Dopo 10' di inattività la macchina va in stand by. Per riattivarla premere un tasto qualsiasi
della tastiera comandi.
3 Impostare il tipo di saldatura
La regolazione del tipo di saldatura deve essere impostata ogni volta che inserite la spina del cavo di alimentazione (13) nella presa di rete. MAGIC VAC® (Mod. P0519ED) è dotato della regolazione della tipologia
di saldatura infatti, il risultato finale della saldatura dei sacchetti, è influenzabile dal genere di alimento da
confezionare oppure dalla temperatura ambiente in cui si opera. Per ottimizzare quindi il risultato finale si
possono selezionare 2 modalità di saldatura:
Dry - per cibi secchi come biscotti, riso e caffè
Humid - per carni rosse e pesce che rilasciano liquidi o sangue, per cibi fragili
4 Consigli per l’utilizzo dei sacchetti
I sacchetti sono disponibili in due larghezze, 20 cm. e 30 cm. Scegliete la misura del sacchetto idonea per il
cibo che intendete conservare. Inoltre verificate che la lunghezza del sacchetto da utilizzare sia almeno 8 cm
superiore al cibo da conservare, e considerate ulteriori 2 cm per ogni volta che il sacchetto verrà successivamente riutilizzato.
5 Realizzare i sacchetti dai rotoli
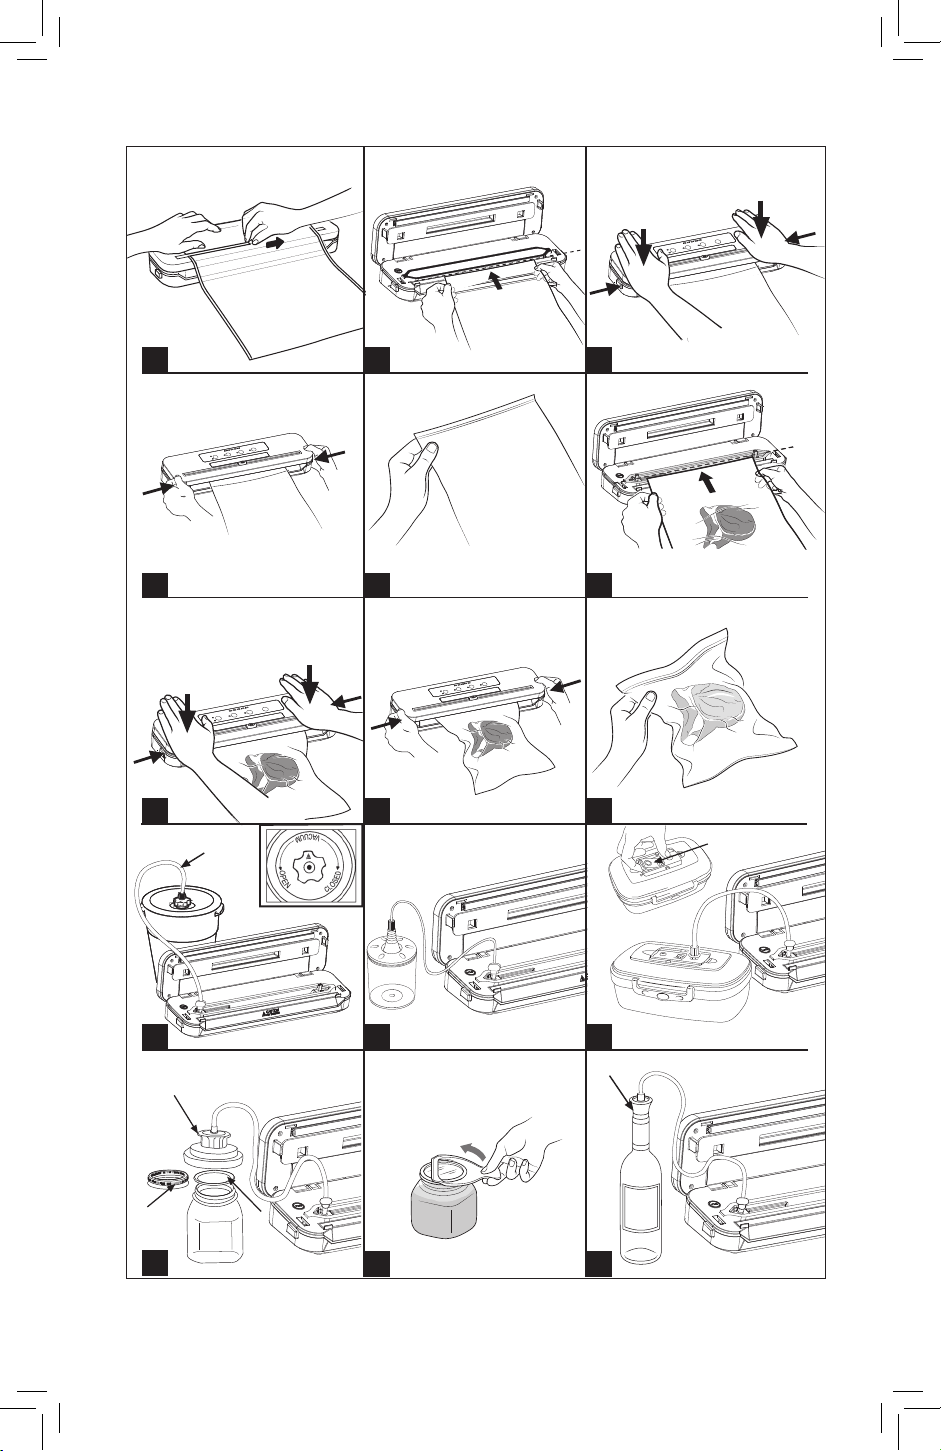
- Estrarre la lunghezza di sacchetti desiderata e appoggiarla sul coperchio chiuso del dispositivo; tenere
- Sollevate il coperchio (5) e ruotatelo in posizione aperta.
- Saldate un lato aperto dello spezzone posizionando una delle due estremità aperte del sacchetto sulla
Attenzione: non lasciate sporgere il sacchetto nella camera del vuoto (7) o sulla guarnizione di tenuta (10).
Vedi linea tratteggiata (fig. B)
- Chiudete il coperchio (5) e premete le due estremità opposte dello stesso (fig. C), sentirete un click che sta
ATTENZIONE: Non conservate la macchina con i pulsanti LOCK/UNLOCK agganciati.
materiale di consumo e non sono in garanzia.
il sacchetto con una mano, quindi far scorrere la taglierina attraverso il rullo per tagliare il sacchetto alla
lunghezza desiderata. (fig A) quindi saldate un lato aperto dello spezzone seguendo queste fasi:
barra saldante (8) con la parte liscia rivolta verso il basso (fig. B).
5
Page 7

a significare che il coperchio si è agganciato.
- Premete sul tasto SEAL (1B) per eseguire la saldatura. Attendete lo spegnimento del led SEAL (1B).
- Premete sui Pulsanti LOCK/UNLOCK (2) (fig D) per consentire l'apertura del coperchio (5) .
- Alzate il coperchio della macchina e togliete il sacchetto.
- Controllate la validità della saldatura ottenuta che dovrà presentarsi come una regolare striscia trasversale,
priva di grinze e delle righe interne del sacchetto. (fig. E)
6 Confezionamento sottovuoto con i sacchetti ricavati dal rotolo o con i sacchetti pre-tagliati
- Sollevate il coperchio (5) e ruotatelo in posizione aperta.
- Inserite l’alimento nel sacchetto senza creare particolari grinze o tensioni delle superfici. Eliminate liquidi o
residui di cibo dalla zona interna del sacchetto che deve essere saldata.
- Adagiate davanti alla macchina il sacchetto con il suo contenuto posizionandone l’estremità aperta all’inter-
no della camera del vuoto (7) e con la parte liscia rivolta verso il basso (fig. F).
ATTENZIONE: fate sporgere l’estremità del sacchetto all’interno della camera del vuoto (7). Vedi linea tratteggiata (fig. F)
- Chiudete il Coperchio (5) e premete le due estremità opposte dello stesso (fig. G), sentirete un click che sta
a significare che il coperchio si è agganciato.
- Premete sul tasto VAC SEAL (1C) per eseguire il ciclo di confezionamento. Attendete lo spegnimento del
tasto led VAC SEAL (1C).
- Premete sui Pulsanti LOCK/UNLOCK (2) (fig H) per consentire l'apertura del Coperchio (5) .
- Alzate il coperchio della macchina e togliete il sacchetto.
- Controllate la validità della saldatura ottenuta che dovrà presentarsi come una regolare striscia trasversale,
priva di grinze e delle righe interne del sacchetto. (fig. I)
-
In qualsiasi momento si può interrompere il ciclo di confezionamento già avviato agendo sul tasto STOP (1D).
7 Confezionamento nei contenitori Executive o in contenitori sigillati con i Coperchi Universali
ATTENZIONE: Utilizzate solo ed esclusivamente i contenitori MAGIC VAC® in quanto sono resistenti al valore di
vuoto creato da MAGIC VAC® (Mod. P0519ED), mentre altri tipi di contenitori potrebbero implodere per la
depressione del vuoto ottenuto con la macchina e causare ferite.
I contenitori Executive ed i Coperchi Universali dotati di manopola a forma di stella (fig. L), semplificano l’esecuzione del sottovuoto perché il tubo di collegamento è inseribile direttamente nel foro centrale della manopola
stessa.
I Coperchi Universali, disponibili nei due diametri da 100 mm e da 125 mm, sono da utilizzare con i vasi per la
conservazione del cibo, con casseruole e scodelle di vetro temperato. I Coperchi Universali funzionano esattamente come i Coperchi per contenitori Executive.
ATTENZIONE: Con i coperchi universali non utilizzate contenitori di plastica o di vetro che non siano idonei in
quanto potrebbero implodere per la depressione del vuoto della macchina, e causare ferite.
- Riempite il contenitore lasciando almeno 3 cm di spazio dal bordo superiore del contenitore e posizionate il
coperchio sul contenitore. Ruotate la manopola in posizione “VACUUM”. (fig. L)
- Collegate mediante il tubetto di collegamento (15), la manopola del coperchio del contenitore alla presa aria
(3) della macchina. (fig. L)
- Premete il pulsante VAC (4) la macchina eseguirà il vuoto e si spegnerà ad operazione ultimata.
- Staccate il tubetto dalla manopola del contenitore.
- Ruotate la manopola in posizione “CLOSED”.
- Per aprire i contenitori ruotate la manopola in posizione “OPEN”; dovreste sentire il suono dell’aria che fischia
rientrando nel contenitore. Questo suono è la garanzia che il contenuto è stato confezionato sottovuoto.
8 Confezionamento nei contenitori Family
Contenitori multiuso, ideali per conservare prodotti che vengono utilizzati frequentemente, come cibi asciutti
e fragili; alimenti in polvere; frutta e verdura sia fresca che frullata o passata. Grazie alla loro trasparenza e
design, sono piacevoli sulle mensole della cucina e garantiscono un’ottima visibilità del loro contenuto.
- Riempite il contenitore lasciando almeno 3 cm di spazio dal bordo superiore del contenitore e posizionate il
coperchio sul contenitore.
- Collegate mediante il tubetto di collegamento (15), il coperchio del contenitore alla presa aria (3) della mac-
china (fig. M e fig. N).
- Premete il pulsante VAC (4) la macchina eseguirà il vuoto e si spegnerà ad operazione ultimata.
- Staccate il tubetto dal coperchio del contenitore.
- Per aprire i contenitori tondi, premete il bottone centrale, per aprire i contenitori quadri premete prima lo
sgancio (16) e poi aprite le chiusure di sicurezza (fig. M).
9 Confezionamento in vasi di vetro sigillati con coperchietti metallici (tipo Leifheit)
Per effettuare il ciclo di confezionamento nei vasi in vetro sigillati con coperchietti metallici, utilizzate l’attacco
per Coperchi.
- Riempite il vaso lasciando almeno 3 cm di spazio dal bordo superiore del vaso.
- Collegate mediante il tubetto di collegamento (15), l’Attacco per Coperchi (17) alla presa aria (3) della macchina. Posizionate l’attacco per coperchi direttamente sul vaso corredato dal solo coperchietto (18) e spingetelo verso il basso, assicurandovi che il collegamento sia corretto (fig. O)
- Premete il pulsante VAC (4) la macchina eseguirà il vuoto e si spegnerà ad operazione ultimata. Verificate
che l’attacco per coperchi faccia tenuta tenendolo premuto con la mano.
- Staccate il tubetto dall’attacco per coperchi. Sfilate l’attacco per coperchi dal vaso.
6
Page 8

- Applicate ed avvitate a fondo la ghiera (19) fornita con il vaso (fig. O).
- Per aprire un vaso di vetro sigillato sottovuoto con coperchietto metallico, utilizzate l’apposito Leva coper-
chietti (con il lato delle scritte rivolto verso l’alto). Posizionate il Leva coperchietti come da (Fig. P) e fate leva
delicatamente fino al rilascio del vuoto. Rimuovete il coperchietto metallico. Questo accessorio consentirà
al coperchietto di essere riutilizzabile.
10 Confezionamento con tappo bottiglia
Il Tappo Bottiglia può essere utilizzato per tappare bottiglie, ad es. di vino o bevande non gassate, parzialmente
piene. Il Tappo Bottiglia Vi permetterà di fare il vuoto nella bottiglia ed il suo contenuto non si ossiderà così
velocemente, mantenendo la qualità ed il gusto più a lungo.
- Collegate mediante il Tubetto di collegamento (15) , la presa aria della macchina (3) con il Tappo Bottiglia
(20) (fig. Q). Spingete saldamente il Tappo nella bottiglia.
- Premete il pulsante VAC (4) la macchina eseguirà il vuoto e si spegnerà ad operazione ultimata.
- Staccate immediatamente il tubetto sia dal Tappo Bottiglia che dalla macchina.
- Per aprire una bottiglia sigillata con il Tappo Bottiglia, tirate semplicemente il tappo fuori dalla bottiglia.
Sentirete il fruscio del flusso dell’aria che entra nella bottiglia.
11 Confezionamento con l’Attacco per Coperchi nei contenitori Executive o in contenitori sigillati con
Coperchi Universali dotati della precedente versione di manopola
Per l’uso dell’Attacco per Coperchi nei contenitori Executive o in contenitori sigillati con i Coperchi Universali
dotati della precedente versione di manopola, consultate le istruzioni fornite nel sito internet. www.flaemnuova.it.
ISTRUZIONI PER LA PULIZIA
ATTENZIONE: Prima di pulire il dispositivo, scollegatelo dalla rete, staccate poi la spina dalla presa (12) e
copritela con il tappo in gomma.
• Lavatevi accuratamente le mani prima di procedere alle fasi di pulizia della macchina e degli accessori.
• Pulite, sia prima che dopo l’utilizzo, le superfici esterne con una spugna inumidita con detergente delicato
per piatti (non abrasivo o solvente). Nel caso vi fossero penetrazioni accidentali di liquidi all’interno della
struttura, non inserite la spina nella presa di alimentazione elettrica di rete, non utilizzatela e rivolgetevi al
centro di assistenza autorizzato più vicino o al vostro rivenditore di fiducia.
• Per la pulizia degli accessori (contenitori, coperchi, vasi, etc.) Fate riferimento alle istruzioni contenute nelle
confezioni degli accessori stessi.
CARATTERISTICHE TECNICHE
Tensione 220V-240~ 50/60Hz 110W
Dimensioni 38 (L) x 10 (P) x 6 (H) cm
Peso 0,94 Kg
Marcatura
Compatibilità elettromagnetica
Il modello P0519ED è stato studiato per soddisfare i requisiti attualmente richiesti per la compatibilità elettromagnetica. In ogni caso, se avete il sospetto che il funzionamento dell’apparecchio interferisca con il normale
funzionamento del vostro televisore, radio o altro apparecchio elettrico provate a posizionare diversamente
l’apparecchio fino a che l’interferenza sparisce, oppure collegate l’apparecchio ad una presa elettrica diversa.
Smaltimento: In conformità alla Direttiva 2012/19/CE, il simbolo riportato sull’apparecchiatura indica
che l’apparecchio da smaltire, è considerato come rifiuto, e deve essere quindi oggetto di “raccolta
separata”. Pertanto, l’utente dovrà conferire (o far conferire) il suddetto rifiuto ai centri di raccolta differenziata predisposti dalle amministrazioni locali, oppure consegnarlo al rivenditore all’atto dell’acquisto di
una nuova apparecchiatura di tipo equivalente. La raccolta differenziata del rifiuto e le successive operazioni
di trattamento, recupero e smaltimento, favoriscono la produzione di apparecchiature con materiali riciclati e
limitano gli effetti negativi sull’ambiente e sulla salute causati da un’eventuale gestione impropria del rifiuto.
Lo smaltimento abusivo del prodotto da parte dell’utente comporta l’applicazione delle sanzioni amministrative di cui all’articolo 50 e seguenti aggiornamenti del D. Lgs. n. 22/1997.
7
Page 9

LOCALIZZAZIONE DEI GUASTI
La macchina non funziona
• Controllate che il cavo di alimentazione sia correttamente collegato all’uscita elettrica e al dispositivo.
Controllate la presa elettrica infilando nella stessa un altro apparecchio.
• La macchina si blocca automaticamente se surriscaldata. Lasciatela raffreddare per 15 minuti e provate di
nuovo.
• Verificate che il cavo di alimentazione o la spina non siano difettosi. In tal caso non utilizzate la macchina.
La macchina non esegue la prima saldatura sullo spezzone di rotolo tagliato
• Controllare il corretto posizionamento dello spezzone di rotolo come descritto nel paragrafo: “ Realizzare i
sacchetti dai rotoli”
La macchina non fornisce un vuoto completo nei sacchetti
• Per saldare correttamente, l’estremità aperta del sacchetto dovrebbe rimanere interamente dentro il vano
della Camera per il Vuoto.
• Controllate che la barra saldante, le guarnizioni di tenuta e sigillanti non abbiano impurità. Dopo l’even-
tuale pulizia, rimettetele correttamente al loro posto.
• Il sacchetto potrebbe essere forato. Per controllare, sigillate il sacchetto con dell’aria all’interno, immerge-
telo nell’acqua e fate pressione. La comparsa di bollicine segnala la presenza di una perdita. Risigillate o
utilizzate un altro sacchetto.
La macchina non salda correttamente il sacchetto
• Se la barra saldante dovesse surriscaldarsi e sciogliere il sacchetto, alzate il coperchio e fate raffreddare la
barra saldante per alcuni minuti.
• La macchina è costruita secondo le norme di sicurezza. In caso di surriscaldamento si spegne automatica-
mente. Raffreddate la macchina per 15 minuti e provare di nuovo.
Il sacchetto non tiene il vuoto dopo essere stato saldato
• Perdite lungo la saldatura possono essere causate da grinze, briciole, grasso o liquidi. Riaprite il sacchetto,
pulite la parte superiore all’interno del sacchetto e togliete il materiale estraneo dalla barra saldante prima
di risigillare.
• Controllate che il sacchetto non sia forato e di conseguenza non abbia mantenuto il vuoto. Proteggete
eventuali bordi appuntiti del contenuto nel sacchetto usando tovaglioli di carta.
La macchina non fa il vuoto nei contenitori
• Collegate mediante il tubetto di collegamento, il coperchio del contenitore (o l’attacco per coperchi se
necessario) e la presa aria della macchina.
• Lasciate uno spazio superiore adeguato (almeno 3 cm.) tra il contenuto e la parte superiore del vaso o del
contenitore.
• Se i liquidi fuoriescono durante la fase di confezionamento sottovuoto, ricordatevi che prima devono
essere raffreddati sotto refrigerazione e non a temperatura ambiente.
• Controllate il bordo del vaso, o del contenitore ed il coperchio universale, che non siano danneggiati nella
zona di sigillatura. Pulite il bordo e il coperchio con un panno tiepido e fate nuovamente il vuoto.
• Controllate che la guarnizione del coperchio del contenitore o del coperchio universale sia collocata cor-
rettamente nel posto giusto e non sia danneggiata.
I contenitori Executive o i Coperchi Universali non mantengono il vuoto
• Assicuratevi che la manopola del coperchio del contenitore sia posizionata su “VACUUM” prima di effettua-
re il vuoto nel contenitore e che sia posizionata su “CLOSED” dopo aver fatto il vuoto.
• Controllate che l’O-ring sotto la manopola del coperchio del contenitore o del coperchio universale sia al
proprio posto correttamente posizionato.
I contenitori Family non mantengono il vuoto
• Controllate che la guarnizione sotto il bottone centrale (16) del coperchio del contenitore sia al proprio
posto correttamente posizionata.
Se dopo aver consultato il paragrafo "localizzazione guasti" il problema non si risolve, rivolgetevi ad un
Centro Assistenza Autorizzato. Trovate l’elenco di tutti i Centri Assistenza alla pagina http://www.flaemnuo-
va.it/it/info/assistenza.
8
Page 10
GB
Mod. P0519ED
We compliment you on your purchase and thank you for your confidence in us. You are advised to carefully
read these directions, which will enable you to use the EFFENNE Agila properly and obtain optimal results in
terms of food preservation. Furthermore, we suggest you keep these instructions handy for further reference.
MACHINE NOMENCLATURE and FUNCTIONS
THE VACUUM PACKING SYSTEM FOR THE HOME
See the illustrations on page 1.
(1) Control panel - To set the functions of the machine
(2) LOCK/UNLOCK buttons - Used to fasten and open the lid (5).
(3) Air intake for the Tube - To insert the Tube to perform vacuum packing in all canisters and with all MAGIC
VAC® accessories.
(4) Vacuum button - To create vacuum in the containers using the tube.
(5) Cover - Open in the upper xed position, it allows for bags to be positioned before proceeding with
packing.
(6) Bag Cutter - Can be used in both directions.
(7) Vacuum chamber - Is the location for positioning the bag and evacuating the air.
(8) Sealing bar - Heating element which seals the bag.
(9) Sealing gasket - Presses the bag on the Sealing Bar.
(10) Airtight gasket - Guarantees the vacuum in the chamber allowing for air to be evacuated from the bags
(11) Window - Solution that allows the user to see the correct positioning of the bag in the vacuum Chamber.
(12) Socket for power cord
(13) Power Cable - To connect the machine to power.
(14) Anti-skid Feet - Prevent the machine from sliding during use.
For further details regarding use with accessories and for the Vacuum Guide,
download the information on www.magicvac.com
DESCRIPTION OF CONTROLS AND FUNCTION
(1A) SEAL MODE - Key to set sealing: Dry for packaging dry food or Humid for packaging wet food.
(1B) SEAL - Key to manually start bag sealing. (wait 30 seconds between one seal and another for the device
to cool down).
(1C) VAC SEAL - Key to start the automatic packaging cycle in bags including nal sealing.
(1D) STOP - Cancel function key, i.e. to stop any packaging in progress.
(1E) LEDs - Light up when the machine is running.
1A
HUMID
Note: If several lights ash simultaneously after continuous
operation, the overheating protection is active. Wait 5-10 minutes for the device to cool down and return to normal mode.
DRY
SEAL
MODE
1B 1C
SEAL
1E
VAC
SEAL
STOP
1D
9
Page 11

IMPORTANT SAFEGUARDS
The manufacturer takes every step necessary to ensure utmost
product quality and safety. However, as for all electrical appliances,
you should follow some basic safety rules to avoid creating a hazard
for people, animals and/or property.
• This appliance can be used by children aged from 8 years and above
and persons with reduced physical, sensory or mental capabilities or
lack of experience and knowledge if they have been given supervision
or instruction concerning use of the appliance in a safe way and understand the hazards involved. Children shall not play with the appliance.
Cleaning and user maintenance shall not be made by children without
supervision.
• Before using for the first time, and periodically during the life of the
product, check the power cable to make sure there is no damage; If
the supply cord is damage, it must be replaced by the manufacturer,
its service agent or similarly qualified person in order to avoid hazard.
• Carefully read the directions before using your EFFENNE Agila and
keep them handy for future reference.
• The appliance is not designed for continuous operation. Do not carry
out more than one complete cycle every 2 minutes. The operating
cycle is 20 seconds approx and after then there’s the break until 2 minutes. In extreme ambient conditions, an intensive use of the appliance
may trigger the automatic thermal protection devices. In such a case
allow the appliance to cool down sufficiently to enable resetting of the
protection devices.
• Do not use the appliance on or in proximity to hot surfaces.
• The casing of this unit is not protected again the penetration of liquids.
• Do not draw liquids into the vacuum chamber. Should this happen,
immediately dry the vacuum chamber.
• Do not immerse the appliance in water and do not use it if the cord or
plug are wet; should they get wet during use, immediately pull out the
plug wearing dry rubber gloves. Do not remove or touch the appliance
under water until you have pulled out the plug. Do not use the appliance after its removal from water (take it immediately to an authorised
service centre or your dealer).
• To avoid burns, do not touch the sealing bar while using the appliance.
• Never use adapters for power supplies different from the one indicated
on the bottom of the unit (plate details).
• Always unplug the appliance after you finish using it.
• Do not open or tamper with the appliance. Servicing may be performed by authorised personnel only. Any unauthorised repairs will
invalidate the warranty.
• The Manufacturer, the Retailer and the Importer are responsible for
safety, reliability and performance only if: a) the unit is used following
the instructions for use; b) the electrical system of the premises where
the appliance is used is in conformity with current laws.
• The use of original bags is highly recommended. If other types of vacuum bags are used to carry out multiple vacuum packaging operations,
the plain side of the film should be laid face down onto the sealing bar.
• No lids or use containers that have cracks or is damaged!
10
Page 12

This text is for users in countries except European countries:
- This appliance is not intended for use by persons (including children)
with reduced physical, sensory or mental capabilities, or lack of experience and knowledge, unless they have been given supervision or
instruction concerning use of the appliance by a person responsible for
their safety.
- Children should be supervised to ensure that they do not play with the
appliance.
Use only original bags and accessories
OPERATING INSTRUCTIONS
After several uses, the sealing gaskets (10) could wear out and the machine may no longer be able to cre-
ate vacuum. In this case, you must replace the seals, as they are considered consumable materials and
Before use, always thoroughly clean your appliance and any accessories coming in contact with food
(containers, caps, jars etc.) as directed in the “INSTRUCTIONS FOR CLEANING” paragraph.
1 Positioning the appliance
Position the appliance in a dry place on a level surface, making sure that the work area in front of the appliance
itself is clear of obstacles and there is enough room to accommodate the bags with the food to be packed.
2 Connecting the machine
Plug the power cable (13) into the socket (12) and then connect it to a mains power outlet matching the
machine voltage (see technical data). The Dry LED of key 1A (SEAL MODE) will be on. Standby: After 10' downtime the machine goes into standby mode. To restart it, press any key on the control keyboard.
3 Set the sealing type
The sealing type must be set whenever the power cable (13) is plugged into the mains power outlet. With
MAGIC VAC® (Mod. P0519ED), the sealing type can be adjusted. As a matter of fact, the final bag sealing result
is affected by the type of food to be packaged or by the ambient temperature in which sealing is performed.
Therefore, to optimise the final result, 2 sealing modes can be selected:
Dry - for dry food such as biscuits, rice and coffee
Humid - for red meat and fish that release liquids or blood, for fragile food items
4 Tips on using bags
The bags are available in two widths: 20 and 30 cm. Choose the bag size suited for the food you intend to
preserve. Check that the bag you are going to use is at least 8 cm longer than the food to be packaged, taking
into account an additional 2 cm for each time the bag will be subsequently reused.
5 Making bags from rolls
- Pull out the desired bag length and place it on the closed lid of the device; hold the bag with one hand, then
slide the cutter through the roller to cut the bag to the desired length (fig A), then seal an open side of the
piece following these steps:
- Lift the lid (1) and turn it in the open position.
- - Seal an open side of the piece by placing one of the two open ends of the bag on the sealing bar (8) with
the smooth part facing downwards (fig. B).
Attention: do not allow the bag to protrude into the vacuum chamber (8) or on the seal (6). See the dotted
line (fig. B)
- Close the Cover (5) and press the two opposite ends (fig. C), you will hear a click, which means that the cover
is latched.
- Press the SEAL key (1B)to perform the sealing process. Wait for the SEAL led (1B) to switch off.
- Press the LOCK/UNLOCK Buttons (2) (fig D) to be able to open the Cover (5).
- Lift the lid and turn it in the open position.
- Check the quality of the seal obtained, which should appear as a regular, wrinkle-free crosswise strip with no
internal ridges in the bag (fig. E).
6 Vacuum packing with bags cut from a roll or pre-cut bags
- Lift the lid (5) and turn it in the open position.
- Place food in the bag without creasing it excessively or stretching surfaces. Eliminate any liquids or food
residues from the area inside the bag that will be sealed.
- Place the bag and its contents in front of the appliance and place the open end inside the vacuum chamber
(7) with the smooth side facing down (fig. F).
ATTENTION: have the end of the bag protrude inside the VACUUM CHAMBER(7). See the dotted line (fig. F)
- Close the Cover (5) and press the two opposite ends (fig. G), you will hear a click, which means that the cover
is latched.
ATTENTION: Do not store the machine with the LOCK buttons hooked.
are not under warranty.
11
Page 13

- Press the VAC & SEAL key (1C) to perform the packing cycle. Wait for the VAC SEAL led (1C) to switch off.
- Press the LOCK/UNLOCK Buttons (2) (fig H) to be able to open the Cover (5).
- Lift the lid and turn it in the open position.
- Check the quality of the seal obtained, which should appear as a regular, wrinkle-free crosswise strip with no
internal ridges in the bag. (fig. B)
-
The packaging cycle already started can be interrupted at any time by pressing the STOP key (1D).
7 Vacuum packing in Executive containers or in containers sealed with Universal Caps
ATTENTION: Only use MAGIC VAC® canisters since they are resistant to the vacuum created by the Mod. P0519ED,
while other types of canisters could implode due to the vacuum created by the machine and cause injury.
Executive containers and the Universal Caps with star-shaped knob (see fig. L) make vacuum packing easier,
because the connection hose can be directly introduced into the knob central hole.
Universal Caps, available in two diameters (100 mm and 125 mm), are to be used on jars for preserving food
and bowls and receptacles made of tempered glass. The Universal Caps work just like the Caps for Executive
containers.
WARNING: When using Universal Caps do not use plastic or glass containers that are not suitable since they
could implode under the vacuum pressure of the appliance and cause injury.
- Fill the container leaving at least 3 cm of room between the contents and upper rim. Place the lid on the
container and turn the knob to the “VACUUM” position (fig. L).
- Connect the container lid knob to the appliance air inlet (15) by means of the connection hose (fig. L).
- Press the VAC button (4) and the machine will create vacuum and switch off when the operation has been
completed.
- Remove the hose from the container lid knob.
- Turn the knob to the “CLOSED” position.
- To open the containers turn the knob to the “OPEN” position, you should hear a hissing of air as it enters the
container. This sound guarantees that the contents have been packed in a vacuum.
8 Vacuum packing in Family containers
Multipurpose containers ideal for storage of frequently used products such as dry and fragile foods; powder
foodstuffs; fresh, pureed or strained fruit and vegetables. Their transparency and design makes them attractive
to display on kitchen shelves while ensuring that their contents are clearly visible.
- Fill the container leaving at least 3 cm of room between the contents and upper rim and position the cap on
the container.
- Connect the container lid to the air inlet (3) of the appliance (fig. M and fig. N) by means of the connection
hose (15).
- Press the VAC button (4) and the machine will create vacuum and switch off when the operation has been
completed.
- Remove the hose from the container lid.
- To open round canisters, press the center button, to open square canisters, first press the release (16) and
then open the safety closure (fig. M).
9 Vacuum packing in glass jars sealed with metal caps (Leifheit type)
Use the cap attachment to pack foods in glass jars with a metal cap.
- Fill the container leaving at least 3 cm of room between the contents and upper rim.
- Connect the cap attachment (17) to the air inlet (3) of the appliance by means of the connection hose (15).
Place the cap attachment directly on the jar with the metal cap only (18) and press down, making sure it fits
correctly. (fig. O)
- Press the VAC button (4) and the machine will create vacuum and switch off when the operation has been
completed. Make sure that the cap attachment holds firmly by keeping it pressed with your hand.
- Disconnect the hose from the cap attachment. Remove the cap attachment from the jar.
- Apply the ring (19) supplied with the jar and screw it down all the way (fig. O).
- To open a glass jar vacuum-sealed with a metal cap, use the cap opener provided (the side with writing
should be turned up). Position the cap opener as shown in (fig. P) and gently pry open the cap until the
vacuum is released. Remove the metal cap. This accessory allows you to reuse the cap.
10 Vacuum packing with bottle caps
The Bottle Cap may be used to seal partly filled bottles of wine or non-fizzy beverages. Using the Bottle Cap
will allow you to create a vacuum inside the bottle so as to slow down oxidisation and preserve the freshness
and flavour of its contents for a longer time.
- By means of the connection hose (15) connect the air inlet (3) of the appliance to the Bottle Cap (20) (fig. Q).
Press the Cap firmly into the bottle.
- Press the VAC button (4) and the machine will create vacuum and switch off when the operation has been
completed.
- Disconnect the hose from both the Bottle Cap and the appliance immediately.
- To open a bottle sealed with the Bottle Cap, simply pull the cap out of the bottle. You will hear the air rushing
into the bottle.
11 Vacuum packing with the cap attachment in Executive containers or in containers sealed with
Universal Caps with the previous model of knob
To use the Cap Attachment in Executive containers or in containers sealed with Universal Caps with the previ-
12
Page 14
ous model of knob, read the instructions supplied in our web page www.flaemnuova.it.
INSTRUCTIONS FOR CLEANING
IMPORTANT: Before cleaning the device, disconnect it from the mains, then remove the plug from the
socket (12) and cover it with a rubber cap.
• Carefully wash your hands before proceeding to clean the appliance and its accessories.
• Both before and after use, clean the exposed surfaces of the using a sponge moistened with a mild, nonabrasive dishwashing detergent. If any liquids accidentally get inside the appliance, do not connect it to the
mains electricity supply and do not use it; contact your nearest dealer or authorised service centre.
• Please refer to the instructions on the accessory pack.
TECHNICAL SPECIFICATIONS
Voltage 220V-240~ 50/60Hz 110W
Dimensions 38 (L) x 10 (P) x 6 (H) cm
Weight 0,94 Kg
Marked
Electromagnetic compatibility
The P0519ED model has been engineered to meet current electromagnetic compatibility requirements.
However if you suspect that the appliance is interfering with the operation of your TV, radio or other electrical
appliance, try relocating the unit until the interference ceases. Alternatively try plugging the appliance into a
different power socket.
Disposal: In conformity with Directive 2012/19/EC, the symbol shown on the appliance to be disposed
of indicates that this is considered as waste and must therefore undergo “sorted waste collection”. The
user must therefore take (or have taken) the above waste to a pre-sorted waste collection centre set up
by the local authorities, or else give it back to the dealer when purchasing a new appliance of the same type.
Presorted waste collection and the subsequent treatment, recovery and disposal operations favour the production of appliances made of recycled materials and limit the negative effects of any incorrect waste management on the environment and public health. The unlawful disposal of the product by the user could result in
administrative fines as provided by the laws transposing Directive 2012/19/EC of the European member state
in which the product is disposed of.
13
Page 15

TROUBLESHOOTING
The appliance does not work
• Make sure the power cable is properly connected to the electrical outlet and to the device. Check the electric
socket by plugging another appliance into it.
• The appliance will stop automatically if overheated. Allow it to cool down for 15 minutes and try again.
• Check for faults in the power cord or the plug. Should you detect a fault, do not use the
appliance.
The appliance fails to apply the first seal on the bag cut from the roll
• Make sure the bag cut from the roll is properly positioned as described in the paragraph: “Making bags from
appliance rolls”
The appliance does not create a complete vacuum in the bags
• To seal the bag properly, you must make sure that the open end remains completely inside the Vacuum
Chamber.
• Make sure that the sealing bar, the sealing gaskets and airtight gaskets are free of impurities. After cleaning
them, put them properly back in place.
• The bag might have a hole in it. To check it, seal the bag with air on the inside. Dip the bag in water and apply
pressure. The appearance of bubbles means that there is a leak.
Reseal or use another bag.
The appliance does not seal the bag properly
• If the sealing bar overheats and melts the bag, you may have to raise the Lid and allow the sealing bar to
cool down for a few minutes.
• The appliance is built in conformity with current safety standards. Overheating will cause it to turn off auto-
matically. Allow the appliance to cool down for 15 minutes and try again.
The appliance bag does not maintain a vacuum after being sealed
• Leaks along the seam may be caused by creases, crumbs, grease or liquids. Reopen the bag, clean the upper
inside part of the bag and remove any foreign material from the Sealing Bar before resealing it.
• Check that the bag has no holes in it which have caused air to leak in. Use paper napkins to protect any sharp
edges on the contents of the bag.
The appliance does not create a vacuum in the containers
• By means of the Connection Hose, connect the container lid (or the Cap Attachment if necessary) to the Air
Inlet of the appliance.
• Leave enough room (at least 3 cm) between the contents and the top of the jar or container.
• If liquids come out during the vacuum-packing process, remember that they must first be chilled in a refrig-
erator, not left at room temperature.
• Check that the rim of the jar or container and the universal lid are not damaged in the sealing area. Wipe the
rim and cap clean with a cloth moistened with lukewarm water and repeat the vacuum-packing process.
• Make sure that the gasket of the container cap or the universal cap is set properly in place and is not dam-
aged.
Executive containers or Universal Caps do not maintain a vacuum
• Make sure that the arrow on the knob of the container cap is positioned on “VACUUM” before creating a
vacuum in the container and it is positioned on “CLOSED” after a vacuum is formed.
• Make sure that the O-ring beneath the knob of the container cap or the universal cap is set properly in place.
Family containers do not maintain a vacuum
• Make sure that the gasket beneath the central button (16) of the container cap is set properly in place and
is not damaged.
14
Page 16
F
Mod. P0519ED
LE SYSTÈME DE CONDITIONNEMENT SOUS VIDE POUR LA MAISON
Nous vous suggérons de lire attentivement ces instructions pour être surs d’utiliser correctement le MOD.
P0519ED et obtenir les meilleures résultats de conservation. Nous vous conseillons en outre de garder avec
Félicitations pour votre achat et merci de nous avoir fait confiance.
soin ce manuel pour pouvoir le consulter ultérieurement.
NOMENCLATURE
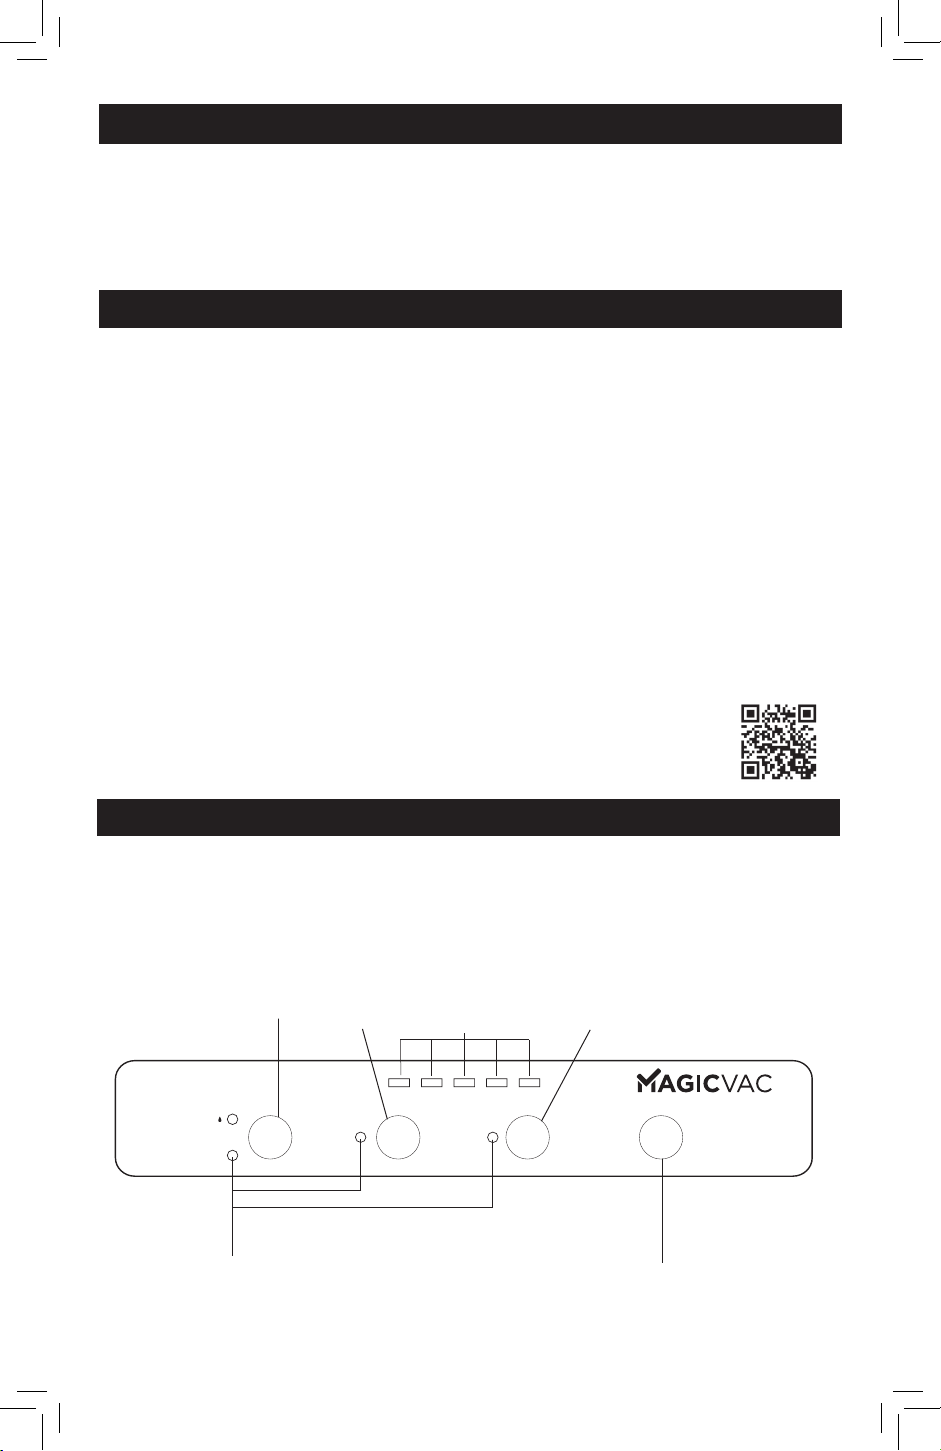
Consulter les instructions de la page 1.
(1) Clavier de commandes – Pour programmer les fonctions de la machine.
(2) Boutons LOCK/UNLOCK - Ils permettent la fermeture et l’ouverture du couvercle (5).
(3) Prise d’air pour le petit tube – Pour insérer le petit tube de façon à eectuer la mise à vide de tous les
contenants et avec tous les accessoires MAGIC VAC®.
(4) Bouton vide - Il permet d’eectuer le sous vide dans les récipients en utilisant le petit tube.
(5) Couvercle – Son ouverture avec position xe en haut, permet de placer les petits sacs avant de procéder
aux opérations d’emballage.
(6) Coupe-sac - Utilisables dans le sens bidirectionnel.
(7) Chambre à vide – C’est le siège pour la position du petit sac et l’évacuation de l’air.
(8) Barre soudeuse – Élément réchauant permettant d’apposer le sceau au petit sac.
(9) Joint de scellement – Appuyer le petit sac sur la Barre Soudante.
(10) Joint d’étanchéité – Garantit la tenue à vide dans la chambre permettant l’évacuation de l’air des petits
sacs
(11) Hublot lumineux – Solution qui permet de voir la bonne position du petit sac dans la Chambre à vide.
(12) Prise pour cordon d’alimentation.
(13) Câble d’alimentation – Pour relier la machine à la tension du réseau électrique.
(14) Petits pieds anti-glissement – Empêchent le glissement de la machine au cours de l’utilisation.
Pour plus d’informations sur l’utilisation avec les accessoires et pour le Guide à la mise
sous vide, les approfondissements sont disponibles sur le site www.magicvac.com
DESCRIPTION DES COMMANDES ET FONCTIONS
(1A) SEAL MODE - Touche pour congurer la soudure : Dry pour l’emballage d’aliments secs ou Humid pour
l’emballage d’aliments humides.
(1B) SEAL - Touche pour le démarrage manuel de la soudure des sachets. (attendre 30 secondes entre une
soudure et l’autre pour que le dispositif puisse refroidir).
(1C) VAC SEAL - Touche pour démarrer le cycle d’emballage automatique dans les sachets, ainsi que la soudure
nale.
(1D) STOP - Touche fonction Cancel, c’est-à-dire l’arrêt de toute phase d’emballage en cours.
(1E) LED - Elles s’allument quand la machine est en marche.
1A
HUMID
Remarque : Si après le fonctionnement en continu, plusieurs
voyants clignotent simultanément, la protection de surchaue
est activée. Attendre 5-10 minutes pour que le dispositif refroidisse et qu’il revienne en mode normal.
DRY
SEAL
MODE
1B 1C
SEAL
1E
VAC
SEAL
15
STOP
1D
Page 17

AVERTISSEMENTS IMPORTANTS
Le constructeur fait tous les efforts nécessaires pour assurer le
plus haut niveau de qualité et de sécurité sur ses produits. Toutefois
comme pour tout appareil électrique, il faut toujours respecter les
normes de sécurité fondamentales pour que l’appareil ne constitue
aucun danger pour les personnes, les animaux et/ou les objets.
• Cet appareil peut être utilisé par des enfants de plus de 8 ans et des
personnes à capacité physique, sensorielle ou mentale réduite ou
manquant d’expérience et de connaissance, à condition qu’elles soient
surveillées et qu’elles aient été instruites quant à l’utilisation sûre de
l’appareil et la compréhension des risques présents. Les enfants ne
doivent pas jouer avec l’appareil. Le nettoyage et l’entretien à la charge
de l’utilisateur ne doivent pas être exécutés par des enfants sans surveillance.
• Avant la première utilisation, puis périodiquement durant la vie du pro-
duit, contrôlez le câble d’alimentation afin de vous assurer qu’il n’y ait
pas d’endommagements; si le cordon d’alimentation est endommagé,
il doit être remplacé par le fabricant, son agent de service ou bien par
une personne de même qualification afin d’éviter des risques.
• Lisez attentivement les instructions avant d’utiliser votre P0519ED, et
gardez-les à la portée de la main pour référence future.
• L’appareil n’est pas prévu pour usage continu. Ne pas effectuer plus
d’un cycle complet toutes les deux minutes. La durée du cycle opérationnel est 20 secondes environ, suivi par une pause de 60 secondes.
Dans des conditions de vie extrêmes l’utilisation intensive de l’appareil
peut faire intervenir les systèmes automatiques de protection thermique. Le cas échéant, attendre que l’appareil se refroidisse jusqu’à
permettre la remise à zéro des systèmes de protection.
• Ne pas utiliser l’appareil à proximité ou sur des surfaces chaudes.
• Le coffret n’est pas protégé contre la pénétration de liquides.
• Évitez d’aspirer de liquides dans la chambre du vide. Le cas échéant,
séchez immédiatement la chambre du vide.
• Ne pas plonger l’appareil dans l’eau et ne pas l’utiliser si le câble ou la
fiche sont mouillés; le cas échéant, pendant l’utilisation débranchez
immédiatement l’appareil en portant des gants en caoutchouc secs. Ne
pas retirer ni toucher l’appareil plongé dans l’eau sans avoir débranché
la fiche. Ne pas utiliser le l’appareil après l’avoir retiré de l’eau (envoyezle immédiatement à un centre de service agréé ou bien à votre revendeur de confiance).
• Ne pas toucher la barre de soudure pendant le fonctionnement de
l’appareil afin d’éviter de possibles brûlures.
• Ne jamais utiliser d’adaptateurs pour des tensions d’alimentation diffé-
rentes de celles inscrites sur l’appareil (données de la plaquette).
• Toujours débrancher l’appareil après l’utilisation.
• Ne pas ouvrir ou modifier l’appareil. Les réparations doivent être
effectuées par du personnel autorisé. Les réparations non autorisées
annulent la garantie.
• Le Fabricant, le Vendeur et l’Importateur ne se considèrent respon-
sables aux effets de la sécurité, de la fiabilité et des performances que
si: a) l’appareil est utilisé conformément au mode d’emploi; b) l’instal-
16
Page 18

lation électrique du local où l’appareil est utilisé est conforme aux lois
en vigueur.
• Il est conseillé d’utiliser des sachets originaux. Si des sachets différents
de ceux cités ci-dessus sont utilisés pour effectuer des opérations
multiples d’emballage sous vide, tenir le film lisse du sachet vers la
barre de soudure.
• Ne pas utiliser des couvercles ou des conteneurs fissurés ou endommagés!
Ce texte est pour les utilisateurs des pays en dehors de l’Union
Européenne:
- Cet appareil n’est pas prévu pour être utilisé par des personnes (y
compris des enfants) aux capacités physiques, sensorielles ou mentales réduites, ou manquant d’expérience et de connaissance, à moins
qu’elles ne soient surveillées ou qu’elles n’aient été instruites quant à
l’utilisation de l’appareil par une personne responsable de leur sécurité.
- Les enfants doivent être surveillés pour s’assurer qu’ils ne jouent pas
avec l’appareil.
Utilisez exclusivement des sachets et des accessoires originaux.
MODE D’EMPLOI
ATTENTION : Ne laissez pas la machine avec les boutons LOCK enclenchés. Après plusieurs utilisations, il se
peut que les garnitures d’étanchéité (10) s’usent et que la machine n’effectue plus le sous vide. Dans ce
cas il faut procéder au remplacement des joints dans la mesure où ils sont considérés comme du matériel
Avant chaque utilisation, nettoyer soigneusement l’appareil et les accessoires en contact avec les aliments
(récipients, couvercles, pots, etc.) suivant les instructions données au paragraphe «INSTRUCTIONS DE
NETTOYAGE «
1 Positionnement de l’appareil
Placez l’appareil dans un endroit sec et sur une surface horizontale en faisant attention à laisser la zone de
travail devant l’appareil libre de tout obstacle. La zone de travail doit être suffisamment large pour permettre
d’appuyer les sachets avec les aliments à conditionner.
2 Branchement de la machine
Introduire le cordon d’alimentation (13) dans la prise (12) puis le brancher à une prise du réseau électrique
correspondant à la tension de la machine (cf. les données techniques). La LED Dry de la touche 1A (SEAL MODE)
s’allume. Stand by : Après 10’ d’inactivité, la machine se met en veille. Pour la réactiver, appuyer sur n’importe
quel bouton du clavier des commandes.
3 Configurer le type de soudure
Le réglage du type de soudure doit être configuré à chaque fois que vous introduisez la fiche du cordon d’alimentation (13) dans la prise de réseau. MAGIC VAC® (Mod. P0519ED) est doté du réglage du type de soudure ;
le résultat final de la soudure des sachets dépend en effet du genre d’aliment à emballer ou de la température
ambiante dans laquelle vous travaillez. Afin d’optimiser le résultat final, il est donc possible de sélectionner 2
modes de soudure :
Dry - pour les aliments secs tels que les biscuits, le riz et le café
Humid - pour la viande rouge et le poisson qui libèrent des liquides ou du sang, pour des aliments fragiles
4 Conseils d’emploi des sachets
Les sachets sont disponibles dans deux largeurs: 20 et 30 cm. Choisissez la taille du sachet adéquate à l’aliment
à conserver. Vérifiez que la longueur du sachet soit au moins 8 cm de plus par rapport à l’aliment à conserver,
et prévoir 2 cm en plus chaque fois que le sachet sera ensuite réutilisé.
5 Réalisez les sachets à partir de rouleaux
- Extraire la longueur de sachet souhaitée et la poser sur le couvercle fermé du dispositif ; tenir le sachet d’une
main puis faire coulisser la coupeuse à travers le rouleau pour couper le sachet à la longueur souhaitée. (fig
A), puis souder un côté ouvert du fragment, en suivant les étapes suivantes :
- Soulevez le couvercle (5) et tournez-le en position ouverte.
- Souder un côté ouvert du fragment en plaçant l’une des deux extrémités ouvertes du sachet sur la barre de
de consommation et ils ne sont pas sous garantie.
17
Page 19

soudure (8) en dirigeant la partie lisse vers le bas (fig.B).
Attention : ne laissez pas dépasser le sachet dans la chambre à vide (7) ou sur le joint d’étanchéité (10). Voir
la ligne en pointillés (fig. B)
- Fermez le couvercle (5) et appuyez sur ses deux extrémités opposées (fig. C). Vous entendrez un clic qui
signifie que le couvercle est accroché.
- Appuyez sur la touche SEAL (1B) pour effectuer la soudure. Attendre l’extinction de la LED SEAL (1B).
- Appuyez sur les boutons LOCK/UNLOCK (2) (fig. D) afin de permettre l’ouverture du couvercle (5) .
- Levez le couvercle de la machine et enlevez le sachet.
- Contrôlez la soudure obtenue qui doit se présenter comme une bande transversale régulière, sans pli et raies
à l’intérieur du sachet. (fig. E)
6 Mise sous-vide avec les sachets coupés du rouleau ou avec des sachets prédécoupés
- Soulevez le couvercle (5) et tournez-le en position ouverte.
- Introduisez le produit dans le sachet sans créer de plis ou tensions des surfaces. Eliminez tous liquides ou
restes de nourriture dans la zone interne du sachet qui sera soudée.
- Posez devant l’appareil le sachet et son contenu avec l’extrèmitè du sachet ouverte placèe à l’intèrieur de la
chambre du vide (7) et avec la partie lisse vers le bas (fig. F).
ATTENTION: laissez dépasser l’extrémité du sachet à l’intérieur de la chambre à vide (7). Voir la ligne en
pointillés (fig. F)
- Fermez le couvercle (5) et appuyez sur ses deux extrémités opposées (fig. G). Vous entendrez un clic qui
signifie que le couvercle est accroché.
- Appuyez sur la touche VAC & SEALl (1C) pour effectuer le cycle de conditionnement. Attendre l’extinction de
la touche LED VAC SEAL (1C).
- Appuyez sur les boutons LOCK/UNLOCK (2) (fig. H) afin de permettre l’ouverture du couvercle (5) .
- Levez le couvercle de la machine et enlevez le sachet.
- Contrôlez la soudure obtenue qui doit se présenter comme une bande transversale régulière, sans pli et raies
à l’intérieur du sachet. (fig. I)
- À tout moment, le cycle de conditionnement qui est en marche peut être interrompu en pressant la touche
STOP (1D).
7 Conditionnement dans les récipients Executive ou dans des récipients scellés avec les couvercles
universels
ATTENTION: Utiliser uniquement et exclusivement les contenants MAGIC VAC® car ils sont résistants à la valeur
de vide créée par le Mod. P0519ED, tandis que d’autres type de contenants pourraient se condenser à cause de
la dépression obtenue avec la machine, et causer des blessures.
Les récipients Executive et les Couvercles Universels dotés d’une poignée en forme d’étoile (fig. E1) simplifient
la réalisation du vide car le tuyau de raccordement peut être introduit directement dans le trou central de la
poignée (fig. E2).
Les couvercles universels, disponibles dans les deux diamètres de 100 mm et 125 mm doivent être utilisés avec
les récipients de conservation des aliments, avec des casseroles et les assiettes en verre trempé. Les Couvercles
Universels fonctionnent exactement comme les Couvercles pour récipients Executive.
ATTENTION: Avec les couvercles universels il ne faut pas utiliser de récipients en plastique ou en verre qui
ne soient pas appropriés car ils peuvent imploser sous la dépression du vide de l’appareil et causer des
blessures.
- Remplissez le récipient en laissant au moins 3 cm de distance par rapport au bord supérieur du récipient et
placez le couvercle sur le récipient. Tournez la poignée sur la position «VACUUM». (fig. L)
- Connectez, au moyen du tuyau de raccordement (15), la poignée du couvercle du récipient à la prise d’air
(3) de l’appareil. (fig. L)
- Appuyer sur le bouton VAC (4) pour que la machine effectue le sous vide. Elle s’éteint une fois l’opération
terminée.
- Détachez le tuyau de la poignée du récipient.
- Tournez la poignée sur la position «CLOSED».
- Tournez la poignée en position «OPEN» pour ouvrir les récipients; on devrait entendre le bruit de l’air qui
rentre dans le récipient. Ce bruit est la garantie que le contenu a été conservé sous vide.
8 Conditionnement dans les récipients Family
Récipients à usages multiples idéaux pour conserver des produits fréquemment utilisés comme les aliments
secs et fragiles; aliments en poudre; fruits et légumes frais or frappés. Grâce à leur transparence et à leur design,
ils décorent agréablement les étagères de la cuisine et garantissent une excellente visibilité de leur contenu.
- Remplissez le récipient en laissant au moins 3 cm de distance par rapport au bord supérieur du récipient et
placez le couvercle sur le récipient.
- Connectez, au moyen du tuyau de raccordement (15), la poignée du couvercle du récipient à la prise d’air
(3) de l’appareil. (fig. M e fig. N).
- Appuyer sur le bouton VAC (4) pour que la machine effectue le sous vide. Elle s’éteint une fois l’opération
terminée.
- Détachez le tuyau du couvercle su récipient.
- Pour ouvrir les récipients ronds, appuyez sur le bouton central. Pour ouvrir les récipients carrés, appuyez
d’abord sur le déverrouillage (16), puis ouvrez les fermetures de sécurité (fig. M).
9 Conditionnement dans des pots en verre scellés avec des disques en métal (type Leifheit)
18
Page 20
Pour effectuer le cycle de conditionnement dans des pots en verre scellés avec des couvercles en métal, utilisez
l’adaptateur pour Couvercles.
- Remplissez le pot et laisser au moins 3 cm de distance par rapport au bord supérieur du pot.
- Connectez au moyen du tuyau de raccordement (15) l’Adaptateur pour Couvercles (17) à la prise d’air (3) de
l’appareil. Placez l’adaptateur pour couvercles directement sur le pot muni du disque (18) et poussez-le vers
le bas et vérifiez que le raccordement soit correct (fig. O).
- Appuyer sur le bouton VAC (4) pour que la machine effectue le sous vide. Elle s’éteint une fois l’opération
terminée. Pressez l’adaptateur pour couvercles avec la main pour en vérifier l’étanchéité.
- Détachez le tuyau de l’adaptateur pour couvercles. Retirez l’adaptateur pour couvercles du pot.
- Appliquez et vissez à fond le collier (19) fourni avec le pot (fig. O).
- Pour ouvrir un pot scellé sous vide avec disque en métal, utilisez l’accessoire enlève-disques (le côté avec les
inscriptions au dessus). Positionnez l’accessoire enlève-disques comme indiqué sur la (fig. P) et faire pression délicatement pour relâcher le vide. Enlevez le disque en métal. Cet accessoire permettra de réutiliser le
disque.
10 Conditionnement avec bouchon bouteille
Le Bouchon Bouteille peut être utilisé pour boucher des bouteilles, par ex. vin ou boissons non gazeuses,
partiellement pleines. Le Bouchon Bouteille vous permettra de faire le vide dans la bouteille dont le contenu
s’oxydera moins vite et gardera sa qualité et son goût plus longtemps.
- Reliez avec le Tuyau de raccordement (15), la prise d’air de l’appareil (3) avec le Bouchon Bouteille (20) (fig.
Q). Pousser fermement le Bouchon dans la bouteille.
- Appuyer sur le bouton VAC (4) pour que la machine effectue le sous vide. Elle s’éteint une fois l’opération
terminée.
- Détachez immédiatement le tuyau du Bouchon Bouteille aussi bien que de l’appareil.
- Pour ouvrir une bouteille scellée avec le Bouchon Bouteille sortez simplement le bouchon de la bouteille.
Vous entendrez le bruit de l’air qui entre dans la bouteille.
11 Conditionnement avec l’adaptateur pour couvercles dans les récipients Executive ou dans des récipients scellés avec les couvercles universels munis de la poignée version précédente
Pour utiliser l’adaptateur pour couvercles dans des récipients Executive ou dans des récipients scellés avec les
couvercles universels munis de la poignée version précédente, consultez les instructions fournies sur le site
internet www.flaemnuova.it.
NETTOYAGE
ATTENTION: Avant de nettoyer le dispositif, le mettre hors tension puis débrancher la fiche de la prise
(12) et la couvrir avec le bouchon en caoutchouc.
• Lavez vous soigneusement les mains avant de commencer les phases de nettoyage et de désinfection des
accessoires.
• Avant et après l’utilisation nettoyez les surfaces externes du avec une éponge mouillée et du savon de
vaisselle doux (non abrasif et non solvant). En cas de pénétration accidentelle de liquides à l’intérieur de la
structure il ne faut pas brancher la fiche dans la prise de courant, ni utiliser l’appareil; contactez le centre de
service après-vente agréé le plus proche ou bien votre revendeur de confiance.
• Prière de vous référer aux instructions sur la boîte de l’accessoire.
CARACTÉRISTIQUES TECHNIQUES
Voltage
Dimensions
Poids
Estampillage
Compatibilité électromagnétique
Le Mod. P0519ED a été conçu pour remplir toutes les conditions actuellement demandées pour la compatibilité électromagnétique. Au cas où, malgré tout, il semblerait que l’appareil créerait une interférence avec votre
télévision, radio ou autre appareil électrique, essayez de changer la position de l’appareil jusqu’à disparition de
l’interférence, ou essayez éventuellement de le brancher à une autre prise.
Elimination: Conformément à la Directive 2012/19/CE, le symbole reporté sur l’équipement indique que
l’appareil à éliminer est un déchet qui doit faire l’objet de «collecte sélective». L’utilisateur devra donc
apporter (ou faire apporter) ce déchet dans l’un des centres pour la collecte sélective prévus par les
collectivités locales ou le remettre au revendeur lors de l’achat d’un appareil de type équivalent neuf. La
collecte sélective du déchet et les opérations de traitement, recyclage et élimination successives favorisent la
production d’appareils à partir de matériaux recyclés et limitent les effets négatifs sur l’environnement et sur la
santé provoqués par une éventuelle gestion incorrecte du déchet. L’élimination abusive du produit de la part
de l’utilisateur comporte l’application des éventuelles sanctions administratives prévues par les lois de mise en
oeuvre de la Dir. 2012/19/CE de l’État membre européen dans lequel le produit est éliminé.
220V-240~ 50/60Hz 110W
38 (L) x 10 (P) x 6 (H) cm
0,94 Kg
19
Page 21

LOCALISATION DES PANNES
L' appareil ne fonctionne pas
• Veiller à ce que le cordon d’alimentation soit branché correctement à la sortie électrique et au dispositif.
Contrôler la fiche électrique et la brancher sur un autre appareil.
• Le appareil se bloquera automatiquement en cas de surchauffe. Laisser refroidir pour 15 minutes et essayer
de nouveau.
• Vérifiez si le câble ou la fiche sont défectueux. Le cas échéant, ne pas utiliser l’appareil.
L' appareil n’exécute pas la première soudure sur le morceau de rouleau coupé
• Vérifier que la partie de rouleau soit correctement positionné selon la description du paragraphe: «Réalisez
les sachets à partir de rouleauxs»
L' appareil ne fournit pas un vide complet dans les sachets
• Pour souder correctement , l’extrémité ouverte du sachet devrait rester entièrement dans le logement de la
Chambre du Vide.
• Contrôler que la Barre de Soudure, les Joints d’Étanchéité et de Scellage ne présentent d’impuretés. Après le
nettoyage éventuel, les positionner de nouveau correctement.
• Le sachet pourrait être perforé. Pour contrôler, sceller le sachet avec de l’air à l’intérieur, le plonger dans l’eau
et presser. La présence de bulles signale la présence d’une perte. Sceller de nouveau ou utiliser un autre
sachet.
L' appareil ne soude pas le sachet correctement
• Si la Barre de Soudure se chauffe et fait fondre le sachet, soulever le Couvercle et laisser refroidir la Barre de
Soudure pour quelques minutes.
• Le appareil est fabriqué selon les normes de sécurité. En cas de surchauffe il s’éteint automatiquement.
Laisser refroidir l’appareil pour 15 minutes et essayer de nouveau.
Le sachet ne conserve pas le vide après avoir été soudé
• Des pertes le long de la soudure peuvent être causées par des plis, des miettes, de la graisse ou des liquides.
Ouvrir de nouveau le sachet, nettoyer la partie supérieure à l’intérieur du sachet et éliminer le matériel étranger de la Barre de Soudure avant de sceller.
• Vérifier que le sachet ne soit percé et par conséquent il n’a pas maintenu le vide. Utiliser des serviettes en
papier pour protéger le sachet si le contenu a des bords pointus.
L' appareil ne produit pas le vide dans les récipients
• Connectez au moyen du Tuyau de Raccordement le couvercle du récipient (ou l’Adaptateur pour Couvercles,
le cas échéant) et la Prise d’Air de l’appareil.
• Laisser un espace supérieur adéquat (3 cm. minimum.) entre le contenu et la partie supérieure du pot ou du
récipient.
• Si des liquides débordent lors de la mise sous-vide, rappelez vous qu’ils doivent être refroidis sous réfrigéra-
tion et non pas à température ambiante.
• Vérifier que le bord du pot ou du récipient et du couvercle universel ne soit pas abîmé dans la zone de scel-
lage. Nettoyez le bord et le couvercle avec un chiffon tiède et procéder de nouveau à l’opération de mise
sous-vide.
• Vérifier que le joint du couvercle du récipient ou du couvercle universel soit correctement positionné et ne
soit pas abîmé.
Les récipients Executive ou les Couvercles Universels ne conservent pas le vide
• Vérifier que la poignée du couvercle du récipient soit positionnée sur «VACUUM» avant de commencer la
procédure de mise sous vide dans le récipient et qu’elle soit positionnée sur «CLOSED» après la procédure
de mise sous-vide.
• Vérifier que l’O-Ring sous le compteur du couvercle du récipient ou du couvercle universel soit correctement
positionné.
Les récipients Family ne conservent pas le vide
• Vérifier que le joint sous le bouton central (16) du couvercle du récipient soit correctement positionné.
20
Page 22
D
Mod. P0519ED
Wir gratulieren Ihnen zum Kauf des Geräts und danken Ihnen für das uns entgegengebrachte Vertrauen.
Lesen Sie diese Gebrauchsanleitung sorgfältig durch, damit Sie mit dem Mod. P05196ED die bestmöglichen
Aufbewahrungsergebnisse erzielen. Wir empfehlen Ihnen, sie für ein späteres Nachschlagen aufzubewahren.
GERÄTEDARSTELLUNG
Die Abbildungen auf Seite 1 konsultieren.
(1) Bedientasten – Um die Funktionen der Maschine einzustellen.
(2) LOCK/UNLOCK-Tasten - Ermöglichen das Einhaken und Önen der Abdeckung (5).
(3) Schlauchanschluss – Um den Schlauch einzuführen und um die Vakuumierung aller Behälter und mit
allen MAGIC VAC® Zubehörteilen ausführen zu können.
(4) Vakuum-Taste - Um in den Behältern mit dem Schlauch das Vakuum herzustellen.
(5) Deckel – Dank der Önung die man oben arretieren kann, kann man die Beutel positionieren. bevor man
mit der Verpackung beginnt.
(6) Beutelschneider – Beidseitig zu benutzen.
(7) Vakuumkammer – Sitz zur Positionierung des Beutels und der Luftabsaugung.
(8) Schweissbalken – Heizelement, zur Versiegelung des Beutels.
(9) Versiegelungsdichtung – Drückt den Beutel an den Versiegelungsbalken.
(10) Dichtungen – Gewährleisten das Aufrechterhalten des Vakuums in der Kammer und das Absaugen der
Luft aus den Beuteln.
(11) Sichtfenster - Lösung, um die richtige Positionierung des Beutels in der Vakuumkammer zu überprüfen.
(12) Steckdose für Netzkabel
(13) Versorgungskabel – Um die Maschine an das elektrische Versorgungsnetz anzuschließen.
(14) Rutschfeste Füße – Verhindern das Wegrutschen des Gerätes während der Nutzung.
Für weitere Einzelheiten zum Gebrauch mit Zubehörteilen und für den Leitfaden zur
DAS VAKUUMSYSTEM FÜR DEN HAUSHALT
Vakuumverpackung können von folgender Internetseite heruntergeladen werden:
www.magicvac.com
BESCHREIBUNG DER BEDIENUNGEN UND FUNKTIONEN
(1A) SEAL MODE - Taste zum Einstellen der Schweißung: Dry für die Verpackung von Trockenfutter oder
Humid für die Verpackung von feuchten Lebensmitteln.
(1B) SEAL - Taste für den manuellen Start der Beutelversiegelung. (Zwischen den Schweißungen 30 Sekun-
den abwarten, damit das Gerät abkühlen kann).
(1C) VAC SEAL - Taste zum Starten des automatischen Verpackungszyklus in den Beuteln, einschließlich
Endversiegelung.
(1D) STOP - Funktionstaste Cancel, d.h. Stopp einer laufenden Verpackungsphase.
(1E) LED - Leuchten auf, wenn die Maschine in Betrieb ist.
1A
HUMID
Anmerkung: Wenn nach dem Dauerbetrieb mehrere Leuchten
gleichzeitig blinken, ist der Überhitzungsschutz aktiviert. 5-10
Minuten abwarten, bis das Gerät abgekühlt ist und in den
Normalbetrieb zurückkehrt.
DRY
SEAL
MODE
1B 1C
SEAL
1E
VAC
SEAL
21
STOP
1D
Page 23

WICHTIGE HINWEISE
Der Hersteller tut alles Nötige, um die höchste Qualität und
Sicherheit aller seiner Geräte zu gewährleisten. Wie für alle
elektrischen Apparate sollten aber beim Gebrauch stets grundlegende Vorsichtsmaßnahmen beachtet werden, um Schäden an
Menschen, Tieren oder Gegenständen zu vermeiden.
• Dieses Gerät kann dann von Kindern ab 8 Jahren, von Personen mit eingeschränkten körperlichen, sensorischen oder geistigen Fähigkeiten
sowie von Personen ohne bisherige Erfahrung und Kenntnisse im
Umgang mit solchen Geräten bedient werden, wenn sie dabei von
einer für ihre Sicherheit verantwortlichen Person beaufsichtigt werden
oder in den sicheren Gebrauch eingewiesen wurden und die damit
zusammenhängenden Gefahren verstanden haben. Kinder dürfen
nicht mit dem Gerät spielen. Reinigung und Wartung des Geräts dürfen
nicht von Kindern ohne Beaufsichtigung vorgenommen werden.
• Vor dem ersten Gebrauch und regelmäßig während der Lebensdauer
des Produktes, das Netzkabel kontrollieren, um sicherzustellen, dass
keine Schäden vorliegen; ist die Anschlussleitung beschädigt, muss
diese von dem Hersteller, dem Servicepartner oder einer ähnlich qualifizierten Person ersetzt werden, um Gefahrensituationen zu vermeiden.
• Lesen Sie die Gebrauchsanleitung vor der Inbetriebnahme Ihres Mod.
P0519ED gründlich durch und bewahren Sie sie zum Nachschlagen gut
auf.
• Das Gerät ist nicht für den Dauerbetrieb geeignet. Führen Sie nicht mehr
als einen kompletten Vakuumierungsvorgang alle 2 Minuten aus. Der
Betriebszyklus beträgt etwa 20 Sekunden, darauf folgt eine Pause von
bis zu 60 Sekunden. Bei extremen Umweltbedingungen kann eine intensive Benutzung des Geräts die automatischen Wärmeschutzsysteme
des Geräts einschalten. In diesem Fall lassen Sie das Gerät abkühlen,
bis es wieder betriebsbereit ist bzw. die Wärmeschutzsysteme wieder
rückgestellt werden.
• Benutzen Sie das Gerät nicht auf oder in der Nähe von heißen Flächen.
• Das Gehäuse des Geräts ist gegen Eindringen von Flüssigkeiten nicht
geschützt.
• Vermeiden Sie das Ansaugen von Flüssigkeiten in der Vakuumkammer.
Sollte es trotzdem vorkommen, trocknen Sie sofort die Vakuumkammer.
• Tauchen Sie das Gerät nicht in Wasser und verwenden Sie es nicht, wenn
der Stecker oder das Elektrokabel nass ist. Sollte diese Situation während des Gebrauchs auftreten, streifen Sie trockene Gummihandschuhe
über und ziehen Sie sofort den Stecker heraus. Das in Wasser getauchte Gerät weder herausnehmen noch berühren, bevor der Stecker aus
der Steckdose gezogen wurde. Verwenden Sie das aus dem Wasser
genommene Gerät nicht (und senden Sie es unverzüglich an die autorisierte Kundendienststelle oder an Ihren Händler ein).
• Berühren Sie die Schweißleiste während des Gebrauchs des Geräts
nicht, um mögliche Brandwunden zu vermeiden.
• Benutzen Sie nie Adapter für eine andere Versorgungsspannung als
die auf dem Boden des Gerätes angegebene (Typenschild).
• Ziehen Sie den Netzstecker nach dem Gebrauch immer heraus.
22
Page 24

• Öffnen oder modifizieren Sie das Gerät nicht. Reparaturen dürfen nur
von autorisierten Fachleuten durchgeführt werden. Nicht autorisierte
Reparaturen führen zum Verlust der Garantie.
• Hersteller, Verkäufer und Importeur sind für Sicherheit, Zuverlässigkeit
und Leistungen nur dann verantwortlich, wenn: a) das Gerät gemäß
der Bedienungsanleitung eingesetzt wird; b) die Elektroanlage des
Raums, wo das Gerät gebraucht wird, den geltenden Gesetzen entspricht.
• Der Gebrauch von Originalbeuteln Marke wird empfohlen. Falls
nicht die oben genannten Beutel verwendet werden, um mehrfache
Vakuumverpackungsvorgänge auszuführen, muss die glatte Folie des
Beutels gegen die Schweißschiene gehalten werden.
• Keine Deckel oder Behälter benutzen, die Sprünge haben oder sonstwie beschädigt sind.
Dieser Text ist für Benutzer in anderen als den Ländern der europäischen
Gemeinschaft bestimmt:
- Dieses Gerät ist nicht zur Verwendung durch Personen (einschließlich Kinder) mit eingeschränkten körperlichen, sensorischen oder
geistigen Fähigkeiten oder ohne bisherige Erfahrung und Kenntnisse
im Umgang mit solchen Geräten bestimmt, es sei denn, sie werden
durch eine für ihre Sicherheit verantwortliche Person beaufsichtigt
oder in den Gebrauch eingewiesen.
- Kinder müssen beaufsichtigt werden, um sicherzustellen, dass sie
nicht mit dem Gerät spielen.
Verwenden Sie nur -Originalbeutel und -zubehör.
BETRIEBSANLEITUNG
ZU BEACHTEN: Lagern Sie das Gerät nicht mit eingerasteten LOCK-Schaltern. Nach mehrmaligem
Gebrauch könnten die Dichtungen (10) abgenutzt sein und die Maschine kann kein Vakuum mehr erzeugen. In diesem Falle müssen die Dichtungen ausgetauscht werden. Die Dichtungen sind Verschleißteile
Reinigen Sie vor jeder Benutzung sorgfältig Ihr Gerät und die mit den Lebensmitteln in Berührung
kommenden Zubehörteile (Behälter, Deckel, Gläser usw.). Gehen Sie dabei gemäß den im Abschnitt
„ANWEISUNGEN FÜR DIE REINIGUNG“ erläuterten Anweisungen vor.
1 Positionierung des Geräts
Stellen Sie das Gerät an einen trockenen Ort und auf eine waagrechte Fläche. Achten Sie darauf, dass der Raum
vor dem Gerät frei von Hindernissen sein soll und genügend räumig, damit die Beutel mit den zu vakuumierenden
Lebensmitteln abgelegt werden können.
2 Anschluss der Maschine
Das Stromkabel (13) in den Verbindungsstecker (12) stecken und es dann an eine Netzsteckdose mit gleicher
Spannung wie die des Geräts einstecken (siehe technische Daten). Die LED Dry auf der Taste 1A (SEAL MODE) ist
eingeschaltet. Stand by: Nach 10' Nichtbetrieb geht die Maschine in den Standby-Modus über. Um sie wieder zu
aktivieren, eine beliebige Taste auf der Tastatur drücken.
3 Einstellen der Art der Schweißung
Die Art der Schweißung muss bei jedem Einstecken des Stromkabels (13) in den Verbindungsstecker eingestellt werden. MAGIC VAC® (Mod. P0519ED) ist mit der Regelung für die Schweißart ausgestattet, denn das Endergebnis der
Versiegelung der Beutel kann je nach Art der zu verpackenden Lebensmittel oder Umgebungstemperatur, in der das
Gerät arbeitet, beeinflusst werden. Um das Endergebnis zu optimieren, können 2 Schweißarten ausgewählt werden:
Dry - für trockene Lebensmittel wie Kekse, Reis und Kaffee
Humid - für rotes Fleisch und Fisch, aus denen Flüssigkeiten oder Blut austritt und für zerbrechliche Lebensmittel
4 Tipps für die Benutzung der Beutel
Beutel sind in zwei Breiten erhältlich: 20 cm und 30 cm. Wählen Sie die geeignete Beutelgröße für die aufzubewahrenden Lebensmittel. Stellen Sie sicher, dass der zu verwendende Beutel mindestens 8 cm länger ist als die zu
vakuumierenden Lebensmittel. Geben Sie für jedes erneute Vakuumieren eines Beutels 2 cm dazu.
und werden nicht von der Gerätegarantie abgedeckt.
23
Page 25

5 Beutel von Rollen herstellen
- Die gewünschte Länge der Beutel herausziehen und auf den geschlossenen Deckel des Geräts legen; den Beutel
mit einer Hand festhalten, dann das Schneidegerät über die Rolle ziehen, um den Beutel auf die gewünschte
Länge zuzuschneiden (Abb. A) und eine offene Seite des Schnitts versiegeln, dazu diese Schritte befolgen :
- Heben Sie die Bedienungsklappe (5) und drehen Sie sie in die offene Stellung.
- Eine offene Seite des Schnitts versiegeln, dazu eine der beiden offenen Enden des Beutels mit dem glatten Teil
nach unten auf die Schweißleiste (8) legen (Abb. B).
ZU BEACHTEN: Der Beutel darf nicht in die Vakuumkammer (7) hineinragen oder über die Dichtung (10) heraus-
ragen. Siehe gestrichelte Linie (Abb. B)
- Schließen Sie die Abdeckhaube (5) und drücken Sie gleichzeitig auf beide Seiten (Abb. C), Sie hören ein Klicken, das
bedeutet, dass die Abdeckhaube eingerastet ist.
- Drücken Sie die Taste SEAL (1B) (Abb. F) zum Verschweißen. Die Deaktivierung der SEAL-LED (1B) abwarten.
- Drücken Sie die Tasten LOCK/UNLOCK (2) (Abb. D) für die Öffnung der Abdeckhaube (5).
- Die Bedienungsklappe des Gerätes anheben undden kleinen Beutel entnehmen.
- Stellen Sie sicher, dass die Schweißnaht ordnungsgemäß ist. Eine korrekte Schweißnaht soll ein glatter, gerader
Streifen ohne Falten sein und die Naht darf kein Muster der unteren Schicht mehr zeigen (Abb. E).
6 Vakuumieren mit von der Rolle hergestellten Beuteln oder mit zugeschnittenen Beuteln
- Heben Sie die Bedienungsklappe (5) und drehen Sie sie in die offene Stellung.
- Legen Sie die Lebensmittel in den Beutel, ohne Falten zu verursachen oder die Oberfläche anzuspannen. Entfernen
Sie Flüssigkeiten und Teilchen der Lebensmittel aus dem Innenbereich des Beutels, der die Schweißnaht erhalten
soll.
- Legen Sie den Beutel mit seinem Inhalt vor das Gerät und plazieren Sie das offene Beutelende mit der glatten Seite
nach unten in die Vakuumkammer (7) (Abb. F).
ZU BEACHTEN: Das äußere Ende des Beutels muss in das Innere der Vakuumkammer (7) geschoben werden.
Siehe gestrichelte Linie (Abb. F)
- Schließen Sie die Abdeckhaube (5) und drücken Sie gleichzeitig auf beide Seiten (Abb. G), Sie hören ein Klicken, das
bedeutet, dass die Abdeckhaube eingerastet ist.
- Drücken Sie auf die Taste VAC & SEAL (1C) für die Ausführung des Verpackungszyklus. Die Deaktivierung der LedTaste VAC SEAL (1C) abwarten.
- Drücken Sie die Tasten LOCK/UNLOCK (2) (Abb. H) für die Öffnung der Abdeckhaube (5).
- Die Bedienungsklappe des Gerätes anheben undden kleinen Beutel entnehmen.
- Stellen Sie sicher, dass die Schweißnaht ordnungsgemäß ist. Eine korrekte Schweißnaht soll ein glatter, gerader
Streifen ohne Falten sein und die Naht darf kein Muster der unteren Schicht mehr zeigen (Abb. I).
- Der bereits begonnene Verpackungszyklus kann in jedem Moment durch Drücken der Taste STOP (1D) unterbrochen werden.
7 Vakuumieren mit Executive Behältern oder in mit Universaldeckeln verschlossenen Behältern
ACHTUNG: Ausschließlich die MAGIC VAC® Behälter benutzen, da sie dem Druck widerstehen der durch die Mod.
P0519ED entsteht, andere Behälter könnten unter dem Druck des Gerätes implodieren und Verletzungen hervorrufen.
Die Executive Behälter und die Universaldeckel mit sternförmigem Knopf (Abb. L) vereinfachen das Vakuumieren, da
der Verbindungsschlauch direkt in das Mittelloch des Knopfs eingesetzt werden kann (Abb. E2). Die in den beiden
Durchmessern 100 mm und 125 mm erhältlichen Universaldeckel verwenden Sie bei den Konservierungsgläsern und
temperatur-unempfindlichen Töpfen und Schalen. Die Universaldeckel funktionieren genau gleich wie die Deckel für
die Executive Behälter.
HINWEIS: Verwenden Sie mit den Universaldeckeln nie ungeeignete Gläser oder Plastikbehälter, da sie unter
dem Druck des Vakuums implodieren und Verletzungen hervorrufen können.
- Füllen Sie den Behälter und lassen Sie mindestens 3 cm Raum unter dem oberen Rand des Behälters und setzen
Sie den Deckel auf den Behälter auf. Drehen Sie den Knopf in die „VACUUM“ Stellung (Abb. L).
- Verbinden Sie mittels des Verbindungsschlauchs (15) den Knopf des Behälterdeckels an den Schlauchanschluss
(3) des Geräts (Abb. L).
- Die Taste VAC (4) drücken; die Maschine führt automatisch das Vakuum aus und wird nach Ende des Vorgang
ausgeschaltet.
- Trennen Sie den Verbindungsschlauch vom Knopf des Behälters.
- Drehen Sie den Knopf auf „CLOSED“.
- Zum Öffnen der Behälter drehen Sie den Knopf auf „OPEN“. Sie sollten nun das Geräusch zurückströmender Luft
hören. Dieses Geräusch ist die Garantie dafür, dass der Inhalt in einem Vakuum gelagert war.
8 Vakuumieren mit Family Behältern
Die idealen Mehrzweckbehälter zum Aufbewahren von Waren, die Sie häufig verwenden, wie trockene und zerbrechliche Lebensmittel, Lebensmittel in Pulverform, Früchte und Gemüse ob frisch, gemixt oder püriert. Mit ihrem
Design dekorieren sie die Küchenregale und weil sie auch noch transparent sind, ist der Inhalt gut ersichtlich.
- Füllen Sie den Behälter und lassen Sie mindestens 3 cm Raum unter dem oberen Rand des Behälters und setzen
Sie den Deckel auf den Behälter auf.
- Verbinden Sie mittels des Verbindungsschlauchs (15) die Vakuumierkappe des Behälterdeckels an den
Schlauchanschluss (3) des Geräts (fig. M e fig. N).
- Die Taste VAC (4) drücken; die Maschine führt automatisch das Vakuum aus und wird nach Ende des Vorgang
ausgeschaltet.
- Trennen Sie den Verbindungsschlauch vom Deckel des Behälters.
24
Page 26
- Zum Öffnen der runden Behälter, auf den Mittelknopf drücken, für die viereckigen Behälter zuerst auf den Haken
(16) drücken und dann die Sicherheitsverschlüsse öffnen (Abb. N).
9 Vakuumieren mit Gläsern mit Metalldeckeln (Leifheit-Typ)
Wenn Sie mit Gläser mit Öffnung mit Metalldeckeln vakuumieren, verwenden Sie die große Vakuumierkappe.
- Füllen Sie das Glas und lassen Sie mindestens 3 cm Raum zum oberen Rand des Glases.
- Verbinden Sie mittels des Verbindungsschlauchs (15) die Vakuumierkappe (17) an den Schlauchanschluss (3) des
Geräts. Plazieren Sie die Vakuumierkappe direkt auf das Glas mit Deckel (18). Drücken Sie dann senkrecht auf die
Kappe, um den korrekten Sitz der Kappe auf dem Deckel sicherzustellen (Abb. O).
- Die Taste VAC (4) drücken; die Maschine führt automatisch das Vakuum aus und wird nach Ende des Vorgang
ausgeschaltet. Stellen Sie sicher, dass die Vakuumierkappe gut sitzt, indem Sie sie gedrückt halten.
- Trennen Sie den Verbindungsschlauch von der Vakuumierkappe. Lösen Sie die Vakuumierkappe vom Glas.
- Setzen Sie den Ring (19), der mit dem Glas geliefert wird auf und schrauben Sie ihn fest. (Abb. O).
- Beim Öffnen eines vakuumierten Konservierungsglases mit Metalldeckel benutzen Sie den dazu bestimmten
Deckelöffner (beachten Sie, dass die Aufschriften nach oben gerichtet sind). Plazieren Sie den Deckelöffner wie in
(Abb. P) dargestellt. Betätigen Sie den Deckelöffner sorgfältig, bis das Vakuum völlig gelöst ist. Entfernen Sie dann
den Metalldeckel. Dieses Zubehör ermöglicht den Deckel wieder zu verwenden.
10 Vakuumieren mit Flaschenverschluss
Der Flaschenverschluss lässt sich beispielsweise verwenden, um nur noch teilweise gefüllte Wein- oder
Getränkeflaschen (ohne Kohlensäurezusatz) wieder zu verschließen. Durch die Anwendung des Flaschenverschlusses
lässt sich ein Vakuum in der Flasche erzeugen und der Inhalt wird nicht so schnell oxydieren und bewahrt Qualität
und Geschmack länger.
- Verbinden Sie mittels des Verbindungsschlauchs (15) den Schlauchanschluss des Geräts (3) mit dem
Flaschenverschluss (20) (Abb. H). Drücken Sie den Verschluss fest in die Flasche.
- Arretieren Sie die Bedienungsklappe (1) über die LOCK-Tasten (4). Das Gerät wird die Vakuumierung ausführen
und am Ende des Vorgangs automatisch abschalten.
- Trennen Sie nun sofort den Verbindungsschlauch vom Flaschenanschluss und vom Gerät.
- Um eine Flasche, die mit einem Flaschenverschluss vakuumiert wurde, wieder zu öffnen, ziehen Sie den Verschluss
einfach langsam aus der Flasche. Sie werden ein Geräusch hören, wenn die Luft in die Flasche zurückströmt.
11 Vakuumieren mit der Vakuumierkappe mit den Executive Behältern oder mit Behältern mit Universaldeckeln,
die mit der vorhergehenden Knopf-Ausführung versehen sind
Für den Gebrauch der Vakuumierkappe mit Executive Behältern oder mit Behältern mit Universaldeckeln, die noch
mit der vorhergehenden Knopfausführung versehen sind, bitten wir Sie, die auf unserer Website www.flaemnuova.it
erteilten Anweisungen zu konsultieren.
ANWEISUNGEN FÜR DIE REINIGUNG
HINWEIS: Vor der Reinigung das Gerät vom Netz abtrennen, dann den Stecker aus der Steckdose (12) zie-
hen und mit der Gummikappe abdecken.
• Waschen Sie sich vor der Reinigung des Geräts oder des Zubehörs gründlich Ihre Hände.
• Reinigen Sie vor und nach dem Gebrauch mit einem angefeuchteten Schwamm und mildem Spülmittel
(keine Scheuer- oder Lösungsmittel) die Geräteoberfläche. Sollte zufällig Flüssigkeit in das Gerät eindringen,
stecken Sie den Netzstecker nicht in die Netzsteckdose, verwenden Sie das Gerät nicht und kontaktieren Sie
die nächstgelegene autorisierte Kundendienststelle oder Ihren Händler.
• Beachten Sie in jedem Fall die Anweisungen auf der Verpackung des Zubehörs.
TECHNISCHE DATEN
Spannung
Abmessungen
Gewicht
Prüfzeichen
Elektromagnetische Verträglichkeit
Das Mod. P0519ED wurde so entwickelt, dass es die derzeit geforderten Voraussetzungen für die elektromagnetische Verträglichkeit erfüllt. Falls Sie aber vermuten, dass der Betrieb des Gerätes den normalen Betrieb von
Fernsehgeräten, Radios oder anderen Elektrogeräten stört, versuchen Sie, die Position des Gerätes zu ändern,
bis die Störungen enden; oder schließen Sie das Gerät an eine andere Steckdose an.
Entsorgung: In Übereinstimmung mit der Richtlinie 2012/19/EG zeigt das auf dem Gerät angebrachte
Symbol an, dass das zu entsorgende Gerät als Abfall eingestuft wird und somit der „Mülltrennung“ unterliegt. Der Verbraucher muss den genannten Abfall also zu den von den Kommunalverwaltungen einge-
richteten Sammelstellen bringen (bzw. bringen lassen) oder beim Kauf eines neuen, gleichartigen Geräts
dem Händler übergeben. Die Mülltrennung sowie die weiteren Schritte der Verarbeitung, der Wiederverwertung
und der Entsorgung fördern die Herstellung von Geräten mit Recyclingmaterial und wirken Schädigungen von
Umwelt und Gesundheit, die durch unsachgemäße Abfallentsorgung verursacht werden könnten, entgegen.
Die vorschriftswidrige Entsorgung des Produkts durch einen Verbraucher kann die Verhängung von in den
Umsetzungsgesetzen zur Richtlinie 2012/19/EG vorgesehenen Verwaltungsstrafen von Seiten des Mitgliedsstaats,
in welchem das Produkt entsorgt wurde, nach sich ziehen.
220V-240~ 50/60Hz 110W
38 (L) x 10 (P) x 6 (H) cm
0,94 Kg
25
Page 27

RATGEBER BEI SCHWIERIGKEITEN
Das Gerät funktioniert nicht
• Sicherstellen, dass das Netzkabel korrekt am elektrischen Ausgang und am Gerät angeschlossen ist. Prüfen Sie
die Steckdose, indem Sie ein anderes Gerät anschließen.
• Das Gerät schaltet bei Überhitzung automatisch ab. Lassen Sie es 15 Minuten abkühlen und versuchen Sie den
Betrieb dann erneut.
• Kontrollieren Sie, ob das Netzkabel oder der Stecker beschädigt sind. Falls diese beschädigt sind, Gerät nicht
benutzen.
Das Gerät verschweißt die erste Seite des abgeschnittenen Beutels nicht
• Kontrollieren Sie, dass die abgeschnittene Seite des Beutels korrekt positioniert ist, wie beschrieben im
Abschnitt: „Beutel von Rollen herstellen“.
Das Gerät stellt bei Beuteln kein volles Vakuum her
• Für ein korrektes Schweißen muss das offene Ende des Beutels stets ganz in die Vakuumkammer hineinreichen.
• Prüfen Sie den Schweißbalken, die Schweißdichtung und die Dichtungen auf Verunreinigungen. Reinigen Sie
sie notfalls und schieben Sie sie in die richtige Lage zurück.
• Der Gerät Beutel könnte ein Leck haben. Um dies zu prüfen, verschweißen Sie den Beutel mit etwas Luft darin,
tauchen Sie ihn unter Wasser und setzen Sie ihn unter leichten Druck. Austretende Luftblasen weisen auf ein
Leck hin. Verschweißen Sie den Beutel neu oder nehmen Sie einen anderen Beutel.
Das Gerät verschweißt die Beutel nicht korrekt
• Sollte der Schweißbalken zu heiß werden und den Beutel schmelzen, öffnen Sie die Bedienungsklappe und
lassen Sie den Schweißbalken ein paar Minuten lang abkühlen.
• Das Gerät wird gemäß den Sicherheitsvorschriften gebaut. Bei Überhitzung wird das Gerät automatisch abge-
schaltet. Lassen Sie es 15 Minuten abkühlen und versuchen Sie dann wieder zu vakuumieren.
Der Beutel verliert sein Vakuum nach dem Verschweißen
• Undichte Stellen an der Schweißnaht können durch Falten, Krümel, Fett oder Feuchtigkeit verursacht wer-
den. Öffnen Sie den Beutel wieder, säubern Sie den oberen Teil des Beutels auf der Innenseite und den
Schweißbalken und führen Sie die Neuverschweißung aus.
• Überprüfen Sie den Beutel auf eine Beschädigung oder ein Loch, welche vielleicht das Vakuum freigesetzt
haben. Polstern Sie scharfe Ecken des Inhalts mit Küchenpapier.
Das Gerät stellt in Behältern kein Vakuum her
• Verbinden Sie mittels des Verbindungsschlauchs den Deckel des Behälters (oder ggf. die Vakuumierkappe) und
den Schlauchanschluss des Geräts.
• Füllen Sie Behälter oder Glas nicht ganz, lassen Sie oben mindestens 3 cm frei.
• Falls beim Vakuumieren Flüssigkeiten überlaufen, erinnern Sie sich, dass die Flüssigkeiten vor dem Vakuumieren
erst abkühlen müssen; und zwar im Kühlschrank und nicht bei Raumtemperatur.
• Prüfen Sie, ob der obere Rand des Behälters oder Glases sowie die Dichtung des Universaldeckels unbeschädigt
und sauber sind. Reinigen Sie den Rand und den Deckel mit einem mit lauwarmem Wasser angefeuchteten
Tuch und vakuumieren Sie erneut.
• Kontrollieren Sie, ob die Dichtungen im Behälterdeckel oder Universaldeckel richtig sitzen und unbeschädigt
sind.
Die Executive Behälter oder die Universaldeckel verlieren ihr Vakuum
• Prüfen Sie, ob der Knopf des Behälterdeckels auf „VACUUM“ steht, bevor Sie mit dem Behälter vakuumieren und
ob er nach dem Vakuumieren auf „CLOSED“ steht.
• Schauen Sie nach, ob der O-Ring unter dem Knopf des Behälterdeckels oder Universaldeckels richtig sitzt und
genau passt.
Die Family Behälter verlieren ihr Vakuum
• Schauen Sie nach, ob die Dichtung unter dem mittleren Knopf (16) des Behälterdeckels richtig sitzt und genau
passt.
26
Page 28
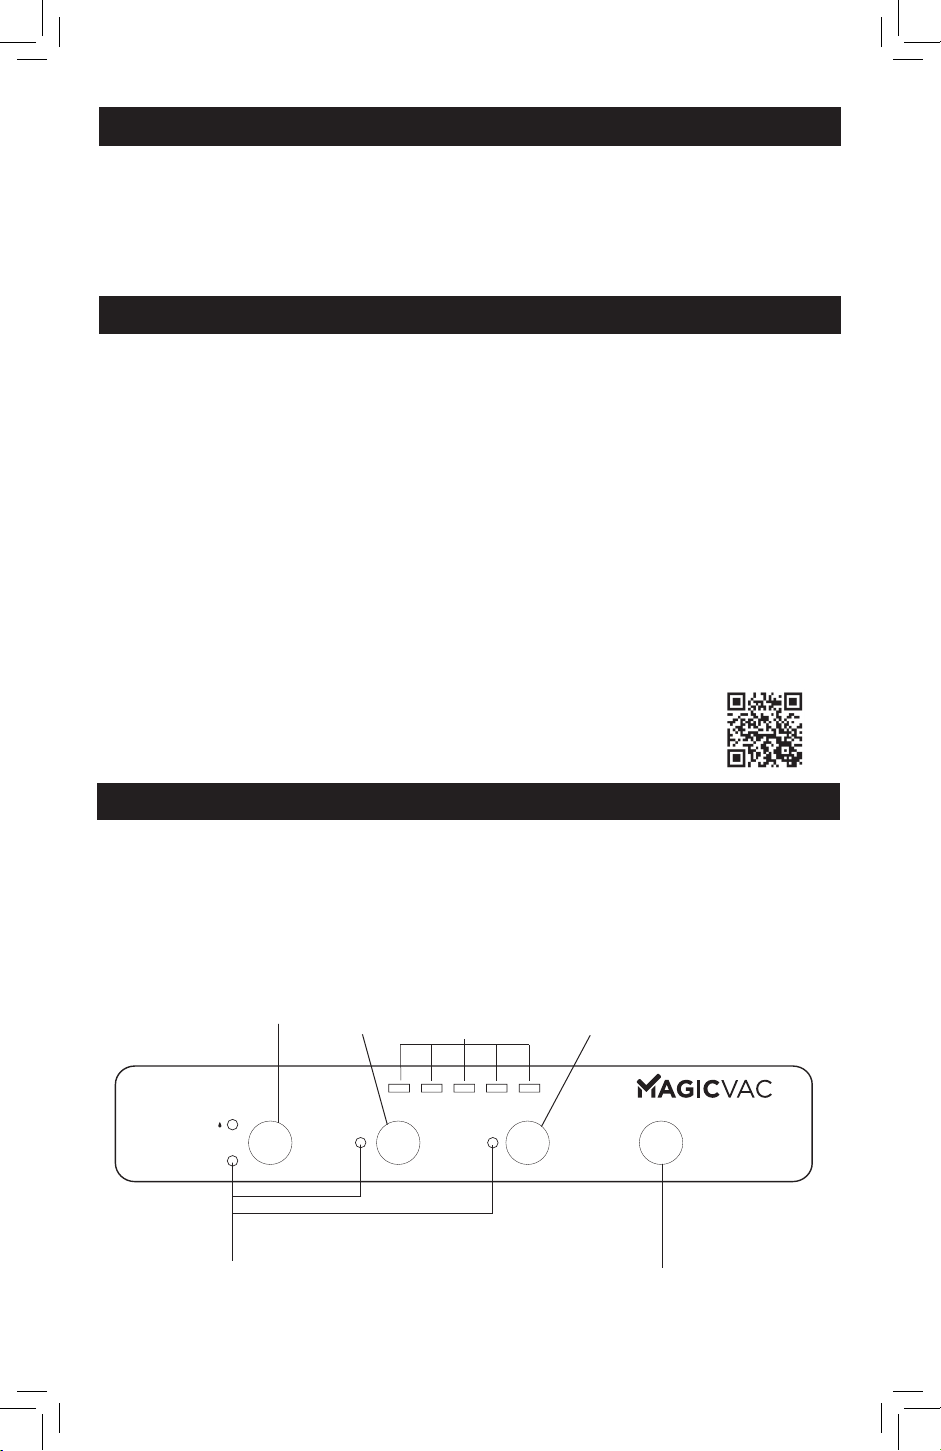
E
Mod. P0519ED
Les felicitamos por su compra y les agradecemos la confianza depositada en nosotros. Les aconsejamos que
lean con atención estas instrucciones, de manera que puedan utilizar correctamente Mod. P0519ED para
Sería aconsejable tener este manual a mano para consultas futuras.
obtener los mejores resultados de conservación.
CONCEPTOS
Consultar las imágenes de página 1.
(1) Teclado de mandos – Para controlar las funciones de la máquina.
(2) ) Botones BLOQUEO/DESBLOQUEO - Permiten el enganche y la apertura de la tapa (5).
(3) Toma de aire para el tubo – Para insertar el tubo para efectuar el envasado al vacío en todos los contene-
dores con todos los accesorios MAGIC VAC®.
(4) Botón de vacío - Para efectuar el envasado al vacío en los recipientes utilizando el tubo.
(5) Tapa – Su abertura, con posición ja en la parte de arriba, permite colocar las bolsas antes de proceder a
realizar las operaciones de envasado el vacío.
(6) Cortador de bolsas – Se puede utilizar en ambas direcciones.
(7) Cámara de vacío – Lugar para colocar la bolsa y evacuar el aire.
(8) Barra soldadora – Elemento calentador que permite soldar la bolsa.
(9) Junta selladora – Presiona la bolsa sobre la Barra soldadora.
(10) Junta hermética – Garantiza la hermeticidad del vacío en la cámara, permitiendo la evacuación del aire
de las bolsas.
(11) Ventanilla – Solución patentada que permite ver la correcta colocación de la bolsa en la cámara de vacío.
(12) Toma para cable de alimentación.
(13) Cable de alimentación – Para conectar la máquina a la tensión de la red eléctrica.
(14) Soportes antideslizamiento – Impiden que la máquina se pueda deslizar durante su utilización.
Para obtener más información acerca del uso con los accesorios y para consultar
EL SISTEMA DE ENVASADO AL VACÍO PARA EL HOGAR
la Guía de vacío, puede descargar la información detallada del sitio web
www.magicvac.com
DESCRIPCIÓN DE LOS MANDOS Y LAS FUNCIONES
(1A) SEAL MODE - Tecla para congurar el sellado: Seco para el envasado de alimentos secos o Húmedo para
el envasado de alimentos húmedos.
(1B) SEAL - Tecla para la activación manual del sellado de las bolsas (espere 30 segundos entre cada sellado
para que el dispositivo pueda enfriarse).
(1C) VAC SEAL - Tecla para activar el ciclo de envasado automático en las bolsas, incluido el sellado nal.
(1D) STOP - Tecla con la función Cancelar, es decir, parada de cualquier fase de envasado que esté en curso
(1E) LED - Se encienden cuando la máquina está en funcionamiento
1A
HUMID
Nota: Si tras el funcionamiento continuo parpadean varios
indicadores simultáneamente, la protección de sobrecalentamiento está activa. Espere 5-10 minutos para que el dispositivo se enfríe y regrese a la modalidad normal.
DRY
SEAL
MODE
1B 1C
SEAL
1E
VAC
SEAL
27
STOP
1D
Page 29

ADVERTENCIAS IMPORTANTES
El fabricante pone todo su empeño para que los productos sean
de la más alta calidad y garanticen la seguridad del usuario. No
obstante, como sucede con cualquier otro aparato eléctrico, se
deben seguir algunas normas de seguridad fundamentales para evitar que pueda representar un peligro para personas o cosas.
• Este aparato lo pueden usar niños mayores de 8 años y personas con
capacidades físicas, sensoriales o mentales reducidas o con falta de
experiencia y conocimiento, siempre que estén vigilados o se les haya
dado una formación sobre el uso del aparato de una manera segura
y que comprendan los peligros asociados. Los niños no deben jugar
con el aparato. La limpieza y el mantenimiento del usuario no pueden
realizarla los niños sin que estén vigilados.
• Antes del primer uso y periódicamente durante la vida del producto,
controlar el cable de alimentación, para asegurarse de que no esté
dañado; si el cable de alimentación está dañado, debe ser reemplazado
por el fabricante, su servicio técnico o persona con cualificación similar,
con el propósito de evitar peligros.
• Leer atentamente las instrucciones de uso antes de utilizar su EFFENNE
Agila y tenerlas a mano para posteriores consultas.
• No es un aparato para uso continuo. No efectuar más de un ciclo completo cada 2 minutos. La duración del ciclo de funcionamiento es de
20 segundos, seguidos por una pausa de 2 minutos. En condiciones
ambientales extremas el uso intensivo del aparato puede provocar la
intervención de los sistemas automáticos de protección térmica. En
este caso, hay que esperar que el aparato se enfríe hasta el restablecimiento de dichos sistemas de protección.
• No utilizar el aparato sobre o cerca de superficies calientes.
• La envoltura del aparato no es protegida contra la penetración de líquidos.
• Evitar aspirar líquidos en la cámara de vacío durante la operación de
envasado al vacío. Si tal cosa sucediera, secar inmediatamente la cámara de vacío.
• No sumergir el aparato en agua ni utilizarlo si el cable o el enchufe
están mojados; en caso de que esto ocurriera mientras se está utilizando, desenchufar inmediatamente el aparato llevando puestos unos
guantes de plástico secos. No sacar ni tocar el aparato sumergido en
el agua antes de haberlo desenchufado. No volver a utilizar el aparato
después de haberlo sacado del agua (llevarlo inmediatamente a un
centro de asistencia autorizado o al revendedor).
• No tocar la barra de soldadura durante la utilización de la máquina para
evitar posibles quemaduras.
• No utilizar adaptadores para voltajes diferentes del que aparece indicado en la parte inferior del aparato (datos de la placa).
• Desenchufar el aparato después de su utilización.
• No abrir ni modificar el aparato. Las reparaciones deben ser efectuadas
solamente por personal autorizado. Reparaciones no autorizadas anulan la garantía.
• El Fabricante, el Vendedor y el Importador se consideran responsables
de la seguridad, fiabilidad y prestaciones del aparato solo si: a) el apa-
28
Page 30

rato se emplea siguiendo las instrucciones de uso; b) la red eléctrica
del local donde se usa el aparato está conforme con las leyes vigentes.
• En caso de que se utilicen bolsas diferentes de las que se indican
arriba para ejecutar las operaciones múltiples de envasado al vacío, el
film liso de la bolsa tiene que colocarse hacia la barra de sellado.
• No utilizar tapas o recipientes estropeados o que presenten grietas!
Este texto está dirigido a los usuarios que no pertenecen a ciudades de
Europa:
- Este aparato no está pensado para ser utilizado por personas (incluidos niños) con capacidades físicas, sensoriales o mentales reducidas,
o con falta de experiencia y conocimiento, a no ser que estén vigilados o se les haya dado una formación sobre el uso del aparato por una
persona responsable de su seguridad.
- Los niños deben ser vigilados para asegurarse de que no jueguen con
el aparato.
Utilicen solamente accesorios y bolsas originales
INSTRUCCIONES DE USO
Después de varios usos, las juntas de retención (10) pueden desgastarse y es posible que la máquina no
pueda realizar el vacío. Si esto ocurre, sustitúyalas, tenga en cuenta que se trata de material de consumo,
Antes de cada uso limpiar cuidadosamente el aparato y los accesorios que van a estar en contacto con
alimentos (recipientes, tapas, tarros etc.) siguiendo las instrucciones de la sección “INSTRUCCIONES PARA
LA LIMPIEZA”.
1 Colocar el aparato
Colocar la máquina en un lugar seco y sobre una superficie horizontal, dejando la zona por delante de la máquina libre de obstáculos y bastante amplia para poder apoyar las bolsas con los alimentos que se desean envasar.
2 Collegamento della macchina
Introduzca el cable de alimentación (13) en la toma (12) y conéctelo después a una toma de red eléctrica de
corriente que se ajuste a la tensión de la máquina (véanse los datos técnicos). El LED Seco de la tecla 1A (SEAL
MODE) se encenderá. En espera: Después de 10' de inactividad, la máquina se pone en espera. Para reactivarla
presione una tecla cualquiera del teclado de mandos.
3 Configuración del tipo de sellado
La regulación del tipo de sellado debe configurarse cada vez que enchufe la clavija del cable de alimentación
(13) en la toma de red. MAGIC VAC® (Mod. P0519ED) está provisto de la regulación del tipo de sellado, de
hecho, el resultado final del sellado de las bolsas depende del género de alimento que hay que envasar o de
la temperatura ambiente a la que se trabaja. Por tanto, para optimizar el resultado final pueden seleccionarse
2 modalidades de sellado:
Seco - para alimentos secos como galletas, arroz y café
Húmedo - para carnes rojas y pescados que sueltan líquidos o sangre, para alimentos frágiles
4 Consejos para el uso de las bolsas
Las bolsas se encuentran disponibles en dos anchos, de 20 y de 30 cm. Escoger la medida de la bolsa apropiada
para los alimentos que se desea envasar. Además asegurarse de que la medida de la bolsa sea al menos 8 cm
más larga que los alimentos que se desea envasar, dejando 2 cm extra para cada uso posterior.
5 Realizar las bolsas con los rollos
- Extraiga la longitud de bolsa deseada y apóyela sobre la tapa cerrada del dispositivo; sujete la bolsa con una
mano y desplace la cuchilla mediante el rodillo para cortar la bolsa en la longitud deseada (fig. A); después,
selle un lado abierto del trozo siguiendo estas fases:
- Levantar la tapa (5) y girarla en posición abierta.
- Selle un lado abierto del trozo colocando uno de los dos extremos abiertos de la bolsa sobre la barra de
sellado (8), con la parte lisa dirigida hacia abajo (fig. B).
Atención: la bolsa no debe sobresalir de la cámara de vacío (7) ni respecto a la junta de estanqueidad (10).
Véase línea punteada (fig. B)
- Cerrar la Tapa (5) y presionar sus dos extremos opuestos (fig. C), se escuchará un clic que indica que la tapa
ATENCIÓN: No guarde la máquina con los botones LOCK enganchados.
por lo tanto no entra en la garantía.
29
Page 31

se ha enganchado.
- Presionar la tecla SEAL (1B) (fig F) para llevar a cabo la soldadura. Espere a que se apague el led SEAL (1B).
- Presionar las Teclas LOCK/UNLOCK (2) (fig D) para permitir que se abra la Tapa (5).
- Levantar la tapa de la máquina y retirar la bolsa.
- Comprobar que la soldadura sea correcta: tiene que presentarse como una banda transversal regular sin
arrugas y estrías al interior de la bolsa. (fig. E)
6 Envasado al vacío con bolsas cortadas del rollo o con bolsas cortadas previamente
- Levantar la tapa (5) y girarla en posición abierta.
- Meter los alimentos en la bolsa sin crear arrugas ni tensar las superficies. Eliminar los líquidos y las partículas
de alimentos de la zona interna de la bolsa que debe sellarse.
- Apoyar delante de la máquina la bolsa con su contenido situando el extremo abierto en la cámara de vacío
(7) y con la parte lisa hacia abajo (fig. F).
Atención: el extremo de la bolsa debe sobresalir del interior de la bolsa de vacÌo (7). Véase línea punteada
(fig. F)
- Cerrar la Tapa (5) y presionar sus dos extremos opuestos (fig. G), se escuchará un clic que indica que la tapa
se ha enganchado.
- Presionar la tecla VAC SEAL (1C) para llevar a cabo el ciclo de envasado. Espere a que se apague la tecla led
VAC SEAL (1C).
- Presionar las Teclas LOCK/UNLOCK (2) (fig H) para permitir que se abra la Tapa (5).
- Levantar la tapa de la máquina y retirar la bolsa.
- Comprobar que la soldadura sea correcta: tiene que presentarse como una banda transversal regular sin
arrugas y estrías al interior de la bolsa. (fig. I)
- Es posible interrumpir en cualquier momento el ciclo de envasado ya iniciado, utilizando la tecla STOP (1D).
7 Envasado en recipientes Executive o en recipientes cerrados herméticamente con las Tapas Universales
ATENCIÓN: Utilice sólo y exclusivamente los contenedores MAGIC VAC® en tanto que son resistentes al valor de
vacío creado por la máquina Mod.P0519ED, mientras que otros tipos de contenedores podrían implosionar por
la depresión del vacío obtenido con la misma y causar heridas.
Los recipientes Executive y las Tapas Universales que disponen de manecilla con forma de estrella (fig. L), simplifican la obtención del envasado al vacío, porque el tubo de conexión puede ser introducido directamente
en el agujero central de la manecilla misma.
Las Tapas Universale están disponibles en dos tamaños (100 mm y 125 mm de diámetro) y se utilizan con tarros
para la conservación de los alimentos, con cazuelas y bandejas de vidrio templado. Las Tapas Universales funcionan exactamente como las Tapas para recipientes Executive.
¡ATENCIÓN! Con las tapas universales no utilizar recipientes de plástico o de vidrio inadecuados ya que
podría producirse una implosión bajo la presión del vacío de la máquina y causar heridas.
- Llenar los recipientes dejando por lo menos 3 cm de espacio hasta el borde superior y colocar la tapa sobre
el recipiente. Girar la manecilla hacia la posición “VACUUM”. (fig. L)
- Conectar a través del tubo de conexión (15) la manecilla de la tapa del recipiente a la toma de aire (3) de la
máquina. (fig. L)
- Presione el botón VAC (4) para que la máquina realice el envasado al vacío y se apague cuando termine la
operación.
- Quitar el tubo de la manecilla del recipiente.
- Girar la manecilla hacia la posición “CLOSED”.
- Para abrir los contenedores girar la manecilla hacia la posición “OPEN”; se escuchará el sonido del aire silbando en el bote. Este sonido es la garantía de que el contenido se ha envasado al vacío.
8 Envasado en recipientes Family
Recipientes multiuso, ideales para conservar productos que se utilizan frecuentemente, como alimentos
secos y frágiles; alimentos en polvo; fruta y verdura fresca o triturada. Gracias a su transparencia y design se
presentan agradablemente sobre las ménsulas de la cocina y garantizan óptima visibilidad de su contenido.
- Llenar los recipientes dejando por lo menos 3 cm de espacio hasta el borde superior y colocar la tapa sobre
el recipiente.
- Conectar a través del tubo de conexión (15) la fijación de la tapa del recipiente a la toma de aire (3) de la
máquina. (fig. M e fig. N)
- Presione el botón VAC (4) para que la máquina realice el envasado al vacío y se apague cuando termine la
operación.
- Quitar el tubo de la tapa del recipiente.
- Para abrir los recipientes redondos, presionar el botón central , para abrir los recipientes cuadrados, presionar primero el desenganche (16) y luego abrir los cierres de seguridad (fig. M).
9 Envasado en tarros de vidrio cerrados herméticamente con tapas metálicas (por ej. Leifheit)
La fijación de tapas se debe utilizar para el envasado en tarrios de vidrio cerrados herméticamente con tapas
metálicas.
- Llenar el tarro dejando por lo menos 3 cm de espacio hasta el borde superior del tarro.
- Conectar a través del tubo de conexión (15), la Fijación para Tapas (17) a la toma de aire (3) de la máquina.
Colocar la fijación para tapas directamente sobre el tarro equipado con su tapa (18) y presionar hacia abajo
asegurándose de que la unión sea correcta (fig. O).
- Presione el botón VAC (4) para que la máquina realice el envasado al vacío y se apague cuando termine la
30
Page 32
operación. Comprobar que la fijación para tapas sea hermética apretándola con la mano.
- Quitar el tubo de la fijación para tapas. Extraer del tarro la fijación para tapas.
- Atornillar el cerquillo metálico (19) proporcionado junto con el tarro (fig. O).
- Para abrir un tarro de vidrio con tapa metálica cerrado al vacío, utilizar el Abretapas específico para tarros de
vidrio (con la parte de las letras hacia arriba). Colocar el abretapas como en la (figura P) y presionar delicadamente hasta dejar salir el vacío. Quitar la tapa metálica. Este accesorio les permitirá volver a utilizar la tapa.
10 Envasado al vacío con Tapones para Botella
Los Tapones para Botella pueden ser utilizados para volver a tapar botellas de vino o bebidas sin gas parcialmente llenas. El tapón de botella permite hacer el vacío en la botella y así su contenido no se oxidará con tanta
rapidez, manteniendo su calidad y sabor durante más tiempo.
- Conectar a través del Tubo de Conexión (15) el Tapón para Botella(20) a la toma de aire de la máquina (3)
(fig. Q). Introducir el tapón de botella firmemente en la botella.
- Premete il pulsante VAC (4) la macchina eseguirà il vuoto e si spegnerà ad operazione ultimata.
- Quitar inmediatamente el tubo tanto del Tapón para Botella como de la máquina.
- Para abrir una botella sellada con el Tapón para Botella, tan sólo hay que retirar el tapón de la botella. Se oirá
nuevamente el sonido del aire que entra en la botella.
11 Envasado con Fijación para Tapas en los recipientes Executive o en recipientes cerrados herméticamente con las Tapas Universales provistas de la precedente versión de manecilla
Para el uso de la Fijación para Tapas en los recipientes Executive o en recipientes cerrados herméticamente
con las Tapas Universales provistas de la precedente versión de manecilla, consultar las instrucciones en el sitio
internet www.flaemnuova.it.
INSTRUCCIONES PARA LA LIMPIEZA
ATENCIÓN: Antes de limpiar el dispositivo, desconéctelo de la red, desenchufe después la clavija de la
toma (12) y cúbrala con el tapón de goma.
•Lavarse cuidadosamente las manos antes de limpiar la máquina y los accesorios.
• Limpiar, tanto antes como después del uso, las superficies externas con una esponja humedecida con un
lavavajillas suave (no utilizar productos abrasivos o disolventes). En caso de penetraciones accidentales de
líquidos en la envoltura, no insertar el cable en la toma de corriente, no utilizar la unidad y acudir inmediatamente a un centro de asistencia autorizado o al revendedor.
• En todo caso leer las instrucciones indicadas en el envase del accesorio.
CARACTERÍSTICAS TÉCNICAS
Voltaje
Dimensiones
Peso
Marcado
Compatibilidad electromagnética
Mod. P0519ED ha sido estudiada para cumplir con los requisitos actualmente necesarios en materia de compatibilidad electromagnética. En caso de sospechas de que su funcionamiento altera el funcionamiento normal
de su televisor, radio u otro aparato eléctrico, cambiar la posición del aparato hasta que la interferencia desaparezca, o bien enchufarlo a otra toma de corriente.
Eliminación/Reciclado: En conformidad con lo establecido por la Directiva 2012/19/CE, el símbolo
presente en el aparato indica que para los efectos de su eliminación/reciclado el mismo debe ser
considerado como residuo específico y, consiguientemente, debe ser objeto de “recogida selectiva”.
Por lo tanto, el usuario deberá entregar (o hacer entregar) el citado residuo a los centros de recogida
diferenciada predispuestos por las administraciones locales, o bien entregarlo al revendedor en el momento de
comprar un nuevo aparato de tipo equivalente. La recogida diferenciada del residuo y las sucesivas operaciones de tratamiento, recuperación y eliminación/reciclado del mismo, favorecen la producción de aparatos con
materiales reciclados y limitan los efectos negativos en el ambiente y sobre la salud derivados de una eventual
gestión impropia del residuo. La eliminación abusiva del producto de parte del usuario comporta la aplicación
de eventuales sanciones administrativas previstas por las leyes de transposición de la Directiva 2012/19/CE del
estado miembro europeo en el que el producto es eliminado.
220V-240~ 50/60Hz 110W
38 (L) x 10 (P) x 6 (H) cm
0,94 Kg
31
Page 33

LOCALIZACIÓN DE AVERIAS
La máquina no funciona
• Controle que el cable de alimentación esté conectado correctamente en la salida eléctrica y en el dispositivo.
Verificar la toma de corriente eléctrica conectando otro aparato.
• La máquina se para automáticamente si se sobrecalienta. Dejarla enfriar durante 15 minutos y volver a
intentar ponerla en marcha.
• Verifiquen si el cable de alimentación o el enchufe están defectuosos. Si es así, no utilizar la máquina.
La máquina no efectúa la primera soldadura en el trozo cortado del rollo
• Verifiquen que el trozo de rollo esté colocado correctamente tal como especificado en la sección: “B4.
Realizar las bolsas con los rollos MAGIC VAC®”
La máquina no realiza un vacío completo en las bolsas
• Para sellar correctamente el extremo abierto de la bolsa, éste debe encontrarse dentro del área de la Cámara
de Vacío.
• Comprobar que la Barra de Soldadura, las Juntas de Retén y Herméticas se hallen libres de residuos.
Limpiarlas si necesario y colocarlas en su lugar.
• La bolsa MAGIC VAC® puede tener algún agujero. Para comprobarlo, sellar la bolsa con un poco de aire
dentro, sumergirla en agua y apretar. La aparición de burbujas indica la presencia de una pérdida. Volver a
cerrar herméticamente o utilizar otra bolsa.
La máquina no cierra la bolsa herméticamente
• La barra de soldadura podría sobrecalentarse y fundir la bolsa, en este caso levantar la Tapa y dejar que la
barra de soldadura se enfríe unos minutos.
• La máquina ha sido construida de acuerdo con las normas de seguridad. En caso de sobrecalientamento se
apaga automáticamente. Dejar enfriar la máquina durante 15 minutos y volver a intentar.
La bolsa MAGIC VAC® no mantiene el vacío después de haber sido sellada
• Pérdidas a lo largo de la parte sellada pueden ser causadas por arrugas, migas, grasa o líquidos. Abrir la bolsa,
limpiar la parte superior del interior de la bolsa y sacar los cuerpos extraños de la Barra de Soldadura antes
de volver a sellar.
• Comprobar que la bolsa no esté agujereada, cosa que podría haber eliminado el vacío. Es aconsejable pro-
teger los bordes puntiagudos del contenido de la bolsa con servilletas de papel.
El aparato no hace el vacío en los recipientes
• Conectar a través del Tubo de Conexión la tapa del recipiente (o la Fijación para Tapas, si necesario) a la Toma
de Aire de la máquina.
• Dejar el espacio necesario (como mínimo 3 cm) entre el contenido y la parte superior del tarro o recipiente.
• Si los líquidos fluyen en la fase de envasado al vacío, es preciso recordar que deben enfriarse previamente en
el refrigerador y no a la temperatura ambiente.
• Comprobar que el borde del tarro o recipiente y la Tapa Universal no estén estropeados en la zona de cierre.
Limpiar el borde y la tapa con un paño húmedo y volver a hacer el vacío.
• Comprobar que la junta de la tapa del recipiente o la de la Tapa Universal esté colocada correctamente en su
lugar y que no esté dañada.
Los recipientes Executive o las tapas universales no mantienen el vacío
• Asegurarse de que la flecha del botón de la tapa del recipiente esté situada sobre "VACUUM" antes de efectuar
el vacío en el recipiente y sobre "CLOSED" una vez que se ha llevado a cabo la operación de vacío.
• Comprobar que el O-ring colocado por debajo del botón de la tapa del recipiente o de la Tapa Universal esté
en su sitio y colocado correctamente.
Los recipientes Family no mantienen el vacío
• Comprobar que la junta colocada por debajo del botón central (16) de la tapa del recipiente esté en su sitio
y colocada correctamente
32
Page 34
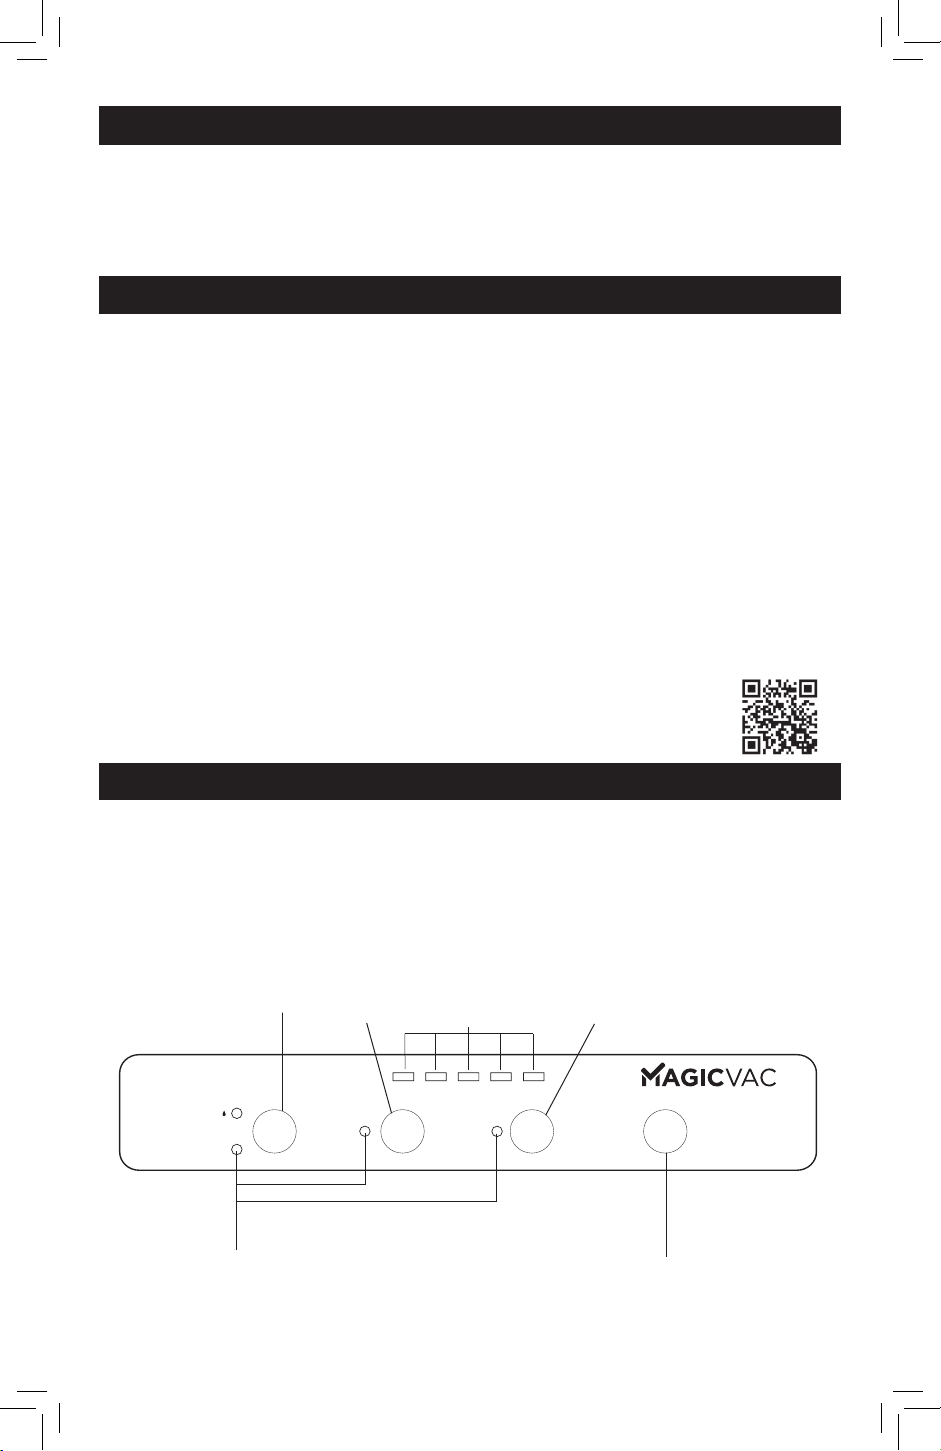
PL
Mod. P0519ED
DOMOWA ZGRZEWARKA DO PAKOWANIA PRÓŻNIOWEGO
Zalecamy uważne zapoznanie się z niniejszą instrukcją, co pozwoli na prawidłowe posługiwanie się
Dziękujemy za zakup naszego urządzenia i okazane nam zaufanie.
Mod. P0519ED w celu uzyskania najlepszych rezultatów przechowywania.
Ponadto należy zachować niniejszą instrukcję na przyszłość.
TERMINOLOGIA I FUNKCJE URZĄDZENIA
Sprawdzić ilustracje na stronie 1.
(1) Klawiatura sterownicza do ustawiania funkcji urządzenia.
(2) Przyciski LOCK/UNLOCK [BLOKOWANIA/ODBLOKOWYWANIA] do mocowania i otwierania pokrywy (5).
(3) Otwór wlotowy powietrza na wężyk, do wkładania wężyka w celu wytworzenia próżni we wszystkich po-
jemnikach i ze wszystkimi akcesoriami MAGIC VAC®.
(4) Przycisk próżni - w celu wytworzenia próżni w pojemnikach za pomocą wężyka.
(5) Pokrywa. Otwarcie ze stałym położeniem w górze umożliwia umieszczenie woreczków przed przystąpie-
niem do pakowania.
(6) Rozmiar – woreczki dwustronne.
(7) Komora próżniowa – wnęka na woreczek i usuwanie powietrza.
(8) Listwa zgrzewająca – element grzejny, który umożliwia zgrzewanie woreczka.
(9) Uszczelnienie zaciskowe – dociska woreczek do listwy zgrzewającej.
(10) Uszczelnienia zabezpieczające – zapewniają szczelność próżni w komorze, umożliwiając usunięcie powie-
trza z woreczków.
(11) Okienko kontrolne – opatentowane rozwiązanie, które pozwala sprawdzić, czy umieszczenie woreczka w
komorze próżniowej jest właściwe.
(12) Gniazdo do kabla zasilającego.
(13) Kabel zasilający do przyłączania urządzenie do napięcia sieciowego.
(14) Nóżki antypoślizgowe – zapobiegają ślizganiu się urządzenia podczas użytkowania.
Szczegółowe informacje na temat korzystania z akcesoriów i pomocy dotyczącej korzystania z
pakowania próżniowego można pobrać z witryny internetowej www.magicvac.it.
OPIS ELEMENTÓW STERUJĄCYCH I FUNKCJI
(1A) SEAL MODE [TRYB ZGRZEWANIA] – przycisk do ustawiania zgrzewania: Dry [Suchy] do pakowania suchej
żywności lub Humid [Wilgotny] do pakowania wilgotnej żywności.
(1B) SEAL [ZGRZEWANIE] – przycisk do ręcznego włączania zgrzewania woreczków (odczekać 30 sekund między
jednym zgrzewaniem a drugim, aby urządzenie ostygło).
(1C) VAC SEAL [ZGRZEWANIE PRÓŻN.] – przycisk do włączania cyklu pakowania automatycznego w woreczki
wraz z ich końcowym zgrzewaniem.
(1D) STOP – przycisk funkcyjny Cancel [Anuluj], czyli zatrzymywanie jakiejkolwiek trwającej fazy pakowania.
(1E) Diody LED – świecą się, gdy urządzenie działa.
1A
HUMID
Adnotacja: jeśli kilka lampek kontrolnych miga jednocześnie
po ciągłym działaniu, ochrona przed przegrzaniem jest aktywna. Odczekać 5 – 10 minut, aż urządzenie ostygnie i powróci
do normalnego trybu.
DRY
SEAL
MODE
1B 1C
SEAL
1E
VAC
SEAL
STOP
1D
33
Page 35

WAŻNE OSTRZEŻENIA
Producent dołożył wszelkich starań, aby zapewnić najwyższą jakość
każdego produktu oraz aby był on jak najbardziej bezpieczny w
obsłudze. Niemniej jednak, tak jak w przypadku każdego urządzenia
elektrycznego, należy stale przestrzegać zasad bezpieczeństwa, aby
zapobiec powstawaniu zagrożenia dla osób, zwierząt i/lub mienia.
• Urządzenie może być używane przez dzieci w wieku od 8 lat oraz przez
osoby o ograniczonej sprawności fizycznej, czuciowej i psychicznej lub
nieposiadające odpowiedniego doświadczenia lub wiedzy, pod warunkiem że pozostają one pod nadzorem lub zostały poinstruowane na temat
bezpiecznej obsługi urządzenia i związanych z tym niebezpieczeństw.
Urządzenie nie może służyć dzieciom jako zabawka. Czyszczenie i konserwacja, leżące w zakresie użytkownika, nie mogą być przeprowadzane
przez dzieci bez nadzoru.
• Przed pierwszym użyciem, a także okresowo, w czasie eksploatacji produktu, należy sprawdzać kabel zasilający, aby się upewnić, że nie jest
uszkodzony; w razie stwierdzenia uszkodzeń kabla zasilającego, należy
zlecić jego wymianę producentowi, jego przedstawicielowi lub innej
wykwalifikowanej osobie, aby uniknąć ewentualnego ryzyka.
• Przed użyciem MAGIC VAC® należy uważnie przeczytać instrukcję oraz
przechowywać ją w miejscu łatwo dostępnym, aby, w razie potrzeby,
można z niej było skorzystać.
• Urządzenie nie nadaje się do użytku ciągłego. Nie należy wykonywać
więcej niż jeden pełny cykl co 60 sekund. Czas trwania cyklu roboczego
wynosi około 20 sekund, po którym następuje 60 sekundowa przerwa.
W ekstremalnych warunkach środowiskowych intensywne użytkowanie
urządzenia może wyzwolić automatyczne systemy ochrony termicznej.
W takim przypadku należy poczekać, aż urządzenie ostygnie i będzie
można przywrócić początkowy stan danych systemów ochronnych.
• Nie używać urządzenia w pobliżu lub na gorących powierzchniach.
• Obudowa urządzenia nie jest chroniona przed przenikaniem cieczy.
• Unikać zasysania cieczy do komory próżniowej. W danym przypadku
należy natychmiast osuszyć komorę próżniową.
• Nie zanurzać urządzenia w wodzie i nie używać go, jeśli kabel lub wtyczka
są mokre; jeśli to się zdarzy podczas użytkowania, należy niezwłocznie
wyciągnąć wtyczkę z gniazdka w suchych gumowych rękawiczkach. Nie
wyjmować ani nie dotykać urządzenia zanurzonego w wodzie, najpierw
należy wyciągnąć wtyczkę z gniazdka. Nie używać po wyciągnięciu z
wody (niezwłocznie zanieść urządzenie do autoryzowanego punktu
obsługi technicznej lub do najbliższego sprzedawcy).
• Aby uniknąć poparzeń nie dotykać listwy zgrzewającej podczas korzystania z urządzenia.
• Nigdy nie używać adapterów do innego rodzaju napięć, od tych wskazanych na spodzie urządzenia (dane na tabliczce znamionowej).
• Zawsze wyciągnąć wtyczkę po użyciu.
• Nie wolno otwierać ani wprowadzać zmian w urządzeniu. Naprawy mogą
być wykonywane wyłącznie przez wykwalifikowanych pracowników.
Naprawy przeprowadzane bez upoważnienia powodują utratę gwarancji.
• Producent, sprzedawca i importer są odpowiedzialni za bezpieczeństwo,
niezawodność i skuteczność urządzenia wyłącznie:
34
Page 36

a) jeśli jest ono używane zgodnie z instrukcją obsługi;
b) instalacja elektryczna pomieszczenia, w którym urządzenie jest używane,
jest zgodna z obowiązującymi przepisami.
• Zalecane jest korzystanie z oryginalnych woreczków. W przypadku
używania woreczków odmiennych od wymienionych powyżej do wykonywania wielokrotnego pakowania próżniowego, gładką warstwę
woreczka należy przytrzymać przy listwie zgrzewającej.
• Nie wolno używać popękanych ani uszkodzonych pokrywek lub pojemników!
Dany test jest przeznaczony dla użytkowników spoza Unii Europejskiej:
– to urządzenie nie jest przeznaczone do użytku przez osoby (w tym
dzieci) o ograniczonej sprawności fizycznej, czuciowej i psychicznej
lub nieposiadające odpowiedniego doświadczenia lub wiedzy, chyba
że są nadzorowane lub otrzymały odpowiednie instrukcje dotyczące
użytkowania od osoby odpowiedzialnej za ich bezpieczeństwo.
– Dzieci powinny być nadzorowane, aby nie bawiły się urządzeniem.
Należy używać wyłącznie oryginalnych woreczków i akcesoriów.
INSTRUKCJA OBSŁUGI
UWAGA: nie przechowywać urządzenia z włączonymi przyciskami LOCK/UNLOCK [BLOKOWANIE/ODBLOKOWYWANIE].
Po kilku zastosowaniach uszczelnienia zabezpieczające (10) mogą się zużyć, a urządzenie nie będzie już w stanie
wytworzyć próżni. W danym przypadku należy je wymienić, ponieważ są uważane za materiały zużywalne i nie są
Przed każdym użyciem należy dokładnie wyczyścić urządzenie oraz akcesoria mające styczność z żywnością
(pojemniki, pokrywy, słoiki itp.). W tym celu należy postępować zgodnie z instrukcjami zawartymi w paragrafie
„INSTRUKCJE DOTYCZĄCE CZYSZCZENIA“.
1 Ustawienie urządzenia
Urządzenie należy ustawić w suchym pomieszczeniu na płaskiej powierzchni, uważając, aby strefa pracy przed
samym urządzeniem była wolna od przeszkód i wystarczająco obszerna, aby umożliwić ułożenie woreczków z
żywnością do zapakowania.
2 Połączenie maszyny
Włożyć kabel zasilający (13) do gniazdka (12), a następnie przyłączyć do gniazdka elektrycznego o napięciu
odpowiadającym napięciu urządzenia (patrz dane techniczne). Dioda LED Dry [Suchy] przycisku 1A (SEAL MODE)
[TRYB ZGRZEWANIA] będzie się świecić. Stand by [Tryb gotowości]: po 10 minutach bezczynności urządzenie
przechodzi w tryb gotowości. Aby ponownie włączyć urządzenie, nacisnąć na dowolny przycisk na klawiaturze
sterowniczej.
3 Ustawianie rodzaju zgrzewania
Regulację rodzaju zgrzewania należy zawsze ustawić za każdym razem, gdy wkładana jest wtyczka kabla
zasilającego (13) do gniazdka sieciowego. MAGIC VAC® (Mod. P0519ED) jest wyposażona w regulację rodzaju zgrzewania; na końcowy wynik zgrzewania woreczków ma wpływ rodzaj żywności, która ma być zapakowana lub temperatura pokojowa, w której jest używana. Aby zoptymalizować końcowy wynik, można wybrać 2 tryby zgrzewania:
Dry [Suchy] – do suchych produktów spożywczych, takich jak herbatniki, ryż i kawa.
Humid [Wilgotny] - w przypadku mięsa czerwonego i ryb, które uwalniają płyny lub krew, kruchej żywności.
4 Wskazówki dotyczące korzystania z woreczków
Woreczki są dostępne w dwóch szerokościach, 20 cm i 30 cm. Wymiar woreczka należy dobrać do przechowywanej
żywności. Sprawdzić również, czy długość używanego woreczka jest co najmniej 8 cm dłuższa niż przechowywana
żywność i wziąć pod uwagę dodatkowe 2 cm za każdym razem, gdy woreczek zostanie ponownie wykorzystany.
5 Wykonywanie woreczków z rolek
– Wyciągnąć folię na wymaganą długość woreczków i ułożyć ją na zamkniętej pokrywie urządzenia; przytrzymać
woreczek jedną ręką, a następnie przesunąć krajarkę przez rolkę, aby przyciąć woreczek do żądanej długości (rys.
A), a następnie zgrzać otwartą stronę kawałka, wykonując następujące kroki:
– Unieść pokrywę (5) i przekręcić ją na pozycję otwarcia.
– Zgrzać otwartą stronę kawałka, umieszczając jedną z dwóch otwartych krawędzi woreczka na listwie
zgrzewającej (8) z gładką częścią zwróconą do dołu (rys. B).
Uwaga: woreczek nie powinien wystawać wewnątrz komory próżniowej (7) lub na uszczelnieniu zabezpieczającym
(10). Patrz linia przerywana (rys. B).
objęte gwarancją.
35
Page 37

Zamknąć pokrywę (5) i docisnąć dwie przeciwległe krawędzie woreczka (rys. G), słychać kliknięcie, które oznacza, że
pokrywa się zablokowała.
– Nacisnąć na przycisk SEAL [ZGRZEWANIE] (1B), aby wykonać zgrzewanie. Poczekać na zgaśnięcie diody LED SEAL
[ZGRZEWANIE] (1B).
-
Nacisnąć na przyciski LOCK/UNLOCK [BLOKOWANIE/ODBLOKOWYWANIE] (2) (rys. D), aby umożliwić otwarcie pokrywy (5).
– Unieść pokrywę urządzenia i wyciągnąć woreczek.
– Sprawdzić poprawność uzyskanego zgrzewu, który powinien wyglądać jak regularny pasek poprzeczny, bez
zmarszczek i wewnętrznych linii woreczka (rys. I).
6 Pakowanie próżniowe z woreczkami na rolce lub z wstępnie pociętymi woreczkami
– Unieść pokrywę (5) i przekręcić ją na pozycję otwarcia.
– Włożyć żywność do woreczka, nie powodując jego marszczenia, ani nie naprężając powierzchni. Usunąć ciecze lub
pozostałości żywności z wewnętrznej części woreczka, która zostanie zgrzana.
– Woreczek z zawartością ułożyć przed urządzeniem, wkładając otwartą krawędź do komory próżniowej (7) z gładką
częścią zwróconą do dołu (rys. F).
UWAGA: krawędź woreczka powinna wystawać wewnątrz komory próżniowej (7). Patrz linia przerywana (rys. F).
- Zamknąć pokrywę (5) i docisnąć dwie przeciwległe krawędzie woreczka (rys. G), usłyszysz kliknięcie, co oznacza,
że pokrywa się zablokowała.
– Nacisnąć na przycisk VAC SEAL [ZGRZEWANIE PRÓŻN.] (1C), aby wykonać cykl pakowania. Poczekać na zgaśnięcie
przycisku z diodą LED VAC SEAL [ZGRZEWANIE PRÓŻN.] (1C).
–
Nacisnąć na przyciski LOCK/UNLOCK [BLOKOWANIE/ODBLOKOWYWANIE] (2) (rys. H), aby umożliwić otwarcie pokrywy (5).
– Unieść pokrywę urządzenia i wyciągnąć woreczek.
– Sprawdzić poprawność uzyskanego zgrzewu, który powinien wyglądać jak regularny pasek poprzeczny, bez
zmarszczek i wewnętrznych linii woreczka (rys. I).
– W dowolnym momencie można przerwać już rozpoczęty cykl pakowania, naciskając na przycisk STOP (1D).
7 Pakowanie w pojemniki Executive lub pojemniki zamykane za pomocą pokrywek uniwersalnych
UWAGA: używać tylko i wyłącznie pojemników MAGIC VAC®, ponieważ są one odporne na wartość próżni wytwar-
zanej przez MAGIC VAC® (Mod. P0519ED), podczas gdy inne rodzaje pojemników mogą implodować z powodu
podciśnienia uzyskanego za pomocą urządzenia i powodować obrażenia.
Pojemniki Executive i pokrywki uniwersalne wyposażone w pokrętło w kształcie gwiazdy (rys. L) . Ułatwiają pakowanie próżniowe, ponieważ rurkę połączeniową można włożyć bezpośrednio w środkowy otwór samego pokrętła.
Pokrywki uniwersalne są dostępne w dwóch średnicach 100 mm i 125 mm, należy je stosować ze słoikami do przechowywania żywności, z garnkami i miskami ze szkła hartowanego. Pokrywki uniwersalne działają dokładnie tak
samo jak pokrywki do pojemników Executive.
UWAGA: z pokrywkami uniwersalnymi nie należy używać plastikowych lub szklanych pojemników, które nie nadają
się do tych celów i mogą implodować z powodu wytwarzanego podciśnienia urządzenia i powodować obrażenia.
– Napełnić pojemnik, pozostawiając co najmniej 3 cm wolnej przestrzeni od górnej krawędzi pojemnika i umieścić
pokrywę na pojemniku. Przekręcić pokrętło do pozycji “VACUUM” [„PRÓŻNIA”] (rys. L).
– Za pomocą wężyka połączeniowego (15) połączyć pokrętło pokrywy pojemnika z otworem wlotowym powietrza
(3) urządzenia (rys. L).
– Nacisnąć na przycisk VAC [PRÓŻN.] (4), urządzenie wytworzy próżnię i wyłączy się po zakończonej czynności.
– Wyciągnąć wężyk z pokrętła pojemnika.
– Przekręcić pokrętło do pozycji „“CLOSED” [„ZAMKNIĘTY”].
– Aby otworzyć pojemniki, przekręcić pokrętło do pozycji „OPEN” [„OTWARTY”]; powinno się usłyszeć „gwizd”
powietrza, które wraca do pojemnika. Ten odgłos jest gwarancją, że zawartość została zapakowana próżniowo.
8 Pakowanie w pojemniki Family
Pojemniki wielofunkcyjne, idealne do przechowywania często używanych produktów, takich jak sucha i krucha
żywność, żywność sypka, owoce i warzywa, zarówno świeże, jak i zmiksowane lub przeciery. Mają interesujący i
przejrzysty design, dzięki czemu będą się świetnie prezentować na półkach kuchennych i zapewniać doskonałą
widoczność zawartości.
– Napełnić pojemnik, pozostawiając co najmniej 3 cm wolnej przestrzeni od górnej krawędzi pojemnika i
umieścić pokrywę na pojemniku.
– Za pomocą wężyka połączeniowego (15) połączyć pokrywę pojemnika z otworem wlotowym powietrza (3)
urządzenia (rys. M i rys. N).
– Nacisnąć na przycisk VAC [PRÓŻN.] (4), urządzenie wytworzy próżnię i wyłączy się po zakończonej czynności.
– Wyciągnąć wężyk z pokrywki pojemnika.
– Aby otworzyć okrągłe pojemniki, nacisnąć na środkowy przycisk, aby otworzyć kwadratowe pojemniki,
najpierw nacisnąć na zatrzask (16), a następnie otworzyć zamknięcia bezpieczeństwa (rys. M).
9 Pakowanie w szklane słoiki zamknięte metalowymi pokrywkami (typu Leifheit)
Aby przeprowadzić cykl pakowania w szklanych słoikach zamkniętych metalowymi pokrywkami, użyć złączki do
pokrywek.
– Napełnić słoik, pozostawiając co najmniej 3 cm wolnej przestrzeni od górnej krawędzi słoika.
– Za pomocą wężyka połączeniowego (15) połączyć złączkę do pokrywek (17) z otworem wlotowym powietrza
(3) urządzenia. Złączkę do pokrywek umieścić bezpośrednio na słoiku wyposażonym tylko w pokrywkę (18) i
popchnąć w dół, upewniając się, że połączenie jest prawidłowe (rys. O).
– Nacisnąć na przycisk VAC [PRÓŻN.] (4), urządzenie wytworzy próżnię i wyłączy się po zakończonej czynności.
Upewnić się, że złączka do pokrywek jest szczelnie umieszczone, przytrzymując je dłonią.
36
Page 38
– Wyciągnąć wężyk ze złączki do pokrywek. Wysunąć złączkę do pokrywek ze słoika.
– Założyć i całkowicie dokręcić zakrętkę (19) dostarczoną ze słoikiem (rys. O).
– Aby otworzyć próżniowo zamknięty szklany słoik z metalową pokrywką, użyć odpowiedniej dźwigni pokrywki
(stroną z napisami skierowaną do góry). Ustawić dźwignię pokrywek zgodnie z (Rys. P) i delikatnie podważyć,
aż do uwolnienia próżni. Zdjąć metalową pokrywę. To akcesorium umożliwi wielokrotne użycie pokrywki.
10 Pakowanie z korkiem butelki
Korek butelki może być używany do korkowania butelek, np. z winem lub napojami niegazowanymi, częściowo
wypełnionymi. Korek butelki umożliwi wytworzenie próżni w butelce, a jej zawartość nie utleni się tak szybko,
zachowując jakość i smak na dłużej.
– Za pomocą wężyka połączeniowego (15) połączyć otwór wlotowy powietrza (3) z korkiem butelki (20) (rys. Q).
Wcisnąć mocno korek do butelki.
– Nacisnąć na przycisk VAC [PRÓŻN.] (4), urządzenie wytworzy próżnię i wyłączy się po zakończonej czynności.
– Natychmiast wyjąć wężyk zarówno z korka butelki jak i urządzenia.
– Aby otworzyć butelkę zamkniętą korkiem butelki, wystarczy wyciągnąć korek z butelki. Usłyszy się świst stru-
mienia powietrza wpływającego do butelki.
11 Pakowanie ze złączką do pokrywek w pojemniki Executive lub pojemniki zamykane za pomocą
pokrywek uniwersalnych wyposażonych w poprzednią wersję pokrętła
W celu uzyskania informacji na temat złączki do pokrywek w pojemnikach Executive lub pojemnikach zamykanych za pomocą pokrywek uniwersalnych wyposażonych w poprzednią wersję pokrętła, patrz instrukcje podane w
witrynie internetowej www.flaemnuova.it.
INSTRUKCJE DOTYCZĄCE CZYSZCZENIA
UWAGA: przed wyczyszczeniem urządzenia należy je odłączyć od sieci, a następnie wyciągnąć wtyczkę z
gniazdka (12) i przykryć gumowym korkiem.
• Przed przystąpieniem do czyszczenia urządzenia i akcesoriów należy dokładnie umyć ręce.
• Wyczyścić zewnętrzne powierzchnie zarówno przed jak i po użyciu za pomocą gąbki zwilżonej delikatnym
płynem do naczyń (nietrącym, bez rozpuszczalników). W razie wystąpienia niepożądanego przenikania
cieczy do wnętrza struktury nie wolno wkładać wtyczki do gniazdka elektrycznego. Nie używać urządzenia.
Zwrócić się do autoryzowanego punktu pomocy technicznej lub do najbliższego sprzedawcy.
• W przypadku czyszczenia akcesoriów (pojemników, pokrywek, słoików itp.) przeczytać instrukcje zawarte w
opakowaniach akcesoriów.
CHARAKTERYSTYKA TECHNICZNA
Napięcie 220 – 240 V ~ 50/60 Hz 110 W
Wymiary 38 (Dł.) x 10 (Gł.) x 6 (Wys.) cm
Masa 0,94 kg
Oznakowanie
Kompatybilność elektromagnetyczna
Model P0519ED został zaprojektowany zgodnie z aktualnymi wymogami kompatybilności elektromagnetycznej. Niemniej jednak, w razie pojawienia się podejrzeń, że urządzenie może wpływać na działanie Państwa
odbiorników telewizyjnych, radiowych lub innego sprzętu elektrycznego, prosimy o ustawienie go w innym
miejscu, tak aby nie dochodziło do zakłóceń lub o przyłączenie urządzenia do innego gniazda elektrycznego.
Likwidacja: Zgodnie z dyrektywą 2012/19/WE symbol umieszczony na sprzęcie oznacza, że podlega on zbiórce selektywnej i w taki sposób powinien być usuwany. W związku z tym użytkownik
jest zobowiązany dostarczyć (lub zlecić odbiór) takiego odpadu do punktów zbiórki selektywnej,
działających na podstawie zezwoleń wydawanych przez władze lokalne, lub dostarczyć go do sprzedawcy
w momencie zakupu nowego sprzętu o tym samym przeznaczeniu. Zbiórka selektywna odpadów i ich
późniejsze przetwarzanie, odzyskiwanie i usuwanie pozwalają na rozwój produkcji sprzętu przy wykorzystaniu materiałów pochodzących z recyklingu i ograniczają negatywny wpływ na środowisko i na zdrowie,
występujące w przypadku nieprawidłowego gospodarowania odpadami. Użytkownicy usuwający odpady niezgodnie z przepisami prawa będą karani zgodnie z art. 50 i późniejszymi aktualizacjami włoskiego
rozporządzenia z mocą ustawy nr 22/1997.
37
Page 39

WYSZUKIWANIE USTEREK
Urządzenie nie działa
• Sprawdzić, czy kabel zasilający jest prawidłowo połączony z wyjściem elektrycznym i z urządzeniem.
Sprawdzić gniazdko elektryczne, wkładając do niego inne urządzenie.
• Urządzenie zatrzymuje się automatycznie w przypadku przegrzania. Pozostawić do ostygnięcia na 15
minut i spróbować ponownie.
• Sprawdzić kabel zasilający i wtyczkę, czy nie są uszkodzone. W danym przypadku nie korzystać z
urządzenia.
Urządzenie nie wykonuje pierwszego zgrzewu na kawałku odciętej rolki
• Sprawdzić położenie kawałka rolki, zgodnie z opisem w paragrafie: „Wykonanie woreczków z rolek”.
Urządzenie nie wytwarza całkowitej próżni w woreczkach
• Aby dokładnie zgrzać, cała otwarta krawędź woreczka powinna znaleźć się w komorze próżniowej.
• Sprawdzić, czy listwa zgrzewająca, uszczelnienia zabezpieczające i środki uszczelniające nie są brudne. Po
ewentualnym wyczyszczeniu, umieścić je odpowiednio na miejscu.
• Możliwe, że woreczek jest przedziurawiony. Aby sprawdzić, zamknąć woreczek z powietrzem wewnątrz,
zanurzyć go w wodzie i nacisnąć. Pojawienie się pęcherzy wskazuje nieszczelność. Skleić ponownie lub
użyć innego woreczka.
Urządzenie nie zgrzewa woreczka poprawnie
• Jeśli listwa zgrzewająca przegrzewa się i topi woreczek, unieść pokrywę i pozostawić listwę na kilka minut
do ostygnięcia.
• Urządzenie jest zbudowane zgodnie ze zasadami bezpieczeństwa. W przypadku przegrzania wyłącza się
automatycznie. Pozostawić do ostygnięcia na 15 minut i spróbować ponownie.
Woreczek nie utrzymuje próżni po zgrzaniu
• Nieszczelności wzdłuż zgrzewania mogą być spowodowane marszczeniami, okruchami, tłuszczem lub
cieczami. Ponownie otworzyć woreczek, wyczyścić górną część wewnątrz woreczka i przed ponownym
zamknięciem usunąć obcy materiał z listwy zgrzewającej.
• Sprawdzić, czy woreczek nie jest przedziurawiony i dlatego nie utrzymał próżni. Zabezpieczyć ewentualne
ostre krawędzie zawartości woreczka, używając papierowych ręczników.
Urządzenie nie wytwarza próżni w pojemnikach
• Za pomocą wężyka połączeniowego połączyć pokrywę pojemnika (lub złączkę do pokrywek, jeśli to
konieczne) z otworem wlotowym powietrza urządzenia.
• Pozostawić odpowiednio dużo miejsca w górnej części (co najmniej 3 cm) pomiędzy zawartością i górną
częścią słoika lub pojemnika.
• Jeśli podczas pakowania próżniowego wydostaną się na zewnątrz ciecze, należy pamiętać, że najpierw
należy je schłodzić w niskich temperaturach, a nie w temperaturze pokojowej.
• Sprawdzić krawędź słoika lub pojemnika i pokrywki uniwersalnej, czy nie są uszkodzone w strefie uszczel-
nienia. Wyczyścić krawędź i pokrywkę ciepłą szmatką i ponownie wytworzyć próżnię.
• Sprawdzić, czy uszczelka pokrywy pojemnika lub pokrywki uniwersalnej jest prawidłowo ułożona we
właściwym miejscu i nie jest uszkodzona.
Pojemniki Executive lub pokrywki uniwersalne nie utrzymują próżni
• Upewnić się, że pokrętło pokrywy pojemnika jest ustawione na „VACUUM” [PRÓŻNIA] przed wytworzeni-
em próżni w pojemniku i że jest ustawione na „CLOSED”[ „ZAMKNIĘTY”] po wytworzeniu próżni.
• Sprawdzić, czy pierścień uszczelniający pod pokrętłem pokrywki pojemnika lub pokrywki uniwersalnej
znajduje się we właściwej pozycji.
Pojemniki Family nie utrzymują próżni
• Sprawdzić, czy uszczelka pod środkowym przyciskiem (16) pokrywki pojemnika jest prawidłowo umieszczo-
na na swoim miejscu.
38
Page 40
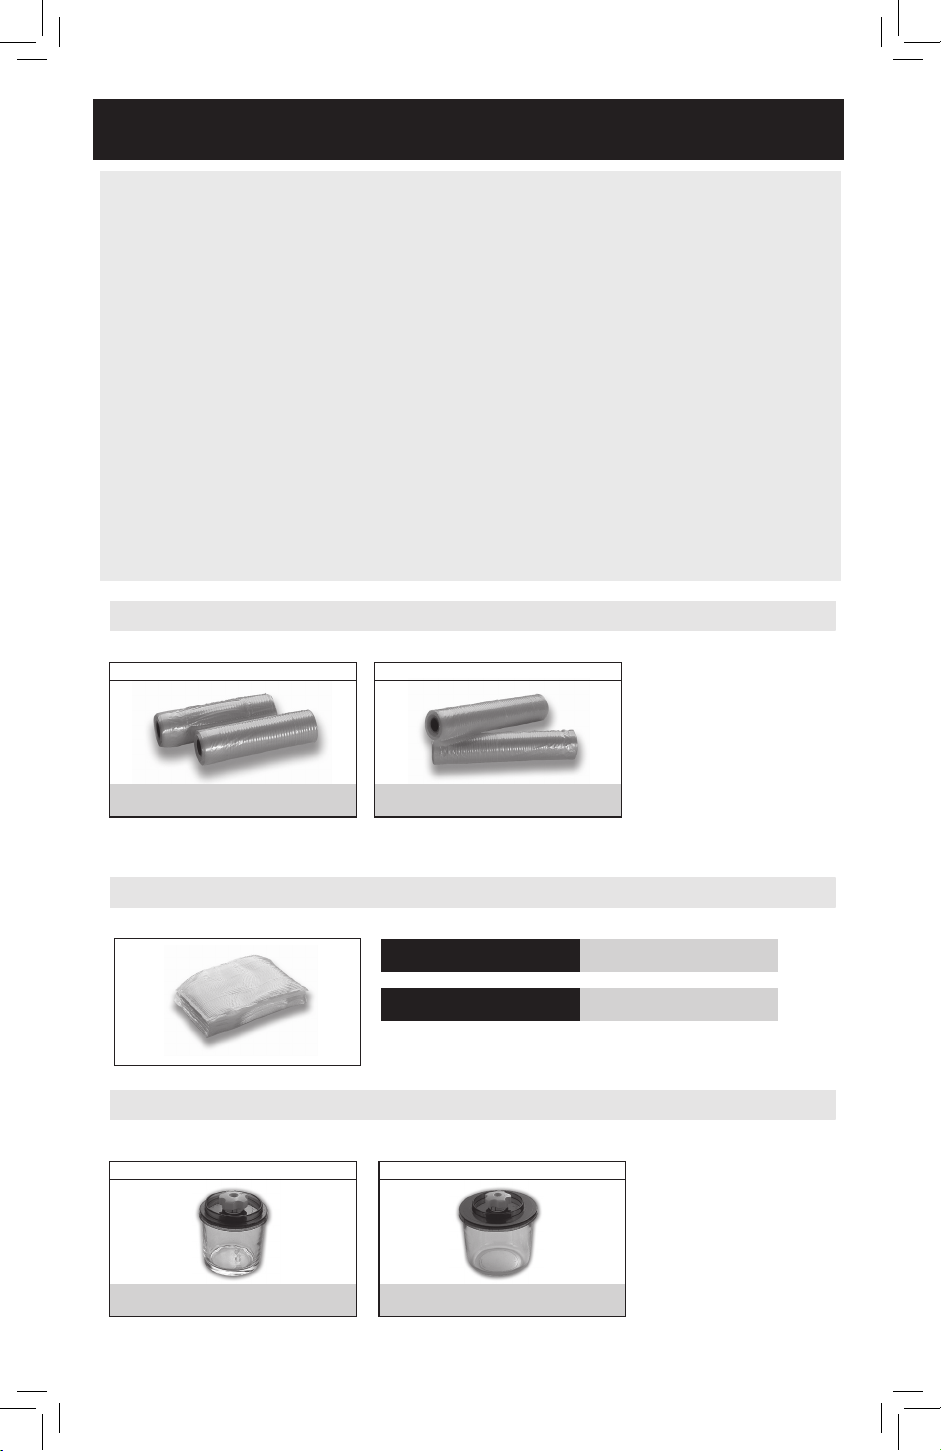
ACCESSORI- ACCESSORIES - ACCESSOIRES - ZUBEHÖR -
ACCESSORIOS - AKCESORIA
IT > Per maggiori informazioni sugli articoli illustrati rivolgetevi al Vs. Ri-
venditore di ducia o visitate il sito internet www.magicvac.com
EN > For additional information on these products please contact your
Dealer or visit our website www.magicvac.com
FR > Pour toute information ultérieure sur ces produits veuillez contacter
votre Revendeur ou visiter notre site internet www.magicvac.com
DE > Möchten Sie noch mehr Infos über die illustrierten Artikel? Dann
wenden Sie sich doch bitte an Ihren Vertrauenshändler oder besuchen Sie
die Webseite www.magicvac.com
ES > Para más información sobre estos artículos pregunte a su distribuidor
o visite el sitio web www.magicvac.com
POL > Aby uzyskać dodatkowe informacje na temat zilustrowanych artykułów, należy skontaktować się z najbliższym sprzedawcą lub odwiedzić
witrynę internetową www.magicvac.com.
ROTOLI - ROLLS - ROULEAUX - ROLLEN - ROLLOS - ROLKI
20x600 cm - 2 pcs.
-
SACCHETTI - BAGS - SACHETS - BEUTEL - BOLSAS - WORECZKI
COPERCHI - LIDS - COUVERCLES - DECKEL - TAPAS - POKRYWY
SMALL UNIVERSAL LID Ø 4-9 cm
30x600 cm - 2 pcs.
-
20x30 cm
30x40 cm
LARGE UNIVERSAL LID Ø 4-12 cm
-
-
ACO1012
ACO1011
39
Page 41
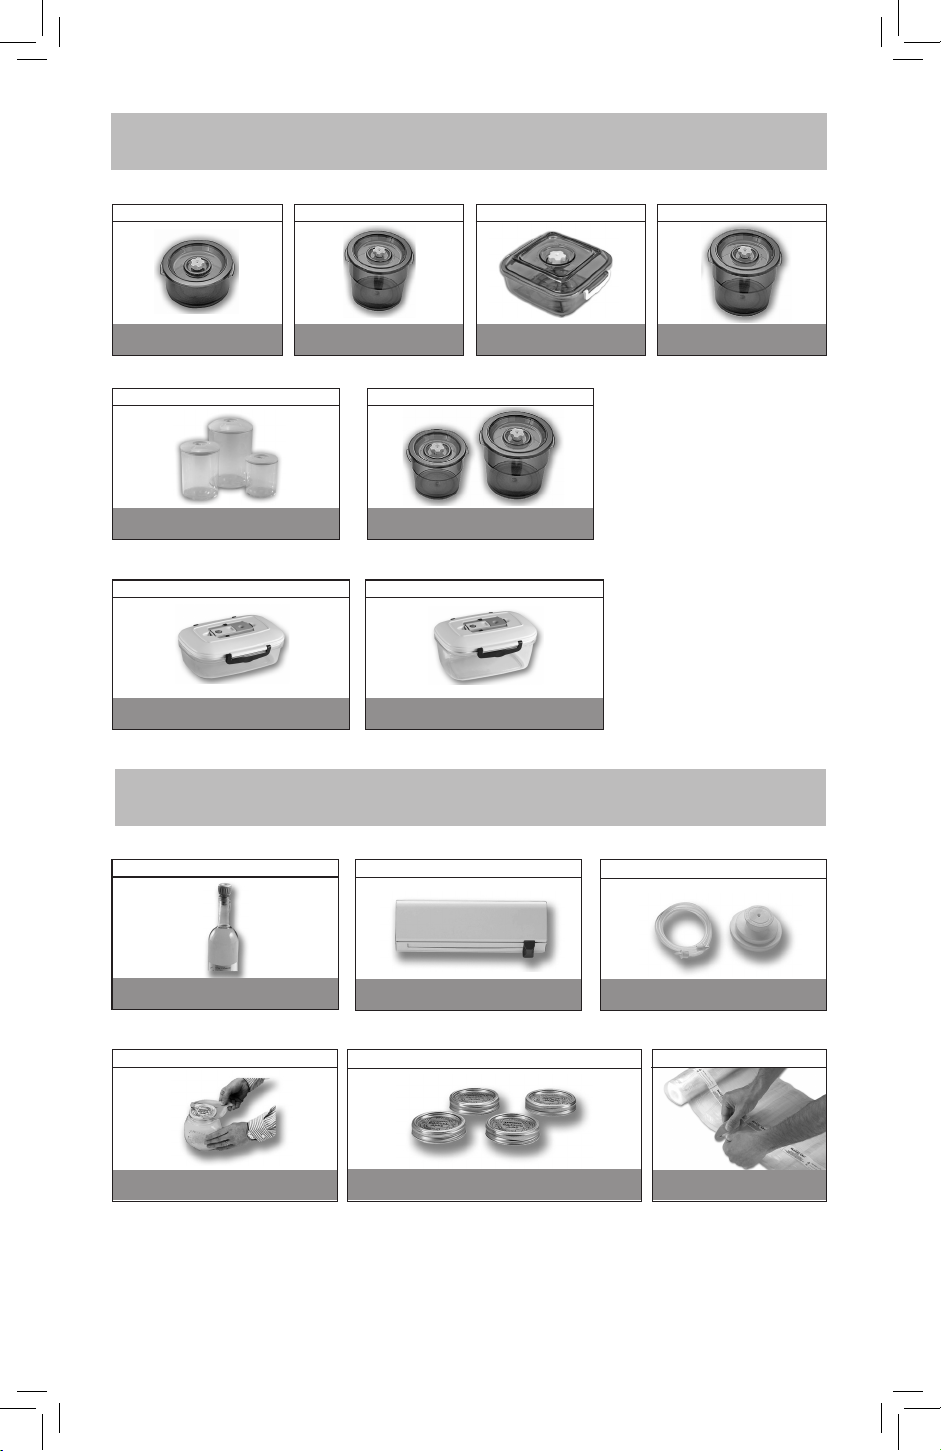
CONTENITORI - CANISTERS - RÉCIPIENTS
BEHÄLTER - CONTENEDORES -POJEMNIKI
1.5 L - Ø 22x10 (h) cm
ACO1004 ACO1003
3+1.5+0.75 L
ACO1082
1L - 23x17x9(h) cm
ACO1093
2 L - Ø 18x16 (h) cm
2.5 L - 23x23x12 (h) cm 4 L - Ø 22x20 (h) cm
ACO1073 ACO1002
2+4 L
ACO1005
1.5L - 23x17x12(h) cm
ACO1092
ALTRI ACCESSORI - OTHER ACCESSORIES - AUTRES ACCESSOIRES
ANDERE ZUBEHÖRTEILE - OTROS ACCESORIOS - INNE AKCESORIA
BOTTLE CAPS - 2 pcs
ACO1013
LID-OPENER FOR GLASS JARS METAL RIMS AND LIDS FOR GLASS JARS - 12 pcs BAG CUTTER
ACO1055 ACO1054 / ACO1053 10039B0
ROLL DISPENSER LARGE VACUUM HOOD
VACUUM HOOD
ACO1027 ACO1007
40
Page 42

MEMO • MEMORANDUM • NOTIZEN • NOTATKI
41
Page 43

42
Page 44
CERTIFICATO DI GARANZIA
Condizioni di Garanzia:
L’ APPARECCHIO É GARANTITO 2 ANNI DALLA DATA DI ACQUISTO
La garanzia copre qualsiasi difetto derivante da non corretta fabbricazione, a condizione che l’apparecchio non
abbia subito manomissioni da parte del cliente o da personale non autorizzato da FLAEM NUOVA S.p.A., o che sia
stato utilizzato in modo diverso dalla sua destinazione d’uso. La garanzia copre inoltre la sostituzione o la riparazione
dei componenti con vizi di fabbricazione.
Sono esclusi dalla presente garanzia le parti soggette a naturale usura (per esempio guarnizioni aerstop, nastro
in teon della barra saldante, ecc.), i danni derivati da usi impropri, da cadute, dal trasporto, dalla mancata
manutenzione ordinaria prevista nelle istruzioni d’uso o comunque da cause non attribuibili al produttore.
FLAEM NUOVA S.p.A. declina ogni responsabilità per eventuali danni, diretti od indiretti, a persone, animali e/o
cose derivati dal mancato o non corretto funzionamento oppure causati dall’uso improprio dell’apparecchio e
comunque non riconducibili a vizi di fabbricazione.
La garanzia è valida su tutto il territorio italiano con l’ausilio dei Centri Assistenza Tecnica Autorizzati, per il resto del
mondo la Garanzia viene applicata dall’Importatore o Distributore.
La GARANZIA è valida solo se la macchina, in caso di guasto, verrà resa adeguatamente pulita secondo le istruzioni
d’uso, impacchettato ed inviata tramite spedizione postale e/o portata al Centro di Assistenza Tecnica Autorizzato
(vedi http://www.aemnuova.it/it/info/assistenza), allegando il presente tagliando debitamente compilato e lo
scontrino scale o fattura d’acquisto o la prova di avvenuto pagamento se acquistato on-line tramite siti internet
(attenzione: l’importo del prodotto deve essere leggibile, non cancellato); diversamente la garanzia non sarà
ritenuta valida e sarà addebitato l’importo della prestazione e del trasporto.
Le spese postali di spedizione e riconsegna della macchina sono a carico del Centro di Assistenza Tecnica Autorizzato
nel caso di operatività della garanzia. Nel caso in cui il Centro di Assistenza Tecnica Autorizzato dovesse riscontrare
che la macchina è esente da difetti e/o risulta funzionante senza alcun intervento manutentivo, il costo della
prestazione e gli altri eventuali costi di spedizione e di riconsegna dell’apparecchio saranno a carico del cliente.
FLAEM NUOVA S.p.A. non risponde di ulteriori estensioni del periodo di garanzia assicurate da terzi.
N° di Serie Apparecchio: Difetto riscontrato: ...............................................................................................................................................................
.....................................................................................................................................................................................................
Allegare lo scontrino scale o fattura d’acquisto Rivenditore (timbro e rma)
The warranty terms here specied are valid only in Italy for Italian residents. In all other countries, the warranty
EN
will be provided by the local dealer that sold you the unit, in accordance with the applicable laws.
Cette garantie n’est applicable que pour les clients résidant en Italie; pour les clients d’autres pays, la garantie
FR
est fournie par le distributeur local qui a vendu l’appareil, conformément aux lois en vigueur.
Diese Garantie ist nur für in Italien ansässige Kunden gültig. Kunden aus anderen Ländern erhalten die Garan-
DE
tie - in Übereinstimmung mit den anzuwendenden Gesetzen - vom Ortshändler, der das Gerät verkauft hat.
Esta garantía es válida sólo para los clientes residentes en Italia. Para los clientes de otros países, la garantía
ES
será otorgada por el distribuidor local que ha vendido el aparato, en conformidad con lo dispuesto por las
respectivas normas legales.
Warunki gwarancji określone tutaj obowiązują tylko we Włoszech dla mieszkańców Włoch. We wszystkich
PL
innych krajach gwarancję zapewni lokalny dealer, który sprzedał ci urządzenie, zgodnie z obowiązującymi
przepisami.
Prodotto importato / Imported by:
Via Colli Storici, 221, 223, 225
25015 S. MARTINO DELLA BATTAGLIA
(Brescia) - ITALY
Tel. +39 030 9910168 r.a.
Fax +39 030 9910287
www.magicvac.it
Published by FLAEM NUOVA®
Cod. 19082-0 rev 02/2020
DISTRIBUTOR:
© 2020 FLAEM NUOVA
All rights reserved
®
 Loading...