

Page 1
1
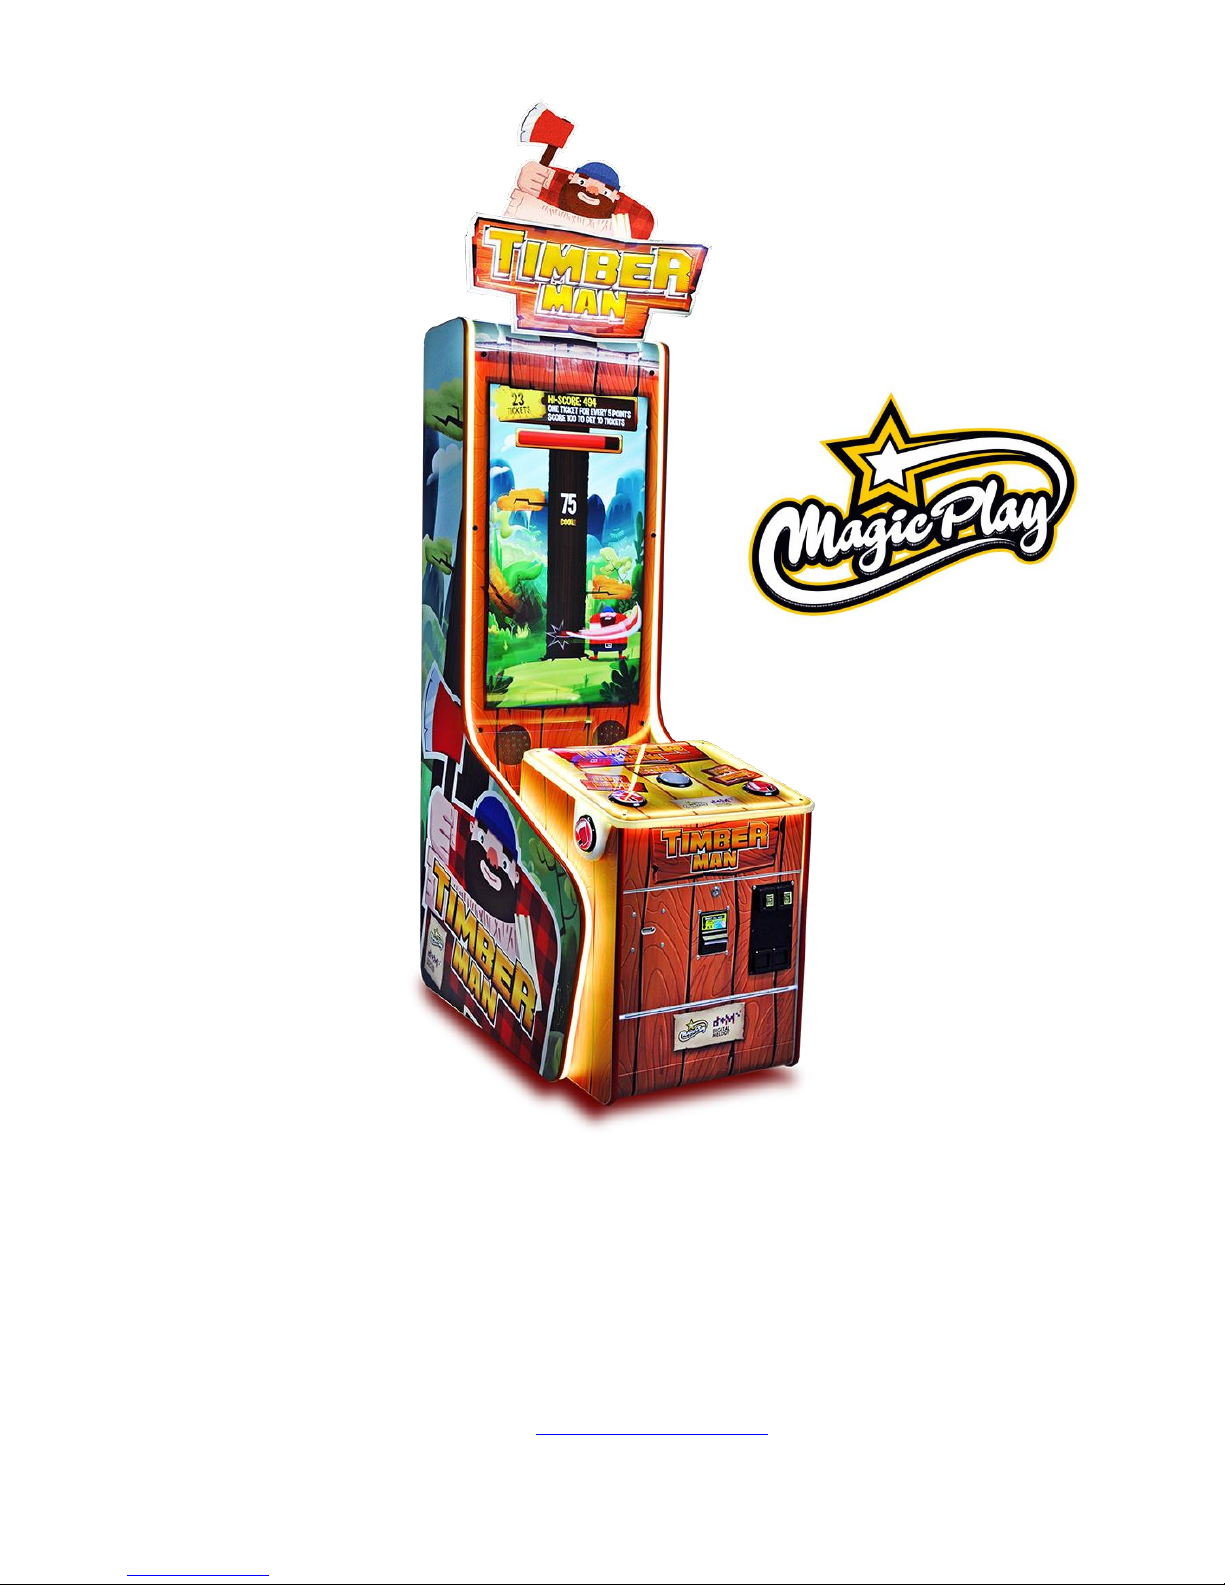
TIMBERMAN HERO
Operation Manual (v1.1)
SOFTWARE VERSION: T204
MAGIC PLAY SP Z O.O.
CHOCIMSKA 6, 62800 KALISZ, POLAND
Phone/Fax: +48 62 753 21 88
e-mail: [email protected]
website: www.magicplay.pl
Page 2

2
TABLE OF CONTENTS
Important Safety Instructions
1. SPECIFICATIONS
2. PACKAGE CONTENTS
3. SET UP & INSTALATION
3.1 DEVICE AND MOST IMPORTANT ELEMENTS
3.2 MARQUEE ASSEMBLY
3.3 LEVEL ADJUSTMENT
3.4 TRANSPORTING THE GAME
3.5 CONNECTING THE POWER
4. ACTIVATION, UPDATE AND GAMEPLAY
4.1 ACTIVATION
4.2 SOFTWARE UPDATE
4.3 GAMEPLAY
5. GAME OPTIONS
5.1. MENU ACCES AND NAVIGATION
5.2. SERVICE MENU
5.3. DEVICE SETTINGS
5.4. GAME SETTINGS
5.5. CREDITS SETTINGS
5.6. TICKETS SETTINGS
5.7. LEADERBOARDS
5.8. COUNTERS
5.9. LOGS AND STATS
5.10. TESTS
6. RECOMMENDED TICKETS SETTINGS
7. MAINTENANCE, INSPECTION
7.1 SAFETY CHECK
8. SPARE PARTS LIST
9. ELECTRICAL DIAGRAM
10. TROUBLESHOOTING FOR CPU BOARD V2
10.1. SYSTEM MICROSD CARD LOCATION.
10.2. „NO SIGNAL” ALERT ON SCREEN
10.3. BLACK SCREEN WITHOUT COMMUNICATES
10.4. PROBLEMS WITH TICKET DISPENSING, GAME CRASHING/FREEZING, SETTINGS ARE NOT SAVED
10.5. PROBLEMS WITH COIN ACCEPTORS/BILL ACCEPTORS
10.6. BUTTONS/COINS MECH NOT WORKING
10.7. MICROSD card repair for Windows OS
11. TROUBLESHOOTING FOR CPU BOARD V3
11.1 SCREEN IS UPSIDE-DOWN
11.2 SCREEN IS CUTTED OFF WITH FRONT SCREEN STICKER OR IS SMALLER THAN STICKER
11.3 SYSTEM FAILURE, ERRORS ON THE SCREEN, OPERATING SYSTEM WON’T BOOT OR SSD (HARD DISK)
DRIVE FAILURE
11.4 I/O BOARD ERROR OR GAME BOARD ERROR
11.5 „NO SIGNAL” ALERT ON SCREEN
11.6 BLACK SCREEN WITHOUT COMMUNICATES
11.7 PROBLEMS WITH COIN ACCEPTORS/BILL ACCEPTORS
11.8 BUTTONS/COINS MECH NOT WORKING
11.9 SYSTEM RECOVERY
12. TERMS OF WARRANTY
Page 3
3
Thank You for purchasing TIMBERMAN . We hope you enjoy the product.
The manual contains valuable information about how to operate and maintain your game machine
properly and safetly. It is intended for the owner and/ or personnel in charge of product operation.
Carefully read and understand the instructions.
If you need any help during instalation and setup please utilize this manual and troubleshooting guide. If
the product fails to function properly, non-technical personnel should under no circumstance sttempt to
service the machine. Contact your distributor or manufacturer for help.
PLEASE READ BEFORE USE
IMPORTANT SAFETY INSTRUCTIONS
To ensure the safe usage of this product, carefully read and understand these
instructions before operating your game.
Save these instructions for future reference.
Use this product only as described in this manual. Other uses not recomended may cause fire,
Electric shock or personal injury. Unplug the game from the outlet when not in use, when moving from one
location to another, and before cleaning/servicing.
Explanations witch require special attention are indicated by signs of warning. Depending on the potential
hazardous degree, the terms: NOTE, NOTICE, and WARNING are used.
NOTE: A NOTE indicates useful hints or information about product usage.
NOTICE: A NOTICE inticades potential damage to product and how to avoid the problem.
WARNING: A WARNING indicates a potential for product damage or serious personal injury.
I tis important to understand the meaning of the following HAZARD SIGNS befor contuning:
High Voltage and Shock Hazard:
High voltage can cause electric shock.
Turn off/unplug power before servicing.
High temperature Hazard:
This part may cause scalding.
Do not touch. Surface may be hot.
No Touching Hazard:
This may be hot or can cause electric shock.
Do not touch.
Use the following safety guidelines to help ensure your own personal safety and to help protect your
equipment and surrounding enviroment from potential damage.
Page 4

4
THIS PRODUCT IS AN INDOOR MACHINE ONLY!
DO NOT INSTALL OUTDOOR!
Avoid installing in the following places to prevent fire, electric shock, injury and/ or
machine malfunctioning:
• Places subject to rain/ moisture, or places subject to high humidy.
• Places subject to direct sunlight, or places subject to extremely hot or cold temperatures to
ensure that it is used within the specified operating range.
• Places where inflammable gas may be present or in the vicinity of highly inflammable/
volatile chemicals or items that can easly catch fire
• On unstable or sloped surfaces. The machine may topple or cause unforeseen accidents.
• Vicinty of fire exist, fire extinguishers.
WARNING!
Non-technical personnel who do not have technical knowlege and expertise should
refrain from performing such work that this manual require or preform tasks wich
are not explained in this manual. Failing to comply can cause severe accidents such
as electric shock or other serious injuries.
WARNING: To reduce the risk of fire, electric shock or personal injury, unplug or
disconnect the machine from the power supply before servicing.
Note: The contents of this manual may be updated without notice.
Page 5
5
1. SPECIFICATIONS
Rated power supply: 110 - 240V
Dimensions: 115 x 68 x 294cm
Weight: 150Kg
NOTICE: After turning off the game, please wait at least 1 minute before restarting again.
2. PACKAGE CONTENTS
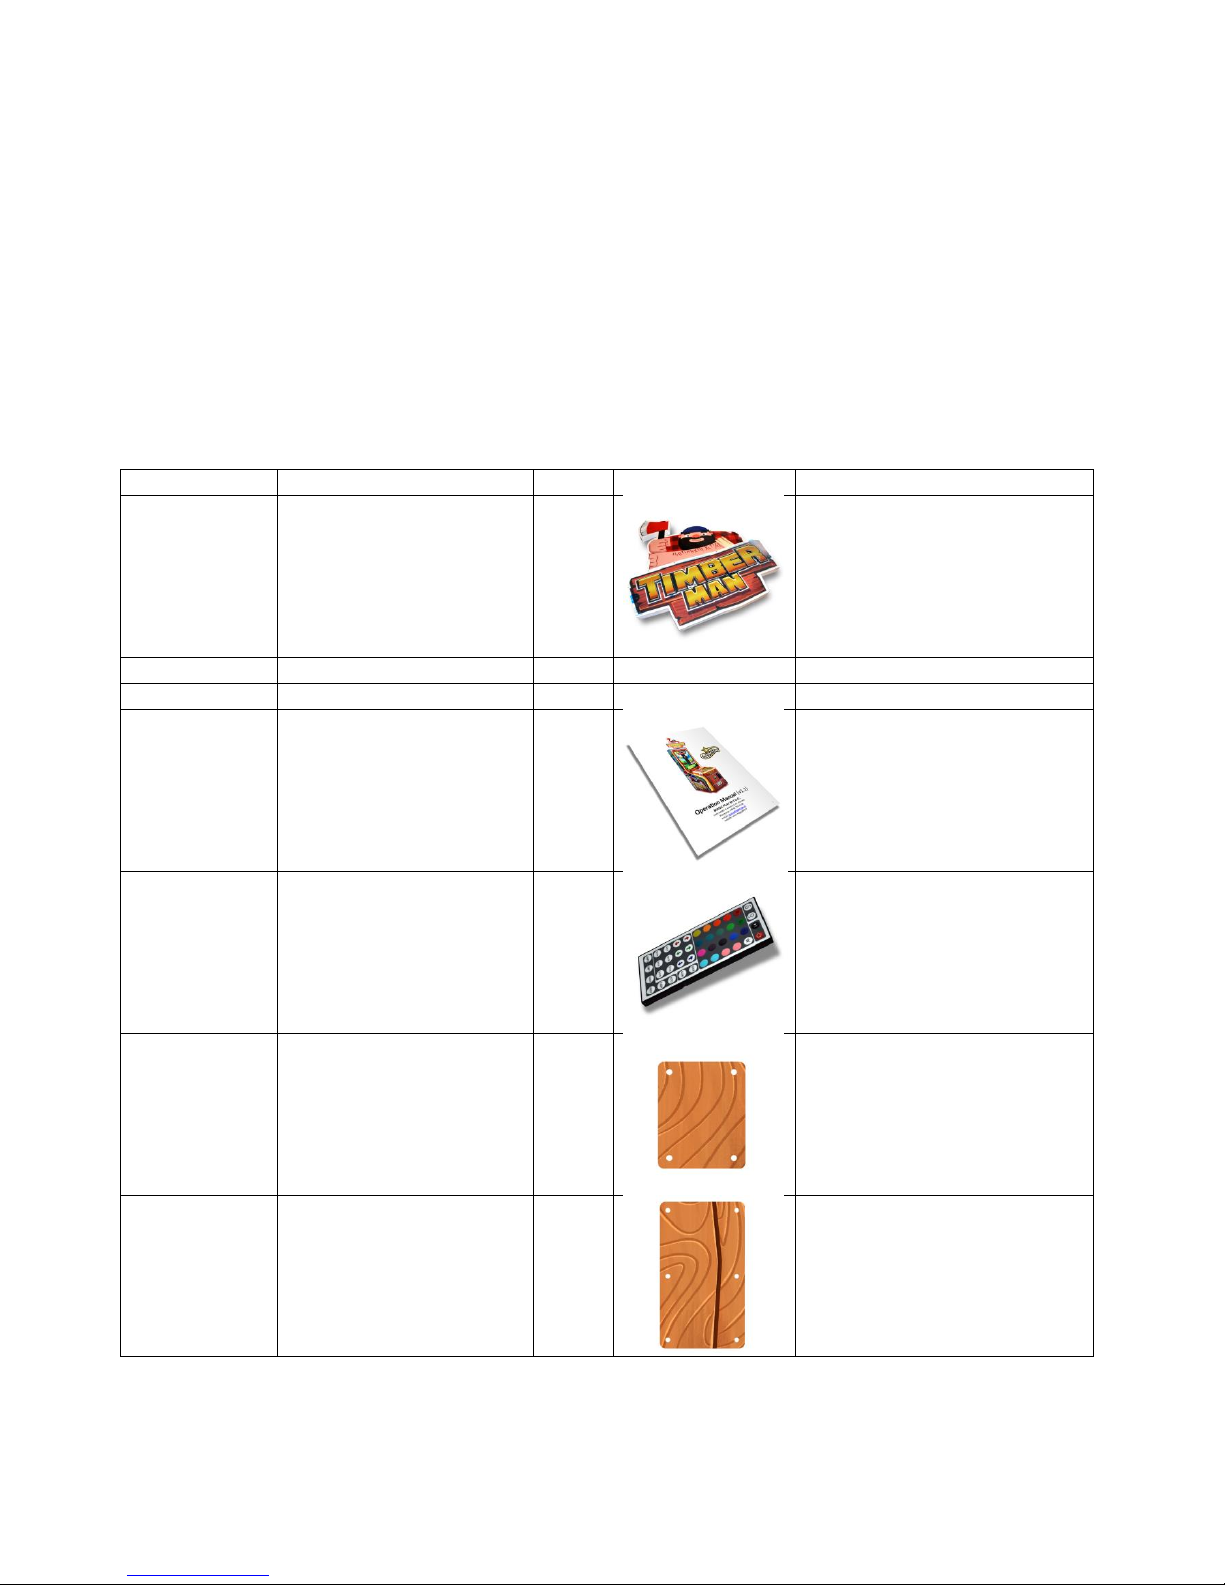
Open the package and make sure all the items are included:
• 1 x Body Assembly
• Following accessories
No.
Name
Qty.
Illustration
Note
1
Marquee
1
2
Marquee mounting screws
4
3
Keys
3 sets
4
User’s manual
1
5
LED controler remote
1
6
Bill acceptor cover
1
7
Coin acceptor cover
1
If any items are found missing, please contact your sales representative for help immediately.
NOTE: Part models are subject to change without notice.
Page 6
6
3. SETUP & INSTALLATION
WARNING!
THIS PRODUCT IS AN INDOOR MACHINE ONLY!
DO NOT INSTALL OUTDOOR!
• Refer to IMPORTANT SAFETY INSTRUCTIONS (Pg. 3) for places to avoid
• Place the unit on dry level surface
• Ventilation openings in the back of the unit must not be obstructed by objects or by wall.
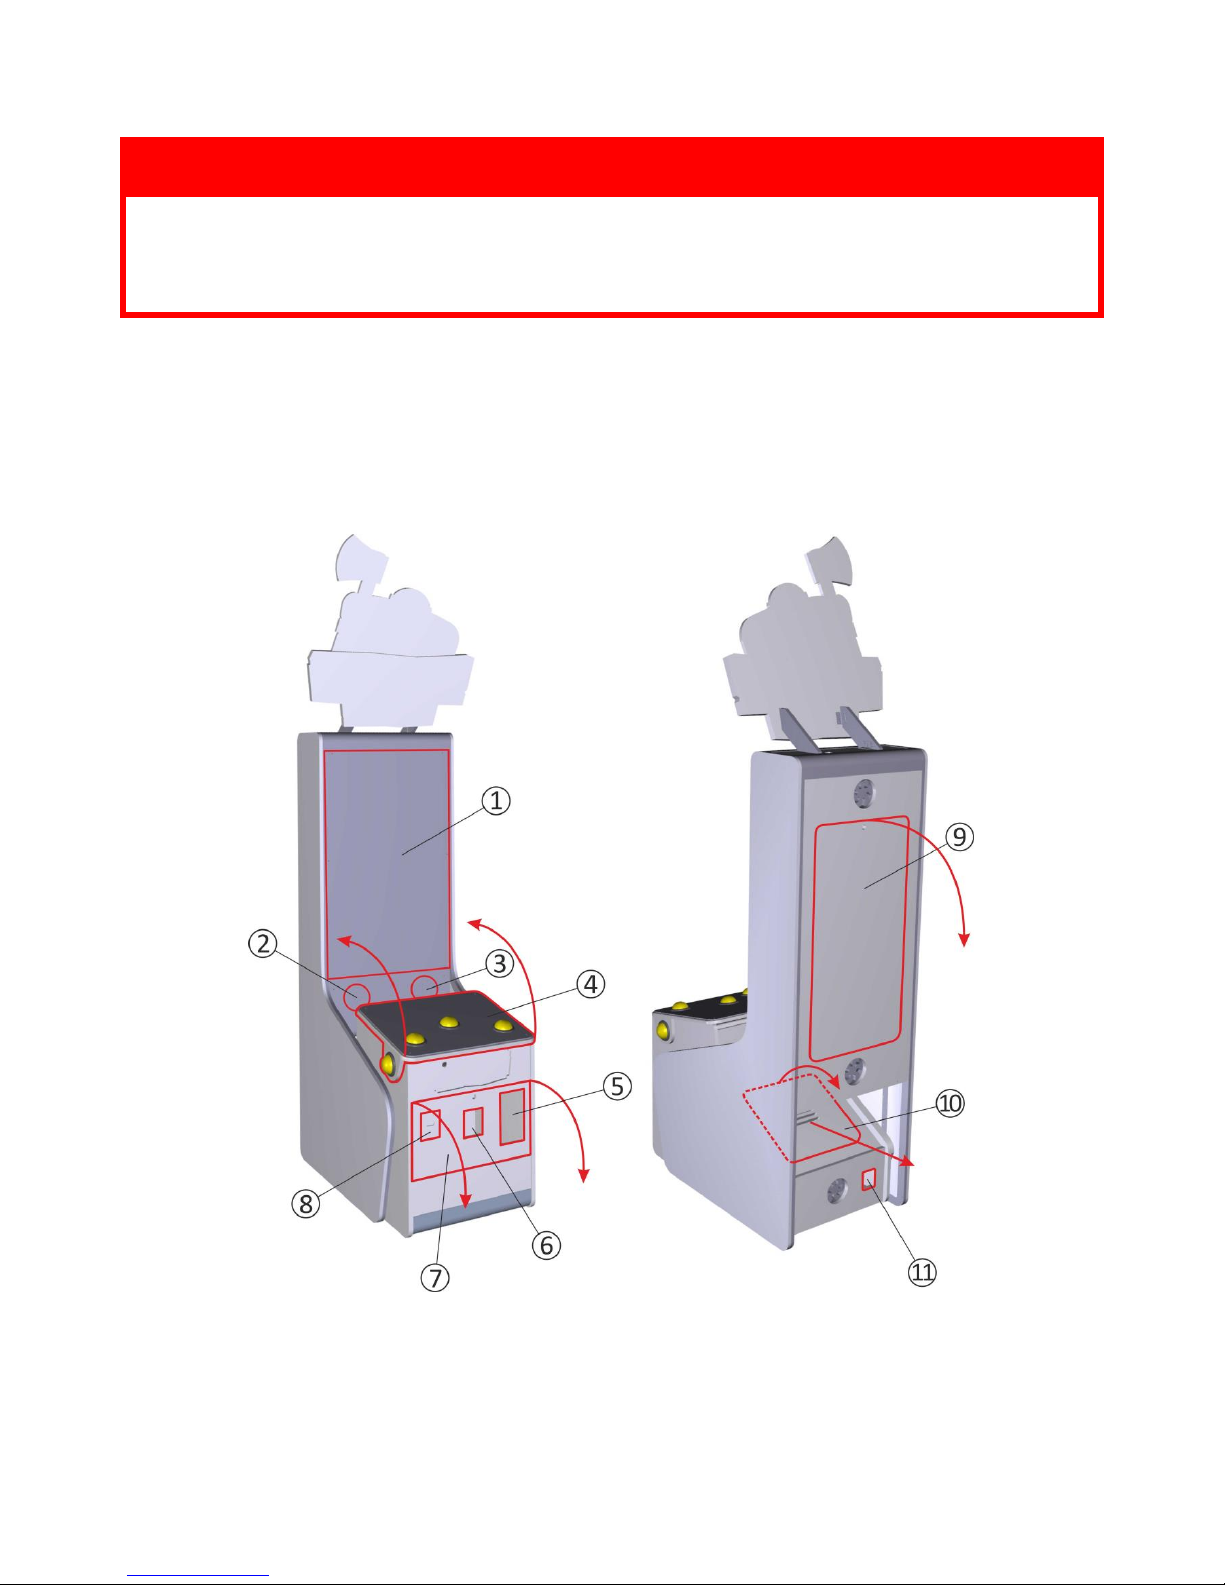
3.1 DEVICE AND IMPORTANT ELEMENTS
1. 42” LED display
7. front service door - access to coin and bill acceptors,
tickets feeder, mechanical counters and service button
2. left speaker
3. right speaker
8. ticket dispenser
4. game panel with control buttons – access to buttons
switches – can be opened by unlocking clamps accessible
through the front service door
9. upper back service door – access to display, speakers and
marquee assembly
10. lower back service door – access to main board, I/O
board, power supply, LED controller and wiring
5. coin acceptor
6. bill acceptor
11. power socket
Page 7
7
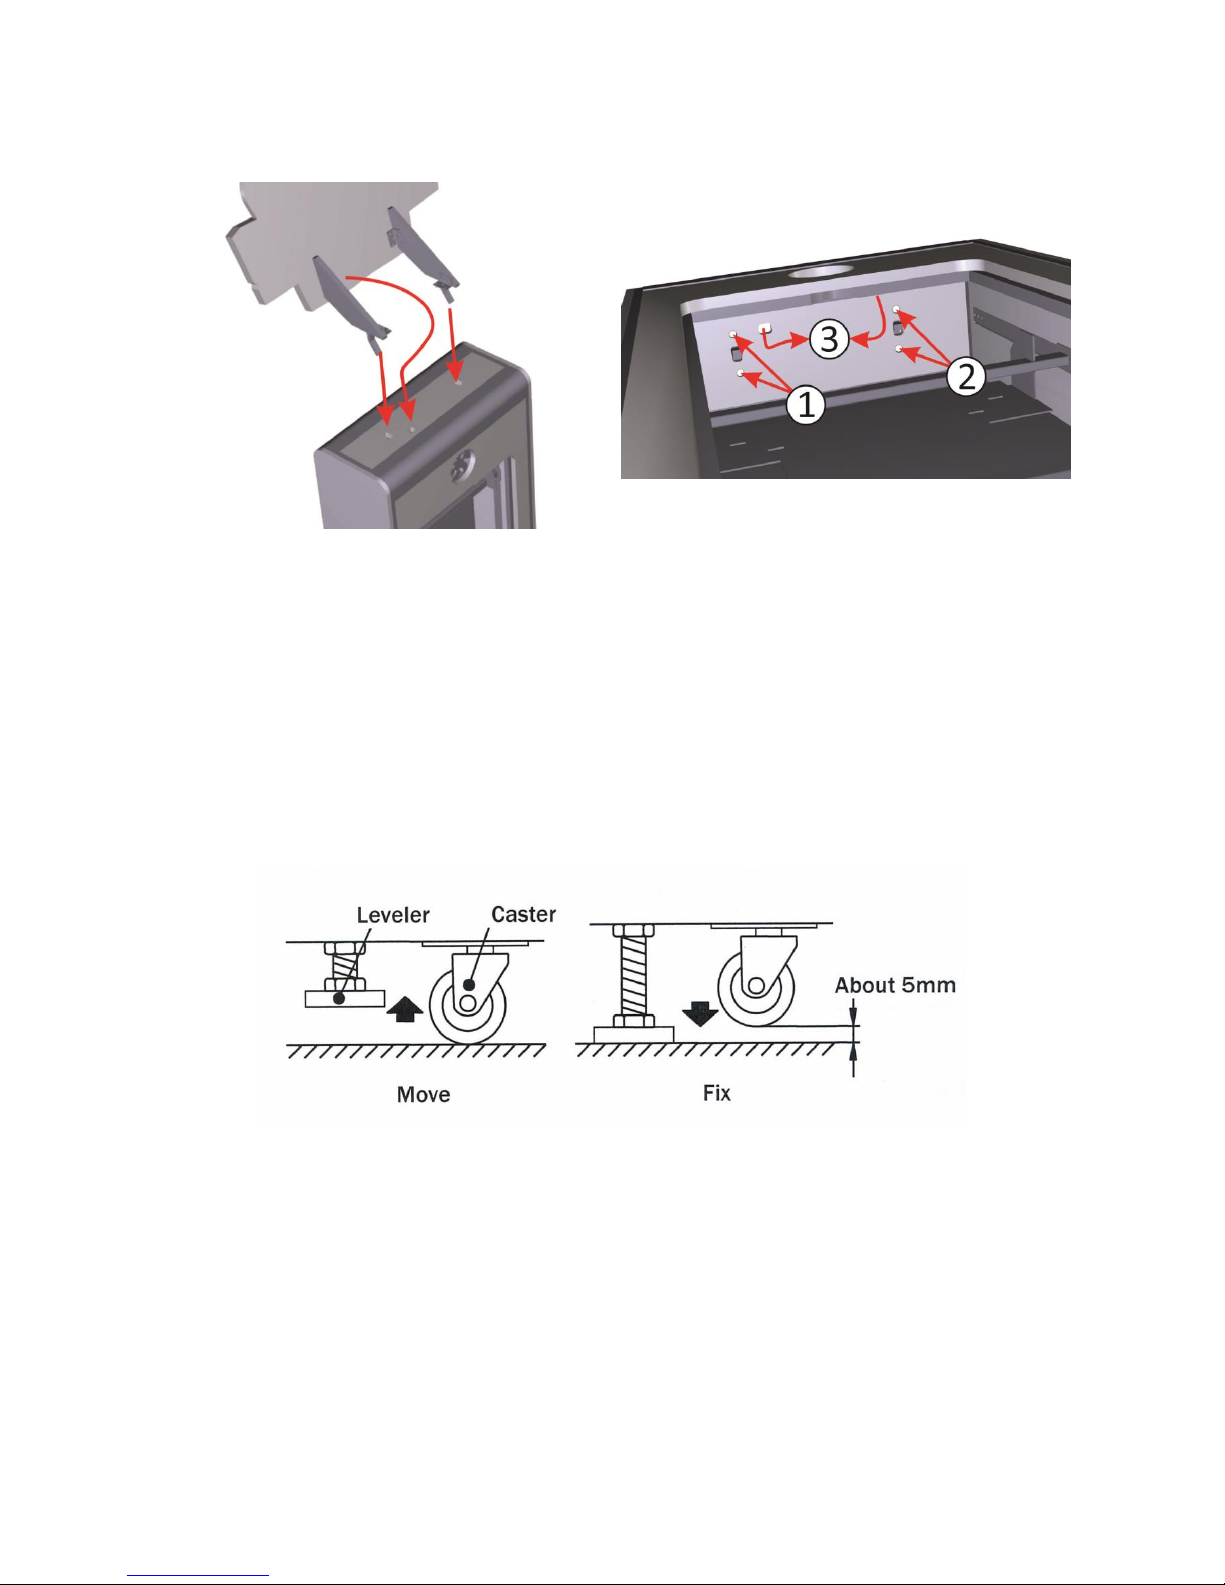
3.2 MARQUEE ASSEMBLY
Two persons may be required for marquee assembly. To install the marquee you first need to open the
rear upper door. Set a ladder or other platform on the back of the unit.
Raise the marquee up, climb onto the platform and
place the marquee base brackets in the holes on
top of the unit. Pass the backlight power cord
through the hole.
Secure marquee by placing the screws in the holes
(1 and 2). Tighten the screws. Connect the power
cable connectors (3).
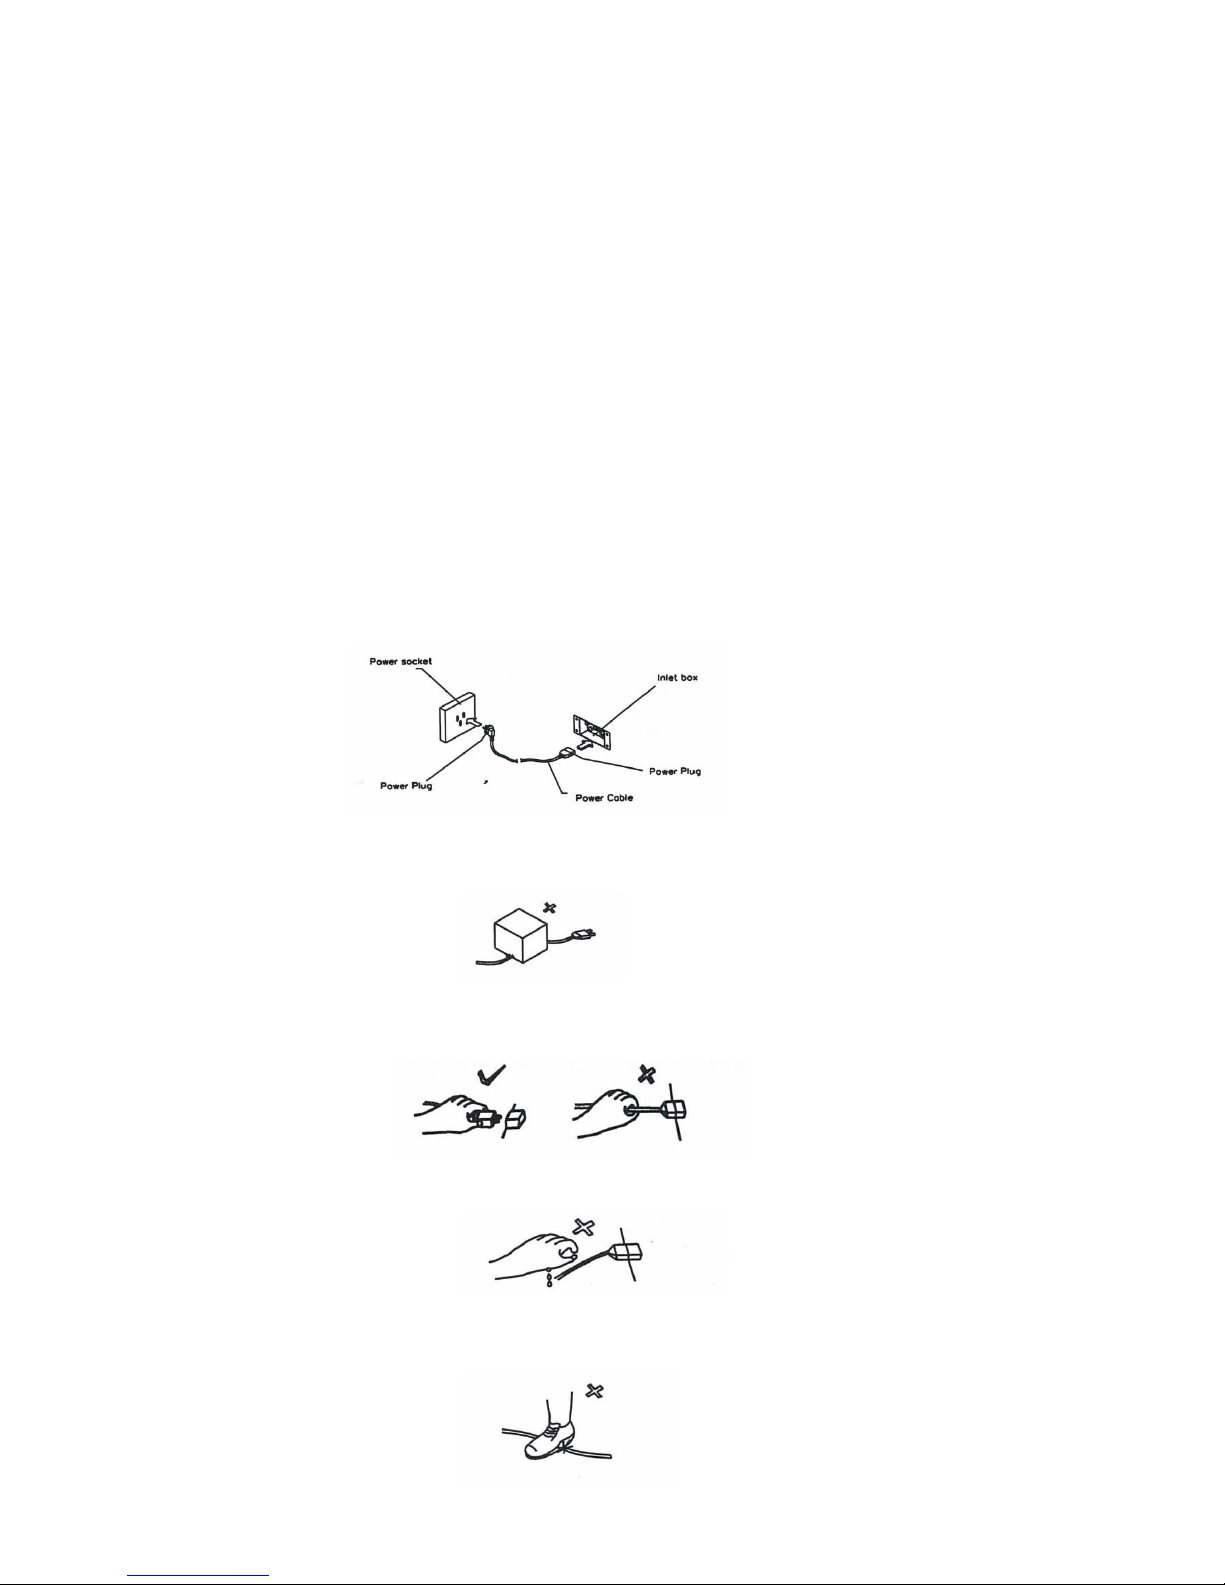
3.3 LEVEL ADJUSTMENT
Install this machine on flat surface. Adjust levers to lift casters off the ground to level the game.
If the game is installed on an unstable floor, it could cause a malfunction.
To fix the game, adjust the leveler down until it touches the floor, lifting the casters off the ground by
5mm. Repeat the same for all levelers.
NOTICE: Make sure the machine is level with the ground and all the adjustable legs
should stick to floor closely.
3.4 PLAY ZONE
This machine requires space for playing and for maintenance as shown below.
Leave space around the game upon instalation:
Service area: 50cm
Play area: 100cm
Page 8
8
3.5 TRANSPORTING THE GAME
If you need to move the game, adjust the levelers back to an „up“ position so the casters touch the
ground.
NOTICE
• Be careful not to damage the machine durning transport.
• The machine should be handled with care when brining it down from a high level.
• Always unplug the game before moving.
• Keep the machine in upright position during transport.
• For longer distance transport, packkage the game properly to prevent damages
3.6 CONNECTING POWER
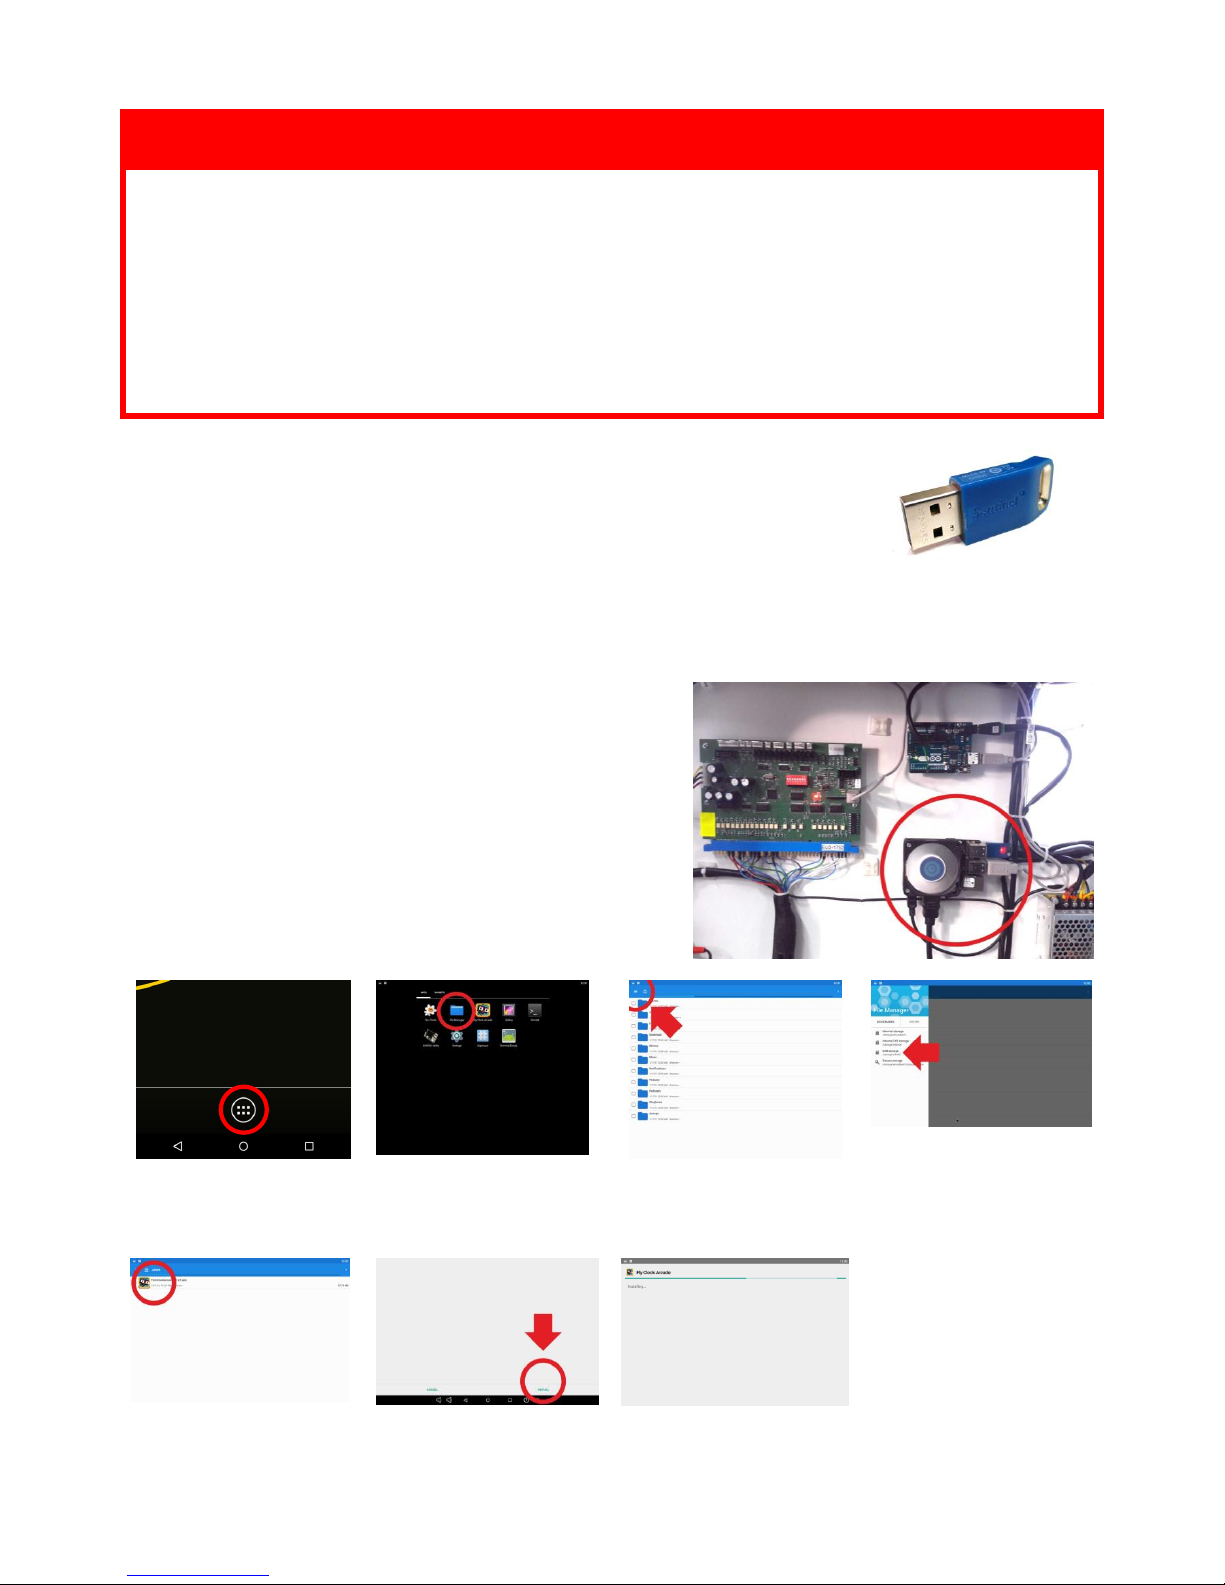
IMPORTANT: POWER SUPPLY ADJUSTS AUTOMATICALLY
• Machines electrical system (power supplys and display) will adjusts automatically to 230V or 115V
voltage.
• Do not plug the equipment power cables into an electrical outlet if the power cable is damaged.
• Avoid putting many loads on one electrical outlet as it could generate heat the fire resulting from
overload.
• Connect the grounding conductor to the earth terminal (GND):
WARNING
Ensure no heavy objects rest on the power cord. Check to make sure the game cabinet does not sit on the
power cord as this could damage the cord and become hazardous.
To disconnect the game, grip the plug and pul lit from the wall outlet. Never pull by the cord.
To prevent electric shock, do not touch the power plug when hand is wet.
Ensure that nothing rests on the power cord and that i tis not located where it can be stepped on or
tripped over.
Page 9
9
4. ACTIVATION, UPDATE AND GAMEPLAY
IMPORTANT!
DEVICE SOFTWARE IS COPYRIGHT PROTECTED. COPYING AND DISTRIBUTION IS
STRICTLY PROHIBITED. IT IS ALSO FORBIDDEN TO INTERFERE IN THE INTEGRITY OF
SOFTWARE THROUGH MODIFICATION OR IMPLEMENTATION OF ANY CHANGES
WITHOUT APPROVAL OF THE MANUFACTURER. ANY ATTEMPTS OF SOFTWARE
CHANGES, OTHER THAN THOSE SPECIFIED BY THE MANUFACTURER MAY RESULT IN
WARRANTY LOSS.
4.1 ACTIVATION
Game software is USB license dongle protected. Each unit is equiped with one
dongle.
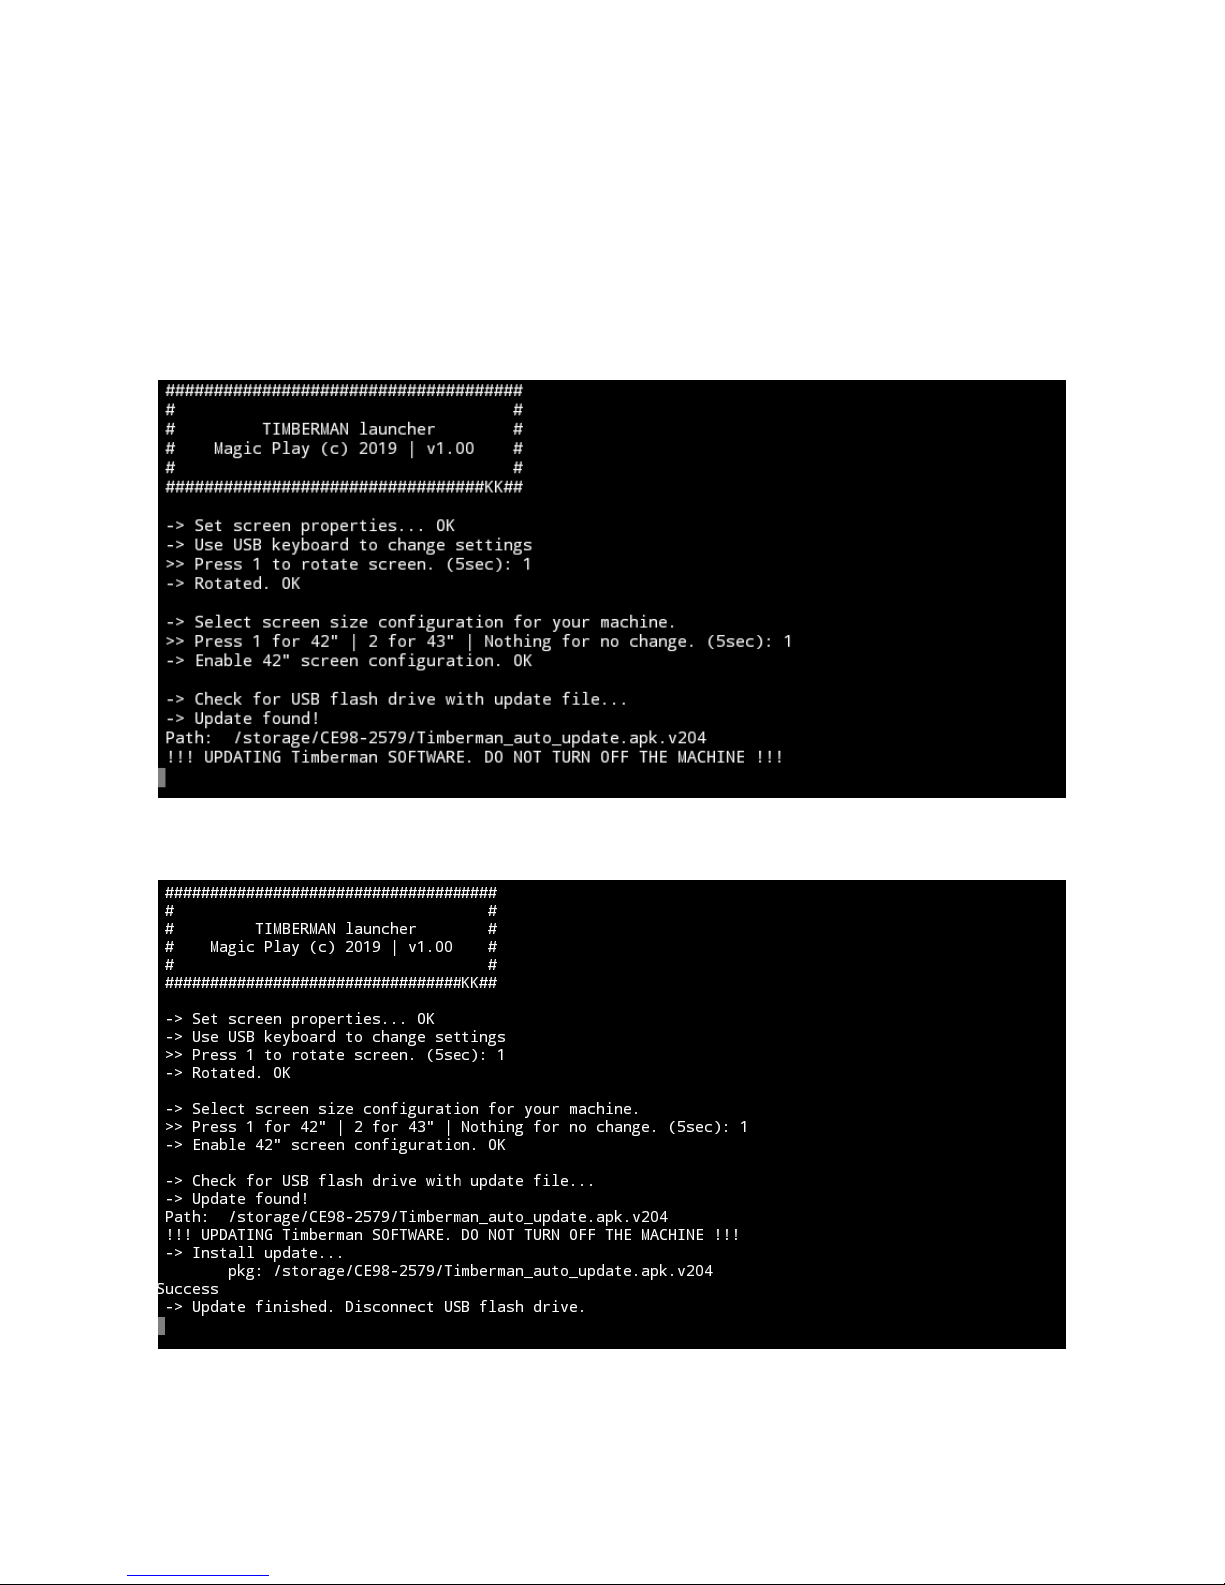
4.2.1 SOFTWARE UPDATE FOR CPU BOARD V2
To carry out software upgrade memory stick and USB computer
mouse is required.
1. Download .apk file provided by manufacturer/distributor and
save it to a memory stick.
2. Open the lower rear service door and locate the CPU board
(see picture)
3. Connect the memory stick and a computer mouse in free USB
ports. Disconnect one of USB plugs if not enought USB ports are
available. Remember to plug it back after update process!
4. Leave the Drifty Chase application by clicking the right mouse
button. Tip: Game will probably exit after disconnecting one of
USB plugs in 3rd step.
5. Go to application list in
bottom center of the screen
6. Click on FILE MANAGER
app
7. Click on 3 parallel lines in
left top corner to see disks
listing
8. Select your USB storage
from list
12. At finish - disconnect USB
mouse and flash
drive, connect disconnected
USB plugs in 3rd step and
replug the machine. Done!
9. Locate and click the
downloaded .apk file
10. Click INSTALL in the right
bottom corner of the screen
11. Wait for installation
complete. It may take a while.
Page 10
10
4.2.2 SOFTWARE UPDATE FOR CPU BOARD V3
To carry out software update USB memory stick is required.
1. Download auto-update file provided by manufacturer/distributor and save it to main direcory of usb
memory stick.
2. Turn OFF your machine
3. Open the rear service door and locate miniPC USB ports
4. Connect the memory stick to free USB port port.
5. Turn ON your machine
6. Update file will be automatically detected and installed to your device
7. After update process detach your USB memory stick
8. Done!
If update file is not detected: redownload and reupload file to the memory stick, check other USB flash
drive. Preferred USB memory stick file system is FAT32.
Page 11
11
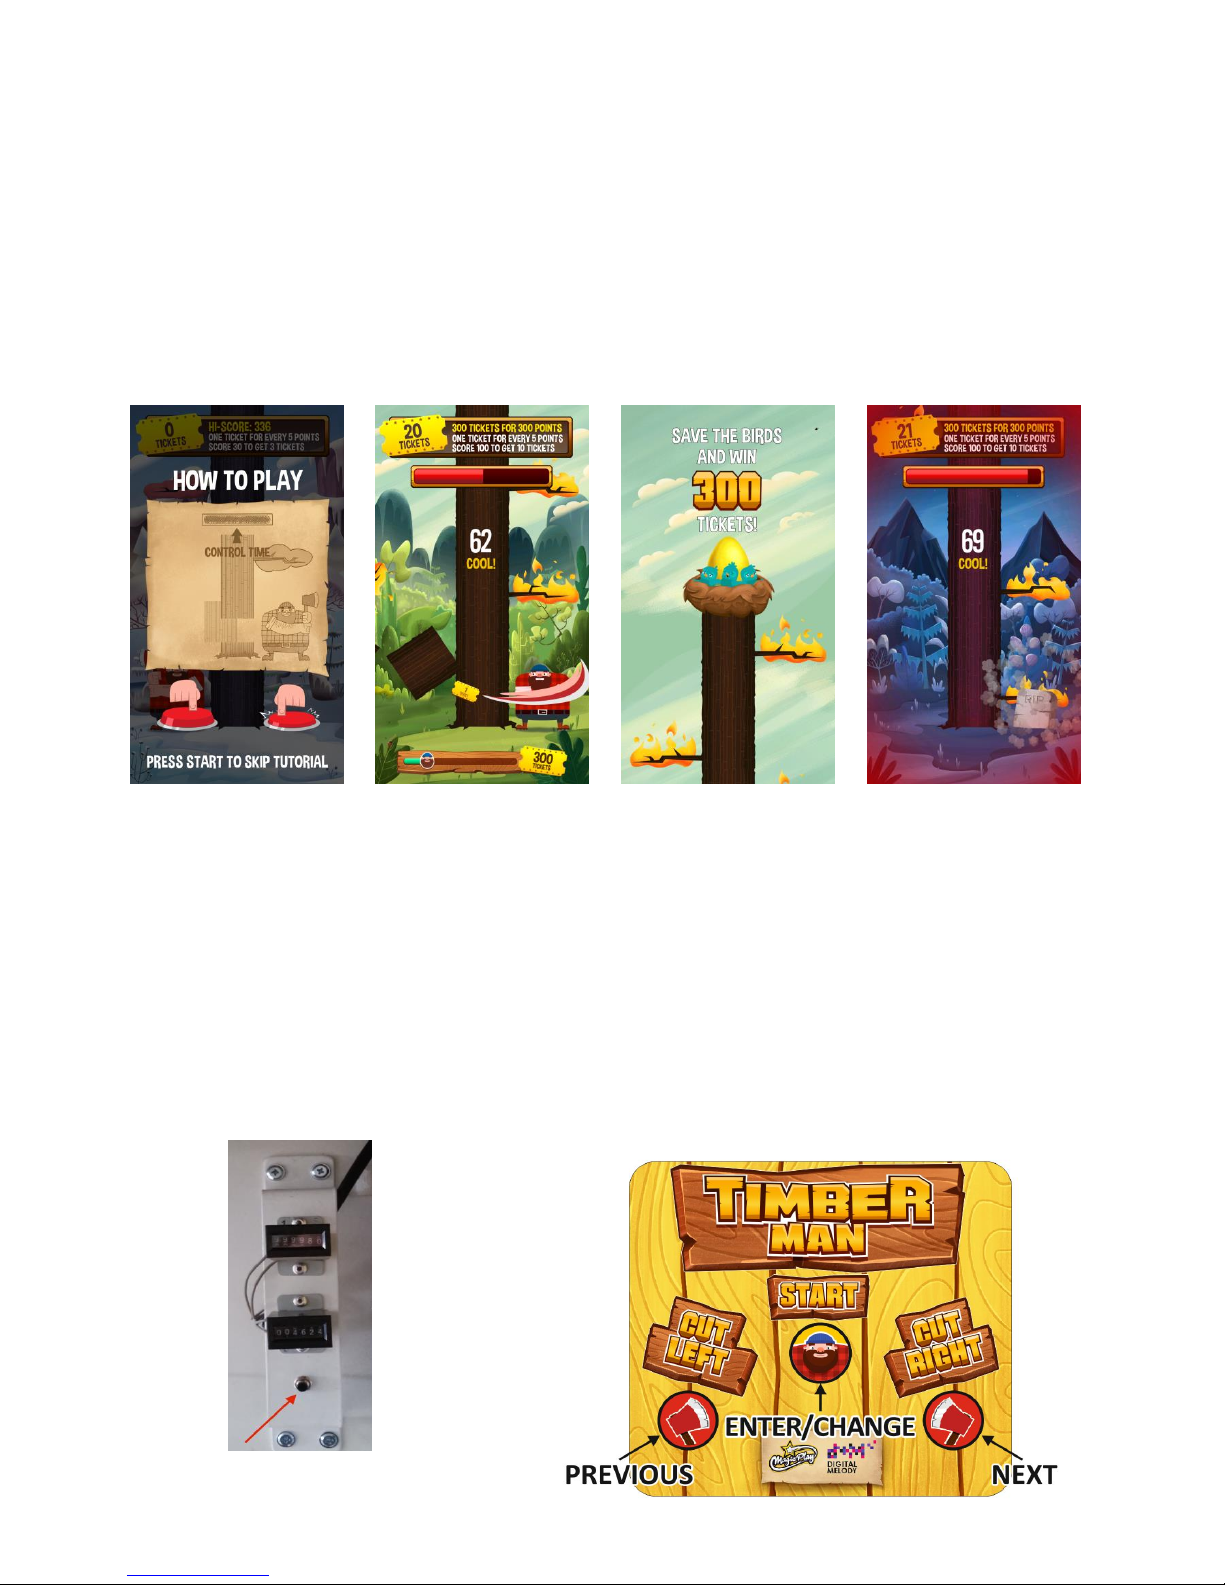
4.3 GAMEPLAY
To start the game insert coins in coin acceptor or banknote in bill validator. Press the START button to start the
game. Instructions for the players who are playing for the first time appears on the screen. You can skip this
information by pressing the START button. After the countdown, you can start the game. Push CUT LEFT button to
chop tree at the left side, push CUT RIGHT button to chop tree at the right side. You get a point for every cut. Each
time for a given number of points you will get one ticket. Any contact of tree branches would result to game's
over. The game will also end if the timer expires. However you can increase the timer by chopping the tree. If you
cut fast enough, you can fill the time bar to the maximum level. Then, the time bar will change color from red to
blue and you will receive bonus tickets. The goal is to cut the tree until the nest with the chicks, which is on the
top of the tree, reaches the ground level. The player can follow the progress of the game on the progress bar at
the bottom of the screen.
Game tutorial
Watch time bar on the top and
progress bar on the bottom of the
screen
Nest on the top of the tree
Avoid flaming branches
5. GAME OPTIONS
5.1 MENU ACCES AND NAVIGATION
To acces menu press SERVICE BUTTON located in service door, at the lower front of the machine, next to
the coin and ticket counters. Use game panel buttons to navigate in the menu. Use RIGHT CUT BUTTON to
select NEXT (down or right) and LEFT CUT BUTTON to select PREVIOUS (up or left). Use START BUTTON to
ENTER or CHANGE the option value or selection.
Page 12
12
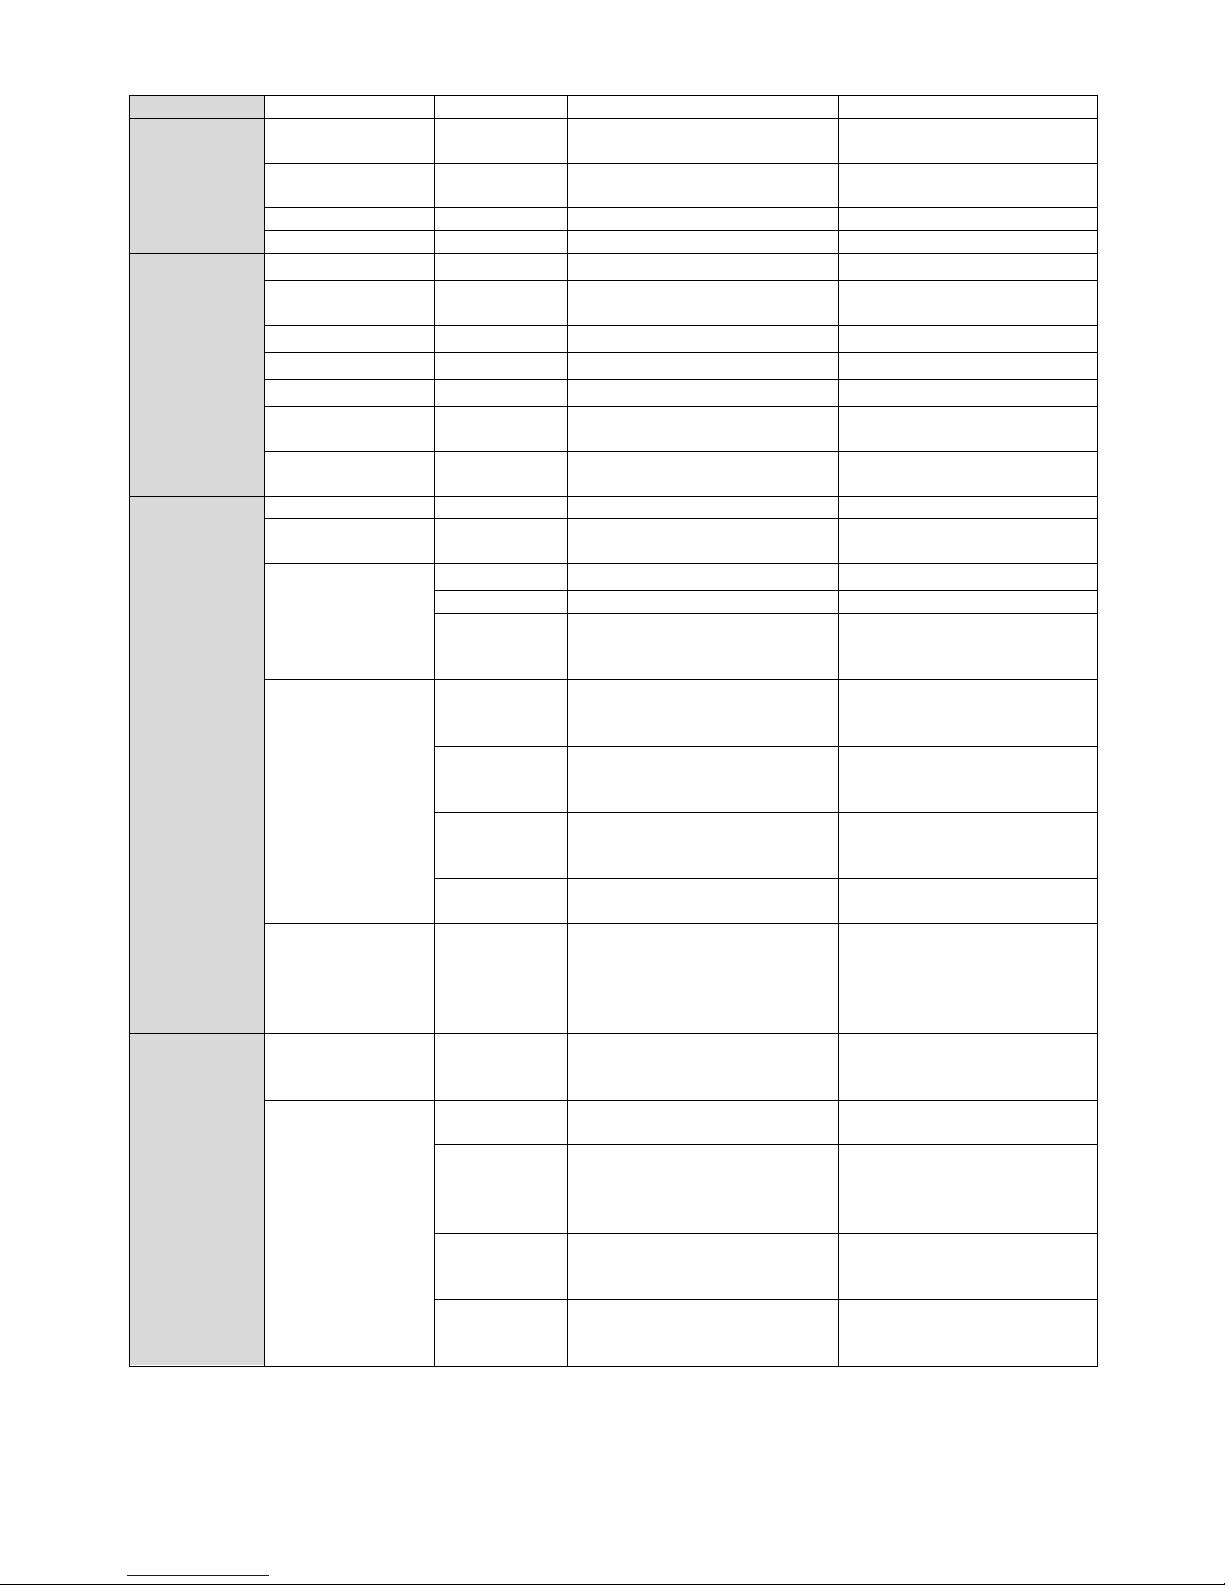
Main Menu
Description
Device settings
Sfx volume
0-100
setting sound volume from 0 to
100
Music volume
0-100
setting music volume from 0 to
100
Music 1, 2, 3
on/off
Lights
on/off
option is temporarily unavailable
Main prize chops
50-500
Easier plays
percentage
0-100%
Game settings
Hinted chops
0-1000
Easy mode retries
0-10
Easy mode chops
0-100
Difficulty / Timebar
speed
0-10
Background settings
on/off
enable or disable the background
of the game
Credits settings
Free play
on/off
Default credits
settings
DEFAULT USD
the preset settings credit for
various currencies
Default credits
settings
Coin settings
DEFAULT EUR
DEFAULT PLN
channel mode
on/off
on/off - enable or disable
channel mode to use electrical
changegiver
Coin settings
Bill settings
impulse mode
on/off
on/off - enable or disable pulse
mode to use mechanical
changegiver
channel
settings
set the number of credits
assigned to the changegiver
channel
impulse
settings
set the number credits
corresponding to one pulse of
the changegiver
set the number of credit to one
pulse of the payout
Tickets on/off
on/off
the possibility of enable or disable
the issuance of tickets. Disable
this option makes disappearance
of any information and messages
that are related with tickets
Tickets settings
Tickets for score
tickets for
every score
on/off
Enable or disable the option for
the conversion of a number of
points on a single ticket
Tickets for score
1 ticket for
every points
0-100
the number of points needed to
gain a single ticket
tickets for
score level
on/off
enable or disable the option to
issue a given amount of tickets
for exceeding a certain level of
points
tickets for
levels table
identify specific limits / levels
point and the amount of the
ticket for exceeding it
mercy tickets
0-100
determine the amount
"consolation" tickets issued
when a player wins nothing
Page 13
13
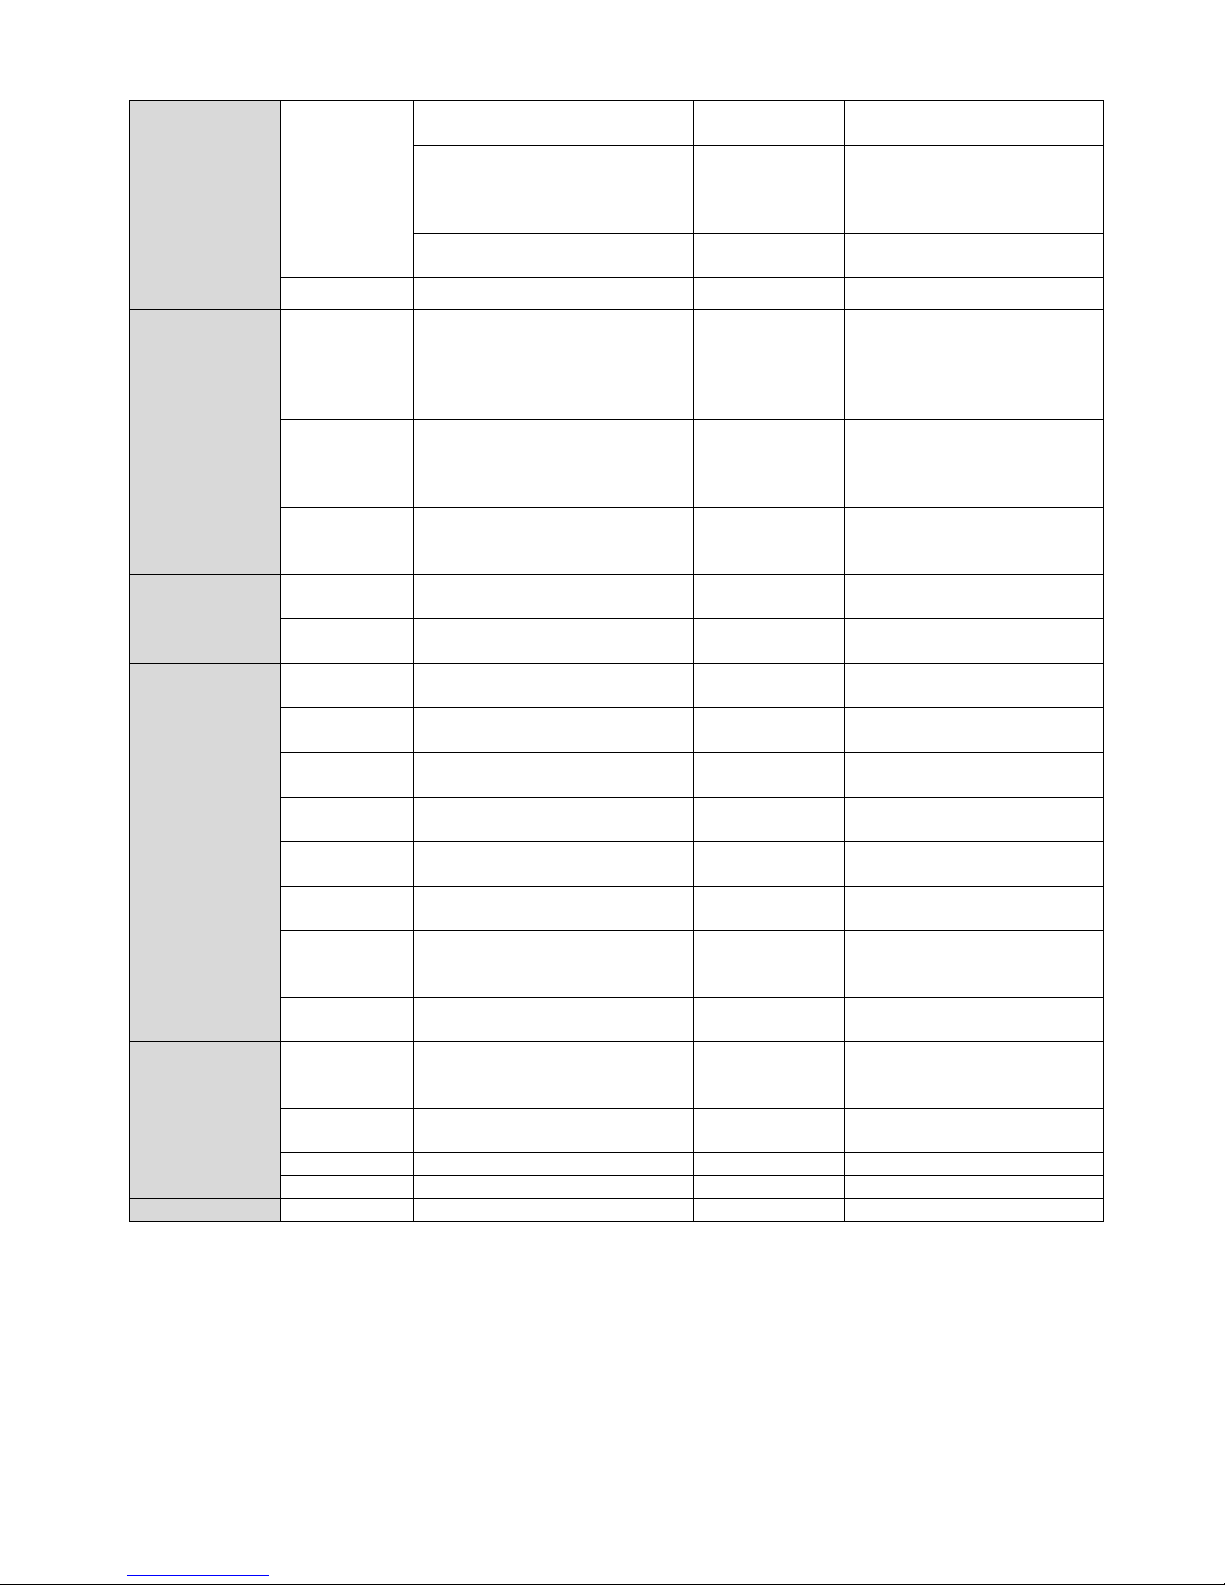
Tickets settings
Tickets for
specials
main prize tickets
200-1000
bonus tickets for completing the
game
full stripe bonus
0-100
specify the number of tickets
issued every second when the
player manages to achieve and
maintain a bonus for speed
fixed tickets
0-1000 (0=off)
win always the same amount of
tickets
Divide by two
for tickets with double value
Leaderboards
Generate
random table
generates a random scoreboard
where the "base value" is the base
number of points and the "spread"
is the minimum and maximum
"scatter" of the results
Generate
random table
interval
specify the time when to generate
a random list of results, value 0 is
disabling the random list
generation
Results
a list of 8 the highest scores with
the option of removing each of
them
Counters
Resetable
credit, won tickets, tickets issued,
the number of games
Resettable counters of the
device
Non resetable
credit, won tickets, tickets issued,
the number of games
Non resetable counters of the
device
Logs and stats
avg. Tickets for
play
the average number of winning
tickets per game
avg. Score for
play
the average number of winning
tickets per game
avg. Time for
play (seconds)
the avarage duration of the game
in seconds
tickets for
score
number of tickets earned for points
tickets for
score levels
the number of tickets earned for
crossing the the levels scoring
tickets for
speed bonus
the number of tickets earned for
keeping the "speed bonus"
tickets for
leaderboard
place
number of tickets earned for
entered into the list of tickets
mercy tickets
the number of tickets earned as a
"consolation"
Tests
input devices
validates input devices: coin
acceptor, bill acceptor and push
buttons
output devices
validates output devices: ticket
dispenser
test audio
audio channels test
test video
display test
Exit
Page 14
14
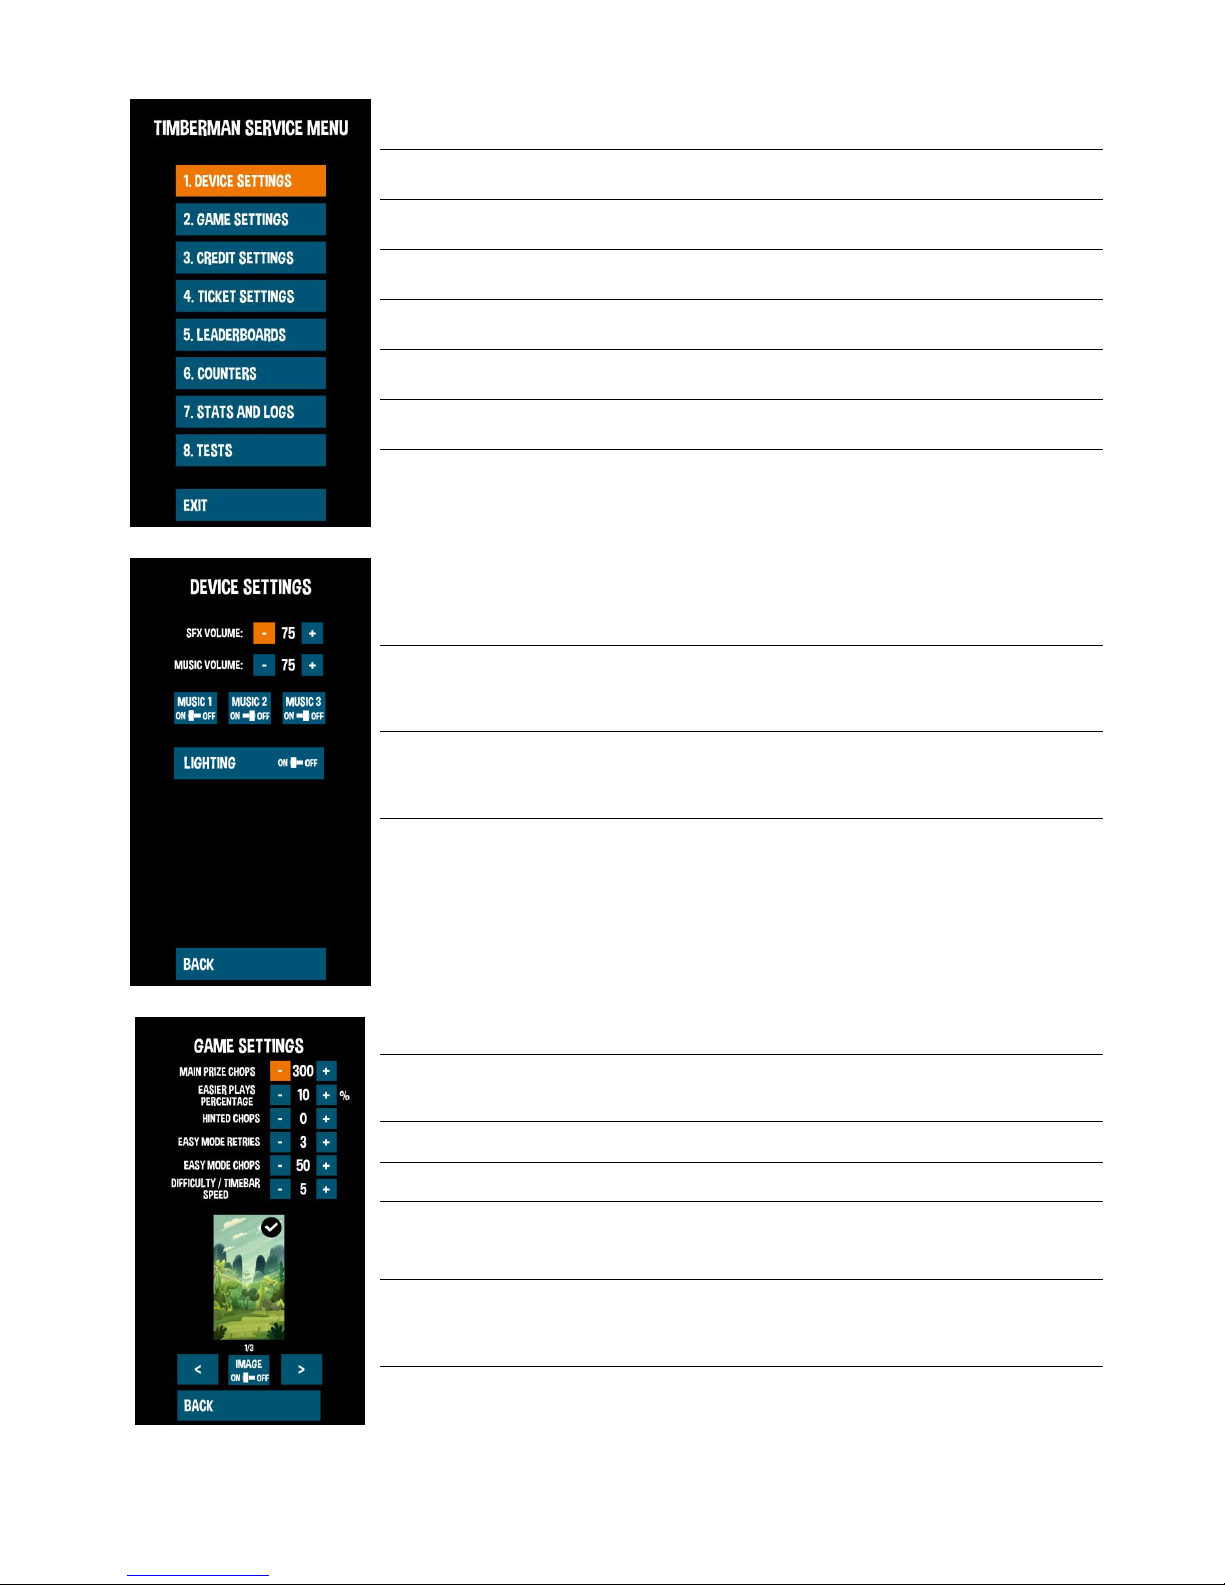
5.2 SERVICE MENU
DEVICE SETTINGS
Sound effect, and music volume settings
GAME SETTINGS
Begginers settings and background images
CREDIT SETTINGS
Game prize, coin and bill acceptors settings
TICKET SETTINGS
Ticket for points, ticket for levels and special ticket
settings
LEADERBOARDS
Random leader board and leaderboard reste time
settings
COUNTERS
Credits and tickets resetable and non-resetable
counters
STATS AND LOGS
Games, average tickets for game etc. statistics
TESTS
Machine components diagnostics
5.3 DEVICE SETTINGS
SFX VOLUME
Audio effects volume settings 0-100
MUSIC VOLUME
Music volume settings 0-100
MUSIC 1, 2, 3 – ON/OFF
Select a melody playing during the game
LIGHTNING
Option is temporarily unavailable
5.4 GAME SETTINGS
MAIN PRIZE CHOPS
Set number of chops needed for ticket bonus
EASIER PLAYS
PERCENTAGE
Chance of lower difficulty level
HINTED CHOPS
Set number of chops with additional hints
EASY MODE RETRIES
Set player lives before easy mode chops limit
EASY MODE CHOPS
Set the number of cuts during which the player
gets hints on avoiding branches and after which
time bar begins to drop
DIFFICULTY / TIMEBAR
SPEED
Set how fast timebar will decrease. Values from 1
to 10. 1 is very easy and 10 is very hard
BACKGROUND IMAGE
Enable or disable game background images
Page 15
15
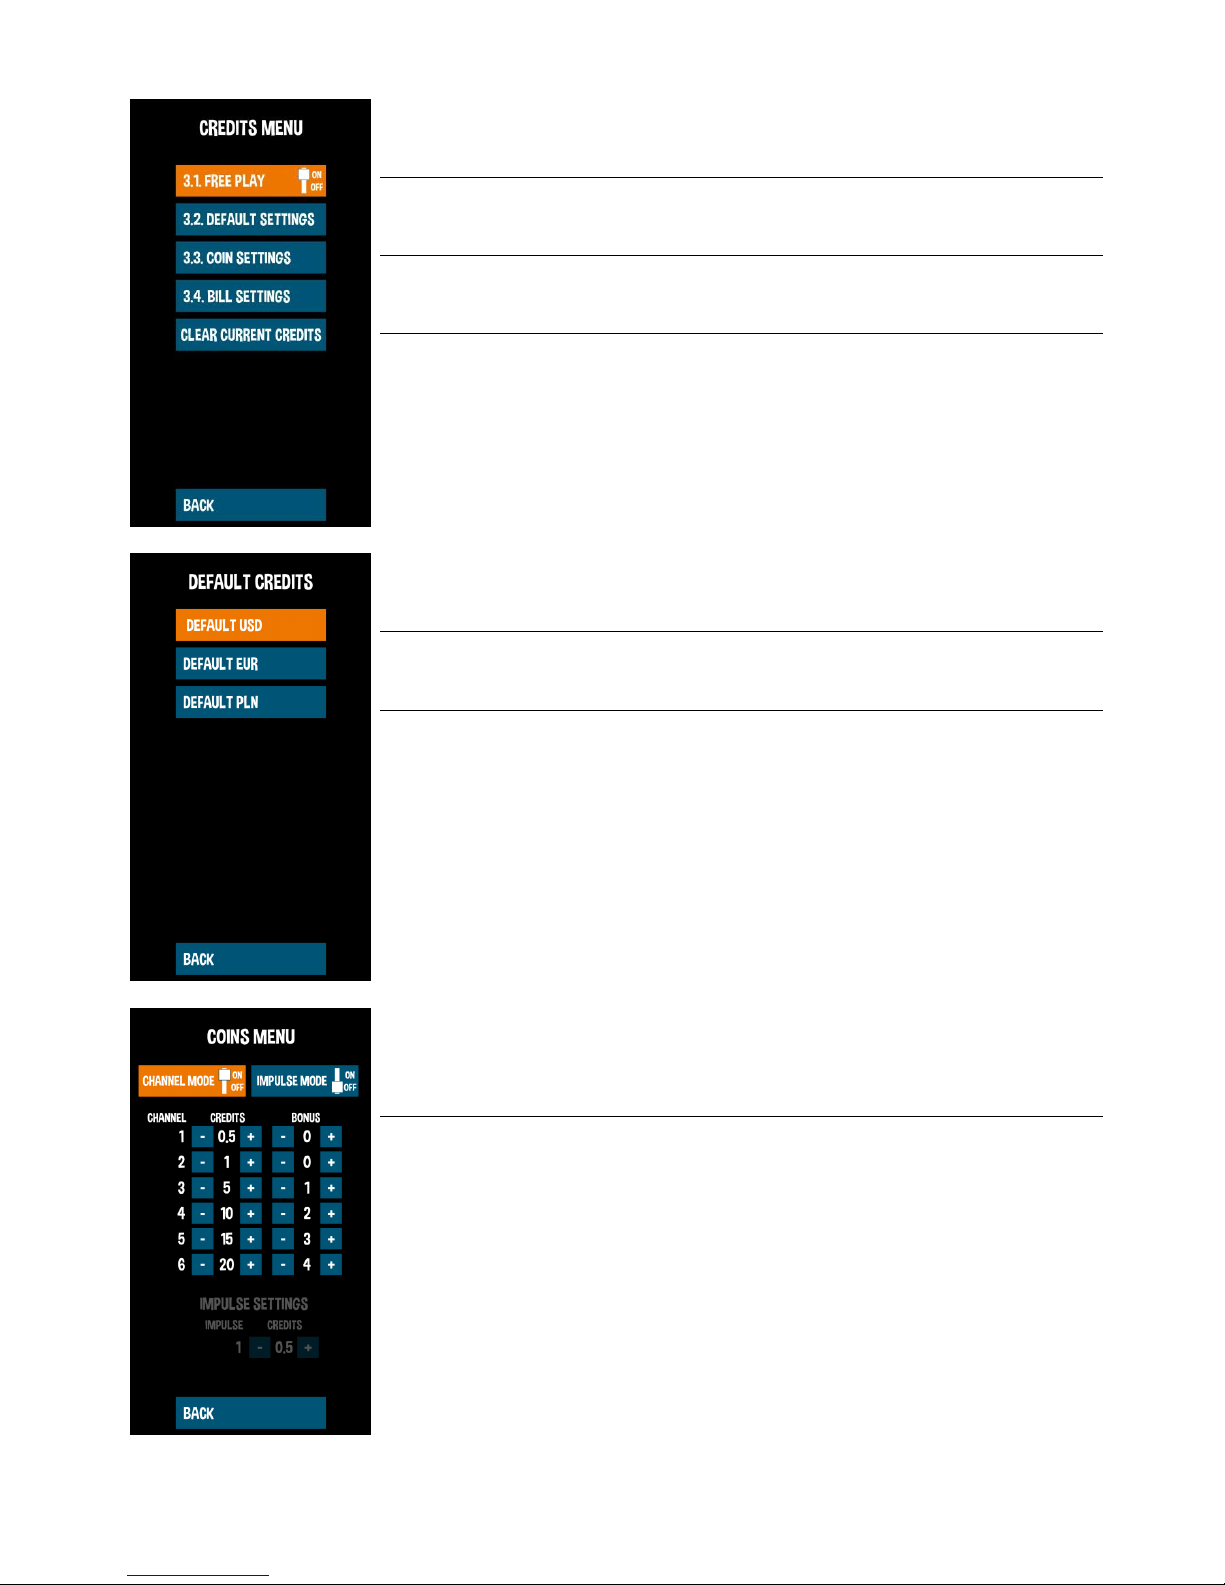
5.5 CREDITS SETTINGS
FREE PLAY ON/OFF
Free play, no credits needed.
DEFAULT SETTINGS
Predefined credits settings for various currencies
COIN SETTINGS
Coin acceptor settings for impulse and channel
modes
BILL SETTINGS
Bill acceptor settings
DEFAULT USD
Predefined credit settings for US DOLLARS
DEFAULT EUR
Predefined credit settings for EURO
DEFAULT PLN
Predefined credit settings for POLISH ZLOTY
CHANNEL MODE ON/OFF
CHANNEL MODE ON/OFF: for channel coin
acceptors – can accept more than one type of
coins/tokens. If channel mode is switched on,
impulse mode turns off automatically.
CHANNEL MODE SETTINGS
Set how many games/credits will be launched by
single pulse from channel 1 to 6
Page 16
16
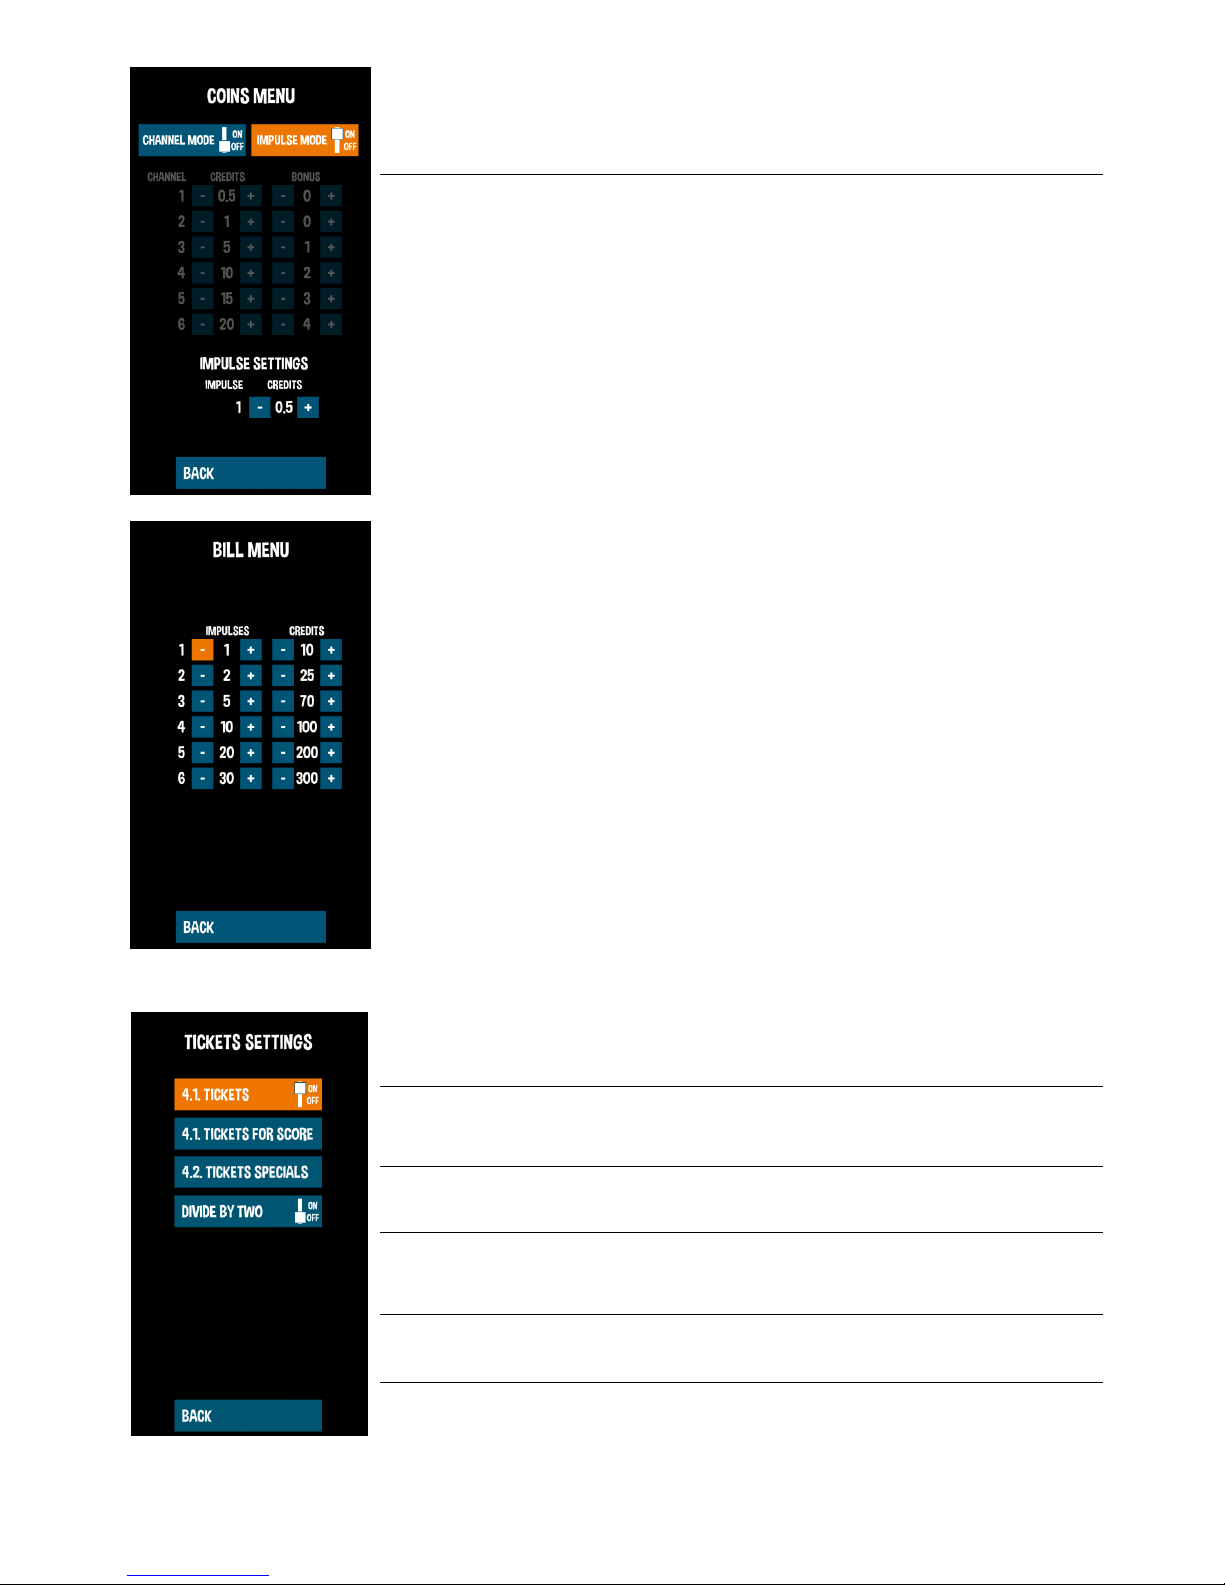
IMPULSE MODE ON/OFF
IMPULSE MODE ON/OFF: for impulse or
mechanical coin acceptors – accepts only one
type of coins/tokens. If pulse mode is switched
on, channel mode turns off automatically.
IMPULSE MODE SETTINGS
Set how many games/credits will be launched by
single pulse from coin acceptor
BILL SETTINGS
Set how many games/credits will be launched by
pulses from bill acceptor.
5.6 TICKETS SETTINGS
TICKETS ON/OFF
Tickets support enabled or disabled. All in-game
tickets information will be unavailable when OFF
TICKETS FOR SCORE
Tickets ratio settings for points scored and number
of tickets for score levels
TICKETS SPECIALS
Tickets for speed bonus and leaderboard place
GIVE ### TICKETS
Dispense outstanding tickets. NOTE: tickets will
also dispense automatically when inserted into the
ticket dispenser
CLEAR REMANING TICKETS
Clear ticket due
DIVIDE BY TWO ON/OFF
Turn on if you value each ticket as 2 tickets
Page 17
17
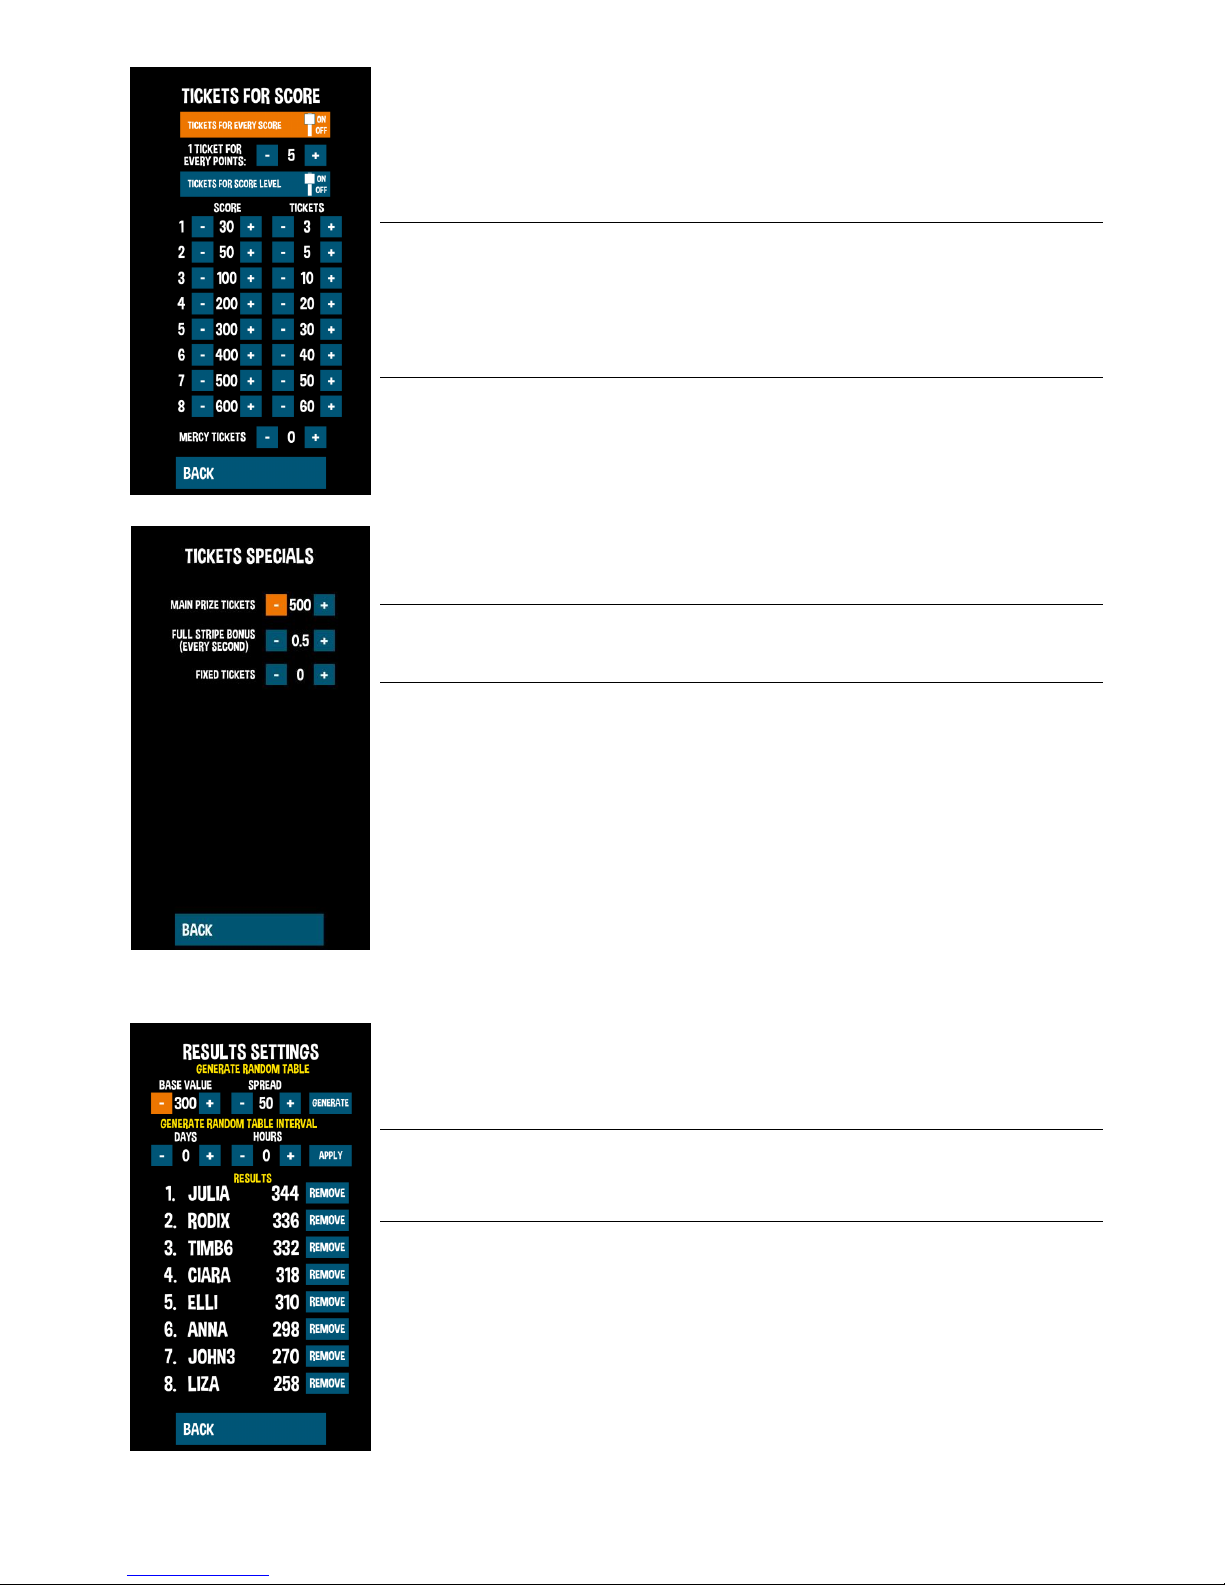
TICKETS FOR SCORE
ON/OFF
Enable or disable the option for the conversion
number of points to a single ticket
Set how many points a player must earn to get a
ticket
TICKETS FOR SCORE
LEVELS
Enable or disable the option to issue a given
amount of tickets for exceeding a certain number
of points
Set how many tickets player will receive for
reaching this score
MERCY TICKETS
Set how many "consolation" tickets will be given
when the player wins nothing
MAIN PRIZE TICKETS
Set amount of tickets that player win if he
complete the game
FULL STRIPE BONUS
Set how many tickets player will receive for
achiving and maintaning the speed bonus bar
FIXED TICKETS
(not active if set on “0”) Amount of tickets player
wins, regardless of the number of points scored in
the game
5.7 LEADERBOARDS
RANDOM LEADERBOARD
GENERATOR
Generates a random scoreboard where the "base
value" is the base number of points and the
"spread" is the minimum and maximum "scatter"
of the results
RANDOM LEADERBOARD
GENERATOR INTERVAL
Specify the time when to generate a random list of
results, value 0 is disabling the random list
generation
LEADERBOARD EDITOR
List of 8 the highest scores with the option of
removing each of them
Page 18
18
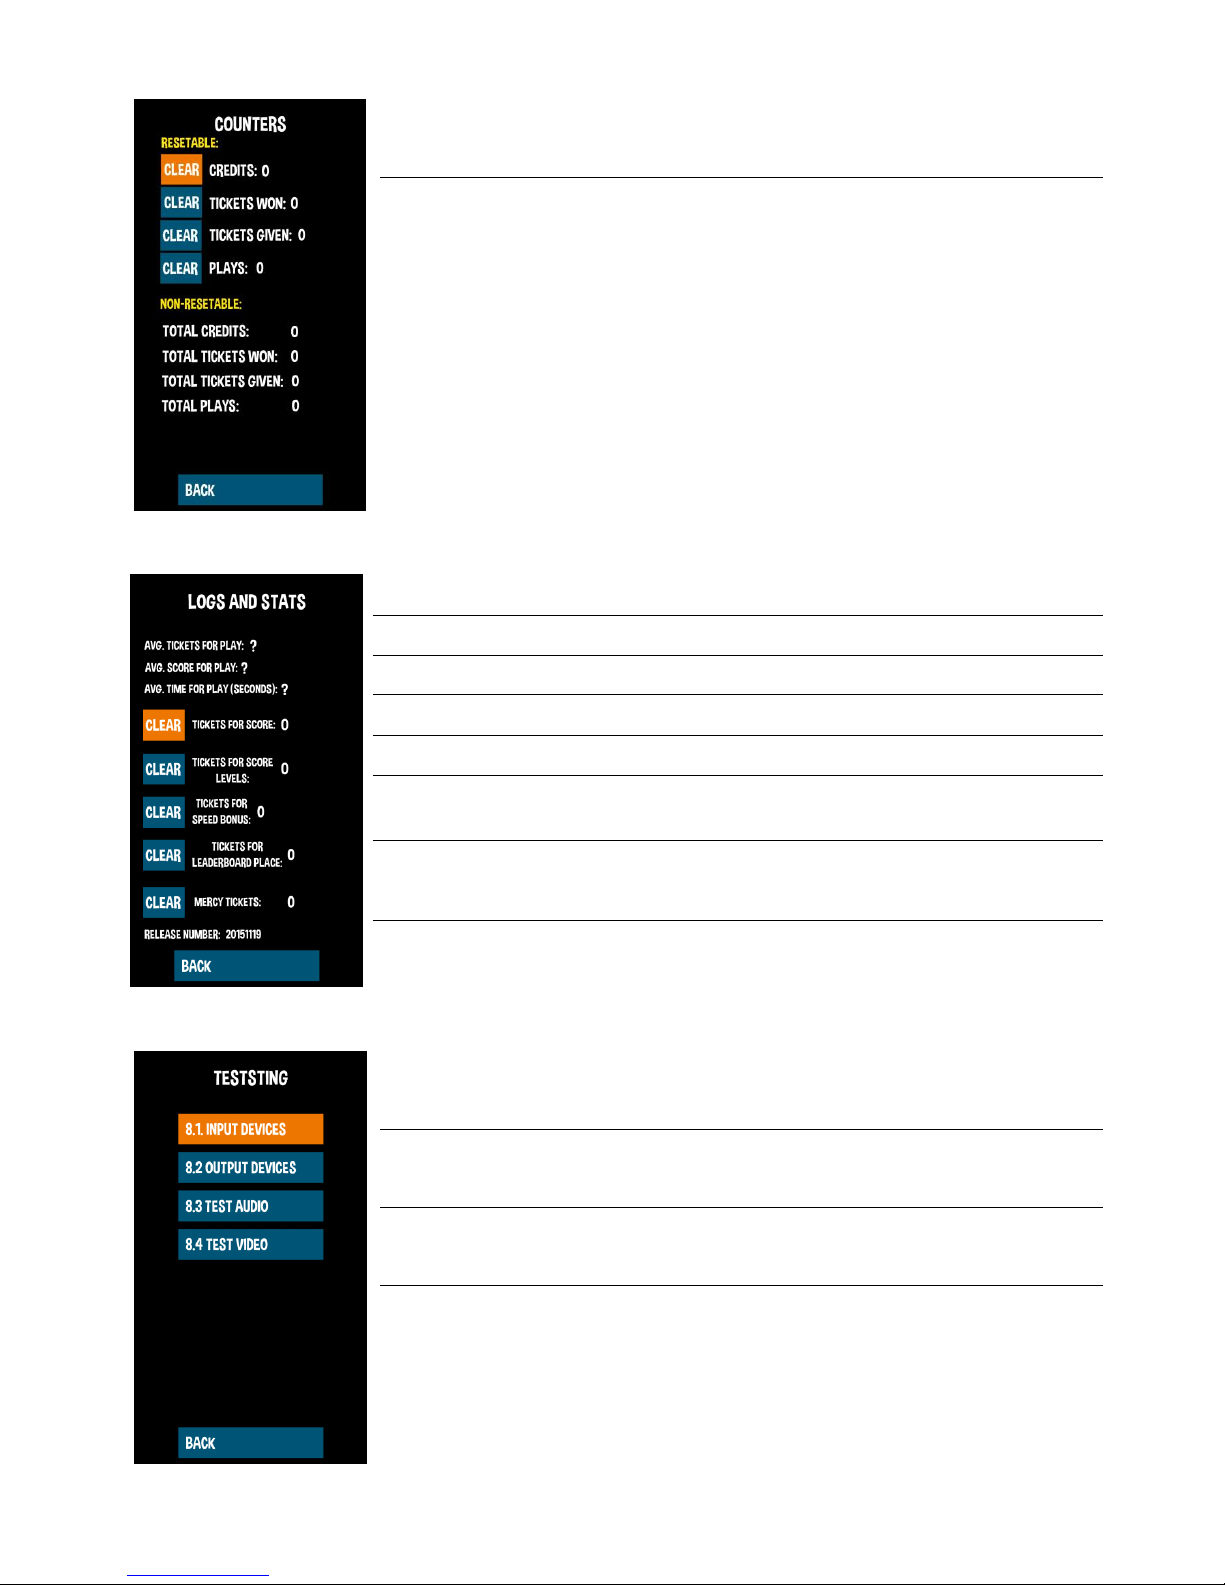
5.8 COUNTERS
RESETABLE COUNTERS
Credit, win tickets, tickets issued, the number of
games
NON-RESETABLE
COUNTERS
Credit, win tickets, tickets issued, the number of
games
5.9 LOGS AND STATS
AVG. TICKETS FOR PLAY
average number of tickets earned for points
AVG. SCORE FOR PLAY
average number of tickets earned for score levels
AVG. TIME FOR PLAY
average duration of the game
TICKET FOR SCORE
number of tickets earned for points
TICKETS FOR SCORE LEVELS
number of tickets earned for score levels
TICKETS FOR SPEED BONUS
number of tickets earned for SPEED BONUS (full
time bar)
TICKETS FOR
LEADERBOARD PLACE
number of tickets earned for leaderboard entry
MERCY TICKETS
number of mercy tickets
5.10 TESTS
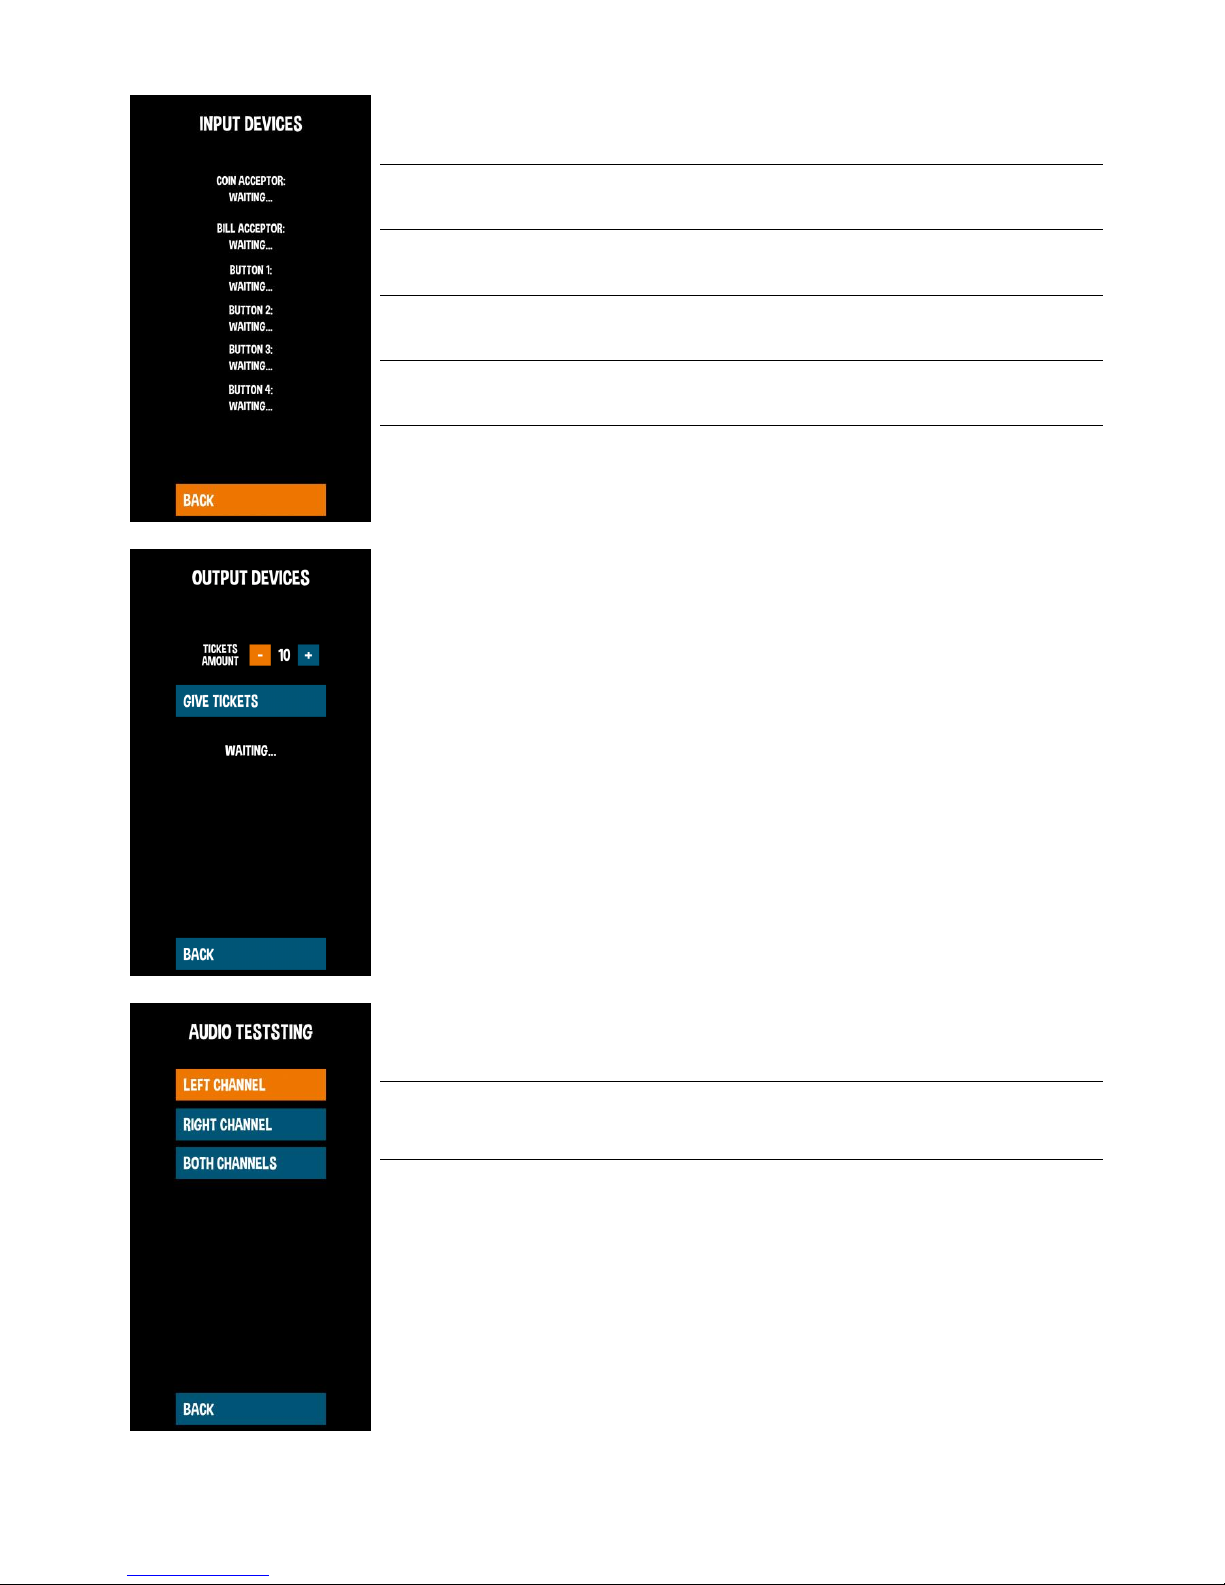
INPUT DEVICES
Validates input devices: coin acceptor, bill
acceptor and push buttons
OUTPUT DEVICES
Validates output devices: ticket dispenser
TEST AUDIO
Audio channels test
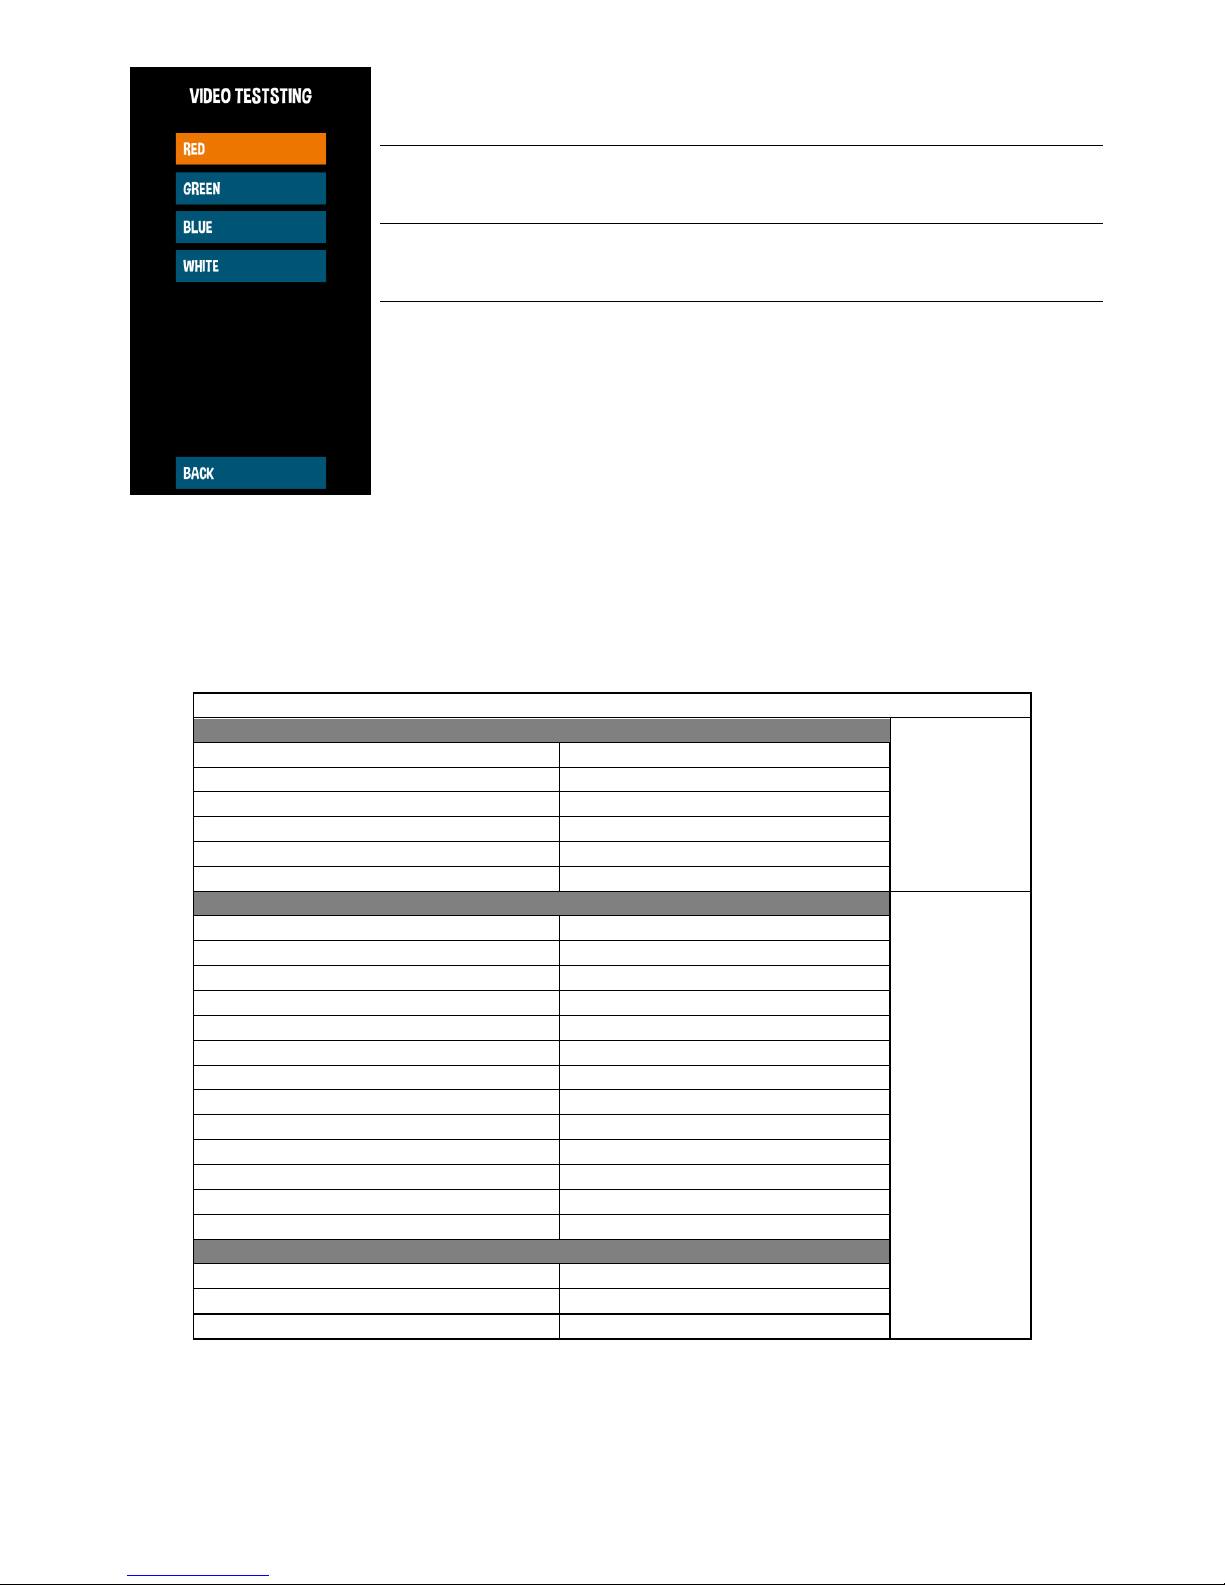
TEST VIDEO
Display test
Page 19
19
COIN ACCEPTOR
To check, insert a coin into the coin acceptor. The
screen will display information about the channel
on which the coin was accepted
BILL ACCEPTOR
To check, insert a bill into the bill acceptor.
BUTTON 1
Press START button to check
BUTTON 2
Press LEFT CUT buton to check
BUTTON 3
Press RIGHT CUT buton to check
BUTTON 4
Press SERVICE buton to check
GIVE TICKETS
Dispense specified amount of tickets
LEFT CHANNEL
Check left audio channel
RIGHT CHANNEL
Check right audio channel
BOTH CHANNELS
Check both channels simultaneously
Page 20
20
RED
Display red color
GREEN
Display green color
BLUE
Display blue color
WHITE
Display white color
6. RECOMMENDED TICKETS SETTINGS
Tickets payout ~20-30 tickets
MENU
GAME SETTINGS
GAME SET.
MAIN PRIZE CHOPS
300
EASIER PLAYS PERCENTAGE
10%
HINTED CHOPS
40
EASY MODE RETRIES
2
EASY MODE CHOPS
50
DIFFICULTY/TIMBER SPEED 5 TICKET FOR SCORE
TICKET SETTINGS
TICKETS FOR EVERY SCORE
YES
ONE TICKET FOR EVERY POINTS
10
TICKETS FOR SCORE LEVEL
YES
SCORE
TICKETS
40 1 60 2 100 4 150 6 175 8 200
10
250
25
275
50
MERCY TICKETS 0 TICKET SPECIALS
MAIN PRIZE TICKETS
500
FULL STRIPE BONUS(SECONDS)
0,5
FIXED TICKETS
0
Page 21
21
7. MAINTENANCE, INSPECTION
7.1 SAFETY CHECK
Check the points listed before operating the machine. These checks are nessessary for safe machine
operation:
1. Try to run the game before operation each day.
2. Conduct monthly routine checks of game components to ensure good working condition
3. Check the machine regularly for dust and clean when nesessary.
Note : Parts and components require preventative maintenance to be kept running smoothly
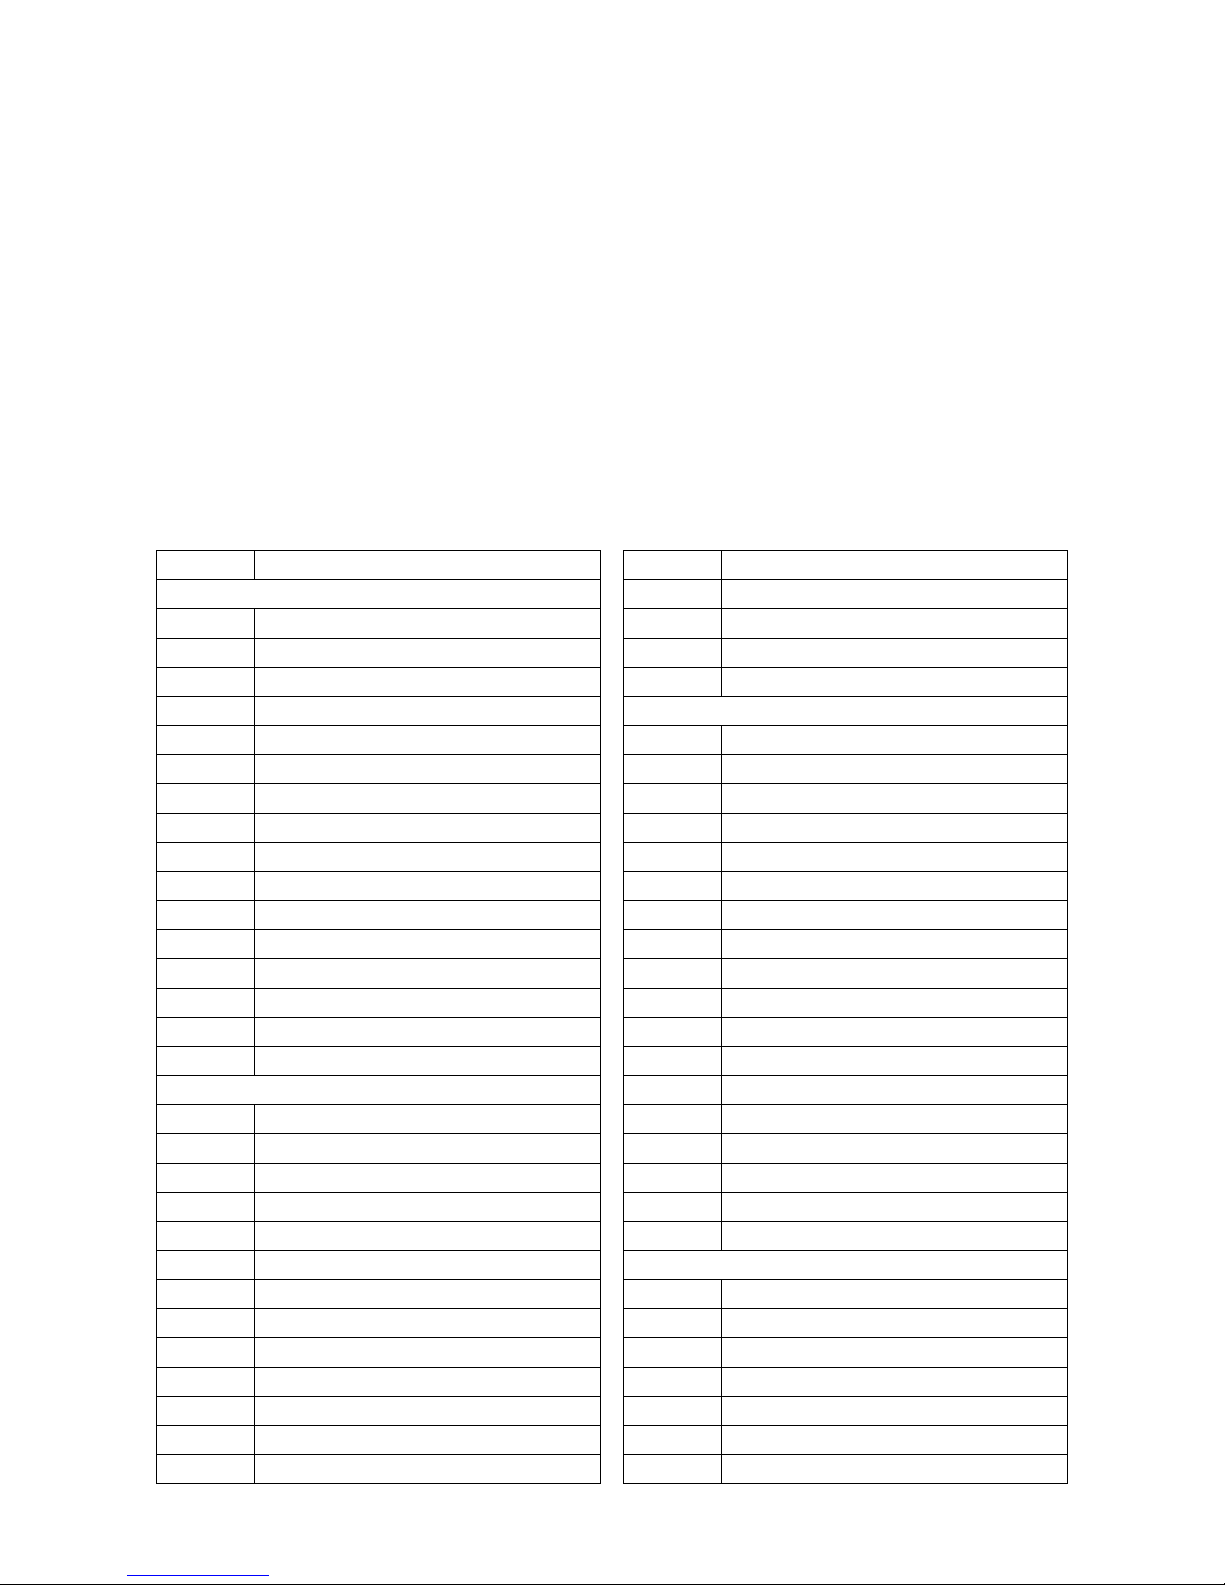
8. SPARE PARTS LIST
Part no.
Part
Part no.
Part
Electronic parts
EU2-1630-1
Socket to power supply wire
TMB-101
42" LED display
EU2-1630a-2
Power supply extension
TMB-102
Main board
EU2-1644
Speakers wiring
TMB-103
I/O board
TMB-113
3m HDMI cord
TMB-104
12V 5V power supply
Deacals and decorative
TMB-105
12V power supply
TMB-301
Display cover with decal
TMB-106
RGB LED driver and remote controler
TMB-302
Front panel cover
TMB-107S
"Start" button with switch
TMB-303
Lower front logo
TMB-107L
"Left cut" button with switch
TMB-304L
Left side sticker
TMB-107R
"Right cut" button with switch
TMB-304R
Right side sticker
TMB-107A
Button LED light
TMB-305
Base front sticker set
TMB-108
Speaker
TMB-306L
Base left side sticker
TMB-109
Power socket with fuse
TMB-306R
Base right side sticker
TMB-110
Power cord
TMB-307
Marquee complete
TMB-111
12cm 12V cooling fan
TMB-307-T
Timberman marquee plexi
TMB-112
Mechanical counter
TMB-307-B
Timberman logo marquee letters
TMB-113
Service button
TMB-308T
Upper display aluminium profile with sticker
Wiring
TMB-308M
Lower display aluminium profile with sticker
EU2-1595
Button switches and lights wiring
TMB-308B
Lower front aluminium profile with sticker
EU2-1596
Counters and service button wire
TMB-309
Front panel with LED's
EU2-1597
RGB LED extension wire
TMB-310B
Bill acceptor cover
EU2-1598
Ticket dispenser wire
TMB-310C
Coin acceptor cover
EU2-1308-2
I/O board to Main Board USB wire
TMB-311
Electronic coin acceptor mounting panel
EU2-1599
Coin acceptor wire
Mechanical parts
EU2-1600
LED power wire
TMB-401
Base wheel
EU2-1607
Bill acceptor wire
TMB-402
Leg leveler
EU2-1608a
Cooling fan wiring
TMB-403
28mm lock with keys
EU2-1626
Main Board power wire
TMB-404
Fan cover
EU2-1627
RGB LED controller power wire
TMB-405
Tickets holder
EU3-1628
I/O board wiring
TMB-406
Cashbox
EU2-1629
I/O board power wire
TMB-407
Front panel fastener
Page 22
22
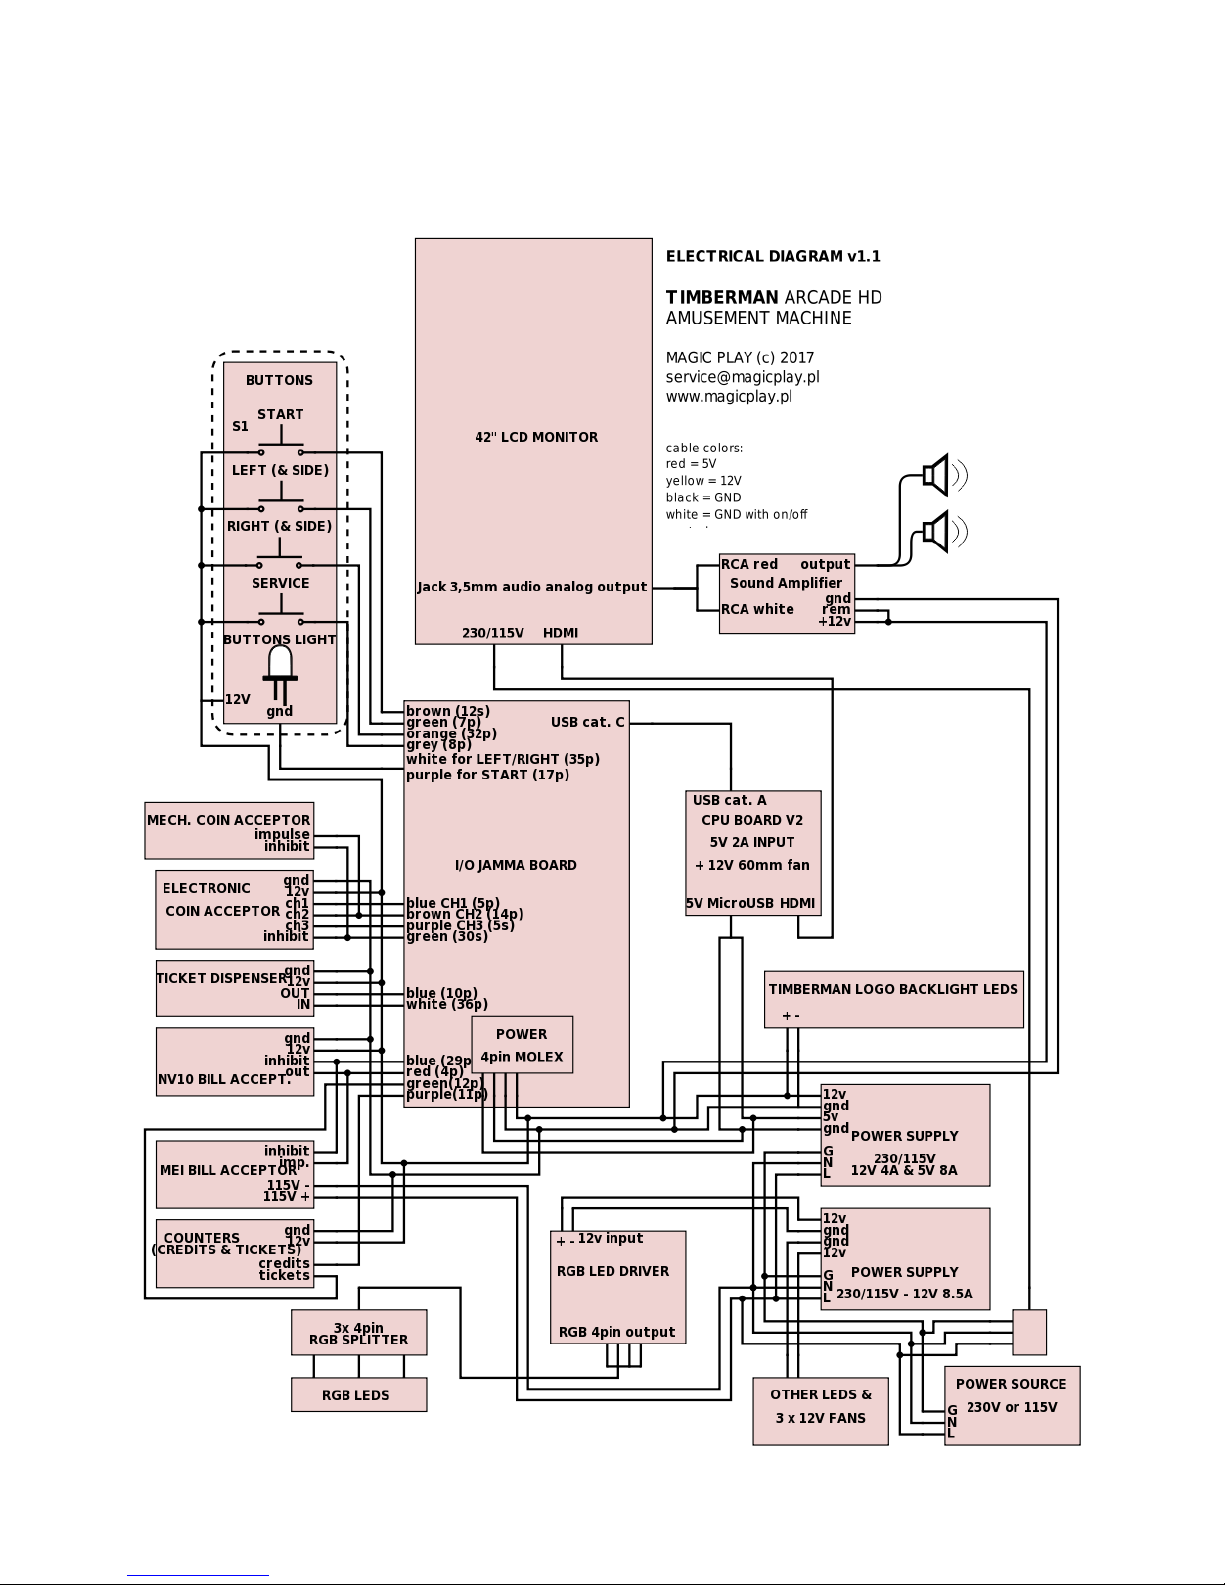
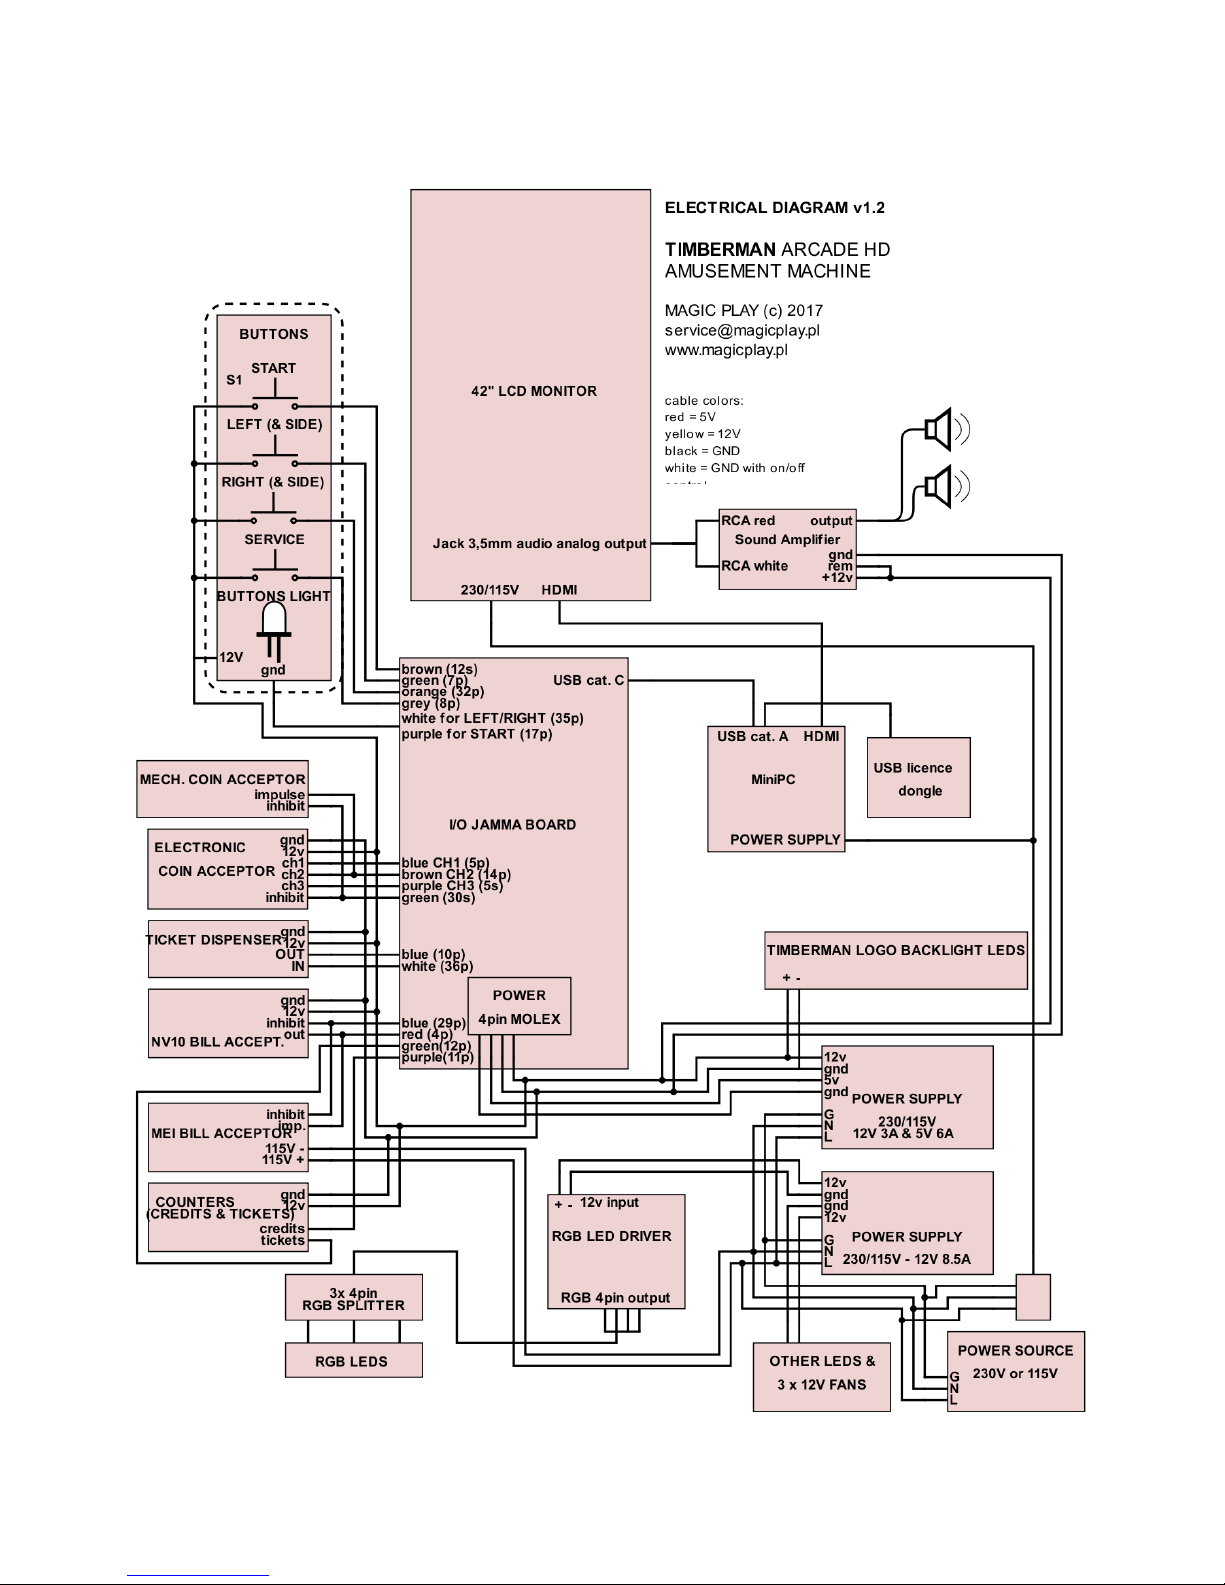
9 ELECTRICAL DIAGRAM
9.1 FOR CPU BOARD v2
Page 23
23
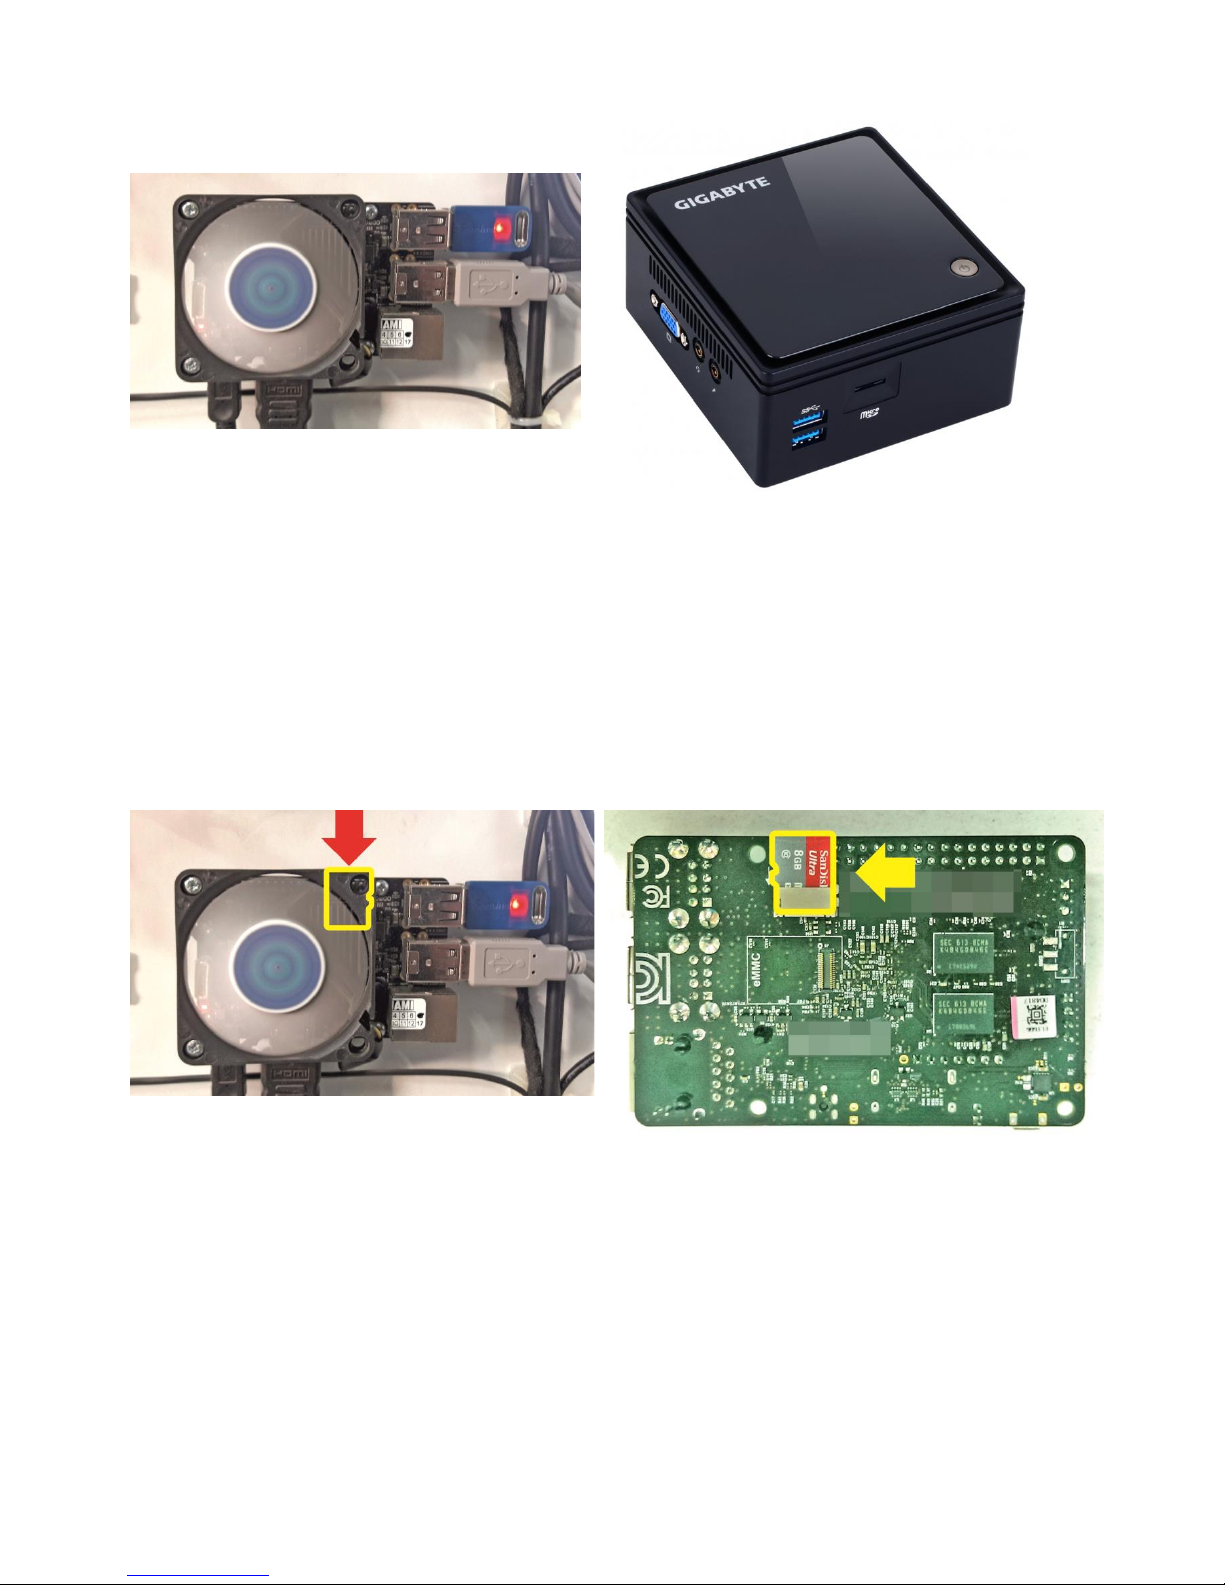
9.2 FOR CPU BOARD v3
Page 24
24
All units above the serial number 1210318 are equipped with CPU board v3.
CPU board v2
CPU board v3 (new)
10. TROUBLESHOOTING FOR CPU BOARD v2
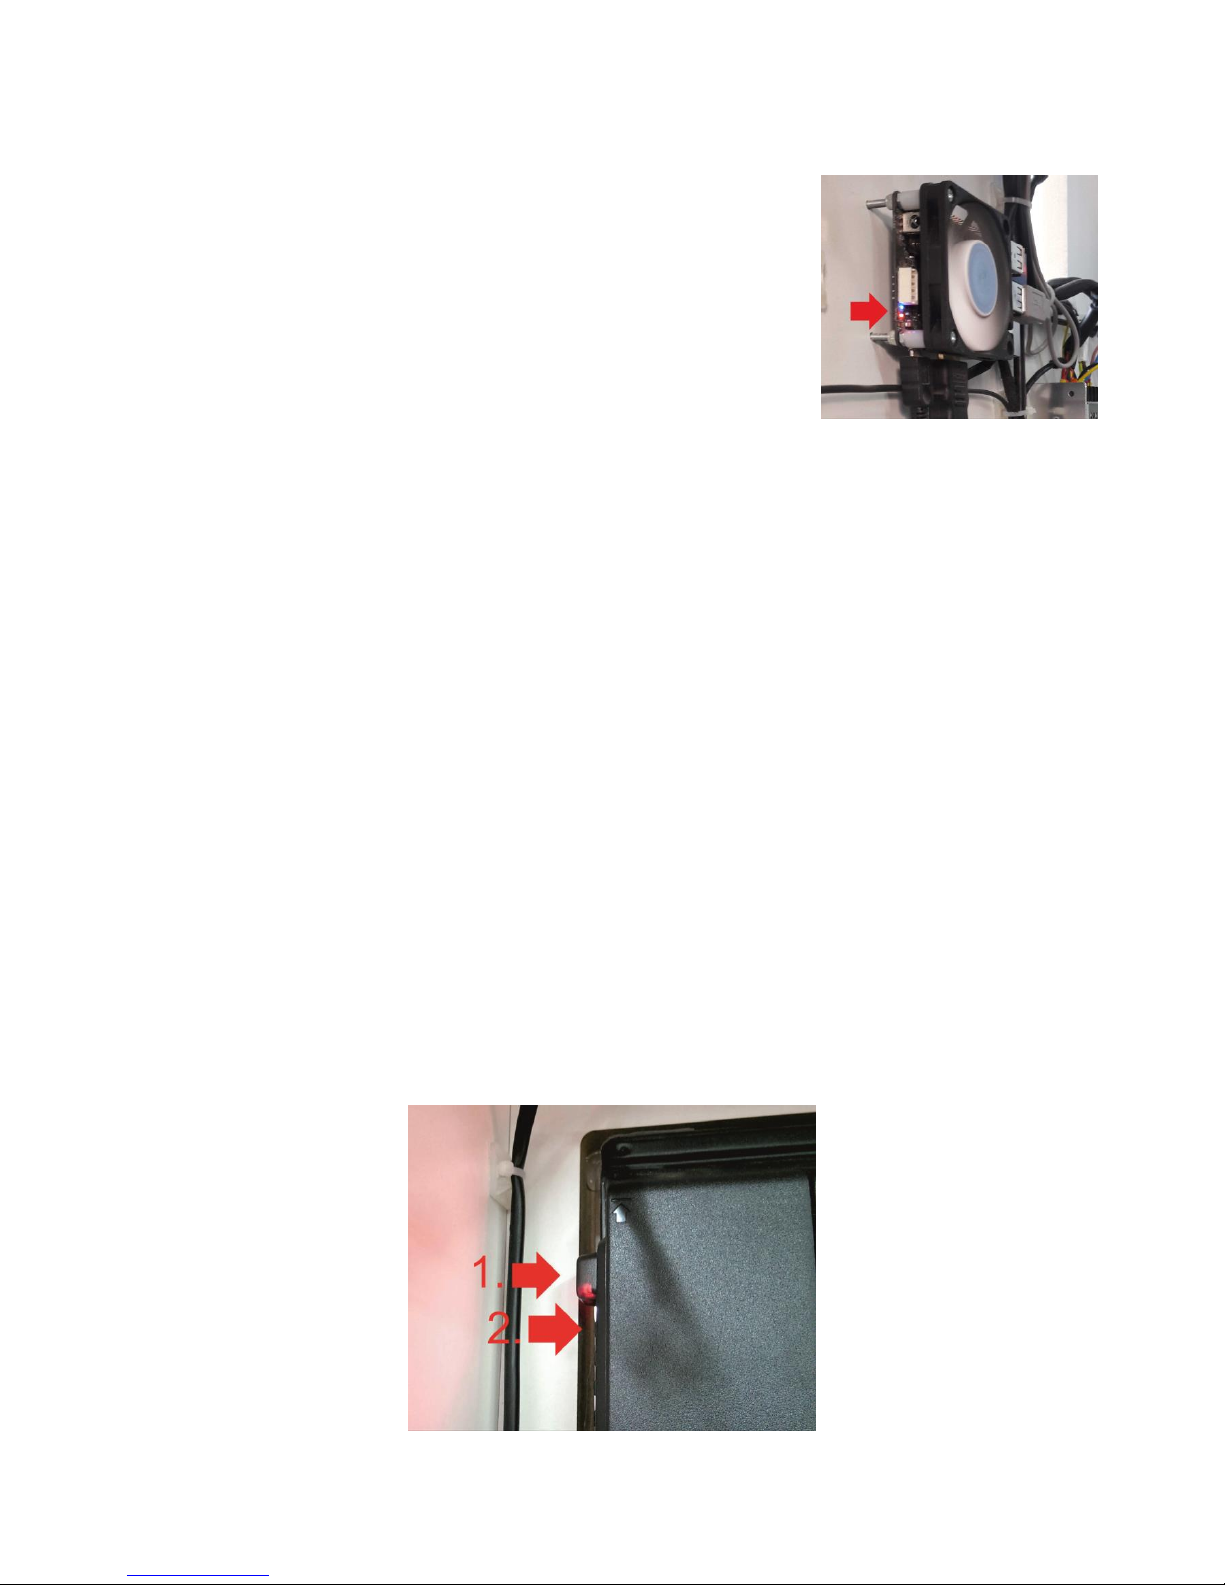
10.1 SYSTEM MICROSD CARD LOCATION
The MicroSD card is located at back of CPU board, near top-right installation screw. It is possible to pull it
without CPU board disassembly. See picture.
CPU board front view
CPU board back view
Page 25
25
10.2 „NO SIGNAL” ALERT ON SCREEN
1. Observe CPU board placed behind bottom rear service door when machine is plugged in.
RED LED light:
Solid: 5V power is on: OK
Blinking: Problems with power supply, check power supply (2nd point) or
wiring connections or CPU board failure atleast.
No red LED light: No 5V power. Check power supply, check power supply
voltage, check wirings and connections. CPU board failure is not common
but possible.
BLUE light:
Solid RED LED light is required to see BLUE LED status!
Solid or no blue LED light: MicroSD Card/software failure. Put backup MicroSD card provided with machine
and check results. There is a posibility to write image on old MicroSD card if it is not physically damaged.
Blinking: Normal operating state – everything seems to be ok with CPU board software.
2. Check two power supplies placed behind bottom rear service door.
Solid green LED signal means: Everything is ok.
Blinking green LED signal means: Power supply failure.
a) Too low power load due disconnected some components of the machine
b) Short circuit in installation
No green LED signal means:
a) Power supply failure
b) No power on supply cables
10.3 BLACK SCREEN WITHOUT COMMUNICATES
1. Check screen power plug
2. Check if the screen is turned ON:
Open big rear service door and check POWER LED signal.
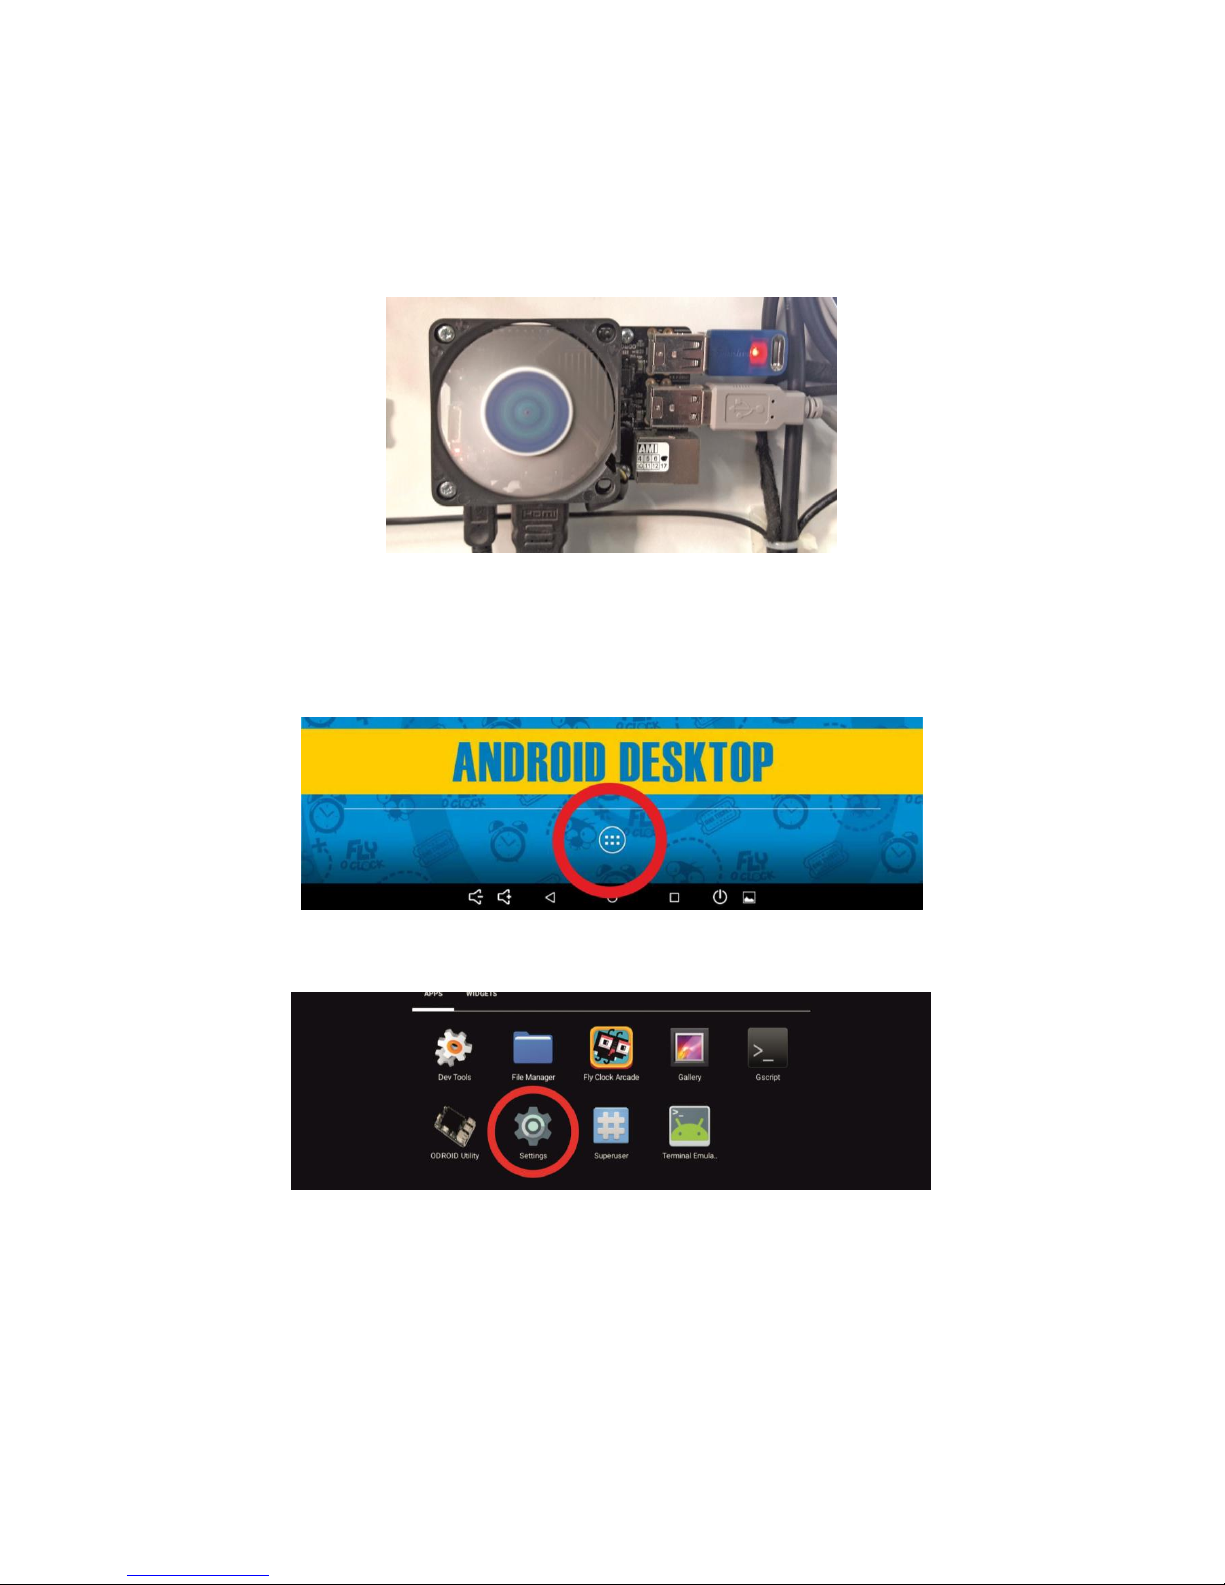
Solid RED: means that TV is turned off (sometimes it could happen). If you see RED LED signal, click by the
nearest button to turn it on(see picture) or use porovided tv remote.
No LED: Screen is ON and it working properly. Check input source using tv remote. Or no power
supplied/screen failure.
3. Check CPU board (1st step of „No signal alert on screen”)
Page 26
26
10.4 PROBLEMS WITH TICKET DISPENSING, GAME CRASHING/FREEZING, SETTINGS ARE
NOT SAVED
Caution: This will erase your game settings/electrical counters and stats! Game will need to be configured
if default settings does not fit your requirements
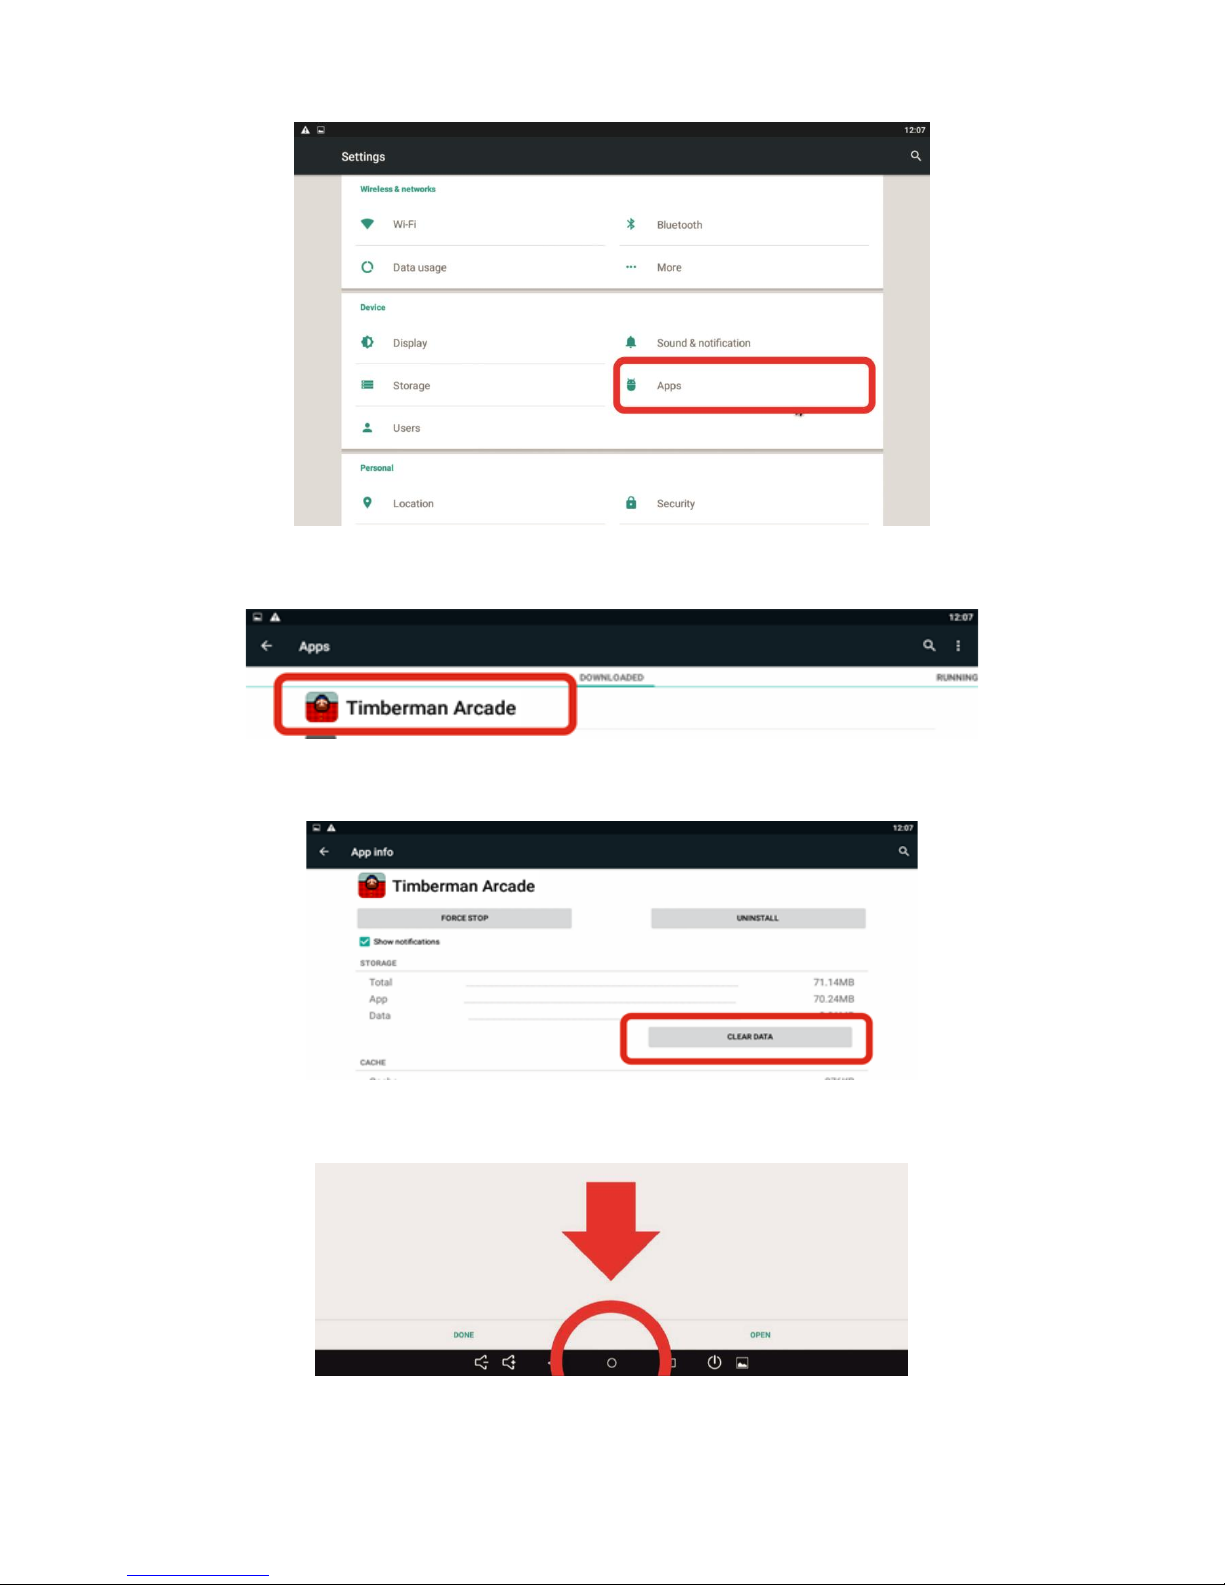
1. Open the lower rear service door, locate the CPU board (see picture) and plug USB mouse.
2. Leave the Timberman application by clicking the right mouse
button.
3. Go to application list in bottom center of the screen
4. Select Settings
Page 27
27
5. Select „Apps“
6. Find and click on Timberman application
7. Click „CLEAR DATA“
8. App refreshed, click on the circle at the bottom of the screen to back to machine desktop.
9. Disconnect USB mouse. Game need to be configured.
Page 28
28
10.5 PROBLEMS WITH COIN ACCEPTORS/BILL ACCEPTORS
1. Possible problems with acceptors firmware
2. Check wirings for acceptors
3. Not accepted permission to acces USB device for I/O board (see „Buttons/coins not working”)
10.6 BUTTONS/COINS MECH NOT WORKING
1. Check wiring connections to I/O board
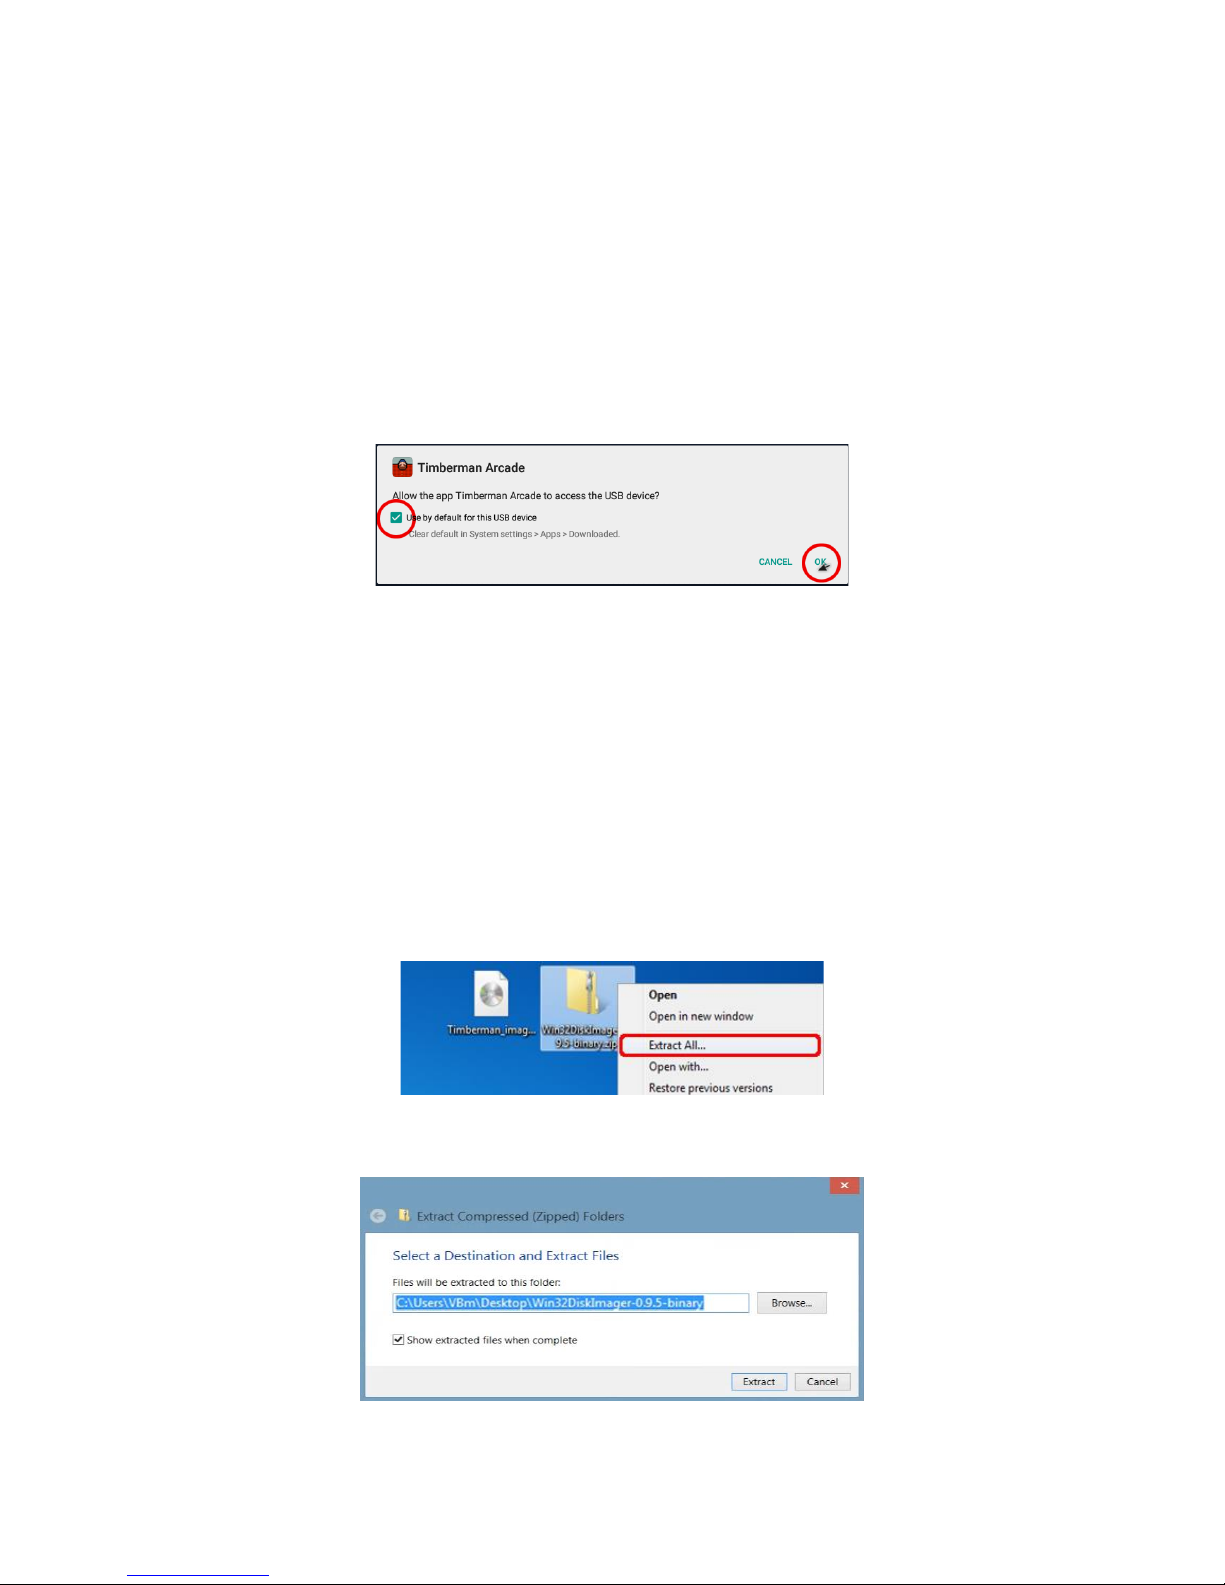
2. If new CPU board, I/O board connected you will be asked to confirm USB Access permission to USB
device. Check everything as described on picture below. Check use by default[...] → click OK. Often three
times this pop-up occur.
3. If You accidently press CANCEL after selecting checkbox for „Use default...“ follow steps from (Problems
with ticket dispensing, game crashing/freezing, settings are not saved) and addicionally click CLEAR
DEFAULTS at step 10! Run Timberman from desktop and follow step 2 from this section.
10.7 MICROSD CARD REPAIR TUTORIAL for Windows OS for CPU board v2
1. Download Win32 Disk Imager (link)
https://sourceforge.net/projects/win32diskimager/files/Archive/Win32DiskImager-0.9.5binary.zip/download
2. Extract downloaded program
3. Select extract location and click extract
4. Insert Micro SDCard (8GB SDHC Class 10) from your CPU board or new into your card reader and run
Win32DiskImager
Page 29
29
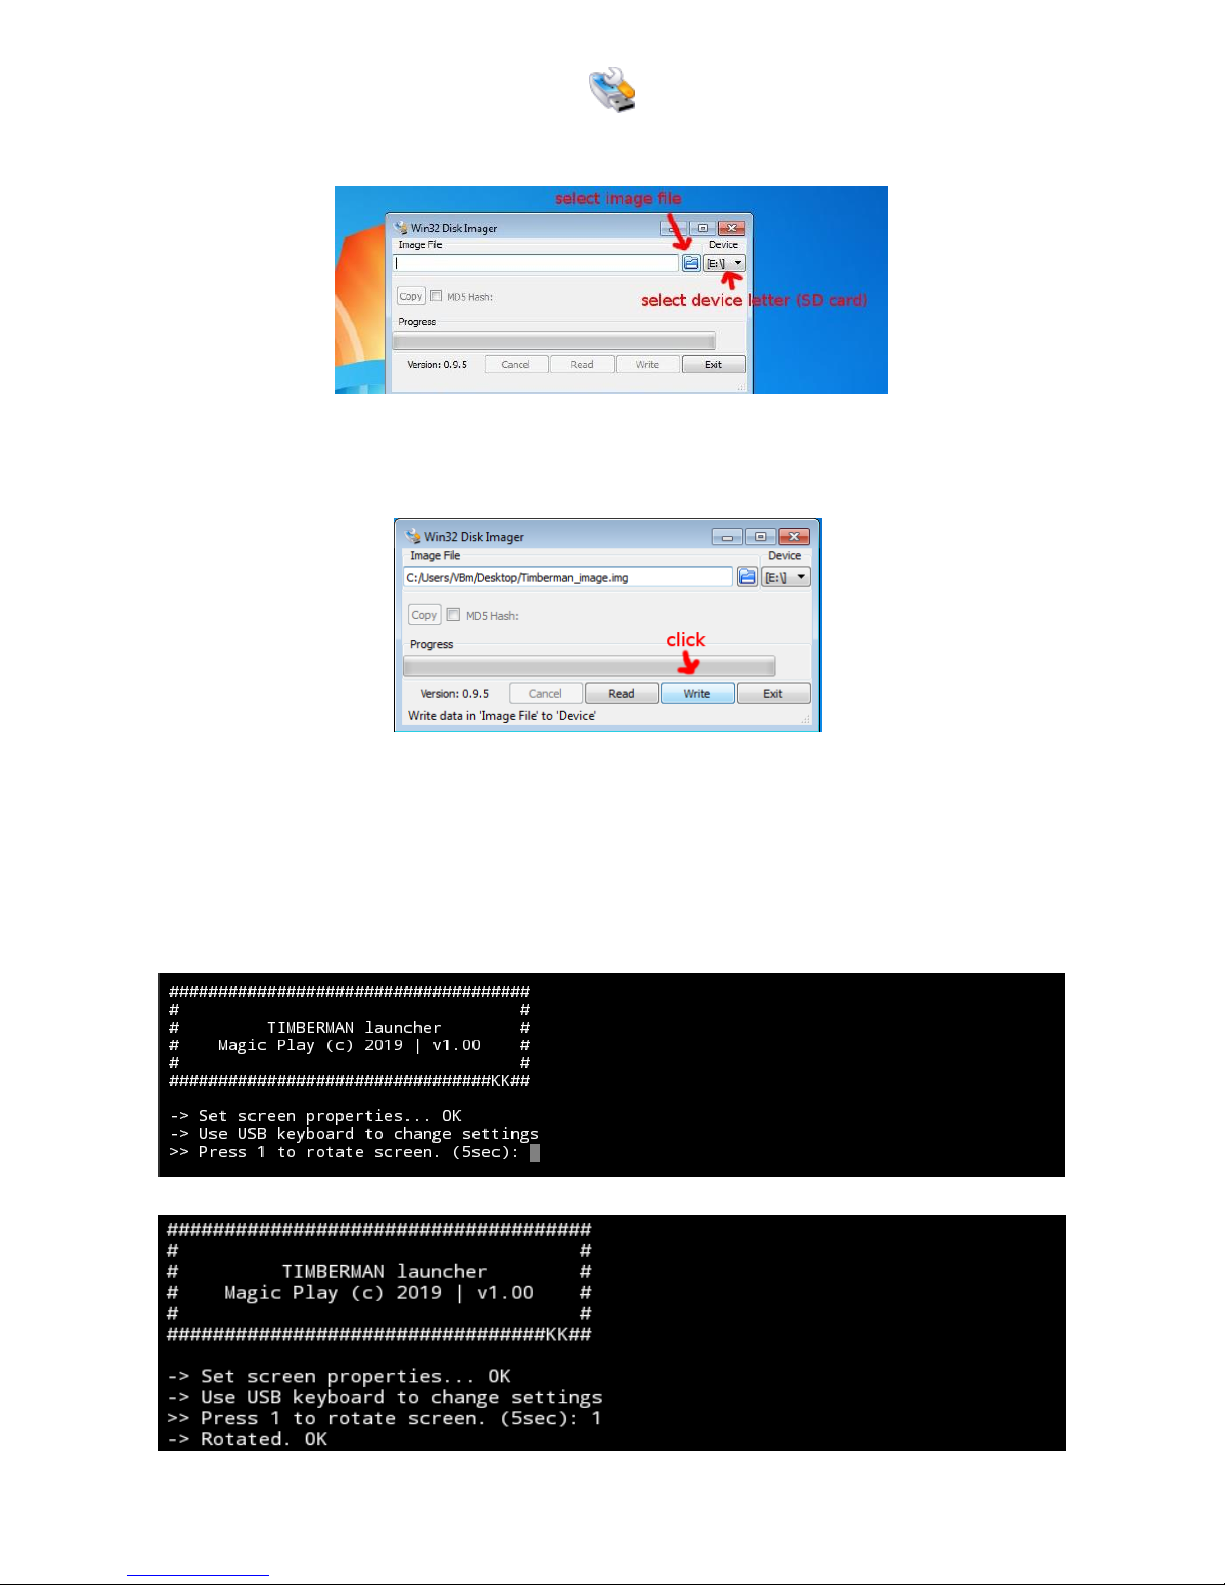
5. Select provided image file and select proper device letter (CPU board Micro SD card)
6. When image file and drive letter is selected properly, click “Write” and wait for finish. Put SD card back
into CPU board unit and turn the machine on. Solid RED and blinking BLUE LED light on CPU board means
that everything is ok. (refer to other “Troubleshooting” steps)
11. TROUBLESHOOTING FOR CPU BOARD v3
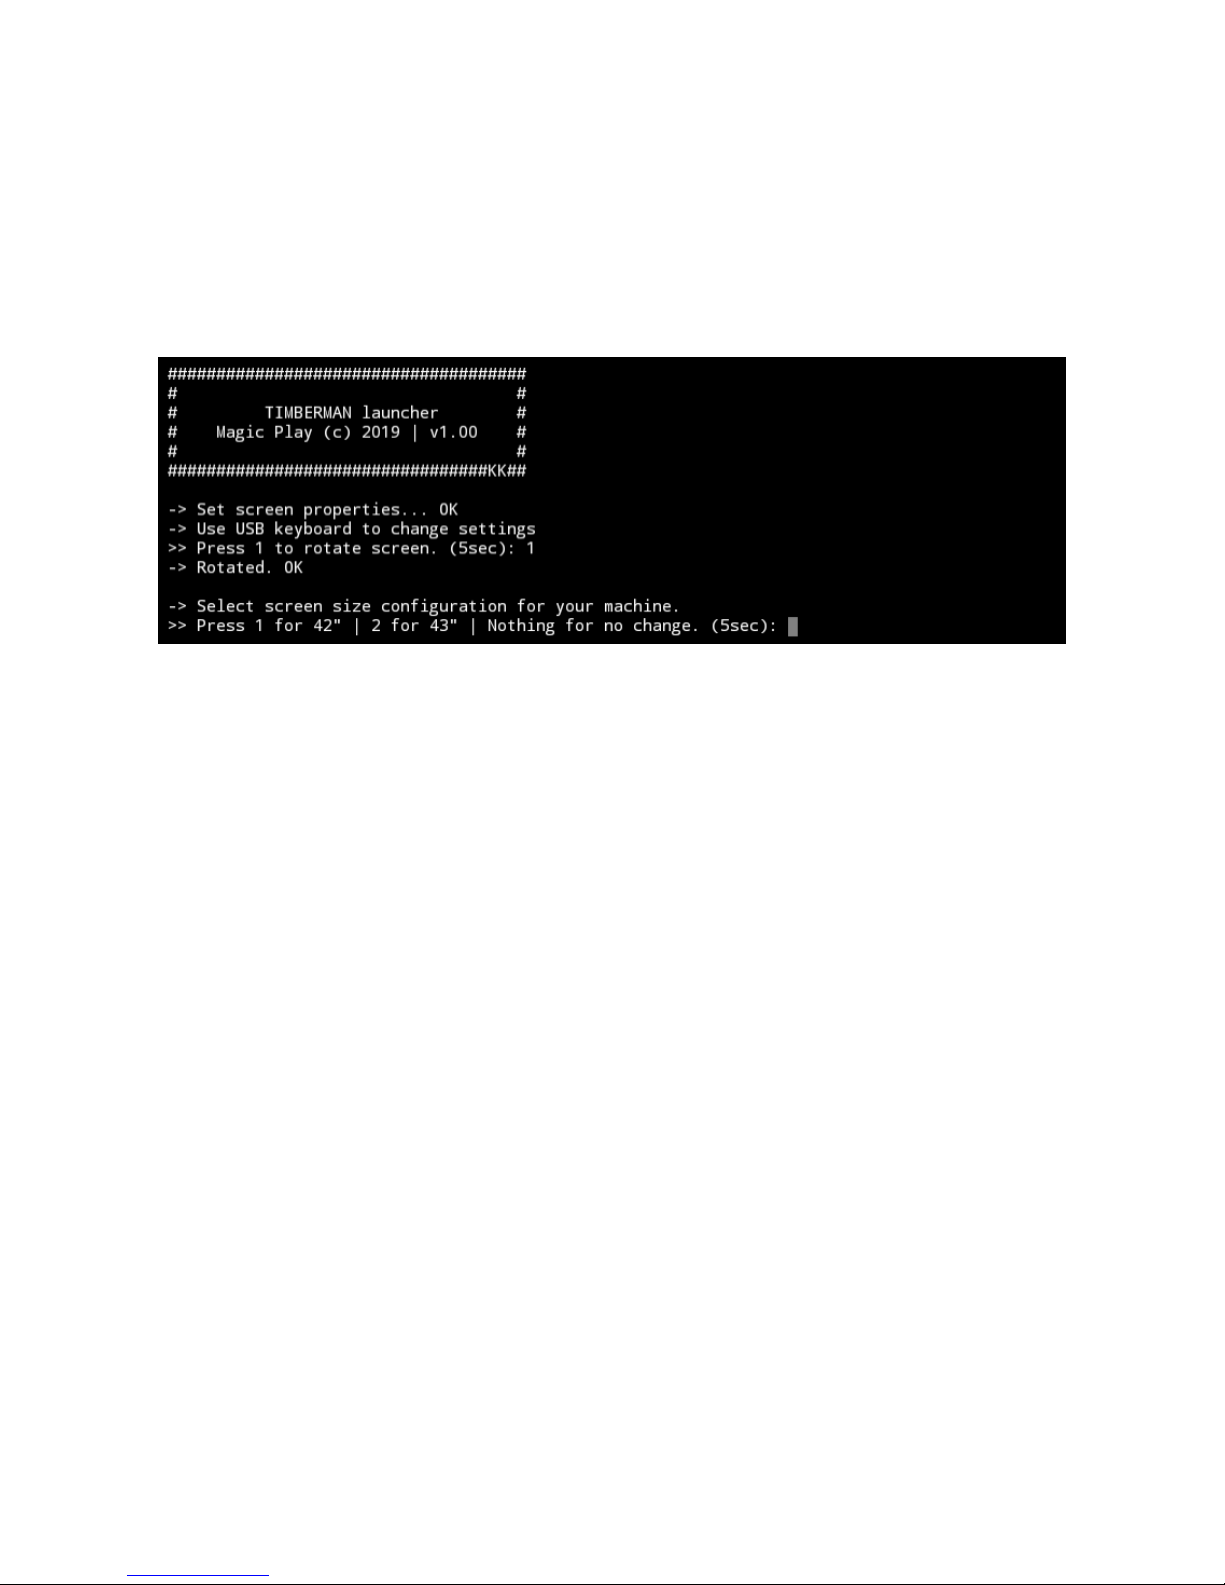
11.1 MY SCREEN IS UPSIDE-DOWN
1. Connect USB keyboard to MiniPC and plug-in the machine
2. Press key „1” when Game Launcher prompt for Screen rotation
Success:
Page 30
30
12.2 MY SCREEN IS CUTTED OFF WITH FRONT SCREEN STICKER OR IS SMALLER THAN
STICKER
1. Connect USB keyboard to MiniPC and plug-in the machine
2. There are two options:
a. If your machine screen is 42”:
Press key „1” when Game Launcher prompt for screen size configuration
b. If your machine screen is 43”:
Press key „2” when Game Launcher prompt for screen size configuration
12.3 SYSTEM FAILURE, ERRORS ON THE SCREEN, OPERATING SYSTEM WON’T BOOT OR
SSD (HARD DISK) DRIVE FAILURE
1. First try to restart your machine
2. If SSD drive is broken: replace it. Minimum 30GB SSD or equivalent HDD is required and follow next step
3. Follow 11.9 SYSTEM RECOVERY for CPU board v3
12.4 I/O BOARD ERROR OR GAME BOARD ERROR
1. Check USB connections between boards and MiniPC
2. Check Boards power and pwoer supply units
3. Board is broken - replace
11.5 „NO SIGNAL” ALERT ON SCREEN
1. Check machine computer state. Turn it on by button if not started automatically.
2. Check monitor „source” and make sure that is pointing to HDMI interface
3. Try to restart your machine
11.6 BLACK SCREEN WITHOUT COMMUNICATES
1. Check screen power plug
2. Check the screen is on:
try to push power button and watch if something changes
3. Check HDMI cable connections
4. Try to restart your machine
Page 31
31
11.7 PROBLEMS WITH COIN ACCEPTORS/BILL ACCEPTORS
1. Possible problems with acceptors firmware
2. Check wirings for acceptors
3. No USB connection between I/O board and computer
4. Try to restart your machine
11.8 BUTTONS/COINS MECH NOT WORKING
1. Check wiring connections to I/O board
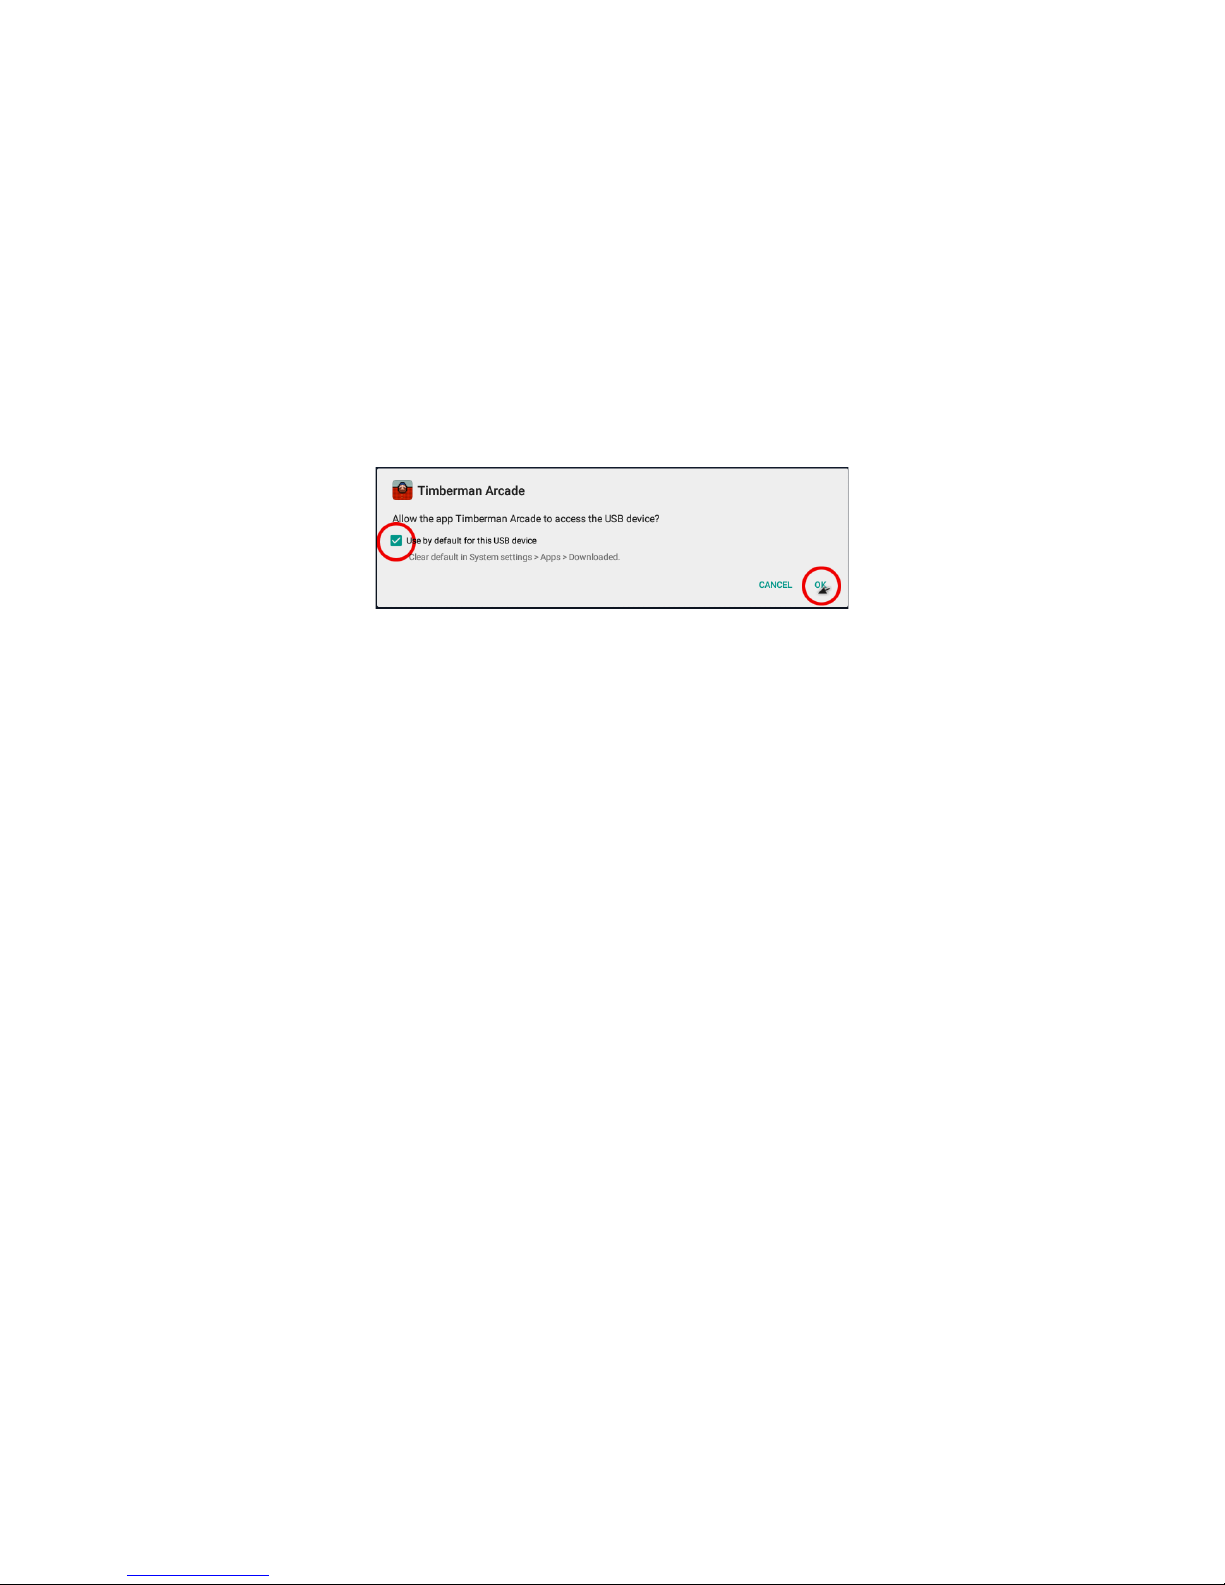
2. If new CPU board, I/O board installed you will be asked to confirm USB Access permission to USB device.
Check everything as described on picture below. Check use by default[...] → click OK. Often three times this
pop-up occur.
4. If You accidently press CANCEL after selecting checkbox for „Use default...“ reconnect USB device.
11.9 SYSTEM RECOVERY for CPU board v3
We are adding special USB auto-restore flash drive to every Timberman machine.
ATTENTION!
This flash drive WILL AUTOMATICALLY ERASE WHOLE COMPUTER HARD DISK, ALL MACHINE DATA WILL BE
LOST! DO NOT CONNECT AND BOOT IT IN NORMAL COMPUTER!
If you replace hard disk or if you encounter system boot failures there is an ease way to recover your
machine to factory state using this USB auto-restore backup.
You need only usb keyboard and the auto-restore usb flash drive. If you lost it, please contact your
distributor for instructions.
Procedure:
1. Turn OFF your machine
2. Connect keyboard and USB auto-restore flash drive to free USB ports of machine computer
3. Turn ON your machine
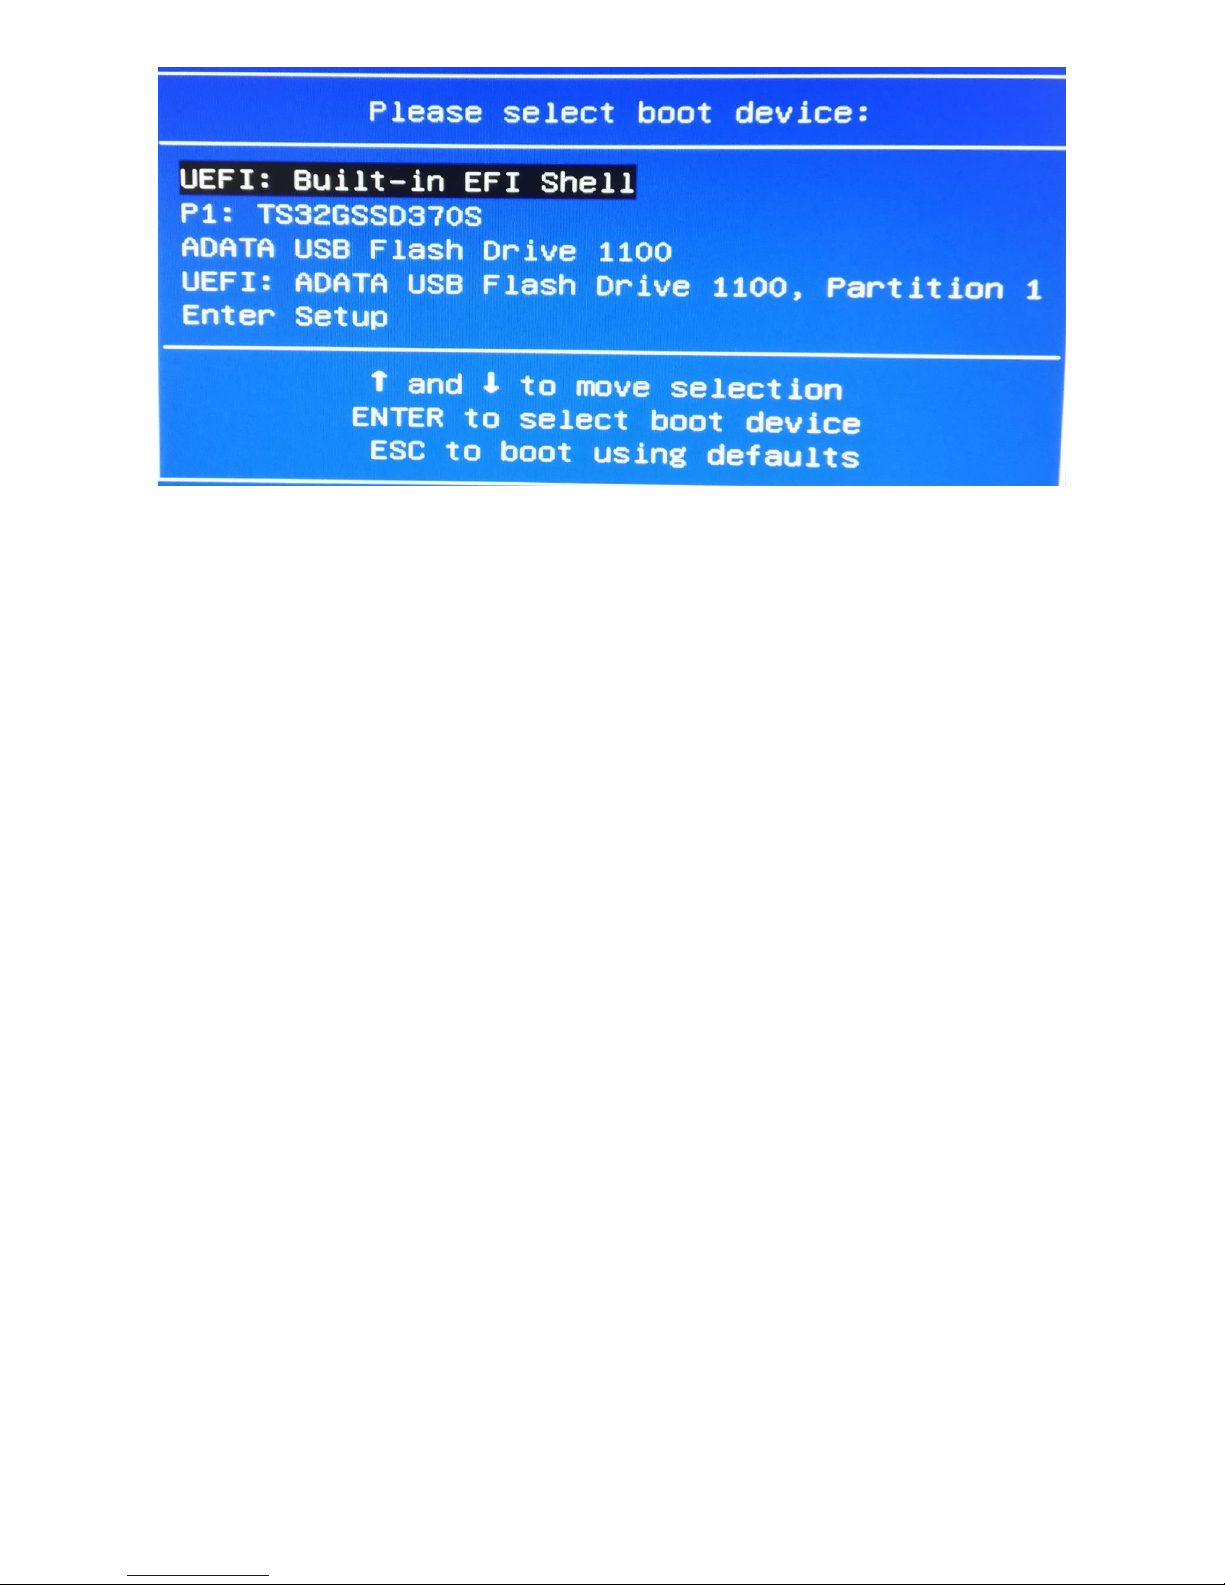
4. Immediately push multiple times F12 keyboard button till you will see „Please select boot device” popup window. ATTENTION: Some screens may not display this dialog box, you will see „No signal” pop-up.
Page 32
32
5. Using keyboard arrows, select USB Flash Drive and accept it by pushing ENTER
Don’t worry if you don’t see this pop-up. Your USB drive is always at the 3rd position. Push two times
DOWN ARROW on keybord and hit ENTER. Then you will see the recovering screen.
6. Now all the process will automatically restore data to your machine and automatically reboot the
computer. This process will take about 15 minutes to finish.
7. When the game starts normally, disconnect USB auto-restore memory stick and hold it for the next time.
Page 33

33
12. TERMS OF WARRANTY
Magic Play Sp. z o.o. warrants that the TIMBERMAN game will be free from defects in electronics for a
period of 12 months from the date of delivery.
Warranty covers:
• Display
• Main board
• I/O board
• Power supplys
• LED driver
• LED lighting
Warranty terms do not cover parts not included above.
Definition of defect:
It will be considered as defective if any connection between subcomponents on a particular board fails or
any of them stops working itself. It does not include damages which occurred due to misuse, unauthorized
connection or modifications.
Should the product prove defective during the warranty period, Magic Play, at its option,
shall:
1. Repair the defective part by means of telephone support or depot service at no charge for parts of labor.
2. Replace the defective part with a comparable product which may be new or refurbished.
Provided that
1. Magic Play is informed of the defect immediately after it occurred. The faulty part should be dispatched
to Magic Play or its authorized distributor as soon as possible.
2. Magic Play diagnoses the defects were not caused by improper use, neglect, unauthorized
modifications, repair, setup or testing.
3. Only parts recommended and approved by Magic Play are covered by Magic Play Terms of Warranty.
UNDER NO CIRCUMSTANCES SHALL MAGIC PLAY SP. Z O.O. BE HELD RESPONSIBLE FOR
LOSES IN PROFIT, USAGE OR ACCIDENTAL SERIOUS DAMAGE TO THE MACHINE!
Magic Play sp. z o.o.
Adress: Chocimska 6
62800 Kalisz, POLAND
Phone: +48 62 753 21 88
Website: www.magicplay.eu
 Loading...