


Service
This manual is to be used by qualified appliance
technicians only. Maytag does not assume any
responsibility for property damage or personal
injury for improper service procedures done by
an unqualified person.
This Base Manual covers general information
Refer to individual Technical Sheet
for information on specific models
This manual includes, but is
not limited to the following:
Dryer
ADE7005AK*
ADE7005AY*
ADE9005AG*
ADG7005AW*
CDE6505*
CDE6505AZ*
CDE9505*
CDE9505AZ*
CDG6505*
CDG9505*
CYE3005AG*
CYE3005AK*
CYE3005AY*
CYE3005AZ*
CYG1005AW*
CYG3005AW*
HYE2205AG*
HYE2205AK*
MDE208DAY*
MDE2706AY*
MDE2706AZ*
MDE308DAY*
MDE3706AG*
MDE3706AK*
MDE3706AY*
MDE3706AZ*
MDE3757AY*
MDE3758AY*
MDE3758AZ*
MDE4657AY*
MDE4658AY*
MDE4806AY*
MDE4806AZ*
MDE508DAY*
MDE5806AY*
MDE5806AZ*
MDET236AY*
MDET236AZ*
MDET336AY*
MDET336AZ*
MDET446AY*
MDET446AZ*
MDG208DAW*
MDG2706A*
MDG270SAW*
MDG308DAW*
MDG3706AW*
MDG3757AW*
MDG3758AW*
MDG4657AW*
MDG4658AW*
MDG4806AW*
MDG508DAW*
MDG5806AW*
MDGT236AW*
MDGT336AW*
MDGT446AW*
NDE2335AY*
NDE2335AZ*
NDE5805AY*
NDE5805AZ*
NDE8805AY*
NDE8805AZ*
NDG2335AW*
NDG5805AW*
NDG8805AW*
PDET910AY*
PDET910AZ*
PDET920AY*
PDET920AZ*
PDGT910AW*
PDGT920AW*
©2006 Maytag Services
16026315
January 2006

Important Information
Important Notices for Servicers and Consumers
Maytag will not be responsible for personal injury or property damage from improper service procedures. Pride and
workmanship go into every product to provide our customers with quality products. It is possible, however , that
during its lifetime a product may require service. Products should be serviced only by a qualified service technician
who is familiar with the safety procedures required in the repair and who is equipped with the proper tools, parts,
testing instruments and the appropriate service information. IT IS THE TECHNICIANS RESPONSIBILITY TO
REVIEW ALL APPROPRIATE SERVICE INFORMATION BEFORE BEGINNING REPAIRS.
!
To avoid risk of severe personal injury or death, disconnect power before working/servicing on appliance to avoid
electrical shock.
To locate an authorized servicer, please consult your telephone book or the dealer from whom you purchased this
product. For further assistance, please contact:
Customer Service Support Center Telephone Number
CAIR Center.............................................................. 1-800-688-9900
CAIR Center in Canada ........................................... 1-800-688-2002
Web Site
WWW.MAYTAG.COM
WARNING
Recognize Safety Symbols, Words, and Labels
DANGER
!
DANGER—Immediate hazards which WILL result in severe personal injury or death.
WARNING
!
WARNING—Hazards or unsafe practices which COULD result in severe personal injury or death.
!
CAUTION
CAUTION—Hazards or unsafe practices which COULD result in minor personal injury, product or property
damage.
2 16026315 ©2006 Maytag Services

Important Information .................................................... 2
Important Safety Information ......................................... 4
General Information
Model Identification .................................................... 8
Serial Label Location ................................................. 8
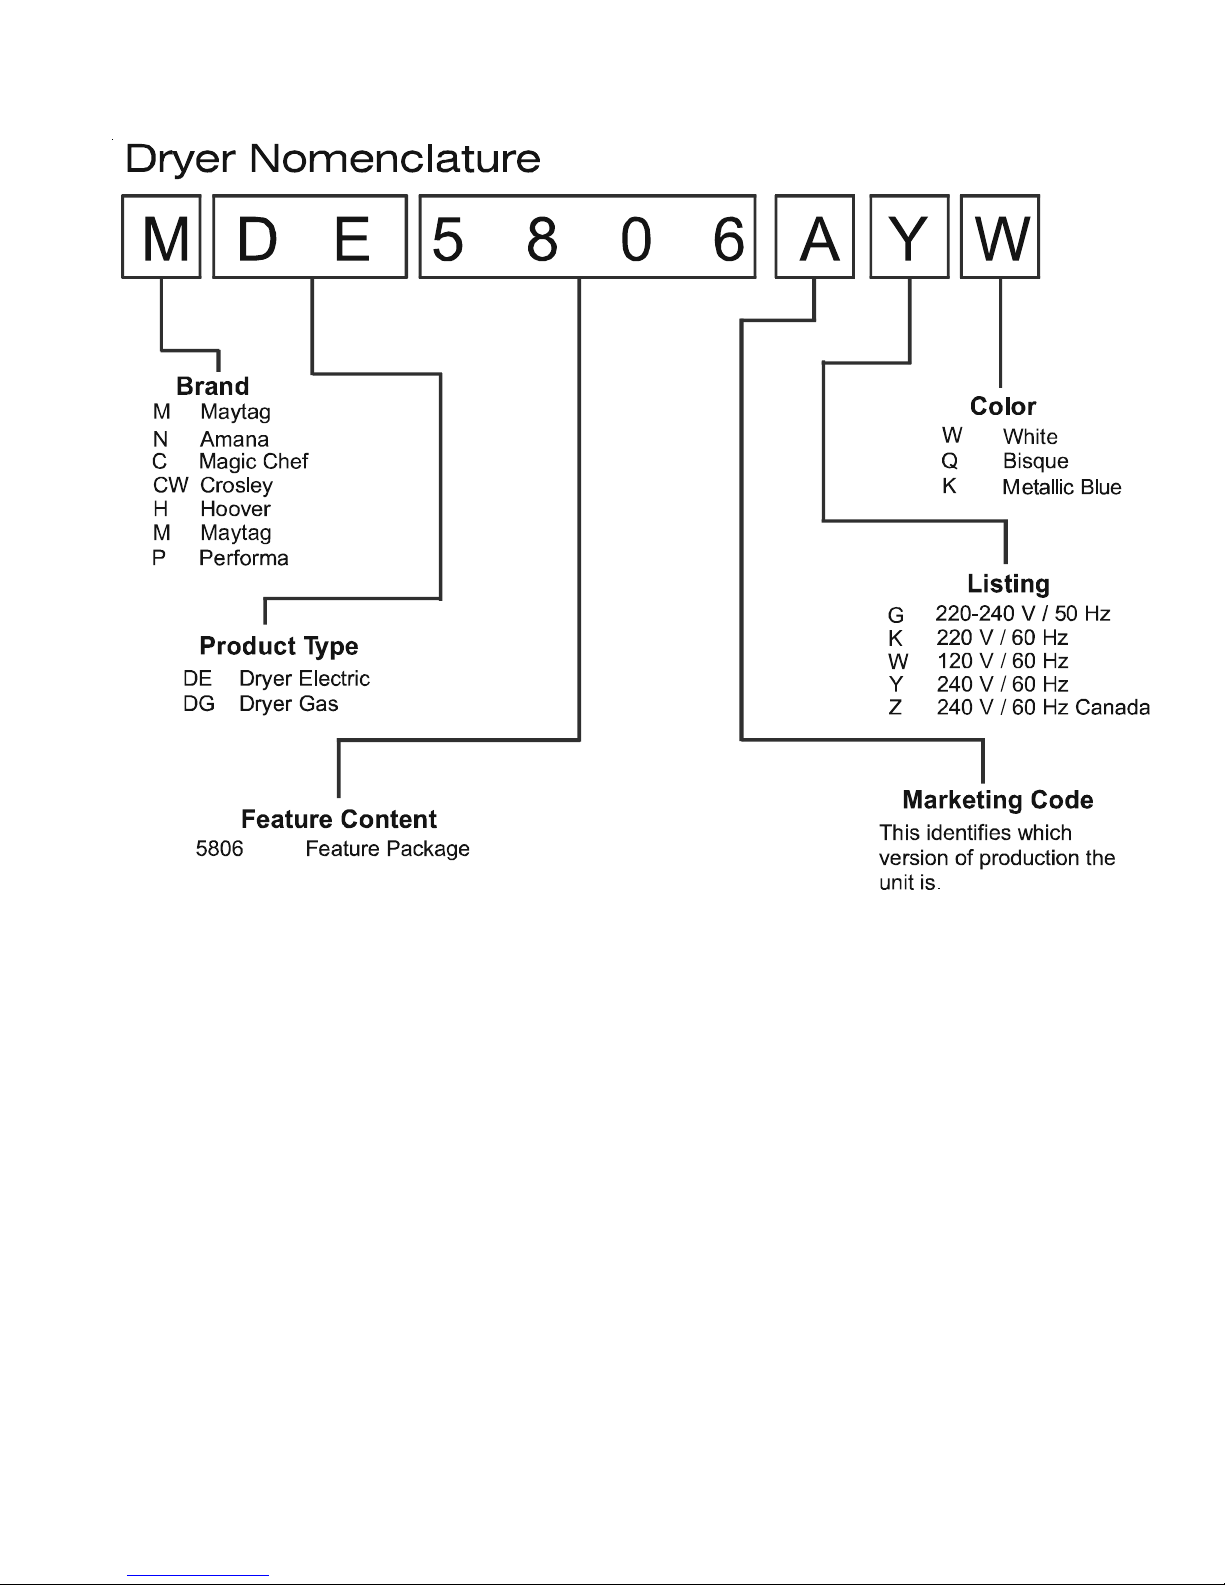
Model Nomenclature.................................................. 9
Troubleshooting
Troubleshooting General Symptoms .........................10
Component T esting Information
Component T esting Information.................................14
Disassembly Procedures
Control Console Access/Facia Removal ...................16
PC Board Removal ...................................................16
Cycle Selector Knob Removal ..................................17
Switch Removal ........................................................17
T op Cover/Door Switch/Front Panel/Gasket Removal 17
Door Reversal/Disassembly Removal........................18
Light Removal ...........................................................19
Motor/Blower/Thermistor/Thermostat Removal..........20
Drum Removal/Roller/Glide Access ..........................22
Heater Removal.........................................................23
Drim Baffle Removal ..................................................23
Gas Model Disassembly Procedures
Igniter Removal .........................................................24
Burner Removal ........................................................24
Appendix A
Installation Instructions........................................... A-1
Appendix B
Use And Care ......................................................... B-1
©2006 Maytag Services 16026315 3

Important Information
Important Notices for Servicers and Consumers
Maytag will not be responsible for personal injury or property damage from improper service procedures. Pride and
workmanship go into every product to provide our customers with quality products. It is possible, however , that
during its lifetime a product may require service. Products should be serviced only by a qualified service technician
who is familiar with the safety procedures required in the repair and who is equipped with the proper tools, parts,
testing instruments and the appropriate service information. IT IS THE TECHNICIANS RESPONSIBILITY TO
REVIEW ALL APPROPRIATE SERVICE INFORMATION BEFORE BEGINNING REPAIRS.
!
To avoid risk of severe personal injury or death, disconnect power before working/servicing on appliance to avoid
electrical shock.
To locate an authorized servicer, please consult your telephone book or the dealer from whom you purchased this
product. For further assistance, please contact:
Customer Service Support Center Telephone Number
CAIR Center.............................................................. 1-800-688-9900
CAIR Center in Canada ........................................... 1-800-688-2002
Web Site
WWW.MAYTAG.COM
WARNING
Recognize Safety Symbols, Words, and Labels
DANGER
!
DANGER—Immediate hazards which WILL result in severe personal injury or death.
WARNING
!
WARNING—Hazards or unsafe practices which COULD result in severe personal injury or death.
!
CAUTION
CAUTION—Hazards or unsafe practices which COULD result in minor personal injury, product or property
damage.
2 16025315 ©2006 Maytag Services

Important Information .................................................... 2
Important Safety Information ......................................... 4
General Information
Model Identification .................................................... 8
Serial Label Location ................................................. 8
Model Nomenclature.................................................. 9
Troubleshooting
Troubleshooting General Symptoms .........................10
Component T esting Information
Component T esting Information.................................14
Disassembly Procedures
Control Console Access/Facia Removal ...................16
PC Board Removal ...................................................16
Cycle Selector Knob Removal ..................................17
Switch Removal ........................................................17
T op Cover/Door Switch/Front Panel/Gasket Removal 17
Door Reversal/Disassembly Removal........................18
Light Removal ...........................................................19
Motor/Blower/Thermistor/Thermostat Removal..........20
Drum Removal/Roller/Glide Access ..........................22
Heater Removal.........................................................23
Drim Baffle Removal ..................................................23
Gas Model Disassembly Procedures
Igniter Removal .........................................................24
Burner Removal ........................................................24
Appendix A
Installation Instructions........................................... A-1
Appendix B
Use And Care ......................................................... B-1
©2006 Maytag Services 16026315 3
Important Safety Information
WARNING
!
T o avoid risk of fire, electric shock, serious injury, or death when using your dryer, follow these basic precautions:
1. Read all instructions before
using dryer.
2. Install dryer according to
Installation Instructions. Refer to
the Grounding Instructions in the
Installation Instructions for
proper grounding of the dryer.
3. Do not dry articles that have
been cleaned in, washed in,
soaked in, or spotted with
gasoline, dry-cleaning solvents,
or other flammable or explosive
substances. V apors could ignite
or explode.
4. Do not use dryer to dry clothes
which have traces of any
flammable substance, such as
vegetable oil, cooking oil,
machine oil, flammable
chemicals, thinner, etc., or
anything containing wax or
chemicals, such as mops and
cleaning cloths. Flammable
substances may cause fabric to
catch fire by itself.
5. Do not store or use gasoline or
other flammable vapors and
liquids near this or any other
appliance.
6. Do not allow children to play on
or in dryer. Close supervision of
children is necessary when
dryer is used near children, a
safety rule for all appliances.
7. Before dryer is removed from
service or discarded, remove
doors to drying compartment.
8. Do not reach into dryer if
cylinder is revolving.
9. Do not install or store dryer
where it will be exposed to water
and/or weather.
10.Do not tamper with dryer
controls.
1 1.Do not repair or replace any part
of dryer or attempt any service,
unless specifically recommended
in user-maintenance instructions
or in published user-repair
instructions that you understand
and have skills to carry out, if you
are a consumer.
12.To reduce risk of electric shock or
fire, do not use extension cords or
adapters to connect dryer to
electrical power source.
13.Use the dryer only for its intended
purpose, drying clothes.
14.Always disconnect dryer from
electrical supply before
attempting any service.
Disconnect power cord by
grasping the plug, not the cord.
15.Do not use heat to dry articles
containing foam rubber or
similarly textured rubberlike
materials.
16.Always clean the lint filter after
every load. A layer of lint in the
filter reduces drying efficiency and
prolongs drying time.
17.Use only fabric softeners or
products to eliminate static that
are appropriate for automatic
dryers.
18.Keep your dryer in good condition.
Bumping or dropping dryer can
damage safety features. If
damage occurs, have dryer
checked by qualified service
technician.
19.Replace worn power cords and/or
loose plugs.
20.Do not tumble fiberglass curtains
and draperies unless the label
says it can be done. If they are
dried, wipe out the cylinder with a
damp cloth to remove particles of
fiberglass.
21.Always read and follow
manufacturer’s instructions on
packages of laundry aids. Heed
all warnings or precautions. T o
reduce risk of poisoning or
chemical burns, keep products
away from children at all times,
preferably , in a locked cabinet.
22.Never operate dryer with guards
and/or panels removed.
23.Do not operate dryer with
missing or broken parts.
24.Do not bypass safety devices.
25.Keep area around the exhaust
opening and adjacent
surrounding areas free from
accumulation of lint, dust, and
dirt.
26.Interior of dryer and exhaust duct
should be cleaned periodically
by qualified service personnel.
27.Dryer will not operate with
loading door open. DO NOT
bypass door safety switch by
permitting dryer to operate with
door open. Dryer will stop
tumbling when door is opened.
Do not use dryer if it does not
stop tumbling when door is
opened or starts tumbling
without pressing or turning the
ST ART mechanism. Remove the
dryer from use and call
the service person.
28.Remove laundry immediately
after the dryer stops.
29.AL WAYS follow the fabric care
instructions supplied by the
garment manufacturer.
Save These Instructions
4 16026315 ©2006 Maytag Services
Important Safety Information
WARNING
Electrical Service Information
Electrical Dryers
• 240 V AC, 60 Hz, 30 Amps,
3–wire or 4–wire installations
Gas Dryers
• 120 VAC, 60 Hz, 15 Amps, 3–wire installations
T o reduce the risk of fire and exposure to combustion
gases, the dryer MUST be exhausted to the outdoors.
DO NOT exhaust dryer air into a window well, gas vent,
chimney or enclosed, unventilated area, such as an
attic, wall, ceiling, crawl space under a building or
concealed space of a building.
Gas Dryer Power Supply
About Ground Wires
In the event of an electrical short circuit, a ground wire
reduces the risk of electric shock by providing an escape
wire for the electric current.
St andard accepted color coding for ground wires is green
or green with a yellow stripe.
Grounding wires and wires colored like grounding wires
are NOT to be used as current carrying conductors.
WARNING
!
To reduce the risk of fire, electric shock, serious injury
or death, all wiring and grounding must conform with
the latest edition of the National Electric Code, or the
Canadian Electrical Code, and such local regulations
as might apply . It is the customer’s responsibility to
have the wiring and fuses checked by a qualified
electrician to make sure your home has adequate
electrical power to operate the dryer.
WARNING
!
T o avoid risk of personal injury or death due to
electrical shock:
• Observe all local codes and ordinances.
• Disconnect electrical power to unit before servicing.
• Ground appliance properly.
• Check with a qualified electrician if you are not sure
this appliance is properly grounded.
• DO NOT ground to gas line.
• DO NOT ground to cold water pipe if pipe is
interrupted by plastic, nonmetallic gaskets, or other
insulating (nonconducting) materials.
• DO NOT modify plug on power cord. If plug does not
fit electrical outlet, have proper outlet installed
by qualified electrician.
• DO NOT have a fuse in the neutral or ground circuit.
A fuse in the neutral or ground circuit could result in
an electrical shock.
• DO NOT use an extension cord with this appliance.
• DO NOT use an adapter plug with this appliance.
• DO NOT pinch power cord.
©2006 Maytag Services 16026315 5
This equipment MUST be grounded. In the event of an
electrical short circuit, grounding reduces the risk of
electric shock by providing an escape wire for the
electrical current. This unit is equipped with a cord
having a grounding wire with a grounding plug. The plug
must be plugged into an outlet that is properly installed
and grounded.
Consult a qualified electrician or servicer if grounding
instructions are not completely understood, or if doubt
exists as to whether the equipment is properly grounded.
Do not use an extension cord. If the product power cord
is too short, have a qualified electrician install a three–
slot receptacle. This unit should be plugged into a
separate 60 hertz circuit with the electrical rating as
shown on the serial plate.
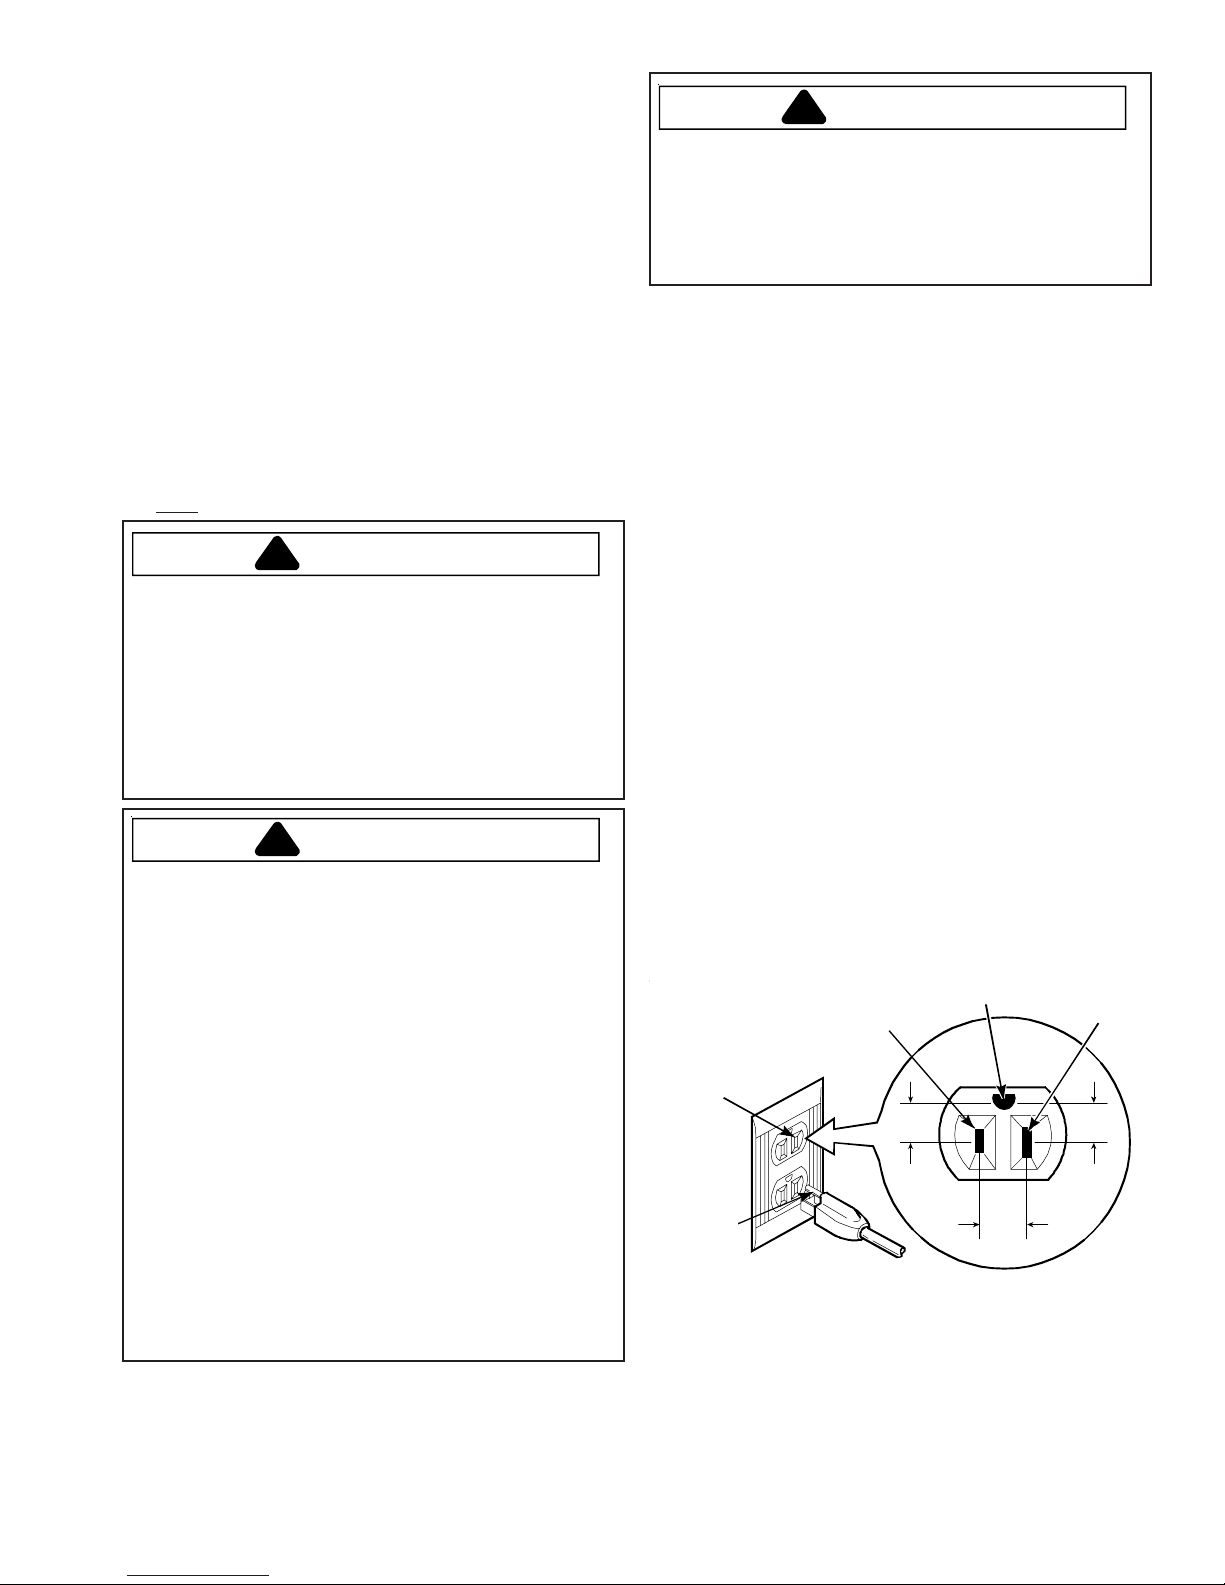
Proper Grounding and Polarization for 120 Volts
Wall Outlets
For the safety of our customers and the service technician ALL gas dryers have a three–prong power cord and
MUST be connected to a properly polarized and grounded
wall outlet. This information was written for those who do
not understand grounding and polarization of a wall
outlet. A 120 VAC wall outlet must always be wired as
shown below.
Neutral
side
Round
grounding
prong
Polarization–This means that the larger slot must be
neutral and the small slot must be hot (live).
Mispolarized–The outlet is miswired so that the larger
slot is hot (live) and the smaller slot is neutral.
Grounded–This means the round hole connection is
connected to ground through a connection to the main
power panel.
Ungrounded–The round hole connection is not
connected to a ground and/or the main power panel.
!
Explanation
L1
115–12
V.A . C .
Ground
115–12
V.A . C.
Neutral
0
V.A . C.
Important Safety Information
Gas Connection Information
WARNING
!
To avoid death, personal injury or property damage,
from fire or explosion, information in this manual must
be followed exactly.
Do not store or use gasoline or other flammable
vapors and liquids in the vicinity of this or any other
appliance.
WHAT TO DO IF YOU SMELL GAS
• Do not try to light any appliance.
• Do not touch any electrical switch; do not use any
phone in your building.
• Immediately call your gas supplier from a neighbor’s
phone. Follow the gas supplier’s instructions.
• If you cannot reach your gas supplier, call the fire
department.
Installation and service must be performed by a
qualified installer, service agency or the gas supplier.
WARNING
!
To reduce the risk of fire and exposure to combustion
gases, the dryer MUST be exhausted to the outdoors.
DO NOT exhaust dryer air into a window well, gas
vent, chimney or enclosed, unventilated area, such as
an attic, wall, ceiling, crawl space under a building or
concealed space of a building.
6 16026315 ©2006 Maytag Services
Important Safety Information
©2006 Maytag Services 16026315 7

General Information
Model Identification
Complete registration card and promptly return. If
registration card is missing:
• For Maytag product call 1-800-688-9900 or visit the
Web Site at www.mayt ag.com
• For product in Canada call 1-800-688-2002 or visit the
Web Sites at www .maytag.com or www .jennair.com
When contacting provide product information located on
rating plate. Record the following:
Model Number: ___________________
Manufacturing Number: ___________________
Serial or S/N Number: ___________________
Date of purchase: ___________________
Dealer’s name and address: ___________________
Service
Keep a copy of sales receipt for future reference or in
case warranty service is required. T o locate an authorized
servicer:
• For Maytag product call 1-800-462-9824 or visit the
Web Site at www.mayt ag.com
• For product in Canada call 1-866-587-2002 or visit the
Web Site at www.mayt ag.com
Warranty service must be performed by an authorized
servicer. W e also recommend contacting an authorized
servicer, if service is required af ter warranty expires.
Parts and Accessories
Purchase replacement parts and accessories over the
phone. T o order accessories for your product call:
• For Maytag product call 1-800-462-9824 or visit the
Web Site at www.mayt ag.com
• For product in Canada call 1-866-587-2002 or visit the
Web Sites at www.mayt ag.com
Extended Service Plan
We offer long-term service protection for this new dryer .
Serial Label is located in the upper left of the door
opening and back panel.
• Dependability PlusSM Extended Service Plan is
specially designed to supplement Maytag’s strong
warranty . This plan covers parts, labor , and travel
charges.
Call 1-800-925-2020 for information.
8 16026315 ©2006 Maytag Services
General Information
Troubleshooting Guide is located inside the
Control Console, see Control Console Access/
Facia Removal Procedure.
©2006 Maytag Services 16026315 9
Troubleshooting Procedures
Due to possibility of personal injury or property damage, always contact an authorized technician for servicing or
repair of this unit.
!
WARNING
T o avoid risk of electrical shock, personal injury or death; disconnect power and shut off gas to unit before servicing,
unless testing requires power.
Will not start or run:
• All wires are hooked up to their corresponding terminals.
•
Dryer is plugged in.
• Blown fuse or circuit breaker.
• Door switch functional...door closed. Check for error code 3
(See Table for code definition).
• Start/Pause rotary selector dial functional.
• Control Board operational.
• Drive motor functional.
• Check motor winding resistance.
Motor runs/ tumbler will not turn:
• Belt off or broken/damaged.
Idler tension spring too weak or stretched.
•
• Idler pulley jammed or stuck.
Runs a few minutes and then stops:
• Empty dryer.
• Check motor spins freely.
• Lint buildup around drive motor.
• Low voltage present.
• Blower impeller blocked in blower housing.
• Drive motor - start switch contacts stuck closed.
Improper drying/clothes wrinkled/ rough texture/long dry
time:
• Lint filter is not clean.
Restriction in exhaust.
•
• Outside exhaust hood damper door stuck closed.
• Exhaust too long, too many elbows, flex ductwork installed.
• Poor intake air available for the dryer.
• Incorrect tumbler speed. Tumbler belt slipping.
• Blower impeller bound; check for foreign material in blower
area.
• Customer overloading dryer.
• Check clothing labels for fabric content and cycle selected.
• Clothes too wet due to insufficient spin out by washer.
Troubleshooting the electronic control circuit:
• Check for miswiring of the electrical connector at the electronic
control board.
Will Not Shut Off
• Check dryer heat setting (wet clothes on air fluff will run an
extended period of time).
• Check Membrane Pad.
• Check Electronic Control Board.
• Short in sensor circuit.
• Ensure timer motor is getting 120V with no load or in cool down.
• Check thermostat.
Noisy and/Or Vibration
• Thumping Check for loose tumbler baffle, rear tumbler roller(s)
worn or misaligned, out-of-round tumbler or high weld seam on
tumbler.
• Ticking Check for loose wire harness or object caught in
blower wheel area.
• Scraping Check for front or rear bulkhead felt seal out of
position or worn tumbler front bearings.
• Roaring Check for blower wheel rubbing on blower housing or
bad motor bearings.
• Popping or squealing sound. Check for a sticky or frayed
belt.
Blows fuses or trips circuit breaker —
• The amperage readings are at 240 volts. One line will be 24 amps
and the other line will be 21 amps. The neutral line will be at 3
amps. If the above amperages are not present, then the house
wiring, fuse box or circuit breaker should be suspect.
• Shorted heating element to housing.
• Incorrect wiring or a wire shorting to ground.
• Drive motor winding shorting to ground.
Blows fuses or trips circuit breaker —
• If igniter is not glowing, check for 120 V at igniter.
• Igniter harness may be loose and shorted to base.
• Incorrect wiring or a wire shorted to ground.
• Drive motor winding shorting to ground.
Will Not Dry —
Will not heat (motor runs):
• Check dryer heat setting.
• Open heating element.
• Hi-Limit trips easily or is open.
• Regulating thermostat trips easily or is open.
• Check Thermistor.
Will Not Dry —
Poor Gas Ignition
When the dryer is operated on a heat setting, the igniter should
be energized and burner shall fire within 45 seconds at 120
VAC. The failure of a component in this system will usually be
indicated by one of three symptoms:
1) The igniter does not glow. If the igniter does not heat up,
remove power and using an ohmmeter, check the following:
• Open flame sensor.
• Open igniter.
• Shorted booster coil.
• Open wiring.
• Bad motor switch (Neutral supply).
• No power from control ( L1 supply).
2) Igniter glows - No gas ignition. If the igniter heats up but
the main burner flame is not ignited, remove power and using an
ohmmeter, check the following:
• Open secondary coil.
• Open holding coil.
• Open wire harness.
• Stuck flame sensor (Stuck closed).
• Check:
3) The gas is ignited but the flame goes out. If a normal
ignition takes place and after a short while the flame goes out,
check for the following:
• Radiant sensor contacts opening prematurely.
• Weak gas valve coil may open when stressed by higher
• Weak Hi-Limit.
• Poor venting.
• Bad drum seals.
ELECTRIC Models
GAS Models
Holding coil term 1 and 2, 1365 ohms ±25 ohms.
Booster coil term 1 and 3, 560 ohms ±25 ohms.
Secondary coil term 4 and 5, 1220 ohms ±25 ohms.
temperatures.
ELECTRIC Models:
GAS Models:
10 16026315 ©2006 Maytag Services
Troubleshooting Procedures
Due to possibility of personal injury or property damage, always contact an authorized technician for servicing or
repair of this unit.
!
WARNING
T o avoid risk of electrical shock, personal injury or death; disconnect power and shut off gas to unit before servicing,
unless testing requires power.
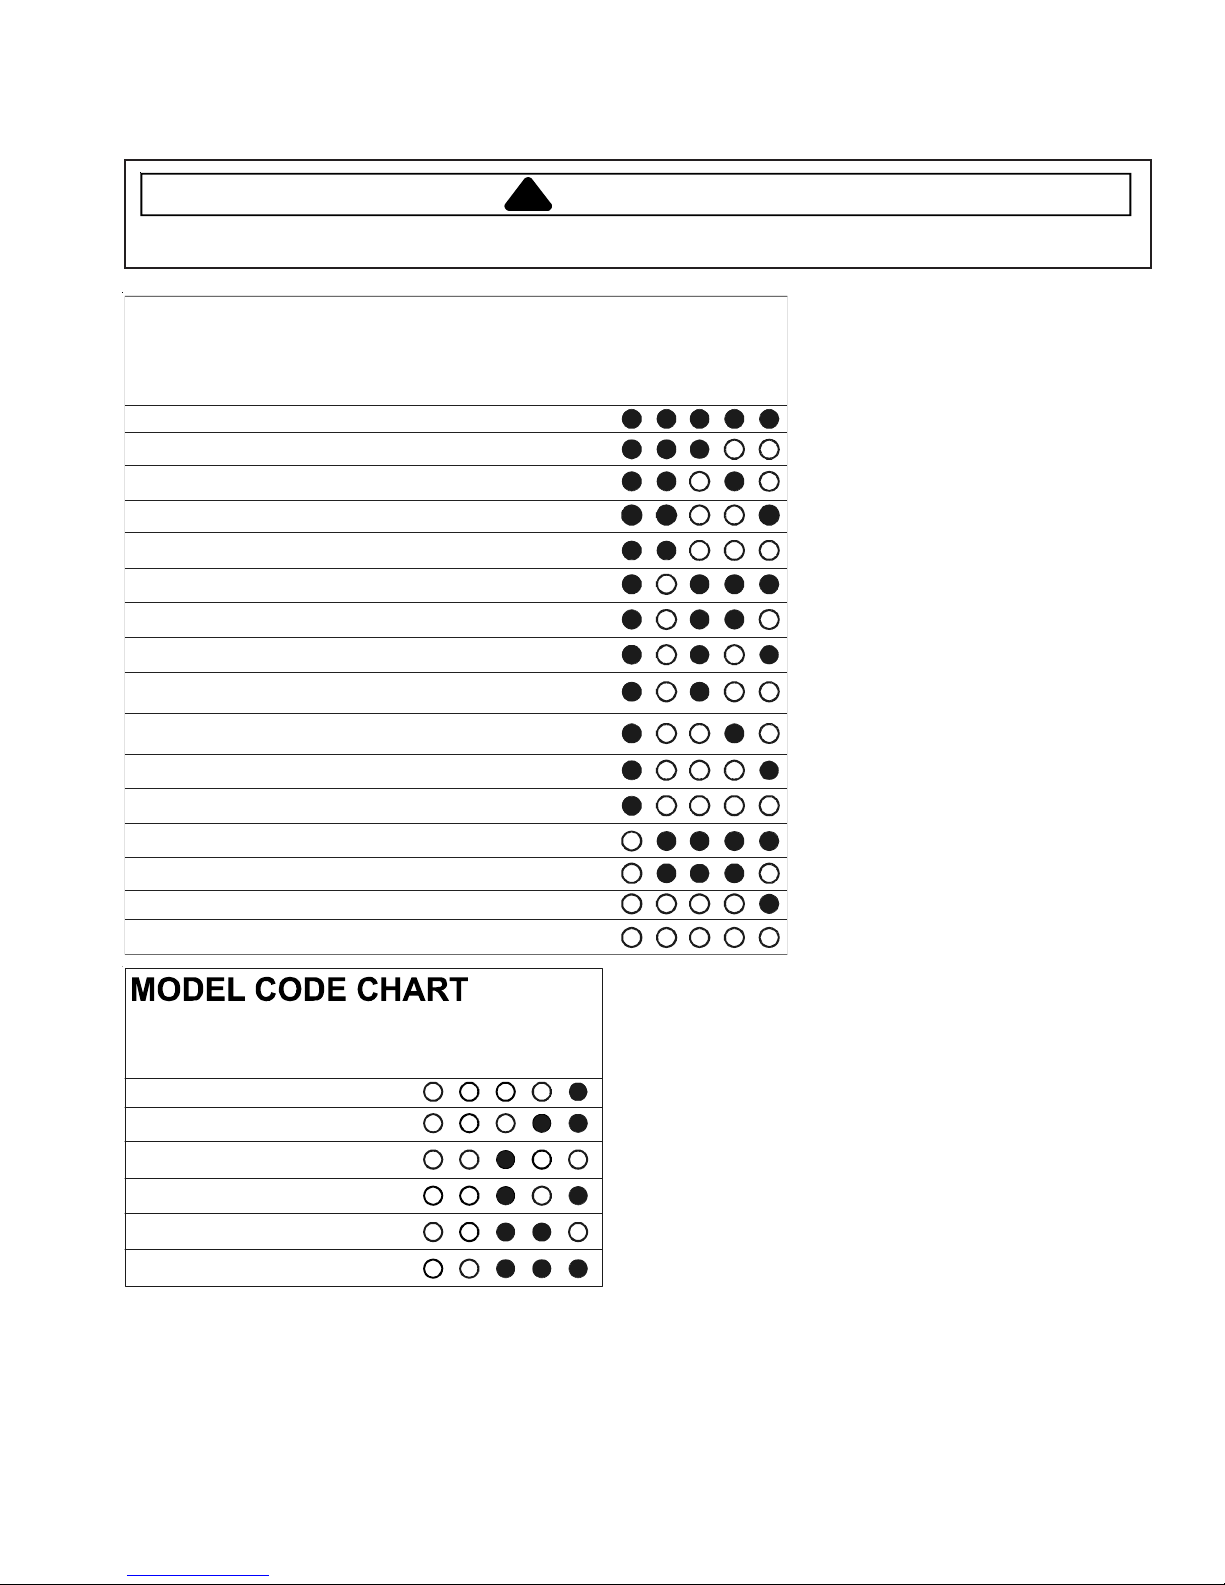
ENTER SERVICE MODE
Rotate the Cycle Selector Knob to the “
position and
press
(All LED’s will be off).
Rotate the Cycle Selector Knob clockwise past
Power Off
“
(LED’s will illuminate as the knob is rotated).
” twice and stop at “
Rotate the Cycle Selector Knob counterclockwise
one revolution back to “Regular” and press knob.
•
Power Off LED will blink. Regular LED will be
illuminated.
•
Model I.D. is displayed by the LED’s around the
bottom of the dial.
•
Model I.D. can be redisplayed while in Service
Mode by setting knob to “
pressing
•
.
Refer to chart for Model I.D.
knob.
Delicate
Power Off
Regular
” and
”
”.
EXIT SERVICE MODE
DISPLAY/CLEAR SERVICE CODES
Rotate Cycle Selection Knob to “
Allow 5 minutes of inactivity.
Disconnect power
Enter Service Mode then set Cycle Selection Knob to
•
•
•
“Time Dry 10”. Press knob.
Time Dry 10 LED will blink if codes other than
power interrupt are pres ent.
Press knob to view codes. Press once for each
code. Codes are displayed newest to oldest.
Machine beeps three times aft er last service code is
displayed.
To clear codes display a code then
Cycle Selection Knob until machine beeps twice.
Time Dry 10 LED stops blink ing.
• Refer to chart for Service Codes.
knob.
or
or
Power Off
press
” and
and
press
hold
©2006 Maytag Services 16026315 11
Troubleshooting Procedures
Due to possibility of personal injury or property damage, always contact an authorized technician for servicing or
repair of this unit.
!
WARNING
T o avoid risk of electrical shock, personal injury or death; disconnect power and shut off gas to unit before servicing,
unless testing requires power.
CONSOLE SWITCH TEST
Enter Service Mode then set Cycle
SERVICE CYCLE
X
Selection Knob to “Wrinkle Prevent” and
•
Power Off LED blinks.
•
Pause and Wrinkle Prevent LED’s are
illuminated.
Rotate th e Cycle Selec tion Knob clockwise
for ascending, and counterclockwise for
decending test mode. Rotate 32 clicks in
the same direction to complete the test.
Press
the test for the rotary switches. The test
begins with the rotary switch imediately to
the left of the Cycle Se lection Knob .
Rotate the switch in either direction. The
LED’s illuminate around the bottom of the
Cycle Selection Knob for each switch
NOTE:
Press the Cycle Se lection Kno b. T he test
continues with the switch immediately to
the left of the previous switch tested.
Repeat rotating the switch and monitoring
the LED’s around the bottom of the Cycle
Selection Knob. Continue
Cycle Selection Knob for each switch
tested right to left untill all rotary switches
•
press
knob.
the Cycle Selection Knob to activate
position.
Any attempt to move a knob or
After the last rotary s witch is tested the
next time the Cycle Se lection Knob is
pressed
rocker switches. Continue
the Cycle Selection Knob and testing
switches until the last switch is tested.
When all switches have been tested
Complete
the “
switch other than the one being
tested results in a chirp sound.
pressing
the
are tested.
the test will continue with the
” LED will illuminate.
pressing
Enter Service Mode then set Cycle Selection Knob to
•
•
• Press
•
•
NOTE:
“Regular” and press knob.
Cool Down LED illuminates. Motor on.
Press
knob Cool Down and Wrinkle Prevent LED’s
illuminate. Motor/Heater on.
knob Cool Down LED illuminates. Motor on.
Press knob Complete LED illuminates. Cycle
Complete.
Press
knob Exit back to Service Mode.
Press knob until Pause LED begins blinking to
pause cycle.
12 16026315 ©2006 Maytag Services
Troubleshooting Procedures
Due to possibility of personal injury or property damage, always contact an authorized technician for servicing or
repair of this unit.
!
T o avoid risk of electrical shock, personal injury or death; disconnect power and shut off gas to unit before servicing,
unless testing requires power.
WARNING
DIAGNOSTIC CODE CHART
Service Code Description
Model ID Unknown, Default used 31
Rotary Switch 3 left of encoder failed
Rotary Switch 2 left of encoder failed at startup
Rotary Switch 1 left of encoder failed at startup 25
Incorrect rotary switch position seen
Dryness sensor bar possibly shorted
Dryness sensor bar possibly open
Selected dryer temperature not reached
Dryer over temp without shutdown 20
Motor thermal protector opened more than 5
times during cycle
Thermistor pos si ble short
Thermistor pos si ble ope n
Thermistor out of range
Heater on and drum temp no t inc reas ing
Power failure
No code
at startup
Service
Code
28
26
24
23
22
21
18
17
16
15
14
0
Wrinkle
Drying
Prevent
Cool Down
Complete
Pause
Model Numbers
MDE/GT446
MDE/G4657
MDE/G4658, MDE/G4806
MDE/G508D
MDE/G5806
NDE/G8805
©2006 Maytag Services 16026315 13
Drying
Wrinkle
Cool Down
Prevent
ete
Pause
Compl
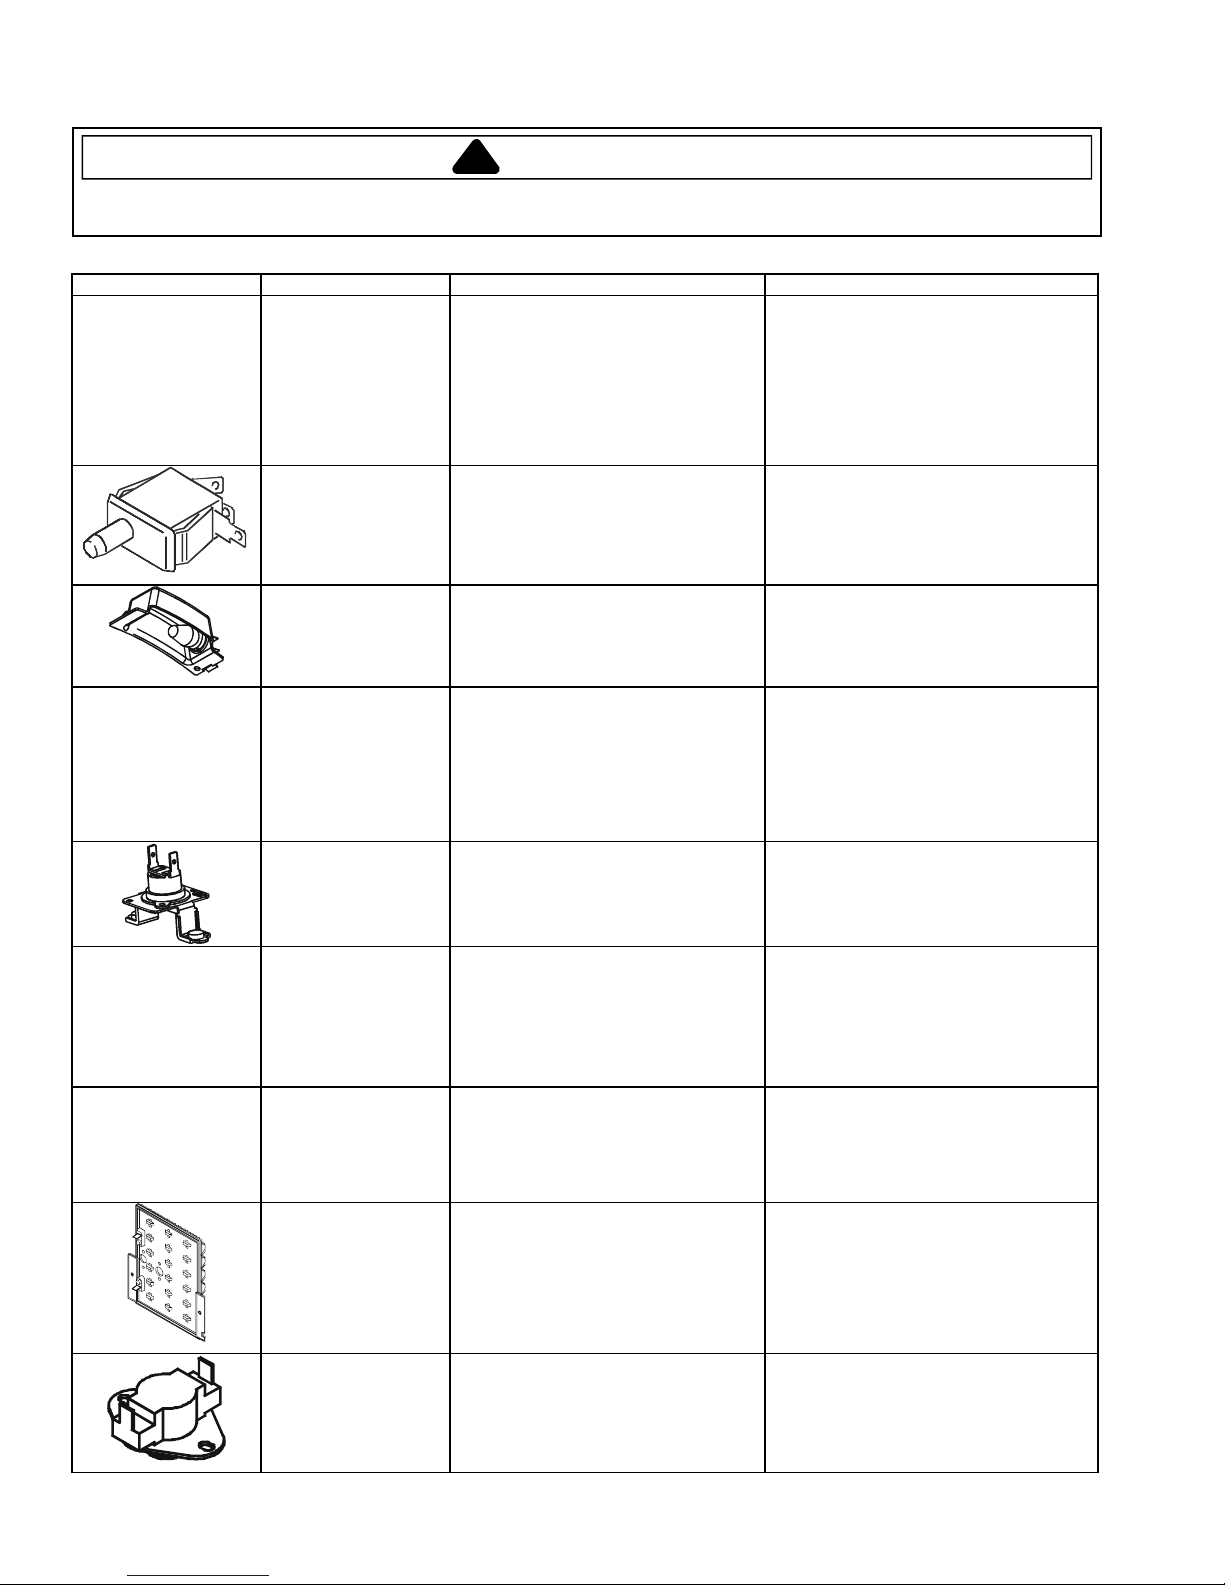
Component Testing Information
!
WARNING
To avoid risk of electrical shock, personal injury or death; disconnect power and shut off gas to unit before servicing,
unless testing requires power.
Illustration Component Test Procedure Results
Thermistor
Unplug harness connector and test
from wire insert ion side.
Pin #1 PK and Pin #11 PK of PS5.......
10000 ohms @ 77° F (25° C)
Door Switch Unplug connectors and t est switch
Light Unplug connectors and test switch
Motor
Thermal Fuse
Hi Limit Thermostat
terminals.
Door open terminals............................
Door closed terminals..........................
terminals.
Check across terminals.......................
Unplug harness connector and test
motor circuits.
Pin #9 GY and Pin #9 Red (W indings).
Unplug connectors and test
Thermostat terminals.
Check across terminals.......................
Unplug connectors and test
Thermostat terminals.
Check across terminals.......................
Infinity
Less than 1 ohm
80 to 100 ohms
2 ohms
Less than 1 ohm
Less than 1 ohms
Thermal Cut Off Unplug connectors and test
Thermostat terminals.
Check across terminals.......................
Heater Element Unplug connectors and t est Heater
terminals.............................................. 10 ohms
Less than 1 ohm
Cycling Thermostat
146 °F
14 16026315 ©2006 Maytag Services
Unplug connectors and test
Thermostat terminals...........................
Less than 1 ohm
Component Testing Information
!
WARNING
To avoid risk of electrical shock, personal injury or death; disconnect power and shut off gas to unit before servicing,
unless testing requires power.
Illustration Component Test Procedure Results
Sensor Bars Unplug harness connector and test
Radiant Sensor Unplug connectors and test sensor
TH2 Safety
Thermostat
from wire insert ion side. Short sensor
bar.
Pin #3 BU to Pin # 7 BU of PS5...........
terminals..............................................
Unplug connectors and test
Thermostat terminals........................... Less than 1 ohm
Less than 1 ohm
Closed
Gas Valve Unplug connectors and test valve
terminals.
Check across terminals #1 and #3
(Booster Coil)......................................
Check across terminals #1 and #2
(Holding Coil).......................................
Check across terminals #2 and #3
(Both coils in series)............................
Check across terminals #4 and #5
(Secondary Coil)..................................
550 ohms
1350 ohms
1900 ohms
1300 ohms
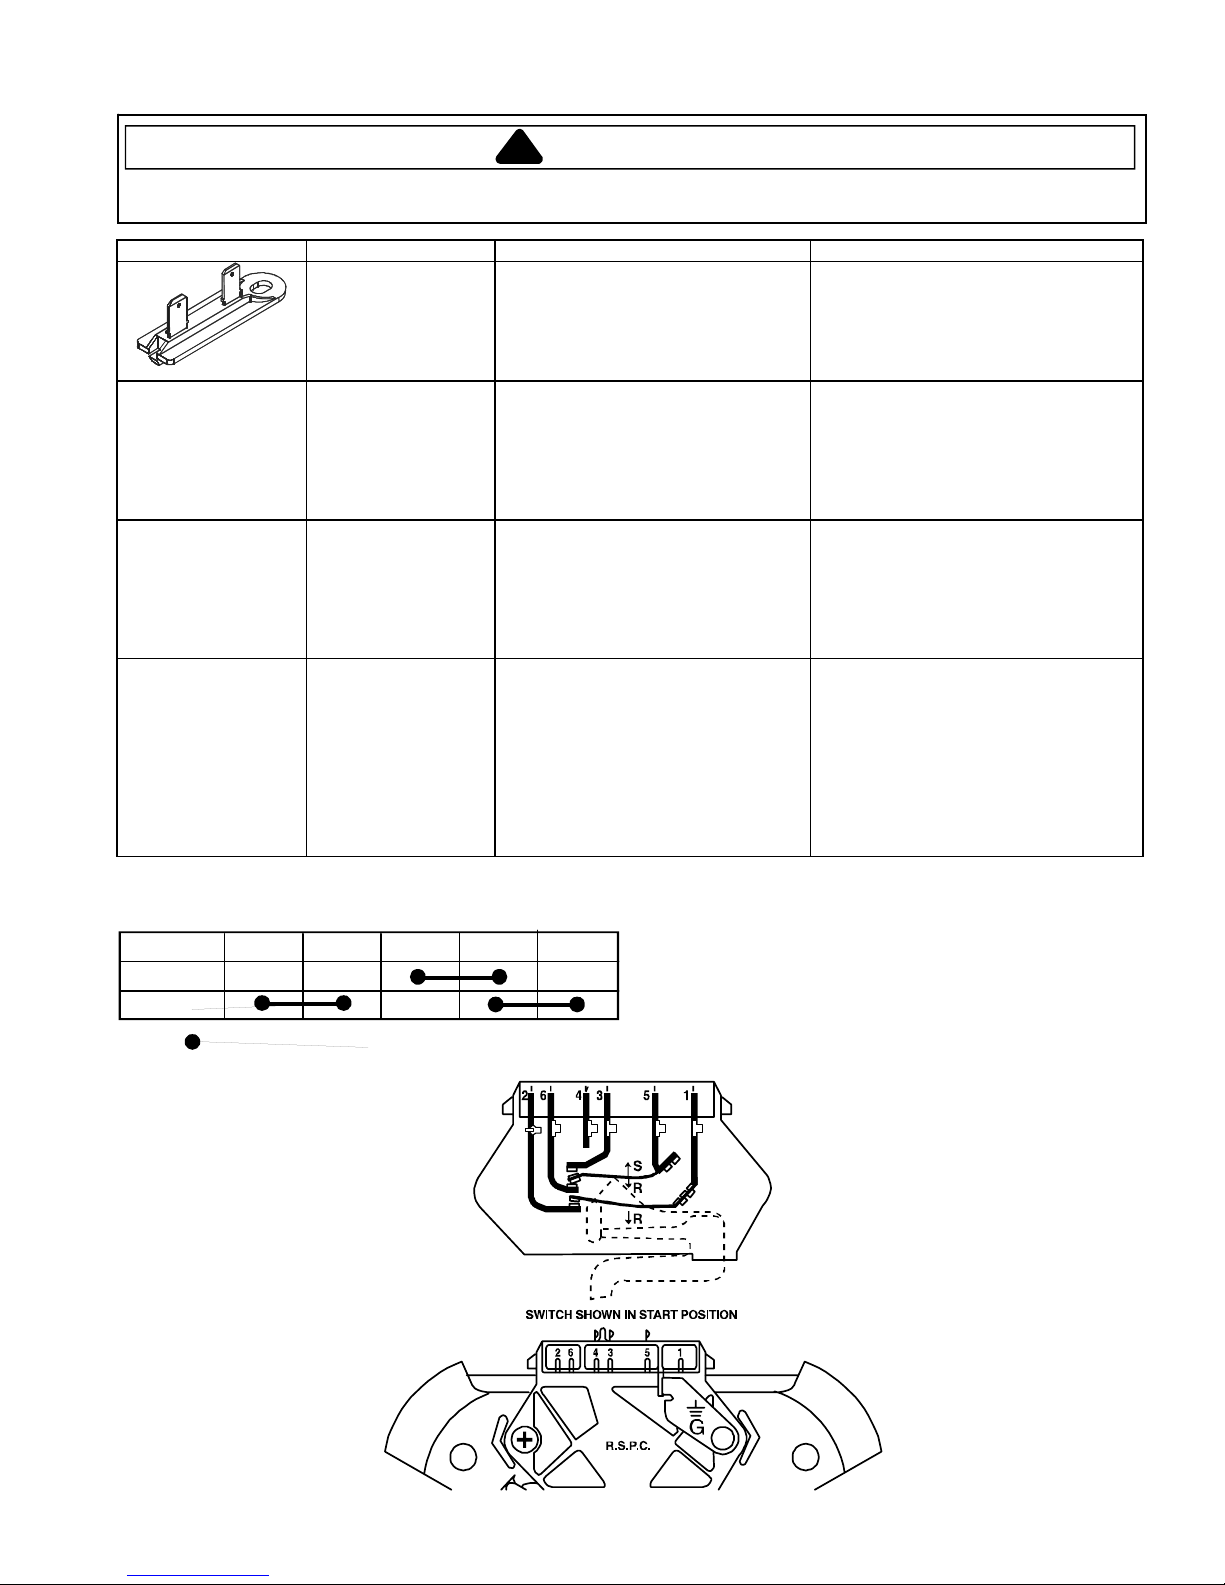
Motor Contacts
Function 1M 2M 3M 5M 6 M
Start
Run
= Contact closed
Gas Valve
Centrifugal Switch (Motor)
123
45
©2006 Maytag Services 16026315 15

Disassembly Procedures
!
WARNING
T o avoid risk of electrical shock, personal injury or death;
disconnect power to unit and shut off gas supply before
performing any disassembly procedure.
Control Console Access / Facia Removal
1. Disconnect power supply to unit.
2. Remove Control Knobs and Cycle Selector Knob.
3. Remove three screws from Console top.
NOTE: W ear an Anti-St atic Wrist S trap and ground
yourself before working with Electronic Control
Boards. Always handle boards by the edge and don’t
touch discreet components.
3. Remove wiring harness connectors from PC Board.
4. Depress the locking tab on the PCB.
NOTE: Be sure to protect the shafts on the front of the
Console when tipping.
4. Tip the Console forward to access the wiring harness
and PC Board.
NOTE: W ear an Anti-St atic Wrist S trap and ground
yourself before working with Electronic Control
Boards. Always handle boards by the edge and don’t
touch discreet components.
5. Depress locking tabs on Facia to remove and replace.
PC Board Removal
1. Disconnect power supply to unit.
2. Access Control Console, see “Control Console
Access / Facia Removal” procedure.
16 16026315 ©2006 Maytag Services
5. Remove the PCB.

Disassembly Procedures
!
WARNING
T o avoid risk of electrical shock, personal injury or death;
disconnect power to unit and shut off gas supply before
performing any disassembly procedure.
Cycle Selector Knob (CSK) Removal
1. Disconnect power supply to unit.
2. Access Control Console, see “Control Console
Access / Facia Removal” procedure.
3. Remove PC Board.
4. Lift locking tab on CSK and rotate switch to remove.
Switch Removal
1. Disconnect power supply to unit.
2. Access Control Console, see “Control Console
Access / Facia Removal” procedure.
3. Remove ribbon connectors to switch.
4. Lift locking tab on switch and rotate to remove.
T op Cover / Door Switch / Front Panel /
Gasket Removal
1. Disconnect power supply to unit.
2. Use a plastic putty knife to depress the locking clip
between the T op Cover and Front Panel.
3. Disconnect wiring from the Door Switch.
©2006 Maytag Services 16026315 17
4. Depress the locking tabs on switch side and remove
through the front.

Disassembly Procedures
!
WARNING
T o avoid risk of electrical shock, personal injury or death;
disconnect power to unit and shut off gas supply before
performing any disassembly procedure.
5. Remove two screws, 1 each side, from the back flange
of the Front Panel.
6. Tip Front Panel back and remove. Rotate Front Panel
to the back side and remove gasket.
Door Reversal / Disassembly
1. Disconnect power supply to unit.
2. Remove four screws on Door Hinge.
18 16026315 ©2006 Maytag Services
3. Remove hole covers opposite hinge side and install
them in the new location.

Disassembly Procedures
!
WARNING
T o avoid risk of electrical shock, personal injury or death;
disconnect power to unit and shut off gas supply before
performing any disassembly procedure.
4. T o switch Door Hinge side, remove screws around the
perimeter of the Door Panel. Rotate Door Panel 180
degrees and move Door Strike to opposite side of
Door. Reinst all screws. Reinstall Door . Continue to
next step for complete Door disassembly .
5. After Door Panel screws are removed the Door Gasket
can be removed from the Inner Door Panel.
Light Removal
1. Disconnect power supply to unit.
2. Remove T op Cover , see “Top Cover / Door Switch /
Front Panel / Gasket Removal” procedure steps 1 - 2.
3. Remove Lens screw.
4. Depress locking tab on Light Socket and remove
through light cavity .
©2006 Maytag Services 16026315 19

Disassembly Procedures
!
WARNING
Motor/Blower/Thermistor/Thermostat
Removal
1. Disconnect power supply to unit.
2. Remove T op Cover.
3. Remove Front Panel.
4. Disconnect wiring from Moisture Sensor.
T o avoid risk of electrical shock, personal injury or death;
disconnect power to unit and shut off gas supply before
performing any disassembly procedure.
6. T o remove Thermistor or Thermostat, disconnect wiring
from component(s) and remove retaining screws.
5. Remove three screws inside drum retaining Blower
Duct.
7. Remove nine screws retaining Blower Cover panel.
20 16026315 ©2006 Maytag Services

Disassembly Procedures
!
WARNING
T o avoid risk of electrical shock, personal injury or death;
disconnect power to unit and shut off gas supply before
performing any disassembly procedure.
8. Remove Blower Cover Panel.
9. Disconnect Motor Harness connector from Motor.
10.Rotate Blower Assembly as shown to remove from
dryer.
1 1.Remove Blower Wheel by placing a wrench on the rear
of the Motor shaft and the nut on the Blower Wheel.
Rotate counterclockwise to loosen.
12.Remove three screws from Blower Scroll.
©2006 Maytag Services 16026315 21
13.Remove Motor locking collar front and back to remove
Motor.
Disassembly Procedures
!
WARNING
T o avoid risk of electrical shock, personal injury or death;
disconnect power to unit and shut off gas supply before
performing any disassembly procedure.
Drum Removal / Roller / Glide Access
1. Disconnect power supply to unit.
2. Remove T op Cover and Front Panel, see “Top Cover /
Door Switch / Front Panel / Gasket Removal”
procedure.
3. Remove wires from light, see “Light Removal”
procedure steps 3 - 4.
4. Remove four screws on Front Bulkhead.
5. Remove belt from Idler Pulley.
6. Grasp the Drum with one hand and the belt with the
other. Lif t the Drum and slide out the front. Carefully
spread the cabinet as needed to gain additional
clearance.
7. Rear Rollers and Glides can be serviced as needed.
22 16026315 ©2006 Maytag Services
Disassembly Procedures
!
WARNING
T o avoid risk of electrical shock, personal injury or death;
disconnect power to unit and shut off gas supply before
performing any disassembly procedure.
Heater Removal
1. Disconnect power supply to unit.
2. Remove T op Cover and Front Panel, see “Top Cover /
Door Switch / Front Panel / Gasket Removal”
procedure.
3. Remove Belt from Idler Pulley .
4. Remove Drum.
5. Remove two screws securing Heater Assembly to rear
bulkhead.
Drum Baffle Removal
1. Disconnect power supply to unit.
2. Remove T op Cover , see “Top Cover / Door Switch /
Front Panel / Gasket Removal” procedure.
3. Remove two screws retaining Drum Baffle.
6. Disconnect wiring, drop Heater Assembly down and
rotate out to remove.
©2006 Maytag Services 16026315 23

Disassembly Procedures
!
WARNING
!
WARNING
To avoid risk of personal injury or death; shut off gas
supply to unit before servicing Burner Assembly .
Gas Model Disassembly
Igniter Removal
1. Disconnect power supply to unit.
2. Remove T op Cover.
3. Remove Console.
4. Remove Front Panel.
5. Loosen the single screw attaching the igniter to the
Burner Assembly . Slide the Igniter back and remove.
T o avoid risk of electrical shock, personal injury or death;
disconnect power to unit and shut off gas supply before
performing any disassembly procedure.
NOTE: The Igniter Bar is fragile. Be careful not to
damage Igniter when removing Burner Assembly.
Burner Removal
1. Disconnect power supply to unit.
2. Shut off gas supply .
3. Disconnect incoming gas line to unit.
4. Remove two screws securing burner to bracket.
NOTE: The Igniter Bar is fragile. Be careful not to
damage Igniter when removing Burner Assembly.
5. Remove the two screws attaching the housing to the
burner bracket. The screws are recessed from view .
6. Slide Burner Assembly from dryer .
24 16026315 ©2006 Maytag Services

Appendix A
©2006 Maytag Services 16026315 A–1

NOTES
A-2 16026315 ©2006 Maytag Services

Power Cord
(3-wire or 4-wire)
and Strain Relief
Installation
®
Screws
(supplied)
Duct Tape
Wrench
Screw
Drivers
Level
Instructions
Electric Dryer
Keep instructions for future reference.
Be sure manual stays with dryer.
Questions?
See the User’s Guide or
call Maytag Appliances
Sales Company
1-800-688-9900 USA
1-800-688-2002
Canada
1-800-688-2080
TTY USA Only
REMOVE PARTS
AND CLEAN
1
Part No. 40136301
Printed in U.S.A. 11/01
©2006 Maytag Services 16026315 A-3
DRYER DRUM
Wipe drum with clean rag and soap
diluted in warm water to remove
any oil used in manufacturing. Make
a paste of laundry detergent and
clean drum if necessary.
To reverse the direction that door
opens, see the User’s Guide.
You'll Need a Few Things Before You Begin
Optional Kits
Kits are available at extra cost
through your Maytag dealer or
Maytag Customer Assistance at
1-800-688-9900 USA
1-800-688-2002 Canada
1-800-688-2080 TTY USA Only
Directional Exhaust Kit
DK1 Sales Accessory (Directional
Exhaust Kit #528P3).
Flexible Metal Vent Kit
Exhausting the dryer in hard-toreach locations can be accomplished by installing Kit # 521P3.

CONNECT DRYER
Flexible Foil
4" (10,16 cm)
4" (10,16 cm)
2-1/2" (6,35 cm)
TO EXHAUST
2
SYSTEM
Secure all joints with clamps or duct
tape. DO NOT use sheet metal
screws or other fastening means
which extend into the duct to attach
exhaust pipe joints. They could
catch lint and reduce the efficiency
of the exhaust system.
IMPORTANT: Keep exhaust duct
as short as possible.
Be sure old ducts are clean before
installing your new dryer.
To prevent backdraft when dryer is
not in operation, outer end of
exhaust pipe must have a weather
hood with hinged dampers (obtain
locally).
Weather hood should be installed at
least 12" (30.5 cm) above the
ground. Higher clearances may be
necessary in areas where heavy
snowfall can occur.
No extra system length consideration is necessary when exhausting
through the roof. Use MAXIMUM
EXHAUST LENGTH table to
calculate system length. Use a roof
cap that provides air flow equal to
weather hood.
Exhaust Directions
Dryer can be exhausted to the outdoors through the back, left, right or
bottom of the dryer.
Dryer is shipped from factory ready
for rear exhaust. No kits required.
To exhaust dryer through sides or
bottom, install a DK1 Sales
Accessory (Directional Exhaust Kit
528P3). Available as optional equipment at extra cost.
Exhaust System Materials
Exhaust duct must be four inches
(10.2 cm) in diameter without
obstructions. Rigid metal duct is
recommended. Non-combustible
semi-rigid flexible metal duct is
acceptable.
DO NOT use plastic pipe, foil pipe,
or flexible plastic pipe, because it
contributes to poor drying performance and collects lint, which can
lead to a fire hazard. To identify
flexible foil or plastic duct, pinch the
coils of the duct between your fingers. If the coils can be brought
together, do not use the duct.
Rigid Metal Semirigid Metal
Use
Do Not Use
Maximum Exhaust Length
Rigid Metal Duct
Number of Weather Hood Weather Hood
90° Elbows 4-inch Opening 2
0 44 feet (13.4 m) 34 feet (10.4 m)
1 34 feet (10.4 m) 26 feet (7.9 m)
2 26 feet (7.9 m) 20 feet (6.1 m)
3 20 feet (6.1 m) 14 feet (4.3 m)
Flexible Metal Duct
Number of Weather Hood Weather Hood
90° Elbows 4-inch Opening 2
0 24 feet (7.3 m) 20 feet (6.1 m)
1 20 feet (6.1 m) 16 feet (4.9 m)
2 16 feet (4.9 m) 12 feet (3.7 m)
3 12 feet (3.7 m) 8 feet (2.4 m)
Recommended Weather Hood
1
-inch Opening
⁄
2
1
⁄
2
-inch Opening
Recommended for
Short Runs Only
Plastic
A-4 16025315 ©2006 Maytag Services
2

3
Access
cover
Strain relief
(not supplied with dryer)
Dryer
Base
Level
Leveling
Leg
"L1"
"L2"
Black
White
Neutral
Ground
screw
Red
"L2"
Ground
Wire
Black
White
"L1"
Neutral
Ground
screw
Green
Red
CONNECT
ELECTRICAL
CORD
3-wire Cord Installed 4-wire Cord Installed
3-wire or 4-wire Plug Connection
Four-wire cord is required for mobile
homes or where codes do not permit grounding through neutral.
1. Remove access cover from rear
of dryer.
2. Use a strain relief and insert end
of power cord through power
supply hole.
3. Use the three screws from envelope located in the drum to
attach the remaining power cord
wires to the terminal block as
follows:
• Red wire to “L1” terminal.
• Black wire to “L2” terminal.
• White wire to Neutral terminal.
• 4-wire Plug Only—Remove
ground screw and detach
ground wire from bulkhead.
Attach power cord ground
(green) wire to rear bulkhead
using ground screw. Attach
free ground wire, previously
attached with ground screw,
with white wire to the neutral
(center) terminal on the terminal block.
4. Tighten all screws and reinstall
access cover removed in step 1.
POSITION AND
LEVEL DRYER
4
Place dryer in position, adjust all
legs (4) until dryer is level side to
side and front to back.
©2006 Maytag Services 16026315 A-5
3

Important Safety Information
About Ground Wires
In the event of an electrical short
circuit, a ground wire reduces the
risk of electric shock by providing
an escape wire for the electric
current.
Standard accepted color coding for
ground wires is green or green
with a yellow stripe.
Grounding wires and wires colored
like grounding wires are NOT
used as current carrying conductors.
to be
WARNING
To reduce the risk of fire, the
dryer MUST be exhausted to
the outdoors. DO NOT exhaust
dryer air into a window well,
gas vent, chimney or enclosed,
unventilated area, such as an
attic, wall, ceiling, crawl space
under a building or concealed
space of a building.
WARNING
To reduce the risk of fire, DO
NOT use plastic pipe, foil pipe,
or flexible plastic pipe to exhaust
the dryer. Never install flexible
duct in concealed spaces, such
as a wall or ceiling.
Grounding Instructions
This dryer must be connected to a grounded metal, permanent wiring system,
or an equipment-grounding conductor must be run with the circuit conductors
and connected to the equipment-grounding terminal or lead on the dryer.
• Power cord (pigtail) is not supplied with electric dryer. Type of pigtail and
gauge of wire must conform to local codes and instructions.
Method of wiring dryer is optional and subject to local code requirements.
• Connect dryer to power supply with MAXIMUM RATED VOLTAGE listed on
the nameplate.
• Use copper wire only. Shorter than 15' (4.5 m) use 10 A.W.G. Longer than
15' (4.5 m) use 8 A.W.G.
WARNING
To avoid risk of personal injury or death due to electrical shock:
• Observe all local codes and
ordinances.
• Disconnect electrical power to
unit before servicing.
• Ground appliance properly.
• Check with a qualified electrician
if you are not sure this appliance
is properly grounded.
• DO NOT ground to gas line.
• DO NOT ground to cold water
pipe if pipe is interrupted by
plastic, non-metallic gaskets or
other insulating (non-conducting)
materials.
• DO NOT modify plug on power
cord. If plug does not fit electrical outlet, have proper outlet
installed by qualified electrician.
• DO NOT have a fuse in the neutral or ground circuit. A fuse in
the neutral or ground circuit
could result in an electrical
shock.
• DO NOT use an extension cord
with this appliance.
• DO NOT use an adapter plug
with this appliance.
• DO NOT pinch power cord.
WARNING
WARNING
To avoid risk of personal injury
or death:
• Do not allow children to play
on or in the appliance. Close
supervision of children is
necessary when the appliance is used near children.
WARNING
To avoid injury or death due to
suffocation, remove door to
dryer compartment before
appliance is removed from
service or discarded.
A-6 16025315 ©2006 Maytag Services
To reduce the risk of fire, electric shock, serious injury or death, all wiring
and grounding must conform with the latest edition of the National Electric
Code, ANSI/NFPA 70, or the Canadian Electrical Code, CSA C22.1, and
such local regulations as might apply. It is the customer’s responsibility to
have the wiring and fuses checked by a qualified electrician to make sure
your home has adequate electrical power to operate the dryer.
Save These Instructions
4

Installation Requirements
Before You Install…
Consider
Location
Electrical Requirements
Exhaust
Description
Use dimensions shown in manual to determine space needed for installation.
Place dryer on a solid floor in an area with an adequate air supply. A closet door
must have a supply air vent of 80 sq. in. (517 sq. cm) minimum.
1
⁄
4
Leveling legs can be adjusted from inside the dryer with a
must rest firmly on the floor so the weight of the dryer is evenly distributed. The
dryer must not rock.
Dryer must not be installed or stored in an area where it will be exposed to water
and/or weather.
Dryer needs a 3- or 4-wire 120/240 volt, 30 amp, 60 hertz, 1 phase electrical supply.
Refer to serial plate for specific requirements. Wiring diagram is located in control
hood.
Use rigid or semi-rigid duct and exhaust the dryer to the outside by the shortest
route possible. Failure to exhaust dryer properly will void warranty.
• Dryer exhaust duct must be secured to the mobile home structure. Dryer exhaust
MUST NOT terminate under the mobile home.
• Exhaust duct must not be connected to any other duct, vent or chimney.
• Venting materials are not supplied with the dryer (obtain locally). Do not use plastic or thin foil flexible ducting.
• Static pressure in the dryer’s exhaust duct should be no greater than .6 inches
(1.5 cm). Check with dryer running and no load. This can be measured with a
manometer placed on the exhaust duct approximately two feet (61 cm) from the
dryer.
For the best exhaust system:
• Locate dryer so exhaust duct is as short as possible.
• Verify old ducts are cleaned before installing new dryer.
• Use 4 inch (10.2 cm) diameter rigid or flexible metal duct.
• Use duct tape on all joints.
• Use as few elbows as possible.
" driver. All four legs
©2006 Maytag Services 16026315 A-7
5

Dryer Dimensions and Minimum Clearances
*With leveling legs turned fully into base
23.5"
(59,7 cm)
7.7"
(19,6 cm)
4.0"
(10,2 cm)
4.0"
(10,2 cm)
28"
(71,1 cm)
.4"
(1,1 cm)
15.4"
(39,1 cm)
26.9"
(68,3 cm)
*36" (91,4 cm)
*43" (109,2 cm)
FRONT VIEW
(w/o Closet Door)
12"
(30,5 cm)
0" (0 cm)0" (0 cm)
SIDE VIEW FRONT VIEW
Closet
Door
2" (5,1 cm)
12"
(30,5 cm)
Min.
Outer wall of
enclosure
2" (5,1 cm)
0"
(0 cm)
(Closet Door)
3" (7,6 cm)
Centered air
openings minimum
40 sq. in.
(260 sq. cm) each
3" (7,6 cm)
A-8 16025315 ©2006 Maytag Services
6

Stainless Steel
or Hard Pipe
Gas Connector
Teflon Tape or
Joint Compound
Duct Tape
Wrench
Screw
Drivers
Level
Installation
®
Instructions
Gas Dryer
Keep instructions for future reference.
Be sure manual stays with dryer.
Questions?
See the User’s Guide or
call Maytag Appliances
Sales Company
1-800-688-9900 USA
You'll Need a Few Things Before You Begin
REMOVE PARTS
AND CLEAN
1
Part No. 40136401 Printed in U.S.A. 11/01
©2006 Maytag Services 16026315 A-9
DRYER DRUM
Wipe drum with clean rag and soap
diluted in warm water to remove
any oil used in manufacturing. Make
a paste of laundry detergent and
clean drum if necessary.
To reverse the direction that the
door opens, see the User’s Guide.
1-800-688-2002
Canada
1-800-688-2080
TTY USA Only
Optional Kits
Kits are available at extra cost
through your Maytag dealer or
Maytag Customer Assistance at
1-800-688-9900 USA
1-800-688-2002 Canada
1-800-688-2080 TTY USA Only
Directional Exhaust Kit
DK1 Sales Accessory (Directional
Exhaust Kit #528P3).
Flexible Metal Vent Kit
Exhausting the dryer in hard-toreach locations can be accomplished by installing Kit # 521P3.
Manufactured (Mobile) Home
Installation Kit
Manufactured home anchor Kit
#526P3.
Propane Gas Conversion Kit
LPK1 Sales Accessory
(L.P./ Propane Kit # 649P3).

CONNECT DRYER
Flexible Foil
4" (10,16 cm)
4" (10,16 cm)
2-1/2" (6,35 cm)
TO EXHAUST
2
SYSTEM
Secure all joints with clamps or duct
tape. DO NOT use sheet metal
screws or other fastening means
which extend into the duct to attach
exhaust pipe joints. They could
catch lint and reduce the efficiency
of the exhaust system.
IMPORTANT: Keep exhaust duct
as short as possible.
Be sure old ducts are clean before
installing your new dryer.
To prevent backdraft when dryer is
not in operation, outer end of
exhaust pipe must have a weather
hood with hinged dampers (obtain
locally).
Weather hood should be installed at
least 12" (30.5 cm) above the
ground. Higher clearances may be
necessary in areas where heavy
snowfall can occur.
No extra system length consideration is necessary when exhausting
through the roof. Use MAXIMUM
EXHAUST LENGTH table to calculate system length. Use a roof cap
that provides air flow equal to
weather hood.
Exhaust Directions
Dryer can be exhausted to the outdoors through the back, right, or
bottom of the dryer. Gas dryers
cannot be vented out the left side
because of the burner housing.
Dryer is shipped from factory ready
for rear exhaust. No kits required.
To exhaust dryer through sides or
bottom, install a DK1 Sales
Accessory (Directional Exhaust Kit
528P3). Available as optional equipment at extra cost.
Exhaust System Materials
Exhaust duct must be four inches
(10.2 cm) in diameter without
obstructions. Rigid metal duct is
recommended. Non-combustible
semirigid flexible metal duct is
acceptable.
DO NOT use plastic pipe, foil pipe,
or flexible plastic pipe, because it
contributes to poor drying performance and collects lint, which can
lead to a fire hazard. To identify
flexible foil or plastic duct, pinch the
coils of the duct between your fingers. If the coils can be brought
together, do not use the duct.
Rigid Metal Semirigid Metal
Use
Do Not Use
Maximum Exhaust Length
Rigid Metal Duct
Number of Weather Hood Weather Hood
90° Elbows 4-inch Opening 2
0 44 feet (13.4 m) 34 feet (10.4 m)
1 34 feet (10.4 m) 26 feet (7.9 m)
2 26 feet (7.9 m) 20 feet (6.1 m)
3 20 feet (6.1 m) 14 feet (4.3 m)
Flexible Metal Duct
Number of Weather Hood Weather Hood
90° Elbows 4-inch Opening 2
0 24 feet (7.3 m) 20 feet (6.1 m)
1 20 feet (6.1 m) 16 feet (4.9 m)
2 16 feet (4.9 m) 12 feet (3.7 m)
3 12 feet (3.7 m) 8 feet (2.4 m)
Recommended Weather Hood
1
⁄
2
-inch Opening
1
⁄
2
-inch Opening
Recommended for
Short Runs Only
Plastic
A-10 16025315 ©2006 Maytag Services
2

CONNECT GAS
Dryer
Base
Level
Leveling
Leg
Use new stainless steel flexible connector
only if allowed by local codes (use Design A.G.A. certified connector)
3/8" NPT gas
connection
1/8" NPT pipe plug
(for checking inlet
gas pressure)
Install equipment
shut-off valve
within 6' (1,8 m)
of dryer
.
Black iron pipe
Shorter than 20' (6,1 m) - use 3/8" pipe
Longer than 20' (6,1 m) - use 1/2" pipe
SUPPLY
3
L.P./Propane
DO NOT connect dryer to
L.P./Propane gas service without
converting the gas valve. An LPK1
Sales Accessory L.P./Propane Gas
Conversion Kit 649P3 must be
installed.
Test for Gas Leaks
After final gas connection is made,
turn on manual gas
valve and test all
connections in gas supply piping for
gas leaks. Leak testing of the appliance shall be conducted according
to the manufacturer’s instructions.
1. Place soap suds on connections.
2. If bubbles appear, a leak is present. Shut off gas supply valve.
3. Tighten joint if leak is at factory
fitting.
• If leak is not at factory fitting,
unscrew, apply more joint
compound, and tighten to correct leak.
4. Retest connection for leak after
tightening or adding joint
compound.
• Retest any connections that
were disturbed.
Connect gas supply to dryer using a
new stainless steel flexible connector or hard pipe (check local codes)
according to illustration. Test for
leaks and check burner flame after
gas supply is connected. See
Checking Burner Flame section on
back page.
• Dryer must be connected to type
of gas as shown on nameplate
located in the door recess.
For proper operation at altitudes
above 2,500 feet
The natural gas valve spud orifice
size must be reduced to ensure
complete combustion. See table.
• Use pipe joint compound insoluble on LP (propane) Gas, or
Teflon tape, on all pipe threads.
• Purge air and sediment from gas
supply line before connecting it to
the dryer. Before tightening the
connection, purge remaining air
from gas line to dryer until odor of
gas is detected. This step is
required to prevent gas valve
contamination.
Altitude Orfice Part
Ft. (M) Size # Number
3000 (915) 43 503778
6000 (1830) 44 58719
8000 (2440) 45 503779
9000 (2740) 46 503780
10000 (3050) 47 503781
CONNECT
POWER CORD
4
TO ELECTRICITY
See Installation Requirements
section. Plug dryer into 3-prong
grounded outlet only.
©2006 Maytag Services 16026315 A-11
POSITION AND
LEVEL DRYER
5
Place dryer in position,
adjust all legs (4)
until dryer is level
side to side and
front to back.
3

Important Safety Information
About Ground Wires
In the event of an electrical short
circuit, a ground wire reduces the
risk of electric shock by providing
an escape wire for the electric
current.
Standard accepted color coding for
ground wires is green or green
with a yellow stripe.
Grounding wires and wires colored
like grounding wires are NOT
used as current carrying conductors.
to be
WARNING
To reduce the risk of fire, the
dryer MUST be exhausted to
the outdoors. DO NOT exhaust
dryer air into a window well,
gas vent, chimney or enclosed,
unventilated area, such as an
attic, wall, ceiling, crawl space
under a building or concealed
space of a building.
Grounding Instructions
Dryer must be grounded. Dryer is equipped with a cord having a grounding
conductor and a 3-prong grounding plug. The three-prong grounding plug on
the power cord should be plugged directly into a polarized three-slot grounded
receptacle rated 110/120V AC (alternating current) 15 Amps.
WARNING
To avoid risk of personal injury or death due to electrical shock:
• Observe all local codes and
ordinances.
• Disconnect electrical power to
unit before servicing.
• Ground appliance properly.
• Check with a qualified electrician
if you are not sure this appliance
is properly grounded.
• DO NOT ground to gas line.
• DO NOT ground to cold water
pipe if pipe is interrupted by
plastic, non-metallic gaskets or
other insulating (non-conducting)
materials.
• DO NOT modify plug on power
cord. If plug does not fit electrical outlet, have proper outlet
installed by qualified electrician.
• DO NOT have a fuse in the neutral or ground circuit. A fuse in
the neutral or ground circuit
could result in an electrical
shock.
• DO NOT use an extension cord
with this appliance.
• DO NOT use an adapter plug
with this appliance.
• DO NOT pinch power cord.
WARNING
To reduce the risk of fire, DO
NOT use plastic pipe, foil pipe,
or flexible plastic pipe to exhaust
the dryer. Never install flexible
duct in concealed spaces, such
as a wall or ceiling.
WARNING
To reduce the risk of fire, electric shock, serious injury or
death, all wiring and grounding
must conform with the latest
edition of the National Electric
Code, ANSI/NFPA 70, or the
Canadian Electrical Code,
CSA C22.1, and such local
regulations as might apply. It is
the customer’s responsibility to
have the wiring and fuses
checked by a qualified electrician to make sure your home
has adequate electrical power
to operate the dryer.
WARNING
To avoid death, personal injury or property damage, from fire or explosion, information in this manual must be followed exactly:
• Do not store or use gasoline or other flammable vapors and liquids in
the vicinity of this or any other appliance.
• WHAT TO DO IF YOU SMELL GAS
– Do not try to light any appliance.
– Do not touch any electrical switch; do not use any phone in your
building.
– Immediately call your gas supplier from a neighbor’s phone. Follow
the gas supplier’s instructions.
– If you cannot reach your gas supplier, call the fire department.
• Installation and service must be performed by a qualified installer,
service agency or the gas supplier.
Save These Instructions
A-12 16025315 ©2006 Maytag Services
4

Installation Requirements
Before You Install…
Consider
Location
Electrical Requirements
Gas
Description
Use dimensions shown in manual to determine space needed for installation.
Place dryer on a solid floor in an area with an adequate air supply. A closet door
must have a supply air vent of 80 sq. in. (517 sq. cm) minimum.
No other fuel burning appliance should be installed in the same closet with the dryer.
Dryer must not be installed or stored in an area where it will be exposed to water
and/or weather.
Manufactured (mobile) home installation must conform to the Manufactured
Home Construction and Safety Standards, Title 24 CFR, Part 32-80 or Standard
CAN/CSA-Z240 MH.
Gas dryers must be permanently attached to the floor at the time of installation.
Order No. 526P3 Dryer Installation Kit for a manufactured (mobile) home installation.
Dryer requires 120 volt, 15 amp, 60 Hz power supply and 3-prong grounding plug.
Power cord is approximately 69" long. Do not operate other appliances on the same
circuit when this appliance is operating. Refer to serial plate for specific requirements. Wiring diagram is located in control hood.
Natural Gas Pressure, 1000 Btu/ ft3(37.3 MJ/m3), service must be supplied at 6.5 +
1.5 inch water column pressure. L.P. (propane) Gas Pressure, 2,500 Btu/ ft
3
MJ/m
), service must be supplied at 10 + 1.5 inch water column pressure.
NOTE: The dryer and its appliance main gas valve must be disconnected from the
gas supply piping system during any pressure testing of that system at test pressures
in excess of 1/2 psi (3.45 kPa). Dryer must be isolated from the gas supply piping
system by closing the equipment shut-off valve during any pressure testing of the gas
supply piping system at test pressures equal to or less than 1/2 psi (3,45 kPa).
When connecting to a gas line, an equipment shutoff valve must be installed within
6' (1.8 m) of the dryer. An 1/8" N.P.T. pipe plug must be installed.
The gas service to a gas dryer must conform with the local codes and ordances or in
the absence of local codes and ordinances, with the latest edition of the National
Fuel Gas Code ANSIZ223.1/NFPA 54 or the CAN/CGA-B149, National Gas
Installation Code. LPK1 Sales Accessory (L.P./Propane Gas Conversion Kit 649P3)
must be installed. DO NOT connect dryer to L.P./Propane Gas Service without
converting the gas valve.
3
(93.1
Exhaust
©2006 Maytag Services 16026315 A-13
Use rigid or semi-rigid duct and exhaust the dryer to the outside by the shortest
route possible. Failure to exhaust dryer properly will void warranty.
• Dryer exhaust duct must be secured to the mobile home structure. Dryer exhaust
MUST NOT terminate under the mobile home.
• Exhaust duct must not be connected to any other duct, vent or chimney.
• Venting materials are not supplied with the dryer (obtain locally). Do not use plastic or thin foil flexible ducting.
• Static pressure in the dryer’s exhaust duct should be no greater than .6 inches (1.5
cm). Check with dryer running and no load. This can be measured with a manometer placed on the exhaust duct approximately two feet (61 cm) from the dryer.
For the best exhaust system:
• Locate dryer so exhaust duct is as short as possible.
• Verify old ducts are cleaned before installing new dryer.
• Use 4 inch (10.2 cm) diameter rigid or flexible metal duct.
• Use duct tape on all joints.
• Use as few elbows as possible.
5

Installation Checks and Adjustments
*With leveling legs turned fully into base
23.5"
(59,7 cm)
7.7"
(19,6 cm)
4.0"
(10,2 cm)
4.0"
(10,2 cm)
28"
(71,1 cm)
.4"
(1,1 cm)
15.4"
(39,1 cm)
26.9"
(68,3 cm)
*36" (91,4 cm)
*43" (109,2 cm)
2.8"
(7 cm)
2.3"
(6 cm)
Appliance main
gas valve
Air shutter
lockscrew
Air
shutter
View of burner
with front access
panel removed
FRONT VIEW
(w/o Closet Door)
SIDE VIEW FRONT VIEW
(Closet Door)
Centered air
openings minimum
40 sq. in.
(260 sq. cm) each
Closet
Door
Outer wall of
enclosure
3" (7,6 cm)
3" (7,6 cm)
2" (5,1 cm)
2" (5,1 cm)
0"
(0 cm)
0" (0 cm)0" (0 cm)
12"
(30,5 cm)
Min.
12"
(30,5 cm)
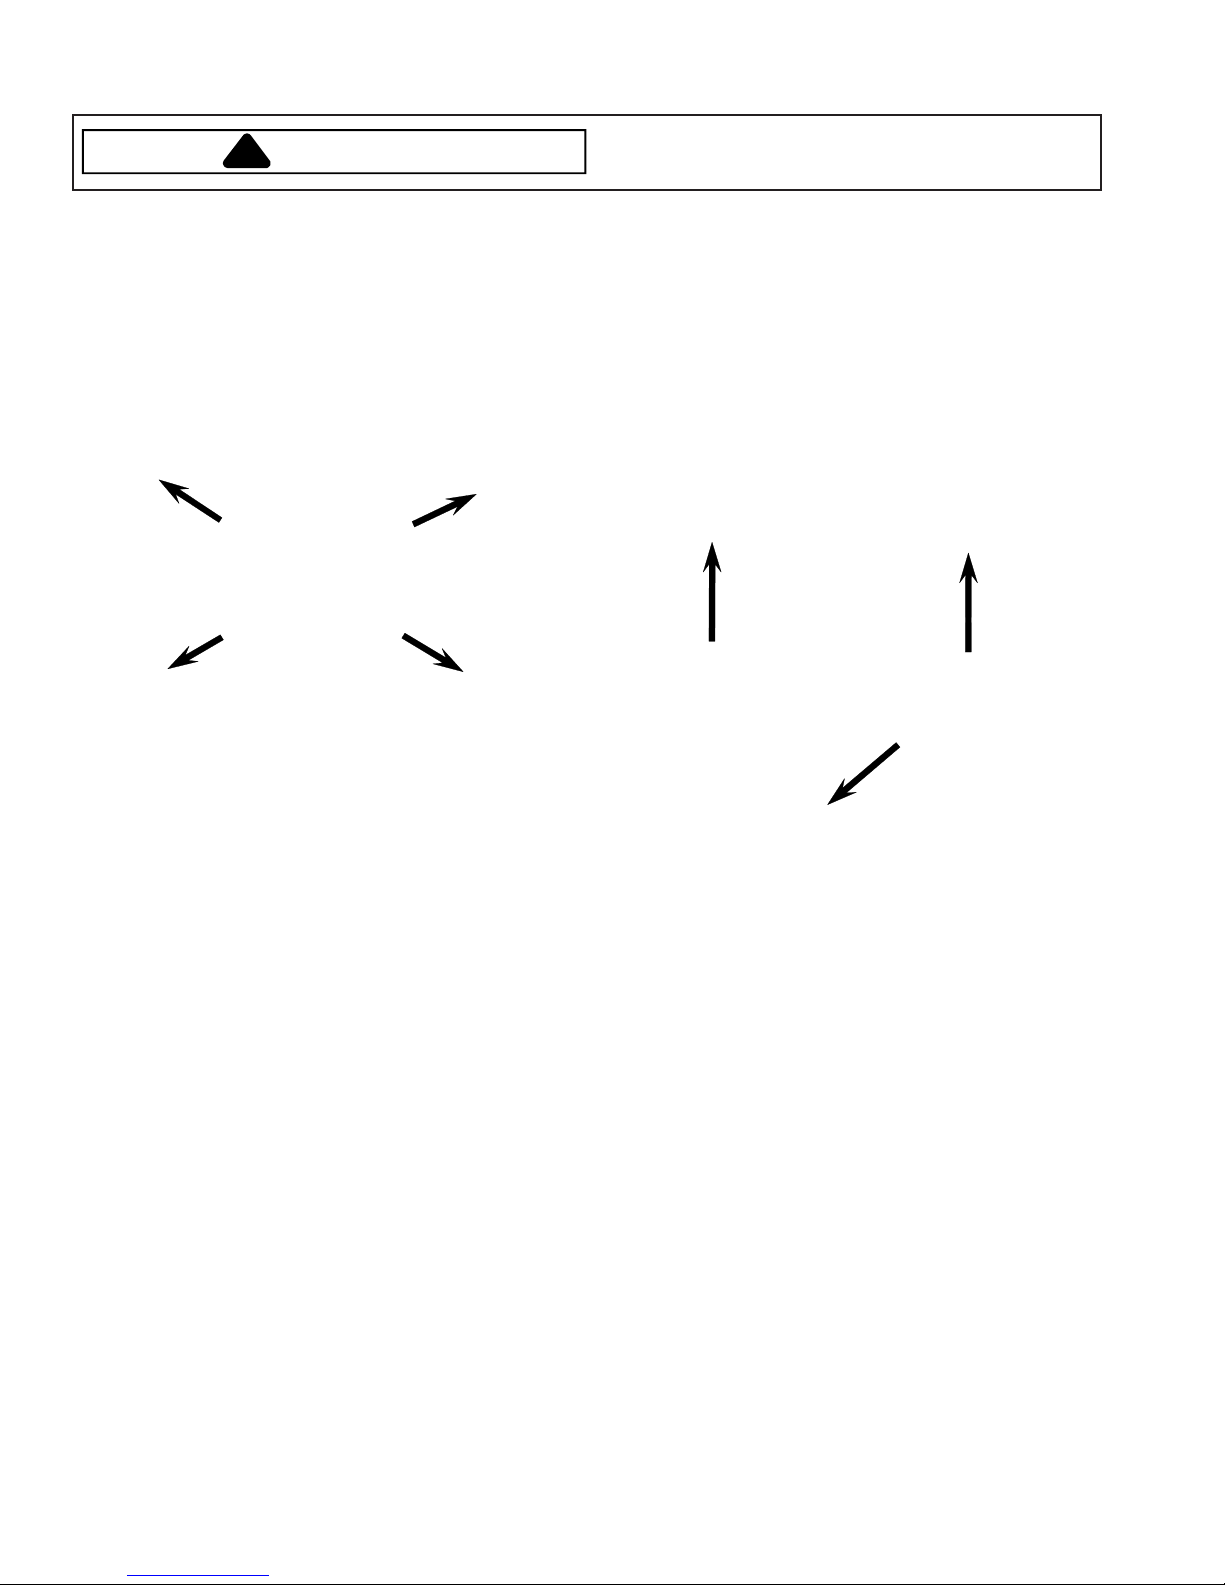
Checking Burner Flame
To view the burner flame, remove the
lower front panel of the dryer.
WARNING
To p revent personal injury or
property damage, front panel
must be in place during normal
operation.
Close the loading door, start the
dryer in a heat setting (refer to User’s
Guide) The dryer will start, ignitor will
glow red, and main burner will ignite.
IMPORTANT: If all air is not purged
out of gas line, gas ignitor may go
off before gas is ignited. If this
happens, after approximately two
minutes ignitor will again attempt
gas ignition.
After the dryer has operated for
approximately 5 minutes, observe
burner flame through lower front
panel. Adjust air shutter to obtain a
soft, uniform blue flame. (A
yellow tipped flame indicates lack of
air. Aharsh, roaring, very blue flame
indicates too much air
lazy,
.)
Adjusting Air Flow to Burner
1. Loosen air shutter lock screw.
2. Turn air shutter to left to get a
luminous yellow-tipped flame,
turn it back slowly to the right to
obtain a steady, soft blue flame.
3. After air shutter is adjusted for
proper flame, tighten air shutter
lock screw securely.
After the dryer has operated for
approximately three minutes,
exhaust air or exhaust pipe should
be warm.
A-14 16025315 ©2006 Maytag Services
6

Appendix B
The Use and Care information provided in this service manual is representative of a limited
number of models. Reference the customer’s Use and Care literature included with the
product, order a copy , or consult the manufacturer’s website for the specific model
(www.maytag.com).
©2006 Maytag Services 16026315 B–1

B-2 16026315 ©2006 Maytag Services

MD-1
Use & Care Guide
Table of Contents
Important Safety
Instructions . . . . . . . . . . . . . . . .1-2
Using the Controls
Auto Dry Models . . . . . . . . . . . . . .3-4
Sensor Models . . . . . . . . . . . . . . . .5-6
Electronic Controls . . . . . . . . . . . .7-9
Operating Tips . . . . . . . . . . . . . . 10
Accessories . . . . . . . . . . . . . . . . 10
Care & Cleaning . . . . . . . . . . . . 11
Form No. A/06/05 Part No. 2202687 www.maytag.com Litho U.S.A. ©2005 Maytag Appliances Sales Co.
Reversing the Door . . . . . . . . . . 12
Dryer Exhaust Tips . . . . . . . . . . 13
Troubleshooting . . . . . . . . . . . . . 14
©2006 Maytag Services 16026315 B-3

1
B-4 16026315 ©2006 Maytag Services

©2006 Maytag Services 16026315 B-5
2

3
B-6 16026315 ©2006 Maytag Services

©2006 Maytag Services 16026315 B-7
4

5
B-8 16026315 ©2006 Maytag Services

©2006 Maytag Services 16026315 B-9
6

7
B-10 16026315 ©2006 Maytag Services

©2006 Maytag Services 16026315 B-11
8

9
B-12 16026315 ©2006 Maytag Services

©2006 Maytag Services 16026315 B-13
10

11
B-14 16026315 ©2006 Maytag Services

©2006 Maytag Services 16026315 B-15
12

13
B-16 16026315 ©2006 Maytag Services

©2006 Maytag Services 16026315 B-17
14

B-18 16026315 ©2006 Maytag Services

Dryer
Use & Care Guide
Important Safety Instructions . . . . . . . . 1-2
Using the Controls
Auto Dry Models . . . . . . . . . . . . . . . . . . . . .3-4
Electronic Controls . . . . . . . . . . . . . . . . . . . .5-7
Operating Tips . . . . . . . . . . . . . . . . . . . . . . . 8
Accessories . . . . . . . . . . . . . . . . . . . . . . . . . 8
Care & Cleaning . . . . . . . . . . . . . . . . . . . . . . 9
Reversing the Door . . . . . . . . . . . . . . . . . . 10
ND-1
Form No. A/06/05 Part No. 2205340 www.amana.com Litho U.S.A. ©2005 Maytag Appliances Sales Co
©2006 Maytag Services 16026315 B-19
Dryer Exhaust Tips . . . . . . . . . . . . . . . . . . . 11
Troubleshooting . . . . . . . . . . . . . . . . . . . . 12

1
B-20 16026315 ©2006 Maytag Services

©2006 Maytag Services 16026315 B-21
2

3
B-22 16026315 ©2006 Maytag Services

©2006 Maytag Services 16026315 B-23
4

5
B-24 16026315 ©2006 Maytag Services

©2006 Maytag Services 16026315 B-25
6

7
B-26 16026315 ©2006 Maytag Services

©2006 Maytag Services 16026315 B-27
8

9
B-28 16026315 ©2006 Maytag Services

©2006 Maytag Services 16026315 B-29
10

11
B-30 16026315 ©2006 Maytag Services

©2006 Maytag Services 16026315 B-31
12

B-32 16026315 ©2006 Maytag Services

Clothes
Dryer
Use & Care Guide
PDT-1
Table of Contents
Important Safety
Instructions . . . . . . . . . . . . . . . .1-2
Using the Controls
5 Cycles Model . . . . . . . . . . . . . . . . . . . . .3-4
6 Cycles Model . . . . . . . . . . . . . . . . . . . . .5-6
Operating Tips . . . . . . . . . . . . . . . 7
Accessories . . . . . . . . . . . . . . . . . 7
Care & Cleaning . . . . . . . . . . . . . 8
Reversing the Door . . . . . . . . . . .9
Dryer Exhaust Tips . . . . . . . . . . .10
Troubleshooting . . . . . . . . . . . . 11
Form No. B/06/05 Part No. 2205342 Litho U.S.A. ©2005 Maytag Appliances Sales Co.
©2006 Maytag Services 16026315 B-33

1
B-34 16026315 ©2006 Maytag Services

©2006 Maytag Services 16026315 B-35
2

3
B-36 16026315 ©2006 Maytag Services

©2006 Maytag Services 16026315 B-37
4

5
B-38 16026315 ©2006 Maytag Services

©2006 Maytag Services 16026315 B-39
6

7
B-40 16026315 ©2006 Maytag Services

©2006 Maytag Services 16026315 B-41
8

9
B-42 16026315 ©2006 Maytag Services

©2006 Maytag Services 16026315 B-43
10

11
B-44 16026315 ©2006 Maytag Services
 Loading...