

Page 1
INDEX
Answers to Questions ..................................... 18 Safety
Grounding ...................................................... 6
Care and Cleaning .................................... 19-21 Important Safety Instructfons
Replacing Light Bulbs ............................ 20-21 and Registration ......................................... 2-5
Interference Note ........................................... 6
Oven Operation Precautions to Avoid
Adding or Subtracting Cook Time ................ 12 Possible Exposure
Auto Cook .................................................... 12 to Excessive Microwave Energy .................... 3
Auto Defrost ........................................... 14-16
Cook Time .................................................... 10 Service Information ................................... 22-23
Keep Warm .................................................. 13
Metal Rack ................................................... 13 Warranty ......................................................... 24
Memories ..................................................... 11
Oven Controls ............................................ 7-9
Popcorn ........................................................ 12
Power ........................................................... 11
Quick Minute ................................................ 13
Reheat Cooking Guide ................................ 17
Time of Day Clock ........................................ 10
Timer ............................................................ 10
YOU MUST REGISTER YOUR MICROWAVE OVEN
The Federal Government requires that records Include the Model Number and Serial Number
be filed on the location of all microwave ovens, in all correspondence. These numbers are
A registration card, packed inside this oven, is found on the rating plate which is located on
used to track the location of our microwave the oven front frame behind the door. Write the
ovens. Please fill in the registration card now information here for handy reference.
and mail to us. If you move, register your new
address by writing to us at the address below.
If you bought this microwave oven from a DATE PURCHASED
previous owner, please establish your owner-
ship by writing to:
Maytag Customer Service MODEL NUMBER
Warranty Administration
P.O. Box 4970
Cleveland, TN 37320-4970 SERIAL NUMBER
Page 2
PRECAUTIONS TO AVOID POSSI-
BLE EXPOSURE TO EXCESSIVE
MICROWAVE ENERGY
a. Do not attempt to operate this oven with damage tothe: (1) door (bent), (2)hinges
the door open since open door opera- and latches (broken or loosened), (3)
tion can result in harmful exposure to door seals and sealing surfaces.
microwave energy. It is important notto
defeat or tamper with the safety inter- d. The oven should not be adjusted or re-
locks, paired by anyone except properly quali-
fied service personnel.
b. Do not place any object between the
ovenfrontfaceandthedoororallowsoil e. Do not operate the microwave oven if
or cleaner residue to accumulate on the door window is broken. The micro-
sealing surfaces, wave oven should be checked for
microwave leakage by qualified service
c. Do not operate the oven if it isdamaged, personnel after a repair is made.
It is particularly important that the oven
door close properly and that there is no f. Do not operate the microwave oven
with the outer cabinet removed.
IMPORTANT SAFETY INSTRUCTIONS
When using electrical appliances, basic safety 5. Some products such as whole eggs and
precautions should be followed, including the sealed containers - for example, closed
following: glass jars - may explode and should not
WARNING- To reduce the risk of burns, elec- poached eggs have been known to ex-
tric shock, fire, injury to persons or exposure to plode. Cover poached eggs and allow a
excessive microwave energy: standing time of one minute before cutting
1. Read all instructions before using the appli- 6. Foods with unbroken outer"skin" such as
ance. potatoes, sausages, tomatoes, apples,
2. Read and follow the specific "PRECAU- chicken livers and other giblets, and egg
TIONSTOAVOIDPOSSIBLEEXPOSURE yolks (see previous caution) should be
TO EXCESSIVE MICROWAVE ENERGY" pierced to allow steam to escape during
found above, cooking. "Boilable" cooking pouches and
3. This appliance must be grounded. Con- tightly closed plastic bags should be slit,
nect only to properly grounded outlet. See pierced, or vented.
"GROUNDING INSTRUCTIONS" on Page 7. Do not heat, store or use flammable ma-
6. terials in or near the oven. Fumes can
4. Install or locate this appliance in accor- create a fire hazard or explosion.
dance with the provided installation instruc-
tions.
be heated inthis oven. In rare instances,
into them.
3
Page 3
IMPORTANT SAFETY INSTRUCTIONS
8. Use this appliance only for its intended use b. Remove wire twist-ties from paper or
as described in this manual. Do not use plastic bags before placing bag inoven.
corrosive chemicals or vapors inthis appli- c. If materials inside the oven should ig-
ance. This type of oven is specifically nite, keep oven door closed, turn oven
designed to heat, cook, or defrost food. It off, and disconnect the power cord, or
isnot designed for industrial, laboratory, or shut off power at the fuse or circuit
commercial use. It is intended for home breaker panel.
use only. Do not use for drying clothes, d. Do not use the oven for storage.
linens, newspaper, orsimilarnon-foodtype e. Do not pop popcorn except in a micro-
items, wave approved popcorn popper or in a
9. As with any appliance, close supervision is commercial package recommended es-
necessary when used by children, pecially for microwave ovens.
10.Do not operate this appliance if it has a 19.Do not operate the oven when empty.
damaged cord or plug, if it is not working 20. Do not lean on the oven door. The door is
properly, or if it has been damaged or designed to close tightly and seal properly
dropped, for safe operation. Leaning on the door
11.This appliance should be serviced only by may warp or break the hinges.
qualified service personnel. Contact near- 21.To avoid exposure to dangerous high volt-
estauthofizedservicefacilityforexamina- age, DO NOT REMOVE THE OUTER
tion, repair or adjustment. CASE.
12.Do not cover or block any openings on the 22. Do not store metal oven rack in oven. Use
appliance, the rack only when cooking more than one
13.Do not use outdoors. Do not use this prod- dish. Do not use microwave browning dish
uct nearwater-forexample, near a kitchen on the shelf; the shelf could overheat.
sink, in a wet basement, or near a swim- 23.Liquids heated in certain shaped contain-
ming pool, and the like. ers (especially cylindrical-shaped contain-
14.Do not immerse cord or plug in water, ers) may become overheated, splash out
15.Keep cord away from heated surfaces, with a _oudnoise. For best results, stir the
16.Do not let cord hang over edge of table or liquid several times before heating. AI-
counter, ways stir liquids several times between
17.When cleaning surfaces of door and oven rehearings.
that come together on closing the door, 24. Read and follow specific microwave oven
use only mild, non-abrasive soaps or de- preparation instructions on food packages
tergents applied with a sponge or soft orcontainers(especiallybabyfood). Above
cloth, all, this is a cooking appliance designed to
18.To reduce the risk of fire in the oven cavity: prepare food.
a. Do not overcook food. Carefully attend 25. Use only cooking utensils and accessories
appliance if paper, plastic, orother corn- made for use in the microwave and specifi-
bustible materials are placed inside the cally described in this manual or cook-
oven to facilitate cooking. Avoid using book.
recycled paper products. Do not use 26. Microwaveoven manufacturers do not rec-
newspaperorotherprintedpaperinthe ommend deep fat frying or frying in a
oven. Such products sometimes con- microwave oven. Hot oil can damage oven
tain impurities which could ignite, parts and utensils and even result in skin
burns.
4
Page 4

IMPORTANT SAFETY INSTRUCTIONS
27.Plastic wrap: Use only those types de- usingmetalinmicrowaveoven, keepmetal
signed for microwave oven use and avoid (other than metal shelf) at least 1-inch
forming an air-tight seal. Fold backa small away from sides of oven.
corner or cut a small sTitto allow steam to 31. Do not defrost frozen beverages in narrow
escape, necked bottles.
28.Stay near the appliance while it is in use 32.Cookware may become hot because of
and check cooking progress frequently, heat transferredfromthe heated food. Pot
Leaving the appliance unattended may holdersmaybeneededtohandlethecook-
result in overcooked food and possibly a ware.
fire in your oven. 33.Do not try to melt paraffin wax in the oven.
29. Do not store the temperature probe in the Paraffin wax will not melt in a microwave
oven. oven because itallows microwaves to pass
30.Use metal only as directed in the cook- through it.
book. TV dinners may be microwaved in 34.This appliance is suitable for use above
foil trays less than 3/4" deep; remove top both gas and electric cooking appliances
foil cover and return tray to box. When 36" or less.
SAVE THESE INSTRUCTIONS
SAFETY PRECAUTIONS FOR EXHAUST FAN
In addition to starting by touching the fan 2. DO NOT allow grease and soil to build up
switch, the exhaust fan may start automati- inthe exhaust filter. Exhaust fan efficiency
cally if excessive temperatures occur around will decrease and fire may result. Clean
the microwave oven. This may occur with high frequently following the filter cleaning in-
temperature frying or long term cooking onthe structions.
cooktop surface below the hood or during 3. DO NOT flame foods when operating the
broiling or the pyrolytic (self) cleaning of a exhaust fan. The fan, if operating, may
range, spread the flame and cause personal in-
This automatic exhaust fan feature is de- jury or property damage.
signedtopreventdamagefromoverheatingof 4. In the event of a grease fire, smother
the oven parts. The exhaust fan may stay on flaming pan on surface unit by covering
as long as 30 minutes to cool the oven. The pan completely with welt-fitting lid.
cooling time will depend on removar of the 5. Use care when cleaning the vent hood
heat source. Pushing the fan switch will not filter. Corrosive cleaning agents, such as
turn the fan off. lye-based oven cleaners, may damage the
Because of the automatic exhaust fan lea- filter.
ture, the following cautions must be observed: 6. Do not change the cooktop or oven lights
without turning the power off at the main
1. DO NOT leave the area when using your power supply. Electrical shock may
cooktop at a high setting. Accidental fires result.
from boilover or spattering on the surface
unit could spread, especially if the exhaust
fan is operating.
5
Page 5
INSTALLATION
GROUNDING INSTRUCTIONS INTERFERENCE NOTE
This appliance must be grounded. In the Microwave ovens generate radio frequency
event of an electrical short circuit,grounding energy during operation, and if not installed
reducesthe riskof electricshockby providing properlymay cause interference to radio and
an escape wire for the electriccurrent. This televisionreception. Youcandetermine ifthis
appliance is equipped with a corcl having a unitiscausinginterferencebyturning it onand
groundingwire with a grounding plug. The offwhile the interference isoccurring. If inter-
plug must be plugged into an outlet that is ference occurs it may be corrected by one or
properlyinstalled and grounded, more of the followingmeasures:
WARNING- Improper use of the grounding • clean door and sealing surfaces of the
plug can result in a risk of electric shock, oven;
Consult a qualified electrician or serviceman • reorient the receiving antenna;
if the grounding instructions are not com-
pletely understood, or if doubt exists as to • relocate the oven with respect to the re-
whether the appliance is property grounded ceiver; and/or
and either:
• plug the oven into a different outlet so that
1) If it is absolutely necessary to use an it and the receiver are on different circuits.
extension cord, use only a 3-wire exten-
sion cord that has a 3-blade grounding If the interference persists, you may want to
plug, and a 3 slot receptacle that will consult an experienced radio/television tech-
accept the plug on the appliance. The nician for additional suggestions.
marked rating of the extension cord shall
be equal to or greater than the electrical
rating of the appliance, or,
2) Do not use an extension cord. If the
power supply cord is too short, have a
qualified electrician or serviceman install
an outlet near the appliance.
6
Page 6
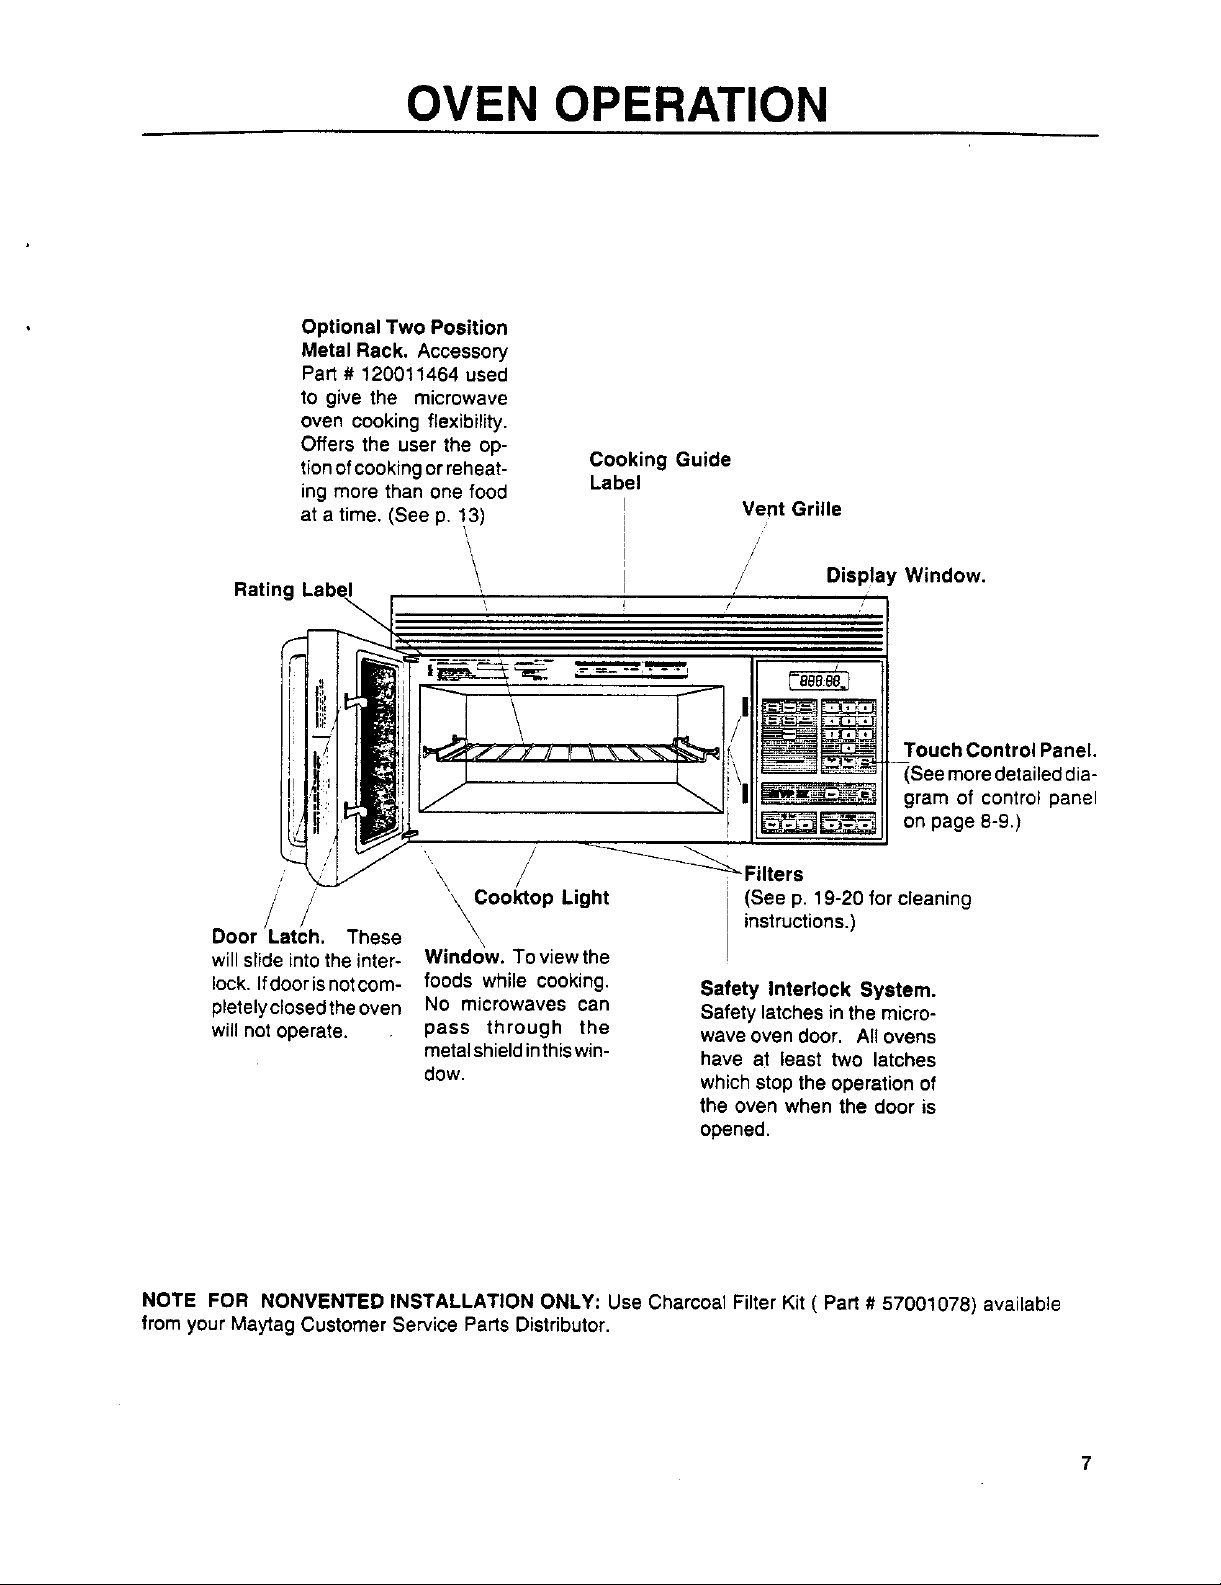
OVEN OPERATION
Optional Two Position
Metal Rack. Accessory
Part # 120011464 used
to give the microwave
oven cooking flexibility.
Offers the user the op-
tionof cookingor reheat- Cooking Guide
ing more than one food Label
at a time. (See p. 13) i
Rating Label i , .,
\
\_ ! //
_'_ __7
I Vent Grille
/
I / Display Window.
PI_ _ !,\ Touch Control Panel.
i_J _ gram of control panelJZl
--i _ on page 8-9.)
, / '\ // _ Filters
/ / _Cooktop Light (See p. 1g-20 for cleaning
D
oor Latch. These _ instructions.)
will slide intothe inter- Window. Toviewthe
lock. Ifdoorisnotcom- foods while cooking. Safety Interlock System.
pletelyclosedtheoven No microwaves can Safety latches in the micro-
will not operate, pass through the wave oven door. All ovens
metalshieldinthiswin- have at least two latches
dow. which stop the operation of
the oven when the door is
opened.
NOTE FOR NONVENTED INSTALLATION ONLY: Use Charcoal Filter Kit ( Part # 57001078) available
from your Maytag Customer Service Parts Distributor,
See more detailed dia-
7
Page 7
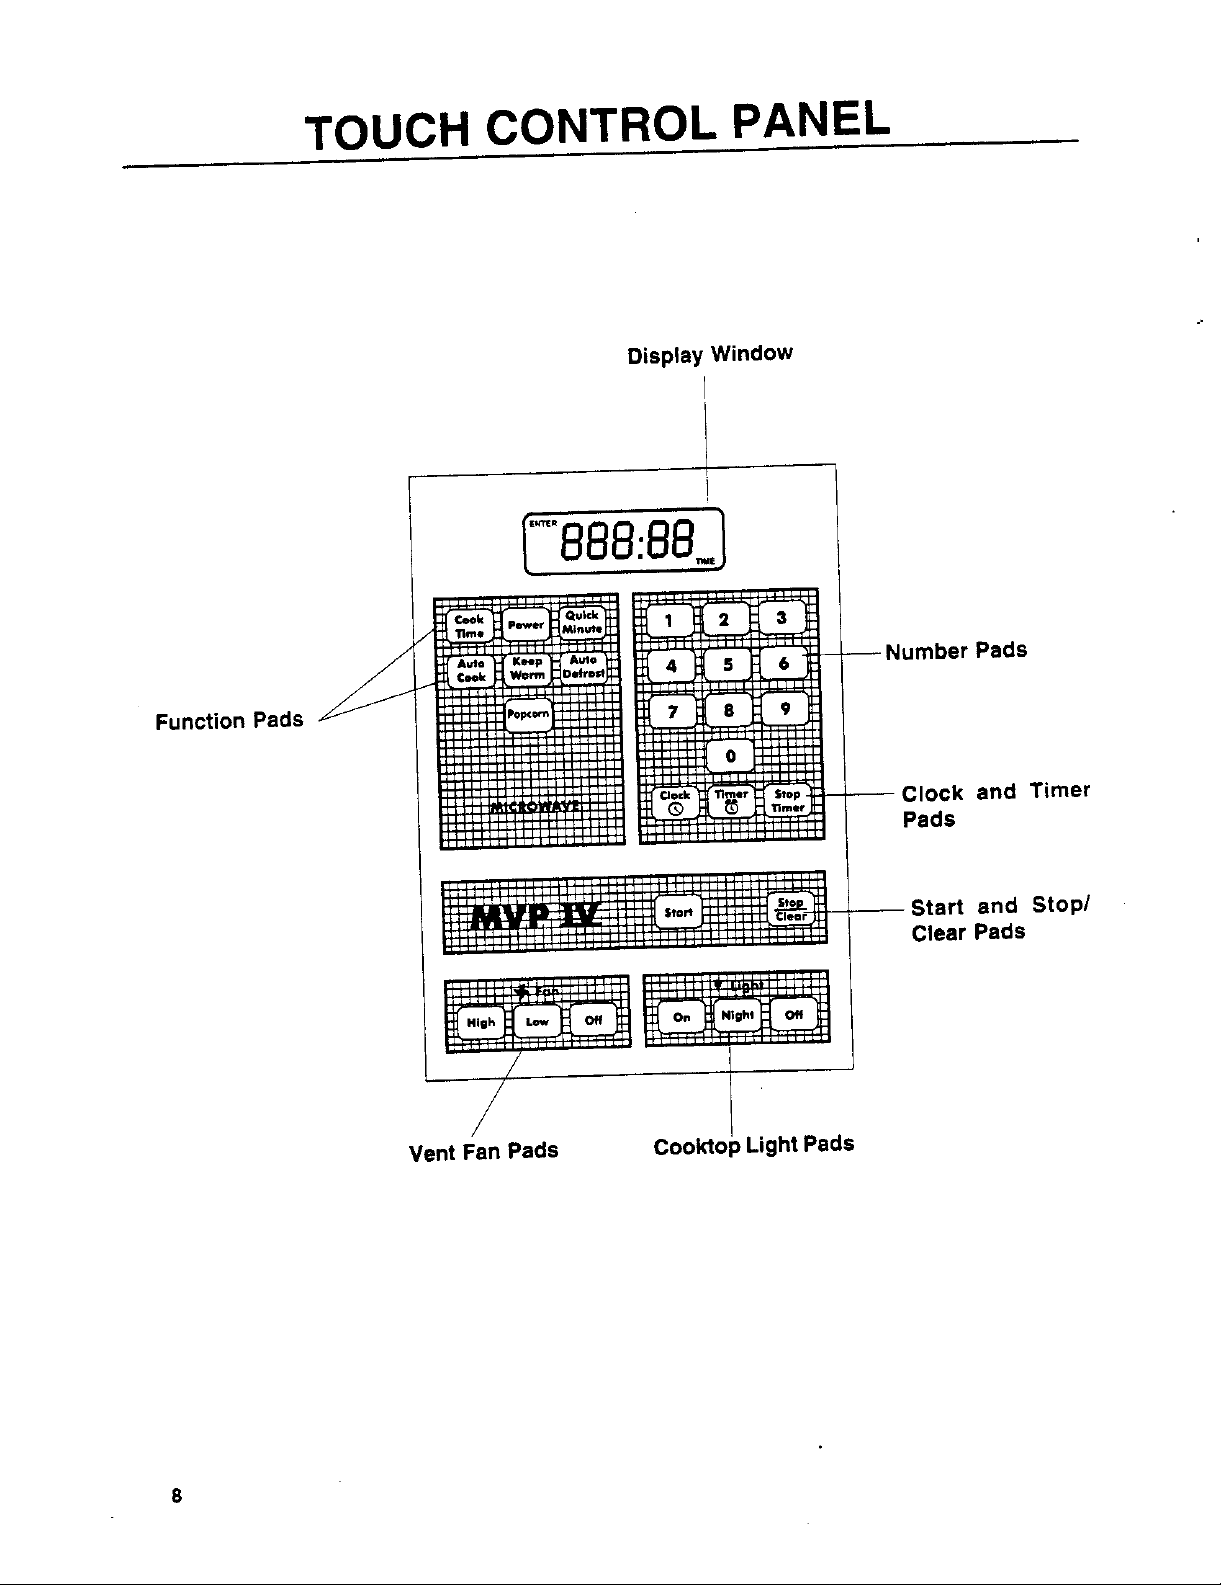
TOUCH CONTROL PANEL
Display Window
=_= ,_.pH.=.-H --Number Pads
¢=ek "4_rm eft"
Function Pads
iit _lEllt til]_Jl_LIIIII
____O.=k =°P --Clock and Timer
I_ll;ll_lEI] I=1_ I=1111 •
I...................... ' Pads
tart and Stop/
Clear Pads
On _
Vent Fan Pads C o op g a s
. ,old L' htPd
Page 8

DISPLAY WINDOW START PAD
The Display includes a clock and indicators to tell Use to start the oven. If you open the door after
you time of day, cooking time settings and cooking the oven begins to cook, retouch the Start Pad.
functions selected. (See p. 10)
FUNCTION PADS STOP/CLEAR PAD
Cook Time Use to erase an incorrect command, cancel a
Use for time cooking. (See p.10) program during cooking, or clear the Display.
Power
Use to set or check power level setting. (See p. VENT FAN PADS
11) High, Low, Off
Quick Minute Use to set the fan speed.
Use to quickly add 1 minute at 100% cooking
power. (See p. 13) COOKTOP LIGHT PADS
Auto Cook On, Night, Off
Use to cook commonly prepared items with Use for cooktop light, night light, or turn off the
preprogrammed times and power levels. (See lights.
Cooking Guide Label and p. 12)
Keep Warm AUDIBLE SIGNALS
Use to keep hot, cooked foods safely warm for
up to 99 min. 99 sec. (See p. 13) setting and using your oven:
Audible signals are available to guide you when
Auto Defrost • A programming tone will sound each time
Use to defrost food by weight. (See p. 14-16) you touch a pad.
Popcorn
Useforprepackagedmicrowavepopcornweigh- • One tone signals the end of a Timer count-
ing 1.75 - 3.5 oz. (See p. 12) down.
NUMBER PADS • Four tones signal the end of a cooking cycle.
Touch number pads to enter cooking time, tem-
perature, power level, quantities, weights or food • Two tones sound once every minute after an
categories. End-of-Cooking signal as a reminder if food
CLOCK PAD
Use to set the correct time of day. (See p. 10) • Three tones sound if you have made an
TIMER PADS
Timer
Use to set the minute timer, (See p. 10)
Stop Timer
Use to cancel the minute timer, (See p. 10)
has not been removed from the oven.
incorrect entry.
9
Page 9

TIME OF DAY CLOCK COOK TIME PAD
• After plugging in the oven or after a power Consultyour cookbookfor the approximate cook-
outage, the Display will flash "888:88". Set ing time for each recipe. Start with the shortest
clock using the instructions below, recommended time and add more as needed.
• Time of Day clock is a 12 hour clock, opened any time during operation; the oven will
• You can only set the clock if the oven is not setting for up to 1 minute until the door is closed
cooking food. Ifset, the time of day will always and the Start Pad is touched. Remember, the
be displayed when no other cooking function cookbook is only a guide. Starting temperatures
is being used. and density of the food can vary the cooking time
BASIC INSTRUCTIONS -, .
I. Touch Clock Pad. Indicatorwords "ENTER I BASIC INSTRUCTIONS
2. Set the time of day bytouching the appropri- 2. Enter cookingtime.*
ate numbers.. 3. Touch the Start Pad.
CLOCK TIME" will appear in the display. I 1. Touch Cook Time Pad.
3. Touch Clock Pad or Start Pad.
Check the food as it cooks. The oven door can be
automatically stop cooking and maintain the time
required.
*Note: Full power cooking is automatic. If you
TIMER wish to use a different power level follow the
instructionson p.11.
The Timer feature of this oven has many uses.
Useit to time a tongdistancephone catl, standing Example= To heat a cup of coffee for I 1/2
times after microwave cooking, or mixing or beat- minutes, touch the Cook Time Pad. Then, touch
ing times when preparing recipes. The Timer can the numbers 1, 3, 0. Then touch the Start Pad.
be programmed upto 99 minutesand 99 seconds. The time you select will appear in the Display
Window. The oven blower will come on and the
BASIC INSTRUCTIONS oven will begin cooking. Time count down will
1. Touch theTimer Pad. Indicatorwords "enter begin. When the time is up, the microwave oven
Timer Time" will appear in the display, willbeep four times; "End" appears in the display;
12. Enter desired time. and oven will stopcooking automatically. Time of
[3. Push Start Pad or Timer Set Pad. day reappears in the display when the door is
• One tone signals the end of a timing opera-
tion.
• To stop timer once it has started, touch
StopTimer Pad.
• The timer can be set while cooking. The time
inthe displayis forwhat iscooking intheoven.
opened or Stop/Clear Pad is touched.
10
Page 10

POWER PAD TO CHECK OR CHANGE POWER
WHILE COOKING
As with conventional cooking methods, your mi-
crowave oven givesyou the flexibility of choosing To Check Power Setting:
the cooking speed (power level) you need for 1. Touch Power Pad.
each type of food.
To Change Power Setting
BASIC INSTRUCTIONS 1. Touch Power Pad.
1. Touch Cook Time Pad. 2. Enter new power setting by touching Number
2, Enter cooking time. Pad. To return to full power, touch Power Pad
3. Touch the Power Pad. twice.
4. Enter power level.* 3. Touch Start Pad.
5, Touch the Start Pad.
*See Power Level Guide. MEMORIES
Example: If the recipe calls for cooking with 50%
powerfor 3 minutes, you would touch:Cook Time The two Memories of this microwave oven letyou
Pad; then the number pads 3,0,0; then Power
Pad; then 5 ("P-50" will appear in the Display program two sequential operations such as
Window); then Start Pad. defrosting and cooking; cooking and standing;
and cooking using two different power levels,
Power Guide* The Memory feature automatically changes power
Power Power beeps will sound between Memories, it is also
Set % Suggested Uses possible to divide cooking times. Then, the signal
HI 100 Forvegetables; beverages; quick would serve asa reminder to add foods(separate
reheating(observecloselytoavoid dishes or add ingredients) and toobtain precisely
overcooking); generallyforquick- the end results desired.
est cooking.
9 90 Sauteing vegetables.
8 80 Forwholepoultry, cheese andegg BASIC INSTRUCTIONS
dishes; cooking certain seafood 1. Touch Cook Time Pad,
(clams, oysters or scallops). 2. Enter cooking time.
7 70 Forcakes, quickbreads and muf- 3. Touch Power Pad.*
fins, 4. Enter power level.
6 60 Reheatingleftoversorfor cooking 5. Touch Cook Time Pad, "Mere" appears
recipesusingprecookedorcanned in Display.
ingredients. 6. Enter cooking time.
5 50 Reheating largeramounts of left- 7. Touch Power Pad.**
overs;cookingroasts.
4 40 Stewing or developing flavor in
main dishes, soups or sauces;
cookingriceor pasta (after water If you wish to cook on HI, skipsteps 3 & 4,
is boiling) reheating pastries. ** If you wish to cook on HI, skip steps 7 & 8.
3 30 Defrosting;tenderizing less ten- Note: Two beeps signal a change from stage 1
dercutsof meat in liquid;cooking to stage 2. During the second stage, a "2" will
dried beans, lentilsor peas inwa° appear inthe Display. Four beeps signal the end
ter, of both stages.
2 20 Softening cheese, butteror choco-
late. To Cancel Memories
settings and cooking time. Since two short audible
8. Enter power level.
9. Touch Start Pad.
1 10 Keeping food(s) warm or taking 1. Touch Stop/Clear Pad.
chill off refrigeratedfoods before
serving. Note: DO NOT touch the Stop/Clear Pad unless
* Guide gives percentage ofmagnetron "on" time at all memories are to be cancelled.
different power levels and suggested uses.
11
Page 11

AUTO COOK PAD _3BASICINSTRUCTIONS __:_i": :' I
i lTouch'thePopcornPadoncefor3.5 oz.
Cooking with Auto Cook allows you to cook _'.-p_k_ge'Or_;_._,_:'-:._t_:_:,. I
commonmicrowave-preparedfoodswithoutneed- _2_;.Tobc_h'the'Popcorn Pad twice'forl;75 oz, I
ing to program times and power levels. Auto , package, i_ -ili (
Cook has preset times and power levels for five
major food categories: casseroles, baked pota- The Display will alternate between "Pop-", "Corn",
toes,baked goods; fresh/cannedvegetables; and and 'lime remaining".
frozen vegetables.
__7_:_.,:_. _-,-._=__,," •-_ .. :__. :_._:-. Popcorn Tips
ASICINS Ruc'rlONS _ : ... ,., ._
P
_.' Touch Auto Cook Pad_:_:_,._;_; • Cooking performance may vary with brand.
_ele= Categ _'_, Try several brands to decide which gives you
_Enter iamo0nt]nLtrt-/_k0f ,6ervings__;;_-. the best popping results. Forbest results, use
1_4.T0uch StartPad."!_':i;_i_:_!:'_ "; ;;_: '_:; fresh bags of popcorn.
• Do nottry to repop unpopped kernels and do
•Note: See chart below or the Cooking Guide not reuse popcorn bags. Fire may result.
Label on the frame behind the door. • Pop only one package at a time.
• tfyou are using a microwave popcorn popper,
Example: if you want to heat twobaked potatoes, follow manufacturer's instructions.
you would touch Auto Cook Pad; 2 (potatoes); 2 • If you want to change the heating time after
(2 servings), Start Pad. choosing Popcorn, see "Add or Subtracting
Cook Time" below,
When the oven starts, the display immediately
changes to the correct cooking time. ADDING OR SUBTRACTING COOK
AUTO COOK CHART
No. of
Servings/Items If a preset cook time is too long or too short, you
3ategory Food Item You Can Cook
TIME
can increase or decrease the cook time by 10%
after choosing the function.
1 Casserole 1-2 ( BASIC INSTRUCTIONS .'_:' _
I1, Touch function pad: Auto Cook Pad or._
2 Baked Potatoes 1-4 I" Popcorn Pad._:;, _.':_:_.::;_-- - .. "
12: Adjust time!i:_i_.,Gi_:_:_:/ ':: :
3 Baked Goods 1-2 I _a) Increase .Time'._-ToUch_he number "9"
4 Fresh/Canned ._ .. _ :, ,_,,; _, ._._:. =,,.:._-.; : _-_ • _, ,
5 Frozen Vegetables 1-4 ,-.... ,.,.-- -._., .-,__,-:_,_..., -,, _.. , _,_
pad or , _ ...... _ .... ..,. .
.::c)Return to._)_g,n_,}Tim(,. Touch the num-
POPCORN PAD
Note: You can only increase or decrease the
The Popcorn option lets you pop commercially cooktime before touchingthe Start Pad or before
packaged microwave popcorn by touching just the oven automatically starts (for example, Pop-
one pad. The Popcorn Pad has been preset for corn Pad).
either 1.75 oz. package or3.5 oz. package. Care-
fully follow the package directions, Do not leave
microwave oven unattended while popping pop-
corn.
12
Page 12

QUICK MINUTE PAD OPTIONAL METAL COOK RACK
(Part # 12001164)
The Quick Minute Pad provides a convenient
way to extend cooking in multiples of 1 minute. It The two position Metal Cooking Rack gives you
will add 1 minute tothe time shown each time the extra space when cooking in more than one
pad is touched, for up to 99 minutes, containeratthe same time. The metal rackcan be
turned upside-downto help fit taller containers on
NOTE: the bottom of the oven.
• If you add a minute during cooking, the oven
willcookatthecurrentlyselectedPowerLevel.Inserting the Rack
• If you add a minute after cooking has ended, I _ _ k
• You cannot use Quick Minute with the follow-
ing options: Popcorn, Auto Cook, or Auto
the oven will cook on Hi power for one minute. _, ,,_ Lower
Defrost.
KEEP WARM /_. _ ( ,, _ -_"_. Upper
You can safely keep hot, cooked food warm in [ .J I.
your microwave oven for up to 99 minutes, 99 LJ
seconds. You can use the Keep Warm feature by
itself or to automatically follow a cooking cycle. • Insert the rack securely into the four rack
supports on the side walls of the oven.
i BASIC INSTRUCTIONS ]
_!. Touchthe Keep Walrm' Pad. _ • Turn the rack upside-down when using taller
2. Touch the Start Pad. : ..... J containers on the bottom of the oven.
Note: Ifyou want Keep Warm tofollow a cooking Metal Cooking Rack Tips
cycle, simply touch the Keep Warm Pad before
you touch the Start Pad. • Use hot pads when removing rack from oven
after cooking to prevent burns.
Keep Warm Tips
• Do notstore the metal rack in the oven. Arcing
• Opening the oven door cancels the Keep and damage to the oven can result if someone
Warm option, accidentally starts the oven.
L_LJ_, Position
Position
• Food cooked covered should be covered dur- • Do not operate the oven with the metal rack
ing Keep Warm. stored on the floor of the oven. Damage to the
• Pastry items (pies, turnovers, etc.) should be
uncovered during Keep Warm. • Do not use rack with browning dish.
• Complete meals kept warm on a dinner place • Do not let food container on rack touch the top
should be covered during Keep Warm. or sides of the oven.
interior finish will result.
• Do not cook foods directly on the rack without
putting them in containers first.
• Do not use metal container on the metal rack.
13
Page 13

AUTO DEFROST ConversionChart
With the Auto Defrost Feature, the oven auto- If the weight isstated in pounds and ounces, the
maticatlysets the defrostingtime and power ]ev- ounces must be converted to tenths (.1) of a
els for you. You enter the code for either meat, pound.
poultry, or fish and then the weight.
Ounces Pounds
BASIC INSTRUCTIONS ': " " "
1, Touch Auto Defrost Pad. : ,_i 1-2 .1
2. Enter category:_l-rneat 2_bitW0r3-fish. 3 ,2
3. Enter weight.* L_Thecorrect defr0sttime is 4-5 .3
automatically,ca!culated and appears in the 6-7 .4
4. Touch Start Pad._%_ "-_, :,:_i-;_,-_,i 9-10 .6
*See conversion chart. 11 .7
12-13 .8
Example: To defrost 2 1/2 Ibs. ground beef, you 14-15 .9
would touch Auto Defrost Pad; then 1 for meat,
then 2, 5; then Start Pad.
After half of the defrost time is over, the Display
will prompt "Turn Over" for you to turn over the Tips
food while the oven continues to defrost. Open
the door, turn over the food, and shield any warm
areas. Then, place food back in the oven and
touch the Start Pad. At the end of the defrost
time, "End" will appear in the Display. outer wrap and tray. Place food on a micro-
1. Do not defrost covered meat. Covering might
allow cooking to take place. Always remove
wave-safe rack in a dish. During defrost
Note: If you do not open the door within two juices accumulate in dish and may become
minutes of seeing the "Turn Over" prompt, the off the dish will prevent the bottom-side from
Display will resume the countdown, beginning to cook.
hot enough to cook the food. Elevating meat
2. Begin defrosting whole poultry breast-side-
up. Begin defrosting roasts fat-side-down.
3. Auto Defrost is programmed for specific
weights. Defrost results will be affected if you
enter an incorrect weight.
4. Auto Defrost is programmed for frozen food at
0°F. Iffood is stored at a higher temperature,
expect shorter defrost times.
5. The shape of the package afters the defrost-
ing time. Shallow rectangular packets defrost
more quickly than a deep block.
14
Page 14

6. During defrost, the oven will prompt you to turn C) Shield
the food over. At this point, open oven door Use small strips of aluminum foil to protect
and check the food. Follow the techniques thin areas, edges or unevenly shaped
listed below for optimum defrost results. Then, foods such as chicken wings. Do not allow
close oven door, press Start/Stop Pad to foil to come within 1-inch of oven walls or
complete defrosting, door to prevent arcing.
A) Turn Over D) Remove
Roast, ribs, whole poultry, turkey breasts, To prevent cooking, thawed portions
hot dogs, sausages, steaks, or chops, should be removed from the oven at this
point. This may shorten defrost time for
B) Rearrange foods weighing less than 3-1bs.
Break apart or separate steaks, chops,
hamburger patties, ground meat, chicken 7. For better results, a preset standing time is
or seafood pieces, chunksofmeatsuchas included in the defrosting time. This may
stew beef. make the defrosting time seem longer than
expected.
AUTO DEFROST CHART
_EAT SETTING - CATEGORY 1
FOOD AT PAUSE SPECIAL INSTRUCTIONS
Beef Meatof irregularshape end large,fatty cuts of meat
shouldhave the narrowor fattyareas shieldedwithfoil at
the beginningof a defrostcycle.
GroundBeef. Bulk Remove thawed portionswith Do not defrost lessthan 1/4lb. Freezein doughnut
fork. Turn over. Return remain- shape.
mg meat to oven.
Ground Beef, Patties Separate and rearrange. Do not defrost lessthat two 4 oz. patties. Depress
;teak Turn over. Cover warm areas Place on a microwevable roasting rack.
with aluminum foil.
;tew Beef Removethawed portions with Placein a microwaveable bakingdish.
fork. Separate remainder.
Return remainder to oven
Roast Turn over. Coverwarm areas Placein a microwavable roastingrack.
with aluminumfoil.
Pork
Chops (1/2" Thick) Separate and rearrange. Place on a microwavabie roasting rack.
Hot Dogs SeParate and rearrange. Place on a microwavable roasting rack.
Sausage, Links Separateand rearrange. Place on a microwavableroastingrack.
center when freezing.
Sausage, Bulk Remove thawed portions with Place in a microwavable baking dish.
Loin Roast, Boneless Turn over. Cover warm areas Place on a microwabable roastingrack.
fork. Turn over. Return remain-
der to oven.
with aluminum foil.
15
Page 15

AUTO DEFROST CHART
POULTRY SE'I-rlNG - CATEGORY 2
FOOD AT PAUSE SPECIAL INSTRUCTIONS
Chicken
Whole (up to 91/2 Ibs) Turn over (finish defrosting Place chicken breast-side up on a microwavable
breast-side down), Cover warm roasting rack. Finish defrosting by immersing in cold
areas with aluminum foil water. Remove giblefs when chicken is partially
defrosted.
Cut Up Separate pieces and rearrange. Place on a microwavable roasting rack. Finish defrost-
Cornish Hens
Whole Turn over. Cover warm areas Place on s microwavabte roasting rack. Finish
Turkey
Breast (under 6 Ibs) Turn over. Cover warm areas Place on a microwavable roasting rack. Finish
Turn over, Cover warm areas ing by immersing in cold water.
with aluminum foil,
with aluminum foil, defrosting by immersing in cold water.
with aluminum foil. defrosting by immersing in cold water.
FISH SETTING - CATEGORY3
FOOD AT PAUSE SPECIAL INSTRUCTIONS
Fish
Fillets Turn over. Separate fillets Piace in a microwavable baking dish. Carefully separate
when partially thawed, fillets under cold water,
Steaks Separate and rearrange. Place in a microwavabla baking dish. Run cold water
over to finish defrosting.
Whole Turn over. Place in s microwavable baking dish. Cover head and tail
I
Shell Fish ' Separate and rearrange. Place in a microwavable baking dish.
with foil; do not let foil touch sides of microwave oven.
Finish defrosting by immersing in cold water.
, , ,, ,i
16
Page 16

REHEATING COOKING GUIDE CHART
ITEM TEMP TIME/POWER PROCEDURE
Meat (chicken pieces,
chops, hamburgers,
meat loaf slices)
1 serving Refrigerated 1-2 rain at 70% Cover loosely.
2 servings Refrigerated 2V2-41/2rain at 70%
Meat Slices(beef, ham,
_ork, turkey) 1 or more Room Temp. 45 sec-1 min per Cover with gravy or wax paper.
servings serving at 50% Check after 30 sec per serving.
Refrigerated 1-3 min per serving at
50%
Stirrable Casseroles
and Main Dishes
1 serving Refrigerated 2-4 min at 100% Cover. Stir after half the time,
2 servings Refrigerated 4-6 min at 100%
4-6 servings Refrigerated i 6-8 rain at 100%
Nonstirrable Casse-
roles and Main Dishes
1 serving Refrigerated 5-8 min at 50% Cover with wax paper.
2 servings Refrigerated 9-12 min at 50%
4-6 servings Refrigerated 13-16 min at 50%
Pizza
1 slice Room Temp. 15-25 sec at 100% Place on paper towel.
1 slice Refrigerated 30-40 sec at 100%
2 slices Room Temp. 30-40 sec at 100%
2 stices Refrigerated 45-55 sec at 100%
Vegetables
1 serving Refrigerated 3/_-1V2min at 100% Cover. Stir after half the time.
2 servings Refrigerated 11/2-2V_min at 100%
Baked Potato Cut potato lengthwise and then
1 Refrigerated 1-2 min at 50% several times crosswise. Cover
2 Refrigerated 2-3 min at 50% with wax paper.
Breads
(Dinner or breakfast roll) Wrap single roll, bagel or muffin
:1 roll !Room Temp. 8-12 sec at 50% in paper towel. To reheat sev-
2 rolls Room Temp. 11-15 sec at 100% eral, line plate with paper towel,
!4 rolls Room Temp. 18-22 sec at 100% Coverwithanotherpapertowel.
Pie
Whole Refrigerated 5-7 min at 70%
1 slice Refrigerated 30 sec at 100%
17
Page 17

ANSWERS TO QUESTIONS ABOUT YOUR
MICROWAVE OVEN
Q. Can I use a rack in my microwave oven Q What does "standing time" mean?
so that I may reheat or cook on two
levels at a time? A. "Standing time" means that food should be
taken out of the oven and covered for
A. You can use a rack only if rack is supplied additional time after cooking. This process
with your microwave oven. Use of any allows the cooking to finish, saves energy
rack not supplied with the microwave oven and frees the oven for another purpose.
can result in poor cooking performance
and/or arcing. Q. Can I pop popcorn in my microwave
Q. Can I use either metal or aluminum
pans in my microwave oven? A. Yes. Pop packaged microwave popcorn
A, Useable metal includes aluminum foil for the preprogrammed Popcorn Pad. Do
shielding (use small, flat pieces), small not use regular paper bags. Use the
skewers and shallow foil trays (if tray is "listening test" by stopping the oven as
3/_inch deep and filled with food to absorb soon as the popping slows to a "pop" every
microwave energy). Never allow metal to one or two seconds, Do not try to repop
touch wails or door. unpopped kernels. You can also use spe-
Q. Sometimes the door of my microwave popper, be sure to follow manufacturer's
oven appears wavy. Is this normal? directions. Do not pop popcorn in glass
A. This appearance is normal and does not
affect the operation of your oven. Q. Why does steam come out of the air
Q. What are the humming noises that I
hearwhen my microwave oven is oper- A. Steam is normally produced during cook-
ating? ing. The microwave oven has been de-
A. You hear the sound of the transformer
when the magnetron tube cycles on.
oven? How do I get the best results?
following manufacturer's guidelines or use
cial microwave poppers. When using a
utensils.
exhaust vent?
signed to vent thissteam out the top vent.
Q. Why does the dish become hot when I
microwave food In It? I thought that
this should not happen.
A. As thefood becomes hotitwiltconductthe
heat to the dish, Be prepared to use hot
pads to remove food after cooking.
18
Page 18

CARE AND CLEANING
CLEANING THE MICROWAVE CLEANING THE ALUMINUM
OVEN EXHAUST FILTER
A minimum of maintenance isneeded to keep The aluminum mesh exhaust filter should be
the microwave oven clean and trouble free. removed and cleaned frequently, at least once
The oven itself should be cleaned after each a month. Disconnect power tothe oven at the
use with a damp cloth to free it from grease circuit breaker panel or by unplugging.
and soil buildup. Stubborn soils can be re-
moved with a plastic scrub pad. When clean- 1. Remove grease filter, slide each filter to
ing interior surfaces and surfaces of door and the side. Pull filters downward and push to
oven that come together when the door is the other side. The filter will drop out.
closed, use only mild, nonabrasive soaps or
detergents applied with a sponge or soft cloth.
Some liquid cleansers can remove the shiny
surface on plastic or vinyl. Therefore, never
spray or pour liquid cleansers directly onto a
surface. Spray or pour cleanser onto a cloth 2. Soak filters in a sink filled with hot sudsy
or sponge and then clean, water. Do NOT use ammonia or clean in a
dishwasher. The ammonia or dishwasher
Odors car, be eliminated from the inside of the detergent can darken the aluminum.
oven by boiling a solution of one cup of water
_"d several tablespoons of lemon juice inthe 3. Agitate and scrub the filter to remove the
:_r 5-7 minutes. This also helps loosen embedded dirt.
ed soil in the oven. Be very careful not
toscratch the door and interior surface. Wipe 4. Rinse thoroughly and dry.
off excess moisture after every use.
5. To replace grease filter, slide filter in the
DO NOT USE abrasive cleaners, oven clean- frame slot on one side ofthe opening. Push
ers, abrasive cleaning pads or steel wool, as filter upward and push to the other side to
they can scratch or dull oven surfaces or lock into place.
remove lettering on oven door.
Note: Do NOT operate the hood without
CLEANING THE OVEN RACK the filters in place.
Wash the oven rack with a mild soap and asoft
or nylon scrub brush. Be sure to dry com-
pletely after washing. Do not use abrasive
scrubbers or cleansers to clean rack.
19
Page 19

REPLACING THE CHARCOAL REPLACING THE OVEN INTERIOR
FILTER LIGHT
If your microwave hood is installed to recircu- 1. Disconnect the power to the oven at the
late air, the charcoal filter (Part #57001078) circuit breaker panel or by unplugging.
should be replaced every 6 - 12 months. The 2. Remove the vent cover mounting screws.
charcoal filter cannot be cleaned. Disconnect
power to the oven at the circuit breaker panel
or by unplugging.
1. Remove the vent cover mounting screws.
3. Tip the cover forward, then lift out to re-
move.
' ,
2. Tip the cover forward, then lift out to re-
move. /
3. Lift the back of the charcoal filter. Slide the ! j
filter straight out.
4. Slide a new charcoal filter into place. The 6. Replace bulb with candelabra-base 30-
filter should rest at the angle shown, watt bulb available from your authorized
5. Slide the bottom of the vent cover into
place. Push the top until it snaps into 8. Slide the top of the vent cover into place.
place.Then replace,themountingscrews. Push the bottom until it snaps into place.
Note: Do NOT operate the hood without Replace the mounting screws. Turn the
the filters in place, power back on at the main power supply.
/ v v
:-- --" 4. Remove bulb holder mounting screw.
5. Lift up the bulb holder.
Service Company (Part #57001073). Note:
Use only candelabra-base bulbs, 30 watt
maximum. Failure to do so could result in
fire.
7. Replace the bulb holder and mounting
screw.
2o
Page 20

REPLACING THE COOKTOP/NIGHT
LIGHT
1. Disconnectthe powerto the ovenat the
circuitbreakerpanelorbyunplugging.
2. Removethebulbcovermountingscrews.
a. Replace bulb(s) with candelabra-base 30-
watt bulb(s) available from your authorized
Service Company (Part # 57001073).
Note: Use onlycandelabra-base bulbs, 30
watt maximum. Failure to do so could
result in fire.
21
Page 21

SERVICE INFORMATION
Check the following list to be sure a service call is If food cooks unevenly:
really necessary, A quick reference of this manual • refer to your cookbook for proper cooking
as well as reviewing additional information on procedures.
items to check, may prevent an unneeded service • be sure food is evenly shaped.
call, • be sure food is completely defrosted before
cooking.
If nothing on the oven operates: • check placement of aluminum strips used to
• check for s blown circuit fuse or a tripped main prevent overcooking.
circuit breaker.
• check if oven isproperly connected to electric If food is undercooked:
circuit in house. • check recipe to be sure all directions (amount.
• check that controls are set properly, time, & power levels) were correctly followed.
• check household vottage.
If the oven interior light does not work: • be sure microwave oven is on a separate
• the light bulb is loose or defective, circuit.
• be sure food was completely defrosted before
If oven will not cook: cooking,
• check that control panel was programmed If food is overcooked:
correctly. • check recipe to be sure all directions (amount.
• check that door is firmly closed, power level, time, size of dish) were followed.
• check that Start Pad was touched, • besureinitialtemperatureoffoodwasn'thigher
• check that timer wasn't started instead of a than normal.
cook function. If arcing (sparks) occur:
• be sure microwave-safe dishes were used,
If oven takes longer than normal to cook or • be sure wire twist ties weren't used,
cooks too rapidly: • be sure oven wasn't operated when empty.
• be sure the Power is programmed properly.
• check instructions on food density, etc. It the Display shows s time counting down but
• verify voltage to the microwave oven is not low, the oven is not eooking:
• check that door is firmly closed.
If the time of day clock does not always keep • check that Timer wasn't started instead of a
correct time: cooking function.
• check that the power cord is fully inserted into
the outlet receptacle. If the Display shows "888:88":
• check that the oven is properly grounded. • there has been a power interruption.
• be sure the oven is the only appliance on the
electrical circuit.
If oven floor is hot:
• this is normal. The floor is absorbing heat from
the food.
If interior of oven collects moisture:
• this is normal. Food gives off moisture when
cooking and the steam collects on the door
and the oven surface. Wipe excess moisture
from oven after each use.
22
Page 22

_,,IFYOU NEED SERVICE _,:,_: :_.,-_;_ _: ,- _,.,_>_ _ -., ,..,.-
e CallthedealerfromwhomyoL=rapphan_eWaspurchaSed'oi ai_authorizedSe_ice
ContractorlistedintheYellowPages.Your ServiceContractorcanprovidebetterand
fasterserviceif you can accuratelydescribeproblemsand givemodel and serial
numberoftheappliance.Besure'toretainproofofpu_;chaseto venfywarrantystatus.
Referto WARRANTYfor further_informationof owner's responsibilities for warranty
. service. :_ _ . •. ,
IfthedealerOr rvicecompan__nnot r..sotvetheproblem,Wl;detoMayta=_ustomer
•--Service-Co., P.O. Box 2370 Cleveland, TN 37_20-2370, :1_800-68B4._20:__ ....
Useandcaremanuals,servicemanuals,andpartscatalogsareavailablefromMaytag
CustomerService.
Allspecifications subject to change by manufacturer withoutnotice. :.-.
23
Page 23

WARRANTY
Full One Year Warranty
• Forone (1) yearfromthe date of originalretailpurchase,any part which fails in normal
home use willbe repairedor replacedfree ofcharge.
LJmded"Warranty
• After the secondyear from the date of original retail purchase, through the fifth year,
magnetron, touch pad assembly, microprocessor, power and microprocessor trans-
former, capacitor, rectifier, and triac assemblywhich fail in normal home use will be
repairedorreplacedfreeofchargeforthe partitself,withtheownerpayingallothercosts,
including labor,whenthe applianceis locatedin the United States.
Limited PartsWarranty Outside The United States
• Fortwo (2) yearsfrom the dateof original retailpurchase,any part whichfailsin normal
home use will be repairedor replacedfree of charge for the part itself, with the owner
payingallothercosts, includinglabor,whentheapplianceislocatedoutsidethe United
States.
This Warranty gives you specific legal rights, and you may also have other rights which vary from state to state.
Part No. 3874W500827/4358920 1/95
-!
o
 Loading...