

TimeSavor TMRange
featuring the Speed Oven
Keep these instructions for future reference. If you have
any questions please call us at 1-800-688-1120
TABLE OF CONTENTS
iMPORTANT SAFETY INSTRUCTIONS ....... 1-4 Preheating ................................ 11
SpeedOvenfeatureonly ..................... 4 Oven operation............................ 12
Precautionsto avoidpossib(e exposure Automaticovencookingfeature .......... 12-13
to excessive microwave energy ............ 4 Conventional baking tips .................... 14
Conventionalbakingchart ................... 15
CLOCK AND OVEN CONTROL .............. 5-6 Common baking problems chart ............. 16
Clock and oven operation .................... 5 Roasting .................................. 17
SpeedOven operation ....................... 6 Broiling ................................... 18
COOKTOP USE .............................. 7 SPEED OVEN FEATURE ................. 19-22
Control knobs .............................. 7 General information ........................ 19
Cookingtips ................................ 7 "Hold" .................................... 19
Cookware .................................. 7 Frequently asked questions about
Canning ................................... 7 SpeedOven ............................ 20
Heatsetting guide ........................... 7 SpeedCook 1or Speed Cook 2 ............. 21
SMOOTHTOPCOOKTOP ................... 8-9
Cookingareas .............................. 8 MAINTENANCE ............................. 23
Hot surface light ............................ 8 Cooktop light .............................. 23
Retainedheat .............................. 8 Oven light ................................. 23
Cooking tips ................................ 8 Ovendoor ................................ 23
Cookware .................................. 8 Doorlock lever ............................ 23
To protectsmoothtop ........................ 8 Storagedrawer ............................ 23
Care information ............................ 9 Levelinglegs .............................. 23
Defrost/Heat .............................. 22
COIL COOKTOP ............................. 10 SELF-CLEAN OVEN ..................... 24-25
Cooktop .................................. 10
Surface elements .......................... 10 CAREAND CLEANING CHART ............... 26
Indicator lights ............................. 10
Dripbowl ................................. 10 SERVICE INFORMATION ................. 27-29
Before you call for service ................... 27
OVEN USE (For Conventional Cooking)... 11-18 Explanationof fault codes ................... 28
Ovencharacteristics........................ 11 Adjustingoventemperature ................. 28
Fan ...................................... 11 Howte obtainservice....................... 29
Ovenracks ................................ 11
Useofaluminumfoil........................ 11 WARRANTY ................................ 30
?,-/oollE
8113P061-60
(5/94)
IMPORTANTSAFETYINSTRUCTIONS
Readall instructions beforeusingthisappliance.
Thefollowinginstructionsarebasedon Storageabove range- Toeliminate Useproper pansize- This
safetyconsiderationsandmustbe thehazardofreachingoverhotsurface applianceisequippedwithoneormore
strictlyfollowedtoeliminatethe elements,cabinetstorageshouldnot surfaceelementsofdifferentsizes.
potentialrisksoffire,electricshock,or beprovideddirectlyaboveaunit.If Selectutensilshavingfiatbottomslarge
personalinjury, provided,storageshouldbelimitedto enoughtocoverthesurfaceelement.
infrequentlyuseditemsthatcanbe Theuseofundersizedutensilswill
Properinstallation- Besureyour safelystoredinanareasubiectedto exposeaportionoftheheatingelement
applianceisproperlyinstalledand heat.Temperaturesmaybeunsafefor todirectcontactandmayresultin
groundedbyaqualifiedtechnician, someitemssuchasvolatileliquids, ignitionofclothing.Properrelationship
Careshouldbegiventolocationof cleaners,oraerosolsprays.Ifcabinet ofutensiltoelementwillalsoimprove
appliance- Besurefloorcovering rangehoodthatprojectsatleast
underappliance,wallsadjacentto 5-inchesbeyondthebottomofthe Neverleavesurfaceunits
appliance,cabinetryadjacentto cabinetwillreducethehazards unattendedathigh heat
appliance,andothermaterialsadjacent associatedwithsuchstorage, settings- Boiloverscausesmoking
toappliancecanwithstandprolonged
heat.Thisisaheavyapplianceandcan Wearproperapparel- Loose-fitting andgreasyspilloversmayignite.
settleintosoftfloorcoveringssuchas orhanginggarmentsshouldneverbe Topreventdamageto range-
cushionedvinyl.Usecarewhenmoving wornwhileusingtheappliance. Neveroperateasurfaceunitwithouta
rangeonthistypeoffloorcovering.
Afterapplianceisinstalled- Be replaceanypartoftheappliance boildry.
certainallpackingmaterialsare unlessspecificallyrecommendedinthe
removedfromtheappliancebefore Owner'sGuide.Allotherservicing Makesuredripbowlsare in
operatingtheunit.Ifapplianceis shouldbereferredtoaqualified place- Absenceofthesebowlsduring
installednearawindow,takestepsto technician.Alwaysdisconnectunitor cookingmaysubjectwiringor
preventcurtainsfromblowingover cut-offpowertounitbeforeany componentsunderneathtodamage.
surfaceelementscreatingafirehazard, servicing. Protectiveliners- Donotuse
Neveruseyourappliancefor Storagein,onornearappliance- aluminumfoillinerstolinesurfaceunit
warmingorheatingtheroom. Donotstoreorusegasolineorother dripbowlsorovenbottom,exceptas
,._ I/_ _ z intheoven,nearsurfaceunitsorinthe Improperinstallationoftheseliners
storageisprovided,installationofa efficiency.
Userservicing- Donotrepairor paninplaceandneverallowapanto
flammablematerials,vaporsandliquids suggestedintheOwner'sGuide.
, " i: r_ _ vicinityofthisoranyotherappliance, mayresultinariskofelectricshock,or
explosion.Donotusecooktoporoven
• asastorageareaforfoodorcooking Glazedcookingutensils- Only
utensils, certaintypesofglass,glass/ceramic,
ceramic,earthenware,orotherglazed
,,,.. Useonlydrypotholders- Moistor utensilsaresuitableforrange-top
_ _ Thefumescancreateafireh_ardor fire.I;
damppotholdersonhotsurfacesmay servicewithoutbreakingduetothe
resultinburnsfromsteam.Donotlet suddenchangeintemperature.
potho(dertouchhotheatingelements.
Donotuseatowelorotherbulky
c_oths, (continuednext page)
PAGE 1
IMPORTANTSAFETYINSTRUCTIONS(continued)
Utensilhandlesshouldbeturned SpeedOvenfeaturewillnegatively a steamburn.Somecleanerscan
inwardandnotextendoveradjacent affecthowthisfeatureoperates.Use producenoxiousfumesifappliedtoa
surfaceunits- Toreducetheriskof aluminumfoilonlyasdirectedinthis hotsurface.
burns,ignitionofflammablematerials, manual.
andspillageduetounintentional Ovendoor- Donotplaceexcessive
contactwiththeutensil,thehandleofa Cleanventilatinghoodsfrequently- weightonanopenovendoororstand
utensilshouldbepositionedsothatitis Greaseshouldnotbeallowedto onanopenovendooras,insome
turnedinward,anddoesnotextend accumulateonhoodorfilter.When cases,itcouldcausetherangetotip
overadjacentsurfaceelements, flamingfoodsunderthehood,turnthe over,breakageofthedoor,orserious
Donotsoakremovableheating spreadtheflame.
elements- Heatingelementsshould _. j
neverbeimmersedinwater.Immersing Deepfatfryers- Useextremecaution
elementinwaterwoulddamage whenmovingthegreasekettleor
insulatingmaterialinsideelement, disposingofhotgrease.
Usecarewhenopeningdoor- Let Donottouchsurfaceelementsor
hotairorsteamescapebefore ovenelements,areasnearelements
removingorreplacingfood. orinteriorsurfacesofoven-
Donotheatunopenedfood aredarkincolor.Areasnearsurface
containers- Build-upofpressuremay elementsandinteriorsurfacesofoven
fanoff.Thefan,ifoperating,may injury.
Elementsmaybehoteventhoughthey
causecontainertoburstandresultin maybecomehotenoughtocause Toavoidpossibleexposureto
injury, burns.Duringandafteruse,donot microwaveenergy,donotoperate
Keepovenventducts touchorletclothingorotherflammable theovenusingtheSpeedOven
unobstructed- Theventislocatedat materialscontactheatingelements, featureiftheovendoorlocking
thebaseofthebackguard.Blockageof areasnearelements,orinterior mechanismordoorsealis
ventpreventsproperovenair surfacesofovenuntiltheyhavehad damaged.Seepage4for
circulationandwillaffectoven sufficienttimetocool.Amongthese additionalsafetyinstructions.
performance.Avoidtouchingovenvent areasarethecooktop,surfacesfacing Anti-tip bracket warning:
areawhileovenisonandforseveral thecooktop,ovenventopeningand
minutesafterovenhasbeenturnedoff. surfacesnearthisopening,ovendoor, Toreducetheriskoftippingofthe
Somepartsoftheventandsurroundingandovenwindow.Also,donotallow appliancefromunusualusageorby
areabecomehotenoughtocause metalobject,otherthanautensilona appliancemustbesecuredbya
burns, properlyinstalledanti-tipdevice.To
Placementofovenracks- Always elements, checkifdeviceisinstalledproperly:
placeovenracksindesiredlocation
whileoveniscool.Ifrackmustbe Smoothtopcooktop- Donotcookon rangetoseethatoneoftherear
movedwhilehot,usecaretoavoid brokencooktop.Ifcooktopshould levelinglegsisengagedinthebracket
contactofpotholderwithovenelement, break,cleaningsolutionsandspillovers slot.Whenremovingappliancefor
Donotcoverovenracks,theoven createariskofelectricshock.Contact engagedwhenrangeisreplaced.The
bottomoranyotherpartoftheoven aqualifiedtechnicianimmediately, anti-tipdevicesecurestherearleveling
withaluminumfoil- Thiswillcause Cleancooktopwithcaution.Ifawet legtothefloor,whenproperlyengaged.
overheatingoftheoven.Theincorrect spongeorclothisusedtowipespillson (continuednextpage)
useofaluminumfoilwhenusingthe ahotcookingarea,becarefultoavoid
aluminumfoil,meatprobesoranyother excessiveloadingoftheovendoor,the
surfaceelement,tocontactheating
Useaflashlightandlookunderneath
maypenetratethebrokencooktopand cleaning,besureanti-tipdeviceis
PAGE 2
IMPORTANTSAFETYINSTRUCTIONS(continued)
Circuitbreakerorfuse- Locateand Donotleavechildrenalone- Thisappliancehasbeentestedfor
markbreakerorfuse.Neverreplacea Childrenshouldnotbeleftaloneor safeperformanceusing
blownfuseorresetabreakeruntilyou unattendedinanareawhereappliance conventionalcookware.Donotuse
knowwhathascausedtheproblem, isinuse.Theyshouldneverbeallowed anydevicesoraccessoriesthatarenot
Alwaysreplaceablownfusewithone tositorstandonanypartofthe specificallyrecommendedinthis
ofthecorrectamperage,donotusea appliance.CAUTION:Donotstore manual.Donotuseeyelidcoversfor
substitute, itemsofinteresttochildrenincabinets thesurfaceunits,stovetopgrills,or
aboveanapplianceoronthe add-onovenconvectionsystems.The
Controlknobs- Turnoftcontrolatthe backguardofarange, useofdevicesoraccessoriesthatare
completionofacookingoperation, notexpresslyrecommendedinthis
Self-cleaningoven- Donotclean manualcancreateserioussafety
doorgasket.Thedoorgasketis _ =-_--P',J"_k / hazards,resultinperformance
betakennottorub,damage,ormove componentsoftheappliance.
thegasket.Donotuseovencleaners
orovenlinerprotectivecoatingofany Preparedfoodwarning- Followfood
kindinoraroundanypartofthe _ manufacturer'sinstructions.Ifaplastic
inthisbooklet.Beforeself-cleaningthe coverdistorts,warps,orisotherwise
essentialforagoodseal.Careshould ___/ problems,andreducethelifeofthe
oven,removebroilerpan,ovenracks, damagedduringcooking,immediately
self-cleanoven.Cleanonlypartslisted _ frozenfoodcontainerand/oritsfilm
andotherutensils.Listenforafan.A foodcouldbecontaminated.
fannoiseshouldbeheardduringa Childrenclimbingontheapplianceto
cleaningcycle.Ifnot,cancelclean reachitemscouldbeseriouslyinjured. Important safety notice and
cycleandcalla qualifiedtechnician Childrenmustbetaughtthatthe warning: TheCaliforniaSafeDrinking
beforeself-cleaningagain, applianceandutensilsinoronitcanbe WaterandToxicEnforcementActof
Itisnormalforthecooktopoftherange hot.Childrenshouldbetaughtthatan 1986 (Proposition65) requiresthe
tobecomehotduringaself-clean applianceisnotatoy.Theyshouldnot GovernorofCaliforniatopublishalistof
cycle.Therefore,touchingorliftingthe beallowedtoplaywithcontrolsorother substancesknownto the State of
cooktopduringacleancycleshouldbe partsoftheunit. Californiato cause cancer or
avoided, reproductiveharm, and requires
CAUTION:DONOTLEAVEFOODOR 1. Turnoffapplianceandventilating potentialexposurestosuchsubstances.
COOKINGUTENSILS,ETC.,INOVEN hood.Disconnectpowerat the
DURINGTHESELF-CLEANING fuseorcircuitbreaker. Usersofthisappliancearehereby
MODEOFOPERATION. 2. Usedrychemicalorfoam-type engagedintheself-cleancyclethere
ATTENTION:NELAISSERAUCUN extinguisheror bakingsodato maybesomelow-levelexposureto
ALIMENT,USTENSILEDECUISINE, smotherfireorflame.Neveruse someofthelistedsubstances,
ETC.,DANSLEFOURDURANTLE wateronagreasefire. includingcarbonmonoxide.Exposure
CYCLED'AUTONETTOYAGE. 3. Iffireisinoven,smotherbyclosing tothesesubstancescanbeminimized
IN CASE OFFIRE: businessesto warn customersof
ovendoor. byproperlyventingtheappliancetothe
4. Iffireisinapanonthesurfaceunit,
coverpan. (continued next page)
discardthefoodanditscontainer.The
warnedthatwhentheapplianceis
outdoorsduringtheself-cleancycle.
PAGE 3
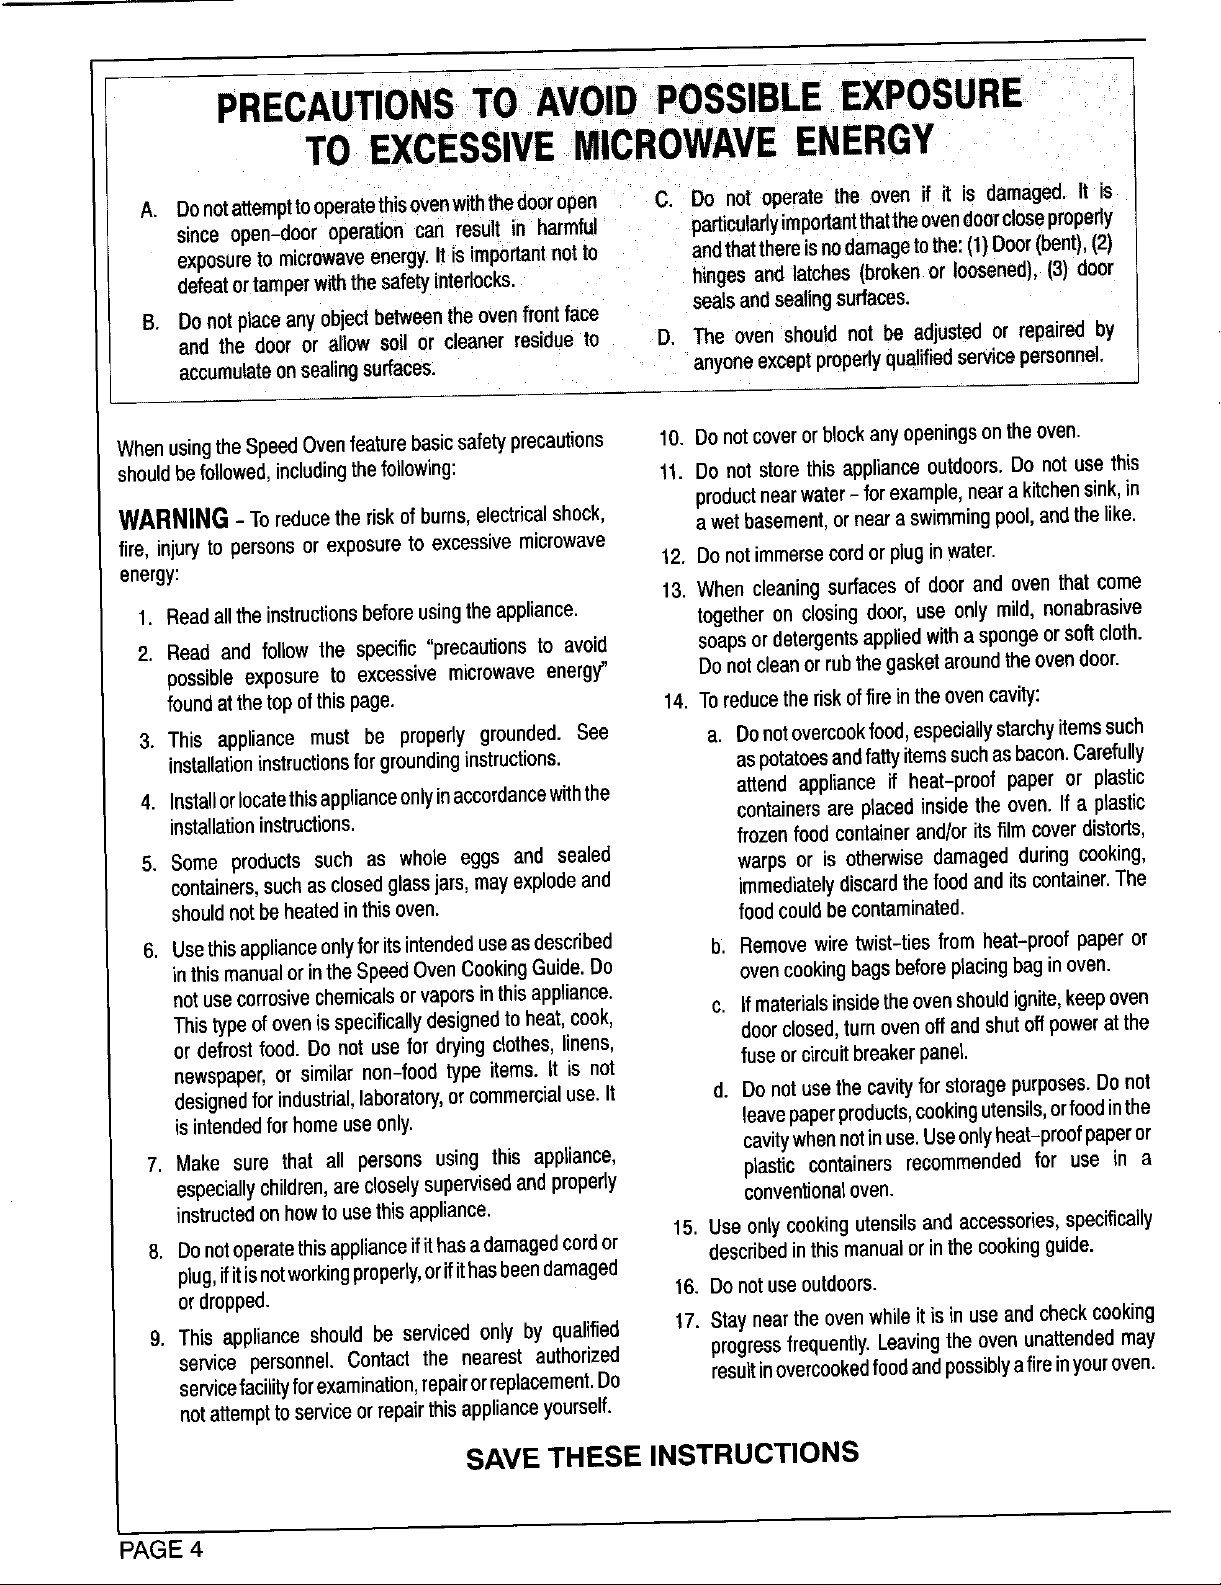
PRECAUTIONSTO AVOIDPOSSIBLEEXPOSURE
TO EXCESSIVEMICROWAVEENERGY
A. DonotattempttooperatethisovenwiththedooropenC. Do notoperatethe ovenif it is damaged.It is
sinceopen-dooroperationcan resultin harmful particularlyimportantthattheovendoorclosepropedy
exposuretomicrowaveenergy.Itisimportantnotto andthatthereisnodamagetothe:(I}Door(bent),(2)
defeatortamperwiththesafetyinterlocks, hingesandlatches(brokenorloosened),(3)door
B. Donotplaceanyobjectbetweentheovenfrontface sealsandsealingsurfaces.
andthedooror allowsoilorcleanerresidueto D. Theovenshouldnotbe adjustedorrepairedby
accumulateonsealingsurfaces, anyoneexceptproperlyqualifiedservicepersonnel.
WhenusingtheSpeedOvenfeaturebasicsafetyprecautions 10.Donotcoverorblockanyopeningsontheoven.
shouldbefo}lowed,includingthefoUowing: 11.Donot storethisapplianceoutdoors.Donotusethis
productnearwater- forexample,nearakitchensink,in
WARNING - Toreducetheriskofburns,electricalshock, awetbasement,ornearaswimmingpool,andthelike.
fire,injurytopersonsorexposureto excessivemicrowave
energy: 12.Donotimmersecordorpluginwater.
13. Whencleaningsurfacesof doorandoventhatcome
1. Readalltheinstructionsbeforeusingtheappliance, togetherondosingdoor,useonlymild,nonabrasive
2. Readandfollowthe specific"precautionsto avoid soapsordetergentsappliedwithaspongeorsoftcloth.
possibleexposureto excessivemicrowaveenergy" Donotcleanorrubthegasketaroundtheovendoor.
foundatthetopofthispage. 14. Toreducetheriskoffireintheovencavity:
3. This appliancemustbe properlygrounded.See a. Donotovercookfood,especiallystarchyitemssuch
installationinstructionsforgroundinginstructions, aspotatoesandfattyitemssuchasbacon.Carefully
4. Installorlocatethisapplianceonlyinaccordancewiththe attendapplianceif heat-proofpaperor plastic
installationinstructions, containersareplacedinsidetheoven.If aplastic
5. Someproductssuchas wholeeggsand sealed
containers,suchasclosedglassjars,mayexplodeand immediatelydiscardthefoodanditscontainer.The
shouldnotbeheatedinthisoven. foodcouldbecontaminated.
frozenfoodcontainerand/oritsfilmcoverdistorts,
warpsor is otherwisedamagedduringcooking,
6. Usethisapplianceonlyforitsintendeduseasdescribed b. Removewiretwist-tiesfromheat-preefpaperor
inthismanualorintheSpeedOvenCookingGuide.Do ovencookingbagsbeforeplacingbaginoven.
notusecorrosivechemicalsorvaporsinthisappliance.
Thistypeofovenisspecificallydesignedtoheat,cook, c. Ifmaterialsinsidetheovenshouldignite,keepoven
ordefrostfood.Donotusefordryingclothes,linens, doorclosed,turnovenoffandshutoffpoweratthe
newspaper,or similarnon-foodtypeitems.It is not fuseordrouitbreakerpanel.
designedforindustrial,laboratory,orcommercialuse.It d. Donotusethecavityforstoragepurposes.Donot
isintendedforhomeuseonly. leavepaperproducts,cookingutensils,orfoodinthe
7. Makesurethat all personsusingthisappliance, cavitywhennotinuse.Useonlyheat-proofpaperor
especiallychildren,arecloselysupervisedandproperly conventionaloven.
instructedonhowtousethisappliance.
8. Donotoperatethisapplianceifithasadamagedcordor 15. Useonlycookingutensilsandaccessories,specifically
plug,ifitisnotworkingproperly,orifithasbeendamaged describedinthismanualorinthecookingguide.
ordropped. 16. Donotuseoutdoors.
9. Thisapplianceshouldbe servicedonlybyqualified t 7. Stayneartheovenwhileitisinuseandcheckcooking
servicepersonnel.Contactthe nearestauthorized progressfrequently.Leavingtheovenunattendedmay
servicefacilityforexamination,repairorreplacement.Do resultinovercookedfoodandpossiblyafireinyouroven.
notattempttoserviceorrepairthisapplianceyourself.
plasticcontainersrecommendedfor use in a
SAVE THESE INSTRUCTIONS
PAGE 4
CLOCKAND OVEN CONTROL
DEFROST SET SPEED
!d s=o
• I-I I-I n n n ]
c.oc,l[coo:I[c.,= I ]
MEATS, CASSEROLES _ ira. DEICATE
FISH, VEGETAB ONLY FOODS COOK 2
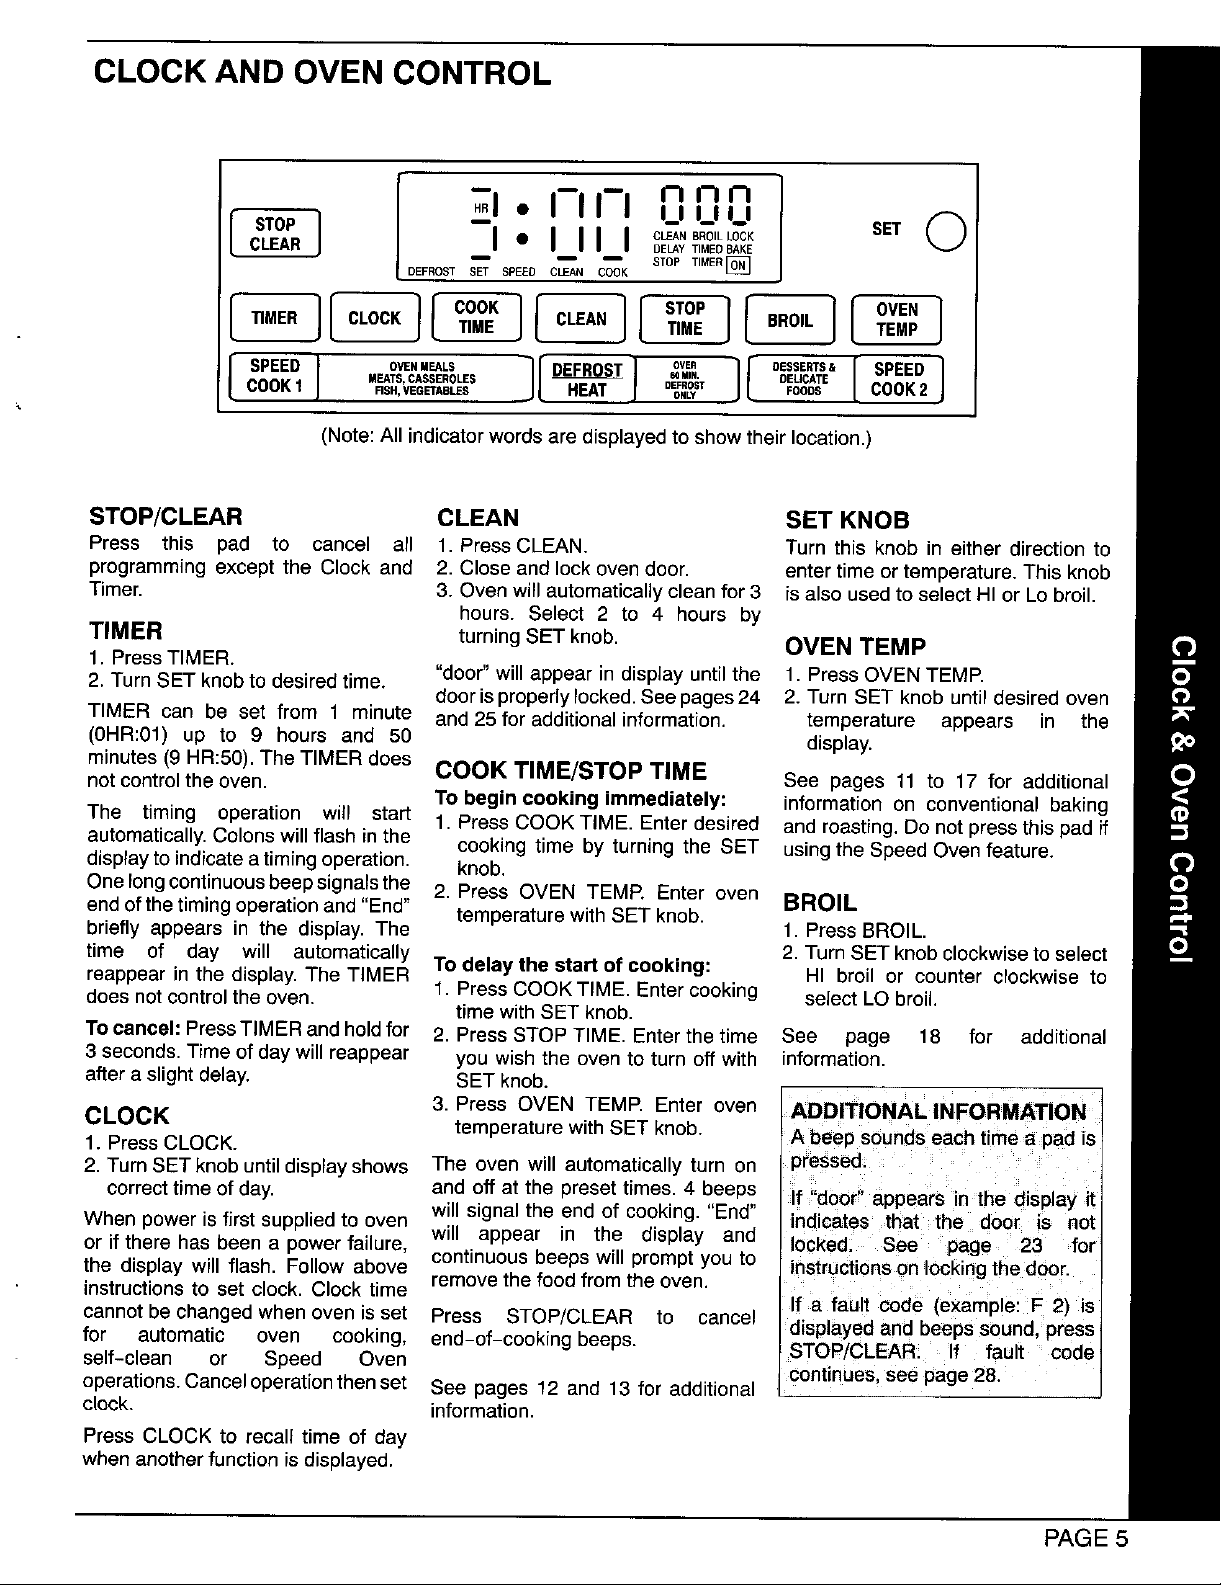
(Note: Allindicator words are displayed to show their location.)
STOP/CLEAR CLEAN SET KNOB
Press this pad to cancel all t, PressCLEAN. Turn this knob in either directionto
programmingexcept the Clock and 2, Closeandlock ovendoor, entertimeortemperature.Thisknob
Timer, 3. Ovenwillautomaticallycleanfor 3 isalsousedtoselectHI or Lo broil,
hours. Select 2 to 4 hours by
TIMER turningSET knob, OVEN TEMP
1. PressTIMER.
2. TurnSET knobto desiredtime. "door"willappearindisplayuntilthe t, PressOVENTEMP,
door isproperlylocked.Seepages24 2. Turn SET knob until desired oven
TIMER can be set from 1 minute and 25for additional information, temperature appears in the
(0HR:01) up to 9 hours and 50 display.
minutes (9 HR:50).The TIMER does COOK TIME/STOP TIME
not control the oven. See pages 11 to 17 for additional
To begin cooking immediately: informationon conventional baking
The timing operation will start 1. PressCOOK TIME. Enterdesired and roasting.Do notpressthispad if
automatically.Colonswillflash inthe cookingtime by turningthe SET usingthe SpeedOvenfeature.
displayto indicatea timingoperation, knob.
DEFROST
o.31...s.[s,,=j
OnelongcontinuousDeepsignalsthe 2. Press OVEN TEMP. Enter oven BROIL
endofthetimingoperationand "End" temperaturewithSET knob.
briefly appears in the display.The 1. PressBROIL.
time of day will automatically 2. TurnSET knobclockwisetoselect
reappearinthe display.The TIMER To delay the start of cooking: HI broil or counter clockwise to
doesnotcontrolthe oven. t. PressCOOKTIME. Entercooking selectLObroil.
Tocancel: PressTIMER andholdfor 2. PressSTOP TIME. Enterthetime See page 18 for additional
3 seconds.Time of daywillreappear youwishthe ovento turn off with information.
after a slightdelay. SET knob.
CLOCK 3. Press OVEN TEMP. Enter oven ADDITIONAL INFORMATION
1. PressCLOCK. temperaturewithSET knob. A beep soundseachtimea pad is
2. TurnSETknob untildisplayshows The oven will automaticallyturn on pressed.
correcttimeofday. andoffat the presettimes. 4 beeps If "door"appears in the displayit
When powerisfirstsuppliedto oven willsignalthe end of cooking."End" indicates that the door is not
or ifthere has been a powerfailure, will appear in the display and locked. See page 23 for
the displaywill flash. Followabove continuousbeeps will promptyouto instructionson lockingthe door.
instructionsto set clock.Clocktime removethefoodfromthe oven.
cannotbe changedwhenoven isset Press STOP/CLEAR to cancel If a fault code (example: F 2) is
for automatic oven cooking, end-of-cooking beeps.
self-clean or Speed Oven STOP/CLEAR. If fault code
operations.Canceloperationthenset See pages12 and 13 for additional continues,see page28.
clock, information.
PressCLOCK to recalltime of day
whenanotherfunctionis displayed.
timewithSET knob.
displayedand beepssound,press
PAGE 5
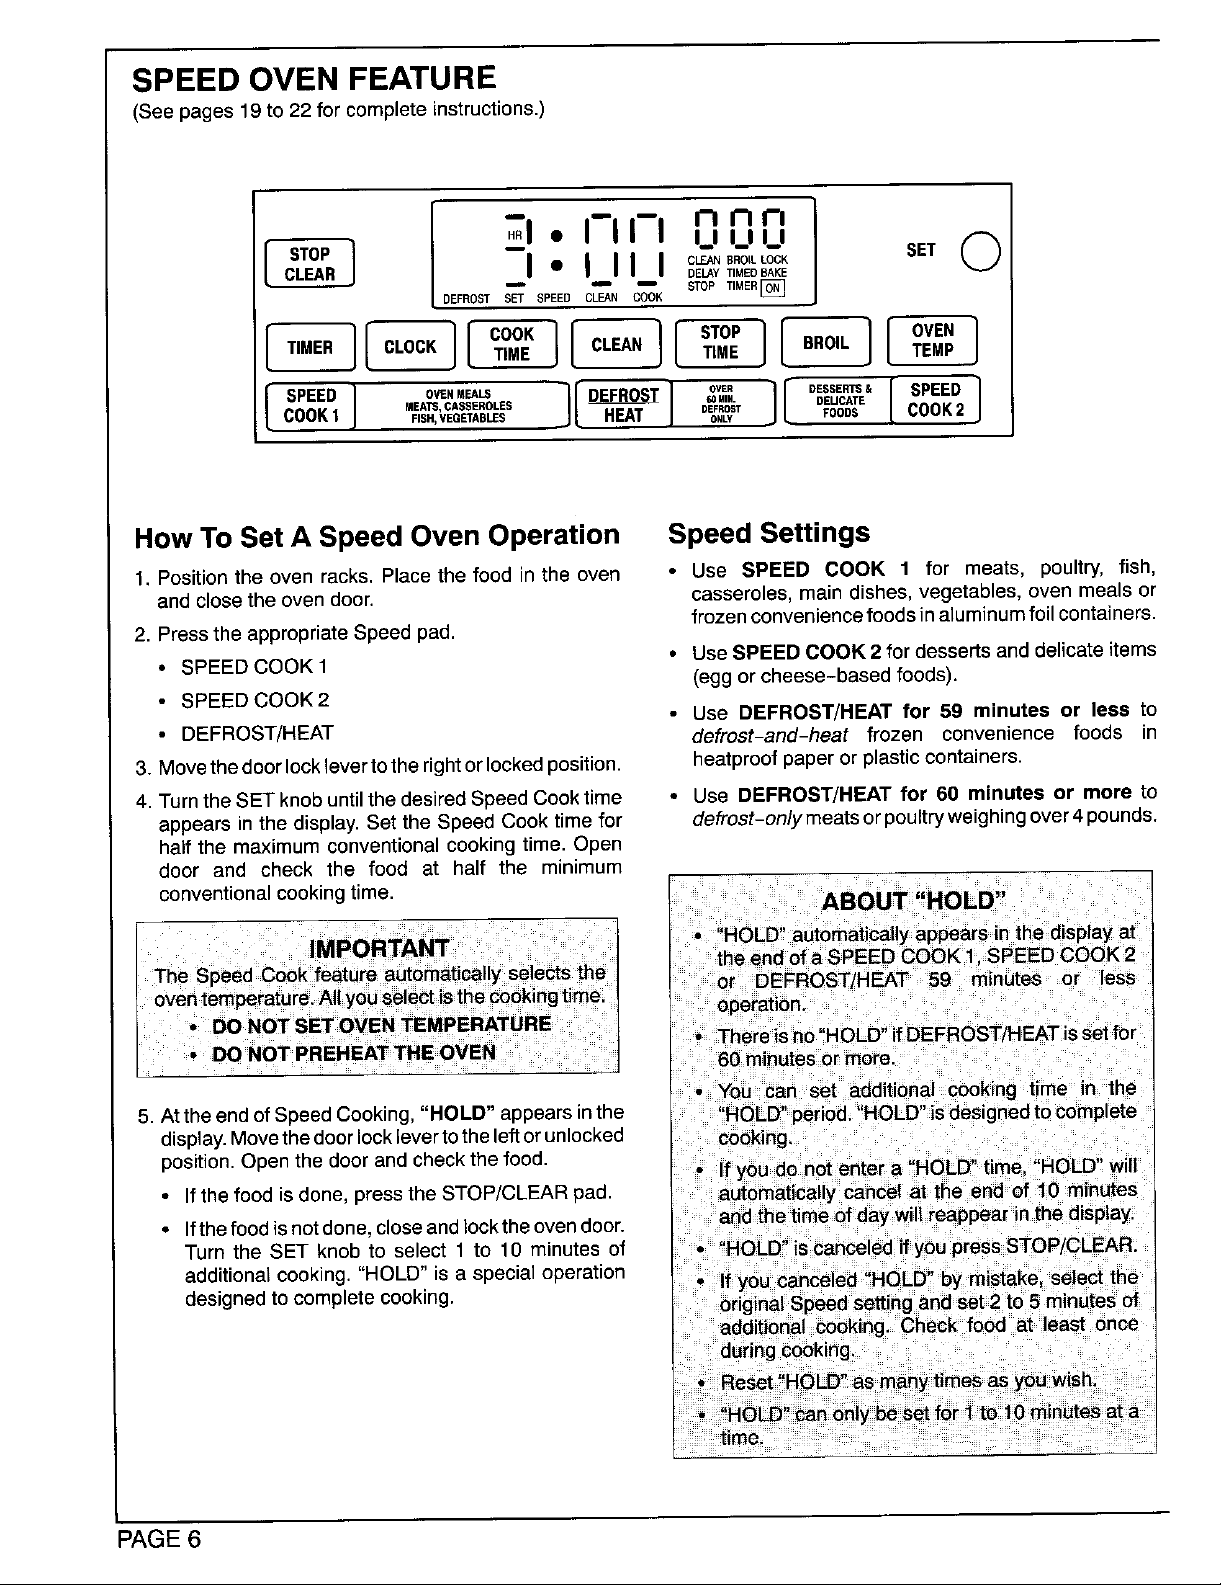
SPEED OVEN FEATURE
(See pages 19 to 22 for complete instructions.)
I 1 ,-,,-,,-, s_.
C,EA, I" I_11 I O_..o,LLocK
stop o
DEFROST _'_ SPEED CLEAN C_OK STOP TIMEB[_
DELAY TIMED BAKE
[ ...,,1[c.oc.1[co:_l[c._.I[s;o:1[.o,.l[ov;.I
[s,.oI ..oo---oo......,.lio,,.os.1.o...j[o.ss.o,is..o]o.o,,COOK1 RSH,VEGETABLESJ L HEAT 0er.OsTONLVFOODS COOK2
HowToSetA SpeedOven Operation SpeedSettings
1, Positionthe oven racks, Placethe food in the even • Use SPEED COOK 1 for meats, poultry, fish,
and close the oven door. casseroles, main dishes, vegetables, oven meals or
2. Pressthe appropriate Speed pad.
• SPEED COOK 1 • Use SPEED COOK 2 for dessertsand delicateitems
• SPEED COOK2
• DEFROST/HEAT defrost-and-heat frozen convenience foods in
3. Movethedoorlocklevertotherightorlockedposition, heatproofpaper orplasticcontainers.
4. TurntheSET knobuntilthedesiredSpeedCooktime • Use DEFROST/HEAT for 60 minutes or more to
appearsinthedisplay.Set the Speed Cook time for defrost-on/y meatsorpoultryweighingover4pounds.
halfthe maximumconventionalcookingtime.Open
door and check the food at half the minimum
frozen conveniencefoods inaluminumfoil containers.
(eggorcheese-basedfoods).
• Use DEFROST/HEAT for 59 minutes or less to
conventionalcookingtime. ABOUT "HOLD"
! u * • ,
HOLD automaticallyappears*nthe displayat
theend ofa SPEED COOK 1. SPEED COOK 2
or DEFROST/HEAT 59 minutes or Jess
operation. ,,
• There isno HOLD"ifDEFROST/HEATissetfor
60 minutesor more.
5. Attheendof Speed Cooking,"HOLD" appearsinthe "HOLD"period.'HOLD' isdesignedtocomplete
display.Movethedoorlocklevertotheleftorunlocked cooking.
position.Openthedoorand checkthe food.
• Ifthefoodisdone,pressthe STOP/CLEAR pad. automaticallycancel at the end of 10 minutes
• ifthe foodisnotdone,closeandlooktheovendoor. andthe time ofdaywiltreappearinthe display.
Turnthe SET knob to select 1 to 10 minutesof iscanceledif
additionalcooking."HOLD" is a special operation
designedtocompletecooking.
• You can set additional cooking time in the
If you do not entera HQLD hme HOLD will
PAGE 6
COOKTOP USE
Control Knobs Cookware
Yourcooktopisequippedwith controlknobsthat provide Cooking performance is greatly affected by the type of
an infinite choice of settings from LOW to HIGH. The cookware used. Proper cookware will reduce cooking
knob can be set on or between any of the numbered times, use less energy and produce more even cooking
settings, results. For best results use a heavy gauge metal pan
To operate push in and turn the knob in either direction
to the desired setting. Cookware with uneven, warped, or grooved bottoms do
Toremoveknobsforcleaning,gently pullforward.Wash reduce heat conductivity and result in slower, less even
knobs in mild detergent and water. Do not use abrasive heating.
cleaning agents as they will scratch the finish and
removemarkings. Rinse,dry and replace.Turn on each Different types of cookware materials require different
elementto be sure knobs have been replaced correctly, heat settingsfor the samecooking operation. The chart
Cooking Tips Lowerthe heat setting if using a thinner gaugemetal or
To preventdamageto the range, backguard or utensil,
neveroperatesurface unitwithouta paninplace,never Oversized cookware orcookware that restsacrosstwo
ellowapantoboildryandneveroperateanelementon elements are not recommended as they may trap
HIGHfor extendedperiods of time. enough heat to cause damage to the cooktop or
Food will not cook any faster at a higher setting than
neededto maintain agentle boil.Water boilsatthe same Donot use woks equipped with round metal rings. The
temperature whether boiling gently or vigorously. If a ring, which is designed to support the wok above the
highsetting is used,excessive spattering will occur and element,willtrapheat andmaydamagetheelementand
food may stick or burnonto the bottom ofthe pan. the cooktop.
with a smooth flat bottomand a tight fitting lid.
not make good contact with the heating surface, will
below is based on heavy gauge aluminum cookware.
other materials.
elements.This isespecially important when canning.
Ifa higherheatsettingis usedto bringliquidto aboilor to Canning
begin cooking, always reduce to a lower setting once
liquid comes to a boil or food begins cooking. Never Usethe HIGH setting just until water comes to a boil or
leavefood unattended during a cooking operation, reduce to the lowestheat setting that maintainsthe boil
Fitthe size of the cookwareto the size of the element, or pressure. Prolonged use of the HIGH setting, or the
This conserves energy, use of incorrect canning utensils produces excessive
pressure is reached in the pressure canner. Then,
heat. Excessive heat can cause permanent damage to
the porcelain cooktop, coilelement and the drip bowl.
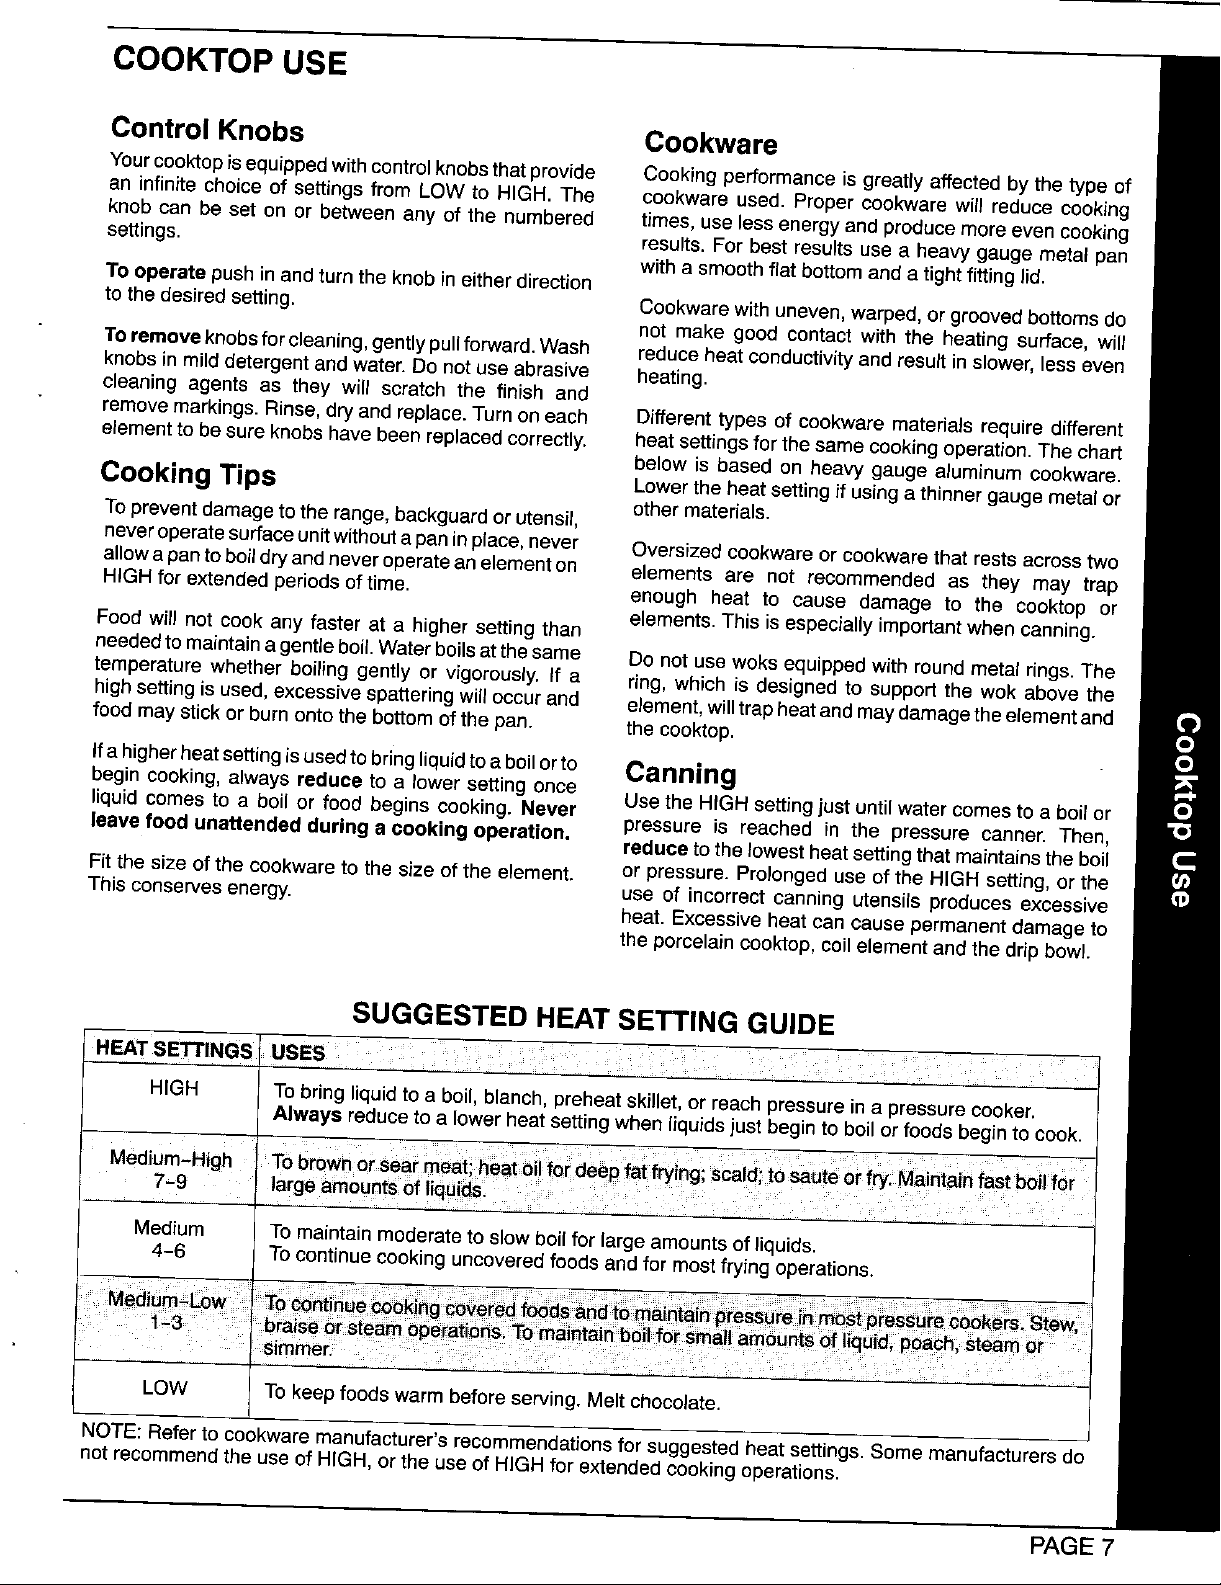
SUGGESTED HEATSETTING GUIDE
HEAT,SETTINGS i USES , .... :
HIGH To bringliquid to a boil, blanch, preheat skillet, or reach pressure in a pressure cooker.
Always reduce to alower heat setting when liquidsjust begin to boil or foods beginto cook.
MedlUm_H_gh Tobiow_ Orseai meati _eat oi foideep fat i_ ng;s_id; to _ute _i f_i Mantai_fast boii'for'
17-9 largeamountsof iiq,,id_: :
Medium To maintain moderate to slow boil for large amounts of liquids.
4-6 Tocontinue cooking uncovered foods and for most frying operations.
.... : ........
LOW I TOkeep foods warm before serving. Melt chocolate.i
NOTE: Referto cookwaremanufacturer's recommendationsfor suggested heat settings. Some manufacturers do
not recommend the use of HIGH, or the use of HIGH for extended cooking operations.
PAGE 7
SMOOTHTOP COOKTOP
Cooking Areas Cooking Tips
On Canadian models only: The surface units will not When cooking delicate foods which easily scorch or
operate during a clean cycle. This isnormal, overcook, start with a lower heat setting then gradually
increase the setting until you find the optimum setting.
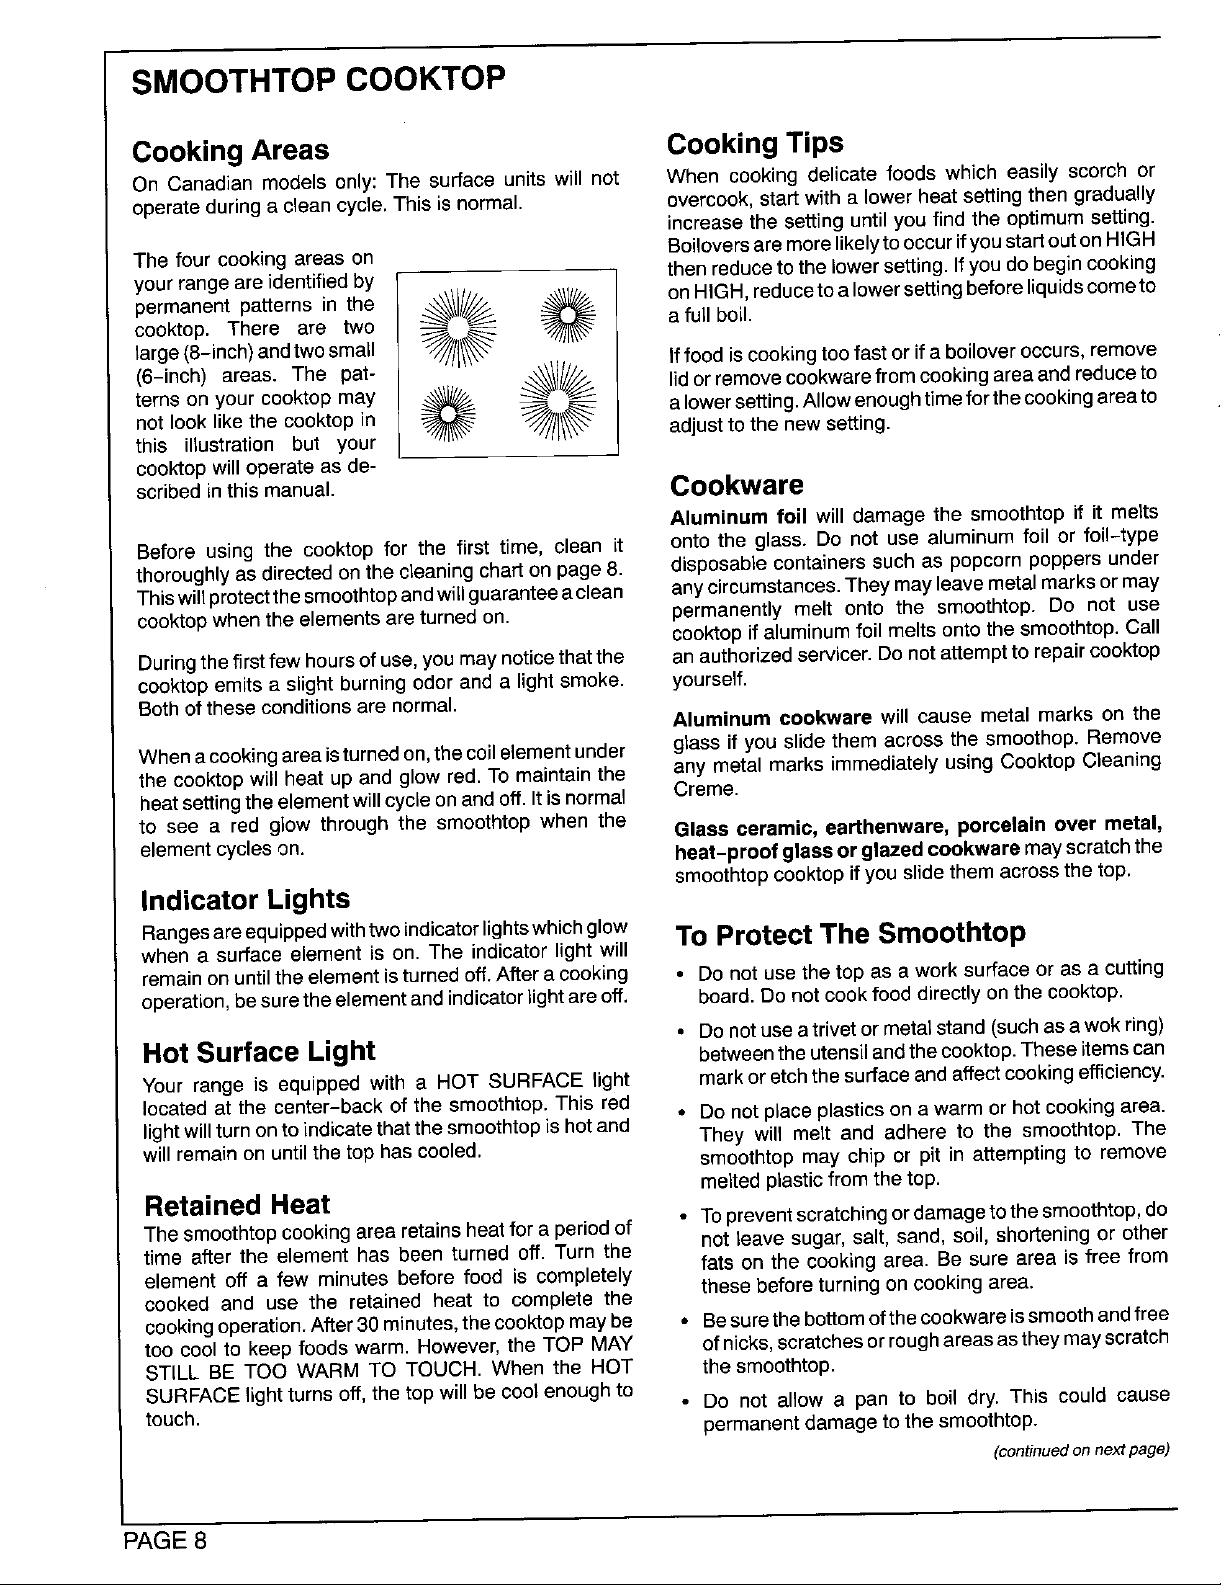
The four cooking areas on Boiloversaremore likelytooccur if you startoutonHIGH
your range are identified by then reduce to the lower setting. Ifyou do begin cooking
cooktop. There are two a fullboil.
permanent patterns in the _/)/_ _ on HIGH,reducetoa lowersetting beforeliquidscometo
large(8-inch) andtwosmall _li_ fffoodis cooking toofast or if a boiloveroccurs,remove
(6-inch) areas. The pat- _/l_
not look like the cooktop in adjust to the newsetting.
terns on your cooktop may @ _/_/_ a lowersetting.Allowenoughtimefor the cookingareato
this illustration but your
cooktopwilloperate as de-
scribed inthis manual. Cookware
Before using the cooktop for the first time, clean it onto the glass. Do not use aluminum foil or foil-type
thoroughly as directed onthe cleaning chart on page 8. disposable containers such as popcorn poppers under
Thiswill protectthesmoothtopandwillguarantee aclean anycircumstances.They mayleave metal marksor may
cooktopwhen the elements are turned on. permanently melt onto the smoothtop. Do not use
Duringthefirstfew hoursof use,youmay noticethatthe an authorized servicer.Do not attempt to repair cooktop
cooktop emits a slight burning odor and a light smoke, yourself.
Bothof these conditions are normal.
When acooking areaisturned on,the coilelement under glass if you slide them across the smoothop. Remove
the cooktop will heat up and glow red. To maintain the any metal marks immediately using Cooktop Cleaning
heatsettingthe elementwillcycle on and off. Itis normal Creme.
to see a red glow through the smoothtop when the Glass ceramic, earthenware, porcelain over metal,
elementcycleson. heat-proof glassor glazed oookware mayscratchthe
lidor remove cookwarefrom cookingarea and reduce to
Aluminum foil will damage the smoothtop if it me}ts
cooktop if aluminum foil melts onto the smoothtop. Call
Aluminum cookware will cause metal marks on the
smoothtopcooktopif youslidethemacrossthe top.
Indicator Lights
Rangesareequippedwithtwoindicatorlightswhichglow TOProtect The Smoothtop
when a surfaceelement is on. The indicatorlightwill
remainon untilthe element isturnedoff.Aftera cooking • Do not use the top as a work surface or as a cutting
operation,besurethe elementand indicatorlightare off. board. Do not cook food directly on the cooktop.
• Do not use atrivet or metal stand (suchas awok ring)
Hot Surface Light betweentheutensilandthecooktop.These itemscan
Your range is equippedwith a HOT SURFACE light markoretchthe surfaceandaffectcookingefficiency.
located at the center-back of the smoothtop. This red • Do not place plasticson awarm or hot cooking area.
lightwill turnonto indicatethat the smoothtop is hot and They will melt and adhere to the smoothtop. The
willremain on until the top has cooled, smoothtop may chip or pit in attempting to remove
Retained Heat meltedplasticfrom the top.
The smoothtop cooking area retains heat for a period of • Topreventscratching or damageto the srnoothtop,do
time after the element has been turned off. Turn the not leave sugar, salt, sand, soil, shortening or other
element off a few minutes before food is completely fats on the cooking area. Be sure area is free from
cooked and use the retained heat to complete the these before turning on cooking area.
cookingoperation.After 30 minutes,the cooktop maybe • Besurethe bottomofthe cookware issmoothandfree
too cool to keepfoods warm. However, the TOP MAY of nicks,scratches or roughareasasthey may scratch
STILL BE TOO WARM TO TOUCH. When the HOT the smoothtop.
SURFACE light turns off, the top will be cool enough to
touch. ° Do not allow a pan to boil dry, This could cause
permanent damage to the smoothtop.
(continuedon next page)
PAGE 8
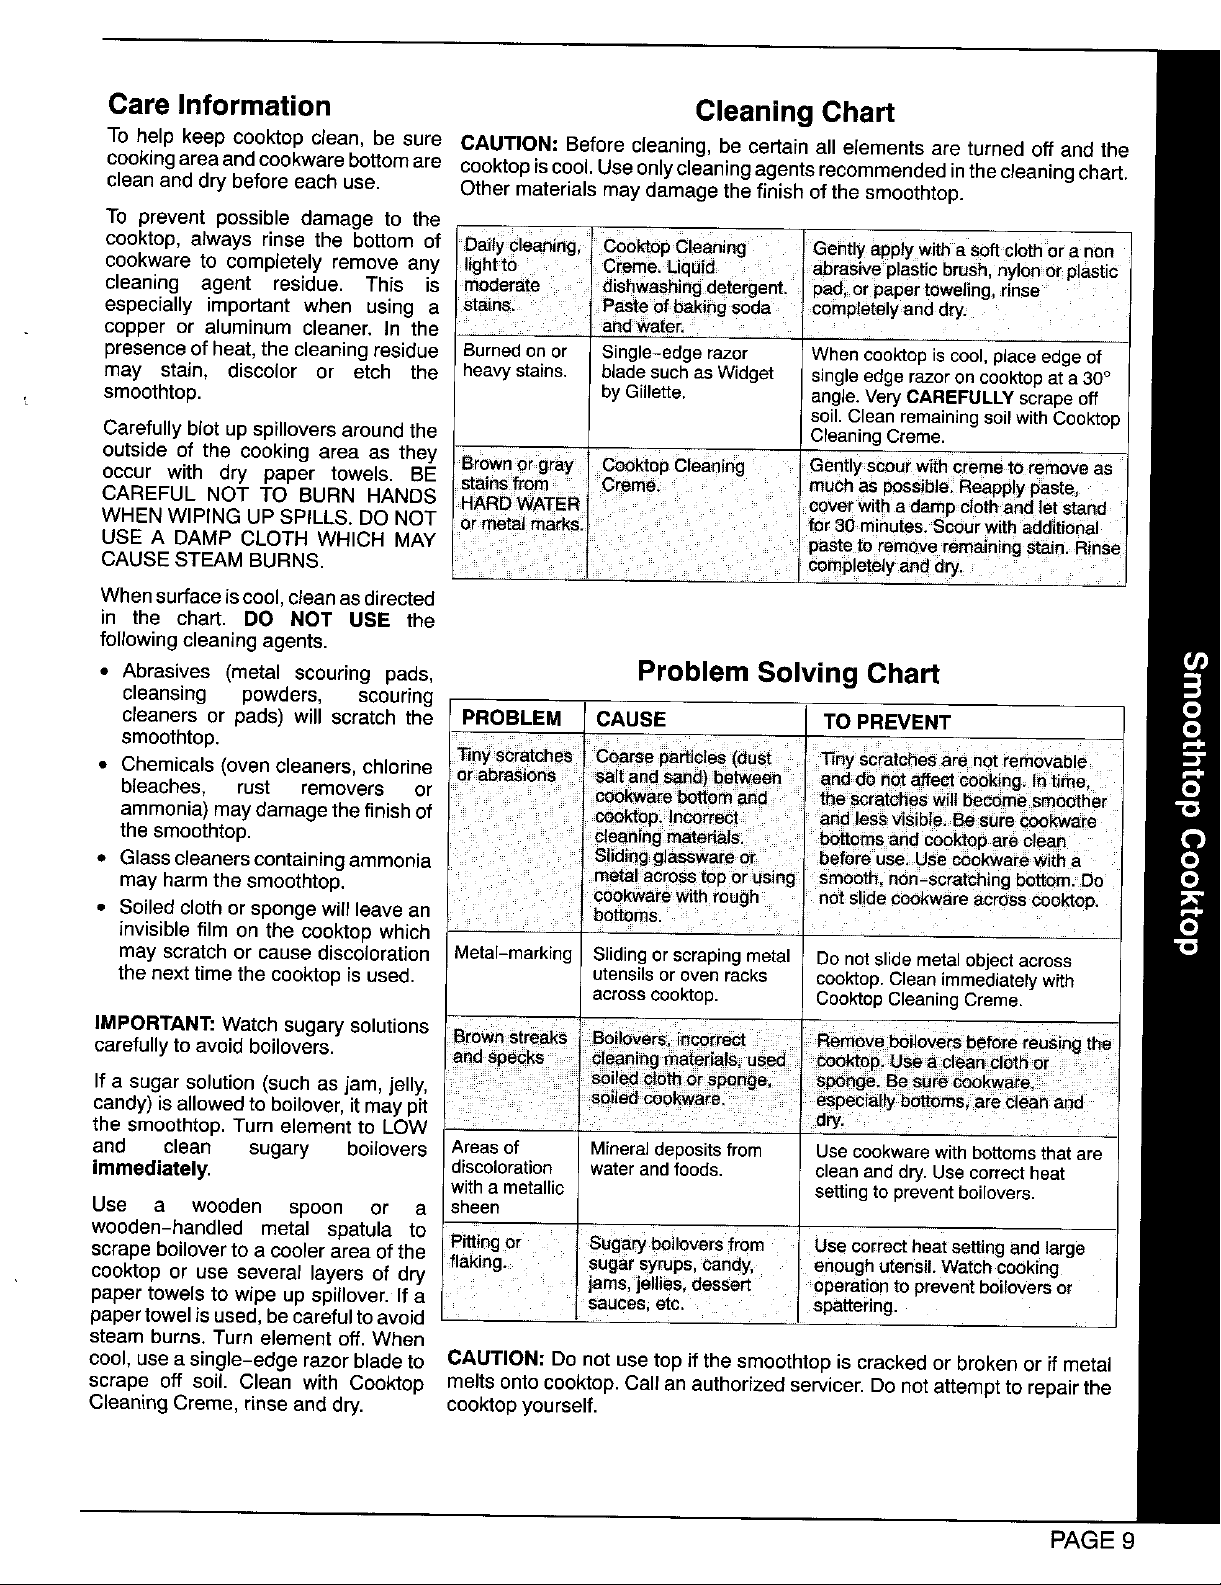
Care Information Cleaning Chart
To help keep cooktop clean, be sure CAUTION: Before cleaning, be certain a11elements are turned off and the
cooking area and cookware bottom are cooktop is cool. Use only cleaning agents recommended in the cleaning chart.
clean and dry before each use. Other materials may damage the finish of the smoothtop.
To prevent possible damage to the
cooktop, always rinse the bottom of ..... ,with a soft cloth or a non
cookware to completely remove any ,nylonor plastic I
cleaning agent residue. This is rinse
especially important when using a
copper or aluminum cleaner. In the
presence of heat, the cleaning residue
may stain, discolor or etch the
smoothtop.
Carefully blot up spillovers around the
outside of the cooking area as they Gently scour Withcreme to remove as
occur with dry paper towels. BE s I:x_ssib_e_Reapp!ypaste,
CAREFUL NOT TO BURN HANDS Witha dampei0thand let stand
WHEN WIPING UP SPILLS. DO NOT nai
USE A DAMP CLOTH WHICH MAY
CAUSE STEAM BURNS.
When surface is cool, clean as directed
in the chart. DO NOT USE the
following cleaning agents.
• Abrasives (metal scouring pads, Problem Solving Chart
cleansing powders, scouring
cleaners or pads) will scratch the PROBLEM CAUSE TO PREVENT
smoothtop.
• Chemicals (oven cleaners, chlorine
bleaches, rust removers or
ammonia) may damage the finish of
the smoothtop.
• Glass cleaners containing ammonia
may harm the smoothtop. Cb_kwarev,Athrough acrosscook"t0p.
• Soiled cloth or sponge will leave an bosoms.
invisible film on the cooktop which : :
may scratch or cause discoloration Metal-marking Sliding or scraping metal Do not slide metal object across
the next time the cooktop is used. utensils or oven racks cooktop. Clean immediately with
across cooktop. Cooktop Cleaning Creme.
IMPORTANT: Watch sugary solutions _emove boiloversbefore ieusi_gme
carefully to avoid boilovers.
If a sugar solution (such as jam, jelly, _spebia[lybo_msi are_ a_d
candy) is allowed to boilover, it may pit d_i
the smoothtop, Turn element to LOW
and clean sugary boilovers Areas of Mineral deposits from Use cookware with bottoms that are
immediately, discoloration water andfoods, clean and dry. Use correct heat
Use a wooden spoon or a sheen
wooden-handled metal spatula to Pitting or Sugary boilovers from Use correct heat setting and large
scrape boilover to a cooler area of the flakiag. Sug&rsyrups,Candy, enough utensil. WatChcooking
cooktop or use several layers of dry jarns,je|lies, dessert OperatiOnto preventboi_oversor
paper towels to wipe up spillover. If a sauces; etc. Spattering.
paper towel is used, be careful to avoid
steam burns. Turn element off. When
cool, use a single-edge razor blade to CAUTION: Do not use top if the smoothtop is cracked or broken or if metal
scrape off soil. Clean with Cooktop melts onto cooktop. Call an authorized servicer. Do not attempt to repair the
Cleaning Creme, rinse and dry. cooktop yourself.
with a metallic setting to prevent boilovers.
PAGE
COIL COOKTOP
Cooktop Indicator Lights
Freestandingrangeswitha coil-type cooktop willfeature Rangesare equippedwithtwo indicatorlightswhich glow
an "upswept" oooktop. The cooktop on a Canadian when a surface element is on. The indicator light will
freestanding range does NOT lift up. remainon until the element is turned off. After a cooking
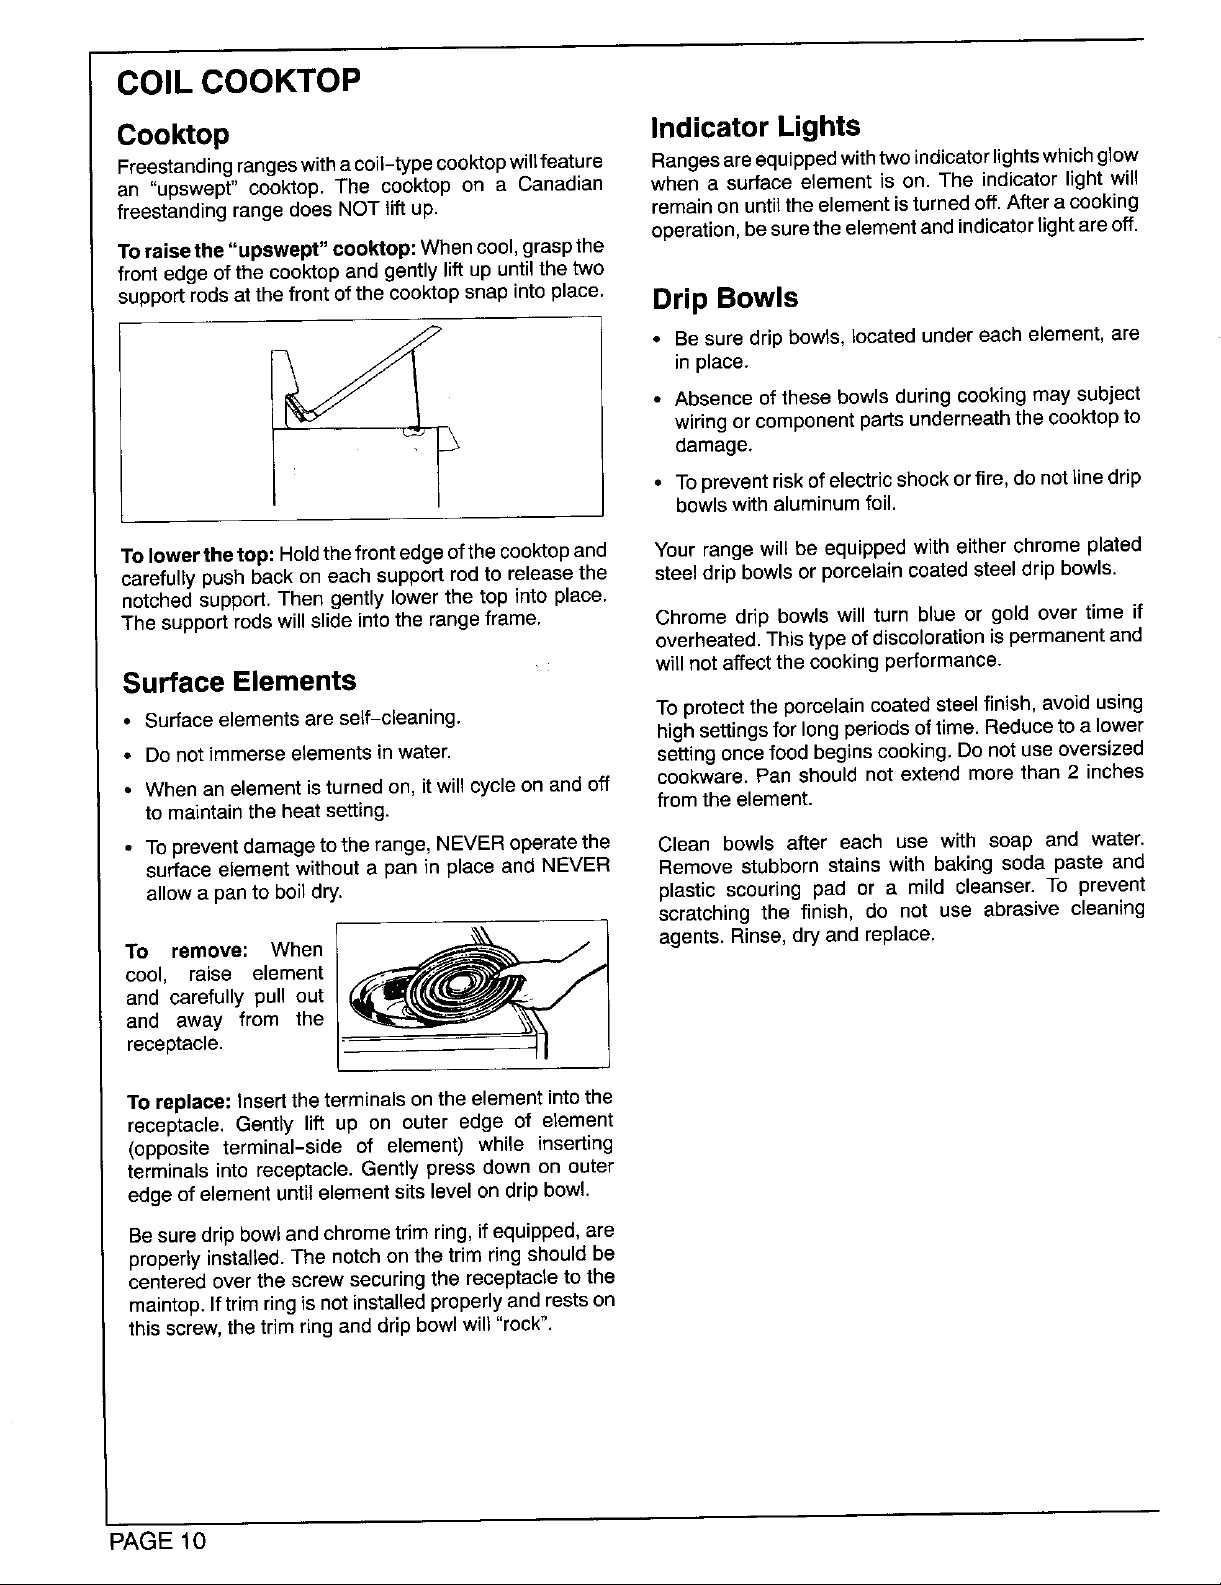
Toraisethe "upswept" cooktop:When cool,graspthe
frontedgeof the cooktopand gentlyliftupuntilthetwo
supportrodsat thefrontof the cooktopsnap intoplace. Drip Bowls
operation, be suretheelement and indicatorlightare off.
in place.
• Absence of these bowls during cooking may subject
wiring or component parts underneath the cooktopto
damage.
__ • Be sure drip bowls, located under each element, are
Tolowerthetop: Holdthefrontedgeofthe cooktopand Yourrangewillbe equippedwith eitherchromeplated
carefullypushback on each supportrodto releasethe steeldripbowlsor porcelaincoatedsteeldripbowls,
notchedsupport.Then gentlylowerthe top into place.
The support rods willslide intothe rangeframe. Chrome drip bowls willturn blue or gold over time if
• To preventrisk ofelectric shock orfire, do not line drip
bowlswithaluminum foil.
overheated. This type ofdiscoloration ispermanent and
Surface Elements will not affect the cookingperformance.
• Surfaceelementsare self-cleaning. Toprotectthe porcelaincoatedsteelfinish, avoidusing
• Do not immerse elements in water, setting oncefood begins cooking. Do not use oversized
• When an element is turned on, itwill cycle onand off cookware. Pan should not extend more than 2 inches
to maintain the heat setting, from the element.
• To preventdamagetothe range, NEVERoperatethe Clean bowls after each use with soap and water.
surface element without a pan in place and NEVER Remove stubborn stains with baking soda paste and
allow a panto boil dry. plastic scouring pad or a mild cleanser. To prevent
receptacle.
andC°°l'T°andcarefullyrem°Ve:awayraisefromelementpulIWhentheOut _,___ agents. Rinse,dry and replace.
highsettings for long periods oftime. Reduceto a lower
scratching the finish, do not use abrasive cleaning
To replace: Insertthe terminals on the element into the
receptacle. Gently lift up on outer edge of element
(opposite terminal-side of element) while inserting
terminals into receptacle. Gently press down on outer
edge of element until element sits level on drip bowl.
Besure drip bowl and chrome trim ring,if equipped, are
properlyinstalled. The notch on the trim ring should be
centered over the screw securing the receptacle to the
maintop, if trimring is not installed properlyand rests on
this screw, the trim ring and drip bowl will "rock".
PAGE 10
OVEN USE - For Conventional Cooking
Oven Characteristics
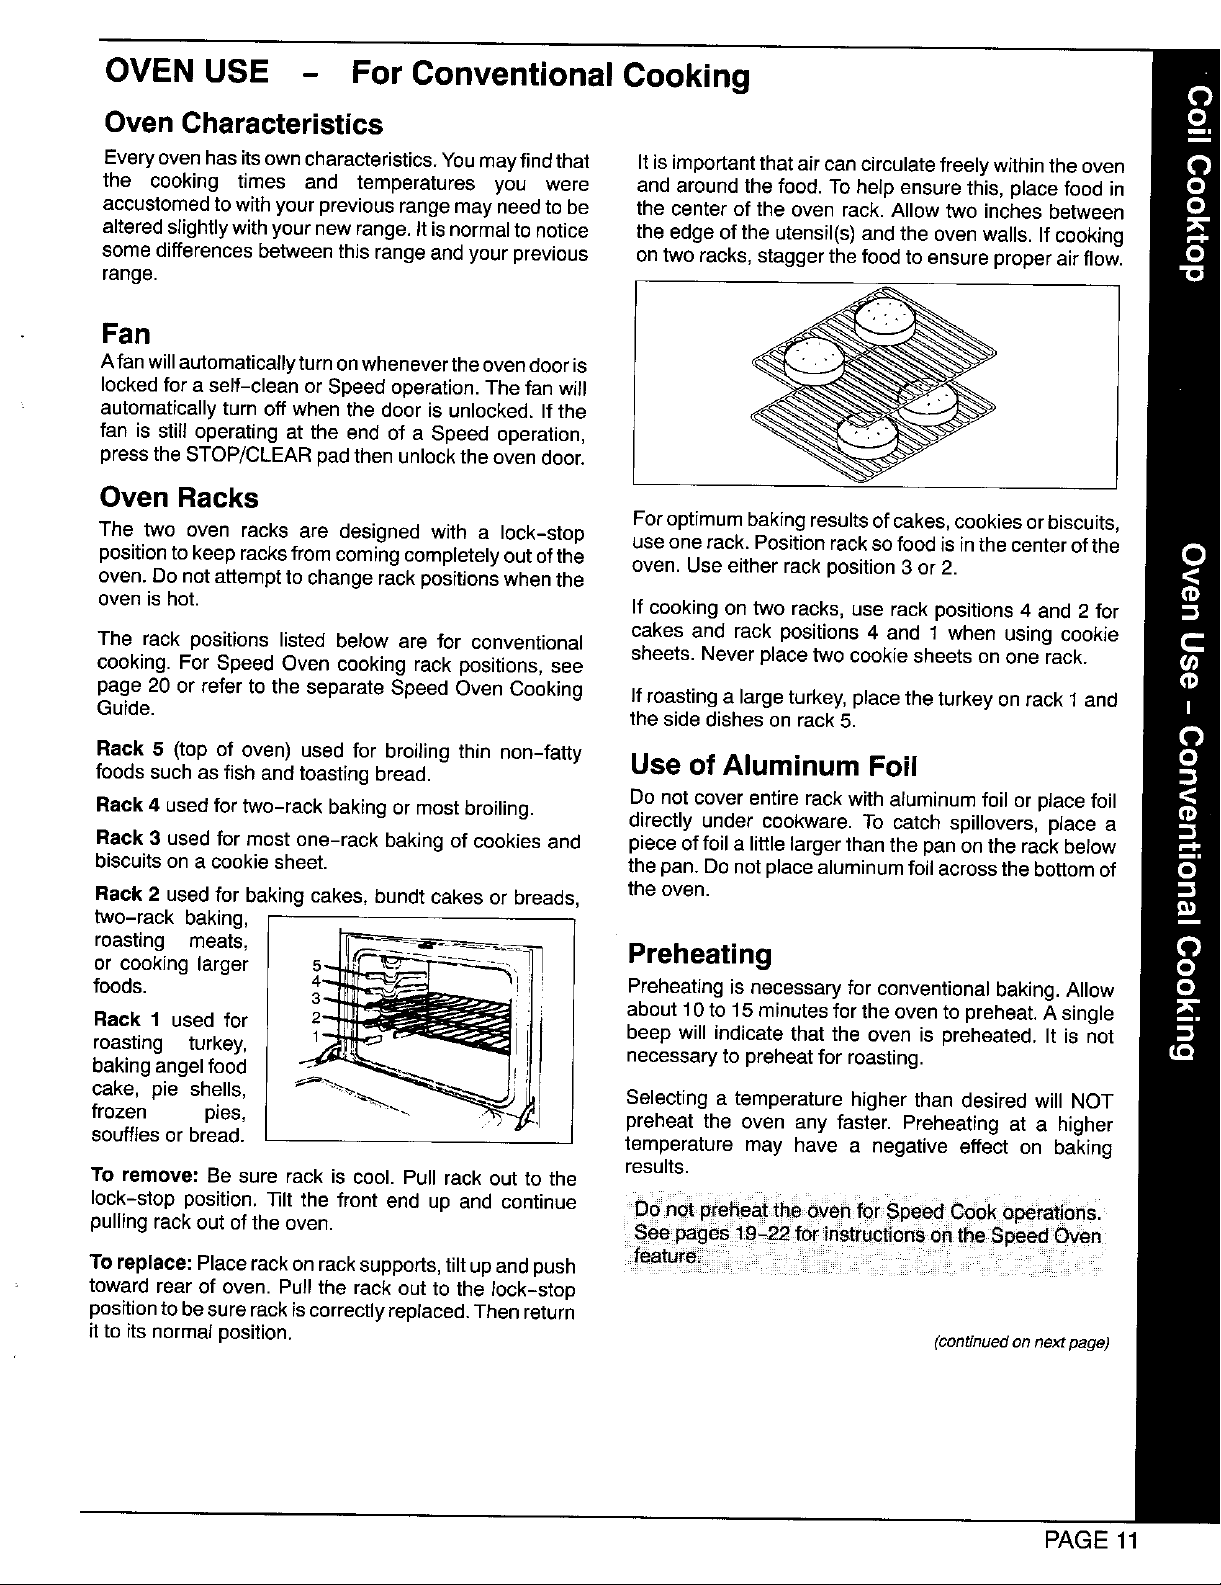
Everyovenhasitsowncharacteristics.Youmayfindthat Itis importantthat air can circulate freely within the oven
the cooking times and temperatures you were and around the food. To help ensure this, place food in
accustomedtowithyour previous range may need to be the center of the oven rack. Allow two inches between
alteredslightlywithyour new range,it isnormalto notice the edge ofthe utensil(s)and the oven walls. If cooking
some differences between this range and your previous on two racks, stagger the food to ensure proper air flow.
range.
Afan willautomatically turnonwheneverthe ovendoor is
lockedfor a self-clean or Speed operation. The fan will
automatically turn off when the door is unlocked. Ifthe
fan is still operating at the end of a Speed operation,
pressthe STOP/CLEARpad then unlock the oven door.
Fan
Oven Racks
Foroptimum bakingresultsofcakes,cookiesorbiscuits,
The two oven racks are designed with a lock-stop useone rack. Positionracksofoodisinthecenterofthe
positionto keep racksfrom coming completely out ofthe oven. Use either rackposition 3 or 2.
oven. Do not attemptto change rack positions whenthe
oven is hot. If cooking on two racks,use rack positions 4 and 2 for
cakes and rack positions 4 and 1 when using cookie
The rack positions listed below are for conventional sheets. Neverplacetwo cookie sheets on one rack.
cooking. For Speed Oven cooking rack positions, see
page 20 or refer to the separate Speed Oven Cooking If roasting a largeturkey,placethe turkey on rack 1 and
Guide. theside dishes on rack 5.
Rack 5 (top of oven) used for broiling thin non-fatty
foods such asfish and toasting bread. Use of Aluminum Foil
Donotcoverentirerack withaluminum foilor placefoil
Rack 4 usedfortwo-rack bakingor mostbroiling, directly under cookware. To catch spillovers, place a
Rack 3 used for most one-rack baking of cookiesand pieceoffoila littlelargerthanthe pan onthe rackbelow
biscuits on a cookie sheet, the pan. Do not placealuminumfoil acrossthe bottomof
Rack 2 used for baking cakes, bundt cakes or breads the oven.
roasting meats, _ _m-_
foods. Preheating is necessary for conventional baking. Allow
or cooking larger ! --_-'- ---L-_---..-_! Preheating
Rack 1 used for 2 i : about 10to 15minutesfor the oven to preheat. A single
bakingangel food , necessary to preheat for roasting.
roasting turkey, _._ I i beep will indicate that the oven is preheated. It is not
cake, pie shells, _-._. Selecting a temperature higher than desired will NOT
frozen pies, preheat the oven any faster. Preheating at a higher
tw°-rack baking' i _ j'!
souffles or bread, temperature may have a negative effect on baking
To remove: Be sure rack is cool. Pull rack out to the
lock-stop position, lilt the front end up and continue
pulling rack out of the oven.
Toreplace: Placerack onrack supports,tilt up andpush
toward rear of oven. Pull the rack out to the lock-stop
positionto besure rack iscorrectly replaced.Then return
itto its normal position. (conUnuedonnextpage)
results.
PAGE 11
Oven Operation Automatic Oven Cooking Feature
The Automatic Oven Cookingfeature is used to turn the
oven on and offat a preset time of day.This feature can
be used for a conventional cook or a self-clean
operation. See page 25 for instructions on delaying a
self-clean operation.
The Automatic Oven Cooking feature can not be used
Toset ovenfor baking or roasting: withthe Speed Oven feature.
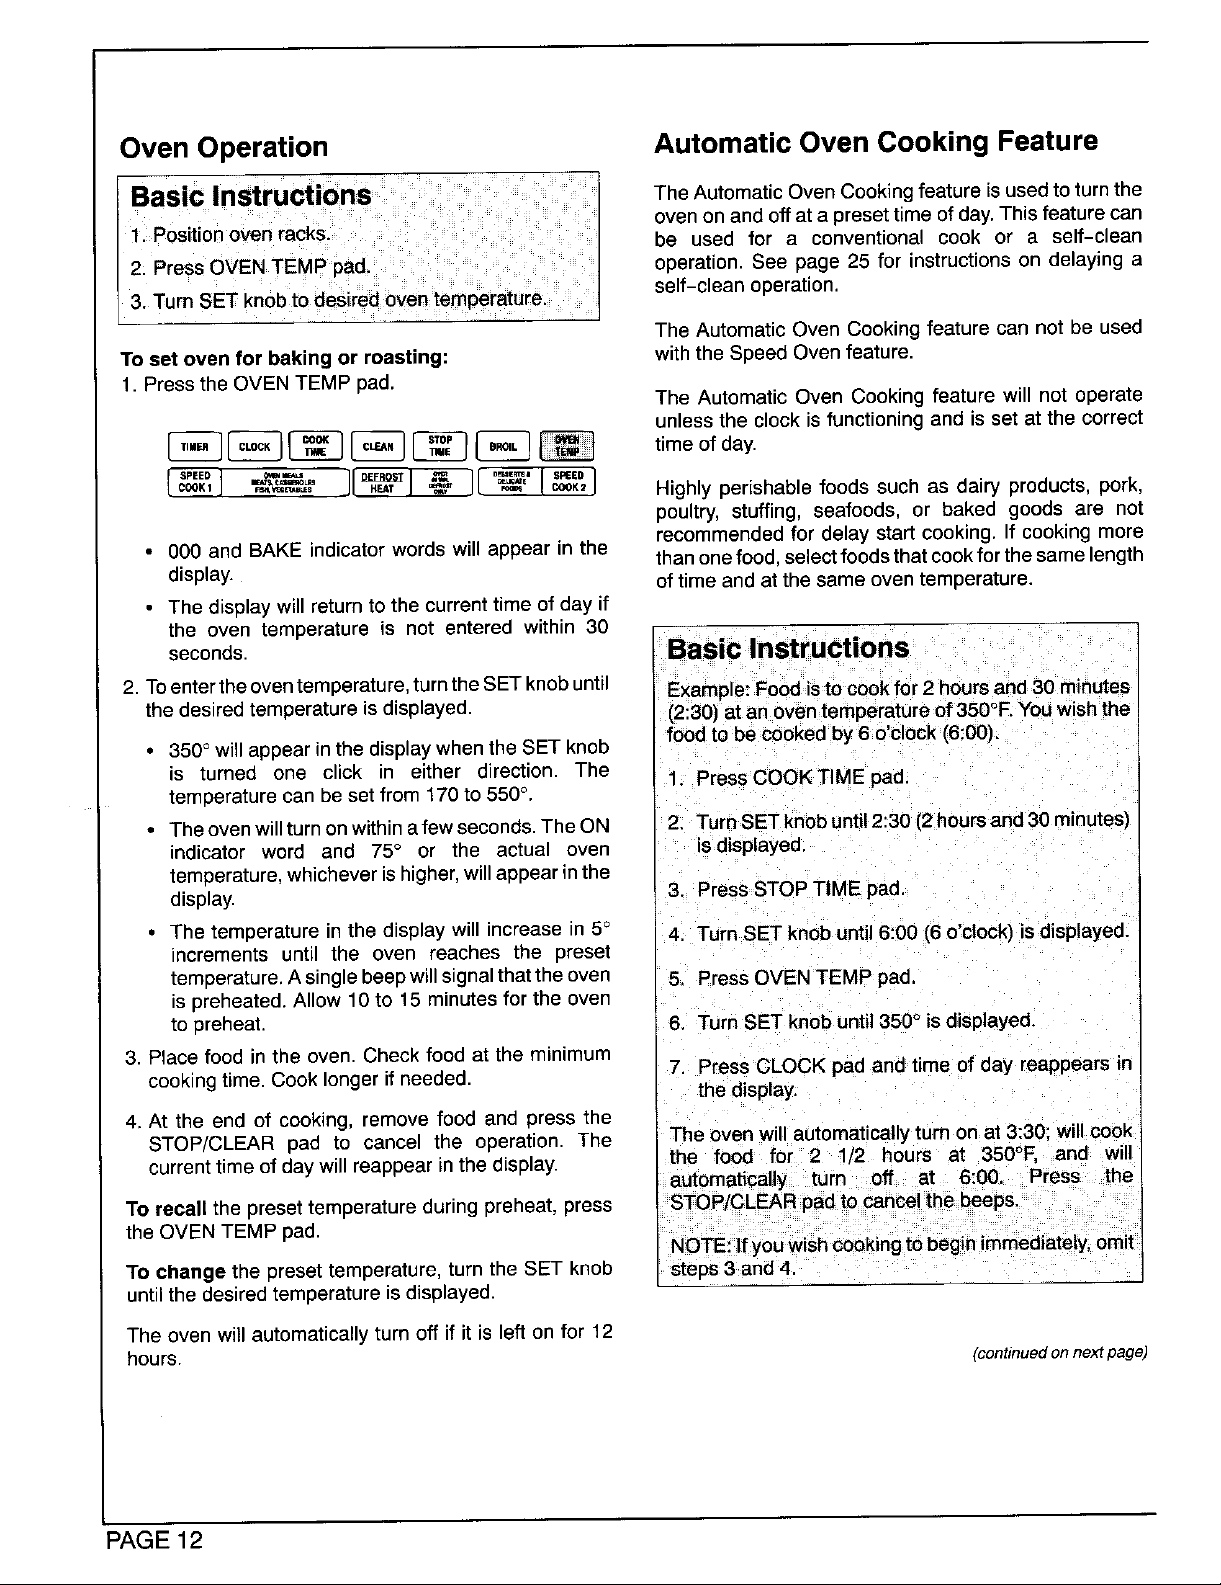
1, Pressthe OVENTEMP pad.
J__ Highly perishable foods such as dairy products, pork,
• 000 and BAKE indicator words will appear in the than onefood,select foods that cook forthesame length
display, of time and at the same oven temperature.
• The display will returnto the current time of day if
the oven temperature is not entered within 30
seconds. Basic Instructions
2. Toenterthe oventemperature,turnthe SETknobuntil Example: Food is to cook for 2 hoursand 30 minutes
the desired temperature is displayed. (2:30) at an oven temperature of350°F,You wishthe
• 350° will appear in the displaywhenthe SET knob foodto be cooked by 6 o'clock (6:00).
is turned one click in either direction. The 1. Press COOK TIME pad.
temperaturecan be set from 170 to 550°.
• Theovenwillturnonwithinafewseconds. TheON 2. TurnSET knobuntil 2:30 (2hours and 30minutes)
indicator word and 75° or the actual oven is displayed,
temperature,whichever is higher,will appear inthe
display. 3. Press STOP TIME pad.
The AutomaticOven Cookingfeature will not operate
unlessthe clockisfunctioningand is set at the correct
poultry, stuffing, seafoods, or baked goods are not
recommended for delay start cooking, If cooking more
• The temperature in the display will increase in 5° 4, Turn SET knob until 6:00 (6 o'clock) isdisplayed.
increments until the oven reaches the preset
temperature,A singlebeepwillsJgnalthat the oven 5, Press OVEN TEMP pad,
is preheated. Allow 10to 15 minutesfor the oven
to preheat. 6. Turn SET knob until350° is displayed.
3. Place food in the oven. Check food at the minimum
cookingtime. Cook longer if needed. 7. Press CLOCK pae and time of day reappears in
4, At the end of cooking, remove food and press the
STOP/CLEAR pad to cancel the operation. The The oven will automatically turn on at 3:30: will cook
currenttimeofdaywill reappear inthedisplay, the food for 2 1/2 hours at 350°F. and will
To recall the presettemperature during preheat, press STOP/CLEARpad to cancel the beeps.
the OVEN TEMP pad. NOTE:If you wish cooking to beginimmediately,omit
To change the preset temperature, turn the SET knob steps 3 and 4.
until the desired temperature is displayed.
The oven will automatically turn off if it is left on for 12
hours. (continuedon next page)
the display.
automatically turn off at 6:00. Press the
PAGE12
To set oven for immediate start: To set oven for delayed start:
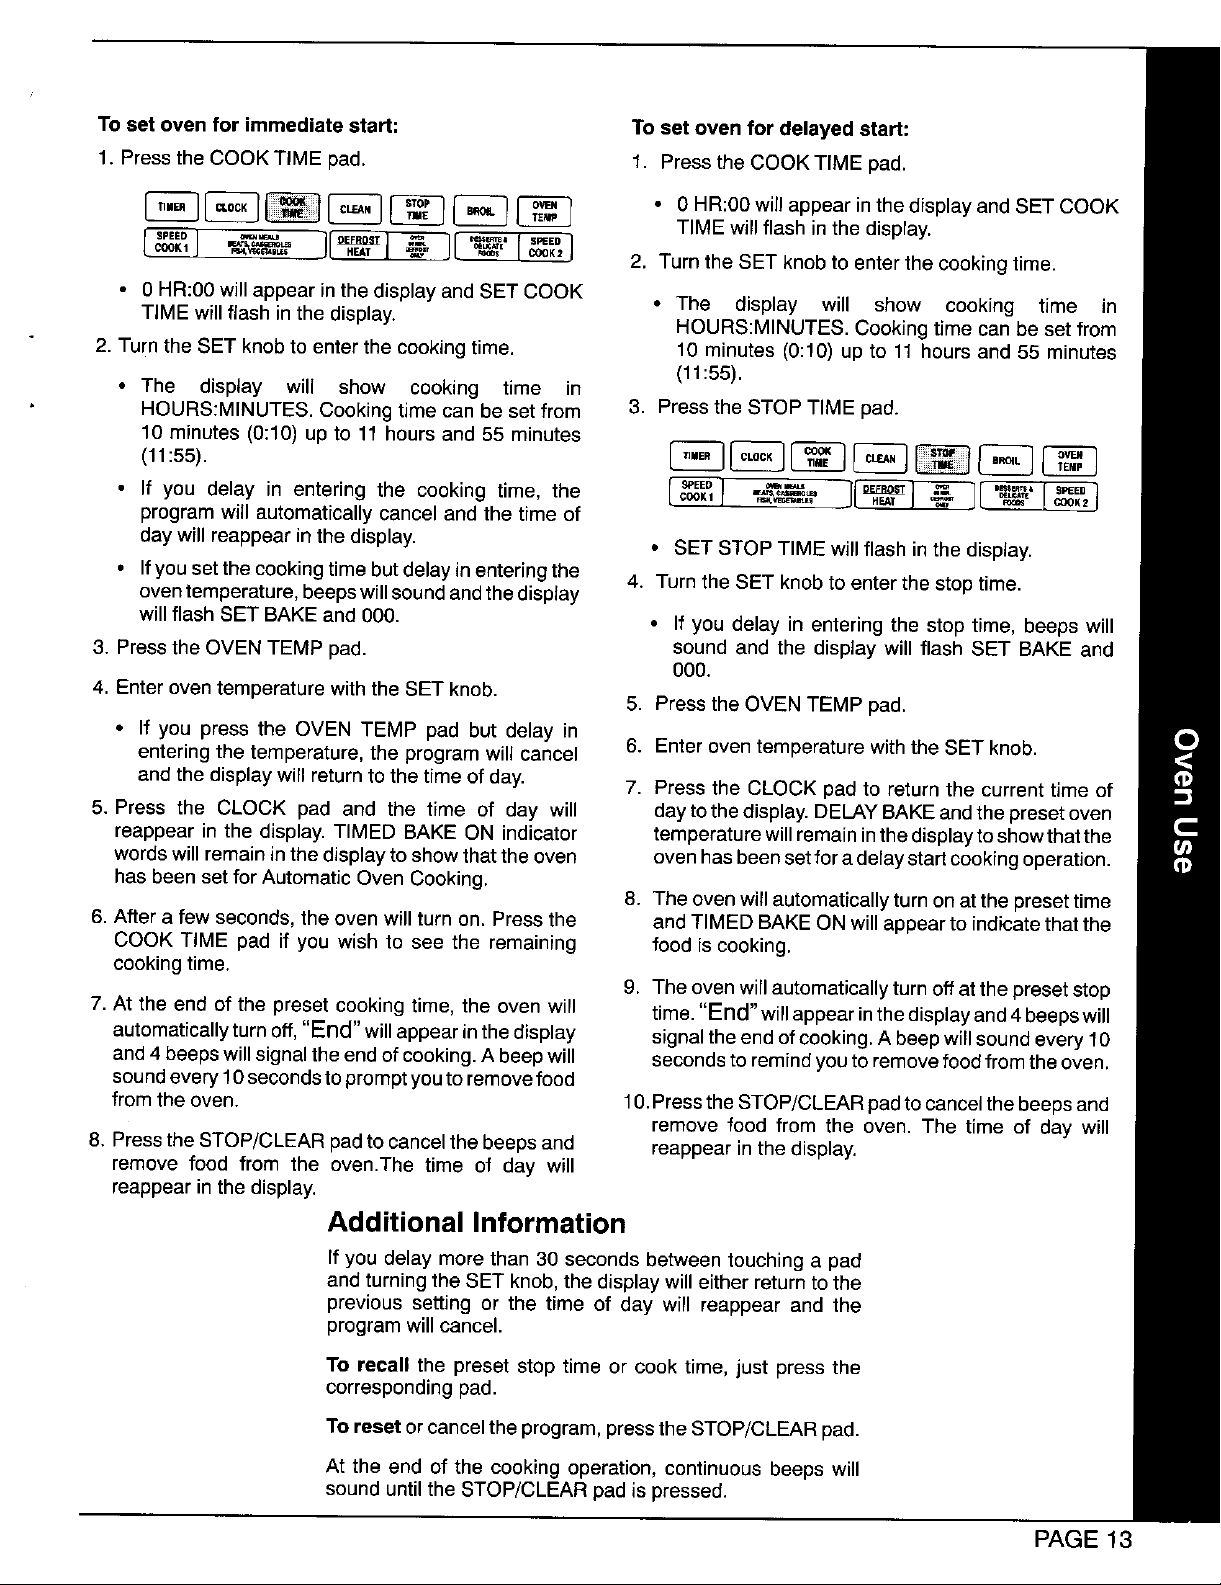
1. PresstheCOOKTIME pad. 1, PresstheCOOK TIME pad,
_ _ _ [_ _ • 0 HR:O0willappear inthedisplay and SET COOK
_'_"'_' 2. Turn the SET knob to enter the cooking time.
• 0 HR:00 will appear in the display and SET COOK
TIME will flash inthe display. * The display will show cooking time in
2. Turnthe SET knob to enter the cooking time. 10 minutes (0:10) up to 11 hours and 55 minutes
• The display will show cooking time in
HOURS:MINUTES. Cooking time can be set from 3. Press the STOP TIME pad.
10 minutes (0:10) up to 11 hours and 55 minutes
• If you delay in entering the cooking time, the _ _--_, ___
program will automatically cancel andthe time of
daywill reappear in the display. • SET STOPTIME will flash in the display.
• Ifyousetthecookingtimebutdelayinenteringthe 4. Turn the SET knob to enter the stop time.
oventemperature, beeps willsound andthedisplay
will flash SET BAKE and 000. * If you delay in entering the stop time, beeps will
3. Press theOVEN TEMP pad. sound and the display will flash SET BAKE and
4. Enter oven temperature with the SET knob.
• If you press the OVEN TEMP pad but delay in
entering the temperature, the program will cancel 6. Enter oven temperature with the SET knob.
and the displaywill return to the time of day. 7. Press the CLOCK pad to return the current time of
5. Press the CLOCK pad and the time of day will day tothedisplay. DELAYBAKEandthe preset oven
reappear in the display. TIMED BAKE ON indicator temperature will remaininthe displaytoshowthatthe
words will remain in the displayto show that the oven oven hasbeensetfora delaystart cookingoperation.
has beenset for Automatic Oven Cooking.
6. After a few seconds, the oven will turn on. Press the and TIMED BAKE ON will appear to indicatethat the
COOK TIME pad if you wish to see the remaining food iscooking.
cooking time.
7. At the end of the preset cooking time, the oven will time."End"willappearinthedisplayand4beepswill
automat'callyturnoff,"End w'll appear inthe display signaltheend ofcooking.A beepwill soundevery 10
and4 beepswillsignalthe endof cooking. A beepwill seconds toremindyou to removefoodfrom the oven.
soundevery 10secondstoprompt youto removefood
from the oven. 10.Pressthe STOP/CLEARpadtocancelthe beepsand
8. PresstheSTOP/CLEAR padto cancel the beeps and reappear inthe display.
remove food from the oven.The time of day will
reappearin the display.
TIME will flash in the display.
HOURS:MINUTES. Cooking time can be set from
(11:55).
000.
5. Press the OVEN TEMP pad.
8. The oven will automaticallyturn on at the presettime
9. Theoven willautomatically turn off at the preset stop
remove food from the oven. The time of day will
Additional Information
If you delay more than 30 seconds betweentouching a pad
and turning the SET knob,the display will either returnto the
previous setting or the time of day will reappear and the
program will cancel.
To recall the preset stop time or cook time, just press the
corresponding pad.
Toreset orcancel the program, presstheSTOP/CLEAR pad.
At the end of the cooking operation, continuous beeps will
sound untilthe STOP/CLEAR pad ispressed.
PAGE 13
Conventional Baking Tips
• Use a reliable recipe and accurately measure fresh • For optimum baking results, bake cookies and
ingredients. Carefully follow directions for oven biscuitson aflat cookiesheet. If the pan has sides,
temperature and cooking time. Preheat oven if suchas ajelly roll pan, browning may not be even.
recommended.
If using oven-proof glassware, or dark pans
• Usethecorrect rackposition, Bakingresultsmaybe such as Baker's Secret reduce the oven
affected if the wrong rack is used. temperature by 25°F except when baking pies or
Top browning may be darker if food is located
towardthe top of the oven.
Bottom browning may be darker if food is located optimum baking results. Improper placement of pans in
toward the bottom ofthe oven. the oven will block air flow and may result in uneven
When using two racks fer baking, allow enough
space between the racksfor proper air circulation. _ Donot crowd a rack with pans. Never place more
Browningand cooking results will be affected if air than one cookie sheet, one 13x9x2-inch cake pan
flow isblocked, ortwo 9-inch round cake panson one rack.
• Cookware material plays an important part in baking is not directly over another pan.
results.Always use the type and size of pan called for in _ Allow two inches between the pan and the oven
the recipe. Cooking times or cooking results may be wans.
affected if the wrong size is used,
bread.Usethe samebakingtime as called for in the
recipe.
• Allow hot air to flow freely through the oven for
browning. For optimum browning and even cooking
results:
Staggerpanswhen bakingon two racksso one pan
Shiny metalpan reflects heat awayfrom the food, • Check the cooking progress at the minimum time
produces lighter browning and a softer crust. Use recommended in the recipe. If necessary, continue
shiny pans for baking cakes or cookies, checking at intervals until the food is done. If the oven
Dark metal pan or a pan with an anodized (dull)
bottom absorbsheat, produces darkerbrowning
and a crispercrust. Usethistypeof panforpies,pie • If you add additional ingredients oralter the recipe,
crustsor bread, expectcookingtimesto increaseordecreaseslightly.
doorisopenedtoo frequently, heatwill escapethe oven;
this canaffect baking results and wastes energy.
PAGE 14
Conventional Baking Chart
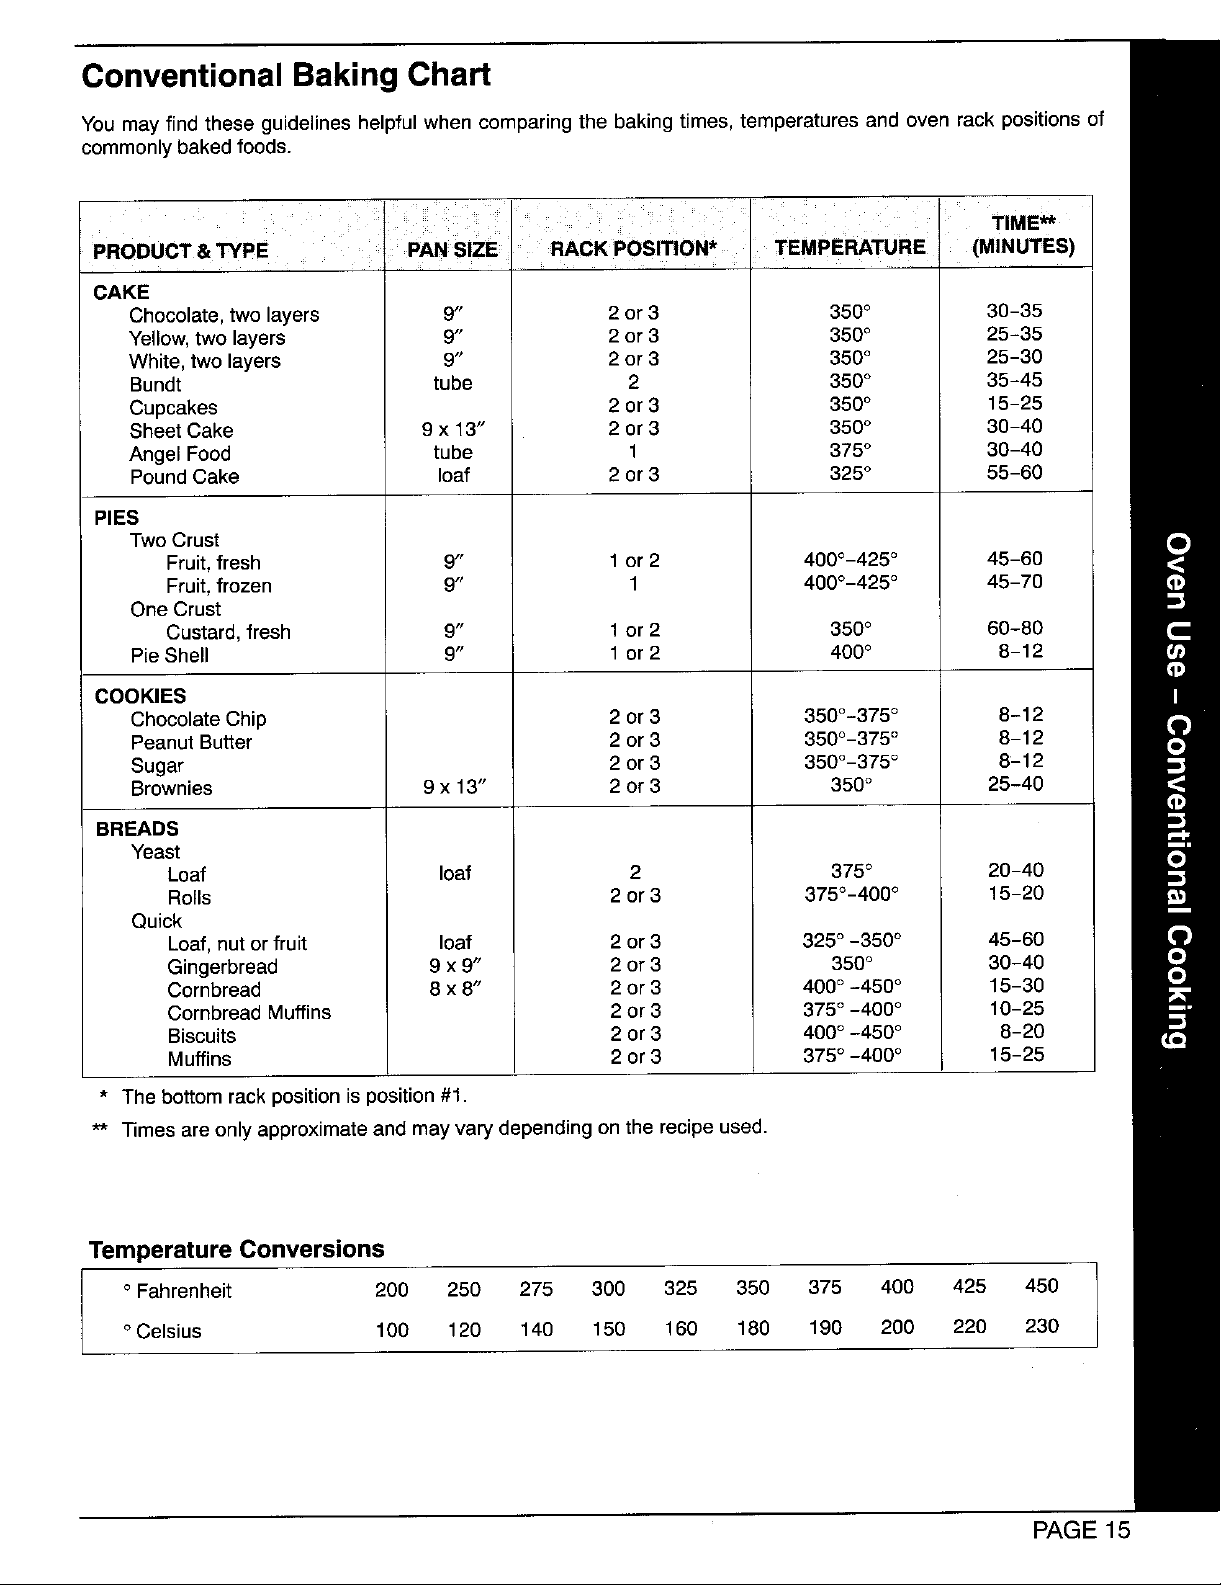
You mayfindtheseguidelineshelpfulwhen comparingthe bakingtimes,temperaturesandovenrack positionsof
commonlybakedfoods.
_--I li TIME**
PRODUCT & TYPE PAN SiZE RACK PosmoN* TEMPERATURE (MINUTES)
CAKE
Chocolate,two layers 9" 2 or 3 350° 30-35
Yellow,two layers 9" 2 or 3 350° 25-35
White, two layers 9" 2 or 3 350° 25-30
Bundt tube 2 350° 35-45
Cupcakes 2or 3 350° 15-25
Sheet Cake 9 x 13" 2 or 3 350° 30-40
Angel Food tube 1 375° 30-40
PoundCake loaf 2 or 3 325° 55-60
PIES
Two Crust
Fruit, fresh 9" 1 or 2 400°-425 ° 45-60
Fruit, frozen 9" 1 400°-425 ° 45-70
OneCrust
Custard, fresh 9" 1or 2 350° 60-80
Pie Shell 9" 1 or 2 400° 8-12
COOKIES
Chocolate Chip 2 or 3 350°-375 ° 8-12
Peanut Butter 2 or 3 350°-375 ° 8-12
Sugar 2 or3 350°-375 ° 8--12
Brownies 9 x 13" 2 or 3 350° 25-40
BREADS
Yeast
Loaf loaf 2 375° 20-40
Rolls 2 or 3 375°-400 ° 15-20
Quick
Loaf,nut or fruit loaf 2 or 3 325° -350 ° 45-60
Gingerbread 9 x 9" 2 or 3 350° 30-40
Cornbread 8 x 8" 2 or 3 400° -450 ° 15-30
Cornbread Muffins 2 or 3 375° -400° 10-25
Biscuits 2 or 3 400° -450° 8-20
Muffins 2or 3 375° -400° 15-25
* The bottom rack position is position #1.
** Times are only approximate and may vary depending on the recipe used.
TemperatureConversions
° Fahrenheit 200 250 275 300 325 350 375 400 425 450
° Celsius 100 120 140 150 160 180 190 200 220 230
PAGE 15
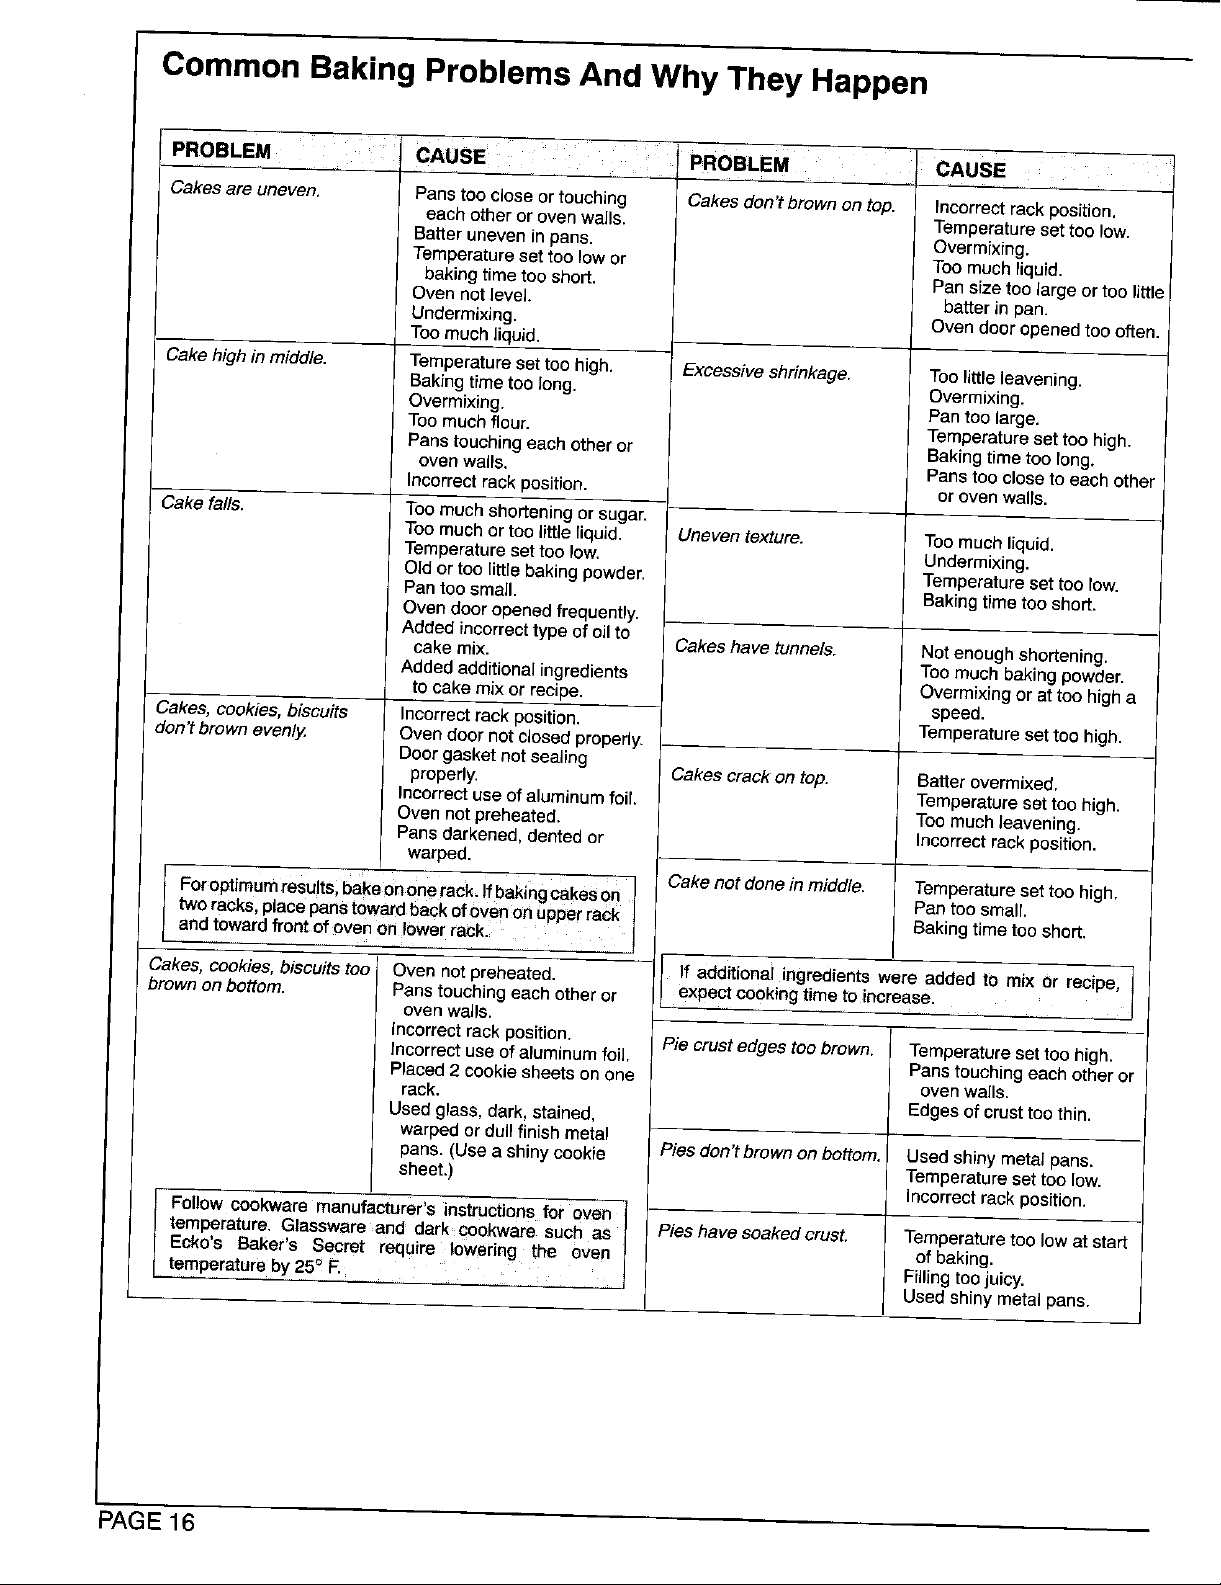
Common Baking Problems And Why They Happen
PROBLEM = CAUSE = PROBLEM CAUSE
Cakesare uneven. Pans too close or touching Cakes don't brown on top. incorrect rack position.
Cake high in middle. Temperature set too high. Excessive shrinkage. Too little leavening.
Cake fails. Too much shortening or sugar.
Cakes, cookies, biscuits Incorrect rack position. Temperatureset too high.
don't brown evenly. Oven door not closed properly.
each other or oven walls. Temperatureset too low.
Batter uneven in pans. Overmixing.
Temperatureset too low or Toomuch}iquid.
baking time too short. Pansizetoo large or too Itttle
Oven not level, batter in pan.
Undermixing. Oven door opened too often.
Too much liquid.
Baking time too long. Overmixing.
Overmixing. Pantoo large.
Too much flour. Temperature set too high.
Panstouching each other or Bakingtime too long.
ovenwails. Panstoo close to each other
incorrect rack position, or oven waits.
Too much or too little liquid. Uneven texture. Toomuch liquid.
Temperatureset too low. Undermixing.
Old or too little baking powder. Temperatureset too low.
Pantoo small. Baking time too short.
Oven door opened frequently.
Added incorrect type of oil to
cake mix. Cakeshave tunnels. Not enough shortening.
Added additional ingredients Toomuch baking powder.
to cake mix or recipe. Overmixingor attoo high a
Door gasket not sealing
properly. Cakes crack on top. Batter overmixed.
Incorrect use ofaluminumfoil Temperature set too high.
Oven not preheated. Too much leavening.
Pans darkened, dentedor Incorrectrack position.
warped.
speed.
Foroptimumresults,bakeon onerack, Ifbakingcakeson I Cake not done in middle. Temperature set too high.
twor&oks,p|acepanstowardbackofovenonUp_errackt Pan too small
andtoward front ofoven on _wer rack. t Bakingtime too short.
Cakes, cookies, biscuits too Oven not preheated. } If additional ingredients were added to mix or recipe,
brown on bottom. Panstouching each other or expectcooking time to increase.
Follow cookware manufacturer's instructions for oven {
temperature. Glassware and dark cookware such as I Pies have soaked crust. Temperaturetoo low at start
Ecko's Baker's Secret require lowering the oven t of baking.
temperature by 250F. Filling too juicy.
ovenwalls.
Incorrect rack position. Pie crust edges too brown, Temperatureset too high.
Incorrect use of aluminum foil. Panstouching each other or
Placed 2 cookie sheets on one oven wa]ls.
rack. Edges of crust too thin.
Used glass, dark, stained,
warped or du{tf{nishmeta_
pans. (Use a shiny cookie Pies don't brown on bottom. Used shiny metal pans.
sheet.) Temperatureset too low.
, , Usedshiny metal pans.
Incorrect rack position.
PAGE16
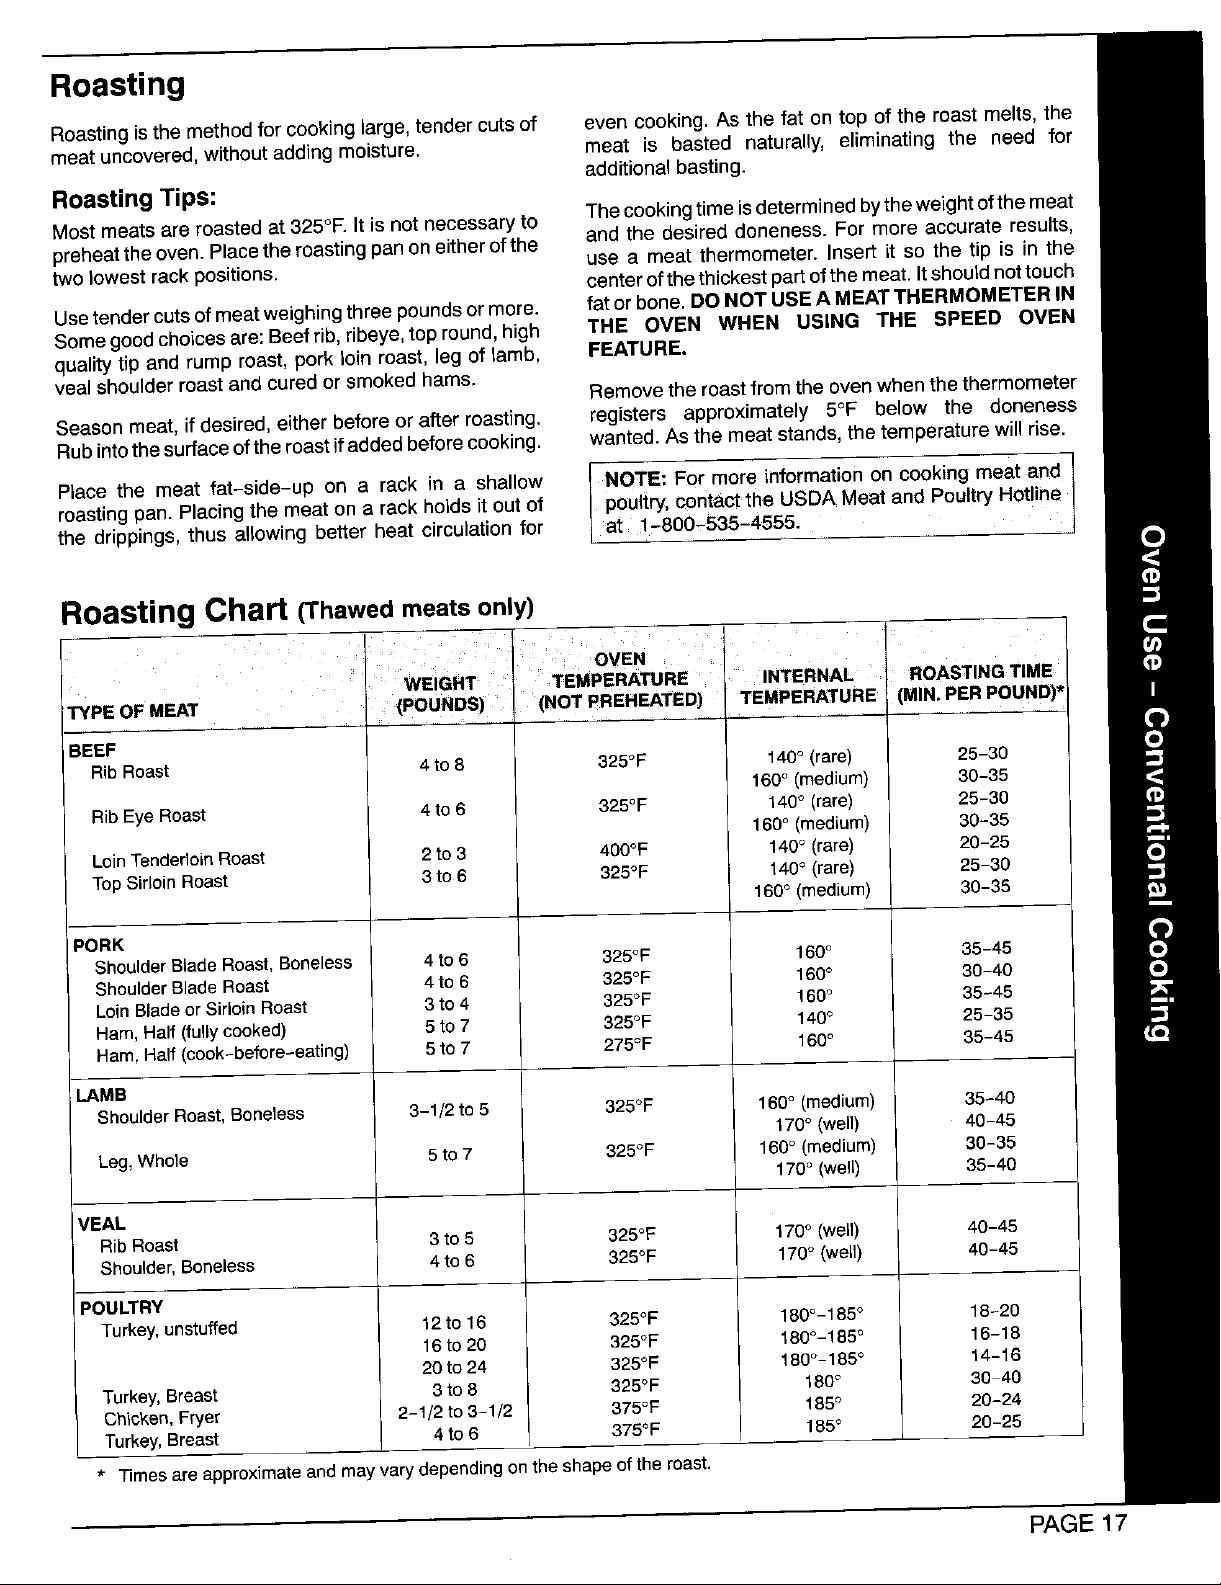
Roasting
Roasting is the method for cooking large, tender cuts of even cooking. As the fat on top of the roast melts, the
meat uncovered, without adding moisture, meat is basted naturally, eliminating the need for
additional basting.
Roasting Tips:
Most meats are roasted at 325°F. It is not necessary to The cooking time is determined by the weight of the meat
preheat the oven. Place the roasting pan on either of the and the desired doneness. For more accurate results,
two lowest rack positions, center of the thickest part of the meat. Itshould not touch
Use tender cuts of meat weighing three pounds or more. fat or bone. DO NOT USE A MEAT THERMOMETER IN
Some good choices are: Beef rib, ribeye, topround, high THE OVEN WHEN USING THE SPEED OVEN
quality tip and rump roast, pork loin roast, leg of lamb, FEATURE.
veal shoulder roast and cured or smoked hams.
Season meat, if desired, either before or after roasting, registers approximately 5°F below the doneness
Rub into the surface of the roast if added before cooking, wanted. As the meat stands, the temperature will rise.
Place the meat fat-side-up on a rack in a shallow NOTE: For more information on cooking meat and
roasting pan. Placing the meat on a rack holds it out of poultry, contact the USDA Meat and Poultry Hotline
the drippings, thus allowing better heat circulation for 1-800-535-4555.
use a meat thermometer, insert it so the tip is in the
Remove the roast from the oven when the thermometer
Roasting Chart (Thawed meats only)
.... OVEN
....WEIGHT TEMPERATURE
TYPE OF MEAT (POUNDS) (NOT PREHEATED) TEMPERATURE _(MIN.PER POUND)*
INTERNAL ROASTING TIME
BEEF
Rib Roast 4 to 8 325°F 140° (rare) 25-30
160° (medium) 30-35
Rib Eye Roast 4 to 6 325°F 140° (rare) 25-30
160° (medium) 30-35
Loin TenderloinRoast 2to 3 400°F 140° (rare) 20-25
TopSirloin Roast 3 to 6 325°F 140° (rare) 25-30
160° (medium) 30-35
PORK
Shoulder Blade Roast, Boneless 4 to 6 325°F 160° 35-45
Shoulder Blade Roast 4to 6 325°F 160° 30-40
LoinBlade or SirloinRoast 3 to 4 325°F 160° 35-45
Ham,Half (fullycooked) 5 to 7 325°F 140° 25-35
Ham,Half (cook-before-eating) 5to 7 275°F 160° 35-45
LAMB
Shoulder Roast, Boneless 3-1/2 to 5 325°F 160°(medium) 35-40
170° (well) 40-45
Leg,Whole 5to 7 325°F 160° (medium) 30-35
170° (well) 35-40
VEAL
Rib Roast 3 to5 325°F 170° (well) 40-45
Shoulder,Boneless 4 to 6 325°F 170° (well) 40-45
POULTRY
Turkey,unstuffed 12to 16 325°F 180°- 185° 18-20
Turkey, Breast 3 to 8 325°F 180° 30-40
Chicken,Fryer 2-1/2 to 3-1/2 375°F 185° 20-24
Turkey,Breast 4 to 6 375°F t85° 20-25
* Times are approximateand may vary depending on the shape of the roast.
16 to 20 325°F 180°-185° 16-18
20to 24 325°F 180°-185° 14-16
PAGE 17

Broiling
Broiling is a method of cooking tender meats by direct To set oven to bro
heat. The cooking time is determined by the distance ii Pressthe BRoiL pad
between the meat and the broil element, the desired 000 and BRO L indicator words will appear in the
degree of doneness and the thickness of the meat. display.
2: Turh SET knob c ockwiSe to se ect HI _or normal
Broiling Tips: broiling or counter clockwise tO select Lo for low
Broiling requires the use ofthe broiler pan and insert. The temperature broilingi
broiler insert must be in place to allow fat and liquid to
drain to the pan below to prevent spatters, smoke and preheat broil element 3 to 5 minutes;
flare-ups. Improper use may cause grease fires. 4, Broil With the oven door opened t0 _he broil stop
Do not cover the broiler insert with aluminum foil as this p0sition(opened about 6-inches), Turn meat Once
prevents fat from draining into pan below. For easier about halfway through cookingl Check for
clean up, the broiler pan can be lined with foil and spray aloneness by cutting asiitin the meat near the center
the insert with a non-stick vegetable spray, for desired Colorl
Remove excess fat and slash remaining fat to help keep to cancei the broil operation,Theeurrenttime Ofday
meat from curling. This also reduces smoking and Wili reappear in the dispay
spattering.
Place oven rack in the correct rack position when oven is BROIL when broiling longer cooking foods such as
cool. For darker browning, place meat closer to the broil poultry. The lower temperature allows food to cook to the
element. Place meat further down if you wish meat to be well done stage without excessive browning. Cooking
well done or if excessive smoking and flaring occurs, time may increase if Lo BROIL is selected.
3i o_imUm results remove broiier pan and
5_Atthe end of cooking press the STOP/CLEAR pad
Use HI BROIL for most broil operations. Select Lo
See Care and Cleaning Chart on page 26 for instructions Broil times may need to be increased if range is installed
on cleaning the broiler pan and insert, on a 208-volt circuit.
Broiling Chart
..... TOTALTIME
TYPE OF MEAT iRACK POSITION*l DONENESS (M NUTES)_
BACON #4 Well Done 6 to 10
CHICKEN LO BROIL
Whole, split #3 or #4 WellDone 45 to 60
Pieces #3 or #4 Well Done 30 to 45
GROUND BEEF PAI-FIES
3/4 to 1-inch thick #4 Medium 12to 15
Well Done 15to 18
LAMB CHOPS
1-inch thick #4 Medium 12 to 15
Well Done 16to 20
1 t/2-inch thick #3 Medium 15to 19
Well Done 25 to30
PORK CHOPS ....
3/4-inch thick Well Done
1-inch thick #4 WellDone 20 to 25
* The bottom rack position is position #1.
** Timesare approximate and mayvary depending on the meat.
PAGE18
SPEED OVEN FEATURE
Pleaserefertothe separateSpeed OvenCookingGuide "HOLD"
for completecooking instructionsusingthe Speed Oven
feature.The information below explains how to operate At the end of a SPEED COOK 1, SPEED COOK 2 or
the Speed Oven feature. If you have any questions, call DEFROST/HEAT for 59 minutes or less, "HOLD"
us at 1-800-688-1120. automatically appears in the display and the oven wilt
turn off. "HOLD" is a special option that allows you to set
General Information additional cooking time iffood is not completely cooked.
The Speed Oven feature uses a combination of
conventional radiant heat from the bake and broil Opentheovendoorandcheckthedonenessofthefood.
elements plus microwave energy to quicklycook food. Ifthe food is not completely cooked, just close and lock
This newway of cooking is called Speed Cooking.The the door. Then add up to 10 minutes of additional
SpeedOven feature can also be used to defrost roasts cooking.
and poultry weighing over 4qbs.
Belowis a description of the three Speed settings: you cancel "HOLD" and find that additional cooking is
SPEED COOK "1setting uses a slightly higher amount needed, select the original Speed setting (SPEED
of microwave energy along with conventional radiant COOK 1, SPEED COOK 2 or DEFROST/HEAT) and
heatto cook suchfoods as: Meats, poultry,seafood and enter 5 minutes additional cooking. Check food at least
fish, main dishes and casseroles, vegetables, oven once during the cooking.
meals, and frozen convenience foods packaged in
aluminum foil containers. Important points to remember about "HOLD":
SPEED COOK 2 settinguses a slightlyloweramountof appearsinthe displayat the end of a Speed Cook 1
microwaveenergyalongwithconventionalradiantheat orSpeedCook2 operationorDEFROST/HEATforup
to gently cook delicate foods such as: Egg or to59 minutes.
cheese-based dishes and bakedgoods.
DEFROST/HEAT isa specialsettingwhichis designed havea "HOLD"period.
for two types of operations:Defrost-and-heat, and
defrostonly. • You can set additionalcookingtime in the "HOLD"
1. DEFROST-AND-HEAT operations use a set upto 10minutesata time.
combinationof BOTH radiant heat and microwave
energy. This operation is designed to defrost then pad.
heat frozen convenience foods packaged in heat
proof paper and plastic containers. • If you do not enter a "HOLD" time, "HOLD" will
2, THAW ONLY operations use ONLY microwave automatically cancel at the end of 10 minutes.
energy to defrost roasts and whole poultry weighing
over4-1bs.There isno radiantheatfor thisoperation IMPORTANT
- onlymicrowaveenergy.
DONOT PRESS THE STOP/CLEARPAD.
Pressing the STOP/CLEAR pad will cancel "HOLD". If
• There is no HOLD pad. "HOLD" automatically
• DEFROST/HEAT for 60 minutes or more does not
periodasmanytimes as youwish. But you can only
• "HOLD" is canceled if you press the STOP/CLEAR
The Speed Cook feature automaticaly selects the
The lengthof time you setfor the DEFROST/HEAT oventemperature.Allyouselect isthecookingtime.
settingdetermines_vh¢h operationisselected. CO NOT SET OVEN TEMPERATURE,
• If you set DEFROST/HEAT for 59 minutes or • DO NOT PREHEATTHE OVEN.
less, the oven will operate in the if you press the OVEN TEMP pad after setting the
• DEEROST-AND-HEAT mode.
If you set DEFROST/HEAT for 60 minutes or operation will be Cancaled.
more, the overt will oper_e in the DEFROST
ONLYmode. rcontinuedon next page)
oven for a Speed Cook operation, the Speed
PAGE 19
Frequently asked questions about the SPEED OVEN feature.
Whet is the difference between SPEEDCOOK 1 and SPEED to continuecookingconventionally.Examplesare:Angelfoodcake,
COOK2? sliceordropcookies,somedelicateorfamilyfavoritecakerecipes,
SPEEDCOOK1hasa slightlyhigherlevelofmicrowaveenergyto homemadetwo-crustpies,popovers,orsouthern-stylecornbread.
cookmeats,poultry,seafood,casseroles,vegetables,ovenmeals,
andfrozenconveniencefoodsinaluminumfoilcontainers.SPEED DoI havetousespecialcookwarefor SpeedCooking?
COOK2 usesaslightlylowerlevelof microwaveenergytogently No.Youcanusethetypeofheatproofcookwareyouareaccustomed
cookdessertsanddelicatefoodssuchas cheeseoregg-based tousinginyourconventionaloven.Usemetalcookware,heatproof
dishes, glass, ceramic,earthenware,potteryand ovencookingbags.To
WhatistheDEFROST/HEATsetting? poultryor roasts.Selectingheatproofglassratherthanmetalpans
DEFROST/HEATisdesignedfortwotypesofoperations.Thelength for ovenmealswillhelpreducecookingtime.Donotuse plastic
oftimeyouselectforthissettingdeterminestheoperation, cookwaredesignedforthemicrowaveoven,asthistypeofcookware
• IfyousetDEFROST/HEATfor59 minutesorless,radiantheatand willnottolerateconventionalheat.
microwaveenergyareusedtodefrostandheatfrozenconveniencefoods
packagedinheatproofplasticorpapercontainers. Canaluminumfoil beusedduringSpeedCooking?
• IfyousetDEFROST/HEATfor60minutesormore,onlymicrowaveenergyYes, you can safely use aluminumfoil just as you wouldin
isactivatedtoDEFROSTONLYroastsorpoultryweighingover4-1bs. conventionalcookingto shieldfood(exampleturkey),orto prevent
Whyarefrozenconveniencefoodsinheatproofplasticorpaper overcookingoroverbrowning.Youcanalsousealuminumfoilstrips
containerscooked on DEFROST/HEATrather than SPEED tocoverwarmareaswhendefrostingroastsorwholepoultry.
COOK1? We do not recommendcompletelycoveringa metal pan with
Heatproofplasticor papercontainersareheatsensitive.If these aluminumfoilorwrappingfoodin foilasthispreventsmicrowave
containersare heated using SPEED COOK 1 rather than energyfromreachingthefood.Theresultwillbeincreasedcooking
DEFROST/HEAT,the containersmaydistortfromthe extraheat times.Ifyouprefertocookpotatoeswrappedinfoil,thencookthem
usedfortheSPEEDCOOK1setting, conventionally.
preventexcessivespattering,usea metalpanwhencookingwhole
Attheendof a Speedoperation,"HOLD" appearsinthedisplay Whenshouldfoodbe covered- and how?
- whatdoesthismean?
"HOLD"is a specialoperationspecificallydesignedto complete Ifyourrecipeorpackagedirectionscallforcoveringthefoodduring
cooking.When"HOLD"appearsinthedisplay,openthe doorand conventionalcooking,thencoverthefoodfor SpeedCooking.Use
checkthe food. If you findthat the food is notcookedto your metal,coverwitha glasslid.Donotcompletelycovera metalpan
satisfaction,"HOLD"allowsyoutoaddupto10minutesofadditional withfoil;thiswillincreasecookingtimes.If youdonothavea proper
cooking.Youcanreset"HOLD"asmanytimesasyouwishas long coverfora metalpan,thenwesuggestusingconventionalcooking
asyoudonotpressSTOP/CLEARandcanceltheoperation, ratherthanSpeedCooking.
Whathappensif I cancela Speedoperationandthenfind that
thefoodneedsmorecooking? Aretherespecialcookingtechniquesfor SpeedCooking?
Ifyoucancel"HOLD",justpresstheoriginalSpeedsettingandenter Ingeneral,thecookingtechniquesyouuseforconventionalcooking
2 to5minutes.Checkthefoodat leastonceduringcooking, willapplyforSpeedCookingwiththeseexceptions:
Whathappensif I selectthewrongSpeedsetting? • Donotsetanoventemperatureorpreheattheoven.
DependingontheSpeedsettingyouselected,youmayfindthat: • Addt°ppings'suchascheese'breadcrumbs'frenchfried°ni°nrings'etc"
• Foodiscookingtoofast ifyouselectedSPEEDCOOK1ratherthan
SPEEDCOOK2. WhathappensifI setanoventemperature?
• Foodiscookingtooslow- ifyouselectedSPEEDCOOK2 ratherthan Ifyouseta Speedoperationthenselectan oventemperature,the
SPEEDCOOK1.
• FoodiacookingratherthandefrostingifyouseloctedDEEROST/HEATSpeedsettingwill be canceledandthe oven will heat to the
for59minutesorless.(Remember-youmustsetDEFROST/HEATfor60 temperatureyouselected.Youwillbecookingconventionally- not
minutesormoretodefrost.) Speedcooking.
How do I determine Speed Cooking times? Are there Whatrackpositionsshouldl usefor SpeedCooking?
exceptions? UseRack#3(middleposition)forcookingchicken&Cornishhens;
SettheSpeedtimeforhalfthemaximumconventionalcookingtime fish & seafood;casseroles& main dishes;vegetables;frozen
and checkcookingprogressat halfthe minimumconventional conveniencefoods;desserts,andovenmeals.
cookingtime.Foods,suchasvegetables,thatcookveryquicklyin
a microwaveoven may take less than half the maximum UseRack#2forroastingmeats;frozenconveniencefoodssuchas
conventionalcooking time. That's why we suggest you check frenchfries,tater tots or fish sticks; somemain dishesor egg &
cookingprogressathalftheminimumcookingtime. poultry.
Mostfoodscan becookedusingthe SpeedOvenfeature.Are
thereanyexceptions? UseRack#1 (bottomposition)forroastingturkeyorbakingfrozen
Youwillfind thatmanyfoodscookto satisfactionusingthe Speed pies.
Ovenfeature.However,therearesomefoodsthatyou mayprefer UseRack#4and#1 whencookingan ovenmealontworacks.
a glasslid oraluminumfoilto coverglassware.If thecookwareis
duringthelast5minutestopreventoverbrowning.
cheese dishes; desserts;oven meals; and defrosting roastsor
PAGE20
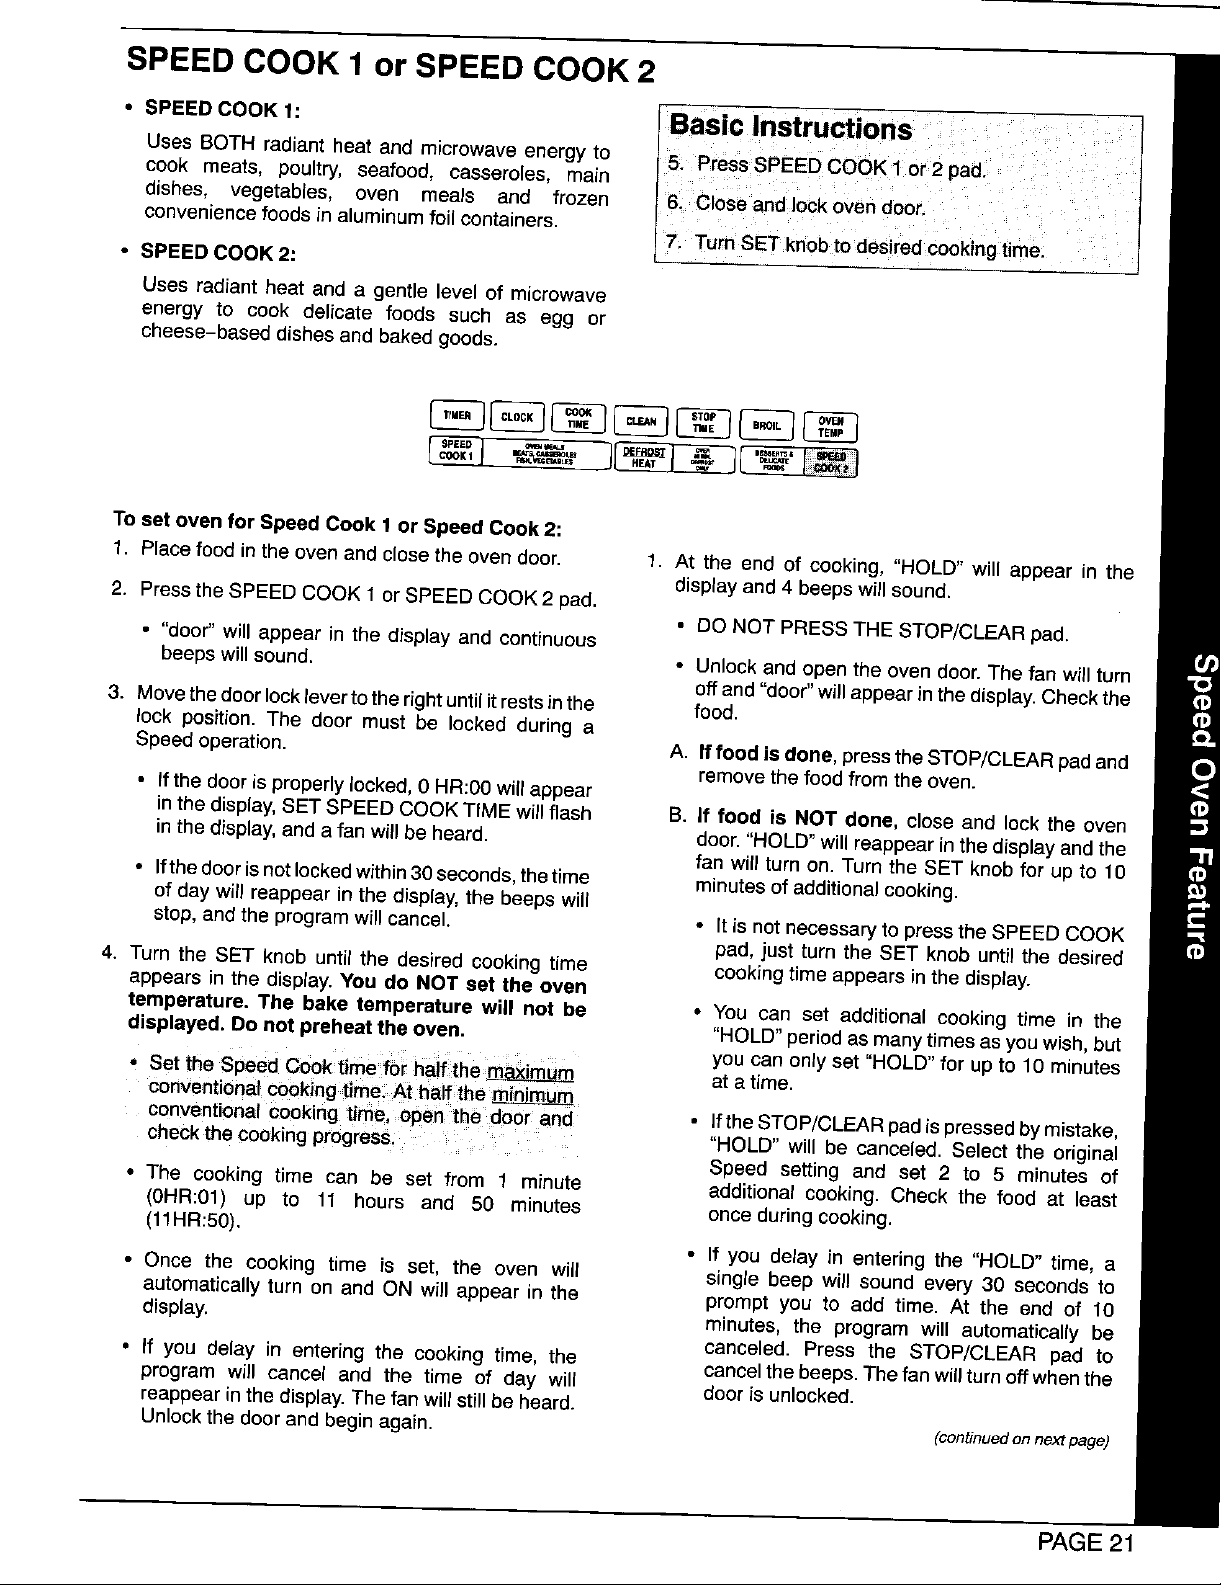
SPEED COOK 1 or SPEED COOK 2
• SPEED COOK 1" Basic Instructions
Uses BOTH radiant heat and microwaveenergy to 5. PressSPEED COOK 1 or 2 pad.
cook meats, poultry, seafood, casseroles, main
dishes, vegetables, oven meals and frozen 6. Close and Jockoven door.
conveniencefoods in aluminumfoil containers.
• SPEED COOK 2.'
Uses radiant heat and a gentle level of microwave
energy to cook delicate foods such as egg or
cheese-based dishes and baked goods.
SPEED _*_J
To setoven for Speed Cook 1 or Speed Cook 2:
1. Place food inthe oven and close the oven door. 1. At the end of cooking, "HOLD" will appear in the
2. Pressthe SPEED COOK 1or SPEED COOK 2 pad.
• "door_ will appear in the display and continuous
beeps will sound. • Unlock and open the oven door. The fan will turn
3. Movethe door lockleverto the rightuntilit rests inthe food.
lock position. The door must be locked during a
Speedoperation. A. If food is done, pressthe STOP/CLEAR padand
• If the door is properly locked, 0 HR:00will appear
inthe display,SET SPEED COOKTIME will flash B. If food is NOT done, close and lock the oven
inthedisplay,and a fan will be heard, door."HOLD"will reappearinthe displayand the
• Ifthe door is not lockedwithin30seconds,thetime minutes of additionalcooking.
of day will reappear in the display,the beeps will
stop, and the programwill cancel. • It is not necessary to press the SPEED COOK
4. Turn the SET knob until the desired cooking time cooking time appears inthe display.
appears in the display.You do NOT set the oven
temperature. The bake temperature will not be • You can set additional cooking time in the
displayed. Do not preheatthe oven. "HOLD" periodas manytimesas you wish, but
7 Turn SET knob to desired cookng time.
display and 4 beeps will sound.
• DO NOT PRESS THE STOP/CLEAR pad.
offand "door"will appearin the display.Check the
remove thefood from the oven.
fan will turn on. Turn the SET knob for up to 10
pad, just turn the SET knob until the desired
• Set ihe Speed Cook time foi hail the m_imum you can only set "HOLD"for up to 10 minutes
ConVentionalcookingtime At half,theminimum
conventional Cooking time, ,open thedoor and= • If the STOP/CLEARpad ispressedbymistake,
checkthe cooking progress, = "HOLD" will be canceled. Select the original
• The cooking time can be set from 1 minute additional cooking. Check the food at least
(0HR:01) up to 11 hours and 50 minutes once during cooking.
(11HR:50).
• Once the cooking time is set, the oven will single beep will sound every 30 seconds to
automatically turn on and ON will appear in the prompt you to add time. At the end of 10
display, minutes, the program will automatically be
• If you delay in entering the cooking time, the cancelthe beeps. The fan will turn off when the
program will cancel and the time of day will door is unlocked.
reappearin the display. The fan will still be heard.
Unlockthe doorand begin again. (continuedon nextpage)
at atime.
Speed setting and set 2 to 5 minutes of
• If you delay in entering the "HOLD" time, a
canceled. Press the STOP/CLEAR pad to
PAGE 21

DEFROST/HEAT
• DEFROST/HEAT for 59 minutes or less: Basic Instructions
UsesBOTHradiant heatandmicrowave energytode- 1. Press DEFROST/HEATpad.
frostthenheatfrozenconveniencefoodspackagedin
heat-proof paperorplasticcontainers. 2. Closeand lockovendoor.
• DEFROST/HEATfor over 60 minutes or more:
Uses ONLY microwaveenergyto defrostroastsand foodsinheatproofpaperOrplasticContainer.
poultryover 4-1bs.
3. Turn SET knobtoenter time.
• 59 minutesor lesstOdefrostand heat frozen
• 60 minutes or moreto defrost roasts or pouffry
F;;qI- q t- q I- -1 over.-lbs
To set oven for DEFROST/HEAT;
1. Placefood inthe oven and closethe oven door. 5. If you selected a Defrost only operation: At the
endof theoperation,"End"willappearin thedisplay.
2. Pressthe DEFROST/HEATpad. RefertotheSpeedOvenCookingGuideforcomplete
• "door"will appear in the displayand continuous
beepswillsound. 6. If you selected a Defrost-and-Heat operation: At
3. Movethedoor locklevertotherightuntil it restsinthe and 4 beepswill sound.
lock position. The door must be locked for a
DEFROST/HEAToperation. • DO NOT PRESS THE STOP/CLEAR pad.
instructionsondefrostingmeatsand poultry.
the end of cooking,"HOLD"will appearinthe display
• If the door is properly locked, 0 HR:00will appear • Unlockand openthe ovendoor.Thefan will turnoff
inthe display,DEFROSTSETTIME willflash inthe and "door" will appear in the display. Check the
display,and fan will be heard, food.
• Ifthedoorisnctlockedwithin30seconds, thetime A. Iffoodisdone, pressthe STOP/CLEAR padand
of day will reappear in the display,the beeps will remove the food from the oven.
stop, and the program will cancel. B. If food is NOT done, close and lock the oven
door. "HOLD"will reappear in the display andthe
4. Turn the SET knob until the desired time appears in fan will turn on. Turn the SET knob for up to 10
thedisplay. Referto the Speed Oven Cooking Guide minutes.
for complete instructions on cooking or defrosting
times. • It is not necessary to press the
• Remember, if you set 59 minutes or lees BOTH DEFROST/HEATpad, just turn the SET knob
radiant heat and microwave energy will be untilthe desired time appears in the display.
activated. DEFROSTCOOKONwillremaininthe • You can set additional cooking time in the
displayto indicate that this is a defrost-and-heat "HOLD"period as many times as you wish, but
operation, not a defrost operation, you can only set "HOLD" for up to 10minutes
• If you set 60 minutes or more, only miorowave
energywill activate. DEFROST ON will remain in • Ifthe STOP/CLEARpad ispressed bymistake,
the clisplay to indicate that this is a defrost "HOLD" will be canceled. Press
operation.The defroettimecanbe set from 1hour DEFROST/HEATpad and set2 to 5 minutes of
(1HR:00) up to 11 hours and 50 minutes additional cooking. Check food at least once
(11HR:50). duringcooking.
at a time.
• Once the time is set, the oven will automatically • If you delay in entering the "HOLD" time, a
turn on and ON will appear in the display, single beep will sound every 30 seconds to
prompt you to add time. At the end of 10
• Ifyou do not enter the time within 30 seconds, the minutes, the program will automatically be
program will cancel and the time of day will canceled. Press the STOP/CLEAR pad to
reappearinthe display.The fan will still be heard, cancelthe beeps. Thefan will turn offwhen the
Unlockthe door and begin again, door is unlocked.
PAGE 22

MAINTENANCE
Cooktop Light, =fequipped Door Lock Lever
Beforereplacingthe cooktoplightbulb,DISCONNECT The ovendoormustbe lockedfor self-cleanandSpeed
POWER TO RANGE.Besurethe bulbiscool. Do not Cookoperationsonly.A fan willautomaticallyturn on
touehahotbulbwithadampclothasthebulbmaybreak, when the door is lockedand willautomaticallyturnoff
Toturnon cooktop light: Pressandholdrockerswitch when the dooris unlocked.See pages 24 and 25 for
untilthelightturnson.Theovenlightswitchislocatedon Cookinstructions.
the backguard.
To replace cooktop light: Grasp the top trim of the
backguardwithyour thumbsunderthe frontedge and positionduringa conventionalcookingoperation.Ifthe
pulloutwardwhileliftingtoreleasetrimfromcatchesat cancelledand"door"willappearinthedisplay.Iftheoven
eachend. is hotenoughto engagethe internallock,theovendoor
self-clean instructionsand pages 19 to 22 for Speed
Do notmove the doorlockleverto the rightor locked
door is locked, the operation will automatically be
willnotopen.Allowthe oven to coolfor up to an hour,
thenunlockandopenthedoor.The LOCKindicatorlight
mustturnoffbeforethedoorcan beopened.
Storage Drawer
Thestoragedraweratthe bottomoftherangeissafeand
convenient for storing metal and glass cookware. DO
NOT store plastic, paperware, food or flammable
Remove fluorescent tube and replace with an 18 watt material in this drawer. Remove drawer to clean under
fluorescent tube. Snap top trim back into place and
restorepower. Resetthe clock.
Oven Light firststop position. Liftup front of drawer and pull to the
Toturn on the oven light, push the rockerswitch located
on the backguard.
Contact your auth0dZedservicerto replace the dven To replace: Fitthe ends of the drawer glides ontothe
light bulb.Do notattempt to replacethe I ght bulb
yourself. .... drawer to the closed position.
range.
To remove: Empty drawer then pull drawer out to the
second stop position. Grasp sides and lift upand out to
remove drawer.
rails.Liftup drawerfrontand gentlypushinto firststop
position. Lift up drawer again and continueto slide
Oven Door Leveling Legs
Do not place excessiveweightonanopen oven door or Some floors are not level, ii I.
stand on anopen oven door as, in some cases, it could For proper baking, your
cause the range to tip over, break the door or cause range must be level.
serious injury to the user. Leveling legs are located
Whenopeningtheoven door,allowsteam and hotairto oneach corner at the base
escapebefore reachingin ovento check, addor remove of the range. Level by
food.This isespeciallyimportant when using the Speed turning the legs.
Oven feature as you may notice more moisture in the
oven with Speed Cooking. To prevent range from accidently tipping, range should
The oven door can only be removed by an authorized be secured to the floor by sliding a rear leveling leg into
servicer. Do not attempt to remove the door yourself, the anti-tip bracket supplied with the range.
PAGE 23

SELF-CLEAN OVEN
The self-clean ovenuses temperaturesabovenormal Basic Instructions
cooking temperatures to automatically cleanthe entire
oveninterior. 1. Removeovenracksand closeovendoor.
Itis normalforthe cooktopoftherangeto becomehot 2. PressCLEANpad.
duringa clean cycle. Therefore, duringa clean cycle, 3. Lockovendoor.
avoidtouchingthecooktoporovenventarea locatedat
thebaseofthe baekguard.Avoidcontactwiththe oven 4. TurnSET knobtoselectcleaningtime
doorandwindowastheseareasalsobecomehotduring ° Lightsoil- 2 hours
a self-clean cycle.
• Averagesoil- 3 hours
Itisbetterto cleantheovenregularlyratherthantowait
untilthereis a heavybuild-upofsoilintheoven. ° Heavysoil- 4 hours
NOTE: On Canadian models only: The smoothtop
surfaceelementswill notoperateduringa clean cycle.
Thisis normal.
Before Self-Cleaning During Self-Cleaning After Self-Cleaning
Remove all pans and th_ 0_en When the CLEAN padis pressedand About one hour after the end of the
racks from the oven The racks the door is locked, the oven will clean cycle, the internal lock will
will discolor and may n0t slide automatically begin to heat to disengage and the LOCK indicator
easily after a clean eye|e, cleaning temperatures, willturn off.At this point,the doorcan
be unlockedand opened. Move the
Turnoffovenlightbefore cleancycle. As the oven reaches cleaning door lockleverto the leftor unlocked
The lifeofthe bulbmaybe shortened temperatures,theLOCKindicatorwill positionand open the door.
ifleft onduringthecleancycle, turnon to showthat an internallock
Clean oven frame, door frame and point, the oven door can not be powderyash whichcan be removed
around the oven vent with a unlockedandopened, witha damp cloth.If soilremains,it
non-abrasivecleaningagentsuchas indicatesthatthecleancyclewas not
non Ami or soapand water. These To preventdamageto the door and longenough.Thesoilwillberemoved
areas are not exposed to cleaning locklever,do notforce the dooropen duringthe nextcleancycle.
temperaturesandshouldbecleaned when the LOCK indicator is
to preventsoilfrombakingonduring displayed., Ifthe ovenracksdonotslidesmoothly
the cleancycle. The first few times the oven is embossedracksupportswithasmall
Wipe up excessgrease or spillovers cleaned,somesmokeand odor may amount of vegetable oil to restore
from the oven bottom to prevent be detected.This is normaland will ease of movement.
excessive smoking and flare-ups reduceor disappearwith use. If the
duringthe cleancycle, oven is heavilysoiled, or ifthe broiler Clean a_oundthe VentOpeningat
Wipe up acid spillovers such as odormayoccur.
lemon juice, tomato sauce or dudngthe_ieancyCie Us6Soap
milk-based sauces and sugary Asthe ovenheatsand cools, you may and water and a ci0th Or
spillovers. Porcelain enamel is acid hearsoundsofmetalpartsexpanding non-abrasi_epad
resistant, not acid proof. The and contracting. This is normal and ........
porcelain finish may discolor if acid will not damage your appliance. Fine, hair-like linesmay appear inthe
spills are not wiped up immediately, oven interior or oven door. This is a
Do not use oven cleaners or oven
liner protective coatings of any kind heating and cooling of the porcelain
on the self-clean oven finish or
around any part of the oven as they performanceof the oven.
will damage the finish or parts.
To prevent damage, do not clean or
rubthe gasket around the oven door.
Thegasket isdesignedto seal inheat
during the clean cycle.
mechanism has engaged. At this Some soil may leave a light gray,
after a clean cycle,wipe racks and
the baseofthebackgUardifthereis
pan is left in the oven, smoke and a d_posit from the fumes vented
normal condition resulting from
finish. These lines do not affect the
PAG E 24

Self-Clean Oven
To set oven for a self-clean cycle: To delay the start of a clean cycle:
1. Removethe oven racks and close the door. 1. Removethe oven racksand close the door.
2. Pressthe CLEAN pad. 2. Press CLEAN pad.
• "door" will appear in the display and beeps will 3. Move the door lock lever to the right or locked
sound, position.
3. Movethe door lock levertothe rightuntil it rests inthe 4. Turn the SET knob to select cleaningtime.
lock position. 5. PressSTOP TIME pad and turn the SET knobto the
• 3 RR:00 will appear in the display, SET CLEAN time of day you wish the oven to turn off.The stop
TIME will flash in the display and a fan can be time and CLEAN DELAY STOP TIME will appear in
heard. After a few seconds delay, the oven will the display.
automaticallyturn on. CLEAN TIME and ON will
remain in the display. 6. PresstheCLOCKpadandthecurrenttirneofdaywill
4. The oven will automatically clean for 3 hours, the display to show that theoven isset for a delayed
• If youwish to change the cleaning time, press the
CLEAN pad and turn the SET knob to select 2 7. At the end of the clean cycle, continuous beeps will
hoursfor light soil upto 4 hoursfor heavy soil. sound. Press the STOP/CLEAR pad to cancel the
• If the door is not locked or the clean time is not
enteredwithin 30 seconds ofpressingthe CLEAN To cancel clean cycle:
pad, the program will automatically be cancelled. 1. Push the STOP/CLEAR pad,
reappearin the display.CLEAN DELAYwill remainin
cleanoperation.
beeps,
5. Pressthe CLOCKpad andthe currenttimeofdaywill 2. Ifthe LOCK indicator is displayed, allow the oven to
reappearin thedisplay. CLEANandON will remainin cool up to one hour. Once the LOCK indicator turns
the disp}ayto showthatthe oven is in a clean cycle, off, the door can be unlocked and opened.
About one hour after the clean cycle ends, the LOCK Ifthe LOCK indicator is not displayed theoven door
indicator will turn off and the ovendoor canbe unlocked can be unlocked and opened.
and opened.
Theovendoor and door lock leverwillbe damaged if the
oven door is forced to openwhen the LOCK indicator is
still displayed.
PAGE 25

CARE AND CLEANING CHART
Many different cleaning agents are recommended for the various parts of the range. The following brands may help
you to make an appropriate selection: Mild abrasive cleaners (BenAmi, Cameo, SoftScrub, Comet or Ajax); mild
liquid sprays (Fantastik, Formula409); glass cleaners (Windex, Glass Plus, Cinch); non-abrasive scouring pad
(Tuffy).Ifa cleaningproductisrecommendedfor useonplastic,glassor porcelain,itcanbe usedonthe sameappliance
finish.
Besureall partsarecoolbeforecleaning,
PARTS CLEANINGAGENTS DIRECTIONS Besureall partsareproperlyreplacedaftercleaning.
Broiler pan & Soap & water. Plastic Removefrom ovenafter use.Cool then pour off grease.Placesoapy
insert scouring pad. Soap clothover insertand pan;letsoak toloosensoil. Washin warmsoapy
filled scouring pad. water. Use soap filled scouring pad to removestubborn soil. Broiler
Dishwasher. pan and insert can becleaned in the dishwasher.
Baked enamel: Soap & water. Paste Usea drysoftclothto wipe upspills, especiallyacidspills, as soonas
Side panels of b_king soda & ' they occur (Thisis especially importantfor white surfaces.) When
Backguard water.Glass cleaner, surface _scool, wash w_thsoap and water. Donot use abrasive o
Oven door harsh ceaning liquids and powders or oven cleaners. These will
Storage drawer I scratch and permanently damage the finish. Dry with a sOftcloth.
Glass: Soap & water. Paste Wash with soap and water. Remove stubborn soil with paste of
Oven window of baking soda & baking soda and water. Do not use abrasive materials such as
See pages 8 and water. Glass cleaner, scouring pads, steel wool or powdered cleaning agents. They will
9 for smoothtop damageglass. Rinsewith clear water and dry.To preventstaining of
instructions ovenwindow,never use excessiveamounts ofwaterwhich may seep
' ' ' ' r
Clean area around vent opening after each oven use to prevent
staining or discoloration.
under or behind glass. NOTE:The screen betweenthe two panes of
glass will discolor over time. This is normal and will not affect the
window ordoor.
Metal finishes Soap &water. Paste of Wash w th soap and water. Remove stubborn soil with paste of
and trim bakng soda & water, baking sodaandwater.Do notuseovencleaners,abrasiveorcaustic
agents. They wi damagethefinish.
Oven and coil Elements are self-cleaning. Soil will burn off as elements are used.
elements Do not spray oven cleaner on elements, electrical hook up or
connection. Do not immerse coil-type surface elements in water.
Oven racks Soap& water ' Cleanwithsoapy water Removestubborn soilwith cleansing powder
Plastic finishes: Soap & water. Paste Do not use oven cleaner, powder or liquid cleansers, abrasive or
Door handle, trim, of baking soda and caustic cleaning agents on plastic finishes. These cleaning agents
knobs, end caps, water. Nonabrasive will scratch or marr finish. To prevent staining or discoloration, wipe
control panel plastic pad or sponge, up fat, grease or acid (tomato, lemon, vinegar, milk, fruit juice,
marinade) immediately with a dry soft cloth. When surface is cool,
cleanwith soap and water; rinse, and dry.
Porcelain enamel: Mild liquid cleaners, I Porcelain enamel is glass fused on metal. Itmay crack or chip with
Cooktoptrim detergent orsoap & ' misuse. Porcelain enamel is acid resistant, not acid proof. All
Cooktop on water.Cleansing I spillovers, especially acid or sugar spillovers, should be wiped up
coil models powders and non I immediately with a dry cloth. Surface may discolor or dull if soil,
See pages 24 and abrasive nylon or especially acid spills, is not removed. Never wipe off a warm or hot
25for serf-clean plastic padS. surface with a damp cloth. This may cause cracking and chipping.
oven. Never use oven ceaners abras ve or caust c c eaning agents on
exterior f n sh of range or in the self-clean oven hlOTE: The
smoothtopcooktop does not lift up.
PAG E 26

Before You Call For Service
Check these points if...
Part or all of your electric range does not operate Food does not broil correctly
• Is the range plug loose or disconnected from the • Wasthecontrolfor broilingset properly? (SeeBroiling
electricaloutlet? Section)
• Areanyhousefusesblownorcircuitbreakerstripped? • Was the proper rack position used? (See Broiling
• Hasthe powersupply to the home been interrupted? Section)
• On Canadian models only: Your range is equipped • Did you allow time for the broilelement to preheat?
withfuses. Checkto see if afuse has blown. Replace • Did you usethe broiler panthat camewith the range?
with the same type and amperage fuse. • Was aluminumfoilused on the broiler insert,blocking
• Was the electronic control correctly set? the slitsfor fat drainage?
• Was the door left in the locked position following a
self-clean or Speed Oven operation? Oven light does not operate
Is the oven set for Automatic Oven Cooking or a • Is the bulb loose or burned out? Contactauthorized
delayedcleanoperation? servicerto replacelightbulb.
• Isthe lightswitch in the On position?
Surface elements fail to turn on or heat the food
properly, Oven will not self-clean
• Is the range plug loose or disconnect from the • Is the self-clean control set properly? (See
electrical outlet? Self-Clean Instructions)
• If the range has coil elements, are they properly • Is the oven set for a delayed clean operation?
plugged into the receptacles?
• Were appropriate utensils used? (See Cookware or
Cooking Tips Sections) • Was the oven heavily soiled?
• Are the surface element controls properly set?
• isvoltage to the house reduced?
• On Canadian models only: The smoothtop surface or a Speed Oven operation?
elements do not operate during a clean cycle.
Food not baking or cooking correctly • Has the self-clean cycle been completedfor at least
• Are the oven racks level and properly placed for one hour?
baking?(See BakingChart)
• Have youusedaluminumfoilcorrectly? Lever on page23.)
• Was the ovenpreheatedas recommended? • Has powersupplyto rangebeen interrupted?
• Are the controlsfor bakeor Speed Oven operations
properlyset? Oven collects moisture
• Was doorproperlylockedforSpeedOvenoperation? • This is normalfor a Speed Cook operation.Because
• Didyou select the correct Speed setting? collectinthe ovenduring SpeedCook operations than
• Isthere 1 to 2 inches of space between pans andthe during normal conventional oven cooking.
oven walls?
• Is the oven door properly locked?
Oven door won't lock
• Are the controls set properly for the self-clean cycle
Oven door will not unlock
• Was the doorcorrectly unlocked?(See Door Lock
ofthe acceleratedcookingspeed, moremoisturewill
• Was good cookware of the proper size used? "F" plus a number appears in the display
• Are you using atested recipefrom a reliable source? • This is a fault code. If a fault code appears in the
• Was the oven vent covered or blocked? STOP/CLEAR pad. See page 28 for additional
Baking results differ from previous oven
• Oven thermostat calibration may differ between old .......
and new oven. Follow a reliable recipe and review
baking information on pages 14to 16.If you still feel
the oven temperature is incorrect see page 28 for
information on adjusting the oven thermostat.
display and a continuous beep sounds, press the
information.
PAGE 27

SERVICE INFORMATION
Explanation Of FaultCodes Adjusting Oven Temperature
Your appliance is equipped with an electronic control Your new appliance has been factory tested for oven
featuring built-in, self-diagnostic software. This temperature accuracy. Even though your range has
software continuouslymonitors the control to insure safe been tested, you may find that the cooking resultswith
and proper operation. If the software should detect a your new oven are different from your previousoven.
questionable situation, a FAULT CODE (F plus a
number)willappearinthe displayand continuousbeeps If you have carefully followed the recipe, reviewed the
maysound, bakingtips on page14andstillfeelcookingresultsdonot
meet your expectations, you can adjust the oven
temperature. DO NOT ADJUST THE TEMPERATUREif
only one or two items are not baking properly.
i-- -- SET adjust it yourself. To decide how much to change the
I I _ Ifyou thinkthe oven should be hotteror cooler, you can
A fault code indicates that there may be a functional To adjust the thermostat:
error. As a safety precaution, the control will
automatically cancel the program.
I__ thermostat, set the oven temperature 25°F higher or
lowerthanthetemperaturecalledforin your recipe,then
bake.The results of the "test" should giveyou an ideaof
how much to adjust the thermostat.
1. Pressthe OVENTEMP pad.
2. Turn the SET knob until 550° isdisplayed.
During Normal Oven Cooking 3. Press and hold the OVEN TEMP pad for several
If a fault code appears in the display and continuous secondsuntil00° appearsinthe display.
beeps sound, press the STOP/CLEAR pad. Then,
reprogramthe cookingoperation. If 00° does not appear in the display,pressthe
If the fault code reappears in the display, call an
authorizedservicer.Donotusetheovenuntilthe range If the oven temperaturewas previouslyadjusted,
hasbeenserviced.The cooktopcanbe used. the changewillbe displayed.For example, if the
STOP/CLEARpadand beginagain.
temperature was reducedby 15°, -15° will be
displayed.
During A Self-Clean Cycle 4. Turn the SET knobtoselectthetemperaturechange
Iftheovenisheavilysoiled,excessivesmokeandflaring desired.
may result in a fault code. If this occurs,press the
STOP/CLEARpadandallowtheoventocoolforanhour. • The oventemperaturecanbe increasedupto35°
Then, reprogramtheovenforthecleancycle, or reduced by as much as 35° (-35 °) in 5°
If the fault code reappears in the display,call an
authorizedservicer.Donotusetheovenuntilthe range NOTE: If youdelayinselectinga temperature,the
hasbeenserviced.The cooktopcanbe used. program will automaticallycancel and 00° will
increments.
disappear.Beginagainif the programcancels.
PAGE 28
5. PresstheSTOP/CLEARpadand thetimeof daywill
reappearinthedisplay.The ovenwillnowbakeatthe
adjustedtemperature.
Itisnotnecessarytoreadjustthe oventemperatureif
thereisa powerinterruption.Thisadjustmentwillnot
affectbroil,cleanorSpeedCookoperations.

SERVICE INFORMATION
Do not attempt to service the appliance yourself Includeor haveavailablethe completemodelandserial
unless directed to do so in this book. Contact the numbersof theappliance,the nameandaddressofthe
dealer who sold you the appliance for service, dealerfromwhomyou purchasedtheappliance,thedate
of purchaseanddetailsconcerningyourproblem.
HOWTo Obtain Service If you do not receive satisfactoryservice, you may
Ifyourapplianceshouldrequireservice orreplacement contactthe MajorApplianceConsumerActionPanel by
parts,contactyourDealer or AuthorizedServicer.Use letter including your name, address, and telephone
only genuine factory parts if replacementparts are number,as wellas the modelandserialnumbersofthe
necessary.Consultthe YellowPagesin yourtelephone appliance.
directory under appliance for the authorizedservice
center nearest you. Be sure to includeyour name, MajorApplianceConsumerActionPanel
address,and phonenumber,alongwiththemodeland 20 NorthWacker Drive
serialnumbersofthe appliance.(See insidefrontcover Chicago,IL 60606
for locationofyourmodeland serialnumbers.)
If you are notsatisfiedwiththe localresponseto your independent agency sponsored by three trade
servicerequirements,callorwriteMagicChefCustomer associations as a court of appeals on consumer
Assistance, Maytag Customer Service, 240 Edwards complaintswhichhave notbeen resolvedsatisfactorily
Street, S.E., Cleveland,TN 37311, (615) 472-3500. withina reasonableperiodoftime.
MACAP (MajorApplianceConsumerActionPanel)isan
PAGE 29

ONE YEAR FULL WARRANTY
MaytagCustomerServicewillrepairorreplace,withoutcharge,anypartof yourappliancewh chhas adefectinmaterial
orworkmanshipduringthefirst yearafterthedateof theoriginalinstallation.Thiswarrantyextendstoany Ownerduring
theoneyearwarrantyperiodwhenthe applianceislocatedinthe UnitedStatesorCanada.
ADDITIONAL FOUR YEAR LIMITED WARRANTY
For an additionalfouryear period,beyondthe firstyearof the FULLwarrantycoverage,MaytagCustomerServicewill
replacetheparts listedbelow,at nocharge.These partsmustbe installedbyan authorizedservicer.Anylaborcharge
requiredfor replacementis NOT covered by this limitedwarranty. This warranty extendsto any owner duringthe
additionalfouryear warrantyperiodwhenthe aDplianceis ocated ntheUnted Statesor Canada.
• Anysmoothtopheatingelement,electroniccontroland/ormagnetrontubewhichfailstoproperlyfunctionas
a resultofdefectiveworkmanshipor materials.
• Anysmoothtopcookingsurfacewhichcracksor breaksduringthe normal householdcooking.
Thetwo warrantiesdescribedabOvearethe only writtenorexpressed warrantiesgiven by Maytag CustomerService.No one is authorizedto increase.
alter,or enlargeMaytagCustomerSen/ice's responsibilitiesorobligationsunderthesetwo warranties. Thesetwowarrantiesgive youspecificlegalrights,
andyou mayalso have other rights whichvary from state to eta_e,
WHAT IS NOT COVERED BY THESE TWO WARRANTIES:
1 Conditions and damages resulting from any of the 3. Light bulbs.
following: 4. Products purchased for commercial or industrial use.
• Improper installation,delivery,or maintenance. 5. The cost of service or servicecall to:
• Any repair,modification,alteration or adjustment • Correct installation errors
notauthorized by Maytag Customer Service. or • Instructthe consumeron the proper useof the
an authorized servicer, oroduct.
• Misuse. abuse accidents or unreasonable use • Transportthe appliance to aservicer.
• Incorrectelectrical current, voltage or suppy 6. CONSEQUENTIAL OR INCIDENTAL DAMAGES
SUSTAINED BY ANY PERSON AS A RESULT OF
• Impropersetting of any control. ANY BREACH OF THESE WARRANTIES Some
Warrantiesare void ifthe originalserial numbers have states do not allow the exclusion or limitation of
been removed, altered, or cannot be readily consequential or incidental damages, so the above
determined.
HOW TO RECEIVE WARRANTY SERVICE
Contact the dealer from whom you purchasedthe appliance or any authorized servicer to receive warranty service under
these warranties.Should you not receive satisfactory warranty service from your local servicer, contact:
Magic Chef Customer Assistance
c/o Maytag Customer Service
240 Edwards Street, S.E.
Cleveland,TN 37311
(615)472-3500
Havethefollowing information available when requesting warranty service:
• Your nameand address
• The modeland serial numbers of your appliance
• The name and address of your dealer or servicer
• The purchasedate of your appliance
• A clear description of the problem
(4/94)

Welcome 2, Table of Contents 3, Introduction 4,
UseofSpeed Settings 5, Cookware/Bakeware 6,
Rack Positions 7, Cooking Techniques 7, Defrosting 8, Roasting 10,
Casseroles 14,
Vegetables22,
Desserts24,
Frozen Foods 28,
Oven Meals 30,
[ndex 39
PRECAUTIONSTOAVOIDPOSSIBLEEXPOSURETO
EXCESSIVEMICROWAVEENERGY
a) Do not attempt to operate this oven with the door open c) Do not operate the oven if it is damaged, It is parficulady
since open-door operation can resultin harmful exposure to important that the oven door close properly and that there
microwave energy, It is important not to defeat or tamper is no damage to the: (1) Door (bent), (2) hinges andlatches
with the safety interlocks. (broken or loosened), (3) door seals and sealing surfaces.
b) Do not place any object between the oven front face d)The oven should not be adjusted or repaired by
andthe door or allow soil or cleaner residue to accumulate anyone except properly qualified service personnel,
on sealing surfaces.
This precaution pertains ONLY to use of Speed Oven settings and NOT to conventional settings,
3


COOKWARE/BAKEWARE
Your Speed Oven offers wonderful flexibility so special new equipment isn't
necessary Here are our recommendations for best choices for cookware
and bakeware:
•Conventional cookware including metal, heatproofglass, pottery, earthenware,
and oven cooking bags can be used. When using cooking bags, always vent the
bag to avoid excess steam buildup.
•Convenience foods packaged in heatproofpaper or plastic containers can
be used-BUT-cook these using the DEFROST HEAT setting (set for 60
minutes or less).
•Cookware material will have the same effect in your Speed Oven as in a
conventional oven. For example:clark pans will produce a dark crust and shiny
pans will produce a lighter crust.
•Aluminum foiland foil containers can be used.
Do not use these:
• Plastic microwave cookware designed for the microwave oven only. This
material will not withstand conventional heat.
• Do not cover a metal pan with a metal lid or aluminum foil.
NOTE: Always use your conventional bakeware and cookware in the
oven whether you are using the Speed Cook settings or the conventional
bake setting.
You don't need
ropurchase new
cookware! A
wide variety
of convenrlonaI
cookware and
', .... _........ :_ bakeware works
weUinyou
Speed Ouerc

¢%!
RACK POSITIONS
For the best browning results and most efficient cooking times,
just follow these easy guidelines for rack positions. Refer to
additional charts for recommendations for specific foods.
Multiple Rack Cooking:
Use # 1and #4 for two-rack oven meals.
Use Rack Position #3:
Roasting poultry; fish, casseroles, vegetables, desserts.
Use Rack Position #2:
Most foods, defrosting, roasting meat, souffle,
quiche, frozen convenience foods, desserts.
Use Rack Position # h
Turkey, frozen baked pies.
COOKING TECHNIQUES
Many of the techniques you already know from conventional cooking can A choice of
he easily applied to Speed Cooking as well. The main difference isthat you 4 rackpositio_
DO NOT PREHEAT or set a temperature in Speed Cooking.
Covering- Cover the food if your recipe calls for it. DO NOT cover a for Speed Cook
metal pan with a metal lid or aluminum foil. DO NOT use plastic wrap or ensures easy
wax paper since the oven is hot. success Follow
Shielding-There are times when you may want to shield food with our guidelines
aluminum foil:
• Poultry or meat during defrost, for the best
• Pie crust per package directions, brouming results
• Large meats/poultry during cooking such as ham and turkey legs. and most efficient
We recommend shielding the turkey at the beginning of the cooking,
then removing the aluminum foil for the remainder ofthe cycle, cooking times.
Handling Food During Cooking-Use the same techniques for Speed
Cooking as you use for conventional cooking. The only differences are:
•Cooking a roast or ham-These meats should be turned over halfway
through cooking.
•Toppings- (Cheese, tomato sauce or bread crumbs) should be added
during the last few minutes.
Standing Times -After removing a roast or whole poultry from the oven,
the temperature will continue to rise Allow 10 to 15 minutes standing
time for easier carving and to allow temperature to finish rising.
NOTE: As with conventional cooking, size and shape, quantity and
starting temperature of food wi]] all affect the cooking times. For
instance, frozen or cold food will take longer to cook than food at room
temperature. Ifyou cut up food such as vegetables, fruits or meats, Shielding food
remember to cut them in uniform pieces so they will cook evenly. Mth aluminum
Individual food items such as potatoes should be as similar in size and will help it cook
shape aspossible for best results. When you increase the quantity of
food in arecipe, be sure to allow extra cooking time. Understanding and brotv_
these easy-to-master techniques will help you achieve great results, more evenly
7

The Speed Oven offers the unique advantage of allowing you to defrost meats During
or poultry over 4 pounds. The large oven cavity promotes a flexible, spontaneous the Defrost
approach to meal preparation, even for last-minute defrosting to entertain.
operation, we
IMPORTANT NOTE: Your Speed Oven is not designed to defrost flsh suggest you
or to defrost meats or poultry weighing less than 4 pounds. Defrost items check the
less than 4 pounds in a microwave oven or refrigerator- DO NOT defrost
at room temperature. DO NOT set the Defrost operation for 60 minutes food several
or less or your food will cook, not defrost, times.
BASIC INSTRUCTIONS
1.Place a 4 pound or larger roast, chicken or turkey in a shallow metal roasting
pan without a rack. Place the pan on rack position #2. The Speed Oven is not
designed to defrost fish or very small amounts of food. Defrost these items in
you r microwave oven or refrigerator.
2.Set DEFROST HEAT for the maximum defrost time listed in the chart on
page 9.
NOTE: DO NOT set atime of 60 minutes or less or your food will cook, not defrost.
3.During the Defrost operation, we suggest you check the food several times.
Shield any warm areas with aluminum foil. For best results, turn roasts over
two or three times during defrosting.
4. Check meat/poultry at the minimum time listed in the chart. Continue
defrosting ffnecessary. Apply small strips of aluminum foil to any areas that
feel warm. (See photo on page 9)
5. ffmeat or poultry needs additional defrosting, press DEFROST HEAT and
set time for over 60 minutes. Check every, 10 minutes by,setting the timer.
6. After defrosting:
• Meats-Roasts will not be completely thawed. They will have an icy center
but a sharp fork can be inserted into the center. Cover a roast with aluminum
foil and let stand for up to 30 minutes, ffthe center of the roast is icy,expect
cooking time to be slightly longer.
•Poultry-Whole poultry should be placed under cold running water to remove
the giblets. It may be necessary to run the water into the cavity for several
minutes to loosen the giblets. Completely cover poultry in water and soak
in cold water for 30 to 60 minutes.
NOTE: Any atea on the poultry skin that discolors or dties will rehydrate
during the 30 to 60 minute soak. The soaking/rehydrating step is necessary
to ensure moistness.

Protect any areas that may defrost too fast by shielding with small strips of aluminum
foil.For best results and more even defrosting, shield ends and any fat spots of roasts
and poultry.
Shielding tip.
Check and turn
roast seperal times
during defrosting
Shield any areas
that feel warm
with small strips
ofaluminum j-oil.
DEFROST CHART FOR POULTRY, BEEF, PORK
FOOD WEIGHT APPROXIMATE TIPS
4 Cornish Hens 4 lbs. Ihr. 15rain.to 1hr.3(-)rain. Leaveinoriginalwrapfordefrosting.
Whole Chicken 4 [bs. Ihr. l5rain.to | hr. 30 rain.
Turkey Breast 7 lbs. I hr. 30rain.to 1hr.50rain.
Whole Turkey l2lbs. 3hrs.to 3hrs.10 rain. Shieldturkey legends andtop of
Whole Turkey, 1(5lbs. 4 hrs.to 4 hrs.20 rain.
Whole Turkey 20 lbs. 5hrs.to 5hrs.20 rain.
Beef,Pork Under4 lb.roast Not recommended Bone-inroastswilltake lesstime to
4-6lbs.roast
-bone-in 1hr.5rain.to I hr.55 rain. Twoor three timesduffngthe defrost,
-boneless 1hr. l 5min.to 2hrs. 10rain. turn the roastover andcheckforwarm
7-9lbs.roast stripsofaluminum foil.
-bone-in 1hr.55 rain.to 2 hrs.50rain.
-boneless 2 hrs. 10rain.to 3 hrs.10 rain.
DEFROST TIME
breast with aluminum foil
defrostthan bonelessroasts.
areas.Shieldthe warmareaswith small


MEAT, POULTRY AND FISH
Ifyou like beautifully browned roasts and poultry that turn out juicy and flavor- For best
ful,the Speed Oven will provide you with awelcome shortcut to success. We've results, select
included all the basic instructions, charts and tips you need to achieve tender per-
fection with a variety of favorite meats, poultry and fish. You'll be delighted with meta.lpans
how easy it isto save time. Now you can serve an elegant roast in the middle of the when roasting
work week -you don't need to wait until Sunday! meats and
BASIC INSTRUCTIONS wholepouhr_
1. Place thawed meat, poultry or fish in a metal pan, (Whole poultry or roasts
will create excessive splattering in a glass pan.)
NOTE: For best results, use at least a 4-pound roast. For preparing frozen tlsh
sticks or fillets, see Frozen chart on page 29.
2. Place the pan in the Speed Oven using the rack position outlined in the
Roast charts on pages 12 and 13.
3. Set SPEED COOK 1 for the maximum time outlined in the charts.
4. Turn roast over after about half the cooking time.
5. At the minimum time listed in the charts, check for doneness using a
thermometer inserted into the center ofthe roast or the thickest part of the
poultry or the center ofthe fish. Temperatures are given in the charts. DO NOT
use aconventional or microwave thermometer in the oven during
SPEED COOK to prevent damaging the the rmometer.
NOTE: Remove roast or poultry when the temperature is 5 degrees below
desired temperature in tire charts. The temperature will continue to rise about
5 to lOdegreesduringthestandingtime.
6. Ifnecessary, continue cooking and check periodically until done. Cover meat
with aluminum foil and allow"to stand up to 20 minutes.
ADDITIONAL TIPS
•Foil shielding isimportant for lesstender beef roasts, which do not have a layer of fat
to help keep the surface from drying. Tie roasts that tend to separate during cooking.
NOTE: Small separated areas on the ends or tops of roasts may overcook unless
shielded with foil
• For best results, select metal pans when roasting meats and whole poultry.
Drippings tend to splatter more in glass dishes than in metal pans. Ifusing a glass
pan when cooking fish, decrease cooking time by about 3 to 5 minutes.
•DO NOT stuffpoultry. Instead, cook stut_ng separately in ashallow dish during
the last 15 minutes ofthe roasting time. For moist stuffing, cover dish.
11

Oven cooking
bags work well
for lesstender cuts
o/mec,ror/or
heating a jully
cooked ham.
5 *'_')2
Be sure to vent tke
bag m avoid excess
steam buildup.
ROASTING CHART FOR BEEF AND PORK ROASTS
FOOD WEIGHT RACK FINAL SPEED TIPS
Beef 4Ibs. # 2 Rare 140 50 min.to l hr. Roastswhicharethin tend
RibEyeRoast Medium 160 l hr.5 rain.to I hr. lOmin, tocookfaster than chunky
boneless Welldone 170 Ihr. lOmin.to I hr.2Omin. roasts.Bonelessroasts
5-6lbs. #2 Rare 140 1hr.5 rain.to 1hr. lOmin, should betiedtokeeptheii
Shoulder Roast 41bs. #2 WeHdone 170 1hr. 10rain.to / hr. 20 min. ' To start,placeservingside
5-6lbs. #2 Welldone 170 I hr. 15min.to I hr.25 min. ! down.At haWofthecook-
Chuck Roast 41bs. #2 Welldone 170 1hr. to 1hr. 15rain. ingtime,turn the mast
RumpRoast 41bs. #2 Med.Rare 150 50min.to 1hr.
bonelessrolled Welldone 170 I hr.5 rain.to I hr. 15min. Forlesstender cuts of
POS. TEMPERATURE TIME*
Medium 160 1hr.5 rain.to I hr. 15min. shapeduring cooking.
Welldone 170 1hr. 15min.to 1hr. 25 rain.
over,andshieldifnecessary
5-6lbs. #2 Med.Rare 150 I hr.5 min.to I hr. 15min. meat,useacooking bag
Welldone 170 1hr. 15rain.to 1hr.25min, withslitscutintheendof
Pork
ShoulderRoast 3-5lbs. #2 Welldone 170 45 rain.to I hr.
boneless,tied
Ham,fullycooked, Usecookingbagwith I cup
whole,boneless water,Cut slitsin'the bagat
Ham,fullycooked the er/d.'Tumth¢ ha_,er
*The times in the chart above are suggested times• A meat thermometer is the most accurate way to determine doneness
12
the bagtovent.

ROASTING CHART FOR POULTRY AND FISH
FOOD WEIGHT RACK FINAL SPEED TIPS
POS. TEMP. TIME*
Poultry
Chicken, Broiler-Fryer Whole Poultry: Tie legs
whole 2I/?_3 I/2lbs. # 3 170 25 to 35 rain. together, tuck wings, and
3E/2-4 f/2lbs. 30 to 35 rain. place breast side up.
cut-up 2 I/2-31/2 lbs. #3 170-breast 18 to 22 rain. Chicken Pieces: Placethe
185-thigh thickest meaty areas
Chicken Breast, 1- 2 lhs. # 3 170 9 to 13 rain. toward edges ofthe dish.
boneless/skinless 2- 3 lbs. 11to 15 rain.
Cornish Hens, 2 hens #3 170 20 to 25 rain.
whole (1.2 lbs. ea.) 4 hens 25 to 30 rain.
6 hens 30to 35 rain.
Turkey, 1O- 12 lbs. l hr. to I hr. 30 min. Oil the skinof neck cavity.
Whole, unstuffed 12- 16 lbs. # 1 170-breast 1hr. 30 min.to 2 hr. Shieldtheloose skinover the
*The times in the chart aresuggested times. Ameat thermometer isthe most accurate way to determine aloneness.
When roastin_ be
suretoshieldfood
with aluminum w
help itcookand
brown moreevenly
]3


( .: A S S E R 0 L E S
MAIN DISHES & CASSEROLES
In minutes _v°ucan have a hot, hearty main dish or a light, simple side dish on the As with
table with the help ofyour new Speed Oven. Use our basic instructions and tips to conventional
guide you to superb results. Just add a saladand the meal's a favorite with your
Familyor unexpected company. YourSpeed Oven will win you over with how baking casseroles
easy it allis! should not be
BASIC INSTRUCTIONS tiffed more than
1.Prepare a main dish or casserole using your Favoriterecipe.See Additional 1/2to2/3full.
Tips below before selecting your cookware.
2.Selectthe proper oven rack for cooking. Generally: foods cook best when
located on rack position # 2or # 3.Use the chart on page ]6 as aguide
forselecting rack positions.
3.Select the proper Speed Cook setting.
UseSPEED COOK 1for most casseroles and main dishes. (Examples are
lasagna and turkey divan.)
UseSPEED COOK 2 for gently cooking delicate foods such asegg and cheese
dishes. (Examples are macaroni and cheese and quiche)
4.Set the time. Use halfthe maximum conventional cooking time. Check the
cooking progress at half of the minimum time.
ADDITIONAL TIPS
Cookware
•When using shallow cookware, there willbe no difference in cooking times
between glassor metal dishes. When using deep dishes (greater than 2 inches),
cooking time willbe increased slightly (up to 5 minutes) forthe metal cookware.
•lfcovering isnecessary usea glasscontainer with a glass lidor aluminum foil.
DO NOT cover a metal dish with a metallid or aluminum foilasthis will
increase cooking times.
Food Temperature
•Forrefrigerated casseroles, add about 5 to 10 additional minutes when heating.
Amount of Food
• During Speed Cooking, there ismore "boilbubble"acton in the casseroles.
Thus, do not overfillthe dish.Aswith conventional baking, casseroles should
not be filledmore than I/2to 2/3full,especially when very juicy. Foods will
cook faster when allowed to spread out in a large dish.
•When using Speed Cooking, two casserolesusually take longer to cook than one.
Toppings
•Add toppings such astomato sauce, catsup, cheese or crumbs during the
last fewminutes of cooking. This prevents overcooking and can allow for some
stirring ofthe food, ifdesired, before atopping isadded to finish the dish.
Frozen Casseroles
•When freezing foods in large amounts, use two dishes with the food spread out
rather than one deep dish.
•Cook time variesForfrozen foods and depends on the shape and size ofthe
casserole. Generally thin, spread-out foods heat best inabout I/2to 2/3ofthe
conventional time. Thicker or deeper casseroles may cook more evenly ifthe
casserole isturned from front to back once during cooking.
•Frozen casseroles generally cook Fasterffcovered. Use glasscooking dishes and
cover the top with a glasslid or aluminum foil.During the lastFewminutes of
cooking, uncover to crisp or brown the top surface.
15

MAIN DISH/CASSEROLE CHART
RECIPE COOKWARE SETTING SPEED BAKE TIPS
Pasta Casseroles
Lasagna 13%9%2" SPEED Fresh: 45to 50rain Let stand afewminutes to firm before
(6-8 servings) COOK 1 cutting and serving. Cook frozen
Macaroni 1I/2qt. SPEED 8to 10rain. Timeis for heating precooked pasta
and Cheese COOK 2 and sauce. To avoid spillover, do not
(6 servings) ovenqllcasserole.
Tuna Noodle 2qt. SPEED 18to 22 min Add toppings last 3-5 minutes
Casserole COOK 1 of cooking.
(4-6servings)
Turkey or Chicken 2 qt. SPEED Precook noodles. Use cooked; cubed
Tetrazzini COOK 1 or chopped poultry and sauce as
(4-6 servings) irecipe directs.
i
Chicken or Turkey 12" x 8 _'X2" i SPEED 3:4 more minutes .... :
Divan (6 servings) ....
Green Bean 12'!X8_glass
Casserole 2pkg.
(9 oz.) fr0zen beans
TIME* TIME
Frozen.. lasagnain aglassdish and cover with
aluminum foilfor faster heating.
*Times are based on specific brands of mixes or recipes tested. Actual times willdepend on the recipes you Speed Cook and the
starting temperature ofthe food.
CTime listed isfor conventional bake time.

No-cook NoddIe Lasagna
toll .go. d aliansausageorgro. dbee No-cook Noodle Lasagna
crumbled
8 ozfreshmushrooms,slieed(3 cups) In6-quartDutchoven, combinesausage, mushrooms, onion
1 smallonion, chopped(l/2cupJ and garlic.Cook over medium-high heat until sausage isno
2 clovesgarlic,minced ]ongerpink, stirringfrequentlyDrain.Stirintomatoes, tomato
2 cal_(I41/2oz each)diced tomames,undrained sauce,oregano, sugar, basil,salt,pepperandbayleal_Bringtoboil
2 cans(8oaeach)tomatosauce utes. Removeffomheat. Removebaylea(Setsauceaside.
1 teaspoondriedoreganoleaves
over medium-high heat. Reduce heat to low.Simmer for 10 rain-
1 teaspoonsugar inmediummixingb°wl'c°mbineric°tta'l/4cupParmesan
cheese, the egg and parsley Set aside.In bottom of 13x 9-inch
_/2 reaspoondried basilleaves metal baking pan, evenly spread 1i/2cups sauce. Arrange
*/2teaspoonsalt 3 uncooked noodles over sauce, pressing noodles down gently
I/4 teaspoonpepper intosauce. Layerhalfthericottamixture, 2/_cupmozzarella,
I bayleaf and one third ofremaining sauce. Repeat layers once. Top with
I comainer(15oaJricottacheese remaining 3 noodles and remaining sauce (besure to completely
92 cupgratedParmesancheese,diuided covernoodleswithsauce).Placehsagnainovenonrack
I egg position #3.
2 tablespoonschoppedfreshparsleyor2 teaspoons Speed Cook Method: Set SPEED COOK 1 for 39 minutes.
driedparsIey leaves Bake for 30 to 35 minutes, or until fork passes easilythrough
9 uncookedlasagnanoodles noodles. Sprinkle remaining 2/3cup mozzarella and I/4cup
2 cupsshreddedmozzarellacheesgdivided Parmesan cheese evenly over lasagna. Continue baking for addi
tiona[ 2to 4minutes, or until cheese ismelted.
Conventional Method_ Heat oven to 350°EPrepare as direct-
ed, except sprinkle remaining /3cup mozzarella and/4 cup
2 I
Parmesan cheese over lasagna before baking. Cover with foil.
Variatiom Zucchini Lasagna= Bakefor 30 minutes. Remove foil.Bakefor additional 15 to 20
Omit sausage. Add 2 tablespoons olive oil and 4 minutes, or until edges are bubbly and cheese isgolden brown.
cups thinly sliced zucchini (I/8-inchslices).In6- 12 servings
quart Dutch oven, combine mushrooms, onion,
oiland garlic. Cook over medium-high heat until PerServing: Exchanges:
mushrooms are golden brown, stirring frequently. Protein: 19g. Sodium: 830g. 2 Meat/MediumFat
Drain.Continue as directed, except layerhalfthe TotalCarbohydrate:22g. Calcium: 320mg 1Vegetable
C_lorie_: 280 Choles_Broh6grog, 1Starch/Bread
TotalFat: 13g. .5 Fat
zucchini slicesover each of the first two layers of
noodles before adding the ricotta mixture.
1;

C. A S S E R 0 L E S
Quick Cassoulet
t/z cup dry bread crumbs In small mixing bow), combine bread crumbs, parsley and
2 tablespoonssnippedjreshparsleyor2teaspoonsdried butter. Set topping aside. In large mixing bowl, combine
parsley leaves remaining ingredients. Spread mixture evenly in 2 l/z-quart
2 tablespoons butter or margarine, meIted casserole. Cover. Place casserole in oven on rack position #3.
2 cans (I6 oz.each) Great Northern beans, drained Speed Cook Method.. Set SPEED COOK 1 for 28 minutes.
l can (141/2oz.)stemed tomatoes, undrained Bake for 20 to 25 minutes, or until bubbly. Sprinkle cassoulet
I/2 Ib. Polishsausage Iink, cut into l/2-inch slices evenly with topping. Continue baking, uncovered, for additional
1 cup cubed cooked chicken or mrkev (l/2-inch cubes) 2 to 3 minutes, or until topping is golden brown. Let stand for 5
2 medium carrots,thinlysliced [l cup) minutes before serving.
1 medium onion, chopped (l cup) Conventional Method: Heat oven to 350°E Prepare as direct-
3 clonesgarlic, minced ed. Cover. Bake for 45 minutes. Sprinkle cassoulet evenly with
1 teaspoon crushed dried rosemary leaves topping. Bake, uncovered, for additional 15 to 20 minutes, or
I/2 teaspoon dried thyme leaves until edges are bubbly and topping is golden brown. Let stand for
J/4 teaspoongroundullspice 5minutesbeforeserving.
1/4 teaspoon pepper 6 to 8 servings
PerServing: Exchanges:
Calories: 290 C_olesterol: 4Stag. 1.5StarchBread
Protein: 17g Sodium: 490g 1 MeatJLean
TotalCarbohydrate:27g Calcium: 101mg 1Vegetable
Pota(Fat: 13g. 2 Fat
Baked Ratatouil[e
1 cup ltalian-seasoned croutons In small mixing bowl, combine croutons and butter. Set aside.
2 tablespoons but_eror margarine, melted Line 151/2 x 1()-inch baking sheet with double-thickness paper
1 smalleggpIanr(12oz3, cut into I/2-inch cube_(about towels. Spread eggplant cubesin single layer on sheet. Sprinkle
4I/2cups) eggplant evenly with salt. Let stand for 30 minutes. Blot with
1 teaspoonsalt additional paper towels to remove excess moisture.In large bowl,
I can(141/2ozjdicedtomatoes, drained combineeggplantandremainingingredients, exceptcroutons
1 small zucchini, cut into I/2-inchslices (about 11/_cups) and butter. Spread mixture evenly in 2-quart casserole. Cover.
I can (8 oz.) tomato sauce PIace casserole in oven on rack position # 3.
/ cupcoarselychoppedgreenpepper SDeedCookMetkod:SetgPEEDCOOK 1 for3Ominutes.
I can (6 oz) tomato paste Bake for 25 to 27 minutes, or until mixture is hot and vegetables
1 smalIonion, chopped (/2 cup) are tender. Sprink[e croutons evenly over ratatouil[e. Continue
l tablesfoonsnippedfreshparsIeyorl reaspoondried baking, uncovered,_radditional2to3minutes, oruntilcrou
parsley leaves tons are golden brown. Let stand for 5 minutes before serving.
I table_poonsnippedfreshbasilorl teaspoondried ConventionalMethod:Heatovento350°EPrepareasdirect -
basil leaves ed. Cover. Bake for 50 minutes. Sprinkle croutons evenly over
] cIovegarlic, minced ratatouille. Bake, uncovered, for additional 10 to 15 minutes, or
until vegetables are tender and croutons are golden brown. Let
stand for 5 minutes before serving.
4 to 6 servings
PerServing: Exchanges:
Calories: 140 Cholesterol: lOrng .5 Starch/Bread
Protein: 4g. Sodium: 930g. 1 Vegetable
TotalCarbohydrate:21g Calcium: 34rag. 1 Fat
TotalFat: 5g

Mexican Corn & Bean Bake
Filling Lightly grease 2-quart casserole. Set aside. In 12-inch nonstick
IIb. lean ground beG crumbled skillet, combine ground beefand onions. Cook over medium-
I smallonion, chopped (I/2cup) high heat until meat is no longer pink, stirring frequently. Drain.
I can (151/2 oz) red kidney beans, rinsed and drained Stir in remaining fdling ingredients. Bring to boil over medium-
1 can (141/2 oz) stewed tomatoes, undrained and cut up high beat. Spread t_[[ing evenly in prepared casserole. Cover to
1 ean(lloz)whole-kerndcorn, drained cornmeal flour, baking powder and chili powder. Add milk, egg
1 can (6 oz_]tomatopaste and butter. Stir just untildry ingredients are moistened. Stir in
1I/2to 2 teaspoonschili powder I/2cup cheese. Sprinkle remaining I/2cup cheese evenly over
I/2 teaspoon salt filling. Drop cornmeal mixture by tablespoons over cheese.
3 to 4 drops red pepper sauce Spread evenly to cover. Place casserole in oven on rack position # 3.
Topping Speed Cook Method: Set SPEED COOK 2 for 12 minutes.
_/4cup yellow cornmeal Bake, uncovered, for 10 to 12 minutes, or until edges are bubbly
I/3 cupall-purposeflour and wooden pickinserted in center ofcorn bread comes out
1 teaspoon bakingpowder clean. Let stand for 5 to 10 minutes before serving.
1/2 ro 1 teaspoon chili powder Conventional Method: Heat oven to 3 50°E Prepare as direcV
I/_ cupmilk ed. Bake, uncovered, for 20 to 25 minutes, or until edges are
] eggbeaten bubbly and wooden pickinserted in center ofcorn bread comes
2 tablespoonsbui:erormargarine, melted outclean. LetstandforSto lOminutesbeforeserving.
I cupshreddedCheddarcheescdivided 6 servings
keep warm. Set aside. In medium mixing bowl, combine
PerServing: Exchanges:
Calories: 490 Cholesterol: 115mg. 2 Starch/Bread
Protein: 28g Sodium: 970g 3 Meat/Medium-Fat
TotalCarbohydrate:46g, Calcium: 248mg 1Vegetable
TotalFat: 23g. 1 Fat
Mexilan Corn & N,an Bake
19

Pasta& 3 Cheeses
2 cupsuncookedtricoloredorplain rotini Prepare rotini asdirected on package. Rinse and drain. Set
t/4 cupbutterormargarine aside.In 3-quar t saucepan, melt butter over medium-low heat.
l/4 cupall-purposeflour Remove from heat. Stir in tqour,chives, salt,white pepper and
] tablespoonsnip_dfreshchiuesorl teaspoondried cayennepepper.Graduallyblendinmilk.Cookovermedium
chives heat until sauce thickens and bubbles, stirring constantly.
I/2 teaspoonsah Gradually stir in Cheddar cheese and Swiss cheese. Fold in rotini.
1/8 reaspoonwhitepepper Pourmixtureinto 11/2-quartcasserole.Placecasseroleinovenon
I/_ teaspooncayennepepper(oprional) rackposition #3.
2 cupsmilk Speed Cook Method: Set SPEED COOK 2 for 13 minutes.
1I/2cupsshreddedsharpCheddar cheese Bakefor 7to 10 minutes, or until edges are bubbly Sprinkle
1I/2cupsshreddedSwissorGruyerecheese top evenly with Parmesan cheese. Continue baking for 2 to 3
I tablespoongratedParmesancheese minutes, or until cheese ismelted.
ConventionalMethod: Heat oven to 350°E Prepare asdirect-
ed, except sprinkle top evenly with Parmesan cheese before bak-
ing.Bake for 25 to 30minutes, or until edges are bubbly and top
isgolden brown.
6 servings
PerServing: Exchanges:
Calories: 450 Cholesteroh 85rng, 15 Starch/Bread
Protein: 22g. Sodium: 560g. 2Meat/Mediurn_Fat
TotalCarbohydrate:30g. Calcium: 594mg. .5Milk/Low-Fat
TotalFat; 27g. 3Fat
Chicken Tetrazzini
1 pkg.(8 oz) uncookedspaghetti,brokenintoquarters Lightly grease 2-quart casserole. Set aside.Prepare spaghetti
8 oz.freshmushrooms,sliced(3cups) as directed on package. Rinse and drain.Set aside. In 12-inch
3 rablespoonsbutrerormargarine nonstick skillet, combine mushrooms and butter. Cook over
3 tablespoo_sall-purposeflour medium-high heat until mushrooms are golden brown, stirring
1/4to I/2teaspoonsah (optional) ffequently.Removefromheat.Stirinflour, saltandpepper.
1/4teaspoonpepper Gradually blend in broth, half-and-halfand wine. Bringmixture
can (1472oz) ready-to-servechickenbroth to boil over medium-high heat, stirring constantly. Remove from
l i heat. Gradually stir in 3/4cup cheese. In large mixing bowl,
I/_ cuphalj_and_half combine mushroom mixture, the spaghetti, chicken and
I/4 cupdry whitewine pimientos. Spread mixture evenly in prepared casserole. Place
I cupgratedParmesancheese,divided casserolein oven on rack position # 3.
2 cupscubedcookedchickenarmrleey(l/2-inchcubes) SpeedCookMethod:SetSPEEDCOOK 1 for 19minutes.
1 jar (2oz)dieedpimientos,drained Bakefor 13 to 15minutes, or until edges are bubbly Sprinkle
top evenly with remaining I/4cup cheese. Continue baking
foradditional 2 to 4 minutes, or until cheese ismelted.
Let stand for 5 to 10minutes before serving.
ConventionalMethod: Heatoven to 350°E Prepare as direct-
ed, except add remaining I/4cup cheese before baking. Bake for
25 to 30 minutes, or until edges are bubbly and top isgolden
brown. Let stand for 5to 10 minutes before serving.
4 to 6 servings
PerServirfg: Excharfge$:
Calories: 400 Cholesterol: 75rag. 2 Starch/Bread
Protein; 27g. Sodium: 570g. 2 5MeatLean
TotalCarbohydrate:33g. Calcium: 22grog. 2 Fat
TotalFat: 70g.

CurriedShrimp & Rice
Curried Shrimp & Rice
3 tabIespoonsbutwrormargarine Lightly grease ] _/2-quartcasserole. Set aside. In 10-inch
I I&frozen eookedmediumshrimp nonstick skillet, reek butter over medium-high heat. Add
l cup slicedfreshmushrooms shrimp, mushrooms, sweet red pepper and onions. Cook until
1/4cupchoppedsweetredpepper shrimp are thawed, stirring frequently Remove from heat. In
t/4 cupslicedgreenonions medium mixing bowl combine shrimp rrftxture and remaining
1 can(lO3/4oz)condensedcreamofshrimpsoup ingredients, except almonds and coconut. Spread evenly in
1 cup uncookedinstant whiterice prepared casserole. Place casserole inoven on rack position # 3.
2 tablespoonsdry sherryorwhitewine Speed Cook Method: Set SPEED COOK 2 for 16 minutes.
l/2 to I teaspooncurrypowder Bakefor 8 to 12 minutes, or until edges are bubbly Sprinkle
I/4 teaspoonwhitepepper top evenly with almonds and coconut. Continue baking for
i/a teaspooncayennepepper Let stand for 5 minutes before serving.
I/2 cupslicedalmon& toasted
2 tablespoonscoeonur(optional) ConventionalMethod:Heatovento350°E Prepareasdirect-
additional 2to 4 minutes, or until almonds arehot.
ed, except sprinkle top evenly with almonds and coconut before
baking. Bake for 20 to 25 minutes, or until edges are bubbly and
almonds are golden brown. Letstand for 5 minutes before serving.
4 servings
PerServing: Exchanges:
Ca_ori_s: 420 Ci_ol_stef_k255rng. t .5Starch/BrBati
Protein: 30g. Sodium: 940g. 2.5Meat/Lean
TotalCarbohydrate:30g. Carciurn: 103rag. 4Fat
Total,Fat: 19g
21

_%_ _ _, %,, _i! • _ !i_ _: _: ii : _ • _,_
Nutrient-rich vegetables take on added appeal when cooking time iscut in half. Use
your Speed Oven to cook baked potatoes quickly and easily•Old-Fashioned scalloped
or au gratin potatoes turn out bubbly, browned and delicious in halfthe time of con-
ventional cooking. Squash, sweet potatoes and frozen vegetables are easy to _x and
fastto cook. It'sall simply delicious, so now there's no excuse to skip your vegetables7
BASIC INSTRUCTIONS
1. Prepare vegetablesaccordingtoyour recipe or the Vegetable Chart.
2. Place vegetables in the oven on rack position # 3. (Baked potatoes can be placed
directly on rack. Other vegetables should be put in a dish or on a cookie sheet.
Seechart for guidelines.)
3. Set SPEED COOK 1for the maximum speed time in the chart. Check at
minimum time and continue cooking ifnecessardc
NOTE: Vegetables will cook quickly, Speed Cooking times may be
less than half the maximum conventional cooking time.
VEGETABLE CHART
RECIPE NAME
OR SERVINGS TIPS
FOOD TYPE
RECOMMENDED SPEED BAKE
COOKWARE TIME* TIME
Potatoes Placeonovenrack. 2to4 21to23min. 50to60min, Usepotatoesequalinweightand
Plainbaked 6to8 25 to27min, shape.Prickpotatoes with afork
(about 7oz. beforecooking,ifunequal,remove
each) potatoesasthey aredone.
ScallopedorAuGratin ll/2-2qt.glassdish l_/2-21bs. 25to35min. 70to90min, Reeipesvary.Coverdishifrecipe
Potatoes 13"x 9"glassdish 21/2lbs. 30 to 45 min. recommends.To avoidspillover,
3Sto4Smin. fillnomorethan I/2ttlll.SweetPotatoes Appropriate-sizeglass 2to 4 18to 22 rain. ' PotatoesofequaIsizeandweight
Plainbaked dishfornumber of 6to 8 28to 31 min. cook moreevenly.Sweet potatoes
(about 9- 10oz. potatoesbeing maydripjuicessothey needto be
each) cooked, cookedina dish.
Squash Appropriate-size 2halves 15to 19rain. 50to 60 min, Halveandremove seedsbefore
Acornor Butternut glassdishfornumber 4halves l 7to 22 rain. cooking.Arrangecut-side-downin
(about Ito 1I/zlbs.) beingcooked. 6halves 20to 24min. dish.lfdesired,aftercooking,turn
overandfillcavitieswithbutter,
brownsugarorseasonings.Cook
for 2moreminutes.Largersquash
maytakelongerthan time on chart. J
, , I
Frozen lqt.glassw/cover 19-10oz.pack 12tol4min. I40to50min. Addl/4cupwatertodish. I
Vegetables ll/2-2qt.glassw/cover 20oz.pack 14tol6min. l 55to65min Rearrangeorstirlargerpiecesif i
*Timesarebasedon specificsizesor recipestested•Actualtimeswilldepend on the recipesyouSpeedCook.
¢Timelistedisfor conventionalbaketime.


There's always time for dessert-your Speed Oven stands ready to put the finishing Use Speed
touch on a meal. Use Speed Cook Option to save time when preparing snack conve- Cook Options
nience foods such as gingerbread and longer-cooking desserts such as brownies and
bars, and select desserts(see chart for examples). Use the conventional Bake Setting ro save time when
for large quantities, desserts with short baking times (such as cookies), or baked goods preparingsnack
that need to rise slowly for an even shape (such as cakes and breads).
co_/penT/ence_
BASIC INSTRUCTIONS foodsand longer-
1. Prepare the snack mix/recipe. Do not preheat oven.
2. Place the pan on the recommended rack. See chart below, cookingdessens
3. Set SPEED COOK 2 for halfc?fthe maximum conventional time.
4. Check for aloneness at half of the minimum conventional time using regular
conventional techniques. Brownies may still be moist in the center. Follow recipe
directions for cutting (ex: some recipes recommend cutting when warm).
DESSERT CHART
FOOD BAKEWARE RACK SPEED BAKE TIPS
POS. TIME* TIME
AppleCrisp 8"sq.glassdish #2 12tol7min. 38to42min. Timingisfordessertwith
fresh fruit topped with
sugar-flour streusel.
When using cooked or canned
sweetened fruit, decrease time.
Brownies, chocolate, Madewithbrownie mix: #2 12 to 17 mio, ' 25 to 30rain. Do not overbake.
fudgy or cakelike 13"x 9" x 2" metal pan
Made with scratch #2 14to 19 min. 130to 35 rain. Test cakelike brownies by
recipe: 8_sq.metal pan lightly touching top -it should
spring back.
Brownies, blonde 8" sq.metal pan # 2 l 2 to 15 min. !23 to 28 rnin. Top willlook dry and crinkled
or butterscotch, made when done.
from scratch recipe
CreamPuffs Largecookiesheet #3 30to35min. 35to40min. Whencompletelycool, remove
(12 puffs) (17" x 14") any moist areasin center.
FruitCobbler lqt.casserole #3 10tol3rffm. 18to20min. Timingisfordessertwithsaucyfruit
base and biscuit dough topping.
LemonY_quares lYx9"x2_metalpan _#2 14tolSmin. 24to28min, BakecrustforSminutesbefore
adding fflling. :
..... , i ]
Use conventional bake set_
_:miiy fav0_e_akesl :; i
*Times are based on specific brands of mixes or recipes tested. Actual times will depend on the recipes you Speed Cook.
tTime listed isfor conve ntional bake time.

Nrut_ Brown Sugar BaG and Frosted Brownies
Apple Crisp
2 IargebakingapFles,peelegcoredand sliced(4cups) Spread apple slices evenly in 8-inch square glass baking dish.
Topping: In small mixing bowl, combine alltopping ingredients, except
1 cupgranola cereal
butter. Add butter to topping. Stir to coat. Sprinkle topping
1/2cupall-purposeflour evenly over apples. Place dish inoven on rack position #2.
_/gcupcoarselychoppedpecans Speed Cook Method: Set SPEED COOK 2 for 18 minutes.
1/4cuppackedbroumsugar Bakefor 15to lgminutes, or until apples are tender and topping
t/2 waspoongroundcinnamon isgoldenbrown. Let stand for 5to lOminutesbeforeserving.
;/4 _easpoongroundnurmeg ConventionalMethod:Heatovento350°E Prepareasdirect-
_/,;cupbu_terormm,garine,melted ed. Bake for 28 to 32 minutes, or until apples are tender and top-
ping isgolden brown. Let stand for 5to 1(/minutes before serving.
6 to 8 servings
PerServing: Exchanges:
Calories: 240 Chotesterol: 15mg 1 Starch/Bread
Protein: 3g SDdJum: 9DO. t Frud
TotalCarbohydrate:32g. Calcium: 24rag 25 Eat
TotalFat 13g,
Nutty Brown Sugar Bars
]/2 cupburterormargarine, s@ened Lightly grease 9-inch square metal baking pan. Set aside. [n
ll/2 cupspacked brotensugar largemixing bowl,combine butter and sugar.Beatat medium
2 eggs speed until light and f/uffy.Beatin eggs.Add flour, vanilla,salt and
It cupsaIl-purposeflour nuts. Stir until well blended. Spread batter evenlyin prepared pan.
I teaspoonvaniIla Place panin oven on rack position #3.
I/4 teaspoonsalt Speed Cook Method: SetSPEED COOK 2 for 23 minutes.
I cup coarselychoppednuts Bakefor 18to 23 minutes, or until wooden pick insertedin center
comes out clean. Cool completely before cutting.
Con yen tiona 1Method.. Heat oa,ento 350°E Prepare asdirected
Bakefor 30 to 35 minutes, or until wooden pick inserted in cen
ter comes out clean. Cool completely before cutting•
24 bars
PerServing: Exchanges:
Calories: 150 Cholesterol: going. 5 Starch/Bread
Proteim 2g Sodium: 70g. t Fruit
TotalCarbohydrate:2Oh, Calcium: tgmg. 15Fat
TotalFat: 25g
26

FrostedBrownies
Brownies.. Lightly grease l 5 x l()-inch baking pan. Set aside, in large mixing
1/2 cup butter or margarine, soj_ened bowl, combine butter and granulated sugar. Beat at medium
I cupgmnulatedsugar speed dielectric mixer untiI light and fluffy. Add remaining
I1/4cupschocolate-flavoredsyrup brownie ingredients, except chips. Beat at medium speed until
1 cupall-purposeflour wellblended.Stirin I/Bcupchips.Spreadbatterevenlyin
4 GCs prepared pan. Placepaninovenonrackposition #3.
1 Feaspoonvanilla Speed Cook Method: Set SPEED COOK 2 for 17 minutes.
I/g teaspoon salt Bake for 15 to 17 minutes, or until wooden pick inserted in center
//e cupmilkchocolatechips comes out clean. Cool complete[> For frosting: Combine
I cup chips, milk and 2 tablespoons butter in 1quart saucepan.
Frosting: Cook over low heat until chips are melted, stirring constantl>
1 cupmilkchocolatechips Remove from heat. Acld remaining frosdng ingredients. Stir until
3 tablespoonsmilh smooth. Spread frosting evenly on brownies.
2 tablespoom&_rierormargarine ConventionalMethod:Heatovento350°E Prepareasdirected.
1I/_ cupspowderedsugar Bake brownies for 18 to 22 minutes, or until wooden pick inserted
1/2 teaspoon vanilla in center comes out clean. Cool completel?_ Continue asdirected.
Dash ofsah 24 brownies
PerServing: Exchaoges:
Calories: 220 Cholesterol: 50mg. 5 Starch/Bread
Protein: 3g Sodium: 135g. 2Fruit
TotalCarbohydrate:34g Calcium: 31mg 15 Fat
TotalFat: 9g
Cherry Cobbler
I/g cupplus I mblespoonsngar, divided Insmallmixingbowl, combine 1 tablespoon sugar, flour,
_/2 cupall-purposeflour bakingpowder, I/steaspooncinnamonandsalt. Using
_/4 teaspoon bahingpowder pastry blender or 2knives, cut in I tablespoon butter until
1/4 teaspoonplusl/,_waspoongromtdcinnamon, divided mixture resembles coarse crumbs. Set topping aside. In 2-quart
Pinch ofsaIF saucepan, combine remaining I/2cup sugar, 1/4teaspoon
2 tnblespoonsbatterormargarine, chilled, divided cinnamon and cornstarch. Stir in cherries and reserved water.
2 tablespoo_ucornstar& Cook over medium highheatfor7togminutes, oruntilmixture
1 can(16oz) redtartpittedcherriesinwater, drained thickens and bubbles. Remove from heat. Stir in remaining
(reservelh cup water) 1tablespoon butter and the God coloring. Spread cherry mixture
3 to 4 drops redfood coloring (optional) evenlyin 1-quartcassemle. Covertokeepwarm.Setaside. Add
I/4 cup milk Drop topping onto cherry mixture in 4 heaping tablespoons.
Variation: Blueberry Cobbler 4 servings
Substitute 1 can (16 I/xoz.) blueberries in heavv
syrup, drained (reserving I/3 cLIp), for cherries. Calories: 280 Cholesterol: 15rag. t Starch/Bread
• Per Serving: Exchanges:
Prepare as directed, except decrease sugar in hlue- Protein: 3g sodium: 170g. 2.5Fruit
berry mixture to ;/3cup and eliminate foodcoloring. TotalFat: 69.
milk to topping. Stir just until dry, ingredients are moistened.
Place casserole in oven on rack position #3.
Speed Cook Method: Set SPEED COOK 2 for 13 minutes.
Bake, uncovered, for 10 to 13 minutes, or until wooden pick
inserted in topping comes out clean and topping is lightly
browned Let stand for 5 minutes before serving.
ConventionaIMethod: Heat oven to 4OO°E Prepare asdirect
ed. Bake, uncovered, for 18 to 20 minutes, or until wooden pick
inserted in topping comes out clean and topping is golden
brown. Let stand for 5 minutes before serving.
TotalCarbohydrale:55g Calcium: 72mg 1 Fal
27

BASIC INSTRUCTIONS
1.Refer to the package directions for a conventional oven, NOT a microwave Frozen convenience
oven. See additional tips below, foods are quicker
2. Place the food in the oven on rack position # 2. (Exception: frozen baked pies and easier than
should be placed on rack position # 1.)
3. Select a Speed Cook setting: ever when you
For food in glass, metal or aluminum foil containers, set SPEED COOK 1. discover theshorter
For food in heatproofplastic or paper containers, set DEFROST HEAT. times of Speed
NOTE: You must use the DEFROST HEAT setting when heating Oven cooking You
commercially frozen foods in heatproofplastic or paper containers.
carl ev_ cook a
4. Set the cooking time for half of the maximum time recommended for
conventional ovens, frozen pizza with a
NOTE: DEFROST HEAT must be set for 60 minutes or less. choice of crisp or
softer c_ts_
PREPARATION TECHNIQUES
•Follow recommended package directions such as removing or venting the
plastic covering or placing food on acookie sheet. Ifpackage directions
recommended placing the food on aluminum foil, use a cookie sheet instead.
•Remove all aluminum foilcovering from aluminum foil containers and
DO NOT wrap food in aluminum foil.
WHEN COOKING TWO OR MORE
FROZEN FOODS TOGETHER:
• Place on the same oven rack for best results.
•When cooking different-size containers of convenience foods, set the time for
the smalrest food item. Check at the minimum time, removing foods that are
done. Then, continue cooking larger items.
• Ifcombining foods in different containers such as plastic and aluminum foil, use
the DEFROST HEAT setting.
•When two or more very large-size frozen foods are cooked together, rearrange
the containers after partial cooking. Rotate the containers one-half turn.
•When cooking multiples of frozen foods together, expect cooking times to
increase slightly. Add 2 to 4 minutes for each additional food.
HOW TO SPEED COOK FROZEN PIZZA
1. Determine the type of crust desired.
•For acrisp crust: Choose SPEED COOK 2 and cook directly on the oven rack.
Place the rack in position # 3.For pizzas with extra thick toppings, check
occasionally for spillovers or place on a pizza pan.
•For a soft crust: Select SPEED COOK I and place the pizza on apizza pan.
Place the rack in position #2.
2. Set SPEED COOK I or SPEED COOK 2 for approximately halfofthe
maximum conventionaltime. See chart on page 29.
28

FROZEN FOOD CHART
FOOD BAKE TIPSCOOKWARE !RACK SETTING SPEED
(QUANTITY)
Entrees
Entrees single ] #3 DEFROST 12tolSmin. 25to45min. Setforhalfofminimumtirne.
(9 to l 1oz.) I HEAT Check early.
Entree-three Follow #3 DEFROST 8to 12rain. 25 to 30 rain. Check early.
food items in tray package HEAT
(10to I l oz,) directions
Egg Rolls Place on metal #2 SPEED 9 to 11 rain. 20 rnin.
(3rolls- 3 oz.ea, cookie sheet COOK 1
fortotal 9oz.)
Pies*
Baked(9") Placeonmetal #1 SPEED ltol4min_ 25to30min. Timeisforwarmnothotpie.
cookie sheet COOK 1
Potatoes
Fries (l 6 oz.) Place on metal #3 SPEED 8to 12min. 18to 20min.
cookie sheet COOK 1
Tater Tots (16 oz.) ] Place on metal #2 SPEED 6to 8 min. 11to 15 min,
I
cookie sheet COOK 1
POS. TIME TIME
Wedges(16oz.) Placeonmetal #2 SPEED 10tol2min. 20to25min. TurnafterSminutes.
cookie sheet COOK 1
Fish
4 Fillets Placeon metal #2 SPEED _to 7 min. 18 to 22 min. Turn at 3 minutes.
conkie sheet COOK 1
10 Fish Sticks Place on metal #2 SPEED 4to 6 min. 15to 18min. Turnat 2 minutes.
cookie sheet COOK 1
Vegetables
Vegetables Covered #3 SPEED 12tol4min. 40to50min. AddJ/qcupwatertodish.
COOK 1 ]
COOK
#3 I, SPEED
#2 :: SPEED
COOK 1 :
:3 ::sPrn
COOK
t Time listed isfor conventional hake time.
*For best results, use the Com,entional Bake Setting forunbaked frozen pies.
**Fortwo pizzas, add 1-2additional minutes.
tt Amount of toppings willaffectspeed cooking times. Check your pizza at ha/f of the maximum speed time.
29


OVEN MEALS
Putting a favorite family meal together takes planning. It becomes a balancing act Oven meals
of perfect timing, with the need to create a harmony of flavor, texture and color, should beplanned
Fortunately, your Speed Oven comes to the rescue with all-together-easy plans for
oven meals. Read through our basic instructions, tips and suggested menus and _ithfoods of
you'll see how they can work beautifully into your schedule, similar quantity,
Oven meals can include two or three dishes from the following categories: seruingsize,
•Meats or poultry less than 4 pounds "Vegetables "Main dishes/casseroles
Set SPEED COOK I for all oven meals, if Speed Cooking a single recipe from an shape, density
oven meal follow recipe directions. Breads and desserts are best cooked separately, and te,nperature.
rather than combining them into oven meals.
BASIC INSTRUCTIONS
l. Determine the menu, cookware and rack positions.
NOTE: For best results, oven meals should be planned with foods of similar
quantity, serving size, shape, density and temperature. Consult the chart on page
32 for examples. Also, be sure to see the tips below for cookware and rack positions.
2. Determine the Speed Cook time for each food item. Refer to the charts as follows:
•Meats or poultry less than 4 pounds (page 12-13 ). •Vegetables (page 23 ).
• Main dishes/casseroles (page 16).
3. Determine the "meal time difference" by subtracting the minimum Speed
Cook time from the maximum Speed Cook time. Example:
Whole chicken 30to 35minutes
Green bean casserole 16to 20 minutes
Meal Time Difference-- (35-16) = 19 minutes Max- rain = difference
4. Determine when foods are added to the oven by using one of the two rules of
thumb guidelines below.
• If'the meal time difference is 15 minutes or less, place all foods in the oven at the
same time. Set for the maximum time.
• If meal time difference is greater than 15 minutes, stagger the entry offood
items. Put in the longest-cooking food and set for the maximum Speed Cook
time. Add additional foods based on individual minimum Speed Cook time.
For example in Step 3 add the green bean casserole after 19 minutes, so the
beans can cook 16 minutes.
5. Check foods occasionally during cooking, just as you would for conventional
oven meal cooking. You may need to remove some foods from the oven, stir or
rearrange placement of items in the oven.
TIPS FOR SPEED COOKING OVEN MEALS
Cookware/Bakeware
• See recommendations in various sections (pages 6, 11, 15, 23, 25 and 29).
NOTE: Use metal pan without rack for meats and whole poultry.
• Cover dishes if`called for in the recipe. Do not cover a metal dish with a metal
lid or aluminum foil.
• Vegetables should be cooked in a glass dish with a cover.
Rack Positions
• For optimum results, place the food on one rack. Use rack position# 2or # 3.
•For two rack cooking, place two of`the items on rack position # 1. Place the
third item (vegetable) on rack position #4.
•When using two racks, items should be covered, ifpossible, to prevent
condensation on the bottoms of`the pans on the top rack.
NOTE: Desserts are best cooked separately.

OVEN MEAL CHART*
FOOD RACK SPEED MEAL TIME NOTES
MEAL# (QUANTITY) POS. TIME** DIFFERENCE
1 Whole Chicken. cut-uo # 1left 30to 35 min. 29 rain.
4 Baked Potatoes # 1 rt rear 21 to 23 rain. Depends on size. See page 23
Canned Corn (16 oz.) # 1rt front 6 to 8 rain. Add after 24 minutes.
2 Tuna Noodle casserole # 1left 12to 15rain. 3rain. Add allfood at once.
FrozenGreen Beans (16oz.) #1 right 12to 14 min.
3 Wholechicken(2.5to31bs.) #1center/left 30to35min. 20rain.
Stuffing # 1right 15 rain. Add after 15 minutes.
Green Bean casserole- 18 oz. #4 center 16to 20 rain. Add after 15 minutes.
t , ,,
*Use SPEED COOK I for Oven Meals.
** Times are based on speci_c brands of mixes or recipes tested. Actual times willdepend on the recipes you Speed Cook.
t When placing more than one dish on a rack, see recommended dish placement.
PorkChops with Mustard-Pretzel Coating
1 tablespoonplusl teaspoonyelloworDijonmustard Lightlygrease 12xS-inchglassbakingdish.Setaside.Spread
4 porkloinchops(about7oaeach), 1inchthick l/2teaspoonmustardoneachsideofchops.Sprinklechopswith
Dash ofpepper pepper. Dredge both sides of each chop in pretzels. Arrange
1 cup coarsely crushed pretzels chops in prepared dish. Place dishin oven on rack position # 3.
Speed Cook Method: Set SPEED COOK I for 23 minutes.
Bake for 18 to 23 minutes, or until chops are no longer pink, or
until desired doneness. 1Jet stand for 5 minutes before serving.
ConventionalMethod: Heat oven to 350°E Prepare asdirect-
ed. Bake for 45 to 55 minutes, or until chops are no longer pink,
or until desired aloneness. Let stand for 5 minutes before serving.
4 servings
Per Serving: Exchanges:
Calories: 250 Cholesterol: 75rag .5 Starch/Bread
ProteJo: 27g. Sodium: 360g. 3.5 Meat/Lean
Total Carbohydrate:_ lg Calcium: 24rag.
Total Eat: log.
32

., 3...,
SeasonedPotato Wedges
4 smalI russetpotatoes(S to 7 o_each) Cut each potato into 8 wedges. Arrange wedges skin-sides-
2 to3 teaspoonsoliveoil downin 13 x 9-inch glass baking dish.Brush wedges with oil
11/2ro2teaspoonsseasonedsalt orgarlicsalt Sprinkle evenly with salt.Place dish in oven onrack position # 3.
Speed Cook Method: Set SPEED COOK 1 for 18minutes.
Bakefor 15 to 18 minutes, or untilpotatoes aretender. Let stand
for 5 minutes before serving.
Conventional Method: Heat oven to 400°E Prepare as direct-
ed. Bake for 30 to 35 minutes, or until potatoes are tender and
golden brown. Let stand for 5 minutes before serving.
4 servings
PerServing: Exchanges:
Calories: 130 Cholestero]: Orng 15 Starch/Bread
Protein: 3g. Sodium: 610g. 5 Fat
TotalBarbohydrate:25g Calcium: 13rag.
TotalFat: 2.5g.
PeaPods,Carrots & Pineapple
2 cupsfrozensugarsnappeas(Soz) In l 1/2quartcasserole, combinepeas, carrotsandpineapple.
2 cupsfrozenslicedcarrots(8oz) In small bowl combine reserved syrup, butter, salt and allspice.
I c_n(81/aozJcr_shedpineappIeinheavysyrupor Pour mixture over pea mixture. Cover. Place casserole in oven on
juice,drained (reserve2 tablespoonssyrup} rack position # 3.
2 tablespoonsburterormargarine,melted SpeedCookMethod:SetSPEEDCOOKlfor2Ominutes.
I/4 teaspoonsalt Bakefor 15to20minutes, oruntilvegetablesaretender-crisp,
1/_teaspoongroundallspice stirringafter lOminutes.LetstandforSminutesbeforeserving.
Stir before serving.
Conventional?clethod: Heat oven to 350°15Prepare asdirect-
ed. Cover. Bakefor 30 to 35 minutes, or until vegetables are
tender-crisp. Continue as directed.
4 to 6servings
PerServing: Exchanges:
Calorfes: BO Chofesterot: _Omg. _ Vegetable
Protein: 2g. Sodium: 150g. .5 Fruit
TotalCarbohydrate:10g. Calcium: 39rag. 1 Fat
TotalFat: 4g.
Pork Chop Oven Meal Chart: (Set SPEED COOK 1 for 23 minutes)

Roast Chicken with Honey Orange Glaze
2 tablespoonsbutterormargarine,melted Spray roasting pan with nonstick vegetable cooking spray. Set
I tablespoonhoney aside. Insmall bowl, combine butter, honey and peel. Set glaze
1 teaspoongratedorangepeel aside.Removeanddiscardchickengib{ets. RJnsechickenwith
l wholebroilerfryer chicken(3I/2to4 lbs) water. Pat dry with paper towels• Stuffchicken with orange
1/2orange,cutintoq_larrers quarters.Securechickenslegstogetherw'thstring. Place
Roast Chicken witt_Honey On¢nge G_aze,A con_ Squash TotalFat: 10g.
with Cra,-AppIe Filling and bruited Bread Stl4ffing
chicken breast-side-up on prepared roasting pan. Spray chicken
with nonstick vegetable cooking spray.Placepan in oven on rack
position #.3.
Speed Cook Method: Set SPEED COOK 1for 35 to 45
minutes, depending on sizeofchicken. Bakefor30 to 40 minutes
(remove pan from oven and check chicken after 30 minutes), or
until internal temperature in thickest portion ofthigh registers
180°ERemovefrom oven.Brush halfofg[aze evenly over chicken.
Continue baking for 3minutes. Brush remaining glaze evenly over
chicken. Continue baking foradditional 2 minutes, or until glaze
begins to brown. Let stand f_r 5 to l 0 minutes before carving.
Con yen tional Method: Heat oven to 375°E Prepare as direct-
ed. Bakeunglazed chicken for 1hour 15 minutes. Remove from
oven. Brush halfthe glaze evenly over chicken. Bakefor addition-
al5to 20 minutes, or until internal temperature in thickest por-
tion of'thigh registers 180°F,brushing with remaining glaze once.
Let stand for 5 to l 0 minutes before carving.
4 to 6 servings
PerServing: Exchanges:
Calories: 210 Cholesterol: 85rng 3 Meat/Lean
Protein: 25g. Sodium: 115g. 5 Fruit
TotalCarbohydrate:4g Calcium: 19rag. I Fat

,. .. z - F¸ -
Acorn Squash with Cran-Apple Filling
2 medium acorn squash (about 11/4Ibs each) Lightly grease 13 x 9-inch glass baking dish. Set aside. Cut
I tablespoon burter or margarine, mehed each squash lengthwise in half Remove seeds. Brush top and
Filling: cavity of halves evenly, with 1 tablespoon butter• Arrange halves
I cupwhole-berrycranberrysauce position#3.
1/3 cup chopped dried apples
I tabIespoonbutterormargarine, mehed SpeedCookMethod..SetSPEEDCOOKlfor21 minutes.
l tablesyoonpachedbrownsugar from oven. Set squash aside. In small mixing bowl, combine filling
J/8 teaspoonground cinnamon ingredients except for nutmeg. Turn squash halves cut-sides-up.
Ground nutmeg Sprinkle top and cavities with nutmeg. Spoon filling evenly into
cut-sides down in prepared dish• Place dish in oven on rack
Bake for 12 to 15 minutes, or until squash is tender. Remove
cavities. Continue baking for additional 4 to 6 minutes, or until
filling is hot. Let stand for 5 minutes before serving.
ConventionalMethod: Heat ovento 350°E Prepare as directed.
Bake squash for 35 to 40 minutes, or until tender. Remove from
oven. Set squash aside. Prepare filling as directed. Sprinkle cavities
with nutmeg. Spoon filling evenly' into cavities. Bake for additional
10 to 15 minutes, or until filling is hot. Let stand for 5 minutes
before serving.
4 servings
PerServing: Exchanges:
Calories: 280 Cholesterol:15rag. 15Starch/Bread
Protein: 2g Sodium: 95g. 2.5Fruit
TotalCarbohydrate:59g.Calcium: 82rag. t Fat
TotalFat: Bg
Fruited Bread Stuffing
I/4 cup _ratteror margarine Lightly grease 1-quartcasserole.Setaside. In 12-inchnonstick
2 sta[kscelery, chopped(I cupJ skillet, meltbutterovermediumheat.Addceleryandonion.
3/4 cup chopped onion Cook for 4 to 5 minutes, or until vegetables are tender-crisp,
4 cupss@breadcutmsfl/2-inchcubes) stirring frequently. Remove from heat. Stir in remaining
;/3 cuporangejuice ingredients. Spread evenly in prepared casserole. Cover. Place
;/4 cup dried currants or raisins casseroleinovenonrackposition #3.
I/4 cup snipped fresh parsley or I tablespoon plus Speed Cook Method: Set SPEED COOK 1 for 13 minutes.
] teaspoondried parsley leaves Bake for 10 to 13 minutes, or until stuffing is hot and vegetables
_/2 teaspoonpoultryseasoning are tender. Let stand for 5 minutes before serving.
;/4 teaspoonsalt ConventwnalMethod:Heatovento3_O Ef repareasdtrected.
;/4 teaspoonpepper Cover.Bakefor3Oto 35minutes, oruntilstufflngishotand
vegetables are tender. Let stand for 5 minutes before serving.
4 servings
PerServing: Exchanges:
Calories: 320 Cholesterol:3Brag. 2Starch/Bread
Protein: 7g Sodium: 2BOg. 1Vegetable
TotalCarbohydrate:48g. Calcium: 45rag. .5Fruit
TotalFat: 13g. 2.5Fat
Chicken Oven Meal Chart: (Set SPEED COOK 1for35-45 minutes, depending on sizeofchicken)
• m o ) *
•?5

.. .... ",;
Sausage VegetableStrata
s/2 lb.groundltaliansausage, cruntbIed Lightlygrease 12xS-inchglassbakingdish.Setaside.[n
] cupslicedfreshmushroo_ns 12-inch nonstick skillet, combine sausage, mushrooms and
1/4cupchoppedonion onion. Cook over medium high heat until meat is no longer
12 sliceswhitebread,cruststrimmed pink, stirring frequently Drain. Set aside.Arrange 6 slicesbread
11/2cupsshreddedCheddar cheese,divided in single layerin bottom ofprepared dish. Layer 3/4cup cheese,
1 cupsmallfreshbroccoiiflowerets themeatmixtureandbroccoli.Topwithremaining6slices
2l/2 cupsmilk milk, eggs,mustard, salt,pepper and pepper sauce. Slowly pour
6 egg_,beaten milk mixtureevenly over bread, allowingliquidtorundownand
I teaspoondrymustard between bread slices,and completely moistening top layerof
1/2teaspoonsah bread.Cover with plastic wrap. Chillat least 2 hours. Removeand
I/8 teaspoonpepper discard plastic wrap. Place casserole in oven on rack position # 3.
3 to4 dropsredpeppersauce Speed Cook Method_ Set SPEED COOK 2 for 44 minutes.
bread in single layer over broccoli. Inlarge mixing bowl, combine
Bakefor 35 to 40 minutes, or untilknife inserted in center comes
out dean. Sprinkle top evenly with remaining 3/4cup cheese.
Continue baking foradditional 2 to 4 minutes, or until cheese is
melted and light golden brown. Let stand for 3to 5 minutes
before serving.
ConventionalMethod_ Prepare strata as directed. Cover with
plastic wrap. Chill at least 2 hours. Heat oven to 325°E Remove
and discard plastic wrap. Sprinkle top evenly with remaining
3_cup cheese. Bake for 50 to 55 minutes, or until knife inserted
in center comes out clean and cheese isgolden brown. Let stand
for 3 to 5 minutes before serving.
Variation_ Parm esan Artichoke Strata
Omit sausage, mushrooms, onion, broccoli and Cheddar cheese.
Arrange 6slices bread in single layer in bottom of prepared dish.
Layer 1can (14 oz.) artichoke hearts, drained and coarsely
chopped; 1jar (2 oz.)diced pimiento, drained; and 3_cup shred-
ded fresh Parmesan cheese. Continue as directed above, except
sprinkle top evenly with additional I/4cup shredded fresh
Parmesan cheese. Cover with plastic wrap. Prepare asdirected
above.
Tip: Strata can be prepared one day in advance.
6 to {7servings
PerServing: Exchanges:
Calories: 340 Cholesterol: 2gSmg 1Starch/Bread
Protein: 2gg Sodium: 55gg. g Meat/Medium-Fat
TotalCarbohydrate:23g. Calcium: 2gOing .5Milk/Low-Fat
TotalFat: 18g. 1 Fat
36

Seafood FetruciniAlfredo
6 oz uncookedfetrucini, broken into 3-inchpieces Lightlygrease 1l/2-quart casserole.Set aside. Prepare
2 tablespoons butrer or margarine fevcucini as directed on package. Drain. Set aside. In lO-inch
2 tablespoonsall-purposeflour skillet, melt butter over medium heat. Remove from heat. Stir in
I/4 teaspoonsah flour, salt and pepper. Gradually blend in half-and-hal( Cook over
Dash pepper medium-high heat for 3 to 5 minutes, or until mixture thickens
1 euphalf-and-halformilk and boils, stirring constantly. Remove from heat. Gradually stir
I cup shredded fresh Parmesan cheese,divided prepared fettucini. Spoon mixture evenly into prepared
t/2 cupsourcream casserole.CovenPlacecasseroleinovenonrackposition#3.
I/2 Ib.frozencookedshrimp
1 can (6 oz) crabmeat, drained Speed Cook Method: Set SPEED COOK 2 for 21 minutes.
1 tablespoonsnippedfreshparsleyor 1 teaspoon Bakefor 15to laminutes, oruntiledgesbegintobubble.
dried parsley leaves Sprinkle remaining I/4cup cheese and the parsley evenly over fet-
in s/4cup cheese and sour cream. Stir in shrimp, crabmeat and
tucini. Continue baking, uncovered, for additional 2 to 3 min-
utes, or until cheese melts and edges are golden brown. Let stand
for 5 minutes before serving.
Con yen tional Method: Heat oven to 350°E Prepare as direct-
ed, except sprinkle remaining 1/4cup cheese and the parsley
evenly over fettucini before baking. Coven Bake for 30 to 35 rain
utes, or until edges begin to bubble. Uncover. Bake for additional
5to 10 minutes, or until edges are golden brown.
4 to 6 servings
Per Serving: Exchanges:
Calories: 360 Cholesterol: 135mg. 1.5 Starch/Bread
Protein: 23g. Sodium: 550g. 2 Meat/Lean
Total Carbohydrate: 25g. Calcium: 29grog. 3 Fat
Total Fat: 18g.
Dil[ed Peas& Water Chestnuts
2 cups (8 o_)frozen babypeas In Iquartcasserole, combinepeasandwaterchestnuts.lnsmal[
I/3 cup sliced water chesmuts, drained bowl, combine butter and dill Add butter mixture to pea mixture.
2 tablespoonsbuvferormargarine, mehed Mix well. Cover. Place casserole in oven on rack position # 3.
1/2 teaspoon dried dill weed Speed Cook Method.. Set SPEED COOK 1 for 12 minutes.
Bake for 9 to 12 minutes, or until peas are hot. Let stand for
5 minutes before serving.
Conventional Method: Heat oven to 350°E Prepare as directed.
Cover. Bake for 25 to 30 minutes, or until peas are hot. Stir once
before serving.
4 servings
Per Serving: Exchanges:
Catories: 110 Cholesterol: 15rag. 1 Starch/Bread
Protein: 3g. Sodium: 125g. 1 Fat
Total Carbohydrate: log. Calcium: 18mg.
Total Fat: gg.
Fettucini Oven Meal Chart: (Set SPEED COOK I for 21 minutes)
38

.at Chocolate, Brownies, 25 L Roasting, 10 13
Acorn Squash, 23 Frosted Brownies, 27 Lasagna, 16 l_eef, 12
Acorn Squash with Cran Apple Filling, 35 Chuck Roa_, 12 N o.cook Noodle Lasagna, C.'A_rV_r12, _ 3
Apple Crisp, 25, 26 Cobbler_ Cherry, with BlueherryVangtion, 27 with Zucchini Variation, 17 Fish, 13
Au Gratin Potatoes, 23 Fruit, 25 Lemon .Squares, 25 Pork, 13
B Cooking Techniques, 7 M Rump Roast Boneless, Rolled, Ro_sting, 12
Baked Potatoes, 23 Cookware/Bakeware, 6, I 1, 15, 28, 31 Macaroni and Cheese, 16
Baked Ratatouille, 18 C_rn, _dexican 8. gea_ Bake, 19 M_in D_shes & Casseroles, 14 21 S
Bakeware, 6, I I,I 5,28,31 Cornish Hens, De fro_ing, 9 Main Dish/Casserole Chart, 16 Sausage Vegetable Strata,
Bars,Nutty Brown Sugar, 26 Roasting, 13 Meats, Defrosting, 8,9 with Parmesan Arpehoke Van_tion, 36
Beans, GTeen Boal_Casserole, L6 C_ve_ing, 7 Roa_ing, I 1-12 Scalfoped Potatoes, 23
Mexican ('_rn & Bean Bake, 19 Cream puffs, 25 BoefRoastsr 12 Scrambled Eggs, Oven, 16
Quick Cassoulet, 18 Crisps, Apple, 25, 26 Perk, 12 Seafood Fettucini Alfredo, 38
BO_f,D_ f_os'_ng,9 Curned Shrimp & Rice, 21 Meat.stuffed Pepper_, 16 Seasoned Pota_ Wodges_ 33
Roasting, 12 Custard, 25 Mexican Corn & Bean Bake, 19 Shielding, 7
Blueberry Cobbler, 27 Fishr 13
grownies, 25 D N Roasts, 9, I I
Blonde, 25 Defrosting, 8 9 No-cook Noodle Lasagna, 7uakey, 13
Butterscotch, 25 Defrosting Chart for Poultry, Beef, Porkr 9 with Zucchini Variation_ 17 Shoulder Roasts, Boer& Pork, 12
Frosted, 27 Desserts, 24-27 Nutty l_rown Sugar Bars,26 Shrimp, Curried & Rice, 2 I
BotXernut Squash, 23 Apple Crisp, 25,26 $nackcake,25
C Chart, 25 Omelet(s)r Oven, 16 Speed Settings, Use of, 5
Canned Vegetahlesr 23 Cherry Cobbler with Blueberry Va_atlon,27 Oven Meals,30.38 Squash, _.co_, 2.q
Carrots, Pea Pods, & Pineapple, 33 Cream Puffs, 25 Acorn Squash with Cran Apple Filling, 35 Acorn Squash with Cran Apple Filling, 35
Casseroles, 14-21 Custard, 25 Dilled Peas & Water (_hestnuts, 38 Butternut, 23
Baked Ratatouille, 18 Fro_ed grow hieS,27 Fna_rd gr_od 8"_ng. 3_ 8tarv4_ng T_mes, 7
Chart_ 16 Fruit Cobbler, 25 Pea Pods, Carrots &Pineapple, 33 Strata
Cheese Boule. I6 Gingefbread/Sr_ackcake, 25 Bork Chops with Mustard-Pretzel Coating. 32 Sausage Vegetable,
Chicken Divan, _6 Lem_ .square% 25 Ro_s_ C_x_oke_with Ho_ey Orange Glaze,34 with Parmesan Ar_choke Variation, 36
Chicken Tetrazzini, 16, 20 Nutty Brown Sugar Bars, 26 Sausage Vegetable Strata, Oven Meal Chart, 37
Curned Shrimp &Ricer 21 Warm Fruit Cx_mp_t e, 37 with Parmesan Artichoke Variation, 36 Scu_ng_ Frui'ced Bread, 35
EggsIC'neese. _6 Di_Od Peas g: W_ter Che_tnut_, _8 Seafood Fettu¢ini Alffedo, 38 Sweet Botatoes, 23
Frozen. 15 Divan, Chicken, 16 Warm Fruit (_omp_e, 37
Green Bean, 16 Turkey, 16 Oven Scrambled Eggs, 16 T
Lasagna, 16 Table o[C_an_ents, 3
Macaroni and Cheese, 16 E P Tater Tots, Frozen, 29
Meat-_tuffed Peppers, 16 Fgg Rolls, 29 Parmesan Artichoke Strata, 36 Techniques, (_oking, 7
Me.can Corn & Bean Bake_ 19 Eggs, Cheese Casseroles, 16 PaPa, No.cook Noodle hasagna, Tutrazzini. Chicken, 16, 20
Norcook Noodle Lasagna, Oven Omelet (sl, 16 with Zucchini Variation, 17 Tuakey_ 16
with Zucchini Variation, 17 Oven Scrambled, 16 Pasta & 3 Cheeses, 20 Tu_a N(xxlle Casserole, 16
Oven Omelet(s), 16 Parmesan Artichoke St ra'_a,36 Pasta Casse_les, 16 Turkey, Deffo_ing, 9
Oven Scrambled Eggs, 16 Quioke Pie, 16 Seafood Bottucini Al[_edo, 38 Divan, 16
Pasta 8_3 Cheeses, 20 Sausage Vegetable Strata_ Zucchini Lasagna, 17 Roasting, 13
Pasta_ 16 with Parmesan Artichoke Variation, 36 Pea Pods, Carrots & Pineapple, 33 Tctrazzini, I (5
Quick Cassoulet, 18 Entrees, Frozen, 29 Peas, l)illed & _/ater Che_nuts, 3_,
QuicBe Pie, 16 Eqtupment, C_akware/Pakeware,6, I L 15,28,31 Beppers, Meat-stuffed, 16 U
Sausage Vegetable Strata, Pies, Frozen, 29 Use of Speed Sctnngs, 5
with Parmesa_ Artichoke Variation_ _6 F Qulcht, 16
Tuna Ncx_dle, I (5 Fettueini, Seafood Alfredo. 38 Pizza, 16 V
Turkey Divan¸ I (5 Fish, Frozen, 29 Frozen, 28.29 Vegetablesr 22-23
Turkey 7etrazzini, 16 Roasting, _|, | 3 p_ak_De(r<astRig,9 Acorn Squash, 23
Vegetable, I (5 French Fries_ Frozen, 23, 29 Roasting, 12 Acorn Squash with Cran Apple Filling, 35
Cass_ulet, Quick, 18 Frozen Foods, 28 29 Pork Chops, 12 Au Gratin potatoes, 23
(._harts Casseroles, 15 Pork Chops with Mustard Pretzel Coanng_ 32 B_tternut Squash_ 23
Chicken Oven Meal, 35 Entrees, 29 Potatoes, Au Gratin, 23 Canned Vegetables, 23
Defrost for Poultry, Beef,Pork, 9 Fish, 29 Bakedr 23 C_sseroles, I(5
De_ert, 25 Fret_ch Fries, 23, 29 French Fries, F_azen, 23 29 Chart, 23
Bettucini Oven Meal, 38 Pies, 29 Frozen, 29 Dilled Peas & Water Chest nu_s, 38
F_zen Food, 29 Pizza, 28, 29 Scalloped, 23 Frozen French Fries, 23, 29
M_m Dish/Ca_serole_ 16 Potatoes, 29 Seasoned Wedges, 33 Frozen Vegetables, 29
Oven Meal, 32 Vegetables, 23, 29 Sweet, 23 Pea Pods, Carrots &Pineapple, 33
Pork Chop Oven Meal, 33 Fruit, Cobbler, 25 Tater Tots, Frozen, 29 Potatoes, _ked. 23
Roasting for Boefaod Perk Roasts, 12 Warm Fruit Compote, 37 Wedges, Frozen, 29 Sausage Venerable S_rata,
Roasting to• Poultry and Fish, 13 Fruited Bread Stuff{ng, 35 Poultry, 17)effos';_ng, 8_9 with Barme_an Ar_achoke Varia_on, 3(3
Strat_ Oven Meal, 37 Roasting, I I, 13 Scalloped Potatoes, 23
Vegetable, 23 G grecautlons to Avoid Bos_ible Exposure to .¢_asoned Potato Wedges, 33
Cheeses, Sot_ffle, 16 Gingerbread, 25 E×ces_ve Microwave Energy, 3
Egg/Cheese C_sseroles, 16 Glaze W
Macaroniand Cheese, 16 Roast Chicken w_th Honey Orange Glaze, 34 _ W_ter Chestnuts, Dillod Pea_ &, 38
Parmesan Artichoke Str_ng 36 Green Bean Casserole, 1(5 Q_ich_ Fie. |6 _VeIcome, 2
PaPa & 3 Cheeses, 20
Cherry Cobbler, wi_h Blueberry Variation, 27 H R Z
Chicken, De _rosting,9 Ham. _oa_ting, _2. Rack P_sitk_ns, 7, ] I Z_cchini Lasagna, 17
Roasting, 13 Handling Food During Cooking, 7 Rata'_ouille, Bakod_ 18
Divan, 16 Rib Eye Roast, Boneless, F(oasting, 12
Tetra_nl, 16,2(_ | Rice, Curried Shrimp &,21
Roast with Honey Orange Glaze, 34 Introduction,4-7 Roast Chicken w_thHoney Orange Glaze, 34
Compote, Warm Prult, ?,7 Bou[try, I2
Brownies, 25 O Souffle, Cheese, 16
39

How To Set A Speed Cook Or Helpful Information About
Defrost Operation Speed Cooking
(Seepages5-6 in the Owner'sGuidefor generaloperating (Seepages19-22intheOwner'sGuideandpage5intheCooking
instructions.) GuideformoreinformationontheSpeedCookfeature.)
_1 • I-Ill uuu _ (_ • UseSPEEDCOOK l formeats,poultry,fish,casseroles,
I ° I II I _,,,_ main dishes, vegetables, oven meals or frozen
I n n n SPEED SET'rINGS (Seepage5 inCookingGuide.)
L.-'I_ I---"LJ__ _ _ {--_ _ convenience foods inaluminumfoilcontainers.
i]__ (egg orcheese-based foods).
1. Positionthe oven racks.Place the food inthe oven and defrost-and-heatlrozen conveniencefoodsinheatproof
closetheoven door. paperorplasticcontainers.
2. Pressthe appropriateSpeed pad. defrost-only meats or poultry weighingover 4 pounds.
• SPEED COOK 1 COOKING TIMES (Seepage5 inCookingGuide.)
• SPEED COOK 2 Speed Cooking is about half the maximum conventional
• DEFROST/HEAT maximum conventional cooking time. Checkfor doneness
3. Move thedoor lock leverto the right or locked position, at halfthe minimum conventionalcookingtime.
4. Turn the SET knob until the desired Speed Cook time minutes, you would cook brownies on SPEED COOK 2 for
appears in the display. Set the SpeedCook time for half 15 minutes. Check doneness at 13minutes.)
the maximumconventional cookingtime. Open door and
checkthe toodathalf the minimumconventional cooking COOKWARE (Seepage6in CookingGuide.)
time. Conventionalcookware (metal, heatproof glass or ceramic,
• Use SPEED COOK 2 for desserts and delicate items
• Use DEFROST/HEAT for 59 minutes or less to
• Use DEFROST/HEAT for 60 minutes or more to
cooking time. Set the Speed Cooking time for half the
(Example: If a brownie recipe bakes at 350°F for 25 to 39
pottery,aluminum foil, and oven cooking bags) can be used
for Speed Cooking. Use metalcookware for roasting meats
IMPORTANT or poultry toreduce spattering. Frozen convenience foods
TheSpeedCookfeature automaticallyselects the oven in heatproof paper or plastic containers are cooked using
temperature.All youselectisthe cookingtime. DEFROST HEAT for 59 minutes or less.
• DO NOT SET OVEN TEMPERATURE COVERING & SHIELDING (Seepage7in CookingGuide.)
• DO NOT PREHEATTHE OVEN Coverif conventionalrecipecallsfor it. Do not completely
covermetalcookwareorfood withaluminumfoilora metal
5. Atthe endof Speed Cooking,"HOLD" appears in the lid as this will increase cooking time. Use small strips of
display.Move the door lock lever to the left or unlocked aluminum foil to shield areas that are defrosting, cooking or
position. Open the door and check the food. browning too quickly.
• Ifthe food isdone, press the STOP/CLEAR pad. RACK POSITIONS (See page7 inCooking Guide.)
• Ifthe food is not done, close and lock the ovendoor. Rack #5 (top) - Used for l_,_--_ ......
Turn the SET knob to select 1 to 10 minutes of conventionalcooking only. 5.JJ,t--cz--. _--._._
additional cooking. =HOLD" is a special operation Racks #4 and #1- Used 4_f-_---J.._ "_:
designed to complete cooking, fOrmeals.2rack cooking of oven /_
• Reset"HOLD"as manytimesasyouwish. for cooking pouNry, fish, ---"_-_.... _
• "HOLD" canonly be set for 1to 10 minutes at atime. desserts and oven meals.
• There is no "HOLD" if DEFROST/HEAT is set for 60 Rack#2 - Used to defrost meat or poultry over 4-1bs.;to
minutesor more. cookmeats, frozen conveniencefoods, and desserts.
• "HOLD" is canceled if you press STOP/CLEAR.
• Ifyoudo not entera "HOLD" time, "HOLD"will auto- [ If you have q uestiOns call us at ]
maficaltycancelattheendof 10minutesandthetime 1-800--688--1120
ofdaywillreappearinthedisplay.
(Seepage5intheCookingGuideforadditionalinformationon 8113P079-60
"HOLD".) (9/94)
ABOUT "HOLD" Rack #3 (middle) - Used ,
casseroles, vegetables,
Rack #1(bottom)- Usedfor cookingturkeyor frozen pies.

Speed Oven Cooking Chart
RACK SPEED
FOOD POSITION SETTING HINTS FOR SPEED COOKING
MEATS, see pages12-13 inCookingGuide.
Beef, perk 2 Speed Cook 1 • Use metal pans to reduce spattering of roasts &
Chicken, Cornish hens 3 Speed Cook 1 turkey. For faster cooking, use glass for peultry &fish.
Turkey, unstuffed 1 Speed Cook 1 • Use oven cooking bag for less tender roasts or
Fish & seafood, thawed 3 Speed Cook 1 precooked ham.
VEGETABLES, seepage 23in Cookguide. 3 Speed Cook 1 * Speed times may be less than half the maximum
CASSEROLES, see page 16 in CookingGuide.
Macaroni & cheese 3 Speed Cook 2 • Use Speed Cook 2 for delicate items such as corn
Stuffed peppers 2 Speed Cook 2 pudding.
Vegetables 3 Speed Cook 1 • Use glass or metal pans. Fill only 1/2 to 2/3 full to
Pasta casseroles 3 Speed Cook f avoid boiiovers.
Egg, cheese or seafood dishes 2 or 3 Speed Cook 2 • Add toppings (cheese, bread crumbs, sauces, onion
DESSERTS, see page25 in CookJngGuide.
Brownies, bar cookies 2 or 3 Speed Cook 2 • Speed times may be slightly more than haft the
Snack convenience foods 2 or 3 Speed Cook 2 maximum conventional cook time. Complete cooking
Apple crisp 2 Speed Cook 2 using "HOLD".
Fruit cobbler 3 Speed Cook 2 • Use metal for baked items (bar cookies, brownies).
Cream puffs 3 Speed Cook 2
FROZEN FOODS, see page29 inCooking Guide. Follow package directions for conventional oven, NO'I"
Convenience foods in a microwave oven.
• Heatproof paper/plastic 2 or 3 Defrost/Heat • Set time for 59 minutes or less.
• Metal, glass or aluminum foil 2 or 3 Speed Cook 1
Pies, baked 1 Speed Cook 1
French fries, tater tots, etc. 2 or 3 Speed Cook 1
Pizza
• Soft crust 2 i Speed Cook 1 • Place pizza on a pizza pan for soft crust.
• Crisp crust 3 Speed Cook 2 • Place pizza on oven rack for crisp crust.
Fish sticks 2 Speed Cook 1 • Turn fish over halfway through cooking.
DEFROSTING, see pages9-10 in CookingGuide. 2 Defrost/Heat • Set time for 60 minutes or more.
Meats & peuitry, over 4 pounds • Use metal pan.
• Turn roast/ham over halfway through cooking.
• Shield fast cooking areas with aluminum foil.
conventional cook time.
rings) during last few minutes of cooking.
• Shield warm areas with small strips of aluminum foil
• Turn roasts over several times.
NOTE: Set Speed Cook Time for half the maximum conventional B. Determine the minimum and maximum Speed Cook time for
cook time. Check doneness at half the minimum conventional each food.
cook time. Do not set oven temperature or preheat the oven C. To determine when foods are placed in the oven, find the "meal
when Speed Cooking. time difference" by subtracting the minimum Speed Cook time
OVEN MEALS - USE SPEED COOK 1 * If the difference is 15 minutes or less, place all foods in the
For complete instructions, see page 31 in Cooking Guide. oven at the same time.
A. Position the oven racks. * Ifthedifference isgreaterthan 15 minutes, stagger theentry
• One rack - use position #2 or #3. of the foods. Put the longest cooking food in the oven first.
• Two racks - use pesitions #4 and #f (bottom). Place D. Press SPEED COOK f and set for the maximum Speed Cook
vegetable on rack #4. time. Check foods occasionally during cooking.
from the maximum Speed Cook time.
Precautions To Avoid Possible Exposure To
Excessive Microwave Energy
A. Donor attempt to operate this oven withthedooropen since C. Do not operate the oven if it is damaged. It is particularly
open-door operation can result in harmful exposure to important that the oven door close properly and that there is
microwave energy. It isimportant not to defeat or tamper with no damage to the: (1) Door (bent), (2) hinges and latches
the safety interlocks. (broken or loosened), (3) door seals and sealing surfaces.
B. Do not place any object between the oven front face and the
doororallowsoilorcleanerresiduetoaccumulateonsealing D. The oven should not be adjusted or repaired by anyone
surfaces, except properly qualified service personnel.

Dear Consumer:
Your range is equipped with two oven racks. One rack is a "straight" rack; the other rack
has an "upturned" front edge.
The front edge of the "upturned" rack is designed to be used as a handle when pulling
the rack out to add, check, or remove food. If the lowest rack position is used in oven cooking,
always place the "upturned" rack in this position.
• When cooking on one rack, position the rack so the food is in the center
of the oven. Either the "straight" or "upturned" rack can be used. If
the lowest rack position is selected, use the "upturned" rack.
• When cooking on two racks, position the racks so they divide the oven
in thirds. If the lowest rack position is selected, use the "upturned" rack
for this position.
Refer to page 11 in the Owner's Guide for additional information on oven racks and rack
positions.
"STRAIGHT" rack "UPTURNED" rack
(Select this rack when using
the lowest rack position)
8113P078-60
(6/94)

Speed Oven Cooking Chart
RACK* SPEED**
FOOD POSITION SETTING HINTSFOR SPEED COOKING
MEATS,seepages12-13inCookingGuide.
Beef, pork 2 Speed Cook 1 • Use metal pans to reduce spattering of
Chicken, Cornish hens 3 Speed Cook 1 roasts & turkey. For faster cooking, use
Turkey, unstuffed 1 Speed Cook 1 glassfor poultry & fish.
Fish & seafood,thawed 3 SpeedCook 1 • Use oven cooking bag for less tender
roasts or precooked ham.
• Turn roast/ham over halfway through
cooking.
• Shieldfastcookingareaswithaluminum
foil.
VEGETABLES,seepage23in Cookguide. 3 Speed Cook 1 • Speed times may be less than half the
CASSEROLES, seepage16inCookingGuide.
Macaroni & cheese 3 Speed Cook 2 • Use Speed Cook 2 for delicate items
Stuffed peppers 2 Speed Cook 2 such as corn pudding.
Vegetables 3 SpeedCook 1 • Use glass or metaLpans. Fin only 1/2to
Pasta casseroles 3 Speed Cook 1 2/3full to avoid boi(overs.
Egg, cheese or seafooddishes 2 or 3 SpeedCook2 • Add toppings (cheese, bread crumbs,
DESSERTS, seepage25inCookingGuide.
I Brownies, bar cookies 2 or 3 Speed Cook2 • Speed times may beslightly more than
I Snack convenience foods 2 or 3 Speed Cook 2 half the maximum conventional cook
Apple crisp 2 Speed Cook 2 time. Complete cooking using "HOLD".
Fruitcobbler 3 Speed Cook 2 * Use metal for baked items (bar cookies,
Cream puffs 3 SpeedCook2 brownies).
I ° Follow package directions for
I FROZEN FOODS,seepage29inCookingGuide. conventional oven, NOT a microwave
Conveniencefoods in oven.
= Heetproofpaper/plastic 2 or 3 Defrost/Heat • Settime for 59 minutes or less,
• Metal, glass oraluminum foil 2 or3 Speed Cook 1
Pies,baked 1 Speed Cook 1
Frenchfries,tatertots,etc. 2 or3 Speed Cook1
Pizza
• Softcrust 2 Speed Cook 1 • Place pizzaon a pizza pan.
• Crispcrust 3 Speed Cook2 = Place pizza on ovenrack.
Fishsticks 2 Speed Cook 1 • Tom fist] overhalfwaythrough cooking.
DEFROSTING,seepagesg-t0 inCookingGuide.
Meats & poultry, over 4 pounds 2 Defrost/Heat = Settime for 60 minutes or more.
NOTE:Set SpeedCook'nme forhalfthe maximum conventionalcooktime. Check alonenessathalf the minimum conventional cooktime.
• Rack position #1 isthe bottom rack position.
•* Do not set oven temperature or preheat the oven when Speed Cooking.
OVEN MEALS - USE SPEED COOK 1
For complete instructions, see page 31 in Cooking Guide.
1. Determine menu and seleCt cookware.
2. Position the oven racks,
•One rack - use position #2 or #3.
•Two racks - use positions #4 and #1 (bottom). (Place vegetable on rack #4.)
3. Determine the minimum and maximum Speed Cook time for each food.
4. To determine when foods are placed in the oven, find the "meal time difference" by subtracting the minimum Speed Cook
time from the maximum Speed Cook time.
•Ifthe difference is 15 minutes or less, place all foods in the oven at the same time.
•Ifthe difference is greater than 15 minutes, stagger the entry of the foods. Put the longest cooking food inthe oven first.
5. PressSPEED COOK 1 and set for the maximum Speed Cooktime. Add additional foods based onthe individual minimum
Speed Cook times. Check foods occasionally during cooking.
maximum conventional cooktime.
sauces, onion rings) during last few
minutes of cooking.
• Use metal pan.
• Shield warm areas with sman strips of
aluminumfoil.
• Turn roasts over severaltimes.

How To Set A Speed Cook Or Helpful Information About
Defrost Operation Speed Cooking
(See pages5-6 in the Owner'sGuide for generaloperating (Seepages19-22intheOwner'sGuideandpage5intheCooking
instructions.) GuideformoreinformationontheSpeedCookfeature.)
-I • IIII _--_UU U _ C) • Use SPEED COOK 1for meats, poultry,fish, casseroles,
I ;I • I-I I-I n n n _ SPEED SE'I-FINGS(Seepage5 in CookingGuide.)
0_'=-;; _*__" =-'-' main dishes, vegetables, oven meals or frozen
_ _ _ _-_ F_-----J_ conveniencefoods in aluminumfoil containers.
[¢_1 _._,= }[_,_T I ,_. ]_-_ ° Use SPEED COOK 2 for desserts and delicate items
1. Positionthe oven racks.Placethe foodin theovenand defrost-and-heat frozen conveniencefoodsinheatproof
closethe ovendoor. paper or plasticcontainers.
2. Pressthe appropriate Speed pad. • Use DEFROST/HEAT for 60 minutes or more to
• SPEED COOK 1 defrost-on/y meatsor poultryweighingover4 pounds.
• SPEED COOK 2 COOKING TIMES (Seepage5 inCookingGuide.)
• DEFROST/HEAT cookingtime. Set the Speed Cookingtime for half the
3. Movethe doorlocklevertothe rightorlockedposition, maximum conventionalcookingtime. Checkfordoneness
4. Turnthe SET knob until the desiredSpeed Cook time
appearsinthedisplay.Set the SpeedCooktimefor half (Example:If a brownierecipebakesat 350°F for 25 to 30
the maximumconventionalcookingtime. Opendoorand minutes,youwouldcookbrowniesonSPEED COOK 2 for
checkthe foodat halftheminimumconventionalcooking 15 minutes.Checkdonenessat 13 minutes.)
time. COOKWARE (Seepage6inCookingGuide.)
(eggorcheese-based foods).
• Use DEFROST/HEAT for 59 minutes or less to
Speed Cooking is about half the maximum conventional
at halfthe minimum conventionalcookingtime.
Conventionalcookware(metal,heatproofglassorceramic,
pottery,aluminumfoil,and oven cookingbags)canbe used
for Speed Cooking.Use metal cookware for roasting meats
or poultryto reduce spattering.Frozen conveniencefoods
in heatproofpaper or plasticcontainersare cookedusing
DEFROST HEAT for 59 minutes or less.
COVERING &SHIELDING (Seepage/in CookingGuide.)
5. At the end of SpeedCooking,"HOLD" appears inthe Coverifconventionalrecipecallsfor it. Do notcompletely
display.Movethe doorlock leverto the left or unlocked covermetalcookwareorfoodwithaluminumfoilora metal
position.Openthe doorandcheckthe food. lid as this will increasecookingtime. Use small stripsof
• If the foodis done,pressthe STOP/CLEAR pad. aluminumfoiltoshieldareasthatare defrosting,cookingor
• if the food is not done, close and lock the oven door.
Turn the SET knob to select 1 to 10 minutes of RACK POSITIONS (Seepage7 in CookingGuide.)
additional cooking. "HOLD" is a special operation
designedtocompletecooking. Rack #5 (top) - Used for = __Z
ABOUT "HOLD" for 2 rackcookingofoven
• Reset"HOLD" as many timesasyouwish. meals. _-_ ,-_
f tO10minutesat a time. for cookingpoultry,fish,
f you press STOP/CLEAR, cook meats, frozen convenience foods, anddesserts.
• Ifyoudonot entera "HOLD"time, "HOLEY'wiilauto- Rack#1 (bottom)-Usedforcookingturkeyorfrozenpies.
maticarejcancelatthe endof10minutesand tl'_ time
of day will reappear in the ¢lisplay.
(Seepage5intheCookingGuideforadditionalinformationon 8113P075-60
HOLD") ..... (4/94)
browningtooquickly.
conventionalcookingonly. ---- --_-- -_
Racks #4 and #1 - Used !_
Rack #3 (middle)- Used
casseroles, vegetables, _ m-_
desserts and oven meals.
Rack #2 - Used to defrost meat or poultryover 4-1bs.;to
 Loading...