

Page 1
Gas RagE) RS-1
Installer: Please leave this manual with this appli-
ance.
Consumer: Please read and keep this manual for
future reference. Keep sales receipt and/or can-
celied check as proof of purchase.
Model Number
Serial Number
Date of Purchase
f you have questions, call:
1-800-688-1120 .U.S.A. and Canada)
1-800-688-2080 qU.S. TTY for
hearing or speech impaired}
(Mon.-Fri., 8 am-8 pm Eastern Time)
For service information, see page 19.
Table af
Safety Instructions ........... 1-3
Controls .................. 4-5
Surface Cooking ............. 6-7
Oven Cooking ............. 8-11
Care & Cleaning ........... 12-15
Maintenance ............. 16-17
Before You Call ............. 18
Warranty .................. 19
Guide de L'utilisateur ........ 20
Guia del Usuario .......... 40
In our continuing effort to improve the quality
and performance of our cooking products, it
may be necessary to make changes to the appli-
ance without revising this guide.
Form Nol A/08/01 Part No. 8113P305-60 74005910 Litho U.S.A.
Page 2
Imln,al icTs
Read and follow all instructions before
using this appliance to prevent the poten-
tial risk of fire, electric shock, personal
injury or damage to the appliance as a
result of improper usage of the appliance.
Use appliance only for its intended pur-
pose as described in this guide.
A IlIi4RNING: If the infor-
mation in this manual is not fol.
lowed exactly, a fire or explosion
may result causing property dam-
age, personal injury or death.
Do not store or use gasoline or
other flammable vapors and liq.
uids in the vicinity of this or any
appliance.
WHAT TODO IF YOU SMELL GAS:
• Do not try to light any
appliance.
• Do not touch any electrical
switch.
• Do not use any phone in your
building.
• Immediately callyourgas
supplier from a neighbor's
phone. Follow the gassupplier's
instructions.
• If you cannot reach your gas
supplier,callthe fire
department.
Installation and service must be
performed by a qualified installer,
service agencyorthe gassupplier.
GerB
Ins ons
To ensure proper and safe operation:
Appliance must be properly installed and
grounded by a qualified installer. Have
the installer show you the location of the
gas shut off valve and how to shut it off in
an emergency.
Always disconnect power to appliance
before servicing.
To ensure proper operation and avoid
possible injury or damage to unit do not
attempt to adjust, repair, service, or re-
place any part of your appliance unless it
is specifically recommended in this guide.
All other servicing should be referred to
a qualified servicer.
INC .
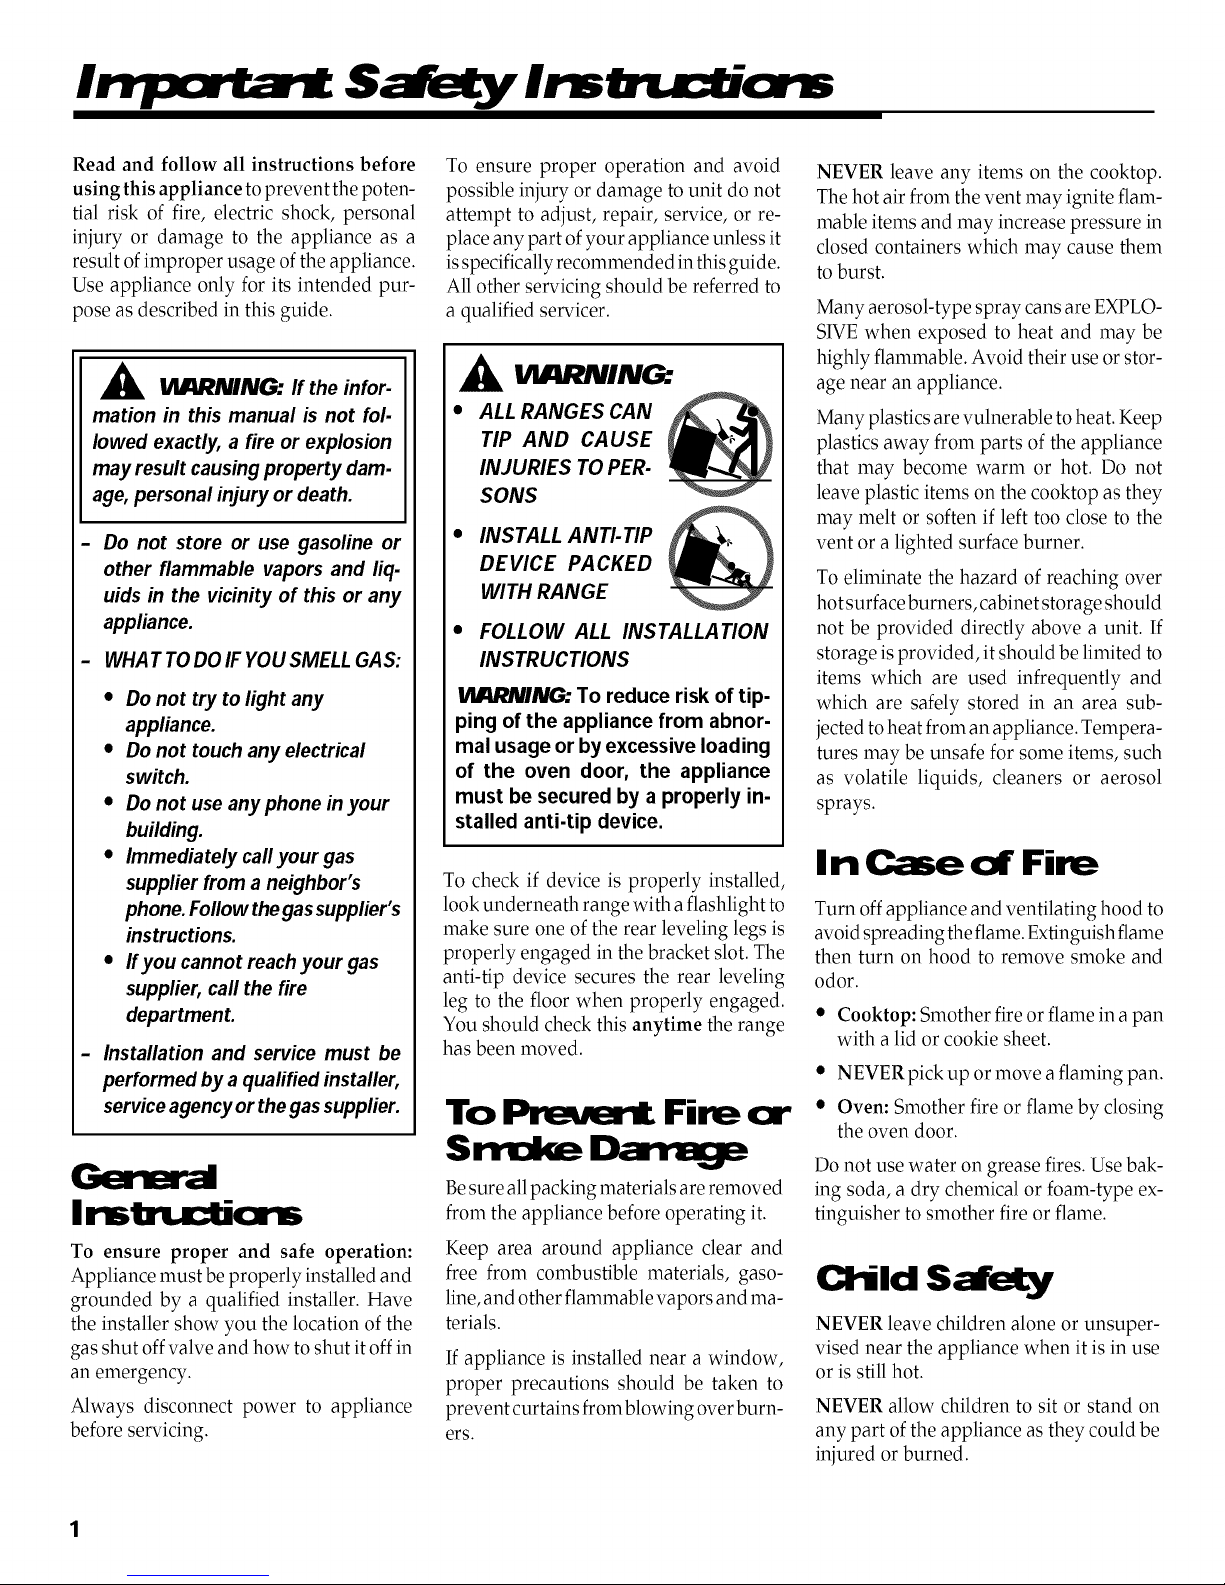
ALL RANGES CAN
TIP AND CAUSE
INJURIES TO PER-
SONS
INSTALL ANTI-TIP
DEVICE PACKED
WITH RANGE
FOLLOW ALL INSTALLATION
INSTRUCTIONS
IlMIIRNING: To reduce risk of tip-
ping of the appliance from abnor-
mal usage or by excessive loading
of the oven door, the appliance
must be secured by a properly in-
stalled anti-tip device.
To check if device is properly installed,
look underneath range with a flashlight to
make sure one of the rear leveling legs is
properly engaged in the bracket slot. The
anti-tip device secures the rear leveling
leg to the floor when properly engaged.
You should check this anytime the range
has been moved.
To Fire or
Shale) DalllCj)
Be sure all packing materials are removed
from the appliance before operating it.
Keep area around appliance clear and
free from combustible materials, gaso-
line, and other flammable vapors and ma-
terials.
If appliance is installed near a window,
proper precautions should be taken to
prevent curtains from blowing over burn-
ers.
NEVER leave any items on the cooktop.
The hot air from the vent may ignite flam-
mable items and may increase pressure in
closed containers which may cause them
to burst.
Many aerosol-type spray cans are EXPLO-
SIVE when exposed to heat and may be
highly flammable. Avoid their use or stor-
age near an appliance.
Many plastics are vulnerable to heat. Keep
plastics away from parts of the appliance
that may become warm or hot. Do not
leave plastic items on the cooktop as they
may melt or soften if left too close to the
vent or a lighted surface burner.
To eliminate the hazard of reaching over
hot surface burners, cabinet storage should
not be provided directly above a unit. If
storage is provided, it should be limited to
items which are used infrequently and
which are safely stored in an area sub-
jected to heat from an appliance. Tempera-
tures may be unsafe for some items, such
as volatile liquids, cleaners or aerosol
sprays.
In Case of Fire
Turn off appliance and ventilating hood to
avoid spreading the flame. Extinguish flame
then turn on hood to remove smoke and
odor.
• Cooktop: Smother fire or flame in a pan
with a lid or cookie sheet.
• NEVER pick up or move a flaming pan.
• Oven: Smother fire or flame by closing
the oven door.
Do not use water on grease fires. Use bak-
ing soda, a dry chemical or foam-type ex-
tinguisher to smother fire or flame.
Child
NEVER leave children alone or unsuper-
vised near the appliance when it is in use
or is still hot.
NEVER allow children to sit or stand on
any part of the appliance as they could be
injured or burned.
Page 3
Childrenmustbetaughtthattheappli-
anceandutensilsinit canbehot.Lethot
utensilscoolinasafeplace,outofreachof
smallchildren.Childrenshouldbetaught
thatanapplianceisnota toy.Children
shouldnotbeallowedto playwithcon-
troisorotherpartsoftheunit.
CAUTION:NEVERstoreitemsofinterest
tochildrenincabinetsaboveanappliance
oronbackguardofarange.Childrenclimb-
ingontheappliancedoorto reachitems
couldbeseriouslyinjured.
Your
NEVER use appliance as a space heater to
heat or warm a room to prevent potential
hazard to the user and damage to the ap-
pliance. Also, do not use the cooktop or
oven as a storage area for food or cooking
utensils.
Do not obstruct the flow of combustion
and ventilation air by blocking the oven
vent or air intakes. Restriction of air flow to
the burner prevents proper performance
and increases carbon monoxide emission
to unsafe levels.
Avoid touching oven vent area while oven
is on and for several minutes after oven is
turned off. Some parts of the vent and
surrounding area become hot enough to
cause burns. After oven is turned off, do
not touch the oven vent or surrounding
areas until they have had sufficient time to
cool.
Other potentially hot surfaces include
cooktop, areas facing the cooktop, oven
vent, surfaces near the vent opening, oven
door and areas around oven door and
window.
WARNING: NEVER use appliance door,
or drawer, if equipped, as a step stool or
seat as this may result in possible tipping
of the appliance, damage to the appliance,
and serious injuries.
Do not touch a hot oven light bulb with a
damp cloth as the bulb could break. Should
the bulb break, disconnect power to the
appliance before removing bulb to avoid
electrical shock.
Always place a pan on a surface burner
before turning it on. Be sure you know
which knob controls which surface burner.
Make sure the correct burner is turned on
and that the burner has ignited. When
cooking is completed, turn burner off be-
fore removing pan to prevent exposure to
burner flame.
Always adjust surface burner flame so
that it does not extend beyond the bottom
edge of the pan. An excessive flame is
hazardous, wastes energy and may dam-
age the appliance, pan or cabinets above
the appliance.
NEVER leave a surface cooking operation
unattended especially when using a high
heat setting or when deep fat frying.
Boilovers cause smoking and greasy
spillovers may ignite. Clean up greasy
spills as soon as possible. Do not use high
heat for extended cooking operations.
NEVER heat an unopened container on
the surface burner or in the oven. Pressure
build-up may cause container to burst re-
sulting in serious personal injury or dam-
age to the appliance.
Use dry, sturdy pot holders. Damp pot
holders may cause burns from steam.
Dishtowels or other substitutes should
never be used as pot holders because they
can trail across hot surface burners and
ignite or get caught on appliance parts.
Always let quantities of hot fat used for
deep fat frying cool before attempting to
move or handle.
Do not let cooking grease or other flam-
mable materials accumulate in or near the
appliance, hood or vent fan. Clean hood
frequently to prevent grease from accu-
mulating on hood or filter. When flaming
foods under the hood turn the fan on.
NEVERwear garments made offlammable
material or loose fitting or long-sleeved
apparel while cooking. Clothing may ig-
nite or catch utensil handles.
Always place oven racks in the desired
positions while oven is cool. Slide oven
rack out to add or remove food, using dry,
sturdy pot holders. Always avoid reach-
ing into the oven to add or remove food. If
a rack must be moved while hot, use a dry
pot holder. Always turn the oven off at the
end of cooking.
Use care when opening the oven door. Let
hot air or steam escape before moving or
replacing food.
PREPARED FOOD WARNING: Follow
food manufacturer's instructions. If aplas-
tic frozen food container and/or its cover
distorts, warps, or is otherwise damaged
during cooking, immediately discard the
food and its container. The food could be
contaminated.
NEVER use aluminum foil to cover an
oven rack or oven bottom. Misuse could
result in risk of electric shock, fire, or
damage to the appliance. Use foil only as
directed in this guide.
Use pans with flat bottoms and handles
that are easily grasped and stay cool. Avoid
using unstable, warped, easily tipped or
loose-handled pans. Also avoid using
pans, especially small pans, with heavy
handles as they could be unstable and
easily tip. Pans that are heavy to move
when filled with food may also be hazard-
ous.
Besure utensil is large enough to properly
contain food and avoid boilovers. Pan
size is particularly important in deep fat
frying. Be sure pan will accommodate the
volume of food that is to be added as well
as the bubble action of fat.
To minimize burns, ignition of flammable
materials and spillage due to uninten-
tional contact with the utensil, do not
extend handles over adjacent surface burn-
ers. Always turn pan handles toward the
side or back of the appliance, not out into
the room where they are easily hit or
reached by small children.
2
Page 4
Never let a pan boil dry as this could
damage the utensil and the appliance.
Follow the manufacturer's directions
when using oven cooking bags.
Only certain types of glass, glass/ceramic,
ceramic or glazed utensils are suitable for
cooktop or oven usage without breaking
due to the sudden change in temperature.
Follow manufacturer's instructions when
using glass.
This appliance has been tested for safe
performance using conventional cook-
ware. Do not use any devices or accesso-
ries that are not specifically recommended
in this guide. Do not use eyelid covers for
the surface units, stovetop grills, or add-
on oven convection systems. The use of
devices or accessories that are not ex-
pressly recommended in this manual can
create serious safety hazards, result in
performance problems, and reduce the
life of the components of the appliance.
Turn off all controls and wait for appli-
ance parts to coolbefore touching or clean-
ing them. Do not touch the burner grates
or surrounding areas until they have had
sufficient time to cool.
Clean appliance with caution. Use care to
avoid steam burns ifa wet sponge or cloth
is used to wipe spills on a hot surface.
Some cleaners can produce noxious fumes
if applied to a hot surface.
Sellf-Cle rt Otmn
Clean only parts listed in this guide. Do not
clean door gasket. The door gasket is es-
sential for a good seal. Care should be
taken not to rub, damage, or move the
gasket. Do not use oven cleaners of any
kind in or around any part of the self-clean
oven.
Before self-cleaning the oven, remove
broiler pan, oven racks and other utensils
and wipe up excessive spillovers to pre-
vent excessive smoke, flare-ups or flam-
ing.
CAUTION: Do not leave food or cooking
utensils, etc. in the oven during the self-
clean cycle.
It is normal for the cooktop of the range to
become hot during aself-clean cycle. There-
fore, touching the cooktop during a clean
cycle should be avoided.
I S drtty
N(:tk: .:l'z:l
Za'r rlg
The California Safe Drinking Water and
Toxic Enforcement Act of 1986 (Proposi-
tion 65) requires the Governor of Califor-
nia to publish a list of substances known to
the State of California to cause cancer or
reprod uctive harm, and requires businesses
to warn customers of potential exposures
to such substances.
Users of this appliance are hereby warned
that the burning of gas can result in low-
level exposure to some of the listed sub-
stances, including benzene, formaldehyde
and soot, due primarily to the incomplete
combustion of natural gas or liquid petro-
leum (LP)fuels. Properly adjusted burners
will minimize incomplete combustion. Ex-
posure to these substances can also be
minimized by properly venting the burn-
ers to the outdoors.
Users of this appliance are hereby warned
that when it isengaged in the self-clean cycle,
there may be low level exposure to some of
the listed substances, including carbon mon-
oxide. Exposure can be minimized by prop-
erly venting the oven to the outdoors durhlg
the self-clean cycle by opening a window
and/or door in theroom where the appliance
is located.
IMPORTANT NOTICE REGARDING
PET BIRDS: Never keep pet birds in the
kitchen or in rooms where the fumes from
the kitchen could reach. Birds have a very
sensitive respiratory system. Fumes re-
leased during an oven self-cleaning cycle
may be harmful or fatal to birds. Fumes
released due to overheated cooking oil, fat,
margarine and overheated non-stick cook-
ware may be equally harmful.
Sau T/-mse Insbz.a= o s far Fub.e
3
Page 5
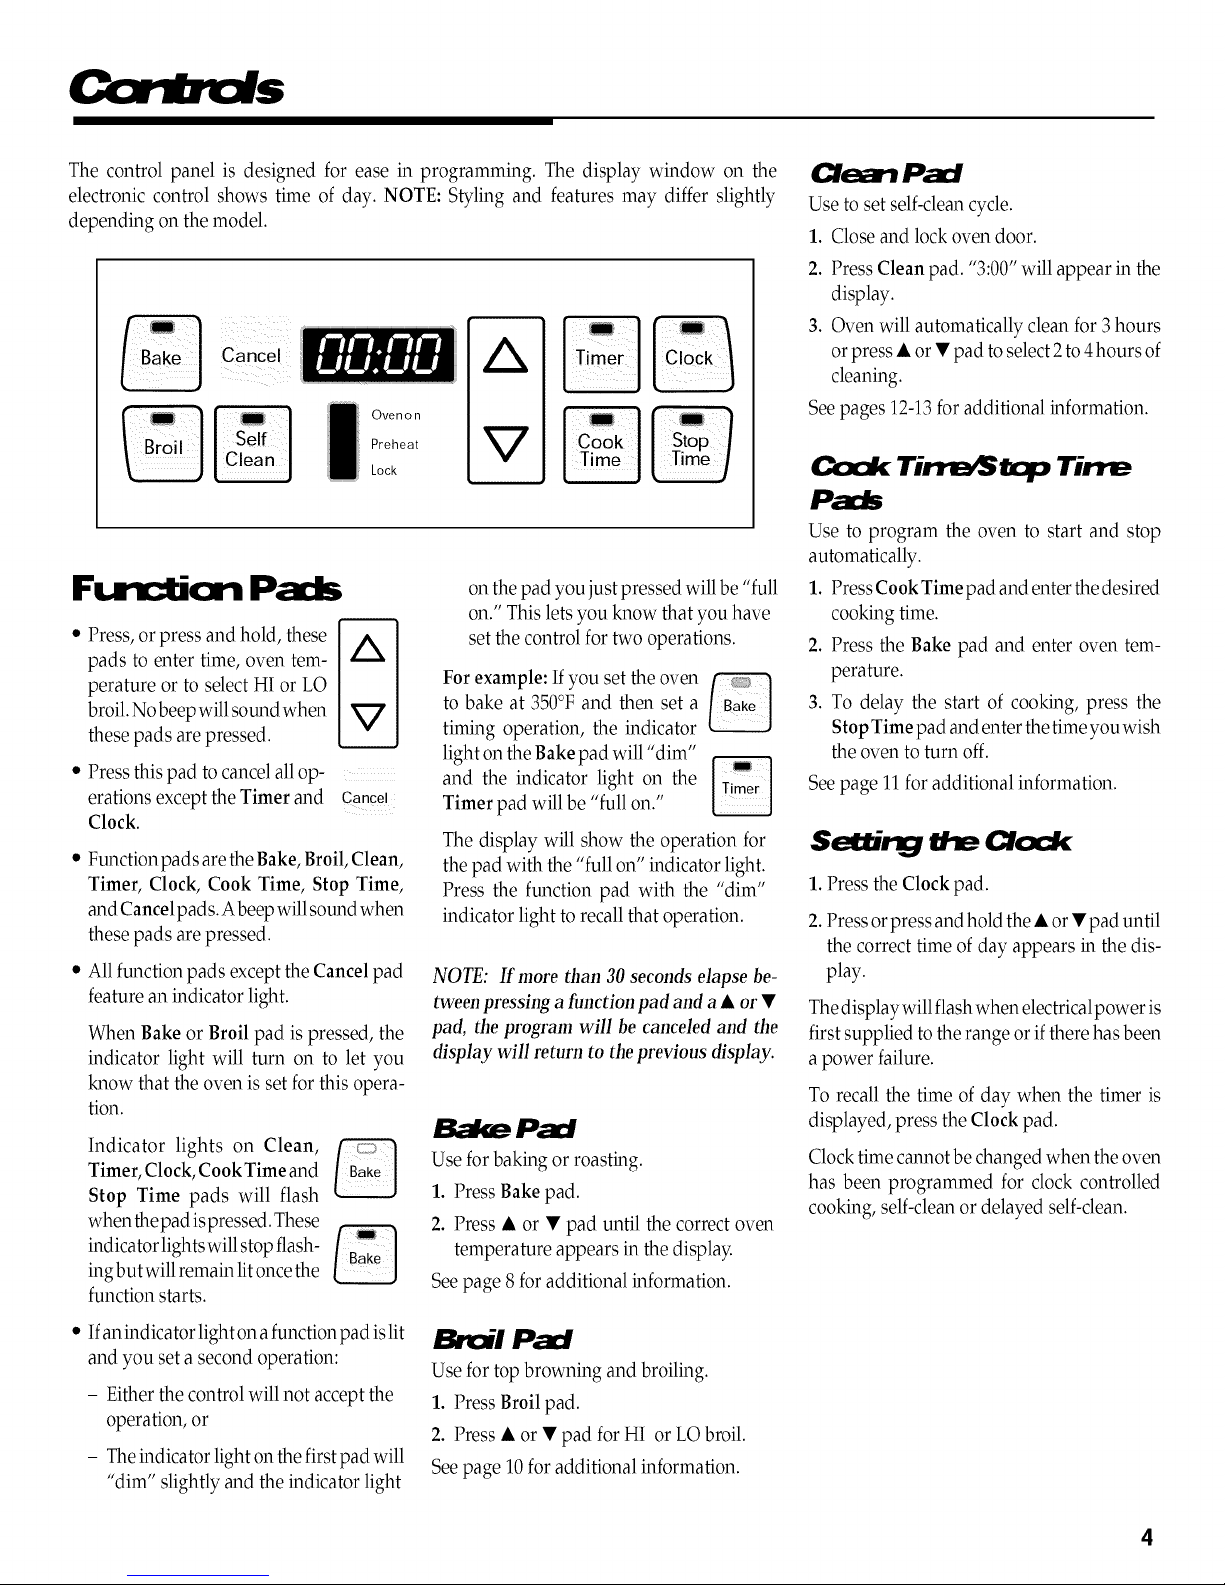
The control panel is designed for ease in programming. The display window on the
electronic control shows time of day. NOTE: Styling and features may differ slightly
depending on the model.
CanCel
Ovenon
Preheat
Lock
on the pad you just pressed will be "full
on." This lets you know that you have
• Press, or press and hold, these
pads to enter time, oven tem-
perature or to select HI or LO
broil. No beep will sound when
these pads are pressed.
• Press this pad to cancel all op-
erations except the Timer and Cancel
Clock.
• Function pads are the Bake, Broil, Clean,
Timer, Clock, Cook Time, Stop Time,
and Cancel pad s.Abeep will sound when
these pads are pressed.
• All function pads except the Cancel pad
feature an indicator light.
When Bake or Broil pad is pressed, the
indicator light will turn on to let you
know that the oven is set for this opera-
tion.
Indicator lights on Clean,
Timer, Clock, Cook Time and
Stop Time pads will flash
when the pad ispressed. These
indicator lights will stop flash-
ingbut will remain litonce the
function starts.
set the control for two operations.
For example: Ifyou set the oven
to bake at 350°F and then set a
timing operation, the indicator
light on the Bake pad will "dim"
and the indicator light on the ] Ti'_r ]
Timer pad will be "full on."
The display will show the operation for
the pad with the "full on" indicator light.
Press the function pad with the "dim"
indicator light to recall that operation.
NOTE: If more than 30 seconds elapse be-
tween pressing a function pad and a • or •
pad, the program will be canceled and the
display will return to the previous display.
Use for baking or roasthlg.
1. Press Bake pad.
2. Press • or • pad until the correct oven
temperature appears in the display.
See page 8 for additional information.
eErl Pad
Use to setself-cleancycle.
1. Close and lock oven door.
2. Press Clean pad. "3:00" will appear in the
display.
3. Oven will automatically clean for 3 hours
or press • or • pad to select 2 to4 hours of
cleaning.
See pages 12-13 for additional hlformation.
Ccx_ Tirre_ _ Tin'e
Pads
Use to program the oven to start and stop
automatically.
1. PressCookTimepad and enter thedesired
cooking time.
2. Press the Bake pad and enter oven tem-
perature.
3. To delay the start of cooking, press the
Stop Time pad and enter the time you wish
the oven to turn off.
See page 11 for additional information.
Setbng Clock
1. Press the Clock pad.
2. Press orpress and hold the • or • pad until
the correct time of day appears hi the dis-
play.
The display will flash when electrical power is
first supplied to the range or if there has been
a power failure.
To recall the time of day when the timer is
displayed, press the Clock pad.
Clock time cannot be changed when the oven
has been programmed for clock controlled
cooking, self-clean or delayed self-clean.
• Ifanindicatorlightona function pad islit
and you set a second operation:
- Either the control will not accept the
operation, or
- The indicator light on the first pad will
"dim" slightly and the indicator light
Broil Pad
Use for top browning and broiling.
1. Press Broil pad.
2. Press • or • pad for HI or LO broil.
See page 10 for additional information.
Page 6
Setting the Tirrer
The timer can be set from one minute (0:01)
up to 9hours and 50 minutes (9:50).
2. Press the • or • pad to select the option
number you wish. The current time ofday
will reappear in the display after four
seconds.
2. "OFF" will appear in the display when this
feature is activated. Only the clock and
timer functions will operate when Control
Lock-Out feature is activated.
The timer can be used independently of any
other oven activity and it can be set while
another oven function is operating. THE
TIMER DOES NOT CONTROL THE OVEN.
1. Press the Timer pad.
2. Press or press and hold the • or • pad
until the correct time appears in the dis-
play.
• Timer will start automatically. The
TIMER indicator on the Timer pad
will light whenenver the timer isin use.
• One long beep and "End" will be
briefly displayed to signal the end of
the timer operation.
To Canc_ Tirre_.
Press and hold Timer pad for three seconds.
Time of day will reappear in the display.
€ ,Jcr,s
Cc llrdled
Coc rg
Option 1.(default option) Four beeps at the
end of cooking, then, one beep every 30
seconds for the next five mhlutes or until the
Cancel pad is pressed.
Option 2. Four beeps at the end of cooking,
then, no other beeps.
Option 3. Four beeps at the end of cooking,
then, one beep every minute for the next 12
hours or until the Cancel pad is pressed.
Semncj Clock _led
O_m Cocidrg Beeps:
1. Press Cook Time and Clock pads at the
same time and hold for three seconds.
• A single beep will sound.
• Display will show current option.
(:: ock Dis/ ay
If you prefer that the time of day not be
displayed:
To set: Press Clock and Cancel pads at
the same time and hold for three seconds.
When clock display isnot shown,pressClock
pad to briefly recall the time of day, if de-
sired.
To restol_ Press the Clock and Cancel
pads at the same time and hold for three
seconds. The time ofday will reappear in the
display.
Ouen Tum
The oven will automatically turn off after 12
hours, if you accidentally leave it on. You
can deactivate this feature, if desired.
To Elirrinate 12 Hour TurnOff:
1.Press the Clock pad and hold for three
seconds.
2. Press and hold the • or • pad until 8:88
appears in the display. Current time of
day will reappear in the display after four
seconds.
To rest[:]l_ Repeat steps 1and 2.12:00
will appear briefly inthe display followed by
the current time of day.
The Control Lock-Out feature prevents the
oven from behlg turned on.
ToSE_t. _
1.Press and hold both Stop Time and Can-
cel pads for three seconds.
Repeat step 1 to deactivate.
Terrpera .re
Ac_us_
You may adjust the oven temperature ifyou
think the oven is not baking correctly. To
decide how much to change the temperature,
setthe temperature 25 degreeshigher or lower
than your recipe recommends, then bake. The
results of the "test" should give you an idea of
how much to adjust the temperature.
NOTE: It is not recommended to change the
oven temperature if only one or two recipes
are hi question.
To Adjust _
Tenperab
1.Press the Bake pad.
2. Enter 550° by pressing • pad.
3. Press and hold the Bake pad for three sec-
onds until 00° appears in the display.
• If the oven temperature was previ-
ously adjusted, the change will be
displayed. For example, if the oven
temperature was reduced by 15°, the
display will show -15°.
4. Press and hold the • or •pad to change the
temperature. Each time a pad is pressed,
the temperature changes by 5°.
• The oven temperature can be in-
creased or decreased by 5 o to 35 o
5.The time of day will automatically reap-
pear in the display.
It is not necessary to readjust the oven tem-
perature if there is apower failure or interrup-
tion. Broilhlg and cleaning temperatures can-
not be adjusted.
5
Page 7
SLrf : Oc 'ds
CAUTIONS:
• If flame shouldgo out during cooking,
turn theburner off. Ifa strong gas odor
is detected, open a window and wait
five minutes before relighting the
burner.
Be sure all surface controls are set in
the OFF position prior to supplying
gas to the range.
Never touch cooktopuntil it hascooled.
Expect some parts of the cooktop, es-
pecially around the burners, to be-
come warm or hot during cooking.
Usepotholders to protect your hands.
Pilotless Ignition
Pilotless ignition eliminates the need for a
constant standhlg pilot light. Each surface
burner has a spark ignitor. Use care when
cleaning around the surface burner. If clean-
big cloth should catch the ignitor, it could be
damaged, preventing ignition.
If the surface burner does not light, check if
ignitor is broken, soiled or wet. If clogged,
clean the small port beneath the ignitor using
a straight pin or soft bristle brush.
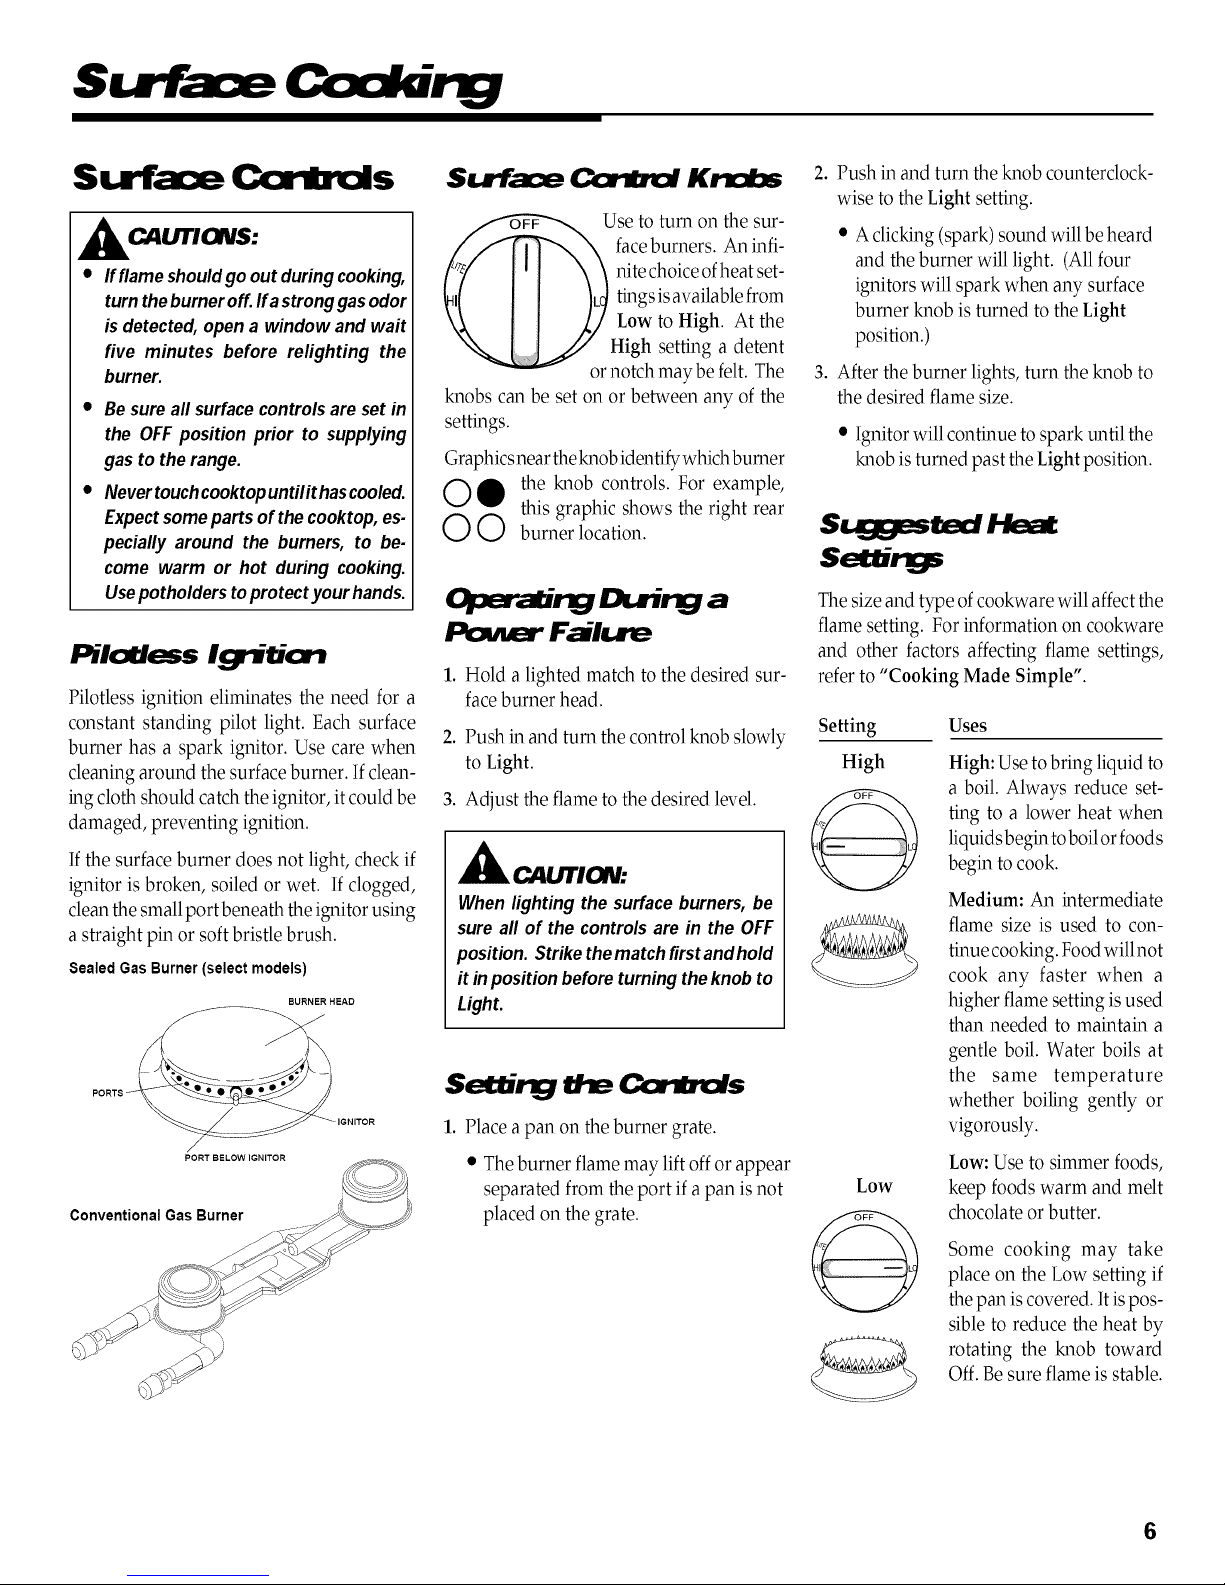
Sealed Gas Burner (select models)
BURNER HEAD
j _
Conventional Gas Burner
Surface KrKd:m
Use to turn on the sur-
face burners. An infi-
nite choice ofheat set-
thlgs is available from
Low to High. At the
High setting a detent
or notch may be felt. The
knobs can be set on or between any of the
settings.
Graphics near the knob identify which burner
O O the knob controls. For example,
this graphic shows the right rear
OO burner location.
Du'ing a
Poute_ Failw'e
1. Hold a lighted match to the desired sur-
face burner head.
2. Push in and turn the control knob slowly
to Light.
3. Adjust the flame to the desired level.
A CAi/rlON:
Whenlighting the surfaceburners,be
sure all of the controlsare in the OFF
position.Strikethematchfirstandhold
it inpositionbeforeturningtheknobto
Light.
Setting tPe
1. Place a pan on the burner grate.
• The burner flame may lift off or appear
separated from the port if a pan is not
placed on the grate.
2. Push in and turn the knob counterclock-
wise to the Light setting.
• A clicking (spark) sound will be heard
and the burner will light. (All four
ignitors will spark when any surface
burner knob is turned to the Light
position.)
3. After the burner lights, turn the knob to
the desired flame size.
• Ignitor will continue to spark until the
knob is turned past the Light position.
The size and type of cookware will affect the
flame setting. For information on cookware
and other factors affecting flame settings,
refer to "Cooking Made Simple".
Setting
High
Uses
High: Use to bring liquid to
a boil. Always reduce set-
ting to a lower heat when
liquids begin toboil or food s
begin to cook.
Medium: An hltermediate
flame size is used to con-
tinue cooking. Food willnot
cook any faster when a
higher flame setthlg is used
than needed to maintain a
gentle boil. Water boils at
the same temperature
whether boiling gently or
vigorously.
Low: Use to simmer foods,
Low
keep foods warm and melt
chocolate or butter.
Some cooking may take
place on the Low setting if
the pan is covered. It ispos-
sible to reduce the heat by
rotating the knob toward
Off. Be sure flame is stable.
6
Page 8

S rPame
To prevent the cooktop from discolor-
ing or staining:
• Clean cooktop after each use.
• Wipe acidic or sugary spills as soon
as the cooktop has cooled as these
spills may discolor the porcelain.
Saafa:f BurrB
The sealed burners of your range are se-
cured to the cooktop and are not designed to
be removed. Since the burners are sealed
hlto the cooktop, boilovers or spills will not
seep underneath the cooktop. However, the
burners should be cleaned after each use.
(See page 15for cleanhlg directions.)
Unlike a range with stan-
dard gas burners, this
cooktop does not lift-up
nor is itremovable. Do not
attempt to lift the cooktop
for any reason.
speed
(select models)
Select ranges feature one high speed burner
located in the right front position. This
burner offers higher speed cooking that
can be used to quickly bring water to a boil
and for large-quantity cooking.
Si BLrner
(select models)
Select models feature a low turn down
simmer burner located at the left rear
position. Use this burner to keep foods
warm, melt chocolate or gently simmer
sauces, soups or stews.
Burrmr Grdk
The grates must be properly positioned
before cooking. Improper installation of
the grates may result in chipping of the
cooktop.
Do not operate the burn-
ers without a pan on the
grate. The grate's porce-
lain finish may chip with-
out a pan to absorb the
heat from the burner
flame.
Although the burner grates
are durable, they will
gradually lose their shine and/or dis-
color, due to the high temperatures of the
gas flame.
Drip Pals -
Removeable porcelain covered drip pans
are available for use with this appliance
to help contain spills. Call 1-800-688-8408
to order.
C rliA rlicrmf Burrmm
Freestanding ranges with conventional
gas burners feature a lift-up cooktop.
To raise the cooktop: when
cool, grasp
the front I
edge of the
cook-top i
and gently i
lift up until i
the two sup- i
port rods, if equipped, at the front of the
cooktop snap into place.
To lower: Hold the front edge of the
cooktop and carefully push back on each
support rod, if equipped, to release the
notched support. Then gently lower the
top into place. The support rods will slide
into the cooktop frame.
i
Page 9
Bddrtg Roasllirtg
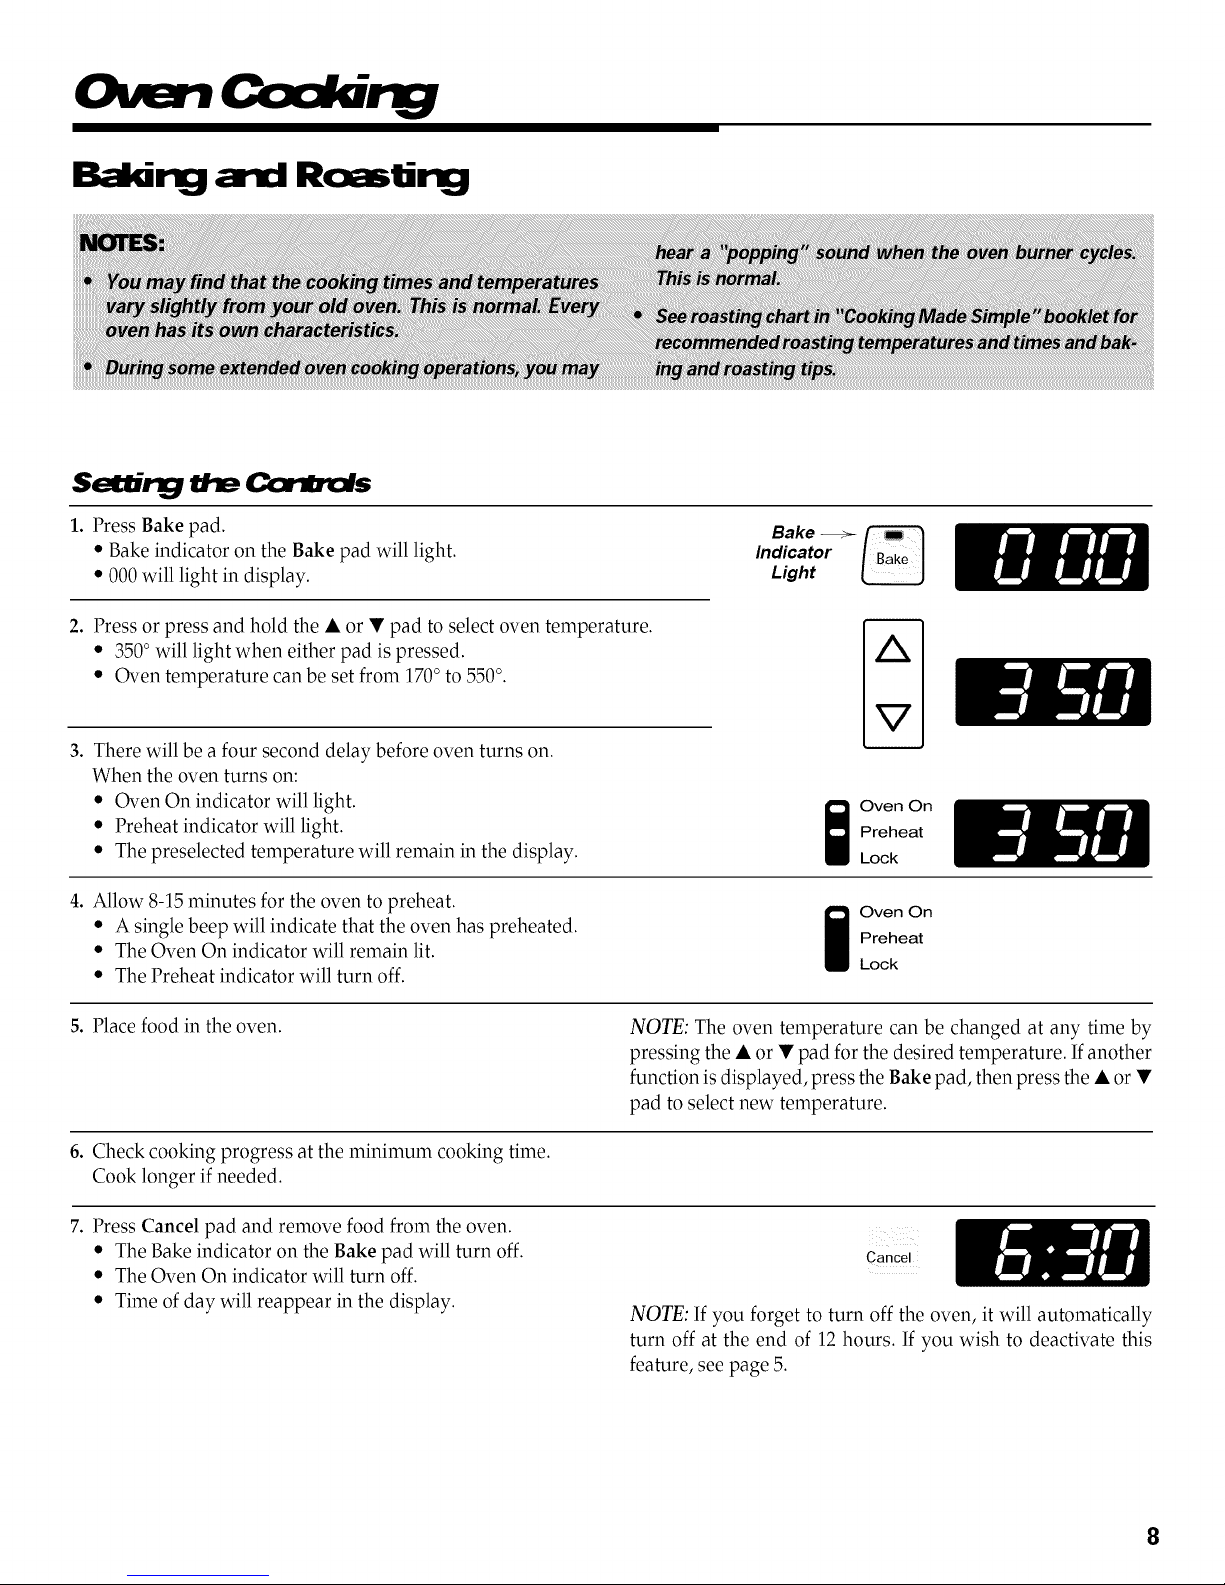
1. Press Bake pad.
* Bake indicator on the Bake pad will light.
• 000 will light in display.
2. Press or press and hold the • or • pad to select oven temperature.
• 350° will light when either pad is pressed.
• Oven temperature can be set from 170° to 550°.
3. There will be a four second delay before oven turns on.
When the oven turns on:
• Oven On indicator will light.
• Preheat indicator will light.
• The preselected temperature will remain in the display.
Indicator
Bake _
Light
Preheat
Oven On
Lock
4. Allow 8-15 minutes for the oven to preheat.
• A single beep will indicate that the oven has preheated.
• The Oven On indicator will remain lit.
• The Preheat indicator will turn off.
5. Place food in the oven.
6. Check cooking progress at the minimum cooking time.
Cook longer if needed.
7. Press Cancel pad and remove food from the oven.
• The Bake indicator on the Bake pad will turn off.
• The Oven On indicator will turn off.
• Time of day will reappear in the display.
Preheat
i ven On
Lock
NOTE: The oven temperature can be changed at any time by
pressing the • or • pad for the desired temperature. If another
function is displayed, press the Bake pad, then press the • or •
pad to select new temperature.
Cancel
NOTE: If you forget to turn off the oven, it will automatically
turn off at the end of 12 hours. If you wish to deactivate this
feature, see page 5.
8
Page 10
Pilotless Ignitic:n
Your range is equipped with pilotless ig-
nition. With this type of ignition system,
the gas automatically shuts off and the
oven will not operate during a power
failure.
A lighted match will not light the oven
burner. No attempt should be made to
operate the oven during a power failure.
Vim'/l:
When the oven is in use, never block the
vent opening.
The oven vent is located at the base of the
backguard. When the oven is in use, this
area may become hot enough to cause
burns. Do not place plastics near the vent
opening as heat from the vent could dis-
tort or melt the plastic.
(select models)
Push the switch on thecontrol panel
to turn the oven light on and off. On select
models the oven light automatically comes
on whenever the oven door is opened.
A CAUTION: Do not attempt
to changethe rack position when the
oven ishot.
Your oven has two racks. They are de-
signed with a lock-stop edge.
To
until it stops
at the lock-
stop position;
lift up on the
front of the
rack and pull
out.
Pull rack straight out
To relplac_ Place rack on the rack
support in the oven; tilt the front end up
slightly; slide rack back until it clears the
lock-stop position; lower front and slide
back into the oven.
Do not cover an entire rack with alumi-
num foil or place foil on the oven bottom.
Baking results will be affected and dam-
age may occur to the oven bottom.
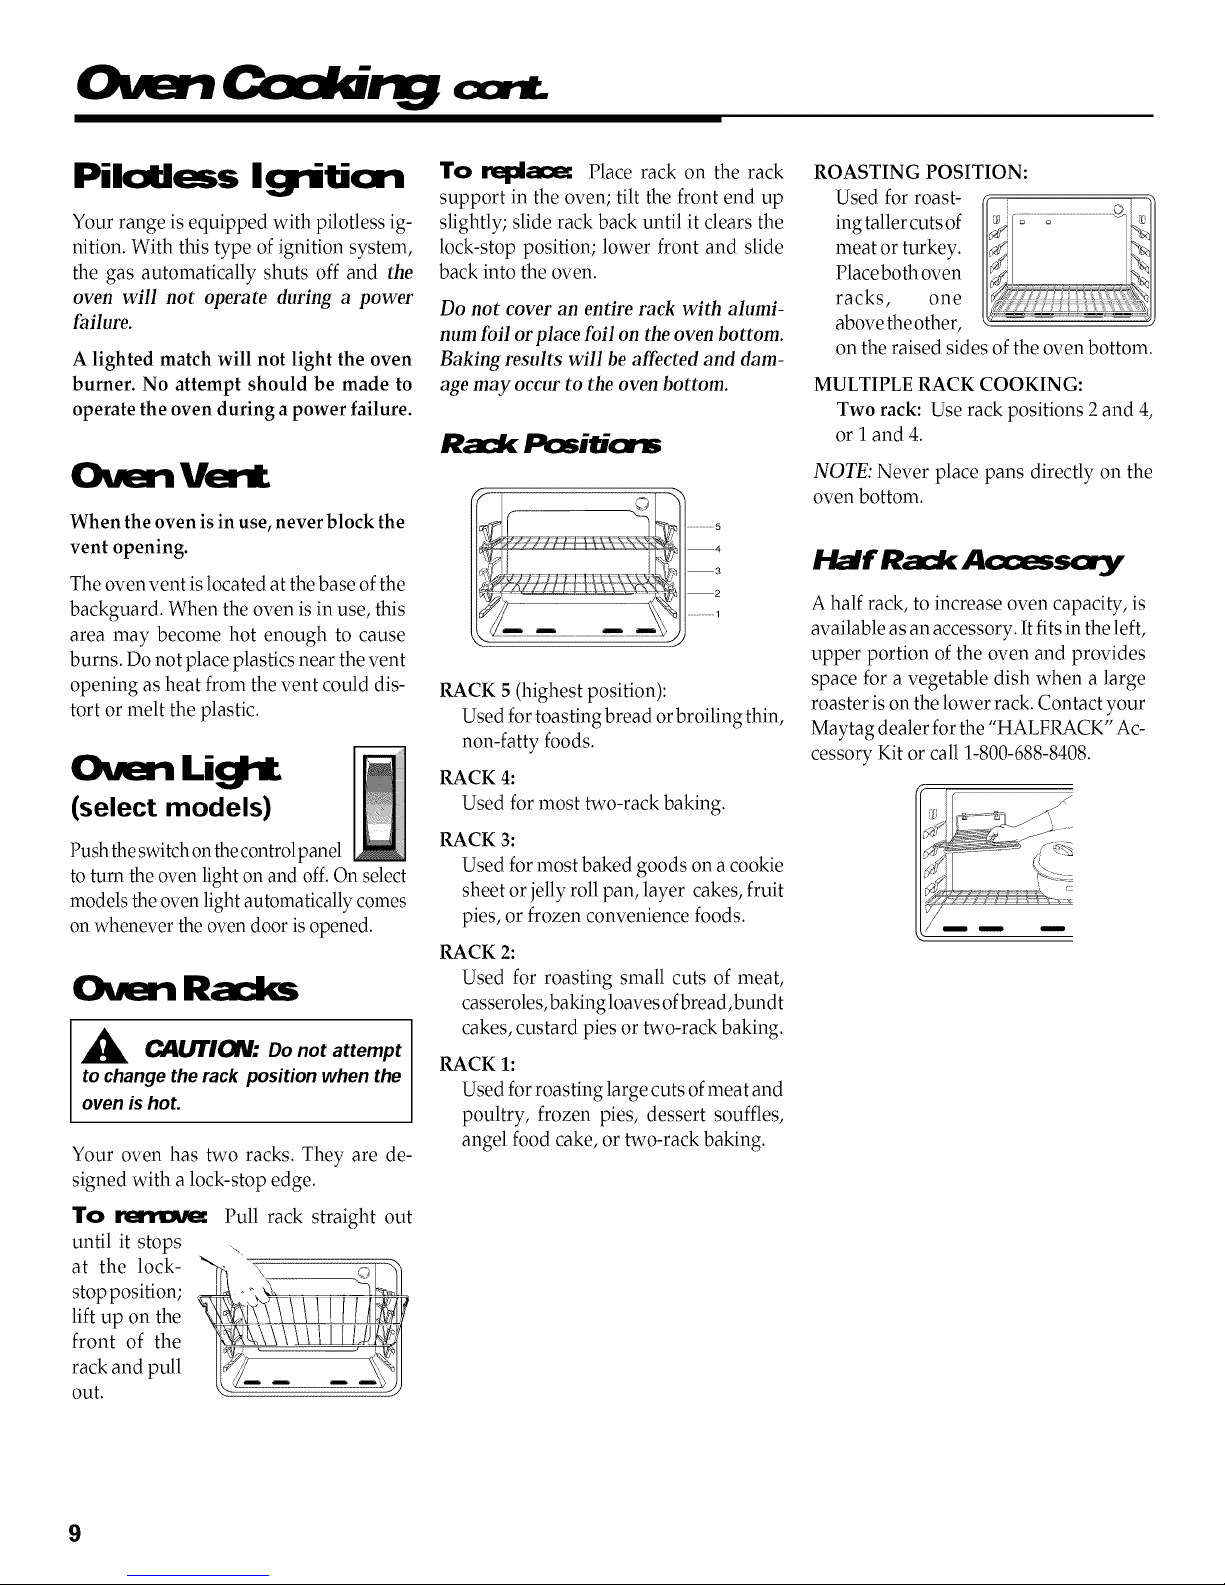
Rack Positia s
RACK 5 (highest position):
Used for toasting bread or broiling thin,
non-fatty foods.
RACK 4:
Used for most two-rack baking.
RACK 3:
Used for most baked goods on a cookie
sheet or jelly roll pan, layer cakes, fruit
pies, or frozen convenience foods.
RACK 2:
Used for roasting small cuts of meat,
casseroles, ba kingloaves of bread, bun dt
cakes, custard pies or two-rack baking.
RACK 1:
Used for roasting large cuts of meat and
poultry, frozen pies, dessert souffles,
angel food cake, or two-rack baking.
ROASTING POSITION:
Used for roast-
ing taller cuts of
meat or turkey.
Place both oven
racks, one
above the other,
on the raised sides of the oven bottom.
MULTIPLE RACK COOKING:
Two rack: Use rack positions 2 and 4,
or 1 and 4.
NOTE: Never place pans directly on the
oven bottom.
Rack A( es
A half rack, to increase oven capacity, is
available as an accessory. It fits in the left,
upper portion of the oven and provides
space for a vegetable dish when a large
roaster is on the lower rack. Contact your
Maytag dealer for the "HALFILACK" Ac-
cessory Kit or call 1-800-688-8408.
LL
9
Page 11
Broiliry
* For best results, use a pan designed for broiling. * For additional broiling tips, refer to the "Cooking Made Simple" booklet.
°
Press the Broil pad.
• Broil indicator on the Broil pad will light.
• 000 will light in the display.
• The Oven On indicator will light. There will be an
eight second delay before the oven turns on.
°
Press the • pad to select HI (high) broil or the • pad
to set LO (low) broil.
• Select HI broil for normal broiling.
• Select LO broil for low temperature broiling of
longer cooking foods such as poultry.
3. Place food in the oven.
4. Turn meat once about half way through cooking.
5.
Press Cancel pad. Remove food and broiler pan from the oven.
* The Oven On indicator will turn off.
* The broil indicator on the Broil pad will turn off.
* Time of day will reappear in display.
Indicator
Broil _
Light
Preheat
I ven On
Lock
Cancel
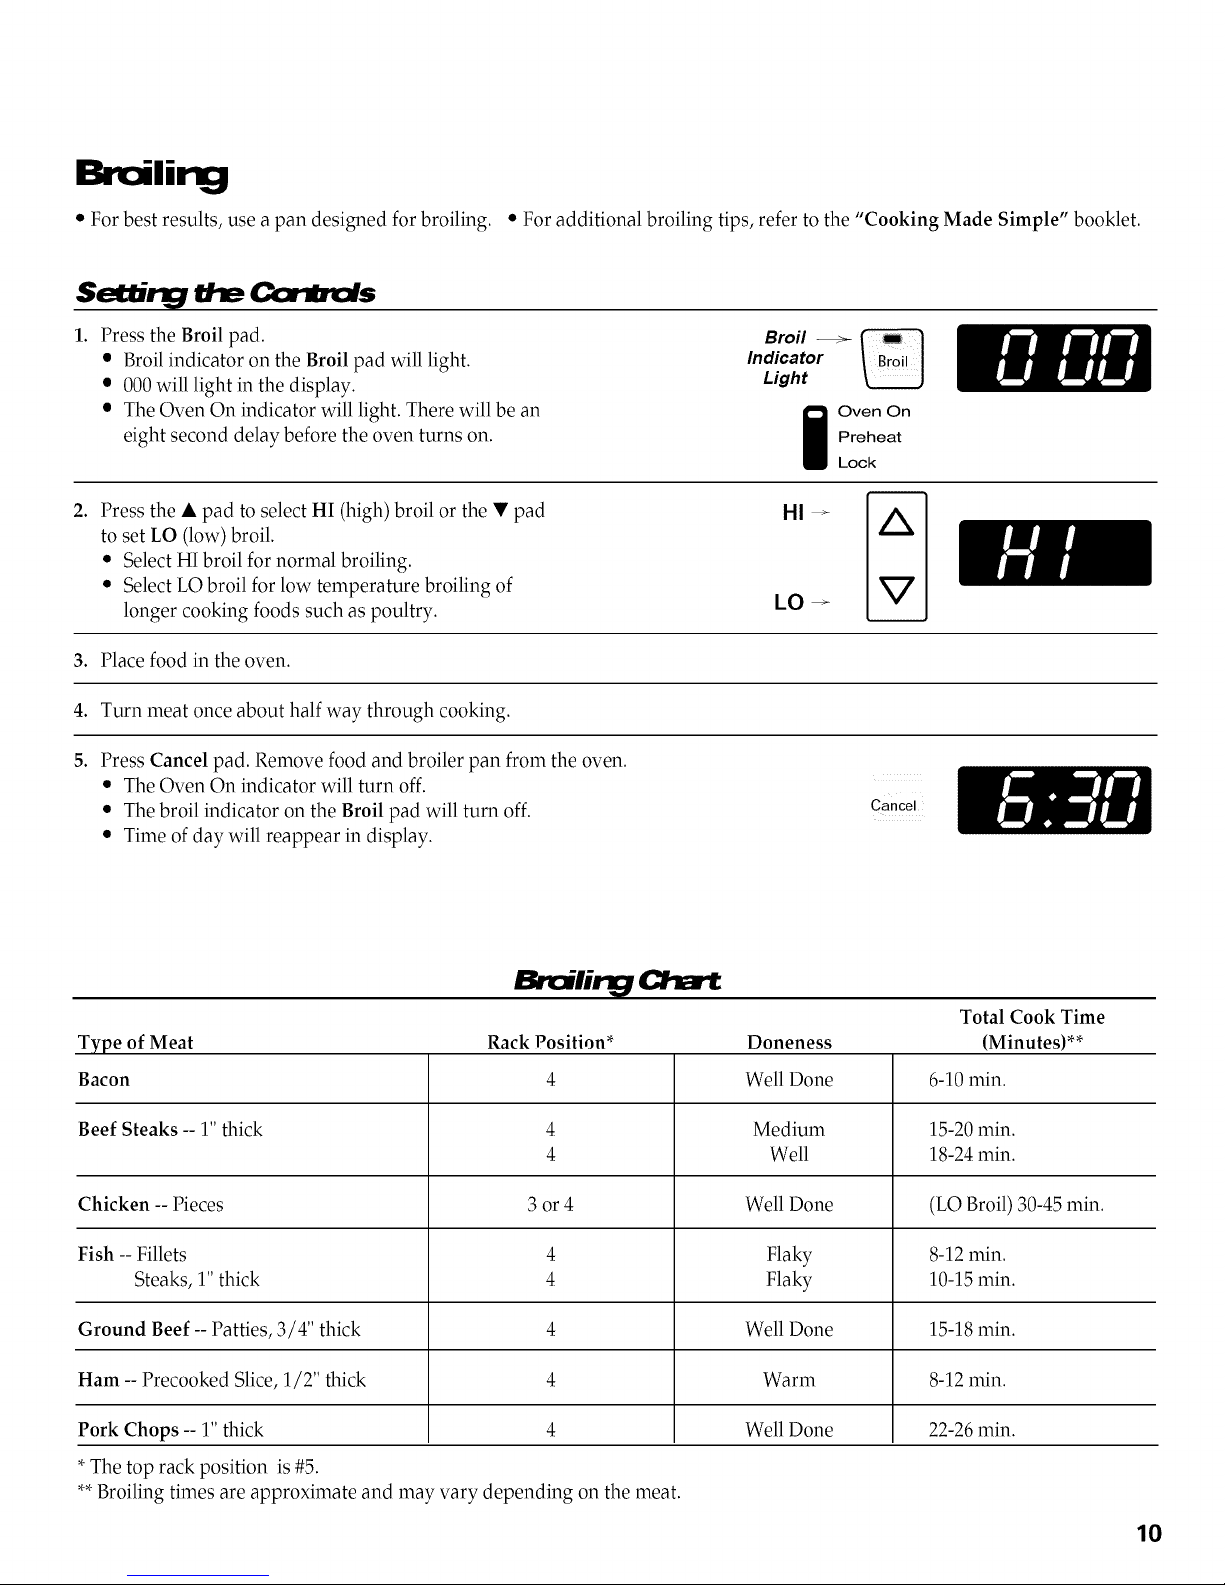
Type of Meat Rack Position* Doneness (Minutes)**
Bacon 4 Well Done 6-10 rain.
Beef Steaks -- 1" thick 4 Medium 15-20 rain.
Chicken -- Pieces 3 or 4 Well Done (LO Broil) 30-45 rain.
Fish -- Fillets 4 Flaky 8-12 rain.
Steaks, 1" thick 4 Flaky 10-15 rain.
Ground Beef -- Patties, 3/4" thick 4 Well Done 15-18 rain.
Ham -- Precooked Slice, 1/2" thick 4 Warm 8-12 rain.
Pork Chops -- 1" thick 4 Well Done 22-26 rain.
* The top rack position is #5.
**Broiling times are approximate and may vary depending on the meat.
Total Cook Time
4 Well 18-24 rain.
10
Page 12
A __J_IUTIOWh
The clock must be functioning and set at the correct time ofday
for this feature to operate correctly.
Highlyperishable foods suchasdairyproducts, pork,
poultry or seafood are not recommended for de-
layed cook operations.
* Clock controlled baking is not recommended for
items that require a preheated oven, suchas cakes,
cookies and breads.
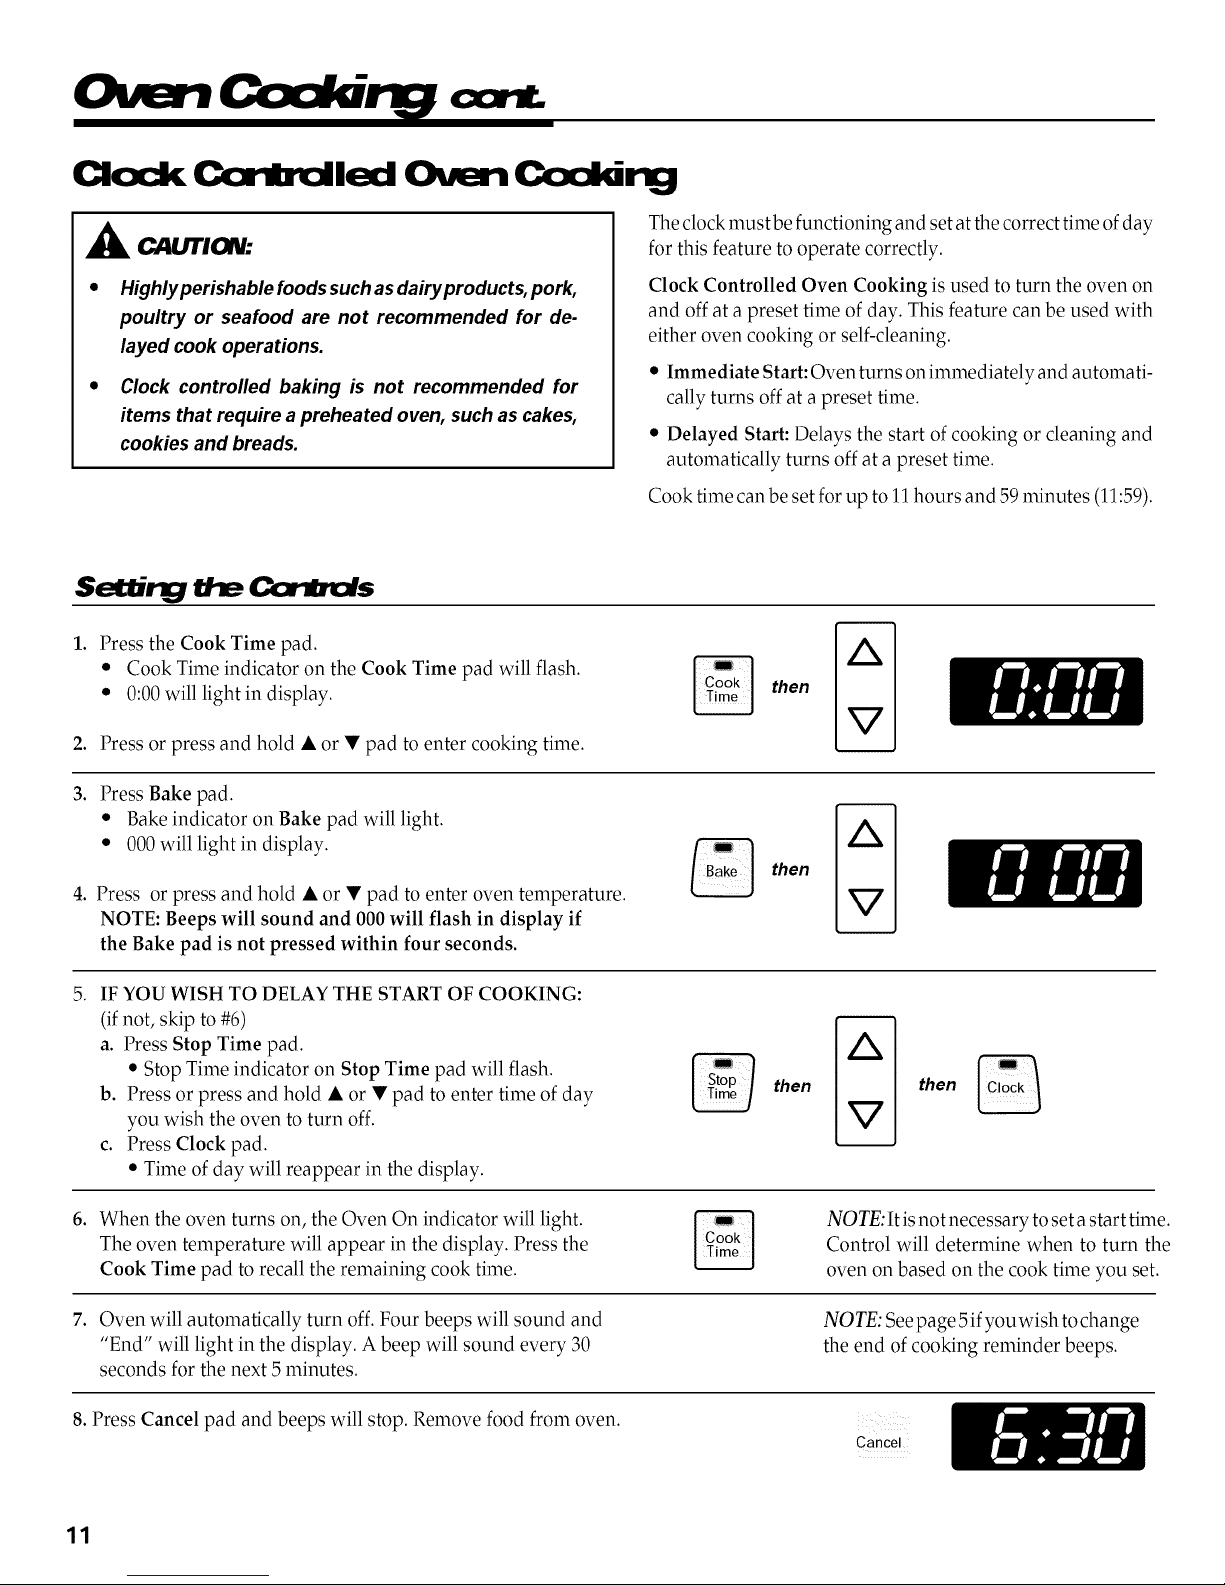
.
Press the Cook Time pad.
• Cook Time indicator on the Cook Time pad will flash.
• 0:00 will light in display.
2. Press or press and hold • or • pad to enter cooking time.
3. Press Bake pad.
• Bake indicator on Bake pad will light.
• 000 will light in display.
4. Press or press and hold • or • pad to enter oven temperature.
NOTE: Beeps will sound and 000 will flash in display if
the Bake pad is not pressed within four seconds.
Clock Controlled Oven Cooking is used to turn the oven on
and off at a preset time of day. This feature can be used with
either oven cooking or self-cleaning.
* Immediate Start: Oven turns on immediately and automati-
cally turns off at a preset time.
* Delayed Start: Delays the start of cooking or cleaning and
automatically turns off at a preset time.
Cook time can be set for up to 11 hours and 59 minutes (11:59).
%
then
then
. IF YOU WISH TO DELAY THE START OF COOKING:
(if not, skip to #6)
a. Press Stop Time pad.
• Stop Time indicator on Stop Time pad will flash.
b. Press or press and hold • or • pad to enter time of day
you wish the oven to turn off.
c. Press Clock pad.
• Time of day will reappear in the display.
6. When the oven turns on, the Oven On indicator will light.
The oven temperature will appear in the display. Press the
Cook Time pad to recall the remaining cook time.
7. Oven will automatically turn off. Four beeps will sound and
"End" will light in the display. A beep will sound every 30
seconds for the next 5 minutes.
8. Press Cancel pad and beeps will stop. Remove food from oven.
11
%
then _ then
NOTE:It is not necessary to set a start time.
Control will determine when to turn the
oven on based on the cook time you set.
NOTE: See page 5if you wish to change
the end of cooking reminder beeps.
Cancel
Page 13
Sdf-Cl
A Self-Cie_n CAUTIONS:
• It is normal forparts of the range to
become hot during a clean cycle.
• Avoid touching cooktop, door, win-
dow, or oven vent area during a
clean cycle.
• Toprevent damage to oven door, do
not attempt to open the door when
the LOCK indicator light is fit.
• Do not use commercial oven clean-
ers on the self-clean oven finish or
around any part of the oven as they
will damage the finish or parts.
Some smoke and odor may be detected
the first few times the oven is cleaned.
This is normal and will lessen in time.
Smoke may also occur if oven is heavily
soiled or if broiler pan was left in oven.
As oven heats, you may hear sounds of
metal parts expanding and contracting.
This is normal and will not damage oven.
The self-clean cycle uses above normal
cooking temperatures to automatically
clean the entire oven interior.
It is normal for flare-ups, smoking or flam-
ing to occur during cleaning if the oven is
heavily soiled. It is better to clean the oven
regularly rather than to wait until there is
a heavy build-up of soil in the oven.
During the cleaning process, the kitchen
should be well ventilated to help eliminate
normal odors associated with cleaning.
Sdf- ea rlg
Turn off the oven light before cleaning as
the light may burn out during the clean
cycle.
Remove broiler pan, all pans and the oven
racks from the oven. The oven racks will
discolor and may not slide easily after a
self-dean cycle.
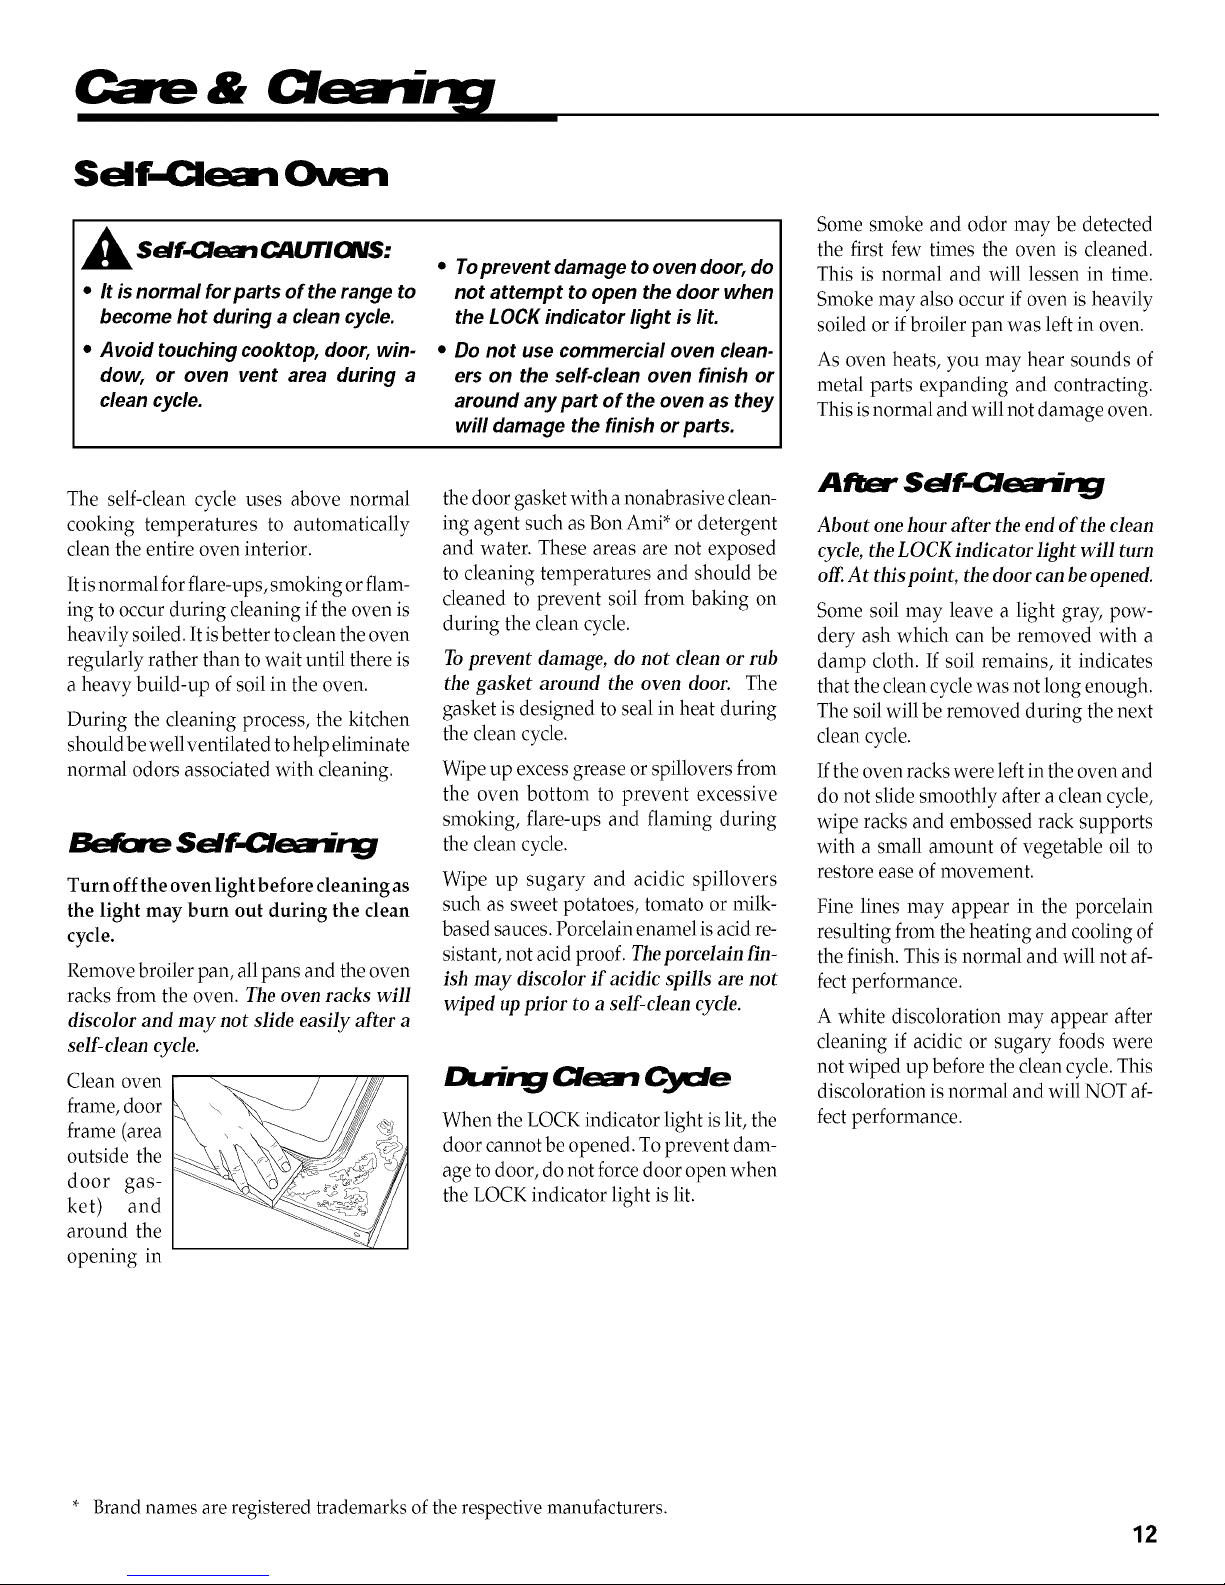
frame, door
frame (area
outside the
door gas-
Clean oven
ket) and
around the
opening in
the door gasket with a nonabrasive clean-
ing agent such as Bon Ami* or detergent
and water. These areas are not exposed
to cleaning temperatures and should be
cleaned to prevent soil from baking on
during the clean cycle.
To prevent damage, do not clean or rub
the gasket around the oven door. The
gasket is designed to seal in heat during
the clean cycle.
Wipe up excess grease or spillovers from
the oven bottom to prevent excessive
smoking, flare-ups and flaming during
the clean cycle.
Wipe up sugary and acidic spillovers
such as sweet potatoes, tomato or milk-
based sauces. Porcelain enamel is acid re-
sistant, not acid proof. The porcelain fin-
ish may discolor if acidic spills are not
wiped up prior to a self-dean cycle.
During Cleat Cycle
When the LOCK indicator light is lit, the
door cannot be opened. To prevent dam-
age to door, do not force door open when
the LOCK indicator light is lit.
Afbsr Seff-K ezrlirlg
About one hour after the end of the clean
cycle, the LOCK indicator light will turn
off. At this point, the door can be opened.
Some soil may leave a light gray, pow-
dery ash which can be removed with a
damp cloth. If soil remains, it indicates
that the clean cycle was not long enough.
The soil will be removed during the next
clean cycle.
If the oven racks were left in the oven and
do not slide smoothly after a clean cycle,
wipe racks and embossed rack supports
with a small amount of vegetable oil to
restore ease of movement.
Fine lines may appear in the porcelain
resulting from the heating and cooling of
the finish. This is normal and will not af-
fect performance.
A white discoloration may appear after
cleaning if acidic or sugary foods were
not wiped up before the clean cycle. This
discoloration is normal and will NOT af-
fect performance.
* Brand names are registered trademarks of the respective manufacturers.
12
Page 14
Setbng to Sdf- e
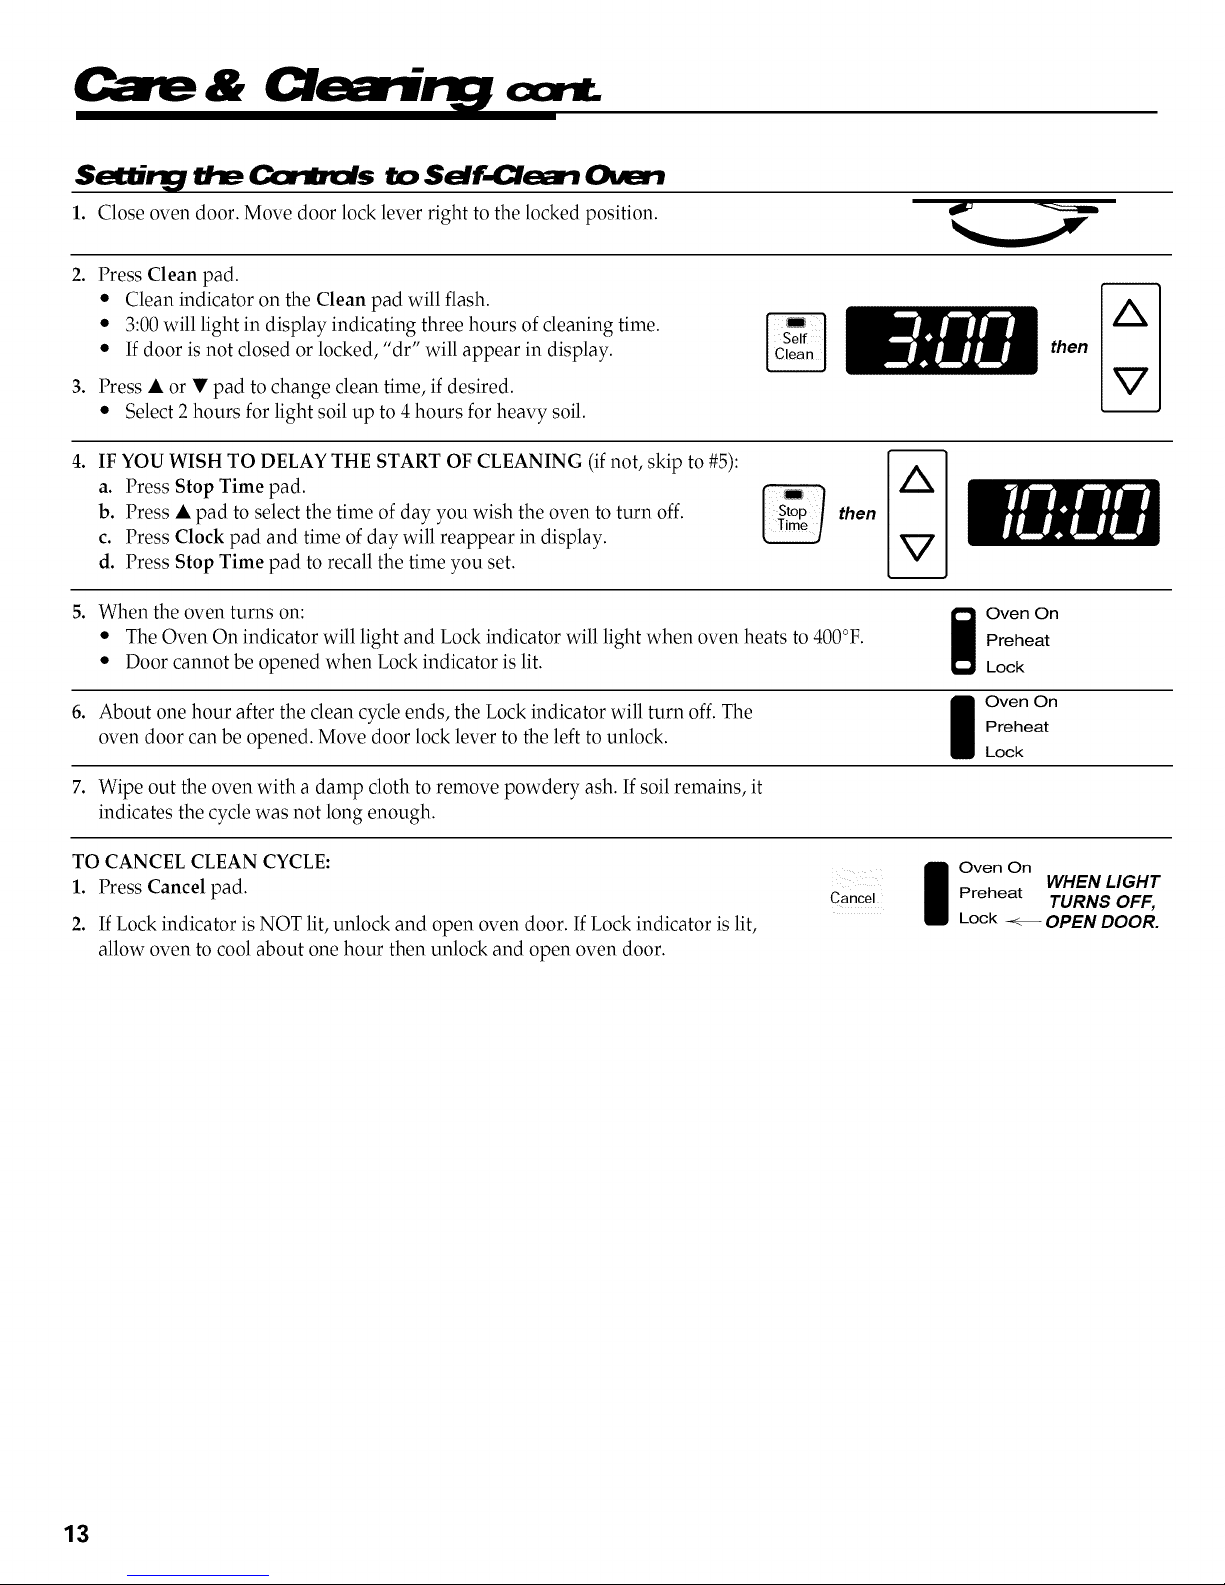
1. Close oven door. Move door lock lever right to the locked position. _"
°
Press Clean pad.
• Clean indicator on the Clean pad will flash.
• 3:00 will light in display indicating three hours of cleaning time.
• If door is not closed or locked, "dr" will appear in display.
°
Press • or • pad to change clean time, if desired.
• Select 2 hours for light soil up to 4 hours for heavy soil.
°
IF YOU WISH TO DELAY THE START OF CLEANING (if not, skip to #5):
a. Press Stop Time pad.
b. Press • pad to select the time of day you wish the oven to turn off.
c. Press Clock pad and time of day will reappear in display.
d. Press Stop Time pad to recall the time you set.
°
When the oven turns on:
• The Oven On indicator will light and Lock indicator will light when oven heats to 400°F.
• Door cannot be opened when Lock indicator is lit.
°
About one hour after the clean cycle ends, the Lock indicator will turn off. The
oven door can be opened. Move door lock lever to the left to unlock. I ven On
,
Wipe out the oven with a damp cloth to remove powdery ash. If soil remains, it
indicates the cycle was not long enough.
%- /tllti
Preheat
Oven On
Lock
Preheat
Lock
then
TO CANCEL CLEAN CYCLE:
1. Press Cancel pad.
2. If Lock indicator is NOT lit, unlock and open oven door. If Lock indicator is lit,
allow oven to cool about one hour then unlock and open oven door.
Cancel
Preheat TURNS OFF,
I ven On WHEN LIGHT
Lock _ OPEN DOOR.
13
Page 15

A Cleaning CAUTIONS:
• Be sure appliance is off and all parts are cool before
handling or cleaning. This is to avoid damage and
possible burns.
Clea ng
Broiler Pan
and Insert
(select models)
Brushed Chrome
(select models)
Burner Box
- Conventional
Burners Only
Burner Grates
Never cover insert with aluminum foil as this prevents the fat from draining to the pan below.
• Placesoapy cloth over insert and pan; let soak to loosen soil.
• Wash in warm soapy water. Use soap filled scouring pad to remove stubborn soil.
• Broilerpan and insert can be cleaned in dishwasher.
• Whoa cool, wash with soapy water, rinse and buff the surface.
• Forheavier soil,use a mild abrasive cleaner such asbaking soda or BonAmi*, rubbing with the grain to avoid streaking
the surface. Rinse and buff.
• Toprevent scratching, do not use abrasive cleaners.
• Torestore luster and remove streaks, follow with Stainless Steel Magic Spray*(Part #20000008)**.Chrome will
permanently discolor if soil is allowed to bake on.
Theburner box islocated under the li_up cooktop. Clean frequently to remove spillovers. Ifsoil is allowed to accumulate,
it may damage the finish.
• Remove grates and surface burners. Raise lift-up top.
• Clean with soap and water, rinse and dry.
• Forstubborn soils,use mildly abrasive cleaning agents such asbaking soda/water paste or Bon Ami*,and a non-abrasive
plastic scrubbing pad.
• Wash grates with warm, soapy water and a nonabrasive, plastic scrubbing pad.
• For stubborn soils, cleanwith a soap-filled, nonabrasive pad or a sponge or Cooktop Cleaning Creme (Part#20000001)**
and a sponge. If soil remains, reapply Cooktop Cleaning Creme, cover with a damp paper towel and soak for 30 minutes.
Scrub again, rinse and dry.
• For burned on soils, remove grates, place on newspapers and carefully spray with commercial oven cleaner. (Do not
spray surrounding surfaces.) Place in plastic bags for several hours or over night. Wearing rubber gloves, remove
from bags. Wash, rinse, dry and replace on cooktop.
• To prevent staining or discoloration, clean appliance
after each use.
• Ira part is removed, be sure it is correctly replaced.
Clock and Control
Pad Area
• Toactivate "Control Lockout" for cleaning, see page 5.
• Wipe with a damp cloth and dry.
• Glass cleaners may be used if sprayed on a cloth first. DO NOT spray directly on control pad and display.
Control Knobs
• Remove kJ3obsinthe OFF position by pulling forward.
• Wash, rinse and dry. Do not use abrasive cleaning agents as they may scratch the finish.
• Turn on each burner to be sure the knobs have been correctly replaced.
Cooktop,
Backguard&
Control Knob Area
(porcelain enamel)
Porce]ainenamel isglass fused on metal and may crack orchipwith misuse. It isacid resistant, not acid proof. A11spillovers,
especially acidic or sugary spillovers, should be wiped up immediately with a dry cloth.
• When cool, wash with soapy water, rinse and dry.
• Never wipe off a warm or hot surface with a damp cloth. This may cause cracking or chipping.
• Never use oven cleaners, abrasive or caustic cleaning agents on exterior finish of range.
Enamel, painted
- Side Panels
- Storage Drawer
- Oven Door
(select models)
- Door handles
(select models)
• When cool, wash with warm soapy water, rinse and dry. Never wipe a warm orhot surface with a damp cloth as this
may damage the surface and may cause a steam burn.
• Forstubborn soil, use mildly abrasive cleaning agents such as baking soda/water paste or Bon Ami*.Do not use
abrasive, caustic or harsh cleaning agents such as steel wool pads or oven cleaners. These products will scratch or
permanently damage the surface.
NOTE: Use dry towel or cloth to wipe up spills, especially acidic or sugary spills. Surface may discolor or dull if soil is
not immediately removed. This is especially important for white surfaces.
* Brand names are registered trademarks of the respective manufacturers.
**To order call 1-800-688-8408.
14
Page 16
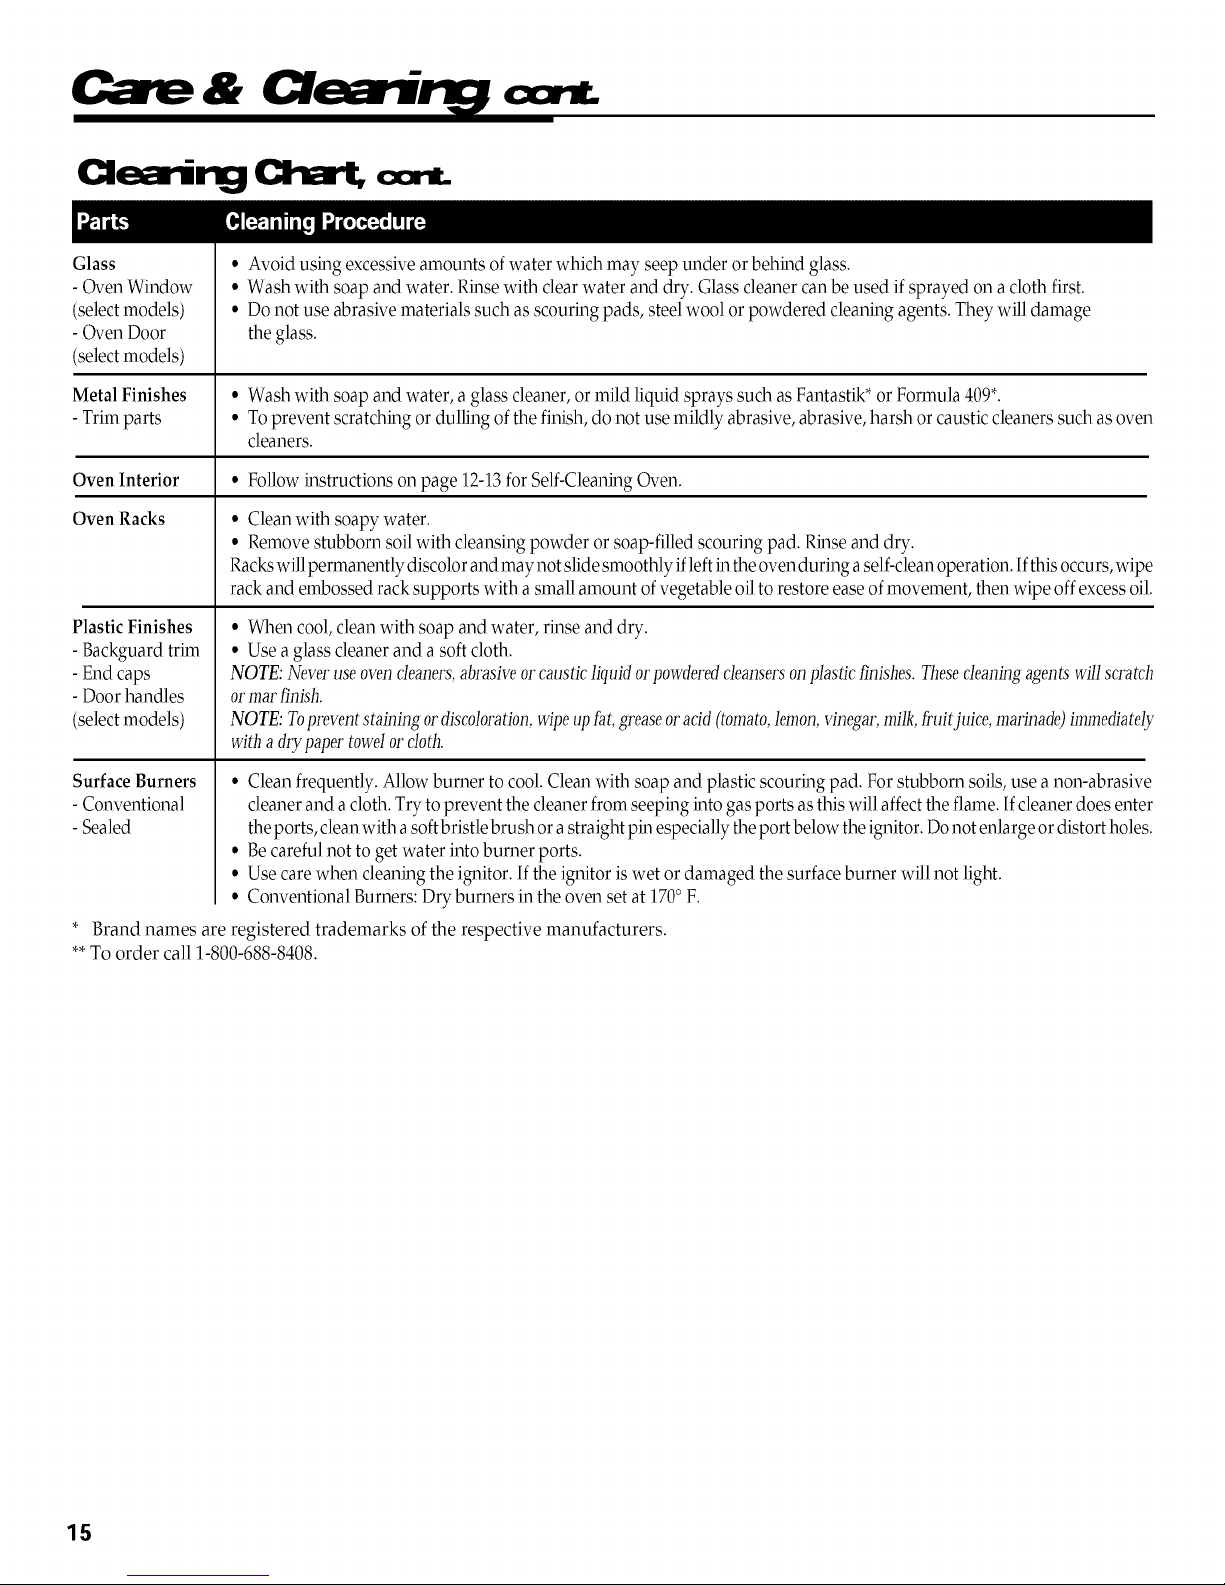
Glass
- Oven Window
(selectmodels)
- Oven Door
(selectmodels)
Metal Finishes • Wash with soap and water, a glass cleaner, ormild liquid sprays such as Fantastik* or Formula 409*.
- Trim parts • Toprevent scratching or dulling of the finish, do not use mildly abrasive, abrasive, harsh or caustic cleaners such as oven
Oven Interior • Follow instructions on page 12-13forSelf-Cleaning Oven.
Oven Racks
Plastic Finishes
- Backguard trim
- End caps
- Door handles
(selectmodels)
• Avoid using excessive amounts of water which may seep under or behind glass.
• Wash with soap and water. Rinse with clear water and dry. Glass cleaner can be used if sprayed on a cloth first.
• Do not use abrasive materials such as scouring pads, steelwool or powdered cleaning agents. They will damage
the glass.
cleaners.
• Clean with soapy water.
• Remove stubborn soil with cleansing powder or soap-filled scouring pad. Rinse and dry.
Racks willpermanently discolor and may not slidesmoothly if leftin theoven during aself-clean operation. Ifthis occurs, wipe
rack and embossed rack supports with a small amount ofvegetable oilto restore easeof movement, then wipe off excessoil.
• When cool, clean with soap and water, rinse and dry.
• Use a glass cleaner and a soft cloth.
NOTE: Never useovencleaners,abrasiveorcausticliquidorpowderedcleansersonplasticfinishes. Thesecleaningagentswillscratch
ormarfinish.
NOTE: Topreventstainingordiscoloration,wipeupfat,greaseoracid(tomato,lemon,vinegar,milk,t}'uitjuice,marinade)immediately
witha dry papertowelorcloth.
Surface Burners
- Conventional
- Sealed
* Brand names are registered trademarks of the respective manufacturers.
**To order call 1-800-688-8408.
• Clean frequently. Allow burner to cool. Clean with soap and plastic scouring pad. For stubborn soils,use a non-abrasive
cleaner and a cloth. Try to prevent the cleaner from seeping into gas ports as this will affect the flame. Ifcleaner does enter
theports, cleanwith a soft bristle brush or a straight pin especially the port below the ignitor. Donot enlarge or distort holes.
• Be careful not to get water into burner ports.
• Use care when cleaning the ignitor. If the ignitor is wet or damaged the surface burner will not light.
• Conventional Burners: Dry burners in the oven set at 170o F.
15
Page 17
Light
CAUTIONS:
Do not place excessive weight on or
stand on an open oven door. This
could cause the range to tip over,
break the door, or injure the user.
Do not attempt to open or close
door or operate oven until door is
properly replaced.
Never place fingers between hinge
and front oven frame. Hinge arms
are spring mounted. If accidentally
hit, the hinge will slam shut against
oven frame and could injure your
fingers.
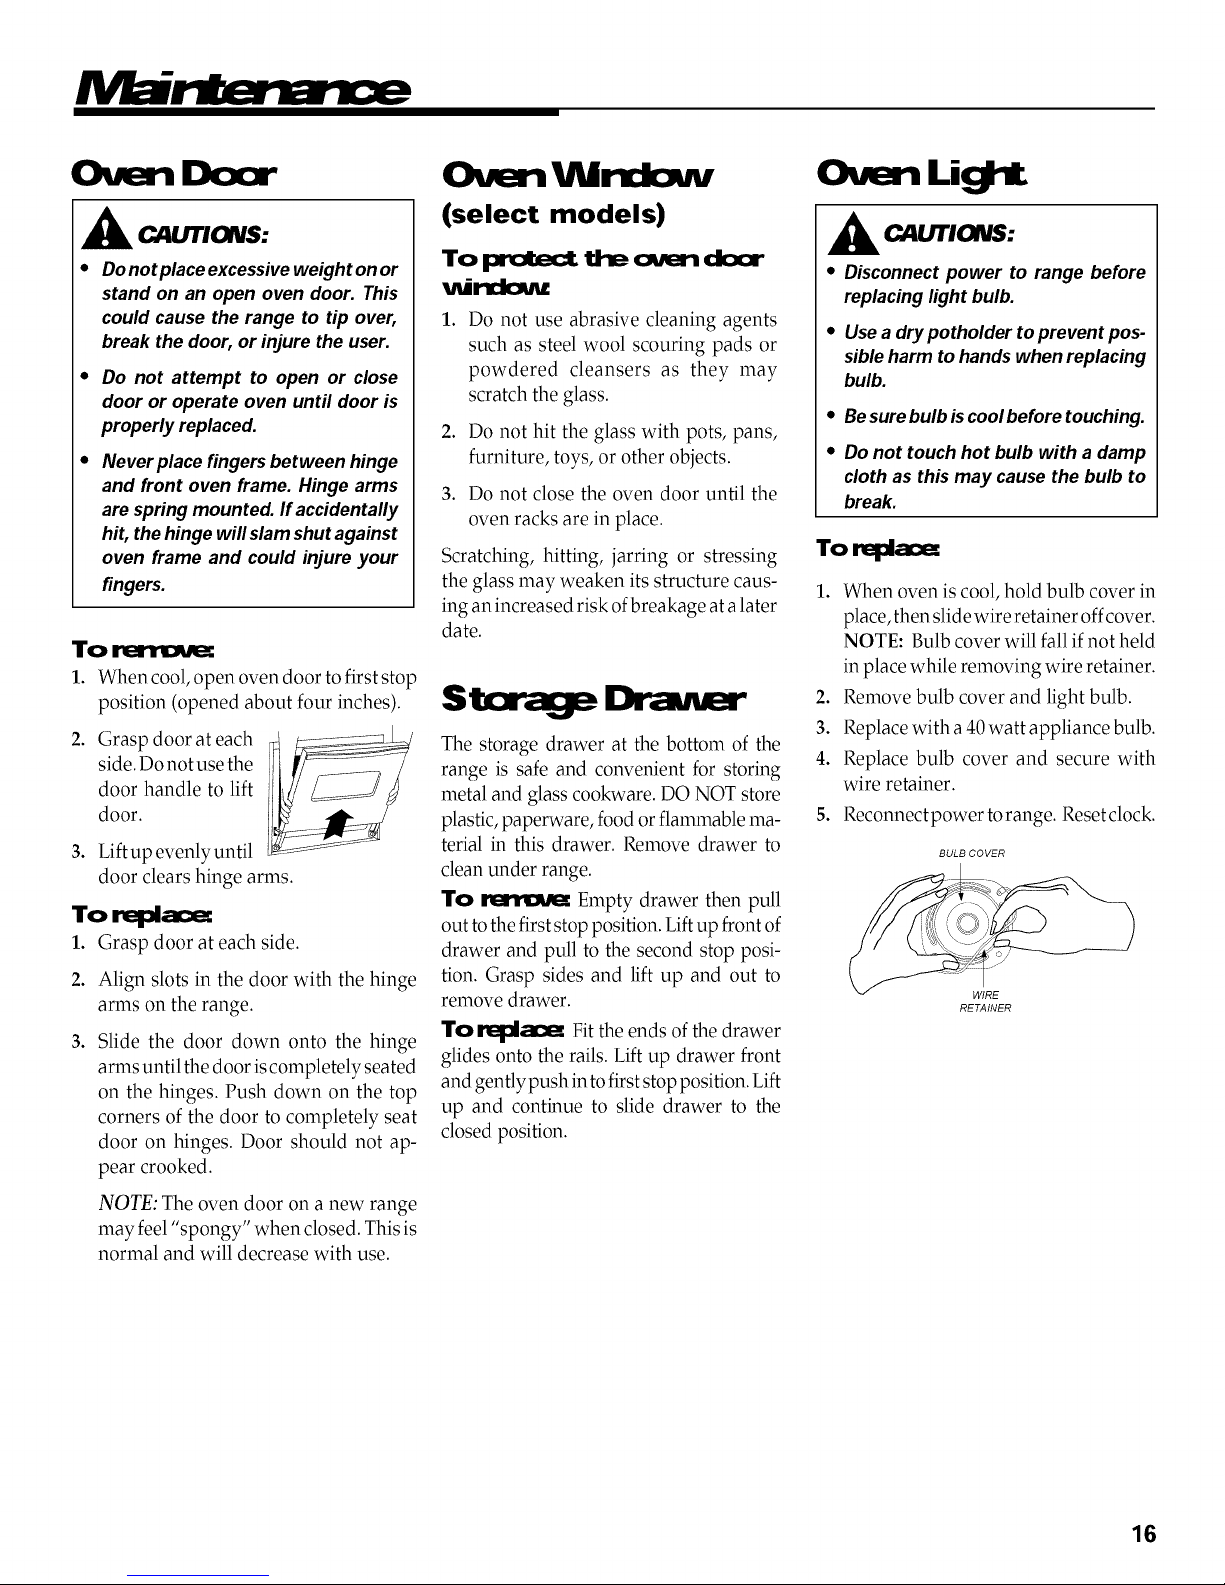
To
1. When cool, open oven door to first stop
position (opened about four inches).
°
Grasp door at each
side. Do not use the
door handle to lift
door.
3. Lift up evenly until
door clears hinge arms.
To rel:la_
°
Grasp door at each side.
2.
Align slots in the door with the hinge
arms on the range.
°
Slide the door down onto the hinge
arms until the door is completely seated
on the hinges. Push down on the top
corners of the door to completely seat
door on hinges. Door should not ap-
pear crooked.
(select models)
To _ tl_ auen cicx:r
,mJ_
°
Do not use abrasive cleaning agents
such as steel wool scouring pads or
powdered cleansers as they may
scratch the glass.
°
Do not hit the glass with pots, pans,
furniture, toys, or other objects.
°
Do not close the oven door until the
oven racks are in place.
Scratching, hitting, jarring or stressing
the glass may weaken its structure caus-
ing an increased risk ofbreakage at a later
date.
The storage drawer at the bottom of the
range is safe and convenient for storing
metal and glass cookware. DO NOT store
plastic, paperware, food or flammable ma-
terial in this drawer. Remove drawer to
clean under range.
To _ Empty drawer then pull
out to the first stop position. Lift up front of
drawer and pull to the second stop posi-
tion. Grasp sides and lift up and out to
remove drawer.
To r_ Fit the ends of the drawer
glides onto the rails. Lift up drawer front
and gently push in to first stop position. Lift
up and continue to slide drawer to the
closed position.
A CAUTIOJK_:
• Disconnect power to range before
replacing light bulb.
• Use a drypotholder topreventpos-
sible harm to hands when replacing
bulb.
Be sure bulb is cool before touching.
Do not touch hot bulb with a damp
cloth as this may cause the bulb to
break.
To rq:ia_
1. When oven is cool, hold bulb cover in
place, then slide wire retainer offcover.
NOTE: Bulb cover will fall if not held
in place while removing wire retainer.
2. Remove bulb cover and light bulb.
3. Replace with a 40 watt appliance bulb.
4. Replace bulb cover and secure with
wire retainer.
5. Reconnect power to range. Reset clock.
BULB COVER
WIRE
RETAINER
NOTE: The oven door on a new range
may feel "spongy" when closed. This is
normal and will decrease with use.
16
Page 18
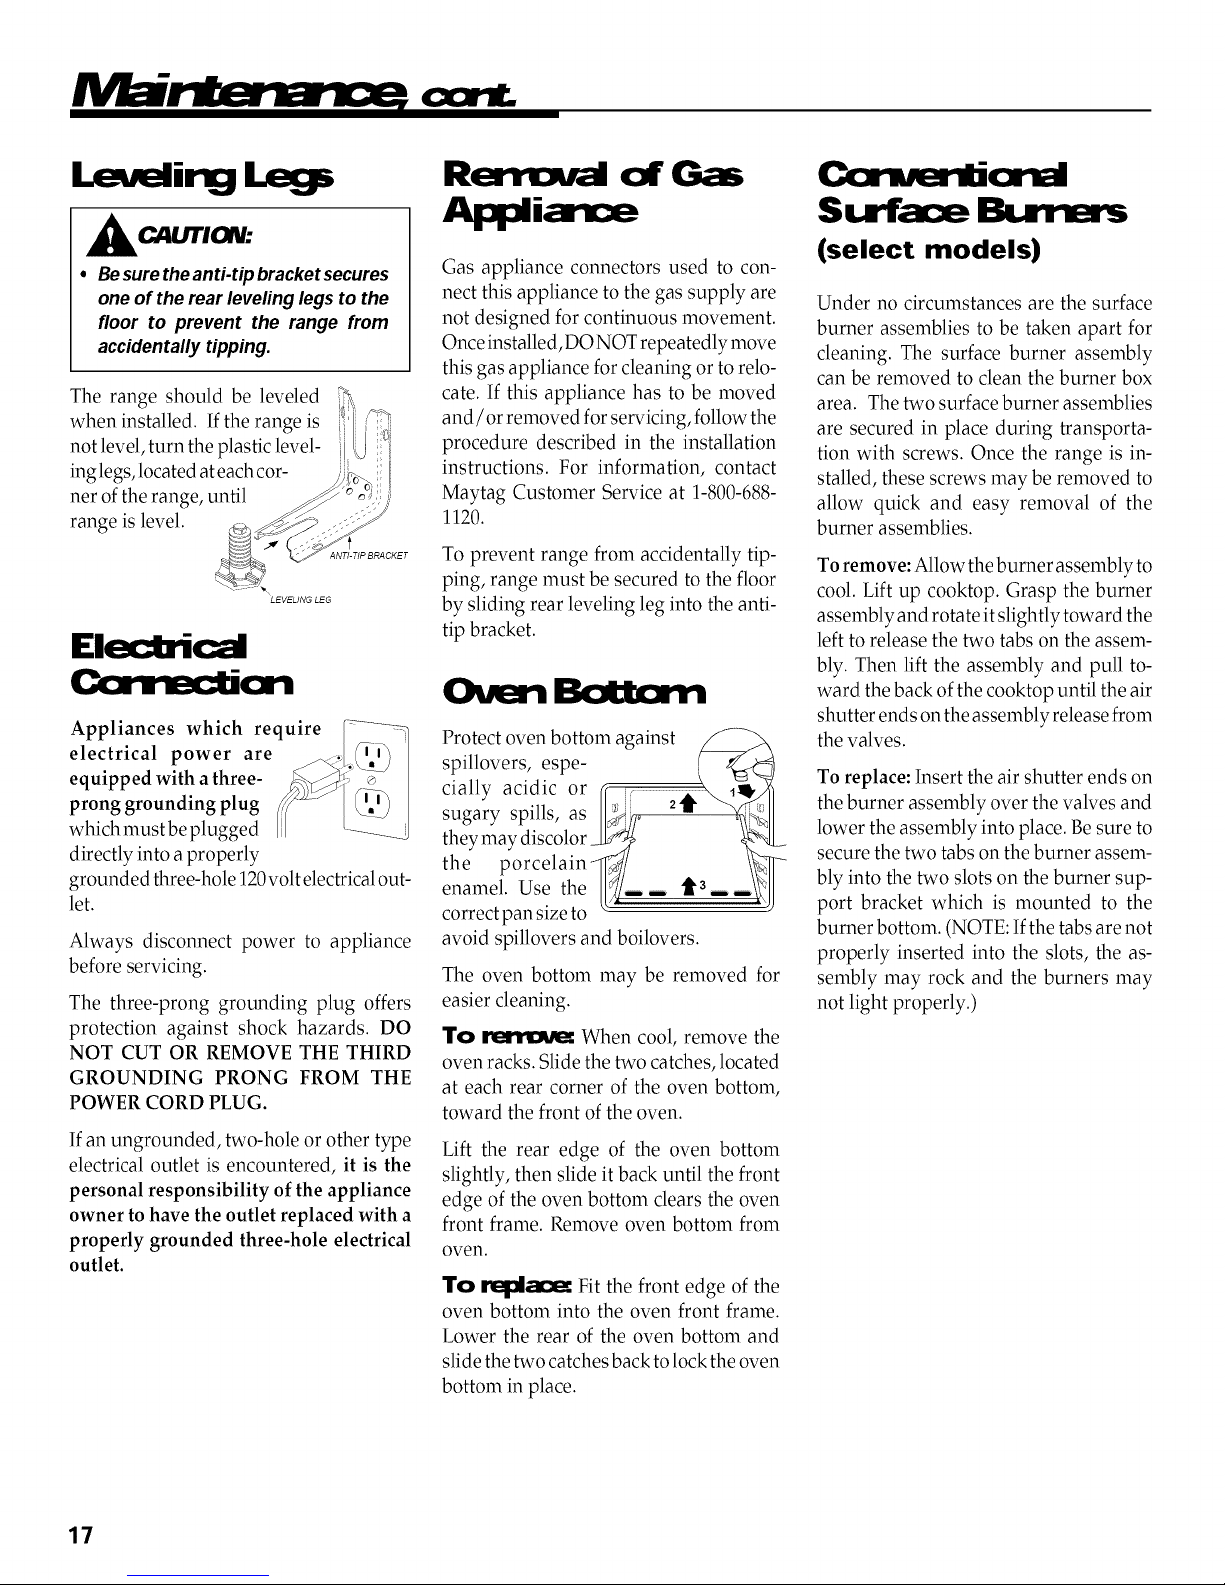
_u.fflOni:
• Be sure the anti-tip bracket secures
one of the rear leveling legs to the
floor to prevent the range from
accidentally tipping.
The range should be leveled
when installed. If the range is
not level, turn the plastic level-
ing legs, located at each cor-
ner of the range, until
range is level.
LEVELING LEG
Elecbic ll
(: n'l dion
Appliances which require
electrical power are
equipped with a three-
prong grounding plug
which must be plugged
directly into a properly
grounded three-hole 120volt electrical out-
let.
Always disconnect power to appliance
before servicing.
The three-prong grounding plug offers
protection against shock hazards. DO
NOT CUT OR REMOVE THE THIRD
GROUNDING PRONG FROM THE
POWER CORD PLUG.
If an ungrounded, two-hole or other type
electrical outlet is encountered, it is the
personal responsibility of the appliance
owner to have the outlet replaced with a
properly grounded three-hole electrical
outlet.
Rerrla l o1'
Gas appliance connectors used to con-
nect this appliance to the gas supply are
not designed for continuous movement.
Once installed, DO NOT repeatedly move
this gas appliance for cleaning or to relo-
cate. If this appliance has to be moved
and/or removed for servicing, follow the
procedure described in the installation
instructions. For information, contact
Maytag Customer Service at 1-800-688-
1120.
To prevent range from accidentally tip-
ping, range must be secured to the floor
by sliding rear leveling leg into the anti-
tip bracket.
BG x n
Protect oven bottom against _
spillovers, espe- ( 4
cially acidic or, r, .............................1
sugary spills, as ]IX//o
they may discolor
the porcelain -_j/ i -
enamel. Use the [[_____ t3--- /
correct pan size to
avoid spillovers and boilovers.
The oven bottom may be removed for
easier cleaning.
To _ When cool, remove the
oven racks. Slide the two catches, located
at each rear corner of the oven bottom,
toward the front of the oven.
Lift the rear edge of the oven bottom
slightly, then slide it back until the front
edge of the oven bottom clears the oven
front frame. Remove oven bottom from
oven.
To repla{_ Fit the front edge of the
oven bottom into the oven front frame.
Lower the rear of the oven bottom and
slide the two catches back to lock the oven
bottom in place.
2 t
C :rlm llicrlal
Surlra=e
(select models)
Under no circumstances are the surface
burner assemblies to be taken apart for
cleaning. The surface burner assembly
can be removed to clean the burner box
area. The two surface burner assemblies
are secured in place during transporta-
tion with screws. Once the range is in-
stalled, these screws may be removed to
allow quick and easy removal of the
burner assemblies.
To remove: Allow the burner assembly to
cool. Lift up cooktop. Grasp the burner
assembly and rotate it slightly toward the
left to release the two tabs on the assem-
bly. Then lift the assembly and pull to-
ward the back of the cooktop until the air
shutter ends on the assembly release from
the valves.
To replace: Insert the air shutter ends on
the burner assembly over the valves and
lower the assembly into place. Be sure to
secure the two tabs on the burner assem-
bly into the two slots on the burner sup-
port bracket which is mounted to the
burner bottom. (NOTE: If the tabs are not
properly inserted into the slots, the as-
sembly may rock and the burners may
not light properly.)
17
Page 19

You C, I for" Ser oe
_thase pcints if...
Pat or dl of al:l:iianos does
not _=dk;
• Check to be sure plug is securely in-
serted hlto receptacle.
• Checkorre-setcircuitbreaker. Checkor
replace fuse.
• Check power supply.
• Check if surface and/or oven controls
have been properly set. See pages 4 & 6.
• Check if oven door is unlocked after a
self-clean cycle. See page 13.
• Check ifoven is set for a delayed cook or
clean program. See page 11 or 13.
Surface burner fails to light.
• Check to be sure unit is properly con-
nected to power supply.
• Check for ablown circuit fuse or atripped
mahl circuit breaker.
Check to be sure burner ports or ignition
ports are not clogged. See page 6.
Check to be sure ignitor is dry and click-
ing. Burner will not light if ignitor is
dam aged, soiled or wet. Ifignitor doe sn't
click, turn control knob Off.
The flarm is
• Burner ports may be clogged.
• Flame setting may need to be adjusted.
Surface I:xrrm- flarm lifts off
ports.
• Check to be sure a pan is sitting on the
grate above.
Baking ms.Is differ
prE_icus
• Temperatures often varybetween a new
oven and an old one. As ovens age, the
oven temperature often "drifts" and may
become hotter or cooler. See page 5 for
instructions on adjusting the oven tem-
perature.
NOTE: It is not recommen&d to adjust
the temperature if only one or two reci-
pes are in question.
B,_kiry ms.its a'e r_
• Check the oven temperature selected.
Make sure oven is preheated when recipe
or directions recommend preheat.
• Check rack positions. See page 9.
• Use correct pan. Dark pans produce dark
browning. Shiny pans produce light
brownhlg. See "Cooking Made Simple"
booklet for more information on
bakeware.
• Check the use of foil in the oven. Never
use foil tocover an entire oven rack. Place
a small piece offoil on the rack below the
pan to catch spillovers.
• Check pan placement. Stagger pans when
using two racks. Allow 1-2 inches be-
tween pans and oven walls.
• Make sure the oven vent has not been
blocked. See page 9 for location.
• Check to make sure range is level.
Food not. brdlincj _y.
• Check oven setting. See page 10.
• Check rack positions. See page 10.
• Aluminum foil was incorrectly used.
Never line the broiler pan insert with foil.
Oven srrd(es excessively
durirg brdlirt 3
• Food too close to flame. See page 10 for
more information.
• Broilerinsert covered with aluminum foil.
• Excessfatnottrimmedfrommeatpriorto
broiling.
• A soiled broiler pan was used.
_vlJll not sdf-de_n
• Check to make sure the cycle is not set for
a delayed start.
• Check ifdoor is closed.
Outen did rest dean _y.
• Longer cleaning time may be needed.
• Excessive spillovers, especially sugary
and/or acidic foods, were not removed
prior to the self-clean cycle.
_ ck=a" _Jll riot uriock after
sdf-dea_ cy:ls
• Oven interior is still hot. Allow about one
hour for the oven to cool after the comple-
tion of a self-clean cycle. The door can be
opened when the LOCK indicator word is
not displayed.
IVi0istum cdlects in ouen or on
ouen _Jnck:_
• This is normal when cooking foods high
in moisture.
• Excessivemoisturewasused when clean-
ing the window.
There is a slbrorz3 ock=r or light
srrd_ Whert o_n is llxJrnad at
• This is normal for a new range and will
disappear after a few uses. Initiating a
clean cycle will "burn off" the odor more
quickly.
• Turning on a ventilation fan will help
remove the smoke and/or odor.
• There are excessive food soils on the oven
bottom. Use a self-clean cycle.
"F" plus a _ qFlf:lears in
CiSl ay.
• This is called a fault code. If a fault code
appears hi the display and beeps sound,
presstheCancelpad. Ifthe fault codeand
beeps continue, disconnect power to the
appliance. Wait a few minutes, then re-
connect power. If fault code and beeps
still continue, disconnect power to the
appliance and call an authorized servicer.
• If the oven is heavily soiled, excessive
flare-ups may result in a fault code during
a clean cycle. Press Cancel pad and allow
the oven to cool completely. Wipe out
excess soil then reset the clean cycle. Ifthe
fault code and beeps still continue, dis-
connect power to the appliance and call
an authorized servicer.
18
Page 20

is C mred By These
Full One Year Warranty - Parts and Labor
For one (1) year from the original retail
purchase date, any part which fails in nor-
real home use will be repaired or replaced
flee of charge.
Limited Warranties - Parts Only
Second through Fifth Year- From the origi-
nal purchase date, parts listed below which
fail in normal home use will be repaired or
replaced free of charge for the part itself,
with the owner paying all other costs, in-
cluding labor, mileage and transportation.
• Sealed Gas Burners
Canadian Residents
The above warranties only cover an appli-
ance installed in Canada that has been
certified or listed by appropriate test agen-
cies for compliance to a National Standard
of Canada unless the appliance was
brought into Canada due to transfer of
residence from the Unite d States to Canad a.
The specific warranties expressed aboveare the
ONLY warranties provided by the manufac-
turer. These warranties give you specific legal
rights, and you may also have other rights
which vary from state to state.
1. Conditions and damages resulting from any of the following:
a. Improper installation, delivery, or maintenance.
b. Any repair, modification, alteration, or adjustment not authorized by the
manufacturer or an authorized servicer.
c. Misuse, abuse, accidents, or unreasonable use.
d. Incorrect electric current, voltage, or supply.
e. Improper setting of any control.
2. Warranties are void if the original serial numbers have been removed, altered,
or cannot be readily determined.
3. Light bulbs.
4. Products purchased for commercial or industrial use.
. The cost of service or service call to:
a. Correct installation errors.
b. Instruct the user on the proper use of the product.
c. Transport the appliance to the servicer.
6. Consequential or incidental damages sustained by any person as a result of any
breach of these warranties. Some states do not allow the exclusion or limitation
of consequential or incidental damages, so the above exclusion may not apply.
If YaJ Need Ser c:e
• Call the dealer from whom your appliance was purchased or call Maytag
Appliances Sales Company, Maytag Customer Assistance at 1-800-688-1120,
USA and CANADA to locate an authorized servicer.
• Be sure to retain proof of purchase to verify warranty status. Refer to WAR-
IL4NTY for further information on owner's responsibilities for warranty
service.
19
If the dealer or service company cannot resolve the problem, write to Maytag
Appliances Sales Company, Attn: CAIR _'_Center, P.O. Box 2370, Cleveland, TN
37320-2370, or call 1-800-688-1120 USA and CANADA.
U.S. customers using TTY for deaf, hearing impaired or speech impaired, call
1-800-688-2080.
NOTE: When writing or calling about a service problem, please include the
following information:
a. Your name, address and telephone number;
b. Model number and serial number;
c. Name and address of your dealer or servicer;
d. A clear description of the problem you are having;
e. Proof of purchase (sales receipt).
User's guides, service manuals and parts information are available from
Maytag Appliances Sales Company, Maytag Customer Assistance.
Page 21

Cusiri re a gaz RS-1
au propri_taire.
sommateur: Life le manuel; conserver le manuel
:consultation ult_rieure. Conserver la facture
ue encaiss8 comme preuve de
NumOro de modble
Num0ro de s0rie
Date d'achat
uestion, contacter Maytag 3:
(I_.-U.et Canada)
vendredi, 8 h - 20 h - heure de l'Est)
r le service apr_s.vente, voir page 39.
Table des rraU res
Instructions de securite
importantes ............... 21-23
Organes de commande ..... 24-25
Utilisation de la table
de cuisson ................ 26-27
Cuisson au four ........... 28-31
Entretien et nettoyage ...... 32-35
Entretien .................. 36-37
Avant de contacter un
depanneur ................... 38
Garantie ..................... 39
Guia del Usuario ............... 40
Dans le cadre de nos pratiques d'am61ioration
constante de la qualit_ et de la performance de
nos produits de cuisson, des modifications de
l'appareil qui ne sont pas mentionn_es dans ce
guide ont pu _tre introduites.
Page 22

Liretoutes les instructions avantd'utilisercet
appareil; observer toutes les instructions pour
61iminerles risques d'incendie, choc 61ectrique,
dommages mat6riels et corporels que pourrait
susciter une utilisation incorrecte de l'appareil.
Utiliserl'appareil uniquement pour lesfonctions
pr6vues, d6critesclansce guide.
A MSE EN GARDE : Si les
directivesdonneesdanslepresentguide
nesontpasrespecteesa la lettre,ily a
risqued'incendieoud'explosionpouvant
causerdesdommages,desblessureset
m_melamorL
- Ne pas ranger ni utiliser de gaz ou autre
matiere inflammable a proximite de cet
appareil ou de tout autre appareil.
- QUEFAIRESIL'ONSENTUNEODEURDE
GAZ
* Ne mettre aucun appareil en marche.
* Ne pas touchera un interrupteur
electrique.
* N'utiliser aucun telephone de
I'immeuble.
* Se rendre chez un voisinet telephoner
immediatement a la compagniede gaz.
Suivreles directives donndespar le
prdpose de la compagnie de gaz.
o S'il est impossible dejoindre la
compagnie degaz, teldphoner au
servicedes incendies.
- L'installation et les reparations doivent
_tre confidesa un installateur competent,
une entreprise de service ou a la
compagnie degaz.
Pour une utilisationad6quateet en s6curit6,il
fautquel'appareil soit convenablement install6et
reli6 a la terre par un technicien qualifi6.
L'installateur dolt indiquer l'emplacement du
robinet de gaz et comment le fermer en cas
d'urgence.
Toujoursd6brancher l'appareil avant d'y fairede
l'entretien.
Pouruneutilisationad6quateet6viterdeseblesser
ou d'endommager l'appareil, ne pas essayer de
fairedes r6glages,des r6parations, de l'entretien
ouderemplacerunepi_cequelconquedel'appareil
21
_moinsquecelasoitsp6cifiquementrecommand6
dans ce guide. Tout autre entretien dolt _tre
ex6cut6parun pr6pos6qualifi_auserviceapr_s-
vente.
A VERTI SS EIVENT:
• TOUTE CUISINIERE
PEUT BASCULER ET
PROVOQUER DES
BLESSURES.
• INSTALLER LA BRIDE
ANTIBASCULEMENT
FOURNIEAVECCETTE
CUISINIERE.
• RESPECTER LES IN-
STRUCTIONS D'IN-
STALLATION.
AVERTISSBVEN'r: Pour reduirele
risque de basculementde I'appareil
I'occasiond'uneutilisationanormaleou
d'unchargementexcessifde la portedu
four,il fautquela brideantibasculement
soitconvenablementinstall6e.
Utiliserune lampe torche pour d6terminer si la
bride antibasculement est convenablement
install6e sous la cuisini_re: L'un des pieds de
r6glage de l'aplomb dolt _tre convenablement
engag6 dans la fente de la bride. Lorsque la
cuisini_re est convenablement cal6e, la bride
antibasculementimmobiliselepied arri_recontre
le sol. V6rifier la parfaite immobilisation de la
cuisini_repar labride apr_schaqued6placement
dela cuisini_re.
un
aa
S'assurer que tous les mat0riaux de
conditiom'tementsontretir0sde l'apparei] avant
de le mettreen marche.
Garder les matOriaux combustibles, l'essence et
autres matibres et vapeurs inflammables bien
OloignOsde l'appareil.
Sil'appareil est installOpros d'une fenOtre,des
prOcautionsappropriOesdoivent Otreprises pour
Oviterque levententraine lesrideaux au-dessus
des brOleurs.
NEJAMAISlaisserdes articlessur lasurfacede
cuisson.L'airchaud de l'0ventpeutlesenflammer
et mettre Ogalementsous pression des conte-
nants fermOsquipourraient alors exploser.
De nombreux flacons d'aOrosol peuvent
EXPLOSERlorsqu'on lesexpose b,la chaleur,et
i!speuventcontenirunproduit tr_sinflammable.
Eviterd'utiliser ouremiser un flacon d'aOrosol
proximitOde l'appareil.
Denombreux articlesde plastique peuvent Otre
d0t0rior0sparlachaleur.Conserverlesarticlesde
plastiquekdistancedescomposantsdel'appareil
susceptiblesde devenir tildes ou chauds.Ne pas
laisser des articles de plastique sur la table de
cuisson;un article de plastique trop proche de
l'0vent du four ou d'un brOleurallum0pourrait
s'amollir oufondre.
Pour01iminerlebesoind'atteindre quelquechose
par-dessus les br01eursde la table de cuisson,il
est pr0f0rable qu'il n'y ait aucune armoire de
cuisinedirectementau-dessus del'appareil. S'ily
a une armoire, on ne devrait y remiser que des
articlespeu fr0quemmentutilis0s etcapablesde
r0sister k la chaleur 0mise par l'appareil. La
temp0raturepourrait Otreexcessivepourcertains
articles, comme liquides volatils, produits de
nettoyageou flaconsd'a0rosol.
En (::as dirt:a'Kie
Interrompre l'alimentation Olectrique de
l'appareil et de la hotte de ventilation pour
minimiser le risque d'extension des flammes.
l_teindreles flammes, puis mettre la hotte en
marchepour OvacuerlafumOeet l'air viciO.
• Tablede cuisson:Utiliseruncouvercleouune
t61ehbiscuitspour 0toufferlesflammesd'un
feuquised0claredansunustensiledecuisson.
• NEJAMAISsaisiroud0placer un ustensilede
cuissonenflamm0.
• Four:Fermerlaportedu fourpour0toufferles
flammes.
Ne pas projeter de l'eau sur un feu de graisse.
Utiliser du bicarbonate de sodium, ou un
extincteur _mousse ou _ produit chimique sec
pour Oteindreles flammes.
NE JAMAISlaisser des enfants seuls ou sans
supervision lorsque l'appareil est en service ou
chaud.
Page 23

NEJAMAISlaisserunenfants'asseoirouse
tenirsurunepartiequelconquedel'appareil;ceci
susciteraitunrisquedeblessureoubr61ure.
IIestimportantd'enseignerauxenfantsquela
cuisini_reetlesustensilesplac_sdessusoudedans
peuvent_trechauds.Laisserrefroidirles
ustensilesenunlieus0.r,horsd'atteintedesjeunes
enfants.I1estimportantd'enseignerauxenfants
qu'unappareilm_nagern'estpasunjouet;nepas
laisserlesenfantsjoueraveclesorganesde
commandeouautrescomposantsdel'appareil.
MISEEN GARDE:NE JAMAISremiser sur le
dosseret d'une cuisini_re ou dans une armoire
au-dessus des articles auxquels les enfants
peuvents'int0resser.Unenfanttentantde grimper
surlaporte de l'appareil pour atteindre un objet
pourrait subir de graves blessures.
FarriliarisatJort
a cl' l
NEJAMAISutiliserla cuisinibrecommesource
de chaleur pour le chauffage de la piece, pour
@iter tout risque de dommages corporels et de
dOtOriorationde l'appareil. Ne pas remiser des
alimentsou ustensiles de cuisine sur la table de
cuissonou dans lefour.
Nepas obstruer lacirculationde l'airde combus-
tionetde ventilationau niveaude l'@ent dufour
ou des entr@s d'air. Une d0ficience de
l'alimentationenair desbr0.1eursd0gradela per-
formance et augmente jusqu'a un niveau
dangereux la concentration de monoxyde de
carbonedans les gazde combustion.
I_viterdetoucher levoisinage del'@ent du four
lorsque le four est utilis0 et pendant plusieurs
minutesapr_sl'arr0tdufour.Certainscomposants
de l'@ent et la zone voisine peuvent devenir
suffisamment chauds pour provoquer des
brOlures.Apr_s l'arrOtdu four, ne pas toucher
l'@entdu four ou la zonevoisine avant que ces
composantsaient pu se refroidir suffisamment.
Autres surfaces potentiellement chaudes: table
decuisson,l'eventdufour,surfacesfaisantl'event
dufour, surfacesfaisantfacealatabledecuisson,
porte du four etzones voisinesde la porte et du
hublot,
AVERTISSEMENT:NEJAMAISutiliserlaporte
du four ou le tiroir (le cas 0ch0ant) comme
tabouret/si_ge/escabeau; ceci pourrait faire
basculer l'appareil et entrah_er dommages
mat0rielset corporelss0rieux.
Ne pas toucherla lampechaude du fouravec un
lingehumide;lechocthermiquepourraitlabriser.
Encasde brisde la lampe,dObrancherl'appareil
dela source d'OlectricitOavantd'enlever leculot
delalampebrisOe,pour @iterun chocOlectrique.
Cuisson el: s :uril
Placertoujours un ustensile sur un brCtleurde la
tablede cuissonavant del'allumer. Veiller a bien
cormaitrelacorrespondanceentre lesboutons de
commande et les brOleurs. Veillerk allumer le
brOleurcorrectetvOrifierquele brOleurs'allume
effectivement,g.la fin de lapOriodede cuisson,
Oteindrele brOleur avant de retirer l'ustensile,
pour Oviter une exposition aux flammes du
brOleur.
Veilleratoujoursajustercorrectementlatailledes
flammes pour qu'elles ne d0passent pas sur la
p0riph0rie de l'ustensile. Des flammes de trop
grande taille sur un br0.1eursont dangereuses,
elles suscitent un gaspillage d'0nergie et dies
peuvent fairesubir desdommages kl'ustensile,k
l'appareil ou k l'armoire situ@au-dessus.
NE JAMAIS laisser un brOleur de la table de
cuissonallure6sanssurveillance,particulibrement
avecune puissance de chauffageOlev@ou lors
d'une opOration de friture. Un dObordement
pourrait provoquer la formationdefum@ etdes
produits graisseux pourraient s'enflammer.
Eliminerd_s que possiblelesproduits graisseux
renvers0s. Ne pas utiliser une puissance de
chauffageOlev@pendant unepOriodeprolong@.
NEJAMAISfairechaufferunrOcipientnonouvert
dans le four ou sur un br0.1eurde la table de
cuisson; l'accumulation de pression dans le
rOcipientpourraitprovoquersonOclatementet de
gravesdommages matOrielsou corporels.
Utiliser des maniques robustes et s_ches. Des
maniqueshumides peuventprovoquer laforma-
tion de vapeur brOlante.Ne jamais utiliser un
torchon a vaisselle ou autre article textile a la
place demaniques; un tel articlepourrait trainer
sur un brOleuret s'enflammer, ou accrocherun
ustensileou un composant de l'appareil.
Laissertoujours refroidir un rOcipientd'huile de
friturechaude avantde tenter dele @placeret le
manipuler.
Ne pas laisser la graisse de cuisson ou autre
matOriauinflammables'accumulerdans ou pros
de l'appareil, de la hotte ou du ventilateur de
l'@ent. Nettoyer frOquemment la hotte pour
empOchertoute accumulation sur la hotte dle-
mOmeousurlefiltre.Lorsduflambaged'aliments
sous lefour, arrOterleventilateur.
NE JAMAIS porter lots de l'utilisation de
l'appareil des v0tements faits d'un mat0riau in-
flammable,ouamples,ou alonguesmanches.De
telsv0tementspeuvent s'enflammer ou accrocher
lapoign@ d'un ustensile.
Placer toujours les grilles k la position appro-
pri@ dartslefour lorsque lefour estfroid. Faire
coulisserlagrillevers l'ext0rieur avant d'ajouter
ouenleverunplat;utiliserpour celaune mm'uque
robusteet s_che.I_viterd'introduire la maindans
le four pour y placer ou retirer un plat. S'il est
n0cessairede d0placer une grille lorsqu'elle est
chaude, utiliser une manique s_che. Veiller a
toujours arr0terle four k la find'une p0riode de
cuJsson.
Ouvrirtoujourslaportedu fourtr_sprudemment.
Laisserl'air chaud ou lavapeur s'Ochapperavant
de retirer/introduire un plat.
AVERTISSEMENT:Metspr0par0s :Respecter
lesinstructions du fabricant.Silecontenant ou le
couvercle de plastique d'un mets surgel0 se
d0forme ou est endommag0 durant la cuisson,
jeterimm0diatementle r0cipientet soncontenu.
Lesalimentspourraient Otrecontamin0s.
NE JAMAIS se servir de feuille d'aluminium
pour recouvrir une grille de four ou le fond du
four. Une mauvaise utilisation de la feuille
d'aluminium pourrait entra_'nerunrisquedechoc
Olectrique, d'incendie ou de dommages de
l'appareil. N'utiliser la feuille d'aluminium que
selonles indicationsdonn@s dans ceguide.
Us il et
Utiliserdes ustensilesafondplat comportantune
poign@qu'on peut facilementsaisir etqui reste
froide. Eviter d'utiliser un ustensile instable ou
dOformO,qui pourrait facilement basculer, ou
dont la poign@ est mal fix@.l_viterOgalement
d'utiliserdesustensilesdepetitetaille comportant
une poign@ lourde; ces ustensiles sont
gOnOralementinstables et peuvent facilement
basculer. Unustensile lourd lorsqu'il est rempli
peut Ogalement0tredangereux lots des manipu-
lations.
Veillerkutiliser un ustensile de taillesuffisante
pour que le contenu ne risque pas de @border.
Ceci est particuli_rement important pour un
22
Page 24

sm.d
ustensilerempli d'huile de friture.V0rifierque la
tailledel'ustensileestsuffisantepourqu'ilpuisse
recevoirles produits alimentaires_cuire, et ab-
sorber l'augmentation de volume suscit0e par
l'0bullitionde la graisse.
Pour minimiser les risques de brOlure,
d'inflammation de mati_reset de renversement
parcontactnon intentiom_elavecun ustensile,ne
pas orienter la poign0e d'un ustensile vers un
brOleur adjacent; orienter toujours la poign0e
d'un ustensileverslec6t0oul'arri_rede l'appareil;
nepas laissernon plusla poign0ed'un ustensile
d0border _ l'avant de l'appareil, o6 un jeune
enfantpourrait facilementla saisir.
Veilleranejamaislaisserlecontenu liquided'un
ustensiles'0vaporer compl_tement;l'ustensileet
l'appareil pourraient subir desdommages.
Appliquer les instructions du fabricant lors de
l'emploi d'un sachetpour cuissonau four.
SeulscertainsmatOriauxdeverre,vitrocOramique,
cOramique, ou certains ustensiles vitrifiOs/
Omaill0speuvent OtreutilisOssur la table de
cuissonou dartsle four sans risque debris sous
l'effetdu choc thermique. Observer les instruc-
tions du fabricant lors de l'utilisation d'un
ustensilede verre.
LasOcuritOde fonctiom'mmentde cet appareil a
OtOtestOe _ l'aide d'ustensiles de cuisson
co_wentionnels.Ne pas utiliser un ustensile ou
accessoire qui n'est pas spOcifiquement
recommandOdans ce guide. Ne pas utiliser de
couvre-brfileur,gril placOsur latable decuisson
ou syst_me de convection additionnel.
L'utilisation d'un dispositif ou accessoire qui
n'est pas expressOmentrecommandOdans ce
guide peut dOgraderla s0curitOde l'appareil ou
sa performance, ou rOduire la longOvitOdes
composants.
l_teindre tousles brOleurs et attendre le
refroidissementdetousles composantsavantde
les toucher ou d'entreprendre lenettoyage. Ne
pas toucher la grille d'un br0.1eurou la zone
voisine avant que ces composants aient pu
refroidir suffisamment.
Exercerune grande prudence lots du nettoyage
del'appareil.TravaillerprudemmentpourOviter
desbrOlurespar delavapeur en casd'utilisation
d'un chiffon ou d'une Opongehumide lots de
l'Oliminationd'un produit renversOsur la table
decuissonchaude.Certainsproduitsdenettoyage
peuvent gOn0rerdes vapeurs nociveslorsqu'on
les applique sur une surfacechaude.
FcLr
Nettoyer uniquement les pi_ces mentionn0es
dartsceguide. Ne pas nettoyer lejoint deporte;
lejointjoueun r61eessentielquanta l'0tanch0itg
Nepas frotter,endommagerou d0placerlejoint.
Nepas utiliser de produit de nettoyage du four
darts le four autonettoyant ou sur les zones
voisines.
Avantd'exOcuteruneopOrationd'autonettoyage,
retirer lal_chefrite,lesgrillesdu fouretlesautres
ustensiles,et01iminerparessuyagetoutexc_sde
rOsidusrenversOspour Oviterla formation de
fumOeou l'inflammation de cesrOsidus.
ATTENTION :Ne laisser aucune nourriture ni
ustensile de cuisine,etc. dans lefour lors d'une
opOrationd'autonettoyage.
I1estnormal que lasurface decuisson devierme
chaude durant une opOrationd'autonettoyage;
par consOquent,0viter de toucher la surfacede
cuisson durant l'autonettoyage.
Averbsserrm
irrporta
pour' la s :.rite
Laloicaliforniem'mSafeDrinking WateretToxic
EnforcementActde 1986(proposition65)stipule
lapublication par legouverneur de laCalifomie
d'une listedes substances quel'OtatdeCalifornie
consid_recommecancOrig_nesou dangereuses
pour le syst_me reproducteur, et impose aux
entreprisescommercialesl'obligationdesignaler
leursclientslesrisques d'exposition_ de telles
substances.
Nous informons les utilisateurs de cetapparel]
qu'ils peuvent OtreexposOsaune faibleconcen-
tration de certaines substances figurant dans la
liste mentionnOe ci-dessus, dont benz_ne,
formaldOhydeet suie, du fait de la combustion
incompletedu gaznaturel ou du propane. Pour
minimiserla combustionincompleteveiller ace
quelesbr0.1eurssoientparfaitementrOglOs.Pour
minimiserl'exposition aces substances,veiller
bienOvacuerlesgazde combustion_ l'extOrieur.
Nous informons les utilisateurs de cetappareil
que lors d'une opOration d'autonettoyage, ils
peuvent _treexpos0s_ une faible concentration
de certaines substances figurant dans la liste
mentionnOeci-dessus, dont le monoxyde de
carbone.Pourminimiser l'exposition,veiller_ce
que la piece o6 se trouve le four soit
convenablement a0r0e durant une op0ration
d'autonettoyage: ouverture d'une fenOtreet/ou
d'une porte.
AVISIMPORTANT- OISEAUXFAMILIERS:
Lesoiseauxont un syst_merespiratoire tr_ssen-
sible. Ne pas garder un oiseau familierdans la
cuisine ou dans une piece ot_il pourrait Otre
expos0aux fumOes. LesfumOes0mises durant
une op0ration d'autonettoyage peuvent Otre
dangereuses ou mortelles pour un oiseau, de
mOmequeles fum0es 0raiseslors du chauffage
excessifdegraisse,huile,margarine,parexemple
dans un ustensilek garnissage anti-adh0sion.
23
Page 25

...... __A A Area
L,,,lI,,,JIr ir J ir _=l" IE,,,,NII_
Les commandes 01ectroniques sont conques pour faciliter la programmation. L'afficheur
indique le heure. REMARQUE: Le style peut varier selon les modbles.
Cancel
Ovenon
Preheat
Lock
• Si on tente de programmer une seconde
• Appuyer ou appuyer/maintenir la
pression sur l'une de ces touches
pour entrer l'heure, le temps de
cuisson, latemp0raturedu four,ou
pour s01ectionnerla puissance HI
(max.)ou LO (rain.) pour le gril.
Aucun signal sonore n'est 0mis
lorsqu'on appuie sur l'une de ces
touches.
* Appuyer sur cettetouche pour an- cance!
nuler toutes les op0rations
programm0es, sauf Timer
(Minuterie)et Clock (Horloge).
e Touchesde fonction:Bake (Cuissonau four),
Broil (Gril), Clean (Nettoyage), Timer
(Minuterie), Clock (Horloge), Cook Time
(Tempsdecuisson),StopTime(Heured'arrOt)
et Cancel (Amlulation).Un signal sonore est
0mislors de chaquepression sur cestouches.
o Un t0moinlumineux estassoci0achaquetou-
chedefonction, sauflatoucheCan-
cel (Ambulation).
• Lorsqu'on appuie sur la touche
Bake (Cuisson au four) ou Broil
(Gril), le t0moin lumineux
s'illumine, ce qui indique que le
four est pr_t pour l'op0ration
command0e.
Let0moinlumineuxassoci0auxtouchesClean
(Nettoyage), Timer (Minuterie), Clock
(Horloge),Cook Time (Temps de cuisson),
StopTime (Heured'arrOt)clignotelorsqu'on
appuie sur latouchecorrespondante.Apr0s le
d0but de l'ex0cution de la fonction, le
clignotement cesse, mais le t0moin reste
illuming
op0ration lorsque le t0moin d'une touche de
fonctionest illumin0:
Lacommande n'est pas accept0e,ou
Let0moin de lapremiere touche devient
<<moinslumineux,>et let0moin dela
touche qui vient d'0tre utilis0e est
<<compl_tementillumin0,>;ceciindique
que l'apparei]est maintenant r0gl0pour
les deux op0rations.
Par exemple: Sion r_gle le four
pour une cuissona177oC(350oF)
et si on commande ensuite une
op0rationde minutage, let0moin
de la touche Bake (Cuisson au ]_m I
four) devient <<moinslumineux>>
(att0nuation), et le t0moin de la
touche Timer (Minuterie) adopte la
duminosit0 maximale,>.
L'afficheur pr0sentera l'information cor-
respondant k l'op0ration dont le t0moin a
adopt0 la duminosit0 maximale>>.Pour
obtenir l'affichage de l'information de la
fonctionpourlaquellelaluminosit0dut0moin
est<<att0nu0e>>,appuyer surla touchedecette
fonction.
REMARQUE: Si un intervalle de plus de 30
secondes s'_coule entre la pression sur une touche
defonction etla pression sur une touche • ou •,
le programme est annul_ et l'afficheur pr_sente
de nouveau l'information ant_rieure.
To_e_ Bake (cuisson
au four)
S'utilisepour le r6tissage etla cuissonau four.
1. Appuyer sur la touche Bake(Cuissonaufour).
2. Appuyer sur la touche• ou • jusqu'kceque la
bonnetemp0raturedu fourparaissekl'afficheur.
Voirrenseignementssuppl0mentaires _lapage 28.
T_ Broil (gril)
S'utilise pour cuire au gri] ou pour rissoler la
nourriture.
1. Appuyer sur la touche Broil (Gri]).
2. Appuyer surla touche• ou • pour unecuisson
au r0glagemax.ou min.
Voirrenseignementssuppl0mentaires _lapage 30.
To_:i'e Clean(nettoyage)
S'utilisepourprogrammerle cycled'autonettoyage.
1. Fermer etserrure le porte du four.
2. Appuyer surlatouche Clean (Nettoyage)."3:00"
para_'tra_l'afficheur.
3. Laprogrammation automatique estde 3heures
ou appuyer sur la touche • ou • pour choisir
des dur0es allantde 2k4 heures.
Voirrenseignementssuppl0mentairesk lapage 32-
33.
Tclz:il_ Cool( Tin'W"
Sfx_ Tirre (Duree de
cuisson/Heure d'arr_t)
S'utilisentpour programmer lamiseen marcheet
l'arrOtautomatiquesdu four.
1. Appuyersur la toucheCook Time (Dur6ede
cuisson)etentrer l'heure de cuissonsouhait0e.
2. Appuyersur la toucheBake (Cuissonau four)
etentrer la temp0raturedu four.
3. Pourretarder lamise enmarche dela cuisson,
appuyer sur latouche StopTime (Heure
d'arr_t) etentrer l'heure klaquellel'on d0sire
que lefours'arr0te.
Voirrenseignementssuppl0mentairesk la page31.
R gfage de Yh:: oc3e
1. Appuyer sur la touche Clock (Horloge).
2. Appuyer ouappuyer/maintenir la pressionsur
latouche • ou • pour faire appara_'trel'heure
correctesur l'afficheur.
Pour faire apparaitre l'heure lorsque le d0compte
de la minuterie est affich0,appuyer sur la touche
Clock(Horloge).
Lorsde la raise sous tension initialeou apr_s une
interruptiondel'alimentation61ectrique,l'afficheur
clignote. 24
Page 26

...... __A A Area
,aLm rw ra su lI
On ne peut modifier l'heure lorsque le four est
programm0 pour une cuisson contr610e par
l'horloge ou pour une opOrationd'autonettoyage
(immOdiateou diffOrOe).
RE cJac_:J de la rri e
Onpeutprogrammerlaminuteriepourunep0riode
de dOcomptede une minute(0:01)k9 heureset 50
minutes (9:50).
On peut utiliserlaminuterie indOpendammentde
toute autre activitOdu four, ou bien lorsqu'une
fonction du four est en cours d'exOcution. LA
MINUTERIENE COMMANDEPAS LE FOUR.
1. Appuyer sur la toucheTimer (Minuterie).
2. Appuyer ouappuyer/maintenir la pressionsur
latouche • ou • pour faire appara_'trela dur0e
du d0comptesur l'afficheur.
• ga minuterie se met enmarche automati-
quement. Let0moinassoci0alatoucheTimer
(Minuterie)s'illumine lorsque la minuterie
est utilis0e.
• A lafinde lap0riode de d0compteun signal
sonorelongest0misetlemessage<<End,,(Fin)
appara_'tbri_vement.
ArrsJation de la
rrabon de la rri__
Appuyer/maintenir la pression pendant trois
secondessurlatouche Timer (Minuterie).L'heure
normale rOapparai'tensuite sur l'afficheur.
crs de
.......... HA
ll_]_ll I I I ll:l" llJl_
Sign ucs r res
adssm
par I'l_rfoc:j_
Option 1 (configurationstandard), l_missionde
quatre signaux sonores _ la fin de la pOriodede
cuisson, puis un signal sonore k intervalle de 30
secondes durant les cinq minutes suivantes ou
jusqu'k ce qu'on appuie sur la touche CANCEL
(Armulation).
Option 2.l_missiondequatre signauxsonores _la
finde la p0riode decuisson, puis riend'autre.
Option 3.t_missiondequatre signauxsonores _la
findela pOriodede cuisson,puis un signalsonore
chaqueminute durant les 12heures suivantes ou
jusqu'acequ'onappuie sur latouche Cancel (An-
nulation).
25
S_leclion des signu( sort.s
-- cuisson au
1. Appuyer simultanOmentsur lestouchesCook
Time (Tempsde cuisson) et Clock (Horloge),
pendant 3 secondes.
• Un unique signalsonore est Omis.
• L'option en vigueur est indiquOesur
l'afficheur.
2. Utiliserlestouches• ou •pour s01ectiormerle
num0rodel'option.L'heurenormaler0apparait
sur l'afficheur apr_squatre secondes.
alia.' I'afl'i-
Si on prOf_re que l'heure normale ne soit pas
affichOe:
R4cJag_Appuyersimultan0mentsur les touches
Clock(Horloge)et Cancel (Annulation),pendant
trois secondes.
Lorsquel'heure n'est pas affichOe,si on souhaite
lire l'heure, il suffit d'appuyer bri_vement sur la
touche Clock(Horloge).
Restauration:AppuyersimultanOmentpendant
trois secondessur les touchesClock (Horloge)et
Cancel(Armulation);l'heurenormale de l'horloge
rOapparaitrasur l'afficheur.
trour
Le four s'Oteintautomatiquement a la fin d'tme
p0riodede 12heures si on lelaisseen marche par
accident.On peut dOsactivercettefonctionsi on le
souhaite.
$t!:!:rer_k_ de I't_lirdi(_
tm s:
1. Appuyer/maintenir la pression sur la touche
Clock(Horloge)pendant troissecondes.
2. Utiliserlestouches• ou • pour faireapparai'tre
8:88surl'afficheur.L'heurenormaledel'horloge
r0appara_'tra sur l'afficheur apr_s quatre
secondes.
Resta.rabcrt ROpOterles0tapes1et2.L'afficheur
prOsentebri_vement12:00,puis l'heure normalede
l'horloge.
valim
___ ........ m__
li,,al,,,i_ ! ! ! i_- i!,,_
LafonctiondedOsactivationdescommandespermet
d'empOchertoute mise enmarche du four.
A_ dl.,i'vmli,s::j_
1. ROglage: Appuyer simultanOment sur les
touches Stop Time (Heure d'arrOt)et Cancel
(hmnulation),pendant trois secondes.
2. Lorsquelaconsoledecommandeestd0sactivOe,
le message <<OFF,,(ARRI_T)est affichO.Seules
les fonctions d'horloge et de minuterie sont
alors opOratiom_elles.
Pour rOactiverla console de commande, r0pOter
l'Otape1.
Reglag_ d_ la
I rabare cla
Sila cuisson au four ne produit pas les rOsultats
dOsir0s,on peut ajuster la tempOrature du four.
Pour pouvoir dOterminerl'amplitude de lavaria-
tion de tempOraturenOcessaire,s01ectiom_erune
tempOraturesupOrieure ou infOrieurede 150 C
(250F)a cellerecommandOedans larecette, puis
ex0cuterune cuissonaufour. LerOsultatde cetest
permettra d'0valuer l'amplitude de la variationk
introduire.
NOTE: On ne lui recommande pas d'ajuster le
temperature siseulementun oudeuxrecettessont
enquestion.
P.justerrm_ de la tenl_rab-re
du fo_.
1. Appuyer sur la toucheBake (Cuissonau four).
2. A l'aide de la touche • entrer 2880C (5500F).
3. Appuyer/maintenir la pression sur la touche
Bake(Cuissonau four)pendant troissecondes,
jusqu'k l'apparition de 00°.
• SiunemodificationdelatempOraturedu four
avaitdOja0tOintroduite, lavaleur delavaria-
tion est indiquOe.Parexemple, sion avait
commandoune rOductionde 15°,l'afficheur
repr0sente-15°.
4. Utiliser les touches • ou • pour modifier la
tempOrature.Lors dechaquepression sur une
touche, latempOraturede rOglageestmodifiOe
de 50.
• Onpeut ainsiintroduire une modification
de la temp0rature du fourde 50_350(aug-
mentation ou diminution).
5. L'heurenormale del'horloge rOapparaitensuite
automatiquement.
I1n'est pas nOcessaired'ajuster de nouveau la
tempOraturedufourapr_s uneparmeouinterrup-
tion de l'alimentation de l'appareil. I1n'est pas
possibled'ajuster les tempOraturesde cuisson au
grilet denettoyage.
Page 27

U lisa on de la t.l e db cussan
Orga s de
....... mA
_lll_l
A IVISES EN GARDE:
• Siunbn31eurs'dteintdurantuneopdration
de cuisson, fermer I'arrivee de gaz au
brOleur. Si une forte odeur de gaz est
perceptible,ouvrirunefen_treetattendre
cinqminutesavant d'allumerdenouveau
le bn31eur.
• Avant d'ouwir I'arrivoe de gaz a la
cuisiniere,verifierquechaquebouton de
commandeesta/apositionOFF(ARR£T).
• NEJAMAIStoucher/asurfacedecuisson
avant qu'elle se soit complotement
refroidie.Certaineszonesde/a surface,
particu/ierement au voisinage des
brO/eurs,peuvent devenirtreschaudes
durantunecuisson.Uti/iserdesmaniques.
Allun_:j_ says gan_ tie
u_lle
Lesyst_med'allumage sansflammede veillerend
inutilel'alimentationpermanented'm'mflamme de
veille.ChaquebrOleurdelatablede cuissonestdot0
d'un allumeur a Otincelles.ProcOderavecprudence
lots du nettoyage au voisinage d'tm br0.1eurde la
table de cuisson. Sile chiffon utilisOaccrochaitle
dispositifd'allumageilpourrait ledOt&iorer,cequi
emp0cheraitensuite l'allumagedu brOleur.
Siun brOleurde la tabledecuissonne s'allumepas,
dOterminersil'allumeurestbrisO,souillOoumouillg
Lecas OchOant,dOboucheravec une aiguilleouune
brocherectilignel'orificesituOjusteau-dessous de
l'allumeur.
BrQleurb gaz scelle (certains modeles)
TETEDU
de Canlllmlde
de) la table de) CLiSSO
Onutilisecesboutons pour
commander l'allumage
des brOleurs. On peut
r0gler chaque bouton
toutepositionentrelespo-
sitions extr0mes Low
(Min.) et High (Max.).On
peut percevoirune dOtentede calagea la position
High (Max.).On peut choisir toute position de
rOglageentre lesdeuxpositions extrOmes.
C) • Un graphisme pros de chaque bouton
C) C) commandopar lebouton. Parexemple,
legraphiqueidentifiele brOleurarri&e/droit.
1. Placertm ustensilesur la grilledu brOleur.
2. Enfoncer/fairetourner dansle sens antihoraire
3. Apr_sl'allumage du br0.1eur,rOglerlebouton a
identifielebr0.1eurde latabledecuisson
• Siaucun ustensilen'est plac0sur lagrille,les
petitesflammespeuvent semblers'0carterdu
brOleur.
leboutonde cornmandejusqu'klapositionLight
(Allumage).
• Onpeut percevoirlecliquetiscorrespondantk
laproduction des Otincelles,etle br0.1eur
s'allume. [Lesquatre allumeursproduisent
des Otincelleslorsqu'onplaceleboutonde l'm_
des brOleursk laposition Light(Allumage).]
position correspondant k la puissance de
chauffagedOsirOe(tailledes flammes).
• L'allumeurcontinuea produire desOtincelles
aussi longtempsque leboutonreste k laposi-
tion Light (Allumage).
R_ages s_ de)la
p.ssaz de
Lapuissancede chauffageaemployerdOpenddu
typeet dela taillede l'ustensileutilisg Ontrouve
clansla brochure <<La Cuisine Simplifi6e ,, de
l'information sur les ustensiles et autres facteurs
affectantle rOglagede lapuissance de chauffage.
ROglage Utilisation
High/Max.
Low/Min.
High/Max.: Utilisation pour
porter tm liquidek l'0bullition.
R0duireensuitelapuissancede
chauffage aprbs le d0but de
l'0bullitionoude lacuissondes
aliments.
Medium/Moyen:Puissancede
chauffageinterm0diairepourla
poursuitede lacuisson.Lesali-
ments ne cuisent pas plus
rapidement si on utilise une
puissance de chauffage plus
01ev0eque n0cessaire pour le
maintien d'une douce
0bullition.L'eau bout toujours
a la m0me temp0rature, que
l'0bullition soit tranquille ou
vigoureuse.
Low/Min.:Pour lemijotageou
le maintien de la temp&ature
d'un mets,oupour la fusionde
chocolatou beurre.
II est possible de cuire sur
r0glage Lo (min.),h condition
qu'i] y ait un couvercle sur
l'ustensile.On peut r0duire la
puissance de chauffage en
tournant le bouton vers OFF
(Arr0t).S'assurerquelaflamme
restestable.
ORIFICESOUS L'ALLUMEUR
Br,',leura gaz conventionel
26
Page 28
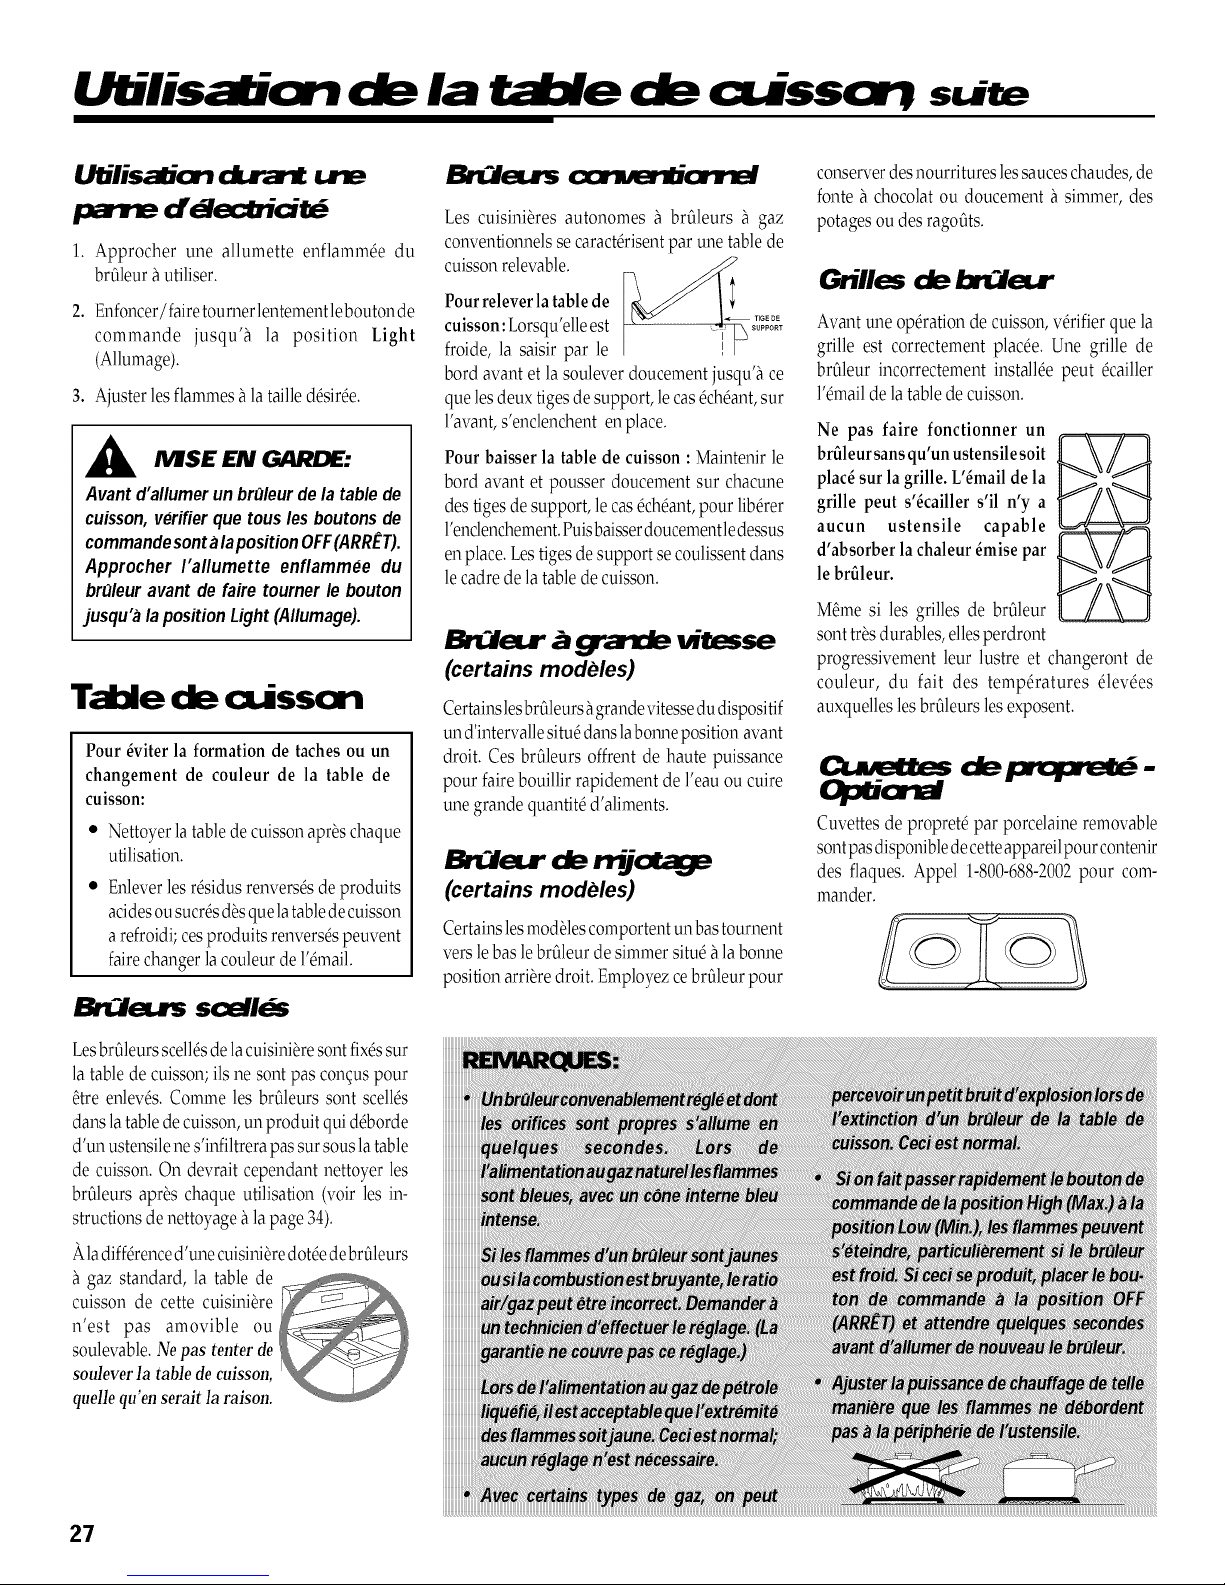
Ul lisation ck) la t.lble ck) ct ssarT s ite
Utilisabm u'e
palle cre ec € te
1. Approcher une allumette enflamm_e du
brOleur_utiliser.
2. Enfoncer/faire toumerlentement leboutonde
commande jusqu'A la position Light
(Allumage).
3. Ajuster lesflammes Alataille d6sir6e.
A IVISE EN GARDE:
Avantd'allumerunbr_Jleurdela tablede
cuisson,verifierquetouslesboutonsde
commandesontalaposition OFF(ARRET).
Approcher I'allumette enflammee du
br_Jleuravant de fairetournerle bouton
jusqu'alaposition Light(Allumage).
Table de c isson
Pour 6viter la formation de taches ou un
changement de couleur de la table de
cuisson:
• Nettoyerla tablede cuissonapr_s chaque
utilisation.
• Enleverles r6sidus renvers6sdeproduits
acidesousucr6sd_s quelatabledecuisson
a refroidi;ces produits renvers6speuvent
fairechanger lacouleur de l'6mail.
Br i ars o rsB' donr !
Les cuisini&es autonomes _ brOleurs _ gaz
co_wentionnelssecaract&isentpar une table de
cuissonrelevable.
Pourrelever la tablede I
cuisson:Lorsqu'elle est
froide, la saisir par le
bord avant et la soulever doucement jusqu'k ce
que lesdeux tigesdesupport, le casOchOant,sur
l'avant, s'enclenchent enplace.
Pour baisser la table de cuisson : Maintenir le
bord avant et pousser doucement sur chacune
des tigesde support, le cas6ch6ant,pour lib&er
l'enclenchement.Puisbaisserdoucementledessus
enplace. Lestigesde support se coulissentclans
lecadre de latable decuisson.
Br eur vi se
(certains modeles)
CertainslesbrOleurs_grandevitessedudispositif
un d'intervallesitubdans laboru3eposition avant
droit. Ces br03eursoffrent de haute puissance
pour faire bouillir rapidement de l'eau ou cuire
une grande quantit6d'aliments.
e eur de
(certains modeles)
Certainslesmodulescomportentun hastournent
vers lehas lebr03eurde simmer situ_Ala bonne
position arri&edroit. EmployezcebrOleurpour
conserverdesnourritures lessauceschaudes,de
fonte _ chocolat ou doucement _ simmer, des
potagesou des ragoOts.
Avant une op&ation de cuisson, v&ifierque la
grille est correctement plac_e. Une grille de
brt?deurincorrectement install_e peut _cailler
l'_mailde la tablede cuisson.
Ne pas faire fonctionner un
brfileur sans qu'un ustensile soit
plac6 sur la grille. L'6mail de la
grille peut s'6cailler s'il n'y a
aucun ustensile capable
d'absorber la chaleur 6raise par
le brfileur.
M_me si les grilles de brfileur
sonttrbsdurables, ellesperdront
progressivement leur lustre et changeront de
couleur, du fait des temp&atures _lev_es
auxquelleslesbrOleursles exposent.
Cuvettes de propret_ par porcelaine removable
sontpasdisponibledecetteappareilpourcontenir
des flaques. Appel 1-800-688-2002pour com-
mander.
LesbrOleursscellOsdelacuisini&esontfixOssur
latable de cuisson; ilsne sont pas conguspour
OtreenlevOs.Comme les brOleurs sont scellOs
dansla tablede cuisson,un produit quidOborde
d'un ustensilene s'infiltrera pas sursous latable
de cuisson. On devrait cependant nettoyer les
brOleursaprbs chaque utilisation (voir les in-
structionsde nettoyage _la page 34).
ladiff&enced'unecuisini&edotOedebrOleurs
gaz standard, la table de _
cuisson de cette cuisini&e ly _
n'est pas amovible ou
soulevable.Ne pas tenter de
souleverla tablede cuisson,
quellequ'enserait la raison.
27
Page 29

Cl.isscn tr tar
R Jage des
1. Appuyer sur la toucheBake (Cuissonau four).
• LetOmoinassociOk la touche Bake(Cuissonau four) s'illumine.
• L'afficheurreprOsente000.
2. Uti]iser]estouches • ou •pour sOlectiomler]a tempOrature.
• Lorsqu'on appuie sur une de cestouches,la valeur 1770C(3500F)appara_'t.
• On peut sOlectiom_erune tempOraturede770k2880C (1700_ 5500F).
lumineux
Temoin_-
"Bake"
3. IIy aune pOrioded'attente de quatre secondes avantla miseen marche du four.
Lorsde la miseen marche du four:
• LetOmoinOven On (FourallumO)s'illumine.
• LetOmoinPreheat (PrOchauffage)s'illumine.
• LatempOratureprOsOlectiom_Oedemeure affichOe.
Preheat
Oven On
Lock
4. PrOvoirune pOriodede 8 a 15minutes pour le prOchauffagedu four.
• Un unique signalsonore indique lafin de la pOriodede prOchauffage.
• LetOmoinOven On (FourallumO)demeure illumin_.
Preheat
i ven On
Lock
• LetOmoinPreheat (PrOchauffage)s'Oteint.
5. Placer lemetsclansle four.
NOTE: On peut modifier la tempOrature de cuisson sOlectionnOea tout
mornentaveclestouches • ou •. SiuneautrefonctionestaffichOe,appuyer
sur ]atoucheBake(Cuissonau four),puis utiliser ]estouches • ou • pour
s_lectiom_er]anouvelle temperature.
6. Lorsque letemps minimum de cuissonest OcoulO,contrOlerl'avancement de lacuisson. Poursuivre lacuisson sic'est nOcessaire.
7. Appuyer sur la toucheCancel (Ambulation)et retirer lemets du four.
• LetOmoinlumineux de latouche Bake s'Oteint.
Cancel
• LetOmoinOven On (FourallumO)s'Oteint.
• L'heure normale rOappara_'tsur l'afficheur.
NOTE:Sion oublie d'arr0ter le four, il s'arr0te automatiquement _ la fin
d'une pOriodede 12heures. Sion souhaite dOsactivercettefonction,voir la
page 25.
28
Page 30
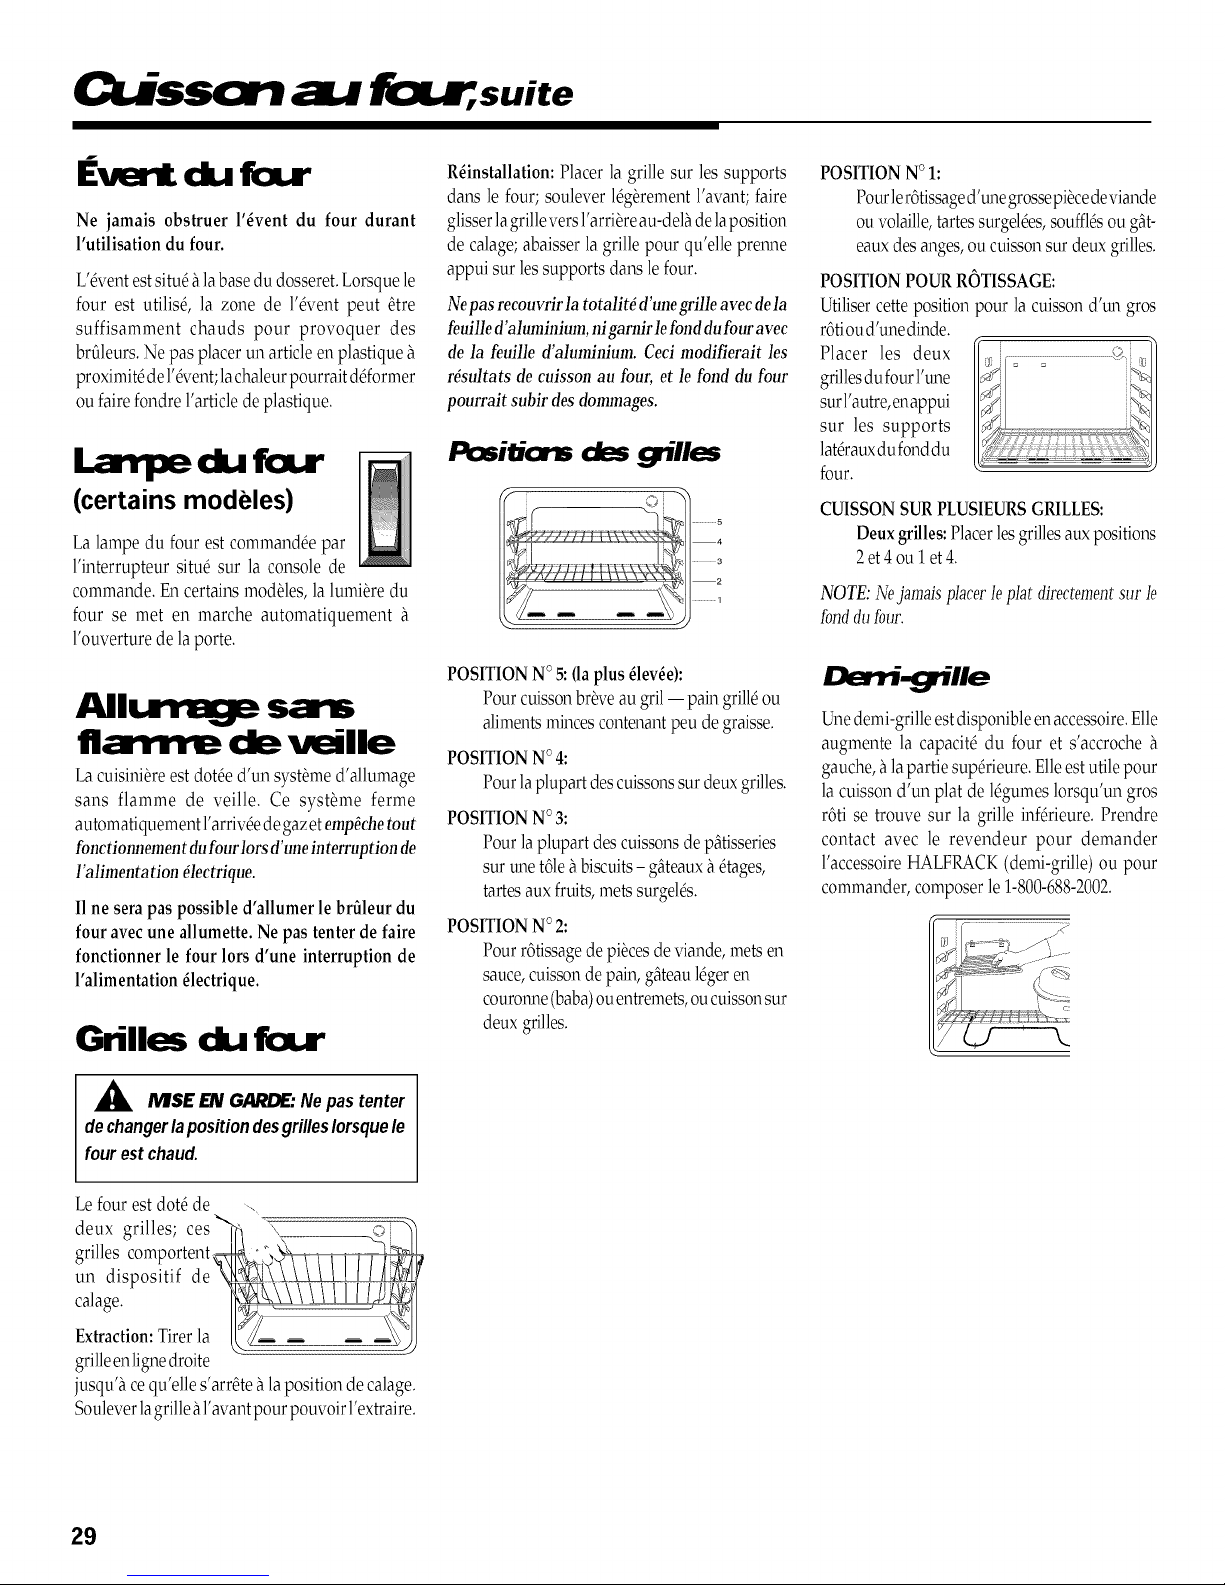
( LiSS4: I3 suite
Evert dufour
Ne jamais obstruer l'6vent du four durant
l'utilisation du four.
L'_ventestsitu_hlabasedu dosseret.Lorsque le
four est utilis_, la zone de l'_vent peut 0tre
suffisamment chauds pour provoquer des
br0.1eurs.Ne pas placer un article enplastique h
proximit_de l'_vent;lachaleurpourrait d_former
ou fairefondre l'article deplastique.
(certains modeles)
La lampe du four est commandOepar
l'interrupteur situOsur la console de
commande. En certains mod01es,lalumi_re du
four se met en marche automatiquement
l'ouverture de laporte.
Allu'racj) sa's
flarn-re de veille
Lacuisini_reest dot_e d'un syst_med'allumage
sans flamme de veille. Ce systbme ferme
automatiquementl'arriv_edegazetempOchetout
fonctionnementdufourlorsd'uneinterruptionde
l'alimentation _lectrique.
I1ne sera pas possible d'allumer le brOleur du
four avec une allumette. Ne pas tenter de faire
fonctionner le four lors d'une interruption de
l'alimentation 61ectrique.
Grilles du fax
R6installation:Placer la grille sur les supports
clansle four; soulever l_gbrement l'avant; faire
glisserlagrilleversl'arribreau-del_delaposition
de calage; abaisserla grille pour qu'elle prenne
appui sur les supports clansle four.
Ne pas recouvrir la totalit_ d'une grille avec de la
feuille d'aluminium, ni garnir le fond du four avec
de la feuille d'aluminium. Ceci modifierait les
r_sultats de cuisson au four, et le fond du four
pourrait subir des dommages.
Positions des grilles
'_ 3
POSITIONNO5:(laplus 61ev6e):
Pour cuissonbr@e augril -- pain grillOou
alimentsminces contenantpeu de graisse.
POSITIONNO4:
Pourlaplupart des cuissonssur deuxgrilles.
POSITIONNo3:
Pour laplupart des cuissonsdepatisseries
sur treet61e_biscuits- gateaux_ Otages,
tartesaux fruits,mets surgel_s.
POSITIONNo2:
Pour r6tissagede pibcesdeviande, mets en
sauce,cuissondepain, gateau lOgeren
courorme(baba)ouentremets,oucuissonsur
deux grilles.
POSITION NO1:
Pourler6tissaged'unegrossepibcedeviande
ou volaille,tartessurgelOes,soufflOsou gkt-
eaux des anges,ou cuissonsur deux grilles.
POSITION POURROTISSAGE:
Utilisercette positionpour la cuissond'un gros
r6tioud'une dinde.
Placer les deux
grillesdufourl'm_e
surl'autre,enappui
sur les supports
latOrauxdufonddu
fOUr.
CUISSONSURPLUSIEURSGRILLES:
Deuxgrilles:Placer lesgrillesauxpositions
2et4 ou I et4.
NOTE: Nejamais placer le plat directement sur le
fond du four.
Unedemi-grilleestdisponibleen accessoire.Elle
augmente la capacit0 du four et s'accroche k
gauche,k lapartie sup0rieure. Elleestutile pour
la cuisson d'un plat de 10gumeslorsqu'un gros
r6ti se trouve sur la grille inf0rieure. Prendre
contact avec le revendeur pour demander
l'accessoire HALFILACK(demi-grille) ou pour
commander, composerle 1-800-688-2002.
A IVlISE EN G,qRDE: Ne pas tenter
de changerla positiondesgrillesIorsquele
four est chaud.
Lefour est dotOde -..
deux grilles; ces_ Oi "_'_
grilles comportent,_ _'",¢_ _,,, ,'_,_
un dispositif de _"lv_'___\// / [ J//{'_
Extraction:Tirer la _/-- i i m_%JJ
gri]leenlignedroite
jusqu'acequ'elle s'arr0te a laposition decalage.
Souleverlagrillekl'avant pourpouvoir l'extraire.
29
Page 31

CUsson a gril
• Pour obtenir lesmeilleursr_sultats, utiliserun ustensile congupour la
cuisson au gril.
1. Appuyer sur la toucheBroil (Cuissonau gri]).
• Let6moin lumineux associ6_la touche Broil (Cuissonau gril)s'illumine.
• L'afficheurrepr6sente 000.
• Let6moin OvenOn (Fourallum_)s'illumine. I1y a une p6rioded'attente de
huit secondesavant laraise en marchedu four.
2. Appuyer sur la touche• pour s6]ectionnerla puissance de chauffageMAX.(HI),ou sur ]a
touche • pour s61ectionnerlapuissance de chauffage MIN.(LO).
• S61ectionnerHI (grilmax.)pour une cuisson au gril normale.
• S61ectionnerLO(gril rain.)pour une temp6rature plus basseou une cuissonde plus
longuedur6e (parex. pour de lavolaille).
3. Placerle mets dans lefour.
4. Retourner lapiece deviande vers le milieude lapOriodede cuisson.
5.Appuyer sur la touche Cancel(Annulation). Retirerle mets et l'ustensiledu four.
• LetOmoinOvenOn (Fourallure0)s'Oteint.
• Let_moin associ__ latouche Broil (Cuissonau gri])s'_teint.
• L'heure normalerOappara_'tsur l'afficheur.
• Pour d'autres conseilsconcernantla cuissonau gril,voir labrochure
_<LaCuisine Simplifi6e_,.
lumineuxde
Temoin _
cuissonaugril
i ven On
Preheat
Lock
Cancel
Tabfe_J de _ssm _J 9riI
Type de viande
Bacon
Steaks -- _paisseur 2,5 cm (1 po) 4
Poulet en morceaux 3 ou 4
Poisson -- Filets 4 La chair se dOtache
Dames, _paisseur 2,5 cm (1 po) 4 La chair se d_tache
Boeuf bach0 -- steakettes, Opaisseur 2 cm (3/4 po) 4 Bien cuit
Jambon -- prO-cult - tranche de 1,3 cm (_/2 po) 4 Tihde
Cotelettes de porc -- Opaisseur 2,5 cm (1 po) 4 Bien cult
* Grille supdrieure a la position no5
** Temps de cuisson approximatifs, variables selon les caractdristiques de chaque piece de viande.
Position de la grille*
4
4
Degr6 de cuisson
Bien cuit
Cuisson moyenne
Bien cuit
Bien cuit
Temps de cuisson
total (minutes)**
6-10 mn
15-20 mn
18-24 mn
(LO Broil) 30-45 mn
(Gril rain.)
8-12 mn
10-15 mn
15-18 mn
8-12 mn
22-26 mn
3O
Page 32
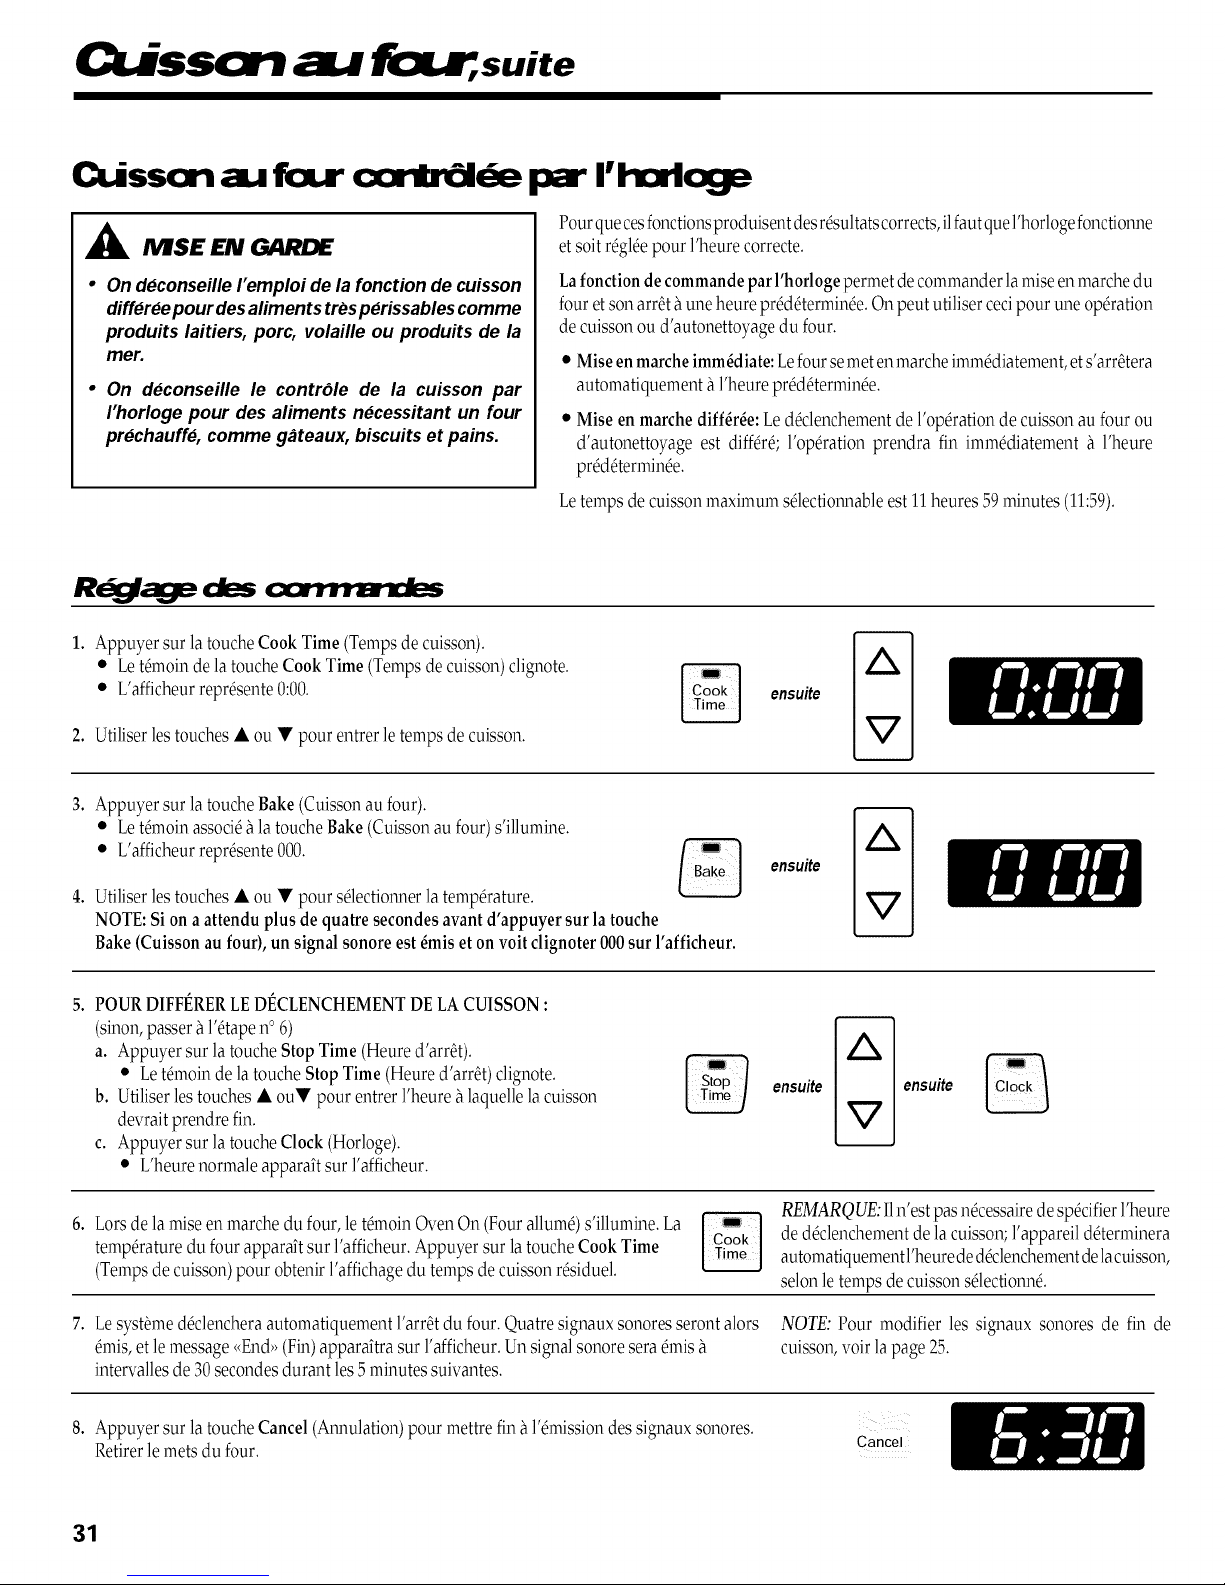
LissGrl su i te
Cusscn fax ( ril r i par I'lzxl 3e
Pourquecesfonctionsproduisent desrOsultatscorrects,ilfautquel'horloge fonctionne
A MSE EN GARDE
* On d_conseille I'emploi de la fonction de cuisson
diff_r_e pour des aliments tres p_rissables comme
produits laitiers, porc, volaille ou produits de la
mer.
* On d_conseille le contrOle de la cuisson par
I'horloge pour des aliments n_cessitant un four
pr_chauff_, comme g_teaux, biscuits et pains.
R Jage des
1. Appuyer sur la touche CookTime (Tempsde cuisson).
• Let0moin de latouche Cook Time (Tempsde cuisson)clignote.
• L'afficheurrepr0sente 0:00.
2. Utiliserles touches• ou • pour entrer le temps de cuisson.
etsoit rOglOepour l'heure correcte.
Lafonction de commande par l'horloge permet decommander laraiseen marchedu
four etson arr_t_ une heurepr6d6termin6e.On peut utilisercecipour une op6ration
decuisson ou d'autonettoyage du four.
• Miseen marcheimm6diate:Lefoursemet enmarche imm6diatement,ets'arr8tera
automatiquement h l'heurepr6d6termin6e.
• Mise en marche diff6r6e: Le d_clenchementde l'op_ration de cuissonau four ou
d'autonettoyage est differS; l'op_ration prendra fin imm_diatement h l'heure
pr_d_termin_e.
Letemps de cuissonmaximum s6lectionnableest 11heures 59minutes (11:59).
%
ensui_
3. Appuyer sur la touche Bake(Cuissonau four).
• LetOmoinassociO_ latouche Bake(Cuissonau four) s'illumine.
• L'afficheurreprOsente000.
4. Utiliserles touches• ou • pour s0lectiom'_erla temp0rature.
NOTE:Si on a attendu plus de quatre secondes avant d'appuyer sur latouche
Bake(Cuisson aufour), un signal sonore est 6mis et on voit clignoter 000sur l'afficheur.
5. POURDIFFI_RERLEDI_CLENCHEMENTDE LACUISSON:
(sinon,passer _ l'Otapen° 6)
a. Appuyer sur latouche Stop Time (Heure d'arrOt).
• LetOmoinde la toucheStop Time (Heure d'arrOt)clignote.
b. Utiliser lestouches • ou• pour entrer l'heure _ laquellela cuisson
devrait prendre fin.
c. Appuyer sur latouche Clock (Horloge).
• L'heure normaleappara_'tsurl'afficheur.
6. Lors de lamiseen marche du four, letOmoinOvenOn (Four allumO)s'illumine.La
tempOraturedu four appara_'tsur l'afficheur.Appuyer sur la toucheCook Time
(Tempsde cuisson)pour obtenir l'affichagedu tempsde cuisson rOsiduel.
7. Le syst_medOclencheraautomatiquement l'arrOtdu four. Quatresignaux sonores serontalors NOTE: Pour modifier les signaux sonores de fin de
Omis,etle message<<End,>(Fin)apparaitra sur l'afficheur.Un signalsonore seraOmish cuisson,voir la page 25.
intervallesde 30secondesdurant les5 minutes suivantes.
%
%
ensui_
ensuite _ ensuite
REMARQUE:I1n'est pas nOcessairede spOcifierl'heure
dedOclenchementdela cuisson;l'appareil dOterminera
automatiquementl'heurede dOclenchementdelacuisson,
selonle temps de cuissonsOlectionnO.
8. Appuyer sur la touche Cancel(Annulation)pour mettre fink l'Omissiondes signauxsonores.
Retirerlemets du four.
31
Cancel
Page 33

Fax
IVESE EN GARDE:
• II est normalque certainesparties des
parois du four deviennent brulantes
pendant un cycle d'autonettoyage.
• Eviter de toucher la r#gion du conduit
d'aeration ainsi que la porte et la
fen_tre du four.
* La porte du four se trouvera endom-
mag_e siI'on force son ouverture pen-
Lecycled'autonettoyageutilisedestemp_ratures
sup_rieureshlanormalepour assurer lenettoyage
automatique de latotalit_du four.
IIestnormal qu'il se produise flamm_cheset de
fum_ependant l'autonettoyage si lefour est tr_s
sale. I1 est preferable de nettoyer le four
r_guli_rement que d'attendre quelasalet_sesoit
accumul_edans le four.
Bien a6rer la cuisine pendant le cycle
d'autonettoyageafind'aiderh61iminerlesodeurs
qui sont normalement produites par
l'autonettoyage.
Arr_tezla lumi6re de four avant que nettoyant
commela lumi6re peut griller pendant le cycle
propre.
Enleverlalbchefrite,tousles platsetlesgrillesdu
four.Lesgrillesvont sed_coloreret risquentdene
plus glisser aussi bien apr_s le cycle
d'autonettoyage.
dant que I'indication LOCK est
I"affichage.
* Nepasutiliserdenettoyeurpourfour
du commerce sur le fini du four
autonettoyant ou sur tout autre
composant du four car cela abimerait
le fini ou ce composant du four.
l'encadrement
du four et
1encadrement
de la porte (la
Nettoyer_
partie sur le
pourtour du
jointde laporte) a l'aided'un produit nettoyant
non abrasif comme Bon Ami* ou d'eau
additionnOede dOtergent.Ces surfacesne sont
pas soumises auxtempOraturesOlevOesdu cycle
d'autonettoyage et doivent OtrenettoyOespour
empOcherla saletOde s'incruster sousl'effetde la
chaleur.
PourempOchertout dommage,nepas nettoyerni
frotter lejoint qui setrouveautourdelaporte du
four. Cejoint est conqupour @iter lespertes de
chaleur pendant le cycled'autonettoyage.
Essuyerlefonddu fourpour 61iminerlesliquides
quiont d6bord6encours decuissonet emp&her
laformation excessivede fum6eou la formation
de flammbchesou de flammespendant le cycle
d'autonettoyage.
Essuyerlesproduits sucrOsou acidesquiont pu
dObordO,tels que jus decitron, sauce tomateou
sauces k base delait. L'OmailvitrifiOrOsisteaux
acidesmaisiln'est pas totalement al'Opreuvede
ceux-ci.Lefini en_mailvitrifi_ peutse d_colorer
siles liquidesacidesquiont d_bord_nesont pas
essuy_savant unautonettoyage.
Laporte du foursetrouvera endommag6esil'on
force son ouverture pendant que l'indication
LOCKesth l'affichage.
Lespremibresfoiso0le fourestnettoy6,ilpeut y
avoir production d'odeur et de fum6e.Ceci est
normal et diminuera ou disparaitrah l'usage. Si
lefour esttrbs saleou sila l@hefritea 6t6laiss6e
clanslefour, ilpeut yavoir productionexcessive
de fum6eet d'odeur.
Pendant que lefour chauffe,il peut seproduire
des bruits de mOtalen expansionou encontrac-
tion. Ceciestnormalet n'indique pas quele four
s'aUme.
Environ une heure apr_s la fin du cycle, le
verrouillagesed_senclencheet l'indicationLOCK
(verrouillage)s'_teint_ l'affichage.Acepoint,la
portepeut Otred_verrouill_eet ouverte.
La saletOpeut avoir laissOau fond du four un
rOsidugris poudreux qui peut OtreenlevOavec
unlingehumide. S'ilrestedelasaletO,celaindique
que lecyclede nettoyagen'a pas OtOassezlong.
Celle-ci sera enlevOe au prochain cycle
d'autonettoyage.
Siles grilles dufour ont OtOlaissOes_l'intOrieur
pendant le cycle d'autonettoyage et qu'elles
glissent mal sur leur support, les enduire ainsi
que les supports d'une fine couche d'huile
vOgOtale.
Une d@olorationblanchepeut apparaitre apr_s
lenettoyage si des salissures acides ou sucrOes
n'ont pas OtO essuyOs avant le cycle
d'autonettoyage. Ceci est normal et n'affectera
PASle bon fonctiom_ementdu four.
Les lignes fines pervent apparaitre dans la
porcelaine resultant du chauffage et du
refroidissement de la fini. Ceci est normal et
n'affecteraPASlebon fonctiom_ementdu four.
*Lesnomsde marque sont des marques dOposOesdes diffOrentsfabricants.
32
Page 34

Erdr m
sm.d
R i:jfage des ,va iii=d, /:our four
1. Fermerla porte du four. Placerla manette deverrouillage _la position deverrouillage.
2. Appuyer sur la touche Clean (Nettoyage).
• Let_moin associ__ latouche Clean (Nettoyage)s'illumine.
• L'afficheurpr6sente 3:00,cequi correspond _une p6riode de nettoyagede trois heures.
• Sila porte n'est pas ferrule ou verrouill_e,l'afficheur pr_sente lemessage <<dry,.
3. Le cas6ch6ant,utiliserles touches• ou • pour modifier la dur6ede l'op6ration de nettoyage.
• S61ectionner2 heures pour un four tr_speu souill6,oujusqu'_ 4 heures pour un four tr_ssale.
4. POURDIFF12RERUOPI_RATIOND'AUTONETTOYAGE(sinonpasser _ l'dtapen° 5):
a. Appuyer sur latouche Stop Time(Heure d'arrSt).
b. Utiliserla touche • pour s61ectiormerl'heure d'arrSt.
c. Appuyer sur latouche Clock (Horloge);l'heure normale de l'horloger6apparait.
d. Pour pouvoir lirede nouveau l'heure de finde l'op6ration, appuyer sur latouche
Stop Time (Heure d'arrSt).
ensui_
ensui__
5. Lorsque lefour semet en marche:
• LetOmoinOvenOn (Fourallum_) s'illumine etle tOmoinLock(Verrouillage)s'illuminependant lechauffage du _ Oven On
four jusqu'_ 204° C(400°F). B Preheat
• IIn'est pas possibled'ouvrir la porte du four lorsque le t_moinLock(Verrouillage)estillumin& Lock
6. Environune heure apr_sla finde l'op_ration d'autonettoyage, le t_moinde verrouillage Lock(Verrouillage)s'_teint.
On peut alorsouvrir la porte du four.Pousser la manette de laporte vers la gauchepour d&errouiller.
Preheat
I ven On
Lock
7. Essuyer lessurfaces du four avec unlinge humide pour _liminerles cendres.S'ilreste des r_sidus, c'estparce que la
dur_ede l'op_ration d'autonettoyage _taitinsuffisante.
POURANNULERUNEOPI_RATIOND'AUTONETTOYAGE:
1. Appuyer sur la touche Cancel(AnnulatJon).
Cancel
Preheat VERROUILLAGE
I Oven On LORSQUELE
Look _ $'ETEINT,OUVRIR
2. Sile t6moinLock (Verrouillage)N'est PASillumin6,d&errouiller et ouvrir la porte du four.
Sile t6moinLock (Verrouillage)est illumin6,laisserle fourrefroidir pendant environ une
heure avant de d&errouiller et ouvrir la porte du four.
T_:MOINDE
LA PORTE
33
Page 35

A N -.-MSES EN GARDE
• Avanttoutemanipulation ouoperationdenettoyage,verifierquele
fourestarr_teetquetouslescomposantssontfroids,afind'eviterdes "
dommagesoudesbr_Jlures.
T blea de
Pour eviterla formation de taches ouun changement de couleur,
nettoyer I'appareil apres chaque utilisation.
Apres tout demontage de composants, veiller a effectuer un
remontage correct.
L_chefriteet
sagrille
(certainsmodbles)
Chromebross6
(certainsmodules)
Cadrede Br61eur
- Bffdeursconven-
tionnelsseulement
Brhleurs
- Conventionnel
- Scell_s
Grillesde
br61eur
Zone de la console
de commande/
horloge
Nejamais garnirlagrilledel_chefriteavecdelafeuilled'aluminium,carceciemp_cheraitlagraissedes'_coulerau-dessous.
• Recouvrirlalbchefriteet sagrilled'un torchonsavonneux;laissertremperpour d_tacherlesr6sidus.
• Laveravecdel'eau savonneusetibde.Utiliseruntampon_ r6curersavonneuxpour 61iminerlessouillurestenaces.
• Onpeut placerlesdeuxcomposantsdelalbchefritedansun lave-vaisselle.
• Unefoislacuisini_rerefroidie,nettoyeravecdel'eausavonneuse,rinceretfairebriller.
• Sila surfaceestrelativementsale,utiliserun produitnettoyant16g6rementabrasifetfrotterdanslesensdugrain pour6viterdefaire des
rayures.Rinceret s&her.
• Pour&iter les_raflures,ne pasutiliserd'articlesou produitsabrasifsou caustiques.
• Pourredonnerala surfacesonbrillantet_liminerlestrainees,fairesuivredeproduitavaporiserStainlessSteelMagicSpray*(r_f_rencen°
20000008)**.Lechromeserad_color_defa_onpermanentesila salet_cuitdessus.
Lecadredebffdeur estsitu_soussoulevent-versletablede cuissonrelevable.Nettoyezfr_quemmentpour enleverdesd_bordements.
Sionpermetale solde s'accumuler,ilpeut endommagerlafinition.
• RetirezlesgrillesetlesbrOleursext_rieurs.Augmentezletabledecuissonrelevable.
• Nettoyeravecdu savonet l'eau,rincageets_chez.
• Pourlessolst_tus,utilisezlesproduitsd'_purationmod_r_mentabrasifstelsqueunepatede lebicarbonatedesoudeet'eauoule nettoyant
BonAmi*,etungarnituredefrottementenplastiquenon-abrasive.
• Nettoyerfr6quemment.Laisserlebrfileurrefroidir.Nettoyeravecdu savonet untampon_r_curerdeplastique.Pourdessouillurestenaces,
utiliserun produitde nettoyagenonabrasifavecunchiffon.Eviterdelaisserleproduitde nettoyages'introduiredanslesorificesdesortie
du gaz;cecipourraitaffecterlacombustiondugaz.Sile produitdenettoyagep_n_tredans lesorifices,nettoyeravecun pinceausoupleou
unebrochedroite,particuli_rementl'orificesitu_au-dessousdel'allumeur.Veillera nepasd_formerouagrandirlestrous.
• Veiller_nepas laisserdel'eaus'introduiredans lesorificesdubffdeur.
• Proc_derprudemmentlorsdu nettoyagedel'allumeur.Lebr61eurnes'allumerapas sil'allumeurestmouill_ouendommag_.
• Br61eursconventionnels:Lesbr61eurssecsdanslefouront plac__750C(170°F).
• Laverlesgrillesavecde l'eausavonneusetilde etun tampon_rdcurerde plastiquenonabrasif.
• Pourlessouillurestenaces,nettoyeravecune_pongeouun tamponnonabrasifsavonneuxetlaCooktopCleaningCreme(produit
n°20000001)**.
• Pourlesr_sidusalimentairescarbonis_s,enleverlesgrillespourlesplacersur dupapier-journal,et pulv_riserprudemmentunproduit
commercialde nettoyagede four(hepasprojeterleproduitsurlasurfaceenvironnante).Placerlesgrillesdansun sachetdeplastiquependant
plusieursheuresoupendantune nuit.Porterdesgantsdecaoutchoucet retirerlesgrillesdu sachet.Laver/rincer/fairesdcheretrdinstaller
lesgrillessurla tablede cuisson.
• Pourutiliserlafonction_ControlLocb_(D_sactivationdescommandes)pour lenettoyage,voirlapage25.
• Essuyeravecun lingehumide,puisfairesdcher.
• Onpeut utiliserun produitde nettoyageduverre,pulv&is_d'abord surunchiffon.NEPASprodeterle produitdirectementsurlestouches
decommandeousurl'afficheur.
Boutonsde
commande
• Placerchaqueboutona lapositionOFF(ARRET),et retirerchaquebouton(tirer).
• Laver/rincer/faire s_cher.Nepas utiliserunagentde nettoyageabrasifsusceptiblederayer lafinition.
• Fairefonctionnerbri_vementchaquebr61eurpourv_rifierqueleboutona_t_correctementr_install_.
Dosseret, table de
cuisson, et zone
des boutons
de commande
(surfaces6maill6es
L'_mailestun mat6riauabasedeverrefondusur lem6tal,quipeutse fissurerous'6cailler.Lacouched'_mailposs_deunecertainer6sistance
auxcompos_sacides,quin'est pasillimit_e.Ondolt61iminerimm_diatementtout r_sidude renversementun lingesec,particuli_rementles
compos6sacidesousucr6s.
• Sur unesurfacefroide,laveravecde l'eausavonneuse,puis rincerets6cher.
• Ne jamaisessuyerunesurfacetilde ouchaudeavecun lingehumide;cecipourraitprovoquerfissurationou_caillage.
• Nejamaisutilisersurla finitionext6rieuredelacuisini_reun produitdenettoyagedefourou unproduitde nettoyageabrasifoucaustique.
*Lesnomsde marque mentioru_6ssont desmarques de commerced6pos6esde leurs propri6taires respectifs.
**Pour commander directement,composer le1-800-688-2002.
34
Page 36
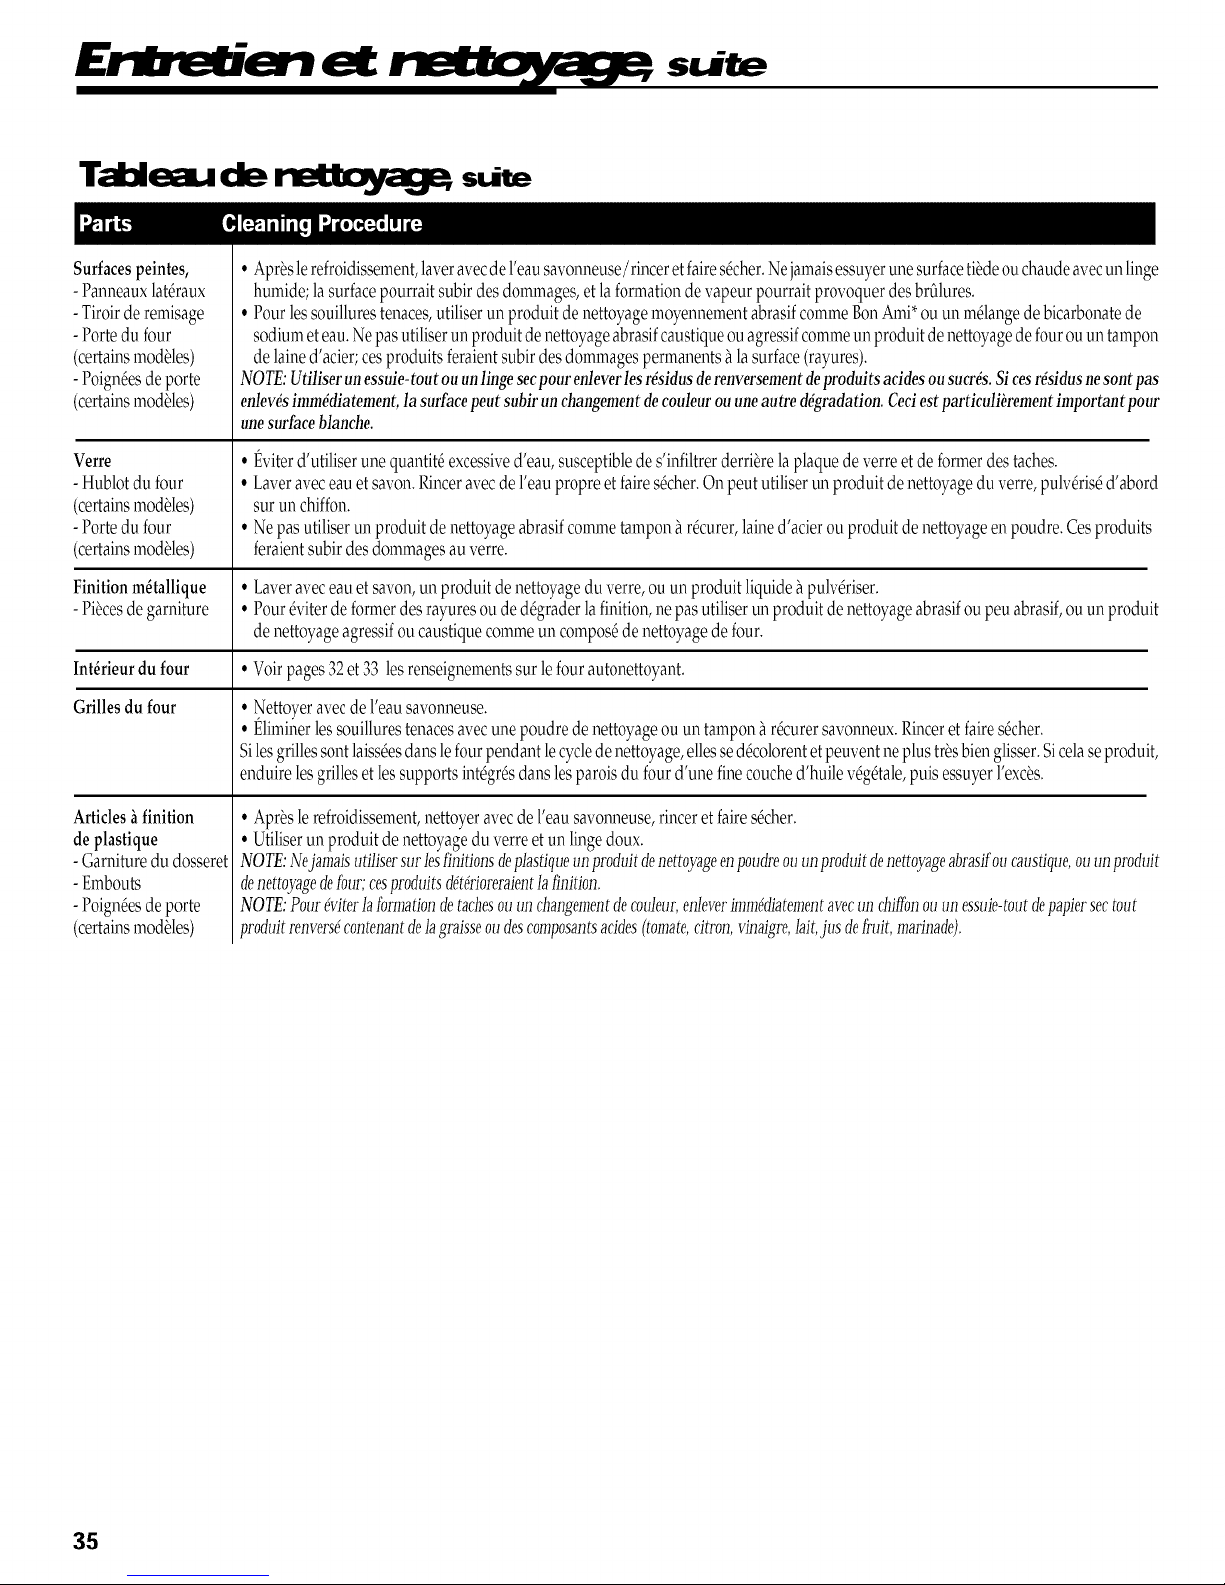
Er'llrl ier'l
Tal:tea de suite
slaill e
Surfacespeintes,
- Panneauxlat6raux
- Tiroirde remisage
- Portedu four
(certainsmodbles)
- Poign_esde porte
(certainsmodbles)
Verre
- Hublotdu four
(certainsmodbles)
- Portedu four
(certainsmodbles)
Finitionm6tallique
- Pibcesde garniture
Int6rieurdufour
Grillesdufour
Articleshfinition
de plastique
- Garnituredu dosseret
- Embouts
- Poign6esde porte
(certainsmodbles)
• Aprbslerefroidissement,laveravecdel'eausavonneuse/rinceretfairesOcher.Nejamaisessuyerunesurfacetibdeouchaudeavecunlinge
humide;la surfacepourraitsubirdesdommages,etlaformationdevapeurpourraitprovoquerdesbffflures.
• Pourlessouillurestenaces,utiliserunproduit de nettoyagemoyennementabrasifcommeBonAmi*ouun mOlangedebicarbonatede
sodiumeteau.Nepasutiliserunproduitdenettoyageabrasifcaustiqueouagressifcommeunproduitde nettoyagedefourouun tampon
delained'acier;cesproduits feraientsubirdesdommagespermanentsalasurface(rayures).
NOTE:Utiliserunessuie-toutouunlingesecpourenleverlesr_sidusderenversementdeproduitsacidesousucres.Sicesr_sidusnesontpas
enlev_simm_diatement,la surfacepeut subirunchangementdecouleurouuneautred_gradation.Ceciestparticuli_rementimportantpour
unesurfaceblanche.
• l_viterd'utiliserunequantitOexcessived'eau, susceptiblede s'infiltrerderriOrelaplaquede verreet deformerdes taches.
• Laveraveceauet savon.Rinceravecde l'eaupropreet faires_cher.Onpeut utiliserunproduitde nettoyageduverre,pulv_ris_d'abord
sur un chiffon.
• Ne pasutiliserun produitde nettoyageabrasifcommetampona r_curer,lained'acier ouproduitde nettoyageenpoudre. Cesproduits
feraientsubirdes dommagesauverre.
• Laveraveceauet savon,un produit de nettoyageduverre,ouun produitliquide_pulv_riser.
• Pour_viterde formerdesrayuresou dedOgraderlafinition,nepasutiliserun produitdenettoyageabrasifoupeuabrasif,ouun produit
denettoyageagressifoucaustiquecommeun compos_de nettoyagedefour.
• Voirpages32et 33 lesrenseignementssur lefourautonettoyant.
• Nettoyeravecde l'eausavonneuse.
• Eliminerlessouillurestenacesavecunepoudrede nettoyageou untampona rOcurersavonneux.Rinceret faires_cher.
Silesgrillessontlaiss_esdartslefourpendant lecycledenettoyage,ellessed_colorentetpeuventneplustrOsbienglisser.Sicelaseproduit,
enduirelesgrillesetlessupportsint_grOsdanslesparoisdu fourd'une finecouched'huilev_g_tale,puisessuyerl'excOs.
• AprOsle refroidissement,nettoyeravecde l'eausavonneuse,rinceretfaires_cher.
• Utiliserunproduit de nettoyagedu verreetun lingedoux.
NOTE:Nejamaisutilisersurlesfinitionsdeplastiqueunproduitdenettoyageenpoudreouunproduitdenettoyageabrasifoucaustique,ouunproduit
denettoyagedefour;cesproduitsdet4rioreraientla[inition.
NOTE:Pour6viterlaformationdetachesouunchangementdecouleur,enleverimm4diatementavecunchiflbnouunessuie-toutdepapiersectout
uroduitrenvers4contenantdelagraisseoudescomposantsacides(tomate,citron,vinaigre,lait,dusdefruit,marinade).
35
Page 37

E ar im
du x.r
A IVISES EN GARDE:
• Ne pas grimper sur la porte du four
ouverte,ouluiimposerunechargeex-
cessive.Cecipourrait faire basculerla
cuisiniere,entrainerlebrisdelaporteou
des blessures pour la personne
concernee.
°Ne pastenterd'ouvriroufermerlaporte
oud'utiliserlefouravantquelaporteait
eteconvenablementreinstallee.
° Ne jamais placer les doigts entre la
charniereet lecadreavantdufour.Les
brasdecharnieresontmontessurressorL
Line charnierepourrait se refermer
brutalementcontrele cadredu fouret
provoquerde serieusesblessures.
Ddpose de la port_
1. Apr_s le refroidisse-
merit du four, ouvrir la
porte d'environ 10 cm
[4pouces].
2. Saisirlaporte dechaque
c6tg Ne pas utiliser la
poign0e deporte pour la soulever.
3. SouleveruniformOmentpour dOgagerlaporte
des chami_res.
R_nstall:,tiort
1. Saisir laporte de chaque c6tg
2. Aligner lesfentesaveclesbras de chami_resur
la cuisini_re.
3. Faire descendre la porte pour la positionner
correctementsurleschamibres.Poussersurles
angles supOrieursde laporte pour l'enfoncer
complbtementsur lescharni_res.IIfaut quela
porte soit parfaitementd'aplomb.
l-kJ Ot du tiaur
(certains modeles)
Pour prObdgsr le h._ot, d_
la porte du four:
1. Ne pas utiliser de produits abrasifs comme
tsmpons hrOcurer,lained'acier ouproduit de
nettoyageenpoudre qui risqueraientde rayer
leverre.
2. Ne pas heurter le hublot de verre avec un
ustensile,un articlede mobilier,un jouet, etc.
3. Ne pas fermer la porte du four avant que les
grillessoient enplace dans le four.
Toute dOgradationdu hublot de verre - rayure,
choc,tension, etc.- peut affaiblirsa structure et
augmenter lerisque debrisk une date ult0rieure.
r acje
1',=l:31a'rb
A IVISE EN GARDE:
• Verifierquela brideantibasculement
agrippeconvenablementI'undespieds
arrieredereglagedeI"apIomb,pour que
la cuisiniere ne puisse basculer
accidentellemenL
II faut que la cuisini_re soit install0e
d'aplomb. Pour ajuster l'aplomb, faire
toumerlespiedsderOglageenplas-
tique dm'mles angles de la
cuisini_re, t
PIED DE REGLAGE DE L'APLOMB
BRIDE
ANTIBASDULEMENT
NISES _ GAm_E:
• Debrancherla cuisiniere du reseau
electriqueavantderemplacerl"ampoule.
• Utiliser une manique seche pour
pmtegerlesmainslorsduremplacement
deI'ampoule.
• Nepas toucherI'ampouleavantqu'elle
sesoitrefroidie.
• NepastoucherI'ampoulechaudeavec
un linge humide;le choc thermique
pourrait labriser.
Rerrl__ de la
lanlpe dlu fou_.
1.
Apr_s lerefroidissement du four, maintenir
le cabochon tout en enlevant la piece
mOtallique qui la maintient en place.
REMARQUE:Lecabochontomberasi on ne
lemaintient pas en place.
2.
Enleverlecabochon etl'ampoule.
3.
Installerune ampoule de 40watts pour
apparel]mOnager.
4.
ROinstallerle cabochonet lefilm0talliquede
retenue.
5. R0tablirl'alimentationdela cuisini_re.R0gler
denouveau l'horloge.
CABOCHON
RESSORTDE
RETENUE(film6_Ilique)
NOTE: On peut percevoir une certaine
<<01asticit0,>lors de lafermeture de la porte du
fourd'une cuisini_reneuve;ceciestnorma];cet
effetdispara_'tprogressivement.
36
Page 38

£i
dun Timir de rerrisa3e
a Letiroirderemisage, enbasdelacuisiniOre, estun
Les raccords des appareils a gaz, utilisOspour
raccordercetappareil a l'alimentation de gaz,ne
sont pas pr0vus pour un mouvement continu.
Unefoisl'appareilinstall0,ilnefautpas led0placer
defaqonr0p0t0epour lenettoyer oulechangerde
place.Sicetappareildolt0tred0m0nag0oud0plac0
pourOtrer0par0,suivre latechniqued0critedans
les instructions d'installation. Pour
renseignements, composerle Maytag Customer
Serviceale 1-800-688-2002.
Pour empOcher la cuisini_re de basculer
accidentellement,ilfautlafixerausolencoulissant
le pied arri_re de r@age de l'aplomb dans le
support antibasculement.
(certains modeles)
En aucune circonstance,il ne faut dOmonterles
ensembles de bNfleurs de surface pour les
nettoyer.UnensembledebrOleurpeutOtreenlevO
d'un blocpour nettoyer lazonecorrespondante.
Les deux ensembles de br01eurssont fixOsen
placependant letransport al'aidede vis.Unefois
lacuisiniOreinstallOe,ilestpossibled'enlever ces
vispour permettre une d@ose rapide et facile
des ensemblesde brOleurs.
D6pose:Laisserl'ensembledebrOleurrefroidir.
Souleverlatable decuisson.Saisirl'ensemblede
brtSleuretle tourner 1Og_rementvers la gauche
pour libOrerlesdeux pattes del'ensemble. Puis,
souleverl'ensemble et le tirervers l'arri_rede la
tablede cuissonjusqu'aceque lesextrOmitOsde
l'obturateur d'air de l'ensemblese dOgagentdes
soupapes.
Remise en place : Introduire les extrOmitOsde
l'obturateur d'air sur l'ensemblede brfileur,par-
dessus les soupapes, et baisser l'ensemble en
place. S'assurer de fixer les deux pattes de
l'ensemble de brfileur dans les deux fentes du
support debrfileurmontOaudessousdu brfileur.
(REMARQUE : Si les pattes ne sont pas
correctement introduites dans les fentes,
l'ensemblepeut basculeret les brfileurspeuvent
nepas s'allumer correctement.)
endroit pratique et sCtrpour le remisage des
ustensiles demOtaletde verre. OnNEDOITPAS
y remiser des articles enplastique ou papier, ou
des produits alimentaires ou matOriaux
inflammables.Retirerletiroir pour nettoyer sous
la cuisini_re.
I_ Viderletiroir,puis tirer letiroirjusqu'a
laposition de la premiere butOe.Souleverl'avant
et tirer jusqu'a la position de la seconde butOe.
Saisirlesc6tOsetsouleverpour pouvoir retirer le
tiroir.
R_nst_llalic_ Positionner les extrOmitOsdes
glissi_resdu tiroirsurlesrails.Souleverl'avant du
tiroir etpousser doucementjusqu'alaposition de
lapremierebutOe.Souleveret continuer apousser
letiroir jusqu'a laposition de fermeture.
Les appareils n6cessitant
unealimentation61ectrique
comportentunefichei_trois
broches raise a la terre qui dolt _tre branchOe
directement dans une prise de 120volts a trois
cavitOset correctementraise a laterre.
ToujoursdObrancherl'appareilavant d'y fairede
l'entretien.
Laficheatroisbrochesraisea laterrefournit une
protection contre les dOchargesOlectriques.NE
PASCOUPER NIENLEVERLABROCHEDE
TERREDU CORDON D'ALIMENTATION.
Silaprise necomportequedeuxcavitOs,n'estpas
mise a la terre ou n'est pas appropri_e, le
propri6taire de l'appareil a la responsibilit6 de
faire remplacer la prise par une prise ii trois
cavit6scorrectement mise iila terre.
Fclnd clLItiat.r
ProtOger le fond du four, (_
particuli_rement [[_' .................2_\ '
contreles produits _<0
pourraient Otre
acidesousucrOsqui _a__
renverses; ces pro- _ t'a _,
duitsfontchangerla
couleurde l'Omail.Utiliserun ustensile de taille
appropriOe pour Oviter renversement ou
d0bordement.
Onpeut enlever la plaque du fond du four; ceci
facilitelenettoyage.
Apr_slerefroidissementdufour,retirer
lesgrillesdu four. Fairecoulisserversl'avant du
fourlesdeuxpitons situOsdans lesanglesarri_re
du fond du four.
Souleverlebord arri_rede laplaque du fond du
four, puis faire glisser la plaque vers l'arri_re
pour dOgagerle bord avant du chassis avant.
Retirerlaplaque du fond du four.
R_nst_llalic_ Engager le bord avant de la
plaque du fond du four dans lechassisavant du
four.Abaisserl'arriOrelelaplaqueetfairecoulisser
lesdeuxpitons vers l'arri_repour immobiliserla
plaque enplace.
37
Page 39

V4rifier oxtairs pints dam les cas
suivar_:
Non-fa'Icliomen1_L cb l'al:_l -
_tal cupar_
• V_rifier que la fiche de branchement est
correctementins_r_edans laprisede couraalt.
• Inspecter/r_armer le disjoncteur. Inspecter/
remplacerlesfusibles.
• ContrOlerlasource d'alimentation_lectrique.
• V_rifiersilescommandesdufourou delatablede
cuissonont_t_bienr_gl&s.Voirpages24et 26.
• D_terminer si l'appareil a _t_ r_gl_ pour un
autonettoyageoun fonctiondecuissondifferS.
• V_rifierquelaportede fourestd@erouilleapr_s
d'autonettoyage.
Un _ d_ la table d_ cuisscn
re s'alluTe pas.
• V_rifierque l'appareil est correctementbranch_
surune prisede courmlt.
• Inspecter le fusible (grill_?) ou le disjoncteur
(ouvert?).
• D_terminers'ily auneobstructiondesorificesdu
brOleur ou de l'orifice situ_ directement sous
l'allumeur.Voirpage 26.
• V_rifierque l'allumeur est secet qu'fi _met des
_tincelles.LebrOleurnepeuts'allumersil'al]umeur
estendommag_,souill_oumouill_.Sil'allumeur
neg_n_repas d'_tincelles,ramenerlebouton de
commmlde_ lapositionOff (Arr_t).
Rm'n1_ r_n uriC.
• OrificesdubrOleurobstru_s.
• Ler_glagedelesflammespeutbesoinadjustement.
S_paralicn erttre les fla'm'es ell le
brl_elJr.
• Veiller_placercorrectementl'ustensilesurlagrille
du brOleur.
I_stJtats cb cLisscrl au four
ci_ cbs _.
• ContrOlerla temperature s_lectionn_epour la
cuisson.Veiller_ pr&hauffer le four si ceci est
demmld_dmlsla recette.
• ContrOlerlapositiondes grilles.Voirpage29.
• Utiliserunustensilecorrect.Unustensilede teinte
sombreproduit un brunissage plus intense;un
ustensilede teinte claireproduit un brunissage
moinsintense.Pour d'autre informationau sujet
des ustensilesde cuissonau four, consulterla
brochure<<LaCuisine Simplifi6e>,.
• Dela feuilled'aluminiuma peut-_tre6t6utilis6e
dans le four. Ne jamais recouvrir une grille
compl_tementavecde la feuilled'aluminium.
Placerunpetitmorceaude feuilled'aluminium
sur la grille au-dessous de l'ustensile pour
r&up_rertout renversement.
D_terminerlapositiondu platdanslefour.Lors
d'une cuissonsur deux grilles,d&alerlesplats
surlesgrilles.Laisserunespacelibrede2,5cm
5cm(1h2 pouces)entrechaqueplatetlesparois
du four.
• Veiller_ne pas obstruerl'@entdu four.Voirla
positiondel'@ent _lapage 29.
• Contr61erlebon aplombde lacuisinibre.
clfT_'er_ de,_ _ts par le
four a't,_ieur.
Ler_glagede temperaturevarie souvententre
unfourneufetlefourqu'ilremplace.Onobserve
souventune d_rivedu r_glagede temperature
d'un four _ mesurequ'ilvieillit;ilpeut devenir
pluschaudou moinschaud.
REMARQUE:I1n'est pas utile de modifierle
reglagede temperaturesi la variationn'affecte
qu'uneou deuxrecettes.
(_isson _a _il €16_eri_
• ContrOlerler_glagedu four.Voirpage30.
• ContrOlerlapositiondes grilles.Voirpage30.
• Utilisationincorrectede feuilled'aluminium.Ne
jamaisgamir la grille de lOchefriteavec de la
feufiled'aluminium.
_e_essive d_ _
durart la cuisscn au gril.
• Alimentstropprochesdesflammesdu bfffleur.
Pourd'autresinformations,voirla page30.
• Grilledel_chefritegarniedefeuilled'aluminium.
• L'exc_sdegraissen'apas 6t_enlev_delapiecede
viande avantla cuissonau gril.
• Utilisationd'unel@hefritesouill_e.
h.q0cssibilit6d_ du
four.
• D_terminersi l'appareil a _t_ r_gl_pour un
autonettoyagedifferS.
• V_rifierquela porteest ferm@.
• V6rifierque les commm3dessont correctement
r6gl@s.
Lo four re s'est I:_ cx:a'_:dben-_
• Un temps de nettoyage plus long peut _tre
n&essaire.
• On n'a pas 61imin6 avant l'op6ration
d'autonettoyagelesaccumulationsexcessivesde
r_sidus, particulibrementlesr_sidus d'aliments
acidesou sucres.
Laportedufl=ur m se
d_mmxilk)pasales
I'aJnretto_9_
• L'int_rieurdu four est encorechaud.Attendre
elwiron une heure apr_s l'ach@ement de la
p_rioded'autonettoyage.I1estpossibled'ouvrir
laporte apr_sla disparitiondu messageLOCK
(VEPd_,OUILLAGE)surl'afficheur.
_at_n dh.n_te dam le
four ousur le hJolOL
• Ceciest normal durant la cuisson d'ahments
contenantbeaucoupd'eau.
• Utilisation excessive d'humidit_ lors du
nettoyagedu hublot.
_fission du_ fcrl_ a_eur ou d_
fu_6e las d_larrbeen _
du foLr.
• Ceciest normalpour une cuisinibreneuve;cet
effet dispara_'t apr_s quelques utilisations.
L'ex&utiond'un programmed'autonettoyage
permettrade fake dispara_'trecetteodeur plus
rapidement.
• Fakefonctionnerleventilateurpour @acuerla
fum#eou l'odeur.
Presence d'une accumulation de r_sidus
alimentairessur le fonddu four.Ex&uterune
operationd'autonettoyage.
A_ d_ ,_ su_ dun
d_ffr_
• II s'agit d'un code d'anomalie. Si un code
d'aa_omalieapparaitsurl'afficheur(avec_mLssion
d'un signalsonore),appuyersurlatoucheCan-
cel(Annulation).Sicecinemetpasfin_l'affichage
du code d'anomalie et _ l'_missiondu signal
sonore,d_brancherl'appareilde laprisede cou-
rant. Rebrancherapr_s quelques minutes. Si
l'appareilaffichetoujourslecoded'm_omalieet
_met encore le signal sonore, d_brancher
l'appareildela prisede courant et contacterun
d_panneuragree.
• Sile fouresttr_s sale,la formationde flammes
durant une operation d'autonettoyage peut
d&lencherl'apparition d'un code d'anomalie.
Appuyersur la toucheCancel (Ambulation)et
laisserle fourrefroidircompletement,nettoyer
les excessivesde r_sidus, puis ex@uter de
nouveau le programme d'autonettoyage. Si
l'appareilaffichetoujourslecoded'm_omalieet
_met encore le signal sonore, d_brancher
l'appareildela prisede courant et contacterun
d_panneuragree.
38
Page 40
Cuisirii re -
Ga-alie
Garantiecompleted'une ann@- Pi_ceset main-
droetivre
Durant une p_rioded'un (1)an_compter dela date
del'achat initial,toutepi_cesubissantune dOfaillance
dans lesconditions normalesd'usage mOnagersera
rOparbe/remplacOegratuitement.
Garantielimit@ -pi6ces seulement
Dela deuxi6me/ila cinqui6meann@_compter de
ladate de l'achatinitialau @tail,lespi_cesde laliste
ci-dessoussubissantune @faillancedans descondi-
tionsnormales d'usage mOnagerserontrOparOesou
remplac@s gratuitement (pi_ces seulement); le
propriOtairedevra assumer tousles autres frais, y
comprislesfrais demain-d'oeuvre, de dOplacement
etde transport.
• Br61eursa gaz scell6s
R6sidents canadiens
Lesgarantiesci-dessuscouvrent un appareilinstalld
auCanada seulement s'ila dtdagrddpar lesagences
detest habilitdes(vdrificafionde laconformitd_une
normenafionaledu Canada), saufsi l'appareil a dtd
introduit au Canada Al'occasiond'un changement
de rdsidencedes I_tats-Unisvers le Canada.
Les garanties sp(cifiques formul(es ci-dessus sont les
SEULES que le fabHcant accorde.Cette garantie vous
confOredes droitsjuridiques sp6cifiqueset vo_lspo_lvez
4g_lementjouir d'autres droits, variablesd'une province
l'autre.
Nesort pas coLsmr par
sa'a
1.
Lesdommages ou ddrangementsdus _:
a. Miseen service,livraison ouentrefieneffectudsincorrectement.
b. Touterdparation,modification,altdrafionettout rdglagenonautorisdsparlefabricantoupar
un prestataire de serviceapr_s-venteagrdd.
c. Accidents,mauvaise utflisationou usage abusifou ddraisom_able.
d. Alimentafiondlectrique(tension, intensitd)incorrecte.
e. Rdglageincorrectd'une commande.
2. Les garanfies ne peuvent _tre honordes si les numdros de sdrie d'origine ont dtd enlevds,
modifidsou ne sont pas facilementlisibles.
3. Ampoules.
4.
Appareils achetdsaux finsd'usage commercialou industriel.
5.
Lesfraisdevisited'unprestatairedeserviceou deserviceapr_s-venteencouruspourlesraisons
suivantes:
a. Correction d'erreurs de mise enservice.
b. Initiation de l'utilisateur _l'emploi del'appareil.
c. Transport de l'appareil aux locauxdu prestataire de service.
6.
Dommages secondaires ou indirects subis par toute persorme suite au non-respect de la
garanfie. Certaines provinces ne permettent pas l'exclusion ou la limitation des dommages
secondairesou indirects;par consequentleslimitationsouexclusionsci-dessuspeuvent ne pas
s'appliquer _votre cas.
Si I'i cn dun dk a neur est
rB:essaire
• Contacterle revendeur chezqui l'appareil a _t_achet_,ou contacterMaytagAppliances Sales
Company/service-client au1-800-688-1120aux E.-U.etCANADA,pour obtenirlescoordom_s
d'une agence de serviceagr@e.
39
• Veiller},conserver lafacture d'achat pour justifier de la validit_de la garantie. Pour d'autres
informations en ce qui concerneles responsabilit_sdu propri_taire _ l'_gard du service sous
garantie, voirle texte delaGARANTIE.
• Silerevendeur oul'agencede serviceapr_s-ventene peutr_soudreleprobl_me,_crire_Maytag
AppliancesSalesCompany, attention CAIR_'Center, P.O.box2370,Cleveland,TN 37320-2370
ou t_l_phonerau 1-800-688-1120aux I_.-U.et CANADA.
NOTE:Lorsde tout contact concernantun probl_me,fournir l'information suivante.
a. Nom,adresse etnum_ro de t616phoneduclient;
b. Num_ro de mo@le etnum_ro de s6rie de l'appareil;
c. Nora et adressedu revendeur ou de l'agencede service;
d. Descriptionclaire du problbmeobserv6;
e. Preuve d'achat fracturede vente).
• Lesguidesd'ufilisation,lesmanuelsde serviceetles renseignementsdespi_cessontdisponibles
aupr_s deMaytag Appliances SalesCompany, service-clientMaytag.
Page 41

Esb./'a a Gas RS-1
esta guia junto con el
sumidor: Por favor lea y conserve esta gu_a
ireferencia futura. Conserve el recibo de venta
e! cheque cance!ado como prueba de compra.
Ntimero de Modelo
Ntimero de Serie
Fecha de Compra
unta, llame al:
1,800/688-1120 (EE.UU. y Canada)
',TTYen EE.UU. para personas
mlpedimentos auditivos o del habla)
;- Viernes, 8:00 a.m. - 8:00 p.m. Hora del
Tabla de It4aberias
Instrucciones de Seguridad.. 41-43
Controles ................. 44-45
Cocinando en la Estufa ...... 46-47
Cocinando en el Horno ...... 48-51
Cuidado y Limpieza ......... 52-55
Mantenimiento ............. 56-57
Antes de Solicitar Servicio ...... 58
Garantia ..................... 59
En nuestro continuo afan de mejorar la calid ad y
rendimiento de nuestros electrodom0sticos,
puede que sea necesario modificar el
electrodom0stico sin actualizar esta gu_a.
informaci6n sobre servicio, ver pagina 59.
Page 42

Im Mes
Lea y siga todas las instrucciones antes de usar
este electrodom6stico para evitar el riesgo
potencial de incendio, choque el@trico, lesi6n
personal o dafio al electrodom_stico como
resultado de su uso inapropiado. Utilice este
electrodom _stico solam ente para el prop6si to que
ha sido destinado segOn se describe en esta gufa.
ADV"r.RT"r.NCIA: sJ
nosesigueestrictamentelainformaciOn
proporcionadaen estaguia,se puede
producirunincendioo unaexplosion,
causandodat_osmateriales,lesiones
personalesomortales.
- No almacene ni use gasolina ni otros
vapores y liquidos inflamables en la
vecindadde este electrodomesticoode
cualquierotto.
- QUEHACERSIPERCIBEOLORA GAS:
• No trate de encender ningun
artefacto.
• Notoqueninguninterruptorelectrico.
• Nouseningun telefonoen suedificio.
• Llame inmediatamente a su
proveedor de gas desde el telefono
de un vecino. Siga las instrucciones
proporcionadas por el proveedor de
gas.
• Si nopuede Iocalizar asu proveedor
degas, Ilame alcuerpodebomberos.
- La instalaciOny reparacionesdeben ser
efectuadaspor untecnicocalificado,una
agenciade reparaciones o elproveedor
de gas.
Irlstn.K:l::i(:rles
Gemrales
Paraasegurarfuncionamientocorrectoyseguro:
E1 electrodom_stico debe ser instalado
debidamente y puesto a tierra por un t@nico
calificado. Pfdale al instalador que le indique
donde se encuentra la llave de cierre del gas y
comocerrar]aen casode una emergencia.
Siempredesenchufeel electrodom_sticoantesde
efectuarreparaciones.
Para asegurar el funcionamiento apropiado y
evitarposibleslesionesodafloalelectrodom_stico,
no intente ajustar, reparar, prestar servicio ni
41
reemplazarninguna piezade suelectrodom0stico
a menos que sea especfficamenterecomendado
enesta gufa. Todaslas otras reparacionesdeben
serefectuadas por un t@nicocalificado.
TODASLASESTUFAS
SEPUEDENVOLCAR
YCAUSARLESIONES
PERSONALES
INSTALEELDISPOSI-
TIVO ANTI-VUELCO
INCLUIDO CON LA
ESTUFA
• SIGA TODAS LAS
INSTRUCCIONESDE
INSTALACION
ADVERTENCIA: Para reducir el
riesgo de vuelco del electrodom_stico a
causa de uso anormal o debido a peso
excesivo en la puerta del homo, es
necesario asegurar el electrodom_stico
mediante un dispositivo antivuelco
debidamente instalado.
Para verificar si el dispositivo est5 debidamente
instalado,mire debajodelaestufaconuna linterna
para asegurarse de que uno de los tornillos
niveladorestraserosestOdebidamenteenganchado
enla ranura delsoporte. E1dispositivoantivuelco
aseguraeltornillonivelador traseroalpisocuando
esta debidamente enganchado. Esto debe
verificarsecadavez que la estufasea movida.
Para Evitar
Ino:ergo o Dar'
CaJsado por el
AsegOresede que se hayan retirado todos los
materiales de empaque del electrodom0sticoan-
tes desu uso.
Mantenga elarea alrededor del electrodomOstico
libreyexentadematerialescombustibles, gasolina
u otrosvapores y materialesinflamables.
Siel electrodomOsticoest5 instaladocercade una
ventana, se deben tener cuidado para evitar que
las cortinaspasen sobre losquemadores.
NUNCA deje articulos sobre la cubierta de la
estufa. E1aire caliente del respiradero puede
encenderlos arficulosinflamablesy aumentar la
presi6n en los envases cerrados hasta hacerlos
reventar.
MuchosenvasesdetipoaerosolsonEXPLOSIVOS
cuando son expuesto al calor y pueden ser
altamente inflamables. Evite su uso o su
almacenamientocercadel electrodom0stico.
Muchos pl_sticos son vulnerables al calor.
Mantengalosplasticosalejadosde laspiezasde la
estufaquepuedan estar tibiasocalientes.No deje
arficulosde plastico sobrelacubiertade laestufa
pues se pueden derretir o ablandar si estan
demasiadocercadelrespiraderoode unquemador
superior encendido.
Para eliminar el riesgo de pasar sobre los
quemadores superiores calientes, no se deben
guardar artfculos en los armarios que est_n
directamentesobrelaestufa. Sitalesarmariosson
usados para almacenamiento, debe limitarse a
colocar articulos de uso poco frecuente y que
pueden guardarse en forma segura en una _rea
que esta sujeta alcalor proveniente de la estufa.
Lastemperaturas pueden no serapropiadas para
algunos articulos, talescomo articulos vol_tiles,
limpiadores o spraysen aerosol.
En Caso de
@ague el electrodom0sticoy la campana de
ventilaci6nparaevitarquelasllamassedispersen.
Extinga las llamas luego encienda la campana
para expulsar el humo yel olor.
• En lacubierta: Apague el fuego ola llama en
una sartOncon una tapa o una bandeja de
hornear.
• NUNCA levante o mueva una sartOnen lla-
mas.
• En el homo: Apague el fuego o la llama
cerrando la puerta del horno.
No use agua en los incendios de grasa. Use
bicarbonatode soda,unproducto qufmicosecoo
un extinguidordel tipoconespuma para apagar
un incendioo la llama.
paraI,=s
Nir' :s
NUNCA dejea losnifiossolos osin supervisi6n
cercadel electrodom0sticocuando est_en uso o
cuando est_todavfa caliente.
NUNCA permita que los nifios se sienten o se
paren enninguna parte dela estufapues pueden
lesionarseo quemarse.
Page 43

Selesdebeense_'_aralosnifiosquelaestufaylos
utensiliosqueestansobreellapuedenestar
calientes.Dejequelosutensiliosqueest&_
Oodnar
calientesseenfrienenunlugarsegurofueradel
alcancedelosnifiospequef_os.Selesdebeensefiar
alosnif_osqueunelectrodom_sticonoesun
juguete.Nosedebepermitirquelosnifiosjueguen
conloscontrolesoalgunaotrapiezadelaestufa.
ATENCION: NUNCA almacene articulos de
interOspara losnifios enlos armarios que estan
sobre la estufa o en el protector trasero de la
estufa. Losnifiosque setrepan en lapuerta de la
estufa para alcanzar tales articulos pueden
lesionarseseriamente.
Ger i
NUNCA use el electrodomOstico como un
calefactor para calentar o calefaccionar una
habitaci6nafindeevitarun riesgopotencialpara
elusuario ydaf'_arelelectrodomOstico.Ademas,
nouse lacubiertao elhomo comouna areapara
almacenaralimentos outensilios de cocina.
No obstruya el flujo del aire de ventilaci6n y
combusti6nbloqueandoel respiraderodelhomo
olastomas deaire. Siserestringe elflujode aire
alquemador se evitaelrendimiento correctoy se
aumenta la emisi6n de mon6xido de carbono a
nivelespeligrosos.
Evite tocar el _rea del respiradero del homo
cuandoelhorno estOencendido y durantevarios
minutos despuOs de que el horno haya sido
apagado. Algunas piezas del respiradero y del
_reacircundante se calientanlo suficientecomo
para causar quemaduras. DespuOsde que el
hornohayasidoapagado,notoqueelrespiradero
ni las _reascircundm'_teshasta que elias hayan
tenidotiempo suficientepara enfriarse.
Otras superficies potencialmente calientes
incluyenlacubiertadelaestufa,las_reasdirigidas
hacia lacubierta de la estufa, el respiradero del
homo,las_reasdirigidashaciaelrespiradero del
horno, lapuerta delhorno y las _reasalrededor
de lapuerta y la ventana.
ADVERTENCIA:NUNCA use la puerta del
electrodomOsticoo la gaveta, si la tiene, como
una banquetao asientopues estopuede resultar
en la posible volcadura del electrodomOstico,
dafioal electrodom0sticoylesiones graves.
Notoque un fococalientedelhomo conun p_o
htimedo pues el foco se puede quebrar. Si se
quiebra elfoco,desconectela corrienteelOctrica
haciala estufa antes de sacarel focopara evitar
choqueelOctrico.
Siempre coloque un utensilio en un quemador
superiorantes deencenderlo. AsegOresedeusar
la perilla correcta que controla cada quemador
superior. AsegOresede encender el quemador
correctoycomprobardequeenefectoelquemador
hayasidoencendido. Cuandohaya terminado de
cocinar,apague el quemador antes de retirar el
utensilio para evitar exposici6n a la llama del
quemador.
Siempreajustelallamadelquemador superior de
modo que no se extienda m_s all_ del horde
inferior del utensilio. Una llama excesiva es
peligrosa, desperdiciaenergia ypuede dafiar la
estufa,elutensilio olosarmarios queest_nsobre
laestufa.
NUNCA deje sin supervisi6n la cubierta de la
estufa cuando estO cocinando, especialmente
cuandousaunajustedecaloraltoocuando frieen
un utensilio profundo. Los derrames pueden
producir humo y losderrames de grasa pueden
inflamarse. Limpie los derrames grasosos tan
pronto como seaposible. No use calor altodu-
rante periodos de coccidnprolongados.
NUNCA caliente un envase cerrado en el
quemadorsuperioroenelhomo. Laacumulacidn
de presi6n puede hacer explotar el envase
causando una lesi6n personal grave o dafioa la
estufa.
Use tomaollas secos y gruesos. Los tomaollas
hfimedospueden causarquemaduras a causadel
vapor. Lastoallas uotros sustitutosno debenset
usados como tomaollas porque ellos pueden
quedar colgando a trav0s de los quemadores
superioresyencenderseoenredarseen laspiezas
de la estufa.
Siempre deje enfriarla grasa calienteque se ha
usado para freir en un utensilio profundo antes
de intentar movero manipularlo.
No permita que se acumule grasa u otros
materialesinflamablesenlaestufao cercadeella,
enlacampanaoenelventiladoraspirador. Limpie
la campana con frecuencia para evitar que la
grasauotros materialesinflamablesse acumulen
enlacampanaoenelfiltro.Enciendaelventilador
cuando cocine alimentos flameados debajo la
campana.
NUNCA use vestimentas de materiales
inflamables o sueltas o ropa de mangas largas
cuando est0cocinando. Lavestimenta sepuede
encender o enganchar en los mangos de los
utensilios.
Siempre coloque las parri]las del homo en la
posici6n deseada cuando el homo estOfrfo.
Deslicela parrilla del homo hacia afuera para
agregaroretiraralimento,usandotomaollassecos
yresistentes. Siempreevite alcm_ar dentro del
horno para agregar o retirar alimentos. Siuna
parrilla debe set sacada cuando esta todavia
caliente,use untomaollasseco. Siempreapague
elhomo despuOsdehaber terminadode cocinar.
Tengacuidado cuando abrala puerta delhorno.
Dejequeescapeelaire oelvaporcalienteantes de
sacaro volver colocarelalimento.
ADVERTENCIA SOBRE LOS ALIMENTOS
PREPARADOS: Siga las instrucciones del
fabricante de los alimentos. Si un envase de
plastico de alimento congelado y/o su tapa se
distorsiona, secomba o se daf_ade alguna otra
manera durante la cocci6n, descarte
inmediatamente el alimento y su envase. E1
alimentopuede estar contaminado.
NUNCAuse papel dealuminio para cubrir una
parrilladelhorno ola parteinferiordelhorno. E1
uso incorrecto puede resultar en un riesgo de
choque el0ctrico, incendio o d__o al electro-
dom0stico. Use papel de aluminio solamente
comoseindica en estagu/a.
Use sartenes con fondos planos y mangos que
sean f_cilesde tomar yque permanezcan frfos.
Eviteusar sartenes u ollasinestables,combadas
que se pueden volcar f_cilmente u ollas cuyos
mangos estOn sueltos. Adem_s evite usar
utensiliosespecialinentepeque¢'_ososartenescon
mangospesadospuesellospuedenserinestables
y volcarse facilmente. Los utensilios que son
pesados de mover cuando est_n llenos con
alimentopueden tambi0n serun peligro.
AsegOresedequeelutensilioeslosuficientemente
grande para contener en forma debida los
alimentos y evitar derrames. E1tamaf'_oes
particularmenteimportante cuandose frieenun
utensilioprofundo. AsegOresedequeelutensilio
tiene capacidad para el volumen de alimentos
queseva aagregar aligualque parala formaci6n
deburbujas de la grasa.
42
Page 44

Para reducira un mfnimolas quemaduras y que
los materiales inflamables y los derrames se
enciendandebidos a contactono intencionalcon
elutensilio,losmargosno debenextendersesobre
el quemador superior adyacente. Siempre gire
losmangosde losutensilioshacia elladoo hacia
laparte trasera delaestufa,nohacialahabitacidn
donde puede ser f_cilmente golpeados o
alcanzadospor los nitiospequetios.
Nuncadejeque un utensilio hiervahasta quedar
secopuesestopuededatiar elutensilioy laestufa.
Sigalas instruccionesdel fabricante cuando use
bolsaspara cocinaren elhorno.
Solamenteciertos tiposde utensiliosde vidrio/
cer_micoo glaseados sonconvenientespara uso
en la cubierta de la estufa o en el homo sin
quebrarse debido al cambio repentino de
temperatura. Sigalasinstruccionesdelfabricante
cuando use utensiliosde vidrio.
EsteelectrodomOsticoha sidoprobado respectoa
surendimientosegurousandoutensiliosdecocina
convencionales. No use ningfin dispositivo o
accesorio que no haya sido especfficamente
recomendado en esta gufa. No use tapas para
cubrirlos quemadoressuperiores, rejillaspara la
cubierta de la estufa ni agregue sistemas de
colweccidnde hornos. E1uso de dispositivos o
accesorios que 11o son expresamente
recomendados en esta gufa, puede crear serios
peligrosde seguridad, resultar enproblemas de
rendimiento y reducir la vida Otil de los
componentesde laestufa.
Seg.ridad de la
Lirlrlpim
Apaguetodosloscontrolesyesperequeseenfrfen
laspiezasdelaestufaantesde tocarlasolimpiarlas.
Notoquelasrejillasdelosquemadores olasareas
circundantes hasta que ellas no hayan tenido
tiempo suficientedeenfriarse.
Limpie la estufa con cuidado. Tenga cuidado
para evitar quemaduras de vapor si se usa una
esponja o un patio mojado para limpiar los
derrames en una superficie caliente. Algunos
limpiadores pueden producir vapores nocivos
cuando seaplican a una superficiecaliente.
Limpie solamente las piezas que se indican en
estagu/a. No limpieelempaque de lapuerta. E1
empaque es esencialpara un selladoherm0tico.
No restriegue,d__e,ni mueva elempaque de la
puerta. Nouse limpiadoresdehornode ninguna
claseen elhomo ni alrededor decualquierparte
delhomo autolimpiante.
Antesdela autolimpiezadelhomo, saque laasa-
dera, las parrillas del homo y otros utensiliosy
limpielosderrames excesivospara evitar que se
produzca demasiado humo, llamaradas o lla-
mas.
ATENCION: No deje alimentoni utensiliosde
cocina, etc. en el horno durante el cic]o de
autolimpieza.
Esnormalque la cubiertade laestufa secaliente
durante elciclodeautolimpieza. Por lotanto,se
debe evitartocar lacubierta durante un cic]ode
autolimpieza.
Aviso y
Adwelerba
I Sob
Secj dad
La(Propuesta 65)delaLeyde1986del Estadode
CaliforniasobreSeguridady Contaminacidndel
Agua Potable (California SafeDrinking Water
and ToxicEnforcementActof 1986)exige que el
Gobernador deCalifornia publique una listade
lassustanciasque segOnel Estadode California
causan c_ncero daf_oal sistema reproductor y
exigequelosnegociosadviertanasus clientesde
laexposicidnpotenciala tales sustancias.
Seadvierte a losusuarios de esta estufa que la
combustidndelgaspuede resultaren exposicidn
de bajo nivel a algunas de las sustancias
publicadas en la lista, incluyendo benceno,
formaldehfdoyhollfn, debido principalmente a
lacombusti6nincompletadel gasnatural ode los
combustibles de petr61eo licuado. Los
quemadoresajustadosenformadebidareduciran
lacombusti6nincompleta. Laexposici6naestas
sustancias puede tambi&_ser reducida a un
m/nimo ventilando losquemadores al exterior
enforma adecuada.
Losusuarios de esteelectrodomOsticoson porlo
tanto aquf advertidos de que cuando el horno
estaenciclode autolimpieza,puede haber algdn
nivelbajodeexposici6naalgunasdelassustancias
que aparecen en la lista, incluyendo mon6xido
de carbono. La exposici6n a esas sustancias
puede ser reducida ventilando debidamente el
hornoa]exteriordurante elcic]odeautolimpieza,
abriendo una ventana y/o una puerta en la
habitaci6n donde estO ubicado el
electrodom0stico.
AVISO IMPORTANTE RESPECTO A LOS
PAJAROSDOMESTICOS: Nunca mantenga
lospajarosde jaulaen lacocinao enhabitaciones
hastadondepuedan llegarloshumosdela cocina.
Losp_jaros tienen un sistema respiratorio muy
sensitivo. Los humos producidos durante el
ciclo de autolimpieza del homo pueden set
perjudiciales o mortales para los pajaros. Los
humos que despide elaceitede cocina,la grasa,
lamargarina, cuandosesobrecalientanylavajilla
antiaderentesobrecalentadapueden tambiOnset
perjudiciales.
ert JEst,as para
43
Page 45
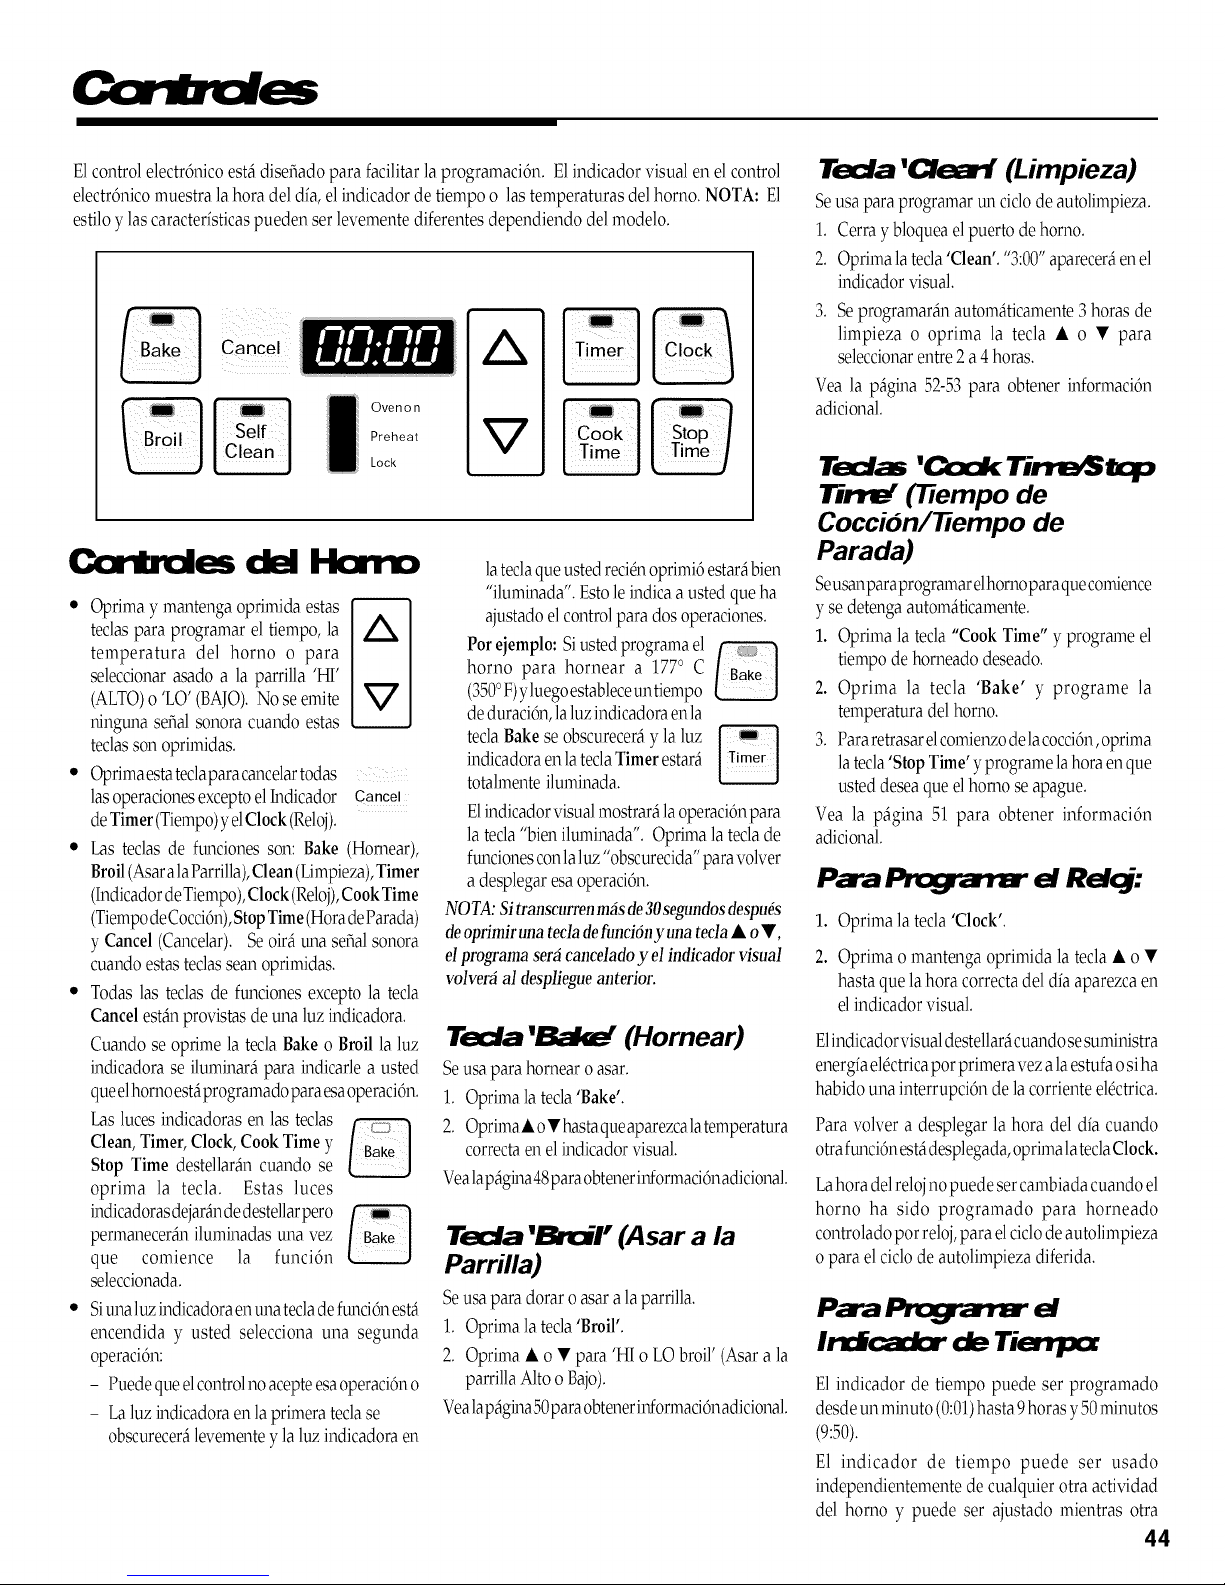
E1controlelectrdnicoestAdiseriadopara facilitarla programacidn. E1indicador visual en el control
electr6nicomuestra la horadel dia, elindicador de tiempo o las temperaturas del horno. NOTA: E1
esti]oylas caracterfsticaspueden set levementediferentes dependiendo del modelo.
CanCel
Ovenon
Preheat
Lock
i r/l ldes del
• Oprima y mantenga oprimidaestas
teclaspara programar el tiempo, la
temperatura del homo o para
seleccionarasado a la parrilla 'HI'
(ALTO)o%0' (BAJO).No seemite
ninguna serialsonora cuando estas
teclasson oprimidas.
• Optimaestateclaparacancelartodas
lasoperacionesexceptoelhldicador Cancel
deTimer(Wiempo)yelClock(Reloj).
• Las teclas de ftmciones son: Bake (Homear),
Broil(AsaralaParrilla),Clean(Limpieza),Timer
(IndicadordeTiempo),Clock(Reloj),CookTime
(TiempodeCoccidn),StopTime(HoradeParada)
y Cancel (Cancelar). Se oir_tmaserial sonora
cuandoestasteclas seanoprimidas.
" Todas las teclas de funciones excepto la tecla
Cancelest_nprovistasde una luz indicadora.
Cuaa-_dose oprime la tecla Bake oBroil la luz
indicadora se iluminarapara indicarlea usted
queelhomo estaprogramadoparaesaoperaci6n.
Las lucesindicadoras en las teclas
Clean, Timer,Clock,Cook Time y
Stop Time destellar_n cuando se
optima la tecla. Estas luces
permanecer_miluminadas una vez
indicadorasdejarandedestellarpero _
que comience la funci6n
seleccionada.
• Siunal_ indicadoraenunateclade funci6nest_
encendida y usted selecciona una segunda
operaci6n:
- Puedequeelcontrolno acepteesaoperaci6no
- Laluz indicadoraen la primera teclase
obscurecer_levementey laluz indicadoraen
i
lateclaqueusted reci&'toprimi6estarF,bien
"iluminada'. Estole indicaa ustedque ha
ajustadoelcontrolpara dos operaciones.
Porejemplo: Siusted programa el
horno para hornear a 1770 C
(3500F)yluegoestableceuntiempo
deduraci6n,laluzindicadoraenla
teclaBakese obscurecer_y la luz
indicadoraenlateclaTimerestar_
totalmenteiluminada.
E1indicadorvisualmostrar_la operaci6npara
latecla"bien iluminada'. Oprima lateclade
funcionesconlal_"obscurecida" paravolver
a desplegaresa operaci6n.
NOTA:Si transcurrenm_s & 30segun&s&spu_s
deoprimirunatecladefundOny unatecla• oV,
elprogramaser_canceladoy el indicadorvisual
volver_ al despliegueanterior.
Tecla 'Bakd (Hornear)
Seusaparahornearoasar,
1. Oprima la tecla'Bake'.
2. OprimaA o•hastaqueaparezca latemperatura
correctaenel indicadorvisual.
Vealap_gina48paraobtenerinformaci6nadicional.
Tecla 'Broil" (Asar a la
Parrilla)
Seusa paradorar o asar ala parrilla.
1. Optima la tecla'Broil'.
2. Oprima • o • para 'HI o LObroil' (Asara la
parrillaAlto oBajo).
Vealap_gina50paraobtenerinformaci6nadiciona].
Tecla 'Ckaari (Limpieza)
Seusa paraprogramar un ciclode autolimpieza.
1. Cerray bloqueaelpuerto de homo.
2. Oprima latecla'Clean'. "3:00"aparecer_enel
indicador visual.
3. Seprogramar_n autom_ticamente3 horasde
limpieza o optima la tecla • o • para
seleccionarentre2 a4horas.
Vea la p_gina 52-53para obtener informacidn
adicional.
Teclam '_ Tirrm_ top
Tirr_ ('fiempo de
Coccidn/7_empo de
Parada)
Seusanparaprogramarelhornoparaquecomience
y se detengaautom_ticamente.
1. Oprima la tecla "CookTime" yprograme el
tiempo dehomeado deseado.
2. Oprima la tecla 'Bake' y programe la
temperatura del horno.
3. Pararetrasarelcomienzodelacocci6n,oprima
latecla'Stop Time' y programelahoraen que
usted desea queelhomo se apague.
Vea la p_gina 51 para obtener informaci6n
adiciona].
Pa'a _ el Reloj:
1. Optima la tecla'Clock'.
2. Oprima o mantenga oprimida la tecla• o •
hasta que lahora correctadel dfaaparezca en
elindicador visual.
E1indicador_isualdestellaracuandosesuministra
energfael0ctricapotprimeravez alaestufao siha
habidouna interrupci6n de la corrienteel0ctrica.
Para volver a desplegar la hora del dia cuando
otrafm'_ci6nestfidesplegada,oprimalateclaClock.
Lahora delrelojno puede sercambiada cuandoel
horno ha sido programado para horneado
controladopot reloj,para elcic]odeautolimpieza
opara elcic]ode autolimpieza diferida.
Irdca:kr de Tienlxx
E1indicador de tiempo puede set programado
desdeun minuto (0:01)hasta 9horasy 50minutos
(9:50).
E1 indicador de tiempo puede ser usado
independientemente de cualquier otra actividad
del homo y puede set ajustado mientras otra
44
Page 46

funcidn del horno esta en operaci6n. EL
INDICADORDETIEMPONO CONTROLA EL
HORNO.
1. Oprima la teclaTimer.
2. Oprima y mantengaoprimida latecla• o •
hasta que el tiempo correcto aparezca en el
indicador visual.
• Elindicadordetiempocome_ar_ automaft-
camente.LaluzindicadoraenlateclaTimer
seiluminara siempreque el indicador de
tiempo estOen uso.
• Una se_al sonora larga y lapalabra "End"
(Fin)sera brevemente desplegada para
sefialarqueelindicadordetiempoha llegado
alfinal del tiempoprogramado.
Para cancelarel indicador de tiempo: Oprima y
mantenga oprimida la tecla Timer durante tres
segundos. La horadel diavolvera a apareceren
elindicador visual.
cres
Opci6n 1. (opci6n de f_ibrica)Cuatro se_ales
sonoras al fin del horneado, despuOsuna serial
sonora cada 30 segundos durante los cinco
minutossiguientes ohasta quese oprimala tecla
Cancel.
Opci6n 2. Cuatro se_ales sonoras al final del
horneado, luegoninguna otra sepalsonora.
Opci6n 3. Cuatro se_ales sonoras al final del
horneado, luego una sepalsonora cada minuto
durea_telas siguientes 12horas o hasta que se
oprima la teclaCancel.
alles So,_r_s d_ I-Ilorrm_do
C dado laorR, oj
; la
Visu lizaci n Relo
Si usted prefiere que la hora del dia no sea
desplegada:
P,,ra reglar: Oprimala teclaClocky Cancela
un mismotiempo ymantOngalasoprimidas du-
rante tres segundos.
Cuandodesapareceelreloj, oprimalateclaClock
paraque aparezca brevementelahora del dia,si
sedesea.
Pa'a restax_. Oprima ]atecla ClockyCan-
cel a] mismo tiempo y mantOngalasoprimidas
durante tres segundos. Lahora del diavolver_ a
apareceren el indicador visual.
E1homo se apagara automaticamente despuOs
de 12 horas, si usted lo deja accidentalmente
encendido. Usted puede desactivar esta
caracterfsticasilo desea.
Para Elirrir_r el Alaacjado
At./b:wn_(=o del
Desl=U_ de, 12 Horn/
Salaado IVImJo
1. Oprimalatecla Clockymant0ngalaoprimida
durante tres segundos.
2. Oprima ymantenga oprimida latecla• o •
hastaqueaparezca8:88enelindicadorvisual.
La hora correcta del dfa reaparecera en el
indicador despuOsde cuatro segundos.
P_ra r_t_ec_r: Repita lospasos 1 y2. Se
desplegara 12:00brevementeen elindicador vi-
sualseguido de la hora correctadel dfa.
C,€ rd
Lacaracteristicadebloqueo de controlevitaque
elhomo pueda ser encendido.
Tiempooperaran cuando la caracterfsticade
bloqueo decontrol estOactivada.
Repitael paso 1para desactivar.
Ustedpuede ajustar]a temperatura del horno si
considera que el horno no esta horneando
correctamente.Paradecidircuantodebecambiar
latemperatura,ajustelatemperatura 150C(250F)
mas alta o mas baja que lo que recomienda su
receta,luegohomee. Losresultadosdela prueba
deben darle una idea de cuanto debe ajustar la
temperatura.
NOTE: No se recomienda para ajustar la
temperatura si ]as solamenteuna o dos recetas
estM_en lapregunta.
Para Ajustar la
Tenlaeraba'a Homo
1. Oprima ]ateclaBake.
2. Coloque2880C(5500F)oprimiendolatecla•.
3. Oprima y mantenga oprimida la tecla Bake
durante tres segundoshasta queaparezca 00°
enel indicadorvisual.
• Sila temperaturadel horno estaba
previamenteajustada,se desplegarael
cambio. Porejemplo,si latemperatura del
horno fuereducida en15°,elindicador
visualmostrara menos15°.
4.
Oprimay mantenga oprimidalatecla• o •
paracambiarlatemperatura. Cadavezque se
oprime una de estas teclas, la temperatura
cambiaen5°.
• Latemperatura de]homo puede ser
aumentada odisminuida en 5°hasta 35°.
5.
Lahora del dia autom_ticamentereaparecer_
enel indicadorvisual.
Noesnecesarioreajustarlatemperaturadelhorno
si hay una interrupci6n o falla de la corriente
elOctrica.Lastemperaturas deasado ala parrilla
ylimpiezano pueden ser ajustadas.
1. Oprima ]ateclaCook Time yClocka]mismo
tiempoymantongalas oprimidasdurante tres
segundos.
• Seescucharauna sola sepalsonora.
• E1indicador visual mostrar_ laopcidn
actual.
2. Oprima la tecla • o • para seleccionarel
nOmerodelaopcidnqueusted desea.Lahora
correcta del dfa volver_ a aparecer en el
indicadorvisuMdespuOsdecuatrosegundos.
48
Pa-a _ ia Ol:x::i(_n
de Bloqusx) de Ccrtb'd
1. Oprima y mantenga oprimida la tecla Stop
Time y Cancel a un mismotiempo durante
tres segundos.
2. Aparecer_ "OFF" en el indicador visual
cuando esta caracteristica estO activada.
Solamente la funci6n Reloj e Indicador de
Page 47

C rtb'ol
Perillas de los
S enares
, dts
S dcs
[A , w mva, u:
• Si la llamaseapagadurantela cocciOn,
apagueelquemador.Sisedetectaunolor
fuertea gas,abraunaventanay espere
cincominutosantesdevolveraencender
elquemador.
• AsegOresede que todos los controles
superioresesten en la posiciOn'OFF"
(APAGADO)antesdesuministrargasala
estufa.
• NUNCA toque la superficie de la estufa
hasta que no se haya enfriado. Es de
esperar que algunas de las piezas de la
superficie,especialmentealrededordelos
elementos, se entibien o calienten
mientras esta cocinando. Use tomaollas
para proteger susmanos.
sin Pilo(o
E1encendidosinpilotoeliminala necesidadde una
luzpilotoconstante. Cadaunode losquemadores
superiorestieneun encendedor de chispa. Tenga
cuidadocuandolimpiealrededordelosquemadores
superiores.Sielpaf_ode limpiezaseenredaraenel
encendedorpuede dafiarloe impedirsu ignicidn.
Siun quemador superiorno enciende,verifiquesi
elencendedor esta roto, sucio o mojado. Siesta
obstruido, limpie el orificio pequefio debajo del
encendedorusando un alfilerderecho.
Quemador a gas sellado (modelos selectos)
_------ QUEMADOR
CABEZA DEL
Seutilizanparaencenderlos
quemadores superiores.
Se dispone de una selec-
cidninfinita de ajustesde
calor desde Bajo a Alto.
Enelajuste'High' (Alto)se
puede sentir un tope o una
muesca. Las perillas pueden ser ajustadas
exactamente en los ajustes correspondientes o
entre cualquiera deellos.
C) • Las ilustraciones cerca de la perilla
identifican cual es el quemador que
C) C) controla esa perilla. Por ejemplo, la
ilustraci6n siguiente muestra la ubicaci6n del
quemador traseroderecho.
1. Coloque un utensilio en la parrilla del
quemador.
• Lallamadel quemadorpuede ser derechao
aparecerseparada delorificiosinosecoloca
un utensilioen la parrilla.
2. Oprima y gire el bot6n a la izquierda a la
posici6nde encendido 'Light'.
• Seoir_elsonidodeunachispayelquemador
seencender_. (Loscuatro encendedores
har_ chispacuando cualquiera de las
perillasde losquemadores superiores sea
girada a laposici6n 'Light'.)
3. Despu6s de que elquemador encienda, gire la
perilla al tamaflo de la llama deseada.
• E1encendedor continuar_haciendo chispas
hasta que la perilla sea girada hasta m_s all_
de la posici6n 'Light'.
E1tamafioytipodelosutensiliosdecocinaafectar_
elajustede lallama. Para informaci6nsobrelos
utensiliosde cocinay otros factores que afectan
los ajustes de la llama, consulte el folleto "La
CocinaF,icil'.
Ajuste
High (Alto)
Usos
'High'(Alto):Seusaparahacer
hervir un lfquido. Siempre
reduzca el ajuste a un calor
mAsbajocuando los lfquidos
comiencena hervir o cuando
los alimentos comiencen a
cocinarse.
'Medium' (Mediano): Seusa
un tamafio de llama
intermedio para continuar
cocinando. E1alimento no se
cocinara mas rapido cuando
seusa un ajustede llama m_s
alto que el necesario para
mantenerun hervor suave. E1
agua hierve a la misma
temperatura siesta hirviendo
suavementeovigorosamente.
Low/Min.
'Low'(Bajo): Se usa para
calentar alimentos a fuego
lento, mantener losalimentos
calientesyderretir chocolateo
mantequilla.
Sepuede aveces cocinarenel
ajuste 'Low' si el utensilio se
tapa.Esposiblereducirelcalor
girandola perilla hacia'OFF'.
Verifique que la llama sea
estable.
_ ENCENDEDOR
Quemador a gas tradicional
una Int n adn de la
Ccrnenle El :b ca
1. Acerqueun f6sforoencendido a lacabeza del
quemador superior deseado.
2. Oprima ygirelaperilla de controllentamente
ala posici6n 'Light' (Encendido).
3. Ajustelallama alnivel deseado.
A TENCI ON:
Cuando so encienden los quemadores
superiores, asegOrese de que todas las
perillas de control esten en la posicion
"OFF" Primero encienda el fosforo y
mantengalo en la posicion antes de girar
la perilla a la posicion 'Light;
46
Page 48

en la EstUra
CtJ=ierta
Paraevitar que la cubierta se descolore
o se manche:
• Limpielacubierta de la estufadespu_s de
cadauso.
• Limpielos derrames &idos o azucarados
tanprontocomolacubiertasehayaenfriado
pues estos derrames pueden descolorar o
marcar laporcelana.
(_.awt_dbres Sellad_
Los quemadores sellados de su estufa estgm
asegurados alacubiertay nohartsidodisefiados
para ser sacados. Debido aque los quemadores
estAn sellados en la cubierta, los derrames o
rebosesno seescurrir&ldebajode la cubiertade
laestufa. Sinembargo,losquemadores pueden
serlimpiados despu6s de cadauso. (Verp_gina
54para las instruccionessobre la limpieza.)
Adiferenciade una estufacon
esta cubierta no se levanta ni
tampoco es removible. No
quemadores de gas est_ndar, _
intentelevantarlacubiertapor
ning6nmotivo.
de AIto
Velol:_dad (modelos selectos)
Modelos selectos ofrecen una hornilla de alta
velocidadsituadaenlaposici6ndelanteraderecha.
Estasquemadoresofrecencocci6nrapidaypuede
ser usado para hervir rapidamente agua o para
cocinargrandes cantidades de alimento.
QuBrrlcb" de Co:_na- a
F_/.ell_
(modelos selectos)
Modelosselectosofrecenun bajodanvueltaabajo
a la hornilla del simmer situada en la posicidn
posterior izquierda. Utilice esta homilla para
mantener los alimentos las salsas calientes, del
derretimiento del chocolate o suavemente del
simmer, lassopas o losguisados.
R_illas d4_ los
O. radm
Las rejillas deben estar debidamente colocadas
antes de comenzar a cocinar. La instalaci6n
incorrecta de las rejillas puede resultar en
picaduras de la cubierta.
Nouse los quemadores sin tener
un utensilio en la parrilla. E1
acabado de porcelana de las
parrillas puede picarse si no
existe un utensilio que absorba
elcalordelallama del quemador.
Aunque las parrillas de los
quemadores son durables,
gradualmente perder_n su brillo y/o se
descolorarF,n, debidoalas altastemperaturas de
lallama del gas.
I alillc:z -
Platillosprotectores porcelana removable est&t
obtenibleporestoelectrodomesticopara contener
derramamientos. Llame al 1-800-688-8408para
solicitarlos.
T cior l
Las estufas autoestables con quemadores
tradicionales estAnequipadas con una cubierta
que puede serlevantada.
Paralevantar lacubierta: cuando estOfrfa,sujete
el borde delantero de la cubierta y levAntelo
cuidadosamente hasta que las dos varillas de
soporte, si las tiene, situadas en el frente de la
cubierta entrenen su lugar conun chasquido.
Parabajar:Sujeteelbordedelanterodela cubierta
y cuidadosamente lev_ntelohacia atr_s en cada
varilla de soporte, si las tiene, para
desengancharlas. Luego baje con
cuidadolacubiertahacia
sulugar. Lasvarillas de I
soporte se deslizar_n vA_,_
hacia dentro del marco ',
de la cubierta.
1
I
I
47
Page 49

: y Asacb ,:111
1. Oprima la teclaBake.
• Seiluminara la luzindicadora en la tecla Bake.
" En elindicador visual aparecer_000.
2. Oprima o mantenga oprimida latecla • o • para seleccionarla temperatura delhorno.
• Seiluminara 1770C (3500F) cuando cualquierade las dosteclas seaoprimida.
" La temperatura del homo puede set ajustada de 770C a 2880C(1700Fa 5500F).
Indicadora
Luz _ _
'Bake '
3. Habr_ unretraso de cuatro segundos antes deque el horno se encienda.
Cuando elhomo seenciende:
" La luzindicadora Oven On seiluminar_.
" La luz'Preheat' se iluminar(t.
" La temperatura preseleccionadapermanecer_en el indicador visual.
Oven On
Preheat
Lock
4. Espere de8a 15minutos para que elhorno seprecaliente.
• Una serialsonora indicara que elhomo ya estfiprecalentado.
" La luzindicadora 'Oven On' permanecer_ iluminada.
" La luzindicadora 'Preheat' se apagar_.
5. Coloque lacomidaen elhorno.
NOTA: Latemperatura del horno puede ser cambiada encualquier momento
Preheat
i ven On
Lock
oprimiendo la tecla • o • para la temperatura deseada. Si se despliega otra
funci6n,oprima la teclaBake,luego optima la tecla • o • para seleccionarla
nueva temperatura.
6. Reviseelprogreso de la cocci6ncuando haya transcurrido eltiempo mfnimo decocci6n. Cocinedurante m_stiempo siesnecesario.
7. Oprima la teclaCancel ysaque el alimentodel horno.
" La luzindicadora en la teclaBakese apagar_.
Cancel
• Laluz indicadora 'Oven On' seapagara.
" La horadel dfa reaparecer_ en elindicador visual.
NOTA: Si se olvida de apagar el horno, este se apagarfi automfiticamente
despuOsde 12horas. Sidesea desactivar estacaracterfstica,vea lap_gina 45.
48
Page 50

S in
Pil®
Su estufa est_ equipada con un encendido sin
piloto. Conestetipo de sistemade encendido,el
gas se apaga automaticamente y el homo no
operar_duranteunainterruption dela corriente
el_ctrica.
Unf6sforoencendidonoencender_iel quemador
del homo. No se debe intentar encender el
homo durante la interrupci6n de la corriente
el6ctrica.
Para volver a colocar: Coloque la parrilla en el
soportedela parrilla enelhorno inclinelevemente
haciaarribaelextremodelantero;deslicelaparrilla
hacia atr_s hasta que pasa sobre los topes de
enganche;baje el frente de la parrilla y deslfcela
hacia adentro delhomo.
No cubra una parrilla completa con papal de
aluminio ni coloque papel de aluminio enla parte
inferior del homo. Seafectar_n los resultados del
horneado y se puede dafiar la parte inferior del
homo.
Posiciones de la Parilla
POSICIONPARA HORNEAR:
Usado para asar
cortes m_s altos
de carne de res o
depavo. Coloque
ambas parrillas
del homo, una
sobre la otra, en
las salientes lateralesde laparte inferior del
horno.
HORNEADOCON VARIAS PARRILLAS:
Dosparrillas: Uselas posiciones2y 4,o1 y4.
NOTA: Nunca coloque losutensiliosde cocina
directamenteen elfondo delhorno.
Cuando elhorno est6 en uso, nunca bloquee la
abertura del respiradero.
E1respiraderoest_ubicadoenlaparte inferiordel
protector trasero. Cuando el homo est_en uso,
esta _rea se calientan lo suficiente como para
causar quemaduras. No coloque artfculosde
pl_sticocercade laaberturadelrespiradero pues
el calor proveniente del respiradero puede
distorsionaro derretir el pl_stico.
t.tz dkJ
(modelos selectos)
Oprima el interruptor en el panel de
controlpara encender y apagar la luz
del homo. En modelos selectos,la luz
delhomo seenciendeautom_ticamente
cuando seabre la puerta.
Parrill
_ ATENCiON: No intentecambiarla
posiciOnde las parrillascuandoel homo
estecaliente.
PARRILLA5(posici6n m_isalta):
Se usa para tostar pan o asar a la parrilla
alimentos delgados nograsosos.
PARRILLA4:
Usada para la mayorfa del horneado con do
parrillas.
PARRILLA3:
Seusa para hornear alimentos enuna bandeja
de hornear galletas o un molde para rollo de
mermelada, para pasteles, pays de frutas o
alimentos congelados.
PARRILLA2:
Usada para asar cortes de carne pequefios,
cacerolas,homear pan,pastelen moldede tubo,
flanesu homeado condos parrillas.
PARRILLA1:
Usadopara asarcortesde carnegrandesycarne
de ave, pasteles congelados, suflOs, pas tel
esponjosou homeado con dosparrillas.
_a Pa'rilla
Sedispone,comoaccesorio,dem3amediaparrilla
paraaumentar lacapacidaddel horno. Seinstala
en la secci6n superior del lado izquierdo del
hornoyofreceespacioparaunaplatodeverduras
cuando seha colocadouna asadera grande enla
parrilla inferior. P6ngase en contacto con su
distribuidor Maytag para obtener el accesorio
"HALFILACK"o para solicitar, llame al 1-800-
688-8408.
HJ_.... d' _
Suhorno tiene dosparrillas. Han sidodise_adas
conun tope de enganche enel borde.
Parasacar:Tiredela parrilladerechohaciaafuera
hasta que se
detenga en la _ oi "__
posiciOndeltope; '{\XII!llli 7g
de enganche; le-
vante el frel"ltede _ \ __
laparrilla y tfrela
hacia afuera. _' { .... _ ))
49
Page 51

Aszr a la Pa'rilla
• Para los mejoresresultados,use una bandejadisefiada para asar a la parrilla. • Para sugerenciasadicionalessobrecomoasara laparrilla,consulteel
folleto"La CocinaF&il'.
/_.__._ €/e los Cor_es
1. Optima la teclaBroil.
• La luzindicadora se iluminar_ en la tecla Broil.
• 000seiluminar_tenel indicadorvisual.
• La luzindicadora 'Oven On' se iluminar£ Habr_ un retrasode ochosegundos antes
de que elhomo seencienda.
2. Optima la tecla• para seleccionarasado a la parrilla'HI' (ALTO)ola tecla• para
seleccionarasado a laparrilla 'LO' (BAJO).
• Seleccione'HI broil' para asado a la parrilla normal.
• Seleccione'LO broil'para asado a la parrilla a temperatura bajapara losalimentos
que demoran masen cocinarse,tal comola came deave.
3. Coloqueel alimentoen elhorno.
4. Devuelta a la carneuna vez,cuando estOamedio cocinar.
5.Optima la teclaCancel. Saqueel alimento yla asadera delhorno.
• La luzindicadora 'Oven On' se apagar£
• La luzindicadora 'Doff' se apagar&
• Lahora del dia volver_ a aparecer en elindicador visual.
Indicadora
Luz _
'Broil'
Preheat
l ven On
Lock
Cancel
Tabla para Asa" a la Pa'rilla
Posici6n de T_rmino de Tiempo Total de
Tipo de Came la Parrilla* Cocci6n Cocci6n (Minutos)**
Tocino 4 Bien Asado 6 a 10 rain.
Bistecs -- 2, 5 cm (1") de grosor 4 Medio 15 a 20 rain.
4 Bien Asado 18a 24 rain.
Pollo -- Presas 3 o 4 Bien Asado (LO Broil) 30 a 45 rain.
Pescado -- Filetes 4 Desmenuzado 8 a 12 rain.
Bistecs, 2, 5 cm (1") de grosor 4 Desmenuzado 10 a 15 rain.
Came de Res Molida -- Hamburguesas,
2 cm (3/4") de grosor 4 Bien Asado 15a 18 rain.
Jam6n -- Rebanadas Precocidas, 1,3 cm (_/2")de grosor 4 Tibio 8 a 12 rain.
Chuletas de Cerdo -- 2, 5 cm (1") de grosor 4 Bien Asado 22 a 26 rain.
* Laposici6n de laparrilla superior es #5
** Lostiempos de cocci6nson aproximados ypueden variar dependiendo de la carne.
5O
Page 52
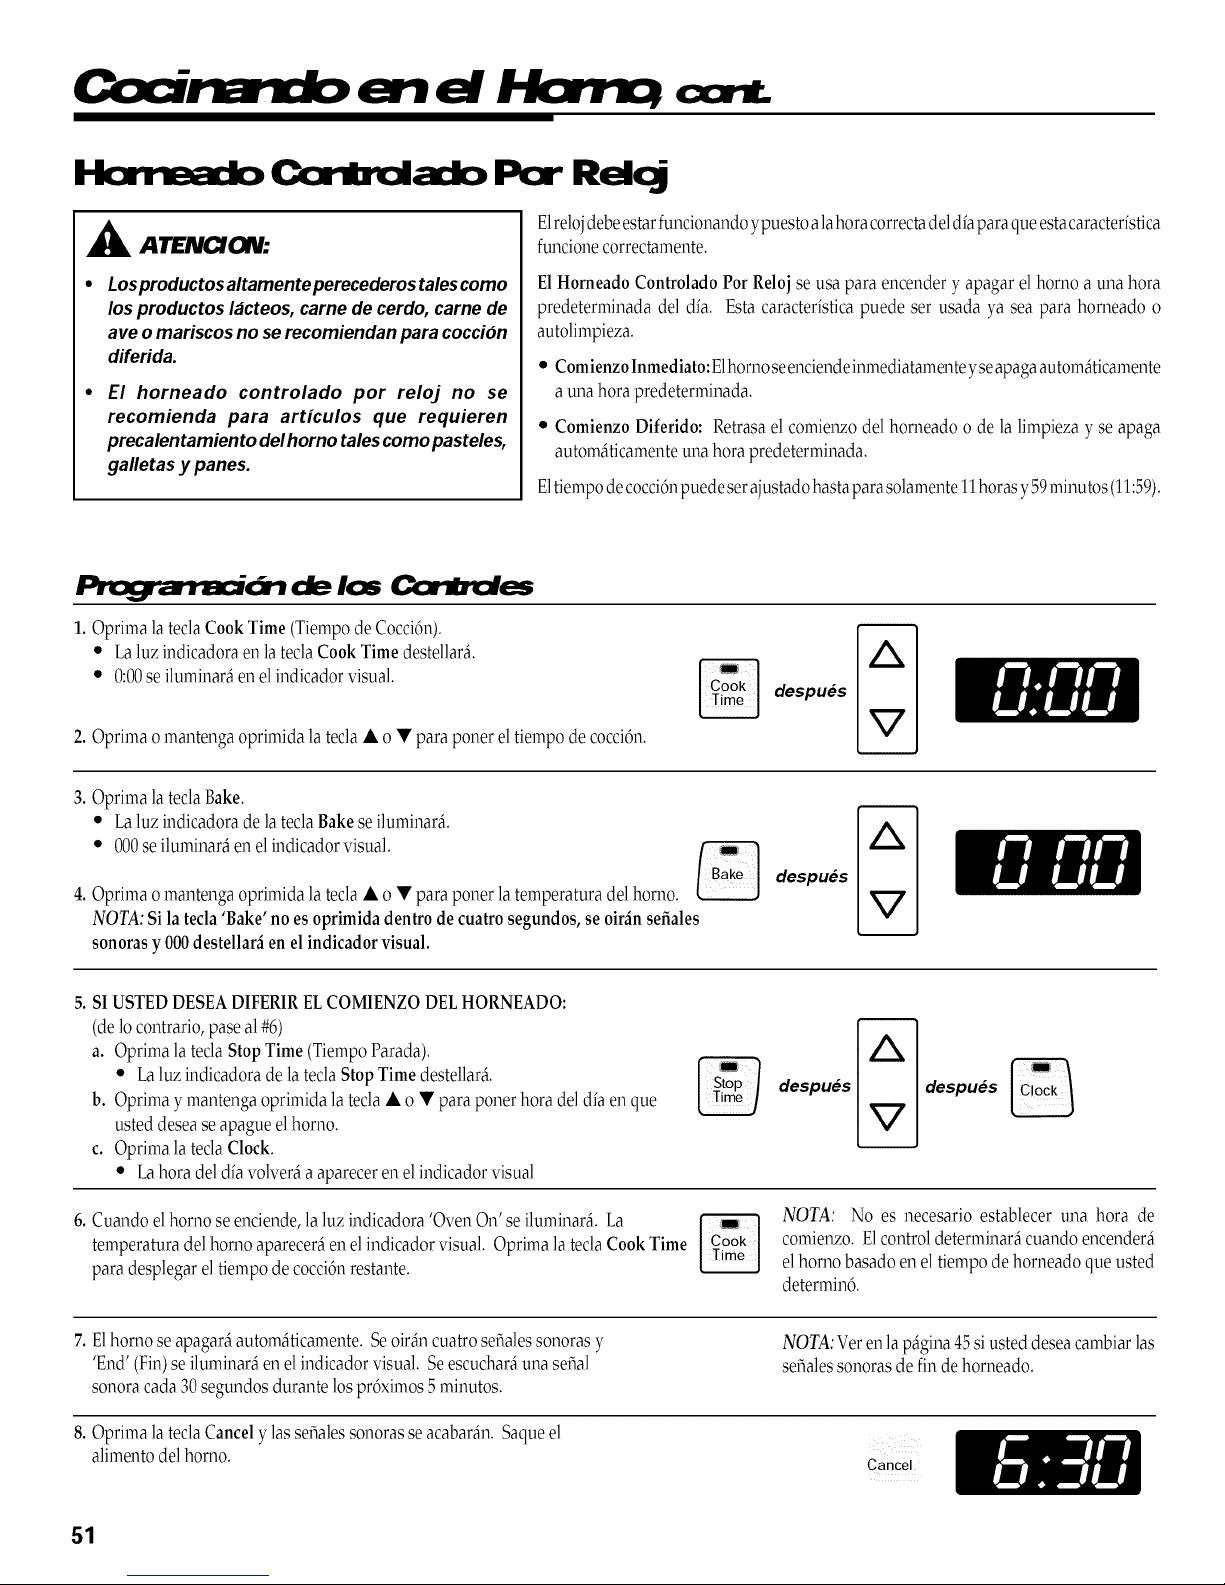
A ATEN(_CW:
E1relojdebeestarfuncionandoypuesto alahoracorrectadeldfapara queestacaracterfstica
funcionecorrectamente.
Losproductos altamente perecederos tales como
los productos lacteos, came de cerdo, came de
ave o mariscos no se recomiendan para coccion
diferida.
El horneado controlado por reloj no se
recomienda para articulos que requieren
precalentamientodelhorno talescomopasteles,
galletas y panes.
1. Optima ]a teclaCook Time (Tiempode Cocci6n).
* La luz indicadoraen lateclaCook Time destellar_.
* 0:00se iluminar_ enelindicador visual.
2. Oprimao mantenga oprimida latecla • o • para poner el tiempo de coccidn.
3. Oprimala teclaBake.
• La luzindicadora de la teclaBake se iluminar_.
• 000seiluminarAen elindicador visual.
E1Horneado Controlado Por Reloj se usa para encender y apagar el horno a una hora
predeterminada del dia. Esta caracterfsticapuede ser usada ya sea para horneado o
autolimpieza.
* ComienzoInmediato:Elhomo seenciendeinmediatamenteyse apagaautom_iticamente
a una horapredeterminada.
* Comienzo Diferido: Retrasa el comiel_o del horneado o de la limpieza y se apaga
autom_ticamenteuna hora predeterminada.
E1tiempodecocci6npuede setajustadohastapara solamente 11horas y59minutos(11:59).
%
despues
4. Oprimao mantenga oprimida latecla • o • para porterla temperatura del homo.
NOTA:Si la tecla'Bake' no es oprimida dentro de cuatro segundos, se oir_insefiales
sonorasy 000destellar_ien el indicador visual.
5. SI USTEDDESEADIFERIRELCOMIENZODELHORNEADO:
(delo contrario,pase al #6)
a. Oprimala tecla Stop Time(TiempoParada).
* La luz indicadorade latecla Stop Time destellara.
b. Oprima y mantenga oprimida la teda • o • para ponerhora del dfa en que
usted desea seapague el homo.
c. Oprimala teclaClock.
* La hora deldfa volver_a apareceren elindicador visual
6. Cuando elhorno se enciende,la luz indicadora 'Oven On' se iluminar_. La
temperatura del homo aparecer_enel indicador visual. Oprima la teclaCook Time
para desplegar eltiempo de cocci6nrestante.
7. E1horno seapagara automaticamente. Seoir_n cuatroserialessonoras y
'End' (Fin)se iluminara en elindicador visual. Seescuchar_una serial
sonora cada30segundos durante los pr6ximos5minutos.
8. Oprimala teclaCancel ylas serialessonoras se acabar_n. Saqueel
alimentodel horno.
%
despues_
despues despues
NOTA: No es necesario establecer una hora de
comienzo. E1controldeterminar_cuando encendera
elhorno basado en el tiempo dehomeado que usted
determin6.
NOTA: Veren lapagina 45si usteddesea cambiarlas
serialessonorasde fin dehorneado.
Cancel
51
Page 53

A TENCI ON:
• Esnormal que laspiezas de la estufa se
calientendurante elciclode limpieza.
• Evitetocarlapuerta,lacubierta,laventana
oelarea de ventilaciondelhomo durante
un ciclodelimpieza.
• Paraevitardat_oala puerta delhomo, no
intente abrirla cuando la palabra LOCK
aparezcaen el indicadorvisual.
• Nouselimpiadoresdehornoscomerciales
en el acabadodel homo autolimpianteni
alrededor de ninguna pieza del homo
puespuede danarelacabadoo laspiezas.
E1ciclo de autolimpieza usa temperaturas de
cocci6nsuperiores a las normales para limpiar
autom_ticamente todo elinteriordel homo.
Es normalque occuran llamaradas,humo o lla-
mas durante la limpieza si el horno estA
demasiado sucio. Es mejor limpiar el horno
regularmenteenvez de esperarhasta quesehaya
acumulado demasiada suciedad.
Durante el proceso de limpieza, la cocinadebe
estar bien ventilada para eliminar los olores
normales asociadoscon lalimpieza.
_ d_ la
a.l irrpiw
D_vueltaapagadoala luzdelhomo antesdeque
limpiecomo laluzpuedequemarduranteel cido
limpio.
P,etirelaasadera,todoslosutensiliosylasparrillas
del homo, Las parrillas del homo se pueden
descolorary no se pueden deslizar f_cilmente
despu_sdeun ciclo deautolimpieza.
Limpie el marco del
horno, el marco de la
puerta (elAreafueradel
empaque de la puerta)
y alrededor de la
aberturaenelempaque
delapuertaconun agentedelimpiezanoabrasivo
tal como 'Bon Ami'* o con detergente y agua.
EstasAreasno estAnexpuestasalas temperaturas
de limpieza y deban ser limpiadas para eviter
que lasuciedad queme y pegue durante el ciclo
de limpieza.
Para evitar dano no limpie ni frote el empaque
situado alrededor de la puerta del homo. E1
empaqueestAdienadopara sellarhermeticamente
elcalordurante el ciclode limpieza.
Limpieelexceso de grasa oderrames del panel
inferior del homo para evitar humo excesivo,
llamaradas durante el ciclode limpieza.
Limpielosderrames azucarados ylos derrames
_cidostalescomojugo delira6n,salsade tomate
osalsasa base deleche.La porcelenaesmaltada
esresistenetal Acidopero no aprueba de Acidos.
E1acabodo deporcelana puede descolorarse si
losderrames_cidosnosonlimpiadosantesdeun
ciclode autolimpieza.
ll_w'_rT_es c_ la
a, mlirrpiw
Lapuerta del horno se dafiarAsise fuerzapara
abrirla cuando la palabra 'LOCK' est6 todavfa
desplegadaen el indicadorvisual.
Las primeras veces que el homo sea limpiado,
puede detectarsealgodehumo yun pocode olor.
Estoesnormal ydisminuirAodesaparecerAconel
uso. Si el homo estAdemasiado sucio o si la
asadera ruedejada accidentalmenteen el horno,
puede producirse humoy olorexcesivos.
Amedida queelhomosecalientayseenfrfa,usted
puede oir ruidos de piezas metAlicasque se
expandenycontraen. Estoesnormaly nocausar_
dafioa su electrodom6stico.
Aproximadamentedepu_sde unahoradehaberse
terminadoelcicode autolimpieza, elbloqueode
la puertase desenganchar_y lapalabra 'LOCK'
se apagar_ en el indicador visual En este
momento lapuertopuededesbloquersey abrirse.
Algunasveceslasuciedadpuededejaruna ceniza
de color gris claro, tipo polvo la cual puede
eliminarse con un pano htimdeo. Si queda
suciedad en el homo, significa que el ciclo de
limpieza no fue lo suficientemente largo. La
suciedadpuedequitarseduranteelpr6ximocicle
de limpieza.
Silas parrillas del horno no se retiraron y no se
deslizan suavemente despu0s de un ciclo de
lirapieza,frotelasparrillasy lossoportesconuna
pequenacantidaddeaceitevegetalpararestaurar
la facilidad demovimiento.
Finas l/neas pueden aparecer en la porcelana
resul tando lasde la calefacci6n yelrefrascarsedel
final.Esto esnormal yno afectar_ funcionamiento.
Puede que aparezca una escoloraci6n blanca
depuOs de la limpieza si no se limpiaron los
derrames _cidos o azucarados antes del ciclo
limpieza. Esto es normal y NO afectar_ el
rendimento del homo.
*Losnombres de los productos son marcas registradas de sus respectivos fabricantes.
52
Page 54

Progra-rm_n de los _es _ el _ Aub_lirrpial_
1. Cerrala puertadel homo.Muevalapalancadebloqueodelapuerta a laderechaa laposici6nbloqueada.
2. OprimalateclaClean.
• Laluzindicadoraenla teclaCleandestellar_.
• 3:00aparecer_en elindicadorvisualindicandoque lalimpiezadurar_tres horas.
• Silapuerta noest_biencerradaobloqueada,en elindicadorvisualaparecer_"dr".
3. Oprimalatecla• o • para cambiareltiempodelimpieza,sise desea.
• Seleccione2horas parasuciedadlevehasta4 horasparamuysucio.
S1USTEDDESEARETRASARELCOMIENZODELALIMPIEZA(delocontrario,paseal #5):
a. OprimalateclaStopTime.
b. Oprimalatecla• paraseleccionarlahoradel diaenqueusteddeseaqueel homoseapague.
c. OprimalateclaClocky lahoradeldia volverdaaparecerenelindicador.
d. OprimalateclaStopTimeparaqueaparezcalahoraqueusted seleccion6.
5. Cuandoel hornoseenciende:
• Laluzindicadora'OvenOn'seiluminar_ylaluzindicadora'Lock'tambi0nseiluminarficuando
elhomo secalientea 2040C(4000F).
• Nose puedeabrirlapuerta cuandolaluzindicadora'Lock'est0iluminada
despues
despues{_
Preheat
N ven On
Lock
6. Aproximadamenteuna horadespuOsdequeel ciclodelimpiezatermina,laluzindicadora'Lock'
seapagar_. DespuOslapuertadelhornopuede serabierta. Muevala palancadebloqueode lapuertaa la
izquierdaparadesbloquearla.
7. Limpieel homoconun patiohOmedoparasacarelpolvode lascenizas.Sipermanecesuciedad
esindicaci6ndequeel ciclonofuelosuficientementelargo.
PARACANCELARELC1CtODEL1MPIEZA:
1. OprimalateclaCancel.
2. Si laluz indicadora'Lock'NOest_iluminada,desbloqueeyabrala puertadelhomo. Si laluz
indicadora'Lock'estdiluminada,dejequeelhornoseenfrieduranteunahoray luego
desbloqueeyabralapuertadelhomo.
Cancel
Preheat
I ven On
Lock
Preheat
I ven On
Lock -_
CUANDOLALUZ
SEAPAGA,ABRA
LAPUERTA,
53
Page 55

A I .E U ONI $ ara Urrpiez
• Aseguresede que la estufa este apagaday que todas las piezas
esten frias antes de manipularla o limpiarla. Estoes para evitar
dat_oy posibles quemaduras.
Tal::ta de Lirrpim
• Paraevitarmanchaso decoloraciOnlimpielaestufadespuesdecada
USO.
• Si seretiraalgunapieza,aseguresede quela vuelvea colocarenla
formacorrecta.
AsaderaeInserto
(modelosselectos
Cromocepillado
(modelosselectos
CajadelaHornilla
-Homillasconven-
cionalessolamente
Quemadores
-Sellados
-Convencional
Nuncacubraelinsertoconpapeldealuminiopuesestoevita quelagrasase escurraala bandejainferior.
• Coloqueunpatioenjabonadosobreelinsertoy labandeja;dejeremojarparasoltarla suciedad.
• Laveenaguajabonosatibia.Useunaesponjadefregarconjab6n para quitarlasuciedadpersistente.
• Labandejade asary elinsertopuedenser lavadosenel lavavajillas.
• Cuandoest_frfolaveconaguajabonosa,enjuaguey pula lasuperficiecongarnuza.
• Siest_rnuysucio,utiliceun limpiadorabrasivosuave,tallandoconelgranoparaevitarrayarlasuperficie.Enjuagueypulacongarnuza.
• Paraevitarlosrayonesno utiliceagentesabrasivosoc_usticos.
• Pararestaurarelbrilloy quitarlosrayones,sigaconStainlessSteelMagicSprayInoxidable*(Parte#20000008)**.E1cromosedecolorar_
permanentementesi sehorneaconla suciedadencima.
Lacajadelahornillaest4situadobajolacubiertaquepuedeselevantada.Limpieconfrequenciaparaquitarspillovers.Si elsuelosepermite
acurnular,puededatiarel final.
• Quitelasrejillasylashornillassuperficiales.Levantelacubiertapara arribalatapa.
• Lirnpieconeljab6nyriegue,aclaraci6ny sequese.
• Paralossuelosobstinados,utilicelosagentesde limpiezasuavementeabrasivostalescorno unengrudode bicarbonatodesosayagua.
odelBonArni*,y unapistaquefrigapl_sticanoabrasiva.
• Lirnpiefrecuenternente.Esperequeelquernadorseenfrfe.Lirnpieconunaesponjadefregarde pl4sticoconjab6n. Para la suciedad
persistente,useunlirnpiadornoabrasivoyunpatio.Tratedeevitarqueellirnpiadorseescurrahacialosorificiosdelgaspuesestoafectar_
lallama.Siellirnpiadorpenetraenlosorificios,lirnpieconunaescobillade cerdassuavesounalfilerderecho,especialmenteelorificio
debajodelencendedor.Noagrandeodistorsionelosagujeros.
• Tengacuidadodequeno entreaguaen losorificiosdelosquernadores.
• Tengacuidadocuandolimpieelencendedor. Siel encendedorest_hOrnedoo datiadoel quernadorsuperiornoencender_
• HornillasConvencionales:Lashornillassecasenelhornofijaronen750C(170°F).
Rejillasdelos
Quemadores
Areadela Tecladel
Relojy Control
Perillasde Control
* Los nombres de losproductos son marcas registradas de sus respectivos fabricantes.
** Llame al 1-800-688-8408para solicitarla.
• Lavelasrejillasconaguajabonosayuna esponjadefregardepl4sticonoabrasiva.
• Parasuciedadpersistente,lirnpieconuna esponjanoabrasivaeimpregnadaconjab6noconunaesponjayla CooktopCleaningCreme
(pieza#20000001)**.Sila suciedadquedarse,reaplicarelaCooktopCleaningCreme,cubrieconun patioh6medoy ernpaparepor30
minutos.Remojarotraves,enjuagueyseque.
• Parasuciedadquemada,saque lasparrillas,coloqueperi6dicosyrociecuidadosarnenteconunlirnpiadordehornocornercial.(Norocie
lassuperficiesvecinas.)Coloqueenbolsasdepl_sticodurante variashorasotoda lanoche.Usandoguantesdegoma,retiredelasbolsas.
Lave,enjuague,sequey vuelvaacolocarenla cubiertadela estufa.
• Paraactivar'ControlLock'(Bloqueode loscontroles)para limpieza,ver P@na 45.
• Lirnpieconun patiohfimedoyluegoseque.
• Sepuedenusar limpiadoresde vidrio siesqueserociaelpatioprimero. NO rociedirectamenteenla tecladecontrolni enel
_readelindicadorvisual.
• RetirelasperillasdecontrolenlaposiciOn'OFF'tirandode eliashaciaadelante.
• Lave,enjuagueyseque. Nouseagentesde limpiezaabrasivospues puedenrayarla superficie.
• Enciendacadaunode losquernadoresparaasegurarsedeque lasperillashansido reinstaladascorrectamente.
54
Page 56
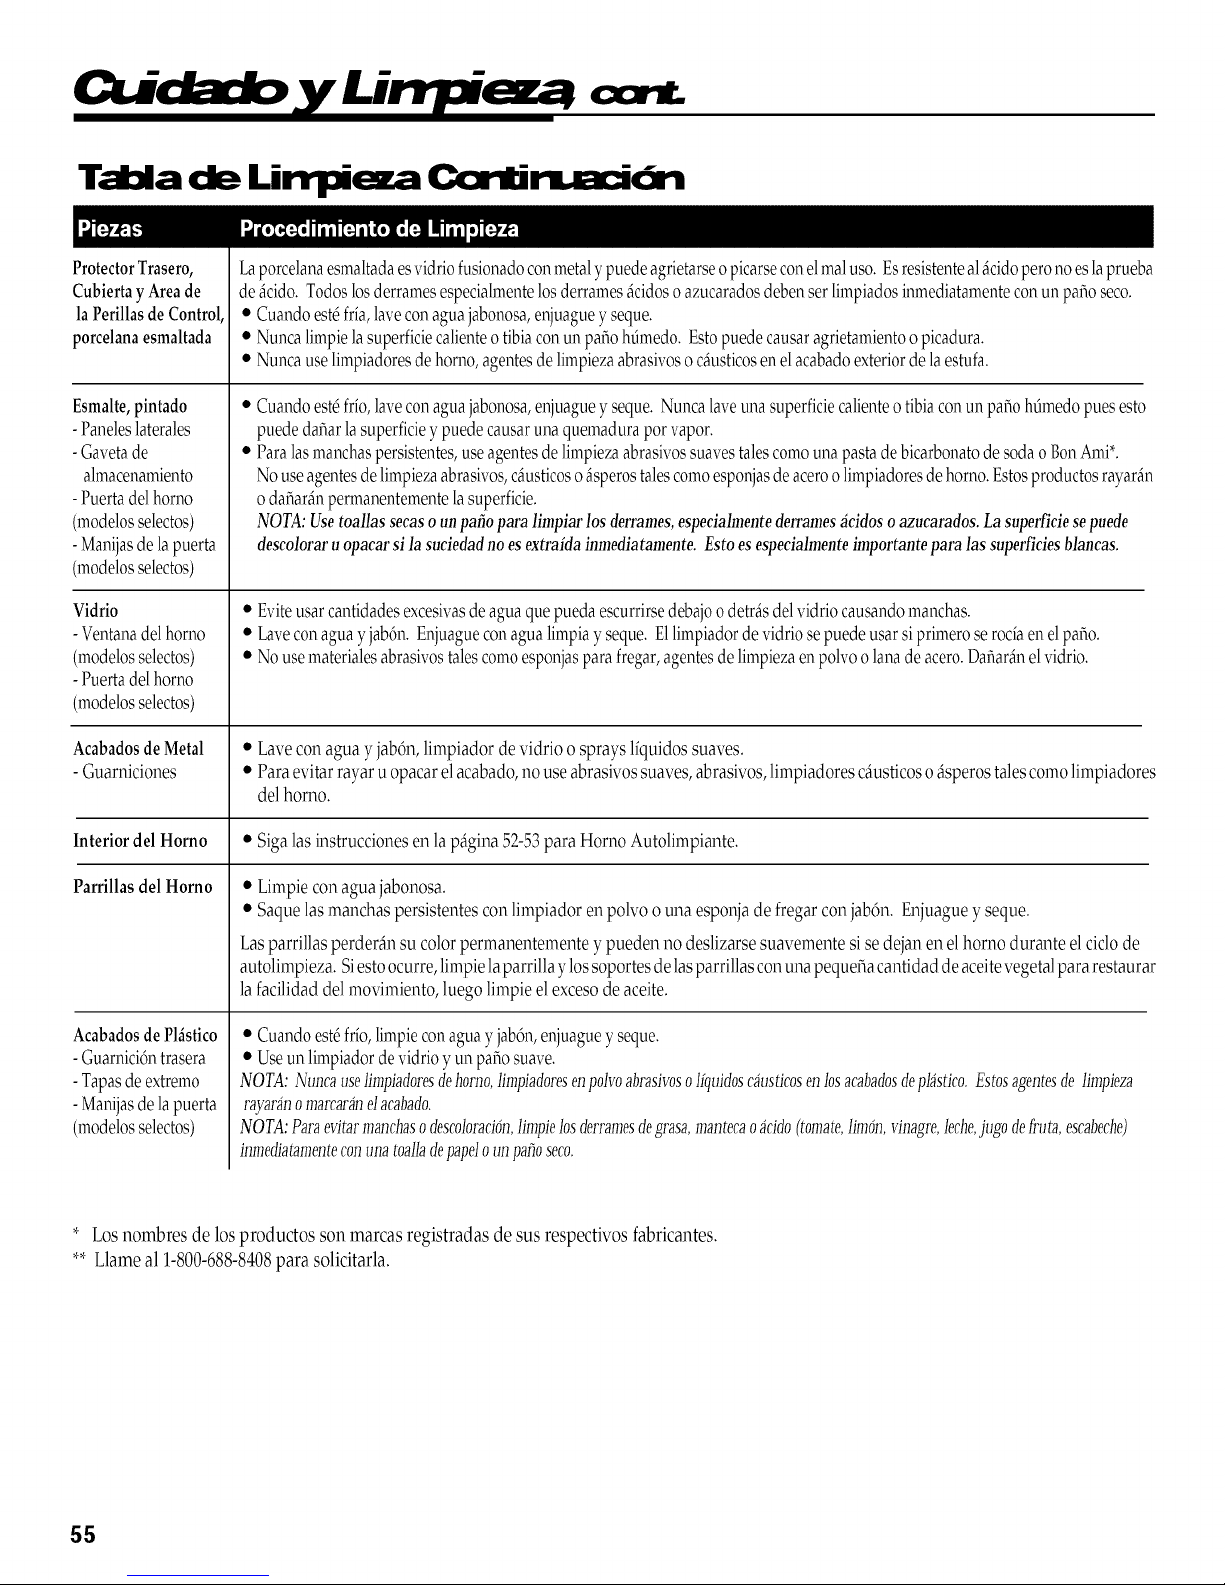
y Lirr
TaUa de Lin'lim Ccrli 6n
ProtectorTrasero,
Cubierta y Area de
la Perillas de Control,
porcelanaesmaltada
Esmalte,pintado
-Paneleslaterales
-Gavetade
almacenamiento
-Puertadelhomo
(modelosselectos)
-Manijasdela puerta
(modelosselectos)
Vidrio
-Ventanadelhomo
(modelosselectos)
-Puertadelhomo
(modelosselectos)
Acabadosde Metal
- Guamiciones
Interior del Homo • Sigalas instruccionesen lap_gina 52-53para Horno Autolimpiante.
Laporcelanaesmaltadaesvidriofusionadoconmetalypuedeagrietarseopicarseconelrealuso. Esresistenteal_cidoperonoeslaprueba
de_cido. Todoslosderramesespecialmentelosderrames_cidosoazucaradosdebenset limpiadosinmediatamenteconun paf_oseco.
• Cuandoest_fria,laveconaguajabonosa,enjuagueyseque.
• Nuncalimpiela superficiecalienteo tibiaconun patiohOmedo.Estopuede causaragrietamientoopicadura.
• Nuncauselimpiadoresdehomo,agentesde limpiezaabrasivosoc_usticosen elacabadoexteriordelaestufa.
• Cuandoest_frio,laveconaguajabonosa,enjuagueyseque. Nuncalaveunasuperficiecalienteotibiaconun patiohOmedopuesesto
puede&tar lasuperficieypuede causarunaquemadurapor vapor.
• Paralasmanchaspersistentes,useagentesdelimpiezaabrasivossuavestalescomounapasta de bicarbonatode sodao BonAmi*.
Nouseagentesdelimpiezaabrasivos,cfiusticosofisperostalescomoesponjasdeaceroolimpiadoresde homo.Estosproductosrayarfin
odatiarfinpermanentementelasuperficie.
NOTA:Usetoallassecaso unpatioparalimpiarlos derrames,especialmentederrames_cidoso azucarados.Lasuperficiese puede
descoloraruopacarsi lasuciedadnoes extrafdainmediatamente.Estoes especialmenteimportanteparalas superficiesblancas.
• Eviteusarcantidadesexcesivasde aguaquepuedaescurrirsedebajoodetrfisdelvidriocausandomanchas.
• Laveconaguayjab6n. Enjuagueconagualimpiay seque. E1limpiadorde vidriosepuedeusarsiprimeroserociaen elpaf_o.
• No usematerialesabrasivostalescomoesponjasparafregar,agentesdelimpiezaenpolvoo lanade acero.Daf_arfinelvidrio.
• Lave conagua y jab6n,limpiador de vidrio osprays lfquidos suaves.
• Para evitarrayar u opacarel acabado,no use abrasivos suaves,abrasivos,limpiadoresc_usticoso_sperostalescomolimpiadores
del horno.
Parrillas del Homo
Acabadosde Pklstico
-Guarnici6ntrasera
-Tapasde extremo
-Manijasdela puerta
(modelosselectos)
* Los nombres de losproductos son marcas registradas de sus respectivos fabricantes.
** Llame al 1-800-688-8408para solicitarla.
• Limpie conagua jabonosa.
• Saque lasmanchas persistentes conlimpiador en polvoo una esponjade fregar conjab6n. Enjuaguey seque.
Lasparrillas perder_n su colorpermanentemente y pueden no deslizarse suavemente si sedejanen elhomo durante elciclode
autolimpieza.Siestoocurre, limpielaparrilla ylossoportesdelasparrillas conunapeque_a cantidadde aceitevegetalpara restaurar
lafacilidad del movimiento,luego limpieel excesode aceite.
• Cuandoest_frfo,limpieconaguay jab6n,enjuagueyseque.
• Useun limpiadordevidrioy un paf_osuave.
NOTA: Nuncauselimpiadoresdehomo,limpiadoresenpolvoabrasivosoliquidosc&isticosenlosacabadosdepl_stico,Estosagentesde limpieza
rayar_nomarcar&elacabado.
NOTA:Paraevitarmanchasodescoloraci6n,limpielos&namesdegrasa,mantecao_cido(tomate,lim6n,vinaye,leche,jugodefruta,escabeche)
inmediatamenteconunatoalladepapelo unpatioseco.
55
Page 57

rl'fN l p
del
AD__AK_:
• Nocoloquepesoexcesivonisepareenla
puertadelhorno.Estopodriahacervolcar
laestufa,quebrarlapuertao lesionaral
usuario.
• No intente abrir o cerrarla puerta ni
hacerfuncionarel homohasta quela
puerta no ha sido debidamente
reemplazada.
• Nuncacoloquelosdedosentrelabisagra
y el marco delanterodel homo. Los
brazosdearticulacionsonmontadosa
resorte.Sisegolpeaaccidentalmentela
bisagrasecerrarabruscamentecontrael
marcodel homoy puede lesionarsus
dedos.
P_l'-d S_ll::_r:.
1. Cuando estd fria, abra la puerta del horno
hasta la posicidn primero a la parrilla
[abierta aproximadamente 10 cm (cuatro
pulgadas)].
2. Sujete la puerta de
cada lado. No use la
manija de la puerta
para levantarla.
3. Levante uniformemente hasta que la
puerta sesalga delosbrazosdearticulacidn.
Para vdver a ccio=a:.
1. Sujete la puerta de cada lado.
2. Alinee las ranuras de la puerta con los
brazos de articulaci6n de la estufa.
3.
Deslice la puerta hacia los brazos de
articulaci6n hasta que estdcompletamente
asentada enlasbisagras. Empuje haciaabajo
las esquinas superiores de la puerta para
asentarla completamente en las bisagras.
La puerta no debe quedar torcida.
NOTA: Lapuerta del horno en una estufa
nueva puede sentirse "esponjosa" cuando
se cierra. Esto es normal y disminuir_ con
el uso.
Vm11:armdel
(modelos selectos)
Para proteger la ventana de la puerta del horno:
1. No use agentes de limpieza abrasivos tales
como esponjas de fregar de lana de acero o
limpiadores en polvo pues pueden rayar el
vidrio.
2. No golpee el vidrio con ollas, sartenes,
muebles,juguetes u otros objetos.
3. No cierre la puerta del horno hasta que las
parrillasdel horno no estdn ensu lugar.
A1golpear,rayar,hacervibrar oesforzarelvidrio
puede debilitarsu estructuracausando un mayor
riesgo de rotura en una fechaposterior.
Torrillos Nivel
ATENCiON:
• Verifiquesielsoporteantivuelcoesta
asegurando al piso uno de los tornil-
los niveladores para evitar que la
estufa se vuelque accidentalmente.
Laestufa debesernivelada cuando se
instala. Si la estufa no est_nivelada,
gire los tornillos niveladores de
plAstico ubicados en cada
esquinade laestufahasta
que quedenivelada.
TORNILLONIVELADOR
f
DISPOSITIVO
ANTIVUELCO
DL jar
de la Estia a
Gas
Los conectores de la estufa a gas usados para
conectarla al suministro de gas no ban sido
disefladospara movimiento continuo. Una vez
instalada,NOmueva estaestufaagasdeunlugar
aotropara propdsitosdelirapiezaopara ubicarla
en otro lugar. Sila estufa debe ser movida y/o
retirada para su reparacidn, siga los
procedimientosdescritosen lasinstruccionesde
instalacidn. Para obtener informacidnllame el
Maytag Customer Service al 1-800-688-1120.
AD__AK_:
Desconectela energia a la estufa an-
tes de reemplazar el foco.
Use un tomaollas seco para evitar
posible dat)oa susmanoscuandoeste
reemplazando el foco.
Asegurese de que el foco este frio
antes de tocarlo.
• Notoqueelfococalienteconunpat)o
humedopuesestopuedequebrarel
foco.
Pa'a reerrpl ea" el foo:x
1.
Cuando elhorno estd fifo,sujetela tapa de la
bombillaensu lugar,luego desliceel retdnde
alambre fuera dela cubierta.
NOTA:La cubierta de labombillase caerAsi
no essujetaensu lugarcuando estAsacandoel
retdnde alambre.
2. Saque lacubierta del focoyel foco.
3. Coloque un foco de 40 watts para
electrodom_stico.
Vuelva a colocarlacubierta de la bombillay
aseghrela con elretdnde alambre.
Vuelvaa enchufarla estufa. Vuelvaa colocar
lahora correcta.
CUBIERTADELFOCO
RETENDE ALAMBRE
Para evitar que se vuelque accidentalmente, la
estufa debe ser anclada al piso insertando el
tornilloniveladortraseroenel soporteantivuelco.
56
Page 58

Protejael fondo del horno con-
tra derrames, especialmente
derrames Acidoso ,,_- .....................................
puedendescolorarla
porcelana esmal-
azucarados, pues __i 2
tada. Usedtamaf'_o .. ta
correctode utensilio
para evitar derrames y reboses.
E1fondodelhornosepuedesacarpara facilitarsu
limpieza.
Para sacar: Cuando se enfrfe,saquelas parrillas
del homo. Deslicelosdos retenes, ubicados en
cada esquina del fondo delhomo hacia la parte
delantera delhomo.
Levante el borde trasero del fondo del horno
ligeramente y luego deslfcelohacia atras hasta
que elhorde delantero del hornopasa por sobre
elmarcodelantero. Saqueelfondodel hornodel
homo.
Paravolveracolocar:Coloqueelhordedelantero
del fondo del horno en el marco delantero del
horno. Bajela partetrasera del fondo del homo
ydeslicelosdosreteneshaciaatrAspara bloquear
elfondo del horno ensu lugar.
$ ,=res
"l' cia"
(modelos selectos)
Bajoninguna circunstanciase debendesarmarlos
quemadores superiores para su limpieza. E1
conjuntodelquemadorsuperiorpuedeserretirado
para limpiarelarea delacajadelquemador. Los
dosconjuntosdequemadoressuperioreshartsido
asegurados durante el transporte con tomillos.
Una vez que se haya instalado la estufa, estos
tomillos deben ser retirados para que los
quemadorespuedan ser sacadosen formaf_cily
r_pida.
Parasacar:Dejequeelquemadorseenfrfe.Levante
la cubierta de la estufa. Sujete el conjunto del
quemador y gfrelolevemente haciala izquierda
paradesengancharlasdos lengi]etasdelconjunto.
Luegolevanteelconjuntoytirede 01hacialaparte
trasera de la estufahasta que los extremos del
obturadordeairedelconjuntosedesenganchende
lav_lvula.
Para volver a colocar:Inserte los extremos del
obturador de aire delconjunto del quemadoren
lasvalvulasybajeelquemadorasulugar.Asegure
lasdoslengfietasdelquemadoren lasranurasdel
soporte del quemador que est_ instalado en la
parte inferior del quemador. (NOTA: Si las
lengi,ietasnoquedanbieninsertadasenlasranuras,
el conjtmto del quemador quedara inestable y
puedequelosquemadoresno enciendanenforma
debida.)
Gatmla €tle
La gaveta de almacenamiento se encuentra en la
parte inferior de laestufa yes segura y colweniente
para guardar utensilios de cocina de metal y vidrio.
NO almacenepl_stico, artfculos depapel, alimentos
o materiales inflamables en esta gaveta. Saque la
gaveta para limpiar debajo de la cocina.
Para sacar: Vacfela gaveta y luego tfrelahacia
afuerahasta laprimeraposici6ndetope. Levante
elfrentede lagavetaytfreloalasegundaposici6n
detope. Sujetelosladosy lev<elahaciaarribay
hacia afuerapara sacar lagaveta.
Paravolver a colocar: Deslicelos extremosde la
gavetaen losrieles. Levantela partedelanterade
la gaveta y suavemente emptijela a la primera
posici6nde tope Lev_ntelaycontinOedeslizando
lagavetahasta la posici6ncerrada.
arEmi n
Los electrodom6sticos que requieren energla
el6ctrica estan equipados con un
enchufe de tres clavijas con
conexi6na tierra, el cualdebe
serenchufado directamente
enuntomacorrienteel@trico
de tres agujeros, para 120
voltiosdebidamente conectado atierra.
Siempredesenchufeel electrodom0sticoantesde
efectuarreparaciones.
E1enchufede tres clavijascon conexi6na tierra
ofrece protecci6n contra peligros de choques
el@tricos. NO CORTE NI ELIMINE LA
TERCERACLAVIJADECONEXIONATIERRA
DELENCHUFEDELCORDON ELECTRICO.
Sisolamente sedispone de un tomacorrientesin
conexi6na tierra, de dos agujerosu otro tipo de
tomacorriente elOctrico, el propietario del
electrodom6sticoespersonalmente responsable
de reemplazar el tomacorriente con un
tomacorriente el6ctrico de tres agujeros
debidamente puesto a tierra.
57
Page 59

Sdicit Ser cio
Vedfiqm Estm I:Ulm si...
Tcda la esbJra o i=mrte clb dla
no funciQrla
• Verifiquesielenchufeest_firmementeinsertado
enel tomacorriente.
• Verifique o vuelva a reponer el disyuntor.
Verifiqueoreemplaceelfusible.
• Verifiqueelsuministrode energfael@trica.
• P,evise si la superficie y/o los controles del
homoest_ndebidamenteajustados.Verp_ginas
44y 46.
• Verifique si la puerta del horno se ha
desbloqueadodespu0sdelciclodeautolimpieza.
VerPagina 53.
• Revisesi elhomo esta ajustado para homeado
diferidoo programade limpieza.VerP_gs.51y
53.
en:i,m'ld_
• Asegdresede que la estufaestOdebidamente
enchufadaenel suministroel@trico.
• VerifiquesihayalgOnfusibledelcircuitofundido
ose ha disparado eldisyuntorprincipal.
• Verifiquepara asegurarsedequelos orificiosde
losquemadores o los orificiosdel encendedor
no estOn obstruidos. Verpagina 46.
• Verifiquepara asegurarsede queelencendedor
estOsecoyquehagaelsonido'click'.E1quemador
no seencender_si elencendedor est_da*-'_ado,
sucioomojado.Sielencendedornohace'click',
girelaperillade controla la posici6n"Off".
La lla'_i es €lispa_a
• Los orificios del quemador pueden estar
obstruidos.
• Lallamadel quemadoenecesitaruna adjuste.
La IlaTa del _ s40e-
ricr se leararia clel aiflciQ
• Verifiquepara asegurarse de que el utensilio
est_asentado en laparrillasobre elquemador.
Los res_lllaJ_ del
son difererles aim dd
artl_lia-.
• Las temperaturas a menudo var/aa_ entre un
horno nuevo y uno antiguo. A medida que pasa
el tiempo, la temperatura del horno cambia y
puede hacerse m_s caliente o m_s frfa. Ver la
pagina 45 por los instrucci6nes para ajustar le
temperatura del horno.
NOTA: No serecomienda ajustar la tempera tura
si ha tenido problemas con solo una o dos
recetas.
Los resLJ_ cld
no sm Io Cl_ usted es_
• Verifique la temperatura del horno que se
seleccion6.Asegdresedeque elhomohaya sido
precalentadocuandolarecetaolasinstrucciones
indicanque debeprecalentarse.
• Verifiquelaposici6nde lasparrillas. VerpAgina
49.
• Useelutensiliocorrecto.Losutensiliosobscuros
producen m'_dorado obscuro. Los utensilios
brillantesproducen dorado masclaro.Consulte
el folleto "La Cocina Facil" para mayor
informaci6nsobrelos utensiliosde hornear.
• Verifiqueelusodepapelde aluminioenelhomo.
Nuncausepapel dealuminiopara cubrirtodala
parrilladelhomo. Coloqueun pequef_opedazo
de papel de aluminio en la parrilla debajodel
utensiliopararecogerlos derrames.
• Verifiquelaubicaci6nde losutensilios. Alterne
losutensilioscuando use dosparrillas. Dejede
2,5a5cm(1a2pulgadas)entrelosutensiliosylas
paredesdel horno.
• AsegOresede que el respiradero del horno no
est0bloqueado. Verpagina49para laubicaci6n.
• Verifiquepara asegurarse de que laestufa esta
nivelada.
Los ali_ noseasmala
parrilla en f(ma €iebidla
• Verifiqueelajustedel horno. Verpagina 50.
• Verifique las posiciones de las parrillas. Ver
pagina 50.
• E1papeldealuminioseus6de maneraincorrecta.
Nunca forre elinserto del asador con papal de
aluminio.
[] l'cma echa daxx;iado
II.rro cua'do se asa' a la
pardlla
• Elalimentoestademasiadocercadelallama.Ver
pagina 50para mayor informaci6n.
• E1insertodel asadorest_ cubiertocon papel de
aluminio.
• Noserecort6elexcesodegrasade lacameantes
deponerla asar ala parrilla.
• Seus6una asadera sucia.
El horm mse aUb:tirrlpia
• Verifiquepara asegurarsede que elcic]ono estO
ajustadoparaun comienzodiferido.
• Verifiquesila puerta est_cerrada.
El horm mse lirrl=iO en
fcmlt d_d_
• Puede que sea necesario un tiempode limpieza
m_sprolongado.
• Los derrames excesivos, especialmente de
alimentos azucarados y/o acidos no fueron
limpiadosantes del ciclode autolimpieza.
La _del lz=rm no se
d bloqu del
cido d_ lirrluier._
• E1interiordelhorno todavfaest_caliente. Deje
que paseaproximadamenteuna horapara que
elhomo seenfrfeantes de que se completeun
ciclode autolimpieza. La puerta puede ser
abiertacuandodesaparezca lapalabra 'LOCK'
del indicadorvisual.
Se acurnJa cu-dnad_n cb
la lxnaJaJ en la vertm dd
• Esto es normal cuando se cocinanalimentos
con altocontenido dehumedad.
• Se us6 humedad excesivacuando limpid la
ventana.
_d hem) se encierd_
se sierle un dcr fumle o sale
un poco €lb I1:_
• Esto es normal en una estufa nueva y
desaparecera despuOs de tu_ospocos usos. Sise
abre una ventana o seenciende un ventilador se
ayudara a extraer el humo y el olor.
• Encendiendo un ventilador ayudar_ a extraer
el humo y/o el olor.
• Puede haber demasiada suciedad de alimentos
en el fondo del horno use un ciclo de auto-
limpieza.
En d irdcador aiere:e la
letra"F" _ un
• Esto es un c6digo de falla. Si aparece un
c6digo de falla en el indicador visual y se
escuchaunasef'_alsonora,oprimalatecla'Can-
cel'. Si el c6digo de falla y la serialsonora
contindan,desenchufe laestufa. Espere unos
minutos luegovuelva aenchufar la estufa. Si
elc6digo defallay la serialsonora continOan,
desconecte la estufa y llame a un t@nico
autorizado.
• Sielhornoestaexcesivamentesucio,sepueden
producirllamaradasexcesivaslocualresultara
en un c6digo de falla durante el ciclo de
limpieza. Oprimala tecla'Cancel' y dejeque
el horno se enfrfe completo, limpie fuera de
excessodel suelo y despu0s reajuste el ciclo
limpio. Siel c6digode fallay laalarma sonora
todavfacontinOa,desenchufelaestufayllame
a un t@nicoautorizado.
58
Page 60

Ga-atb-a de la
EsllUra
GarantlaCompletade UnAfto- PiezasyManode
Obra
Durante un (1) afio desde la fecha original de
compra al por menor, se repararAo reemplazarA
gratuitamente cualquier pieza que falle durante
usonormal en el hogar.
GarantlasLimitadas- Piezas Solamente
Desde el SegundoHasta elQuintoAfio-A partir
de la fecha original de compra, se reparar_ o
reemplazarAgratuitamente las piezas indicadas a
continuaci6nque fallen durante uso normal en lo
que respecta alas piezas y el propietario deberA
pagar todos los otros costos incluyendo mano de
obra, kilometrajey transporte.
• Quemadores de Gas Sellados
Residentes Canadienses
Lasgaranfiasanteriorescubrensolamenteaquellos
electrodom6sticosinstalados en Canad_ que han
sido certificadoso aprobados por las agencias de
pruebas correspondientespara cumplimientocon
la Norma Nacional de Canada a menos que el
electrodom_sticohaya sidotraido aCanada desde
losEE.UU.debido a un cambiode residencia.
Lo O.e No estas Ga-a -as:
1. Situaciones y dafios resultantes de cualquiera de las siguientes eventualidades:
a. Instalaci6n, entrega o mantenimiento inapropiados.
b. Cualquier reparaci6n, modificaci6n, alteraci6n o ajuste no autorizado pot el
fabricante o pot un centro de servicio autorizado.
c. Mal uso, abuso, accidentes o uso irrazonable.
d. Corriente el_ctrica, voltaje o suministro incorrecto.
e. Programaci6n incorrecta de cualquiera de los controles.
2.
Las garantias quedan nulas si los nfimeros de serie originales han sido retirados,
alterados o no son fAcilmente legibles.
3.
Focos.
4.
Productos comprados para uso comercial o industrial.
5.
E1costo del servicio o llamada de servicio para:
a. Corregir errores de instalaci6n.
b. Instruir al usuario sobre el uso correcto del artefacto.
c. Transporte del artefacto al establecimiento de servicio.
6.
Losdafiosconsecuentesoincidentalessufridospor cualquierpersona comoresultado
del incumplimiento de esta garantia. En algunos estados no se permite la exclusi6n
o limitaci6n de dafios consecuentes o incidentales, pot lo tanto la limitaci6n o
exclusi6n anterior puede no aplicarse en su caso.
Las_arantfas especfficasexpresadas anteriormente son
las UNICAS _rantfas provistas porelfabricante. Estas
garantfasle otorgan derechoslegalesespecfficosy usted
puecte tenet adem_s otros derechosque vat[an & un
estadoa otto.
Si Nec:esita Ser cio
Llame al distribuidor donde compr6 su electrodom_stico o llame a Maytag Appli-
ances Sales Company, Maytag Customer Assistance al 1-800-688-1120 EE.UU. y
Canada para ubicar a un t_cnico autorizado.
Asegfirese de conservar la prueba de compra para verificar el estado de la garantia.
Consulte la secci6n sobre la GAP,ANTIA para mayor informaci6n sobre las
responsabilidades del propietario para servicio bajo la garantia.
Si el distribuidor o la compafifa de servicio no pueden resolver el problema, escriba
a Maytag Appliances Sales Company, Attn: CAIR °, Center, P.O. Box 2370, Cleveland,
TN 37320-2370 o llame al 1-800-688-1120 EE. UU. y CANADA.
NOTA: Cuando llame o escriba acerca de un problema de servicio, por favor incluya
la siguiente informaciOn.
a. Su nombre, direcci6n y ntimero de tel_fono;
b. Ntimero de modelo y nfimero de serie;
c. Nombre y direcci6n de su distribuidor o t_cnico de servicio;
d. Una descripci6n clara del problema que estA experimentando;
e. Prueba de compra (recibo de compra).
Las guias del usuario, manuales de servicio e informaci6n sobre las piezas pueden
solicitarse a Maytag Appliances Sales Company, Maytag Customer Assistance.
Form No. A/08/01 Part No. 8113P305-60 74005910 Litho U.S.A.
 Loading...