

Page 1
I
(Refrigerator/Freezer1
!.ofrost |
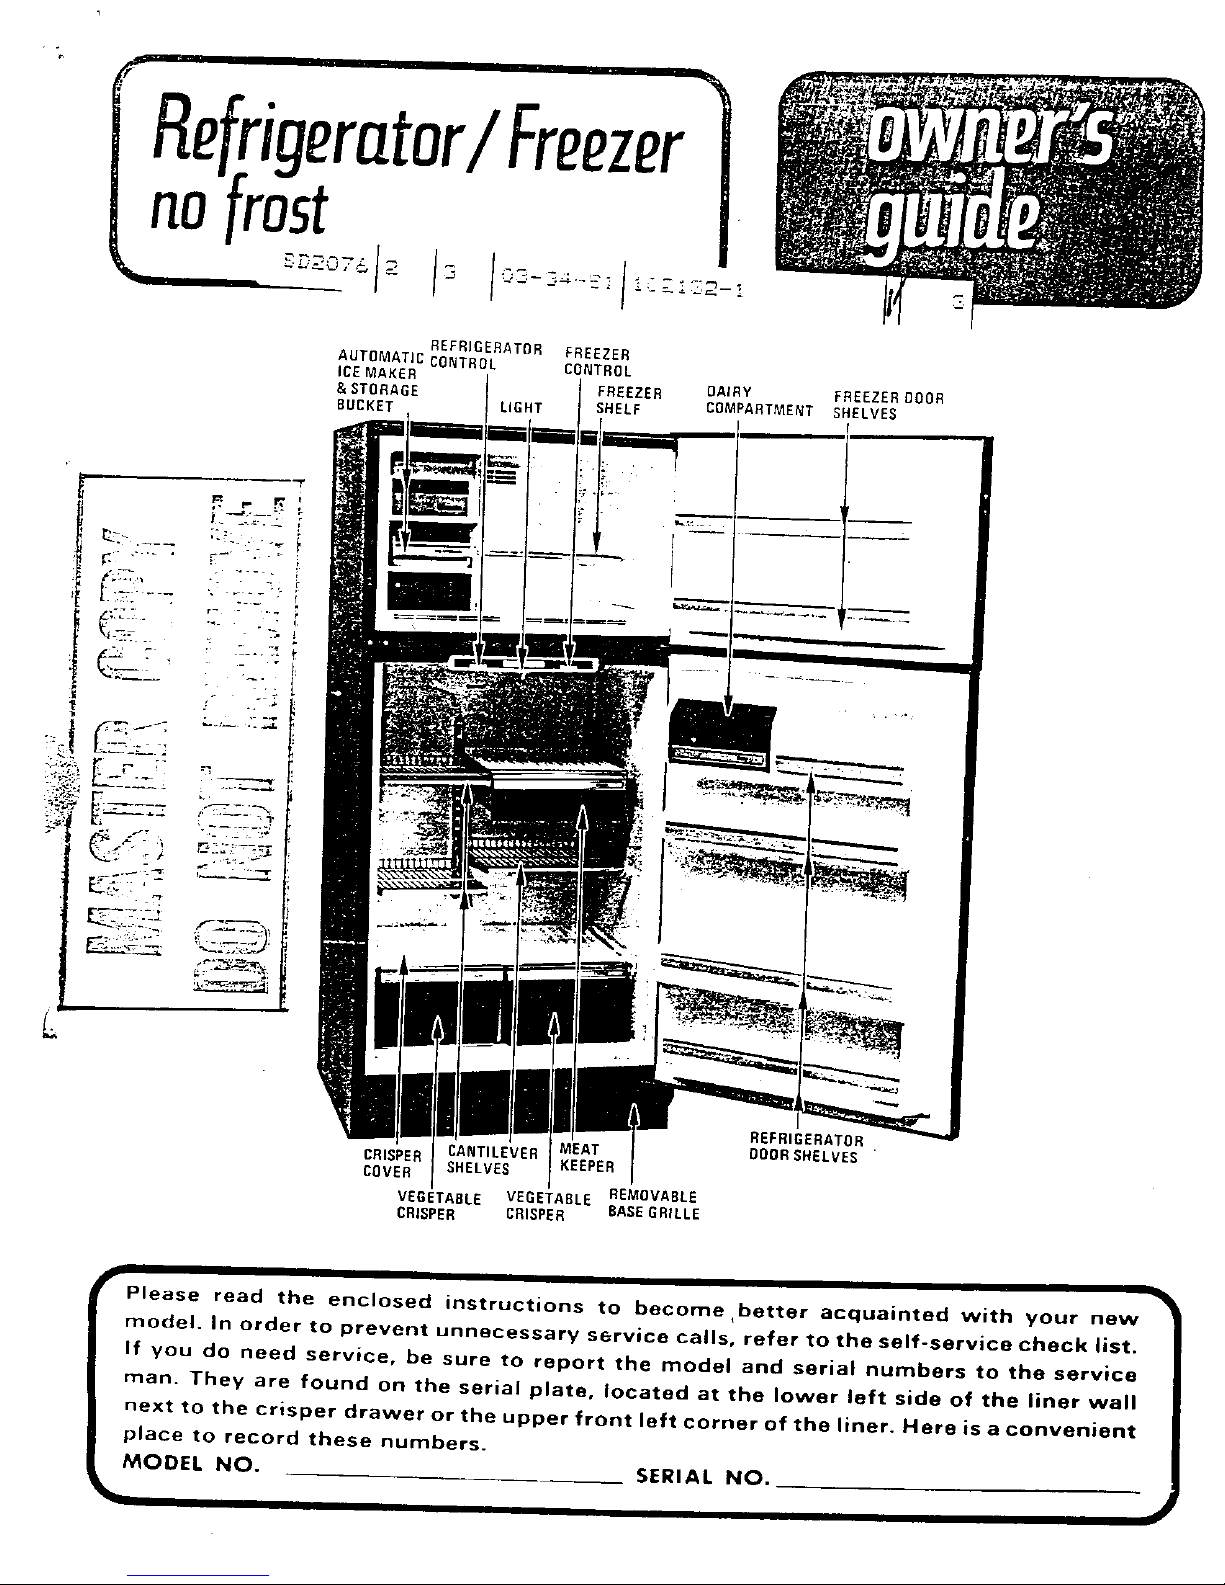
REFRIGERATOR fREEZER
AUTOMATIC CONTROL CONTROL
ICE MAKER
& STORAGE FREEZER DAIRY FREEZER {JOOR
BUCKET L(GHT SHELF COMPARTMENT SHELVES
i"-""--_:
• .
p
_ r
REFRIGERATOR.
DOOR SHELVES
CRISPER
COVER
VEGETABLE VEGETABLE REMOVABLE
CRISPER CRISPER BASE GRILLE
Please read the enclosed instructions to become better acquainted with your new
model. In order to prevent unnecessary service calls, refer to the self-service check list.
If you do need service, be sure to report the model and serial numbers to the service
man. They are found on the serial plate, located at the lower left side of the liner wall
next to the crisper drawer or the upper front left corner of the liner. Here is a convenient
place to record these numbers.
MODEL NO. SERIAL NO.
Page 2
INSTALLATION EU_c'rRICAL CONNECTION The NO. 9 freezer control setting is recom-
AND GROUNDING mended for short term use only.
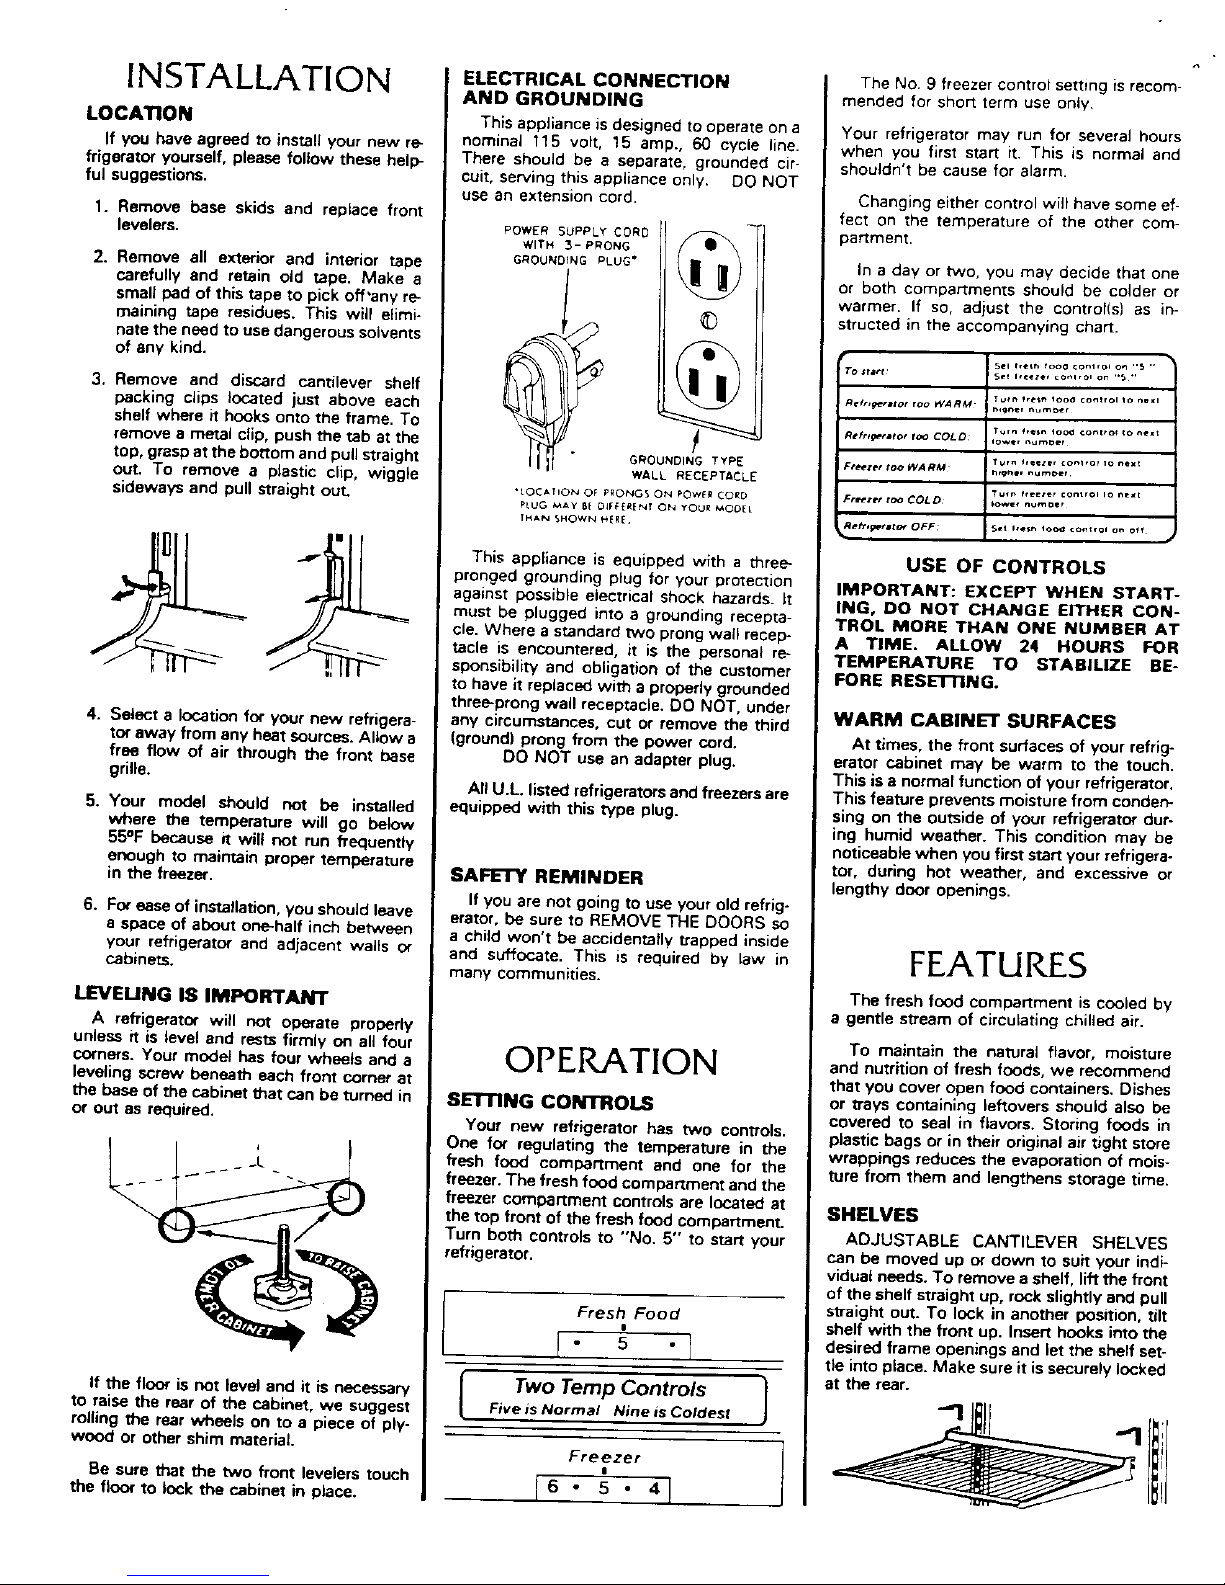
LOCATION This appliance is designed to operate on a Your refrigerator may run for severa_hours
If you have agreed to install your new re- nominal 115 volt, 15 amp., 60 cycle line. when you first start it. This is normal and
frigerator yourself, please follow these help- There should be e separate, grounded cir- shouldn't be cause for a_a;m.
ful suggestions, cult, serving this appliance only. DO NOT
use an extension cord. Changing either control will have some el-
1. Remove base skids and replace front fect on the temperature of the other corn-
levelers. POWERSUPPLYCORD _ pertinent.
WITH 3- PRONG
2. Remove all exterior and interior tape GROUNDINGPLUG" In a day or two, you may decide that one
carefully and retain old tape. Make a or both compartments shou)d be colder or
smafl pad of this tape to pick off'any re- warmer• If so, adjust the control(s) as in-
maining tape residues. This will e_imi- _ structed inthe accompanying chart.
nate the need to use dangerous solvents
of Shy kind. /" Q_ • s.,,,.,. ,ooo_-,,_, _ _
Tost41¢t Set irtctc*r c_J_lrol orl ,.5 •,
3. Remove and discard cantilever shelf
packing clips located just above each _,,_,,,o, ,ooWA.M ,,_..,'_'""*",,m,,,'°°"'°"'°' '° "'"
T_rn f_G.sn IOO_ ¢ontto¢ (O n_lt
shelf where it hooks onto the frame. To _t,,_,,ro, fogcoLo ,o,,, ,_,,
remove a metal clip, push the tab at the
Turn leeezer toni,or IO next
top, grasp at the bottom and pull straight GROUNDING TYPE Freeze, too WARM .,e*_*, .um¢_.,
out. To remove a plastic clip, wigg)e W_,LLeECEPT_CL£
Turn fteetet ContrOl Io n_xt
sideways and pull straight out. "_OCAhO_ OF PRONGS ON POW_ CORD Freeze, too COLD _ow,, numoer
PLUG _AY Bf O_FFERENI ON YOUR _ODEL
THAN _HOWN H_R£. _eh'_t_lt_ OFF _>et Ite_ Ioo_ ¢o_t¢Oi o_ of_ •
_'_'_1 I This appliance is equipped with a three- USE OF CONTROLS
pronged grounding plug for your protection IMPORTANT: EXCEPT WHEN START-
against possible electrical shock hazards. It ING, DO NOT CHANGE EITHER CON-
must be plugged into a grounding recepta- TROL MORE THAN ONE NUMBER AT
Lie. Where a standard two prong wall recep- A TIME. ALLOW 24 HOURS FOR
tacle is encountered, it is the personal re- TEMPERATURE TO STABILIZE BE-
sponsibiliW and obligation of the customer FORE RESI:I lING.
to have it replaced with a properly grounded
three-prong wall receptacle. DO NOT, under
4. Select a location for your new refrigera- any circumstances, cut or remove the third WARM CABINET SURFACES
tot away from any heat sources.Allow a (ground) prong from the power cord. At times, the front surfacesof your refrig-
free flow of air through the front base DO NOT use an adapter plug. erator cabinet may be warm to the touch.
grille. This is a normal function of your refrigerator,
All U.L listed refrigerators and freezers are This feature prevents moisture from conden-
5. Your model should not be installed equipped with this type plug. sing on the outside of your refrigerator dut-
where the temperature will go below ing humid weather. This condition may be
55°F because it will not run frequently noticeable when you first startyour refrigera-
enough to maintain proper temperature tor, during hot weather, and excessive or
in the freezer. SAPt: _f REMINDER lengthy door openings.
If you are not going to use your old refrig-
6. Fo,"ease of installation,you should leave erator, be sure to REMOVE THE DOORS so
e space of about one-half inch between a child won't be accidentally trapped inside
your refrigerator and adjacent walls or and suffocate. This iS required by law in FEATURES
cabinets, many communities.
The fresh food compartment is cooled by
LEVELING IS IMPORTANT e gentle stream of circulating chilled air.
A refrigerator will not operate properly
unless it is level and rests firmly on all four To maintain the natural flavor, moisture
corners. Your model has four wheels and a OPERATION and nutrition of fresh foods, we recommend
leveling screw beneath each front cornet at that you cover open food containers. Dishes
the base of the cabinet that can be turned in el= I IING CON'r_OLS or trays containing leftovers should also be
covered to seal in flavors. Storing foods in
or out as required. Your new refrigerator has two controls, plastic bags or in their original air tight store
____ One for regulating the temperature in the wrappings reduces the evaporation of mois-
fresh food compartment and one for the lure from them and lengthens storage time.
freezer.The freshfood compartment and the
(__) freezer compartment controls are located at SHELVES
the top front of the fresh food compartment.
Turn both controls to "No. 5" to start your ADJUSTABLE CANTILEVER SHELVES
refrigerator, can be moved up or down to suil your indi-
vidual needs. To remove a shelf, lift the front
of the shelf straight up. rock slightly and DUll
Fresh Food straight out. To lock in another position, tilt
! shelf with the front up, Insert hooks into the
I " 5 " r desired frame openings and Jetthe shelf set-
tie into piece. Make sure it is securely locked
If the floor is not level and it is necessary [ TWOTernp Controls I at the rear.
rolling the rear wheels on to a piece of ply- "I
wood or other shim material. Freezer
Be sure that the two front levelers touch = 4 I
the floor to lock the cabinet in place. I 6 • 5 •
Page 3

THE FREEZERSHELF can be removed by or odor. To avoid these conditions, occasion- REMOVING ICE CUBE TRAY
11) lifting the auick-freeze compartment ally empty ice bin and replenish the entire If ice cubes seem to be sticking in the tray,
straight up until me left end bars of the freez- supply of ice cubes. An untevel refrigerator
er shelf are out of the sockets _nthe side wall may result in non-uniform cubes which it is possible that the water in your area con-
tains an abundance of mineral deposits and
of the quick freeze compartment. (2) Lift the could stick together, is leaving a film residue in the tray. Wipe the
freezer Shelf slightly and (3) pull to the left Certain sounds may accompany the vari- tray pockets with a cloth soaked in vinegar
untd right end bars are out of the sockets in pus operating cycles of the ice maker. The until the film is cleaned out. If the residue
the right freezer wall Reverse the removal motor may have a slight hum--a dull thump seems heavy, clean the tray each time you
procedure toreDiace the freezer shelf. The may be heard as cubes are ejected--the clean your refrigerator.
freezer shelf can be lowered into another cubes will rattle as they fall into an empty
PLASTIC
position, storage bin--water valve may click or CLIP
_ ,CE CUBE TRAY
"buzz" occasionally. All of these sounds are _ +
3 normal and are no cause for alarm.
e__ ConneCtinstructedtheinice maker to the water supplYfur.
as the separate instructions, _)
nished with the refrigerator.
STARTING OR STOPPING __'¢_1
YOUR ICE MAKER %-.-....o_jY"_L__ _ _ J}
Lower the wire arm from the OFF position. _ ...... _--_The wire arm stops the mechanism when
the storage bin is full and restarts it after ice _,,_,._'_ W_REARM
cubes have been dispensed. You can use
MEAT KEEPER the wire arm to stop production of ice cubes In order to remove the tray for cleaning,
at any time. Pullthe arm forward slightly and do the following:
A sliding drawer _s provided for short raise it onto the OFF Notch.
term storage of fresh meats. This meat --_ 1. Check to see if the tray is level.
keeper ts suspended from one of the re- _ _ 2. If the tray is not level, the ice maker is in
frigerator compartment she_ves. It slides _"_3,_*,,.,,_ _ the dumping cycte. Wait until the tray is
out to the front so you can easdy reach all _ _ levet before proceeding. (About 8 min-
items stored w_thin. KEEP YOUR MEAT utes.)
KEEPER TIGHTLY CLOSED AT ALL ,,,_,\o_.._j_-'_
TIMES. 3. If the tray is level move the wire arm to
_o_ the "OFF" position. (1)
All meats or poultry should be stored in 4. Check the cube pockets to determine
their original store wrappings or in plastic '_'w_RsARM whether the water is frozen, if not, be
bags to reduce the evaporation of moisture sure you keep the tray level so as not to
from them. If you operate your refrigerator before the spill the water while removing the tray.
To remove the meat pan, pull it out until water connection is made, keep the wire arm 5. Remove the plastic clip by pushing the
it stops. Then apply a little more pressure in the OFF position. After the water connec- dip as shown on the clip. (2)
and pull completely out. lion {s made, remove the wire arm from the
OFF position. 6. Pull the tray straight out off of the shaft.
(3)
FRUIT AND VEGETABLE CRISPER if you plan to turn the ice maker off for an
The fruit and vegetable crispers slide out extended period of time, it is best to shut off 7. To reinstall the tray, reverse the removal
for easy access to foods stored within. They the water supply, procedure.
are comp)etely removable for cleaning or for
use elsewhere in your kitchen. The plastic ICE MAKER ENCLOSURE MAGNETIC DOOR GASKETS
Door gaskets are magnetized to insurean
crisper cover also serves as a refrigerator ADJUSTMENT air tight seal all around. These gaskets cting
storage shelf. TO remove the cover, lift the The ice maker enclosure front can be to the cabinet front, once the doors are
front edge and pull straight out. To replace leveted or readjusted by loosening the front closed to within their magnetic range.
the cover, set rear bars on supports and mounting screws and moving the front up or
push back until front can be lowered into down as desired. Retighten the screws after
place. If a restricted door opening does not the front is readjusted or leveled.
permit removal of a drawer, tilt crispers and REPLAC 1NG
shelf assembly up and remove by lifting
straight out. LIGHT BULB
Keep your crispers tightly closed to insure IT IS RECOMMENDED THAT YOU DIS-
crispness and freshness. Storing leafy rage- CONNECT THE POWER CORD BEFORE RE-
tables, such as celery and lettuce in plastic PLACING LIGHT BULBS.
bags reduces the evaporation of moisture
from them. ALWAYS USE A 40 wA'rr, STANDARD
BASE, APPLIANCE TYPE BULB WHEN RE-
PLACING A LIGHT.
AUTOMATIC ICE MAKER ll
The automatic ice maker will furnish a
continual supply of ice cubes. After installa- CLEANING
lion, it may take 8 to 24 hours for the ice REMOVING ICE MAKER
maker to furnish any cubes. The first two or ENCLOSURE IT IS RECOMMENDED THAT YOU DIS-
CONNECT THE POWER CORD BEFORE
three batches of ice cubes may be under- To remove the enclosure from around the CLEANING.
sized and irregular due to air in the water ice maker, insert a phillips head screw driver
supply line. They may also be discolored due up between the ice maker and the side of the Your refrigerator can be rolled out for
to impurities from the new water supply tub- enclosure and loosen the two top mounting cleaning. Turn the levelers, at each front
ing. Therefore, all cubesfrom the first two or screws. Slide the enclosure to the right to corner of the cabinet, COUNTERCLOCK-
three harvests should be discarded, disengage the two top mounting slots and WISE until they turn freely. Then pull the
Ice cubes that have been in the ice bin for the two mounting studsfrom the holes in the cabinet straight out. We recommend that
a long time may shrinkand possibly stick to- liner.Reverse this procedure when replacing you turn off the water supply before mov-
getber. Also, they may acquire a food taste the enclosure, ing the cabinet.
Page 4

After cleaning behind your refrigerator, i '
WISE until they touch the floor and lock
the cabinet in place.
INSIDE
Clean both compartments and inner door
panets with mild soap and water. Do not use __.______/_Q_e/o
an abrasive powder, solvent, polish cleaner _ C{F,_, Q._.e.o
or undiluted detergent,
You may notice a slight discoloration ap- B.szG.,LLZ
peering at the top and near the center of the To replace base grille, align spring clips
beck wall of the fresh food compartment, with square opening in cabinet and tap each
This is no cause for alarm, but it should be end until grilie locks in place.
cleaned off periodically.
OUTSIDE ENERGY TIPS
Wash regularly with mild soap and water.
rinse with clear water. Never use abrasive FOR EFFICIENT ENERGY USE.
scouring powders, automobile polish or fur- 1. Be sure refrigerator is level and ventila-
niture polish. GlassWax or e similar product tion around front grille is not blocked.
will clean and protect the finish satisfactorily.
2. Check door seals occasionally for leak-
DOOR GASKETS age. Check at various places, top. bot-
tom. sides.
Your door gaskets are vinyl They may be
cleaned with soap end water, a soda solu- 3. Check the temperature; avoid unneces-
lion or with a mild scouring powder, sarily cold settings.
4. Keep freezer full to near capacit'/, _ess
DEFROST PAN cold air is lost during door openings.
Defrost water drains into a shallow pan 5. Let hot dishes cool before putting into re-
beneath the cabinet and evaporates.This frigerator or freezer.
pan should be cleaned at isest once a month
with a solution of strong soap and water. 6. Cover liquids; if uncovered, the unit must
work Longer.
[iI' _ 7. Clean refrigerator condenser coils atleasttwicea year.
SAFETY TIPS
_'_, / 1. In case of power failure, minimize door
openings. If power failure is of long dura-
tion, protect frozen food by placing
To remove the defrost pan, grasp the base blocks of dry ice an top of the packages,
grille at both ends and pull it straight out. or check with a local frozen foods locker
Slide the pan out from underneath the plant about temporary storage.
cabinet.
I| ([ SUPPORT RAILS 2. Use the three-pronged plug only with a
grounding receptacle to provide ptotec-
IL-JI /DEFROST PAN _ lion from electrical shook.
_'-'_ 1 I 3. Unplug refrigerator before cleaning con-
_/ k denser or replacing light bulb.
' ' I J 4. Remove the doors from out-of-use refrig-
erator. Prevent a child from becoming ac-
To replace the defrost pan, position the cidentally trapped and suffocating.
side flanges to fit over slide rails and push it
in until it stops.
To replace base grille, align spring clips GOING '-'_',Jl_
with square opening Jncabinet and tap each
end until grille locks in place. VACATION
7
If you will be gone for a month or less,
CONDENSER leave the control knob at its usual setting.
Your refrigerator will operate more effi- During longer absences, (a) remove all
ciently when the condenser is clean, it food, (b) disconnect from electrical outlet, (c)
should be cleaned at least twice a year. It clean the refrigerator thoroughly, including
canbe adequately cleaned through the right defrost pen, (d) leave doors open to prevent
front of the base opening. Grasp the base odor formation.
grille at both endsand pull straight out. Then
reach through the base opening with your
vacuum cleaner attachment to clean the
front and open end of the condsnser. Continued On Back
Page 5

CHANGING 10. Pry the plug cover from the plastic
bushing at the top of the lower door
and press into the p_astic bushing on
REVF_P,:SIBLE the opposite side of the door.
DOOES 11. Remove the base grille by grasping
at
both ends and pulling it straight out.
This refrigerator has been built with the 12. Remove the lower hinge and spacer.
doors hinged on the right. If you wish to
hinge the doors on the left, follow these in- 13, Rotate the lower hinge counterclock-
structions. If it becomes necessary to return wise 90 ° and install it (including
the hinges to the right side, merely trans- spacer) to the left leg of the cabinet.
pose all references to "right" and "left"
when following these instructions. NOTE: It will take extra effort to install the
screws. The screws are self tapping and
TOOLS REQUIRED will have to cut threads in the screw holes.
Phillips screwdriver
End wrench (5/16") _'--_ _ JL""= _ _K_
Hex-head socket screwdriver (5/16")
Table knife i---_ _ O]
CHANGING DOORS
1. Turn the fresh food control to OFF and O
remove all food from the interior. O
2. Remove the handles from 1he doors I
and set aside. On the side of the doors
that you are gotng to install the han-
dles, remove the small round screw 14. Pull the metal hinge pin from the side
ho_e plugs with a table knife and press of the lower hinge and place it, in-
them into the holes on the opposite ctuding the spacer washer, intothetop
side of the doors, hole.
3. Using a socket screwdriver or end 15. Pry out the two screw hole plug but*
wrench, remove the screws from the up-
per hinge. Carefully lift the door (includ- tons on the bottom left side of the top
door and lower door. Remove the door
ing upper hinge) off the center hinge stops (metal plate) on the bottom of
and place it on a padded surface to pre- each door and install them on opposite
vent scratching. Avoid losing the spacer sides. Press in the plug buttons in the
that was between the hinge and the cab- holes on the right side of both doors.
inet top.
16. Set the lower door on the bottom
4. Using a table knife, pry the plug but- hinge, making sure the hinge pin
ton cover from the plastic bushing at enters the bushing in the door bottom.
the top of the door. Save the cover 17. While holding the door in a closed
for future use. position, take the center hinge pin that
was removed in step 8, and insert it
5. Lift the upper hinge and the spacer through the _eft hote of the center
washers from the door and install hinge and into the bottom door bush-
them at the opposite corner, ing. Make sure the long pin goes into
the bottom door and the short pin
6. Position the ptug button cover, saved goes into the top door.
from step 4, over the old hinge bush- 18. Set the upper door on the center
ing and press it into place, hinge, making sure the hinge pin
enters the door bushing. When you
7. Pry out the 3 plastic plug buttons close this door, the gasket should hold
from the cabinet top and press them it in place.
into the opposite corner.
19. Making sure to use the same number
8. Lift the center hinge pin out of the of spacers that were originally used
bottom door and center hinge. Care- beneath the upper hinge, install the
fully lift the lower door off the lower hinge mounting screws. Before tight-
hinge and place it on a padded sur- ening these screws, make sure the top
face. If the metal hinge pin pulls out of the door is level with the cabinet
of the lower hinge when the door is top, and the space between the door
removed, pull it out of the door bot- is eguidistant across the entire front.
tom and press it back into the hinge. Avoid over-tightening these screws.
Tighten both until they are just snug,
then turn them in another one-half
9. Remove the center hinge and spacer turn.
from the cabinet. Transfer the two
screws from the left end of the divider 20. Examine the door gasket all around
bar to the right end. Install the center each door, making sure no gaps are
hinge and spacer on the left end of visible between the gasket and cabi-
the divider bar the same way it was net. If a gap shows, try stretching the
installed on the right end. Tighten gasket away from the door so the
both screws until they are just snug, magnet will contact the cabinet sur-
then turn them one-half turn more. face.
 Loading...