

Page 1

1. cu. ft. Microwave Oven
Instruction Manual
Before operating this oven, please read these instructions completely.
1
MCM1110WF/BF
Page 2

1
PRECAUTIONS TO AVOID POSSIBLE EXPOSURE
TO EXCESSIVE MICROWAVE ENERGY
(a) Do not attempt to operate this oven with the door open since open-door operation can result in
harmful exposure to microwave energy. It is important not to defeat or tamper with the safety
interlocks.
(b) Do not place any object between the oven front face and the door or allow soil or cleaner residue to
accumulate on sealing surfaces.
(c) Do not operate the oven if it is damaged. It is particularly important that the oven door close
properly and that there is no damage to the: (1) door (bent), (2) hinges and latches (broken or
loosened), (3) door seals and sealing surfaces.
(d) The oven should not be adjusted or repaired by anyone except properly qualified service personnel.
Page 3

TABLE OF CONTENTS
PRECAUTIONS TO AVOID POSSIBLE EXPOSURE TO EXCESSIVE MICROWAVE ENERGY.................................1
IMPORTANT SAFETY INSTRUCTIONS..................................................................................................
................................3
FEDERAL COMMUNICATIONS COMMISSION
RADIO FREQUENCY INTERFERENCE STATEMENT.........................................................................................
....................4
GROUNDING INSTRUCTIONS.........................................................................................................
........................................4
INSTALLATION..........................................................................................................................................................................5
SPECIFICATIONS.................................................................................................................
....................................................6
................................................7
TURNTABLE......................................................................................................................
.........................................................7
MICROWAVE OVEN CONTROL.........................................................................................................
.....................................7
DISPLAY...................................................................................................................................................................................7
POWER LEVEL....................................................................................................................
....................................................8
CLOCK SETTING........................................................................................................................................................................8
KITCHEN TIMER..................................................................................................................
......................................................8
MICROWAVE COOK.................................................................................................................
..............................................8
FAST STARTING........................................................................................................................................................................8
DEFROSTING BY WT FUNCTION......................................................................................................
....................................9
TIME DEFROST FUNCTION..........................................................................................................
......................................9
POPCORN...............................................................................................................................
.........................................9
PO TATO........................................................................................................................................................................10
PIZZA........................................................................................................................................................................10
BEVERAGE
...............................................................................................................................
.........................................10
SOUP
........................................................................................................................................................................10
DINNER PLATE
...............................................................................................................................
.........................................10
FRESH VEGETABLE..........................................................................................................................................................10
FROZEN VEGETABLE
...............................................................................................................................
................................11
PRE-SET FUNCTION..............................................................................................................................................................11
MEMORY FUNCTION...............................................................................................................................................................11
MULTI-SECTION COOKING...............................................................................................................................
INQUIRING FUNCTION.....................................................................................................................................................12
LOCK FUNCTION FOR CHILDREN.....................................................................................................
...........................12
COOKING END REMINDING FUNCTION.................................................................................................
.........................12
OTHER SPECIFICATIONS...................................................................................................................................................12
CARE OF YOUR MICROWAVE OVEN....................................................................................................
.................................13
BEFORE YOU CALL FOR SERVICE....................................................................................................
...................................14
CARE AND CLEANING..............................................................................................................
..............................................14
QUESTIONS AND ANSWERS..........................................................................................................
........................................15
USE YOUR MICROWAVE OVEN SAFELY.................................................................................................
............................16
ARCING.........................................................................................................................
............................................................16
MICROWAVE OVEN WARRANTY........................................................................................................
..................................17
z
z
z
z
z
z
z
z
z
z
z
z
z
z
z
2
PARTS AND FEATURES
..........................................................................................................
11
.................
Page 4

IMPORTANT SAFETY INSTRUCTIONS
When using electrical appliances, basic safety precautions should be followed, including the following:
WARNING-To reduce the risk of burns, electric shock, fire, injury to persons or exposure to excessive
microwave energy:
11. Read all instructions before using the appliance.
12. Read and follow the specific “PRECAUTIONS TO
AVOID POSSIBLE EXPOSURE TO EXCESSIVE
MICROWAVE ENERGY” found on page 1.
13. This appliance must be grounded. Connect only to
properly grounded outlet. See “GROUNDING
INSTRUCTIONS” found on page 4.
14. Install or locate this appliance only in accordance
with the provided installation instructions.
15. Some products such as whole eggs and sealed
containers - for example, closed glass jars are able
to explode and should not be heated in this oven.
16.
Use this appliance only for its intended use as
described in this manual. Do not use corrosive
chemicals or vapors in this appliance. This type of
oven is specifically designed to heat, cook, or dry
food. It is not designed for industrial or laboratory use.
17. As with any appliance, close supervision is
necessary when used by children.
18. Do not operate this appliance if it has a damaged
cord or plug, if it is not working properly, or if it has
been damaged or dropped.
19. This appliance should be serviced only by qualified
service personnel.
Contact nearest authorized service facility for
examination, repair or adjustment.
10.
Do not cover or block any openings on the appliance.
11. Do not store this appliance outdoors. Do not use this
product near water — for example, near a kitchen
sink, in a wet basement, near a swimming pool, or
similar locations.
12. Do not immerse cord or plug in water.
13. Keep cord away from heated surfaces.
14. Do not let cord hang over edge of table or counter.
15. When cleaning surfaces of door and oven that
comes together on closing the door, use only mild,
non-abrasive soaps or detergents applied with a
sponge or soft cloth.
16. To reduce the risk of fire in the oven cavity:
a) Do not overcook food. Carefully attend appliance
when paper, plastic, or other combustible materials
are placed inside the oven to facilitate cooking.
b) Remove wire twist-ties from paper or plastic bags
before placing bag in oven.
c) If materials inside the oven ignite, keep oven
door closed, turn oven off, and disconnect the
power cord, or shut off power at the fuse or circuit
breaker panel.
d) Do not use the cavity for storage purposes. Do
not leave paper products, cooking utensils, or
food in the cavity when not in use.
17. Liquids, such as water, coffee, or tea are able to be
overheated beyond the boiling point without
appearing to be boiling due to surface tension of the
liquid. Visible bubbling or boiling when the container
is removed from the microwave oven is not always
present. THIS COULD RESULT IN VERY HOT
LIQUIDS SUDDENLY BOILING OVER WHEN A
SPOON OR OTHER UTENSIL IS INSERTED INTO
THE LIQUID.
To reduce the risk of injury to persons:
a) Do not overheat the liquid.
b) Stir the liquid both before and halfway through
heating it.
c) Do not use straight-sided containers with narrow
necks.
d) After heating, allow the container to stand in the
microwave oven for a short time before removing
the container.
e) Use extreme care when inserting a spoon or
other utensil into the container.
18. Do not use this microwave oven to heat corrosive
chemicals (for example, sulfides and chlorides).
Vapors from such corrosive chemicals may interact
with the contact and springs of the safety interlock
switches thereby rendering them inoperable.
19. Keep the waveguide cover clean at all times.
Wipe the oven interior with a soft damp cloth after
each use. If you leave grease or fat anywhere in the
cavity it may overheat, smoke or even catch fire
when next using the oven.
20. Never heat oil or fat for deep frying as you cannot
control the temperature and doing so may lead to
overheating and fire.
21.
Do not operate the oven without the glass tray in
place. Be sure it is properly sitting on the rotating
base.
SAVE THESE INSTRUCTIONS
3
Page 5

FEDERAL COMMUNICATIONS COMMISSION
RADIO FREQUENCY INTERFERENCE STATEMENT
GROUNDING INSTRUCTIONS
This appliance must be grounded. In the event of an electrical short circuit, the grounding plug reduces the risk of
electric shock by providing an escape wire for electric current. This appliance is equipped with a cord having a
grounding wire with a grounding plug. The plug must be plugged into an outlet that is properly installed and
grounded.
WARNING:
This equipment generates and uses ISM frequency energy and if not installed and used properly, that is in
strict accordance with the manufacturer's instructions, may cause interference to radio and television
reception.
It has been type-tested and found to comply with limits for an ISM Equipment pursuant to part 18 of FCC
Rules, which are designed to provide reasonable protection against such interference in a residential
installation.
However, there is no guarantee that interference will not occur in a particular installation.
If this equipment does cause interference to radio or television reception, which can be determined by
turning the equipment off and on, the user is encouraged to try to correct the interference by one or more
of the followings.
• Reorient the receiving antenna of radio or television.
• Relocate the Microwave oven with respect to the receiver.
• Move the microwave oven away from the receiver.
• Plug the microwave oven into a different outlet so that microwave oven and receiver are on
different branch circuits.
THE MANUFACTURER is not responsible for any radio or TV interference caused by
UNAUTHORIZED MODIFICATION to this microwave oven. It is the responsibility of the user to correct
such interference.
WARNING:
Improper use of the grounding can result in a risk of electric shock.
Consult a qualified electrician or serviceman if the grounding instructions are not completely understood, or if
doubt exists as to whether the appliance is properly grounded, and either :
(1) If it is necessary to use an extension cord, use only a 3-wire extension cord that has a 3-blade grounding
plug, and a 3-slot receptacle that will accept the plug on the appliance. The marked rating of the
extension cord shall be equal to or greater than the electrical rating of the appliance.
or
(2) Do not use an extension cord, if the power supply cord is too short, have a qualified electrician or
serviceman install an outlet near the appliance.
WARNING:
Do not cut or remove the third (ground) prong from the power cord under any circumstances.
4
Page 6
INSTALLATION
1. Examine the oven after unpacking.
Check for damage such as a misaligned door, broken door or dent in the cavity.
If any damage is visible, DO NOT INSTALL, and notify your dealer immediately.
2. Level, flat location.
Install the microwave oven on a level, flat surface.
3. Ventilation.
Do not block air vents. If they are blocked during operation, the oven may overheat and eventually cause a
failure.
For proper ventilation, allow 4 inches (10.16 cm) of space between oven top, sides, rear and adjacent surfaces.
4. Away from radio and TV sets.
Poor television reception and radio interference may result if the oven is located close to a TV, radio, antenna,
feeder, etc.
Place the oven as far from them as possible.
5. Away from heating appliances and water taps.
Keep the oven away from heat, steam or splashing liquids. These things can adversely affect oven wiring and
contacts.
6. Power supply.
• Check your local power source.
This microwave oven requires a current of approximately 12 amperes, 120Volts, 60Hz grounded outlet.
1. A short power-supply cord is provided to reduce the risks resulting from becoming entangled in or tripping
over a longer cord.
2. Longer cord sets or extension cords are available and may be used if care is exercised in their use.
3. If a long cord or extension cord is used:
• The marked electrical rating of the cord set or extension cord should be at least as great as the electrical
rating of the appliance.
• The extension cord must be a grounding type 3-wire cord.
• The longer cord should be arranged so that it will not drape over the counter top or tabletop where it can be
pulled on by children or tripped over unintentionally.
7. The minimum height of free space necessary above the top surface of the oven is about 4 inches (10.16 cm).
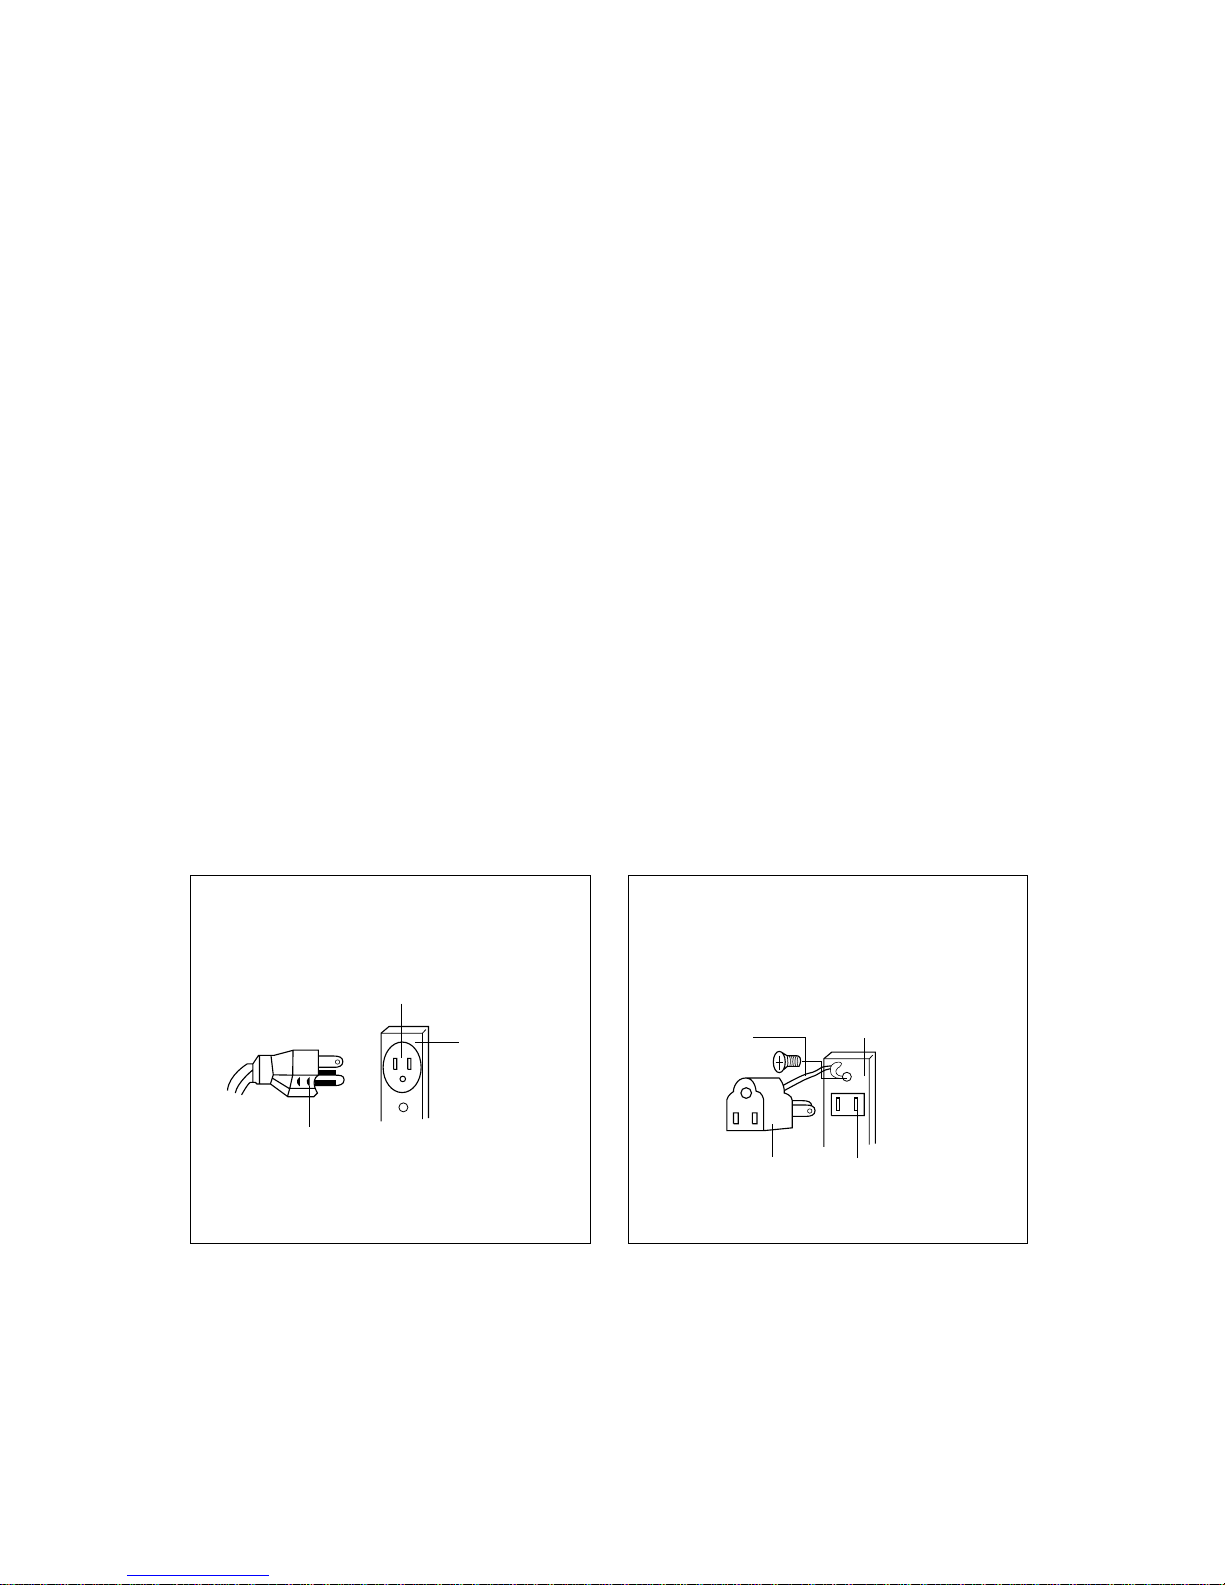
When use 3-pronged plug
3-prong Receptacle
Receptacle
Box cover
3-prong plug
When use grounding adaptor, make sure
the receptacle box is fully grounded.
Receptacle Box Cover
Receptacle
Grounding
Lead
Grounding
Adaptor
“THE CANADIAN ELECTRICAL CODE DOES NOT ALLOW THE USE OF THE GROUNDING ADAPTOR”
5
Page 7
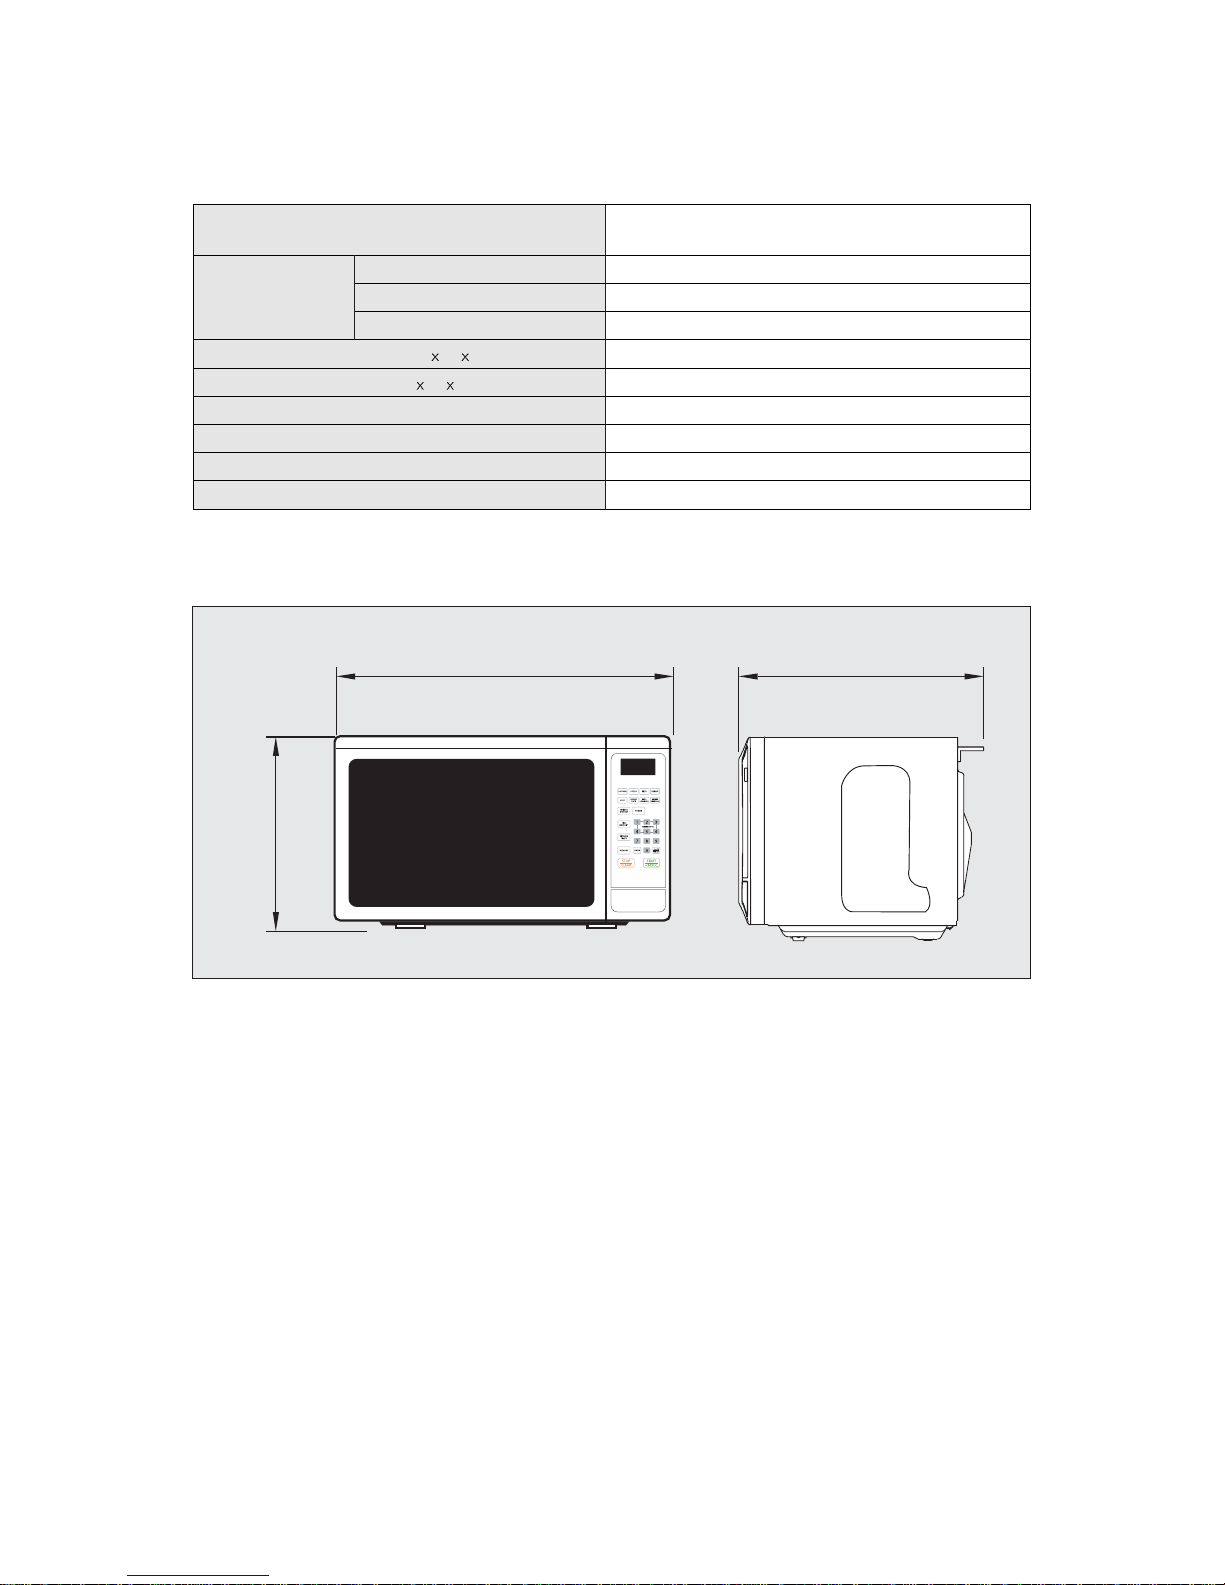
SPECIFICATIONS
POWER SUPPLY
120V AC, 60Hz SINGLE PHASE WITH
GROUNDING
INPUT POWER 1500 W
MICROWAVE ENERGY
OUTPUT
1000W
FREQUENCY 2,450MHz
OUTSIDE DIMENSIONS (W H
CAVITY DIMENSIONS (W H D) 328x226x368 mm (12.9x8.9x14.5 in)
CAVITY VOLUME 1.1 cu.ft
TIMER 99 min. 99 sec.
POWER LEVELS 10 Levels
* Specifications are subject to change without notice.
6
20.2
12
NET WEIGHT APPROX. 31.8 lbs.
D) 513x305x425 mm (20.2x12x16.7 in)
16.7
Page 8
7
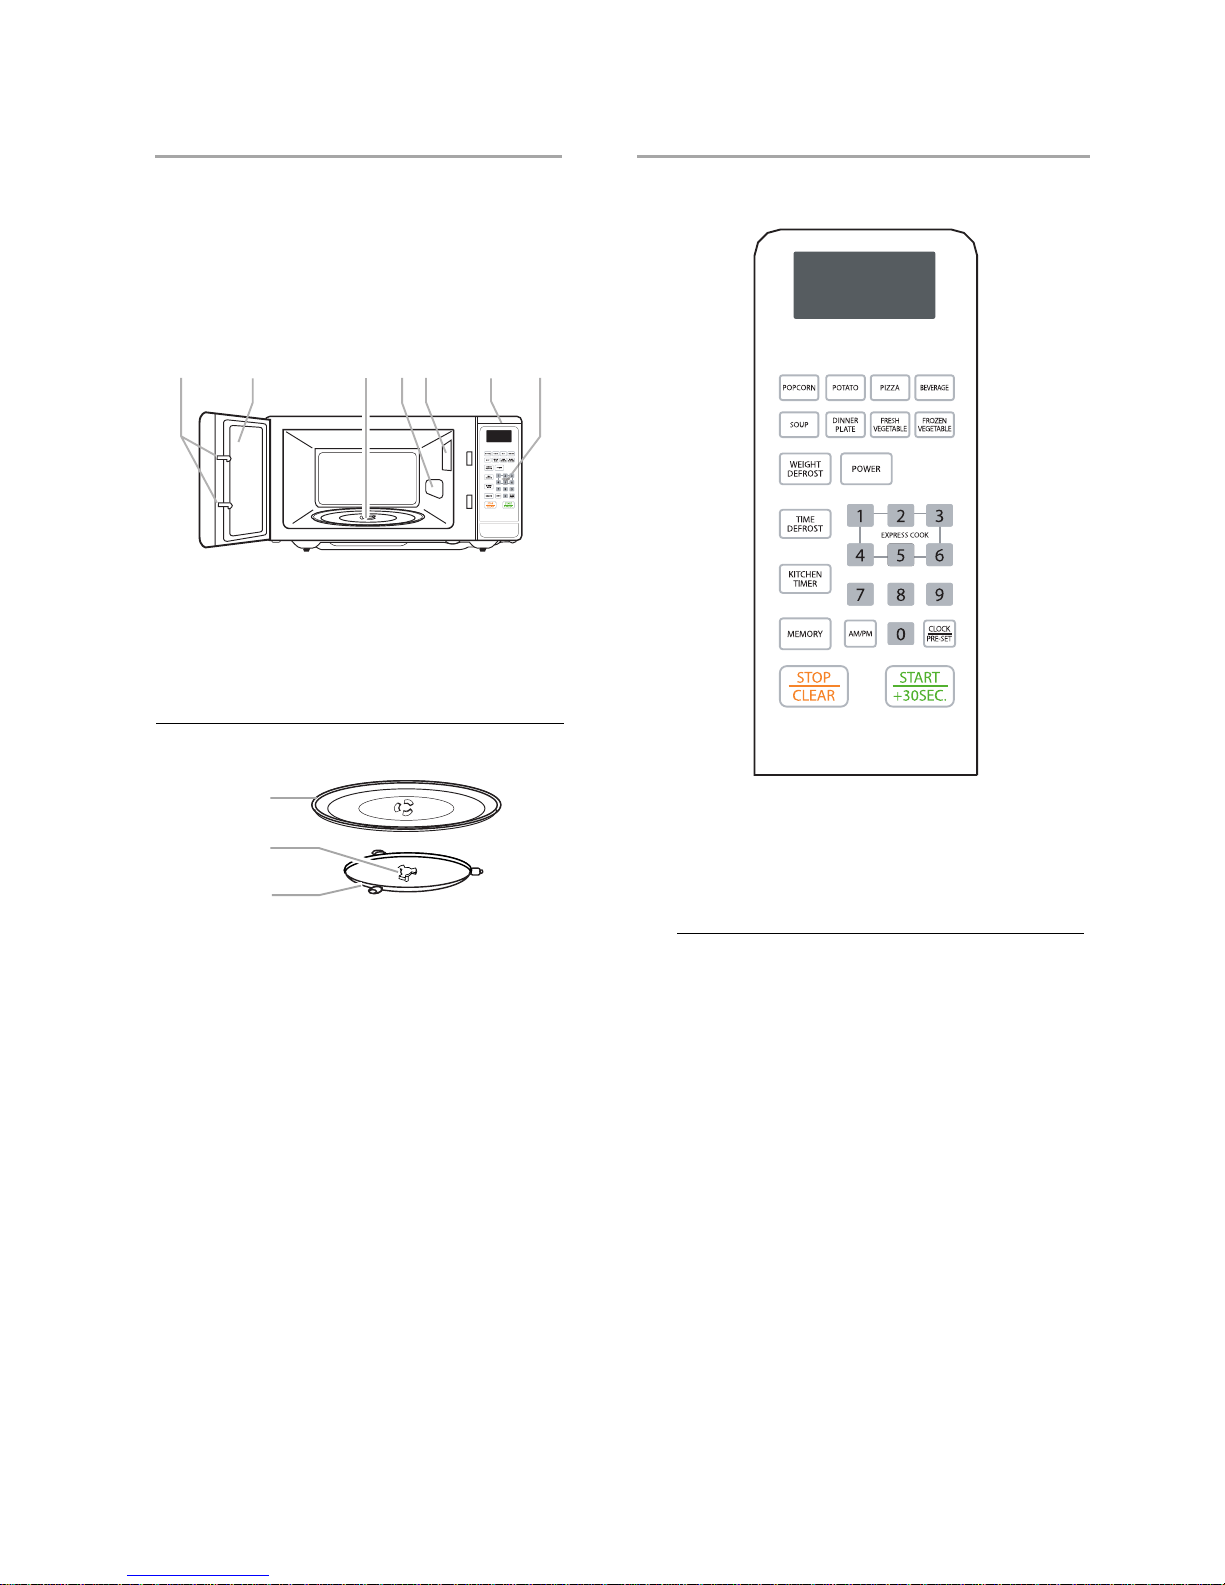
PARTS AND FEATURES
This manual may cover several different models.
The model you
have purchased may have some
or all of the features shown here.
The appearance
of your particular model may differ slightly from
the illustrations in this manual.
Turntable
The turntable can rotate in either direction to help
cook
food
more evenly. For best cooking results,
do not
operate the
microwave oven without having
the turntable
in place. See
“Assistance or Service”
to reorder any of
the parts.
T o Install:
1.
Install the hub into the hole in the center of the
microwave
oven cavity bottom
2.
Place the support on the microwave oven cavity
bottom.
3.
Place the turntable on the support.
Fit the raised, curved mounds in the center of the
turntable
bottom between the three spokes of the
hub.
MICROWA VE OVEN CONTROL
Display
When power is first supplied to the microwave oven,
“0:00” will
appear in the display. Ifthe “0:00” appears
in the display at any
other time, a power failure has
occurred. Reset the clock if
needed. See “Clock” section.
When the microwave oven is in use, the display shows
cook time
remaining. When the microwave oven is not
in use, the display
shows the time of day (if the clock is
set)
or Timer countdown.
A.Door lock system
B.Metal shielded window
C.Glass turntable
D.Microwave inlet cover
E.Microwave oven light
F.Display
G.Control panel
A.Turntable
B.Hub
C.Roller Guide
A B C D E F G
C
A
B
Page 9

Power Level
Ten power levels are available.
LEVEL POWER
10
9
8
7
6
5
4
3
2
1
Clock Setting
(1)
(3)
Kitchen Timer
Microwave cook
Fast Starting
PL10
PL9
PL8
PL7
PL6
PL5
PL4
PL3
PL2
PL1
100%
90%
80%
70%
60%
50%
40%
30%
20%
10%
(2)
(4)
(5)
(1)
(2)
(3)
(4)
(1)
(2)
(3)
(1)
(2)
DISPLAY
Remarks:
when a power between level 10-8 is chosen, the high
level indicator is lighted and it will flash when in
operation.
When a power between level 7-1 is chosen, the low
level indicator is lighted and it will flash when in
operation.
When the microwave oven is plugged into a outlet,
the oven will display " 0:00 ".
Press " CLOCK/PRE-SET ", LED will display
00:00, clock indicator will be lighted. The hour
figures will flash; ":" and "0" will be lighted.
Press the number keys and enter the correct time.
For example, time is 10:12 now, please press
"1,0,1,2" in turn.
Press " AM/PM " to choose AM or PM. AM or PM
will be selected in turn by press the button of "
AM/PM " continuously.
Press " CLOCK/PRE-SET " to finish clock setting,
and the clock indicator will go out. ":"will be flashing
and the clock will be lighted.
If the numbers input are not within the range of
1:00--12:59, the setting will be invalid until valid
numbers are input.
Note: In the process of clock setting, if the "
STOP/CLEAR
" button is pressed or if there is no
operation within 1 minute, the oven will go back to
the former setting automatically.
Press "
KITCHEN TIMER
", LED will display
00:00, clock indicator will be lighted.
The first "0" will flash; ":" and the other "0" will
be lighted.
Press the number keys
and enter the correct
time.(
the maximum cooking time is 99 minutes
and 99 seconds).
Press " START/+30SEC. " to confirm setting,
clock indicator will be lighted.
When the kitchen time is reached, clock indicator
will go out. The buzzer will ring 5 times.
If the clock be set(12-hour system), LED will
display the current time.
Note: The kitchen Time is differ from 12-hour system,
Kitchen Timer is a timer.
Keep on pressing "
POWER
" to choose
microwave power. " "and " " or " " will
be lighted.
Press number keys to input the cooking time; the
maximum cooking time is 99 minutes and 99
seconds.
Press " START/+30SEC. " to start cooking, and
the remained cooking time will be displayed. ":",
" ", " " or "
" indicators will be
flashing.
Note: In the process of cooking, if the " STOP/CLEAR
" button is pressed or if there is no operation within
1 minute, the oven will go back to the former setting
automatically.
In waiting state, instant cooking at 100% power
level can be started by select a cooking time from
1 to 6 minutes by pressing number pads1 to 6.
Press "
START/+30SEC
" to increase the cooking
time; the maximum cooking time is 99 minutes
and 59 seconds.
In waiting state, instant cooking at 100% power
level with 30 seconds' cooking time can be started
by pressing " START/+30SEC
". Each press on
the same button will increase cooking time by 30
seconds. the maximum cooking time is 99 minutes
and 59 seconds.
8
Page 10

POPCORN
Defrosting By WT Function
(1)
(2)
(3)
(4)
(1)
(2)
(3)
(4)
(5)
1)
2)
3)
1)
2)
3)
4)
1)
(2)
(3)
(4)
(5)
Time Defrost Function
a) Default mode
b) Cooking-time adjustable mode
Note: Each press on "
START/+30SEC
" can increase
the cooking by 30 seconds for the microwave and
Auto menu cooking. However, the operation will not
work under "Weight Defrost" operation.
Press "
WEIGHT
DEFROST
", LED will display
"dEF1"; when at the same time " ", " "
indicators will be lighted.
Press numerical pads to input weight to be
defrosted. "Oz" indicator will be lighted.
Input the weight ranged between 4~100 Oz.
If the weight input is not within 4~100, the input
will be invalid. No "beep" will be sound and the
microwave will not work until valid numbers are
input .
Press " START/+30SEC. " to start defrosting and
the remained cooking time will be displayed. ":",
" " and " " indicators will be flashing
and the "Oz" indicator will go out.
Press " TIME DEFROST ", LED will display
"dEF2". At the same time, "
", " "
indicators
will be lighted.
Press number pads to input defrosting time. The
effective time range is 00:01~99:99.
If the time input is not within 00:01~99:99, no
"beep" will be sound and the microwave will not
work until valid numbers are input.
The default microwave power is power level 3.
If you want to change the power level, press "
POWER
" once, and the LED will display "PL 3",
then press the number pad of the power level
you wanted.
Press " START/+30SEC. " to start defrosting. The
remained cooking time will be displayed. ":",
" " and " " indicators will be flashing.
Press "
POPCORN " to select popcorn mode,
" "," " and "Oz" are light. "1.75","3.0","3.5"
appears in the display.
Press " START/+30SEC. " to start cooking, the
buzzer will ring once, "Oz" will go out,
"
"
,
"
"
will flash.
When the cooking is over, the buzzer will ring 5
times, LED will display "0:00".
If the clock be setted(12-hour system), LED will
display the currently time.
Press "
POPCORN
" to select popcorn mode,
" "," " and "Oz" are light. "1.75","3.0","3.5"
appears in the display.
Press "
MEMORY
"
,
LED will display the cooking
time of the weight, the minute
figure is flashing.
Press the number keys and enter the time.
Press " MEMORY " to save the setting.If straight
press "
START
/+30 SEC.
", the oven will to cook
ith the amended cooking time. " "," "
will flash.
Users can change the cooking time
e.g.: Users set "
POPCORN
" time for 3 minutes
and 15 seconds.
Press" POPCORN " button once or twice when
the oven is on call ( the screen will display "1.75"
for once press and "3.0" for twice), then press
"
MEMORY
" button, LED screen will display the
default cooking time of current food weight ( which
is not 0:00 ), for example 1'30''. on the screen the
first number 1 glints, press nember button to input
3; the second number 3 glints, press number
button to input 1; the third num
ber 0 glints, press
number button to input 5.and then the first number
3 glints again (It is similar as clock setting ).
Press "MEMORY" again to save current setting.
If press "
START/+30SEC.
" to begin cooking
directly, the program will save the latest setting
of cooking time automatically.
To change the set cooking time, repeat step 1),
the screen will firstly display the saving time
( 3:15 for example ), press number button to reset
cooking time, and the follow step 2).
When completed, whenever press "
POPCORN
" button, screen displays food weight 1.75 , 3.0
or 3.5, only cooking time follows the saved time
setting.
To go back to initialization, press " POPCORN "
button for more than three seconds, the buzzer
will sound, then go back to initial setting.
9
Page 11
1(about 3.0 Oz)
2(about 6.0 Oz)
3(about 9.0 Oz)
Once
Twice
Thrice
1set
2set
3set
Once
Twice
Thrice
4.0 Oz
8.0 Oz
12.0 Oz
16.0 Oz
Once
Twice
Thrice
4 times
PIZZA
POTATO
(a)
(b)
1
2
3
POTATO
PIZZA
a)
b)
1Mug
2Mugs
3Mugs
Once
Twice
Thrice
BEVERAGE
1
2
3
BEVERAGE
a)
b)
SOUP
SOUP 4.0
8.0
12.0
16.0
a)
b)
4.0 Oz
8.0 Oz
16.0 Oz
9.0 Oz
12.0 Oz
18.0 Oz
Once
Twice
Thrice
DINNER PLATE
DINNER
PLATE
9.0
12.0
18.0
a)
b)
Once
Twice
Thrice
FRESH
VEGETABLE
FRESH
VEGETABLE
a)
b)
4.0
8.0
16.0
1
2
3
PAD TOUCH DISPLAY SERVING SIZE
PAD TOUCH DISPLAY SERVING SIZE
PAD TOUCH DISPLAY SERVING SIZE
PAD TOUCH DISPLAY SERVING SIZE
PAD TOUCH DISPLAY SERVING SIZE
PAD TOUCH DISPLAY SERVING SIZE
Press "
POTATO
" repeatedly until the number
you wish appears in the display,
" ", " " light.
"1"SET: 1 potato (approximate 230 gram)
"2"SET: 2 potatoes (approximate 460 gram)
"3"SET: 3 potatoes (approximate 690 gram)
For example, press "POTATO" once : "1" displays.
Press
" START/+30 SEC.
" to cook,
"
"
,
" " are flashing, time counts down.
Press "
PIZZA
" repeatedly until the number you
wish appears in the display,
"
"
,
"
"
light.
You can reheat 1~3 slices of Pizza each time
.
For example, press" PIZZA " twice, "2" appears
in the LED.
Press
" START/+30 SEC.
" to cook,
"
"
,
" " are flashing, time counts down.
Press "
BEVERAGE " repeatedly until the number
you wish appears in the display, " ", " ",
" "
light.
You can reheat 1~3 cups of beverage each time
(approximate 250 ML).
For example, press "BEVERAGE" twice,
"2"appears in the display.
Press " START/+30 SEC." to cook, " ",
" " are flashing, time counts down.
Press " SOUP " repeatedly until the number you
wish appears in the display, " ", " "
,"Oz" light.
For example, press "SOUP" twice, "8.0"appears
in the display.
Press " START/+30 SEC." to cook, " ",
"
" light
, time counts down.
Press " DINNER PLATE " repeatedly until the
number you wish appears in the display,
"
"
,
"
"
and
"
Oz
"
light.
For example, press" DINNER PLATE " twice,
"12.0" appears in the display.
b) Press " START/+30 SEC. " to cook, " ",
" " are flashing, time counts down.
Press "
FRESH VEGETABLE " repeatedly until
the number you wish appears in the display,
"
",
"
" and "Oz" light.
For example, press " FRESH VEGETABLE "
twice, "8.0" appears in the display.
Press "
START/+30 SEC.
" to cook, "Oz"
disappears, " ", " " are flashing, time
counts down.
10
Page 12

4.0 Oz
8.0 Oz
16.0 Oz
Once
Twice
Thrice
FROZEN
VEGETABLE
FROZEN
VEGETABLE
a)
b)
4.0
8.0
16.0
PRE-SET FUNCTION
(1)
(2)
(3)
(4)
(5)
(6)
(6)
MEMORY FUNCTION
(1)
(2)
(3)
Multi-section cooking
PAD TOUCH DISPLAY SERVING SIZE
Press "
FROZEN VEGETABLE
" repeatedly until
the number you wish appears in the display,
" ", " " and "Oz" light.
For example, press " FROZEN VEGETABLE "
twice, "8.0" appears in the display.
Press " START/+30 SEC. " to cook, "Oz"
disappears,
"
"
,
"
"
are flashing, time
counts down.
Set the clock first. (Consult the instruction of
clock setting.)
Set a certain cooking procedure(one or two
blocks), the setting method and display are same
as relevant cooking procedure. (Defrosting is
beyond pre-set cooking).
Example: If you want to cook the food with 100%
microwave power for 10 minutes.
Do it as following:
a. Press "POWER" once to choose 100%
microwave power;
b. Press number keys "1","0","0","0" in order to
adjust the cooking time;
c. Be careful! Please do not press "
START/ +
30 SEC."to start cooking.
Press "
CLOCK/PRE-SET
" to display current
time and hour figure is flashing, the icon " : " keep
lighting on.
Press number keys to
input the cooking time.For
example: to set the time is 12:12, you can press
the number keys "1","2","1","2" in order.
Press " AM/PM " to choose AM or PM. AM or PM
will be selected in turn by pressing the button of
" AM/PM " continuously.
Press "START/ +30 SEC." to confirm the preset
procedure.When it is confirmed, the unit will go
back the clock states.
When time arrives, the buzzer will sound twice
and the cooking starts.
Press "
MEMORY
" to choose memory 1-5
procedure. The LED will display 1,2,3...5.
If the procedure has been set, press "
START/
+30 SEC.
" to use it. If not, continue to set the
procedure. Only one or two stages can be set.
After finishing the setting, press "
MEMORY
" to
save the procedure and turn back to the waiting
states.If press " START/ +30 SEC." ,it can save
and operate the setting.
Example: to set the following procedure as the
second memory, that is memory 2. to cook the
food with 80% microwave power for 3minutes
and 20 seconds.
The steps are as follow:
a. In waiting states, press "
MEMORY
" twice,stop
pressing until the screen displays "2".
b. Press "POWER" three times until "PL8"
displays.
c. Press number keys "3","2","0" in order to input
the cooking time.
d. Press "MEMORY" to save the setting. Buzzer
sounds once then turn back to waiting states.
If you press "START/+30SEC." after the above
step, the procedure will be saved as the
memory 2 and operated.
e. If the electricity is not cut off, the procedure
will be saved all the time. If it is, the procedure
need to reset.
f. If you want to run the saved procedure, in
waiting states, press "MEMORY" twice, screen
displays "2", then press "START/+30SEC."
to run.
At most 2 sections can be set for cooking. In multisection cooking, if one section is defrosting, then
defrosting shall be placed in the first section. When
the first stage finish, the buzzer will sound once and
the next stage will begin cooking.
Example: if you want to cook with 80% microwave
power for 5 minutes + 60% microwave power for 10
minutes. The cooking steps are as following:
11
Page 13

(1)
(2)
(3)
(4)
(5)
INQUIRING FUNCTION
(1)
(2)
LOCK FUNCTION FOR CHILDREN
COOKING END REMINDING
FUNCTION
OTHER SPECIFICATIONS
(1)
(2)
(3)
Press "
POWER
" for times to choose 80%
microwave,now "PL8" is displayed;
Press number keys "5","0","0" to set the cooking
time;
Press "
POWER
" for times to choose 60%
microwave power, "PL6" is displayed;
Press number keys "1","0","0","0" to set the
cooking time;
Press "START/+30SEC." to start cooking.
In cooking state, press " CLOCK/PRE-SET ", the
LED will display clock for three seconds.
In the microwave
cooking state, press "
POWER
" to inquire microwave power level, and the current
microwave power will be displayed. After three
seconds, the oven will turn back to the previous
state. In multi-stage state, the inquiring way can
be done by the same way as above.
Lock: In waiting state, press "
STOP/CLEAR
" for 3
seconds, there will be a long "beep" denoting the
entering into the children-lock state; meanwhile, LED
will display " ".
Lock quitting: In locked state, press "
STOP/CLEAR
" for 3 seconds, there will be a long "beep" denoting
that lock is released.
When the cooking is over, the buzzer will sound 5
"beep" to alert user the cooking is finished.
In standby state , if the set clock digital tube
displays current time, the icon "
:
" would flash;
otherwise, it shows "
0:00
".
In setting function state, LED displays
corresponding setting.
In working or pause state, LED displays surplus
cooking time.
12
Page 14

CARE OF YOUR MICROWAVE OVEN
Unplug the power cord before cleaning any
part of this oven.
Keep the inside of the oven clean. When food
spatters or spilled liquids adhere to oven walls,
wipe with a damp cloth. Mild detergent may be
used if the oven gets very dirty.
The use of harsh detergent or abrasives is not
recommended.
The outside oven surface should be cleaned
with soap and water, rinsed and dried with a
soft cloth. To prevent damage to the operating
parts inside the oven, water should not be
allowed to seep into the ventilation openings.
If the Control Panel becomes wet, clean with a
soft, dry cloth. Do not use harsh detergents or
abrasives on Control Panel.
If steam accumulates inside or around the
outside of the oven door, wipe with a soft cloth.
This may occur when the microwave oven is
operated under high humidity conditions and in
no way indicates malfunction of the unit.
It is occasionally necessary to remove the glass
tray for cleaning. Wash the tray in warm sudsy
water or in a dishwasher.
The roller guide and oven cavity floor should be
cleaned regularly to avoid excessive noise.
Simply wipe the bottom surface of the oven with
mild detergent water or window cleaner and dry.
1
2
3
4
5
6
7
ROLLER GUIDE
Glass Tray
Roller Guide
The ROLLER GUIDE and oven floor should be
cleaned frequently to prevent excessive noise.
The ROLLER GUIDE MUST ALWAYS be used
for cooking together with the Glass Tray.
1
2
GLASS TRAY
DO NOT operate the oven without the Glass Tray
in place.
DO NOT use any other Glass Tray with this oven.
If Glass Tray is hot, ALLOW TO COOL before
cleaning or placing it in water.
DO NOT cook directly on the Glass Tray.
1
2
3
4
The oven should be cleaned regularly and any food deposits removed.
Failure to maintain the oven in a clean condition could lead to deterioration of the surface that
could adversely affect the life of the appliance and possibly result in a hazardous situation.
13
Page 15

CARE AND CLEANING
Although your oven is provided with safety features, it is important to observe the following:
1. It is important not to defeat or tamper with safety
interlocks.
2. Do not place any object between the oven front
face and the door or allow residue to accumulate on
sealing surfaces. Wipe the sealing area frequently
with a mild detergent, rinse and dry. Never use
abrasive powders or pads.
3. When opened, the door must not be subjected to
strain, for example, a child hanging on an opened
door or any load could cause the oven to fall
forward to cause injury and also damage to the
door. Do not operate the oven if it is damaged, until
it has been repaired by a competent service
technician. It is particularly important that the oven
closes properly and that there is no damage to the:
i) Door(bent)
ii) Hinges and Hookes(broken or loosened)
iii) Door seals and sealing surfaces.
4. The oven should not be adjusted or repaired by
anyone except a properly competent service
technician.
5. The oven should be cleaned regularly and any food
deposits removed;
6. Failure to maintain the oven in a clean condition
could lead to deterioration of the surface that could
adversely affect the life of the appliance and
possibly result in a hazardous situation.
BEFORE YOU CALL FOR SERVICE
Refer to following checklist, you may prevent an unnecessary service call.
* The oven doesn’t work :
1. Check that the power cord is securely plugged
in.
2. Check that the door is firmly closed.
3. Check that the cooking time is set.
4. Check for a blown circuit fuse or tripped main
circuit breaker in your house.
* Sparking in the cavity;
1. Check utensils. Metal containers or dishes with
metal trim should not be used.
2. Check that metal skewers or foil does not touch
the interior walls.
If there is still a problem, contact the service station.
A list of these stations is included in the oven.
14
Page 16

QUESTIONS AND ANSWERS
* Q : Can the oven be used with the glass tray or
roller guide removed?
* A : No. Both the glass tray and roller guide must
always be used in the oven before cooking.
* Q : Can I open the door when the oven is
operating?
* A : The door can be opened anytime during the
cooking operation. Then microwave energy will
be instantly switched off and the time setting
will maintain until the door is closed.
* Q : Why do I have moisture in my microwave
oven after cooking?
* A : The moisture on the side of your microwave
oven is normal. It is caused by steam from
cooking food hitting the cool oven surface.
* Q : Does microwave energy pass through the
viewing screen in the door?
* A : No. The metal screen bounces back the energy
to the oven cavity. The holes are made to allow
light to pass through. They do not let
microwave energy pass through.
* Q : Why do eggs sometimes pop?
* A : When baking or poaching eggs, the yolk may
pop due to steam build-up inside the yolk
membrane. To prevent this, simply pierce the
yolk with a toothpick before cooking. Never
cook eggs without piercing their shells.
* Q : Why this standing time recommended after
the cooking operation has been completed?
* A : Standing time is very important.
With microwave cooking, the heat is in the
food, not in the oven. Many foods build up
enough internal heat to allow the cooking
process to continue, even after the food is
removed from the oven. Standing time for joints
of meat, large vegetables and cakes is to allow
the inside to cook completely, without
overcooking the outside.
* Q : What does “standing time” mean?
* A : “Standing time” means that food should be
removed from the oven and covered for
additional time to allow it to finish cooking. This
frees the oven for other cooking.
* Q : Why does my oven not always cook as fast
as the microwave cooking guide says?
* A : Check your cooking guide again, to make sure
you’ve followed directions exactly ; and to see
what might cause variations in cooking time.
Cooking guide times and heat settings are
suggestions, to help prevent over-cooking... the
most common problem in getting used to a
microwave oven.
Variations in the size, shape and weights and
dimensions could require longer cooking time.
Use your own judgement along with the
cooking guide suggestions to check whether
the food has been properly cooked just as you
would do with a conventional cooker.
* Q : Will the microwave oven be damaged if it
operates while empty?
* A : Yes. Never run it empty.
* Q : Can I operate my microwave oven without
the turntable or turn the turntable over to
hold a large dish?
* A : No. If you remove or turn over the turntable,
you will get poor cooking results. Dishes used
in your oven must fit on the turntable.
* Q : Is it normal for the turntable to turn in either
direction?
* A : Yes. The turntable rotates clockwise or
counterclockwise, depending on the rotation of
the motor when the cooking cycle begins.
* Q : Can I pop popcorn in my microwave oven?
How do I get the best results?
* A : Yes. Pop packaged microwave popcorn
following manufacture’s guidelines. Do not use
regular paper bags. Use the “listening test” by
stopping the oven as soon as the popping
slows to a “pop” every 1 or 2 seconds. Do not
repop unpopped kernels. Do not pop popcorn
in glass cookware.
15
Page 17

USE YOUR MICROWAVE OVEN SAFELY
General Use
Food
ARCING
If you see arcing, touch the STOP/CLEAR pad and correct the problem.
Arcing is the microwave term for sparks in the oven.
Arcing is caused by:
• Metal or foil touching the side of the oven.
• Foil not molded to food (upturned edges act like
antennas).
• Metal, such as twist-ties, poultry pins, or gold rimmed
dishes, in the microwave.
• Recycled paper towels containing small metal pieces
being used in the microwave.
Do not attempt to defeat or tamper with safety
interlocks.
Do not place any object between the oven front frame
and the door or allow residue to build up on sealing
surfaces. Wipe with a mild detergent, rinse and dry.
Never use abrasive powders or pads.
Do not subject the oven door to strain or weight such
as a child hanging on an open door.
This could cause the oven to fall forward resulting in
injury to you and damage to the oven.
Do not operate the oven if door seals or sealing
surfaces are damaged; or if door is bent; or if hinges
are loose or broken.
Do not operate the oven empty. This will damage the
oven.
Do not attempt to dry clothes, newspapers or other
materials in the oven. They may catch on fire.
Do not use recycled paper products as they may
contain impurities which may cause sparks or fires.
Do not hit or strike the control panel with hard objects.
This can damage the oven.
Never use your microwave oven for home canning.
The oven is not designed for proper home canning.
Improperly canned food may spoil and be dangerous
to consume.
Always use the minimum recipe cooking time. It is
better to undercook rather than overcook foods.
Undercooked foods can be returned to the oven for
more cooking. If food is overcooked, nothing can be
done.
Heat small quantities of food or foods with low
moisture carefully. These can quickly dry out, burn or
catch on fire.
Do not heat eggs in the shell. Pressure may build up
and eggs can explode.
Potatoes, apples, egg yolks and sausages are
examples of food with non-porous skins.
These must be pierced before cooking to prevent
bursting.
Do not attempt to deep fat fry in your microwave oven.
Always allow a standing time of at least 20 seconds
after the oven has been switched off to allow the
temperature to even out, stir during heating, if
necessary, and ALWAYS stir after heating. To prevent
eruptive boiling and possible scalding, you should put
a spoon or glass stick into the beverages and stir
before, during and after heating.
Do not leave the oven unattended while popping corn.
Do not pop corn in a paper bag unless it is the
commercially prepared Microwave Popcorn product.
The kernels can overheat and ignite a brown paper
bag.
Do not put packaged Microwave Popcorn bags directly
on the oven tray. Place the package on a microwave
safe glass or ceramic plate to avoid overheating and
cracking the oven tray.
Do not exceed the Microwave Popcorn manufacturers
suggested popping time.
Longer popping does not yield more popcorn but it can
result in buring the popcorn or risk of fire. Remember,
the Popcorn bag and tray can be too hot to handle.
Remove with caution and use pot holders.
16
Page 18

Microwave Oven
Warranty
MC Appliance corp. warrants each new Microwave Oven to be free from defects in material and
workmanship and agrees to remedy any such defect or to furnish a new part(s) (at the company’s
option) for any part(s) of the unit that has failed during the warranty period. Parts and labor
expenses are covered on this unit for a period of one year after the date of purchase. In addition
MC Appliance corp. warrants the Magnetron (parts only) to be free from defects in material and
workmanship for a period of 8 years. The consumer is responsible for all labor and transportation
expenses related to the diagnosis and replacement of the Magnetron after the initial one- year
warranty expires. If in the event the unit requires replacement or refund under the terms of this
warranty the consumer is responsible for all transportation expenses to return the unit to our
factory prior to receiving a replacement unit or refund. A copy of the dated sales receipt /
invoice is required to receive warranty service, replacement or refund.
This warranty covers appliances in use within the continental United States, Puerto Rico and
Hawaii. The warranty does not cover the following:
• Damages due to shipping damage or improper installation.
• Damages due to misuse or abuse.
• Content losses due to failure of the unit.
• Repairs performed by unauthorized service agents.
• Service calls that do not involve defects in material and workmanship such as instruction on
proper use of the product or improper installation.
• Replacement or resetting of house fuses or circuit breakers.
• Failure of this product if used for other then its intended purpose.
• Disposal costs of failed units not returned to our factory.
• Any delivery / installation costs incurred as the result of a unit that fails to perform as specified.
• Expenses for travel and transportation for product service in remote locations.
• Removal and reinstallation of your appliance if it is installed in an inaccessible location or is not
installed in accordance with published installation instructions
This warranty is in lieu of all warranties expressed or implied and no representative or person is
authorized to assume for us any other liability in connection with the sale of this product. Under
no circumstances is the consumer permitted to return this unit to the factory without prior written
consent from MC Appliance corp.
Model Parts Labor Magnetron (Part Only) Type of Service
For Service or Assistance please call
888 775-020
2
Or visit us on the web at ww
w.mcappliance.com
17
One-Year One-Year Eight Years Carry In
F
MCM1110W /B F
Page 19

Four à micro-ondes 1.1 pi3
MCM1110WF / MCM1110BF
Ne mettez jamais le micro-ondes en marche s’il est vide ou sans le repose-plat en vert.
Avant de faire fonctionner ce four, veuillez lire complètement les présentes instructions.
Page 20

PRECA UTIONS POUR EVITER T OUTE EXPOSITION
1
PO TENTIELLE EXCESSIVE A L’ENERGIE MICRO-ONDES
(a) Ne pas essayer d’utiliser ce four avec la porte ouverte car une utilisation avec la porte ouverte
risque de provoquer une exposition dangereuse à l’énergie des micro-ondes. Il est important de
ne pas neutraliser ni modifier les joints de sécurité.
(b) Ne pas placer d’objet entre la face avant du four et la porte ou laisser un résidu de saleté ou de
détergent s’accumuler sur les surfaces des joints.
(c) Ne pas utiliser le four si celui-ci est détérioré. Il est particulièrement important que la porte du four
ferme correctement et qu’il n’y ait aucune détérioration de : (1) la porte (courbée), (2) des
charnières et des loquets (cassés et lâches), (3) des joints de la porte et des surfaces des joints.
(d) Le four ne devrait pas être réglé ou réparé par quiconque à l’exception des personnels
d’entretien qualifiés.
Page 21

TABLE DES MATIÈRES
2
• PRECAUTIONS POUR EVITER TOUTE EXPOSITION POTENTIELLE EXCESSIVE A L’ENERGIE
MICRO-ONDES………………………………………………………………………………………………….. 1
• CONSIGNES DE SECURITE IMPORTANTES………………………………………………………………. 3
• DÉCLARATION DES PERTUBATIONS RADIOÉLECTRIQUES DE LA COMMISSION FÉDÉRALES
DES COMMUNICATIONS……………………………………………………………………………………… 4
• INSTRUCTIONS DE RACCORDEMENT Á LA TERRE…………………………………………………….. 4
• INSTALLATION………………………………………………………………………………………………….. 5
• SPÉCIFICATIONS………………………………………………………………………………………………. 6
• PIECES ET FONCTIONNALITES…………………………………………………………………………….. 7
PLATEAU TURNANT…………………………………………………………………………………………… 7
• COMMANDES DU FOUR A MICRO-ONDES……………………………………………………………….. 7
AFFICHAGE…………………………………………………………………………………………………….. 7
NIVEAU DE PUISSANCE……………………………………………………………………………………… 8
RÉGLAGE DE L’HORLOGE…………………………………………………………………………………… 8
MINUTEUR DE CUISINE………………………………………………………………………………………. 8
CUISSON AU FOUR Á MICRO-ONDES…………………………………………………………………….. 8
DÉMARRAGE RAPIDE………………………………………………………………………………………… 8
DÉCONGÉLATION AVEC LA FONCTION WT……………………………………………………………… 9
FONCTION DE DÉCONGÉLATION MINUTÉE……………………………………………………………… 9
POPCORN………………………………………………………………………………………………………. 9
POMME DE TERRE……………………………………………………………………………………………. 10
PIZZA…………………………………………………………………………………………………………….. 10
BOISSON………………………………………………………………………………………………………… 10
SOUPE…………………………………………………………………………………………………………… 10
ASSIETTE DE DINER………………………………………………………………………………………….. 10
LÉGUMES FRAIS………………………………………………………………………………………………. 10
LÉGUMES SURGELÉS………………………………………………………………………………………… 11
FONCTION RÉGLAGE PRÉDÉFINI………………………………………………………………………….. 11
FONCTION MÉMOIRE…………………………………………………………………………………………. 11
CUISSONS MULTI-SECTIONS……………………………………………………………………………….. 11
FONCTION INFORMATION…………………………………………………………………………………… 12
FONCTION VERROUILLAGE ENFANT……………………………………………………………………… 12
FONCTION DE RAPPEL DE FIN DE CUISSON.................................................................................... 12
AUTRES CARACTÉRISTIQUES……………………………………………………………………………… 12
• ENTRETIEN DE VOTRE FOUR Á MICRO-ONDES………………………………………………………… 13
• AVANT DE FAIRE UN APPEL DE SERVICE………………………………………………………………... 14
• CARE AND CLEANING………………………………………………………………………………………… 14
• QUESTIONNES ÉT RÉSPONSES…………………………………………………………………………… 15
• UTILISER VOTRE FOUR MICRO-ONDES SANS RISQUE……………………………………………….. 16
• LES ÉTINCELLES........................…………………………………………………………………………….. 16
• GARANTIE DU FOUR A MICRO-ONDES…………………………………………………………………… 17
Page 22

CONSIGNES DE SECURITE IMPORTANTES
3
Pendant l’utilisation d’appareils électriques, des précautions de sécurité élémentaires devraient être
prises, notamment les précautions ci-dessous:
11. Lisez toutes les instructions avant d’utiliser l’appareil.
12. Lisez et suivez les instructions particulières de la page 1.
PRECAUTIONS POUR EVITER TOUTE EXPOSITION
POTENTIELLE A UNE ENERGIE MICRO-ONDE
EXCESSIVE”.
13. Cet appareil doit être raccordé à la terre. Connectez-le
uniquement à des prises secteur correctement raccordées à
la terre. Voir “INSTRUCTIONS POUR LE
RACCORDEMENT A LA TERRE”, page 3.
14. Installer ou situer cet ?lectrom?nager uniquement selon les
consignes d'installation fournies.
15. Certains produits comme les oeufs entiers et les récipients
fermés (par exemples les bocaux fermés) peuvent exploser
et ne devraient pas être chauffés dans ce four.
16. Utilisez cet appareil uniquement pour l’utilisation pour
laquelle il a été conçu tel que décrit dans ce manuel.
N’utilisez pas d’agent chimique corrosif ou de vapeurs dans
cet appareil. Ce type de four a été conçu particulièrement
pour chauffer, cuire ou décongeler des aliments. Il n’a pas
été conçu pour une utilisation industrielle, en laboratoire ou
commerciale.
17. Comme pour tout appareil, une surveillance étroite est
nécessaire lorsque des enfants s’en servent.
18. N’utilisez pas cet appareil s’il présente un cordon
d’alimentation ou une fiche détériorés, s’il ne fonctionne pas
correctement ou s’il a été détérioré ou s’il est tombé.
19. Cet appareil devrait être réparé uniquement par des
personnels d’entretien qualifiés. Contactez le point
d’entretien agréé le plus proche pour tout examen,
réparation ou réglage.
10. Ne couvrez ou n’obstruez aucune des ouvertures de cet
appareil.
11. Ne pas utiliser ni conserver cet appareil en extérieur. Ne pas
utiliser ce produit à proximité d’eau – par exemple près d’un
évier de cuisine, dans un sous-sol humide ou près d’une
piscine ou dans des lieux semblables.
12. Ne pas immerger le cordon ou la fiche dans l’eau.
13. Maintenir le cordon à l’écart de toute surface à haute
température.
14. Ne pas laisser le cordon pendre au-dessus du bord de la
table ou du plan de travail.
15. En nettoyant les surfaces de la porte et du four qui se
touchent en fermant la porte, utilisez uniquement des
savons de force moyennes non abrasifs appliqués avec une
éponge ou un chiffon doux.
16. Pour réduire le risque d’incendie dans la cavité du four :
a. Ne pas trop cuire les aliments. Surveiller attentivement
l’appareil lorsque du papier, du plastique ou d’autres
matières combustibles sont placés à l’intérieur du four
pour faciliter la cuisson.
b. Retirez les pinces de fermeture des sacs en papier ou en
plastique avant de les placer dans le four.
c. Si les matériaux à l’intérieur du four prennent feu,
maintenez la porte du four fermée, éteignez le four puis
débranchez le cordon d’alimentation ou coupez
l’électricité au niveau du panneau des fusibles ou des
coupe-circuits.
d. Ne pas utiliser le four comme espace de stockage. Ne
pas laisser de produits en papier, d’ustensiles de cuisine
ou d’aliments à l’intérieur du four lorsqu’il n’est pas utilisé.
17. Les liquides comme l’eau, le café ou le thé peuvent être
surchauffés au-delà du point d’ébullition sans sembler
bouillir en raison de la tension de surface du liquide. Un
bouillonnement visible ou la formation de bulles ne sont pas
toujours présents lorsque le récipient est retiré du four à
micro-ondes. CELA RISQUE D’ENTRAINER UNE
EBULLITION SOUDAINE DU LIQUIDE LORSQU’UNE
CUILLER OU TOUT AUTRE USTENSILE EST PLONGE
DANS LE LIQUIDE.
Pour réduire le risque de blessure : a) Ne pas surchauffer le
liquide. b) Mélangez le liquide avant la cuisson et au milieu
de la cuisson.
c) N’utilisez pas de récipients à bord droit et à goulot étroit.
d) Après la cuisson laisser le récipient reposer dans le four à
micro-ondes pendant un court instant avant de le retirer.
e) Soyez extrêmement prudent en insérant une cuiller ou
tout autre ustensile dans le récipient.
18. Ne pas utiliser ce four à micro-ondes pour chauffer des
produits chimiques corrosifs (par exemple, les sulfures et
les chlorures). Les vapeurs de tels produits chimiques
corrosifs peuvent avoir une interaction avec le contact et
les ressorts des interrupteurs de verrouillage de sûreté les
rendant ainsi impossible de fonctionnement.
19. Maintenir le couvercle du guide d’ondes propre à tout
moment. Essuyer l’intérieur du four avec un torchon mouillé
après chaque usage. Si vous laissez des matières grasses
où que ce soit à l’intérieur de la cavité, elles pourraient
surchauffer, fumer ou voire même prendre feu la prochaine
fois que vous utilisez le four.
20. Ne jamais chauffer de l’huile ou du lard pour de la grande
friture car vous ne pouvez pas contrôler la température et
l’entreprendre pourrait produire un surchauffement et le feu.
21. Ne pas faire fonctionner le four sans que le plateau en
verre ne soit poser en place. Assurer qu’il est bien posé sur
l’entraîneur de plateau.
CONSER VEZ CES INSTR UCTIONS
Page 23

DÉCLARATION DES PERTUB ATIONS
4
RADIOÉLECTRIQUES DE LA COMMISSION
FÉDÉRALE DES COMMUNICATIONS
MISE EN GARDE :
Cet appareil produit et utilise des fréquences d’énergie ISM et s’il n’est pas installé et utilisé de façon
adaptée, c’est-à-dire strictement selon les consignes du fabricant, il pourrait causer des perturbations à la
réception de la radio et des émissions télévisées.
Il a été mis à l’essai et s’avère conforme aux limites pour un Appareil ISM conformément à la partie 18 des
Règles de la FCC, qui sont conçues pour assurer la protection raisonnable contre une telle perturbation dans
une installation résidentielle.
Cependant, il n’y a aucune garantie que la perturbation ne se produira pas dans une installation particulière.
Si cet appareil ne cause pas de perturbations à la réception de la radio ou aux émissions télévisées, que
vous pouvez déterminer en mettant en marche l’appareil et en l’arrêtant, on incite l’utilisateur à tenter de
corriger la perturbation en effectuant l’une ou plusieurs des dispositions suivantes :
• Réorienter l’antenne de réception de la radio ou de la télévision.
• Déplacer le four à micro-ondes par rapport au récepteur.
• Éloigner le four à micro-ondes du récepteur.
• Brancher le four à micro-ondes dans une prise de secteur différente de sorte à ce que le four à microondes et le récepteur soient branchés sur des circuits différents.
LE FABRICANT n’est pas responsable des perturbations de la radio ou des émissions télévisées qui sont
provoquées par une MODIFICATION NON-AUTORISÉE à ce four à micro-ondes. La responsabilité retombe
sur l’utilisateur de corriger une telle perturbation.
INSTRUCTIONS DE RA CCORDEMENT À LA TERRE
Cet appareil doit être raccordé à la terre. En cas de court-circuit, la prise de raccordement à la terre réduit le
risque de choc électrique en proposant un câble pour l’évacuation du courant électrique. Cet appareil est
équipé d’un cordon ayant un câble de raccordement à la terre et une prise de terre. Cette prise doit être
branchée à une prise secteur correctement installée et raccordée à la terre.
MISE EN GARDE :
Une mauvaise utilisation du raccordement à la terre risque de provoquer un choc électrique.
Consultez un électricien ou un réparateur qualifié si vous comprenez mal les instructions de
raccordement à la terre ou en cas de doute sur le bon raccordement à la terre de l’appareil ainsi que
dans les cas ci-dessous :
1) S’il est nécessaire d’utiliser un cordon de rallonge, utilisez uniquement une rallonge à 3 câbles ayant
une prise de terre à trois lames, et un réceptacle à 3 trous pour accueillir la prise de l’appareil. Les
puissances nominales indiquées sur le cordon de rallonge devraient être supérieures ou égales à la
puissance électrique de l’appareil, sinon
2) N’utilisez pas de cordon de rallonge, si le cordon d’alimentation électrique est trop court, faites
installer une prise secteur à proximité de l’appareil par un électricien ou par un réparateur qualifié.
MISE EN GARDE : Ne coupez pas ou n’enlevez pas la troisième lame (raccordée à la terre) du
cordon d’alimentation électrique sous aucune circonstance.
Page 24

INSTALLATION
5
1. Examiner le four après le déballage.
Vérifier pour des endommagements tels qu’une porte désalignée, une porte casée ou une bosse dans la
cavité.
Si tout endommagement est visible, NE PAS INSTALLER, et avertir votre concessionnaire
immédiatement.
2. Position plane et nivelé.
Installer le four à micro-ondes sur une surface plane et nivelée.
3. Ventilation.
Ne pas bloquer les grilles d’aération. Si elles se trouvent bloquée durant le fonctionnement, il se peut que
le four surchauffe et provoque éventuellement une défaillance.
Pour une bonne ventilation, laisser 3 pouces d’espace entre le haut, les côtés, le dos du four et des
surfaces adjacentes.
4. Éloigné des postes de radio et de télévision.
Une mauvaise réception télévisée et du brouillage radioélectrique en serait le résultat si le four se trouvait à
proximité d’une télé, radio, antenne, ligne d’alimentation, etc.
Éloigner le four le plus loin possible de celles-ci.
5. Éloigné des appareils de chauffage et des robinets à eau.
Garder le four au loin du chaud, de la vapeur ou des liquides qui giclent. Les conditions susmentionnées
peuvent affecter défavorablement le câblage et les contacts.
6. Alimentation électrique.
Ce four à micro-ondes nécessite une alimentation électrique d’environ 15 ampères, 120 volts, 60 Hz et une
prise de secteur raccordée à la terre. Le cordon d’alimentation électrique fourni est court afin de réduire les
risques à l’utilisateur résultant d’un emmêlement ou d’un trébuchement sur un cordon plus long.
Si une rallonge électrique est utilisée, la puissance nominale indiquée du cordon devrait être au moins
aussi élevée que la puissance nominale du four.
Le cordon de rallonge doit être un cordon de raccordement à la terre à 3 câbles. Le cordon plus long
devrait être positionné de sorte qu’il ne pende pas au-dessus du plan de travail ou de la table d’où un
enfant pourrait tirer dessus ou se prendre les pieds sans le vouloir.
7. La hauteur minimum d’espace libre nécessaire au-dessus du haut de la surface du four est de 100mm.
Lorsque vous utilisez une prise à 3 lames
Lorsque vous utilisez un adaptateur
raccordé à la terre, assurez-vous que
le réceptacle est entièrement raccordé
à la terre.
Réceptacle à 3 lames
Prise à 3 lames
Couvercle de
la boîte du
réceptacle
Fil de
sortie
raccordée
à la terre
Adaptateur
raccordé à la
terre
Couvercle de la boîte
du réceptacle
Réceptacle
“LE CODE CANADIEN DE L’ÉLECTRICITÉ NE PERMET PAS L’UTILISATION D’ADAPTATEUR RACCORDÉ À LA TERRE”
Page 25

SPÉCIFICATIONS
6
ALIMENTATION ÉLECTRIQUE
CONSOMMATION ÉLECTRIQUE 1500 W
MICRO-ONDES PUISSANCE RESTITUÉE 1000 W
FRÉQUENCE 2,450MHz
DIMENTIONS EXTÉRIEURES (W x H x D)
DIMENTIONS CAVITÉ (W x H x D) 328x226x368 mm (12.9x8.9x14.5 in)
VOLUME CAVITÉ 1.1 cu.ft
POIDS NET APPROX. 31.8 lbs.
MINUTEUR 99 min. 99 sec.
NIVEAUX DE PUISSANCE 10 Levels
* Spécifications sont susceptibles de changer sans préavis.
20.2
120V AC, 60Hz SINGLE PHASE WITH
GROUNDING
513x305x425 mm (20.2x12x16.7 in)
16.7
21
Page 26

PIECES ET
7
COMMANDES DU FOUR A
FONCTIONNALITES
Il est possible que ce manuel couvre plusieurs
modèles différents. Le modèle que vous avez acheté
peut proposer certaines ou la totalité des
fonctionnalités présentées ici. Il est possible que
l’aspect de votre modèle particulier soit légèrement
différent des illustrations de ce manuel.
A B C D E F G
A. Dispositif de verrouillage de la porte D. Cache de l’arrivée des micro-ondes
B. Vitre protégée par du métal E. Lumière du four à micro-ondes
C. Plateau tournant en verre F. Affichage
G. Panneau de commande
Plateau tournant
A
MICRO-ONDES
B
A. Plateau tournant
B. Axe
C. Guide qui roule
Le plateau tournant peut pivoter dans les deux sens
pour aider à cuire les aliments de manière plus
homogène. Pour un résultat de cuisson optimal,
n’utilisez pas le four à micro-ondes sans que le
plateau tournant soit à sa place.
Voir la section « Assistance ou entretien » pour recommander l’une des pièces.
Pour l’installation :
1. Installez l’axe dans le trou au centre de la partie
inférieure de la cavité du four à micro-ondes.
2. Placez le support sur la partie inférieure de la
cavité du four à micro-ondes.
3. Placez le plateau tournant sur le support.
Positionnez les supports surélevés et courbés au
centre de la partie inférieure du plateau tournant
entre les trois bras de l’axe.
C
Affichage
Lors de la première mise sous tension du four à
micro-ondes, « 0:00 » s’affiche sur l’écran. Si le
« 0:00 » s’affiche à un autre moment, cela signifie
qu’une coupure de courant a eu lieu. Réglez à
nouveau l’heure le cas échéant. Voir la section
“Horloge.
Lorsque vous utilisez le four à micro-ondes, l’écran
indique le temps de cuisson restant. Lorsque vous
n’utilisez pas le four à micro-ondes, l’écran affiche
l’heure du jour (si l’horloge est à l’heure) ou le
compte à rebours du Minuteur.
Page 27

Niveau de puissance
8
Dix niveaux de puissance sont disponibles.
NIVEAU AFFICHAGE PUISSANCE
10 PL10 100%
9 PL9 90%
8 PL8 80%
7 PL7 70%
6 PL6 60%
5 PL5 50%
4 PL4 40%
3 PL3 30%
2 PL2 20%
1 PL1 10%
Remarques :
Lorsque vous choisissez une puissance entre les
niveaux 10 et 8, l’indicateur de niveau élevé est
allumé et il clignote pendant le fonctionnement
du four à micro-ondes.
Lorsque vous choisissez une puissance entre les
niveaux 7 et 1, l’indicateur de niveau faible est
allumé et il clignote pendant le fonctionnement
du four à micro-ondes.
Réglage de l’horloge
Lorsque le four à micro-ondes est branché sur
une prise secteur, le four affiche « 0:00 ».
(1) Appuyez sur « CLOCK/PRE-SET ». L’écran
affiche 0:00, le voyant de l’horloge s’allume. Les
chiffres de l’heure clignotent ; et « : » et « 0 » ne
clignotent pas.
(2) Appuyez sur les touches numériques et
saisissez l’heure correcte. Par exemple, il est
10 :12 maintenant, veuillez appuyer sur « 1, 0, 1,
2 » tour à tour.
(3) Appuyez sur « AM/PM » pour choisir AM ou
PM. AM ou PM sont sélectionnés tour à tour si
vous maintenez le bouton AM/PM enfoncé.
(4) Appuyez sur « CLOCK/PRE-SET » pour
terminer le réglage de l’horloge, et le voyant de
l’horloge s’éteint. « : » clignote et l’horloge
s’allume.
(5) Si les chiffres saisis ne se situent pas entre
1:00 et 12:59, le réglage ne sera pas validé. Il
sera validé uniquement lorsque les chiffres saisis
seront corrects.
Remarque : Pendant le réglage de l’horloge, si la
touche « STOP/CLEAR » est enfoncée, ou si
aucune action n’est effectuée pendant une
minute, le four revient automatiquement au
réglage précédent.
Minuteur de cuisine
(1) Appuyez sur « KITCHEN TIMER », l’écran
affiche 00 :00, et le voyant de l’horloge s’allume.
Le premier « 0 » clignote ; et « : » et l’autre « 0 »
ne clignotent pas.
(2) Appuyez sur les touches numériques et
saisissez la durée correcte. (La durée maximale
de cuisson est de 99 minutes et 99 secondes.)
(3) Appuyez sur « START/+30SEC » pour
confirmer le réglage, le voyant de l’horloge
s’allume.
(4) Une fois le temps de cuisson écoulé, le
voyant de l’horloge s’éteint. L’alarme sonne 5
fois.
Si l’horloge est à l’heure (système sur 12 heures),
l’écran indique l’heure.
Cuisson au four à micro-ondes
(1) Maintenez la touche « POWER » enfoncée
pour choisir la puissance micro-ondes. « » et
« » ou « » s’allume.
(2) Appuyez sur les touches numériques pour
indiquer le temps de cuisson ; la durée maximale
de cuisson est de 99 minutes et 99 secondes.
(3) Appuyez sur « START/+30SEC. » pour
lancer la cuisson, et le temps de cuisson restant
s’affiche. « : », « », « » ou « » clignote.
Remarque : Pendant la cuisson, si la touche
« STOP/CLEAR » est enfoncée ou si aucune
action n’est effectuée pendant 1 minute, le four à
micro-ondes revient au réglage précédent
automatiquement.
Démarrage rapide
(1) En mode pause, la cuisson instantanée à un
niveau de puissance de 100% peut être lancée
en sélectionnant une durée de cuisson de 1 à 6
minutes en appuyant sur les touches
numériques 1 à 6.
Appuyez sur « START/+30SEC » pour
augmenter la durée de la cuisson ; la durée
maximale de cuisson est de 99 minutes et 99
secondes.
(2) En mode pause, la cuisson instantanée à un
niveau de puissance de 100% avec une durée
de cuisson de 30 secondes peut être lancée en
appuyant sur « START/+30SEC ». Chaque
appui sur la même touche augmente le temps de
cuisson de 30 secondes. La durée maximale de
cuisson est de 99 minutes et 99 secondes.
Page 28

Remarque : Chaque appui sur « START/+30SEC »
9
augmente le temps de cuisson de 30 secondes pour la
cuisson au micro-onde et la cuisson de menu Auto.
Toutefois, cette opération ne fonctionne pas en mode
« Décongélation ».
Décongélation avec la fonction WT
(1) Appuyez sur « WEIGHT DEFROST », l’écran affiche
« DEF1 » ; et les voyants « » et « » sont allumés.
(2) Appuyez sur les touches numérique s pour saisir le
poids des aliments à décongeler. Le voyant « Oz »
s’allume.
Saisissez un poids entre 4 et 100 Oz.
(3) Si le poids saisi ne se situe pas entre 4 et 100, la
saisie ne sera pas validée. Aucun « bip » ne sera émis
et le four à micro-ondes ne fonctionnera pas avant que
vous saisissez des chiffres valides.
(4) Appuyez sur « START/+30SEC » pour lancer la
décongélation et le temps de cuisson restant s’affiche.
Les voyants « » et « » clignotent et le voyant
« Oz »
s’éteint.
Fonction de décongélation minutée
(1) Appuyez sur « TIME DEFROST », l’écran affiche
« DEF2 ». En même temps, les voyants « » et « »
s’allument.
(2) Appuyez sur les touches numérique s pour saisir le
temps de la décongélation. La durée effective se situe
entre 00:01 et 99:99.
(3) Si la durée saisie ne se situe pas entre 00:01 et 99:99,
la saisie ne sera pas validée. Aucun « bip » ne sera émis
et le four à micro-ondes ne fonctionnera pas avant que
vous saisissez des chiffres valides.
(4) La puissance par défaut des micro-ondes est le
niveau 3. Si vous voulez modifier le niveau de puissance,
appuyez une fois sur « POWER » et l’écran affiche
« PL3 ». Appuyez ensuite sur la touche numérique
correspondant au niveau de puissance que vous
souhaitez.
(5) Appuyez sur « START/+30SEC » pour lancer la
décongélation. La durée de cuisson restante s’affiche.
« : », « » et « » clignotent.
POPCORN
a) Mode par défaut
1) App uyez su r « POPCORN » pour sélectionner le mode
popcorn. « », « » et « Oz » s allument. « 1.75 »,
« 3.0 », « 3.5 » s’affichent à l’écran.
2) Appuyez sur « START/+30SEC » pour commencer la
cuisson. L’alarme sonne une fois. « Oz » s’éteint, et « »
et « » clignotent.
3) Une fois la cuisson terminée, l’alarme sonne 5 fois et
l’écran affiche « 0:00 ».
Si l’horloge a été réglée (système de 12 heures), l’écran
indique l’heure.
b) Mode avec durée de cuisson ajustable
1) Appuyez sur « POPCORN » pour sélectionner le mode
popcorn. « », « » et « Oz » s’allument.
« 1.75 », « 3.0 », « 3.5 » s’affichent à l’écran.
2) Appuyez sur « MEMORY ». L’écran affiche le temps
de cuisson correspondant au poids. Le chiffre des
minutes clignote.
3) Appuyez sur les touches numériques et saisissez la
durée.
4) Appuyez sur « MEMORY » pour enregistrer le réglage.
Si vous cuisez le popcorn directement, appuyez sur
« START/+30SEC ». Le four va cuire le popcorn pendant
la durée indiquée. « et « » vont clignoter.
Les utilisateurs peuvent modifier le temps de cuisson.
Ex. : Les utilisateurs règlent la durée du « POPCORN »
sur 3 minutes et 15 secondes.
1) Appuyez sur le bouton « POPCORN » une ou deux
fois lorsque le four est à l’arrêt (l’écran affiche « 1.75 »
pour un appui et « 3.0 » pour deux appuis.). Appuyez
ensuite sur le bouton « MEMORY ». L’écran affiche la
durée de cuisson par défaut ou le poids des aliments
dans le four (qui n’est pas 0 :00), par exemple « 1.30 ».
Sur l’écran, le premier chiffre 1 clignote. Appuyez sur la
touche numérique pour saisir 5. Ensuite, le premier
chiffre 3 clignote (Semblable au réglage de l’horloge).
(2) appuyez sur « MEMORY » à nouveau pour
enregistrer le réglage en cours. Si vous appuyez sur
« START/+30SEC » pour commencer la cuisson
directement, le programme enregistre le dernier réglage
du temps de cuisson automatiquement.
(3) Pour modifier le temps de cuisson réglé, répétez
l’étape 1). L’écran affiche d’abord le temps enregistré
(3 :15 par exemple). Appuyez sur le bouton numérique
pour régler à nouveau le temps de cuisson, puis suivez
l’étape 2).
(4) Une fois que vous avez terminé, chaque appui sur la
touche « POPCORN » affiche le poids des aliments
« 1.75 », « 3.0 » ou « 3.5 ». Seul le temps de cuisson suit
le temps enregistré.
(5) Pour revenir à l’initialisation, maintenez la touche
« POPCORN » enfoncée pendant plus de trois secondes.
L’alarme sonne. Revenez ensuite au réglage initial.
»
Page 29

POMME DE TERRE
10
TOUCHE APPUYEZ AFFICHAGE PORTION
POTATO Une fois 1 1 part
Deux fois 2 2 parts
Trois fois 3 3 parts
(a) Appuyez plusieurs fois sur « POTATO » jusqu’à
ce que le chiffre de votre choix s’affiche à l’écran.
« » et « » s’allument.
RÉGLAGE « 1 » : 1 pomme de terre (environ 230
grammes)
RÉGLAGE « 2 » : 2 pommes de terre (environ 460
grammes)
RÉGLAGE « 3 » : 3 pommes de terre (environ 690
grammes)
Par exemple, appuyez sur « POTATO » une fois :
« 1 » s’affiche.
(b) Appuyez sur « START/+30SEC » pour
commencer la cuisson. « » et « » clignotent.
La durée est décomptée au fur et à mesure de la
cuisson.
PIZZA
TOUCHE APPUYEZ AFFICHAGE PORTION
PIZZA Une fois 1 1 (environ 3.0 Oz)
Deux fois 2 2 (environ 6.0 Oz)
Trois fois 3 3 (environ 9.0 Oz)
(a) Appuyez plusieurs fois sur « PIZZA » jusqu’à ce
que le chiffre de votre choix s’affiche à l’écran.
« » et « » s’allument.
Vous pouvez réchauffer 1 à 3 tranches de pizza à
chaque fois.
Par exemple, appuyez sur « PIZZA » deux fois : « 2 »
s’affiche.
(b) Appuyez sur « START/+30SEC » pour
commencer la cuisson. « » et « » clignotent.
La durée est décomptée au fur et à mesure de la
cuisson.
BOISSON
TOUCHE APPUYEZ AFFICHAGE PORTION
BEVERAGE Une fois 1 1 grande tasse
Deux fois 2 2 grandes tasses
Trois fois 3 3 grandes tasses
(a) Appuyez plusieurs fois sur « BEVERAGE »
jusqu’à ce que le chiffre de votre choix s’affiche à
l’écran.
« » et « » s’allument.
Vous pouvez réchauffer 1 à 3 tasses de boisson à
chaque fois (environ 250 ml).
Par exemple, appuyez sur « BEVERAGE » deux fois :
« 2 » s’affiche.
(b) Appuyez sur « START/+30SEC » pour
commencer la cuisson. « » et « » clignotent.
La
durée est décomptée au fur et à mesure de la
cuisson.
SOUPE
TOUCHE APPUYEZ AFFICHAGE PORTION
SOUP Une fois 4.0 4.0 Oz
Deux fois 8.0 8.0 Oz
Trois fois 12.0 12.0 Oz
Quatre fois 16.0 16.0 Oz
(a) Appuyez plusieurs fois sur « SOUP » jusqu’à ce
que le chiffre de votre choix s’affiche à l’écran.
« », « » et « Oz » s’allument.
Par exemple, appuyez sur « SOUP » deux fois :
« 8.0 » s’affiche.
(b) Appuyez sur « START/+30SEC » pour
commencer la cuisson. « » et « » clignotent.
La durée est décomptée au fur et à mesure de la
cuisson.
ASSIETTE DE DINER
TOUCHE APPUYEZ AFFICHAGE PORTION
DINNER Une fois 9.0 9.0 Oz
PLATE Deux fois 12.0 12.0 Oz
Trois fois 18.0 18.0 Oz
(a) Appuyez plusieurs fois sur « DINNER PLATE »
jusqu’à ce que le chiffre de votre choix s’affiche à
l’écran.
« », « » et « Oz » s’allument.
Par exemple, appuyez sur « DINNER PLATE » deux
fois : « 12.0 » s’affiche.
(b) Appuyez sur « START/+30SEC » pour
commencer la cuisson. « » et « » clignotent.
La durée est décomptée au fur et à mesure de la
cuisson.
LÉGUMES FRAIS
TOUCHE APPUYEZ AFFICHAGE PORTION
FRESH Une fois 4.0 4.0 Oz
VEGETABLE Deux fois 8.0 8.0 Oz
Trois fois 16.0 16.0 Oz
(a) Appuyez plusieurs fois sur « FRESH
VEGETABLE » jusqu’à ce que le chiffre de votre
choix s’affiche à l’écran.
« », « » et « Oz » s’allument.
Par exemple, appuyez sur « FRESH VEGETABLE »
deux fois : « 8.0 » s’affiche.
(b) Appuyez sur « START/+30SEC » pour
commencer la cuisson. « Oz » disparait. « » et
« » clignotent. La durée est décomptée au fur et
mesure de la cuisson.
à
Page 30

LÉGUMES SURGELÉS
11
TOUCHE APPUYEZ AFFICHAGE PORTION
FROZEN Une fois 4.0 4.0 Oz
VEGETABLE Deux fois 8.0 8.0 Oz
Trois fois 16.0 16.0 Oz
(a) Appuyez plusieurs fois sur « FROZEN
VEGETABLE » jusqu’à ce que le chiffre de votre
choix s’affiche à l’écran.
« », « » et « Oz » s’allument.
Par exemple, appuyez sur « FROZEN
VEGETABLE » deux fois : « 8.0 » s’affiche.
(b) Appuyez sur « START/+30SEC » pour
commencer la cuisson. « Oz » disparait. « » et
« » clignotent. La durée est décomptée au fur
et à mesure de la cuisson.
FONCTION RÉGLAGE PRÉDÉFINI
(1) Réglez l’horloge d’abord. (Consultez les
instructions pour le réglage de l’horloge.)
(2) Définissez une certaine procédure de cuisson
(un ou deux blocs), la méthode de réglage et
l’affichage sont les mêmes que pour la
procédure de cuisson correspondante. (La
décongélation se trouve au-delà de la cuisson
prédéfinie.).
Par exemple : si vous souhaitez cuire les
aliments avec une puissance micro-ondes de
100% pendant 10 minutes.
Procédez comme suit :
a. Appuyez sur « POWER » une fois pour choisir
la puissance micro-ondes 100% ;
b. Appuyez sur les touches numériques « 1 »,
« 0 », « 0 », « 0 » afin de régler la durée de
cuisson ;
c ; Attention ! Veuillez ne pas appuyer sur
« START/+30SEC » pour démarrer la cuisson.
(3) Appuyez sur « CLOCK/PRE-SET » pour
afficher l’heure. Le chiffre de l’heure clignote.
L’icone « : » est allumée.
(4) Appuyez sur les touches numériques pour
saisir la durée de cuisson. Par exemple : pour
régler la durée sur 12:12, vous pouvez appuyer
sur les touches « 1 », « 2 », « 0 », « 0 » dans cet
ordre.
(5) Appuyez sur « AM/PM » pour choisir AM ou
PM. AM ou PM sont sélectionnés tour à tour si
vous maintenez la touche « AM/PM » enfoncée.
(6) Appuyez sur « START/+30SEC » pour
confirmer la procédure prédéfinie. Une fois la
procédure confirmée, l’affichage de l’appareil
revient à l’horloge.
(7) Une fois que l’heure arrive, l’alarme sonne
deux fois et la cuisson commence.
FONCTION MÉMOIRE
(1) appuyez sur « MEMORY » pour choisir la
procédure de mémoire 1 à 5. L’écran affiche 1, 2,
3...5.
(2) si la procédure a été définie, appuyez sur
« START/+30SEC » pour l’utiliser. Sinon,
continuez le réglage de la procédure. Seulement
une ou deux étapes peuvent être défininies.
(3) Une fois que vous avez terminé le réglage,
appuyez sur « MEMORY » pour sauvegarder la
procédure et revenir dans un mode d’attente. Si
vous appuyez sur « START/+30SEC », l’appareil
peut enregistrer le réglage et fonctionner avec ce
réglage.
Par exemple : pour définir la procédure suivante
comme la seconde mémoire, c’est à dire la
mémoire 2 pour cuire les aliments avec une
puissance micro-ondes de 80% pendant 3
minutes et 20 secondes.
Les étapes sont les suivantes :
a. Dans les modes d’attente, appuyez sur
3MEMORY » deux fois. Arrêtez d’appuyer
lorsque l’écran affiche « 2 ».
b. Appuyez trois fois sur « POWER » jusqu’à ce
que PL8 s’affiche.
c. Appuyez sur les touches numériques « 3 »,
« 2 » et « 0 » afin de saisir le temps de cuisson.
d. Appuyez sur « MEMORY » pour enregistrer le
réglage. L’alarme sonne une fois puis l’appareil
se remet en mode d’attente.
Si vous appuyez sur « START/+30SEC » après
l’étape ci-dessus, la procédure sera enregistrée
en tant que mémoire 2 et la cuisson
commencera avec ce réglage.
e. Si l’électricité n’est pas coupée, la procédure
demeurera enregistrée. En cas de coupure de
courant, le réglage devra être effectué à
nouveau.
f. Si vous souhaitez utiliser la procédure
enregistrée, en mode d’attente, appuyez sur
« MEMORY » deux fois. L’écran affiche « 2 ».
Appuyez ensuite sur « START/+30SEC » pour
lancer la cuisson.
Cuisson multi-sections
Au plus 2 sections peuvent être réglées pour la
cuisson. Dans la cuisson multi-sections, si une
section est la décongélation alors la
décongélation doit être placée en premier.
Lorsque la première étape est terminée, l’alarme
sonne une fois et l’étape suivante commencera
la cuisson.
Par exemple : si vous souhaitez faire une
cuisson avec une puissance de micro-ondes de
80% pendant 5 minutes +60% de puissance
micro-ondes pendant 10 minutes. Les étapes de
cuisson seront les suivantes :
Page 31

(1) Appuyez sur « POWER » pour choisir la
12
puissance micro-ondes de 80%. « PL8 »
s’affiche.
(2) Appuyez sur les touches numériques « 5 »,
« 0 » et « 0 » pour régler le temps de cuisson.
(3) Appuyez sur « POWER » pour choisir la
puissance micro-ondes de 60%. « PL6 »
s’affiche.
(4) Appuyez sur les touches numériques « 1 »,
« 0 », « 0 » et « 0 » pour régler le temps de
cuisson.
(5) Appuyez sur « START/+30SEC » pour
commencer la cuisson.
FONCTION INFORMATION
(1) En mode de cuisson, appuyez sur
« CLOCK/PRE-SET ». L’écran affiche l’horloge
pendant trois secondes.
(2) Dans le mode de cuisson aux micro-ondes,
appuyez sur « POWER » pour voir le niveau de
puissance des micro-ondes, et la puissance des
micro-ondes utilisées s’affiche. Après trois
secondes, le four revient à l’état précédent. Dans
le mode multi-étapes, les informations
s’obtiennent de la même manière.
FONCTION VERROUILLAGE ENFANT
Verrouillage : En mode d’attente, appuyez sur
« STOP/CLEAR » pendant 3 secondes. Un long
bip indique l’entrée dans le mode de verrouillage
enfant. L’écran affiche « ».
Sortir du mode verrouillé : Dans le mode
verrouillé, appuyez sur « STOP/CLEAR »
pendant 3 secondes. Un long bip indique que la
fonction de verrouillage est désactivée.
FONCTION DE RAPPEL DE FIN DE CUISSON
Lorsque la cuisson est terminée, l’alarme sonne
5 dois pour avertir l’utilisateur que la cuisson est
terminée.
AUTRES CARACTÉRISTIQUES
(1) En mode d’attente, si l’écran digital affiche
l’heure, l’icone « : » clignote. Sinon, l’écran
affiche « 0:00 ».
(2) En mode de réglage d’une fonction, l’écran
affiche le réglage correspondant.
(3° En mode de fonctionnement ou de pause,
l’écran affiche le temps de cuisson restant.
Page 32

ENTRETIEN DE V OTRE FOUR À MICRO-ONDES
13
Arrêter le four avant de le nettoyer.
1
Maintenez l’intérieur du four propre. Lorsque des
2
éclaboussements d’aliments ou des
renversements de liquides s’adhèrent aux parois
du four, essuyez avec un torchon mouillé. Un
détergent doux peut être utilisé si le four devient
très encrassé. L’utilisation de nettoyants abrasifs
n’est pas recommandée.
La surface extérieure du four devrait être
3
nettoyée avec du savon et de l’eau, puis rincée et
essuyée avec un torchon doux. Pour empêcher
l’endommagement des composants internes au
fonctionnement du four, évitez que de l’eau
pénètre dans les orifices de ventilation.
Si le Tableau de commande devient mouillé,
4
nettoyez le avec un torchon sec et doux.
N’utilisez pas de nettoyants abrasifs sur le
Tableau de commande.
Si de la vapeur s’accumule à l’intérieur et autour
5
de l’extérieur de la porte du four, essuyez avec
un torchon doux. Ceci peut survenir lorsque vous
utilisez le four à micro-ondes dans des conditions
à haute humidité et ceci n’indique en aucun cas
que l’unité est défectueuse.
Il est parfois nécessaire d’enlever le plateau de
6
verre pour le nettoyer. Savonnez le plateau dans de
l’eau tiède ou dans le lave-vaisselle.
Les guides roulants et le palier de la cavité du four
7
devraient être nettoyés régulièrement afin de réduire
les bruits de rotation. Épongez tout simplement la
surface inférieure du four avec de l’eau savonneuse
ou un nettoie-vitre, puis essuyez. Vous pouvez
savonner les guides roulants dans de l’eau tiède.
GUIDES ROULANTS
Les GUIDES ROULANTS et le palier du four
1
devraient être nettoyés fréquemment afin de
réduire les bruits de rotation.
Les GUIDES ROULANTS DOIVENT TOUJOURS
2
être utilisés ensemble avec le Plateau en verre
pour la cuisson.
PLATEAU EN VERRE
NE PAS mettre en marche le four sans que le
1
Plateau en verre ne soit mis en place.
NE PAS utiliser d’autre Plateau en verre avec ce
2
four.
Si le Plateau en verre est chaud, LAISSEZ LE
3
REFROIDIR avant de le nettoyer ou de le plonger
dans l’eau.
NE PAS cuire directement sur le Plateau en verre.
4
Plateau en verre Guides roulants
Page 33

AVANT DE FAIRE UN APPEL DE SERVICE
14
• Le four ne marche pas :
1. Vérifiez que le cordon d’alimentation électrique
est bien branché.
2. Vérifiez que la porte est bien fermée.
3. Vérifiez que la durée de cuisson est fixée.
4. Vérifiez qu’un fusible n’a pas sauté ou que le
disjoncteur principal ne s’est pas déclenché
dans votre maison.
• Des étincelles à l’intérieur de la cavité :
1. Inspectez les ustensiles. Les contenants en
métal ou les plats à rebord métallique ne
devraient pas être utilisés.
Si un problème existe toujours, contacter le
Service de soutien à la clientèle des
électroménagers MC au 888-775-02002 ou vous
pouvez demander un appel de service en ligne à
www.mcappliance.com.
CARE AND CLEANING
Toutefois que votre four a été pourvu de caractéristiques sécurisées, il est important d’observer les
points suivants :
1. Il est important de ne pas désactiver ou de
toucher aux interrupteurs de verrouillage.
2. Ne pas poser d’objet entre la face avant du four
et la porte ou permettre de résidus d’accumuler
sur les surfaces étanches. Éponger la zone
d’étanchéité fréquemment avec un détergent
doux, la rincer et sécher. Ne jamais utiliser de
poudres décapantes ou de tampons abrasifs.
3. Alors qu’elle est ouverte, la porte ne doit pas
être soumise à des contraintes, par exemple, un
enfant suspendu à la porte ouverte ou un
chargement quelconque sur celle-ci pourrait
occasionner la culbute du four en avant ainsi
provoquant des blessures et l’endommagement
de la porte. Ne pas faire fonctionner le four s’il
est endommagé jusqu’à ce qu’il soit réparé par
un technicien d’entretien qualifié.
Il est tout particulièrement important que le four
se ferme bien et qu’il n’y ait pas de dommages :
ii) à la porte (tordu)
ii) aux charnières et crochets (casés ou
desserrés)
iii) aux joints de porte et aux surfaces
d’étanchéité.
4. Le four ne devrait pas être ajusté ou réparé par
une personne autre qu’un technicien d’entretien
hautement qualifié.
Page 34

QUESTIONS ET RÉPONSES
15
* Q : Le four peut-il être utilisé si le plateau de
verre ou le guide qui roule sont enlevés ?
* R : Non. Le plateau de verre et le guide qui roule
doivent toujours être placés dans le four avant la
cuisson.
* Q : Puis-je ouvrir la porte lorsque le four
fonctionne ?
* R : La porte peut être ouverte à tout moment
pendant la cuisson. L’énergie micro-ondes est
immédiatement arrêtée et le temps paramétré reste
en mémoire jusqu’à la fermeture de la porte.
* Q : Pourquoi mon four à micro-ondes est-il
couvert d’humidité après la cuisson ?
* R : L’humidité sur la paroi de votre four à microondes est normale. Elle est produite par la vapeur
issue de la cuisson des aliments qui entre en contact
avec la surface plus froide du four.
* Q : L’énergie micro-ondes traverse-t-elle la
fenêtre de contrôle sur la porte ?
* R : Non. L’écran métallique fait rebondir l’énergie
vers la cavité du four. Les trous sont là pour permettre
à la lumière de passer à travers la vitre. Ils ne laissent
pas passer les micro-ondes.
* Q : Pourquoi les œufs éclatent-ils parfois ?
* R : Lorsque vous cuisez ou que vous pochez des
œufs, il est possible que le jaune éclate à cause d’une
accumulation d’humidité à l’intérieur de sa membrane.
Pour empêcher cet éclatement, percez simplement le
jaune à l’aide d’un cure-dent avant la cuisson. Ne
cuisez jamais des œufs sans percez leur coquille.
* Q : Pourquoi recommande-t-on d’observer un
temps d’attente une fois que la cuisson est
terminée ?
* R : Le temps d’attente est très important. Avec la
cuisson aux micro-ondes, la chaleur est dans les
aliments, pas dans le four. De nombreux aliments
accumulent suffisamment de chaleur interne pour
permettre à la cuisson de se poursuivre même une
fois que les aliments ont été retirés du four. Le temps
d’attente pour les rôtis, les légumes de grande taille et
les gâteaux permet à l’intérieur de cuire complètement,
sans trop cuire l’extérieur.
* Q : Que signifie « temps d’attente » ?
* R : « Temps d’attente » signifie que les aliments
devraient être retirés du four et couverts pendant
quelques instants pour permettre à la cuisson de
s’achever. Cela libère le four pour une autre cuisson.
* Q : Pourquoi mon four ne cuit-il pas toujours
aussi rapidement que ce qui est indiqué dans le
guide de cuisson au four à micro-ondes ?
* R : Vérifiez à nouveau votre guide de cuisson, pour
vous assurer que vous avez suivi les instructions
exactement ; et pour voir ce qui pourrait provoquer
des variations de la durée de cuisson.
La durée de cuisson et les paramètres de température
indiqués dans le guide de cuisson sont des
suggestions, pour aider à empêcher de trop cuire les
aliments... le problème le plus fréquent lorsqu’on se
familiarise avec l’utilisation d’un four à micro-ondes.
Les variations en matière de taille, de forme et de
poids ainsi que de dimensions pourraient nécessiter
un temps de cuisson plus long.
Utilisez votre jugement personnel ainsi que les
suggestions du guide de cuisson pour vérifier si les
aliments ont été cuits correctement tout comme vous
le feriez avec un four traditionnel.
* Q : Le four à micro-ondes sera-t-il détérioré s’il
fonctionne alors qu’il est vide ?
* R : Oui. Ne le faites jamais fonctionner lorsqu’il est
vide.
* Q : Puis-je utiliser le four à micro-ondes sans le
plateau tournant ou retourner le plateau tournant
pour accueillir un plat large ?
* R : Non. Si vous retirez le plateau tournant ou si
vous le retournez, le résultat de la cuisson sera
médiocre. Les plats utilisés dans votre four doivent
passer sur le plateau tournant.
* Q : Est-il normal que le plateau tournant tourne
dans les deux sens ?
* R : Oui. Le plateau tournant pivote dans le sens des
aiguilles d’une montre ou dans l’autre sens, en
fonction de la rotation du moteur au moment où le
cycle de cuisson commence.
* Q : Puis-je préparer du popcorn dans mon four à
micro-ondes ?
Comment obtenir les meilleurs résultats ?
* R : Oui. Faites cuire le popcorn conditionné pour une
préparation au four à micro-ondes en suivant les
instructions du fabricant. N’utilisez pas de sacs en
papier ordinaires. Faites le “test auditif” en arrêtant le
four dès que les « pops » ralentissent jusqu’à 1 “pop”
toutes les 1 à 2 secondes. Ne recuisez pas les
morceaux de maïs qui ne se sont pas transformés en
popcorn. Ne faites pas cuire du popcorn dans un plat
en verre.
Page 35

UTILISER VOTRE FOUR A
16
MICRO-ONDES EN TOUTE
SÉCURITÉ
Généralités
Ne tentez pas de désactiver ou de modifier les
verrouillages de sécurité.
Ne placez aucun objet entre le cadre avant du four et
la porte ou ne laissez aucun résidu s’accumuler sur
les surfaces d’étanchéité. Essuyez le four à l’aide d’un
détergent doux. Rincez et séchez. N’utilisez jamais de
poudres abrasives ou de tampons à récurer.
Ne soumettez pas la porte du four à une pression ou à
un poids comme un enfant suspendu à une porte
ouverte.
Cela risque de provoquer la chute en avant du four ;
ce qui pourrait provoquer des blessures et détériorer
le four.
Les aliments
N’utilisez jamais le four à micro-ondes pour préparer
des conserves maison. Ce four n’est pas conçu pour
la préparation de conserves maison dans les règles
de l’art. Les aliments mis en conserve sans respecter
les règles de l’art peuvent être gâchés et leur
consommation peut également se révéler dangereuse.
Utilisez toujours le temps de cuisson minimal de la
recette. Il est préférable de ne pas cuire suffisamment
plutôt que de trop cuire les aliments. Les aliments qui
ne sont pas suffisamment cuits peuvent être passés
au four à nouveau. Si les aliments sont trop cuits, on
ne peut rien faire.
Chauffez les petites quantités ou les aliments à faible
teneur en humidité avec prudence. Ceux-ci peuvent
en effet très rapidement se dessécher, brûleur ou
prendre feu.
Ne chauffez pas d’œufs dans leurs coquilles. La
pression risque de s’accumuler et les œufs pourraient
exploser.
Les pommes de terre, les pommes, les jaunes d’œufs
et les saucisses sont des exemples d’aliments à peau
non poreuse.
Ceux-ci doivent être percés avant la cuisson afin de
les empêcher d’éclater.
N’essayez pas de fricasser des aliments dans votre
four à micro-ondes.
Patientez toujours au moins 20 secondes après l’arrêt
du four pour permettre à la température de
N’utilisez pas le four si les joints de la porte ou les
surfaces étanches sont détériorées ; ou si la porte est
courbée ; ou si les charnières sont desserrées ou
cassées.
Ne mettez pas le four en marche lorsque celui-ci est
vide. Cela risque de détériorer le four.
Ne tentez pas de faire sécher des vêtements, des
journaux ou d’autres matériaux dans le four. Ceux-ci
pourraient prendre feu.
N’utilisez pas de produits à base de papier recyclé car
ceux-ci sont susceptibles de contenir des impuretés
qui pourraient provoquer des étincelles ou des
incendies.
Ne frappez pas la console de commande avec des
objets durs.
Cela risque de détériorer le four.
s’harmoniser, mélangez pendant la cuisson si
nécessaire, et mélangez TOUJOURS après la cuisson.
Pour empêcher toute ébullition éruptive et le risque de
brûlure, vous devriez placer une cuiller ou un bâtonnet
de verre dans les boissons et mélanger avant,
pendant et après la cuisson.
Ne laissez pas le four sans surveillance lorsque vous
préparez du popcorn.
Ne préparez pas de popcorn dans un sac en papier
sauf s’il s’agit d’un produit commercial conçu et
conditionné pour la préparation de popcorn au four à
micro-ondes. Les morceaux de maïs risquent de
surchauffer et de faire brûler un sac en papier marron.
Ne placez pas des sachets de popcorn micro-ondable
directement sur le plateau du four à micro-ondes.
Placez le sachet sur un verre résistant aux microondes ou sur une assiette en céramique pour éviter
de provoquer une surchauffe et ne pas fissurer le
plateau du four.
Ne dépassez pas la durée de cuisson suggérée par le
fabricant du popcorn micro-ondable.
Une cuisson plus longue ne produit pas davantage de
popcorn mais elle peut en revanche provoquer la
combustion du popcorn ou provoquer un incendie.
Souvenez-vous que le sachet de popcorn et le plateau
peuvent être trop chauds pour qu’on les manipule.
Sortez-les du four prudemment et utilisez des
supports pour vos pots de popcorn.
LES ÉTINCELLES
Si vous voyez des étincelles, appuyez sur la touche STOP/CLEAR et corrigez le problème.
Des étincelles peuvent se former dans le four à micro-ondes.
Les étincelles peuvent avoir plusieurs causes :
• La présence de métal ou de papier aluminium en contact avec la paroi du four.
• La présence d’un papier aluminium mal enroulé autour des aliments (les extrémités ori entées vers le haut se
comportent comme des antennes.).
• La présence de métal, comme des attaches, des épingles de volaille, ou des plats à bordures dorées dans le four à
micro-ondes.
• L’utilisation de serviettes en papier contenant de petits morceaux de métal dans le four à micro-ondes.
Page 36

Garantie du f our à micr o-ondes
17
MC Appliance Corp. garantit que chaque Four à micro-ondes neuf est dépourvu de défaut de pièce
ou de main d’oeuvre et accepte de remédier à tout défaut de ce type ou de fournir une/des pièce(s)
neuve(s) (à la discrétion de l’entreprise) pour toute(s) pièce(s) de l’appareil qui tomberait en panne
pendant la durée de la garantie. Les frais de pièces et de main d’oeuvre sont couverts sur cet
appareil pour une période d’un an à compter de la date d’achat. De plus, MC Appliance Corp.
garantit que le Magnetron (pièces uniquement) contre tout défaut de pièce et de main d’oeuvre
pour une durée de 8 ans. Le consommateur prend en charge toute dépense de main d’oeuvre et
de transport liée au diagnostic et au remplacement du Magnetron à partir de l’expiration de la
période de garantie initiale l’un an. Au cas où l’appareil aurait besoin d’être remplacé ou remboursé
dans le cadre de la présente garantie, le consommateur est responsable pour tous les frais de
transport pour le retour de l’appareil à notre usine avant de recevoir un appareil de remplacement
ou un remboursement. Une copie du ticket de caisse/facture d’achat daté(e) est nécessaire
pour bénéficier du service de la garantie, remplacement need ou space rembour sement.
Cette garantie couvre les produits utilisés aux Etats-Unis continentaux, à Porto Rico, à Hawaï et le
Canada. La présente garantie ne prend pas en charge les éléments ci-dessous :
• Détériorations provoquées pendant l’expédition ou par une mauvaise installation.
• Détériorations dues à une mauvaise utilisation ou à une utilisation abusive.
• Pertes de contenu en raison d’une défaillance de l’appareil.
• Réparations effectuées par des agents d’entretien non homologués.
• Appels pour un entretien non lié à des défauts de pièces et de main d’oeuvre comme des instructions
concernant l’utilisation correcte du produit ou une mauvaise installation.
• Remplacement ou réinitialisation des fusibles de la maison ou des coupe-circuits.
• Panne de ce produit en cas d’utilisation pour un usage autre que celui pour lequel il a été conçu.
• Les frais d’évacuation des déchets des unités défectueuses non retournées à notre usine.
• Tous les débours de livraison / d’installation encourus en conséquence de l’unité étant défaillante
dans son rendement anticipé
• Frais de Voyage et transport pour le service dans les régions éloignées.
• L'enlèvement et la réinstallation de votre appareil, si elle est installée dans un endroit inaccessible ou
n'est pas installé conformément aux instructions d'installation publiées.
La présente garantie annule et remplace toutes les garanties exprimées ou induites et aucun
représentant ou personne n’est autorisé à assumer pour nous toute autre responsabilité en rapport
avec la vente de ce produit. En aucune circonstance le client n’est autorisé à retourner cet appareil
à l’usine sans autorisation écrite préalable délivrée par MC.
Modèle Pièces Main d’oeuvre Magnetron Type de service
MCM1110BF Un an Un an Huit ans
MCM1110WF
Pour des Réparations ou de l’Assistance, veuillez téléphoner au
888 775-0202 Ou consultez notre site Internet : www.mcappliance.com
(Pièces uniquement)
Acheminer soi-même
 Loading...