

Page 1
W
ine Coole
r
Beverage Cooler
Wine Cooler Model No. MCWC50DBT
Beverage Cooler Model No. MCBC580DBT
. Before Putting Into Use . . . . . . . . . . . . . . . . .
. Important . . . . . . . . . . . . . . . . . . . . . . . .
. Installation . . . . . . . . . . . . . . . . .
. Description of the Appliance . . . . . . . . . . . . . . .
. Temperature Control . . . . . . . . . . . . . . . . . . .
. Maintenance and Cleaning . . . . . . . . . . . . . . . .
. Trouble Shooting Guide . . . . . . . . . . . . . . . . .
. Changing The Reversible Door . . . . . . . . . . . . . . . . . .
. Appliance Warranty . . . . . . . . . . . . . . . . . .
To ensure proper use of this appliance and your safety, please read the following
instructions completely before operating this appliance.
2
2
3
4
5
6
7
9
10
Page 2

.
.
A
.
.
W
ine Cooler, Beverage Coole
r
Thank you for purchasing this appliance.
We hope it will successfully serve your requirements for many years.
SAVE THESE INSTRUCTIONS
Before Putting Into Use . . . . . . . . . . . . .
Important . . . . . . . . . . . . . . . . . . . .
Disposing of Worn Out Appliances
Tips for Energy Savings
Installation . . . . . . . . . . . . . . . . . .
Built-in Installation
Free Standing Installation
Description of the Appliance . . . . . . . . . . . .
Wine Cooler MCWC50DBT
Beverage Cooler MCBC580DBT
Temperature Control and Display . . . . . . . . . 5
Wine Cooler MCWC50DBT
Beverage Cooler MCBC580DBT
Maintenance and Cleaning . . . . . . . . . . . . .
utomatic Defrosting of the appliance
Cleaning of the Appliance
Replacing the Bulb
Switch Off the Appliance When Not In Use
Trouble-Shooting Guide . . . . . . . . . . . . . .
Changing The Reversible Door . . . . . . . . . .
2
2
3
4
6
7
9
Appliance Warranty . . . . . . . . . . . . . . .
1
10
Page 3

Before Putting Into Use
Before connecting the appliance to electrical
·
power supply, leave it to stand for about 4 hours, refrigerant and oil ,so when the appliance is damaged,
which will reduce the possibility of malfunctions handle it with care and dispose of it in compliance
in the cooling system due to transport handling. with environmental protection safeguards.
Clean the appliance thoroughly, especially in the
·
interior (See Cleaning and Maintenance). technical data specific to this unit, is located either
In case the interior accessories are not correctly inside the appliance or outside on the rear wall.
·
placed, rearrange them as described in chapter
"Description of the Appliance".
These instructions for use are intended for the user.
·
They describe the appliance and correct operating Before you throw away your old appliance:
procedures for safe use . -Take off the doors
SAVE THESE INSTRUCTIONS:
Important
·
If you have bought this appliance to replace an old
one equipped with a door lock that cannot be
opened from the inside (lock, bolt), make sure that
the lock is removed, disabled or destroyed before
discarding. This will make it impossible for children
to accidentally lock themselves inside the appliance
and suffocate.
·
To avoid risk of child entrapment, leave the
shelves in place so children can not easily
climb inside even when the appliance is in the weather is hot and humid. Once you open the
routine use or not in use at home. door , close it as soon as possible. This is
·
The appliance must be properly connected to especially important if you have an upright model .
an electrical power supply. (See: Connection
to Power Supply) . sufficiently ventilated ( adequate air circulation
·
Do not use an extension cord. behind the appliance ).
·
Always disconnect the appliance from the
power supply before cleaning the appliance, soon as possible (depends on how loaded the
or attempting repairs. appliance is, ambient temperatures etc.).
WARNING:
.
Repairs should be performed by qualified energy consumption is substantially higher. To
service personnel only. restore efficiency, replace the gasket.
·
Do not defrost the appliance with other electric
appliances (for example a hair dryer) and never
attempt to scrape/remove ice/frost with sharp objects.
·
The cooling system of the appliance is filled with
·
The rating plate containing Model No and other
Disposing of Worn Out Appliances
·
DANGER OR WARNING: Risk of child entrapment.
- Leave the shelves in place so children may not
easily climb inside.
Refrigerant: All refrigeration products contain refrigerants,
·
which under the guidelines of federal law must be removed
before disposal of product. It is consumer's responsibility
to comply with federal and local regulations when disposing
of this product.
Be careful not to damage the tubes on the rear wall
of the appliance (danger of pollution).
Tips for Energy Saving
Try not to open the door too often, especially when
·
Every now and then check if the appliance is
·
Set the thermostat from higher to lower settings as
·
If the gasket is damaged or the door seal is poor,
·
2
Page 4
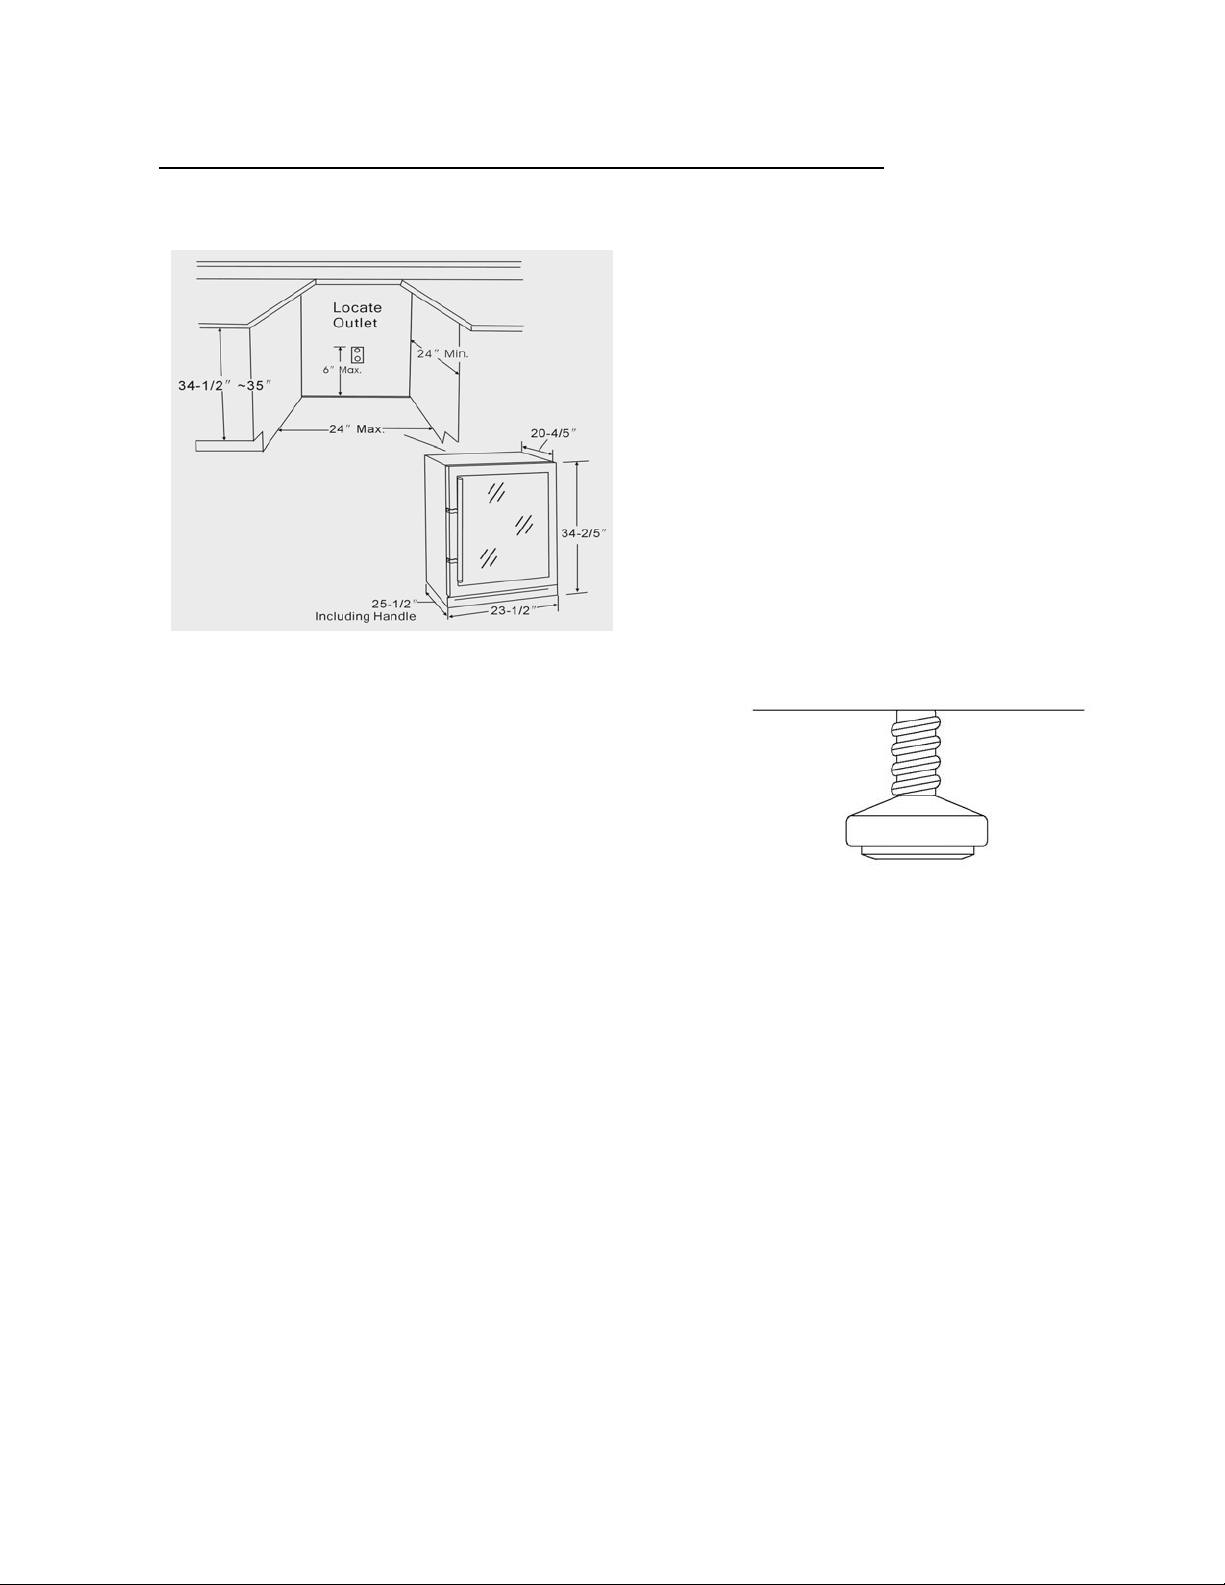
Installation
N
BUILT-IN INSTALLATION
The cutout depth must be 24".
The cutout dimensions shown allows for a full door
swing and access to the pull-out racks when installed
as a built-in.
The appliance can be installed freestanding.
.
If installing between frameless cabinets, a 1/2" wide
.
filler strip or side panel may be needed on hinge
side. The filler strip will act as a spacer between the
appliance case and adjacent cabinet door swing.
The width of the opening must include the filler
panels. Note: The door should protrude 1" beyond
the surrounding cabinets.
FREE STANDING INSTALLATIO
Choose the location
Be sure the front of the appliance is unobstructed
.
for air circulation and proper access to the door.
Do not install the appliance where the temperature
.
will go below 55°F or above 90°F.
Do not install where it will be subject to direct
.
sunlight, heat or moisture.
Allow sufficient space for door swing.
.
This unit is not designed for use in garage or any
.
other outside installation.
Adjustable Feet
Some appliances have adjustable feet on the front
side; use them to level the appliance.
Note: If you want to change door swing, change it
before installation.
Additional Specifications
A 120 volt 60Hz., 15 or 20 amp power supply is
.
required. An individual properly grounded branch
circuit or circuit breaker is recommended. Install a
properly grounded 3-prong electrical receptacle
recessed into the back wall as shown. Electrical must
be located on rear wall as shown. Note: GFI (ground
fault interrupter) is not recommended.
Consult a qualified electrician or serviceman if the
wiring instruction are not clearly understood, or if
doubt exists as to whether the appliance is properly
grounded.
3
Page 5

A
A
A
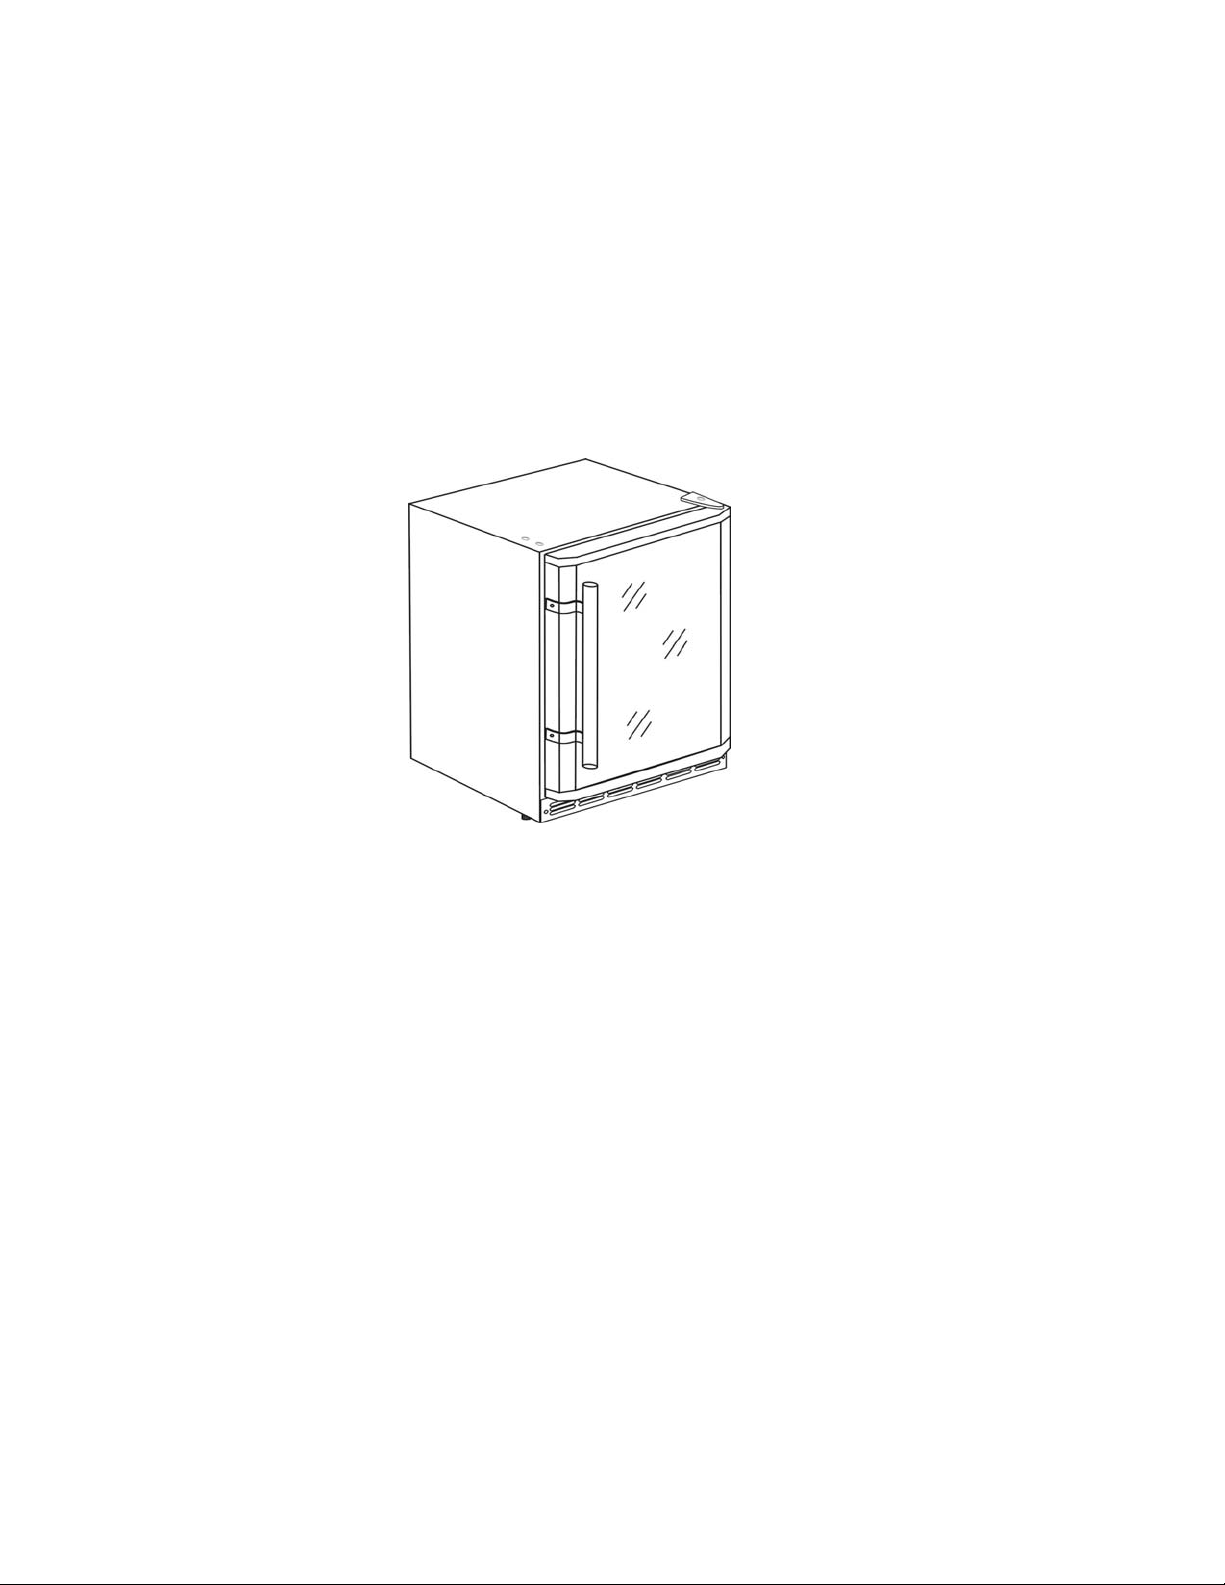
Description of the appliance
Wine Cooler MCWC50DBT
Engaged wine racks
There are five wine racks of full depth on upper part
.
of the cabinet to store wine bottles.
Interior Light
The appliance has an interior light (E14 socket,
max. 15W) for easy interior visibility.
Beverage Cooler MCBC580DBT
The second supporting
.
guide (counted from
top, see illustration
marked "A") is not
suitable for wine racks.
It is for beverage guide as you desire.
shelves only.
ll the top five wine racks have tabs to engage the To remove a shelf:
.
cabinet on both sides. 1. Remove all beverages from the shelf.
ny of the wine racks can be removed to store 2. Lift the shelf upwards and then pull out.
.
larger bottles.
To remove a rack: supporting guides of the cabinet and push back
1. Remove all bottles from the rack. until the shelf tabs snap into place.
2. Lift the rack upwards and then pull out.
To replace, put the sides of the rack back onto the
supporting guides of the cabinet and push back
until the rack tabs snap into place.
Note: Make sure the tabs on the rack are well
engaged in place before loading any bottles.
Bottle arrangement
.
The top five racks each holds 8 bottles with the
necks alternating front to back.
The bottom rack consists of two stories, each of
.
which holds 6 bottles with the necks facing the front.
Engaged beverage shelves
There are three glass shelves to store beverages.
.
ll the shelves have tabs to engage the cabinet
on both sides.
These shelves can be placed on any supporting
.
Any of the beverage shelves can be removed to
.
store larger beverages.
To replace, put the sides of the shelf back onto the
Note: Make sure the tabs on the shelf are well
engaged in place before loading any beverages.
Interior Light
The appliance has an interior light (E14 socket,
max. 15W) for easy interior visibility.
WE RESERVE THE RIGHT TO ALTER THE
SPECIFICATIONS WITH NO EFFECT ON THE
OPERATION OF THE APPLIANCE.
4
Page 6

s
A
A
t
r
t
e
Temperature Control and Display
Wine Cooler MCWC50DBT
The temperature range of the wine cooler is intended
for 43°F to 64°F (+/- 5°F ). intended for 41°F to 54°F (+/- 5°F ).
verage temperature for red wine is 54°F to 61°F.
verage temperature for white wine is 43°F to 50°F.
The display usually shows the average temperature
of the appliance at that moment.
PRESET WINE ZONES: NORMAL' pad is pressed, the appliance runs on the
Press the [Red] or [White] pads to choose prese
storage conditions for Red or White Wine. (The lights.
indicator 'RED' or 'WHITE' will light accordingly.) The MANUAL TEMPERATURE SETTING:
programmed Temperature for red or white wine will The temperature of the beverage cooler can be set
be displayed for a few seconds. anywhere between 41°F to 54°F by the temperature
MANUAL TEMPERATURE SETTING:
The temperature of the wine cooler can be set
anywhere between 43°F to 64°F by the temperature
up ▲ and temperature down ▼pads as follows:
(1) Press the [SET] pad until you hear a "beep"
sound (approximately fifteen seconds).
(2) Press the ▲▼ pads to increase or decrease
the desired temperature in increments of one degree.
(3) Press the [SET] pad to confirm your choice - if NOTE:
confirmation is not made within ten seconds the unit
will go back to the previous setting. runs on 'MANUAL' setting.
NOTE:
The temperature display can be changed between Celsius and Fahrenheit by pressing and holding
Celsius and Fahrenheit by pressing and holding
the ▲ pad for approximately 10 seconds.
.
.
.
.
Beverage Cooler MCBC580DBT
The temperature range of the beverage cooler i
The display usually shows the average temperature
of the appliance at that moment.
NORMAL TEMPERATURE SETTING:
Whenever the appliance is switched on, or the
'NORMAL' setting of 45°F and the 'NORMAL' indicato
up ▲ and temperature down ▼pads as follows:
(1) Press the [SET] pad until you hear a "beep"
(approxima
(2) Press the ▲▼ pads to increase or decrease
the desired temperature in increments of one degree.
(3) Press the [SET] pad to confirm your choice - if
confirmation is not made within ten seconds the unit
will go back to the previous setting.
The 'MANUAL' indicator lights when the appliance
The temperature display can be changed between
the ▲ pad for approximately 10 seconds.
The following is applicable to both MCWC50DBT and MCBC580DBT:
To return the controller back to the Factory Setting,
pad and continue holding both for approximately 10 seconds, until you hear a "beep" sound signaling that th
controller is back to the original Factory Setting.
The indicator indicates status of the refrigeration cycle as follows: (1) It flashes before the compressor
starts; (2) It remains ON during the refrigeration cycle; (3) It remains OFF during the idle cycle.
To switch the interior light on/off, simply press the pad.
press and hold the ▼ pad, within one second press ▲
5
Page 7

Maintenance and Cleaning
Automatic Defrosting of the
Appliance
Correct Steps to Change Bulb
There is no need to defrost the appliance,
because ice depositing on the inner back wall is
defrosted automatically.
Ice build-up on the inner back wall during the
compressor operation will defrost automatically
(when the compressor has cycled off) . Defrost
water will drain out passing through the drain
outlet in the inner back wall into a drain pan
situated above the compressor, from where it Very important: Be sure to disconnect power
evaporates. supply before you change bulb.
1. Pull out the power plug from wall socked.
Use a screw driver to loose the screw that holds
the bulb protective cover and then remove the
cover.
2. Screw out the old bulb counter-clockwise.
3. Screw on a new bulb (E14, max. 15W)
clockwise.
4. Replace the bulb protective cover.
Switch Off the Appliance
Cleaning the Appliance
When Not In Use
Disconnect the power supply before cleaning
the appliance.
Do not use coarse or aggressive cleaning
agents as you may damage the surface.
Clean the exterior with water and detergent.
Remove the detachable accessories in the
interior of the appliance and clean with water and
liquid detergent. Plastic parts cannot be washed
in dishwashers.
Wash the interior of the appliance with lukewarm
water , adding one or two spoonfuls of vinegar.
After cleaning, connect the appliance to power
supply and reload it.
If you do not intend to use the appliance for long
periods of time, disconnect the power supply,
take out the contents and defrost and clean the
appliance. Leave the door slightly open.
This unit is not designed for
outside installations such as
garage or porch.
6
Page 8

g
(
g
(
A
Trouble-Shooting Guide
.
Sometimes you may come across minor problems
that in most cases do not require a service call
and can be easily eliminated. The problem may
have resulted from improper handling and / or
installation of the appliance. Please refer to the
below trouble-shooting guide to assist you in
identifying the possible cause and solution to your
problem. Should the problem still persist after
completing these checkpoints, please contact our
Customer Support Dept. by visiting our website at
www.ma
The Appliance Fails to
Operate After Connecting to
Electrical Power Supply
.
Check the power cord is properly connected.
.
Check the power supply in the electrical outlet.
blown fuse / circuit breaker) .
Continuous Operation of the
Cooling System
.
The door is frequently opened or left open for
too long.
.
The door is not properly closed (the door may
sa
.
Perhaps you may have overloaded the appliance.
.
The reason may be inadequate ventilation of the
compressor
icchef-ewave.com or at (888)-775-0202.
, the gasket may be contaminated or damaged).
assure adequate air circulation).
Ice Formation on the Inner Rear
Wall
As long as the defrost water runs to the
channel and through the outlet to the drain
pan on the compressor, automatic defrosting
of the appliance is assured.
In case the ice formation on the inner back
wall is increased (1/8-1/5in.), ice should be
manually defrosted.
Disconnect the power supply, leave the door
open and defrost the ice. Never
use electric devices for defrosting and do
not scrape the ice or frost layer with sharp
objects.
fter defrosting is complete, close the door,
connect the power supply and set the
temperature as desired. The cause of increased
ice formation may be one of the following:
_
the door does not seal well (clean the
gasket if it is contaminated, or replace it if
it is damaged);
_
the door is frequently opened or left too
long;
_
the content stored in the appliance was warm;
_
the contents are touching the inner back
wall.
7
Page 9

r
Water is Leaking From the
Appliance
If the discharge water outlet is clogged, or the
defrost water drips over the channel, water will
leak from the appliance.
Clean the clogged outlet.
.
Manually defrost the increased ice layer ( see
.
ice Formation on the Inner rear Wall ).
Noise
Cooling in this appliance is made possible by
cooling the system using a compressor, which
will produce certain noise levels. How noisy
the appliance is depends on where it is
placed, how it is used and how old the
appliance is.
During the operation of the compresso
.
the noise of the liquid is heard and when the
compressor is not operating, the refrigerant flow
is heard. This is a normal condition and it has
no influence whatsoever on the lifetime of the
appliance.
After starting the appliance, the
.
operation of the compressor and the refrigerant
flow may be louder, which does not mean that
something is wrong with the appliance and it has
no influence on the lifetime of the appliance.
Gradually the noise will reduce.
Sometimes unusual and louder noise
.
may be heard. This noise is often a
consequence of inadequate installation.
_
The appliance must be level and installed on
a firm solid base/floor.
_
The appliance should not touch the wall or
kitchen units standing next to it.
Check the accessories on the interior of the
appliance, they should be placed correctly in
their positions; also check bottles, tins, and
other vessels are not touching each other
causing rattling and/or vibrations.
8
Page 10

Changing The Reversible Doo
r
CAUTION: To avoid personal injury to yourself
and/or property, we recommend someone
assist you during the door reversal process.
1. Remove the top hinge assembly and keep them for
later use.
2. Remove the bottom hinge assembly and keep them
for later use.
3. Remove the plug buttons from the upper left holes
and transfer them to the uncovered holes at the
right side. Be sure to press the plug buttons
firmly into the holes.
4. Re-install the top hinge assembly previously
removed in step 1 on the opposite side.
5. Re-install the bottom hinge assembly previously
removed in step 2 on the opposite side.
6. Re-install the door assembly with the door handle
on the opposite side (Rotating the door assembly
for 180°) .
7. Make sure the door assembly is properly aligned on
the cabinet before tightening the screws.
The process is now complete.
Note: If desired, change the door swing before installation.
Page 11

p
y
y
Appliance Warranty
MC Appliance Corp. warrants each new Appliance to be free from defects in material
and workmanship and agrees to remedy any such defect or to furnish a new part(s) (at the company’s
option) for any part(s) of the unit that has failed during the warranty period. Parts and labor expenses
are covered on this unit for a period of one year after the date of purchase. In addition MC Appliance
Corp. warrants the compressor (parts only) to be free from defects in material and workmanship
for a period of 5 years. The consumer is responsible for all labor and transportation expenses
related to the diagnosis and replacement of the compressor after the initial one- year warranty
expires. If in the event the unit requires replacement or refund under the terms of this warranty
the consumer is responsible for all transportation expenses to return the unit to our factory
rior to receiving a replacement unit or refund. A copy of the dated sales receipt / invoice is
required to receive warrant
This warranty covers appliances in use within the continental United States, Puerto Rico and Hawaii.
The warranty does not cover the following:
. Damages due to shipping damage or improper installation.
. Damages due to misuse or abuse.
. Content losses due to failure of the unit.
. Inside components such as door panels, door shelves, racks, light bulbs, etc.
. Punctures to the evaporator system due to improper defrosting of the unit.
. Repairs performed by unauthorized service agents.
. Service calls that do not involve defects in material and workmanship such as instruction on proper
use of the product, door reversal or improper installation.
. Replacement or resetting of house fuses or circuit breakers.
. Failure of this product if used for other then its intended purpose.
. Disposal costs of failed units not returned to our factory.
. Any delivery costs incurred as the result of a unit that fails to perform as specified.
. The consumer is responsible for a $75.00 delivery charge for all replacement units
provided under warranty.
service.
This warranty is in lieu of all warranties expressed or implied and no representative or person is
authorized to assume for us any other liability in connection with the sale of this product. Under no
circumstances is the consumer permitted to return this unit to the factory without prior written
consent from MC Appliance Corp.
Model Parts Labor Compressor (Part Onl
MCWC50DBT One-Year One-Year Five Years In Home
MCBC580DBT One-Year One-Year Five Years In Home
) Type of Service
For Service or Assistance please call 888 775-0202 or visit us on the web at
www.magicchef-ewave.com. To avoid delays when obtaining warranty service,
please utilize our warranty request form available on our website
10
 Loading...