

Page 1
4.7 CU.FT. BEVERAGE COOLER
INSTRUCTION MANUAL
Model No.: MCBC470BF
To ensure proper use of this beverage cooler and your safety, please read the
following instructions completely before operating this appliance.
Page 2

1
Product Registration Copy
Thank you for purchasing a Magic Chef product. The first step in protecting your
new product is to complete the product registration form on our website at
www.mcappliance.com/register .The benefits of registering your product
include the following.
1. Registering your product will allow us to contact you regarding a safety
notification or product update.
2. In the event that warranty service is required, registering your product w
allow for more efficient warranty service processing.
3. In the event of an insurance loss registering your product could act as
your proof of purchase.
Once again thank you for purchasing a Magic Chef product.
EN
Page 3

2
TABLE OF CONTENTS
NAMES OF THE PARTS+++++++++++++++++++++ 3
SPECIFICATIONS+++++++++++++++++++++++.. 3
IMPORTANT SAFETY INSTRUCTIONS++++++++++++++. 4
INSTALLATION INSTRUCTIONS
BEFORE USING YOUR BEVERAGE COOLER++++++..++ 4
INSTALLING YOUR BEVERAGE COOLER+.++..+.+++++ 4
ELECTRICAL CONNECTION ++++++.+++++++++. 5
OPERATING YOUR APPLIANCE
TEMPERATURE CONTROL +..+++++.+++++++++.. 6
CHANGING THE INTERIOR LIGHT +++++++++++++.. 6
AUTOMATIC DEFROST ++++++++++++++++++ 6
CHANGING THE REVERSIBLE DOOR ++++++++++++++. 7
CARE AND MAINTENANCE
CLEANING YOUR APPLIANCE+++++++..+++++++ 8
VACATION TIME+++++++++++++++++++++. 8
MOVING YOUR APPLIANCE+++++++..++++++++ 8
ENERGY SAVING TIPS++++++.+++.++++++++. 8
TROUBLESHOOTING GUIDE++++++++++++++++++. 9
BEVERAGE COOLER WARRANTY++++++.+++.++++++ 10
EN
Page 4
3
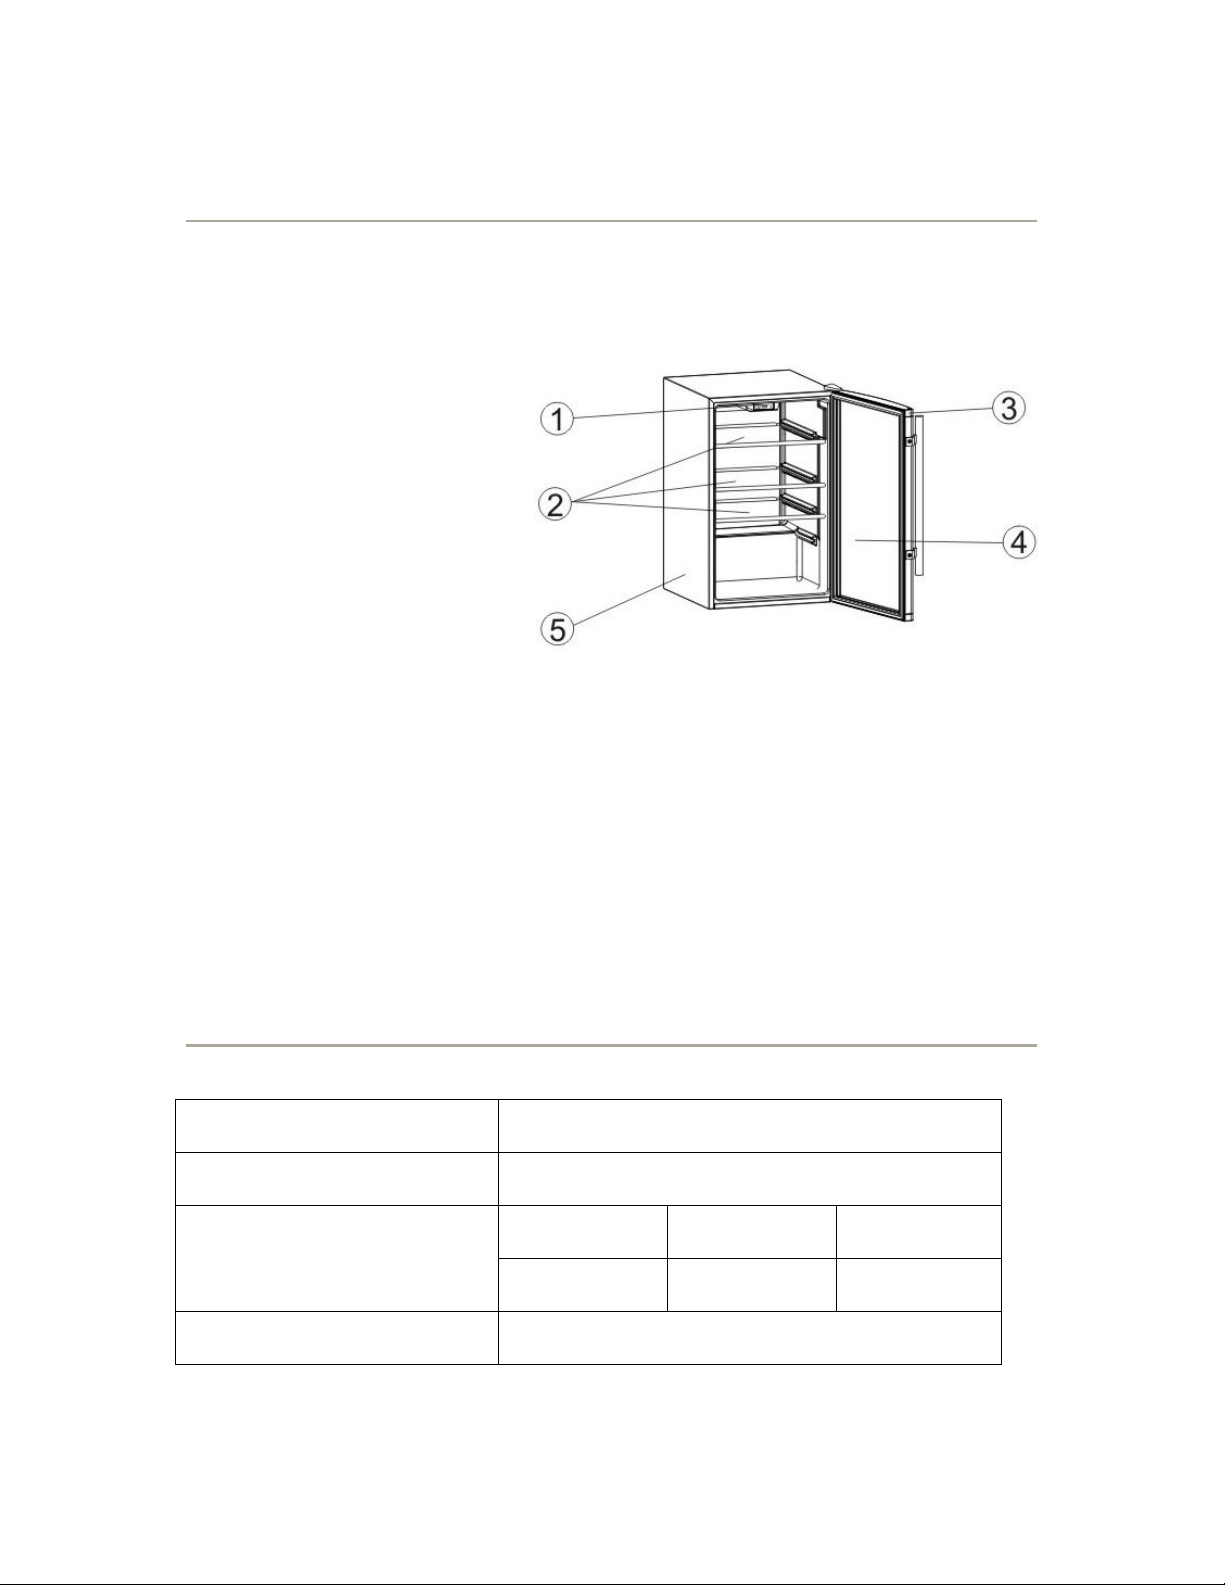
NAMES OF THE PARTS
Model No
.
MCBC470BF
MODEL NO.: MCBC470BF
1) Thermostat Dial
2) Glass Shelves
3) Magnetic Gasket
4) Tempered Glass Door
5) Cabinet
SPECIFICATIONS – Model # MCBC470BF
Product Description
Unit Dimensions
( inches )
Net Weight ( lbs )
Magic Chef 4.7 Cu.ft. Beverage Cooler
Width
20 3/5”
Height
32 1/2”
72 lbs
Depth
22 3/5”
EN
Page 5

4
IMPORTANT SAFETY INSTRUCTIONS
-
Save these instructions
-
WARNING
• Read all instructions before using the beverage cooler.
• DANGER or WARNING: Risk of child entrapment.
• To avoid the possibility of child entrapment, please take the following precautions
before throwing out the beverage cooler.
- Remove all doors from the unit.
- Leave the shelves in place so that children may not easily climb inside.
• Never allow children to operate, play with, or crawl inside the beverage cooler.
• Refrigerants: All refrigeration products contain refrigerants, which under the
guidelines of federal law must be removed before disposal of product. It is the
consumer’s responsibility to comply with federal and local regulations when
disposing of this product.
• Never clean beverage cooler parts with flammable fluids. The fumes can create a
fire hazard or explosion.
• Do not store or use gasoline or any other flammable vapors and liquids in the vicinity
of this or any other appliance. The fumes can create a fire hazard or an explosion.
To reduce the risk of fire, electrical shock,
or injury when using your appliance, follow
these basic precautions:
INSTALLATION INSTRUCTIONS
Before Using Your Beverage Cooler
• Remove the exterior and interior packing.
• Before connecting the beverage cooler to the power source, let it stand upright for approximately
4 hours. This will reduce the possibility of a malfunction in the cooling system from improper
handling during transportation.
• Clean the interior surface with lukewarm water using a soft cloth. (Cleaning instruction on page 7)
Installing Your Beverage Cooler
• This beverage cooler is designed to be free standing only, and should not be recessed or built-in.
• Allow 5 inches of space between the back and sides of the beverage cooler, which allows the
proper air ventilation. Adjust the feet to keep the beverage cooler level.
• Locate the beverage cooler away from direct sunlight and sources of heat (stove, heater, radiator,
etc.). Direct sunlight may affect the acrylic coating and heat sources may increase electrical
consumption. Ambient temperature below 55°F (12.8°C) or above 77°F (25°C) will hinder the
performance of this appliance. This unit is not designed for use in a garage or any other
outside installation.
• Avoid locating the beverage cooler in moist areas.
• Plug the beverage cooler into dedicated, properly installed-grounded wall outlet. Do not under any
circumstances cut or remove the third (ground) prong from the power cord. Any questions
concerning power and/or grounding should be directed toward a certified electrician or an
authorized service center. This unit is not designed to be installed in an RV or used with an
inverter.
• After plugging the beverage cooler into a wall outlet, turn the unit on and allow the unit to cool
down for 3 ~ 4 hours under before placing beverages in the appliance.
EN
Page 6

5
Electrical Connection
Improper use of the grounded plug can result in the risk of electrical shock. If the power cord is
damaged, have it replaced by an authorized service center.
This beverage cooler should be properly grounded for your safety. The power cord of this beverage
cooler is equipped with a three-prong plug which mates with standard three prong wall outlets to
minimize the possibility of electrical shock.
Do not, under any circumstances, cut or remove the third ground prong from the power cord supplied.
This beverage cooler requires a standard 115 Volt A.C. /60Hz electrical outlet with three-prong
ground.
This beverage cooler is not designed to be used with an inverter.
The cord should be secured behind the beverage cooler and not left exposed or dangling to prevent
accidental injury.
Never unplug the beverage cooler by pulling the power cord. Always grip the plug firmly and pull
straight out from the receptacle.
Do not use an extension cord with this appliance. If the power cord is too short, have a qualified
electrician or service technician install an outlet near the appliance. Use of an extension cord can
negatively affect the performance of the unit.
If any problems with the beverage cooler persist, please contact our Customer Service Dept. to
consult with a representative at 888 775-0202 or visit our website to request warranty service at
www.mcappliance.com.
WARNING
EN
Page 7
6
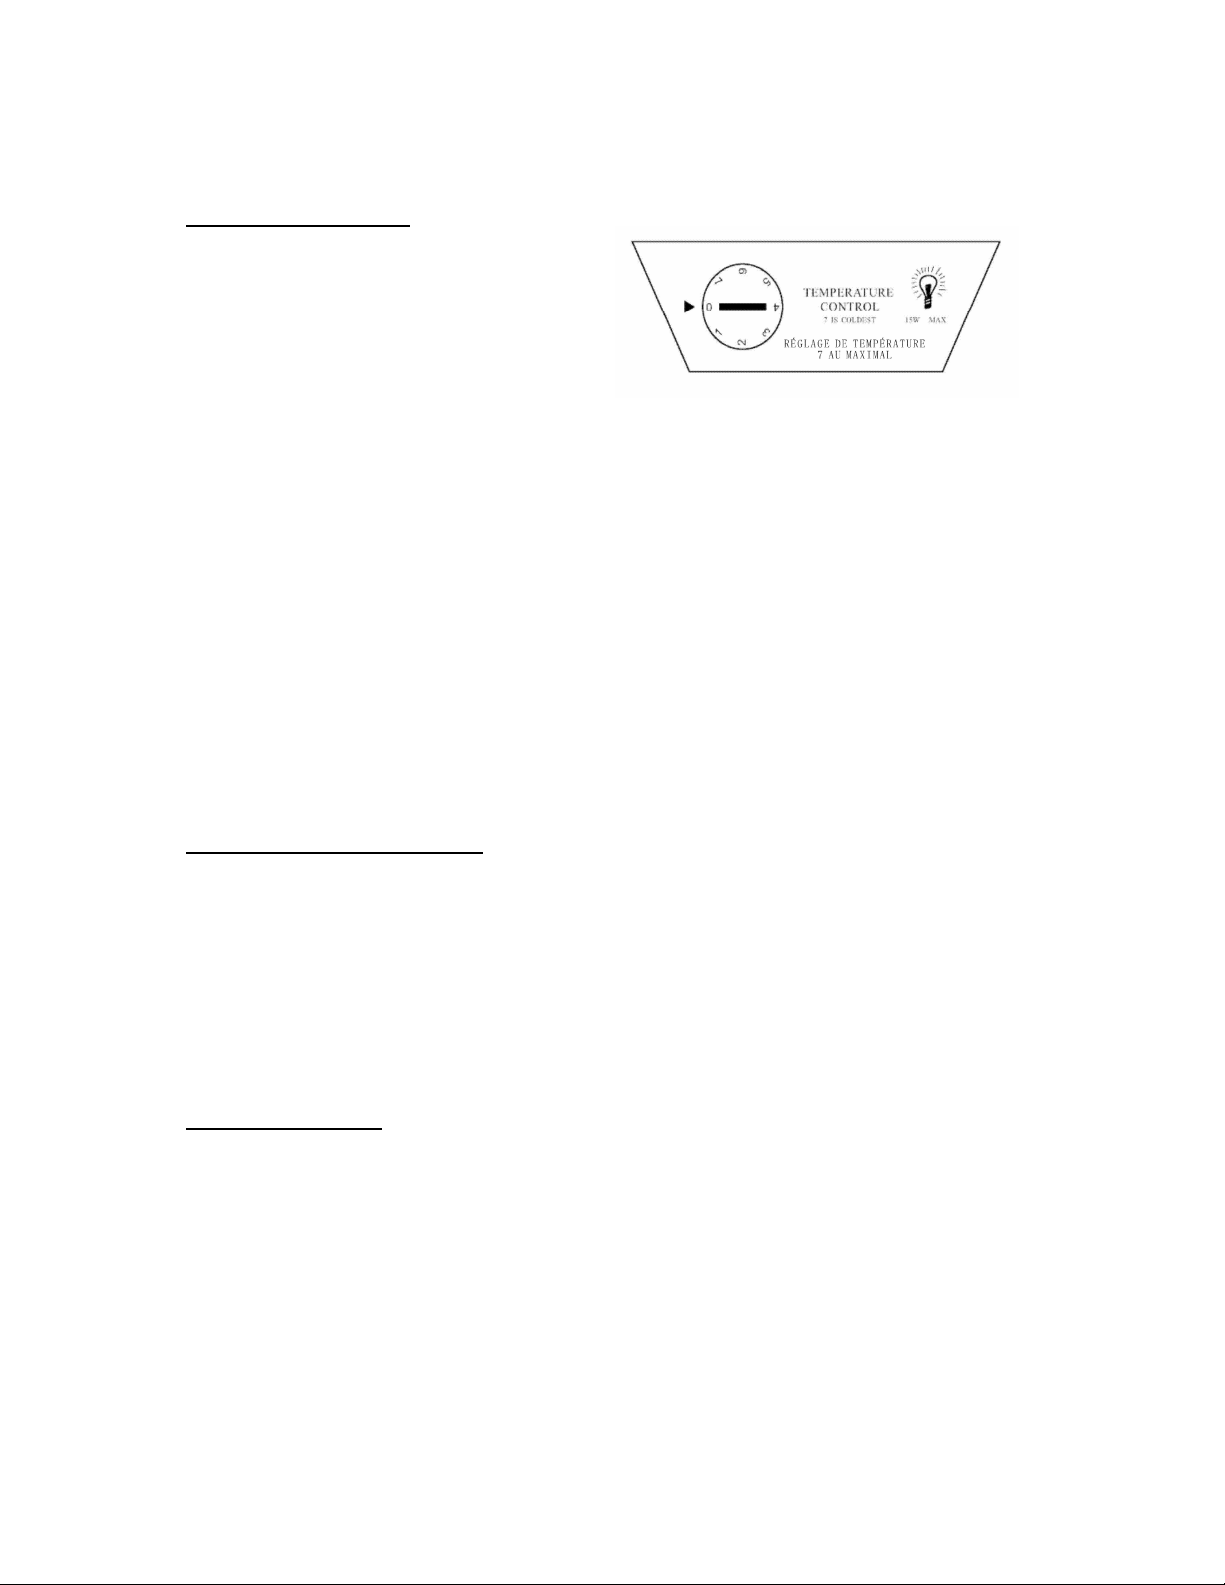
OPERATING YOUR APPLIANCE
Temperature Control
• Your beverage cooler has one control for
regulating the temperature. The temperature
control is located on the top center of the
beverage cooler compartment.
• The first time you turn the unit on, adjust the
temperature control knob to “7” and run for at
least 2 hours before putting beverages
inside. This will ensure the cabinet is thoroughly chilled before beverages is stored.
• The range of the beverage cooler temperature control is from position "1" the warmest to "7" the
coldest. Adjust the temperature control to the setting that best suits your needs.
• To turn off the beverage cooler, please turn the temperature control knob to “0”. Please note that
turning the temperature control knob to “0” position stops the cooling cycle, but does not
disconnect the power supply to the beverage cooler.
WARNING: Do not set the temperature control to setting of “7” position for longer than 8 hours.
If the unit is unplugged or loses power; you must wait 3 to 5 minutes before restarting the unit. If you
attempt to restart before this time delay, the beverage cooler will not start.
• Change in ambient temperature will affect the internal temperature of the beverage
cooler.
• If you choose to change the thermostat setting, adjust thermostat control by one
increment at a time. Allow several hours for temperature to stabilize between
adjustments.
Changing The Interior Light
Before removing the interior light, turn off the beverage cooler first and then unplug the unit from the
wall outlet. Failure to do so could result in electrical shock or personal injury.
• Use Phillips screwdriver to take out the screw holding the transparent light cover.
• Remove the transparent light cover gently.
• Pull out the existing light bulb by unscrewing it counter-clockwise.
• Insert new light bulb (E12, max. 15W) by screwing it in clockwise.
• Replace the transparent light cover and tighten screw.
Automatic Defrost
There is no need for manual defrosting of this beverage cooler due to automatic defrosting function.
• The ice build-up on the inner back wall during compressor operation will be automatically
defrosted once the compressor cycle is off.
• Defrost water will drain out passing through the drain outlet in the inner back wall into a drain pan
located above the compressor, from where it evaporates.
EN
Page 8

7
CHANGING THE REVERSIBLE DOOR
This beverage cooler is built with a reversible door. You have the choice of either opening it from the
left or the right side. In order to reverse the opening direction of your door, please follow these simple
instructions.
Caution: To avoid personal injury to yourself and/or property, we highly recommend that
someone assist you during the door reversal process.
1) Remove the top hinge assembly and keep
them for later use.
2) Remove the bottom hinge assembly and keep
them for later use.
3) Remove the plug buttons from the upper left
holes and transfer them to the uncovered
holes on the right side. Be sure to press the
plug buttons firmly into the hole.
4) Re-install the top hinge assembly previously
removed in step 1 on the opposite side.
5) Re-install the bottom hinge assembly
previously removed in step 2 on the opposite
side.
6) Ensure that the door assembly is properly
aligned with cabinet before tightening the
screws.
EN
Page 9

8
CARE AND MAINTENANCE
Cleaning Your Appliance
• Upon installation of your new appliance, it is recommended that it be cleaned thoroughly.
• Turn the temperature control knob to “0” and then unplug the unit from the wall outlet.
• Remove all contents.
• Wash the inside with a damp warm cloth soaked in lukewarm water and baking soda solution.
The solution should be about 2 tablespoons of baking soda to a quart of water.
• Be sure to keep the door gasket (seal) clean to keep the unit running efficiently.
• The outside of the beverage cooler should be cleaned with mild detergent and warm water.
• Dry the interior and exterior with a soft cloth.
Vacation Time
• Turn the temperature control knob to “0” and then unplug the unit from the wall outlet.
• Remove all the contents.
• Clean the appliance.
• Leave the lid open slightly to avoid possible formation of condensation, mold, or odors.
• Short vacations: Leave the beverage cooler operating during vacations of less than three weeks.
• Long vacations: If the beverage cooler will not be used for several months, remove all content and
unplug the power cord. Clean and dry the interior thoroughly. To prevent odor and mold growth,
leave the door open slightly: blocking it open if necessary.
Moving Your Appliance
• Turn the temperature control knob to “0” and then unplug the unit from the wall outlet.
• Remove all the contents.
• Securely tape down all loose items inside your appliance.
• Tape the doors shut.
Energy Saving Tips
• The beverage cooler should be located in the coolest area of the room, away from heat producing
appliances or heating ducts, and out of the direct sunlight.
• Ensure that door is properly closed when the beverage cooler is turned on.
EN
Page 10

9
TROUBLESHOOTING GUIDE
PROBLEM
POSSIBLE CAUSE
cooler and unplug the power plug.
You can solve many common beverage cooler problems easily, saving you the cost of a
possible service call. Try the suggestions below to see if you can solve the problem before
calling for service.
Beverage cooler does not operate.
Temperature inside the beverage cooler is too
warm.
Temperature inside the beverage cooler is too
cold.
Vibrations. Check to assure that the beverage cooler is on a
Moisture forms on inside beverage cooler walls. Door is slightly open.
Moisture forms on outside of appliance. Door is slightly open, causing cold air from inside
The door will not close properly.
Not plugged in.
The circuit breaker tripped or a blown fuse.
Temperature control is set too warm. Turn the
control to a cooler setting and allow several hours
for the temperature to stabilize.
Door is kept open too long or is opened too
frequently. Warm air enters the beverage cooler
every time the door is opened. Open the door
less often.
The door is not closed completely.
The door gasket does not seal properly.
The beverage cooler has recently been
disconnected for a period of time. 4 hours are
required for the beverage cooler to cool down
completely.
Temperature control is set too cold. Turn the
control to a warmer setting and allow several
hours for the temperature to stabilize.
level surface.
The beverage cooler is touching the wall. Relevel the beverage cooler and move it from the
wall.
If continued vibration occurs, turn off the
beverage
Contact Customer Service Dept. for further
assistance.
Door is kept open too long, or is opened too
frequently. Open the door less often.
The door is not sealed properly.
the beverage cooler to meet warm moist air from
outside.
The beverage cooler is not on a level surface.
The gasket is dirty.
EN
Page 11

10
Appliance Warranty
Unless otherwise prohibited, MC Appliance Corporation warrants each new appliance to
be free from defects in material and workmanship and agrees to remedy any such defect or
to furnish a new part(s) (at the company’s option) for any part(s) of the unit that has failed
during the warranty period. Parts and labor expenses are covered on this unit for a period of
one year after the date of purchase. In addition, MC Appliance Corp. warrants the
compressor (parts only) to be free from defects in material and workmanship for a period of
5 years. The consumer is responsible for all labor and transportation expenses related to
the diagnosis and replacement of the compressor after the initial one-year warranty expires.
If in the event that the unit is determined to be non-repairable under the terms of this
warranty, the consumer is responsible for all transportation expenses to return the unit to our
factory prior to receiving a refund. A copy of the dated sales receipt / invoice is required
to receive warranty service or a refund.
This warranty covers appliances in use within the continental United States, Puerto
Rico and Hawaii, and Canada. The warranty does not cover the following:
Damages due to shipping damage or improper installation.
Damages due to misuse or abuse.
Content losses due to failure of the unit.
Inside components such as door panels, door shelves, racks, light bulbs, etc.
Punctures to the evaporator system due to improper defrosting of the unit.
Repairs performed by unauthorized service agents.
Service calls that do not involve defects in material and workmanship such as
instruction on proper use of the product, door reversal or improper installation.
Replacement or resetting of house fuses or circuit breakers.
Failure of this product if used for other than for its intended purpose.
Disposal costs for any failed unit not returned to our factory.
Any delivery costs incurred as the result of a unit that fails to perform as specified.
Expenses for travel and transportation for product service if your appliance is located
in a remote area where service by an authorized service technician is not available.
The removal and reinstallation of your appliance if it is installed in an inaccessible
location or is not installed in accordance with published installation instructions.
Liability under this warranty is limited to repair, replacement or refund. If a
replacement unit is not available or the unit cannot be repaired, liability is limited to
the actual purchase price paid by the consumer.
This warranty is non-transferable.
This warranty applies only to the original purchaser and does not extend to any
subsequent owner(s).
This warranty is in lieu of all warranties expressed or implied and no representative or
person is authorized to assume for us any other liability in connection with the sale of
this product. Under no circumstances is the consumer permitted to return this unit to
the factory without prior written consent from MC Appliance Corporation.
Model Parts Labor Compressor Type of Service
(part only)
MCBC470BF One-Year One-Year Five-Year In-Home
For Service or Assistance please call 888 775- 0202. Or visit us on the web at
www.mcappliance.com
to request warranty service.
EN
Page 12

MANUEL D’INSTRUCTIONS POUR
REFROIDISSEUR DE BOISSON 4,7 PI
Modèle No.: MCBC470BF
3
Pour bien utiliser cet appareil et assurer la sécurité, prière de lire entièrement
les instructions suivantes avant d'utiliser cet appareil.
Page 13

1
Copie de l’enregistrement du produit
Nous tenons à vous remercier d’avoir acheter un produit Magic Chef.
La première démarche à suivre pour protéger votre nouveau produit est de
remplir la demande d’enregistrement du produit sur notre site Web à
www.mcappliance.com/register. L’enregistrement de votre produit vous offrent
les avantages suivants :
1. L’enregistrement de votre produit nous permettra de vous contacter
concernant une notice de sécurité ou une mise à jour produit.
2. Dans l’éventualité où il s’avère nécessaire de faire appel au service de
garantie, l’enregistrement de votre produit facilitera le traitement plus efficace
auprès du service de garantie.
3. Dans l’éventualité d’un sinistre d’assurance, l’enregistrement de votre produit
pourrait faire preuve d’achat.
Nous tenons encore à vous remercier d’avoir acheter un produit Magic Chef.
Page 14

2
TABLE DES MATIÈRES
NOMS DES PIÈCES .......................................................................................... 3
CARACTÉRISTIQUES ....................................................................................... 3
CONSIGNES DE SÉCURITÉ IMPORTANTES .................................................. 4
INSTRUCTIONS POUR L’INSTALLATION
AVANT D’UTILISER VOTRE APPAREIL ................................................. 4
INSTALLATION DE VOTRE REFROIDISSEUR DE BOISSON................ 4
BRANCHEMENTS ÉLECTRIQUES ......................................................... 5
UTILISATION DE VOTRE APPAREIL
COMMANDE DE TEMPÉRATURE...................... 6
CHANGEMENT DE LA LAMPE INTERNE... ....... 6
DÉGIVRAGE AUTOMATIQUE .......... 6
CHANGEMENT DE LA PORTE RÉVERSIBLE .......... 7
ENTRETIEN ET MAINTENANCE
NETTOYAGE DE VOTRE APPAREIL .................................................... 8
PENDANT LES VACANCES .................................................................. 8
DÉPLACEMENT DE VOTRE APPAREIL ............................................... 8
CONSEILS POUR FAIRE DES ÉCONOMIES D’ÉNERGIE ................... 8
GUIDE DE DÉPANNAGE .................................................................................. 9
GARANTIE DES APPAREILS ............................................................. 10
Page 15

3
NOMS DES PIÈCES
MODÈLE N° : MCBC470BF
1) Cadran de thermostat
2) Tablettes en verre
3) Joint magnétique
4) Porte en verre trempé
5) Meuble
CARACTÉRISTIQUES – Modèle N° MCBC470BF
Description du produit
Modèle N° MCBC470BF
Dimensions de l’appareil
(en pouces)
Poids net (en livres)
4.7 REFROIDISSEUR DE BOISSON
AUTONOME
Largeur
20 3/5”
Hauteur
32 1/2”
72 lbs
Profondeur
22 3/5”
Page 16

4
CONSIGNES DE SÉCURITÉ IMPORTANTES
AVERTISSEMENT
• Lisez la totalité des instructions avant d’utiliser la cave à vin.
• DANGER ou AVERTISSEMENT : Risque d’enfermement accidentel d’enfant.
• Pour éviter toute possibilité d’enfermement accidentel d’enfant, veuillez prendre les
mesures de sécurité suivante avant de jeter l’appareil.
- Retirez toutes les portes de l’appareil.
- Laissez les étagères en place de sorte que les enfants ne puissent pas
facilement grimper à l’intérieur.
• Ne laissez jamais des enfants utiliser, jouer avec ou ramper à l’intérieur de l’appareil.
• Réfrigérants : Tous les produits de réfrigération contiennent des réfrigérants; dans
le cadre des recommandations de la législation fédérale ceux-ci doivent être retirés
avant la mise au rebut du produit. Il relève de la responsabilité du consommateur de
se conformer aux réglementations locales lorsqu’ils jettent ce produit.
• Ne nettoyez jamais les pièces de cet appareil avec des fluides inflammables. Les
émanations pourraient créer un risque d’incendie ou d’explosion.
• Ne conservez pas ou n’utilisez pas d’essence ni d’autres émanations et liquides
inflammables à proximité de cet appareil ou de tout autre appareil. Les émanations
pourraient créer un risque d’incendie ou une explosion.
-Veuillez conserver ces instructions-
Pour réduire le risque d’incendie,
d’électrocution ou de blessure pendant
l’utilisation de votre appareil, veuillez
appliquer les mesures de sécurité
élémentaires suivantes :
INSTRUCTIONS POUR L’INSTALLATION
Avant d’utiliser votre appareil
• Retirez l’emballage extérieur et intérieur.
• Avant de connecter l’appareil à la source électrique, laissez-le reposer à la verticale pendant
environ 4 heures. Cela réduira la possibilité d’un dysfonctionnement dans le système de
refroidissement résultant d’une mauvaise manipulation pendant le transport.
• Nettoyez la surface intérieure avec de l’eau tiède à l’aide d’un chiffon doux. (Instructions pour le
nettoyage à la page 8)
INSTALLATION DE VOTRE REFROIDISSEUR DE BOISSON
• Ce refroidisseur de boisson est conçu pour une utilisation autonome seulement. Il ne doit pas être
encastré ou fixé à demeure.
• Laissez un espace de 12.5 cm (5 po) à l’arrière et sur les côtés du refroidisseur de boisson pour
assurer une bonne circulation d’air. Ajustez les pieds pour mettre le refroidisseur de boisson à
niveau.
• Placez l’appareil à l’écart de la lumière directe du soleil et des sources de chaleur (cuisinière,
chaudière, radiateur, etc.). La lumière directe du soleil pourrait affecter le revêtement en acrylique
et les sources de chaleur pourraient augmenter la consommation électrique. Une température
ambiante inférieure à 68°F (20°C) ou supérieure à 90°F (32°C) aura une influence négative sur la
performance de cet appareil. Cet appareil n’est pas conçu pour une utilisation dans un
garage ou dans toute autre installation d’extérieur.
• Évitez de placer l’appareil dans des zones humides.
Page 17

5
• Branchez l’appareil sur une prise secteur dédiée, correctement installée et raccordée à la terre.
Ne coupez ou ne retirez le troisième ergot (terre) du cordon d’alimentation sous aucun prétexte.
Toute question concernant l’alimentation et/ou le raccordement à la terre devrait être redirigée
vers un électricien certifié ou un centre de réparations agréé. Cet appareil n’est pas conçu pour
être installé dans un véhicule de loisir ou utilisé avec un onduleur.
• Après avoir branché l’appareil à une prise secteur, mettez l’appareil en marche et laissez
l’appareil refroidir pendant 3 ~ 4 heures avant de placer des bouteilles de vin à l’intérieur.
Branchements électriques
Une utilisation incorrecte de la prise raccordée à la terre peut entraîner un risque d’électrocution.
En cas de détérioration du cordon d’alimentation, faîtes-le remplacer par un centre de
réparations agréé.
Cet appareil devrait être correctement raccordé à la terre pour votre sécurité. Le cordon d’alimentation
de cet appareil est équipé d’une fiche à trois ergots qui s’adapte aux prises secteurs à trois ergots
standards pour minimiser la possibilité d’électrocution.
Ne coupez ou ne retirez pas le troisième ergot de raccordement à la terre du cordon d’alimentation
fourni, sous aucun prétexte.
Cet appareil nécessite une prise secteur standard de 115 Volt A.C. /60Hz avec un troisième ergot de
raccordement à la terre.
Cet appareil n’est pas conçu pour être utilisé avec un onduleur.
Le cordon devrait être sécurisé derrière l’appareil et ne devrait pas demeurer exposé ou pendant pour
éviter toute blessure accidentelle.
Ne débranchez jamais l’appareil en tirant sur le cordon d’alimentation. Saisissez toujours fermement la
fiche et tirez tout droit pour la sortir de la prise murale.
N’utilisez pas de cordon de rallonge avec cet appareil. Si le cordon d’alimentation est trop court,
demandez à un électricien ou à un technicien d’entretien qualifié d’installer une prise secteur près de
l’appareil. L’utilisation d’un cordon de rallonge peut avoir un effet négatif sur la performance de
l’appareil.
AVERTISSEMENT
En cas de persistance d’un problème avec l’appareil, veuillez contacter notre Service client
pour vous entretenir avec un représentant au 888 775-0202 ou consultez notre site Internet
pour demander à bénéficier du service de garantie sur www.mcappliance.com.
Page 18

6
UTILISATION DE VOTRE APPAREIL
COMMANDE DE TEMPÉRATURE
• Votre refroidisseur de boisson dispose d’une
commande pour régler la température. La
commande de température se trouve au centre en
haut du compartiment du refroidisseur à vin.
• La première fois que vous mettez l’unité en
marche, ajustez le bouton de commande de
température à la position « 7 » et laissez
fonctionner pendant au moins deux heures avant de poser des bouteilles de vin à l’intérieur. Ceci
assurera que la caisse est refroidie complètement avant d’entreposer les bouteilles de vin.
• La plage de la commande de température du refroidisseur de boisson se situe de la position « 1 »
(plus chaud) à la position « 7 » (plus froid). Ajustez la commande de température au réglage qui
convient le mieux à vos besoins.
- Le réglage à la position « 2 » est recommandé pour l’entreposage de vins rouges.
- Le réglage à la position « 6 » est recommandé pour l’entreposage de vins blancs.
• Pour arrêter le refroidisseur à vin, tournez le bouton de la commande de température à la position
« 0 ». Prenez note qu’en tournant le bouton de réglage de la température à la position « 0 », seul
le cycle de refroidissement est interrompu, le refroidisseur de boisson n’est pas débrancher de
l’alimentation électrique.
MISE EN GARDE : Ne réglez pas la commande de température à la position « 7 » pendant plus
de huit heures.
Si l’unité est débranchée ou perd de la puissance; patientez 3 à 5 minutes avant de remettre l’unité en
marche. Le refroidisseur de boisson ne se mettra pas en marche si vous tentez de le remettre en
marche avant le délai indiqué.
• Un changement de la température ambiante aura un effet sur la température interne du
refroidisseur à vin.
• Si vous décidez de changer le réglage du thermostat, ajustez graduellement la commande du
thermostat. Laissez fonctionner pendant plusieurs heures afin de permettre à la température de
se stabiliser entre les ajustements.
Remplacement de l’éclairage interne
Avant de retirer l’éclairage interne, mettez d’abord l’appareil hors tension puis débranchez l’appareil
de la prise secteur. Le non respect de cette consigne pourrait entraîner une électrocution ou une
blessure.
• Retirez la vis qui tient en place le couvercle transparent de l’ampoule à l’aide d’un tournevis
Phillips.
• Retirez soigneusement le couvercle transparent de l’ampoule
• Enlevez l’ampoule en la dévissant dans le sens anti-horaire.
• Insérez une nouvelle ampoule (E12, 15W max.) en la vissant dans le sens horaire.
• Replacez le couvercle transparent de l’ampoule et serrez la vis.
Dégivrage automatique
Il n’est pas nécessaire de procéder à un dégivrage manuel de cet appareil grâce à la fonction de
dégivrage automatique.
• L’accumulation de glace sur la paroi interne pendant le fonctionnement du compresseur est
automatiquement dégivrée une fois que le cycle de compression est terminé.
• L’eau de dégivrage s’écoule par la sortie d’évacuation dans la paroi interne vers un égouttoir situé
au-dessus du compresseur, d’où elle s’évapore.
Page 19

7
CHANGEMENT DE LA PORTE RÉVERSIBLE
Cet appareil comporte une porte réversible. Vous avez le choix de l’ouvrir du côté gauche ou du côté
droit. Afin d’inverser le sens d’ouverture de votre porte, veuillez suivre ces instructions simples.
Attention : Pour éviter toute blessure personnelle et/ou dégât matériel, nous vous
recommandons fortement de vous faire assister par une autre personne pendant la procédure
d’inversion du sens d’ouverture de la porte.
1) Retirez l’ensemble de l’huisserie supérieure et
conservez les pièces pour une utilisation ultérieure.
2) Retirez l’ensemble de l’huisserie inférieure et
conservez les pièces pour une utilisation ultérieure.
3) Retirez les caches des trous supérieurs gauches et
transférez-les vers les trous non cachés du côté
droit. Assurez-vous d’enfoncer fermement les
caches dans le trou.
4) Remettez en place l’ensemble de l’huisserie
supérieure préalablement retiré lors de l’étape 1 de
l’autre côté.
5) Remettez en place l’ensemble de l’huisserie
inférieure préalablement retiré lors de l’étape 2 de
l’autre côté.
6) Assurez-vous que l’ensemble de la porte se trouve
bien en face du meuble avant de serrer les vis.
Page 20

8
ENTRETIEN ET MAINTENANCE
Nettoyage de votre appareil
• Au moment de l’installation de votre nouvel appareil, nous vous recommandons de le nettoyer
méticuleusement.
• Tournez le bouton de commande de température à la position « 0 », puis débranchez l’unité de la prise de
courant murale.
• Retirez la totalité du contenu.
• Nettoyez l’intérieur avec un tissu trempé dans de l’eau tiède et une solution à base de bicarbonate. La
solution devrait être composée d’environ 2 cuillers à soupe de bicarbonate pour un quart d’eau.
• Assurez-vous de maintenir le joint de la porte propre afin que l’appareil continue à fonctionner avec efficacité.
• L’extérieur de l’appareil devrait être nettoyé avec un détergeant peu agressif et de l’eau tiède.
• Séchez l’intérieur et l’extérieur à l’aide d’un chiffon doux.
Pendant les vacances
• Tournez le bouton de commande de température à la position « 0 », puis débranchez l’unité de la prise de
courant murale.
• Retirez la totalité du contenu.
• Nettoyez l’appareil.
• Laissez la porte légèrement ouverte pour éviter toute formation éventuelle de condensation, de moisissure
ou d’odeurs.
• Séjours courts : Laissez l’appareil en fonctionnement pendant des vacances de moins de trois semaines.
•
Séjours longs : Si l’appareil va être inutilisé pendant plusieurs mois, retirez la totalité du contenu et
débranchez le cordon d’alimentation. Nettoyez et séchez méticuleusement l’intérieur. Pour empêcher la
formation d’odeurs et de moisissures, laissez la porte légèrement ouverte, en la bloquant pour la maintenir
ouverte si nécessaire.
Déplacement de votre appareil
• Tournez le bouton de commande de température à la position « 0 », puis débranchez l’unité de la prise de
courant murale.
• Retirez la totalité du contenu.
• Fixez solidement avec de l’adhésif tous les éléments en mouvement à l’intérieur de votre appareil.
• Fermez les portes avec de l’adhésif.
Conseils pour faire des économies d’énergie
• Cet appareil devrait être placé dans la zone la plus fraîche de la pièce, à l’écart des appareils émettant de la
chaleur ou des conduits de chauffage et ne devrait pas être exposé à la lumière directe du soleil.
• Assurez-vous que la porte est fermée lorsque l’appareil est en marche.
Page 21

9
GUIDE DE DÉPANNAGE
PROBLÈME
CAUSE POTENTIELLE
Vous pouvez résoudre un grand nombre de problèmes fréquents avec votre appareil
facilement, ce qui vous fait économiser le coût d’un appel éventuel aux services techniques.
Essayez les suggestions ci-dessous pour voir si vous pouvez résoudre le problème avant
d’appeler pour une réparation.
L’appareil ne fonctionne pas.
La température à l’intérieur de l’appareil est
trop élevée.
La température à l’intérieur de l’appareil est
trop faible.
Vibrations.
De l’humidité se forme sur les parois
intérieures de l’appareil.
De l’humidité se forme à l’extérieur de
l’appareil.
La porte ne ferme pas correctement.
Pas branché.
Le coupe-circuit s’est déclenché ou un fusible a
sauté.
La température paramétrée sur la commande de
température est trop élevée. Positionnez la
commande sur un réglage de température inférieur
et attendez plusieurs heures pour que la
température se stabilise.
La porte reste ouverte trop longtemps ou est ouverte
trop fréquemment. De l’air chaud pénètre à
l’intérieur de l’appareil à chaque fois que la porte est
ouverte. Ouvrez la porte moins souvent.
La porte n’est pas complètement fermée.
Le joint de la porte n’est pas totalement hermétique.
L’appareil a été récemment débranché pendant
quelques temps. 4 heures sont nécessaires pour
que l’appareil refroidisse complètement.
Le paramétrage de température est trop faible.
Positionnez la commande de réglage sur une
température plus élevée puis patientez plusieurs
heures pour que la température se stabilise.
Vérifiez que l’appareil se situe sur une surface
plane.
L’appareil est en contact avec le mur. Remettez
l’appareil à niveau et éloignez-le du mur.
Si la vibration persiste, éteignez l’appareil et
débranchez-le. Contactez le Service client pour une
assistance avancée.
La porte est légèrement ouverte.
La porte reste ouverte trop longtemps ou est ouverte
trop fréquemment. Ouvrez la porte moins souvent.
La porte n’est pas complètement hermétique.
La porte est légèrement ouverte, ce qui permet à de
l’air froid de l’intérieur de l’appareil de rencontrer de
l’air humide en provenance de l’extérieur.
L’appareil ne se situe pas sur une surface plane.
Le joint est sale.
Page 22

Garantie du réfrigérateur
Sauf autre interdiction, MC Appliance Corp. garantit chacun de ses réfrigérateur neufs contre les
défauts de matière et de main-d’œuvre et accepte de remédier à ces défauts ou de remplacer la ou
les pièces devenues défectueuses pendant la période de garantie par une ou des pièces neuves (au
choix de la compagnie). Les frais de pièces et de main-d’œuvre nécessaires sont couverts pendant un
an à partir de la date d’achat. De plus, MC Appliance Corp. garantit pendant 5 ans le compresseur
(pièces seulement) contre tout défaut de matière et de main-d’œuvre. Après l’expiration de la garantie
initiale d’un an, le consommateur est responsable de tous les frais de main-d’œuvre et de transport
encourus à cause du diagnostic et du remplacement du compresseur. Une copie datée du reçu de
vente ou de la facture est requise pour que le service de garantie puisse être assuré.
Cette garantie couvre les appareils utilisés dans la partie continentale des États-Unis, au
Canada, au Porto-Rico et à Hawaii. Elle ne couvre pas les éléments suivants :
Les dommages causés par le transport ou une installation inappropriée.
Les dommage causés par une utilisation inappropriée ou abusive.
Les pertes de contenu causées par une panne de l’appareil.
Les éléments intérieurs comme les panneaux de porte, les étagères de porte, les étagères
ajourées, les ampoules électriques, etc.
Les perforations du circuit de l’évaporateur causées par un dégivrage inapproprié de l’appareil.
Les réparations effectuées par des agents d’entretien non autorisés.
Les interventions ne mettant pas en cause des défauts de matière ou de main-d’œuvre, comme
les directives données pour utiliser le produit, l’inversion des portes ou les installations
inappropriées.
Le remplacement ou le réenclenchement des fusibles ou des disjoncteurs domestiques.
Les pannes de ce produit, s’il est utilisé à d’autres fins que celles pour lesquelles il a été
construit.
Les coûts d’évacuation des appareils non renvoyés à notre usine.
Les coûts de livraison engagés à la suite d'une unité qui ne fonctionne pas comme indiqué.
Les frais pour le voyage et le transport pour le service de produit si votre appareil es trouvé
dans une région lointaine ou le service par un technicien de service autorisé n’est pas
disponible.
L’enlévement et la réinstallation de votre appareil s’il est installé dans un endroit inaccessible ou
n’est pas installé conformément aux instructions publiées d’installation.
Responsabilité en vertu de cette garantie est limitée à la réparation, de remplacement ou un
remboursement. Si une unité de remplacement n'est pas disponible ou l'unité ne peut être
réparé, la responsabilité est limitée au prix d'achat payé par le consommateur.
Cette garantie n'est pas transférable.
Cette garantie s'applique uniquement à l'acheteur original et ne s'étend pas à tout propriétaire
subséquent (s).
Tout frais de livraison entraîné par une panne d’appareil ne fonctionnant pas de la façon
indiquée Cette garantie est en vigueur à la place de toute autre garantie expresse ou implicite et
aucun représentant ni personne n’est autorisé à assumer pour nous quelque autre
responsabilité liée à la vente de ce produit. Le consommateur n’est en aucun cas autorisé à
renvoyer cet appareil à l’usine sans autorisation écrite de la part de MC Appliance Corp.
Modèle Pièces Main-d’œuvre Compresseur Condition d’entretien
(pièces seulement)
MCBC470BF Un an Un an Cinq ans A domicile
Pour tout renseignement sur l’entretien ou si vous avez besoin d’aide, veuillez appeler au
888 775-0202 ou rendez-nous visite sur notre site web: www.mcappliance.com
10
 Loading...