

Page 1
PLEASE READ THIS MANUAL CAREFULLY BEFORE USING YOUR PIZZA
OVEN AND KEEP IT FOR FUTURE REFERENCE.
Model HQPZO13ST, HQPZO13B, HQPZO13R
12-Inch Pizza Oven
User’s Manual
Page 2

2
PRODUCT REGISTRATION
Thank you for purchasing a Magic Chef® product. The first step to protect your new product is to complete the product
registration on our website: www.mcappliance.com/register. The benefits of registering your product include the following:
1. Registering your product will allow us to contact you regarding a safety notification or product update.
2. Registering your product will allow for more efficient warranty service processing when warranty service is required.
3. Registering your product could act as your proof of purchase in the event of insurance loss.
Once again, thank you for purchasing a Magic Chef product.
Page 3

3
CONTENTS
PRODUCT REGISTRATION . . . . . . . . . . . . . . . . . . . . . . . . . . . . . . . . . . . . . . . . . . . . . . . . . . . . . 2
PRECAUTIONS
. . . . . . . . . . . . . . . . . . . . . . . . . . . . . . . . . . . . . . . . . . . . . . . . . . . . . . . . . . . . . . . 4
IMPORTANT SAFETY INSTRUCTIONS
. . . . . . . . . . . . . . . . . . . . . . . . . . . . . . . . . . . . . . . . . . . 5
SPECIFICATIONS
. . . . . . . . . . . . . . . . . . . . . . . . . . . . . . . . . . . . . . . . . . . . . . . . . . . . . . . . . . . . . . 7
PARTS AND FEATURES
. . . . . . . . . . . . . . . . . . . . . . . . . . . . . . . . . . . . . . . . . . . . . . . . . . . . . . . . 8
ASSEMBLY
. . . . . . . . . . . . . . . . . . . . . . . . . . . . . . . . . . . . . . . . . . . . . . . . . . . . . . . . . . . . . . . . . . . 9
OPERATION INSTRUCTIONS
. . . . . . . . . . . . . . . . . . . . . . . . . . . . . . . . . . . . . . . . . . . . . . . . . . 10
CARE AND MAINTENANCE
. . . . . . . . . . . . . . . . . . . . . . . . . . . . . . . . . . . . . . . . . . . . . . . . . . . 13
TROUBLESHOOTING
. . . . . . . . . . . . . . . . . . . . . . . . . . . . . . . . . . . . . . . . . . . . . . . . . . . . . . . . . 14
LIMITED WARRANTY
. . . . . . . . . . . . . . . . . . . . . . . . . . . . . . . . . . . . . . . . . . . . . . . . . . . . . . . . 15
Page 4

4
PRECAUTIONS
EXPLANATION OF SYMBOLS
WARNING
Hazards or unsafe practices which COULD result in severe personal injury or death.
CAUTION
Hazards or unsafe practices which COULD result in minor personal injury.
THIS PRODUCT IS INTENDED FOR
HOUSEHOLD USE ONLY
WARNING: Read and understand all safety precautions. Failure to follow all instructions described in this user
manual may result in electric shock, fire and/or serious personal injury. The warnings, cautions and instructions
discussed in this user manual cannot cover all possible conditions and situations that may occur.
ELECTRIC POWER
If an electric circuit is overloaded with other appliances, the Pizza Oven may not operate properly. The Pizza Oven
should be operated on a separate electrical circuit from other operating appliances.
POLARIZED PLUG
The Pizza Oven has a polarized plug (one blade is wider than the other). To reduce the risk of electric shock, this
plug is intended to fit into a polarized outlet only one way. If the plug does not fit fully into the outlet, reverse
the plug. If it still does not fit, contact a qualified electrician. DO NOT attempt to modify the plug in any way.
If the plug fits loosely into the AC outlet or if the AC outlet feels warm, DO NOT use that outlet. operating
appliances.
CAUTION: A short power supply cord is provided to reduce the risk of becoming entangled in or tripping over
a longer cord. An extension cord is not recommended for use with this product, but if necessary, the marked
electrical rating must be at least as great as that of the product. Arrange the extension cord so that it will not
drape over the countertop or tabletop where it can be tripped over or pulled.
Page 5

5
IMPORTANT SAFETY INSTRUCTIONS
WARNING: To reduce the risk of fire, electric shock, or serious personal injury, please read and save all
instructions before using the Pizza Oven.
When using this or any other electrical appliance, basic safety precautions should be observed, including the
following:
1. READ ALL INSTRUCTIONS BEFORE USE.
2. Before using the appliance for the first time, check if the voltage of the appliance corresponds to the
voltage in your home.
3. ALWAYS assemble the appliance completely before plugging the unit into an electrical outlet. DO NOT
begin operating this appliance until it is properly assembled.
4. ALWAYS ensure the appliance is unplugged from the electrical outlet, has cooled down completely, and all
parts have stopped before assembling, disassembling, relocating or cleaning the unit. Unplug the unit from
the electrical outlet when not in use.
5. The temperature of accessible surfaces may be hot when the appliance is operating.
6. DO NOT touch hot surfaces. ALWAYS use the handles or control knobs. ALWAYS wear protective, insulated
oven gloves when inserting or removing items from the hot oven.
7. ALWAYS ensure the baking rack is securely locked in place before operating the product. NEVER try to
remove or force the baking rack open while the appliance is operating.
8. DO NOT expose or immerse the base, power cord or plug of this appliance in water or any other liquid.
9. DO NOT place on or near a hot gas or electric burner, or in or near a heated oven.
10. For adequate air circulation, leave approximately 4 inches of open space all around the exterior of this
appliance while it is in use.
11. A fire may occur if the oven is covered or touches flammable materials, including curtains, draperies, walls,
and the like, when in operation. DO NOT place any item on top of the appliance during operation.
12. Ensure that the appliance and its power cord do not come into contact with hot surfaces.
13. DO NOT leave the appliance unattended while it is in use. ALWAYS unplug the
appliance from the electrical outlet when not in use.
14. Close supervision is necessary when any appliance is used near incapacitated persons, children or pets.
15. Keep the appliance out of the reach of children and pets. This appliance is not intended for use by children
or incapacitated persons.
16. Avoid contact with internal parts during operation. Keep hair, hands, fingers or any other body part from
coming into contact with the internal components while the appliance is operating.
17. Keep utensils away from the internal assembly while operating the appliance. A scraper or spatula may be
used but only when the appliance is not in operation.
18. Oversized foods or metal utensils must not be inserted into the oven as they may create a fire hazard or risk
of electric shock.
19. The use of attachments or accessories not recommended or sold by the manufacturer may result in fire,
electric shock or injury.
20. Extreme caution should be exercised when using cookware or bakeware constructed of anything other than
ovenproof metal or glass. DO NOT place any of the following materials in the oven: cardboard, plastic,
paper, or anything similar.
Page 6

6
21. Ensure that nothing touches the top and bottom heating elements of the oven.
22. Extreme caution must be used when moving the drip pan containing hot oil or other hot liquids.
23. Use extreme caution when removing the crumb tray, baking rack or disposing of hot grease and other hot
liquids.
24. DO NOT cover any part of the pizza oven with metal foil, including the crumb tray. This may cause the oven
to overheat.
25. To disconnect the appliance from the electrical outlet, ensure the appliance is OFF, by verifying that the
timer control knob is turned to the OFF position, and then pull directly on the plug. DO NOT pull on the
power cord.
26. DO NOT put any stress on the power cord where it connects to the appliance, as the power cord could fray
and break.
27. DO NOT plug or unplug the appliance into or from the electrical outlet with a wet hand.
28. DO NOT operate the appliance if it has a damaged or cut power cord or plug, if the wires are exposed, if the
unit malfunctions, if the unit is dropped or damaged, or if the pizza oven housing is dropped in or exposed
to water.
29. DO NOT clean the inside of the oven with metal scouring pads, as pieces of the pad can break off and touch
electrical parts, thereby creating a risk of electric shock.
30. DO NOT store any materials other than the manufacturer’s recommended accessories in this oven when it
is not in use.
31. This appliance has no user serviceable parts. DO NOT attempt to examine or repair this appliance yourself.
Only qualified service personnel should perform any servicing.
32. DO NOT use the appliance with a damaged electrical outlet.
33. Return the appliance to an authorized service center for examination, repair or adjustment.
34. DO NOT use this appliance for purposes other than its intended use.
35. This appliance is intended for household use only. DO NOT use the appliance outdoors or for any other
purpose.
36. ALWAYS place the appliance on a level and stable surface.
SAVE THESE INSTRUCTIONS
FOR FUTURE REFERENCE
SAFETY WARNINGS
Although the appliance is easy to operate, the warnings below must be followed for your safety:
• DO NOT immerse the cord, plug, or any portion of the base unit in water or any other liquid.
• DO NOT use the appliance on an unstable surface.
• DO NOT place the appliance near a heat source.
• DO NOT unplug the appliance by pulling on the power supply cord.
• The appliance must be unplugged and cooled down completely before any cleaning or maintenance duties.
• If the appliance appears to be faulty, it must be unplugged.
Page 7

7
SPECIFICATIONS
Product Dimensions 19.3” x 6.6” x 14.0” [W x H x D]
Net Weight 4.5 Lbs.
Capacity Up to 12 Inches
Voltage Rating 120V AC, 60 Hz
Power Rating 1300 Watts
14.0”
19.3”
6.6”
Figure 1
Page 8
8
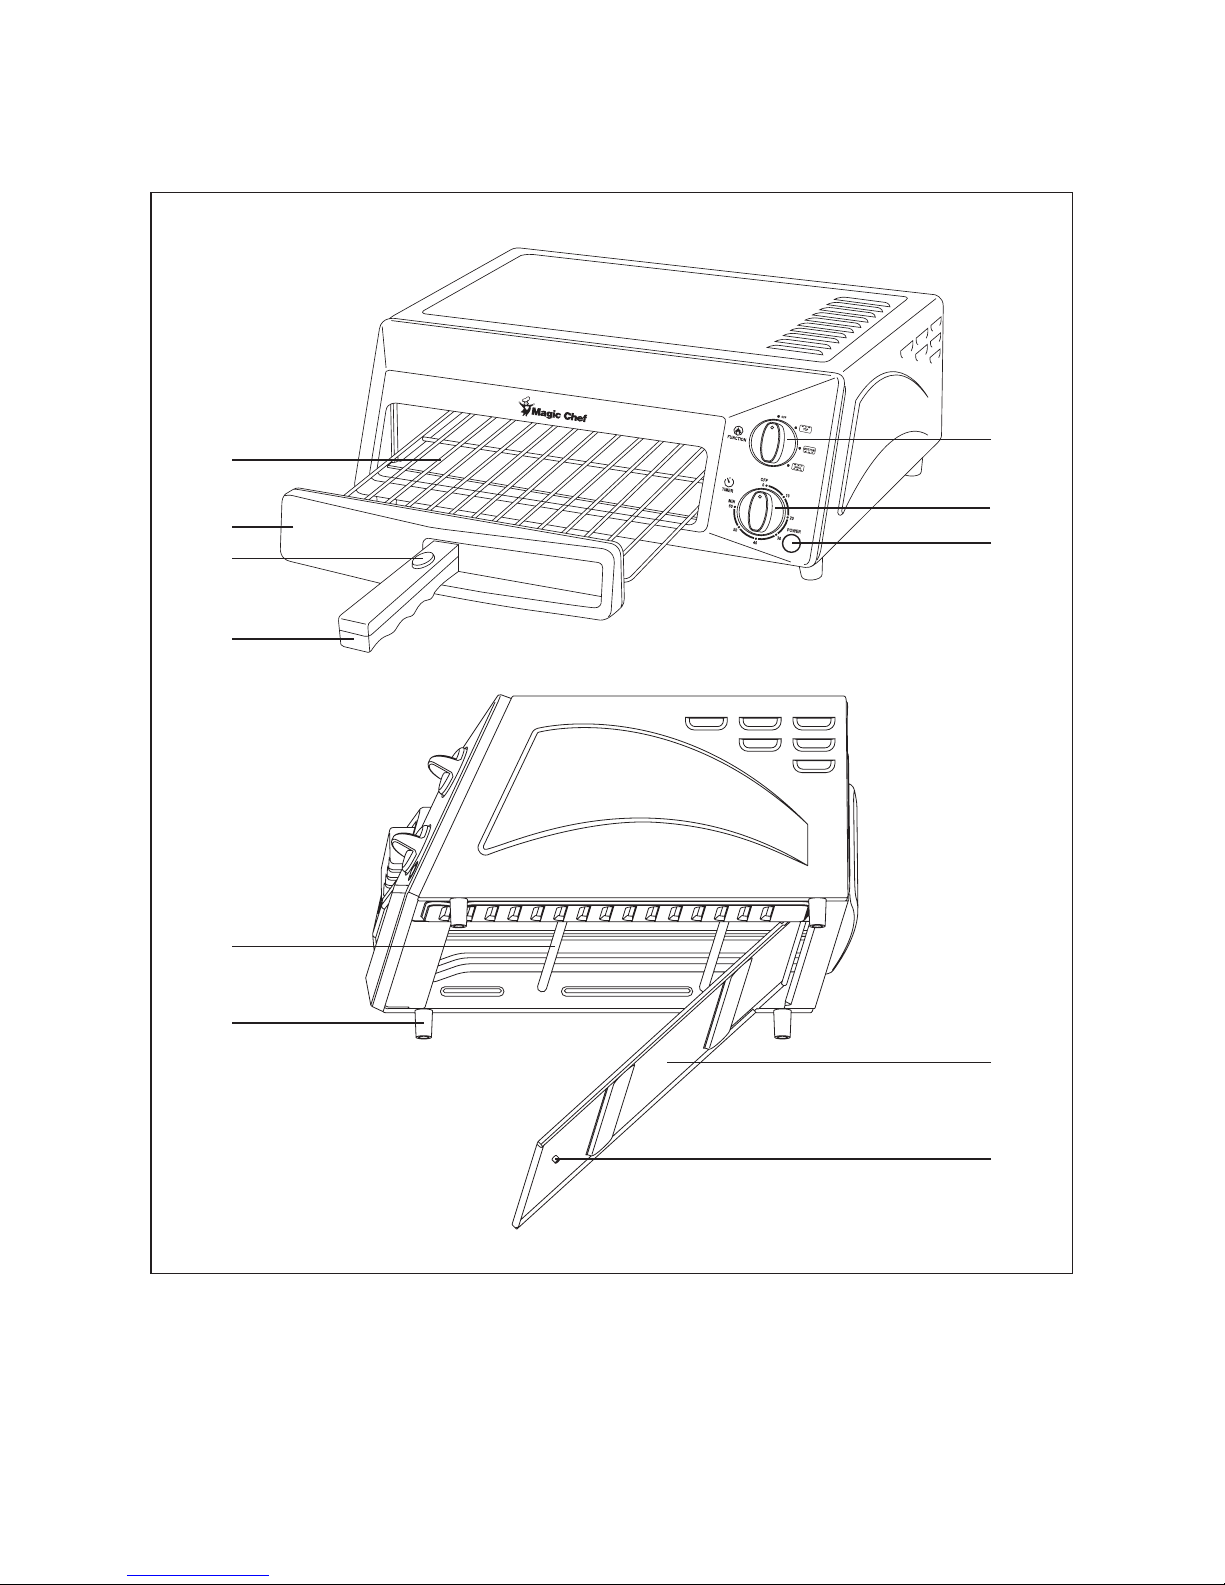
PRODUCT COMPONENTS
Figure 2
a. Removable baking rack with chrome wire rack (1)
b. Baking rack face panel (1)
c. Handle release button (1)
d. Folding baking rack handle (1)
e. Heating element control knob (1)
f. Timer control knob (1)
g. Power indicator light (1)
h. Stainless steel heating element (4)
i. Skid-resistant foot (4)
j. Hinged crumb tray (1)
k. Crumb tray knob (1)
e
f
g
j
k
c
d
a
b
i
h
Page 9

9
ASSEMBLY
1. Remove the product from its packaging materials. No assembly is required as the unit is preassembled.
2. The baking rack handle folds into the baking rack face panel when not in use for convenient storage. To
unfold the handle for use, pull the right end of the handle out and away from the pizza oven until it is
perpendicular with the oven and locked in place.
3. Before the first use, thoroughly wash the baking rack with a warm, soapy cloth. Gently rinse the parts and
dry them thoroughly. Using a damp cloth, wipe the inner surface of the crumb tray and dry it thoroughly.
NOTE: DO NOT immerse the baking rack face panel or the pizza oven in water or any other liquids.
4. Reinsert the crumb tray and baking rack into the pizza oven. Ensure the hinged crumb tray is locked into
place with the pizza oven housing. Place the oven on a flat, dry surface away from the countertop edge and
plug the unit into a 120V AC electrical outlet.
Page 10
10
OPERATION INSTRUCTIONS
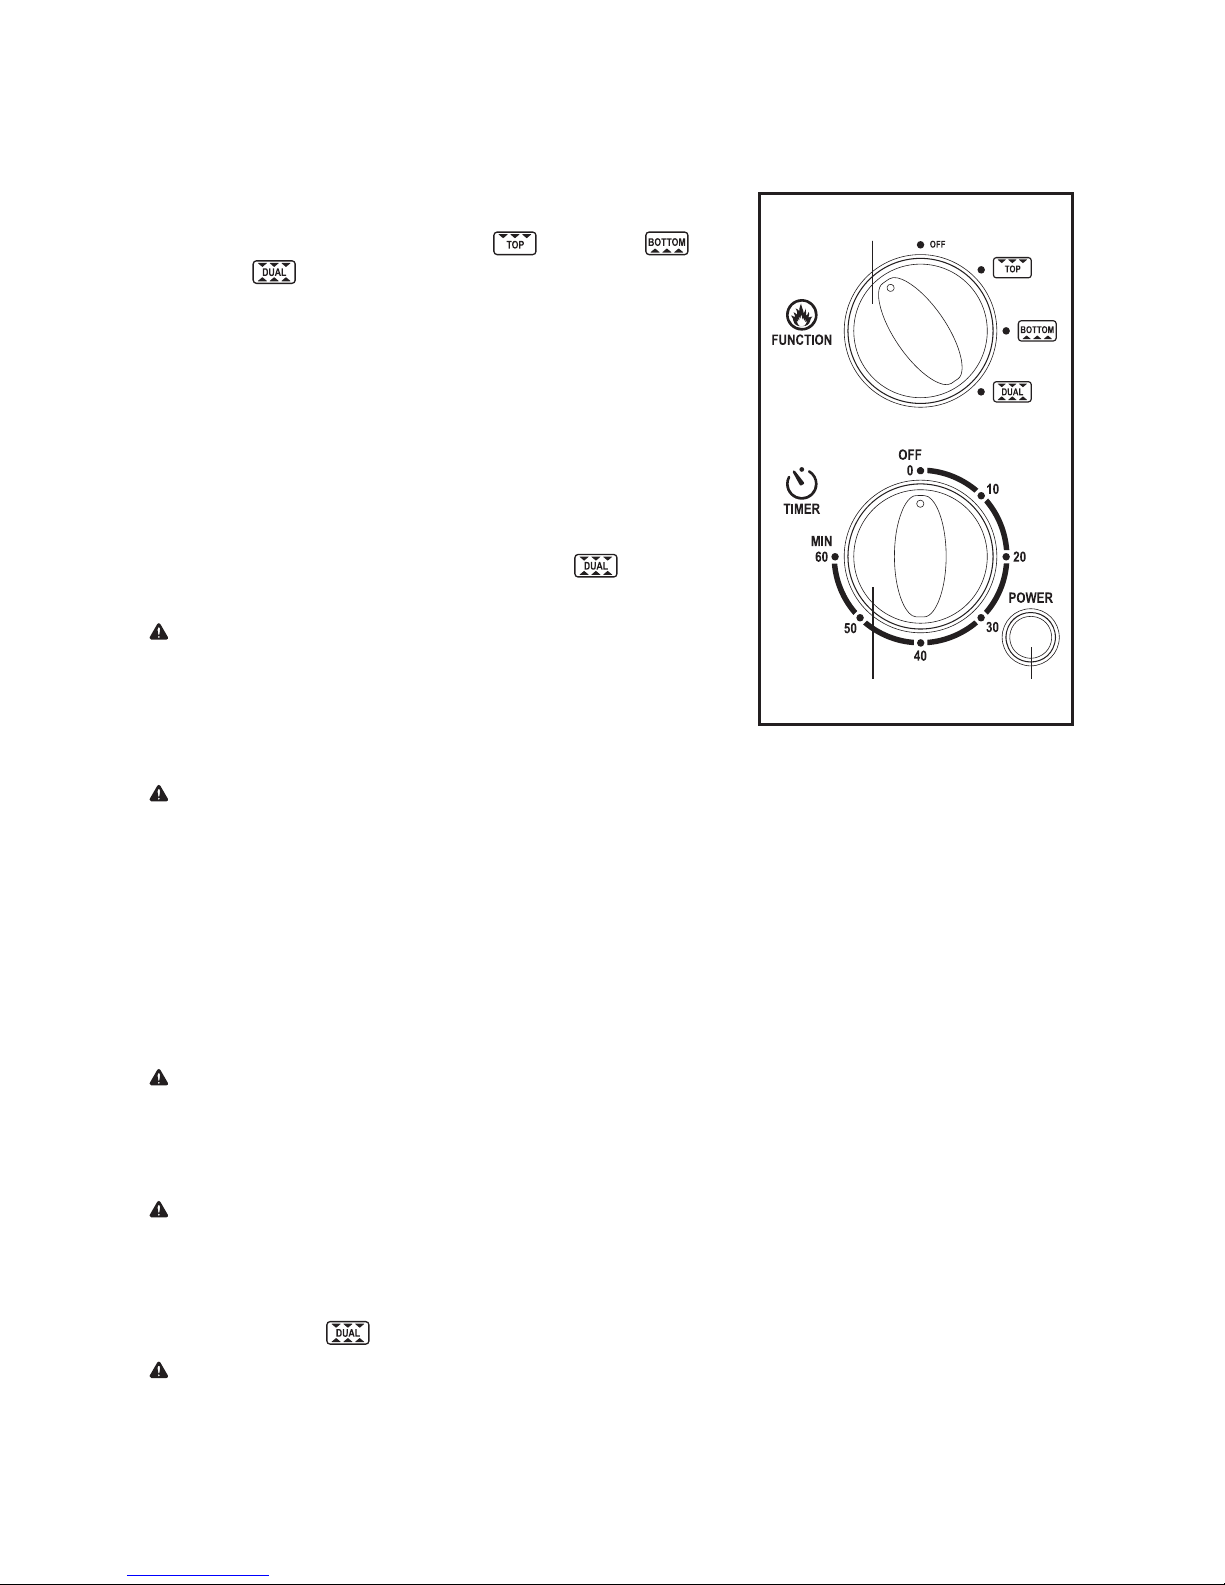
CONTROL PANEL
a. Heating element controls: OFF, TOP ( ), BOTTOM (
),
DUAL (
)
b. Timer controls: 0-60 min. timer with 10 min. increments
c. Power indicator light
BEFORE USE
Before the first use, it is recommended to run the pizza oven without a
pizza at its highest temperature setting to allow any manufacturing
residue to burn off. This will also remove any traces of odor initially
present. Allow the oven to heat for approximately 10 to 15 minutes by
turning the heating element control knob to DUAL (
) and setting
the timer to 10 to 15 minutes via the timer control knob.
NOTE: Initial operation of the pizza oven may result in minimal smell
and smoke. This is normal due to the burning of protective manufacturing
residue applied to the heating elements.
OPERATION
CAUTION: Whenever operating the pizza oven, allow a minimum of 4 inches of open space around the exterior
of the oven for proper air circulation. NEVER operate the oven without the baking rack installed. To reduce the
risk of personal injury or burns, avoid touching the hot surfaces of the oven during operation.
1. To turn the pizza oven ON, rotate the timer control knob clockwise to select the desired time. The knob
must past the 10 minute marker in order to activate the oven. For cooking times less than 10 minutes, simply
turn the timer knob past the 10 minute marker, and then counterclockwise to the desired time. Once the
set time has expired, the timer will ring to indicate the end of the programmed time and the unit will stop
heating. The maximum setting for the timer is 60 minutes.
2. The power indicator light will be illuminated whenever the pizza oven is heating.
NOTE: The exterior of the pizza oven will produce heat during use and may become hot. DO NOT touch
hot surfaces. ALWAYS use the handles or control knobs. ALWAYS wear protective, insulated oven gloves when
inserting or removing items from the hot oven.
3. To turn the oven OFF, rotate the timer control knob counterclockwise to OFF/0.
NOTE: ALWAYS use extreme care when removing the baking rack, crumb tray or any hot container from the
pizza oven. ALWAYS use the handle of the baking rack and an insulated oven mitt when removing hot items from
the oven.
4. To bake a pizza, preheat the pizza oven for approximately 3 minutes by setting the heating element control
knob to DUAL (
), and then turning the timer control knob to the desired time.
NOTE: Remember to activate the pizza oven by turning the timer control knob past the 10 minute marker.
For cooking times less than 10 minutes, first turn the timer knob past the 10 minute marker, and then
counterclockwise to the desired time.
a
b c
Figure 3
Page 11

11
5. Remove the pizza from its packaging, including the cardboard disk. If necessary, place the pizza on an
ovenproof cookware or bakeware.
NOTE: The pizza oven can accommodate pizzas up to 12 inches in diameter. Ensure proper fitment when using
an ovenproof cookware or bakeware. DO NOT cover any part of the pizza oven with metal foil, including the
crumb tray; oversized pizzas or metal utensils must not be inserted into the oven.
6. After preheating, pull the baking rack partially out of the pizza oven and carefully place the pizza onto the
wire rack. Use caution as the baking rack and oven exterior will be hot. Guide the baking rack back into the
oven using its handle.
7. Refer to the “Pizza Cooking Chart” on p. 12 for approximate cooking times. If applicable, use the directions
included with the pizza in conjunction with the below chart. Set the timer for the halfway point of the
suggested cooking time for the type of pizza listed. For instance, if the below chart indicates to cook for
18 to 24 minutes, set the timer to 9 minutes. When the time expires, use the handle to carefully pull the
baking rack partially out of the oven. Rotate the pizza using a spatula, fork or tongs. Then carefully guide
the baking rack back into the oven and set the timer for the remaining time.
NOTE: At the end of the baking time, select TOP ( ) on the heating element control knob for well-done
cheese and toppings. For a crispier crust, select BOTTOM (
) on the heating element control knob.
8. When the timer goes off, check to see if the pizza is cooked thoroughly. If additional baking time is needed,
simply reset the timer to the desired time.
NOTE: All pizzas will cook differently; bake until the crust is golden brown and the cheese is melted.
9. When the pizza appears to be done, turn the timer to OFF/0 if the timer has not already expired.
10. Carefully pull the baking rack out of the oven using its handle, and then slide the pizza onto a pizza pan. Set
the hot baking rack onto a heat resistant surface.
11. Allow the pizza to cool for approximately 3 to 5 minutes and then cut into serving pieces.
12. Allow the pizza oven to cool down completely before cleaning and storing.
HELPFUL TIPS
1. To reheat pizza slices, allow the pizza oven to preheat for approximately 3 minutes with the heating
element control knob set to DUAL (
).
2. After preheating, turn the heating element control knob to TOP ( ) and place the pizza slices onto the
center of the baking rack. Set the timer for 6 to 12 minutes.
3. Use the shorter of the two cooking times when reheating thin crust or single topping pizza, and the longer
cooking time when reheating thicker crusts or multiple toppings.
4. For best results, check the pizza after 6 minutes.
PIZZA COOKING CHART
The following cooking times are for baking 12-inch pizzas. The times are approximate. Use the shorter cooking
times for single topping pizzas and the longer cooking times for pizzas with extra toppings or vegetable toppings.
When the cheese has melted and begins bubbling, the pizza is done.
At the end of the cooking time, turn the heating element control knob to BOTTOM (
) for a crispier crust.
For well-done toppings, turn the control knob to TOP ( ). Next, reset the timer by turning it beyond the 10
minute marker and then counterclockwise to 1 or 2 minutes. Cook the pizza as desired. To avoid overcooking the
pizza, DO NOT leave the oven unattended.
Page 12

12
Type of Pizza Approximate Cooking Time
Regular Crust 18 to 26 minutes
Rising Crust 25 to 35 minutes
Thin Crust 13 to 21 minutes
Type of Pizza Preparation and Cooking Time
Frozen Pizza Cook for 10 to 20 minutes or as indicated on the package. It is recommended to remove the pizza
from the freezer approximately 10 minutes before placing into the pizza oven. Place the pizza onto an
ovenproof pizza tray or the baking rack.
Pizza Mix Follow the instructions on the box. Place the pizza onto an ovenproof pizza tray or the baking rack to
bake. Cook for 18 to 25 minutes.
Scratch Pizza Follow the recipe instructions. Place the pizza onto an ovenproof pizza tray and then onto the baking
rack. Follow the cooking time listed in the instructions.
NOTE: During first use with each type of pizza, start with the
shorter baking time in the indicated range. Then open the oven
and check the pizza. Extend the time as needed to bake the pizza
the way you like it. Make a note of the entire baking duration, and
thereafter, use that time as a guide to bake pizza in the future.
Cooking times will vary depending on the household voltage. The higher the voltage, the shorter the cooking
time, while the lower the voltage, the longer the cooking time.
Page 13

13
CARE AND MAINTENANCE
CLEANING
WARNING: To avoid the risk of electric shock, ALWAYS ensure the pizza oven is unplugged from the electrical
outlet before assembling, relocating, cleaning or storing.
The pizza oven should be cleaned regularly for optimal performance. Regular cleaning will also reduce the risk of
fire hazard and electric shock. Before cleaning the pizza oven, check to see that the timer control knob is in the
OFF/0 position, and then unplug the oven from the electrical outlet. Allow the pizza oven to cool completely
before cleaning.
NOTE: DO NOT use the dishwasher to clean any of the accessories which are included with the pizza oven.
a. Exterior Surface: Occasionally wipe the outside of the pizza oven with a damp cloth and dry thoroughly.
NEVER immerse the oven in water or any other liquids. DO NOT use steel wool scouring pads or abrasive cleaners
on the exterior surface of the pizza oven.
NOTE: DO NOT immerse the base of the unit in water or any other liquid. The base contains the electrical
components of the appliance. The lifespan of the product depends on how well it is cleaned and maintained after
every use. ALWAYS follow the care and maintenance instructions. NEVER use any abrasive cleaning products on
the appliance to maintain its original finish.
b. Baking Rack: Wash the baking rack with a hot, soapy cloth. Rinse and dry thoroughly. If necessary, clean the
wire portion of the rack with a nylon mesh pad to remove any food residue. The baking rack face panel may be
wiped with a damp cloth and wiped dry with a soft cloth or towel. DO NOT immerse the baking rack face panel
or its handle in water or any other liquids, as the water or liquid may enter the interior of the panel and become
trapped inside.
NOTE: Dry thoroughly before reinserting the baking rack into the oven. NEVER operate the pizza oven with the
oven door open.
To fold the baking rack handle in for compact storage, press the handle release button and turn the handle in
towards the pizza oven.
c. Crumb Tray: To prevent the kitchen countertop from being damaged, the pizza oven should be operated
with the crumb tray installed and cleaned of excess food. To open the crumb tray for cleaning, tip the pizza oven
backwards and then hold the oven so that it is in an upright position. Pull down on the crumb tray knob located
on the underside of the pizza oven and then swivel the tray towards you.
While holding the pizza oven in an upright position, wipe the crumb tray and the interior of the pizza oven with a
damp, soapy cloth. If necessary, use a nylon mesh pad to remove stubborn stains.
NOTE: DO NOT use steel wool scouring pads or abrasive cleaners on the crumb tray.
Dry the crumb tray and pizza oven thoroughly and return the tray to its closed position. While pushing down on
the knob, insert the crumb tray back into the oven.
d. Heating Elements: DO NOT wipe the heating elements as they are self-cleaning.
MAINTENANCE AND STORAGE
• Reassemble the product before placing it into storage.
• Store the product in a cool, dry place.
Page 14

14
Problem Possible Causes Solutions
Will not operate or
turn on.
- No power
- Timer control knob
activation
- Damages due to shipping
damage or improper
installation
- Check if the pizza oven is plugged in.
- Check the fuse/circuit breaker in the home.
- Turn the timer control knob past the 10 minute marker. For cooking
times less than 10 minutes, first turn the timer knob past the
10 minute marker, and then counterclock wise to the desired time.
- See “Warranty Conditions” on p. 15 of this user manual.
Will not cook pizza
evenly.
- Selecting the correct
heat setting for the type
of pizza used
- Distribution of pizza
ingredients
- If the bottom of the pizza is cooked and the top is not or vice versa,
the selected heat setting may be incorrect for the type of pizza used.
Refer to the cooking chart on back of the pizza or this user manual
for recommended cooking guidelines. The majority of pizzas should
be cooked using the dual setting for at least part of the cooking time.
- It is also possible that the ingredients on the pizza are not distributed
evenly. If so, allow the pizza to cook slightly and then redistribute the
ingredients with a fork. This will allow the pizza to cook more evenly.
Nothing happens
when trying to brown
the top or crisp the
crust for additional
minutes.
- Timer has expired.
- Timer control knob
activation
- Rotate the timer control knob beyond the 10 minute marker when
setting the timer for the additional minutes. When selecting a
setting of ten minutes or less, you must ALWAYS rotate the dial
beyond the 10 minute marker and then back to the desired time.
When cooking rising
crust pizza, sometimes
the crust seems
doughy or it does not
rise very much.
- Did not follow
recommended cooking
settings
- Type of pizza ingredients
used
- Follow the recommended cooking settings: cook 9 to 12-inch pizzas
for approximately 10 to 12 minutes first using the heat setting
BOTTOM
(
) and then another 10 to 12 minutes on the heating
setting DUAL (
)
.
- The yeast in the pizza crust may no longer be fully active. The height
and consistency of a rising crust are dependent upon the conditions
of the yeast. Freshness, freezer temperatures, packaging, and
original dough quality are all contributing factors. Generally, more
consistent results may be secured by nationally branded pizzas, as
they tend to abide by more rigorous packaging and quality
standards than many regional/grocery store pizzas.
TROUBLESHOOTING
Page 15

15
LIMITED WARRANTY
MC Appliance Corporation warrants each new Pizza Oven to be free from defects in material and workmanship, and agrees to
remedy any such defect or to furnish a new part(s), at the company’s option, for any part(s) of the unit that has failed during the
warranty period. Parts and labor expenses are covered on this unit for a period of one year from the date of purchase. A copy of
the dated sales receipt/invoice is required to receive warranty service, replacement or refund.
This warranty covers appliances in use within the contiguous United States, Alaska, Hawaii and Puerto Rico. This warranty does not
cover the following:
• Damages due to shipping damage or improper installation.
• Damages due to misuse or abuse.
• Content losses due to failure of the unit.
• Repairs performed by unauthorized service agents.
• Service calls that do not involve defects in material and workmanship such as instructions on proper use of the
product or improper installation.
• Replacement or resetting of house fuses or circuit breakers.
• Failure of this product if used for other purposes than its intended purpose.
• Disposal costs for any failed unit not returned to our factory.
• Any delivery/installation costs incurred as the result of a unit that fails to perform as specified.
• Expenses for travel and transportation for product service if your appliance is located in a remote area where
service by an authorized service technician is not available.
• The removal and reinstallation of your appliance if it is installed in an inaccessible location or is not installed in
accordance with published installation instructions.
• Refunds for non repairable products are limited to the price paid for the unit per the sales receipt.
• This warranty is non transferable. This warranty applies only to the original purchaser and does not extend to any
subsequent owner(s).
Limitations of Remedies and Exclusions:
Product repair in accordance with the terms herein, is your sole and exclusive remedy under this limited warranty. Any and all
implied warranties including merchantability and fitness for a particular purpose are hereby limited to one year or the shortest
period allowed by law. MC Appliance Corporation is not liable for incidental or consequential damages and no representative or
person is authorized to assume for us any other liability in connection with the sale of this product. Under no circumstances is
the consumer permitted to return this unit to the factory without the prior written consent of MC Appliance Corporation.
Some states prohibit the exclusion or limitation of incidental or consequential damages, or limitations on implied warranties.
This warranty gives you specific legal rights, and you may also have other rights which vary from state to state.
Model Parts Labor Type of Service
HQPZO13ST One Year One Year Carry In
HQPZO13B One Year One Year Carry In
HQPZO13R One Year One Year Carry In
For Service or Assistance please call 888-775-0202 or visit us on the web at www.mcappliance.com to request warranty service
or order parts.
Page 16

CNA International, Inc. d/b/a MC Appliance Corporation. All rights reserved.
Magic Chef® logo is a registered trademark of CNA International, Inc.
www.mcappliance.com Printed in China
Page 17

17
LEA ESTE MANUAL ANTES DE UTILIZAR SU HORNO PARA PIZZA Y
GUÁRDELO PARA FUTURA REFERENCIA.
Modelo HQPZO13ST, HQPZO13B, HQPZO13R
Horno para pizza de 12 pulgadas
Manual del usuario
Page 18

18
REGISTRACIÓN DEL PRODUCTO
Gracias por comprar el producto Magic Chef®. El primer paso para proteger su nuevo producto es completar la forma de
registración en nuestra pagina web: www.mcappliance.com/register. Los beneficios de registrar su producto incluyen lo siguiente:
1. Al registrar su producto nos permite contactarle para notificarle de un cambio de seguridad o actualización del
producto.
2. Si llegara a necesitar servicio bajo garantía, registrando su producto nos permite ser más eficiente en procesar el
servicio.
3. En el evento que usted tenga una perdida que esta cubierto por un seguro, registrando su producto puede servir
como prueba de su compra.
Una vez más gracias por comprar un producto marca Magic Chef.
Page 19

19
ÍNDICE
REGISTRACIÓN DEL PRODUCTO . . . . . . . . . . . . . . . . . . . . . . . . . . . . . . . . . . . . . . . . . . . . . . 18
PRECAUCIONES
. . . . . . . . . . . . . . . . . . . . . . . . . . . . . . . . . . . . . . . . . . . . . . . . . . . . . . . . . . . . . 20
INSTRUCCIONES DE SEGURIDAD IMPORTANTES
. . . . . . . . . . . . . . . . . . . . . . . . . . . . . . . . 21
ESPECIFICACIONES
. . . . . . . . . . . . . . . . . . . . . . . . . . . . . . . . . . . . . . . . . . . . . . . . . . . . . . . . . . 23
PIEZAS DEL PRODUCTO
. . . . . . . . . . . . . . . . . . . . . . . . . . . . . . . . . . . . . . . . . . . . . . . . . . . . . . 24
ARMADO
. . . . . . . . . . . . . . . . . . . . . . . . . . . . . . . . . . . . . . . . . . . . . . . . . . . . . . . . . . . . . . . . . . . 25
INSTRUCCIONES DE FUNCIONAMIENTO
. . . . . . . . . . . . . . . . . . . . . . . . . . . . . . . . . . . . . . . 26
CUIDADO Y MANTENIMIENTO
. . . . . . . . . . . . . . . . . . . . . . . . . . . . . . . . . . . . . . . . . . . . . . . 29
SOLUCIÓN DE PROBLEMAS
. . . . . . . . . . . . . . . . . . . . . . . . . . . . . . . . . . . . . . . . . . . . . . . . . . 30
GARANTÍA LIMITADA
. . . . . . . . . . . . . . . . . . . . . . . . . . . . . . . . . . . . . . . . . . . . . . . . . . . . . . . . .31
Page 20

20
PRECAUCIONES
SIGNIFICADO DE LOS SÍMBOLOS
ADVERTENCIA
Peligros o prácticas inseguras que PODRÍAN provocar lesiones graves o la muerte.
PRECAUCIÓN
Peligros o prácticas inseguras que PODRÍAN provocar lesiones menores.
ESTE PRODUCTO ESTÁ DESTINADO
EXCLUSIVAMENTE PARA USO DOMÉSTICO
ADVERTENCIA: Lea con atención todas las advertencias de seguridad. Si no se siguen las instrucciones descritas
en este manual del usuario se pueden producir choques eléctricos, incendios y/o lesiones graves. Las advertencias,
precauciones e instrucciones detalladas en este manual del usuario no cubren todas las condiciones y situaciones
posibles que podrían suceder.
ALIMENTACIÓN ELÉCTRICA
Si se sobrecarga un circuito eléctrico con otros aparatos, es posible que el Horno para pizza de acero inoxidable
no funcione correctamente. El Horno para pizza de acero inoxidable se debe utilizar en un circuito eléctrico
diferente al de otros aparatos en funcionamiento.
CLAVIJA POLARIZADA
El Horno para pizza de acero inoxidable posee una clavija polarizada (una varilla es más ancha que la otra). Para
reducir el riesgo de choque eléctrico, esta clavija debe insertarse en un tomacorrientes polarizado y en un solo
sentido. Si la clavija no encaja por completo en el tomacorrientes, inviértala. Si aun así no encaja, contacte a un
técnico electricista calificado. NO intente alterar la clavija de forma alguna. Si la clavija queda suelta dentro del
tomacorrientes de CA o si este se calienta, NO use ese tomacorrientes.
PRECAUCIÓN: Se proporciona un cable de alimentación corto para reducir el riesgo de que se enriede o que se
tropiece con un cable largo. No se recomienda usar un cable de extensión con este producto, pero si es necesario,
la calificación eléctrica debe ser por lo menos igual de buena que la del producto. Acomode la extensión de
forma tal que no cuelgue de la encimera o de la mesada para evitar tropezarse o jalar el aparato.
Page 21

21
INSTRUCCIONES DE SEGURIDAD IMPORTANTES
ADVERTENCIA: Para reducir el riesgo de incendio, choque eléctrico o lesiones graves, lea y guarde todas las
instrucciones antes de usar el Horno para pizza de acero inoxidable.
Al usar este o cualquier otro electrodoméstico, se deben tener en cuenta precauciones de seguridad básicas,
incluidas las siguientes:
1. LEA TODAS LAS INSTRUCCIONES ANTES DEL USO.
2. Antes de usar el aparato por primera vez, verifique si la tensión del mismo corresponde con la tensión en su
hogar.
3. SIEMPRE arme el aparato por completo antes de enchufarlo en un tomacorrientes. NO empiece a utilizar el
aparato hasta que esté armado por completo.
4. SIEMPRE asegúrese de que el aparato esté desconectado del tomacorrientes, que se haya enfriado y que
todas las partes se hayan detenido antes de armarlo, desarmarlo, reubicarlo o limpiarlo. Desconecte el
producto del tomacorrientes cuando no lo esté usando.
5. La temperatura de las superficies accesibles puede ser muy alta cuando el aparato está en funcionamiento.
6. NO toque las superficies calientes. SIEMPRE utilice las asas o agarraderas. SIEMPRE usa guantes para horno
con protección y aislación al meter o sacar elementos del horno caliente.
7. SIEMPRE asegúrese de que la bandeja de horneado esté bien colocada antes de usar el producto. NUNCA
intente quitar o abrir a la fuerza la bandeja de horneado mientras el aparato está en funcionamiento.
8. NO exponga la base, el cable de alimentación o la clavija del aparato al agua o a cualquier otro líquido ni lo
sumerja.
9. NO lo coloque sobre o cerca de una hornilla a gas o eléctrica, o dentro o cerca de un horno caliente.
10. Para permitir una circulación de aire adecuada, deje aproximadamente 4 pulgadas (10 cm) de espacio
alrededor del aparato mientras lo esté usando.
11. Puede iniciarse un incendio si se cubre el horno o si está en contacto con materiales inflamables, entre
otras, cortinas, trapos, paredes y similares, cuando está en funcionamiento. NO coloque ningún elemento
encima del aparato cuando esté en funcionamiento.
12. Asegúrese de que el aparato y su cable de alimentación NO entre en contacto con superficies calientes.
13. NO deje el aparato desatendido mientras esté funcionando. SIEMPRE desconecte el aparato del
tomacorrientes cuando no lo esté usando.
14. Se debe tener cuidado adicional cuando se usa cualquier aparato cerca de personas discapacitadas, niños o
mascotas.
15. Mantenga el aparato alejado de los niños y las mascotas. Este aparato no debe ser utilizado por niños o
personas discapacitadas.
16. Evite el contacto con las piezas internas mientras está en funcionamiento. Mantenga el pelo, las manos, los
dedos o cualquier otra parte del cuerpo alejados de las piezas internas mientras esté usando el aparato.
17. Mantenga los utensilios alejados del conjunto interno al utilizar el aparato. Se puede usar una paleta o
espátula cuando el aparato no esté en funcionamiento.
18. No se deben introducir alimentos de tamaño mayor al indicado o utensilios de metal en el horno ya que
podrían iniciar un incendio o generar riesgo de descarga eléctrica.
19. El uso de adjuntos o accesorios que el fabricante no recomiende ni venda pueden provocar incendios,
choques eléctricos o lesiones.
Page 22

22
20. Se debe tener cuidado al usar elementos de cocina o de horneado que estén hechos de cualquier material
que no sea metal o vidrio para hornos. NO coloque ninguno de los siguientes materiales en el horno: cartón,
plástico, papel o similares.
21. Asegúrese de que nada toque los elementos de calefacción superior e inferior del horno.
22. Tenga mucho cuidado al mover la bandeja de drenaje que contiene aceite u otros líquidos calientes.
23. Tenga mucho cuidado al extraer la bandeja de migas, la bandeja de horneado o al deshacerse de la grasa
caliente y otros líquidos calientes.
24. NO cubra ninguna parte del horno para pizza con láminas metálicas, incluida la bandeja para migas. Esto
puede provocar que el horno se sobrecaliente.
25. Para desconectar el aparato del tomacorrientes, asegúrese de que el aparato esté apagado al controlar que
la perilla de control del temporizador esté en la posición OFF, y luego jale del enchufe. NO jale del cable de
alimentación.
26. Evite que el cable de alimentación se estire donde se conecta al aparato, ya que podría abrir y romperse.
27. NO enchufe o desenchufe el aparato del tomacorrientes con las manos húmedas.
28. NO use el aparato si el cable de alimentación o la clavija se dañaron o cortaron, si los cables están
expuestos, si la unidad falla, si la unidad se cayó o se dañó, o si la carcasa del motor se cayó o quedó
expuesta al agua.
29. NO limpie el interior del horno con un estropajo de metal, ya que partes de la misma pueden desprenderse
y tocar las piezas eléctricas, lo que crea el riesgo de descarga eléctrica.
30. NO almacene ningún otro material además de los accesorios recomendados por el fabricante en el horno
cuando no lo esté usando.
31. Este aparato no posee piezas que el usuario pueda reparar. NO intente examinar o reparar el aparato por
cuenta propia. Solo el personal de servicio técnico calificado puede realizar dicho trabajo.
32. NO use el aparato en un tomacorrientes dañado.
33. Devuelva el aparato a un centro de servicio técnico autorizado para su examinación, reparación o ajuste.
34. NO use este aparato para propósitos que difieran de su uso indicado.
35. Este aparato fue diseñado para uso doméstico solamente.
36. SIEMPRE coloque el aparato en una superficie nivelada y estable.
GUARDE ESTAS INSTRUCCIONES
PARA REFERENCIA FUTURA
ADVERTENCIAS DE SEGURIDAD
Si bien el aparato es fácil de utilizar, se debe cumplir con las siguientes advertencias por cuestiones de seguridad:
• NO sumerja el cable, la clavija o cualquier parte de la unidad base en agua o cualquier otro líquido.
• NO use el aparato sobre una superficie inestable.
• NO coloque el aparato cerca de una fuente de calor.
• NO desenchufe el aparato jalando del cable de alimentación.
• El aparato debe desenchufarse y enfriarse por completo antes de limpiarlo o de realizarle mantenimiento.
• Si el aparato parece fallar, debe desconectarlo de inmediato.
Page 23

23
ESPECIFICACIONES
Dimensiones del producto 490 mm x 168 mm x 356 mm [W x H x D]
Peso neto 2.0 kg
Capacidad De hasta 12 pulgadas
Tensión nominal 120 V CA, 60 Hz
Potencia nominal 1300 Vatios
356 mm
490 mm
168 mm
Figura 1
Page 24

24
PIEZAS DEL PRODUCTO
Figura 2
a. Bandeja de horneado extraible con entretejido
de cromo (1)
b. Panel frontal de la bandeja de horneado (1)
c. Botón de liberación del asa (1)
d. Plegado del asa de la bandeja de horneado (1)
e. Perilla de control del elemento de calefacción (1)
f. Perilla de control del temporizador (1)
g. Luz indicadora de alimentación (1)
h. Elemento de calefacción de acero
inoxidable (4)
i. Soporte antideslizante (4)
j. Bandeja para migas con bisagras (1)
k. Perilla de la bandeja de migas (1)
e
f
g
j
k
c
d
a
b
i
h
Page 25

25
ARMADO
1. Extraiga el producto del material de embalaje. No necesita realizar ningún ensamble ya que la unidad viene
ensamblada.
2. El asa de la bandeja de horneado se pliega sobre el panel frontal de la bandeja de horneado cuando no la
está usando para guardarla de forma conveniente. Para desplegar el asa, jale del extremo derecho del asa
hacia afuera del horno para pizza hasta que esté perpendicular respecto del horno y trabada en su lugar.
3. Antes del primer uso, limpie bien la bandeja de horneado con un trapo tibio y jabonoso. Enjuague bien las
piezas y séquelas meticulosamente. Con un trapo húmedo, limpie la superficie interior de la bandeja para
migas y séquela meticulosamente.
NOTE: NO sumerja el panel frontal de la bandeja de horneado o el horno para pizza en el agua o cualquier otro
líquido.
4. Vuelva a insertar la bandeja para migas y la bandeja de horneado en el horno para pizza. Asegúrese de que
la bandeja para migas con bisagras esté trabada en su lugar en la carcasa del horno para pizza. Coloque el
horno en una superficie plana y seca lejos del borde del mostrador y conecte la unidad a un tomacorriente
de 120 V CA.
Page 26

26
INSTRUCCIONES DE FUNCIONAMIENTO
PANEL DE CONTROL
a. Controles del elemento de calefacción: OFF (Apagado), TOP ( )
(Superior), BOTTOM ( ) (Inferior), DUAL (
) (Doble)
b. Controles del temporizador: temporizador entre 0-60 min en
múltiplos de 10
c. Luz indicadora de alimentación
ANTES DE USAR
Antes del primer uso, se recomienda encender el horno para pizza sin
una pizza dentro en la temperatura más alta para permitir que se queme
cualquier residuo de la fabricación. Esto también eliminará cualquier
rastro de olor que hubiese quedado. Permita que el horno se caliente por
aproximadamente 10 o 15 minutos girando la perilla de control del elemento
de calefacción a DUAL (
) y estableciendo el temporizador a 10
o 15 minutos con la perilla de control del temporizador.
NOTA: Initial operation of the pizza oven may result in minimal smell
and smoke. This is normal due to the burning of protective manufacturing
residue applied to the heating elements.
FUNCIONAMIENTO
PRECAUCIÓN: Siempre que utilice el horno para pizza, deje un mínimo de 4 pulgadas (10 cm) de espacio
alrededor del aparato para permitir una circulación de aire adecuada. NUNCA utilice el horno sin la bandeja
de horneado colocada. Para reducir el riesgo de lesiones personales o quemaduras, evite tocar las superficies
calientes del horno mientras está en funcionamiento.
1. Para encender el horno para pizza, gire la perilla de control del temporizador en sentido de las agujas del
reloj para seleccionar el tiempo deseado. La perilla debe superar la marca de 10 minutos para activar el
horno. Para tiempos de cocción inferiores a 10 minutos, solo gire la perilla del temporizador hasta pasada
la marca de 10 minutos, y luego en sentido contrario a las agujas del reloj hasta el tiempo deseado. Una vez
que el tiempo ha expirado, el temporizador sonará para indicar el final del tiempo programado y la unidad
dejará de calentar. La configuración máxima del temporizador es de 60 minutos.
2. La luz indicadora de alimentación se encenderá cuando el horno para pizza esté calentando.
NOTA: El exterior del horno para pizza generará calor mientras esté en funcionamiento y podría calentarse.
NO toque las superficies calientes. SIEMPRE utilice las asas o agarraderas. SIEMPRE usa guantes para horno con
protección y aislación al meter o sacar elementos del horno caliente.
3. Para apagar el horno, gire la perilla de control del temporizador en sentido contrario de las agujas del reloj
hasta OFF/0.
NOTA: SIEMPRE tenga mucho cuidado al extraer la bandeja de horneado, la bandeja para migas o cualquier
contenedor caliente del horno para pizza. SIEMPRE use el asa de la bandeja de horneado y un guante para horno
con aislamiento al extraer elementos calientes del horno.
4. Para hornear una pizza, precaliente el horno por aproximadamente 3 minutos estableciendo la perilla
de control del elemento de calefacción a DUAL (
) , y luego girando la perilla de control del
temporizador al tiempo deseado.
a
b c
Figure 3
Page 27

27
NOTA: Recuerde activar el horno para pizza girando la perilla de control del temporizador hasta pasada la
marca de 10 minutos. Para tiempos de cocción inferiores a 10 minutos, primero gire la perilla del temporizador
hasta pasada la marca de 10 minutos, y luego gire en sentido contrario a las agujas del reloj hasta el tiempo
deseado.
5. Quite la pizza de la caja, incluido el disco de cartón. De ser necesario, coloque la pizza sobre un elemento
de cocción o horneado apto para hornos.
NOTA: Puede colocar en el horno pizzas de hasta 12 pulgadas (30 cm) de diámetro. Asegúrese de que haya un
ajuste correcto al usar elementos de cocción y horneado aptos para horno. NO cubra ninguna parte del horno
para pizza con láminas metálicas, incluida la bandeja para migas; no se deben introducir pizzas de tamaño mayor
al indicado o utensilios metálicos en el horno.
6. Después del precalentamiento, jale un poco la bandeja de horneado y coloque con cuidado la pizza en la
bandeja entretejida. Tenga cuidado ya que la bandeja de horneado y el exterior del horno estará caliente.
Vuelva a introducir la bandeja de horneado en el horno agarrándola por el asa.
7. Consulte la “Tabla de cocción de pizza” en la pág. 28 para ver los tiempos de cocción aproximados.
Si corresponde, use las instrucciones que incluye la pizza junto con la tabla a continuación. Ajuste el
temporizador en un punto medio del tiempo de cocción sugerido para el tipo de pizza. Por ejemplo, si en
la siguiente tabla indica cocinar por entre 18 y 24 minutos, coloque el temporizador en 9 minutos. Cuanto
expire el tiempo, use el asa para jalar con cuidado un poco la bandeja de horneado. Gire la pizza con una
espátula, un tenedor o una pinza. Luego vuelva a introducir con cuidado la bandeja de horneado y ajuste el
temporizador el tiempo restante.
NOTA: Al terminar el tiempo de horneado, seleccione TOP ( ) en la perilla de control del elemento de
calefacción para que el queso y otros ingredientes queden bien cocidos. Para obtener una masa más crujiente,
seleccione BOTTOM (
) en la perilla de control del elemento de calefacción.
8. Cuando el temporizador se apaga, verifique si la pizza está bien cocida. Si se necesita más tiempo de
cocción, reajuste el temporizador al tiempo deseado.
NOTA: Todas las pizzas se cocinan de forma diferente; cocínela hasta que la masa esté dorada y el queso esté
derretido.
9. Cuando la pizza parezca estar lista, coloque el temporizador en OFF/0 si es que aún no expiró.
10. Jale con cuidado la bandeja de horneado del horno con el asa y luego deslice la pizza a una bandeja para
pizza. Coloque la bandeja de horneado caliente sobre una superficie resistente al calor.
11. Permita que la pizza se enfríe por aproximadamente 3 o 5 minutos y luego corte en porciones para servir.
12. Deje que el horno para pizza se enfríe por completo antes de limpiarlo y guardarlo.
CONSEJOS ÚTILES
1. Para recalentar las porciones de pizza, permita que el horno para pizza se precaliente por aproximadamente
3 minutos con la perilla de control del elemento de calefacción en DUAL (
).
2. Tras precalentar, gire la perilla de control del elemento de calefacción a TOP ( ) y coloque las
porciones de pizza en el centro de la bandeja de horneado. Ajuste el temporizador entre 6 y 12 minutos.
3. Use el tiempo de cocción más corto al recalentar masas delgadas o pizzas con un solo ingrediente y el
tiempo más largo al recalentar pizzas con masas más gruesas o varios ingredientes.
4. Para obtener mejores resultados, verifique la pizza cada 6 minutos.
Page 28

28
Tipo de Pizza
Tiempo de
cocción aproximado
Masa regular 18 a 26 minutos
Masa gruesa 25 a 35 minutos
Masa delgada 13 a 21 minutos
Tipo de Pizza Tiempo de preparación y cocción
Pizza congelada Cocinar entre 10 y 20 minutos o según se indica en el paquete. Se recomienda sacar la pizza del
congelador aproximadamente 10 minutos antes de colocarla en el horno para pizza. Coloque la pizza en
una bandeja para pizza apta para horno o en la bandeja de horneado.
Pizza Mix Siga las instrucciones de la caja. Coloque la pizza en una bandeja para pizza apta para horno o en la
bandeja de horneado para hornearla. Cocine entre 18 a 25 minutos.
Pizza para
preparar
Siga las instrucciones de la receta. Coloque la pizza en una bandeja para pizza apta para horno y luego
en la bandeja de horneado. Use el tiempo de cocción que aparece en las instrucciones.
NOTA: Durante el primer uso con cada tipo de pizza, inicie
por el tiempo de horneado más corto en el rango indicado.
Luego, abra el horno y verifique la pizza. Extienda el tiempo
cuanto sea necesario para hornear la pizza como usted
desee. Anote la duración del horneado, y en otra ocasión,
use ese tiempo como guía para hornearla en el futuro.
Los tiempos de cocción variarán en función de la tensión del hogar. Cuanto más alto el voltaje, más corto el
tiempo de cocción, mientras que a menor tensión, mayor tiempo de cocción.
TABLA DE COCCIÓN DE PIZZA
Los siguientes tiempos de cocción son para hornear pizzas de 12 pulgadas (35 cm). Los tiempos son aproximados.
Use los tiempos de cocción más cortos para pizzas con un solo ingrediente y los tiempos más largos al recalentar
pizzas con varios ingredientes o ingredientes vegetales. Cuando el queso se haya derretido y empiece a burbujear,
la pizza estará lista.
Al finalizar el tiempo de cocción, gire la perilla de control del elemento de calefacción a BOTTOM (
) para
lograr una masa más crujiente. Para obtener ingredientes bien cocidos, gire la perilla de control a TOP ( ).
Luego, reinicie el temporizador girándolo hasta pasada la marca de 10 minutos y luego en sentido contrario de las
agujas del reloj 1 o 2 minutos. Cocine la pizza como desee. Para evitar cocinar la pizza de más, NO deje el horno
desatendido.
Page 29

29
CUIDADO Y MANTENIMIENTO
LIMPIEZA
ADVERTENCIA: Para evitar el riesgo de choque eléctrico, SIEMPRE asegúrese de que el horno para pizza esté
desconectado del tomacorrientes antes de armarlo, reubicarlo, repararlo limpiarlo o, guardarlo.
Se debe limpiar el horno para pizza regularmente para un rendimiento óptimo. Una limpieza regular también
reducirá el riesgo de incendio y descarga eléctrica. Antes de limpiar el horno para pizza, verifique que la perilla de
control del temporizador esté en la posición OFF/0, y luego desconecte el horno del tomacorrientes eléctrico.
Deje que el horno para pizza se enfríe por completo antes de limpiarlo y guardarlo.
NOTA: NO use el lavavajillas para limpiar ninguno de los accesorios que incluye el horno para pizza.
a. Superficie exterior: Ocasionalmente, limpie el exterior del horno para pizza con un trapo húmedo y séquelo
meticulosamente. NUNCA sumerja en horno en agua o cualquier otro líquido. NO use estropajos de lana de acero
o productos de limpieza abrasivos sobre la superficie exterior del horno para pizza.
NOTA: NO sumerja la base de la unidad en agua o cualquier otro líquido. La base contiene los componentes
eléctricos del aparato. La vida útil del producto depende de qué tan bien se lo limpia y mantiene después de cada
uso. SIEMPRE siga las instrucciones de cuidado y mantenimiento. NUNCA use productos de limpieza abrasivos en
el aparato de forma tal que se mantenga el acabado original.
b. Bandeja de horneado: Limpie la bandeja de horneado con un trapo tibio y jabonoso. Enjuague y seque
meticulosamente. De ser necesario, limpie la porción entretejida de la bandeja con una esponja de nailon para
quitar los restos de comida. Se puede limpiar el panel frontal de la bandeja de horneado con un trapo húmedo y
luego secarse con un trapo suave o una toalla. NO sumerja el panel frontal de la bandeja de horneado o su manija
en agua o cualquier otro líquido, ya que estos podrían ingresar al interior del panel y quedar atrapados.
NOTA: Seque meticulosamente antes de volver a meter la bandeja de horneado en el horno. NUNCA use el
horno para pizza con la puerta del mismo abierta.
Para plegar el asa de la bandeja de horneado para compactarla, presione el botón de liberación del asa y gire el
asa hacia el interior del horno para pizza.
c. Bandeja para migas: Para evitar que se dañe la mesada de la cocina, se debe colocar la bandeja para migas y
se debe limpiar el exceso de comida antes de usarlo. Para abrir la bandeja para migas y poder limpiarla, incline el
horno para pizza hacia atrás y luego sosténgalo para que quede en posición vertical. Jale hacia abajo la perilla de
la bandeja para migas ubicada en el lado inferior del horno para pizza y luego deslice la bandeja hacia usted.
Mientras sostiene el horno para pizza en posición vertical, limpie la bandeja para migas y el interior del horno
para pizza con un trapo húmedo y jabonoso. De ser necesario, use una esponja de nailon para quitar manchas
resistentes.
NOTA: NO utilice estropajos de lana de acero o productos de limpieza abrasivos sobre la bandeja para migas.
Seque la bandeja para migas y el horno para pizza en detalle y vuelva a colocar la bandeja en su posición original.
Mientras empuja la perilla, inserte la bandeja para migas en el horno.
d. Elementos de calefacción: NO limpie los elementos de calefacción ya que se limpian por sí solos.
MANTENIMIENTO Y ALMACENAMIENTO
• Rearme el producto antes de guardarlo.
• Almacene el producto en un lugar seco y fresco.
Page 30

30
Problema Causas posibles Soluciones
No funciona o no se
enciende.
- No hay energía
- Activación de la perilla
de control del
temporizador
- Daños durante el
transporte o instalación
inadecuada
- Verifique que el horno para pizza esté enchufado.
- Verifique el fusible/disyuntor eléctrico del hogar.
- Gire la perilla de control del temporizador hasta pasada la marca de
10 minutos. Para tiempos de cocción inferiores a 10 minutos,
primero gire la perilla del temporizador hasta pasada la marca de 10
minutos, y luego gire en sentido contrario a las agujas del reloj hasta
el tiempo deseado.
- Consulte “Garantía limitada” en la pág. 31 de este manual del usuario.
La pizza no se cocina
uniformemente.
- Seleccione el ajuste
de calentamiento
correcto para el tipo
de pizza que se usa
- Distribución de los
ingredientes de la pizza
- Si se cocina la parte inferior de la pizza y la superior no o viceversa,
el ajuste de calentamiento seleccionado podría ser incorrecto para
ese tipo de pizza. Consulte la tabla de cocción en el dorso de la caja
de la pizza o la guía de cocción recomendada por este manual del
usuario. La mayoría de las pizzas se deben cocinar con el ajuste doble
por al menos una parte del tiempo de cocción.
- También es posible que los ingredientes de la pizza no estén distribui
dos uniformemente. De ser así, permita que la pizza se cocine un poco
y luego redistribuya los ingredientes con un tenedor. Esto permitirá
que la pizza se cocine más uniformemente.
No pasa nada cuando
intento dorar la parte
superior o hacer
crujiente la masa por
varios minutos.
- El temporizador expiró.
- Activación de la perilla
de control del
temporizador
- Gire la perilla de control del temporizador hasta pasada la marca de
10 minutos al ajustar más minutos en el temporizador. Al seleccionar
un ajuste de diez minutos o inferior, SIEMPRE debe rotar la perilla
hasta pasada la marca de 10 minutos y luego regresar al tiempo
deseado.
Al cocinar pizza de
masa gruesa, a veces
la masa parece quedar
pastosa o que no
quede tan gruesa.
- No se siguieron los
ajustes de cocción
recomendados
- Tipo de ingredientes
de pizza utilizados
- Siga los ajustes de cocción recomendados: cocine pizzas de entre
9 y 12 pulgadas (23 y 35 cm) por aproximadamente 10 o 12 minutos
primero con el ajuste BOTTOM (
) y luego otros 10 o 12 minu
tos con el ajuste DUAL (
).
- La levadura en la masa de la pizza puede ya no estar activa. La altura
y la consistencia de la masa gruesa depende de las condiciones de
la levadura. La frescura, la temperatura del congelador, la caja y la
calidad de la masa son todos factores que contribuyen. En general,
se pueden garantizar resultados más consistentes con pizzas de mar
cas nacionales, ya que tienden a cumplir con normas de embalaje y
calidad más rigurosas que muchas otras pizzas regionales/de
tiendas.
SOLUCIÓN DE PROBLEMAS
Page 31

31
GARANTÍA LIMITADA
MC Appliance Corporation garantiza que todas las Horno para pizza carecen de defectos en el material y la mano de obra y acuerda
solucionar cualquiera de estos defectos o instalar la(s) parte(s) nueva(s) (a elección de la compañía) en caso de que la unidad haya
fallado durante el periodo de garantía. Las partes y gastos de reparación están cubiertos en esta unidad por un periodo de un año a
partir de la fecha de compra. Es necesario presentar una copia del recibo o factura de compra con fecha para obtener los servicios
de la garantía, el reemplazo o el reembolso.
Esta garantía cubre los aparatos que se usen dentro de los Estados Unidos contiguos, Alaska, Hawái y Puerto Rico. La garantía no
cubre lo siguiente:
• Daños debido al daño del envío o a la instalación incorrecta.
• Daños debido al mal uso o abuso.
• Pérdidas de contenido debido a falla de la unidad.
• Las reparaciones se realizaron por los agentes desautorizados del servicio.
• Llamadas de servicio que no implican defectos en material y la ejecución tal como instrucción en el uso apropiado
del producto o de la instalación incorrecta.
• Reemplazo o reajuste de los fusibles o de los interruptores de la casa.
• Falla de este producto si se usa con fines distintos a los que fue diseñado.
• Costes de la disposición de unidades falladas no vueltas a nuestra fábrica.
• Todos los gastos de entrega/instalación incurridos como resultado de una unidad que no cumple con lo especificado.
• Gastos de viajes y el transporte de los productos principales de servicio si su aparato está situado en una zona remota
donde el servicio por un técnico de servicio no está disponible.
• La remoción y reinstalación de su gran aparato, si está instalado en un lugar inaccesible o no está instalado de
conformidad con las instrucciones de instalación publicadas.
• Restituciones por productos no reparables se limita al precio pagado por la unidad por el recibo de compra.
• Esta garantía es intransferible. Esta garantía es válida exclusivamente para el comprador original y no se extiende a
ningún otro propietario o propietarios subsiguientes.
Limitaciones de remedios y exclusiones:
La reparación del producto de acuerdo con los términos de este documento, es el único y exclusivo remedio determinado en
esta garantía limitada. Todas y cada una de las garantías implicadas, incluyendo la calidad de comerciable y capacidad para un
propósito particular, se limitan mediante la presente a un año o el periodo más corto permitido por la ley. MC Appliance
Corporation no es responsable por daños incidentales ni resultantes y ningún representante o persona alguna están autorizados
para asumir de parte nuestra ninguna otra responsabilidad en relación con la venta de este producto. Bajo ninguna circunstancia
se le permite al consumidor regresar esta unidad a la fábrica sin consentimiento previo por escrito de MC Appliance Corporation.
Algunos estados prohíben la exclusión o limitación por daños incidentales o resultantes, o limitaciones en las garantías implícitas.
Esta garantía le otorga a usted derechos legales específicos, y usted puede también tener otros derechos que varían según la
entidad federa!va donde se encuentre.
Modelo Piezas Trabajo Tipo de servicio
HQPZO13ST Uno año Uno año Lleve adentro
HQPZO13ST Uno año Uno año Lleve adentro
HQPZO13ST Uno año Uno año Lleve adentro
Para servicio o asistencia, llame por favor al 888-775-0202. O visítenos en www.mcappliance.com para solicitar el servicio de
garantía o repuestos.
Page 32

32
CNA International, Inc. realiza negocios bajo el nombre de MC Appliance
Corporation. Derechos reservados.
El logotipo Magic Chef® es una marca registrada de CNA International, Inc.
www.mcappliance.com Impreso en China
 Loading...