

Page 1
4.3 CU.FT. REFRIGERATOR
INSTRUCTION MANUAL
Model No.: HMBR445WE
HMBR445BE
HMBR445SE
To ensure proper use of this appliance and your safety, please read the
following instructions completely before operating this appliance.
Page 2

1
Product Registration Copy
Thank you for purchasing a Magic Chef product. The first step in protecting your
new product is to complete the product registration form on our website at
www.mcappliance.com/register .The benefits of registering your product
include the following.
1. Registering your product will allow us to contact you regarding a safety
notification or product update.
2. In the event that warranty service is required, registering your product w
allow for more efficient warranty service processing.
3. In the event of an insurance loss registering your product could act as
your proof of purchase.
Once again thank you for purchasing a Magic Chef product.
Page 3

2
TABLE OF CONTENTS
NAMES OF THE PARTS+++++++++++++++++++++ 3
SPECIFICATIONS+++++++++++++++++++++++.. 3
IMPORTANT SAFETY INSTRUCTIONS++++++++++.++++ 4
INSTALLATION INSTRUCTION
BEFORE USING YOUR REFRIGERATOR +++++++++... 4
INSTALLING YOUR REFRIGERATOR +++++++++..++ 4
ELECTRICAL CONNECTION++++++++++++++++ 5
OPERATING YOUR REFRIGERATOR
TEMPERATURE CONTROL++++++++++++++++.. 6
ICE TRAY++++++++++++++++..++++++++ 6
THE CHILLER COMPARTMENT+++++++++++..+++. 6
HOW TO DEFROST +++++++++++++++++..++. 6
HOW TO CHANGE THE INTERIOR LIGHT+...++++++++ 7
CHANGING THE REVERSIBLE DOOR ++++++++++++++.. 8 - 9
CARE AND MAINTENANCE
CLEANING YOUR REFRIGERATOR+++++++++++++ 10
VACATION TIME+++++++++++++++++.++++. 10
MOVING YOUR REFRIGERATOR++++++++++++++ 10
ENERGY SAVING TIPS++++++++++++++.++++. 10
TROUBLESHOOTING GUIDE++++++++++++.+++.+++. 11 - 12
REFRIGERATOR WARRANTY+++++++++.+++++.++++ 13
Page 4

3
NAMES OF THE PARTS
Width
Height
Depth
MODEL NO. HMBR445WE/HMBR445BE/HMBR445SE
(1) Evaporator
(2) Drain Pan
(3) Temperature Control Box
(4) Shelves
(5) Door Liner
(6) Ice Cube Tray
(7) Rack
(8) Bottle Rack
(9) Crisper
(10) Can Dispenser
(11) Temperature Control Dial
(12) Interior Light Switch
WARNING
compartment with wet hands as this could result in frost bite.
: Never touch the interior of the Freezer Chamber or frozen foods in the
SPECIFICATIONS
Model #
HMBR445WE/HMBR445BE/HMBR445SE
Product Description
Model No.
Capacity
Unit Dimensions
( inches )
Net Weight ( lbs)
Magic Chef Refrigerator
HMBR445WE/HMBR445BE/HMBR445WE
18.9”
4.3 Cu. Ft.
32.91”
55 ( lbs )
21.1”
Page 5

4
IMPORTANT SAFETY INSTRUCTIONS
follow these basic precautions:
WARNING
• Read all instructions before using the refrigerator.
• DANGER or WARNING: Risk of child entrapment.
• To avoid the possibility of child entrapment, please take the following precautions
before throwing out the refrigerator.
- Remove all doors from the unit.
- Leave the shelves in place so that children may not easily climb inside.
• Never allow children to operate, play with, or crawl inside the refrigerator.
• Refrigerants: All refrigeration products contain refrigerants, which under the
guidelines of federal law must be removed before disposal of product. It is the
consumer’s responsibility to comply with federal and local regulations when
disposing of this product.
• Never clean refrigerator parts with flammable fluids. The fumes can create a fire
hazard or explosion.
• Do not store or use gasoline or any other flammable vapors and liquids in the vicinity
of this or any other refrigerator. The fumes can create a fire hazard or an explosion.
-Save these instructions-
To reduce the risk of fire, electrical shock,
or injury when using your refrigerator,
INSTALLATION INSTRUCTIONS
Before Using Your Refrigerator
• Remove the exterior and interior packing.
• Before connecting the refrigerator to the power source, let it stand upright for approximately 4
hours. This will reduce the possibility of a malfunction in the cooling system from improper
handling during transportation.
• Clean the interior surface with lukewarm water using a soft cloth. (Cleaning instruction on page 9)
Installing Your Refrigerator
• This appliance is designed to be free standing only, and should not be recessed or built-in.
• Place your refrigerator on a floor that is strong enough to support the refrigerator when it is fully
loaded.
• Allow 5 inches of space between the back and sides of the refrigerator, which allows the proper
air ventilation. Adjust the feet to keep the refrigerator level.
• Locate the refrigerator away from direct sunlight and sources of heat (stove, heater, radiator,
etc.). Direct sunlight may affect the acrylic coating and heat sources may increase electrical
consumption. Ambient temperature below 50°F (10°C) or above 85°F (29.4°C) will hinder the
performance of this appliance. This unit is not designed for use in a garage or any other
outside installation.
• Avoid locating the refrigerator in moist areas.
• Plug the refrigerator into dedicated, properly installed-grounded wall outlet. Do not under any
circumstances cut or remove the third (ground) prong from the power cord. Any questions
concerning power and/or grounding should be directed toward a certified electrician or an
authorized service center. This unit is not designed to be installed in an RV or used with an
inverter.
• After plugging the appliance into a wall outlet, turn the unit on and allow the unit to cool down for
2~3 hours under before placing food in the refrigerator or freezer compartment.
Page 6

5
Electrical Connection
Improper use of the grounded plug can result in the risk of electrical shock. If the power cord is
damaged, have it replaced by an authorized service center.
WARNING
This refrigerator should be properly grounded for your safety. The power cord of this refrigerator is
equipped with a three-prong plug which mates with standard three prong wall outlets to minimize the
possibility of electrical shock.
Do not, under any circumstances, cut or remove the third ground prong from the power cord supplied.
This refrigerator requires a standard 115/120 Volt A.C. ~/60Hz electrical outlet with three-prong
ground.
This refrigerator is not designed to be used with an inverter.
The cord should be secured behind the refrigerator and not left exposed or dangling to prevent
accidental injury.
Never unplug the refrigerator by pulling the power cord. Always grip the plug firmly and pull straight
out from the receptacle.
Do not use an extension cord with this appliance. If the power cord is too short, have a qualified
electrician or service technician install an outlet near the appliance. Use of an extension cord can
negatively affect the performance of the unit.
If any problems with the appliance persist, please contact our Customer Service Dept. to consult with
a representative at 888 775-0202 or visit our website to request warranty service at
www.mcappliance.com.
Page 7
6
OPERATING YOUR REFRIGERATOR
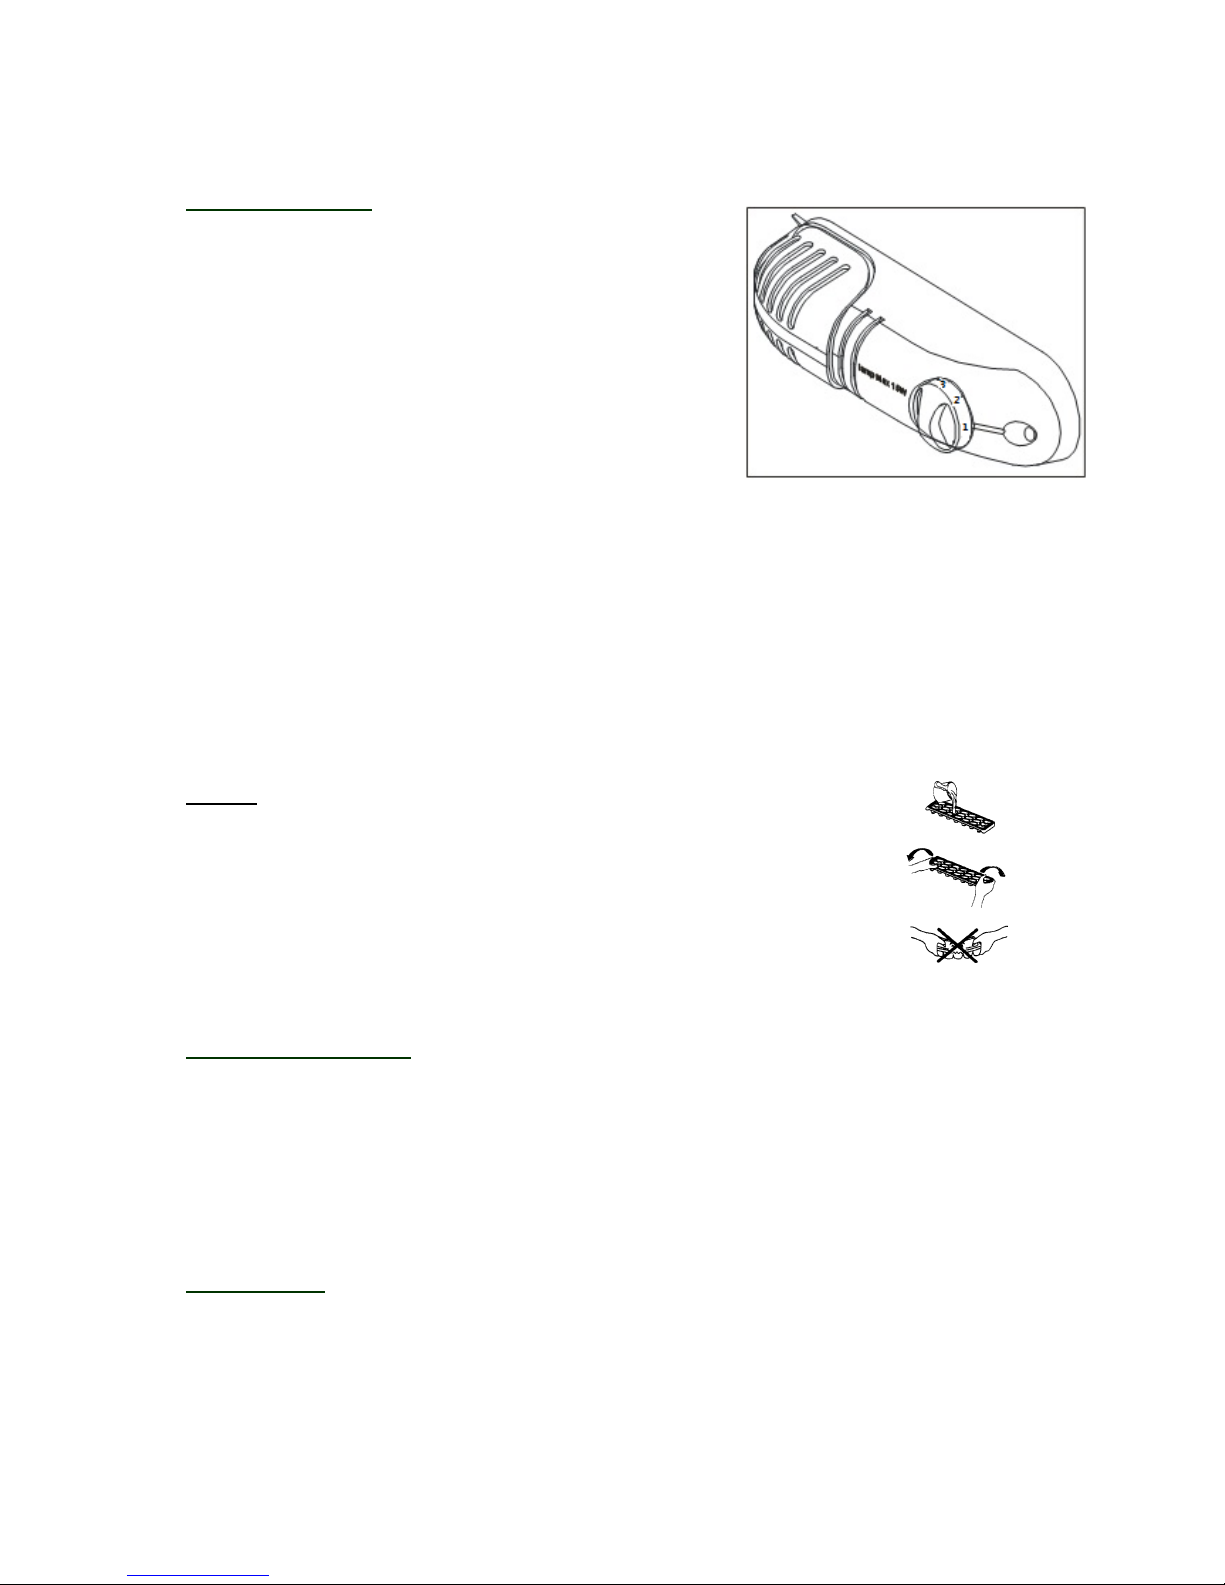
Temperature Control
• Your refrigerator has one control for regulating the
temperature. The temperature control is located on the
upper right hand corner of the interior compartment.
• The first time you turn the unit on, adjust the temperature
control knob to “7” and run for at least 2 hours before putting
foods inside. This will ensure the cabinet is thoroughly
chilled before food is put in.
• The range of the refrigerator temperature control is from
position "1" to "7". Adjust the temperature control to the
setting that best suits your needs. The setting of “4” should
be appropriate for home or office refrigerator use.
• NOTE;
• If the unit is unplugged, loses power; you must wait 3 to 5 minutes before restarting the
unit. If you attempt to restart before this time delay, the refrigerator will not start.
• Large amounts of food will lower the cooling efficiency of the appliance.
• Do not place the foods on the air outlet, and leave spaces for airflow.
• If you choose to change the thermostat setting, adjust thermostat control by one
increment at a time. Allow several hours for temperature to stabilize between
adjustments.
Ice Tray
• Recommended temperature control setting for ice making is “7”.
• Fill the ice cube tray (2/3 capacity) with cold water and place the tray on the
bottom of the chiller compartment to freeze properly.
• To eject the ice cubes from the tray, place over the ice bucket and twist
slightly.
• Re-set the temperature control to setting “4”.
The Chiller Compartment
• This compartment is designed for the ice making and short-term storage of some commercially
frozen foods.
• The temperature of the chiller compartment may not reach temperature low enough to store
frozen foods and works well when the food is already frozen prior to storage.
• Place frozen food into the freezer as quickly as possible after purchase. If there are instructions
on the packet, carefully follow these instructions regarding storage times.
How To Defrost
Defrost the freezer compartment when the ice / frost is approximately ¼” thick. Set the thermostat
dial to “0” to defrost. Remove all contents from the freezer compartment. Leave the freezer door
open to allow accumulated ice / frost to melt. Remove large pieces of ice as needed. Do not use hot
water or other electric heating devices to melt the accumulated ice. After defrosting, remove
accumulated ice / water and wipe the freezer compartment dry with a soft cloth. Restart the unit per
starting instructions.
Page 8

7
How To Change the interior light
NOTE: All parts removed must be saved to do the reinstallation of the light bulb. Before removing the
light bulb, unplug the appliance from the power supply. Failure to do so could result in electrical shock
or personal injury.
1. Hold the lamp cover and push toward inside of the cabinet
2. Remove the lamp cover.
3. Unscrew the old bulb and install the new bulb.
4. Re-install the lamp cover.
Page 9

8
CHANGING THE REVERSIBLE DOOR
CAUTION: To avoid personal injury to yourself and/or property, we recommend someone
assist you during the door reversal process.
Your refrigerator is built with a reversible door. You have the choice of either opening it from the left
or the right side. In order to reserve the opening direction of your door, please follow these simple
instructions:
1. Remove the hinge cover on the right top of the
cabinet.
2. Remove the two screws (using a ratchet tool
with a 7/16” socket) that hold the top hinge to
the cabinet. Keep these screws for later use.
3. Lift the top hinge straight up to free the pin from
the socket on the top of the door.
4. Lift the door and place it on a padded surface to
prevent scratching it.
5. Remove the plug buttons from the upper left
holes as illustrated and transfer them to the
uncovered holes at the right side. Be sure to
press the plug buttons firmly into the holes.
Page 10

9
6. Lay the cabinet on its side down on the floor.
Remove the three screws that hold the bottom
hinge to the cabinet using a 7/16” socket. Keep
these screws and washer for later use.
7. Insert the bottom hinge at the left side using the
two screws previously removed in step 6.
NOTE: Do not tighten screws.
8. Stand the cabinet.
9. Replace the door making sure the bottom
socket enters the bottom hinge pin. Be sure
washer is in place.
10. While holding the door in the closed position,
secure the top hinge at the left side using the
two screws previously removed at the
beginning in step 2. Do not tighten the screws
until the top of the door is leveled with the top
cabinet.
11. Replace the hinge cover.
12. Replace plugs.
13. Tools Required:
- 7/16” socket-ratchet.
- Putty knife or thin-blade screwdriver.
Page 11

10
CARE AND MAINTENANCE
Cleaning Your Refrigerator
• Upon installation of your new appliance, it is recommended that it be cleaned thoroughly.
• Turn the temperature control knob to “0” and then unplug the unit from the wall outlet.
• Remove all food content.
• Wash the inside with a damp warm cloth soaked in lukewarm water and baking soda solution.
The solution should be about 2 tablespoons of baking soda to a quart of water.
• Be sure to keep the door gasket (seal) clean to keep the unit running efficiently.
• The outside of the refrigerator should be cleaned with mild detergent and warm water.
• Dry the interior and exterior with a soft cloth.
Vacation Time
• Turn the temperature control knob to “0” and then unplug the unit from the wall outlet.
• Remove all the food.
• Clean the refrigerator.
• Leave the door open slightly to avoid possible formation of condensation, mold, or odor.
• Use extreme caution in the case of children. The unit should not be accessible to child’s play.
• Short vacations: Leave the refrigerator operating during vacations of less than three weeks.
• Long vacations: If the appliance will not be used for several months, remove all food and unplug
the power cord. Clean and dry the interior thoroughly. To prevent odor and mold growth, leave
the door open slightly: blocking it open if necessary or have the door removed.
Moving Your Refrigerator
• Turn the temperature control knob to “0” and then unplug the unit from the wall outlet.
• Remove all the food.
• Securely tape down all loose items inside your refrigerator.
• Tape the doors shut.
• Be sure the refrigerator stays in the upright position during transportation.
Energy Saving Tips
• The refrigerator should be located in the coolest area of the room, away from heat producing
appliances or heating ducts, and out of the direct sunlight.
• Let hot foods cool to room temperature before placing in the refrigerator. Overloading the
refrigerator forces the compressor to run longer. Foods that freeze too slowly may lose quality, or
spoil.
• Be sure to wrap foods properly, and wipe containers dry before placing them in the refrigerator.
This cuts down on frost build-up inside the refrigerator.
• Organize and label food to reduce door openings and extended searches. Remove as many
items as needed at one time, and close the door as soon as possible.
Page 12

11
TROUBLESHOOTING GUIDE
PROBL
EM POSSIBLE CAUSE
You can solve many common refrigerator problems easily, saving you the cost of a possible
service call. Try the suggestions below to see if you can solve the problem before calling for
service.
Refrigerator does not operate.
Compressor turns on and off frequently. The room temperature is hotter than normal.
Temperature inside the refrigerator is too warm. Temperature control is set too warm. Turn the
Temperature inside the refrigerator is too cold. Temperature control is set too cold. Turn the
Temperature of external refrigerator surface is
warm.
Popping or cracking sound when compressor
comes on.
Bubbling or gurgling sound, like water boiling. Refrigerant (used to cool refrigerator) is
Vibrations.
Not plugged in.
The circuit breaker tripped or a blown fuse.
A large amount of food has been added to the
refrigerator.
The door is opened too often.
The door is not closed completely.
The temperature control is not set correctly.
The door gasket does not seal properly.
The refrigerator does not have the correct
clearances.
The refrigerator has recently been disconnected
for a period of time. 4 hours are required for the
refrigerator to cool down completely.
control to a cooler setting and allow several hours
for the temperature to stabilize.
Door is kept open too long or is opened too
frequently. Warm air enters the refrigerator every
time the door is opened. Open the door less
often.
The door is not closed completely.
The door gasket does not seal properly.
A large amount of warm or hot food might have
been stored recently. Wait until the refrigerator
has had a chance to reach its selected
temperature.
The refrigerator has recently been disconnected
for a period of time. 4 hours are required for the
refrigerator to cool down completely.
control to a warmer setting and allow several
hours for the temperature to stabilize.
The exterior refrigerator walls can be as much as
30οF warmer than room temperature. This is
normal while the compressor works to transfer
heat from inside the refrigerator cabinet.
Metal parts undergo expansion and contraction,
as in hot water pipes. This is normal. Sound will
level off or disappear as refrigerator continues to
run.
circulating throughout the system. This is normal.
Check to assure that the refrigerator is on a level
surface.
Floor is uneven or weak. Refrigerator rocks on
the floor when it is moved slightly. Be sure floor
can adequately support refrigerator. Level the
refrigerator by putting wood or metal shims under
Page 13

12
part of the refrigerator.
The refrigerator is touching the wall. Re-level the
refrigerator and move it from the wall.
See “Installation Instructions”.
Moisture forms on inside refrigerator walls. Weather is hot and humid, which increases
internal rate of frost build-up. This is normal.
Door is slightly open.
Door is kept open too long, or is opened too
frequently. Open the door less often.
The door is not sealed properly.
Moisture forms on outside of refrigerator. Door is slightly open, causing cold air from inside
the refrigerator to meet warm moist air from
outside.
The door will not close properly. The refrigerator is not on a level surface.
The gasket is dirty.
Page 14

13
Refrigerator Warranty
Unless otherwise prohibited, MC Appliance Corporation warrants each new refrigerator to
be free from defects in material and workmanship and agrees to remedy any such defect or
to furnish a new part(s) (at the company’s option) for any part(s) of the unit that has failed
during the warranty period. Parts and labor expenses are covered on this unit for a period of
one year after the date of purchase. In addition, MC Appliance Corporation warrants the
compressor (parts only) to be free from defects in material and workmanship for a period of
5 years. The consumer is responsible for all labor and transportation expenses related to the
diagnosis and replacement of the compressor after the initial one-year warranty expires. A
copy of the dated sales receipt / invoice is required to receive warranty service or a
refund.
This warranty covers appliances in use within the continental United States, Puerto
Rico, and Hawaii. The warranty does not cover the following:
Damages due to shipping damage or improper installation.
Damages due to misuse or abuse.
Content losses due to failure of the unit.
Inside components such as door panels, door shelves, racks, light bulbs, etc.
Punctures to the evaporator system due to improper defrosting of the unit.
Repairs performed by unauthorized service agents.
Service calls that do not involve defects in material and workmanship such as
instruction on proper use of the product, door reversal or improper installation.
Replacement or resetting of house fuses or circuit breakers.
Failure of this product if used for other than for its intended purpose.
Disposal costs for any failed unit not returned to our factory.
Any delivery costs incurred as the result of a unit that fails to perform as specified.
Expenses for travel and transportation for product service if your appliance is located
in a remote area where service by an authorized service technician is not available.
The removal and reinstallation of your appliance if it is installed in an inaccessible
location or is not installed in accordance with published installation instructions.
Liability under this warranty is limited to repair, replacement or refund. If a
replacement unit is not available or the unit cannot be repaired, liability is limited to
the actual purchase price paid by the consumer.
This warranty is non-transferable.
This warranty applies only to the original purchaser and does not extend to any
subsequent owner(s).
This warranty is in lieu of all warranties expressed or implied and no representative or
person is authorized to assume for us any other liability in connection with the sale of
this product. Under no circumstances is the consumer permitted to return this unit to
the factory without prior written consent from MC Appliance Corporation.
Model Parts Labor Compressor Type of Service
HMBR445WE One-Year One-Year Five Years Carry-In
HMBR445BE One-Year One-Year Five Years Carry-In
HMBR445SE One-Year One-Year Five Years Carry-In
For Service or Assistance please call 888 775-0202. Or visit us on the web at
www.mcappliance.com to request warranty service.
(Part Only)
Page 15

REFRIGERADOR De 4.3 PIES CÚBICOS
MANUAL DE INSTRUCCIONES
Modelo Nº: HMBR445WE
HMBR445BE
HMBR445SE
Para asegurar el uso apropiado de este aparato y su seguridad, leyó por favor
las instrucciones siguientes completamente antes de operar este aparato.
Page 16

1
Copia de Registración Del Producto
Gracias por comprar el producto Magic Chef. El primer paso para proteger su nuevo
producto es completar la forma de registración en nuestra pagina Web
www.mcappliance/register. Los beneficios de registrar su producto incluyen lo
siguiente.
1. Al registrar su producto nos permite contactarle para notificarle de un cambio
de seguridad o actualización del producto.
2. Si llegara a necesitar servicio bajo garantía, registrando su producto nos
permite ser más eficiente en procesar el servicio.
3. En el evento que usted tenga una perdida que esta cubierto por un seguro,
registrando su producto puede servir como prueba de su compra.
Una vez más gracias por comprar un producto marca Magic Chef.
Page 17

2
INDICE DE MATERIAS
EL NOMBRE DE LAS PARTS 3
ESPECIFICATIONES.. 3
LAS INSTRUCCIONES IMPORTANTES DE LA SEGURIDAD … 4
INSTRUCCIONES DE INSTALACIÓN
ANTES DE UTILIZAR SU APARATO ... 4
INSTALACIÓN DE SU REFRIGERADOR.. 4
CONEXIÓN ELÉCTRICA 5
OPERAR EL REFRIGERADOR
CONTROL DE TEMPERATURA.. 6
CUBITERA.. 6
EL COMPARTIMIENTO REFRIGERADO. 6
CÓMO DESHELAR... 6
CAMBIO DE LA BOMBILLA DE LUZ 7
CAMBIAR LAS PUERTAS REVERSIBLES . .8 - 9
CUIDE Y LA CONSERVACIÓN
PARA LIMPIAR SU APARATO....................................... 10
EN LAS VACACIONES .... 10
PARA CAMBIAR DE LUGAR SU APARATO............................. 10
RECOMENDACIONES PARA AHORRAR ENERGÍA. 10
GUÍA DE RESOLUCIÓN DE PROBLEMAS11-12
GARANTIA DE APARATO ........................................................................ 13
Page 18

3
EL NOMBRE DE LAS PARTS
MODEL NO. HMBR445WE/HMBR445BE/HMBR445SE
(1) Evaporador
(2) Bandeja colectora
(3) Caja de control de temperatura
(4) Estante
(5) Revestimiento interno de la puerta
(6) Bandeja de hielo
(7) Rejilla
(8) Estante para botellas
(9) Cajón para verduras y frutas
(10) Compartimiento para latas
(11) Dial de control de temperatura
(12) Interruptor de la luz interior
ADVERTENCIA
congelados en el compartimiento con manos mojadas como esto
podría tener como resultado cubre de escarcha la mordedura.
: Nunca toque el interior de la Cámara del Congelador ni alimentos
ESPECIFICATIONES
Modelo #
HMBR445WE/HMBR445BE/HMBR445SE
Descripción Del Producto REFRIGERADOR MAGIC CHEF
No Modelo HMBR445WE / HMBR445BE / HMBR445SE
Capacidad 4.3 Cu. Ft.
Dimensiones
( pulgadas) de unidad
Peso neto ( lbs ) 55( lbs )
Anchura Altura Profundidad
18.89” 32.91” 21.1”
Page 19

4
LAS INSTRUCCIONES IMPORTANTES DE LA
SEGURIDAD
Para reducir el riesgo de incendios, golpes
ADVERTENCIA
• Lea atentamente todas las instrucciones antes de usar el aparato.
• El PELIGRO o ADVIRTIENDO: Riesgo de que los niños queden atrapados.
• Para evitar este riesgo, sírvase observar las siguientes recomendaciones antes de
lanzar fuera del aparato.
- Retire la tapa del aparato.
- Deje los estantes en lugar de modo que los niños no puedan subir fácilmente
adentro.
• No deje que los niños usen el aparato, jueguen con él o se introduzcan en el interior.
• Refrigerantes: Todos los productos de la refrigeración contienen los refrigerantes,
que debajo de las pautas de la ley federal se deben quitar antes de la disposición
del producto. Es la responsabilidad del consumidor conformarse con regulaciones
federales y locales al disponer de este producto.
• No limpie las partes del aparato con productos inflamables. Los vapores pueden
originar un incendio o explosión.
• No almacene ni use gasolina ni ningún otro gas o líquido inflamable cuando se
encuentre cerca de este aparato u otro. Los vapores pueden originar un incendio o
explosión.
-Excepto estas instrucciones-
de corriente o lesiones cuando utilice su
aparato, sírvase tener en cuenta las
siguientes recomendaciones básicas:
INSTRUCCIONES DE INSTALACIÓN
ANTES DE UTILIZAR SU APARATO
• Retire el material de embalaje del exterior e interior.
• Antes de conectar el Refrigerador a la fuente de alimentación, déjelo en posición vertical durante
4 horas aproximadamente. De esta forma, se reducirá la posibilidad de mal funcionamiento del
sistema de refrigeración debido a manipulación incorrecta durante el traslado.
• Limpie la superficie interior con agua tibia y paño suave. (Limpiando la instrucción en la página 9)
INSTALAR EL REFRIGERADOR
• Este electrodoméstico está diseñado para funcionar apoyado sobre el piso y no debe empotrarse
ni embutirse en la pared.
• Coloque el Refrigerador sobre un piso que sea lo suficientemente resistente como para sostener
el peso del electrodoméstico cuando esté cargado.
• Deje el Refrigerador separado 5 pulgadas de las paredes atrás y de los costados para que haya
buena circulación de aire. Ajuste los pies para mantener el refrigerador llano.
• Ubique el Refrigerador fuera de la luz directa del sol y otras fuentes de calor (horno, calentador,
radiador, etc.). La luz directa del sol puede afectar la cubierta de acrílico y las fuentes de calor
pueden aumentar el consumo eléctrico. La temperatura ambiente debajo de 50°F (10°C) o sobre
85°F (29.4°C) obstaculizará el funcionamiento de esta aplicación. Esta unidad no se diseña
para el uso en un garage o ninguna otra instalación exterior.
Page 20

5
• No coloque el Refrigerador en ambientes húmedos.
• Enchufe el Refrigerador en un toma corriente con la debida descarga a tierra utilizado
exclusivamente para este aparato. No corte ni retire la tercera pata (descarga a tierra) del
enchufe bajo ninguna circunstancia. Cualquier duda relacionada con la red de electricidad y/o la
descarga a tierra debe resolverse con un electricista certificado o un centro de servicios
autorizado. Esta unidad no se diseña para ser instalada en un RV o para ser utilizada con
un inversor.
• Después de enchufar en el tomacorriente de pared, prende la unidad y permite la unidad enfríe
durante 2 ó 3 horas antes de colocar alimentos en el interior
CONEXIÓN ELÉCTRICA
El uso indebido de la descarga a tierra puede causar golpes de corriente. Si el cable de
alimentación está dañado, hágalo reemplazar con un service autorizado.
ADVERTENCIA
El aparato debe estar adecuadamente conectado a tierra para su seguridad. El cable de electricidad
de este electrodoméstico cuenta con un enchufe de tres patas apto para los tomacorrientes de pared
con tres patas para minimizar las posibilidades de golpes de corriente.
No corte ni retire la tercera pata de descarga a tierra del enchufe bajo ninguna circunstancia.
Este equipo debe conectarse a un toma corriente de tres patas con descarga a tierra instalado en
una red estándar de electricidad con corriente 115 Volt A.C. ~/60Hz.
Este aparato no se diseña para ser utilizado con un inversor.
El cable debe mantenerse recogido detrás del Aparato; no debe dejarse a la vista ni colgando para
prevenir accidentes.
No desenchufar tirando del cable. Tome el enchufe con firmeza y tire en dirección opuesta al
receptáculo.
No utilice prolongaciones para conectar este aparato. Si el cable es muy corto, llame a un electricista
o técnico calificado para que instale un toma corriente cerca del equipo. El uso de cables de
prolongación puede perjudicar el funcionamiento de la unidad.
Si persisten algunos problemas con la aplicación, entre en contacto con por favor nuestro
departamento del servicio de cliente para consultar con un representante en 888 775-0202 o visite
nuestro Web site para solicitar servicio de la garantía en www.mcappliance.com.
.
Page 21

6
OPERAR EL REFRIGERADOR
CONTROL DE TEMPERATURA
• La unidad tiene un control para regular la temperatura. El
control de la temperatura está situado en la esquina superior
de la mano derecha del compartimiento interior del
refrigerador.
• La primera vez que usted gira la unidad, ajuste la perilla del
control de la temperatura a "7" y funcione por por lo menos
2 horas antes de poner los alimentos congelados adentro.
De esta forma, el gabinete estará suficientemente
refrigerado antes de colocar los alimentos.
• Las temperaturas del control varían desde la posición "1", la
más baja, hasta "7", la más fría. Elija la temperatura más
conveniente para sus necesidades y fíjela en el control. La
posición “4“ debería ser la indicada para el uso en el hogar o
en la oficina
• NOTA;
• Si se desenchufa la unidad, pierde energía; usted debe esperar 3 a 5 minutos antes de
recomenzar la unidad. Si intenta volver a ponerla en funcionamiento antes de transcurrido ese
período, el Refrigerador no funcionará.
• Las grandes cantidades de alimentos disminuyen la capacidad de enfriamiento del aparato.
• No coloque los alimentos en el enchufe de aire, y deje los espacios para la circulación de aire.
• Si decide modificar el valor fijado en el termostato, ajústelo modificando de a un número por vez.
Cada vez que realiza un ajuste, deje pasar varias horas para que se estabilice la temperatura
CUBITERA
• Para la fabricación de hielo se recomienda fijar la perilla de control de
temperatura en la posición “7”.
• Llene la cubitera (2/3 de su capacidad) con agua fría y colóquela en la parte
inferior del compartimiento para que se congele.
• Para sacar los cubos de la cubitera, colóquela sobre el balde para cubos y
retuércela levemente.
Vuelva a fijar la perilla de control de temperatura en la posición “4”.
El COMPARTIMIENTO REFRIGERATO
• Este compartimiento está diseñado para la fabricación de hielo y para guardar transitoriamente
alimentos que se venden congelados.
• Es posible que el compartimiento no alcance temperaturas lo suficientemente bajas como para
que los alimentos se mantengan congelados en forma segura; funciona adecuadamente cuando
los alimentos ya están congelados antes de guardarse.
• Coloque los alimentos congelados en el freezer lo antes posible después de la compra. Si el
producto trae instrucciones en el envase, siga las recomendaciones sobre los plazos de
almacenamiento.
CÓMO DESHELAR
Deshiele el compartimiento del congelador cuando el hielo/cubre de escarcha es aproximadamente
Page 22

7
¼” grueso. Ponga la esfera de termostato a “0” deshelar. Quite todo contenido del compartimiento del
congelador. Salga la puerta del congelador abre para permitir hielo acumulado/cubre de escarcha
para fundirse. Quite los pedazos grandes de hielo necesitaron como. No utilice agua caliente ni otros
dispositivos eléctricos de calefacción para fundirse el hielo acumulado. Después que deshelar, quita
hielo acumulado/agua y enjuga el compartimiento del congelador seca con una tela suave. Vuelva a
encender la unidad por empezar las instrucciones
No utilice nunca cuchillos ni elementos de metal para retirar la escarcha del evaporador.
CAMBIO DE LA BOMBILLA DE LUZ
NOTA: Conservar todas las partes que retira para la reinstalación de la bombilla de luz. Antes de
quitar la bombilla de luz desenchufe el aparato del tomacorriente. Si no lo hace se puede provocar
un choque eléctrico o lesiones físicas.
1. Sostenga la cubierta de la lámpara y empuje hacia el interior del gabinete
2. Quite la cubierta de la lámpara.
3. Desenroscar la bombilla antigua e instalar la nueva bombilla.
4. Vuelva a instalar la cubierta de la lámpara.
.
Page 23

8
CAMBIAR LAS PUERTAS REVERSIBLES
PRECAUCIÓN: Para evitar daños corporales a se y/o a la característica, recomendamos a
alguien ayuda usted durante el proceso de la revocación de la puerta
Su refrigerador está construido con una puerta reversible. Usted tiene la opción de abrirla desde la
izquierda o desde la derecha. Con el fin de reservar el sentido de apertura de la puerta, siga estas
sencillas instrucciones:
1. Retire la cubierta de la bisagra del lado
derecho del gabinete.
2. Retire los dos tornillos (usando un trinquete
con cabeza de 7/16” ) que fijan la bisagra
superior al gabinete. Guarde los tornillos para
su uso posterior.
3. Levante la bisagra superior hasta liberar las
clavijas de la base que se encuentra en la
parte superior de la puerta.
4. Levante la puerta y colóquela sobre una
superficie acolchada para que no se dañe.
5. Retire los tapones de los orificios superiores
sobre la izquierda, como ilustra la figura, y
utilícelos para tapar los orificios del lado
derecho que quedaron destapados. Presione
bien los tapones para que queden firmes.
Page 24

9
6. Coloque el gabinete de costado sobre el
piso. Retire los tres tornillos que sostienen
la bisagra inferior del gabinete con un
trinquete de cabeza de 7/16”. Guarde los
tornillos y las arandelas para su uso
posterior
7. Inserte la bisagra inferior en el costado
izquierdo utilizando los dos tornillos que retiró
en el paso 6.
NOTA: No ajuste los tornillos.
8. Ponga el gabinete en posición vertical.
9. Vuelva a colocar la puerta asegurándose de
que la base inferior permita la entrada de la
clavija de la bisagra inferior. Asegúrese de
que la arandela esté bien colocada
10. Mientras sostiene la puerta cerrada, ajuste la
bisagra superior con los dos tornillos que
había sacado al comienzo, en el paso 2. No
ajuste los tornillos hasta que el borde superior
de la puerta esté nivelado con la parte
superior del gabinete.
11. Vuelva a colocar la cubierta de la bisagra.
.
12. Vuelva a colocar los tapones.
13. Herramientas necesarias:
- trinquete con cabeza de7/16” .
- Espátula para masilla o destornillador de
hoja delgada.
Page 25

10
CUIDE Y LA CONSERVACIÓN
PARA LIMPIAR SU APARATO
• Una vez finalizada la instalación, se recomienda una limpieza completa de la unidad.
• Dé vuelta apagado al aparato primero y después desenchufe la unidad del enchufe de pared.
• Quite todo el contenido.
• Limpie el interior con un paño humedecido en una solución de agua tibia y bicarbonato de soda.
La solución se prepara con aproximadamente 2 cucharadas de bicarbonato de soda y un cuarto
de agua.
• Recuerde mantener limpia la junta de la puerta (burlete) para que la unidad funcione
correctamente.
• La parte exterior del aparato se debe limpiar con una solución de agua tibia y detergente suave.
• Seque el interior y exterior con paño suave.
EN LAS VACACIONES
• Dé vuelta apagado al refrigerador primero y después desenchufe la unidad del enchufe de pared.
• Quite todo el contenido del alimento.
• Limpie el refrigerador.
• Deje la puerta apenas abierta para evitar la posible formación de condensación, moho u olores.
• Extreme los cuidados cuando haya niños. La unidad no debe ubicarse donde los niños puedan
jugar con ella.
• Vacaciones cortas: Deje el Refrigerador en funcionamiento durante los períodos de vacaciones
que no superen las tres semanas.
• Vacaciones largas: Si el electrodoméstico no se usa durante varios meses, retire todos los
alimentos y desconecte de la red de electricidad. Limpie y seque cuidadosamente el interior.
Para evitar la formación de olores y humedad, deje la puerta apenas abierta: si es necesario,
trábela para que se mantenga abierta o retire la puerta.
PARA CAMBIAR DE LUGAR SU APARATO
• Dé vuelta apagado al refrigerador primero y después desenchufe la unidad del enchufe de pared.
• Quite todo el contenido del alimento.
• Asegure con cinta adhesiva los elementos sueltos en el interior del Refrigerador.
• Asegure la puerta con cinta adhesiva.
• Verifique que el Refrigerador se mantenga en posición vertical durante el traslado.
RECOMENDACIONES PARA AHORRAR ENERGÍA
• El Refrigerador se debe ubicar en el lugar más fresco de la habitación, alejado de las fuentes de
calor y de caños de calefacción, y protegido de la luz del sol directa.
• Deje que los alimentos calientes se enfríen hasta llegar a la temperatura ambiente antes de
colocarlos en el Refrigerador. Si se coloca una cantidad excesiva de alimentos en el
Refrigerador, se fuerza el compresor a trabajar durante más tiempo. Los alimentos que tardan
mucho en congelarse pueden perder calidad o echarse a perder.
• Asegúrese de envolver los alimentos adecuadamente y seque los envases antes de ubicarlos en
el Refrigerador. Esto ayuda a reducir la formación de escarcha en el interior.
• Organice y etiquete los alimentos para reducir la cantidad de veces que abre la puerta y las
demoras de la búsqueda. Retire todos los elementos que necesita de una sola vez y cierre la
puerta lo antes posible.
Page 26

11
GUÍA DE RESOLUCIÓN DE PROBLEMAS
PROBLEMA
CAUSA POSIBLE
una gran cantidad de alimentos tibios o calientes.
Usted puede resolver muchos de los inconvenientes comunes que se producen con el
aparato y ahorrarse el costo de llamar al servicio de mantenimiento. Intente las sugerencias
a continuación para ver si puede resolver los problemas antes de llamar al service.
.
El Refrigerador no funciona.
El compresor se prende y se apaga con
frecuencia.
La temperatura del interior del Refrigerador es
muy elevada.
No está enchufado.
Se activó el corta corriente o se quemó un
fusible.
La temperatura ambiente es más elevada que lo
normal.
Se ha colocado gran cantidad de alimentos en el
Refrigerador.
La puerta se abre con mucha frecuencia.
La puerta no está completamente cerrada.
La temperatura fijada en el control no es la
correcta.
La junta de la puerta no ajusta lo necesario.
El Refrigerador no está lo suficientemente
alejado de las paredes que lo rodean.
El Refrigerador estuvo últimamente
desconectado durante un período de tiempo. Se
requieren 4 horas para que el Refrigerador se
enfríe completamente.
El control de temperatura está fijado a una
temperatura muy elevada. Fije el control a una
temperatura más baja y deje que la temperatura
se estabilice durante varias horas.
La puerta estuvo mucho tiempo abierta o se
abrió con mucha frecuencia. Cada vez que se
abre el Refrigerador entra aire caliente. Abra la
puerta con menos frecuencia.
La puerta no está completamente cerrada.
La junta de la puerta no ajusta lo suficiente.
Es posible que recientemente se haya guardado
La temperatura del interior del Refrigerador es
muy baja.
La temperatura del exterior del Refrigerador es
elevada.
Ruidos de explosiones o rajaduras cuando el
compresor empieza a funcionar.
Espere hasta que el Refrigerador haya tenido la
oportunidad de alcanzar la temperatura fijada.
El Refrigerador estuvo últimamente
desconectado durante un período de tiempo. Se
requieren 4 horas para que el Refrigerador se
enfríe completamente.
El control de temperatura está fijado a una
temperatura muy baja. Fije el control a una
temperatura más elevada y deje que la
temperatura se estabilice durante varias horas.
Las paredes externas pueden llegar a tener una
temperatura 30ºF por encima de la temperatura
ambiente. Esta situación es normal mientras el
compresor trabaja para sacar el calor del interior
del gabinete.
Las partes metálicas se expanden y contraen
como ocurre en las cañerías de agua caliente. Es
normal. Los ruidos se normalizarán o
Page 27

12
desaparecerán a medida que el Refrigerador siga
funcionando.
Ruidos burbujeantes parecidos al del agua
hirviendo.
Vibraciones. Verifique que el Refrigerador esté sobre una
Se forma humedad en las paredes interiores del
Refrigerador
Se forma humedad en las paredes externas del
Refrigerador
La puerta no cierra convenientemente. El Refrigerador no está en una superficie
El refrigerante (utilizado para enfriar el
Refrigerador) está circulando por el sistema. Es
normal.
superficie nivelada.
El piso está desparejo o no es fuerte. El
Refrigerador se balancea sobre el piso apenas
se lo toca. Verifique que el piso soporta
adecuadamente el Refrigerador. Nivele el
electrodoméstico poniendo cuñas de metal o
madera debajo del Refrigerador
El Refrigerador está tocando la pared. Vuelva a
nivelar y retirar de la pared.
Lea las "Instrucciones de instalación".
El tiempo está caluroso y húmedo, lo que
ocasiona la mayor acumulación de escarcha en
el interior. Es normal.
La puerta está apenas abierta.
La puerta está mucho tiempo abierta o se abre
con mucha frecuencia. Abra la puerta con
menos frecuencia.
La junta de la puerta no ajusta lo necesario.
La puerta está apenas abierta y el aire frío del
interior se combina con el aire tibio del exterior.
nivelada.
La junta está sucia.
Page 28

13
Salvo cuando se encuentre prohibido, MC Appliance Corp. autoriza cada refrigerador nuevo para
estar libre de defectos en material y la ejecución y acuerda remediar cualquier defecto o equipar un
nuevo part(s) (en la opción de las compañía) para cualquier part(s) de la unidad que ha fallado
durante el período de la garantía. Las piezas y los costos del trabajo se cubren en esta unidad por un
período de un año después de la fecha de la compra. Además MC Appliance Corp. autoriza el
compresor (piezas solamente) para estar libre de defectos en material y la ejecución por un período
de 5 años. El consumidor es responsable de todo el trabajo y los costos del transporte relacionados
con la diagnosis y el reemplazo del compresor después de las uno garantías inicial del año han
expirado. Si en el acontecimiento la unidad requiere el reemplazo o el reembolso bajo términos de
esta garantía el consumidor es responsable de todos los costos del transporte volver la unidad a
nuestra fábrica antes de recibir una unidad o un reembolso del reemplazo. Una copia de las ventas
anticuadas pone el recibo/factura se requiere para recibir servicio de la garantía o un
reembolso.
Esta garantía cubre aplicaciones en uso dentro de los Estados Unidos, del Puerto
Rico, y de la Hawaii continentals. La garantía no cubre el siguiente:
• Daños debido al daño del envío o a la instalación incorrecta.
• Daños debido al uso erróneo o al abuso.
• Pérdidas contentas debido a la falta de la unidad.
• Componentes interiores tales como paneles de la puerta, estantes de la puerta, estantes,
bombillas etc.
• Punturas al sistema del evaporador debido a la descongelación incorrecta de la unidad.
• Las reparaciones se realizaron por los agentes desautorizados del servicio.
• Llamadas de servicio que no implican defectos en material y la ejecución tal como
instrucción en el uso apropiado del producto, de la revocación de la puerta o de la
instalación incorrecta.
• Reemplazo o reajuste de los fusibles o de los interruptores de la casa.
• Falta de este producto si está utilizado para otro que su propósito previsto.
• Costes de la disposición de unidades falladas no vueltas a nuestra fábrica.
• Cualquier costos de la entrega contrajeron como el resultado de una unidad que falla de
realizar como specifed.
• Gastos de viajes y el transporte de los productos principales de servicio si su aparato
está situado en una zona remota donde el servicio por un técnico de servicio no está
disponible.
• La remoción y reinstalación de su gran aparato, si está instalado en un lugar inaccesible
o no está instalado de conformidad con las instrucciones de instalación publicadas.
• La responsabilidad bajo esta garantía se limita a reparar, reemplazar o realizar el
reembolso. Si no existe disponidbilidad de unidades para el reemplazo, o la unidad no
puede repararse, la responsabilidad está limitada al reintegro del precio de compra real
pagado por el consumidor.
• Esta garantía es intransferible.
•
Esta garantía es válida exclusivamente para el comprador original y no se extiende a
ningún otro propietario o propietarios subsiguientes.
Esta garantía está en lugar de todas las garantías expresadas o implicó y no se autoriza a
ningún representante o persona a asumir para nosotros ninguna otra responsabilidad en la
conexión con la venta de este producto. Bajo ningunas circunstancias está el consumidor
permitido para volver esta unidad a la fábrica sin consentimiento anteriormente escrito MC
Appliance Corp.
Modelo Piezas Trabajo Compresor Tipo de servicio
HMBR445WE Uno-Año Uno-Año Cinco- Años En Su Casa
HMBR445BE Uno-Año Uno-Año Cinco- Años En Su Casa
HMBR445SE Uno-Año Uno-Año Cinco- Años En Su Casa
Para el servicio o la ayuda llame por favor 888 775-0202 o visítenos en la tela en www.mcappliance .com para solicitar
servicio de la garantía.
GARANTIA DE APARATO
(Solamente partes)
 Loading...