

Page 1
GUIDE
For Future Assistance.. 1
Safety Instructions .... 1
Operating Steps .... 2-5
• Hot water ....... 2
• Rinse Aid ........ 2
• Detergent ........ 2
• Loading Tips ..... 3
• Cycles/Options ., 4
• Display Window .. 5
• Adding a
Forgotten Item .... 5
Care and Cleaning .... 5
Storing Your
Dishwasher ......... 5
What Can and Cannot
Be Washed ......... 6
Common Questions
and Answers ...... 7-8
Notes ............ 9-10
Warranty .... Back Page
Page 2

Congratulations on the purchase of your new dishwash- A, WARNING - Check with the installer to make sure
er! It is designed to handle virtually every dish you need the appliance has been properly grounded to avoid pos-
to do. For best results, we suggest reading this guide to sible electrical shock. Be sure you read the IMPORTANT
help you properly operate and maintain the appliance. PERSONAL SAFETY INSTRUCTIONS before you start to
use this dishwasher.
Please record your model and serial numbers in the
spaces provided below. These numbers can be found in In addition, keep your sales slip or cancelled check
the upper left corner of the tub opening. They are need- should any warranty service be required. Proof of origi-
ed for any correspondence or service calls concerning nal date of purchase is needed.
your dishwasher.
In our continuing effort to improve the quality of
Model Number our dishwashers, it may be necessary to make
changes to the appearance without revising this
guide.
Serial Number
Products with a ® label have been listed with 8. Be careful not to touch the heating element on the
Underwriter's Laboratories, Inc. - those with a CSA tag bottom of the tub during or at the completion of a
have been listed with Canadian Standards Association. cycle. It may be hot.
Nevertheless, as with any other equipment using elec- 9. Use only detergents and rinse additives designed for
tricity and moving parts, there is a potential hazard, an automatic dishwasher. Never use soap, laundry
detergent, or hand washing detergent in your dish-
washer. Keep these products out of reach of children.
10. Do not sit, stand on or abuse the door or dish racks
1. Read all instructions before using the dishwasher, of the dishwasher.
2. Use the dishwasher only for its intended function. 11. Under certain conditions, hydrogen gas may be pro-
duced in a hot water system that has not been used
3. Disconnect electrical power to dishwasher before for two weeks or more. Hydrogen gas is explo-
attempting to service, sive. If the hot water system has not been used for
4. To avoid electrical shock hazard, the sides and back such a period, turn on all hot water faucets and let
must be enclosed and the front panels must be the water flow from each for several minutes. This
attached before electrical power is applied to the dish- will release any accumulated hydrogen gas. As the
washer. Refer to the installation instructions for prop- gas is flammable, do not smoke or use an open flame
er grounding procedures, during this process.
5. Connect to a properly rated, protected and sized 12. Do not wash plastic items unless marked "dishwash-
power supply circuit to avoid electrical overload, er safe" or the equivalent. For plastic items not so
6. Children should never be permitted to operate, or play marked, check the manufacturer's recommendations.
in, with, or around this dishwasher. 13. Do not tamper with controls.
7. To reduce the risk of injury when loading items to be 14. Always remove the door to the washing compart-
washed, sharp or pointed items should be located with ment when removing an old dishwasher from service
the handles up. Also, load sharp items so they are not or discarding it.
likely to damage the door seal.
SAVE THESE INSTRUCTIONS
Page 3
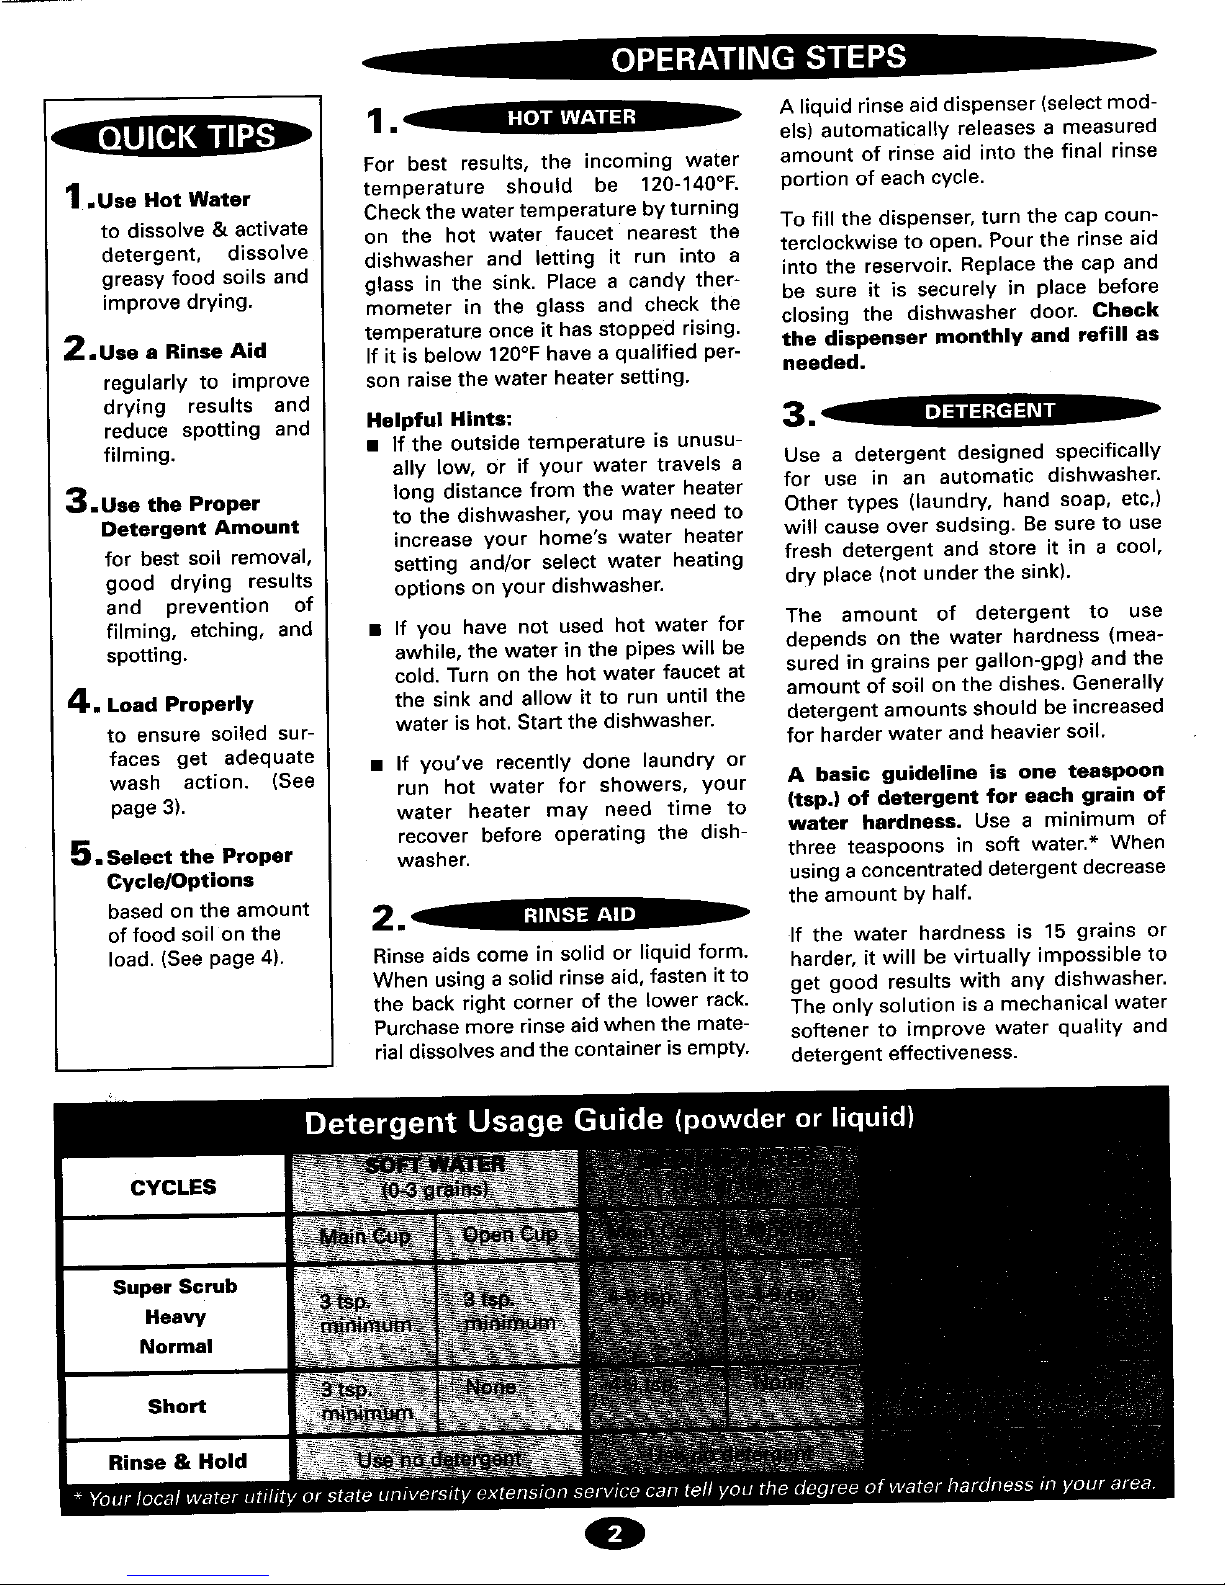
1 • e , . A liquid rinse aid dispenser (select mod-
els) automatical(y releases a measured
For best results, the incoming water amount of rinse aid into the final rinse
1.Use Hot Water temperature should be 120-140°F. portion of each cycle.
Check the water temperature by turning
to dissolve & activate on the hot water faucet nearest the To fill the dispenser, turn the cap coun-
detergent, dissolve dishwasher and letting it run into a terclockwise to open. Pour the rinse aid
greasy food soils and glass in the sink. Place a candy ther- into the reservoir. Replace the cap and
improve drying, mometer in the glass and check the be sure it is securely in place before
temperature once it has stopped rising, closing the dishwasher door. Check
the dispenser monthly and refill as
2.Use e Rinse Aid If it is below 120°F have a qualified per- needed.
regularly to improve son raise the water heater setting.
drying results and
reduce spotting and Helpful Hints:
filming. • If the outside temperature is unusu-
Use a detergent designed specifically
ally low, or if your water travels a
3.Use the Proper long distance from the water heater for use in an automatic dishwasher.
Detergent Amount to the dishwasher, you may need to Other types (laundry, hand soap, etc,)
increase your home's water heater will cause over sudsing. Be sure to use
for best soil removal, setting and/or select water heating fresh detergent and store it in a cool,
good drying results options on your dishwasher, dry place (not under the sink).
and prevention of
filming, etching, and • If you have not used hot water for The amount of detergent to use
spotting, awhile, the water in the pipes will be depends on the water hardness (mea-
cold. Turn on the hot water faucet at sured in grains per gallon-gpg) and the
4.Load Properly the sink and allow it to run until the amount of soil on the dishes. Generally
to ensure soiled sur- water is hot. Start the dishwasher, detergent amounts should be increased
for harder water and heavier soil.
faces get adequate • If you've recently done laundry or
wash action. (See run hot water for showers, your A basic guideline is one teaspoon
page 3). water heater may need time to (tsp.) of detergent for each grain of
recover before operating the dish- water hardness. Use a minimum of
5.Select the Proper washer, three teaspoons in soft water.* When
Cycle/Options using a concentrated detergent decrease
based on the amount the amount by half.
of food soil onthe If the water hardness is 15 grains or
load. (See page 4). Rinse aids come in solid or liquid form. harder, it will be virtually impossible to
When using a solid rinse aid, fasten it to
get good results with any dishwasher.
the back right corner of the lower rack, The only solution is a mechanical water
Purchase more rinse aid when the mate- softener to improve water quality and
rial dissolves and the container is empty, detergent effectiveness.
CYCLES
Super Scrub
Heavy
Normal
Short
Rinse & Hold
0
Page 4

4. . ,D • Bottom Back (Features vary slightly per model.)
Large items may be placed in any convenient location in
• Scrape off bones or large food particles. Remove this rack. Keep soiled surfaces facing the center.
excessive quantities of greasy/oily substances.
• Scrape or soak items with burnt on foods as they
require more energy than the rest of the load to clean.
• If connected to a food waste disposer, make certain the
disposer is empty before starting the dishwasher. This
allows proper draining.
• Mustard, mayonnaise, vinegar, lemon and other acidic
foods can cause rust or discoloration on stainless steel.
Rinse these pieces as soon as possible.
• Starch from foods like potatoes, pasta, rice and oat-
meal, require more energy to clean than the rest of the
load.
• Place all items in the racks so they are separated and
facing center.
The back of this rack accommodates a row of dinner
• Wedge flat, lightweight items next to the silverware plates or two rows of smaller plates. Serving bowls, pots
basket or along the sides and back of the racks, and pans also fit across the back of the rack.
• Load items so they do not rest over the wash tower. Small plates, saucers or shallow bowls may be loaded in
the elevated area behind the wash tower.
• Avoid blocking the upper and lower spray arms by not
allowing items to extend beyond the racks. Folding tines located on the right side, provide loading
• Place glasses in any row of the racks for proper clean- flexibi}ity for large--shaped items.
ing and rinsing. Do not load glasses over the tines.
Top Rack (Features vary slightly per model.)
This rack is designed to hold glasses, cups, small plates,
bowls, cookware, etc. Bowls fit securely in the back right
half of the top rack. Small plates or saucers should be
loaded with soiled surfaces facing the center of the rack.
_ i ' _ Removable Utensil Basket
_ _ Place flatware in the basket with
_J/'_ some handles up and some
_Wl_i_¢] _ down to prevent nesting.
,_=__/" _ Always load sharp or pointed
items with handles up.
0
Page 5

TEMP SANI I_ HEATED _ DELAY
• BOOST • HEAT "_ DRY U RESUME • OFF
Styling may differ depending on the model you selected.
Your dishwasher offers various cycles and options to DELAY/RESUME can delay or interrupt any wash cycle
adiust to specific load conditions. To start a cycle, simply from _hour to 9 hours.
press the desired cycle pad and close the door until it To set up a delay, first select the appropriate cycle and
latches. (Features may vary slightly depending on options for the load. Then, quickly press and hold the
your model.) Delay/Resume pad until the desired amount of delay
time appears in the display. The clock will count down
and the cycle will automatically start as soon as the delay
time expires.
If you wish to cancel the delay start simply press the
Delay/Resume pad again, The indicator light will go out
and the cycle will start immediately.
This pad can also be pressed to temporarily interrupt a
cycle. The cycle will resume from the point of interrup-
tion when the delay time runs out or when the
Delay/Resume pad is pressed again.
TEMP BOOST checks the main wash and final rinse
water temperatures and will extend the heating and
water circulation until proper water temperature is
reached. Heating Delay will light in the window when
selected. Press the pad again to cancel the option. See
Hot Water Section on page 2.
SANI HEAT turns the heating element on during all
wash and rinse portions of the cycle. It checks the main
wash and final rinse water temperatures and will extend
the heating and water circulation until proper water tem-
perature is reached. It also turns the heating element on
for a longer portion of the dry cycle. The Sani Heat light
will glow when the option is selected. Press the pad
again to cancel the option, (This option does not sanitize
the dishes.)
HEATED DRY improves drying results by turning the
heating element on during fan dry. A small indicator light
will glow when it is selected. Cancelling Heat Dry turns
the heating element off during the fan dry portion of the
cycle. Towel drying of some items may be necessary.
DRAIN/OFF Pressing the pad once will drain the dish-
washer and then turn it off. Pressing the pad twice will
turn it off without draining.
0
Page 6

Clean the control panel and front panels with a
lightly dampened cloth. Dry thoroughly. _o not use
abrasives or sharp objects on the panel. They can dam-
age it.
The inside normally takes care of itself.
Occasionally check the tub bottom for large food pieces
which may have collected. Periodically clean the edge of
the door liner and gasket if any food spills are noticed.
To remove any odor, try one of the following:
• Put baking soda in both cups. Select the normal cycle
HEATING DELAY glows to indicate that the cycle is
and let the water circulate for about 10 minutes.
being extended to heat the water to proper temperature, Unlatch the door and let it sit overnight, Then relatch
WASH light glows during all wash portions, the door and let the cycle finish.
RINSE light glows during all rinse portions. • Select the Normal cycle and let the dishwasher fill with
water. Then open the door and pour 1 cup of chlorine
DRY light glows during the entire dry period and goes
out when the cycle is completed, bleach into the bottom of the dishwasher. Latch the
door and let it cornp)ete the cycle.
CLEAN glows at the end of the dry cycle and remains
lit until the door has been open for 30 seconds continu- • Try a lemon scent detergent and/or rinse aid to help
ously, periodically freshen the dishwasher interior,
• Run the dishwasher more frequently. Use the Rinse &
Hold cycle (if available) to remove any food soil that
may cause an odor.
Heating Options
(Located on buttons on the left side of the panel.)
FAN DRY HEAT improves drying results by turning the
heating element on during a portion of fan dry.
FAN DRY AIR turns the heating element off during the fan If your dishwasher will be in storage or an unheated area
dry portion of the cycle. Towel drying of some items may exposed to freezing temperatures:
be necessary.
a Clean the dishwasher as explained in the Care and
Cleaning section.
• Operate the drain portion twice to ensure most of the
water is removed. Most dishwashers begin each cycle
with a drain.
• Disconnect the electrical supply and prop open the
door.
O
Page 7

Remember. It is the user's responsibility to determine if the item should be washed in a dishwasher.
Page 8

• •
Page 9

O. & A. CONTINUED
* Brand names are trademarks of the respective manufacturer.
Page 10

TO OBTAIN WARRANTY SERVICE
To locate an authorized service company in your area contact the Magic Chef dealer from whom your
appliance was purchased; or call Maytag Customer Service. Should you not receive satisfactory war-
ranty service, please contact:
Magic Chef Customer Assistance
c/o Maytag Customer Service
P.O. Box 2370
Cleveland, TN 37320-2370
1-800-688-1120
When contacting Maytag Customer Service be sure to provide the complete model and serial number
of your appliance, the name and address of the dealer from whom you purchased the appliance and the
date of purchase.
Should you still have a problem, write to Major Appliance Consumer Action Program, 20 North
Wacker Drive, Chicago, illinois 60606. MACAP is an industry sponsored but independent group of con-
sumer experts who receive and act on complaints from appliance owners.
NOTE: When writing about an unsolved service problem, please include the following information:
(a) Your name, address and telephone number;
(b) Model number and serial number (found on the upper left corner of the tub opening) of your
appliance;
(c) Name and address of your dealer and the date the appliance was purchased;
(d) A clear description of the problem you are having.
(e) Water hardness, detergent brand and amount, water temperature, and cycle used.
Form No, 210CMA Part No. 6 913730 JN Litho U. S.A.
 Loading...