

Page 1
Contents
Energy-saving tips ....................... 2 Help ushelp you...
Safety instructions ....................... 3
Before using your dishwasher,
Operatinginstructions.................. 4,5 read this book carefully.
Automatic Temp Boost ................... 6
How to test water ........................ 6 maintainyour new dishwasher properly.
Using a rinse agent ....................... 6 Keep it handy foranswers to your-
How to choose and use the right detergent ..... 6 questions.
How to prepare dishes for washing .......... 7 help...
HOWto load your dishwasher ............. 8, 9 Write (include your phone number):
What you can wash safely ................. 10 Service Center
The Problem Solver ................... 11-13 240 Edwards Street
Care and cleaning ....................... 14 Cleveland, TN 37311
It is designed to help you operate and
If you don't understand something or need more
Master Care, Inc.
How to change color panel ................ 15
If you need service ...................... 15 serial numbers.
Warranty ...................... Back Cover You'll fred them on a label just inside the
11,-,_ Q M_
Write down the model and
dishwasher door.
These numbers are also on the Consumer
Energy-saving tips Product Ownership Registration Card that came
with your dishwasher. Before sending in this
card, please write these numbers here:
• Operate the dishwasher only when it's full.
Let the dishes accumulate in the dishwasher.
When you put in only a partial load, use the Mode/Number
Rinse & Hold cycle torinse off heavy soils.
• If you don't need your dishes right away,use SerialNumber
your energy saving Cool Dry feature that turns Use these numbers in any correspondence or
the drying heater off automatically. Dishes dry service calls concerning your dishwasher.
naturally over a longer period such as overnight. If you received a damaged dishwasher,
• Always select the cycle that uses the least immediately contact the dealer (or builder) that
amount of water that will remove the soil sold you the dishwasher.
from the load. See pages 4 and 5.
Save time and money.
Before you call for service...
Check the Problem Solver (pages 11through 13).
It lists causes of minor operating problems that
you can conr, ct yourself.
2
Page 2
IMPORTANT SAFETY INSTRUCTIONS
Read all instructions before using this appliance.
WARNING--When using this • Loadfight plastic items so dishwasher, removethe door of
appliance, always exercise basic they will not become dislodged thewashing comparUnent.
safety precautions, including the and drop to the bottom of the • Keep all washing detergents
following: dishwasher--they might come and wetting agents out of the
• Use this appliance only for its and be damaged, leach of children, preferablyin
intended purpose as described a locked cabinet. Observe all
in this book. To minimize the possibility of warnings on container labels to
• This dishwasher must be injury, avoidpersonal injury.
properly installed and located • When loading itemsto be • HYDROGEN GAS is
in accordance with the washed: produced by the chemical action
In_dlation Instructions before A. Locate sharp items so that within yourwaterheater. It can
it is used. If you did not receive they are notlikely to damage accumulate in the waterheater
an Installation Instructions sheet the door seal, and and/orwater pipes if hot water
with your dishwasher you can has notbeen used for a period of
obtain one bycontacting the B. Load sharpknives with the twoweeks or longer.HYDROGEN
service location nearest you. handles up to reduce the risk of GAS IS EXPLOSIVE. Toprevent
--This appliance must be cut-type injuries, the possibility of damage or
connected to a grounded metal, • Do not touch the heating injury, if you have not used hot
permanent wiring system; or an element during or immediately water for two weeks or more, or
equipment-grounding conductor after use. move into a residence in which
must be runwith the circuit the hot water system may not
conductors and connected tothe dishwasher unless all enclosure turn on all hot water faucetsand
equipment-grounding terminal panels are properly in place, allow them to run for several
or lead of the appliance.
--Connect to a propedy rated, • Do not tamper with controls, minutes before using any
protected and sized power supply • Do not abuse, sit on, or stand connected to the hot water
circuitto avoidelectrical overload, on the door or dish rack of the system. This will allow any
• Use only powder or liquid dishwasher, hydrogen gas to escape. Also,
detergents or wetting agents • Close supervision is necessary since the gas is flammable, do
recommended for use in a if this appliance is used by or not smoke or use an open flame
dishwasher, near children. Do not allow or appliance during this process.
into contact with the heating unit
• Do not operate your have been used for some time,
electrical appliance which is
• Do not wash plastic items children to play inside, on or
unless marked "dishwasher with this appliance or any SAVE THF.SE
safe" or the equivalent. For discarded appliance. Dispose
plastic items not so marked, of discarded appliances and INSTRUCTIONS
check the manufacturer's shipping or packing material
recommendations, properly. Before discarding a
3
Page 3
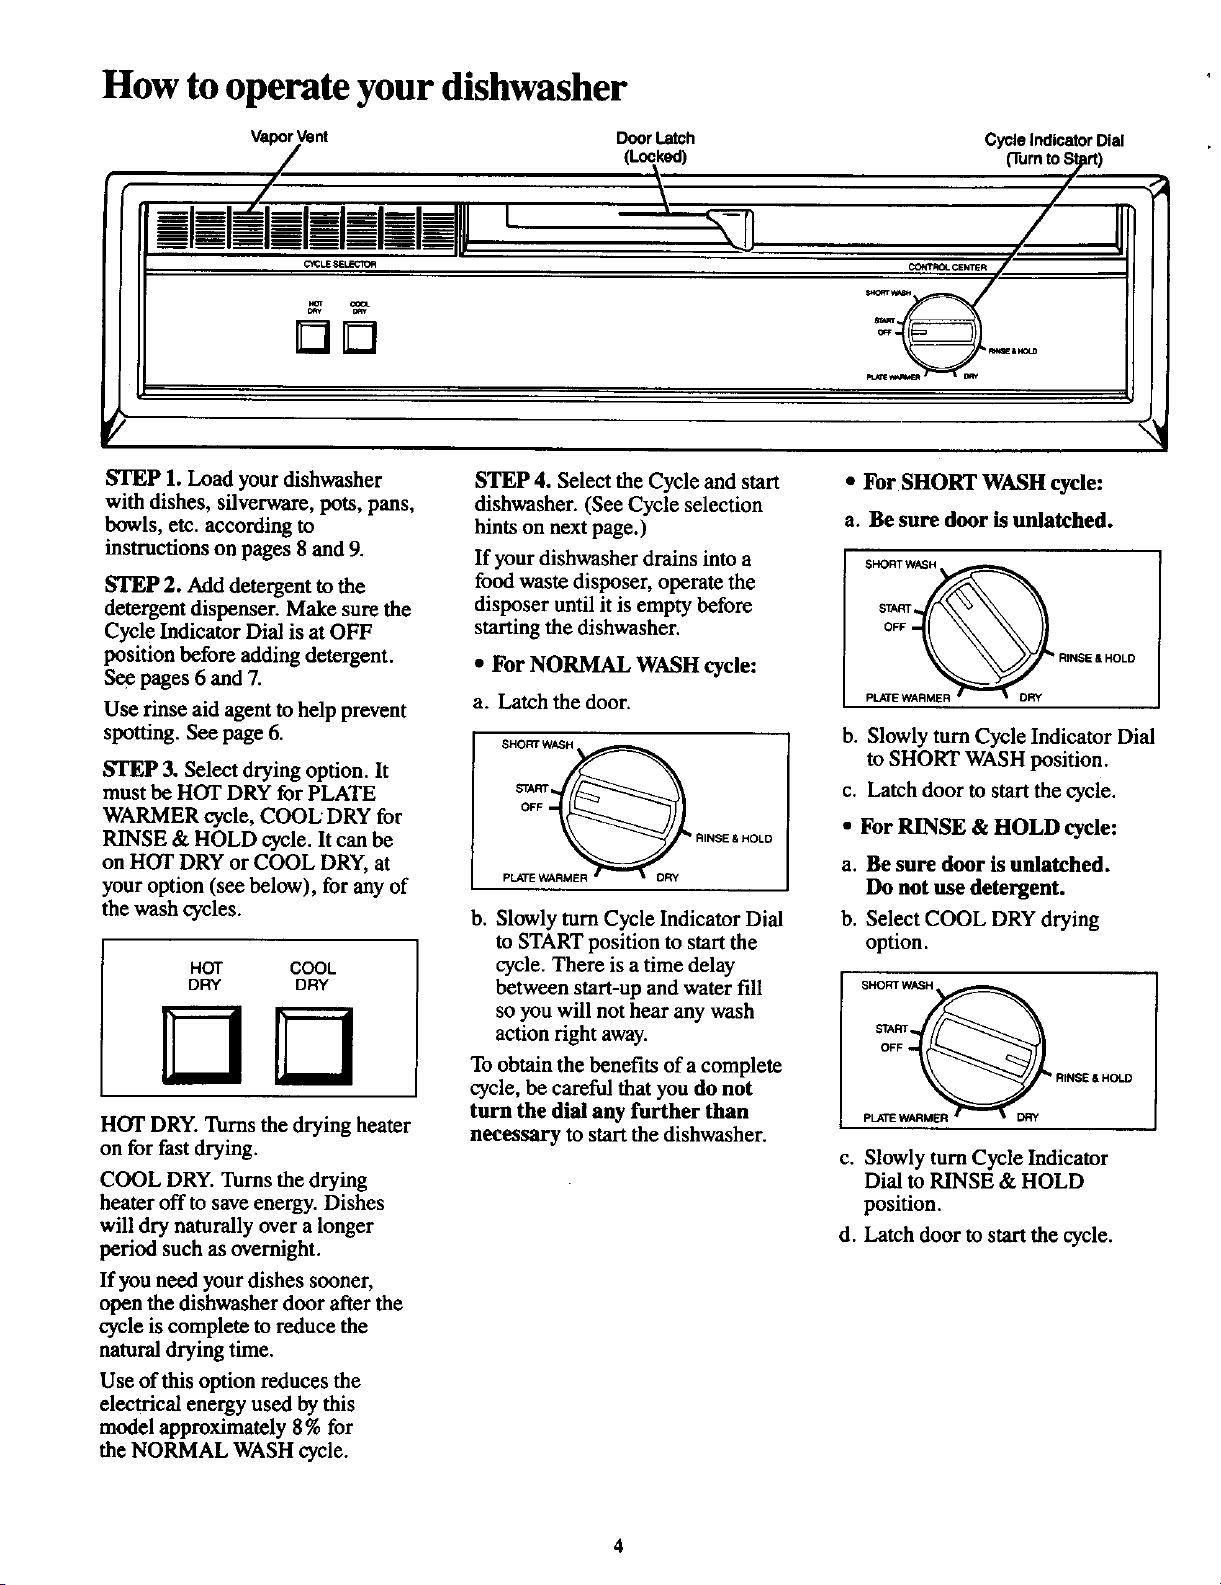
How tooperate your dishwasher
VaporVent Door Latch CYcleIndicatorDial
STEP 1. Load your dishwasher STEP 4. Select the Cycle and start • For SHORT WASH cycle:
with dishes, silverware, pots, pans, dishwasher. (See Cycle selection
bowls, etc. according to hints on next page.) a. Be sure door is unlatched.
instructions on pages 8and 9. If your dishwasher drains into a SHORT WASH
STEP 2..Add detergent to the food waste disposer, operate the "_--_N
detergent dispenser. Make sure the disposer until it is empty before srAsr
Cycle Indicator Dial is atOFF starting the dishwasher. OFF
position before adding detergent. • For NORMAL WASH cycle: R,.SE_MOL0
See pages 6 and 7.
Use rinse aid agentto help prevent a. Latch the door.
spotting. See page 6. s.o_wAs, b. Slowly turn Cycle Indicator Dial
STEP 3. Select drying option. It '-_ to SHORT WASH position.
ked) (Turnto$
PLATE
WARMER cycle, COOL" DRY for o_F
RINSE & HOLD cycle. It can be R,_SE_,O_O • For RINSE & HOLDcycle:
must be HOT DRY for PLATE srAmw_ c. Latch door to startthe cycle.
on HOT DRY or COOL DRY, at P_rE a. Be sure door is unlatched.
your option (see below), for any of Do not use detergent.
the wash cycles, b. Slowly turn Cycle Indicator Dial b. Select COOL DRY drying
to START position to start the option.
HOT COOL cycle. There is a time delay
DRY DRY between start-up and water fill '_n_
action right away. sr^_r
_ so you will not hear any wash
L!
HOT DRY. Turns the drying heater necessary to start the dishwasher.
on for fast drying, c. Slowly turn Cycle Indicator
COOL DRY. Turns the drying Dial to RINSE & HOLD
heater off to save energy. Dishes position.
will dry naturally over a longer d. Latch door to start the cycle.
period such as overnight.
If you need your dishes sooner,
open the dishwasher door after the
cycle is complete to reduce the
natural drying time.
Use of this option reduces the
electrical energy used by this
model approximately 8% for
the NORMAL WASH cycle.
To obtain the benefits of a complete
cycle, be careful that you do not .,.SE_.O.D
turn the dial any further than PL_
SHORT WASH
4
Page 4
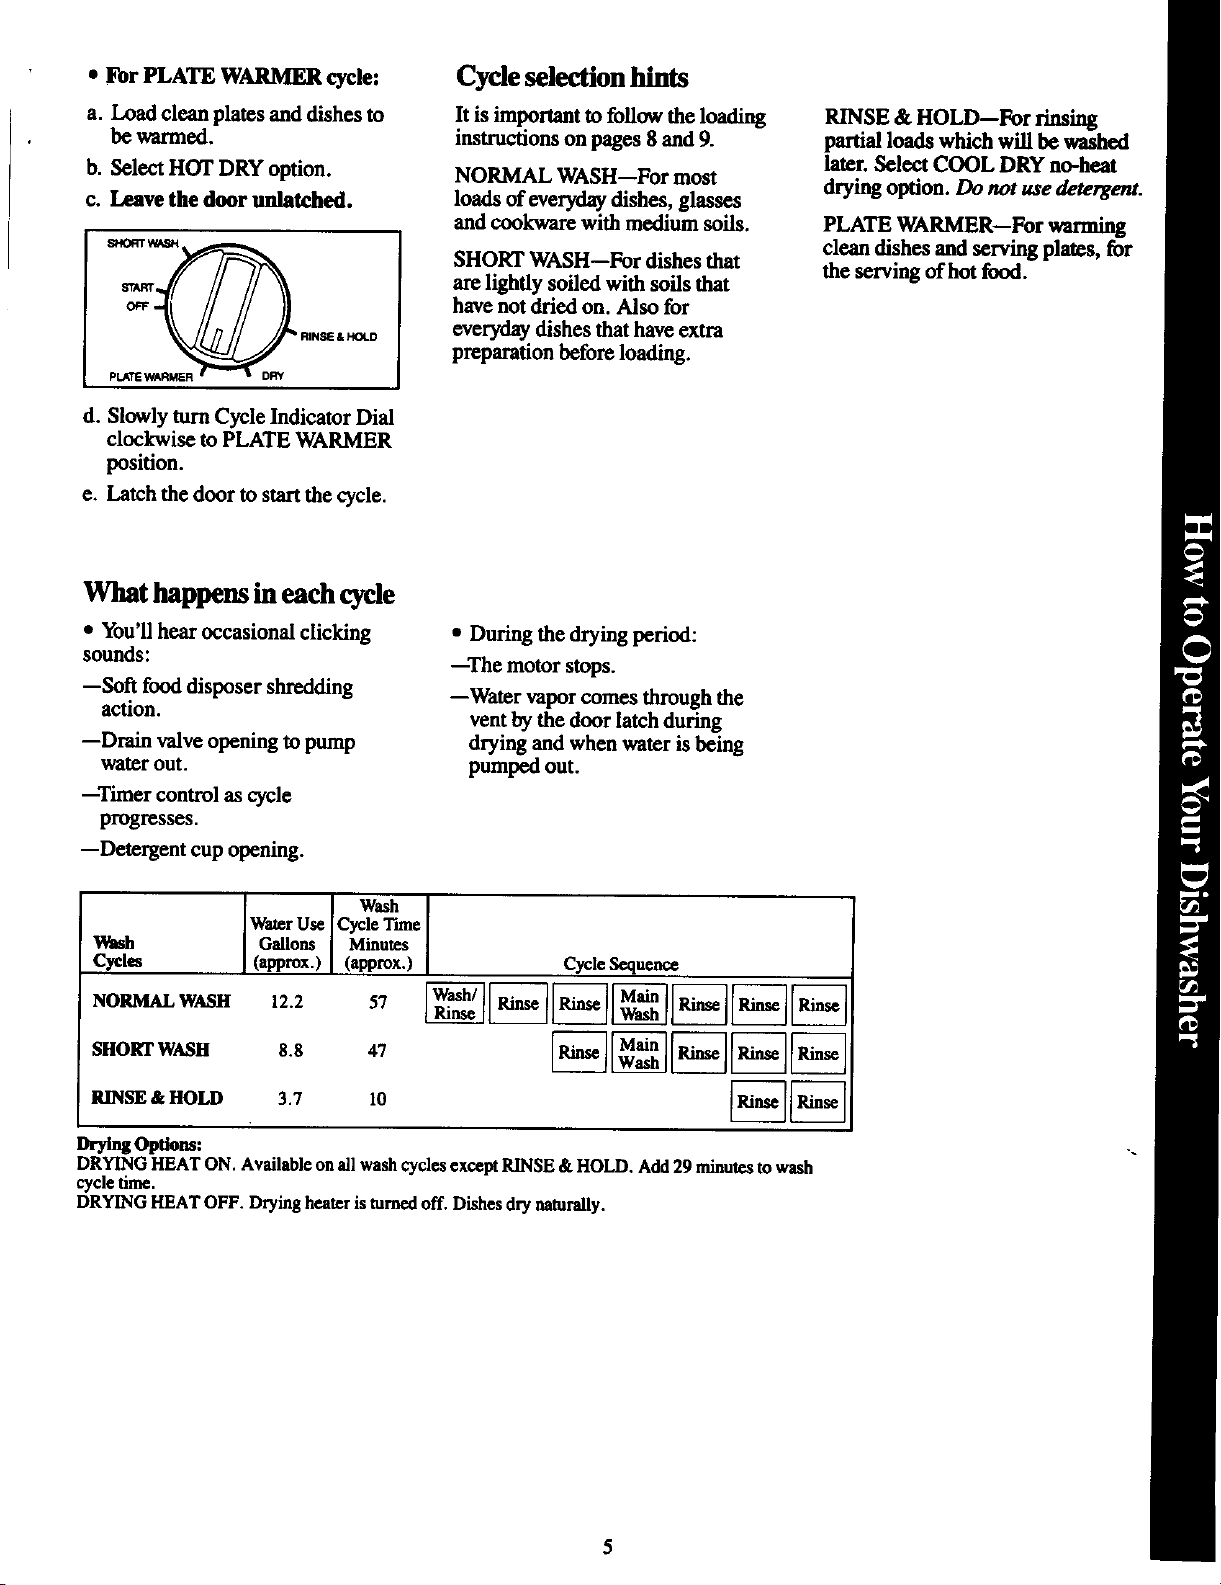
• For PLATE WARMER cycle: Cycle selection hints
a. Load clean plates and dishes to It is important to follow the loading RINSE & HOLD--FOr rinsing
be warmed, instructions on pages 8 and 9. partial loads which will be washed
b. Select HOT DRY option. NORMAL WASH--FOr most later. Select COOL DRY no-heat
c. I._tve the door Ilnlfdghed. loads of everyday dishes, glasses drying option. Do not use detergent.
and cookware with medium soils. PLATE WARMER--For warming
s_o__--_ SHORT WASH--For dishes that clean dishes and serving plates, for
are lightly soiled with soils that the serving of hot food.
,,,_, MOLD everyday dishes thathave extra
r_ havenot dried on. Also for
Pu_re i preparationbefore loading.
d. Slowly turn Cycle Indicator Dial
clockwise to PLATE WARMER
position.
e. Latch the door to startthe cycle.
What happens in each cycle
• You'll hear occasional clicking • During the drying period:
sounds: --The motor stops.
--Soft food disposer shredding --Water vapor comes through the
action, vent by the door latch during
--Drain valve opening to pump drying and when water is being
water out. pumped out.
--Timer control as cycle
progresses.
--Detergent cup opening.
Wash
Wash Gallons Minutes
Cycles (approx.) (approx.) CycleSequence
NORMALWASH 12.2 57 jease [IRJn_[]P._e[]_ []RinseI[Pan_eiip.i_eI
SHORTWASH 8.8 47 _----_ _ _--_ _'] _
WaterUse CycleTune
I II II l_[----'-7_Wash/ . •
I I] I] I_ [_ [] [[ [
.HOLO 3.7 10
DryingOptions: ..
DRYINGHEATON.AvailableonallwashcyclesexceptRINSE&HOLD.Add29minutestowash
cycletime.
DRYINGHEATOFF.Dryingheateristurnedoff.Dishesdrynamraily.
5
Page 5
Water Heating How tochoose and use
To get dishes clean and dry you showers, give your water heater detergent.
need hot water. Tohelp you get time to recover before operating the First, use only powder or liquid
water of the proper temperature, dishwasher, detergents specifically made for
your dishwasher automatically To improve washability if the water use in dishwashers. Other types
heats the water in the wash cycle, is less than 120°F and you cannot will cause oversudsing.
For good washing and drying, the adjust your water heater: Select a
entering water must be atleast longer cycle and fill beth detergent content. Phosphate helps prevent
120°E To prevent dish damage, cups atleast half-full with detergent.
inlet water should notexceed 150°F. hard-water materials from forming
How to test water temperature: How to use a rinse agent, water is hard (7 grains or more),
Check the water temperature your detergent has to work harder.
inside your dishwasher with a A rinse agent makes water flow Detergents with a higher phosphate
candy or meat thermometer, offdishes quickerthan usual. This level will probably work better. If
Let the dishwasher run through drying faster, too.
one fill and pump out cycle, then or less), you'll have to use extra
let the dishwasher flUwith water For best dishwashing performance, detergent with hard water.
the second time. use of a rinse agent such as JET-DRY
When you hear the water stop you how hard your water is. So
filling, unlatch the door and slowly Rinse agents come in either liquid can your county extension agent.
open it. or solid form. Your dishwasher's Or your area's water softener
Measure the temperature of the dispenser uses the liquid form. company. Just call and ask them
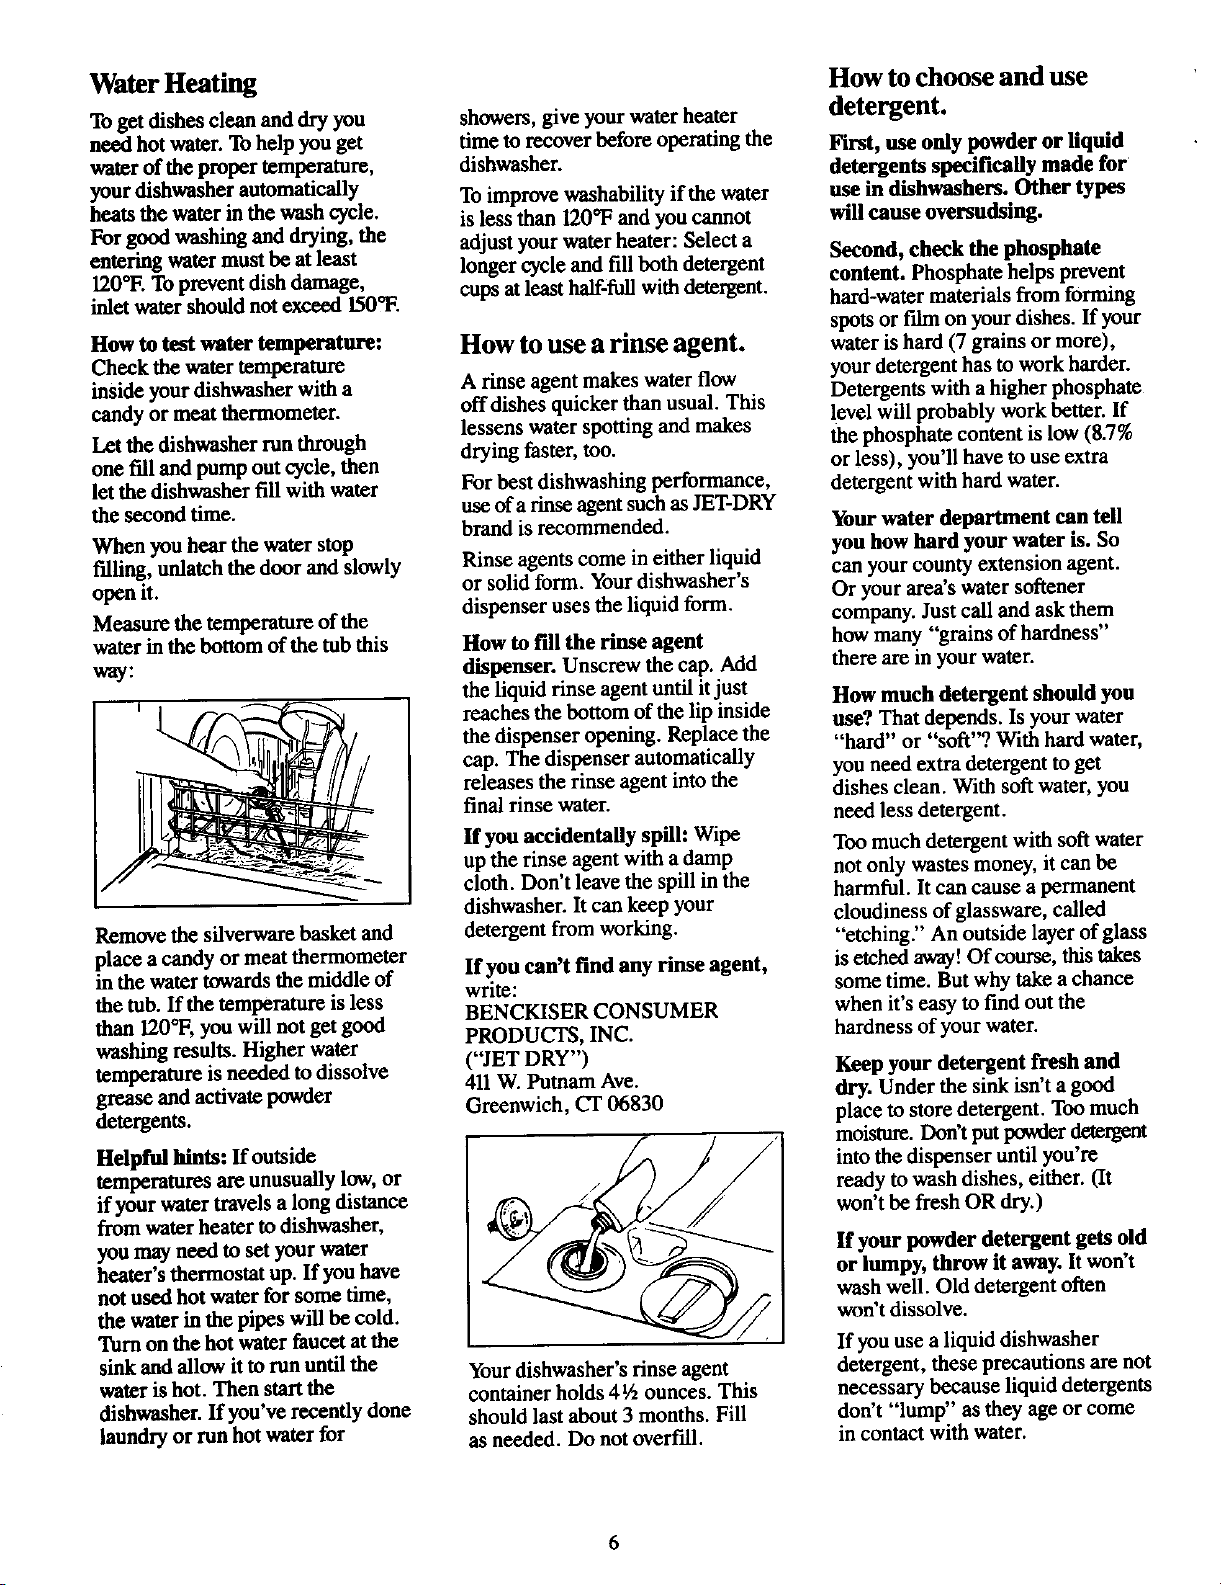
water in the bottom of the tub this How to fill the rinse agent how many "grains of hardness"
way: dispenser. Unscrew the cap. Add there are in your water.
Remove the silverware basket and detergent from working. "etching." An outside layer of glass
place a candy or meat thermometer If you can't find any rinse agent, is etched away! Of course, this takes
in the water towards the middle of write: some time. But why take a chance
the tub. If the temperature is less BENCKISER CONSUMER when it's easy to find out the
than 120°F, you will not get good
washing results. Higher water PRODUCTS, INC. hardness of your water.
temperature is needed to dissolve ("JET DRY") Keep your detergent fresh and
grease and activate powder 411W. Putnam Ave. dry. Under the sink isn't a good
detergents. Greenwich, CT 06830 place to store detergent. Too much
Helpful hints: If outside /A / _ into the dispenser until you're
lessens water sporing and makes the phosphate content is low (8.7%
brand is recommended. Your water department can tell
the liquid rinse agent until itjust How much detergent should you
reaches the bottom of the lip inside use? That depends. Is your water
the dispenser opening. Replace the "hard" or "soft"? With hard water,
cap. The dispenser automatically you need extra detergent to get
releases the rinse agent into the dishes clean. With soft water, you
fina/rinse water, need less detergent.
If you accidentally spill: Wipe Too much detergent with soft water
upthe rinse agent with adamp not only wastes money, it can be
cloth. Don't leave the spill in the harmful. It can cause a permanent
dishwasher. It can keep your cloudiness of glassware, called
Second, check the phosphate
spots or film on your dishes. Ifyour
moisture. Don't put IXr,vderdetergent
if your water travels a long distance .o. _/ won't be fresh OR dry.)
temperatures are unusually low, or /J/// ready to wash dishes, either. (It
from water heater to dishwasher,
you may need to set your water If your powder detergent gets old
heater's thermostat up. If you have or lumpy, throw it away. It won't
not used hot water for some time, wash well. Old detergent often
the water in the pipes will be cold. __ won't dissolve.
Turnon the hot water faucet at the If you use a liquid dishwasher
sink and allow it to rununtil the Your dishwasher's rinse agent detergent, these precautions are not
water is hot. Then startthe container holds 4½ ounces. This necessary because liquid detergents
dishwasher. If you've recently done should last about 3 months. Fill don't "lump" as they age or come
laundry or run hot water for as needed. Do not overfdl, in contact with water.
6
Page 6

How to prepare
the dishes for washing.
You'll f'md two detergent If this is your first dishwasher, or if 3. Try to remove food scraps and
dispensers on the inside door of you're replacing a much older place dishes in dishwasher before
your dishwasher. Two, because model, you may wonder how much soil has a chance to dry and become
some cycles use two washes, preparation your dishes need. hard. Dishes with dried-on soil are
Actually very little. Pre-rinsing of more difficult to wash and may
- With common sense and a little WASH cycle. Remember to use
practice you'll soon know what your RINSE & HOLD cycle for
OPEN foods to remove. Here are some small "holding" loads.
cup_ /_\ normal food soils is not necessary, not come clean in the NORMAL
cop 1. Scrape off bones, seeds, skins, are for examples only. Other foods
toothpicks and other hard solids. It not mentioned may also need to be
__ guidelines: Note: The foods mentioned above
See "Detergent Usage Guide" vegetables and crusts. Remove foods such as mustard, mayonnaise,
below. (Be sure the Cycle Indicator excessive quantities of oil or vinegar, lemon juice and other
Dial is at OFF position before grease, foods that can cause discoloration
odding detergent. Otherwise, the 2. Remove large quantities of any remain on dishes for a long period
detergent cup lid will not close and food. Your dishwasher has a built-in of time.
latch properly.) sofl food disposer that pulverizes
GRASPHANDLE, _/-_ softfoodbits andflushesthemaway.
ROTATE _ It can handle small amounts of
AND CLOSE _ / soft foods, but large amounts will
TIGHTLY. _.
is also best to remove hard shelled removed from your dishes. You
vegetables, meat trimmings, leafy may also want to consider removing
of stainless steel if allowed to
_,Y_ be difficult to handle.
Always close the main cup tightly.
When it isfirmly latched you will
hear a clicking sound. It is not
necessary to overtighten.
NOTE: Detergent cup may be
opened manually with no harm.
Turn handle counterclockwise until
it releases. A snapping sound is
normal when it opens.
Detergent Usage Guide (powder or liquid)
SOFT WATER MEDIUM WATER HARD WATER
(0-3 grains hardness) (3-7 grains) (%12 grains*)
CYrl I_'__l Main Cup Open Cup Main Cup Open Cup Main Cup:_ Open Cup:_
NORMAL WASH cycle 1 Tablespoon 1Tablespoon Half Full Half Full Completely . Completely
SHORTWASHcycle 1Tablespoon None HalfFull None Completely None
RINSE&HOLDcycle Usenodetergent Usenodetergent Useaedetergent
"12grainsandupisextremel,hardwater.Awatersoftenerisrecommended.Withoutit,
limecanbuildupinthewatervalve.Thewatervalvemaystickwhileopenandcauseflooding.
:_FilI_MainCupholds3 tablespoons;FilledOpenCupholds2tablespoons.
minimum minimum Full Full
minimum Full
Page 7

How to load your dishwasher How toload the TOP RACK
The top rack is best for glasses, cups and saucers. Cups
and glasses fit best along the sides. This is the place for
dishwasher-safe plastics, too. Make sure small plastic
items are lodged in tightly so they can't fall onto the
This is a random mixed load, the most common type you heating unit. Arrange stemware so that it cannot move
will have. easily. Don't let the glasses touch each other.
Make sure dishes are properly loaded to insure that
water can reach the soiled surfaces. The wash arm in the
bottom sprays water up. The tower that rises in the
center sends water out over the dishes to wash the items
in the upper rack.
WATCH OUT FOR THIS.
The wash tower rises through the center of the bottom
rack during the wash and rinse portions of the cycle.
Don't block it or load tall things next to it. Also, be
careful not to let a portion of an item such as a pot or
dish handle extend through the bottom rack. This could
block the wash ann and cause poor washing results.
Sauce pans, mixing bowls and other small items may be
placed--face down--in the top rack. The top rack is
handy for all kinds of odd shapes. Be sure the force of
water and detergent can reach soiled surfaces.
8
Page 8

How to load the BOTTOM RACK
4L
Plates Heavily soiled pots, pans and casseroles MUST be
Fit plates and saucers between the pins. Place items so loaded in the bottom rack, facing down. Prop bro'fler
that water and detergent fromwash arm can reach soiled pans and racks along the edge.
surfaces.
Don't let any
item extend
through bottom,
Put flatware in the removable basket with handles up Precaution!
to protect your hands. Mix knives, forks and spoons so Take out anything that may fall or extend through the
they don't nest together. Distribute evenly. Small plastic bottom of the basket.
items, such as measuring spoons and lids from small
containers are not recommended for automatic
dishwashing. If placed in the dishwasher, they should go
in the bottom of silverware basket with silverware on top.
9
Page 9

What you can usually wash safely in your dishwasher.
And what you can't.
Usually
Material Safe Exceptions (not safe) Special Instructions
Aluminum YES Somecolored anodized Somedarkeningorspottingpossible.Removeby
aluminumcan fade. scouringwith soap-f'flledsteel woolpads.
China/ YES Antique, metal-trimmed, If in doubt,check withthemanufacturer.Ortestwash
Stoneware hand-iaalntedorover-the-glaze one piece dailyforatleasta month. Comparewiththe
Crystal YES Antique,metal-trimmedor Loadsecurely to preventmovement.
Non-dishware NO Do not washin dishwasher.Damageto dishwasher
Rents--such anddiscolorationor stainingof dishwashermayresult.
as electronic
air deaner
filters, furnace
filters, paint
brushes, etc.
Glass YES Milk Glassmayyellow.
Iron NO Ironwill rust.
Pewter NO Pewtertarnishes.
patternsfade. restofthe set.
Gold leafwill discolor.
hand-puintedpatternsfade. Checkmanufacturer'sinstructionsforyourcrystal.
Gold leafwill discolor.
Plastics YES Ifitdoesn'tsay DISHWASHERSAFE,test one piece
beforedishwashingan entire set.
Stainless steel YES Rinseifnotwashing immediately.Saltyor acid foods
SterlingSilver YES Don't putinsame silverware Rinse ifnotwashingimmediately Saltyor acid foods can
and Silver basketwith stainlesssteel, stainif left on. Drydetergentcan causedifficult-to-remove
plate Contactbetweenmetals can blackspots. Placeinbacksection ofsilverwarebasketto
damage silver, avoidexposure to detergentfromthe detergentcup.
Don'twash copper utensils in
the same load. Silvermayget a
brownfilm.
Adhesiveusedto attach some
hollow-handleknivescan loosen.
Non-stick YES Afterwashing, wipe the non-stickcoating areawith
coatings vegetableoil to keepitfromlosing its non-stickquality.
Tin NO Tin can rust.
Wood NO Woodcan warp,crockor lose
itsfinishwith anytype washing.
can stain ifIeRon.
Forget a dish? Here's when However, opening the door during 2. Wait a few seconds until the
yOU can add R. any cycle lessens cleaning power water calms. Then open the door.
Adddishes any time during the because the temperatureinsidethe 3. Adddishesyou'veforgotten.
RINSE& HOLDcycle. Withother dishwasheris lowered.So tryto 4. Close the doorandpushthe
washcycles, youcan adddishes at loadeverythingatthebeginning, latchtothe farright.Whenthe
any timeBEFOREthemain How to add a forgotten dish: door is locked, washingwill
detergentwashportionof the cycle. 1. Pushthe door latchto theleft. continue.
Washingwill stop.
10
Page 10

Save Time and Money-
Before you call for service,
check the Problem Solver.
If you have a problem, it may be
minor. You may be able to correct
it yourself. Justuse this Problem
Solver to locate your problem and
then follow the suggested
recommendations.
The Problem Solver
PROBLEM POSSIBLE CAUSE AND REMEDY
DISHWASHER * A fuse inyour home may be blown, or the circuit breaker tripped. Replace fuse or
WON'T RUN reset circuit breaker. Remove any other appliances from the cLreuit.
UNUSUAL NOISE • Utensils may not be secure on rack pins or something small may have dropped from
the rack. Water is causing utensils to rattle. Make sure everything is securely p/aced
in dishwasher.
DISHES DON'T DRY * Make sure inlet water temperature is correct. (See page 6.)
• Unload the bottom rack first. Waterfrom dishes in the top rack may be spilling into
the bottom rack.
• Check for improper loading. Dishes shouldn't nest together. Avoid overloading.
• Check the rinse agent dispenser to see that it's not empty.
UNCLEAN DISHES • Check inlet water temperature, It should be at least l20°F. (Totest, s_c page 6Q
AND FLATWARE • Waterpressure may be temporarily low. Turnon a faucet. Is water coming out slower
than usual? If so, wait until pressure is normal before using your dishwasher.
• Plugged air gap. (See page 14.)
• Improper rack loading. (See pages 8 and 9.)
BLACK OR GRAY • Aluminum deposits often leave marks when they rub against other things. Remove
MARKS ON DISHES marks with a mild abrasive cleanser.
DETERGENT LEFT • Water may not be reaching the detergent cups. Move dishes that may be blocking the
IN DISPENSER CUPS detergent cup.
• The dispenser cover may not be apeaing or may be blocked by improperly loaded
items. If you used a powder detergent, open the cup and remove any caked-on
detergent. If the cup still doesn't open automatically, call for service.
• Detergent maybe old. If the powder detergent is hardor caked in the box, throw
itaway.
• The detergent may not be working well. Try another brand.
11
[ (c°ntinuednexlmge)_
Page 11

•The Problem Solver (connu)
PROBLEM POSSIBLE CAUSE AND REMEDY
DETERGENT CUP LID Cycle Indicator must be in OFF position for cup lid to close and latch properly.
WON'T LATCHAI_TER If you unlatch the door and open it to dry your dishes, the Cycle Indicator does not
ADDING DETERGENT advance to OFF by itself.
SPOTS AND FILMING Spotting can be caused by all these things:
ON GLASSES AND • Extremely hard water. (See page 6.)
FLATWARE
• Low inlet water temperature. (Totest, see page 6.)
• Overloading the dishwasher.
• Improper loading. (See pages 8 and 9.)
• Old or damp powder detergent.
• Phosphate level in detergent too low. (See page 6.)
• Rinse agent dispenser empty. (See page 6.)
• Too little detergent. (See page 7.)
Due to varying local water conditions and personal preferences, try several brands of
detergents to find one that gives the best results for you. A liquid dishwasher detergent
may help reduce filming.
To remove spots and film from glassware:
1. Remove all metal utensils from the dishwasher.
2. DO NOTADD DETERGENT.
3. Select NORMAL WASH cycle.
4. Startthe dishwasher and allow to runfor 15to 20 minutes. The dishwasher will
now be in the main wash.
5. Then open the door and pour 2 cups (500 ml) of white vinegar into the bottom of
the dishwasher.
6. Close the door and allow the dishwasher to complete the cycle.
If vinegar rinse doesn't work: Repeat as above, except use 1/4 cup (60 ml) of citric
acid crystals instead of vinegar. (Most drugstores carry citric acid crystals.)
Using a vinegar or citric acid crystal rinse more than twice a month? Consider a home
water softener.
CLOUDINESS ON If vinegar or citric acid crystal rinse doesn't work, the cloudiness is "etchingY
GLASSWARE The film cannot be removed.
It can be prevented: Use less detergent if you have soft water. Wash glassware in the
shortest cycle that will get them clean.
Watertemperature entering dishwasher exceeds 150°F.
YELLOW OR BROWN Teaor coffee can stain cups. Remove the stains by hand, using asolution of 1/2cup
FILM bleach and 3 cups warm water.
An overall yellow or brown film on dishes or glassware can be caused by iron deposits
in water. A special filter in the water supply line is the only way to correct this problem.
Yourwater softener company can tell you about the filter.
Yellow film on sterling silver results when you wash copper utensils in the same load.
Silver polish will usually remove this stain.
12
Page 12

PROBLEM POSSIBLE CAUSE AND REMEDY
CHIPPING OF CHINA Rough handlingcancausechipping.Load withcare.Make sureglasswareandchina
aresecureandcan'tjarloose.(Seepage8 forcorrectway toloadglassware.)Make
suretallglassesandstemwarewillclearthetopofthetubwhen youpushtherackinto
the dishwasher.
Always use the top rack for delicate items.
SMALL AMOUNT OF Wateraround the outlet on the tub bottom at the back of the tub is normal. It is dean
WATERSTANDING water. It's there to keep the water seal lubricated.
IN THE BOYIDM
OF THE TUB
WATERWON'T PUMP If the entire bottom of the tub has water, you may have a drainproblem. Clean the air
OUT OF THE TUB gap, ifyou have one. (Seepage 14.)
Check the kitchen sink. Is it draining well? You may need a plumber.
If dishwasher drains into a disposer, run the disposer to clear. Be sure the disposer is
notclogged.
SUDS IN THE TUB Sudsing detergents are not meant for dishwashers. USE ONLY AUTOMATIC
DISHWASHER DETERGENTS TO AVOIDSUDSING.
To remove suds from the tub: Open the dishwasher. Let suds evaporate. Add 1 gallon
of cold water tothe tub. Close and latch the dishwasher. Pump out water by slowly
turningthecontroldialuntiladrainperiod isreached.
Repeat if necessary.
DISHWASHER LEAKS Suds can cause unit to overflow. That's why it's so important to use adete_ent that's
designed for automatic dishwashers.
Spilling the rinse agent can cause foam during washing. This can lead to overflow'rag.
Wipe up accidental spill of rinse agent with adamp cloth.
13
Page 13

Care and cleaning
Cleanthecontrolpanel with Built-in dishwashers Not using your dishwasher
alightlydampenedcloth.Dry often use an air gap. in winter? Protect against
thoroughly. Do not use abrasives Keepit clean, freezing.
or sharp objects on the panel.
They can damage it. An air gap is a plumbing device. If your dishwasher is left in an
It protects your dishwasher against unheated place during the winter,
Clean the outside with a good water backing up into it if a drain ask a service technician to:
appllan_ pullsh wax. The outside clogs. The air gap is not a part of * Cut off electric power to the
cabinet finish is durable, but it can the dishwasher. And you may not
scratch. So use no scouting pads, even have one. Not all plumbing dishwasher. Remove fuses or trip
or harsh or gritty cleaners, codes require air gaps. circuit breaker.
The inside usually takes care * Turn off the water supply.
of itself. If it should ever need * Disconnect the water inlet line
cleaning, use a mild cleansing OF AIR GAPS [_',i:, .i
powder. Scouring pads and harsh __: ' ',2 _ from the water valve.
cleaners can mar the finish. __ • Drain water from the inlet line
__--------__ J ._ and water valve. (Use a pan to
• Reconnect the water inlet line to
catch the water.)
the water valve.
• Remove the plastic pump cover in
If you have an air gap, check it the tub bottom and use a sponge to
at least once a month. IT IS NOT soak up water in the rubber boot.
PART OF YOUR DISHWASHER.
IT IS NOT COVERED IN YOUR PUMPCOVERiSCREWS
WARRANTY.
The air gap is easy to clean.
With most types, first turn off the
dishwasher, then lift off the chrome
cover. Then unscrew the plastic cap
and check for any build-up of grit.
A toothpick makes cleaning easy.
Check the air gap any time your
dishwasher isn't draining well.
14
Page 14

How to change color panels
If you are redecorating, you can How to change Dimensions for 1/4nwood inserts:
change your dishwasher's front lower panel inserts: Door Panel: 19_ H x 23_ W.
panels to match or blend with your 1. Remove four panel attachment Lower Panel: 3_y_ H x 23_ W.
new colors, screws. (Two above panel, two
Two panels are held in place by the below.) Note: Do not operate dishwasher
door trim and the trim on the panel 2. Remove entire panel.
below thedoor. Each side of each lower access panel is removed.
panel is a different color. Or you 3. Takeout three screws and
can paint a panel with the color of "remove top trim.
your own choice, 4. Slide out both insert panels at
How to change once.
door panel inserts: 5. Replace panels with the color
1. Takeout three trim screws on you want in front.
either side of the dishwasher door. 6. Replace top trim and screws.
Remove the side trim. 7. Replace entire panel andfour
2. Slide out both insert panels at attachment screws.
once. Color insert panels for both door
3. Put the panel with the color you and panel can be replaced by 1/4" Change color in minutes. Just
want in front. (Handle panels thick wood inserts to match your remove trim and change.
carefully. Edges may be sharp.) kitchen cabinets. Get them from your
4. Replace side trim and screws, nearest cabinet or lumber dealer.
while changing panels or when
If you need service
Master Care has a nationwide If you are dissatisfied with the This panel, known as MACAP, is
network of service people. For the service you received, here are a group of independent consumer
nearest service outlet, contact the three steps you should follow: experts under the sponsorship of
dealer or consult the telephone FIRST, contact the people who several industry associations. Its
directory Yellow Pages under serviced your appliance. Explain purpose is to study practices and
Dishwashing Machines. why you are not pleased. In most advise the industry of ways to
For additional information about cases, this will solve the problem, improve customer service. Because
your dishwasher, write to us. Be NEXT, if you are still dissatisfied, and influence, it is able to make
sure to include the model and serial write all the details--including impartial recommendations and
numbers shown on the serial plate your phone number--to: consider each case individually.
located just inside the door. Master Care
Maycor Service Department
240 Edwards Street
Cleveland, TN 37311
FINALLY, if your problem is still
not resolved, write:
Major Appliance
Consumer Action Panel
20 North Wacker Drive
Chicago, Illinois 60606
MACAP is free of industry control
15
Page 15

MASTERCARE
FULL ONE-YEARDISHWASHERWARRANTY
MasterCare, Inc.will repair or replace, withoutcharge,anypartofyourproductwhichhasa defectin
materialorworkmanshipduringthefirstyearafterthe dateofthe originalinstallation.Thiswarranty
extendsto anyownerduringthe one-yearwarrantyperiodas longasthe productislocatedinthe
contiguous48 statesor DistrictofColumbia.
LIMITED TEN-YEARWARRANTY
Forten years from dateofodginalpurchase,wewillprovide,freeofcharge,partsand servicelaborto
repairor replacetheDURATM 10tubordoorlinerif itfailsto containwaterbecauseofa manufacturing
defectsuchascracking,peelingor rusting.
Youare responsibleforthe serviceman'stravelchargesbeyondthe normalservicearea,localcartage,
andnormalmaintenance,andforavoidingdamagefromcookingfatsand acids,orcleaningcompounds.
WHAT IS NOTCOVEREDBY THIS WARRANTY
1.Conditions and damage resulting from 4.Any productusedforotherthannormal
improperinstallation,delivery,unauthorized householduse.Itdoesnotextend toproducts
repair,modification,ordamage notattributable purchasedforcommercialorindustrialuse.
toa defectinmaterialor workmanship.
2.Conditionsresultingfromdamage,suchas: correctinstallationerrorsortoinstructyouon
(a)impropermaintenance,(b)misuse,abuse, howto usethe product.
accident,alteration,or(c)incorrectelectrical
currentorvoltage. 6. CONSEQUENTIAL OR INCIDENTAL DAMAGES SUSTAINED
3.Warrantyisvoidiftheoriginalserialnumber WARRANTYORANYIMPUEOWARRANTY.Somestates
hasbeenremoved,alteredor cannotbe readily donotallowtheexclusionorlimitationof
determined, consequentialorincidentaldamages,so the
5.Anyexpenseincurredforservicecallsto
BYANY PERSON AS A RESULT OF ANY BREAK OF THIS
aboveexclusionmay notapplytoyou.
HOW TOOBTAINSERVICE
Beforerequestingservice,be sureyouhavereadthisCare andUse Manual.Toobtainthe repairor
replacementofa defectivepart underthiswarranty,youshouldcontactthe dealeror builderfromwhom
you purchasedtheapplianceora serviceagent hedesignates.
ADDITIONAL HELP
If youare not satisfied with the local responsetoyourservice requirementsandwishtocontactMaster
Care, Inc.,pleaseaddressyourlettertoMaycorParts& ServiceCo., P.O.Box2370,Cleveland,Tennessee
37311orcall615-472-3333.CustomersinCaliforniamaycontactCustomerRelationsDepartment,247 N.
VinelandAvenue,City ofIndustry,California91746.Tosavetime,yourletter shouldincludethecomplete
model andsedal number ofthe warrantedappliance,the nameandaddressofthe dealerfromwhomyou
purchasedtheappliance,thedateofpurchase,anddetailsconcerningyourproblem.
Thiswarrantyisthe onlywrittenor expressedwarrantygivenbyMasterCare, Inc.Noone isauthorizedto
increase,alter,orenlargeMasterCare'sresponsibilityorobligationsunderthiswarranty.Thiswarranty
givesyouspecificlegalrights,and youmayalsohaveotherrightswhichvaryfromstatetostate.
Consultthe Yellow of for the service
I Pages yourtelephonedirectory sourcenearestyou. ]
DU2
1
1 16so3osoP089I CDU2NDU2
Page 16

MASTERCARE
FULL ONE-YEAR DISHWASHER WARRANTY
Master Care, Inc.willrepairor replace,withoutcharge,anypart ofyourproductwhichhas adefectin
materialorworkmanshipduringthefirstyearafterthe dateofthe originalinstallation.Thiswarranty
extendstoanyownerduringthe one-yearwarrantyperiodas longas theproductislocatedinthe
contiguous48 statesorDistrictofColumbia.
LIMITED TEN-YEAR WARRANTY
Fortenyearsfromdateoforiginalpurchase,wewillprovide,freeof charge,partsandservicelaborto
repairorreplacetheDURATM 10tubordoorlinerifit failsto containwaterbecauseofa manufacturing
defectsuchas cracking,peelingorrusting.
Youare responsiblefortheserviceman'stravelcharges beyondthe normalservicearea, localcartage,
and normalmaintenance,and foravoidingdamage from cookingfatsand acids,orcleaningcompounds.
WHAT IS NOT COVERED BY THIS WARRANTY
1.Conditionsanddamage resultingfrom 4. Anyproductusedforotherthan normal
improperinstallation,delivery,unauthorized householduse. Itdoes notextendto products
repair,modification,ordamage notattributable purchasedfor commercialor industrialuse.
toa defectin materialor workmanship.
2. Conditionsresultingfrom damage,suchas: correctinstallationerrorsorto instructyouon
(a)impropermaintenance,(b) misuse,abuse, howto usethe product.
accident,alteration,or(c)incorrectelectrical
currentorvoltage. 6, CONSEQUENTIAL OR INCIDENTAL DAMAGES SUSTAINED
3.Warranty isvoidiftheoriginalserialnumber WARRANTYORANYIMPLIEDWARRANTY.Somestates
hasbeenremoved,alteredorcannot bereadily donotallowthe exclusionor limitationof
determined, consequentialorincidentaldamages,sothe
5.Anyexpenseincurredforservicecallsto
BYANY PERSON AS A RESULT OF ANY BREAK OF THIS
aboveexclusionmaynotapplytoyou.
HOW TO OBTAIN SERVICE
Beforerequestingservice,besureyouhavereadthisCare and Use Manual.Toobtainthe repairor
replacementofa defectivepart underthiswarranty,youshouldcontactthedealer or builderfromwhom
youpurchasedtheapplianceora serviceagenthedesignates.
ADDITIONAL HELP
If youare notsatisfiedwiththe local responsetoyourservicerequirementsand wishtocontactMaster
Care, Inc.,pleaseaddress yourletterto MaycorParts & Service Co., P.O.Box2370,Cleveland,Tennessee
37311orcall615472-3333. Customersin CaliforniamaycontactCustomerRelationsDepartment,247 N.
VinelandAvenue,City of Industry,California91746.Tosavetime,yourlettershouldincludethecomplete
modelandserialnumberofthewarrantedappliance,thenameand addressofthe dealerfromwhomyou
purchasedtheappliance,thedateofpurchase,and detailsconcerningyourproblem.
ThiswarrantyistheonlywrittenorexpressedwarrantygivenbyMaster Care, Inc.Nooneisauthorizedto
increase,alter,orenlargeMasterCare'sresponsibilityorobligationsunderthiswarranty.Thiswarranty
givesyouspecificlegalrights,andyoumayalsohaveotherrightswhichvaryfromstate tostate.
the Yellow of forthe service
Consult Pages yourtelephonedirectory sourcenearestyou. ]
DU2
I
I PartNo. 165D3080P089 I CDU2NDU2
 Loading...