

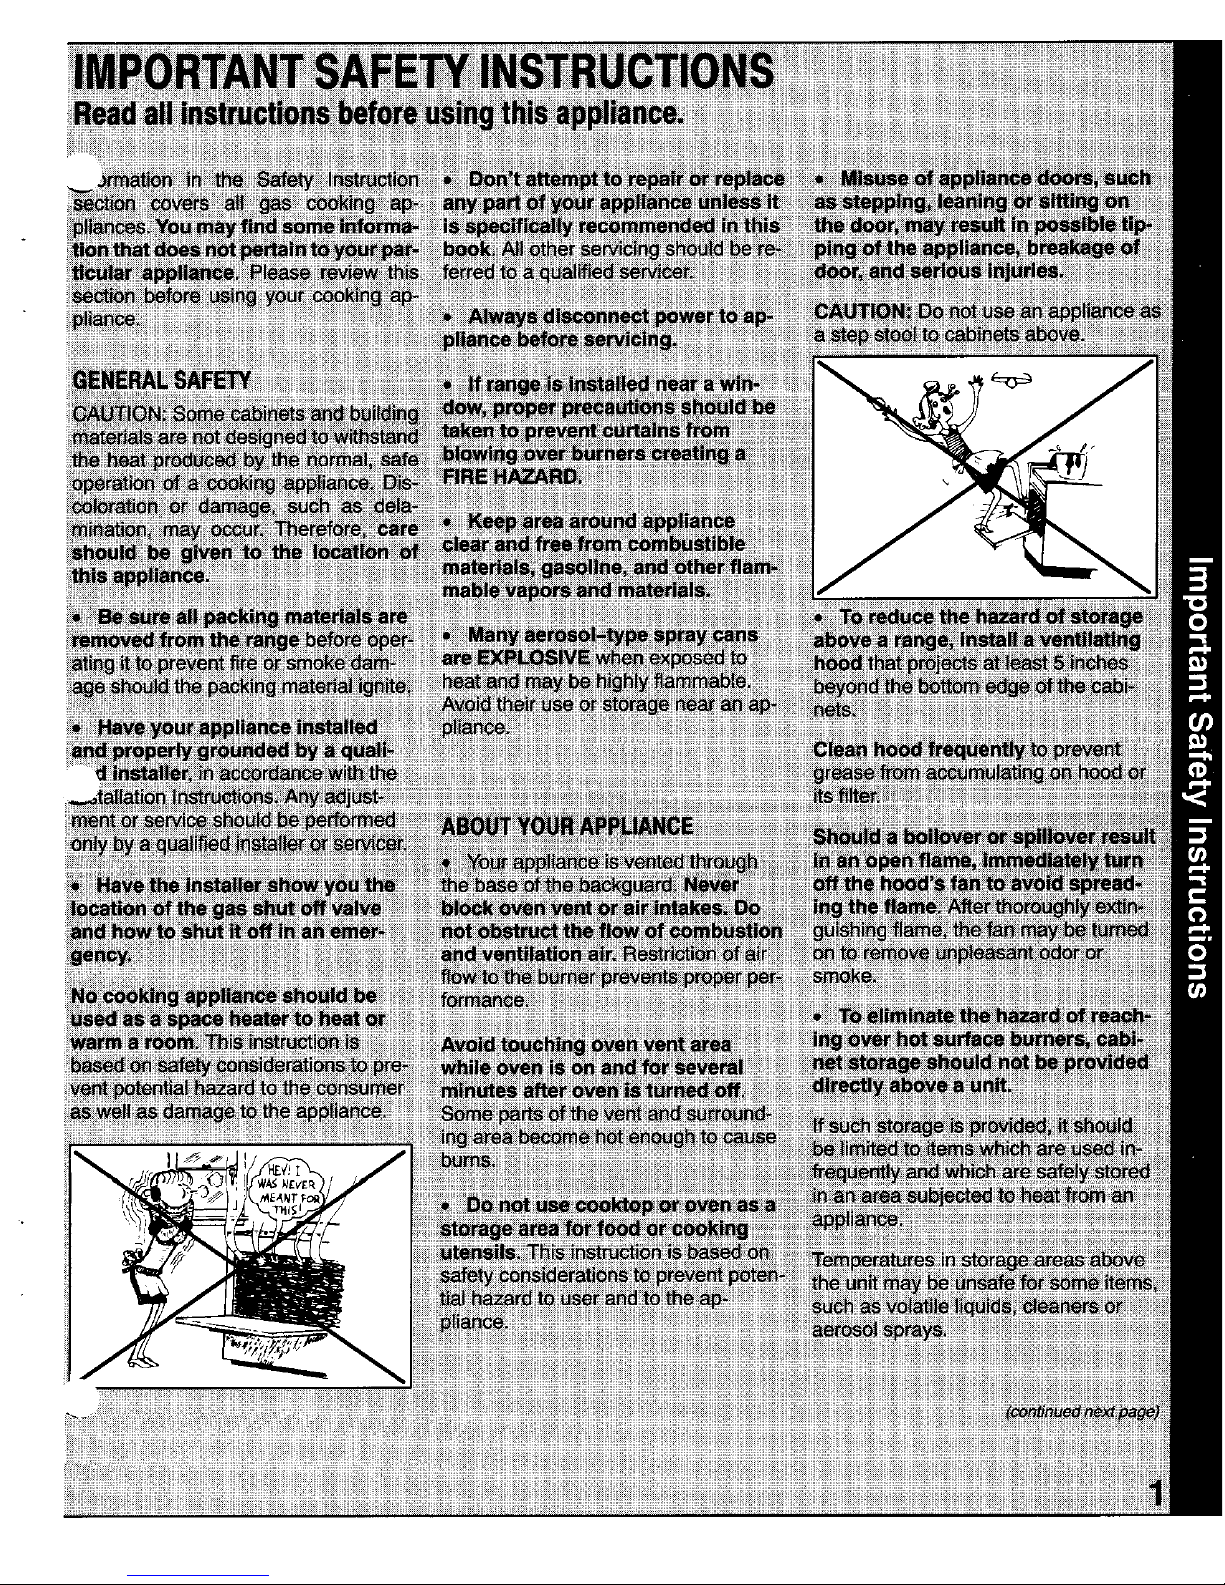
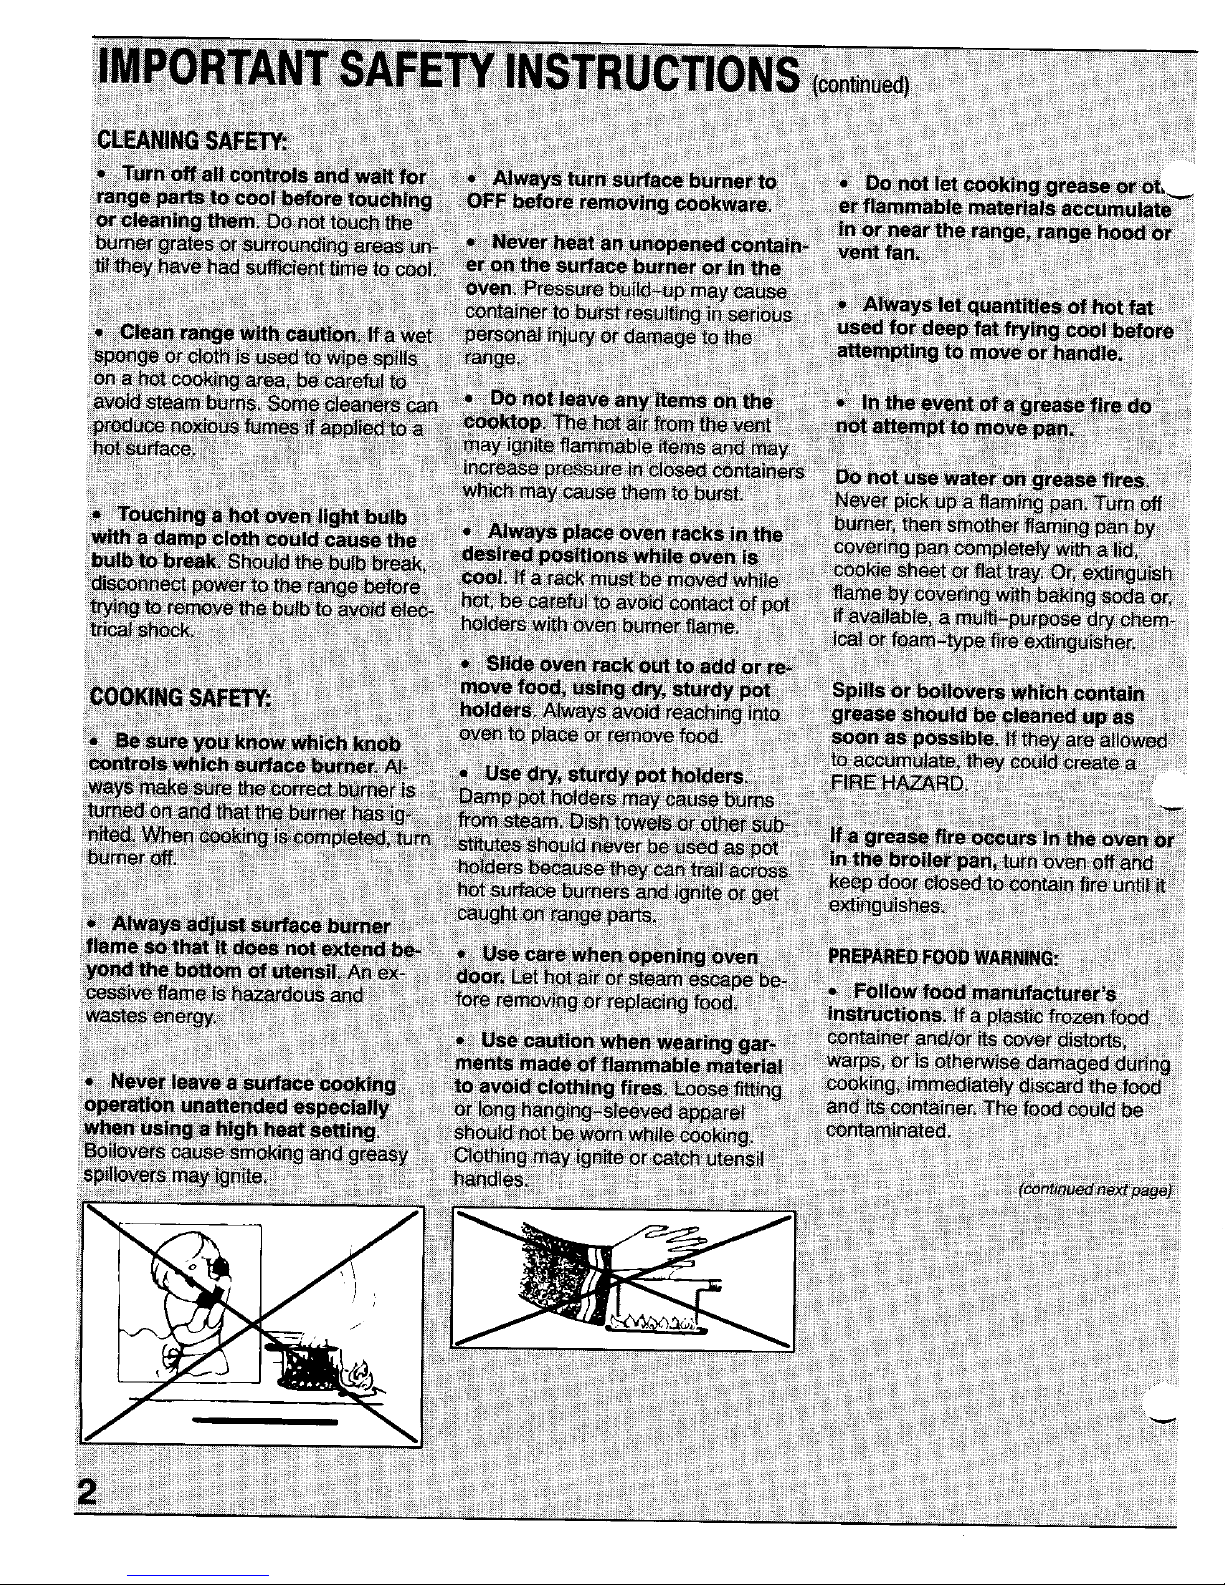
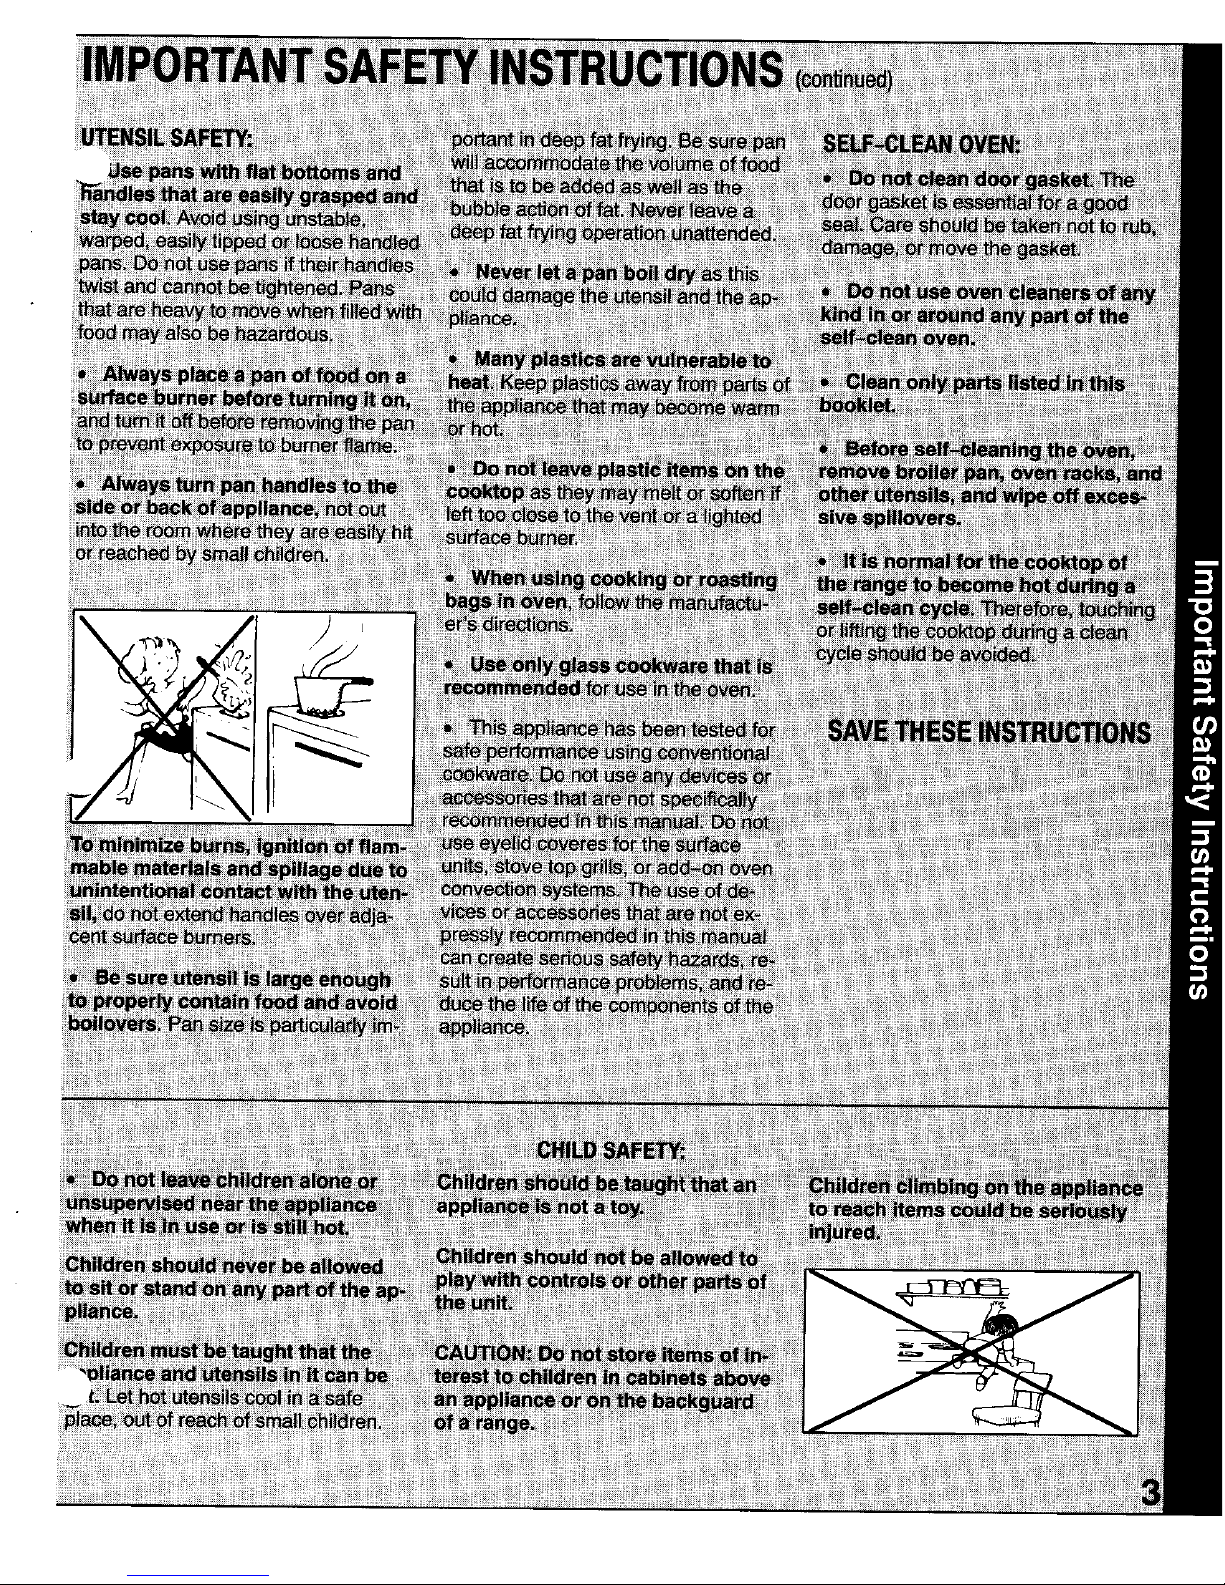
Page 1

IMPORTANTSAFETY
NOTICEAND WARNING WARNING: If the informa-
tion in this manual is not
TheCaliforniaSafe DrinkingWater
and ToxicEnforcementAct of 1986 followed exactly, a fire or
(Proposition65) requiresthe Governor explosionmayresult caus-
ofCaliforniato publisha listof sub- inn propertydamage, per-
stancesknowntotheStateof Califor- sonal injuryor death.
niato causecancer or reproductive ._
harm,and requiresbusinessesto
warncustomersofpotentialexposures - Donot store or use gaso-
to suchsubstances, line or other flammable
vapors and liquids in the
Usersofthisappliancearehereby vicinity of this or any oth-
warnedthattheburningofgascanre- er appliance.
suitin low-levelexposureto someof
the listedsubstances,includingben- - WHAT TO DO IF YOU _k,
zene,formaldehydeand soot,due pri- SMELL GAS: ---- WARNINQ
marilytothe incompletecombustionof
naturalgas orliquidpetroleum(LP) • Do not try to light any • ALL RANGES
fue(s.Proper(yadjustedburnerswill appliance. CAN TIP
minimizeincompletecombustion.Ex-
posuretothesesubstancescanalso • Do not touch any elec- = INJURY TO PERSONS
beminimizedbyproperlyventingthe
burnerstothe outdoors, trical switch; do not COULD RESULT
use any phone in your
building. • INSTALL ANTI-TIP
FORFUTUREREFERENCE DEVICESPACKED
• Immediately call your WITH RANGE
Forfuturereferencewesuggestyou
retainthismanualafter recordingthe gas supplier from a
modelnumberandserialnumberof neighbor's phone. • SEE INSTALLATION
thisgasapplianceinthe spacespro- Follow the gas suppli- INSTRUCTIONS
vided.This informationcanbefound er's instructions.
ontheratingplatelocatedonthe
sidesofthe lowerrangefrontframe. • If yOU cannot reach To reduce the risk of tipping of the
Pullout lowerdrawerto see rating your gas supplier, call appliance from unusual usageor by
plate, the fire department, excessive loading of the oven door,
the appliance must be secured by a
- Installation and service properly installed anti-tip device.To
checkifdeviceisinstalledproperly:Use
must be performed by a
a flashlightandlookunderneathrange
MODELNUMBER qualified installer, ser- to seethatoneoftherearlevelinglegs
vice agency or the gas isengagedinthebracketslot.
supplier.
SERIALNUMBER
DATEOFPURCHASE
These numbersidentifyyour range.
Pleaseusethemin anycorrespon-
denceor servicecallsconcerningyour
appliance.
Pleaseretainthe proof of purchase
documentsforwarrantyservice. _+
Page 2
Page 3
Page 4
Page 5
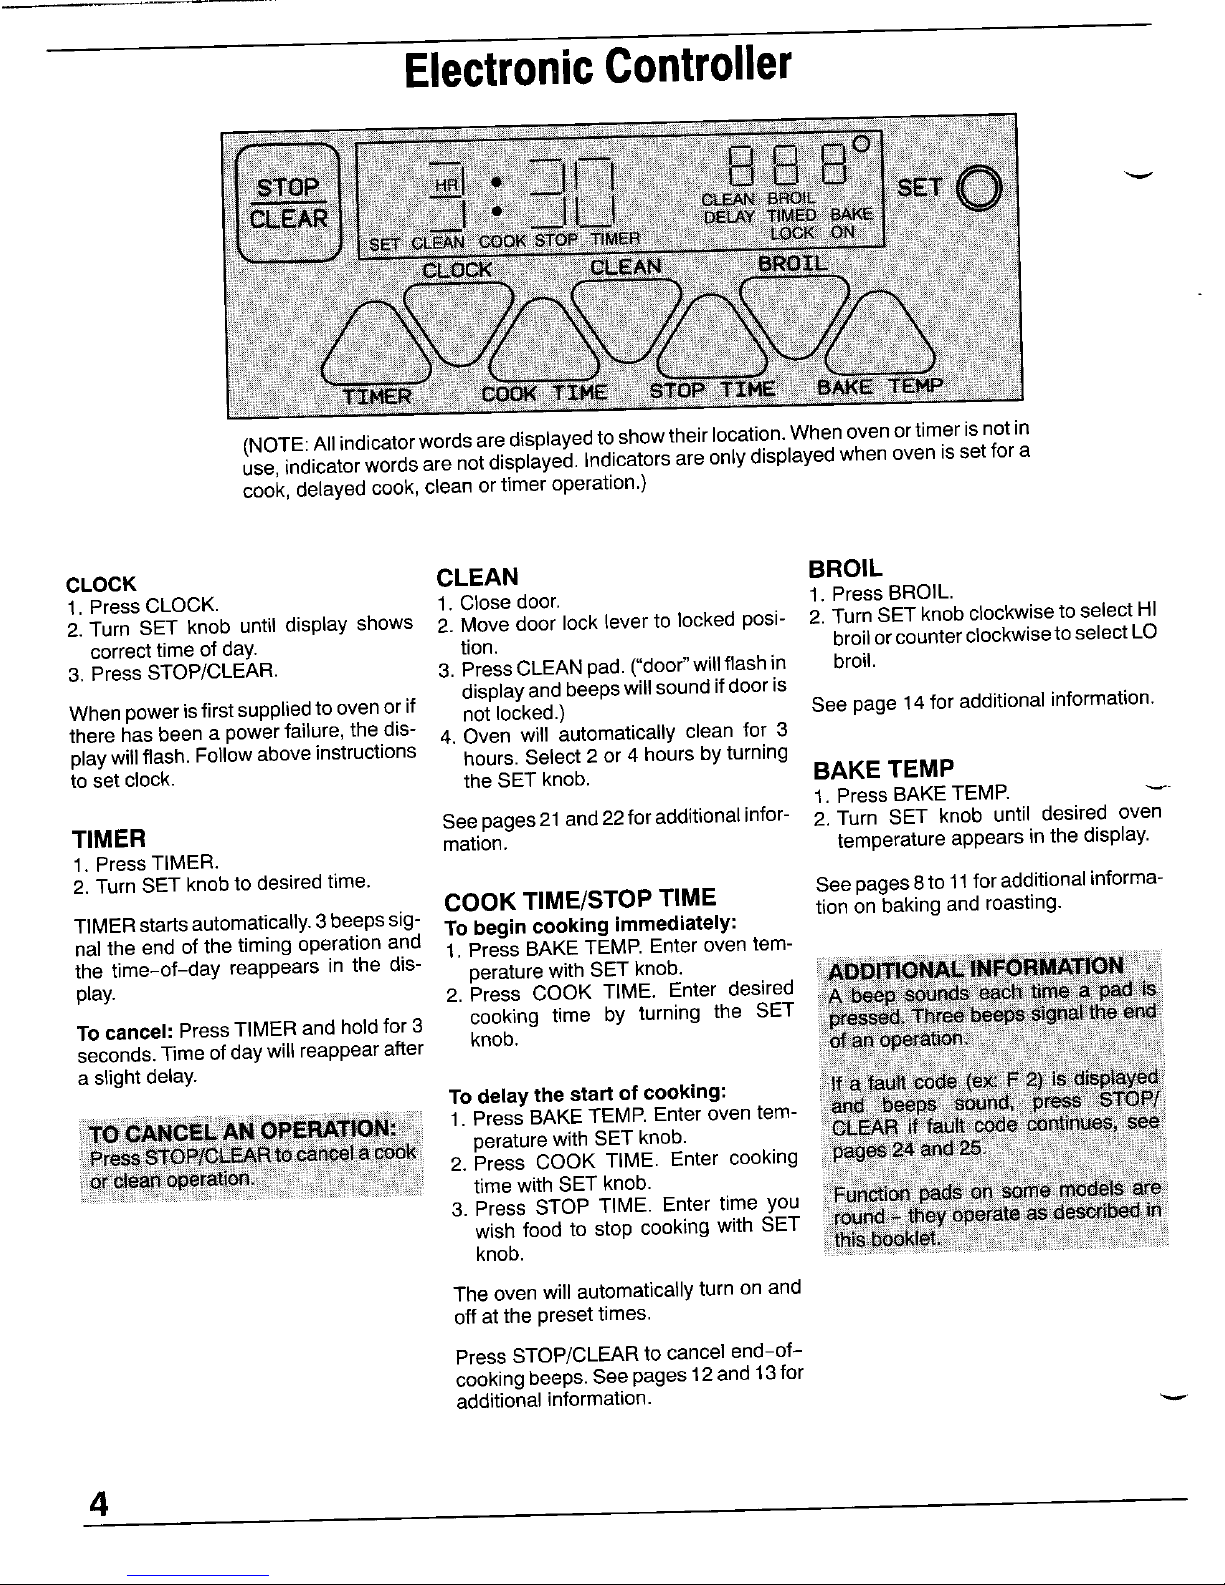
ElectronicController
CLOCK CLEAN BROIL
1.PressCLOCK. 1,Close door. 1.PressBROIL.
2,Turn SET knob until display shows 2. Movedoorlock leverto lockedposJ- 2. TurnSETknobclockwiseto selectHI
correcttime ofday. lion, broilor counterclockwisetoselectLO
3, PressSTOP/CLEAR. 3. PressCLEANpad.("door"willflashin broil.
Whenpowerisfirstsuppliedto ovenor if displayandbeepswillsoundif dooris
notlocked.) See page 14foradditional information.
there has been a powerfailure, the dis- 4. Oven will automatically clean for 3
playwillflash. Followaboveinstructions hours.Select2 or 4 hours by turning
toset clock, theSET knob. BAKE TEMP
1. PressBAKETEMP. --*
TIMER Seepages21 and22for addit{onalinfor- 2. Turn SET knob until desired oven
1,PressTIMER. mation, temperatureappearsinthe display.
2,Turn SET knobto desiredtime.
COOK TIME/STOP TIME Seepages8to 11foradditionalinforma-
TIMERstartsautomatically.3 beepssJg- To begincookingimmediately: tion onbakingandroasting.
naltheend ofthe timingoperationand 1. PressBAKETEMP.Enteroventern-
the time-of-day reappearsin the dis- peraturewithSETknob. iK
play. 2. Press COOK TIME. Enter desired
Tocancel:PressTIMERandholdfor3 cooking time by turning the SET _s
seconds.Timeofdaywillreappearafter knob. wess_e
a s_ightdelay.
Todelaythe startof cooking: !_ _'fa_
1. PressBAKETEMP.Enteroventern- _e
peraturewithSETknob. _L_
2. Press COOK TIME. Enter cooking
timewith SET knob.
3. Press STOP TIME. Enter time you
wishfood to stop cooking with SET
knob. t_iiS _ )k!
The oven willautomaticallyturnon and
offatthe presettimes.
PressSTOP/CLEARto cancel end-of-
cookingbeeps.Seepagest 2and 13for
additionalinformation.
4
Page 6

SurfaceCooking
IGNITION SYSTEM TO LIGHT SEALED BURNER ADDITIONAL INFORMATION
_ur range willfeature pilotless igni- 1. Placeutensil onburnergrate. • Whenthe rangeis first installed,the
"_ion; a spark from the ignitor lightsthe pilotsmaybe difficultto lightdueto air
burner.Theignitorislocatedatthe back 2. Push in and turn knob to the LITE inthegasline.Tobleedoffairfromthe
sideof eachsurface burner, position.After the burnerlights, turn line, hold a lighted match next to the
theknobto thedesiredflame size. burner and turn knob on. When the
_ burner lights, turn the knob off and
proceedas directed.
• Be sureall surface controls are set
inthe OFFpositionpriorto supplying
Ignitor gasto the appliance.
REARVIEWOFSEALEDBURNER
• CAUTION: If flame should go out
during a cooking operation, turn the
NOTE: The knob on your appliance burner off. If gas has accumulated
may not look like the knob in this il- and a strong gas odor is detected,
lustration, but it will operate as de- wait 5 minutesfor the gas to dissi-
scribedin this booklet, patebefore relightingburner.
• Youmayheara "popping"soundon
LP gas when the surface burner is
turnedoff.This is a normaloperating
soundofthe burner.
• If a knob isturnedvery quicklyfrom
HIto LOsetting,theflamemaygoout,
particularlyif the burner iscold.
ABOUT THE SURFACE
DUAL PURPOSE HI SPEED BURNER FLAME
SEALED BURNERS* (ifequipped) • A properlyadjustedburnerwithclean _,,_ _ -'__ _----_.-.-,_
Somemodelsfeatureoneortwospecial ports willlightwithina few seconds. \\__l_,_.gL__
HISPEED sealedburners. • On naturalgas, the flamewill be blue
with adeeperbluecore;there shouldbe
Referto the rating plate to determineif notraceofyellowin theflame. ,f"_/- _,_ _J I
your appliancefeatures the HISPEED
burners.Seeinsidefrontcoverfor Ioca- A yellow flame indicates an improper
tionof ratingplate, mixtureof air/gas. This wastes fuel,so
have a servicemanadjustthemixture if Ifthisoccurs,turnthe knobtothe OFF
LOCATION OF BURNERS: a yellowflame occurs, position.Wait several seconds, then
HIGI-SPEEDBURNER lightthe burneragain.
• On LPgas, someyellowtipping is ac-
ceptable.This isnormalandadjustment
is not necessary.
HIGHSPEED BURNER
(continuednextpage)
*U.S. Patent Pending 5
Page 7
SurfaceCooking(con,,nued)
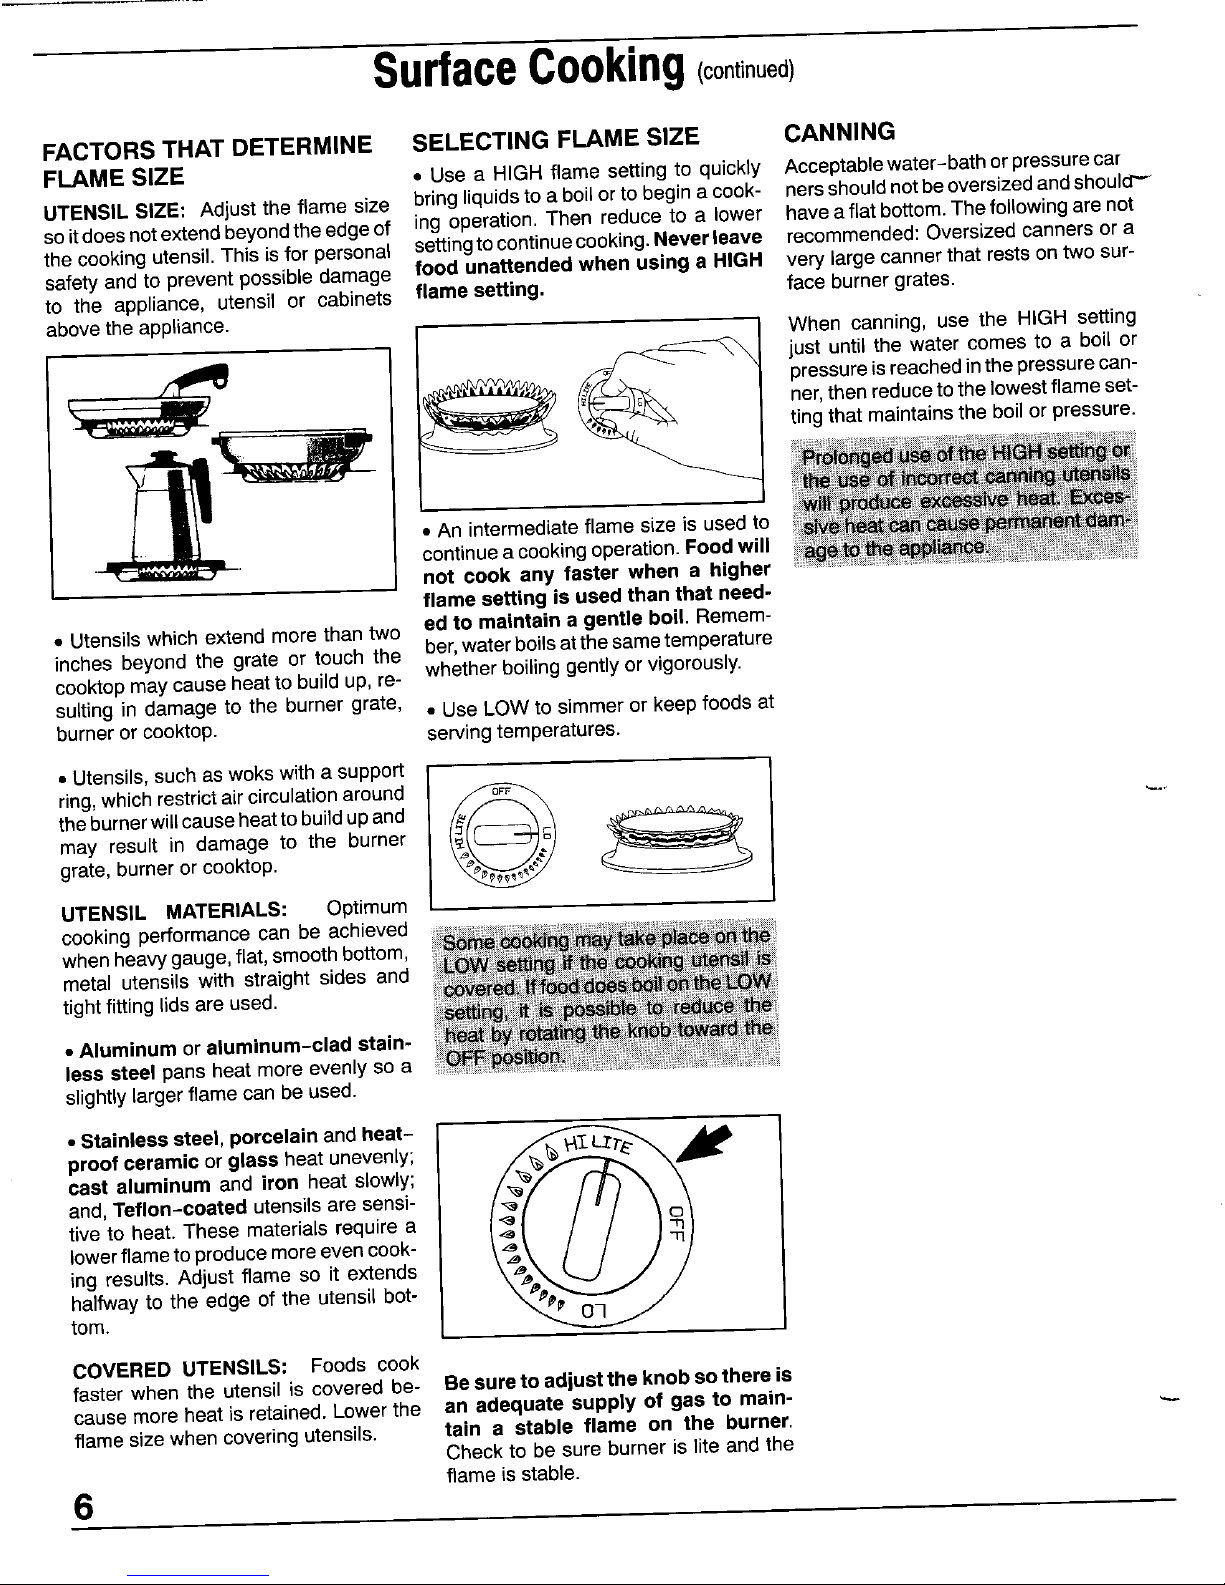
FACTORSTHATDETERMINE SELECTINGFLAMESIZE CANNING
FLAMESIZE • Use a HIGH flamesettingtoquickly Acceptablewater-bathorpressurecar
UTENSIL SIZE: Adjust the flame size bringliquidsto a boilorto beginacook- nersshouldnotbeoversizedandshould"-_
soitdoesnotextendbeyondtheedgeof ing operation. Then reduce to a lower haveaflat bottom.Thefollowingare not
thecookingutensil.This isfor personal settingtocontinuecooking.Neverleave recommended:Oversizedcannersora
safety andto preventpossibledamage food unattended when using a HIGH verylargecannerthat restson two sur-
to the appliance, utensil or cabinets flame setting, face burner grates.
abovethe appliance. When canning, use the HIGH setting
_ _ justuntilthewatercomestoabo,lor
pressureisreachedinthe pressurecan-
ner,then reducetothe lowestflameset-
j ._j_ _ tingthat maintainsthe boilor pressure.
• An intermediateflamesize is used to
continueacookingoperation.Foodwill
not cook any faster when a higher
flamesetting Is usedthan that need-
. Utensilswhichextend more than two ed to maintaina gentle boil.Remem-
inches beyond the grate or touch the ber,waterboilsatthe sametemperature
whether boilinggentlyor vigorously.
cook-topmaycauseheatto buildup, re-
sulting in damage to the burner grate, • UseLOWto simmeror keepfoods at
burneror cooktop, servingtemperatures.
• Utensils,suchaswokswith a support
ring,whichrestrictaircirculationaround __
theburnerwillcauseheattobuildupand "-_
may result in damage to the burner
grate,burner or cooktop.
UTENSIL MATERIALS: Optimum
cookingperformancecan be achieved
whenheavygauge,flat,smoothbottom, _ _ _ _
metal utensils with straight sides and W se g.,l _1_
tightfittinglids are used. f_ _ _ D_
• Aluminumor aluminum-cladstain- _t__ _ _th
less steel pansheatmoreevenlysoa
slightlylargerflamecan beused.
• Stainlesssteel,porcelainand heat- ...fC-_T_--c_.. =._
proofceramic orglass heatunevenly;
cast aluminum and iron heatslowly;
and,Teflon-coated utensilsaresensi-
tiveto heat. These materialsrequire a
lowerflametoproducemoreevencook-
ing results.Adjust flame so it extends
halfwayto the edge of the utensil bot-
tom.
COVERED UTENSILS: Foods cook
faster when the utensil is covered be- Besureto adjust the knobsothere is
cause moreheat is retained.Lowerthe an adequate supply of gasto main-
flame sizewhen coveringutensils, tain a stable flame on the burner.
Checkto besure burnerisliteand the
flameis stable.
6
Page 8
UsingYourOven
1_ OVENVENT
The oven ventis located at the baseof :D_:)_!_ _CK
_e the backguardor backsplash.Whenthe :_ _
_ oven is in use,this area may feel warm _,O1
_ orhotto the touch.Topreventproblems (li
F_srK donot:Blocktheventopening,touchthe O1r_:a _!o_
noJ areanear the openingor place utensils _1_
nearthe vent opening.
_ FAN
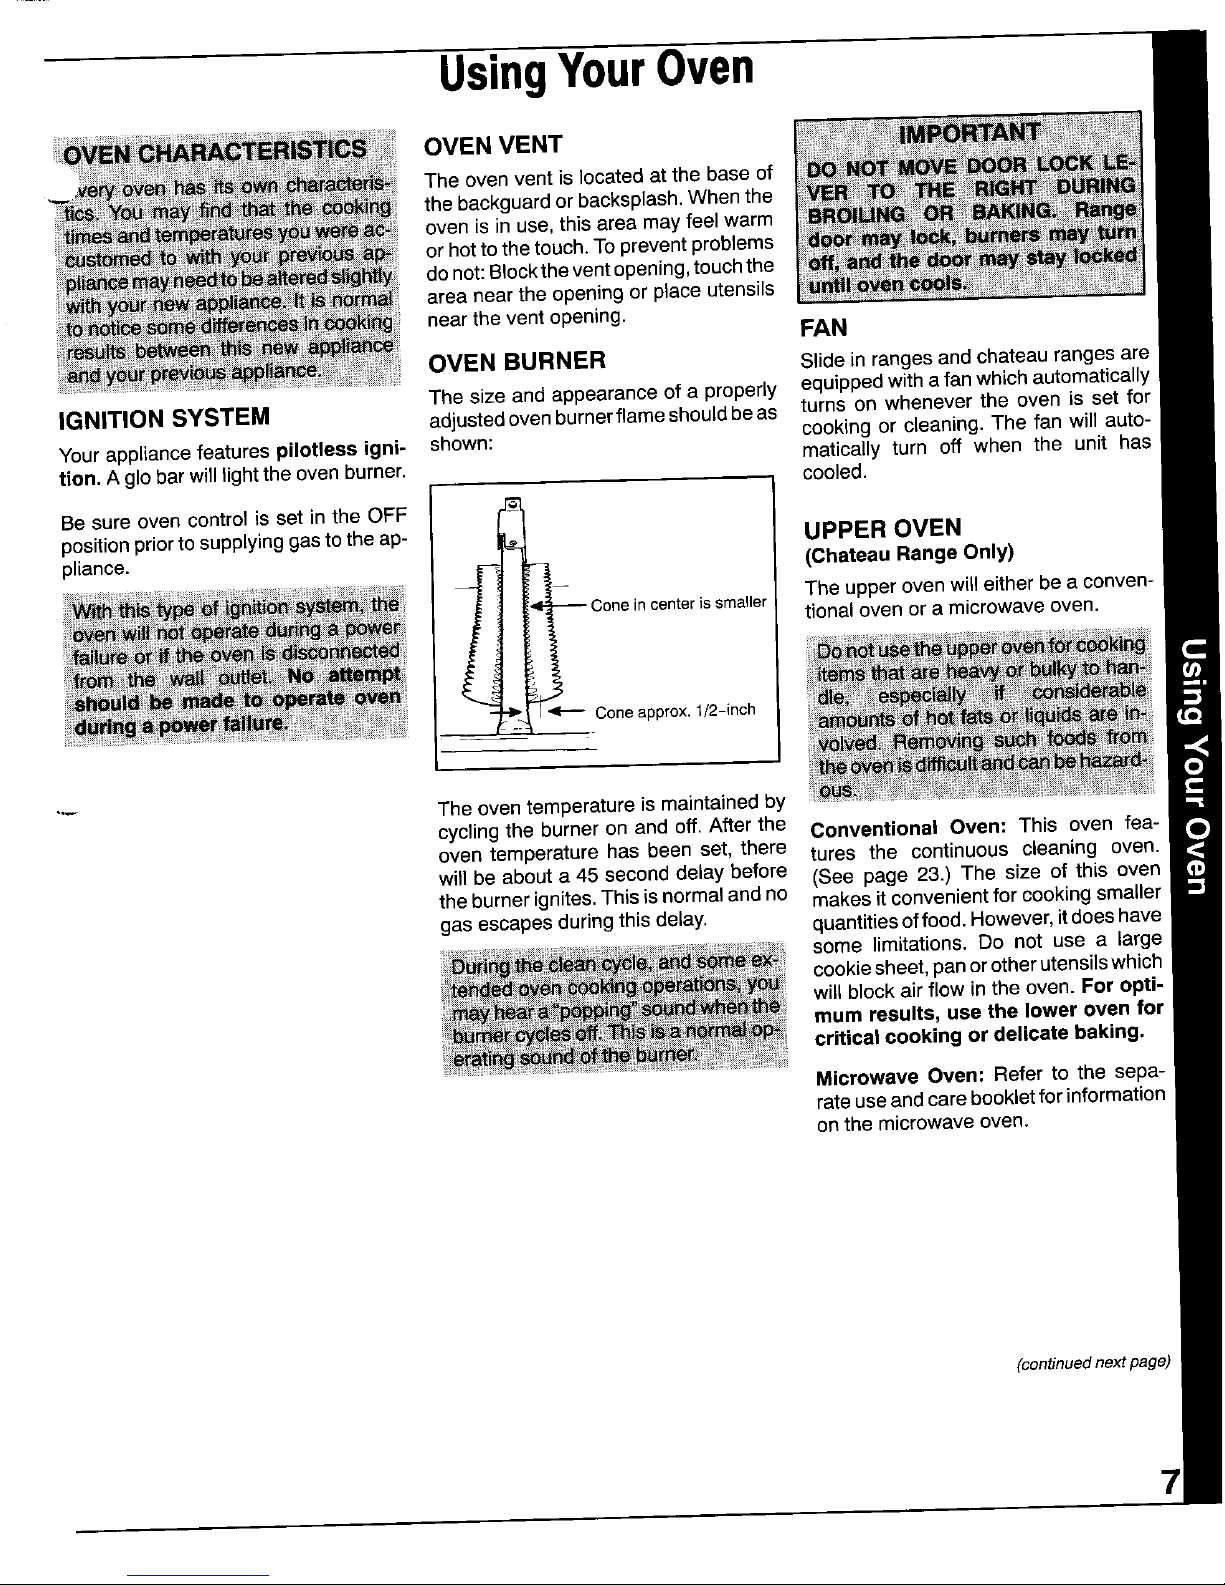
OVEN BURNER Slideinrangesandchateaurangesare
Thesize andappearanceof a properly equippedwithafanwhichautomatically
IGNITIONSYSTEM adjustedovenburnerflameshouldbeas turnsonwheneverthe ovenis set for
cook(ngor cleaning.The fan will auto-
Yourappliancefeaturespilotlessigni- shown: maticallyturn off when the unit has
tion.Agigbarwillfighttheovenburner, cooled.
1
Besure oven controlis set in the OFF _ _ /
positionpriortosupplyinggasto the ap- _/ _ _ / UPPER OVEN
pliance. (Chateau RangeOnly)
i-
:Ot'l Coneincenterissmaller The upperovenwilleitherbe a conven-
tionalovenor a microwaveoven.
_1 _ Coneapprox.1/2-inch / _1_
i J M{IS
"_ The oventemperatureis maintainedby
cyclingthe burner on and off. Afterthe Conventional Oven: This oven fea-
oven temperature has been set, there tures the continuous cleaning oven.
will be abouta 45 second delay before (See page 23.) The size of this oven
theburnerignites.Thisisnormaland no makesitconvenientforcookingsmaller
gasescapesduringthis delay, quantitiesoffood. However,it doeshave
some limitations. Do not use a large
cookiesheet,panorotherutensilswhich
willblockair flowin the oven. For opti-
mum results, usethe lower ovenfor
criticalcookingordelicatebaking.
Microwave Oven: Refer to the sepa-
rateuseandcarebookletforinformation
onthe microwaveoven.
(continuednextpage)
7
Page 9
UsingYourOven(continued)
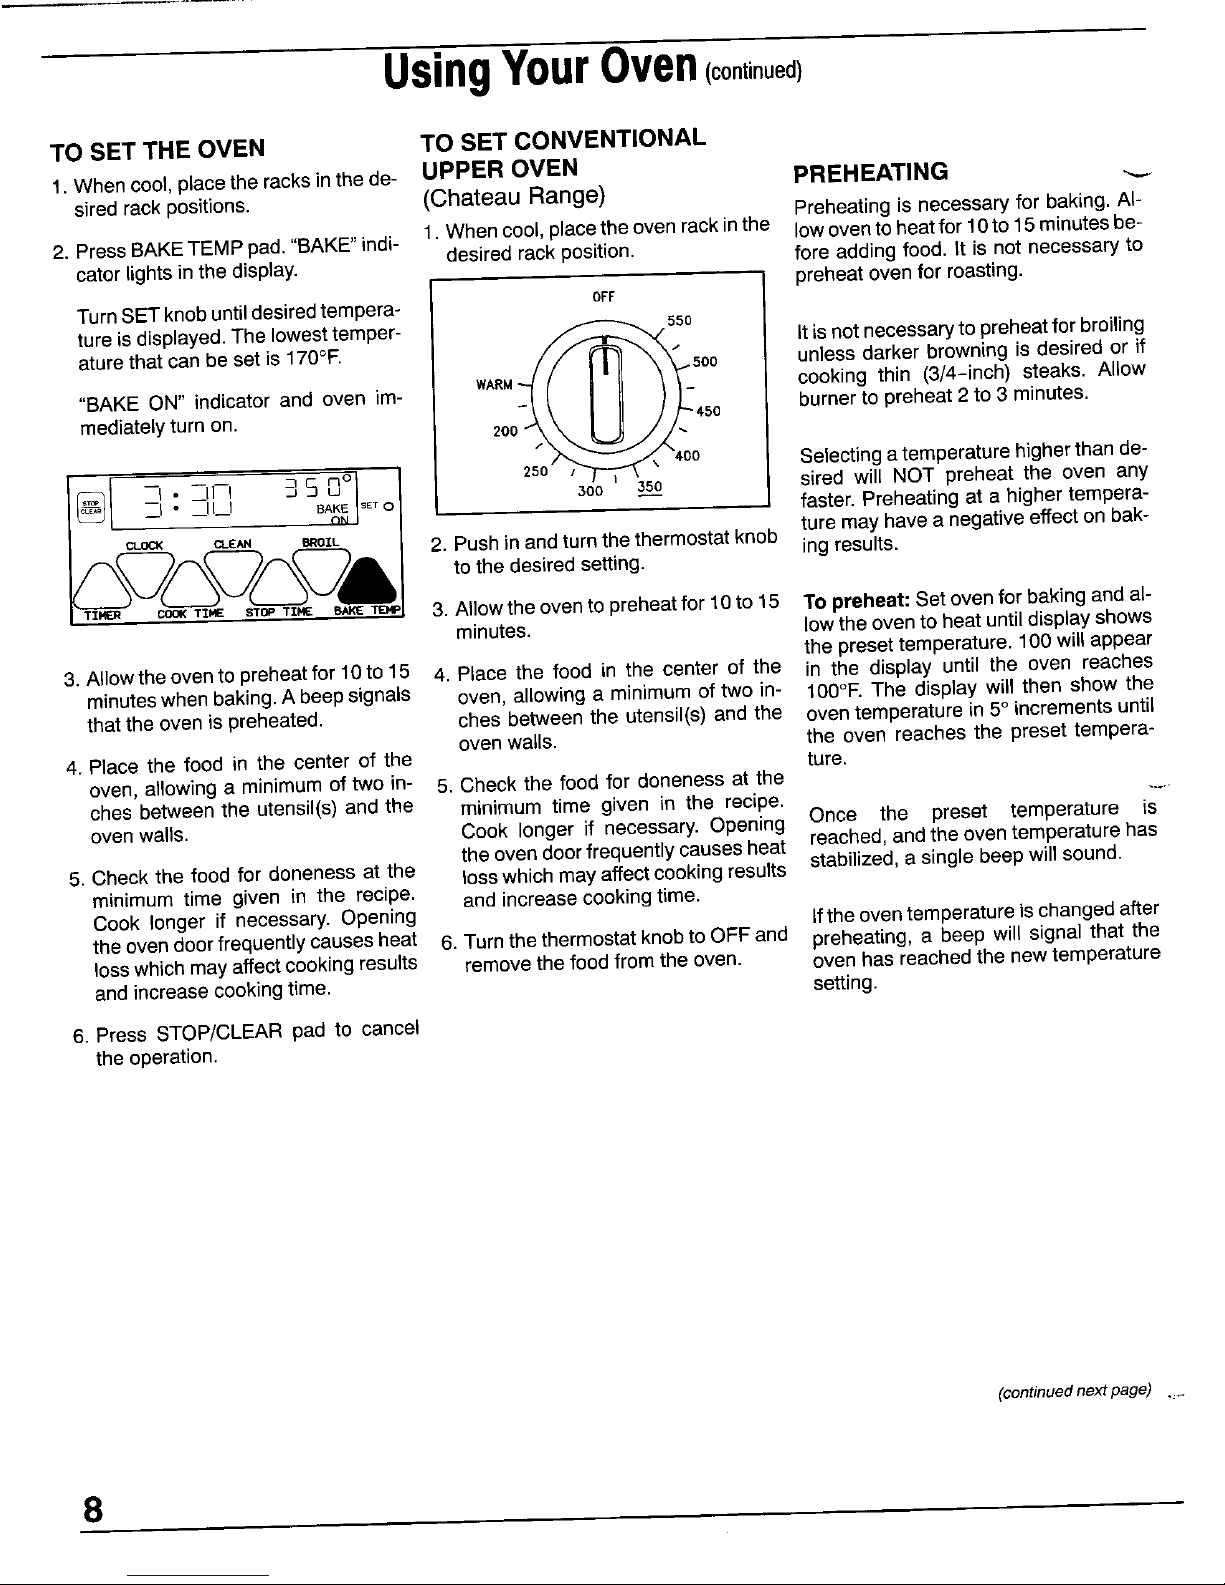
TO SET THE OVEN TO SET CONVENTIONAL
1.Whencool,placetheracksinthede- UPPER OVEN PREHEATING
sired rack positions. (ChateauRange)
Preheatingis necessaryfor baking,AI-
2. PressBAKETEMPpad."BAKE"indi- 1. Whencool, placetheovenrackinthe Iowoventoheatfor10to15minutesbe-
catorlightsinthe display, desiredrack position, fore adding food. it is not necessaryto
preheatovenfor roasting.
TurnSETknobuntildesiredtempera- ocF
ture isdisplayed.The lowesttemper- /_----------_ _50 Itis not necessaryto preheatfor broiling
aturethat can be set is 170°F /f _ _" oo unless darker browning is desiredor if
"BAKE ON"indJcatorandovenim- WARM_/(/ I|11 "_": cooking thin (3/4-inch) steaks. Allow
- _\ I ]J J J---4so burnerto preheat2 to 3 minutes.
mediatelyturnon. 200_kxX L._j.._..
,,_/"--- -- _-_ 40o Selectingatemperaturehigherthande-
25o '-7 _-'_ " sired will NOT preheat the oven any
300 350
_, o -- faster. Preheatingat a highertempera-
ture mayhave a negativeeffecton bak-
CLOC_ CLEAN _RO_L 2.Pushin andturnthethermostatknob ingresults.
_(_(_(_(_A tothe desiredsetting.
TZ,Cn CO=TZ_¢STO_T_ _ T¢_ 3. Allowtheovento preheatfor 10to 15 Topreheat: Setovenfor bakingandal-
minutes, lowthe ovento heatuntildisplayshows
thepresettemperature.100willappear
3.Allowthe ovento preheatfor 10to 15 4, Place the food in the center of the in the display until the oven reaches
minuteswhenbaking.A beepsignals oven, allowing a minimumof two in- 100°F.The displaywill then show the
that the oven is preheated, ches betweenthe utensil(s)andthe oventemperaturein5° incrementsuntil
ovenwails, the oven reaches the preset tempera-
4. Place the food in the center of the ture.
oven,allowinga minimumof two in- 5. Check the food for donenessat the
ches betweenthe utensil(s) and the minimum time given in the recipe. "-
ovenwalls, Cook longer if necessary. Opening Once the preset temperature is
theovendoorfrequentlycausesheat reached,andthe oventemperaturehas
5. Checkthe food for doneness at the losswhich mayaffectcookingresults stabilized,a singlebeepwillsound.
minimum time given in the recipe, andincreasecookingtime.
Cook longer if necessary. Opening Lfthe oventemperatureischangedafter
theovendoorfrequentlycausesheat 6. Turnthethermostatknobto OFFand preheating, a beep will signalthat the
losswhichmayaffectcookingresults removethe foodfrom the oven. oven has reachedthe newtemperature
and increasecookingtime. setting.
6. Press STOP/CLEAR pad to cancel
theoperation.
(continued next page) ....
8
Page 10

UsingYourOven(continued)
"_ (continuednextpage)
Page 11

UsingYourOven(continued)
(continuednextpage)
10
Page 12

CommonBakingProblemsAndWhyTheyHappen
..- Cakesare uneven. Panstouchingeachotheror Cakesdon't brown on top, Incorrectrack position.
ovenwalls. Temperaturetoo low.
Batter unevenin pans. Overmixing.
Oventemperaturetoo lowor Toomuch liquid.
bakingtime too short. Pansize too large ortoo little
Ovennot level, batterin pan.
Undermixing. Ovendoor openedtoo often.
Toomuch liquid.
Excessiveshrinkage. Toolittle leavening.
Cakehigh in middle. Temperaturetoohigh. Overmixing.
Bakingtime too long. Pantoo large.
Overrnixing. Temperaturetoo high.
Toomuchflour. Bakingtime too long.
Panstouching eachother or Panstoo closeto eachother
ovenwalls, or ovenwalls.
Incorrectrack position.
Cake falls. Too much shorteningorsugar. Uneventexture. Too muchliquid.
Toomuchortoo little liquid. Undermixing.
Temperaturetoo low. Temperaturetoo low.
Oldor too little baking powder. Bakingtime tooshort.
Pantoo small,
Oven dooropenedfrequently. Cakeshave tunnels. Notenoughshortening.
Added incorrecttypeof oil to Toomuch baking powder.
cake mix. Overmixingor at too high a
Added additionalingredients speed.
tocake mix or recipe. Temperaturetoo high.
Cakes,cookies,biscuits Incorrectrackposition.
don'tbrownevenly, Ovendoor not closed properly. Cakescrackon top. Batterovermixed.
Doorgasket notsealing Temperaturetoo high.
properly, Toomuch leavening.
.... Incorrectuse of aluminumfoil. Incorrectrack position.
Ovennot preheated.
Pansdarkened,dentedor
warped. Cakenot donein middle. Temperaturetoo high.
Pantoo small.
Cakes,cookies,biscuitstoo Oven notpreheated.
brownon bottom. Panstouching eachother or
ovenwalls, Piecrustedges too brown. Temperaturetoo high.
Incorrectrack position, Panstouching eachotheror
Incorrectuseof aluminumfoil ovenwalls.
Placed2 cookiesheetson one Edgesof crust toothin.
rack. Incorrectrackposition.
Usedglass,darkened,stained,
warpedor dull finish metal Pies or cakes don't brown Used shiny metalpans.
pans. (Usea shiny cookie onbottom. Temperaturetoo low.
sheet.)
Pies havesoakedcrust. Temperaturetoo low at startof
baking.
Fillingtoo juicy.
Used shiny metalpans.
11
Page 13

UsingYourOven(continued)
AUTOMATICOVENCOOKING
Automaticcookingfeature is used to TO BAKE BY TIME
turntheovenonandoffat the preset with immediate START:
time-of-day.Thisfeaturecanbeused
todelaythestartof a cookingopera- 1. Press BAKE TEMP pad. "BAKE"
tion. lightsin thedisplay.
To resetor cancelthe program:Press .,--, --,, . rnmno
Theautomaticcookingfeaturewill not the STOP/CLEARpad.
operateunlesstheclockisfunctioning
and isset at thecorrecttime-of-day. After setting the AutomaticCooking CLO= CLEA. BROZL
feature,presstheCLOCKpadandthe ___A
GENERAL INFORMATION time-of-day will reappear in the dis-
IMPORTANT: Highly perishable play. "TIMED BAKE ON", "DELAY TZE. _ TZ.E _ropTZ.¢ 6_ETE_
BAKE"or"DELAYTIMEDBAKE"and
foods such as dairy products, pork, the oven temperaturewill remain in 2. Enter oven temperature with the
poultry,seafoods or stuffing are not SETknob.
recommendedfor delayed cooking. If thedisplayasareminderthattheoven
cooking more than one food, select is set for a cookingoperation. 3. Press COOK TIME pad. "SET
foodsthatcook forthe samelengthof At end of cooking, continuousbeeps COOKTIME"flashes inthedisplay.
time and at the same oven tempera- will sound. Press STOP/CLEARpad ,no
ture. to cancelbeeps. " ° I II I _ cj
CLEAN BRGIL
4. Entercookingtime(how longyou ....
wish food to cook)with the SET
knob.
"TIMEDBAKEON"lightsinthedis-
play.Theovenautomaticallyturns
onandthedisplaybeginsto count
down.
--I .. • _11 I _ _ 0°1
I__ ,=oo_"__libEl _I_,.EDea,KEJl
CLOCK CLEAN BROIL
5. At the end of the preset cooking
time, the oven automatically turns
off.
6. Press STOP/CLEARpad to can-
cel end-of-cookingbeeps.
(continuednextpage)
12
Page 14

UsingYourOven
AUTOMATIC OVEN COOKING (continued)
TO BAKE BY TIME
with delayed START:
1, Press BAKE TEMP pad, "BAKE"
lights in the display.
ILl-- mmO._°J
Ill.--_,,--, u u
• I LI
CLOCK CLEAN BROIL
TZMER COOK TIME STOP TIFtE BAKE TIEHP
2. Enter oven temperature with the
SET knob.
3. Press COOK TIME pad. "SET
COOK TIME" flashes in the display.
I "_ "FiF'., ,, , _SO° 1
SE_ COC_<-- _ME ¢_KE
CLOC_ CLEAN BROZL
TIMER COOK TIH_ STOP TIME bAKE "IEMP
_. Enter cooking time (how long you
wishfoodto cook) withthe SET knob,
5. Press STOP TIME pad, "SET STOP
TIME" flashes in the display,
Enter the time you wish the oven to
turn off by turning the SET knob.
i-. .i-lrl _SO °
CLOCK CLEAN BROIL
TZMER COO( TZHE STOP TZHE BAKE TEI4P
Depending on your model, either
"DELAY TIMED BAKE" or "DELAY
BAKE" will light in the display and the
time of day will then reappeac
6. The oven will automatically turn on
and will automatically turn off at the
preset times.
7. Press STOP/CLEAR pad to cancel
end-of-cooking beeps, (continuednextpage}
13
Page 15

UsingYourOven(continued)
HOWTO BROIL
Broiling is a method of cooking used for tender steaks, rareinterior,the meatshould be closeto the burner.Place
chops,hamburgers,chicken,fish,andsomefruitsandvege- the panfurtherdownifyouwishthe meatwelldoneorifsp_
tables.Thefood is placeddirectlyunderthe ovenburner, teringandsmokingoccurs.
Thecookingtimeisdeterminedbythe distancebetweenthe The distance from the burner dependson the thickness of
meat andthe burner,the desireddegreeof doneness,and themeatand desireddegreeof doneness.Thin cuts should
thethicknessofthe meat. be placedon rack#1(top)or#2 (middle);thickercutsshould
beplacedonrack#2 or #3(bottom).Broil untilthe top ofthe
GENERALTIPS meat is browned. Itshouldbeapproximatelyhalfcookedby
Broilingrequirestheuseofthe broilerpanandinsertsupplied thetimethe top is browned.
withyourappliance.Itisdesignedto drainexcessliquidand
fat away from the cooking surface to prevent spatters, Trimexcessfatto preventexcessivespatteringor smoking.
Cutslashesinthe outeredgesofthemeattopreventcurling
smokeandflare ups. duringcooking.
Foreasierclean-up, linethe broilerpan(bottompiece)with
aluminumfoilandspraythe insertwitha non-stickvegetable Ifyou plan to season the meat,it is betterto do so afterthe
coating.Donotcoverthebroilerpaninsertwithaluminumfoil surface has browned. Salttends to delay browningwhich
as this preventsfat from draining into the pan below.The canresultin overcooking.Saltingbeforecooking alsodraws
broilercanbepreheatedforafew minutes.However,do not the juices out of the meat,causingdryness.
preheatthe broiler panand insert.
Ifthe foodisplacedtoocloseto the burner,overbrowning
andsmoking mayoccur.Generallyfor a brown exteriorand
BROILINGCHART
Quantity &/or Rack Approx,Minutes/Side
Food Thickness Temp Position* Doneness 1stSide 2ndSide
Bacon thickslice Lo 2 well 3 - 4 1- 2
BeefPatties 3/4" thick Hi 2 rare 2 - 3 2- 3
2 medium 4 - 5 3- 4
2 well 4 - 6 4- 5
Steaks 1"thick Hi 2 rare 3 - 4 3- 4
2 medium 5 - 6 3 - 5
2 well 6- 8 5 - 7
112"thick Hi 2 rare 6- 7 5 - 6
2 medium 7 - 8 6 - 7
Lo 3 well 9 - 11 9 - 11
ChickenBreast Lo 3 well 10- 14 8 - 10
Halves
FishFillets 1"thick Lo 2 5 - 7 4- 6
12"thick 2 3 - 5 3- 5
HamSlices 1/2"thick Hi 2 3 - 5 2 - 4
(precooked)
PorkChops 1" thick Lo 4 well 9- 11 6 8
Weiners/Sausage Hi 2 2 - 3 1 - 2
(precooked)
* The top positionisrack #1.
NOTE:CookingtimesintheBroilChartarebasedona2to3 minutepreheat.Follow
thesuggestedtimesinthe broilingchart.Meatshouldbeturned onceabouthalfway
throughitscookingtime.Checkthedoneness bycuttingaslit inthe meat nearthe ._.
centerto check the color.
14
Page 16

Maintenance
COOKTOP BURNER GRATES DUAL PURPOSE
_ecooktopis designedwithtwocon- SEALED BURNERS
touredwellswhichcontainspillsuntil Thefoursealedburnersare securedto
theycan bewipedup.Unlikethe stan- thecooktopandareNOTdesignedto be
dard gas appliance,THIS COOKTOP removedbytheconsumer.
DOES NOT LIFT-UP NOR IS IT RE-
MOVABLE.To preventdamageto the Sincethefour burnersare sealed into
gastubingortop, do notattemptto lift thecooktop,boiloverswon'tseepunder-
neathto the burner box area. Thus,
cooktop. When reinstallingsquaregrates,place thereareno hiddenspillsinthe burner
-_. _ indentedsidestogethersostraightsides boxareato clean.
areatfront and rear.
IGNITORS
Whencleaningaroundthesurfaceburn-
er, use care to preventdamage to the
spark ignitor which is located at the
back-side of each burner.If a cleaning
cloth should catch the ignitor, it could
damageor break it. Ifthe ignitorisdam-
agedor broken, the surface burner will
notlight.
_ Burner gratesare durablebut may lose Ignitor
their shinedue to usage and high tern- REARVIEWOFSEALEDBURNER
peratures.
(continuednextpage)
VALVE ADJUSTMENT
TheLOWsettingshouldproduceasta-
bleflamewhenturningtheknobfromHI
toLO.Theflameshouldbe 1/8 inchor
lowerandmustbestableonallportson
LOWsetting.
To adjust: Operate burneron HI for NOTE: Allgas adjustmentsshouldbe
about5 minutesto preheatburnercap. donebya qualifiedserviceronly.
Turnknobbackto LO;removeknob,
and inserta small screwdriverinto the
centerof the valvestem.Adjustflame
size by turningadjustmentscrew in
eitherdirection.
15
Page 17

Maintenance(continued)
OVEN DOOR OVEN RACKS STORAGE DRAWER
Thetwoovenracksaredesignedwitha Thestoragedraweratthebottomofti"
lock-stopedgeto keepthe racksfrom rangeis safeandconvenientforstoring-
comingcompletelyoutoftheoven. metal and glasscookware.DO NOT
storeplastic,paperware,food orflarn-
Toremove:Besuretherackiscool.Pull mablematerialinthisdrawer.Remove
therackstraightoutuntilitstops.Tiltthe drawertocleanunderrange.
frontofthe rackupandcontinuepulling Storecleanbroilerpanandinsertinthe
Whenopeningovendoor,allowsteam therackoutoftheoven.
andhotairto escapebeforereachingin broilerdrawer.
oventocheck,addorremovefood. Toreplace:Tiltthefrontendofthe rack
upandplacetherackbetweentherack To remove: Empty drawer then pull
draweroutto thefirststopposition.Lift
To remove door: Open door to the supports.Slideitbackuntilitclearsthe upfrontofdrawerandpulltothesecond
"stop"position(openedabout4 inches) lock-stopposition.Lowerthe frontand stopposition.Graspsidesandliftupand
andgraspdoorwithbothhandsat each slidetherackstraightin.Pulltherackout out to remove drawer. Gently move
side.Donotusedoorhandletoliftdoor. to thelock-stoppositionto besureitis drawer side-to-side as you pull the
Liftupevenlyuntildoorclearsthehinge positionedcorrectlyandthenreturnitto drawerout.
arms. itsnormalpositon.
To remove: When cool, remove the To replace: Fit ends of drawer glide._
oven racks. Slide the two catches, Io- onto rails. Liftup drawer front and gently
cated at each rear corner of the oven push in to first stop position. Gently
bottom, toward the front ofthe oven. move drawer side-to-side as you push
in the drawer. Liftup drawer again and
,__ continue to slide drawerto the closed
position.
To replace door: Grasp door at each o 2
side,alignslotsinthedoorwiththehinge -r_-_/ _
armsandslidedoordownontothe hinge
1t3
armsuntilcompletelyseatedon hinges. _.
Liftthe rear edge of the oven bottom
slightly,then slide it backuntil the front
edgeoftheovenbottomclearstheoven
frontframe. Removeoven bottomfrom
oven.
To replace:Fitfront edge of oven bot-
tomintofrontframe. Lowerrear ofoven
bottomand slide the catchesback to
lockovenbottomintoplace. (continuednextpag
16
Page 18

Maintenance(cont .ue)
qACKGUARDLIGHT BACKPANELLIGHT LOWEROVEN LIGHT
.._ turn on backguard light, press and (ChateauRangeOnly) (ChateauRangeOnly)
hold "cooktop" rocker switch until light On conventionalupperoven:Toturn on To turn on oven light, press rocker
turns on. The switch is located on the light, pressbuttonmarked"BACKPAN- switch,locatedon manifoldpanel,tothe
backguard. EL" which is locatedat the base ofthe "ON"position.
controlpanel.
To replacefluorescent surfacelight: Toreplaceovenlight:Beforereplacing
Disconnectpowerto range.Grasp the On microwaveoven model: Toturn on light bulb, DISCONNECT POWERTO
toptrim ofbackguardwiththumbsunder light, press"ON" padlocated at baseof RANGE. Be sure bulb is cool. Do not
front edge and pulloutwardwhile lifting microwavecontrol panel, toucha hotbulbwith adampclothasthe
toreleasetrimfrom catchesateachend. bulbmaybreak.Useadrypotholderand
Toreplace fluorescent surface light: carefullyunscrewbulb coverand bulb.
Before replacing light, DISCONNECT
POWERTO RANGE.Besure bulb and
rangeparts are co°l- D° not t°uch a hot _ __ 0
bulbwith a damp cloth asthe bulb may .....
break.
Removethreescrewsholdingtrimpiece
alongtop edgeof glassOR two screws
holding trim piece along side edge of Replacewith a 40 watt appliance bulb
Remove bulb and replacewith an 18 glass. Support glass while removing and bulb cover. Reconnect power to
watt fluorescent tube. Snap top trim screwsso glasswill notfall forward. Re- rangeand reset clock.
backintoplace,restorepower,andreset movebulband replace.Restorepower,
clock, check light operation prior to replacing UPPEROVENLIGHT
glasspanel andresetclock. (ChateauRangeOnly)
_VEN LIGHT Onmicrowaveoven model, referto the On conventionaloven only: To turn on
oven light, push in button, located at
separatemicrowaveovenuse and care
base of controlpanel.
bookletfor instructionsonremovingthe
cooktoplightbulb. Onmicrowaveoven:Ovenlightturnson
wheneverthe door is opened or when
Before replacing oven light bulb, DIS- the oven is ina cook or defrost opera-
CONNECT POWER TO RANGE. Be tion.
sure bulband range partsare cool. Do
nottouchahotbulbwithadampclothas To replaceconventional oven light:
thebulb maybreak. Before replacing light bulb, DISCON-
NECT POWER TO RANGE. Be sure
To replace oven light: Use a dry pot bulb is cool. Use a dry potholder and
holder, to prevent possible harm to very carefullyremovebulb.Replacewith
hands;andvery carefully unscrewbulb a 40wattAPPLIANCEbulb. Reconnect
coverandbulb. Replacewith a 40-watt
APPLIANCEbulb. Replacebulb cover, powerto the rangeand reset clock.
Reconnectpowertotherangeandreset Onmicrowaveoven model:Referto the
clock, separatemicrowaveovenuse and care
bookletfor instructionson removingthe
_ _ _____ ovenlight bulb.
17
Page 19

GeneralInformation
ELECTRICAL CONNECTION USE OF ALUMINUM FOIL HOW TO REMOVE
Appliances which require electrical Use aluminum foil ONLY as RANGE FOR CLEANING
power are equipped with a three- instructedin this book. Improperuse AND SERVICING
pronggroundingplug whichmustbe ofaluminumfoilmay causedamageto Followtheseproceduresto removeap-
plugged directly into a properly theoven,affectcookingresults,andcan plianceforcleaningorservicing:
groundedthree-hole120voltelectrical alsoresultinshockand/orfire hazards. 1. Shut-offgassupplytoappliance.
outlet.
Foilcanbeusediftheseguidelinesare 2. Disconnectelectricalsupplyto ap-
followed: pliance,ifequipped.
3. Disconnectgas supply tubing to ap-
Fq_ • Do not use aluminumfoil directly pliance.
_ under the cookware. Foil will reflect
_ heatawayfromtheutensilcausing inad- 4. Slide range forward to disengage
equate browning. Placinga pie directly rangefrom theanti-tip bracket.(See
InstallationInstructionsforlocationof
:, onfoil mayresultinasoggybottomcrust bracket.)
and inadequatebrowning.
5. Reverseprocedureto reinstall.If gas
= • Do notplacealuminumfoil directly linehasbeendisconnected,checkfor
A/ways disconnectpower to app/i- on the ovenbottomas thismaydam- gasleaksafterreconnection.(SeeIn-
ancebefore servicing, age the oven bottom. A pieceoffoil stallationInstructionsforgasleaktest
that is slightlylargerthan the cooking method.)
utensilcanbeplacedontherackdirectly NOTE: A qualifiedservicershoulddis-
The three-prong groundingplugoffers belowtherackcontainingtheutensil, connectand reconnectthe gassupply.
protectionagainstshockhazards.DO
NOT CUT OR REMOVETHE THIRD . Do not completely cover an oven To prevent range from accidentlytip-
GROUNDING PRONG FROM THE ra¢kwith foil.Thisblocksairflowinthe ping,rangemustbesecuredtothefloor
POWERCORDPLUG. oven,constitutesa safety hazard,and byslidingrearlevelinglegintoan anti-
willadverselyaffectcookingresults, tip bracketsuppliedwiththe range. -_
WARNING: Possible risks may result
• Never cover the broiler insert with from abnormal usage, includingexces-
aluminum foil as this prevents fat siveloadingofthe ovendoorand ofthe
from draining to the pan below. The riskof tip over,shouldthe appliancenot
broiler pancan be lined withfoil. be reinstalled accordingto the installa-
tion instructions.
LEVELING LEGS
Levelinglegsarelocatedoneachcorner
ffthe baseof the range.
Place a level horizontally on an oven
rack and check front-to-back and sid,
to-side. Level by turning the legs. --
18
Page 20

CareandCleaning
CLEANING CHART
PARTS CLEANINGAGENTS DIRECTIONS
Baked Enamel • Soapand water Useadrytowelorclothtowipeupspills,especiallyacid(milk,lemonjuice,fruit,mustard,
or PorcelainEnamel • Pasteof bakingsoda andwater tomato sauce)or sugaryspills.Surfacemaydiscoloror dull ifsoilis notimmediatelyre-
• Cooktop • Mildliquidcleaner moved.This isespeciallyimportantfor white surfaces.
• Ovendoor • Glasscleaner
Broilerdrawer Whensurfaceiscool,wash withwarmsoapywater,rinseanddry.Forstubbornsoil,use
Sidepanels mildlyabrasivecleaningagentssuchasbaking sodapasteor SonAmi. Ifdesired,athin
• Backguard coatofmildappliancewaxcanbeusedto protectthesidepanels.Aglasscleanercanbe
usedto add "shine"to the surface.
NOTE:Donotuseabrasive,causticorharshcleaningagentssuchassteelwoolpadsor
ovencleaners.These productswill scratchor permanentlydamagethe surface.
NOTE:Neverwipea warmorhotsurfacewitha dampclothasthismaydamagethesur-
faceand maycause asteamburn.
Broilerpan and • Soap andwater Removefromovenafteruse.Coolthen pouroffgrease. Placesoapyclothoverinsertand
insert • Plasticscouring pad pan;let soakto loosensoil.Washinwarmsoapywater.Usesoap-filled scouringpadto
• Soap-filled scouring pad remove stubbornsoil. Cleanin dishwasherif desired.
• Dishwasher
NOTE:Foreasiercleanup,sprayinsertwithanon-stickvegetablecoatingandlinebroiler
panwithaluminumfoil.
NOTE:Always storecleanbroilerpan andinsertinthe broilercompartment.Ifpan and
insertare notcleanedaftereachuse,thesoilmightbecomehotenoughto ignitethenext
timethe oven isused.
Chromedrip bowls, • Soapand water Clean bowlsaftereachuse withsoap and water.Removestubbornstainswith baking
if equipped • Paste ofbaking soda andwater sodapasteandplasticscouringpad.Topreventscratchingthefinish,donotuseabrasive
• Plasticscouringpad cleaningagents. Rinse,dry andreplace.
NOTE:Bowlscanpermanentlydiscolorifexposedtoexcessiveheatorifsoilisallowedto
bakeon.
Control knobs • Soapand water Toremoveknobsforcleaning,gentlypullforward.Washin milddetergentandwater.Do
notsoakknobsinwater.Donotuseabrasivecleaningagents.Theywillscratchfinishand
removemarkings.Rinse dryand replace.TurnONeach burner to see if knobs have
beenreplacedcorrectly.
(continuedon nextpage)
19
Page 21

CareandCleaning(coo,,.oed)
PARTS CLEANING AGENTS DIRECTIONS
Glass • Soap andwater Washwithsoapandwater.Usea windowcleanerandasoftclothaftercleaning.Remov_
• Backguard • Pasteof bakingsodaandwater stubbornsoil withpasteof bakingsoda andwater.Rinsewithaclothwrungoutin clear
• Ovenwindow • Glasscleaner water.Dry.Donotuseabrasivematerialssuchasscouringpads,steelwoolorpowdered
cleaningagents.
NOTE:Toavoid inside stainingof oven door glass,donot oversaturatecloth.
Grates • Detergentandwater Gratesare madeofporcelain-coatedsteel.Theycanbecleanedatthe sinkwithdeter-
. Non-abrasive plasticpad gentandwaterorinthe dishwasher.Toclean bakedonsoil, placeadampsoapy paper
toweloverthegrateandletstandfor30Tin utes.Useanon-abrasiveplasticpadtoscour
stubbornsoil
NOTE:Neveroperateburnerwithoutagrateinplace.Toprotecttheporcelainfinishonthe
gratefromexcessiveheat,neveroperatesurfaceburnerwithoutacookingutensilonthe
grate,Itis normalforgrates to losetheir shineovera periodof time.
Metalfinishes • Soapandwater Washwith soapandwater.Removestubbornsoilwithpasteofbakingsodaandwater.
• Backguard • Paste ofbaking soda andwater Use a window cleaneranda softclothto removefingermarksor smudges.
• Trimparts • Glasscleaner
• Manifoldpanel NOTE:Donotuseovencleaners,abrasiveorcausticagents.Theywil)damagethefinish.
Oven bottom See pages21and22 for instructions.
• Self-clean porcelain
Protectthe ovenbottomby (1) usinglargeenough cookwareto prevent boilovers;(2)
placea pieceofaluminumfoil,thatis slightlylargerthanthecookware,onthelowerrack.
NEVERplacefoil directly onthe ovenbottom.
Protectovenbottomagainstacidspills(milk,cheese,tomato,lemonjuice,etc.)orsugary
spills(pie filling)as they may pit or discolorthe oven bottom.
Oven cavity See pages21and 22 forinstructions.
• Self-clean porcelain
Wipeacidorsugarstainsassoonasthe oveniscoolasthesestainsmaydiscolororetch
the porcelain.
Upperconventional Cleaning action begins whenever the ! Brush off heavy soil with a nylon or plastic pad. Do not use paper towels, cloths, (_
oven cavity oven is on.The oven mustbe usedfor ! spongesbecausetheovenwallsareporousandparticlesofthesematerialswillruboffon
(ChateauRange cleaningtotakepace Higheroventem- thewalls.Rinseareawithcleanwateronly.Donotuseanytypeofovencleanar, cleanser
only) )eratures and longer baking times ! or detergenton thissurface.
• Continuousclean speedthecleaningaction.
oven,see page23
Ovenracks • Soapand water Cleanwithsoapywater.Removestubbornsoilwithcleansingpowderorsoapfilledscour-
. Cleansingpowders ing pad. Rinseanddry.
• Plasticpad
• Soapfilled scouringpad NOTE:If racksbecomedifficulttoslide,athin coatofvegetableoilontheundersideofthe
rack wi}lmakeslidingeasier.
Plasticfinishes • Soapand water Whensurfaceiscool,clean withsoapand water;rinse,and dry.Usea windowcleaner
• Doorhandles • Paste ofbakingsoda and water and a softcloth.
• Backguardtrim • Non-abrasive plasticpador sponge,
• Overlays NOTE:Neveruseevencleaners,abrasiveorcausticliquidorpowderedcleaningagents
• Knobs on plasticfinishes.These cleaningagents willscratch or mart finish.
• Endcaps NOTE:Topreventstainingor discoloration,wipeupfat, greaseoracid (tomato,lemon,
vinegar,milk,fruit juice,marinade)immediatelywith a drypaper towel or cloth.
Silicone rubber • Soap andwater Wash with soapandwater,rinse and dry.Donot remove doorgasket.
• Doorgasket
Sealed burners • Soapandwater Clean,whencool,asnecessarywithwarmsoapywater.Removestubbornsoilbyscour-
• Paste ofbaking soda andwater ingwithanon-abrasive plasticscouringpadandapasteofbakingsodaandwater.Clean
• Plastic scouringspongeor pad portswithastraightpin. Donotenlargeordistorttheports. Donotuseawoodentoothpick.
Itmaybreakoffendclogport.Sealedsurfaceburnerscannotberemovedbytheconsum-
er.
NOTE:Whencleaningaroundthesurfaceburner,usecaretopreventdamagetotheigni-
torwhich islocatedatthe back-sideof eachburner.Ifa cleaningclothshould catchthe
ignitor,itcoulddamageorbreakit. Iftheignitorisdamagedor broken,thesurfaceburner
willnot light.
2O
Page 22

Self-CleanOven
HOW TO SET OVEN FOR A CLEAN CYCLE
1. Close door and move door lock lever
to the right (locked position).
2. Press CLEAN pad.
If door is not locked as described,
"door" will flash in the display.
3. When the CLEAN pad ispressed, the
oven will automatically clean for 3
hours.
I" .1 II I
SET CLEAN TIME
A shorter (2 hour) or longer (4 hour)
clean cycle can be selected by turn-
ing the SET knob.
(continued next page)
21
Page 23

Self-CleanOven(continued)
BEFORE SELF-CLEANING DURING SELF-CLEANING AFTER SELF-CLEANING
Theself-cleanovenusestemperatures Itis normalforthecooktopoftherange Aboutonehourafterthecleancycle
abovenormalcookingtemperaturesto to becomehot duringa clean cycle, completed,the internallockwill disef_.
automaticallycleantheentireoven. Therefore,touchingthe cooktopduring gageandthedoorlatchcanbereturned
a self-cleancycleshouldbeavoided, to its original(unlocked)position.Turn
selectorknobtoOFF.
The oven automaticallybeginsto heat
upwhenthedoorislocked.Astheoven
reachescleaningtemperaturesaninter- Do not attemptto unlock door until
nallockengagesandtheovendoorcan internal lock disengages. Door and
Turnoffoven lightbeforecleancycle, notbeopened.Donotforcelatchtothe latch will be damaged if the latch is
The lifeof the bulb may beshortenedif leftoncethe internallockengages, forcedto the left before internallock
leftonduringthecleancycle.
The firstfewtimestheovenis cleaned, disengages.
Clean oven frame, door frame and somesmokeandodormaybedetected.
aroundthe ovenventwitha non-abra- This isnormaland willreduceordisap-
sivecleaningagentsuch as BonAmi. pear with use. If the oven is heavily Somesoilmayleavea lightgray,pow-
Theseareas are notexposedtoclean- soiled,or ifthe broilerpanis leftinthe dery ashwhichcanbe removedwitha
ingtemperaturesandshouldbecleaned oven,smokeandodormayoccur, dampcloth.If soilremains,it indicates
topreventsoilfrombakingonduringthe that the clean cycle was not long
cleancycle. As the ovenheatsandcools,youmay enough.The soilwillberemovedduring
hear sounds of metal parts expanding the nextclean cycle.
Wipe up excess grease or spillovers and contracting.This is normaland will
fromthe oven bottomto preventexces- not damageyourappliance.
sive smoking or flare-ups during the If the oven racksdo not slide smoothly
cleancycle, aftera clean cycle,wipe racks andem-
Do not use oven cleanersor oven liner bossed rack supports with a small
protectivecoatings of any kind on the amountof vegetableoilto restoreease
self-cleanovenfinishoraroundanypart of movement.
oftheoven.
Toprevent damage,do notclean or rub Fine,hair-like lines may appear in the
the gasket aroundthe oven door. The oven interioror ovendoor.This is a nor-
gasketisdesignedto sealin heatduring mal conditionresultingfrom heatingand
theclean cycle, cooling of the porcelain finish. These
lines do not affect the performanceof
theoven.
22
Page 24

CareandCleaning
CONTINUOUSCLEANINGOVEN(ConventionalUpper OvenOnly)
WHATISTHE CONTINUOUS MANUALLYCLEANING HINTS
CLEANINGOVEN? HEAVYSPILLOVERS Brittlecrustsorstainscanbe loosened
The finishof the ContinuousCleaning The specialfinishwillcleanmostspat- byGENTLYtappingstainwithawooden
Ovenis identifiedby itsdark graycolor, ters during normal oven use unless orplasticutensil.Brushawayany loose
and rough, porous texture. The rough there is a heavy buildupof soil. Heavy soil that flakes off. Varnishtype stains
texture prevents grease spatters from spillovers such as pie or casserole usuallyneedto besoftenedwith a small
formingbeadswhichrundownthewalls boilovers will not clean effectivelywith- amountofwateror dampcloth.Remain-
leaving unsightly streaks. Rather, the out some manual help. The crusty or ingsoilwillgraduallyreducewithcontin-
rough texture absorbs spattersand al- varnish-like stains that form fromthese uedovenuseatnormalbakingtempera-
lows them to spread, thus exposing a spilloversclogtheporesandpreventthe tures.
largerareatothe hotovenair.Thecata- specialfinishfrom beingexposedto the
lyst, when exposedto heat,speedsthe hot oven air. This greatly reduces the
oxidationof soil. cleaningeffectivenessofthe finish. DO NOT USE ANY TYPE OF OVEN
CLEANER, POWDERED CLEANS-
ERS,SOAP,DETERGENTOR PASTE
Cleaning action automatically begins Thesecrustyorvarnish-likestainsmust ON ANY CONTINUOUS CLEANING
whenevertheoven is turnedon for bak- eitherbe removedor broken up before SURFACE.ALSO, DO NOTUSE ANY
ingorroasting.TheovenMUSTbe"on" cleaningcaneffectivelytake place. ABRASIVE MATERIALS, STEEL
for cleaningto take place. No cleaning WOOL, SHARP INSTRUMENTS OR
willoccurwhentheoven isoff.The spe- SCRAPERS FOR THEY WILL DAM-
cial catalyticfinishmustbe exposedto TO MANUALLYCLEAN AGETHE FINISH.
hot oven air before soil will begin to HEAVYSPILLOVERS
graduallyreduceinsize. Brushoffheavysoilwithanylonbrushor
plasticpad.DONOTUSEpapertowels, Avoidspilloversby usingutensilsthat
FACTORSAFFECTINGLENGTHOF clothsorspongesfortheovenwallsare arelargeenoughto holdfood.A cookie
porousandparticlesofthesematerials sheetorpieceofaluminumfoil,justa lit-
CLEANINGTIME willruboffonthewalls,Rinseareawith
,e higherthe oven temperature,the tie largerthanthepan,canbeplacedon
f'asterthe cleaningaction.Thelengthof clearwateronly. the rackdirectlybelowthe rackholding
cleaningtimewilldependonthese fac- theutensilto catchspills.
tors:Typeofsoil,amountor size of soil,
oven temperature and length of time
ovenisinuse.Timemayvaryfromafew Over a periodof time,wear marks may
minutestoseveralhours.Soildeposited appearontheembossedracksupports.
attheendof a cyclemaystillbe visible. This is normaland results from sliding
This will usually fade with continued the racks in and out of the oven. Wear
oven use untilthe soil graduallydisap- markswillnotaffectthe cleaningaction
pearsorcan be wipedup manually.The / ofthe oven.
oven will appear presentably clean,
eventhoughsomespattersmaybe pre-
sent.
23
Page 25

Service
BEFORE CALLING A SERVICETECHNICIAN,CHECK THE FOLLOWING:
PROBLEM CAUSE CORRECTION
1. Surfaceburnerfailsto light a. powersupply notconnected a. connectpower,checkcircuitbreaker or
(pilotlessignition) fusebox
b. cloggedburnerport(s) b. clean portswith straight pin
c. surfacecontrolnotcompletelyturnedto c. turn controlto the LITEpositionuntilthe
the LITEpositionor turned too quickly burnerignites, then turn control to de-
fromtheLITEposition(pilotlessignition) sired flame size
d. powerfailure(pilotlessignition) d. seepage5tolightburnerduringapower
failure
2. Burnerflame uneven a. cloggedburner port(s) a. clean portswith straightpin
3. Surfaceburnerflame a. air/gas mixturenotproper a. call servicemanto adjust burner
• lifts off port NOTE:Someyellowtippingwith LP gasis
• yellowincolor normalandacceptable.
4. Ovenburnerfails to light a. powersupply notconnected a. connectpower,checkcircuit breakeror
(pilotlessignition) fusebox
b. powerfailure(pilotless ignition) b. ovenwillnotoperateduringapowerfail-
ure
c. oven incorrectlyset c. besureto set boththe thermostatand
the selectorknobs. See pages4 or 8
d. automatic oven cooking feature incor- d. Seepages 12-13.
rectlyset
5. Poppingsoundheardwhen burner This is a normalsoundthat occurswith some typesof gas whena hot burneris turned off.
extinguishes The poppingsoundis nota safetyhazard andwill not damagethe appliance.
6. Clockand/orovenlightdoesnotwork a. power supplynotconnected a. connect power supply, check circuit--
breakeror fuse box
b. bulb maybe loose orburnedout b. tighten or replace lightbulb
c. malfunctioningswitch, starteror ballast c. call servicemanto check
d. malfunctioningclockor loosewiring d. call servicemanto check
7. Moisturecondensationonoven a. itis normalfor thewindowto fog during a. leavedoorajarfor oneortwominutesto
window,if equipped the firstfew minutesthe ovenis on allow moistureto escape
b. cloth saturated with water is used to b. Use a damp cloth to clean window to
cleanthe window preventexcesswaterfrom seeping
betweenthe panelsof glass
8. Oventemperatureinaccurate a. ovennot preheated a. preheatoven 10to 15minutes
• food takes too long or cooks too b. incorrect rack position b. seepage9
fast c. incorrect useofaluminumfoil c. see page 18
• pale browning d. ovenbottom incorrectlyreplaced d. replace ovenbottomcorrectly
• food over-done on outside and e. oven thermostat sensing device out of e. reinstall sensing device securely into
under-done incenter holdingclip(s) clip(s)
• over browning SeeProblemChart on page 11
• poor bakingresults See bakingtipson page 10
9. Ovensmokesexcessivelyduring a a. foodtoo closeto burner a. movebroilerpandownone rackposition
broil operation b. meat hastoo much fat b. trim fat
c. sauceappliedtooearly or marinadenot c. apply sauce duringlast few minutesof
completelydrained cooking.Ifmeat hasbeen marinated,
drainthoroughlybefore cooking
d. soiledbroilerpan d. alwaysclean broilerpanand insertafter
eachuse
e. broilerinsertcoveredwithaluminumfoil e, nevercover insertwithfoil asthispre-
ventsfat from drainingto pan below
Fplusa numberappearsin the display This iscailed a FAULTCODE.Ifa faultcodeappearsinthe display,presstheSTOP/CLEAR
anda continuousbeepsounds, pad,If thefaultcode reappears,disconnectpowerto the unit and call the servicer.
(Example:F 1) See page25 for FAULTcode information.
24
Page 26

Service (continued)
FAULTCODES SERVICING
_rrangeisequippedwithanelectron- Ifyoudid notreceivesatisfactoryservice
_,_controlfeaturing built-in, self-diag- through your servicer or Mayoor you
nosticsoftware. Thissoftwarecontinu- may contact the Major Appliance Con-
ouslymonitorsthe controlto insuresafe sumer Action Panel by letter including
and proper operation. If the software your name, address, and telephone
shoulddetectaquestionablesituation,a number,as wellasthe modeland sedal
FAULTCODE(Fplusanumber)will ap- numbersofthe appliance.
pear in the display and continuous MajorApplianceConsurnerActionPanel
beepswillsound. 20NorthWackerDrive
Chicago,IL 60606
HOWTOOBTAINSERVICE MACAP (Major Appliance Consumer
I I Whenyourappliancerequiresserviceor sponsored by three trade associations
• T replacementparts, contact your Dealer asa courtofappealsonconsumercora-
l I or Authorized Servicer.Useonly genu- plaints which have not been resolved
ine factory or Maycor parts if replace- satisfactorilywithina reasonableperiod
ment parts are necessary.Consult the of time.
YellowPages in your telephonedirec-
toryunderappliancefortheservicecen-
A faultcode indicatesthatthere maybe ter nearestyou. Be sureto includeyour
functionalerror.As a safetyprecaution, name, address, and phone number,
thecontrol will automaticallycancelthe alongwiththe modelandserialnumbers
program. Follow the procedures de- ofthe appliance.(Seeinsidefront cover
scribedbelowto checkthe range, for location of your model and serial
numbers.)
DURINGNORMAL
OVENCOOKING Ifyouareunabletoobtainservice,write
faultcode reappearsin the display, to us.Our addressisfoundonthe rating
"C"alla servicer.Do notusethe ovenuntil plate.See insidefront coverfor location
thecontrol has been serviced.The sur- of rating plate.
faceunit can beused.
If youare notsatisfiedwith thelocal re-
DURING A SELF-CLEAN sponseto your service requirements,
callor writeMAYCORApplianceParts
CYCLE: and Service Company, 240 Edwards
Ifthe ovenis heavilysoiled,excessive Street,S.E.,Cleveland,TN37311,(615)
smokeand flaringmay resultina fault 472-3500. Includeorhaveavailablethe
code.If this occurs, press the STOP/ completemodeland serialnumbersof
CLEARpadandallowthe oventocool theappliance,the nameandaddressof
foran hour.Then,reprogramtheoven the dealer from whomyou purchased
forthecleancycle, theappliance,thedateofpurchaseand
detailsconcerningyourproblem.
Ifthefaultcodereappearsinthedisplay,
callaservicer.Donotusetheovenuntil
thecontrolhasbeenserviced.The sur-
faceunitcanbe used.
25
Page 27

ii ......
II
WHAT IS NOT COVERED BY THESE TWO WARRANTIES:
1. Conditions and damages resulting from any of the fol- 4. Products purchased for commercial or industrial use.
lowing: 5. The cost of service or service call to:
a. Improper installation, delivery, or maintenance.
a. Correct installation errors.
b. Any repair, modification, alteration or adjustment not
authorized by Maycor, or a Maycor authorized servic- b. Instruct the consumer on the proper use of the prod-
uct.
er.
C. Transport the appliance to a servicer.
c. Misuse, abuse, accidents or unreasonable use.
d. Incorrect electrical current, voltage or supply. 6. CONSEQUENTIAL OR INCIDENTAL DAMAGES SUS-
TAINED BY ANY PERSON AS A RESULT OF ANY"-
e. Improper setting of any control. BREACH OF THESE WARRANTIES. Some states do
2. Warranties are void if the original serial numbers have not allow the exclusion or limitation of consequential or
been removed, altered, or cannot be readily determined, incidental damages, sothe above exclusion may not ap-
3. Light bulbs, ply to you.
HOW TO RECEIVE WARRANTY SERVICE
1. Contact the dealer from whom you purchased the appliance or any authorized Maycor servicer to
receive warranty service under these warranties.
: 2. Should you not receive satisfactory warranty service from your local servicer, contact:
Customer Assistance
Maycor Appliance Parts and Service Company
240 Edwards Street, S.E.
Cleveland, TN 37311
(615) 472-3500
3. Have the following information available when requesting warranty service:
- Your name and address.
- The model and serial numbers of your appliance.
- The name and address of your dealer or servicer.
- The purchase date of your appliance.
- A clear description of the problem.
(1/93)
 Loading...