

Page 1
ABOUT YOUR NEW RANGE
Congratulationsonyourchoice ofthisrange.Asyouuse instructionscarefully,youwillbe able tofully enjoy and
your new range, we know you will appreciate the many properly maintainyour new range.
features that provide excellent performance, ease of
cleaning,convenience and dependability. Should you have any questions about using your new
Newfeatures have dramatically changed today's cook-
ingappliances and theway we cook. It is therefore very MAYTAGCUSTOMER SERVICE
importantto understandhowyour newelectric rangeop- 240 Edwards Street, S.E.
erates BEFOREyou use itfor thefirst time. Cleveland,TN 37311
Inthis Owner's Guide, you willfind a wealth of informa- Besure to include the model and serial numbers ofyour
tionregarding all aspects of your range. By following range. For your convenience, we have provided space
the belowto record this information.
electric range, please writeto us at this address:
IMPORTANT INFORMATION
For future referencewe suggestyou retain this DEALERFROMWHOM PURCHASED:
manual after recordingthe informationin the
spacesprovided.Thisinformationcanbefoundon
the ratingdata plate locatedon the range front
frame aroundthe storage drawer. Open the stor- ADDRESS:
age drawer to see the rating plate. For drop-in
models, therating data plateis located onthe left CITY:
side of theside panel.Open the oven door to see
the rating plate. PHONE:.
MODEL NUMBER:
AUTHORIZED SERVICECONTRACTOR:
SERIAL NUMBER:
ADDRESS:
DATEOF PURCHASE: CITY:
PHONE:
IMPORTANT:Retain the proof of purchase docu-
mentsfor warrantyservice.
Page 2
C_ng afirehazed _"a_ "'
.......... ............. ==O_U_ asQneoro_e =
=: == g
PAGE 1
Page 3
Utensihandlesshouldbeturnedin- Donotcoverovenracks,theoven Smoothtopcooktop- Donotcookon
wardandnotextendoveradjacent bottomoranyotherpartoftheeven brokencool(top.Ifcooldopshould
surfaceunits- Toreducetheiiskof withaluminumfoil- Thiswillcause break,cleaningsolutionsandspillevers
burns,ignitionoffammabematerials overheatingoftheoven.Usealuminum maypenetratethebrokencooktopand
andspillageduetounintentionalcon- foilonlyasdirectedinthismanual, createariskofelectricshock.Contact
tactwiththeutensilthehandleofa aqualifiedtechnicianimmediately.
utensilshouldbepositionedsothatitis Cesnventiatnghoodsfrequently- Cleancooktopwithcaution.Ifawet
turnedinward,anddoesnotextend Greaseshouldnotbeallowedtoaccu- spongeorclothisusedtowipespillson
overadjacentsurfaceelements, mulateonhoodorfilter.Whenflaming ahotcookingarea,becarefultoavoid
foodsunderthehood,turnthefa_off. asteamburn.Somecleanerscanpro-
Donotsoakremovableheatingele- Thefan,ifoperating,mayspreadthe ducenoxiousfumesifappliedtoahot
ments-Heatingelementsshould flame, surface.
neverbeimmersedinwater.Immersing
elementnwaterwoulddamageinsulet_
ingmaterialinsideelement, whenmovingthegreasekettleordis- weightonanopenovendoororstand
posingofhotgrease, onanopenovendooras,insome
Usecarewhenopeningdoor- Let cases,itcouldcausetherangetotip
hotairorsteamescapebeforeremov- Donottouchsurfaceelementsor over.breakageofthedoor,orserious
ingorreplacingfood. injury.
Donotheatunopenedfoodcontain,
strutted- Theventislocatedatthe
rightrearelementforcoilcooktopsor
atthebaseofthebackguardforthe
smnothtopcooktop.Blockageofvent
preventsproperovenaircirculation
Keepovenventductsunob- _J __
andwillaffectovenperformance,Avoid
touchingovenventareawhileovenis top,ovenventopeningandsurfaces
onandforseveralminutesafteroven Anti-tip bracket warning:
theccektopSurfacesfacingthecook-
hasbeenturnedoff.Somepartsofthe nearthisopening,ovendoor,andoven
ventandsurroundingareabecomehot window.Also,donotallowaluminum Toreducetheriskoftippingoftheap-
enoughtocauseburns, fo, meatprobesoranyothermetal _ssiveloadingoftheovendoor_the
jectotherthanautensilonasurface
oh- pliancefromunusualusageorbyex-
Placementofovenracks- Always eement,tocontactheatngelements, appliancemustbesecuredbyaprop-
placeovenracksindesiredlocation erynstalledanti-tipdevice.Tocheckif
deviceisinstaedproperly:Usea
whileoveniscool.If rackmustbe flashlightandlookunderneathrangeto
movedwhilehot,usecaretoavoid seethatoneoftherearlevelinglegsis
contactofpotholderwithovenelement, engagedinthebracketslot.Whenre-
movingapplianceforcleaning,besure
anti-tipdeviceisengagedwhenrange
isreplaced.Theanti-tipdevicesecures
therearlevelinglegtothefloor,whe_
properlyengaged.
PAGE 2
(czmtinuednext page)
Page 4
i(centnued)
markbreakerorfuse.Neverreplacea
b_own1useorreseta oraccessories
knowwhathascausedtheproblem, thismanualDonot
Alwaysreplaceablownfusewithone
ofthecorrectamperage,donotusea
subs"_ute. interesttochildrenincabinetsabove
anapplianceoronthebaCkguardofa vectonSystems.[heuseo1d_ or
Controlknobs- TurnoffCoutrolatthe range.
completonofacookingoperation, ommendedinthismanualcancreate
Self-oteaningoven- Donotclean mancaprou_msandreduoethelifeof
doorgasket.Thedoorgasketisassert- thecomponentsoftheapponce.
tialtotagoodsea].Careshouldbe
takennottorub,damage,ormovethe Preparedfoodwarning- Followfood
gasket.Donotuseovencleanersm m_ufacturer'sinstructi()ns.Ifaplastic
ovenlinerprotectvecoatingOfanyknd frozenfoodcontainerand/oritsfilm
inoraroundanypartofthesefi-cle_ coverdistorts,warpsorisotherwise
evenCeanonlypartslistedinthis
manualBeforesod-cleanngtheoven,
removebroilerpanovenracks,and
otherutensils.SIde-inanddrOp-in Chdranclmbngonthe_pplonce
models:Ustenforafan.Afannoise Childrenmuletbetaughtthat_e ap-
shouldbeheardduringacleaning plianseandutensilsinorontcanbe
cycle.Ifnot,cansecleancycleandcall hotChIdrenshouldbetaughtthatan Ware
aqualifiedtechnicianbeforesail-clean- applianceisnotatoy.Theyshould emorofCaliforniatcpublishalistO!sub-
ngagain. _eallowedtoplaywithcontrolsorother stancesknowntoth_StateofCaiifoma
reachitemscouldbeseriouslyit_jured.
not ,o,,uIPreposition65)requirestheGov-
access_esthatarenotexpresslyrec-
setous_aty hazardsresultinperfor-
CAUflON:DONOTLEAVEFOODOR partsoftheunit. to causecancerorreproductiveharm,
COOKINGUTENSILS,ETC.,INOVEN IN CASE OF FIRE: tomersofpotentiaexposurestosuch
DURINGTHESELF-GLEANING 1 _urnoftappfanceandventilating substances,
MODEOFOPERATION. hoed.
ATTENTION:NELAISSERAUCUN 2 Usedr/chemicalorfoam-typeex- Usersotthisappliancearehereby
ALIMENT.USTENSILEDECUISINE, tinguisheror bakingsodatO warnedthat_en theapplianceisan-
ETC,DANSLEFOURDURANTLE smotherfireorflame.Neveruse gagedintheself-cleancycletheremay
CYCLEOAUTONE'I-FOYAGE wateronagreasefire. thebesomelistedsubstances,ow-levelexposureincludingtosome_benof
3. Iffireisinoven,smotherbyclosing monoxide,Exposuretothesesub-
ovendoor stancescanbeminimizedbyproperly
4, Iffireisinapanonthesurfaceunit, veutingtheappliancetotheoutdoors
coverpan. duringtheself-cleancycle.
andrequresbusnessestowarncue-
-- PAGE 3
Page 5
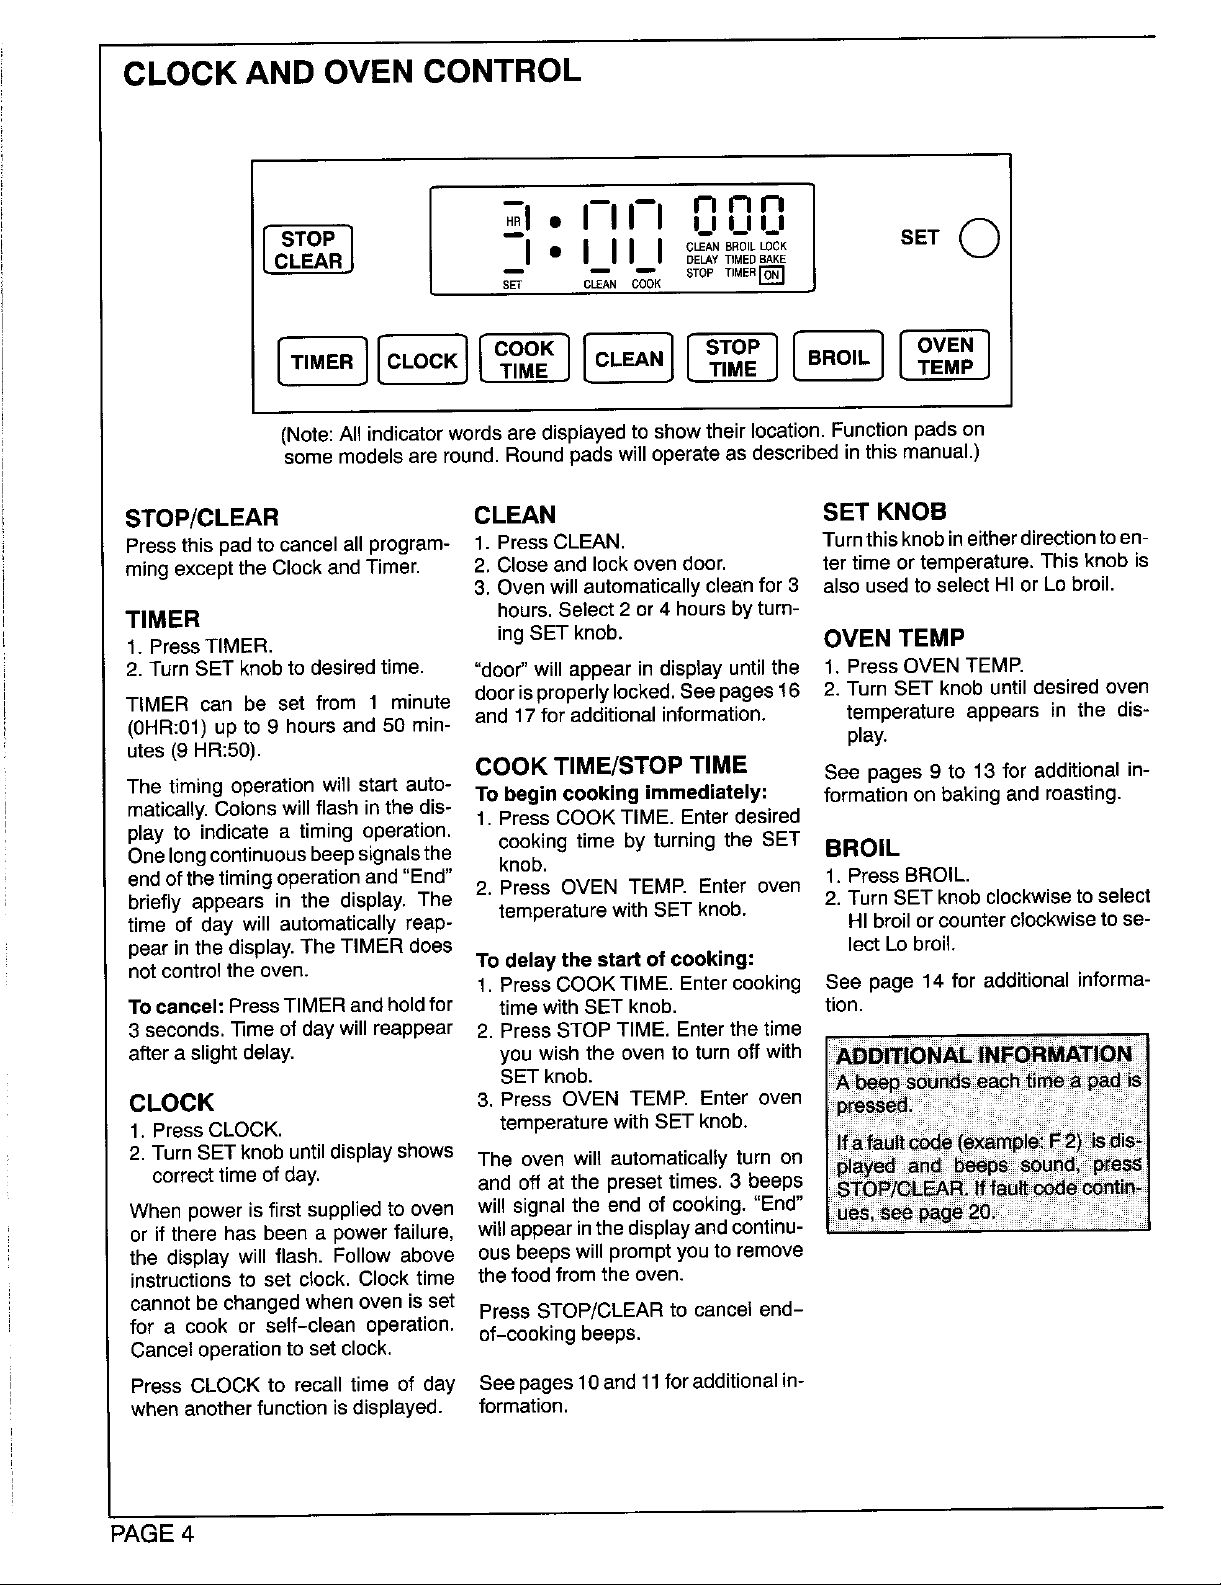
CLOCK AND OVEN CONTROL
• I 7.1° I-I I-I n n n 1
c.oo.l[c....)[ 1[ 1( )
(Note:Allindicatorwordsare displayedto showtheirlocation.Functionpadson
somemodelsareround.Roundpadswilloperateas describedinthismanual.)
STOP/CLEAR CLEAN SET KNOB
Pressthispadto cancelallprogram- 1. PressCLEAN. Turnthisknobinether directiontoen-
ruingexceptthe ClockandTimer. 2, Closeand lockoven door. tertime or temperature.Thisknobis
TIMER hours.Select2 or 4 hours byturn-
t. PressTIMER. ingSET knob. OVEN TEMP
2. TurnSET knobtodesiredtime. "door"willappear indisplayuntilthe 1. PressOVEN TEMP.
TIMER can be set from 1 minute doorisproperlylocked.Seepages 16 2. TurnSET knobuntildesiredoven
(0HR:01)upto 9 hoursand 50 rain- and 17 for additionalinformation, temperatureappears in the dis-
utes(9 HR:50). play.
The timingoperationwill start auto- To begin cooking immediately= formationonbakingandroasting.
matically.Colonswillflashinthe dis- 1. Press COOK TIME. Enterdesired
play to indicatea timing operation.
Onelongcontinuousbeepsignalsthe cookingtime by turning the SET BROIL
endof thetimingoperationand"End" 2. Press OVEN TEMP. Enter oven 1. PressBROIL.
briefly appears in the display.The 2. Turn SET knobclockwisetoselect
time of day will automaticallyreap- temperaturewithSET knob. HI broilorcounterclockwiseto Be-
3. Oven willautomaticallycleanfor3 alsousedtoselectHI orLobroil.
COOK TIME/STOP TIME See pages 9 to 13 for additionalin-
knob.
pearinthedisplay.TheTIMER does To delay the start of cooking: lectLobroil.
not controlthe oven.
Tocancel:PressTIMER andholdfor timewithSET knob. tion.
3 seconds."i3meofdaywillreappear 2. PressSTOP TIME. Enterthe time
after aslight delay, you wish the ovento turn off with
CLOCK 3. Press OVEN TEMP. Enter oven
1. Press CLOCK. temperature with SETknob.
2. Turn SETknob until displayshows The oven will automatically turn on
correct time of day. and off at the preset times. 3 beeps
When power is first supplied to oven will signal the end of cooking. "End"
or if there has been a power failure, will appearinthe displayandcontinu-
the display will flash. Follow above CUBbeeps will prompt you to remove
instructions to set clock. Clock time thefoodfrom the oven.
cannotbechanged whenoven is set
for a cook or self-clean operation, of-cooking beeps.
Cancel operationto set clock.
Press CLOCK to recall time of day Seepages10andllforadditionalin-
when anotherfunction is displayed, formation.
PAGE 4
1. PressCOOKTIME. Entercooking See page 14 for additionalinforma-
SET knob.
Press STOP/CLEAR to cancel end-
Page 6
COIL COOKTOP
Cool(top Indicator Lights
Freestandingrangeswithacoil-type cooktopwillfeature Rangesareequippedwithtwoindicatorlightswhichglow
an "upswept"cooktop, when a surfaceelement ison. Theindicatorlightwillre-
(NOTE:The cooktoponaslide-in ordrop-in rangedoes operation,besuretheelementandindicatorlightare off.
NOT lift up.The cooktopon a Canadianfreestanding
rangedoesNOT lift up.)
Toraisethe "upswept" cooktop: Whencool,graspthe Drip Bowls
front edgeof the cooktopandgently lift up untilthetwo • Be sure dripbowls,locatedundereach element,are
supportrodsat thefront ofthe cooktopsnapintoplace, in place.
To lower the top: Holdthefrontedgeofthecooktopand Chrome drip bowls will turn blue or gold over time or if
carefully push back on each supportrod to release the overheated. This type of discoloration is permanentand
notched support. Then gently lower the top into place, will not affect cooking performance.
The support rods will slide into the rangeframe. To protect the chrome or porcelain finish, avoid using
Surface Elements setting once food beginscooking.Donot use oversized
• Surface elements are self-cleaning, from the element.
mainon until the element isturnedoff.After a cooking
wiring orcomponent partsunderneath the cooktop to
damage.
• Toprevent riskof electricshockorfire,do not line drip
bowls with aluminum foil.
Your range will be equipped with either chrome plated
• Absence of these bowlsduring cooking may subject
steel dripbowls or porcelaincoated steeldrip bowls.
high settingsfor longperiods oftime. Reduceto a lower
cookware. Pan should not extend more than 2 inches
• Do not immerse elements inwater. Clean bowls after each use with soap and water. Re-
. When an element isturned on, itwill cycle onand off movestubbornstainswith bakingsodapaste andplastic
to maintain the heat setting, scouring pad.Porcelaindripbowls can becleanedwith a
mild cleanser. To prevent scratching the porcelain or
• To preventdamageto the range, NEVERoperateBur- chrome finish, do not use abrasive cleaning agents.
face elementwithout a paninplaceand NEVERallow Rinse, dry and replace.
a pan to boildry.
NOTE:Theovenvent islocatedattheright rearelement.
cool, raiseelement center toallowproperovenventing.Never blockthevent
and carefully puff opening by placingasolid drip bowl in thislocation or by
out and away from coveringthe hole inthecenterofthedripbowlwith alumi-
the receptacle, numfoil. Blockingthe vent will restrictproperoven vent-
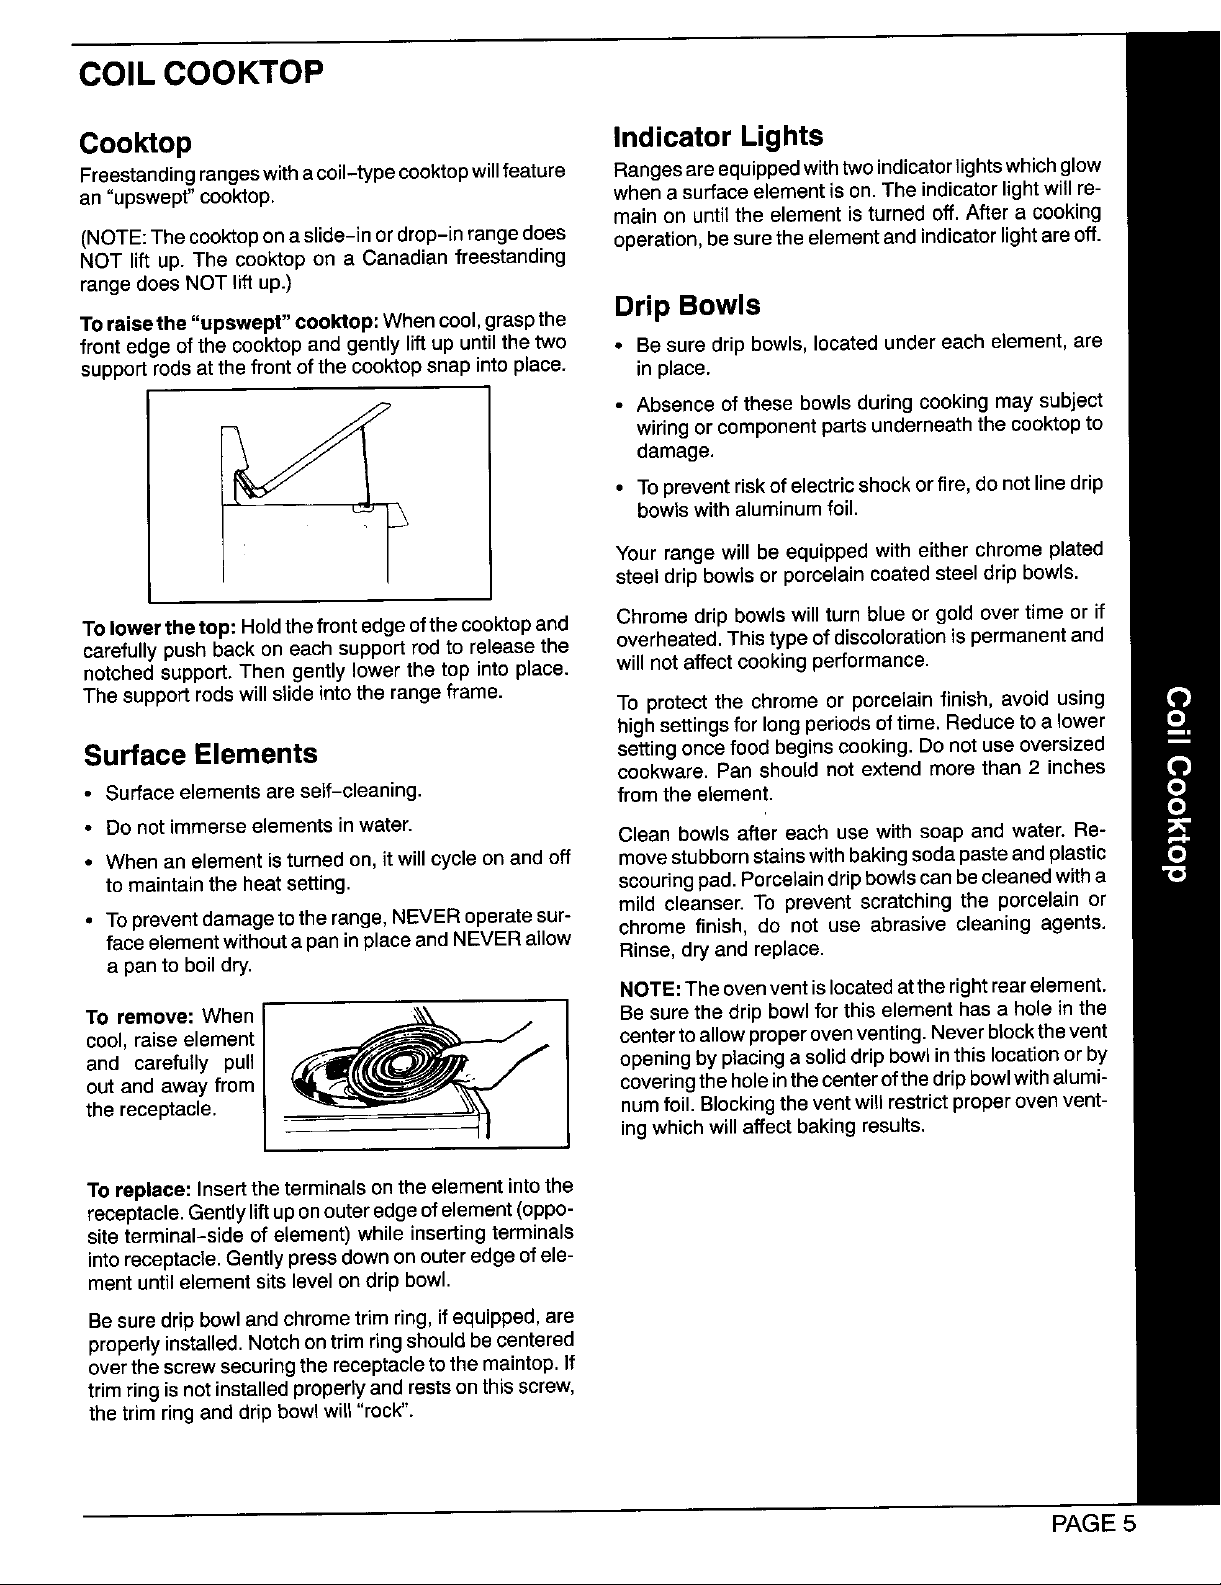
Toremove:Whenl _ I Besurethedripbowlferthiselementhasaholeinthe
Toreplace: Insertthe terminals on the element intothe
receptacle.Gentlylift uponouteredgeofelement (oppo-
site terminal-side of element) while inserting terminals
intoreceptacle.Gentlypress downon outeredgeof ele-
ment until element sits level ondrip bowl.
Besure drip bowland chrome trim ring, if equipped, are
properlyinstalled. Notchontrimring should be centered
overthe screw securingthe receptacleto the maintop. If
trim ring isnot installedproperly andrestson thisscrew,
the trim ringand drip bowl wilt"rock".
ing which will affect baking results.
PAGE5
Page 7
SMOOTHTOP COOKTOP
Cooking Areas Cooking Tips
On Canadian modelsonly:The surfaceunits willnotop- When cooking delicate foods which easily scorch or
erate duringa clean cycle.This isnormal, overcook, start with a lower heat setting then gradually
increase the setting until you find the optimum setting.
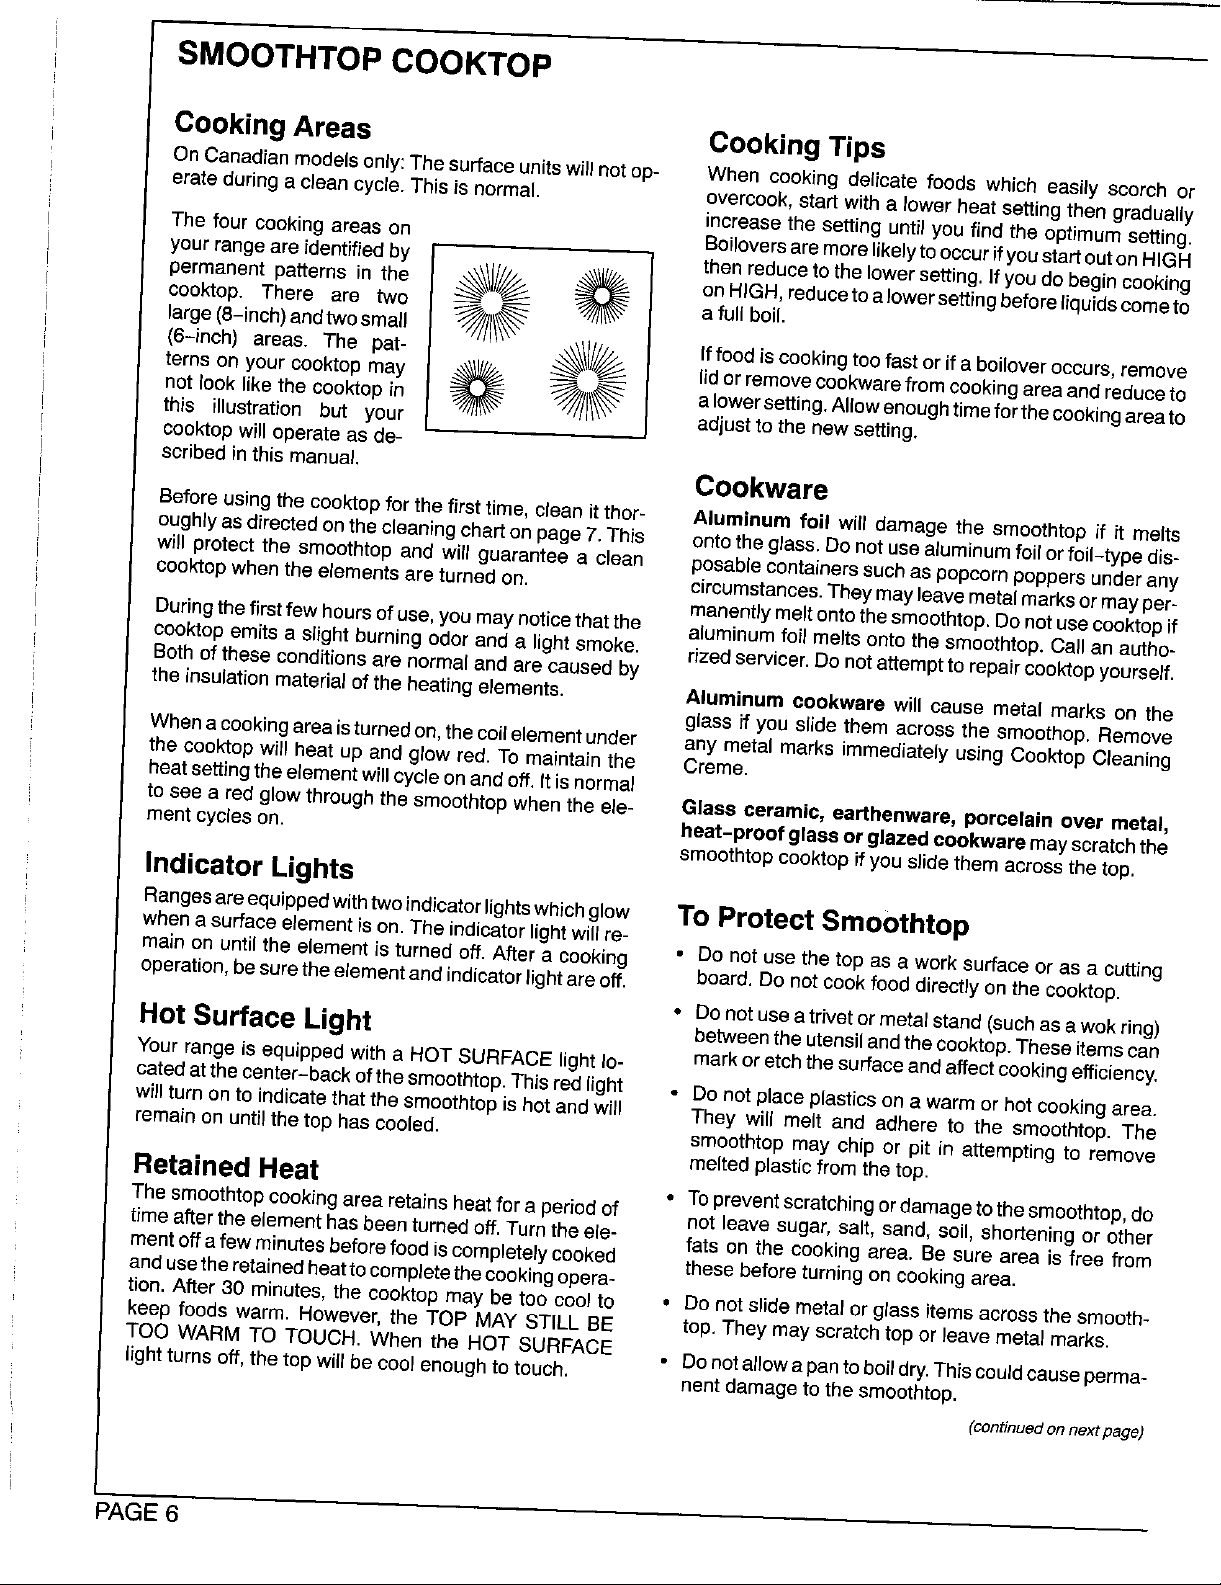
The four cooking areas on Boiloversare morelikelytooccurifyoustartoutonHIGH
your rangeare identifiedby then reduce to thelowersetting. If you do begin cooking
permanent patterns in the _/__ _ onHIGH, reduceto alowersettingbeforeliquidscometo
large(8-inch) andtwosmall
cooktop. There are two _/1/_: a full boil.
(6-inch) areas. The pat- --_/l_ (ffood iscooking toofast or if a boilover occurs,remove
not look like the cooktop in a lowersetting. Allow enoughtimeforthe cooking areato
terns on your cooktop may _ _1_ _ lid orremovecookwarefrom cooking areaand reduceto
this illustration but your adjust to the new setting.
cooktop will operate asde-
scribedinthis manual.
Cookware
Before usingthe cooktopfor the first time, clean itthor- Aluminum foil will damage the smoothtop if it melts
oughlyasdirected onthecleaningcharton page7. This ontothe glass.Do not use aluminumfoilorfoil-type dis-
will protect the smoothtop and will guarantee a clean posablecontainerssuch as popcorn poppers underany
cooktopwhen the elements are turned on. circumstances.They may leave metalmarksor mayper-
manentlymelt ontothe smoethtop.Do notuse cooktop ff
Duringthefirst few hoursof use,you may noticethat the aluminumfoil melts onto the smoothtop. Call an autho-
cook'topemits a slight burning odor and a light smoke, rizedservicer.Donotattemptto repaircooktopyourself.
Bothof these conditionsare normal and are caused by
the insulation material of the heating elements. Aluminum ¢ookware will cause metal marks on the
glass if you slide them across the smoethop. Remove
Whena cookingareaisturnedon,thecoilelementunder any metal marks immediately using Cooktep Cleaning
the cooktopwill heat up and glow red. To maintain the Creme.
heatsettingthe element willcycle onandoff.It isnormal
to see a red glow through the smoothtop when the ele- Glass ceramic, earthenware, porcelain over metal,
mentcycleson. heat-proof glassor glazedeookwaremayscratchthe
smoothtopcooktopifyou slidethemacrossthe top.
Indicator Lights
Rangesareequippedwithtwoindicatorlightswhichglow To Protect Smoothtop
when asurface element ison.The indicatorlight will re-
main on untilthe element is turned off. After a cooking • Do not use the top as awork surface or as a cutting
operation, be surethe elementandindicatorlightare off. board, Do not cook food directly onthe cooktop.
• Do not use a trivet or metalstand(suchas awok ring)
Hot Surface Light betweenthe utensil andthe cooktop.These itemscan
Your rangeis equipped with a HOT SURFACE light Io- markoretchthesurfaceand affectcookingefficiency.
earedat thecenter-back ofthe smoothtop.This red light • Do not place plasticson a warm or hot cooking area.
will turn on to indicate thatthe smoethtopis hot andwill They will melt and adhere to the smoothtop. The
remain on untilthe top has cooled, smoothtop may chip or pit in attempting to remove
melted plasticfrom the top.
Retained Heat • Topreventscratching or damagetothesmoothtop,do
Thesmoethtop cookingarea retainsheat fora periodof not leave sugar, salt, sand, soil, shortening or other
timeafterthe elementhas beenturned off.Turn the ele- fats on the cooking area. Be sure area is free from
mentoffa few minutesbefore food is completely cooked these before turningon cooking area.
anduse theretainedheattocompletethecookingopera-
tion. After 30 minutes, the cooktop may be too coolto • Donotslide metal orglass itemsacrossthe smooth-
keep foods warm. However, the TOP MAY STILL BE top. They may scratchtop orleave metal marks.
TOO WARM TO TOUCH. When the HOT SURFACE • Donotallowapantoboildry.Thisceuldcauseperma-
lightturns off, the top will be coolenough to touch, nent damageto the smoothtop.
(continuedonnextpage)
PAGE 6
Page 8

Care Information Cleaning Chart
To help keep cooktopclean, be sure CAUTION: Before cleaning,becertainall elementsare turnedoffandthe
cookingareaandcookwarebottomare eooktopiscooI,Useonlycleaningagentsrecommendedinthecleaningchart,
c(eanand dry before each use. Other materials may damage the finish ofthe smoothtop.
To prevent possible damage to the
cooktop, always rinse the bottom of
cookware to completely remove any
cleaning agent residue. This is espe-
ciallyimportantwhenusingacopper or
aluminum cleaner. In the presence of
heat, the cleaning residue may stain, Burnedonor
discolor or etch the smoothtop, heavystains.
Carefully blot upspillovers around the Cookto
outsideof the cookingareaas theyoc-
cur with dry paper towels. BE CARE-
FUL NOT TO BURN HANDS WHEN
WIPING UP SPILLS. DO NOT USE A
DAMP CLOTH WHICH MAY CAUSE
STEAM BURNS.
Whensurfaceiscool, clean asdirected
in the chart. DO NOT USEthe follow-
ingcleaning agents.
• Abrasives (metal scouring pads,
cleansing powders, scouringclean- Problem Solving Chart
ereor pads)will scratchthesmooth-
top. PROBLEM CAUSE TO PREVENT
• Chemicals(ovencleaners,chlorine
bleaches,rust removersor ammo-
nia) maydamage the finish of the
smoothtop.
• Glasscleanerscontainingammonia
mayharmthe smoothtop.
• Soiledclothorspongewill leavean
invisiblefilm onthe cooktopwhich
may scratchor causediscoloration Metal-markingSlidingorscrapingmetal Donotslidemetalobjectacrosscook-
thenexttime the cooktopis used. utensilsor oven racks top.CleanimmediatelywithCooktop
IMPORTANT:Watch sugary solutions
carefully to avoid believers.
lette.
acrosscooktop. CleaningCreme,
If a sugar solution (such as jam, jelly,
candy) isallowed to believer,itmaypit
the smoothtop.Turn element to LOW Areasofdiscol- Mineraldepositsfromwa- Usecookwarewithbottomsthat are
and clean sugary believers immedi- orationwitha ter andfoods, cleananddry.Usecorrectheatsetting
ately, metallicsheen topreventboilovere.
Use a wooden spoon or a wooden-
handled metal spatula to scrape boil-
over to acooler area ofthe cooktopor
use several layersof dry paper towels
to wipe upspillover.Ifa paper towel is
used,becarefulto avoidsteam burns. CAUTION: Donot use top ifthe smoothtop is cracked or broken or if metal
Turn element off. When cool, use a melts onto cooktop. Callan authorizedservicer. Do not attempt to repairthe
single-edge razor blade to scrape off cooktopyourself.
soil. Clean with Cooktop Cleaning
Creme, rinseanddry.
PAGE 7
Page 9
COOKTOP USE
ControlKnobs Cookware
Yourcooktopisequippedwithcontrolknobsthat provide Cookingperformanceisgreatlyaffected bythe typeof
an infinitechoiceof settingsfrom LOWto HIGH. The cookwareused. Proper cookwarewill reduce cooking
knobcanbesetonorbetweenany ofthenumberedset- times,useless energyandproducemoreeven cooking
tings, results. For best results use a heavy gauge metal pan
To operate push in and turn the knobin eitherdirection
to the desired setting. Cookwarewith uneven,warped, or grooved bottomsdo
Toremoveknobsforcleaning,gentlypullforward.Wash duce heat conductivityand result in slower,less even
knobs inmilddetergent and water. Do not use abrasive heating.
cleaning agents as they will scratch the finish and re-
move markings. Rinse, dry and replace. Turn on each Different types of cookware materials require different
element to besure knobs have been replacedcorrectly, heat settings for the same cooking operation. The chart
with a smooth flat bottom anda tightfitting lid.
not make good contactwith the heatingsurface, will re-
below is based on heavy gauge aluminum cookware.
CookingTips Lower the heat setting if using a thinner gauge metal or
Topreventdamagetothe range,backguardorutensil, othermaterials.
neveroperate surface unitwithout a paninplace,never Oversized cookware or cookware that rests across two
allow a panto boildryandneveroperatean element on elements are not recommended as they may trap
HIGHfor extended periods of time. enough heat to cause damage to the cooktop or ele-
Foodwillnot cook any faster at a higher settingthan
neededtomaintainagentleboil.Waterboilsatthe same Do notuse woksequippedwithroundmetal rings.The
temperaturewhether boilinggentlyor vigorously.If a fing,whichisdesignedtosupportthewokabovetheele-
highsettingisused,excessivespatteringwilloccurand ment,willtrap heat and may damagethe elementand
food maystickor burnontothe bottomof thepan. the cook'top.
ments.This is especially important whencanning.
Ifa higherheatsettingisusedto bringliquidtoaboilorto Canning
begincooking,alwaysreducetoa lowersettingonceliq- Usethe HIGH settingjust untilwater comestoa boilor
uidcomestoa boilorfoodbeginscooking.Neverleave pressureis reached in the pressurecanner.Then, re-
food unattended during a cooking operation, duce tothe lowestheatsettingthat maintainstheboilor
Fitthe size of the cookwareto thesizeofthe element, pressure.Prolongeduseofthe HIGH setting,ortheuse
Thisconservesenergy, of incorrectcanning utensilsproducesexcessiveheat.
Excessive heat can cause permanent damage to the
porcelain cooktop, coil elementand the drip bowl.
SUGGESTED HEAT SETTING GUIDE
Medium To maintain moderatetoslow boil for large amountsof liquids.
4-6 Tocontinue cooking uncovered foods and for mostfrying operations.
LOW Tokeep foods warm beforeserving. Meltchocolate.
NOTE: Refer tocookware manufacturer's recommendations for suggested heat settings. Some manufacturers do
notrecommend the use of HIGH, orthe use of HIGH for extended cooking operations.
PAGE8
Page 10

OVEN USE
Oven Characteristics
Everyoven hasitsown characteristics. Youmayfindthat RACK POSITIONS:
the cookingtimesandtemperaturesyou were accus-
somedifferencesbetweenthis range and your previous
teredslightlywithyournew range.It is normalto notice 45_,i,--2_'- ._2_--2_ _!
range. 3
2
Fan !
Slide-in and drop-in ranges are equipped with a fan _,._'--
whichautomaticallyturns onwheneverthe oven issetfor
a cooking oracleaningoperation. Thefan will automati-
tomed to with your previousrange may need to be al- J i_l i__
callyturn offwhen the unit has cooled.
Rack 5 (top of oven) used for broiling thin non-fatty
Oven Racks foods suchas fish.
The twoovenracksare designedwitha lock-stopposi-
tion to keep racksfrom coming completelyout of the Rack 4 usedfortwo-rack baking or mostbroiling.
oven,Donot attempttochange rackpositionswhenthe Rack 3 usedfor mostone-rack baking ofcookiesand
oven ishot. biscuitson a cookiesheet.
To remove: Be sure rack is cool. Pull rack out to the Reck 2 used for baking cakes, bundt cakes or breads,
lock-stop position.Tiltthefrontendupand continuepull- two-rack baking, roasting meats, or cooking larger
ing rack out ofthe oven.
Toreplace:Place rackon racksupports,tilt upandpush pie shells, frozen pies, soufflesor bread.
towardrearofoven.Pullthe rackouttothelock-stoppo-
sitionto besurerackis correctlyreplaced.Thenreturnit Use of Aluminum Foil
to its normal position. Do not coverentirerackwithaluminumfoil orplacefoil
Itis importantthat air can circulatefreelywithinthe oven directly under cookware. To catch spillovers, place a
and aroundthe food. To help ensure this, place food in piece of foil alittlelargerthan the pan on the rack below
the center of the oven rack. Allow two inches between the pan.Donotplacealuminumfoil across the bottomof
the edge of the utensil(s) and the oven walls. If cooking the oven.
ontwo racks,stagger thefoodto ensure properair flow.
foods.
Rack I used for roastingturkey,bakingangelfood cake,
Preheating is necessary for conventional baking. Allow
about 10to 15 minutesfor the ovento preheat. It is not
necessary to preheat the oven for roasting.
Selecting a temperature higher than desired will NOT
preheattheoven anyfaster.Preheating atahighertem-
perature may affect bakingresults.
A single beep will indicate thatthe oven is preheated.
Door Lock Lever
Foroptimum bakingresultsofcakes,cookiesorbiscuits, The ovendoorislockedforself-cleanoperationsonly.
useonerack.Positionracksofood is inthecenterof the Do not move the door lock lever to the right or locked
oven. Use either rack position3 or 2. positionduring acookingoperation. Ifthedooris locked,
the operationwill automatically becancelled and "door"
If cooking on two racks, use rack positions4 and 2 for willappear inthedisplay.Ifthe oven is hotenoughto en-
cakes and rack positions 4 and 1 when using cookie gage the internallock,the oven doorwill not open.Allow
sheets.Never place two cookiesheets on one rack. the ovento coolfor upto an hour,then unlock and open
Ifroasting alargeturkey,placeturkeyon rack1and side
disheson rack 5. (continuedonnextpage)
the door.
PAGE 9
Page 11

OVEN OPERATION
AutomaticOvenCookingFeature
The Automatic OvenCookingfeature is usedtoturnthe
ovenonand offat a presettimeofday.Thisfeaturecan
be used for a conventional cook or a self-clean opera-
tion. See page 17 for instructions on delaying a self-
cleanoperation.
To set oven for baking or roasting: TheAutomaticOvenCookingfeaturewillnotoperateun-
1. PressOVEN TEMP pad. ofday.
[_ _ _ _ I-_ I Highly perishable foods such as dairy products, pork,
• 000° and BAKE indicator words will appear in the time and at the same oventemperature.
display.
• The display will return to the current time of day if
the oven temperature is not entered within 30 se-
conds.
2. Toenterthe oven temperature,turnthe SETknob until
the desiredtemperature is displayed.
• 350° willappear inthe displaywhenthe SET knob
isturnedoneclickineitherdirection.The tempera-
turecanbesetfrom170to 550°.
• The ovenwillturnonwithina fewseconds.TheON
indicatorwordand75°ortheactualoventempera-
ture,whicheverishigher,willappearinthedisplay.
• Thetemperatureinthedisplaywillincreasein5°in-
crementsuntiltheovenreachesthepresettemper-
ature.A singlebeepwillsignalthattheovenispre-
heated.Allow10to 15minutesforthe ovento pre-
heat.
3. Placefood inthe oven. Checkfood at the minimum
cookingtime. Cooklongerifneeded.
lesstheclockisfunctioningandissetatthecorrecttime
poultry,stuffing, seafoods, or baked goods are not rec-
ommendedfor delay startcooking. Ifcooking morethan
one food, select foods that cookfor the same length of
4. At the end of cooking,remove food and press the
STOP/CLEAR padto cancelthe operation.The cur-
renttimeofdaywillreappearinthedisplay.
To recall the presettemperatureduringpreheat,press
theOVENTEMP pad.
To change the presettemperature,turn the SET knob
untilthe desiredtemperatureisdisplayed.
The oven willautomaticallyturn off ifitis leftonfor 12
hours. (continuedonnextpage)
PAGE 10
Page 12

Toset ovenfor immediate start: To set oven for delayed start:
1. PressCOOK TIME pad. 1. PressCOOK TIME pad.
• 0HR:00willappearinthedisplayandSETCOOK
_] [_ I-_-_ _ [_] _ TIME will flashinthe display.
• 0 HR:00will appear inthe display andSET COOK HOURS:MINUTES. Cooking time can be set
TIME willflash inthe display, from 10minutes (0:10) upto 11hours and 55 min-
2. Turn the SET knobto enter the cooking time. utes (11:55).
• The displaywill show cookingtime in HOURS:MIN-
UTES. Cooking time can be set from 10 minutes
(0:10) upto 11hoursand 55 minutes (11:55). I"_--I [_ _ [_ __
• If you delay in entering the cooking time, the pro-
gram will automatically cancel and the time of day
will reappear in the display. • SET STOP TIME willflash in the display.
• Ifyou set thecooking time but delay in enteringthe 4. Turn the SET knobto enter the stop time.
oventemperature, beepswill sound andthe display • If you delay in entering the stop time, beeps will
will flash SET BAKE and000°. sound and the display will flash SET BAKE and
3. Press OVEN TEMP pad. 000°.
4. Enter oven temperature with the SET knob.
• Ifyou pressthe OVEN TEMP padbut delay in en-
teringthetemperature,the programwillcanceland 7. Press CLOCK padto returnthe current time of day
the displaywill return to the time of day. to the display. DELAY BAKE and the preset oven
5. Press CLOCK pad and the time of day will reappear temperature willappear in the display to show that
in the display. TIMED BAKE ON indicator words will the oven has been setfor a delay start cooking op-
remain in the displayto show thatthe oven has been oration.
setfor AutomaticOven Cooking. 8. Theovenwillautomaticallyturnonatthe presettime
6. After a few seconds,theovenwillturn on and the dis- food is cooking.
play will beginto count down.
7. Attheend ofthepresetcookingtime,the ovenwillau- time."End"will appear inthe display and continu-
tomatically turn off, "End" will appear in the display ous beeps will signalthe end of cooking.
and3 beepswill signaltheendofcooking.Continuous
beeps will prompt you to removefood fromthe oven. 10. Press STOP/CLEAR to cancel the beeps and re-
8. PressSTOP/CLEARtocancelthebeeps and remove
food from the oven.
2. Turn the SET knob to enterthe cookingtime.
• The display will show cooking time in
3. PressSTOP TIME pad.
5. Press OVEN TEMP pad.
6. Enter oven temperature with the SET knob.
andTIMED BAKEON willappear to indicatethatthe
9. Theovenwill automaticallyturnoff atthepresetstop
move food from the oven.
Additional Information
'_ Ifyou delay more than 30 seconds betweentouching a
pad and turning the SETknob, the displaywill either re-
turn to the previous settingor thetime of daywill reap-
pearand the program will cancel.
To recall the preset stop timeor cooktime,just press
thecorrespondingpad.
To reset or cancel the program, press the STOP/
CLEARpad.
At the end of the cooking operation, continuous beeps
will sound untilthe STOP/CLEAR pad is pressed.
PAGE 11
Page 13

Baking Tips
Use a reliable recipe andaccuratelymeasurefreshin- andacrisper crust,Usethistypeof panfor pies,pie
gredients.Carefully follow directionsfor oventemper- crustsor bread.
ature and cooking time. Preheatoven if recommended.
Use the correct rack position. Bakingresultsmay be suchas Baker's Secret reducetheoventempera-
affectedifthe wrongrackisused. turaby25°F exceptwhenbakingpiesorbread.Use
Top browning may be darker if food islocated
towardthetopoftheoven.
Bottom browningmay be darkerif food islocated mumbakingresults.Improperplacementofpansinthe
towardthe bottomoftheoven. ovenwillblockairflowandmayresultinunevenbrown-
When usingtwo racksfor baking, allow enough
spacebetween the racksfor properaircirculation. • Do notcrowda rackwithpans. Never place more
Browningandcookingresultswillbe affectedifair than one cookiesheet,one 13x9x2-inchcake pan
flowis blocked, or two9-inch roundcake panson one rack.
Cookware materialplaysanimportantpartinbakingre- isnot directlyoveranotherpan.
suits.Alwaysusethe type and sizeof pan calledforin
therecipe.Cookingtimesorcookingresultsmaybeaf- • Allow two inchesbetween the pan and the oven
fected ifthewrong size isused. walls.
Shinymetal pan reflectsheatawayfromthefood, Check the cooking progress at the minimum time
produceslighterbrowningand a softercrust.Use recommended in the recipe. If necessary,continue
shiny pansfor bakingcakes or cookies.Foropti- checkingat intervalsuntilthe foodis done. If the oven
mum bakingresults,bake cookiesand biscuitson doorisopenedtoofrequently,heatwillescapetheoven;
a flat cookiesheet. Ifthe panhassides,suchasa thiscan affectbakingresultsandwastesenergy.
jelly rollpan,browningmaynotbe even.
If using oven-proof glassware, or dark pans
thesame bakingtimeascalledforintherecipe.
Allow hot air toflow freely through the ovenforopti-
ing.Foroptimumbrowningandeven cookingresults:
Staggerpans whenbakingontwo racksso onepan
Darkmetal pan ora pan with an anodized (dull) If you add additional ingredients or alterthe recipe,
bottom absorbs heat, produces darker browning expect cookingtimes to increaseor decrease slightly.
Roasting Tips
Roasting is the methodforcookinglarge,tendercutsof ing,As the fat on top of the roast melts, the meat is
meat uncovered,withoutaddingmoisture.Mostmeats bastednaturally,eliminatingtheneedforadditionalbast-
areroastedat 325°F. It is not necessaryto preheatthe ing.
oven. Place the roasting pan on eitherof thetwo lowest
rackpositions. The cookingtimeisdeterminedbythe weight ofthe meat
Usetender cutsof meatweighingthree poundsor more. use a meat thermometer. Insert it so the tipis in the cen-
Somegood choices are: Beef rib,ribeye,top round,high tar of thethickestpart ofthe meat. Itshould nottouch fat
qualitytip and rump roast, pork loin roast, leg of lamb, or bone.
veal shoulder roastand cured or smoked hams.
Seasonmeat, if desired, either before or after roasting, registers approximately 5°F below the doneness
Rubintothe surfaceofthe roast ifadded before cooking, wanted. As the meatstands, the temperature will rise.
Placethe meatfat-side-up on a rackinashallowroast- NOTE: For more information on cooking meat
ingpan.Placingthemeatonarackholdsitoutofthedrip- and poultry, contact the USDA Meat & Poultry
pings,thusallowingbetterheatcirculationforevencook- Hotline at 1-800-535-4555.
and the desired aloneness.For more accurate results,
Removethe roast from theoven when thethermometer
PAGE 12
Page 14

Common Baking Problems And Why They Happen
Cakes are uneven. Pans tooclose or touching Cakesdon't brown on top, Incorrect rackposition.
Cake highin middle. Temperature set too high. Excessive shrinkage. Too little leavening.
Cake falls. Too much shodeningor sugar.
Cakes, cookies, biscuits Incorrect rack position. Temperature set too high.
don'tbrown evenly. Oven door not closed properly.
each other or oven walls, Temperatureset too low.
Batter uneven in pans, Overmixing.
Temperatureset too low or Toomuch liquid.
bakingtime too short. Pansize too large or too little
Oven not level, batter in pan.
Undermixing. Oven door opened too often.
Too much liquid.
Baking time too long. Overmixing.
Overmixing. Pan too large,
Toomuch flour, Temperature settoo high.
Panstouching each other or Baking timetoo long.
ovenwails. Panstoo closeto each other
Incorrect rackposition, or ovenwalls.
Toomuch or too little liquid. Uneven texture. Toomuch liquid.
Temperatureset too low. Undermixing.
Old ortoo littlebaking powder, Temperatureset too low.
Pan too small. Baking time too short.
Oven dooropenedfrequently.
Added incorrect type of oil to Cakes have tunnels. Not enough shortening,
cake mix. Too much baking powder.
Addedadditiona_ingredients Overmixing or at too h)gha
to cake mixor recipe, speed.
Doorgasket notsealing Cakes crack on top. Batter overmixed.
properly.
Incorrectuse of aluminum foil. Temperatureset too high.
Oven not preheated, tncorrectrack position.
Pansdarkened, dented or
warped.
Cake not done inmiddle, Temperaturesettoo high.
Toomuch leavening.
Pan too small.
Bakingtime too short.
Cakes, cookies,biscuits too Oven not preheated.
brown on bottom. Pans touching eachether er
oven walls.
Incorrect rack position. Pie crustedges too brown. Temperaturesettoo high.
Incorrectuse of a_uminumfell Pans touch}rigeach etheror
Placed 2 cookie sheets on one oven walls.
rack. Edgesof crust too thin,
Used glass, dark, stained,
warped or dull finish metal
pans. (Useashiny cookie Pies don't brown onbottom. Usedshinymetal pans.
sheet.) Incorrect rack position.
Temperature set too low.
Pies have soaked crust, Temperature too low at start
of baking.
Fillingtoo juicy.
Used shiny metal pans.
PAGE 13
Page 15
Broiling
Broiling is a method of cooking tender meats by direct
heat. The cooking time is determined by the distance be-
tween the meat and the broil element, the desired degree
of doneness and the thickness of the meat.
Broiling Tips:
Broiling requires the use of the broiler pan and insert. The
broiler insert must be in place to allow fat and liquid to
drain to the pan below to prevent spatters, smoke and
flare-ups. Improper use may cause grease fires.
Do not cover the broiler insert with aluminum foil as this
prevents fat from draining into pan below. For easier
clean up, the broiler pan can be lined with foil and spray
the insert with a non-stick vegetable spray.
Remove excess fat and slash remaining fat to help keep
meat from curling. This also reduces smoking and spat-
tering.
Use HI BROIL for most broil operations. Select Lo
Place oven rack in the correct rack position when oven is BROIL when broiling longer cooking foods such as poul-
cool. For darker browning, place meat closer to the broil try. The lower ternperature allows food to cook to the welt
element. Place meat further down if you wish meat to be done stage without excessive browning. Cooking time
well done or if excessive smoking and flaring occurs, may increase if Lo BROIL is selected.
See Care and Cleaning Chart on page 18 for instructions Broil times may need to be increased if range is installed
on cleaning the broiler pan and insert, on a 208-volt circuit.
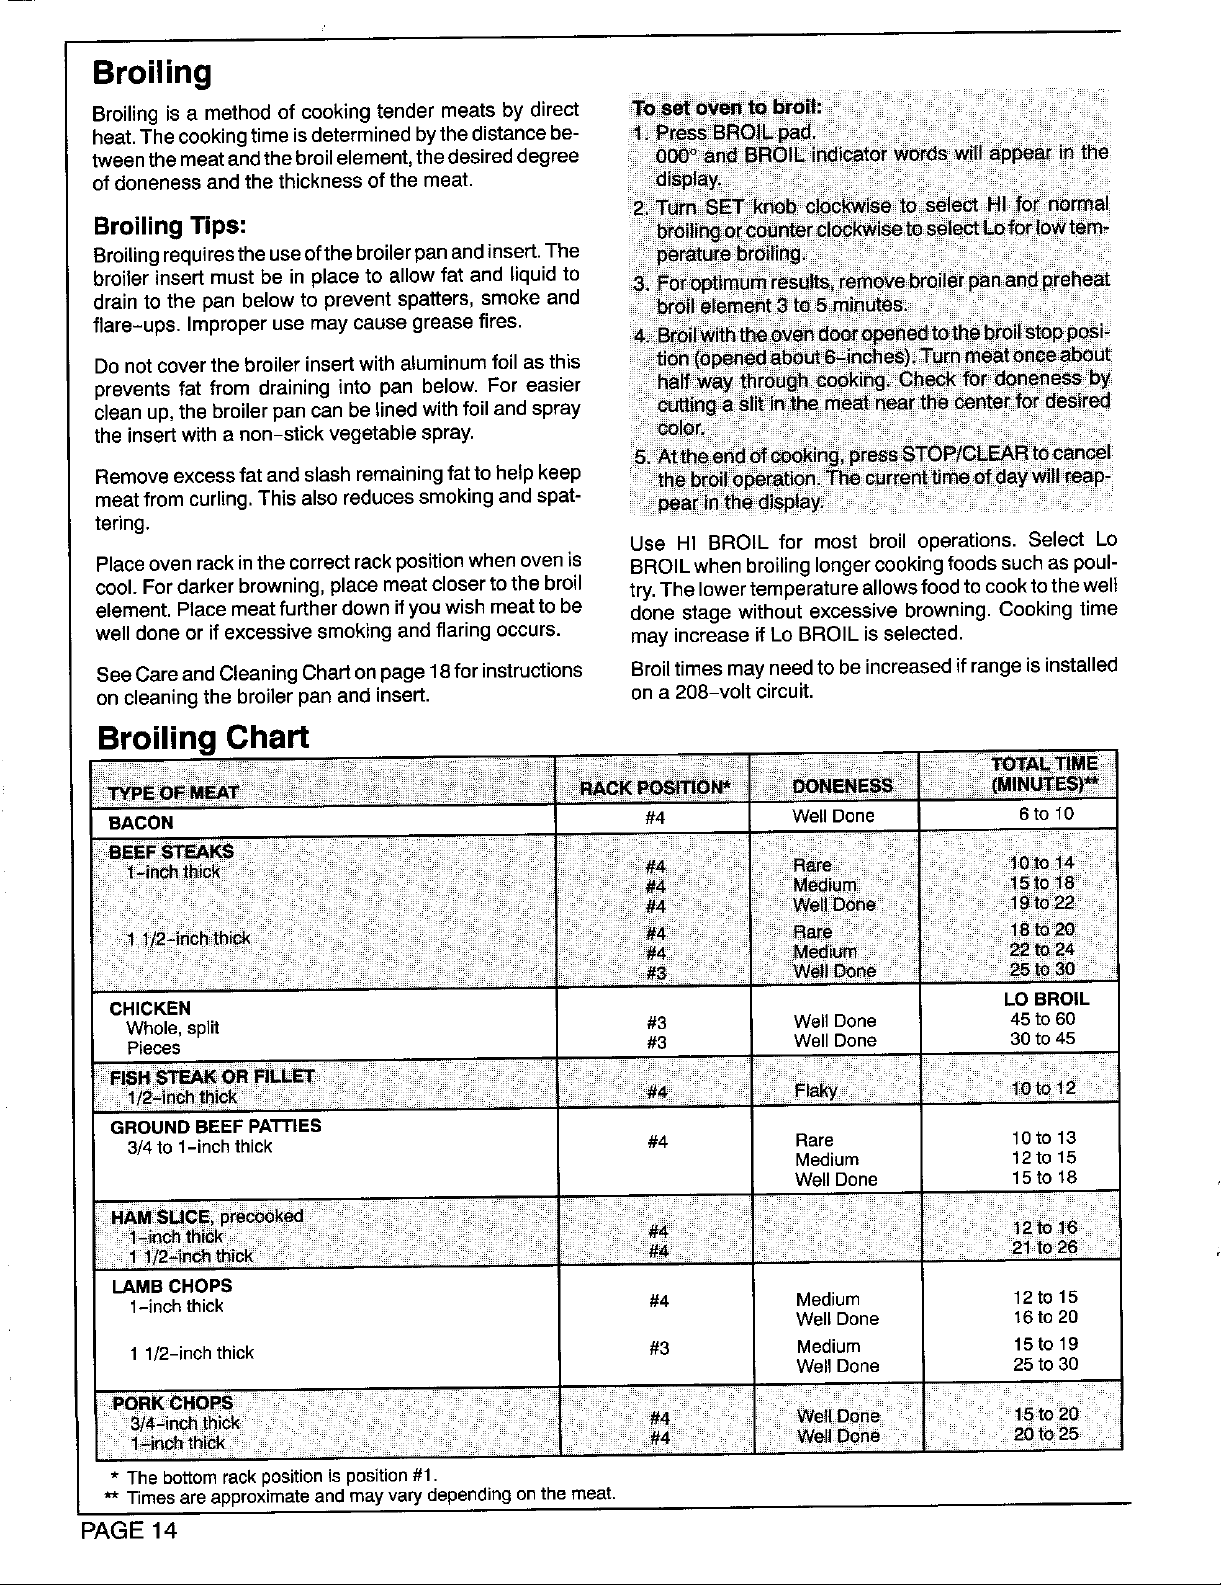
Broiling Chart
BACON #4 Well Done 6to 10
CHICKEN LO BROIL
Whole,split #3 WellDone 45 to60
Pieces #3 WellDone 30 to45
GROUND BEEF PATTIES
3/4 to 1-inch thick #4 Rare 10 to 13
LAMB CHOPS
1-inch thick #4 Medium 12 to 15
1 1/2-inch thick #3 Medium 15to19
Medium 12to 15
Well Done 15 to18
Well Done 16 to20
Well Done 25 to 30
* The bottom rack positionis position#t.
** Times are approximateand may vary dependingon the meat.
PAGE 14
Page 16
MAINTENANCE
Cooktop Light, If equipped Do not attemptto open or close dooruntilthe door is
Beforereplacingthe cooktoplightbulb,DISCONNECT completelyseatedonthehingearms.Neverturnonthe
POWER TO RANGE, Be sure the bulb is cool. Do not oven unlessdoor isproperly inplace. Whenbaking, be
toucha hotbulb witha dampclothasthe bulb maybreak, affected if the door is not securely closed.
Toturn on cooktop light: Pressand holdrocker switch
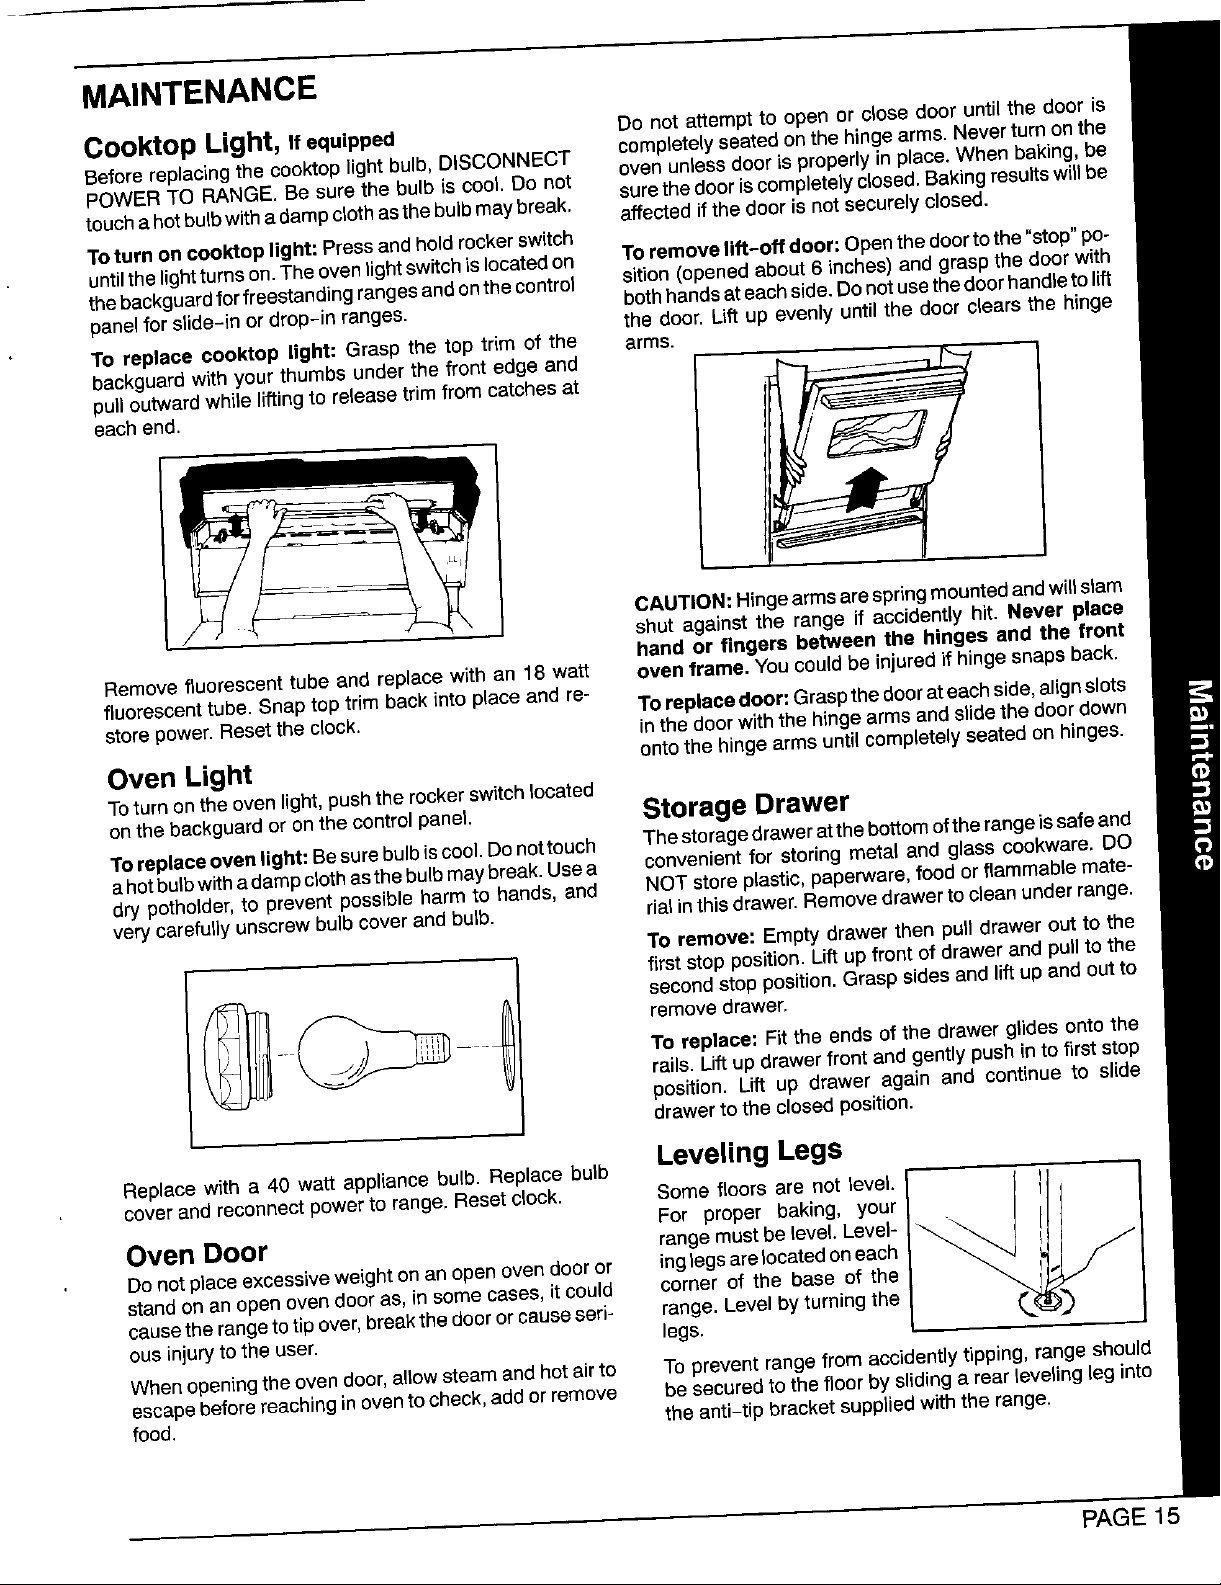
untilthe lightturnson.Theoven lightswitchislocatedon Toremove lift-off door:Openthe doortothe"stop"po-
thebackguardfor freestanding rangesandonthecontrol sition (openedabout 6 inches) and grasp the door with
panel for slide-in or drop-in ranges, bothhandsateach side.Donot usethe doorhandleto lift
To replace ¢ooktop light: Grasp the top trim of the arms.
beckguard with your thumbs under the front edge and _-,._ --'-'-'-F-_
pull outward while lifting to releasetrim from catchesat
each end.
Removefluorescenttube and replacewith an 18 watt oven frame. Youcouldbe injuredif hingesnapsback.
fluorescenttube. Snap top trimbackintoplaceand re-
storepower.Resetthe clock. Toreplacedoor: Graspthedoorateachside,alignslots
surethe door iscompletelyclosed.Baking resultswill be
the door. Lift up evenly until the door clearsthe hinge
CAUTION: Hingearmsare springmountedandwill slam
shut against the range if accidently hit. Never place
hand or fingers between the hinges and the front
inthe doorwiththehinge armsand slidethe doordown
Oven Light onto the hingearms untilcompletelyseated onhinges.
Toturnonthe ovenlight,pushthe rockerswitchlocated
on the backguardoronthe controlpanel. Storage Drawer
To replace ovenlight: Besurebulbiscool.Donottouch Thestoragedraweratthebottomoftherangeissafeand
ahotbulbwithadampclothasthebulbmaybreak. Usea convenientfor storingmetal and glass cookware.DO
dry potholder, to prevent possible harm to hands, and NOTstore plastic,paperware,food or flammable mate-
very carefullyunscrewbulb cover and bulb. dal inthisdrawer. Removedrawer toclean underrange.
To remove: Empty drawer then pull drawer out to the
first stop position. Lift upfront of drawer and pullto the
..... To replace: Fit the ends of the drawer glides onto the
_ _ _ 0' removesecond stopposition.Grasp sidesand liftup and out todrawer.
Replace with a 40 watt appliance bulb. Replace bulb Leveling Legs
coverand reconnect power to range. Resetclock. Some floors are not level. III,
rails. Lift up drawerfront andgently push into first stop
position. Lift up drawer again and continue to slide
drawerto the closed position.
For proper baking, your
Oven Door range must be level. Level-
Donotplace excessiveweighton anopenovendooror inglegsarelocatedoneach
standon anopen ovendooras, in some cases,itcould corner of the base of the
causetherange totip over,breakthedoororcauseseri- range. Level by turningthe
ous injurytothe user. legs.
Whenopeningthe oven door,allowsteam andhot airto To prevent range from accidently tipping, range should
escapebeforereachingin ovento check, add or remove be securedto the floor by sliding a rearleveling leginto
food. the anti-tip bracket supplied with the range.
PAGE 15
Page 17
SELF-CLEAN OVEN
The self-clean oven usestemperaturesabove normal
cookingternperaturestoautomaticallycleantheovenin-
terior.
It isnormalforthecooktopofthe rangeto becomehot
duringa clean cycle.Therefore,duringa clean cycle,
avoidtouchingthecooktoporovenventarea locatedat
thebaseofthe backguardonsmoothtopcooktopsandat
the rightrear elementfor coil cooktops.Avoidcontact
withthe ovendoorandwindowastheseareas alsobe-
comewarmduringa self-clean cycle.
Itisbettertocleantheoven regularlyratherthantowait
untilthereisa heavy build-upof soilintheoven.
NOTE:On Canadianmodelsonly,the smoothtopsur-
face unitswillNOT operateduringa cleancycle.This is
normal.
Before Self-Cleaning During Self-Cleaning After Self-Cleaning
When theCLEANpad ispressedand About one hour after the end of the
the door is locked, the oven will auto- clean cycle, the internal lock will dis-
matically begin to heat to cleaning engage and the LOCK indicator will
temperatures, turn off.Atthis point, the door can be
unlocked andopened.Movethe door
Turn off oven light beforeclean cycle. As the oven reaches cleaning tern- lock leverto the leftorunlocked posi-
The life ofthe bulbmaybeshortened peratures, the LOCK indicator will
if left onduring the clean cycle, turn on to show that an internal lock
Clean oven frame, door frame and mechanism has engaged. At this Somesoilmayleavealightgray, pow-
around the oven vent with a non- point,theoven doorcannotbelocked deryash whichcanberemovedwith a
abrasive cleaning agentsuch as Bon andopened, damp cloth. If soil remains, it indi-
Ami or soap and water. These areas To prevent damage to the door and longenough.The soilwill beremoved
are notexposed tocleaningtempera- lock lever, do not force the door open during the next cleancycle.
tures and should be cleaned to pre- when the LOCK indicator is dis-
vent soil from baking on during the played. Iftheovenracksdonotslidesmoothly
clean cycle, after a clean cycle, wipe racks and
The first few times the oven is embossed rack supportswithasmall
Wipe up excess grease or spillovers cleaned, some smoke and odor may amount of vegetable oil to restore
from the oven bottom to prevent ex- be detected. This is normal and will easeof movement.
cessive smoking and flare-ups dur- reduce or disappear with use. If the
ingthe clean cycle, oven isheavily soiled, or ifthe broiler On smoothtop cooktops: Clean
Wipe up acid spillovers such as lem- pan is left in the oven, smoke and around the vent opening at the base
onjuice, tomato sauceormilk-based odor may occur, of the backguard if there is a deposit
sauces and sugary spillovers. Porce- Asthe oven heats andcools, you may clean cycle. Use soap and waterand
lain enamel is acid resistant, not acid hear soundsof metalpartsexpanding a cloth or non-abrasive pad.
proof. The porcelain finish may dis- and contracting. This is normal and
colorif acidspills arenotwipedupim- will notdamage your appliance. Fine,hair-like linesmayappear inthe
mediately, oven interior or oven door. This is a
Donotuseovencleanersorovenlin- normal conditionresultingfrom heat-
er protectivecoatingsofany kindon ingandcoolingofthe porcelainfinish.
theself-clean ovenfinishor around These lines do notaffectthe perfor-
anypartofthe oven. manceof theoven.
Topreventdamage, donot cleanor
rubthegasketaroundtheovendoor.
Thegasketisdesignedtosealinheat
duringthe cleancycle.
tion and open the door.
cates that the clean cycle was not
from the fumes vented during the
PAGE 16
Page 18
Toset ovenfor a self-clean cycle: To delay the start of a clean cycle:
1. Removeoven racksand closethe oven door. 1. Remove oven racksand closethe oven door.
2. Move the door lock leverto the right or locked posi- 2. Move the door lock lever to the right or locked posi-
tion. tion.
3. Press the CLEAN pad. 3. Press CLEAN pad.
• 3 HR:00 willappearinthedisplay,and SETCLEAN 4. Turn SET knob to select cleaningtime.
TIME willflash in the display.After a few seconds 5. PressSTOPTIME padandturn SET knobto thetime
delay, the oven will automatically turn on. CLEAN ofdayyouwish the oven to turnoff.Thestoptime and
and ON will appear in the display. CLEAN DELAY STOP TIME will appear in the dis-
, If you wish to change the cleaning time, press the play.
CLEAN pad and turn the SET knob to select 2
hoursfor light soil or 4 hours for heavy soil. 6. Press CLOCK pad and the current time of day will
• "door" will appear in the display and continous the displayto showthat theoven is set for adelayed
beepswill sound ifthe oven door is not locked, clean operation.
• Ifthedoor is notlockedorthe cleantime is not en- 7. At the end of a clean cycle, continuous beeps will
tered within 30 seconds of pressing the CLEAN sound. PressSTOP/CLEAR to cancelthe beeps.
pad, the programwill automatically becancelled.
4. Press CLOCK pad and the current time of day will To cancel clean cycle:
reappearinthe display.CLEAN and ON will remain in 1. Push STOP/CLEAR pad.
thedisplay to showthat the oven is in a clean cycle. 2. Ifthe LOCKindicator is displayed,allowoven to cool
About onehourafterthe clean cycle ends, theLOCK in- up to one hour. Once LOCK indicator turns off, the
dicator willturn off and the oven door can be opened, door can be unlocked andopened.
reappear inthedisplay.CLEAN DELAYwill appearin
The ovendooranddoorlockleverwill bedamagedifthe If the LOCKindicator is not displayed the oven door
oven door isforced to openwhen the LOCK indicator is can be unlocked and opened.
still displayed.
PAGE 17
Page 19

CARE AND CLEANING CHART
Manydifferent cleaning agents are recommendedfor the various parts of the range. The followingbrands may help
you to make an appropriate selection: Mild abrasive cleaners (Bon Ami, Cameo, Soft Scrub, Comet or Ajax); mild
liquid sprays (Fantastik, Formula409); glass cleaners (Windex, Glass Plus, Cinch); non-abrasive scouring pad
(Tufty).Ifacleaningproductis recommendedfor useon plastic,glass orporcelain, itcanbeused onthe same appliance
finish.
Broiler pan & in- Soap &water. Plastic Removefrom oven after use. Coolthenpouroffgrease. Placesoapy
sert scouring pad. Soap clothoverinsertand pan;letsoak to loosensoil.Wash inwarm soapy
filled scouring pad. water.Use soapfilled scouring padto remove stubborn soil. Broiler
Dishwasher. pan and insert can be cleaned in the dishwasher.
Glass: Soap & water. Paste Wash with soap and water. Removestubbornsoilwith paste of bak-
Ovenwindow of bakingsoda & wa- ingsoda andwater. Donot use abrasive materials suchas scouring
See pages 6 and ter. Glass cleaner, pads, steel wool or powdered cleaning agents. They will damage
7 for smoothtop glass. Rinsewithclear wateranddry.Toprevent stainingofoven win-
instructions dow,never useexcessiveamountsofwaterwhich mayseep under or
behindglass.
Oven andCoil Elements are self-cleaning. Soil will burnoff as elements are used.
Elements Do notspray ovencleaner onelements,electrical hookupor connec-
tion.Donotimmersecoil-typesurfaceelementsinwater.
Plastic finishes: Soap& water.Pasteof Do not use oven cleaner, powder or liquidcleansers, abrasive or
Doorhandle,trim, baking soda & water.: causticcleaningagents on plasticfinishes.These cleaningagents
knobs,end caps, Non abrasive plastic willscratchor marrfinish.To preventstainingor discoloration,wipe
controlpanel pador sponge, upfat,greaseoracid(tomato,lemon,vinegar,milk,fruitjuice,mari-
nade)immediatelywitha drypapertowelorcloth.When surfaceis
cool,cleanwithsoapandwater;rinse,and dry.
Porcelainenamel: I Mildliquiacleaners, Porcelainenamelisg assfusedonmetal, t maycrackor chipwith
Cooktoptrim I detergentorsoap & I misuse.Porcelainenamel is acid resistant,notacid proof,All spil-
Cooktop 1water.Cleansingpow- lovers especialy acidor sugarspillovets shouldbe wipedup im-
coil models, ] ders and non_rasive mediatelywitha dry cloth. Surfacemay discolorordull ffsoil, espe-
See pages 16 and nylon or plasticpads, cially acid soil, is notremoved.Never wipe offa warm or hot surface
17for sef-clean wth adamp cloth Th s may cause crackingandchipping.Never use
oven cleaners abrasive orcaustic cteaning agentson exteriorfinish
of range or inthe serf-clean oven.
PAGE 18
Page 20
BEFORE YOU CALL FOR SERVICE
Check these points if...
Part or allof your electric range does not operate Baking results differ from previous oven
• Istherangeplug looseordisconnected fromtheelec- • Oven thermostat calibration may differ between old
trical outlet? and new oven. The newer oven thermostat may be
• Are any housefuses blownor circuitbreakerstripped? more accurate than the one on you previous oven.
• Has the powersupplyto the home been interrupted? onpages12to 13.Ifyou stillfeelthe oventemperature
• Are the oven controls properlyset? the oven thermostat.
• Was the electronic controlcorrectly set?
• Was the door left in the locked position following a Food does not broil correctly
self-clean cycle? • Was the controlset properlyfor broiling?(See page
• Is the ovensetfor automaticovencooking? 14).
• ON CANADIAN MODELS ONLY: Check to see if a • Was theproper rackpositionused?(See page14).
fusehas blown(Seepage20). Didyouallowtimefor thebroilelement topreheat?
Surface elements fail to turn on or heat the food
properly. • Wasaluminumfoilusedonthebroilerinsert,blocking
• Istherangepluglooseordisconnectfromtheelectri-
caloutlet? Oven light does not operate
• If the range has coil elements, are they properly • Isthe bulb loose or burned out?
plugged into the receptacles?
• Were appropriate utensils used? (See Cookware or
Cooking TipsSections) Oven will not self-clean
Followareliable recipeandreviewbakinginformation
is incorrect see page 20 for information on adjusting
Didyouusethe broilerpanthatcamewiththerange?
the slitsforfatdrainage?
• Is the light switchin the On position?
• Are the surface element controls properly set? • Is the self-clean control set properly? (See pages
Isvoltage to thehouse reduced? 16-17).
• CANADIAN MODELS ONLY:Thesmoothtop cooktop • Is the oven set for adelayed clean operation?
witl not operate during a self-clean operation. This is • Is the oven door properly locked?
normal.
• Was the oven heavily soiled?
Food not baking or cooking correctly Oven door will not unlock
• Aretheovenracks properlyplacedfor baking? • Hastheself-cleancyclebeencompletedforatleast
• Have youusedaluminumfoilcorrectly? one hour?
• Was the ovenpreheatedasrecommended? • Was thedoorcorrectlyunlocked?
• Are thecontrolsproperlyset?
• Is there 1to2 inches ofspace betweenpansand the
oven walls? Are the rangeand oven rackslevel? • This is a fault code. If a fault code appears inthe dis-
• Was good cookware/bakeware of the proper size CLEAR pad. See page20 for additional information.
used?
• Was the oven vent covered or blocked on the range
surface?
• Are you using a tested recipe from a reliablesource?
"F" plus a number appears in the display
playand a continuousbeepsounds, presstheSTOP/
PAGE 19
Page 21

SERVICE INFORMATION
Explanation Of Fault Codes Adjusting Oven Temperature
Yourapplianceisequippedwithanelectroniccontrolfea- Your new appliance has been factory tested for oven
turing built-in, self-diagnostic software. This software temperature accuracy. Even though your range has
continuously monitors the control to insure safe and been tested, you may find that the cooking resultswith
properoperation. If the software should detect a ques- your newoven are different from your previous oven.
tionablesituation, aFAULTCODE (Fplus a number)will
appear inthe displayand continuousbeeps may sound. If you have carefully followed the recipe, reviewed the
bakingtips onpage 12and stillfeelcookingresults donot
meetyour expectations,youcanadjustthe oven temper-
k I one ortwoitemsare not bakingproperly.
I I SET Ifyouthink the ovenshould behotterorcooler,you can
A fault code indicates that there may bea functional er- results ofthe "test"shouldgive youan idea of how much
ror.As asafety precaution,the controlwill automatically to adjust the thermostat.
cancelthe program.
During Normal Oven Cooking
If a fault codeappears in the displayand continuous 2. TurnSET knobuntil550° isdisplayed.
beeps sound, press the STOP/CLEAR pad. Then,
reprogramthe cookingoperation. 3. Pressand hold the OVENTEMP padforseveralse-
Ifthefaultcodereappearsinthedisplay,callan autho-
rizedservicer.Donet usethe ovenuntilthe controlhas • If 00° does not appear inthe display,pressthe
beenserviced. The cooktopcan be used. STOP/CLEAR pad and begin again.
O ature. DO NOT ADJUST THE TEMPERATURE if only
adjust it yourself. To decide how much to change the
thermostat, setthe oventemperature 25°Fhigheror low-
er than the temperature in your recipe,then bake. The
Toadjust the thermostat:
1. Press OVEN TEMP pad.
condsuntil00° appearsinthe display.
• If the oven temperature was previously adjusted,
DuringA Self-Clean Cycle the change will be displayed. For example, if the
Iftheovenisheavilysoiled,excessivesmokeandflaring temperaturewasreducedby 15°, -15 ° willbe dis-
mayresultin afaultcode.Ifthisoccurs,presstheSTOP/ played.
CLEARpadandallowtheoventocoolforanhour.Then, 4. Turnthe SET knobto selectthetemperaturechange
reprogramtheovenforthe cleancycle, desired.
Ifthe faultcode reappears inthe display,call an autho- • The oven temperaturecan be increased up to35°
rizedservicer.Donotusethe ovenuntilthe controlhas or reduced byas muchas 35° (-35°) in 5° incre-
beenserviced.The cooktopcanbe used. ments.
• NOTE: Ifyoudelayinselectinga temperature,the
Fuses (Canadian Ranges Only) programwillautomaticallycanceland00° willdis-
Yourrangeisequippedwithseven(7)type"P"fuses.The appear.Beginagain iftheprogramcancels.
fusesare locatedonthe backwalloftherange.Remove
thestoragedrawerforaccesstothefuses. 5. Pressthe STOP/CLEAR padandthe timeofdaywill
reappearinthedisplay.Theovenwillnow bake atthe
It isnotnecessary to readjusttheoventemperature if
there is a power interruption. This adjustment will not
affect broil or cleantemperatures.
__ adjustedtemperature.
If part of your range does not operate, check to see ifa
fusehasblown.Agap inthefusestripora darkenedwin-
dowindicatesa blownfuse. Replacewith the sametype
and amperage type "P"fuse.
PAG E 20
Page 22
SERVICE INFORMATION
Do not attempt to service the appliance yourself un- completemodelandserialnumbersoftheappliance,the
less directed to do so in this book. Contact the nameand addressof the dealerfrom whom you pur-
dealer who sold you the appliance for service, chased the appliance,the date ofpurchaseand details
concerningyourproblem.
HOWTOObtain Service Ifyoudo notreceivesatisfactoryservice,youmaycon-
If yourapplianceshouldrequireserviceorreplacement tacttheMajorApplianceConsumerActionPanelbylet-
parts,contactyour Dealer or AuthorizedServicer. Use ter includingyourname, address,andtelephonehum-
onlygenuinefactorypartsif replacementpartsare nec- bet,aswellasthe modelandserialnumbersoftheappli-
essary.ConsulttheYellowPagesinyourtelephonedi- ance.
rectoryunderappliancefortheauthorizedservicecenter
nearestyou.Besuretoincludeyourname,address,and MajorApplianceConsumerActionPanel
phonenumber,alongwiththemodelandserialnumbers 20 NorthWackerDrive
ofthe appliance.(See insidefront coverfor locationof Chicago,IL 60606
yourmodeland serialnumbers.)
If you are notsatisfiedwiththe localresponseto your independentagencysponsoredbythreetradeassocia-
service requirements,call or write Maytag Customer tionsas a court of appeals on consumercomplaints
Service, 240 Edwards Street, S.E., Cleveland, TN whichhavenotbeenresolvedsatisfactorilywithina rea-
37311, (615) 472-3500. Includeor have availablethe sonableperiodof time.
MACAP (MajorApplianceConsumerActionPanel)isan
PAGE 21
Page 23

ONE YEAR - FULL WARRAN_
Maytag Customer Servicewillrepairor replace,withoutcharge,anypart of your appliancewhich hasa defect inmaterial
orworkmanship duringthe firstyearafter the date of the original instaBation.Thiswarranty extendsto any ownerduring
- MaytagCustomer Servicewillreplace,atno charge,any smoothtop heatingelement,solid disc heatingele-
Theseparts mustbe installedby an authonzed servicer, Any laborchargerequiredfor replacement isNOT covered by
this limited warranty.This warranty extends to any ownerduring the additionalfour year warranty periodwhen the ap-
pliance is located in the UnitedStates or Canada.
WHAT IS NOT COVERED BY THESE TWO WARRANTIES:
1. Conditions and damages resulting from any of the fol- 4. Products purchased for commercial or industrial use.
lowing: 5. The cost of service orservice callto:
a. Improperinstallation, delivery,or maintenance, a. Correct installation errors.
b. Any repair,modification, alterationor adjustment not b. Instruct the consumer onthe proper use of the prod-
authorized by Maytag Customer Service, or an au-
thorized servicer, uct.
c. Misuse, abuse, accidents or unreasonableuse. c. Transport the appliance to a servicer.
d. Incorrect electrical current, voltage or supply. 6. CONSEQUENTIALOR INCIDENTAL DAMAGESSUS-
e. Impropersetting of any control. BREACH OF THESE WARRANTIES. Some states do
2. Warranties are void if the original serial numbers have not allow the exclusionor limitationof consequential or
beenremoved,altered,orcannotbereadilydetermined, incidental damages,so theabove exclusion may notap-
3. Light bulbs, ply to you.
TAINED BY ANY PERSON AS A RESULT OF ANY
HOW TO RECEIVE WARRANTY SERVICE
1. Contactthedealerfromwhomyoupurchasedthe applianceorany authorizedservicertoreceive
warranty service under thesewarranties.
2. Should you not receive satisfactory warranty service from your local servicer,contact:
Maytag Customer Service
240 EdwardsStreet, S.E.
Cleveland, TN 37311
(615) 472-3500
3. Have thefollowing information available when requestingwarranty service:
- Your nameand address.
- The model and serial numbers ofyour appliance.
- The name and address of your dealeror servicer.
- The purchase date of your appliance.
- A clear description ofthe problem.
atrer,orEnla_geMaytagCust_e!_rv!c___eSpO_!_!!_i_SP_O_!!gatio_d_rthesetwowarranties:l_ese_o w_ra_i_Sg!veYo_s_!fi¢ iegaliights
andyOO;may_!s°hav_°the[_Ohts_!¢h;va_!Omstate!Ost_e ;: ; ; ;; ;; ;; ; ;; ;; ;; ; ; :1
(12/93)
 Loading...