

Page 1
GVs C
Care
Instructions for your Electric Wall Oven with "T" Clock
(ELECTRONICCONTROLLER)
CONTENTS
SAFETY INSTRUCTIONS ................... 1-3 AUTOMATIC OVEN COOKING ................. 8
ELECTRONIC CONTROLLER .................. 4 SELF CLEANING OVEN ...................... 9
USING YOUR OVEN ....................... 5-7 MAINTENANCE ............................ 10
Ovencharacteristics ........................ 5 Ovendoor
Ovenvent ................................ 5 Light replacement
Fan ..................................... 5
Oven racks ............................... 5 CARE AND CLEANING CHART ............... 11
Preheating ................................ 5 SERVICE .................................. 12
Howto bake or roast ........................ 6
Common baking problem chart. 6 Troubleshooting
............... Howto obtain service
Howto broil ............................... 7 Circuit breaker (Canada only)
WARRANTY ............................... 15
8112P103-60
(7/91)
Page 2
SAFETY INSTRUCTIONS
Informationinthe Safety Instructionsection covers all STORAGE IN, ON OR NEAR APPLIANCE - Do not
electriccooking appliances. You may find some infor- store or usegasoline orotherflammable materials,va-
mation that does not pertain to your particular applF porsand liquidsintheoven, nearsurfaceunitsorinthe
ance. Please review this section before using your vicinity of this or any other appliance. The fumes can
cooking appliance, create a fire hazard or explosion. Do not use cooktop
or ovenas astorage areaforfood or cooking utensils.
Thefollowing instructions are based on safety consid-
erations and must be strictly followed to eliminatethe
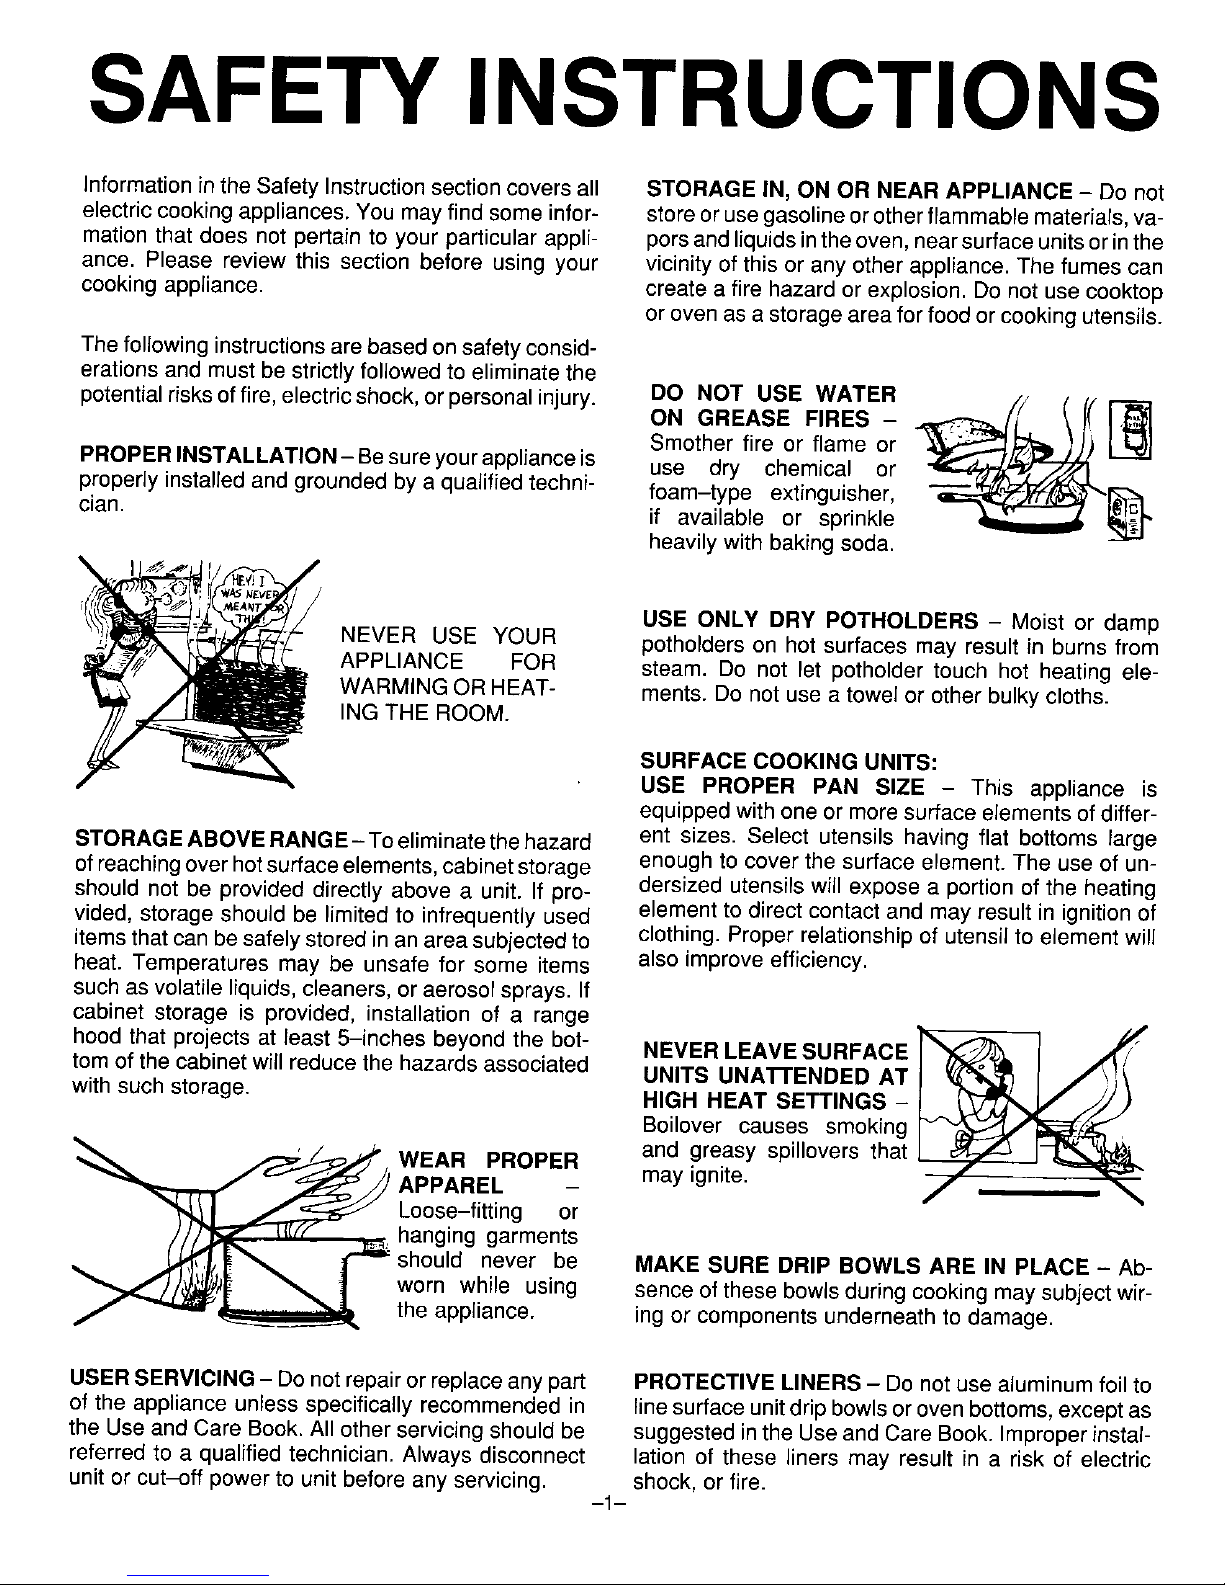
potentialrisksoffire, electricshock,orpersonal injury. DO NOT USE WATER //(I,'r-"-_
ON GREASE FIRES -
Smother fire or flame or
PROPERINSTALLATION- Besureyour applianceis use dry chemical or
cian.Pr°periyinstalled and grounded by a qualified techni- foam-typeifavailable extinguisher,orsprinkle __j-_[_
heavilywith bakingsoda.
USE ONLY DRY POTHOLDERS - Moist or damp
NEVER USE YOUR potholders on hot surfaces may result in burns from
APPLIANCE FOR steam. Do not let potholder touch hot heating ele-
WARMING OR HEAT- ments. Do not use a towel or other bulky cloths.
ING THE ROOM.
SURFACE COOKING UNITS:
USE PROPER PAN SIZE - This appliance is
equipped with one or more surface elements of differ-
STORAGEABOVERANGE-Toeliminatethehazard ent sizes. Select utensils having flat bottoms large
of reachingover hotsurfaceelements,cabinet storage enough to cover the surface element. The use of un-
should not be provided directly above a unit. If pro- dersized utensilswill expose a portion of the heating
vided, storage should be limitedto infrequently used element to direct contact and may result in ignition of
itemsthat can besafely stored inanarea subjected to clothing. Proper relationship of utensil to element will
heat. Temperatures may be unsafe for some items also improve efficiency.
suchas volatile liquids, cleaners, or aerosol sprays. If
cabinet storage is provided, installation of a range
hood that projects at Feast5-inches beyond the bot- NEVER LEAVESURFACE I/_/_'J¢,,_ t
tom of the cabinet will reducethe hazardsassociated UNITS UNATFENDED AT I _ f /"4/\ I
with such storage. HIGH HEAT SETTINGS -I __l_"y/)
Boilover causes smoking _'__
.,,-'-_/_-_/ WEAR PROPER and greasy spillovers that J _ I_
'_-_ _'S,,,_._ APPAREL - may ignite. /,
"_J _ Loose-fitting or
///._ uc// _: hanging garments
.,_,_,_ _ should never be MAKE SURE DRIP BOWLS ARE IN PLACE - Ab-
_',_/_?[- _ | worn while using sence of these bowls during cooking maysubject wir-
/ _ _/===========_ the appliance, ing or components underneath to damage.
USERSERVICING- Do not repairorreplace anypart PROTECTIVE LINERS - Do not usealuminum foil to
of the appliance unless specifically recommended in linesurface unitdrip bowlsorovenbottoms, except as
the Use and Care Book. All other servicing should be suggested inthe Useand Care Book. Improper instal-
referred to a qualified technician. Always disconnect lation of these liners may result in a risk ef electric
unit or cut-off power to unit before any servicing, shock, orfire.
-1-
Page 3
SAFETY INSTRUCTIONS
GLAZED COOKING UTENSILS- Only certain types VENTILATING HOODS:
of glass, glass/ceramic, ceramic, earthenware, or CLEAN VENTILATING HOODS FREQUENTLY -
other glazed utensils are suitable for range-top sew- Grease should not be allowedto accumulate onhood
icewithoutbreaking dueto the suddenchange in tem- orfilter. When flaming foods underthe hood, turn the
perature, fan off. The fan, if operating, mayspread the flame.
IMPORTANT SAFETY NOTICE AND WARNING
UTENSIL HANDLES The California SafeDrinking WaterandToxic Enforce-
_ _ SHOULD BE meritActof 1986 (Proposition65) requiresthecOVer-
TURNED INWARD norof California to publish a list of substances known
AND NOT EXTEND to the State of California to cause cancer or reproduc-
OVER ADJACENT tive harm, and requiresbusinesses towarncustomers
SURFACE UNITS - of potential exposures to such substances.
To reduce the risk of
burns, ignition of flam- Users of this appliance are hereby warned that when
mable materials, and the appliance isengaged in the self-clean cyclethere
spillage due to unin- may be some low-level exposureto some of the listed
tentional contact withthe utensil,the handle of a uten- substances, including carbon monoxide. Exposure to
sil should bepositioned sothat it isturned inward,and these substances can be minimized byproperly vent-
does not extend over adjacent surface elements, ing the appliance tothe outdoors duringthe self-clean
cycle.
DO NOT SOAK REMOVABLE HEATING ELE-
MENTS - Heating elements should never be im- DEEP FAT FRYERS:
mersed in water. Immersing element in water would Useextreme cautionwhen movingthegrease kettleor
damage insulating material inside element, disposing of hot grease.
DO NOTTOUCH SURFACE ELEMENTS OR OVEN
OVENS: ELEMENTS, AREAS NEAR ELEMENTS OR INTE-
USE CARE WHEN OPENING DOOR - Let hot air or RIOR SURFACES OF OVEN - Elements may be hot
steam escape before removing or replacing food. eventhough they aredark in color.Areasnearsurface
elements and interior surfaces of oven may become
DONOT HEAT UNOPENEDFOOD CONTAINERS- hot enough to cause burns. During and after use, do
Build-up ofpressure maycause containertoburst and not touch or let clothing or other flammable materials
contact heatingelements, areas near elements or in-
result in injury, terior surfaces of oven until they have had sufficient
timeto cool.Among these areas are the cooktop,sur-
KEEP OVEN VENT DUCTS (located under rear ele- faces facing the cooktep, oven vent opening andsur-
ment; rear cornerof cooktop;between oven door and facesnearthis opening, ovendoor, andoven window.
control panel of wall oven or on backguard) UNOB- Also, do not allow aluminum foil, meat probes or any
STRUCTED. Blockage of vent prevents proper oven other metal object, other than a utensil on a surface
air circulation andwillaffect oven performance. Avoid element, to contact heating elements.
touching oven vent areawhileoven is on andfor sev-
eral minutesafter ovenis turned off.Some partsofthe ANTI-TIP BRACKET:
vent and surrounding area become hot enough to WARNING: To reducethe risk of tipping of the appli-
cause burns, ance from unusual usage or by excessive loading of
the oven door, the appliance must be secured by a
PLACEMENTOFOVEN RACKS- Always placeoven properly installed anti-tip device. To check ifdevice is
racks in desired location while oven is cool. If rack installed properly: Use a flashlight and look under-
mustbe movedwhile hot,use care to avoidcontact of neath rangeto see thatone of the rear leveling legsis
engagedin the bracketslot. Whenremovingappliance
potholderwith oven element, for cleaning, be sure anti-tip device is engaged when
rangeisreplaced.The anti-tip device secures the rear
leveling leg to the floor, when properly engaged.
-2-
Page 4
SAFETY INSTRUCTIONS
ADDITIONAL INFORMATION:
Afterappliance is installed, be certain all packing ma- ATTENTION: NE LAISSER AUCUN ALIMENT, US-
terials are removed from the appliance before operat- TENSILE DE CUISINE, ETC., DANS LE FOUR
ing the unit. If appliance is installed near a window, DURANT LE CYCLE D'AUTONETTOYAGE.
take steps to prevent curtains from blowing over sur-
face elements creating a fire hazard. Onsome models,afan shouldbe heardduring the self
clean cycle. If not, cancel clean cycle and call a serv-
Careshould be givento locationofappliance. Be sure iceman before self cleaning again. (Refer to CON-
floorcoveringunderappliance,walls adjacenttoappli- TENTSon front coverfor locationofself clean instruc-
ance,cabinetryadjacent toappliance,andothermate- tions and fan information.)
rials adjacent to appliance can withstand prolonged
heat. This isa heavyappliance and can settle into soft SMOOTHTOP COOKTOP:
floor coverings such as cushioned vinyl. Use care Do not cook on broken cooktop. If cooktop should
when moving range on this type of floor covering, break, cleaning solutions and spillovers may pene-
trate the broken cooktop and create a risk of electric
shock. Contact a qualified technician immediately.
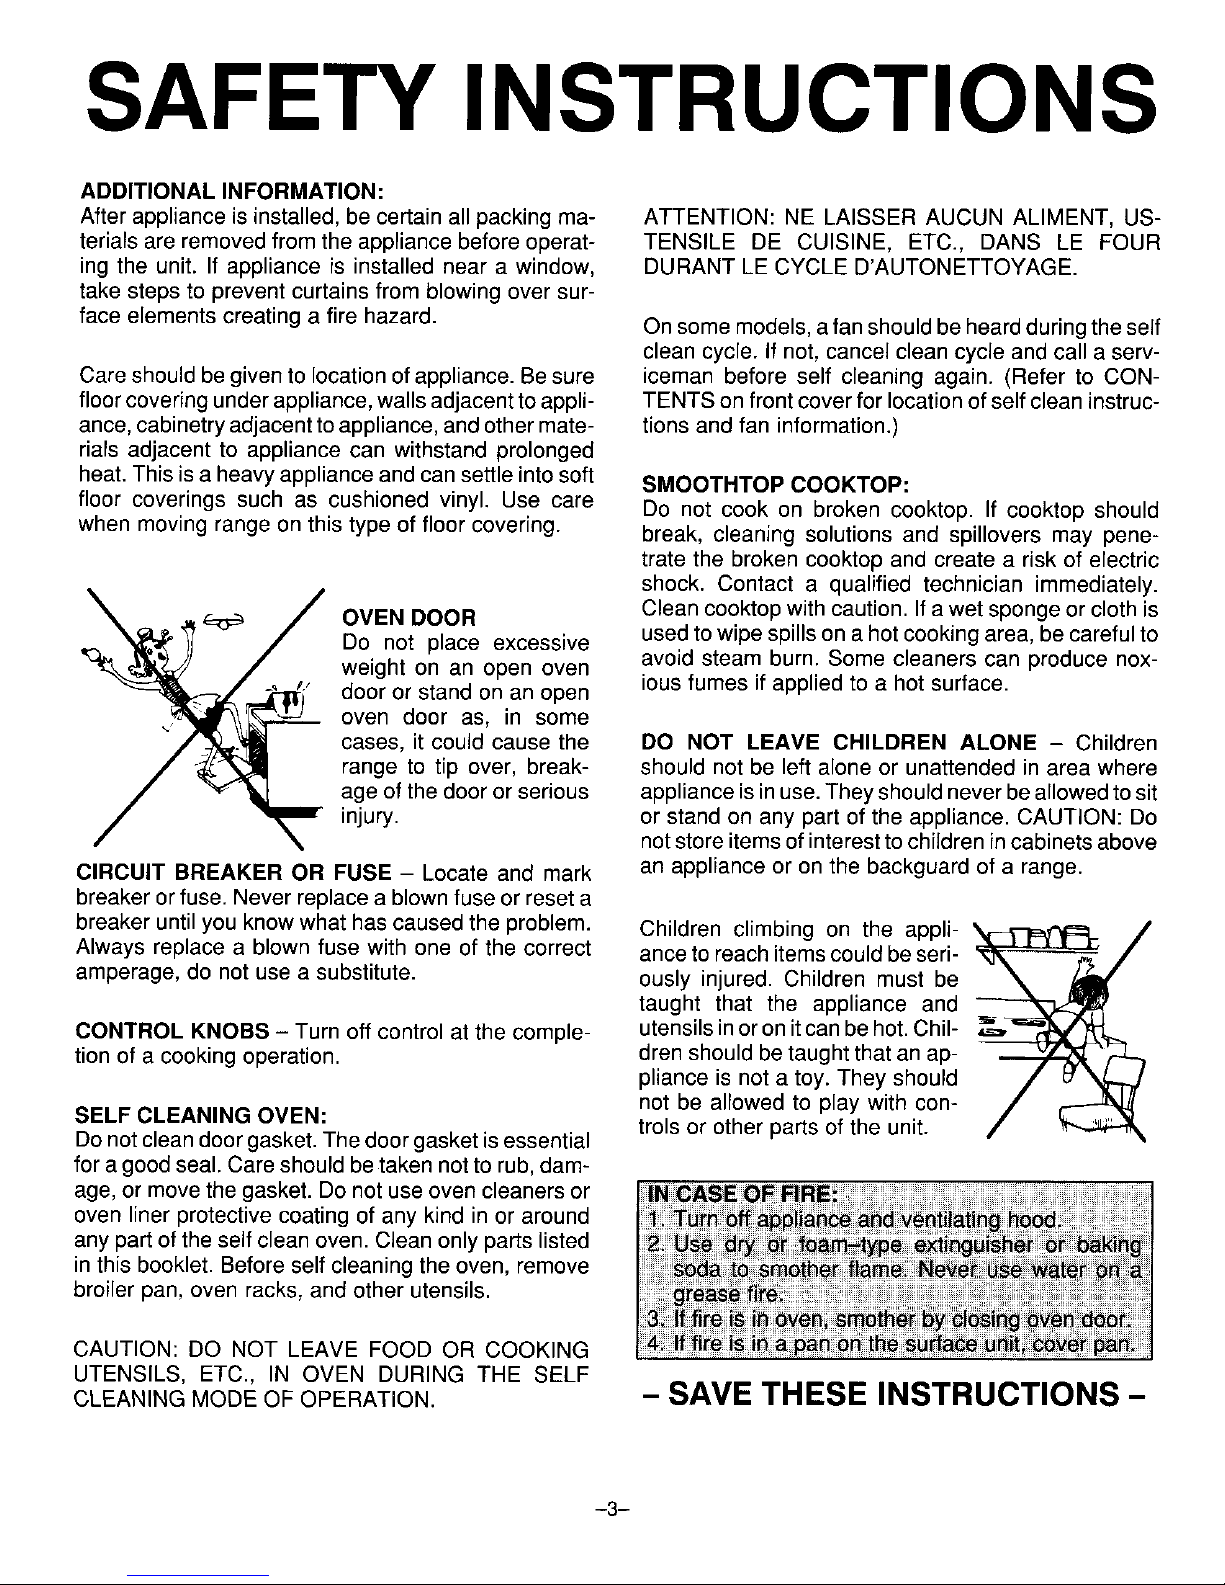
_ c.o_ / OVEN DOOR Cleancooktop withcaution. Ifawet sponge orcloth is
/
/
Do not place excessive usedto wipe spills ona hot cookingarea, becareful to
weight on an open oven avoid steam burn. Some cleaners can produce nox-
/
-:--c_.__i' door or stand on an open ious fumes if applied to a hot surface.
_. _.wj oven door as, in some
cases, it could cause the DO NOT LEAVE CHILDREN ALONE - Children
range to tip over, break- should not be left alone or unattended in area where
age of the door or serious appliance isinuse.They should neverbeallowedto sit
injury, or stand on any part of the appliance. CAUTION: Do
notstoreitems ofinteresttochildren incabinetsabove
CIRCUIT BREAKER OR FUSE - Locate and mark an appliance or on the backguard of a range.
breaker orfuse. Never replace a blownfuse or reset a
breaker until you know what has caused the problem. Children climbing on the appli-
/
Always replace a blown fuse with one of the correct anceto reach itemscould beseri- _ /
amperage, do not use a substitute, ously injured. Children must be _"
taught that the appliance and
CONTROL KNOBS - Turn off control at the comple- utensils inoronitcan behot.Chil- _'_'_ ,
tion of a cooking operation, dren should be taught that an ap-
pliance is not a toy. They should
not be allowed to play with con-
SELF CLEANING OVEN: trois or other parts of the unit.
Donot cleandoor gasket. Thedoorgasket is essential
fora good seal. Careshould betaken notto rub,dam-
age, or movethe gasket. Do not use oven cleaners or
oven liner protective coating of any kind in or around
anypart of the self clean oven. Clean only partslisted
in this booklet. Beforeself cleaning the oven, remove
broilerpan, oven racks, and other utensils.
CAUTION: DO NOT LEAVE FOOD OR COOKING
UTENSILS, ETC., IN OVEN DURING THE SELF
CLEANING MODE OF OPERATION. -- SAVE THESE INSTRUCTIONS -
-3-
Page 5

ELECTRONIC CONTROLLER
CLOCK (time-of_:tay) CLEAN BROIL
1. Press CLOCK pad. 1. Closedoor. 1. Press BROILpad.
2. Turn SET knobuntildisplayshows 2. Movedoor handleto lockedposi- 2. Turn SET knobclockwiseone or
correcttime-of-clay, tion. twoclickstoselectHIorLO broil.
3. PressSTOP/CLEARpadtolockin 3. Press CLEAN pad. ("door" will 3. PressSTOP/CLEARpadtocancel
time. flash in display and beeps will broiloperation.
sound if door is not locked.)
When power is first supplied to oven
4. Oven will automatically clean for 3 See page7for additionalinformation.
or ifthere is apower failure, the dis- hours.Select 2 or 4 hoursby turn-
play will flash. Follow above instruc- ing the SET knob.
tions to set clock.
See page9for additionalinformation.
_ _ 8ooo 3,
_ToPQ I__II,RI• I_11 I u u QjT
c_,, I II I • I II I C,EA,BRO,L
DELAY TIMED BAKE
SET CLEAN COOK STOP TIMER LOCK ON
STOP/CLEAR I CLOCK CLEAN BROI_EMp SET
resstocance,a,, T m oi e,t,er
operationsexcept direction to enter
clockandtimer. TIMER COOKTIME STOP"riME time or temperature.
Knobis alsousedto
selectHI/LO broil.
TIMER (minute timer) COOK TIME/STOP TIME BAKE TEMP
1. PressTIMER pad. To begincookingimmediately: 1. Press BAKETEMP pad.
2. Turn SET knobto desiredtime. 1. Press COOK TIME padand enter 2. Turn SET knobuntildesiredoven
3. TIMER starts automatically. 3 desiredcookingtimebyturningthe temperatureappears in the dis-
beepssignalthe endof thetiming SET knob. play.
operationandthetime-of_:lay re- 2. Press BAKETEMP padand enter 3. PressSTOP/CLEAR padtocancel
appearsinthe display, oventemperaturewithSET knob. the bakingoperation.
4. To cancel:Press TIMER pad and
turnSET knobuntil:goappears in To delaythe startof cooking: See pages 5 to 6 foradditionalinfor-
thedisplay.Time-of-daywill reap- 1. Press COOK TIME padandenter mationon bakingand roasting.
pearafter a 3-second delay, cookingtime with SET knob.
2. Press STOP TIME pad and enter
time youwishfood to stopcooking
with SET knob.
3. Press BAKETEMP pad and enter
oven temperature with SET knob.
Seepage8foradditionalinformation.
-4-
Page 6

USING YOUR OVEN
To remove: Be sure rack is cool. Pull edge ofutensilandthe ovensidesorad-
rackout to the "lock-stop" position. Tilt jacent utensils.
up and continue pulling until rack re-
leases.
PREHEATING
Preheating is necessary for baking. AI-
_=_ lowovento heatfor 10to15minutes be-
fore addingfood. Preheat broil erement
_,,_...._ _-,-,-,-,-,-,-,-,-_ for 5 to10minutesifdarkerbrowningis
desired or if broiling thin (3/4-inch)
meats. It is not necessary to preheat
OVEN VENT oven for roasting.
Youroven is vented through a duct Io- _,_ _ Selectingatemperature higherthande-
cated on the right side above the oven __ sired will NOT preheat the oven any
door. To prevent baking problems, do faster. Preheating at a higher tempera-
notblockthis opening. Donottouch the ture may havea negativeeffect on bak-
vent openings or nearby surfaces dur-
ingoven operationasthey may be hot. _ ing results.
To preheat: Set ovenfor baking andal-
lowtheoven to heat untildisplay shows
FAN the presettemperature(100willappear
in the display until the oven reaches
This unitis equippedwitha fan which 1O0°F.The displaywill then show the
automaticallyturns on whenever the oventemperaturein5° incrementsuntil
oven isset forcookingorcleaning.The RACK POSITIONS: the oven reaches the preset tempera-
fan willautomaticallyturn off whenthe RACK1 (topof oven)usedfor broiling ture.)
unithascooled, thinfoods.
Once the preset temperature is
RACK 2 used for one--rackbaking or reached,andthe oventemperaturehas
OVEN RACKS broiling thickercutsofmeat. stabilized,a singlebeepwillsound.
Thetwooven racksare designedwitha RACK3 usedformostone-rack baking Iftheoventemperatureischangedafter
"lock-stop"positionto keep racksfrom andfor roastingsome meats, preheating,a beep will signal that the
accidentallycomingcompletelyout of ovenhasreachedthe newtemperature
theoven. RACK 4 usedfor roastinglargemeats, setting.
cookinglargerfoodsand forbakingan-
NEVERplacepansdirectlyontheoven gelfoodcake orpieshells.
bottom. Do not cover entire rack with
aluminumfoilorplacefoildirectlyunder
utensil.Tocatchspillovers,cut a piece HINTS:
of foil a little larger than the pan and Ifcookingontworacks,staggerpansso
placeiton the rackbelowtherackcon- one is not directlyover theother. Use
tainingthe utensil, rackpositions1and 3, 2 and4, or1and
4, dependingon bakingresults,when
To replace: Place rack on rack sup- cookingontworacks.
ports,tiltupandpushtowardrearofov-
en. Pullrackoutto "lock-stop" position Placefood inthe ovenonthe centerof
tobe sure rackis correctly replaced, the rack. Allow 1 or 2 inches between
-5-
Page 7

USING YOUR OVEN
HOW TO BAKE OR ROAST and begins to heat. The dispray will time in recipe. Cook longer if neces-
1. When cool, position rack in oven de- register the oven temperature start- sary. Remove food from the oven.
pending on what you are baking, ing at 100°F.
Press STOP/CLEAR button to cancel
2. To set oven: Press BAKE TEMP pad. 3. Place food incenter of oven, allowing a baking operation.
"BAKE" lights rn the display, a minimum of 2 inches between uteri-
Turn SET knob to the desired oven sil and oven walls. If you have carefully followed the ba-
sic instructions and still experience
temperature. "ON" lights in the dis- poor results, these suggestions may
play. The oven immediately turns on 4. Check food for doneness at minimum be helpful:
COMMON BAKING PROBLEMS AND WHY THEY HAPPEN
Cakes are uneven. Panstouching each other or Cakes don't brown on top. Oventemperature too low.
oven walls. Overmixing.
Batter uneven in pans. Too much liquid.
Oven temperature too lowor Pan size too large or too little
baking time too short, batter inpan.
Oven not level. Oven door opened too often.
Undermixing. Incorrect rack position.
Too much liquid.
Cake high in middle. Temperature too high. Excessive shrinkage. Too little leavening.
Overmixing.
Bakingtime too long. Pan too large.
Overmixing. Oven temperature too high.
Too much flour. Bakingtime too long.
Panstouching each other or Panstoo close to each other
oven wells, or over]walls.
Incorrect rack position.
Cake falls. Too much shortening or sugar. Uneven texture. Too much liquid.
Too much or too little liquid. Undermixing.
Temperature too low. Oven temperature too low.
Oldor too little baking powder. Baking time too short.
Pan too small.
Oven door opened frequently. Cakes have tunnels. Not enough shortening.
Added incorrect type of oil to Too muchbaking powder.
cake mix. Overmixing orat too high a
Added additional ingredients speed.
to cake mix or recipe. Oven temperature too high.
Cakes, cookies, biscuits Oven door not closed properly.
don't brown evenly. Doorgasket notsealing Cakescrack on top. Batter overmixed.
properly. Oven temperature too high.
Incorrect useof aluminumfoil. Too much leavening.
Oven not preheated. Incorrect rackposition.
Pans darkened, dented or
warped.
incorrect oven position. Cake not done in middle. Temperature too high.
Pan too small.
Baking time too short.
Cakes, cookies, biscuits too Oven not preheated.
brown on bottom. Panstouching each other or
oven walls. Pie crustedges too brown. Oven temperature too high.
incorrect rack position. Panstouching each other or
incorrect use of aluminum foil. oven walls.
Placed 2 cookie sheets on one Edges of crust too thin.
rack.
Used glass, darkened, stained,
warped or dull finish metal Pies don't brown on bot- Used shiny metal pans.
pans. (Useashiny cookie tom. Oven temperature too low.
sheet.)
Pies have soakedcrust. Temperature too low at start of
baking.
Filling too juicy.
Used shiny metalpans.
--6--
Page 8

USING YOUR OVEN
HOW TO BROIL TO BROIL: To set oven:
Broiling is a method of cooking tender 1.Preparemeat by removingexcess fat
foods by direct heat underthe element, and slashing remaining fat, being
The degree of doneness is determined careful not to cut into meat. This will
by the distance between the meat and help keep meatfrom curling.
the element, and the length of broiling 2. Placebroilerpanonanyoftherecom-
time. mended rack positions. Generally,
for brown exterior and rare interior,
Broiling requires the use of the broiler the meat should be close to the ele-
pan and insert. The correct position of ment. Placefurther down ifyouwant
the insert in the pan is very important, meat well done.
The broiling insert should be placed in 3. Broiling should be done with oven
the pan so the grease will drain freely, door openedto the broilstopposition
Improperuse maycause grease fires.
(opened about 4-inches). UseHIBROILfor most broiloperations.
The broilerinsert CANNOT be covered 4. Follow suggested times on broiling When broiling longer cooking foods
with aluminum foil as this prevents fat chart. Meat should be turned once such as pork chops, poultry or thick
fromdraining into pan below. However, about half waythrough cooking, steaks, select LO BROIL.Lowtempera-
for easier cleaning,the broiler pan can 5. Check doneness by cutting a slit in ture broiling allows food to cook to the
belinedwithfoil. Do notusedisposable meat nearcenter for desired color, well done stage without excessive
broiler pans. They do not provide a 6.Press STOP/CLEARbuttonto cancel browning. Cooking time may increase if
separatetray. a broil operation. LO BROIL is selected.
BROILING CHART
STEAKS 2 rare 8 to 10min.
1-inch medium 12 to 14rain.
well 18 to 20 min.
HAMBURGER 2 rare 10to 12 min.
3/4to l-INCH medium 12to 15 min.
well 15to 18 min.
FISH FILLETS
Fresh 2 flaky 10to 15 min.
Frozen 2 flaky 15to 20 min.
BACON 1 well done 2 to 4 min.
-7-
Page 9

AUTOMATIC OVEN COOKING
Automatic cookingfeature is usedto turn the oven on and oft at thepreset time-of-day. This feature can be
usedto delaythe start of a cooking operation.
Theautomaticcookingfeaturewill notoperate unlesstheclockisfunctioning andissetat the correcttime-of-
day.
IMPORTANT:Highlyperishablefoodssuch asdairyproducts,pork, poultry,seafoods or stuffing are notrec-
ommendedfor delayed cooking. Ifcooking more than onefood, selectfoods that cook for thesame lengthof
timeand atthe same oven temperature.
TO BAKE BYTIME - TO BAKE BY TIME -
with immediate start with delayed start
1. PressCOOKTIMEpad."SET COOK 1, Press COOKTIME pad."SETCOOK
TIME" flashes inthe display.
TIME"flashes inthe display. 2. Enter cooking time with SET knob.
3. Press STOP TIME pad. "SET STOP
TIME" flashes inthe display.
t I'"" I I I I 4 Enter the time you wish the oven to
turn off by turningthe SET knob.
l I " I I I I 5. Press BAKE TEMP pad. "DELAY
BAKE"lights in the display.
SET COOK TIME 6. EnteroventemperaturewiththeSET
knob.
2. Enter cooking time (how long you
wishtoodtocookwiththeSETknobI " I II I 350°
3. PressBAKETEMP pad."Bake" lights
,nt.ed,splay .teroventemperaL L" L II I
ture withthe SET knob. STOP TIME
4. "TIMED BAKE ON" lights in the dis-
play.Theovenautomatioallyturnson The oven will automatically turn on in
and begins to heat. The display be- time to have the food ready by the
gins to count down. _reselectedSTOP TIME.
At the end el the preset cooking time, EXAMPLE
the oven automatically turns off. Food is to cook for 2 hours and 30
minutesat350°F.You wish the food
to be cooked by 6:00.
EXAMPLE 1. Press COOK TIME pad.
2. Turn SET knob until 2:30 (2
Food isto cook for one hourand30
hours,30 minutes)appearsinthe
minutesat 350°F. display.
1. PressCOOK TIME pad. 3. Press STOP TIME pad.
2. Turn SET knob until 1:30(1hour, 4. TurnSETknob until6:00 appears
30 minutes) appears in the dis- inthe display.
play. 5. Press BAKE TEMP pad.
3. Press BAKETEMP pad. 6. Turn SET knob until 350° ap-
4. Turn SETknob until350°appears pears inthe display.
in the display, Oven turns on im-
The oven will turn on at 3:30, cook
mediately, the food for 2 1/2 hours and will
automatically turn off at 6:00.
-8-
Page 10

SELF CLEAN OVEN
The self clean oven uses temperatures above normal cooking temperatures to automatically clean the entire
oven. The separate clean cycle eliminates soil completely or reduces it to a gray ash which is easily wiped up
with a damp cloth when the oven is cool.
BEFORE SELF TO CANCEL CLEAN CYCLE:
CLEANING I"""I II I Push STOP/CLEAR button. Ifthe LOCK
light has not turned on, the oven door
I" I I] IcLEANcan be opened.
SET CLEAN TIME If the LOCK light has turned on, allow
Clean oven frame, door frame and the oven the cool (up to I hour.) Once
around the oven vent with a non-abra- LOCK light turns off, oven door can be
sire cleaning agent such as Bon Ami. When the CLEAN pad is pressed, the unlocked and opened. Door and latch
These areas are not exposed to clean- oven will automatically clean for 3 will be damaged if the latch is forced to
ing temperatures and should be hours. A shorter (2 hours) or longer (4 the left before the lock light turns off.
cleaned to prevent soil from baking on hours) clean cycle can be selected by
during the clean cycle, turning the SET knob. AFTER SELF CLEANING
Wipe up excess grease or spillovers To prevent accidently changing the About one hour after the clean cycle is
from the oven bottom to prevent exces- clean cycle, press CLOCK pad to return completed, the internal lock will disen-
sive smoking during the clean cycle, displaytotime-of_lay."CLEAN ON"re- gage, LOCK light will turn off and the
mains in the display as a reminder that door latch can be returned to its original
DO NOT USE OVEN CLEANERS OR the oven is set for a clean operation. (unlocked) position. Do not attempt to
unlock door until lock light has
OVEN LINER PROTECTIVE COAT- turned off. Door and latch will be
INGS OF ANY KIND ON THE SELF DURING SELF CLEANING damaged if the latch is forced to the
CLEAN OVEN FINISH OR AROUND
ANY PART OF THE OVEN. The oven automatically begins to heat left before the lock light turns off.
when the CLEAN pad is pressed and
To prevent damage, do not clean orrub the door is locked. As the oven reaches Some soil may leave a lightgray, pow-
the gasket around the front oven frame, cleaning temperatures, the LOCK light defy ash which can be removed with a
The gasket is designed to seal in heat will turn on. At this point, the oven door damp cloth. If soil remains, it indicates
can not be manually opened. Do not that the clean cycle was not long
during the clean cycle, force latch to the left once the lock light enough. The soil will be removed during
turns on. A fan sound can be heard dur- the next clean cycle.
TO OPERATE: ing the clean cycle.
If the oven racks do not slide smoothly
1. Close door. Move door latch to the The first few times the oven is cleaned, after a clean cycle, wipe racks and era-
right until it rests in the lock position, somesmokeandodor maybedetected, bossed rack supports with a small
This is normal and will reduce or disap- amount of vegetable oil to restore ease
I_ _ pear with use. If the oven is heavily of movement.
soiled, or if the broiler pan is left in the
oven, smoke and odor may occur. Fine, hair-like lines may appear in the
oven interior or oven door. This is a nor-
As the oven heats and cools, you may mal condition resulting from heating and
2. Press CLEAN pad. If the door is not hear sounds of metal parts expanding cooling of the porcelain finish. These
locked as described, "door" will flash and contracting. This is normal and will lines do not affect the performance of
in the display, not damage your appliance, the oven.
-9-
Page 11

MAINTENANC
OVEN DOOR CAUTION: OVEN LIGHT
To remove door: Open door to the Hingearmsarespring mountedandwill Before replacing light bulb. DISCON-
"stop"position(openedabout4 inches) slamshutagainsttherangeifaceidently NECTPOWERTO OVEN. Besurebulb
and graspthe sides of the door at the hit. Never place hand or fingers be- iscool.Do nottoucha hot bulbwitha
middle of the door. Slowly lift door tween the hinges and the front oven dampclothas thebulbmay break.
straightup. frame. You could be injuredif hinge
snaps back. To replace ovenlight: Remove4 screws
As you lift the door up, very slightly
open door by pulling door toward you. and plates as illustrated below. Use
Check to be sure latches swing down To replace door: Grasp door at each care when removing gasket, it maytear.
into the notcheson the hinge arms. side, align slots in the door with the Replace with a 40 watt appliancebulb.
hinge arms. Very slightly pull door to a (Not covered by warranty.) Reconnect
moreopenpositionasyouslidethedoor powerto oven and reset clock.
down onto the hinge arms. The sliding
action of the door will disengage the
latches on the hinge arms. Gently push j(-'_
the door downward until the door rests _(_ (,2"7"_"
evenlyon the hinges. Close door.
Do notattempttoopen orclose door un- _,,
til door is completely seated on hinge
arms.Neverturn onoven unlessdoor is
properly inplace.
CARE AND CLEANING
BESUREALL PARTSOFTHEOVENARECOOL BEFORECLEANING. AFTER CLEANINGBE SUREALL PARTSARE
REPLACEDCORRECTLY.
Broilerpan & insert Soap &water. Remove from the oven after use. Allow to cool then pour off
Plasticscouring pad. grease. Place soapy cloth over insert and pan; let soak to
Soap filled scouring pad. loosensoil. Wash inwarm soapywater. Usesoapfilled scour-
ing pad to remove stubborn soil. Clean in dishwasher if de-
sired.
Metalfinishes- Soap & water. Washwith soapandwater. Removestubborn soilwith pasteof
Trim Parts Paste of baking soda &water, bakingsodaandwater. Do notuseabrasive orcausticagents.
They will damage the finish.
Oven elements Elements are self cleaning. Soil will burnoff as elementsare
used.
-10-
Page 12

TROUBLESHOOTING CHART
BEFORE CALLING A SERVICE TECHNICIAN, CHECK THE FOLLOWING:
F plus a numberappearsinthedis- This is calleda FAULTCODE. If a faultcodeappears inthe display,pressthe
playand a continuousbeepsounds. STOP/CLEAR button.If thefaultcodereappears,calltheservicer.
(Example:F 1)
Controlwillnotacceptanentry. This may indicatea "stuck"pad.Presseachofthesevenpadstodisengagethe
pad.Then,pressSTOP/CLEAR buttonand reprogramtheoperation.Ifthe con-
trolstilldoesnotacceptan entryafter checkingeach pad, call the servicer.
Partorallofofyourovendoes notop- Isovenproperlyconnectedtothe electricalsupply?• Havefusesblownorcircuit
erate, breakerstripped?* Has thepowersupplytoyourhomebeen interrupted?° Has
ovenbeen set for a delayedcookingoperation?(Seepage8).
Ovenelementsfail toturnonorheat Isovenproperlyconnectedtotheelectricalsupply?=Havefuses blownorcircuit
foodproperly, breakerstripped?• Hasthe powersupplytoyourhomebeeninterrupted?
Food not bakingsatisfactorily. Are racks properly in place and in correct positionfor what you are baking?• Is
your oven level? • Are you using the proper pan?° Isit bright, not soiled or dark
colored? • Haveyou usedfoil incorrectly? • Are you using standard measuring
utensils? • Didyou preheat if recommended?See chart on page 6.
Ovendoes not operate. Wasthe electroniccontrolcorrectlyset?• See page4.• Isthe ovendisconnected
from the electrical power?
Oven lightdoes notwork. Is bulb loose or burned out?
SERVICE ifyou are not satisfied with the localre- asa court ofappealsonconsumercom-
Do not attempt to service the appli- sponse to your service requirements, plaints which have not been resolved
ante yourself unless directed to do call or write MAYCORAppliance Parts satisfactorilywithin a reasonableperiod
so in this book. Contact the dealer and Service Company, 240 Edwards of time.
who sold you the appliance for sen/- Street, S.E., Cleveland, TN 37311,
ice. (615)472-3500. Include or have avail-
able the complete model and serial CIRCUIT BREAKER
numbersoftheappliance,thenameand CANADIAN APPLIANCE ONLY
HOW TO OBTAIN address of the dealer from whom you
purchased the appliance, the date of Yourapplianceisequippedwith acircuit
SERVICE purchase and details concerning your breaker box. The box is located either
When your appliance requires service problem, on a wall or in a cabinet next to or near
or replacement parts, contact your the appliance. If partor all of the appli-
DealerorAuthorized Servicer. Useonly ance does not operate, check to see if
genuine factory or Maycor parts if re- If you did not receive satisfactory serv- one of the breakers has tripped. Reset
placementpartsarenecessary.Consult icethrough yourserviceror Maycoryou the breaker to the ON position.
the Yellow Pages inyour telephone di- may contact the Major Appliance Con-
rectory under appliance for the service sumer Action Panel by letter including
center nearest you. Be sure to include your name, address, and telephone e
your name, address, and phone hum- number, as wellasthe modelandserial
ber, along with the model and serial numbers of the appliance.
numbers of the appliance. (See front
coverforlocation ofyour model and se- MajorApplianceConsumerActionPanel
rial numbers.) 20NorthWackerDrive
Chicago,IL 60606 IE]IB_I
IIII
Ifyou are unableto obtain service,write
to us.Our addressisfoundonthe rating MACAP (Major Appliance Consumer J I
plate.Seefrontcoverfor locationof rat- Action Panel)isan independentagency
ingplate, sponsored by three trade associations
-11-
Page 13

FULL ONE-YEAR WARRANTY
DOMESTIC GAS OR ELECTRIC RANGE
_aycorAppliance Parts&ServiceCompanywill repairor replace,withoutcharge,any partofyour productwhichhasa
defect inmaterialor workmanship during thefirstyear after the date ofthe original installation.This warranty extends
I
to any owner during the one-year warranty period. -
I
ii!i!i!!iiiiiiiii
LIMITED 5 YEAR WARRANTY .....
!iiiiiiiiii!!iiii
_n e_ectricranges equippe_ with s_1iddisc orsmo_th__p heating e_ements, and _n gas ranges with sea_ed burners, __r .......
an additional 4 year period beyond the firstyear of the general coverage of this warranty, Maycor willreplace any ofthe !,, °
so d d scer smoothtop heating elements or sealed burners which failto heat as a result of defective workmanship or
il i] mater al. Additionally Mayoer will replace any smeethtop coeking surface which cracks or breaks during normal
heusehold ceeking. These parts must be installed by a qualified person. Anylabor charge requ red for replacement is
notcovered by thiswarranty. : ::!
I
.ow,oo_s_
To obtain the repair or replacementof a defective part under these warranties, you should contact the dealer from
whom you purchasedthe appliance or a servicer hedesignates.
I
WHAT IS NOT COVERED BY THESE WARRANTIES
1. Conditions and damage resultingfrom improper in- 5. Any product usedfor other than normal household
stallation, delivery, unauthorized repair, modifica- use. It does not extend to products purchased for I
tion,or damage notattributableto a defect in mate- commercial or industrial use.
rial orworkmanship.
6. Any expense incurred for servicecallsto correct in-
2. Conditions resulting from damage, such as: (1) im- stallation errors or to instructyou on how to usethe .
.................proper maintenance,(b) misuse, abuse, accident, products, il
I
or(c) incorrect electrical current or voltage...... :,,
7. CONSEQUENTIAL OR INCIDENTAL DAMAGES
3. Warranties arevoid ifthe original serial number has SUSTAINED BYANY PERSONAS A RESULT OF
been removed,altered, or cannot be readily deter- ANY BREACHOFTHESE WARRANTIESORANY i
' mined. IMPLIED WARRANTY. Some states do not allow
= the exclusion or limitation of consequential or inci-
dental damages, so the above exclusion may not !
.... Light b Ibs apply yo
...... 4. u to u.
i
I
...... ADDITIONAL HELP .....
If youare notsatisfiedwiththe localresponseto yourservicerequirementsandwishtocontactMaycor,please ad-
dressyourlettertotheCustomerRelationsDepartment,MaycorParts&ServiceCompany,240 EdwardsStreet,S.E.,
Cleveland,TN 37311or call(615)472-3500. To save time,yourlettershouldincludethecompletemodelandserial
................. numbersofthewarrantedappliance,thenameandaddressofthedealerfromwhomyoupurchasedtheappliance, the
dateof purchaseanddetailsconcerningyourproblem.
Thesewarrantiesare theonlywrittenor expressedwarrantiesgiven byMaycor. Noone is authorizedtoincrease,
alter,orenlargeMaycor'sresponsibilitiesor obligationsunderthesewarranties.These warrantiesgiveyouspecific
legalrights,andyoumay also haveotherrightswhichvary fromstatetostate. .................
iiiiiiiiiiiiiiiiii_
8109P059-60
(6/91)
-14-
 Loading...