

Page 1

Owner's Guide
READANDKEEPTHESEINSTRUCTIONSFORFUTUREREFERENCE.
Gas Range
CONTENTS
SAFETY INSTRUCTIONS ..................... 1-3 Broilerdrawer .............................. 11
Oven racks .................................. 11
FEATURES ................................. 4-6 Thermostat knob ............................. 12
Digitalclock/timer ............................. 4 Preheating .................................. 12
Analog clock/timer ............................ 5 Hints ..................................... 12
Eye level oven ............................... 5 Howto set over ............................. 12
Continuous cleaning oven ...................... 6 Common bakingproblems chart ............... 13
Broilinghints ................................ 14
USING YOUR COOKTOP ...................... 7-9 Broiling chart ................................ 14
Ignitionsystem ............................... 7
Pilotignition ................................ 7 MAINTENANCE ............................. 15
Pilotless ignition ............................. 7 Electricalconnection ........................ 15
Cooktop ..................................... 8 Remove range for cleaning .................... 15
Burnergrates................................. 8 Ught replacement ............................ 15
Surface burners .............................. 8 Leveling egs ............................... 15
Lighting burners .............................. 8 Propo_ona valveadjustment .............. 15
Selectingflame size ........................... 9
Griddleand 5th burner ....................... 9 CARE AND CLEANING CHART ................. "16
USING YOUR OVEN ........................ 10-14 SERVICE ..................................... "17
Pilotignt on ....... 10 Troubleshooting chart ........................ 17'
Pilotess ignition ........................... IC
Oven burner ................................. 10 WARRANTY .................................. 18
Oven door .................................. 10
Oven bottom ................................ 10
8112Pl14-60
(1/93)
Page 2
IMPORTANTSAFETYINSTRUCTIONS
Readallinstructionsbeforeusingthisappliance.
Information in the Safety Instruction • Don't attempt to repair or replace • Misuse of appliance doors, such
section covers all gas cooking ap- any part of your appliance unless it as stepping, leaning or sitting on
ptiances. You may find some informa- is specifically recommended in this the door, may result in possible tip-
tion that does not pertain to your par- book. All other servicing should be re- ping of the appliance, breakage of
tieular appliance. Please review this ferred to a qualified servicer, door, and serious injuries.
section before using your cooking ap-
pliance. • Always disconnect power to ap- CAUTION: Do not use an appliance as
pliance before servicing, a step stool to cabinets above.
GENERAL SAFETY • If range is installed near a win-
CAUTION: Some cabinets and building dow, proper precautions should be
materials are not designed to withstand taken to prevent curtains from
the heat produced by the normal, safe blowing over burners creating a
operation of a cooking appliance. Dis- FIRE HAZARD.
coloration or damage, such as dela-
mination, may occur. Therefore, care
should be given to the location of clear and free from combustible
this appliance, materials, gasoline, and other flam-
• Be sure all packing materials are • To reduce the hazard of storage
removed from the range before oper- • Many aerosol-type spray cans above a range, install a ventilating
ating it to prevent fire or smoke dam- are EXPLOSIVE when exposed to hood that projects at least 5 inches
age should the packing material ignite, heat and may be highly flammable, beyond the bottom edge of the cabi-
• Have your appliance installed pliance.
and properly grounded by a quaff- Clean hood frequently to prevent
fled installer, in accordance with the grease from accumulating on hood or
Installation Instructions. Any adjust- its filter.
ment or service should be performed ABOUT YOUR APPLIANCE
only by a qualified installer or servicer. Should a boilover or spillover result
• Have the installer show you the the base of the backguard. Never off the hood's fan to avoid spread-
location of the gas shut off valve block oven vent or air intakes. Do ing the flame. After thoroughly extin-
and how to shut it off in an emer- not obstruct the flow of combustion guishing flame, the fan may be turned
gency, and ventilation air. Restriction of air on to remove unpleasant odor or
No cooking appliance should be formance.
used as a space heater to heat or • To eliminate the hazard of reach-
warm a room. This ins,ruction is Avoid touching oven vent area
based on safety considerations to pre- while oven is on and for several net storage should not be provided
vent potential hazard to the consumer minutes after oven is turned off. directly above a unit.
as well as damage to the appliance. Some parts of the vent and surround-
* ing over hot surface burners, cabi-
• Keep area around appliance
mable vapors and materials.
Avoid their use or storage near an ap- nets.
• Your appliance is vented through In an open flame, immediately turn
flow to the burner oreven[s proper per- smoke.
If such storage is provided, it should
_ngarea become hot enough [o cause be limited to items which are used in-
burns, frequently and which are safely stored
storage area for food or cooking appliance.
utensils. This instruction is based on Temoeratures in storage areas above
safety considerations to prevent poten- the unit may be unsafe for some items,
tial hazard to user and to the ap- such as volatile liqJids, cleaners or
pliance aerosol sprays.
• DO not use cooktop or oven as a
in an area subjected to heat from an
(continued next page)
1
Page 3

IMPORTANTSAFETYINSTRUCTIONS(continued)
CLEANING SAFETY:
• Turn off all controls and wait for • Always turn surface burner to • Do not let cooking grease or oth-
range parts to cool before touching OFF before removing cookware, er flammable materials accumulate
or cleaning them. Do not touch the in or near the range, range hood or
burner grates or surrounding areas un- • Never heat an unopened contain- vent fan.
til they have had sufficient time to cool. er on the surface burner or in the
oven. Pressure build-up may cause • Always let quantities of hot fat
• Clean range with caution. If a wet personal injuryor damage to the
sponge or cloth is used to wipe spills range, attempting to move or handle.
on a hot cooking area, be careful to
avoid steam burns. Some cleaners can ° Do not leave any items on the • In the event of a grease fire do
produce noxious fumes if applied to a cooktop. The hot air from the vent not attempt to move pan.
hot surface, may ignite flammable items and may
• burner, then smother flaming pan by
Touching a hot oven light bulb • Always place oven racks in the covering pan completely with a lid,
with a damp cloth could cause the desired positions while oven is
bulb to break. Should the bulb break, cool. tf a rack must be moved while cookie sheet or flat tray. Or, extinguish
disconnect power to the range before flame by covering with baking soda or,
trying to remove the bulb to avoid elec- hot, be careful to avoid contact of pot if available, a multi-purpose dry chem-
trical shock, holders with oven burner flame.
COOKINGSAFETY: holders. Always avoid reaching into grease should be cleaned up as
• Be sure you know which knob oven to olace or remove food. soon as possible. If they are alloweo
controls which surface burner. AI- • Use dry, sturdy pot holders. FIRE HAZARD.
ways make sure the correct burner is Damp pot holders may cause Burns
turned on and {hat the burner has ig- from steam. Dish towels or other sub- If a grease fire occurs in the oven or
hired. When cooking is completed, turn stitutes should never be used as pot in the broiler pan, turn oven off anc
burner off. holders because they can trail across keee door closed to contain fire until it
• Always adjust surface burner
flame so that it does not extend be- • Use care when opening oven PREPAREDFOODWARNING:
yond the bottom of utensil. An ex- door. Let hot air or steam escape be- • Follow food manufacturer's
cessive flame ishazardous and fore removing or replacing food.
wastes energy.
• Never leave a surface cooking to avoid clothing fires. Loose fitting cooking, immediately discard the food
operation unattended especially or long hanging-sleeved apparel and its container. The food could be
when using a high heat =setting. should not be worn while cooking, contaminated.
Boilovers cause smoking and greasy Clothing may Jgnlte o_catch utensil
Spillovers may ignite, handles. .'continuednextpage)
container to burst resulting in serious used for deep fat frying cool before
increase pressure in closed containers Do not use water on grease fires.
which may cause them to burst. Never pick up a flaming pan. Turn off
ical or foam-type fire extinguisher.
• Slide oven rack out to add or re-
move food. using dry, sturdy pot Spills or believers which contain
to accumulate, tlaey could create a
hot surface burners and ignite or get extinguishes.
caught on range parts.
instructions. Ifa plastic frozen food
• Use caution when wearing gar- container and,or its cover distorts.
ments made of flammable material warps, or is otherwise damaged during
2
Page 4

IMPORTANTSAFETYINSTRUCTIONSI00ntm+d/
UTENSILSAFETY: • Be sure utensil is large enough IMPORTANT SAFETY
• use panswith flat bottoms and to properly contain food and avoid NOTICEANDWARNING
handlesthat are easily grasped and believers. Pansize is particularlyim-
stay ¢ool. Avoid usingunstable, will accommodate the volume of food and Toxic Enforcement Act of 1986
warped, easily tipped or loose handled that is to be added as well asthe (Proposition65) requires the Governor
pans. Donot usepans if their handles bubble action of fat. Never leave a of Californiato publish alist of sub-
twist and cannot be tightened. Pans deep fat frying operationunattended, stances known to the State of Califor-
that are heavy to move when filled with nia to cause cancer or reproductive
food may also be hazardous. • Never let a pan boil dry as this harm, and requires businessesto warn
• Always place a pan offood on a could damage the utensiland theap- customers of potential exposures to
surface burner before turning it on, pliance, such substances.
and turn it offbefore removingthe pan • Many plastics are vulnerable to Users of this appliance are hereby
to preventexposure to burner flame, heat. Keep plastics away from parts of warned that the burning of gas can re-
. Always turn pan handles to the the appliance thatmay become warm suit in low-level exposureto some of
side or back of appliance, notout or hot. the listed substances, including ben-
intothe room where they are easily hit zene, formaldehyde and soot, due pri-
or reached by small children. • Do not leave plastic items on the marily tothe incomplete combustion of
portant in deep fatfrying, Be sure pan The California Safe Drinking Water
cooktop as they may me_torsoften if naturat gasor liquid petro{eum(LP)
/ lefttoo close to the vent or a lighted fuels. Properly adjusted burners will
" ' posure to these substances can also
r_ "_'_-- er's directions.
To minimize burns, ignition offlam-
mable materials and spillage due to SAVE THESE INSTRUCTIONS
unintentionalcontact with the uten-
sil,do not extend handles overadja-
centsurfaceburners.
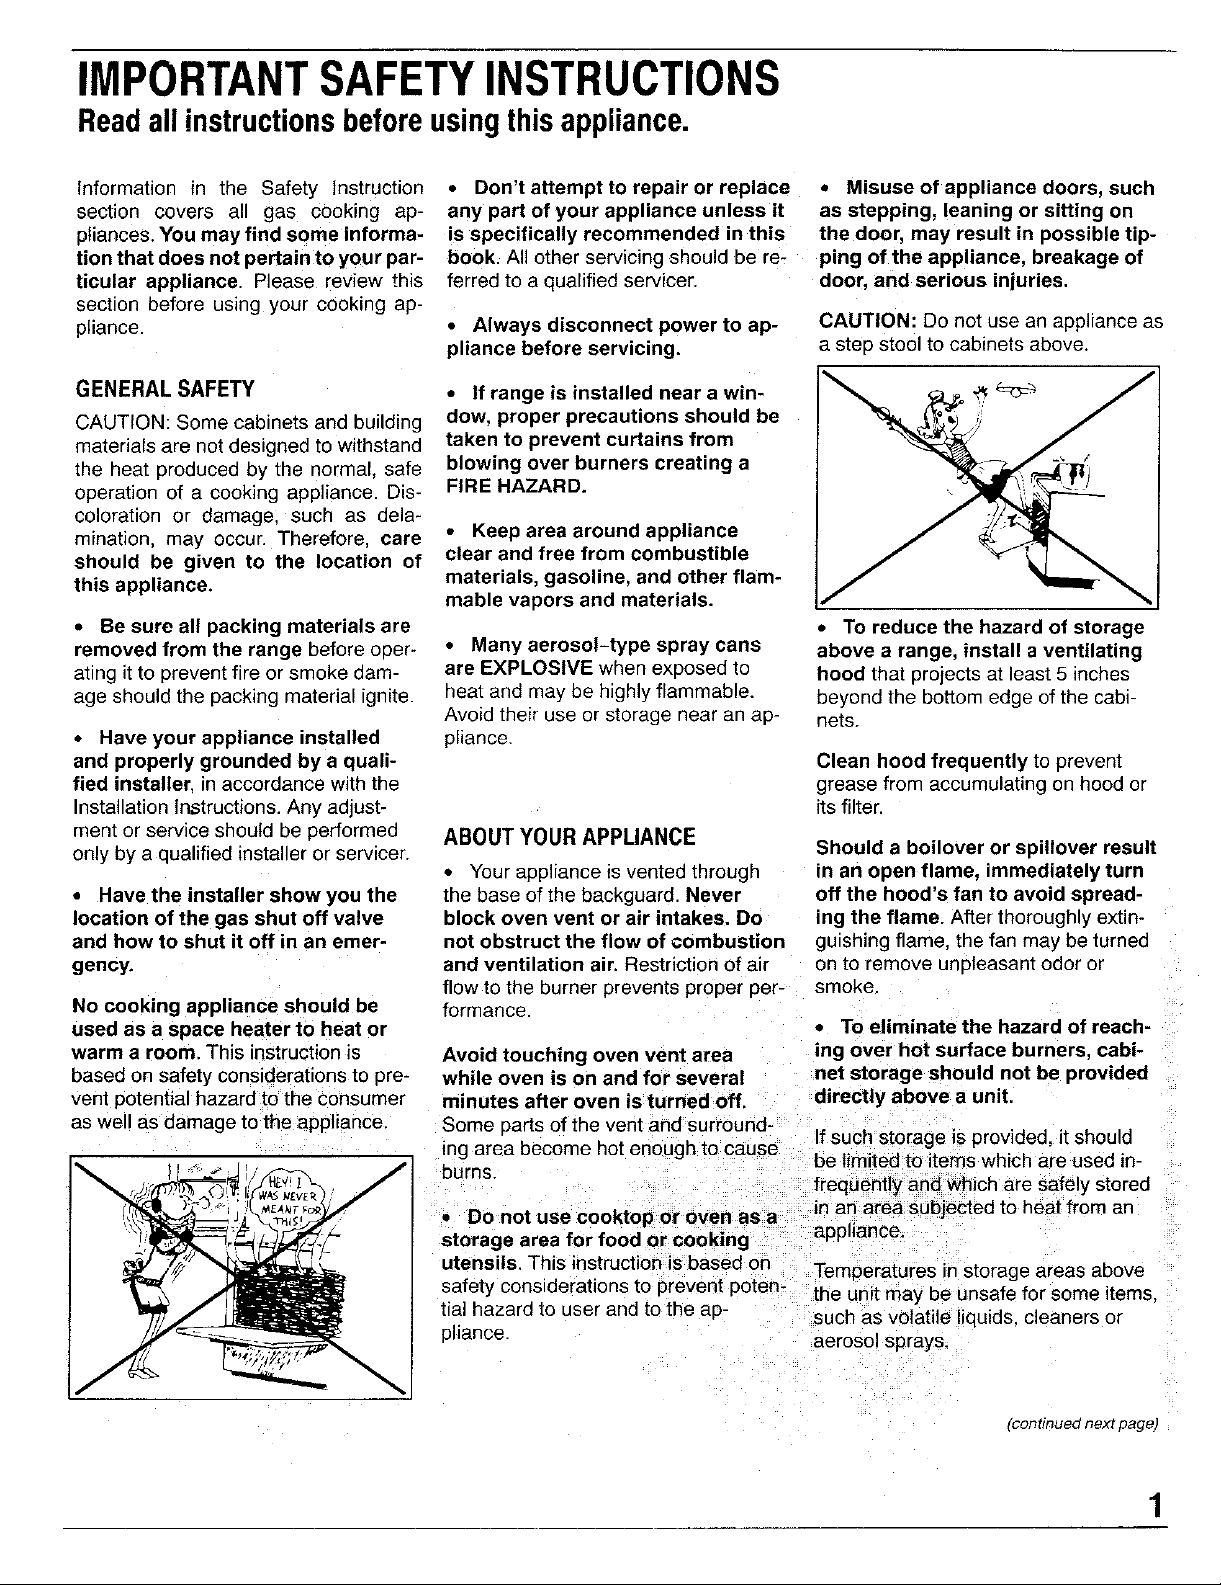
• Do not leave children alone or Children should be taught that an Children climbing on the appliance
unsupervisednear the appliance appliance is not a toy, to reach items could be seriously
when it is inuse or is still hot. injured.
Children should never be allowed play with controls or other parts of __ /
to sit or stand on any part of the ap- the unit.
plianee.
surface burner, minimize incomplete combustion. Ex-
• When using cooking or roasting be minimized by properly venting the
bags in oven, follow the manufactu- burners to the outdoors.
• Useonly glass cookware that is
recommended for usein the oven.
CHILD SAFETY:
Children should not be allowed to
CAUTION: Do notstore items of in-
hot. Let hotutensilscoolina safe )ronthe backguard
place,outof reach of small children.
Irenin cabinets above
3
Page 5
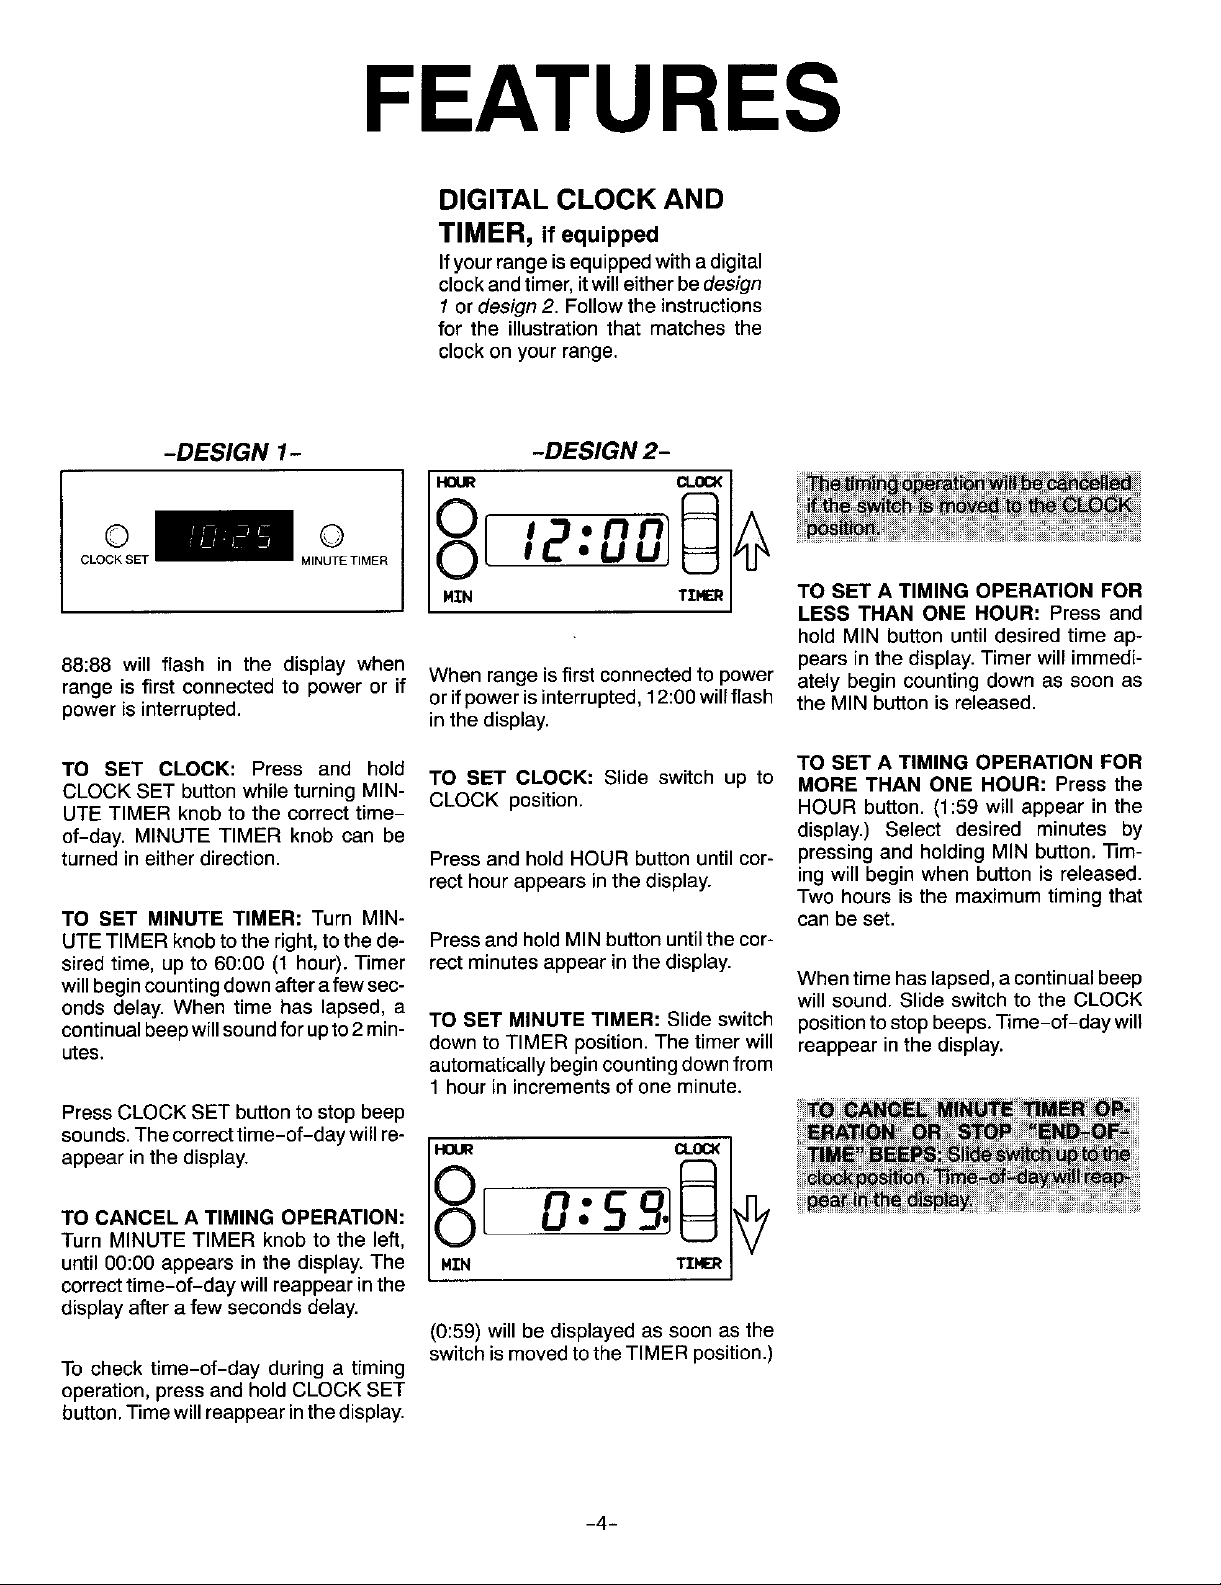
FEATURES
DIGITAL CLOCK AND
TIMER, if equipped
Ifyour range isequippedwitha digital
clockandtimer,itwilleitherbedesign
/ or design2. Followtheinstructions
for the illustrationthat matches the
clockon yourrange.
-DESIGN1- -DESIGN2-
© © :
CLOCK SET MINUTETIMER
TO SET A TIMING OPERATION FOR
LESS THAN ONE HOUR: Pressand
holdMIN buttonuntildesiredtime ap-
pearsinthe display.Timerwill immedi-
88:88 will flash in the display when When rangeisfirstconnectedto power ately begincountingdownas soonas
range is first connectedto poweror if orifpoweris interrupted,12:00willflash the MIN buttonisreleased.
powerisinterrupted, in thedisplay.
TO SET A TIMING OPERATION FOR
TO SET CLOCK: Press and hold TO SET CLOCK: Slide switch up to MORE THAN ONE HOUR: Press the
CLOCK SET buttonwhileturning MIN- CLOCK position. HOUR button. (1:59 will appear in the
UTE TIMER knob to the correct time-
of-day. MINUTE TIMER knob can be display.) Select desired minutes by
turned in either direction. Press and hold HOUR button until cor- pressing and holding MIN button. nm-
rect hour appears in the display, ing will begin when button is released.
TO SET MINUTE TIMER: Turn MIN- canbe set.
UTETIMER knobto the right,tothede- PressandholdMIN buttonuntilthecer-
siredtime, upto 60:00 (1 hour).Timer rect minutesappear inthe display.
willbegincountingdownafterafewsec- Whentimehaslapsed,a continualbeep
onds delay.When time has lapsed, a will sound.Slideswitchto the CLOCK
continualbeepwillsoundforupto2min- TO SET MINUTE TIMER: Slideswitch positiontostopbeeps.'rime-of-daywill
utes. downtoTIMER position.Thetimerwill reappearinthe display.
PressCLOCKSET buttonto stopbeep
sounds.Thecorrecttime-of-day willre-
appear in the display. HOUR CLOO<
Turn MINUTE TIMER knob to the left,
until 00:00 appears in the display. The MZN TZHER
correct time-of-day will reappear in the
display after afew seconds delay.
To check time-of-day during a timing
operation, press and hold CLOCK SET
button.Timewillreappearinthe display.
automaticallybegincountingdownfrom
1 hourin incrementsofoneminute.
8Lo.sg.j@
(0:59) will be displayed as soon as the
switch ismoved tothe TIMER position.)
Two hours is the maximum timing that
-4-
Page 6

FEATURES
ANALOG CLOCK AND EYE LEVEL OVEN
TIMER, if equipped if equipped
The upper ovenwill eitherbea conven-
12 tional oven or a microwave oven.
11 1
10_'/_ 2 Do not use the upper oven for cooking
itemsthat aretoo heavy or bulkyto han-
9 --_'_1°[("I __qr._____3 die easily, especially if considerable
-_._.L_/2_4O,,__./j_ -._ amounts of hot fat or liquids are in-
8 i///_ 30 . x_ 4 volved. Removing such foods from the
"/]/lllh%_\\'<' oven isdifficultand can be hazardous.
7 5
6
CONVENTIONAL OVEN:
The sizeof thisovenmakesitconven-
ient for cooking smaller quantitiesof
TO SET CLOCK: PushinandturnMin- food. However,itdoes havesome limi-
uteMinderknobtothecorrecttime-of- tations.Donotusea largecookiesheet,
day. Be sure MinuteMinderhandis on panorotherutensilswhichwillblockair
OFF aftersettingclock, flowinthe oven.Usethelargerovenfor
optimumbakingresults.
TO SET MINUTE MINDER: Turnknob
in either directionto the desiredtime. MICROWAVEOVEN:
Whenthebuzzersounds,manuallytum Refer to the separate Use and Care
the MindertoOFR bookletfor informationon the micro-
wave oven.
-5-
Page 7

FEATURES
CONTINUOUS CLEANING
OVEN (if equipped)
WHAT IS THECONTINUOUS MANUALLY CLEANING HINTS
CLEANING OVEN? HEAVY SPILLOVERS Brittle crustsorstainscan be loosened
The finish of the ContinuousCleaning The specialfinishwill clean mostspat- byGENTLYtappingstainwithawooden
Ovenisidentifiedbyitsdarkgraycolor, ters during normal oven use unless orplasticutensil.Brushawayanyloose
and rough,poroustexture. The rough there is a heavybuildupof soil.Heavy soil thatflakesoff.Varnishtype stains
texturepreventsgreasespatters from spillovers such as pie or casserole usuallyneedtobesoffenedwithasmall
formingbeadswhichrundownthewalls boiloverswillnot cleaneffectivelywith- amountofwaterordampcloth.Remain-
leavingunsightlystreaks. Rather,the out some manualhelp. The crustyor ingsoilwillgradualiyreducewithcontin-
roughtextureabsorbsspattersand al- varnish-likestainsthatformfrom these ued oven use at normalbaking tern-
lowsthemto spread,thus exposinga spilloversclog the pores and prevent peratures.
largerareatothehotovenair.Thecata- thespecialfinishfrombeingexposedto
lyst,whenexposedto heat,speedsthe the hot oven air. This greatlyreduces
oxidationofsoil. thecleaningeffectivenessof the finish.
Cleaning action automaticallybegins Thesecrustyorvarnish-likestainsmust ERS, SOAP,DETERGENT OR PASTE
whenevertheovenisturnedonforbak- either be removedor brokenup before ON ANY CONTINUOUS CLEANING
ingor roasting.The oven MUSTbe"on" cleaningcan effectively take place. SURFACE.ALSO, DO NOT USE ANY
for cleaning to take place. No cleaning ABRASIVE MATERIALS, STEEL
will occurwhenthe oven isoff.The spe- WOOL, SHARP INSTRUMENTS OR
cial catalyticfinish must be exposed to TO MANUALLYCLEAN SCRAPERS FOR THEY WILL DAM-
hot oven air before soil will begin to HEAVYSPILLOVERS AGE THE FINISH.
graduallyreduceinsize. Brushoffheavy soilwitha nylonbrush
orplasticpad.DONOTUSE papertow-
FACTORSAFFECTING LENGTH OF els,clothsorspongesfortheovenwalls
CLEANINGTIME are porousand particlesofthese mate- Avoidspillovers by using utensilsthat
The higherthe oven temperature, the rials willruboffonthe walls.Rinsearea arelargeenoughto holdfood.A cookie
fasterthecleaningaction.The lengthof withclearwateronly. sheet orpieceofaluminumfoil,justalit-
cleaningtimewilldependonthese fac- tie largerthanthe pan,canbe placedon
ters:Typeofsoil,amountorsizeof soil, therackdirectlybelowthe rackholding
oven temperature and length of time theutensilto catchspills.
ovenisinuse.Timemayvaryfromafew
minutestoseveralhours.Soildeposited
at theend ofa cyclemaystillbe visible.
This will usually fade with continued Over a periodoftime, wear marksmay
ovenuse untilthe soilgradually disap- appearontheembossedracksupports.
pearsorcanbe wipedup manually.The This is normaland resultsfrom sliding
oven will appear presentably clean, theracks in andout of the oven.Wear
eventhoughsomespattersmay bepre- marks willnotaffectthecleaningaction
sent. of theoven.
DO NOT USE ANY TYPE OF OVEN
CLEANER, POWDERED CLEANS-
-6-
Page 8

USING YOUR COOKTOP
IGNITION SYSTEM PILOT IGNITION PILOTLESS IGNITION
Your range is equipped with either pilot When the range is first installed, the pi-
ignition (using a pilot flame to light the lots may be difficultto light due to air in
burner) or pilotless ignition (using a thegasline.Tobleedoffairfromtheline,
spark from an ignitorto lightthe burner), hold a lighted match next to the burner
Be sure allsurface controls areset inthe directed below.
OFF position prior to supplying gas to
the appliance. To light pilot: Remove or raise and sup-
and turn knob on. When the burner
lights, turn the knob off and proceed as
port cooktop on metal rod, if equipped.
Hold lighted match near the pilot ports. TO OPERATE SURFACE BURNER
WITH PILOTLESS IGNITION DURING
A POWER FAILURE:
sition. Hold a lighted match to the de-
sired surface burner head.
2. Turn knob to LITE. The burner will
then light.
3. Adjust the flame to the desired level.
_ __ 1. Besure allcontrols areinthe OFF po-
-
-7-
Page 9

USING YOUR COOKTOP
COOKTOP SURFACE BURNERS LIGHTING SURFACE
To remove cooktop: When cool, first ¥0_!!:_tu_e_e_ BURNERS
remove grates and drip bowls, if 1. Place utensilonburnergrate.
equipped.Grasp two front burner wells
and lift up. 2. Push inand turn knobto the LITE po-
Followthe instructions to the illustration __ _E___._.
that matchesthe burnerson your range.
sition.
I I
.:. be removedto allow quick and easy re-
'_ One piece uniburner
_I cured inplaceduringtransportationwith
The top can be completely removed or, 3. After the burner lights, turn knob to
ifequipped witha metal support rod, can the desired flame size.
across the front of the burner box. , _' As the burner heatsand cools, you may
rest on the red. Support rod is located __"-_C,\
BURNER GRATES contracting. This is a normal operating
Burner grates must be properly posi-
tioned before cooking. Do not operate Allow burner to cool. Lift cooktop. Tore- Ifflame should go out during a cooking
burnerswithout a pan onthe grate.The move uniburner, lift up slightly and pull operation, turn the burner off. IF GAS
porcelain finish may chip without a pan out. Under no circumstances are burn-
to absorb the intense heat. HAS ACCUMULATED AND A
When reinstalling square grates, place washer.Burnerandburnertubemustbe ODOR TO DISAPPEAR BEFORE
indented sides together so straight dry before use. RELIGHTING BURNER.
sides are at front and rear.
eithera shippingscrew or a spring clip.
moval of the burner.
Oncethe range isinstalled, these may
i Uniburners and single burners are se-
hearsoundsofthe metalexpanding and
sound of the burner.
ers to be taken apart for cleaning. STRONG GAS ODOR IS DETECTED,
Uniburner can be cleaned in the dish- WAIT 5 MINUTES FOR THE GAS
You may heara "popping" sound on LP
Standard single burner gas when the surface burner is turned
A properly adjusted burner with clean
ports will lightwithin afew seconds. On
deeper blue innercore; thereshould be
notrace ofyellow in the flame. Ayellow
flame indicates an improper mixture of
I _ 1 [ _ theOff'Thisisan°rmaloperatingseundOfburner.
Remove or support cooktop. Grasp Iowflame occurs. On LPgas, someyel-
burner head andtiltto release tab from low tipping isacceptable. This is normal
slot near ignitor.Liftupand toward back and adjustment is not necessary.
ofcooktop untilair shutter end ofburner
releases from valve.
--8--
natural gas, the flame will bebluewith a
air/gas. This wastes fuel, so have a
serviceman adjust the mixture if a yel-
Page 10

USING YOUR COOKTOP
SELECTING FLAME SIZE
If a knob is turned very quicklyfrom I
out, particularly if burner is cold. If this _____
occurs,turn the knob OFF Wait several
seconds, then light again.
HIGHto LOWsetting,theflame may go __ .._/_
Flame should be adjustedsoitdoesnot
extend beyond the edge of cooking
utensiI.Thisisforpersonalsafetyandto Use LOW to simmer or keep foods at
prevent damage to cabinets above serving temperatures. Some cooking
range, maytake placeif the utensiliscovered.
UseHIGHto quickly bringfoodsto a boil
orto beginacooking operation. Reduce
to a lower setting to continue cooking.
Never leave food unattended when us-
ing a HIGHflame setting. PROPORTIONAL VALVE
Toobtain a lower flame size, turn knob
back toward the OFF position until the
I desiredflame size is reached. The Iow-
,,_,, the OFF position.
",,_ ___ est flame setting is located adjacent to
GRIDDLE AND 5TH BURNER
(36" Range Only) Remove Griddle Cover: To Clean Griddle:
1. Pressdownonany corner. Whengriddleiscool,removeandwash
8REASEPAN 2. Slidefingersunder 2sidesof griddle in hot soapy water; rinse and dry. Do
....... with any instrument or tool. gents will completely remove the sea-
C_" "_ To Use Griddle:
J_¢'_'_- .,.--_C'-,, 1. Remove griddle cover BEFORE
__ _. ,._ turningon griddle burner.Top cover ToClean Grease Cup:
-,,,,._Z_,/ -,,._ ,C..t burner is in use. the griddle burner.This pan should be
"/_ t_"_ _ 2. Be sure grease cup, located under removed andcleaned as necessary.
.... griddle, is in place.
5THBUHER cooking results, preheat griddle US-
UNDER6RIODLE ing a low flame setting for about 5 The griddle burner can be used as a
Before using the griddle for the first minutesor untilthe entire cooking fifthsurfaceburner.Merelyremovethe
time, season it by lightlyrubbingthe surface is heated. Sprinkle a few griddle and replace with extra grate
surface with a small amountof un- dropsofwater overgriddle.If prop- provided.
salted shortening. To prevent damage erly heated, water will bead and
tothe finish, do notuse metal utensils, dance. The water will sizzle and
a high flame setting or suddenly steam if griddle is not hot enough.
change temperatures, such as im- 4. Never replace griddle cover until
mersing hot griddle in water, griddle has cooled completely.
cover and lift off. DO NOT pry off not wash in the dishwasher. Deter-
soning.
must be removedwhenever griddle There is a grease pan located under
3. Position griddle correctly. For even FIFTH BURNER
-9-
Page 11

USING YOUR OVEN
PILOT IGNITION OVEN DOOR OVEN BOTTOM
Be sure oven control is set in the OFF When opening oven door, allow steam
positionprior to supplying gas tothe ap- and hot air to escape before reaching in
pliance, oven to check, add or removefood.
To light oven pilot: When cool, remove Oven door is removable on 30 and 36
oven racks and oven bottom. With the inch ranges only. 20 inch range has a
oven thermostat knob in the OFF posi- non-removable oven door.
tion, hold a lighted match to the pilot lo-
catedat the backend oftheoven burner.
Once pilot lights, replace oven bottom To remove door: Open door to the Youroven will be equipped with one of
and racks. "stop" position (opened about4 inches) the following types of oven bottoms. Be
andgrasp doorwith both hands at each sureoven bottom iscool. Remove oven
_ side. Do not use door handleto lift door. racks.
----_S ...... Liftupevenly until door clears the hinge
arms.
locatedalongthefrontofthe ovenbot-
tom.Slide the screws back to release
" bottom, liftupand pullforward until rear
PILOTLESS IGNITION backovenwall. Lowerintoplace. Slide
GIo bar-type ignition bottomisfitted into slots andscrews are
With this type of ignitionsystem, the tight.Ifnotcorrectlyreplaced,ovenbot-
ovenwillnotoperateduringapowerfail- tom may becomewarpedand cooking
ure or if unit is disconnectedfrom the resultswillbe affected.
walloutlet.Noattemptshouldbe made
tooperateovenduringa powerfailure.
OVEN BURNER
The size andappearance of a properly
adjusted oven burner flame should be i
as shown: _1
To replace door: Grasp door at each i
side, align slots in the door with the
hinge arms and slide door down onto
the hinge arms until completely seated
_ on hinges.
_ thefrontofthe oven bottom. Grasp oven
, tabs release. Then, remove oven bet-
tom from oven.
!i _ 20 inch range: LOOsenthe twOscrews
To replace: Inserttabs intoslots on the
twoscrewsforwardandtighten.Besure
center is smaller
t
I_ - Coneapprox. 1/2-inch
=
-10-
Page 12

USING YOUR OVEN
36 inch range: Push oven bottom to- BROILER DRAWER OVEN RACKS
wardbackofoven.Liftfrontendup. Pull 20inch range:When broileriscool,re- The two ovenracksaredesignedwitha
towardfrontofovenand remove, move broiler insert and pan. Open "lock-stop"positiontokeep racksfrom
drawer halfwayand pullmetal clip Io- accidentlycomingcompletelyoutofthe
To replace: Reverseprocedure, catedincenterof drawerbottomupward oven.
i!! rack outto the "lock-stop" position."RIt
t_',,'11_ _/ of the compartment. To remove: Be sure rack is cool. Pull
as far as it willgo(about2 inches).The
drawercannowbepulledallthewayout
up and continue pulling until rack re-
leases.
.= oven. Pull rack out to "lock-stop" posi-
30 inch range: Slidethe two catches, RACK POSITIONS:
locatedateach rear cornerof theoven RACK1 (topof oven)usedfortwo-rack
bottom,towardthefrontoftheoven.Lift baking.
therearedgeoftheovenbottomslightly, To replace: Slide grooves at top of
thenslideit back untilthe holes in the drawerontoguiderailsatsidesofbroiler
frontedgeoftheovenbottomclearthe compartment and push drawer in to RACK 2 used for one-rack baking or
pinsin the oven frontframe. Remove close, broiling.
ovenbottomfromoven.
2'_ _/ gel food cakeor pieshells.
"_ To replace: Place rack on rack sup-
30 or 36 inch ranges: When broileris RACK3 usedformostone-rackbaking
cool,removebroirerinsertandpan. Lift and for roastingsome meats.
androtatethetwo levers"A" totheside,
pulldrawerforward,up andout.
_'-_...'_ ports, tilt up and push toward rear of
tiontobesurerackiscorrectlyreplaced.
RACK 4 used for roastinglargemeats,
cookinglargerfoodsandforbakingan-
, RACK2
To replace: Fit holes onto pins,lower "
rear of oven bottom and slide the
catchesback to lockoven bottominto To replace: Line up hookson drawer
place.
slides"B" withholes in drawerand push '\
untilhooksarecaught. Returnlevers"A"
to locking position, i
-11-
Page 13

USING YOUR OVEN
THERMOSTAT KNOB
The THERMOSTATknobisusedtose- Selectingtemperaturehigherthan de- Ifcookingontworacks,staggerpansso
lectandmaintaintheoventemperature, sired will NOT preheat the oven any one is notdirectlyoverthe other.Use
Alwaysturn this knobjust TO the de- faster.Preheatingat a highertempera- rack positions2 and 4, or 1 and 3, de-
siredtemperaturenotto a highertern- turemayhavea negativeeffectonbak- pendingonbakingresults,whencook-
peratureandthen back.Onsomerood- ing results, ingontworacks.
els,thereisan indentat the 350°F set-
ting.Turnthis knobto OFF whenever
theovenis notinuse.
HINTS:
THERMOSTAT 1. Place rack in correct position.
HOW TO SET OVEN:
2. Turnthermostat knobto desiredtem-
perature setting for bakingor roast-
PREHEATING ing.Turn to BROILfor a broil opera-
Preheating is necessary for baking. AI- tion.
lowovento heatfor 10to 15rninutesbe-
fore addingfood. It is not necessary to NEVER place pans directly on the oven 3. Preheat oven for baking operations
preheatoven for roasting, bottom. Do not cover entire rack with or ifcalledfor inthe recipe.
aluminumfoil. Do not place foil directly 4. Checkfoodfordonenessatminimum
onoven bottomor placefoil directlyun- time in recipe.Cook longer if neces-
Itis not necessaryto preheatfor broiling der utensil. To catch spillovers, cut a sary.
unless darker browning is desired or if piece of foil a little larger than the pan
cooking thin (3/4-inch) steaks. Allow and place it on the rack below the rack 5. Turn thermostat knob to OFF and re-
burnerto preheat 3 to 5 minutes, containingthe utensil, movefood fromthe oven.
-12-
Page 14

USING YOUR OVEN
COMMON BAKING PROBLEMS AND WHY THEY HAPPEN
";akesare uneven, Pans touching each other or Cakes don't brown on top. Incorrect rack position.
Cake high in middle. Temperature set too high. Overmixing.
Cake falls. Too much shortening or sugar, Uneven texture. Toomuch liquid.
Cakes, cookies, biscuits Incorrect rack position.
don'tbrown evenl_ Ovendoor not closed properly. Cakes crack on top. Batterovermixed.
oven walls. Temperature set too low.
Batter uneven in pans. Overmixing.
Temperatureset too low or Too much liquid.
bakingtime too short. Pan size too large or too little
Oven not level, batter in pan.
Undermixing. Oven door opened too often,
Toomuch liquid.
Excessive shrinkage. Toolittle leavening.
Bakingtime too long. Pan too large.
Overmixing. Temperatureset too high.
Toomuch flour. Baking time too long.
Pans touching each other or Pans too close to eachother
oven walls, or oven walls.
Incorrect rack position.
Toomuch ortoo little liquid. Undermixing.
Temperatureset too low. Temperatureset too low.
Old or too little baking powder. Baking time too short.
Pantoo small.
Oven door opened frequently. Cakes have tunnels. Not enough shortening.
Added incorrect type of oil to Toomuch baking powder.
cake mix, Overmixing or attoo high a
Added additional ingredients speed,
to cake mix or recipe, Temperatureset too high.
Door gasket not sealing Temperatureset too high.
properly. Too much leavening.
Incorrect use of aluminum foil. Incorrect rack position.
Oven not preheated,
Pans darkened, dented or
warped. Cakenot done in middle. Temperature set too high.
Pan too small.
Bakingtime too short.
Cakes, cookies, biscuits Oven not preheated.
too brown on bottom. Pans touchingeach other or
oven walls. Pie crust edges too brown. Temperature set too high.
Incorrect rack position. Panstouching each other or
Incorrect use of aluminumfoil. oven walls.
Placed 2 cookie sheets on one Edges of crust too thin.
rack.
Used glass, darkened, stained,
warped or dull finish metal Piesdon'tbrown on bot- Usedshiny metal pans,
pans. (Use a shinycookie tom. Temperatureset too low,
sheet.)
Pies have soaked crust. Temperaturetoo low at start of
baking.
Fillingtoo juicy.
Used shiny metal pans.
-13-
Page 15

USING YOUR OVEN
BROILING HINTS
Broiling is a method of cooking tender broiler pans. They do not provide a broiling is completed, remove broiler
foods by direct heat under the burner, separate tray. pan from compartment. Grease left in
The cooking time is determined by the the pan can catch fire is the oven is used
distance between the meat and the without removing the broiler pan.
burner, the desired degree of doneness Prepare meat by removing excess fat
and the thickness of the meat. and slashing remaining fat, being care-
ful not to cut into meat. This will help Broiling is done in the lower broiler corn-
keep meat from curling, partment.
Broiling requires the use of the broiler
pan and insert. The correct position of Place broiler pan on the recommended
the insert in the pan is very important, rack position. For brown exterior and
The broiler insert should be placed in rare interior, themeatshouldbecloseto
the pan so grease will drain freely. Ira- the burner. Place further down if you
proper use may cause grease fires, wish meat well done. Excessive smok-
ing may occur if meat isplaced too close ._.)_;;_._ .,_J"j
to the oven burner.
The broiler insert CANNOT be covered
with aluminum foil as this prevents fat
from draining into pan below. However, NOTE: Below are recommended rack
for easier cleaning, the broiler pan can positions. Remember, the closer to the
be lined with foil. Do not use disposable flame, the quicker the food cooks. When
)
TYPE OF FOOD POSITION* DONENESS TOTAL TIME
STEAKS 2 140°F rare 8 to 12 min.
1-inch 2 160°F medium 12 to 16 min.
1 1/2-inchs • 140°F rare 14 to 18 min,
HAMBURGER PATFIES 2 140°F rare 10 to 12 min.
3/4 to 1-inch 2 160°F medium 12 to 14 rain.
CHICKEN HALVES**
FISH FILLETS, fresh or thawed
1-inch 2 flaky 14 to 20 rain.
BACON 2 crisp 5 to 10 rain.
BROILING CHART
RACK
2 170°F well done 16 to 22 min.
2 160°F medium 18 to 22 rnin.
, 2 1700F well done 22 to 30 rnin_ ; ;
2 170°F well done 14 to 18 rain.
...... ,o20
• Rack 1 is the top rack position.
•* Turn thermostat to 450=E
-14-
Page 16

MAINTENANC
ELECTRICAL forgas leaksafterreconnection. (See ANTI-TIP BRACKET
CONNECTION test method.)
Appliances which require electrical ping, range should be secured to the
powerareequippedwitha three-prong floorbyslidingrear levelingleg intoan
groundingplugwhichmust be plugged NOTE:A qualifiedservicershoulddis- anti-tipbracketsuppliedwiththe range.
directlyintoa properlygroundedthree- connectand reconnectthe gas supply.
hole120 volt electricaloutlet.
('-_ tip bracket suppliedwith the range. The LOW setting should produce a sta-
_ WARNING: Possible risks may result to LOW.The flame should be 1/8 inchor
_'17,, lowerand mustbestableon all ports on
_2_,,' siveloading ofthe oven door and ofthe LOW setting.
. _ be reinstalledaccordingto the installa- To adjust: Operate burner on HI for
Always disconnect power to appli- tion instructions, about5 minutes to preheat burnercap.
ance before servicing, and insert a small screwdriver into the
InstallationInstructionsfor gas leak To prevent range from accidentlytip-
To prevent range from accidentlytip- PROPORTIONAL VALVE
ping,rangemustbesecuredtothefloor
by sliding rear leveling leg into ananti- ADJUSTMENT (if equipped)
from abnormal usage, including exces-
risk of tip over,should the appliance not
LIGHT REPLACEMENT center of the valve stem. Adjust flame
bleflame when turningthe knobfrom HI
Turn knobback to LOW; remove knob,
If an ungrounded, two-hole or other Before replacing oven lightbulb, DIS- size by turning adjustment screw in
typeelectricaloutletis encountered,IT CONNECT POWER TO RANGE. Be eitherdirection.Flamemustbe ofsuffi-
ISTHE PERSONALRESPONSIBILITY sure bulband range parts are cool.Do cient size to be stable on all burner
OF THE APPLIANCE OWNER TO nottouchahotbulbwithadampclothas just ONLY onthe LOW setting. Never
HAVE RECEPTACLE REPLACED the bulbmay break.
WITH A PROPERLY GROUNDED
THREE HOLE ELECTRICALOUTLET. To replace oven light: Use a dry pot
The three-pronggroundingplugis pro- holder, to prevent possible harm to
videdfor protectionagainstshockhaz- hands;verycarefully removebulb.Re-
ards.DO NOT CUT OR REMOVETHE place with a40 watt APPLIANCE bulb.
THIRD GROUNDING PRONG FROM Reconnect power to the range•
THE POWER CORD PLUG. i_'_
ports.Ifflame adjustmentisneeded,ad-
adjustflamesize on a highersetting.
J
LEVELING LEGS
HOW TO REMOVE Some floors are not level. For proper
RANGE FOR CLEANING baking,yourrange must belevel.Level-
AND SERVICING ing legs are located on each corner of
Followtheseproceduresto removeap- the baseoftherange. Placea levelhori-
pliancefor cleaningorservicing: front-to-back and side-to-side. Level
1. Shut-off gas supplyto appliance. NOTE: All gas adjustmentsshould be
2. Disconnectelectricalsupplyto ap-
pliance,ifequipped.
3. Disconnectgas supplytubingto ap-
pliance.
zontally on an oven rack and check
byturningthe legs.
donebya qualifiedserviceronly.
4. Slide range forward to disengage _
rangefromtheanti-tip bracket. (See
InstallationInstructionsforlocationof
bracket.)
5. Reverseproceduretoreinstall. If gas _)
line has been disconnected, check
-15-
Page 17

CARE AND CLEANING
PARTS CLEANING AGENTS DIRECTIONS Be sure all parts are cool before cleaning,
Baked Enamel Soap & water Paste of Use a dry tower or cloth to wipe up spills, especially acid spills, as soon as they occur (This is espe-
Side panels baking soda & water cially important for white surfaces.) When surface is cool wash with soap and water Do not use
Backguard abrasive or harsh cleaning riquids and powders or oven cleaners. These will scratch and perrna-
Oven door nently damage the finish. Dry with asoff cloth.
Broiler drawer
Broiler pan & in- Soap & water. Plastic Remove from oven after use. Cool then pour off grease. Place soapy cloth over insert and pan; let
sert scouring pad. Soap filled soak to loosen soil. Wash in warm soapy water. Use soap filled scouring pad to remove stubborn soih
Burner box Soap & water. Burner box. located under tiff-up cooktop, should be cleaned frequently to remove spiltovers. If soil
Chrome drip Soap & water. Paste of Clean bowls after each use with soap and water. Remove stubborn stains with baking soda paste
bowls, if equipped baking soda & water, and plastic scouring pad. To prevent scratching the finish, do not use abrasive cleaning agents.
Control knobs Soap & water. To remove knobs for cleaning, gently pull forward. Wash in mild detergent and water. Do not use
Glass Soap & water. Paste of Wash with soap and water. Remove stubborn soil with paste of baking soda and water. To avoid
Backguard baking soda & water, inside staining of oven door glass, do not oversaturate cloth. Do not use abrasive materials such as
Oven window Window cleaning fluid, scouring pads, steel wool or powdered cleaning agents. They wilt damage glass. Rinse with clear
Grates Paste of baking soda Grates are made of porcelain coated steel. They can be cleaned at the sink with detergenl and water
Metal finishes Soap & water. Paste of Wash with soap and water. Remove stubborn soil with paste of baking soda and water. Do not use
Backguard * baking soda & water, oven cleaners, abrasive or caustic agents. They will damage the finish.
Trim parts
Manifold panel
Oven racks Soap & water. Cleansing Clean with soapy water. Remove stubborn soil with cleansing powder or soap filled scouring pad.
Plastic or vinyl Soap &wateh Paste of Never use oven cleanersl abrasive or caustic liquid or powdered cleaning agents on plastic finishes.
finishes baking soda & water. These cleaning agents will scratch or mart finish. To prevent staining or discoloration, wipe up fat,
Door handles Non-abrasive plastic grease or acid (tomato, lemon, vinegar, milk, fruit juice, marinade) immediately with a dry paper
Backguard trim pad or sponge, towel or cloth. When surface is cool, clean with soap and water: rinse, and dry.
Overlays
Knobs
End caps
Porcelain finish Soap & water, Paste of Porcelair_ erlamel is glass fused on metal. It may crack or chip with misuse. Clean with soap and
Cooktop baking soda & water water when parts are cool. All spillovers, especially acid or sugar spillovers, should be wiped up ira-
Porcelain finish Soap & Water Gleansing " Clean 0vGn ihterlor with soap and water, Use cleansing powders or a plastic scouring pad to remove
inleriO _ powde_ & _iasti_ pads. stubborn Soil Wipe acid Orsugar stains as soon as the oven is cool as these stains may discolor or
(See page 6 for Commercial oven etch the porcelain; Do not use metal!is scou ring pads as they will scratch the porcelain. Commercial
continous clean _ieaner:' Oven cleaners can NOT be used On the Continuous Cleaning oven finish. Oven cleaners can be
Oven instructions) ..... Used 05 th_ p6t_e a n oven but fo ow manufa_u[er_s d rect ons
scouring pad. Clean in dishwasher if desired,
is not removed and is allowed to accumulate, it may damage the finish To clean, remove surface
burners and croon with soap and water, rinse and dry. NOTE: Cooktop on sealed burner models do
not lift up
Plastic scouring pad. Rinse, dry and replace. NOTE: Bowls can permanently discoIor if exposed to excessive heat or if soil
and water, scouring or in the dishwasher. Clean stubborn soil with soap filled scouring pad
powder, detergent &
water. Soap filled scour-
ing pad.
powders & plastic pads Rinse and dry.
Soap filled scouring pad
Non-abrasive plastic mediately with a dry cloth. Surface may discolor or dull if soil is not removed. When surtace is cool,
pad or sponge, clean with warm soapy water. NEVER WIPE OFF A WARM OR HOT ENAMEL SURFACE WITH A
is allowed to bake on.
abrasive cteaning agents. They will scratch finish and remove markings Rinse. dry and replace
Turn each burner ON to see if knobs have been replaced correctly
water and dry.
DAMP CLOTH. THIS MAY CAUSE CRACKING AND CHIPPING, Never use abrasive or caustic
cleaning agents on exterior finish of range.
Be sure atl parts are properly replaced after cleaning.
Silicone rubber Soap & water, Door gasket is located on oven frame Wash with soap and water, rinse and dry Do not remove door
Door gasket gasket.
SUrface burners Soap &water past e of c_ean as necessa_ With warm soapy water. Remove stubborn SOilby scouring with a non-abrasive
Un!burner, baking soda &water. _lastic scouring pad and a paste of baking soda and water. Clean ports with a straight pin. Donot
Single burner Plastic scoudng _ponge enlarge or distort the ports: Do not Use a wooden toothpick, it may break off and clog port. DO NOT
or pad: CLEAN BURNERS WITH THE FOLLOWING caustic cleaners: oven cleaners, steel wool or abra-
sive cleaning agents.These may damage finish. Burners can be dried in the even set at 140°t£ CAU
TION: Burner and burner tube must be dry before use
=16-
Page 18

SERVICE
BEFORE CALLING A SERVICE TECHNICIAN, CHECK THE FOLLOWING:
PROBLEM CAUSE CORRECTION
1. Surface burnerfails to light a. pilots are notlit (pilotignition) a. see page7 to lightpilots
b. power supply not connected b. connect power, check circuit
(pilotless ignition) breakerorfuse box
c. clogged burner port(s) c. clean ports with straightpin
d. burnersnot placedcorrectly onto d. removeand reinstall burner prop-
gas valve erly
2. Burnerflame uneven a. clogged burner port(s) a. clean ports with straight pin
b. burner not properly positioned b. see page 8 to correctly replace
3. Surface burnerflame a. air/gas mixture not proper a. call serviceman to adjust burner
• lifts off port
• yellow in color
4. Oven burnerfailstolight a. power supply not connected a. connect power, check circuit
(pilotlessignition) breaker orfuse box
b. pilot is out (pilotignition) b. see page 10to light pilots
c. power failure (pilotless ignition) c. glo-bar ignition system,
5. Oven temperature inaccurate a. oven not preheated a. preheat oven 3 to 5 minutes
• food takes too long or cooks b. incorrect rack position b. see page 11
too fast c. incorrect useof aluminumfoil c. see page 12
• pale browning d. oven bottom incorrectly replaced d. replace oven bottom correctly
• food over-done on outside e. oven thermostat sensing device e. reinstall sensing device securely
and under-done in center out of holding clip(s) intoclip(s)
• over browning See Problem Chart on page 13.
burner
see page 10
6. Clock and/or oven light does not a. power supply not connected a. connect power supply, check cir-
work (pilotless ignition) cult breakeror fuse box
b. burned out light bulb b. replace light bulb
c. malfunctioningswitch, starter or c. call servicemanto check
ballast d. call servicemanto check
d. malfunctioningclock or loosewir-
ing
SERVICING
Electrical supply, if equipped, must be numbers of the appliance. (See front If you did not receive satisfactory serv-
disconnectedfromthe wall outlet before coverfor location of your modeland se- icethrough yourservicer or Maycor you
servicing appliance. Do not repairor re- rialnumbers.) may contact the MajorAppliance Con-
placeanypartofyour range unlessspe- sumer Action Panel by letter including
cifically recommended in this manual. Ifyou are unableto obtain service, write your name, address, and telephone
Allother servicingshould be referred to to us.Ouraddress isfound on the rating number, aswell as the model and serial
a qualified technician, plate.Seefront coverfor location of rat- numbers of the appliance.
ing plate.
HOW TO OBTAIN
SERVICE sponse to your service requirements, 20NorthWackerDrive
If you are not satisfied with the local re- MajorApplianceConsumerActionPanel
When your appliance requiresservice call or writeMAYCOR ApplianceParts Chicago, IL 60606
or replacement parts, contact your and ServiceCompany, 240 Edwards
DealerorAuthorizedServicer.Useonly Street, S.E., Cleveland, TN 37311,
genuinefactoryor Maycor parts if re- (615) 472-3500. Includeor have avail- MACAP (Major Appliance Consumer
placementpartsarenecessary.Consult able the complete model and serial ActionPanel)isanindependentagency
the YellowPages in yourtelephonedi- numbersoftheappliance,thenameand sponsoredby threetrade associations
rectoryunder appliancefor the service address of the dealerfrom whom you as a courtofappealsonconsumercorn-
centernearest you. Be sure to include purchased the appliance,the date of plaintswhich have not been resolved
your name, address, and phone num- purchase and details concerning your satisfactorily withina reasonableperiod
ber, along with the model and serial problem, oftime.
-17-
Page 19

18
8109P059-60
(6/91)
 Loading...