

Page 1

......,......,.-.....,.-,...,,......,,......,....,.,,-.....,......., ....., ,...-,........-..-.-,......,......,................,,................._...,.....,.............,.
• .. , ...., . ......., . .......................... , .........., . .. , ......., . ......., . ............... ,......, . ..
': ••-: • %-: •..': • %': ...:...:•..-:...,:....: •-.':..,:• ..': •.,-:. %.;...-: •..': • ..: •..-: •,': , ..': •..-: • %':...: •-.-:• %';...: • %,:• %': °..:• %': •..-:..,; •.,: •-.-: ,_
_i_i_".:_,:' :_:_•!."L:-::,ii:.-_L:•;_•_"L_-__'::_;L_":L:._-:;L_",iL_:::L:_-:_•_".|_:: _.::L:":L_Li:L_-.,:IL::.::e- :,_,•:-:._:::- '-::.;::..::--.._:::.:,":: "-:': " ,,_;-...:"-_!-9,:-:;_i,:._::,: :. ::,_,:._.." :.,.":::.:,-:-3
ili!'i llyf" iiiii2ii:ii:ilZiliiiiiill:ii:iiiiiii:ii:i:illilililiiiiiiiiiiiiiiiiill:iiiiiiii:iiiiiilliiiiilliii iiiiiiiil)i:i:iiiiiiiill:iiiiiiiiii:i)iii:iiiii:iiii:iiiiilliiiiii:iii!iiiii:i:!:illiiiiiiiill
::;2-.":"2-.":;2..":;2-.":;2-;':"2..":;2..":;2..":;2..":;2..":;2-,":;2.;':;2.."::2.."::2..":;2-.":;2.,":;2..":;2..":;2,,":"2..":;2..":;2..::'2..":;2..".";2..":;2..":;2..":;2-.":;2.,":;2..":;2..":;2-.":;2.."::2-
TABLEOFCONTENTS
IMPORTANTSAFETYINSTRUCTIONS ......... 1-4 Roastingandchart........................... 16
Automaticovencookingfeature............. 17-18
CLOCKAND OVEN CONTROL .................. 5 Broilingandchart ............................ 19
SURFACECOOKING ........................... 6 CONTINUOUSCLEANING OVEN
Controlknobs ................................ 6 (ChateauRange) ............................ 20
Cookingtips .................................. 6
Cookware.................................... 6 SELF-CLEAN OVEN ........................ 21-22
Heatsettingguide ............................. 6
SMOOTHTOPCOOKTOP ..................... 7-8
COIL ELEMENTCOOKTOP ..................... 9 Cooktoplight ................................ 25
OVENUSE ................................. 10-19 Backpanel light(Chateau Range).............. 25
Ovenlight .............................. ..... 10 Upperoven light (ChateauRange) ............. 25
Ovenvent ................................... 10 Cooktop .................................... 26
Ovencharacteristics..... i .................... 10 Oven door .................................. 26
Fan ........................................ 10 Storagedrawer .............................. 26
Ovenracks................................... 11 Levelinglegs ................................ 26
Howto set oven .... .......................... 12
Preheating ...... :........... :............... 12 SERVICEINFORMATION.................... 27-29
Useof aluminumfoil .......................... 12 Explanationoffaultcodes..................... 27
Upperoven(ChateauRange) ................. 13 Adjustingoventemperature ................... 27
Generalbakingtips .......................... 14 Beforeyoucallforservicechart ................ 28
Commonbakingproblemschart ............... 15 Howtoobtainservice......................... 29
CARE AND CLEANING CHART .............. 23-24
MAINTENANCE ............................ 25-26
Ovenlight ................................... 25
Themodelandserial numbersarefoundonthe ratingplatelocated
INSTALLE R Please leave this onthe rangefrontframe.Openthe storagedraweror ovendoorto
manualwiththis appliance.
Besureappliancehas beenproperly
installed. Serial Number:
seethe rating plate.
ModelNumber:
CONSUMERTosaveyoutime, Dateof Purchase:
energyand money,read and keep Pleasekeep yoursales receiptand/oryourcancelledcheckas
thismanualforfuturereference, proofofpurchaseshouldwarrantyservicebeneeded.Storethese
documentswiththisbooklet.
8113P141-60
(09-96-00)
/}'-I,
/ _ L .,
Page 2

IMP()RTANTSAFETYINSTRUCTI()NS
Read all instructions before using this appliance.
Congratulationson your choiceof this range. As you use Instructionson the followingpages are based on safety
your new range, we knowyou will appreciatethe many considerationsand mustbestrictlyfollowedto eliminatethe
features that provide excellent performance, ease of potentialrisks offire, electricshock,or personalinjury.
cleaning,convenienceand dependability.
m.
Newfeatures have dramaticallychanged today's cooking WARNING
appliancesand the way we cook. It is therefore very Ap'- _k
important to understand how your new electric range
operatesBEFOREyouuseitforthe firsttime. I " ALL RANGES CAN TIP AND
InthisOwner'sGuide,youwillfind a wealthof information CAUSEINJURIESTO PERSONS.
regardingallaspectsofyourappliance. Byfollowing the
properlymaintainyour new range. NOTE:Yourappliance PACKEDWITH RANGE.
maynotbeequippedwithsomeofthefeaturesreferredtoin
thismanual. I
n
• FOLLOWALL INSTALLATIONI
Shouldyou have any questionsabout using your new INSTRUCTIONS.
electricappliance,pleasewritetous atthis address:
instructi°nscarefully, y°uwillbeablet°fullyenj°yand I _ • INSTALL ANTI-TIP DEVICES
CustomerAssistance
c/oMaytagCustomerService WARNING: Toreducethe riskoftippingof theappliance
P.O.Box2370 fromabnormalusageor by excessiveloadingofthe oven
Cleveland,TN 37320-2370 door,theappliancemustbesecuredbya properlyinstalled
Be sureto includethe modeland serialnumbersofyour
appliance.For yourconvenience,wehaveprovidedspace Iftherangeismovedfromthe wallforcleaning,besurethe
onthefrontcovertorecordthisinformation, anti-tip deviceis engagedwhen the range is replaced.
Inourcontinuingeffortto improvethequalityofour cooking rangeto verify that oneof the rearlevelinglegsis properly
products,it may be necessaryto make changesto the engagedinthebracketslot.Theanti-tipdevicesecuresthe
appliancewithoutrevisingthismanual, rearlevelingleg tothe floorwhen properlyengaged.
anti-tipdevice.
Removestoragedrawer,ifequipped,and lookunderneath
Page 3

IMPORTANT SAFETY N;TRUCTIONS
Besure applianceis properly installedand groundedby a
qualifiedtechnician.
Turn off applianceand ventilating hoodto avoidspreading
Locateand mark circuit breaker or fuse. Never replacea
blown fuse or reset a circuit breaker until you know what smokeand odor.
causedthe problem.Always replacea blown fusewithone Use drychemicalor foam-type extinguisheror bakingsoda
ofthe correctamperage,do not usea substitute, to smotherfire or flame. Neveruse water on a greasefire.
To ensure proper operationand avoid possible injury or door.
damageto unit do notattempt to adjust, repair,service, or Iffire is in a pan on the surface element,cover pan. Never
replace any part of your applianceunless it is specifically attemptto pickup or movea flaming pan.
recommendedin this book. All other servicing should be
referredtoaqualifiedinstallerorservicer.Alwaysdisconnect
powerto unitbefore anyservicingbytrippingcircuit breaker
tothe OFF positionor removingthe fuse.
Besureallpackingmaterialsare removedfromtheappliance cool in a safe place,out of reachof
beforeoperatingit. small children. Children should be
Do notstore or use gasolineor other flammablematerials, Children should not be allowed to
vaporsand liquidsin the oven, near surface units or in the play with controls or otherparts of
vicinityof this or anyotherappliance.Thefumes cancreate the unit.
afire hazardor explosion. CAUTION: Do not store items of
If appliance is installedneara window,proper precautions anapplianceor onthe backguardof
should be taken to prevent curtains from blowing over a range. Children climbing on the
surfaceelements, appliance or on the appliance door
Do notleaveany itemsonthe cooktop.The hot air from the injured.
ventmayigniteflammableitemsandmayincreasepressure
in closedcontainerswhich maycausethemto burst.
the flame. Extinguish flame then turn on hood to remove
If fire is inthe oven or broiler pan, smotherby closing oven
Do not leave children alone or unsupervised near the
appliancewhenitisinuseorisstill hot.Childrenshouldnever
beallowedto sit or standon anypartofthe appliance.
Childrenmust betaught that the applianceand utensilsin
or on it can be hot. Let hot utensils
taughtthat an applianceisnotatoy.
interesttochildrenincabinetsabove
to reach items could be seriously
Many aerosol-type spray cans are EXPLOSIVE when To preventinjury or dama(e to the appliance,do not use
exposedto heat and may be highlyflammable. Avoidtheir appliance as a space \
useor storagenearan appliance, heaterto heator warm a
room. Also, do not use
Many plastics are vulnerable to heat. Keep plastics away the cooktopor oven as a
frompartsoftheappliancethat maybecomewarmorhot.Do storage area for foodor
notleaveplastic itemson the cooktopasthey may melt or cookingutensils.
soften if lefttoo close to the vent or surface element.
To eliminate the hazard of reaching over hot surface or at the right rear ele- /
elements,cabinet storage should not be provideddirectly ment. Keepovenventduct unobstructed.Blockageof the
abovea unit. Ifsuchstorageis provided,itshould belimited vent prevents proper oven air circulation and will affect
to items which are used infrequentlyand which are safely oven performance.Avoidtouchingvent areawhileoven is
. stored in an area subjected to heat from an appliance, on and for severalminutes after oven isturned off. Some
Temperatures may be unsafe for some items, such as partsof the ventandsurroundingareas may becomehot
volatileliquids,cleanersor aerosolsprays, enoughto causeburns.
The oven vent is located
atthe rearofthe cooktop
Page 4
IMPORTANT SAFETY NSTRUCTIONS
Donottouchsurfaceor ovenelements,areasnearelements cooking on a higher heat settingthen reduce to a lower
or interior surface of oven. Heating elements may be hot setting to continue cooking. For smoothtops: To prevent
even though they are dark in color. Areas near surface believers,reduceto thedesiredheatsettingjustas thefood
elementsand interiorsurfacesof an oven may becomehot beginsto cookor waterbeginsto boil.
enoughto causeburns.Duringand after use, donottouch,
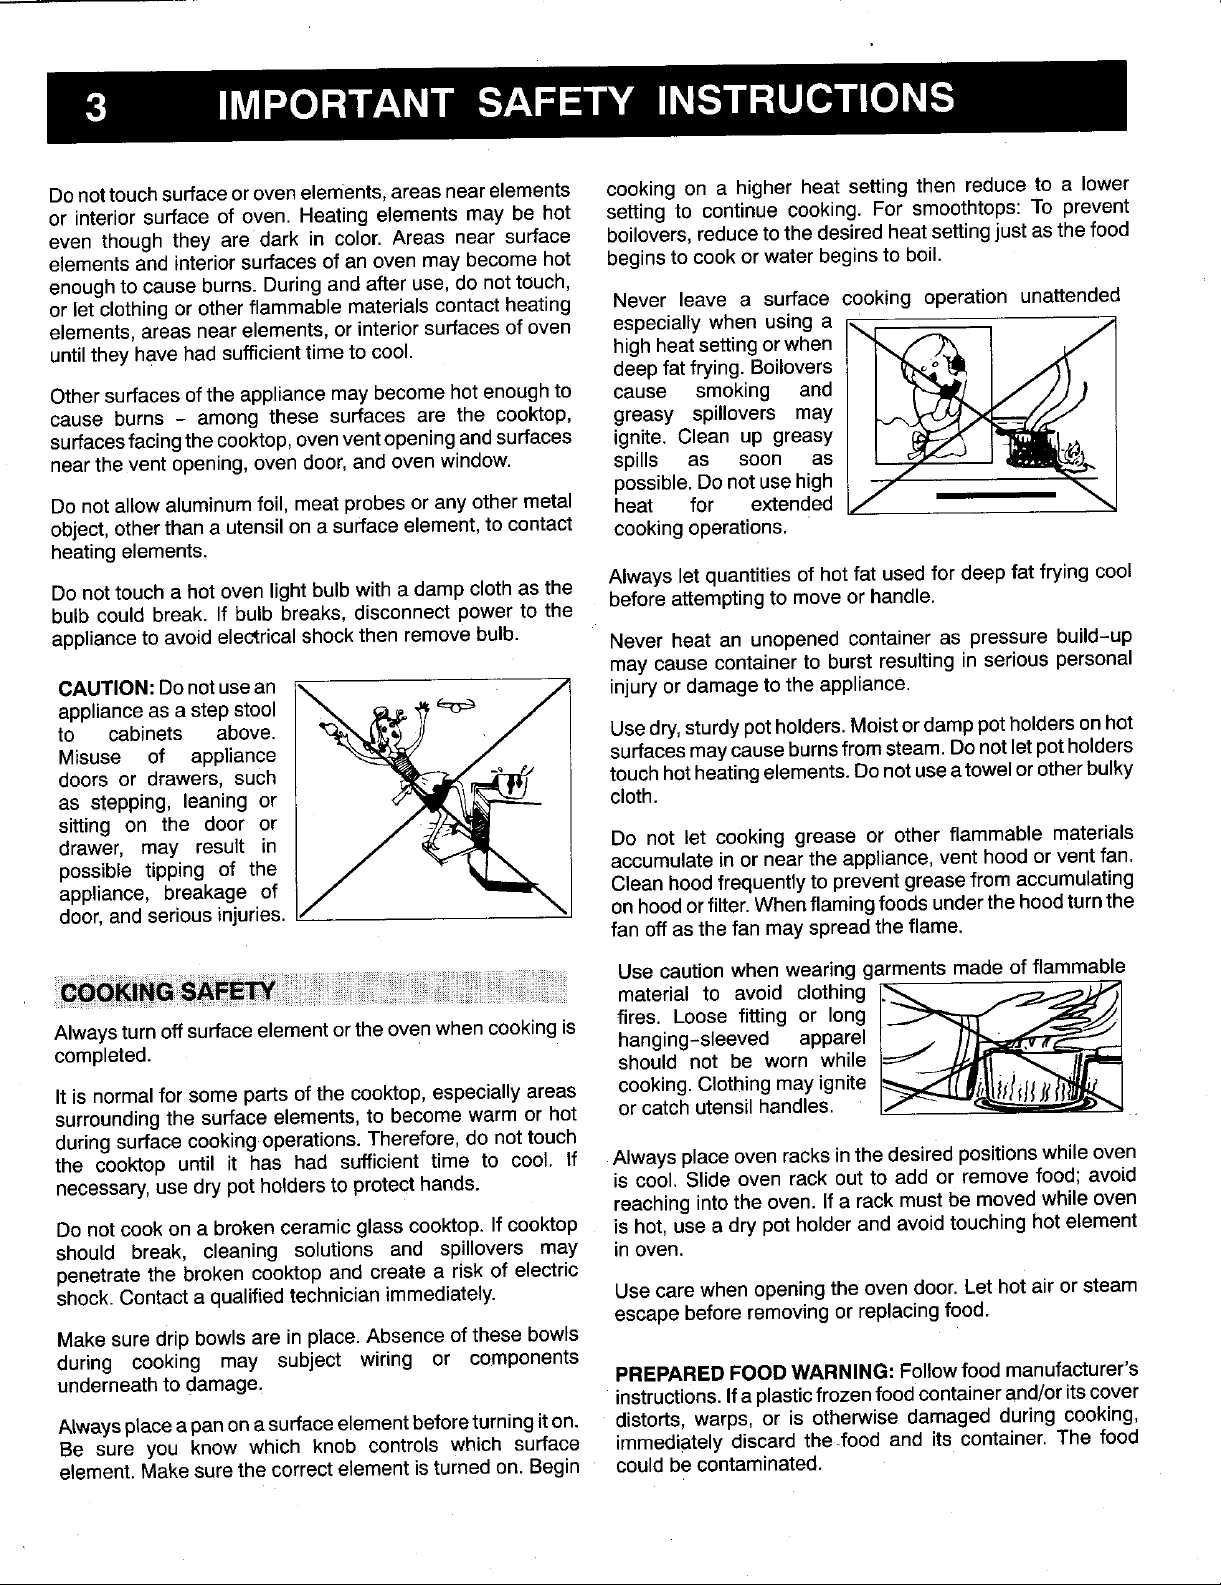
or let clothingor otherflammablematerialscontactheating Never leave a surface cooking operation unattended
elements,areas near elements,or interiorsurfacesof oven especially when using a r,_ _ .t1
untiltheyhavehad sufficienttime tocool. highheatsettingor when
Othersurfacesofthe appliancemaybecomehot enoughto cause smoking and
cause burns - among these surfaces are the cooktop, greasy spillovers may
surfacesfacingthecooktop,ovenventopeningandsurfaces ignite. Clean up greasy
neartheventopening,ovendoor,andoven window, spills as soon as
Do notallowaluminumfoil, meat probesor any other metal heat for extended
object,otherthan a utensilona surfaceelement,to contact cookingoperations.
heatingelements.
Do nottouch a hotoven lightbulb with a damp clothas the Alwayslet quantitiesof hot fat used for deepfat fryingcool
bulb could break.If bulb breaks, disconnect powerto the beforeattemptingto moveor handle.
applianceto avoidelectricalshockthenremovebulb. Never heat an unopened container as pressure build-up
CAUTION:Donotusean _ _ / injuryordamageto theappliance.
applianceasa stepstool
to cabinets above. . Usedry,sturdypotholders.Moistordamppotholderson hot
Misuse of appliance surfacesmaycauseburnsfromsteam. Donotletpotholders
doors or drawers, such touchhotheatingelements.Donotuseatowelor otherbulky
as stepping, leaning or _ cloth.
sitting on the door or
deepfat frying. Believers
possible.Donotuse high
may cause containerto burst resulting in serious personal
possible tipping of the accumulatein or near theappliance,vent hoodor vent fan.
appliance, breakage of Cleanhoodfrequentlyto preventgreasefrom accumulating
drawer, may result in / , Do not let cooking grease or other flammable materials
door,and seriousinjuries, onhoodorfilter.Whenflamingfoods underthehoodturnthe
Alwaysturnoffsurfaceelementor theovenwhen cookingis fires. Loose fitting or long
completed, hanging-sleeved apparel
It is normalfor some partsof the cooktop,especiallyareas cooking. Clothingmayignite
surroundingthe surface elements,to become warm or hot or catch utensilhandles.
duringsurface cookingoperations.Therefore,do not touch
the cooktop until it has had sufficienttime to cool. If Alwaysplaceoven racksin the desiredpositionswhileoven
necessary,usedry pet holdersto protecthands, is cool, Slide oven rack out to add or remove food; avoid
Do notcookon a brokenceramicglass cooktop.If cooktop is hot, usea dry potholder andavoid touching hot element
should break, cleaning solutions and spillovers may inoven.
penetratethe brokencooktopand create a risk of electric
shock.Contacta qualifiedtechnicianimmediately. Usecarewhen openingthe ovendoor. Let hot air orsteam
Makesuredrip bowlsare inplace.Absence ofthese bowls
during cooking may subject wiring or components
underneathto damage. PREPAREDFOODWARNING:Followfoodmanufacturer's
AIwaysplaceapanonasurfaceelementbeforeturningiton. distorts, warps, or is otherwise damaged during cooking,
Be sure you know which knob controls which surface immediately discard the_foodand its container.The food
element.Make surethe correctelementisturnedon. Begin could becontaminated.
fan offasthe fan may spreadthe flame.
Use cautionwhen wearing garments made of flammable
material to avoid clothing >,_ __,_]
should not be worn while
reachinginto the oven. If a rackmustbemovedwhile oven
escapebeforeremovingor rePlacingfood.
instructions.Ifaplasticfrozenfoodcontainerand/orits cover
Page 5

MPq)RTANT SAFETY NSTRUCTIONS
careto avoidsteam burnsif awetspongeor clothisusedto
wipe spills on a hot surface. Some cleaners can produce
Useproperpansize.Thisapplianceisequippedwithone or noxiousfumes ifappliedto ahot surface.
more surface elementsof different sizes. Select utensils
having flat bottoms large enough to cover the surface Do not soak or immerse removable heating elements in
element.Theuseofundersizedutensilswillexposeaportion water: Immersingelement in water would damageelement
of the heatingelement to directcontact and may result in andinsulatingmaterialinsideelement.
ignitionof clothing.Properrelationshipof utensilto element
will also improveefficiency. Donot usealuminumfoil orfoil linersto linedripbowls,cover
anoven rackor linethe oven bottom.Improperuseofthese
Use pans with flat bottoms and handles that are easily liners may result in a riskof electricshock, or fire and may
graspedandstaycool.Avoidusingunstable,warped,easily causeoventooverheat.Usefoilonlyasrecommendedinthis
tippedor loose handledpans.Pansthat are heavyto move booklet.
whenfilled withfood mayalso be hazardous.
Besureutensilis largeenoughto properlycontainfood and
avoidboilovers.Pansizeisparticularlyimportantindeepfat
frying.Besurepanwillaccommodatethevolumeoffoodthat
isto beaddedas wellas the bubbleaction offat. Clean only parts listed in this booklet. Do not clean door
To minimize burns, ignition of flammable materials and shouldbetaken notto rub,damage,ormovethe gasket.Do
spillageduetounintentionalcontactwiththeutensil,donot notuseovencleanersor ovenlinerprotectivecoatingsofany
extend handles over 1)) kind inor aroundany partof theself-clean oven.
EE_ _ OVEN
gasket.The doorgasket is essentialfor agood seal. Care
panhandlestowardthe ' racks, andotherutensils,andwipeoffexcessivespillovers
side or back of the topreventexcessivesmokeor flareups.CAUTION: Do not
appliance,not out into leave food or cooking utensils,etc. inthe oven during the
elements. Always turn _ Before self-cleaning the oven, remove broiler pan, oven
the room where they self-cleancycle.
are easily hit or
adjacent surface __
reached by small Onsomemodels,afanshouldbeheardduringtheself-clean
children, cycle. If not, cancelthe clean cycle and call a qualified
technicianbeforeself-cleaning again.Referto theTableof
Neverleta panboildryasthiscoulddamagethe utensiland Contents for location of self-clean instructionsand for fan
theappliance, information,ifequipped.
Follow the manufacturer's directions when using oven
cookingbags. Itisnormalforthe cooktopofthe rangetobecomehotduring
a self-clean cycle. Therefore, avoid touching or lifting the
Only certain types of glass, glass/ceramic, ceramic, cooktopduringaclean cycle.
earthenwareor glazed utensils are suitablefor cooktop or
oven usagewithout breakingdue to the suddenchange in
temperature.
Thisappliancehas beentested for safe performanceusing
conventional cookware. Do not use any devices or The CaliforniaSafe DrinkingWater and ToxicEnforcement
accessoriesthat are not specifically recommendedin this Act of 1986 (Proposition 65) requires the Governor of
manual.Donot useeyelidcoversfor thesurfaceunits,stove Californiato publisha listof substancesknowntothe State
top grills, or add-on ovenconvection systems.The use of of California to cause cancer or reproductive harm, and
devicesoraccessoriesthatarenot expresslyrecommended requires businesses to warn customers of potential
in this manualcan createserious safety hazards, resultin exposuresto such substances.Users ofthis applianceare
performance problems, and reduce the life of the hereby warned that when the oven is engaged in the
componentsof the appliance, self-clean cycle, there may be some lowlevel exposureto
someof the listed substances,includingcarbonmonoxide.
Exposuretothesesubstancescanbeminimizedbyproperly
Turnoff allcontrolsandwaitforappliancepartstocool before byopeningthe windowsand/ordoor in the room where the
touchingorcleaningthem.Cleanappliancewithcaution.Use applianceis located..
ventingthe Oventothe outdoorsduring the self-clean cycle
SAVETHESE INSTRUCTIONS
Page 6
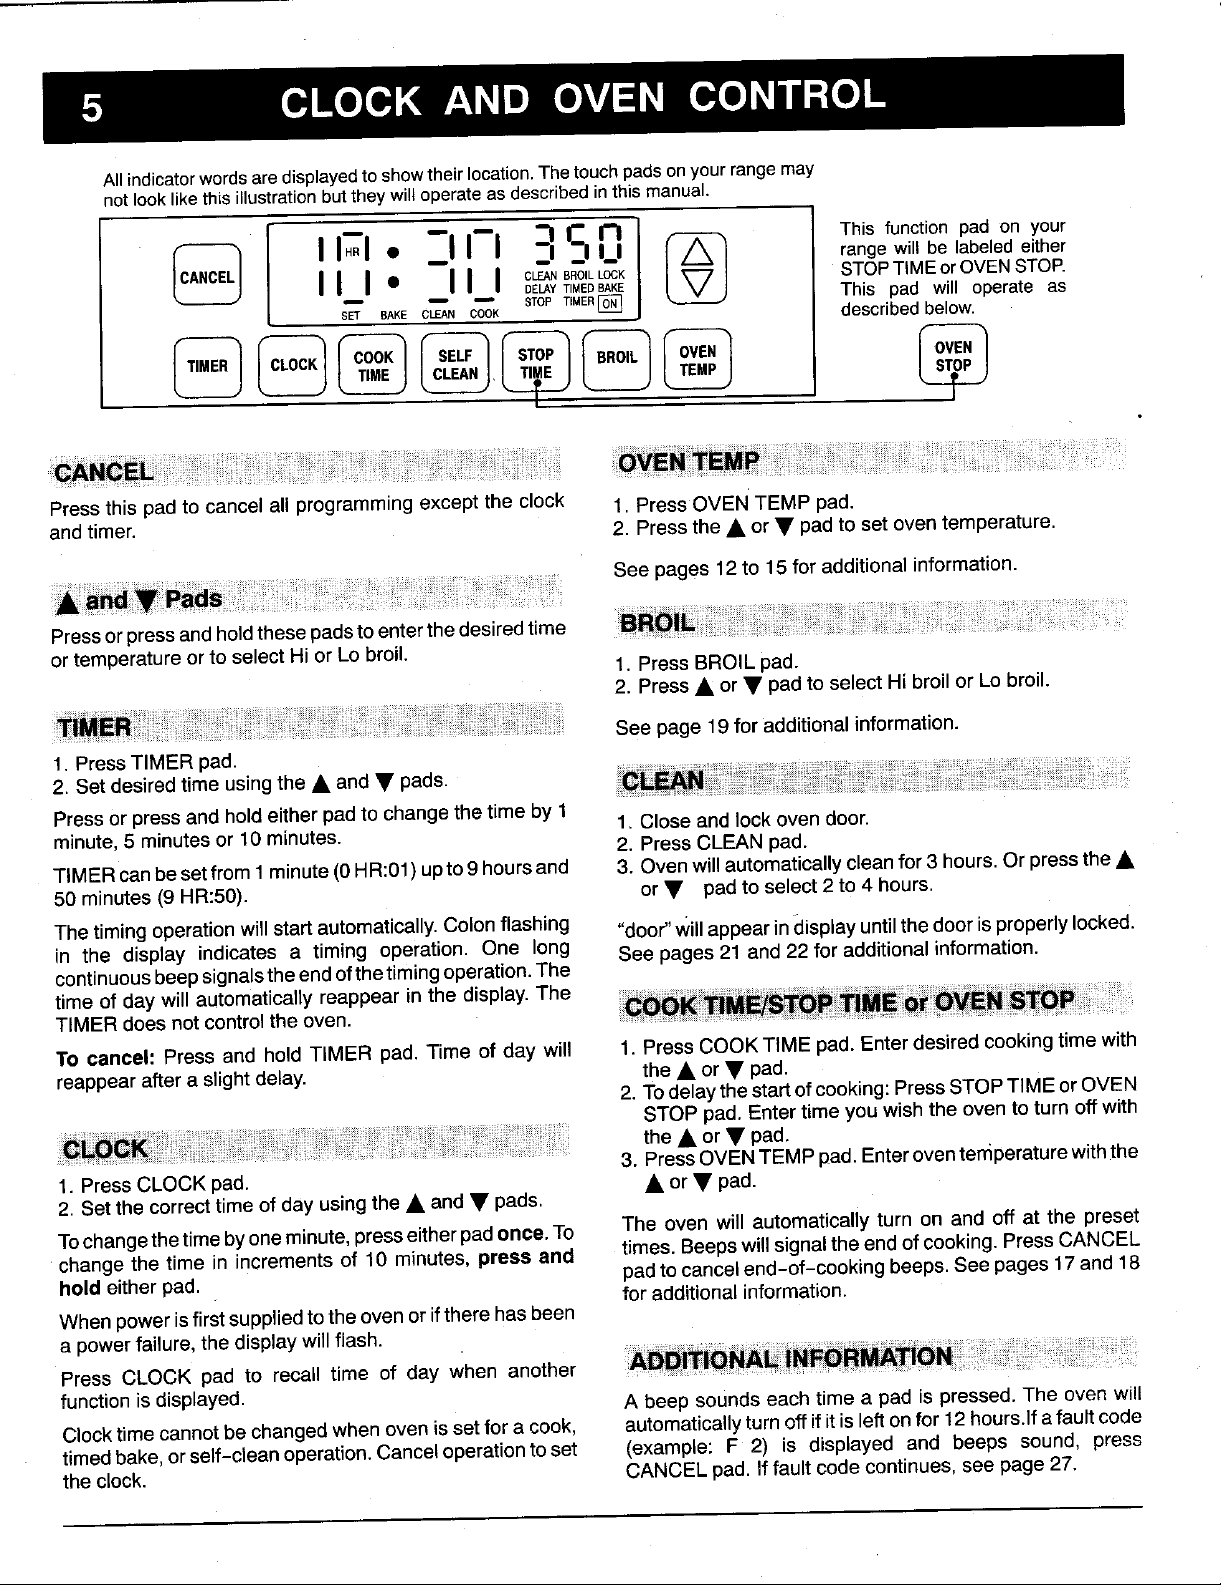
CLOCK AND OVEN CONTR()L
All indicatorwordsare displayedtoshowtheir location.The touchpadsonyourrangemay
notlooklikethLsillustrationbutthey wiltoperate as describedin this manual.
cLEANBROILLOCK STOPTIMEor OVENSTOP.
I.I I !/ sDTEo_¥TI_EERD_ This pad will operate as
BAKECLEAN described below.
I I ____I" rl I This function pad on your
Press this pad to cancel all programming except the clock 1. Press OVEN TEMP pad.
and timer. 2. Press the • or • pad to set oven temperature.
See pages 12 to 15 for additional information.
Press or press and hold these pads toenter the desired time
or temperature or to select Hi or Lo broil.
1. Press BROIL pad.
2. Press • or • pad to select Hi broil or Lo broil.
See page 19for additional information.
1. Press TIMER pad.
2. Set desired time using the • and • pads.
Press or press and hold either pad to change the time by 1 1. Close and lock oven door.
minute, 5 minutes or 10 minutes.
TIMER can be set from 1minute (0 HR:01) upto 9 hours and 3. Oven will automatically clean for 3 hours. Or press the •
50 minutes (9 HR:50). or • pad to select 2to 4 hours.
The timing operation will start automatically. Colon flashing "door" Will appear in display until the door isproperly locked.
in the display indicates a timing operation. One long See pages 21 and 22 for additional information.
continuous beep signals the end of the timing operation. The
time of day will automatically reappear in the display. The
TIMER does not control the oven.
To cancel" Press and hold TIMER pad. Time of day will 1. Press COOK TIME pad. Enter desired cooking time with
reappear after a slight delay, the • or • pad.
1. Press CLOCK pad. • or • pad.
2. Set the correct time of day using the • and • pads.
Tochange the time byone minute, presseither padonce. To The oven will automatically turn on and off at the preset
change the time in increments of 10 minutes, press and times. Beeps will signal the end of cooking. Press CANCEL
hold either pad. for additional information.
When power is first supplied to the oven or ifthere has been
a power failure, the display will flash.
Press CLOCK pad to recall time of day when another
function is displayed. A beep sounds each time a pad is pressed. The oven will
Clock time cannot be changed when oven is set for a cook, automatically turn off if it is left on for 12 hours.If a fault code
timed bake, or self-clean operation. Cancel operation to set (example: F 2) is displayed and beeps sound, press
the clock. CANCEL pad. If fault code continues, see page 27.
2. Press CLEAN pad.
2. To delay the start ofcooking: Press STOP TIME or OVEN
STOP pad. Enter time you wish the oven to turn off with
the • or • pad.
3. Press OVEN TEMP pad. Enter oven ternperature with the
pad to cancel end-of-cooking beeps. See pages 17 and 18
Page 7

SURFA(;E COOKING
Yourcooktopisequippedwithcontrolknobsthatprovidean Use HIGH just untilwater comes to a boil or pressureis
infinitechoiceofsettingsfrom LOWto HIGH.The knobcan reachedinthe pressurecanner.Then,reduceto the lowest
beset onor betweenany of the numberedsettings, heatsettingthat maintainsthe boil or pressure.Prolonged
Tooperatepushinandturntheknobineitherdirectiontothe produce excessive heat. Excessive heat can cause
desiredsetting. An indicator light will glow when a surface permanentdamageto the porcelaincooktop,coil element
elementisturnedon. The indicatorlightwill remainon until and the drip bowl.See page 9 for additionalinformation.
theelementisturnedoff.Aftera cookingoperation,besure
the elementand indicatorlightareoff.
Topreventdamageto therangeorutensil,neveroperate bestresultsusea heavygaugemetalpanwithasmoothflat
surfaceunitwithoutapaninplace,neverallowapantoboil bottomanda tightfittinglid.
dryandneveroperatean elementonHIGHfor extended
periodsoftime. Cookwarewithuneven,warped,orgroovedbottomsdonot
Foodwillnotcookanyfasterata highersettingthanneeded conductivityandresultinslower,lessevenheating.
to maintain a gentle boil. Water boils at the same Differenttypesofcookwarematerialsrequiredifferentheat
temperaturewhetherboilinggentlyor vigorously.If a high settingsforthesamecookingoperation.Thechartbelowis
settingisused,excessivespatteringwilloccurandfoodmay basedonheavygaugealuminumcookware.Lowertheheat
stickor burnontothebottomofthepan. settingifusingathinnergaugemetalorothermaterials.
use of HIGH or the use of incorrect canning utensilswill
Cooking performance is greatly affected by the type of
cookwareused.Propercookwarewillreducecookingtimes,
uselessenergyandproducemoreevencookingresults.For
makegoodcontactwiththeheatingsurface,willreduceheat
Ifa higherheatsettingisusedto bringliquidto a boilorto Oversizedcookwareand cookwarethat restsacrosstwo
begincooking,alwaysreducetoa lowersettingonceliquid elementsarenot recommendedas theymay trapenough
comesto a boilorfoodbeginscooking.Never leavefood heatto causedamagetothe cooktoporelements.This is
unattendedduring a cookingoperation, especiallyimportantwhencanning.
Fitthesizeofthe cookwaretothesizeofthe element.This Donotusewoksequippedwithroundmetalrings.Thering,
conservesenergy, whichisdesignedtosupportthewokabovetheelement,will
trapheatandmay damagetheelementandthe cook'top.
Referto cookwaremanufacturer'srecommendationsfor suggestedheatsettings.Somemanufacturersdonotrecommend
the useof HIGH.orthe useof HIGHfor extended cookingoperations.
HIGH Tobringliquidto a boil,blanch, preheatskillet,or reachpressure ina pressurecooker.
Always reduceto a lowerheatsettingwhen liquidsjust beginto boilor foods beginto cook.
Medium-High Tobrown or sear meat; heatoil for deepfat frying;scald;to sauteor fry.
7-9 Maintainfast boilforlarge amountsof liquids.
Medium To maintainmoderatetoslow boilfor largeamountsof liquids.
4-6 Tocontinuecookinguncoveredfoodsandfor mostfrying operations.
Medium-Low Tocontinuecookingcoveredfoodsand to maintainpressurein most pressurecookers.
1-3 Stew,braiseor steamoperations.
To maintainboilfor smallamountsof liquid,poach, steamor simmer.
LOW Tokeepfoods warm beforeserving.Melt chocolate.
Page 8
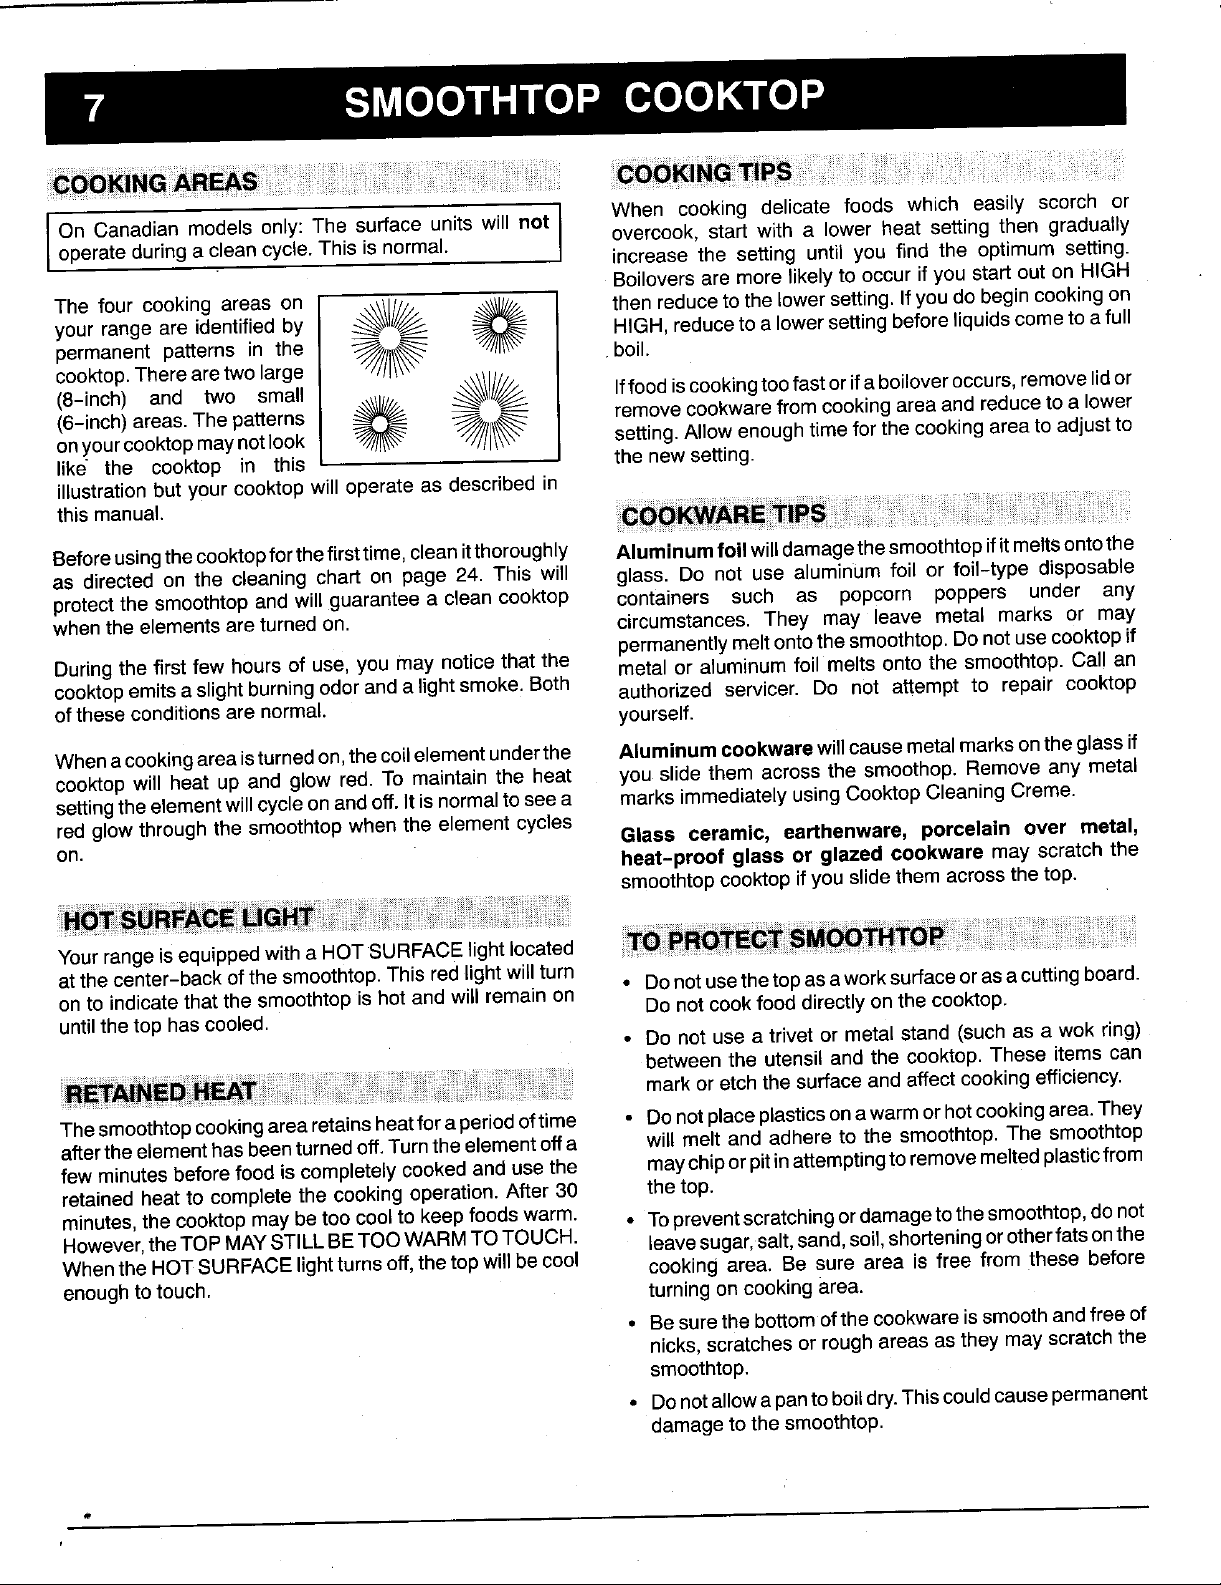
SMOOTHTOP COOKTOP
IOn Canadian models only: The surface units will not I When cooking delicate foods which easily scorch oroperateduringa clean cycle.This is normal. I overcook, start with a lower heat setting then gradually
The four cooking areas on _\\\lllll/_ _J//_ then reducetothe lowersetting. Ifyoudo begincookingon
your rangeare identifiedby _._///___ _ HIGH,reduceto a lowersettingbeforeliquidscome to afull
permanent patterns in the _/1_ .boil.
cooktop.Therearetwo large
(8-inch) and two small .\\\\11//_. _l_ Iffoodiscookingtoofastorifaboiloveroccurs, removelidor
(6-inch)areas.The patterns _ removecookwarefrom cookingareaand reduceto a lower
onyourcooktopmaynotlook -///t_\_- _ll_ setting.Allowenoughtime for the cookingarea to adjustto
like the cooktop in this the newsetting.
illustrationbut your cooktop will operate as described in
thismanual.
Beforeusingthe cooktopforthefirsttime, cleanitthoroughly Aluminum foil willdamagethesmoothtopifitmeltsontothe
as directed on the cleaning chart on page 24. This will glass. Do not use aluminum foil or foil-type disposable
protectthe smoothtopand will guarantee a clean cooktop containers such as popcorn poppers under any
whenthe elementsareturned on. circumstances. They may leave metal marks or may
Duringthe first few hoursof use,you may noticethat the metal or aluminumfoil melts onto the smoothtop. Call an
cooktopemitsaslightburning odoranda lightsmoke.Both authorized servicer. Do not attempt to repair cooktop
oftheseconditionsare normal, yourself.
Whenacookingareaisturnedon,the coilelementunderthe Aluminum cookware willcausemetalmarks ontheglassif
cooktopwill heat up and glow red. To maintain the heat you slide them acrossthe smoothop. Remove any metal
settingtheelementwill cycleon andoff.It isnormaltosee a marksimmediatelyusingCooktopCleaning Creme.
red glowthrough the smoothtopwhen the elementcycles
on. heat-proof glass or glazed cookware may scratchthe
increase the setting until you find the optimum setting.
Boiloversare morelikelyto occur ifyou start out on HIGH
permanentlymeltontothe smoothtop.Donot usecooktopif
Glass ceramic, earthenware, porcelain over metal,
smoothtopcooktop ifyou slidethem acrossthe top.
Yourrangeisequippedwith a HOTSURFACElightlocated
at the center-back ofthe smoothtop.This redlightwill turn
on to indicatethat the smoothtopis hot and will remainon • Donotusethetop asaworksurfaceorasa cuttingboard.
untilthe top hascooled. Do notcookfood directlyon the cooktop.
• Do not use a trivet or metalstand (suchas a wok ring)
between the utensiland the cooktop. These items can
mark or etch the surfaceand affectcookingefficiency.
Thesmoothtopcookingarearetainsheatforaperiodoftime • Donotplaceplasticsonawarmorhotcookingarea.They
afterthe elementhasbeenturnedoff.Turnthe elementoffa will melt and adhere to the smoothtop. The smoothtop
fewminutesbeforefood is completelycookedand use the maychipor pitinattemptingtoremovemeltedplasticfrom
retained heat to completethe cooking operation.After 30 the top.
minutes,the cooktop maybe too coolto keepfoodswarm. • Topreventscratchingordamagetothe smoothtop,donot
However,the TOPMAYSTILLBETOOWARMTOTOUCH. leavesugar,salt,sand,soil,shorteningorotherfatsonthe
Whenthe HOTSURFACElightturns off,the topwill becool cooking area. Be sure area is free from these before
enoughto touch, turning oncookingarea.
• Besurethe bottomofthecookwareissmoothandfree of
nicks,scratches or roughareasas they mayscratchthe
smoothtop.
• Donotallowapantoboildry.Thiscouldcausepermanent
damageto the smoothtop.
Page 9

SMOOTHTOP COOKTOP
To help keep cooktop clean, be sure cooking area and When surface is cool, clean as directed in the chart on page
cookware bottom are clean and dry before each use. 24. DO NOT USE the following cleaning agents:
Topreventpossibledamagetothecooktop, alwaysrinsethe • Abrasives (metal scouring pads, cleansing powders,
bottom of cookware to completely remove any cleaning scouring cleaners or pads) will scratch the smoothtop.
agent residue. This is especially important when using a • Chemicals (oven cleaners, chlorine bleaches, rust
copper or aluminum cleaner. In the presence of heat, the removers or ammonia) may damage the finish of the
cleaning residue may stain, discolor or etch the smoothtop, smoothtop.
• Glass cleaners containing ammonia may harm the
Carefully blot up spillovers around the outside of the cooking smoothtop.
area as they occur with dry paper towels. BE CAREFUL
NOT TO BURN HANDS WHEN WIPING UP SPILLS. DO • Soiled cloth or sponge will leave an invisible film on the
NOT USE A DAMP CLOTH WHICH MAY CAUSE STEAM cooktop which may scratch or cause discoloration the
BURNS. next time the cooktop is used.
CAUTION: Do not use cooktop if the smoothtop -is I IMPORTANT: Watch sugary solutions carefully to avoid
an authorized servicer. Do not attempt to repair the boils over, it may pit the smoothtop. Turn element toLOW
cooktop yourself, and clean sugary boilovers immediately. See page 24 for
cracked, broken, or if metal melts onto the cooktop. Call l believers. If a sugar solution (such as jam, jelly, candy)
complete cleaning instructions.
PROBLEM CAUSE
Tiny scratchesor Coarseparticles (dust,salt and Tinyscratches arenotremovableanddo notaffectcooking.In
abrasions sand)betweenceokware bottom time, the scratcheswill becomesmootherand lessvisible. Be
Metal-marking Slidingor scrapingmetalutensilsor Do not slide metal object across cooktop.When cool,clean
Brownstreaksand Boilovers,incorrectcleaning Remove boilovers before reusing the cooktop. Use a clean
specks materials,usedsoiled cloth or cloth orsponge. Be sure cookware,especially bottoms,are
Areasofdiscoloration Mineraldeposits fromwaterand Usecookwarewithbottomsthat arecleananddry.Usecorrect
with a metallicsheen foods, heatsettingto preventboilovers.
Pittingor flaking. Sugaryboiloversfrom sugarsyrups, Use correct heat setting and large enough utensil. Watch
and cooktop.Incorrectcleaning surecookwarebottomsandcooktoparecleanbeforeuse.Use
materials.Sliding glasswareor metal cookwarewith a smooth,non-scratching bottom.Donot slide
acrosstopor usingcookwarewith cookwareacrosscooktop.
roughbottoms.
ovenracksacrosscooktop, with CooktopCleaningCreme.
sponge,soiledcookware, cleanand dry.
candy,jams, jellies, dessert sauces, cookingoperationto prevent boiloversor spattering.
etc.
Page 10

C()IL ELEMENT COOKTOP
• Coil surfacb elements are self-cleaning. • Be sure drip bowls, located under each element, are in
• Do not immerse elements in water, place.
• Absence of these bowls during cooking may subject
• When an element is turned on, it will cycle on and off to wiring or component parts underneath the cooktop to
maintain the heat setting, damage.
• Toprevent damage to the range, NEVER operate surface • To prevent risk of electric shock or fire, do not line drip
element without a pan in place and NEVER allow a pan bowls with aluminum foil.
to boil dry.
Your range will be equipped with either chrome plated or
To remove: When _._ . porcelain coated steel drip b6wls.
cool, raise element
and carefully pull out Chrome drip bowls will turn blue or gold over time or if
and away from the overheated. This type of discoloration is permanent and will
receptacle, not affect cooking performance.
To protect the chrome or porcelain finish, avoid using high
settings for long periods of time. Reduce to a lowersetting
To replace: Insert the terminals on the element into the oncefood begins cooking. Do not use oversized cookware.
receptacle. Gently liff up onouter edge of element (opposite Pan should notextend more than 2 inches from the element.
terminal-side of element) while inserting terminals into
receptacle. Gently press down on outer edge of element Iftheovenventislocatedattherightrearelement, besure
until element sits level on drip bowl. the drip bowl for this element has a hole in the center to
Be sure drip bowls are properly installed. Notch on trim ring allow proper oven venting. To prevent baking problems,
should be centered over the screw securing the receptacle
to the maintop. If trim ring is not installed properly and rests in this location or by covering the hole in the center of the
on this screw, the trim ring and drip bowl will "rock". drip bowl with aluminum foil.
never block the vent opening by placing a solid drip bowl
CANNINGELEMENTACCESSORYKIT
(MODEL CE1)
The use of oversized cookware or large canners on the coil element
cooktopmay result indamage tothe porcelain enamel finish.A special
canning element has been designed to protect the finish when using
this type of cookware. The canning element and chrome drip bowl are
available as an optional accessory kit.
For information on the Canning Element Accessory Kit, contact your
dealer orwrite to Maytag Customer Service, P.O.Box 2370, Cleveland,
TN 37320-2370.
NOTE: For additional canning information contact your local County
Extension Office. Or, contact AIItrista Consumer Products Company,
marketer of Ball brand home canning products at 800-240-3340 or
write: AIItrista Corp., Consumer Affairs Dept., P.O. Box 2729, Muncie,
IN 47307-0729.
Page 11

OVEN USE 10
Theovenlightswitchis locatedonthe controlpanel.Toturn Because each oven has its own personal baking
theoven lighton, pushinthe bottomhalf ofthe switch, characteristics, do not expect that your new oven will
performexactlylikeyour previous oven. You mayfind that
thecookingtimes, oventemperatures,and cookingresults
differsomewhatfromyour previousrange.Allow aperiodof
adjustment. If you have questions con.cerning baking
Theovenvent islocatedat therearofthecooktop orat the information.
rightrearsurfaceelement.Whentheovenisinuse,thisarea
may feel warm or hot to the touch. To prevent baking
problems,do notblock theventopeningin anyway.
results,pleasereferto pages12,14,15and28for additional
Slide-in, drop-in and Chateaurangesare equippedwith a
fanwhichautornaticallyturnsonwhenevertheovenissetfor
a cookingor a cleaningoperation.Aftertheoperation,the
fanwillautomaticallyturnoffwhentheovenhascooled.
Page 12

11 OVEN USE
The two oven racksare designed with a safety lock-stop For optimum baking resultsof cakes, cookies or biscuits,
position to keep the racks from accidently coming useonerack.Positionthe racksothefoodisinthe centerof
completelyoutofthe ovenwhenpullingtherackouttoaddor the oven. Use either rackposition2 or 3.
removefood.
, Ifcookingonmorethanonerack,staggerthefoodtoensure
CAUTION:Do not attemptto changetherack positions
whentheovenis hot.
Toremove:Besuretherackiscool.Pulltherackstraightout
untilitstopsatthe lock-stop position.Tiltthe frontendof the
rackup and continuepullingthe rackout of the oven.
Toreplace: Placethe rack onthe racksupportsand tilt the
frontendofthe rackupslightly.Slideitbackuntilitclearsthe
lock-stopposition.Lowerthefrontandslidetherackstraight
in. Pullthe rack outto thelock-stop positionto besure it is
positionedcorrectlyandthen returnit to its normalposition. Ifcookingontwo racks,userackpositions2 and4 forcakes
Itisimportantthataircancirculatefreelywithintheovenand placetwo cookie sheetson one rack.
around the food. To help ensure this, place food on the
centerof theovenrack.Allowtwo inchesbetweenthe edge If roastinga largeturkey,placethe turkey onrack 1andthe
of the utensil(s)andthe ovenwalls, sidedisheson rack 5.
properairflow.
andrackpositionsI and4whenusingcookiesheets. Never
RACK5 Usedfor toasting bread,orfor two-rack baking.
(highestposition)
RACK 4 Usedfor most broilingand two-rack baking. 5
RACK3 Usedfor mostbakedgoodsona cookiesheetor 4_ _!
RACK2 Used for roasting small cuts of meat, large I
RACK 1 Used for roasting large cuts of meat and large
jelly roll pan,or frozen conveniencefoods, or for
two-rack baking.
casseroles, baking loaves of bread, cakes (in
either tube, bundt, or layer pans) or two-rack _ .-
baking. _-'__...,.
poultry, pies,souffles, or angel food cake, or for
two-rack baking.
Page 13

OVEN USE 12
1.Whenovenincool, positionthe ovenracks inthe oven. • Do not movethe doorlock leverto the rightduringa
cooking operation.If the door is locked, the cooking
2. Pressthe OVENTEMP pad. operationwillbe cancelled.Ifthe ovenishot enoughto
• 000° and BAKE indicator words will appear in the engagethe internallock, theovendoor willnot open.
display, unlockand open the door.
3. Press the • or • pad. Then press either paduntil the
desiredoventemperatureis displayed. ° If you pressthe OVENTEMP pad and do not set an
• 350° will appear in the display when either pad Js automaticallycancelandthe timeofdaywillreappear
pressedonce. inthe display.
Ifthisoccurs,allowtheoventocool uptoonehour,then
oventemperaturewithin 30 seconds,the programwill
° The oventemperaturecanbe setfrom 170°to 550°.
• The ON indicator word and 75° or the actual oven the OVENTEMP pad.
temperature, whicheveris higher, will appear in the
display. • Tochangetheoventemperatureduringcooking,press
• The temperature in the display will increase in 5° displayed.
increments until the oven reaches the preset
temperature. • Theovenfeaturesanautomaticshut-off: Ifthe ovenis
• Allow10to 15minutesfortheoventopreheat.Asingle lefton for 12 hoursit will automaticallyturn off.
beepwill soundwhen the oven is preheated.
4. Place the food in the center of the oven allowing a
minimumof 1 to 2-inches betweenthe utensil and the
ovenwalls. Donotcoverthe oven bottomor an entire rackwith foil
5. Checkfoodfor alonenessat the minimumcookingtime. placea pieceof foila littlelargerthanthe pan,on therack
Cooklongerifneeded.Cookingtimemayvaryfromoven
tooven. to placethe foil directlyunderthe utensil.Cut a small
6. At theendof cooking,turntheovenoffbypressingthe openinginthefoiltoallowheattothebottomofthepan.This
CANCELpad.Removefoodfromtheoven. isespeciallyimportantwhenbakingpies.
Preheatingisnecessaryforbaking.Topreheat,settheoven
tothedesiredtemperatureandallowabout10to 15minutes
fortheovento preheat.A singlebeepwillindicatethatthe
ovenispreheated.Itisnotnecessarytopreheatforroasting.
• Torecallthe presettemperatureduringpreheat,press
the • or • pad until the desired temperature is
or place foildirectlyundercookware.Tocatchspillovers,
belowthepan.Forrangeswithonerack,itwillbenecessary
Selectinga temperaturehigherthan desiredwillNOT I
preheattheevenanyfaster,and mayhavea negative
effecton bakingresults.
(
Page 14

13
The upperoven of the Chateaurange will featureeither a TO set upper oven:
microwaveovenor a conventionalbakingoven. 1.When cool, place the oven rack in the desired rack
Microwaveoven: Refertothe separateUseandCareBook position.
for microwaveovenoperatinginstructions.
Conventionaloven:This ovenis equippedwithan electric
bake elementandfeaturesthe ContinuousCleaningOven. OFF
See page20 for additional informationon the Continuous /'_--r_ _._55°
CleaningOvenfeature. __/,/t____oo,, ,,
Thesize ofthe upperovenmakesit convenientfor cooking
smaller quantities of food. However, itdoes have some 2oo._\_//f_" '5°
largebakeware.Largebakewarewill blockthe airflowand
limitations.Do not usea largecookingsheet, pan or other 2,o_.____4o0,_.-_,Z,_ " "7"_ _/_
affectcookingresults. 3oo _5.._o
Foroptimumresults,usethe lowerovenfor criticalcooking
and delicatebaking. 3. Allowthe ovento preheatfor 10to 15 minutes.
Do notuse the upperovenfor cookingitemsthatare heavy minimum of two inches between the utensil(s)and the
orbulkyto handle,especiallyifconsiderableamountsof hot oven wallsand ovendoor.
fat or liquidsare involved.Removingsuch foods fromthe
oven isdifficultand canbe hazardous. 5. Checkthefood for donenessatthe minimumtime given
2. Push in and turn the thermostat knob to the desired
setting.
WARM
4. Place the food in the center of the oven, allowing a
inthe recipe.Cooklongerifnecessary.Openingtheoven
door frequently causes heat loss which may affect
cookingresultsand increasecookingtime.
6. Turn the thermostat knob to OFF and removethe food
fromthe oven.
Page 15

Use a reliable recipe and accurately measure fresh • A dark, dull, anodized or satin-finish metal pan
ingredients. Carefully follow directions for oven absorbs heat and producesdarker browningwith a
temperatureandcookingtime. crispercrust.Usedarkpansforpies,piecrustsorbread.
Preheatoven if recommendedin the recipeor package • Foroptimumbakingresults,bakecookiesandbiscuitson
directions.Selectingatemperaturehigherthanthe desired aflat cookiesheet.Ifthe panhassides,suchasajellyroll
temperaturewill notpreheatthe ovenanyfaster.Infact,this pan, browningmay not be even.
mayhavea negativeeffectonbakingresults. • If using heat-proof glassware, or dark pans such as
Baker's Secretor Wiltonreducethe oventemperature
Use the correct rack position. Bakingresultsmay be by25°F exceptwhenbakingpiesorbread.Usethe same
affectedif the wrongrack positionis used. For optimum bakingtimeas calledforinthe recipe.
results,bakefoodsononerack.Selectarackpositionthat
locatesthefoodin the centeroftheoven.If bakingon two
racks,select rackpositions#2 and4, #1 and4 or #2and 5. Allow hot airto flowfreelythroughthe ovenforoptimum
• Top browningmay be darkerJffoodislocatedtoward optimumbrowningandevencookingresults:
thetopofthe oven.
• Bottombrowningmaybedarkeriffoodislocatedtoward cookiesheet,one 13x9x2-inchcakepan ortwo9-inch
thebottomoftheoven. roundcake pansononerack.
• When usingtworacksfor baking,allowenoughspace • Staggerpanswhenbakingontworackssoonepanisnot
betweentheracksforproperaircirculation.Browningand directlyoveranotherpan.
cookingresultswillbeaffectedifairflowis blocked. • Allow onetotwo inchesbetweenthe panand the oven
bakingresults.Improperplacementofpansintheovenwill
block air flow and may resultin uneven browning.For
• Donotcrowdarackwithpans.Neverplacemorethanone
walls.
Cookware material plays an importantpart in baking Check the cooking progress at the minimum time
results.Alwaysusethetypeand sizeofpancalledforinthe recommendedintherecipe.Ifnecessary,continuechecking
recipe.Cookingtimesor cookingresultsmaybe affectedif at intervalsuntilthefoodisdone.Iftheovendooris opened
thewrongsizeis used. toofrequently,heatwillescapefromtheoven;thiscanaffect
• A shinymetalpanreflectsheatawayfromthefood.This
typeof panproduceslighterbrowninganda softercrust. If you add additional ingredients or alter the recipe,
Useshiny pans forbakingcakesor cookies, expectcookingtimesto increaseordecreaseslightly.
bakingresultsandwastesenergy.
Page 16

15 OVEN USE
PROBLEM CAUSE
Cakesareuneven. ° Panstoo closeortouchingeachother oroven walls.° Batteruneven in pans.
• Temperaturesettoo lowor bakingtimetoo short.• Ovennot level.• Undermixing.• Too
muchliquid.
Cakehigh in middle, oTemperaturesettoohigh. • Bakingtimetoo long.• Overmixing.• Toomuchflour.• Pans
touchingeach otheror oven walls. • Incorrect rackposition.
Cakefalls. • Toomuchshorteningor sugar.• Toomuchor too little liquid.=Temperatureset too low.
• Oldor too little bakingpowder.• Pantoo small. • Ovendooropenedfrequently.• Added
incorrecttype of oilto cakemix.. Added additionalingredientsto cakemix or recipe.
Cakes,cookies,biscuits , Incor_ectraCkposition.=Ovendoornotclosedproperly,•Doorgasketnotsea ngproperly
don tbrown evenly, I orproperlyattachedtodoor.' Incorrectuseofaluminumfoil:• Oven notpreheated,• Pans
darkened;dentedor warped:
j Foroptimumresuitslbakeon oneiack. i bakingcakesontworaCks,placepanstowardtheI
; ; frontoftheovenontheupperrackandtowardthebackof!heovenonthe!ower !aCk,
Cakes,cookies,biscuits • Ovennotpreheated.• Panstouchingeachotherorovenwalls.• Incorrectrackposition.
toobrownon bottom. • Incorrectuseofaluminumfoil.• Placed2 cookiesheetsononerack.• Usedglass,dark,
stainedwarpedordullfinishmetalpans.(Usea shinycookiesheet.)
Followcookwaremanufacturer'sinstructionsfor oventemperature.Glasswareanddark
cookwaresuchas Ecko'sBaker'sSecretmayrequireloweringthe oventemperatureby
25°R
i
Cakesdon'tbrown on :o!_correctraCkpositioni,Tempe_aturesettooiow:• overmixing.• Toomuchiiquid.•Pan
top. ; ; sizetoo largeortoolittlebatterinpan:;•Oven dooropenedtoooften.
Excesslve _hrinkage • TooIi_1_e_e_i_g • Ova'fruiting'• P_t_olalge:.Temperature set too high .Bak ng
timetoo long. • Panstoo closeto each otheror ovenwalls.
• TOOmuch quid:• Undermx ng.• Temperatureset too low • Bakingtimetoo short:
Cakeshave tunnels. =Notenoughshortening.• Toomuch bakingpowder.• Overmixingorattoo higha speed.
• Temperaturesettoo high.
Piecrust edgestoo • Temperaturesettoo high.• Panstouchingeachotheror ovenwalls.• Edges ofcrusttoo
brown, thin; shieldwith foil.
: i :
Pies havesoakedcrust. • Temperaturetoo lowat start ofbaking. • Fillingtoo juicy.• Usedshiny metalpans.
Page 17

OVEN USE 16
Roasting isthe method for cooking large, tender cuts ofmeat thus allowing better heat circulation for even cooking. As the
uncovered,_ without adding moisture. Most meats are fat on top of the roast melts, the meat is basted naturally,
roasted at 325°F. it is not necessary to preheat the oven. eliminating the need for additional basting.
Place the roasting pan on either of the two lowest rack
positions. The cooking time is determined by the weight of the meat
Roasting Tips a meat thermometer. Insert it so the tipis inthe center of the
Use tender cuts of meat weighing three pounds or more.
Some good choices are: Beef rib, ribeye, top round, high Remove the roast from the oven when the thermometer
quality tip and rump roast, pork loin roast, leg of lamb, veal registers the desired temperature.
shoulder roast and cured or smoked hams.
Season meat, ifdesired, either before or after roasting. Rub USDA's Meat & Poultry Hotline at 1-800--535-4555. For
into the surface of the roast if added before cooking, cooking information write to the National Live Stock and ]
Place the meat fat-side-up on a rack in a shallow roasting Illinois 60611.
pan. Placing the meat on a rack holds itout of the drippings,
and the desired doneness. For more accurate results, use
thickest part of the meat. It should not touch fat or bone.
NOTE: I=or more information about food safety, call I
Meat Board, 444 North Michigan Avenue, Chicago, /
J
Approximate Oven Approximate*
Weight Temperature Internal RoastingTime
Cut of Meat (pounds) in °F Temperature (rain.per lb.)
Beef
RibRoast(cut-sideLdown) 4to 8 325°F 160°F(medium) 30-35
RibEyeRoast 4to 6 350°F 160°F(medium) 30-35
TopSirloinRoast 3 to 6 325°F 160°F(medium) 30-35
Pork, Fresh
ShoulderBlade Roast,(boneless) 4 to 6 325°F 160°F 35-45
ShoulderBlade Roast 4 to 6 325°F 160°F 30-40
Loin Bladeor Sirloin Roast 3 to 4 325°F 160°F 35-40
BonelessPorkLoin 6 to 8 325°F 160°F 25-35
Pork,Smoked
Ham,Half (fully cooked)** 5 to 7 325°F 140°F 25-35
Ham,Half (cook-before-eating) 5to 7 325°F 160°F 35-45
Poultry
Turkey,unstuffed*** 12 to16 325°F 180°-185°F 18-20
Turkey,Breast 3to 8 325°F 180°F 30-40
Chicken,Fryer 2 1/2 to3 1/2 350-375° 180°F 20-24
Chicken,Roaster 4 to6 350-375°F 180°F 20-25
Lamb
Leg(boneless) 2 to 3 325°F 160°F 35-40
WholeLeg 5 to 7 325°F 160°F 30-35
* Cookingtimesare approximateand may varydependingon theshapeofthe roast.A meat thermometeristhe most accurateway
todetermine doneness.
** Addwaterandfollowpackagedirections.
*** Stuffedturkeyrequiresadditionalroastingtime.Shield legsand breast withfoil toprevent overbrowningand dryingofskin.
16 to20 325°F 180°-185°F 16-18
20 to24 325°F 180°-185°F 14-16
170°F 40-45
Page 18

17 OVEN USE
The Automatic Oven Cooking feature is used to turn the To set oven:
oven on and off at a preset time of day. This feature can be
used to: 1. Place food in the oven.
• Turn the oven on immediately (immediate start), 2. Press the COOK TIME pad,
• Delay the start of cooking (delay start). • The words SET COOK TIME willflash inthe display.
The feature can be used with either oven cooking or the
self-cleaning oven feature. See page 22 for instructions on
delaying the start of a clean cycle. 4, Press the OVEN TEMP pad.
The clock must be functioning and set at the correct time of • The words BAKE and 000° willappear in the display.
day for the Automatic Oven Cooking feature to operate
properly, 5. Press the • or • pad to enter the oven temperature,
IMPORTANT The oven will immediately turn on.The words TIMED BAKE
• Highly perishable foods such as dairy products, ON will appear in the display and the display will begin
pork, poultry, seafood, or stuffing are not countingdownthe cookingtime.
recommended forDelay Start cooking. At the end of the preset cooking time, the oven will
• If cooking more than one food, select foods that automaticallyturn off and END will appear in the display.
cook for the same length of time and at the Same Continuousbeeps willremind you to remove the food from
oven temperature, the oven.
To recall the preset cook time or stop time, press the time of day will reappear in the display when the CANCEL
correspondingpad. pad ispressed. Remove the food from the oven.
3, Press the • or • pad to enter the cooking time.
Press the CANCEL pad to cancel the beeps. The current
To cancel the AutomaticOven Cooking operation,pressthe
CANCEL pad. Example For Immediate Start
At the end of the Automatic Oven Cooking operation, the Food is to cook for one hour and thirty minutes (1:30) at
oven will automatically turn off and continuous beeps will 375°F'
sound to remind you to remove food from the oven. Press 1. Pressthe COOK TIME pad.
the CANCEL pad to cancel the beeps.
This feature will only delay cookingup to eleven hoursand
fiftyfive minutes (11:55). isdisplayed.
If you delay morethan 30 secondsbetween pressinga pad 3. Pressthe OVEN TEMP pad.
and the • or • pad, the display will either:
• Return to the previous setting. The oven willturn onimmediately and willautomaticallyturn
• Beep and flash to indicatethe next entry, offat the preset time. Press the CANCEL pad to cancel the
• Returnto the currenttimeofdayandcancel theoperation, beeps.
2. Pressthe • I_aduntil 1:30 (one hour and thirty minutes)
4. Press the • pad until375 ° is displayed.
Page 19

OVEN U,c;E 18
Toset oven: ExampleFor DelayStart
1. Placefoodintheoven. Foodis to cookfor one hourand thirtyminutes(1:30)at
2. PresstheCOOKTIME pad.
• The wordsSET COOKTIME willflashinthe display. 1. PresstheCOOKTIME pad.
3. Pressthe• or• padtoenterthecookingtime. 2. Pressthe• paduntil1:30(onehourandthirtyminutes)
• The cookingtime will be displayedin hoursand isdisplayed.
minutes. 3. PresstheSTOP TIME orOVENSTOP pad.
4. PresstheSTOPTIME or OVENSTOP pad.
• The wordsSET STOPTIME willflashinthedisplay. 4. Pressthe• paduntil6:00isdisplayed.
5. Pressthe• or•padto enterthetimeyouwishtheoven 5. PresstheOVENTEMP pad.
toturnoff.
6. PresstheOVENTEMP pad.
• The wordsBAKEand 000°will appear inthe display. The oven will automaticallyturn on and off at the preset
7. Pressthe • or • padto enterthe oven temperature.
8. Press the CLOCKpad and the currenttime of day will
reappearinthe display.
• DELAYBAKEwill appearinthe displayto indicatethat
the ovenis setfor a delaystartcooking operation.
The controlwill automaticallydeterminewhen to turn on I
the oven basedon the COOKTIMEand STOPTIME or
OVENSTOPtime youset. Itis NOT necessaryto set a
start time.
376°F.Youwishthe foodtobe cookedby6:00.
6. Pressthe• paduntil375° isdisplayed.
times. Pressthe CANCELpad to cancelthe beeps.
i
At thepreset time,the ovenwill automaticallyturn on and
TIMEDBAKEONwill appearin the display.The displaywill
begincountingdownthe cookingtime.
At the end of the preset cooking time, the oven will
automaticallyturn off and END will appear in thedisplay.
Continuousbeepswill remindyouto removethe foodfrom
the oven.
PresstheCANCELpadto cancelthe beepsandremovethe
foodfromtheoven.Thecurrenttime ofdaywill appearinthe
displaywhenthe CANCELpadis pressed.
Page 20

19 OVEN USE
Broiling is a method of cooking tender meats by direct heat. TO set oven to broil:
The cookingtime isdetermined bythe distance betweenthe 1. When the oven iscool, positionthe rack inthe oven.
meat andthe broilelement, thedesired degree of aloneness 2. Pressthe BROIL pad.
and the thicknessofthe meat. 000 ° and BROIL indicatorwordswillappearinthe display.
Broiling Tips 3. Press the • pad to selectHI for normal broilingor press
Broilingrequires the use of a broiler pan and insert. The 4. For optimum browning results, remove the broiler pan
broilerinsert mustbe inplacetoallowfat and liquidtodrainto and preheat the broil element for 3 minutes.
the pan below to prevent spatters, smoke and flare-ups. 5. Broilwiththe oven door opened to the broil stop position
Improper use may cause grease fires. (opened about 6-inches). Turn meat once abouthalfway
For easier clean up, line the broiler pan with foil and spray through cooking. Check for doneness by cutting a slit in
the insertwitha non-stick vegetable spray.Do notcoverthe the meat nearthe center for desired color.
broiler insert with aluminum foil as this prevents fat from 6. At the end of cooking, removethe broilerpan and press
draininginto pan below, the CANCEL pad to cancel the broil operation. The
Trim excess fat and slash remaining fat to help keep meat
from curlingand to reduce smokingand spattering.Season
meat after cooking. Use HI BROIL for most broil operations. Select Lo BROIL
Place oven rack in the correct rack positionwhen oven is lowertemperature allowsfoodto cooktothe well done stage
cool. For darker browning, place meat closer to the broil without excessivebrowning.Cooking time will increase if Lo
element.Place meat further down if youwishmeat tobe well BROIL is selected.
done or ifexcessive smokingor flaring occurs.
See Careand Cleaning Chart onpage 23 for instructionson Broil times will increase if oven is installed on a 208-volt
cleaning the broilerpan and insert, circuit.
the • pad to select Lo for lowtemperature broilihg.
current time of day willreappear inthe display.
when broiling longer cooking foods such as poultry.The
TYPEOF MEAT
BACON #4 WellDone 6to 10
BEEF STEAKS
1-inchthick #4 Medium 15to18
CHICKEN LO BROIL
Pieces #3 or#4 WellDone 30 to 45
FISH
Fillets #4 Flaky 8 to12
Steaks,1-inchthick #4 Flaky 10to 15
GROUNDBEEFPATTIES
3/4-inchthick #4 WellDone 15to18
HAMSLICE,precooked
1/2-inchthick #4 Warm 8to 12
PORKCHOPS
1-inchthick #4 WellDone 22 to26
* Thetoprackpositionis position#5.
** Broilingtimesareapproximateandmay varydependingonthemeat.
#4 Well Done 19to 23
Page 21

\
\
CONTINUOUS CLEANING OVEN 20
CHATEAU RANGE CONVENTIONAL UPPER OVEN ONLY
Theupperovendoorlinerisporcelainenamel.Forcleaning effectively without some manual help. The crusty or
instructions,referto thecleaningchart on page24. varnish-like stainsthat formfrom these spilloversclog the
poresand preventthe special finishfrom being exposedto
the hot oven air. This greatly reduces the cleaning
effectivenessof the finish.
Thefinishofthe ContinuousCleaningOvenis identifiedby Thesecrustyor varnish-likestains musteither beremoved
its dark gray color,and rough, porous texture.The rough orbroken up beforecleaningcan effectivelytake place.
texturepreventsgreasespattersfrom formingbeadswhich
run down the walls leaving unsightly streaks. Rather,the
roughtextureabsorbsspattersand allowsthem to spread,
thusexposingalargerareato thehotovenair.Thecatalyst,
whenexposedto heat,speedsthe oxidationof soil. Brushoff heavy soil with a nylon brush or plastic pad. DO
Cleaningactionautomaticallybeginswhenever theovenis areporousandparticlesofthesematerialswill ruboff onthe
turnedonfor bakingor roasting.TheovenMUSTbe "on"for walls.Rinseareawithclear wateronly.
cleaningtotakeplace.Nocleaningwilloccurwhentheoven Brittlecrustsor stainscan beloosenedbyGENTLYtapping
is off. The specialcatalyticfinish must be exposed to hot stainwith awoodenor plasticutensil.Brushawayany loose
oven airbefore soilwillbeginto graduallyreducein size. soil that flakes off.Varnish type stains usually need to be
NOTUSEpapertowels,clothsor spongesforthe ovenwalls
softened with a small amount of water or damp cloth.
Remaining soil will gradually reducewith continued oven
useat normalbakingtemperatures.
The higherthe oven temperature,the faster the cleaning DO NOT USE ANY TYPE OF OVEN CLEANER,
action. The length of cleaning time will depend on these
factors:Typeofsoil,amountorsizeofsoil,oventemperature PASTEON ANY CONTINUOUSCLEANING SURFACE.
and lengthoftimeoven is in use.Time mayvaryfrom afew ALSO,DONOTUSEANYABRASIVEMATERIALS,STEEL
minutestoseveralhours.Soildepositedattheendofacycle WOOL, SHARP INSTRUMENTS OR SCRAPERS FOR
maystillbevisible.Thiswill usuallyfadewithcontinuedoven THEYWILL DAMAGETHE FINISH.
use until the soilgraduallydisappearsor can bewiped up
manually.The oven will appear presentably clean, even Avoid spilloversby usingutensi_ thatare large enoughto
thoughsomespattersmay be present, holdfood. A cookie sheet or piece of aluminum foil, just a
The special finish will clean most spatters during normal embossedrack supports.This is normal and resultsfrom
oven use unless there is a heavy buildup of soil. Heavy slidingthe racksin andout ofthe oven.Wearmarkswill not
spillovers suchas pieor casseroleboiloverswill not clean affectthe cleaningaction oftheoven.
POWDERED CLEANSERS, SOAP, DETERGENT OR
littlelargerthan thepan,can beplacedon the rackdirectly
belowthe rack holdingthe utensilto catchspills.
Over a period of time, wear marks may appear on the
Page 22

21 SELF-CLEAN OVEN
On Canadianmodelsonly: The SmoothtopCooktopwill ]
notoperateduringa cleancycle.This isnormal. } Whenthe doorislockedandthe CLEANpadispressed,the
oven will automatically begin to heat to cleaning
The self-clean oven uses temperatures above normal temperatures.
cookingtemperaturestoautomaticallycleantheentireoven
interior.
Onslide-in, drop-in andChateauranges:A fanwill auto-I
hotduringa cleancycle.Therefore,duringa clean cycle,I matca yturn off afterthe c eancyc e whenthe oven hasl
avoidtouchingthe cooktop,oven vent area, oven door cooled.
CAUTION:It isnormalfor partsof the rangeto becomeI maticallyturnon duringthe self-clean cycleandwillauto-
andw ndow.
Itisbettertocleantheovenregularlyratherthanto waituntil indicatorwill appear in thedisplayto show that an internal
there isa heavybuild-up of soil inthe oven. lock mechanismhas engaged.At this point,the oven door
Turnofftheovenlightbeforeacleancycle.Iftheovenlight is
lefton, the light bulbwillburn out duringthe cleancycle. To preventdamagetothe doorand lock lever,do notforce
1. Removeovenracks. Closeandlock oven door. odor may be detected. This is normal and will lessen or
2. PressCLEANpad. broiler panwas accidentlyleft in theoven,smokeand odor
3. Pressthe A or • padto selectcleaningtime. may occur.
• Lightsoil - 2 hours
• Averagesoil - 3 hours Asthe ovenheatsandcools,youmay hearsoundsofmetal
• Heavysoil- 4 hours partsexpandingand contracting.This isnormaland willnot
As the oven reaches cleaning temperatures, the LOCK
cannot be unlockedand opened.
the dooropen whenthe LOCKindicatoris displayed.,
The first few times the oven is cleaned,some smoke and
disappearwith use. Ifthe oven is heavilysoiled, or if the
damageyourappliance.
Removebroilerpan,all pans and the oven racksfromthe
oven.The racks will discolor and may not Slide easily Aboutone hourafterthe endofthe cleancycle,the internal
aftera clean cycle, lockwilldisengageandthe LOCKindicatorwillturnoff.At
thispoint,thedoorcanbe unlockedandopened.Movethe
Cleanovenframe,doorframeandaroundtheovenventwith doorlockleverto theleft orunlockedpositionandopenthe
a non-abrasive cleaning agent such as Bon Ami or door.Theovenmaystill be hot.
detergentand water. These areas are not exposedto
cleaningtemperaturesandshouldbecleanedtopreventsoil Somesoilmayleavealightgray,powderyashwhichcanbe
frombakingonduringtile cleancycle, removedwitha dampcloth.If soilremains,itindicatesthat
the cleancycle was not long enough.The soil will be
Wipeupexcessgreaseorspilloversfromtheovenbottomto removedduringthe next clean cycle.
preventexcessivesmokingand flare-ups duringthe clean
cycle. If the oven racks were left in the oven and do not slide
smoothlyafteracleancycle,wiperacksand embossedrack
Wipeupsugaryspilloversandacidspilloverssuchaslemon supportswithasmallamountof vegetableoilto restoreease
juice, tomato sauce or milk-based sauces. Porcelain of movement.
enamelis acidresistant,not acidproof.Theporcelainfinish
maydiscolorifacidspillsare not wiped up immediately. Clean around the oven vent opening at the rear of the
cooktopifthere isadepositfromthefumesventedduringthe
Donot useoven cleaners onthe self-clean ovenfinishor clean cycle. Use detergent and water and a cloth or
aroundanypart oftheovenastheywilldamagethefinishor non-abrasive pad.
parts.
Fine,hair-like linesmay appearin the oveninterioror oven
Topreventdamage,do notclean or rubthe gasketaround door.This isa normalconditionresultingfrom heatingand
theovendoor.Thegasketis designedto sealinheatduring coolingof the porcelainfinish. These linesdo notaffectthe
thecleancycle, performanceofthe oven.
Page 23

SELF-( ;LEAN OVEN 22
To set oven for a self-clean cycle: Todelaythe startof a cleancycle:
1. Removetheovenracksandclosethe door. 1. RemovetheovenracksandcUosethedoor.
2. Movethe doorlock leverto the right untilit restsinthe 2. Movethedoor locklever to the rightor lockedposition.
lockedposition. 3. PressCLEANpad._
3. Pressthe CLEAN pad. 4. Pressthe• or • padto selectthe cleaningtime.
• "door"willappearinthe displayand beepswill sound
ifthe door is notlocked. 5. PressSTOPTIMEorOVENSTOPpadand pressthe •
or• pad to selectthe time of day youwishthe ovento
• 3 HR:00willappear in the displayand SET CLEAN turn off.The stoptimeand CLEANDELAYSTOPTIME
TIMEwillflash in thedisplay, willappearin the display.
• After a few seconds delay, the oven and fan will 6. Pressthe CLOCK padand the current time of day will
automatically turn on. CLEAN TIME and ON will reappearinthe display.CLEANDELAYwillremaininthe
remaininthe display, displayto showthat the ovenisset fora delayedclean
4. The ovenwillautomaticallycleanfor3hours.Or,select2
hoursforlightsoilupto4hoursforheavysoilbypressing 7. At the end of the clean cycle, continuous beeps will
the• or • pad. sound.Pressthe CANCELpad to cancelthe beeps.
5. Pressthe CLOCKpad and the current time of day will
reappearinthe display.CLEANandONwillremaininthe
displaytoshowthat theovenisin aclean cycle. To cancelcleancycle:
Ifthedoorisnotlockedorthecleantimeisnotenteredwithin 1. PresstheCANCELpad.
30 secondsof pressingthe CLEANpad,the programwill
automaticallybecancelled, forupto onehour.OncetheLOCKindicatorturns off,the
About one hour after the clean cycle ends, the LOCK doorcan be unlockedandopened.
indicatorwillturn offandthe ovendoorcanbe unlockedand Ifthe LOCKindicatorisnotdisplayed,theovendoor can
opened, beunlockedand opened.
The oven door and door lock lever will be damagedif the
ovendoor Usforced toopen whenthe LOCKindicatorUsstill
displayed.
operation.
2. IftheLOCKindicatorisdisplayed,allowtheoventocool
Page 24

23 CARE AND CLEANING CHART
READ THE MANUFACTURER'S INSTRUCTIONS to be Mildly Abrasive Powder or Liquid Cleansers - Ajax,
sure the cleaner can be safelyused on this appliance. Also, Barkeepers Friend, Cameo, Comet, Soft Scrub.
read and carefully follow the manufacturer's directions when
using any cleaning product. Non-Abrasive or Scratchless Plastic or Nylon Scouring
To determine if a cleaning product is safe, test a small Scrunge Scrub Sponges, or Scotch-Brite No Scratch,
inconspicuous area using a very light pressure to see Jfthe Cookware or Kitchen Sponge.
surface may scratch or discolor. This is particularly important
for porcelain enamel, metal, plastic or highly polished, shiny, Abrasive Scouring Pads - S.O.S., Brillo Steel Wool Soap,
or painted surfaces. Scotch-Brite Wool Soap Pads.
Glass Cleaners - Don Ami, Cinch, Glass Plus, Windex. trademarks of the respective manufacturers.)
Pads or Sponges - Chore Boy Plastic Cleaning Puff,
(Brand names for the above cleaning products are registered
Dishwashing Liquid Detergents-Dawn, Dove, Ivory, Joy, Be sure appliance is off and all parts are cool before
Mild Liquid Spray Cleaners - Fantastik, Formula 409. If a part is removed, be sure it is correctly replaced.
Non-Abrasive Cleaners - Don Ami, paste of baking soda To prevent staining or discoloration, clean cooktop
and water, after each use.
., PARTS , :::.....:. ; DIRECTIONS ......: .....
Enamel,baked or • Soap and water Usea drytowelor cloth to wipe up spills, especiallyacid (milk,lemonjuice, fruit,
painted • Mildliquid cleaner mustard, tomatosauce) or sugaryspills. Surface may discoloror dull if soil is not
• Backguard • Glass cleaner immediatelyremoved.This isespeciallyimportantfor white surfaces.
• Ovendoor Whensurface iscool,washwithwarm soapywater,rinse and dry.Forstubbornsoil,
• Sidepanels usemildlyabrasivecleaningagentssuchasbakingsodapasteor DonAmi.Ifdesired,
• Storagedrawer a thin coat of mild appliancewax can be used to protectthe side panels.A glass
Enamel,po_;celain cleanercanbe used toadd "shine"tothe surface.
• Cooktop NOTE: Donotuseabrasive,causticor harshcleaningagentssuchassteelwoolpads
Broiler Panand • Detergentandwater Pretreatthe broilerpanandinsertwith a non-stick vegetablecoatingsuchas Pareor
Insert, if equipped • Plasticor soap-filled scouringpad Mazolato makecleaningeasier.
• Dishwasher Removefromovenafteruse.Coolthenpouroffgrease.Placesoapyclothoverinsert
ControlKnobs • Detergentand water Forease ofcleaning,turnoff knobandremoveby pullingforward.Wash, rinse, and
• Mildliquid sprays dry.Do notuseabrasivecleaningagentsastheymay scratchthe finish and remove
• Glasscleaners the markings,Turn on each elementto be sureknobshave beencorrectlyreplaced.
Drip Bowls,Chrome
• Brownfood stains • Detergentand water Bowlscan permanentlydiscolorovertimeor if exposedto excessiveheator ifsoilis
I • P(asticscouringpads al(owedtobake on. The discolorationwillnotaffectthe cookingperformance.
• Mildabrasivecleaners Aftereach use, wash,rinse and dryto preventdifficultsoils. If heavily soiled,gently
• Blue/goldheat • FlitzMetalPolish Thesestainsare causedby overheating,and normallyoccurovera periodof time.
stains (Followpackagedirections) Theyare usuallypermanent.Tominimize:
Drip Bowls, • Detergentandwater Aftereachuse,wash,rinseanddryto preventdifficultsoils.Tocleanbyhand,soakin
Porcelain • Mildabrasivecleaners hotsudsywater,then usemildabrasivecleanerandplasticscouringpad.Porcelain
• Plasticscouringpads maydiscoloror craze overtime or if overheated.Thisis normal and willnot affect
• Dishwasher cooking performance.Do notcover with aluminum foil.
or oven cleaners.These productswill scratchor permanentlydamagethe surface.
NOTE:Neverwipe a warmor hotsurfacewithadamp (:lothasthis maydamagethe
surfaceand maycause a steam bum.
andpan letsoakto loosensoil.Wash inwarmsoapywater.Usesoapfilledscouring
.padto removestubbornsoil.Broilerpan andinsertcanbecleanedinthedishwasher.
scrubwith plasticscouring pad.Ifsoil is allowedto burnon, it maybe impossibleto
remove.
Donotcover withaluminumfoil.
1. Avoidexcessiveuse ofthe highheatsetting.Use HIGHonlyto startcooking,then
lowerthe settingtofinish cooking.
2. Useflatbottom pansthat do notextend more thantwo inchesfrom the surface
element.
Anon-abrasivemetal polishsuchas Ritzmaybe usedto helpremovestains.Flitzis
availablein manyautomotivesupplyand hardwarestores.
handling or cleaning to avoid damage and possible burns.
Page 25

CARE AND CLEANING CHART 24
• PARTS CLEANINGAGENTS DIRECTIONS ; ....
Elements, Elementsare self-cleaning.Soilwillburnoffaselementsareused.Donotsprayoven
Ovenand Coil cleaner on elements,electricalhook up or connection. Do not immerse ceil-type
Glass I • Detergentandwater Topreventstainingof the ovenwindow,avoidusingexcessiveamountsof water
• Ovenwindow • Glasscleaner whichmay seepunderorbehindglass.Washwith detergentand water.Remove
Metalfinishes • Soapand water Washwith soap and water or a glass cleanerand a soft cloth. NOTE: Toprevent
including brushed • Glasscleaner scratchingor dullingofthefinish,donotusemildlyabrasive,abrasive,harshorcaus-
aluminumand • Plasticornon-abrasivepad or ticcleanersorovencleaners.
chrome sponge Tocleanbrushedaluminumbackguard:Useonlysoapandwaterorasoftclothand
• Backguard glasscleanertopreventscratchingordulling.
• Cooktop
• Doorhandle Tocleanstubbornsoilonthebrushedchromecoektop or door: Useapasteofbak-
• Manifold panel ingsodaandwateranda sol_cloth.Rubwiththegraintopreventscratching,dullingor
• Ovendoor streakingof the surface. Torestore lusteror toremovefingerprints,use a soft cloth
• Storagedoor andmineral oil. Remove excess with a cleancloth.Or, clean withan automative
• Trimparts chromecleaneror polisher.
Oven Interior • Followinstructionson page20 for Wipe up all spillsimmediatelywitha dry cloth- especially acidspills (milk,fruits,
OvenRacks • Detergentandwater "Cleanwithsoapywater.Removestubbornsoilwithcleansingpowderorsoapfilled
PlasticFinishes ,, Soapandwater Whensurfaceiscool,cleanwithsoapandwater;rinse,anddry.Use a glasscleaner
• Doorhandles • Non-abrasiveplasticpad orsponge and a soft cloth.NOTE: Never use ovencleaners, abrasiveor causticliquidor
• Backguardtrim * Glasscleaner powderedcleansersonplasticfinishes.Thesecleaningagentswill scratchormarr
• Knobs finish.NOTE:Topreventstainingordiscoloration,wipeupfat,greaseoracid(tomato,
• Endcaps lemon,vinegar,milk,fruitjuice,marinade)immediatelywithadrypapertowelor cloth.
Porcelain Enamel • Detergentandwater Porcelain enamel is glass fused on metal and may crack or chip with misuse.
• Cooktap,coil • Pasteof bakingsodaand water Porcelainenamelisacid resistant,notacidproof.All spil_overs,especiallyacidicor
elements • Non-abrasive plasticpad or sugarspillovers,should bewiped upimmediately with adrycloth. This is especially
• Cooktoptrim, sponge importantaround the vent opening for smoothtop cooktop models. Surface may
smoothtop discoloror dullif soil,especiallyacidic soil,is notremoved.Neverwipeoffawarmor
• Doorlineron Chateau hotsurfacewithadampcloth.Thismaycausecrackingandchipping.Neveruseoven
upperoven cleaners,abrasiveorcausticcleaningagentson exteriorfinishofrangeorintheSelf-
SmoothtopCooktop
• Lightto moderate • CooktopCleaningCreme Wait untilcooktophascooledbeforecleaning,Gentlyapplycleaningagent witha
soil * Detergentandwater non-abrasiveplastic brush,nylonor plasticpad,paper towel orclean cloth.Rinse
theContinuousCleanOven. tomato,etc.). Neverwipe a warmorhotsurfacewitha dampclothas crackingand
• Followinstructionsonpages21-22 chippingmayresult.
for Self-CleaningOven.
• Plasticscouringpad scouringpad. Rinse anddry. Rackswfll permanentlydiscolorand may notslide'
• Cleansingpowders smoothlyifleftintheoven duringaself-clean operation.Ifthisoccurs,wipetherack
,,Soap-filledscouringpads andembossedracksupportswitha smallamountofvegetableoilto restoreease of
• Pasteof bakingsoda and water thoroughlyandcompletelydry.
surfaceelementsJnwater.
stubbornsoilwithpasteofbakingsodaandwater.Donotuseabrasivematerialssuch
asscouringpads,steelwoolorpowderedcleaningagents.Theywilldamageglass.
Rinsewithclear wateranddry.
movement,thenwipeoffexcessoil.
cleanor ContinuousCleanOven,
• Heavysoilorbrown/ ,,CooktopCleaningCreme Gentlyscrubwithcleaningcremeandcleanclothorpapertowel.Reapplycleaner.
graystainsfrom Coverwithdamppapertowelstokeepcleanermoist.Letstandfor30to45 minutes.
hardwateror metal Scrubtoremoveremainingstain.Rinseanddry.
marks
• Burned-onor crusty • Single-edge safetyrazor blade Hold razor blade scraper at 30° angle and very carefully scrape off soil. Clean
soilsorresidue * Cook'topCleaningCreme remainings0il withcleaningcreme.
• Sugar,plastic, • Single-edge safetyrazorblade Immediatelyturnelementto LOW and scrapefromhotsurfaceto a coolarea.Then
aluminumfoil heldwith a pothofderor awooden turn element OFF and cool. Clean residuewith razor bladescraperand cleaning
handledstainlesssteelspatula creme,
NOTE:Callanauthorizedservicerifthesmoothtopshouldcrack,breakorifmetalor
aluminumfoilshouldmeltonthecooktop.
Page 26

25 MAINTENAN(:E
Before replacing the light bulb or fluorescent tube,
DISCONNECTPOWERTO RANGE.Besure thebulbis Onconventional upperoven:Toturnonlight,pressbutton
cool.Donot toucha hotbulbwithadampclothasthe bulb marked"BACKPANEL"whichislocated at the baseof the
maybreak, controlpanel.
On microwave oven model: To turn on light, press"ON"
pad locatedat base of microwavecontrol panel.
Toturn oncooktop light: Pressandholdrockerswitchuntil
the light turns on. The oven light switchis located on the Toreplace fluorescent panel,light: Be sure bulb is cool.
backguard. Removethree screwsholdingtrim piecealongtop edgeof
glassOR two screwsholdingtrimpiecealong sideedgeof
Toreplacecooktop light:Besure bulbiscool.Graspthe glass.Supportglasswhileremovingscrewssoglasswillnot
toptrimof thebackguardwithyourthumbsunderthefront fallforward.Removebulbandreplace.Reconnectpowerto
edge and pull outward while lifting to release trim from
catchesat eachend. andreset the clock.
range,check lightoperationprior to replacing glasspanel
On microwave oven model: Refer to the sepa#ate
microwaveoven use and care booklet for instructionson
removingthe cooktoplight bulb.
Remove fluorescent tube and replace with an 18 watt
fluorescent tube. Snap top trim back into place and
reconnectpowerto range.Resetthe clock.
Toturnonovenlight:Pushthe rockerswitchlocatedonthe On conventionalovenonly:Toturn onoven light,pushin
backguardoronthecontrolpanel, button,locatedatbase of controlpanel.
To replace oven light: Be sure bulb is cool.Use a dry
potholder,to preventpossibleharm to hands,and very On microwave oven: Oven lightturns on wheneverthe
carefullyunscrewbulbcoverandbulb. dooris openedor when theoven is in a cookor defrost
operation.
..... Useadrypotholderandverycarefullyremovebulb.Replace
witha 40watt APPLIANCEbulb.Reconnectpowerto range
''__J/}_t Toreplaceconventionalovenlight:Besurebulbiscool.
Replacewith a 40 watt appliancebulb. Replacebulbcover microwave oven use and care booklet for instructions on
andreconnectpowerto range.Resetthe clock, removingthe oven light bulb.
and resetthe clock.
On microwave oven model: Refer to the separate
Page 27

MAINTENAN(;E 26
To remove lift-off door:Whencool, openthe door to the
"stop"position(openedabout6inches)andgraspthedoor
To preventstainingor discoloration,clean cooktopafter at eachside.Donotusethedoorhandletoliftthedoor.Lift
eachuse.Wipeacidorsugarstainsassoonasthecook-top upevenlyuntilthedoorclearsthehingearms.
has cooled as these stains may discoloror etch the
Freestandingrangeswithacoil elementcooktopwillfeature
a lift-up cooktop.
Smoothtop cooktops, slide-in or drop-in ranges and
I Cooktops on the following models do not lift up:
rangesfor Canada.
porcelain, i_
Toraise thecooktop: Whencool,grasp the frontedge of
thecooktopandgentlyliftup untilthetwosupportrodsat the Toreplacedoor:Graspthedoorat eachside,align slotsin
frontof the cooktopsnapinto place, the door with the hingearms and slidethe door downonto
the hingearmsuntilit iscompletelyseated on hinges.
not movethe doorlock leverto the rightor lockedposition
Theoven doorislockedfor a self-clean operationonly.Do
L_ I\ during a cooking operation. If the door is locked, the
operation will automatically be cancelled and "door" will
appearinthedisplay.Ifthe ovenishotenoughtoengagethe
internallock,the oven door will not open.Allow the ovento
coolfor up to an hour,then unlockand openthe door.
To lower the top: Holdthe front edgeof the cooktopand
carefully push back on each support rod to release the
notchedsupport.Then gently lowerthe top intoplace.The
supportrodswill slideintothe rangeframe. The storagedrawerat the bottomof the rangeis safe and
convenientfor storingmetaland glasscookware.DONOT
storeplastic, paperware,foodorflammable materialinthis
drawer.Removedrawerto clean underrange.
Do not place excessive weightonan openoven door or Toremove: Emptydrawerthen pulldrawer outto the first
stand on an open oven door as, in some cases, it could stop position.Liftupfront of drawerand pull tothe second
causethe rangeto tipover,breakthedoor or causeserious stop position. Grasp sides and lift up and out to remove
injurytothe user. drawer.
When openingthe ovendoor,allow steam and hot air to Toreplace: Fitthe endsof thedrawerglides ontothe rails.
escape before reachingin ovento check, add or remove Liftup drawerfront andgently pushin to first stopposition.
food. Lift up drawer again and continue to slide drawer to the
Do not attempt to open or close door until the door is
completelyseated on the hinge arms. Never turnon the
ovenunlessdoorisproperlyinplace.Whenbaking,besure
thedoo_:iscompletelyclosed.Bakingresultswillbeaffected
CAUTION: Hinge arms are spring mounted and will Levelinglegsarelocatedon
slam shut against the range if accidently hit. Never each corner at the base of
place hand or fingersbetween the hingesand the the range.Levelbyturning
ifthe dooris not securelyclosed, rangeS°reeFerproperfl°°rSmustarebaking,ben°tlevel.level'y°ur__
frontoven frame.Youcouldbe injuredffhingesnaps the legs. To prevent range _
back. from accidently tipping,
closedposition.
range should be secured to the floor by sliding a rear
levelinglegintotheanti-tip bracketsuppliedwiththe range.
Page 28

27 SERVI(;E INF()RMATION
Your appliance is equippedwith self-diagnostic software If you have carefully followed the recipe, reviewed the
whichcontinuouslymonitorsthe controlto ensuresafeand bakingtipsinthismanualandstillfeel cookingresultsdonet
properoperation. If the software detects a questionable meet your expectations, you can adjust the ov6n
situation,a FAULTCODE (Fplusa number)will appear in temperature. DO NOT ADJUST THE TEMPERATUREif
the display,continuousbeeps maysound and as a safety only one ortwo itemsare not bakingproperly.
precaution,the operationwill be cancelled. If you think the oven should be hotter or cooler,you can
If afault codeappearsin the displayand continuousbeeps adjust it yourself. To decide how much to change the
sound, press the CANCEL pad. Then, reprogram the thermostat, setthe oven temperature25°F higheror lower
cookingoperation.Ifthefault codereappearsinthe display, thanthe temperaturein yourrecipe,then bake.The results
call an authorizedservicer. Do notuse the oven untilthe ofthe '_est"shouldgiveyouan idea of howmuchto adjust
appliance hasbeen serviced, the thermostat. .
Toadjust the thermostat:
J
1.
Iftheovenisheavilysoiled,excessivesmokeandflaringI
mayresultinafaultcodeduringa self-clean cycle.IfthisI 2. Pressthe • paduntil 550° isdisplayed.
occurs,presstheCANCELpadandallowtheoventocool
for anhour. l 3. Press and hold the OVEN TEMP pad for several
PresstheOVENTEM
seconds. The display will show the ambient oven
temperatureforafewsecondsthen00°willappearinthe
display.
• If 00° does not appear in the display, press the
CANCELpadand beginagain.
• If the oventemperaturewas previouslyadjusted,the
change will be displayed. For example, if the
temperature was reduced by 15°, -15 ° will be
displayed.
4. Pressthe • or• pad to selectthe temperaturechange
desired.
• The oventemperature can be increasedupto 35° or
reducedby as much as 35° (-35°) in5° increments.
• Ifyoudelayinselectingatemperature,theprogramwill
automatically cancel and 00° will disappear. Begin
againif the programcancels.
5. Pressthe CANCELpadandthetime of daywill reappear
in the display.The ovenwill nowbake at the adjusted
temperature.
P
pad.
It is not necessaryto readjust the oven temperature if
there is a power interruption.This adjustmentwill not
affect broilor cleantemperatures.
Page 29

SERVICE INF()RMATI( )N 28
Partor all of your electricrange doesnot operate Baking resultsdiffer from previousoven
• IstherangeplugIooseordisconnectedfromtheelectrical • Oventhermostatcalibrationmay differbetween old and
outlet? new oven. The newer oven thermostat may be more
accuratethan the one on your previousoven. Followa
• Are any housefuses blownor circuitbreakerstripped? reliablerecipeandreviewbakinginformationonpages14
• Hasthe power supplyto the homebeeninterrupted? to 15.Ifyoustillfeel theoventemperatureisincorrectsee
• Are the ovencontrols properlyset?
• Wastheelectroniccontrolcorrectlyset? Fooddoes notbroil correctly
• Was the door left in the lockedpositionfollowinga • Wasthecontrolset properlyforbroiling?(See page19.)
self-cleancycle? • Wasthe properrackpositionused?(See page19.)
• Isthe ovensetforautomaticovencooking? • Didyouallowtimeforthe broilelementto preheat?
Surface elements fail to turn on or heat the food slitsforfatdrainage?
properly.
• Isthe rangeplug looseordisconnectfromthe electrical
outlet? Oven lightdoes notoperate
• Ifthe rangehascoilelements,aretheyproperlyplugged • Isthebulblooseor burnedout?
intothe receptacles?
• Wereappropriateutensilsused?(Seepage6,)
page27forinformationon adjustingthe oventhermostat.
• Wasaluminumfoilusedonthebroilerinsert,blockingthe
• Wastheovendooropenedto thebroilstopposition?
• Is the lightswitchinthe Onposition?
• Arethesurfaceelementcontrolsproperlyset? Ovenwill notself-clean
• Is voltagetothehousereduced? • Istheself-cleancontrolsetpropedy?(Seepages21-22.)
• CANADIANMODELSONLY:Thesmoothtopcooktopwill • Isthe ovensetfor a delayedcleanoperation?
notoperateduringa self-cleanoperation.Thisisnormal. • Isthe ovendoorproperlylocked?
Foodnot bakingor cooking correctly
• Aretheovenracksproperlyplacedforbaking? Oven doorwill not lock
• Haveyouusedaluminumfoilcorrectly? • Are the controlsproperlyset forthe self-clean cycle?
• Was the oven preheatedas recommended?
• Are thecontrolsproperlyset? • Hastheself-cleancyclebeencompletedforat leastone
• Isthere1to2inchesofspacebetweenpansandtheoven hour?
walls? • Wasthe doorcorrectlyunlocked?
• Aretherangeand ovenrackslevel? • Isthe LOCKindicatorwordinthedisplay?
• Was goodcookware/bakewareof the propersize used?
• Was the oven vent coveredor blockedon the range
surface? • Thisisa faultcode.Ifafaultcodeappearsinthedisplay
• Are youusinga testedrecipefroma reliablesource? andacontinuousbeepsounds,pressthe CANCELpad.
• Haveyouusedaluminumfoilcorrectly? page27 foradditionalinformation.
• Wastheovenheavilysoiled?
Oven door will notunlock
"F" plus a numberappears in thedisplay
Ifthe beepscontinue,callan authorizedservicer.See
Page 30

29 SERVI(:E INF(IRMATI()N
Do notattempt toservicethe applianceyourself unless address, phone number, the complete model and serial
directedtodo sointhis manual.Contactthedealerwho numbersofthe appliance,the name and addressof the
sold you the appliance for service or call us. Our dealerfromwhomyoupurchasedtheappliance,thedateof
telephonenumber is found on the separatewarranty purchaseand detailsconcerningyourproblem.
sheet.
Ifyoudo notreceivesatisfactoryservice,youmaycontact
If your appliance should require service or replacement the Major ApplianceConsumerAction Program by letter.
parts,contactyourdealeror authorizedservicer.Be sureto Includethe informationlisted above.
have the model and serial numbers of the appliance MajorApplianceConsumerAction Program
available.Seethe frontcover of this manualfor locationof 20 NorthWacker Drive
these numbers.Pleasereviewthe separatewarrantysheet Chicago,iL 60606
that comeswith your applianceto see if the serviceyou are
requestingiscoveredbythe warranty. MACAP(MajorApplianceConsumerAction Program)isan "
independentagencysponsoredbythree tradeassociations
Ifyouarenotsatisfiedwiththelocalresponsetoyourservice as a court of appealson consumercomplaintswhich have
requirements,writeto MaytagCustomerService,P.O,Box notbeenresolvedsatisfactorilywithinareasonable3eriodof
2370, Cleveland, TN 37320-2370. Include your name, time.
 Loading...