

Page 1
ABOUTYOUR NEWRANGE
Congratulationsonyourchoiceofthisrange.Asyouuse instructionscarefully,youwill be ableto fullyenjoy and
your newrange,we know you will appreciatethe many properlymaintainyour new range.
features that provide excellent performance, ease of
cleaning,convenienceanddependability. Shouldyou have any questions about using your new
Newfeatures have dramaticallychangedtoday's cook-
ingappliancesandthe waywe cook. It is thereforevery MAYTAGCUSTOMERSERVICE
importanttounderstandhowyournewelectricrangeop- 240EdwardsStreet,S.E.
eratesBEFOREyou useitfor the firsttime. Cleveland,TN 37311
Inthis Owner'sGuide,you will find awealth of informa- Besureto includethe modelandserial numbersofyour
tionregarding all aspects of your range. By following range.For your convenience,we have provided space
the belowto recordthis information.
electricrange, pleasewriteto us atthis address:
tf
IMPORTANT INFORMATION
Forfuturereferencewe suggestyou retainthis DEALERFROMWHOM PURCHASED:
manual after recordingthe informationin the
spacesprovided.Thisinformationcanbefoundon
the ratingdata platelocatedonthe rangefront
framearoundthestoragedrawer.Openthestor- ADDRESS:
age drawerto see the ratingplate.For drop-in
models,the ratingdata plate is _ocatedontheleft CITY."
sideofthesidepanel.Openthe oven doorto see
the rating plate. PHONE:
MODELNUMBER:
AUTHORIZEDSERVICECONTRACTOR:
SERIALNUMBER:
ADDRESS:
DATEOF PURCHASE: CITY:
PHONE:
IMPORTANT:Retainthe proof of purchase docu-
mentsforwarrantyservice.
Page 2
IMPORTANTSAFETYINSTRUCTIONS
Readallinstructionsbeforeusingthisappliance.
Thefollowinginstructionsarebasedon Storageaboverange-Toeliminate Useproperpansize- Thisap-
safetyconsiderationsandmustbe thehazardofreachingoverhotsurface plianceisequippedwithoneormore
strictlyfollowedtoeliminatethepoten- elements,cabinetstorageshouldnot surfaceelementsofdifferentsizes.Se-
tialrisksoffire,electricshock,orper- beprovideddirectlyaboveaunit.Ifpro- lectutensilshavingflatbottomslarge
sonaiinjury, vided,storageshouldbelimitedtoin- enoughtocoverthesurfaceelement.
frequentlyuseditemsthatcanbesafely Theuseofundersizedutensilswillex-
Properinstallation- Besureyour storedinanareasubjectedtoheat. poseaportionoftheheatingelementto
applianceisproperlyinstalledand Temperaturesmaybeunsafeforsome directcontactandmayresultinignition
groundedbya qualifiedtechnician, itemssuchasvolatileliquids,cleaners, ofclothing.Properrelationshipofuteri-
Careshouldbegiventolocationof oraerosolsprays.Ifcabinetstorageis siltoelementwillalsoimproveefficien-
appliance- Besurefloorcoveringun- provided,installationofarangehood cy.
derappliance,wallsadjacenttoap- thatprojectsatleast5-inchesbeyond
plianco,cabinetryadjacenttoap- hazardsassociatedwithsuchstorage, unattendedat high heat set-
pliance,andothermaterialsadjacentto "_ tings- Boiloverscausesmokingand
appliancecanwithstandprolonged Wearproperapparel-_Loose-fittinggreasyspiUoversmayignite.
heat.Thisisaheavyapplianceandcan orhanginggarmentsshouldneverbe
settleintosoftfloorcoveringssuchas wornwhileusingtheappliance. TOpreventdamageto range-
cushionedvinyl.Usecarewhenmoving Neveroperatea surfaceunitwithouta
rangeonthistypeoffloorcovering. Userservicing- Donotrepairorre- paninplaceandneverallowa panto
Afterapplianceisinstalled- Becer- specificallyrecommendedintheOwn-
tainallpackingmaterialsareremoved er'sGuide.Allotherservicingshould Makesuredripbowlsare in
fromtheappliancebeforeoperatingthe bereferredtoaqualifiedtechnician.Al- place- Absenceofthesebowlsduring
unit.Ifapplianceisinstallednearawin- waysdisconnectunitorcut-offpower cookingmaysubjectwiringorcompo-
dow,takestepstopreventcurtains tounitbeforeanyservicing, nentsunderneathtodamage.
fromblowingoversurfaceelements
creatingafirehazard. Storagein,onornearappliance- Protectiveliners- Donotuseaiumi-
Neveruseyourapplianceforwarm- flammablematerials,vaporsandliquids bowlsorovenbottom,exceptassug-
ingorheatingtheroom. intheoven,nearsurfaceunitsorinthe gestedintheOwner'sGuide.Improper
_._ I/,_ J Thefumescancreateafirehazardor ariskofelectricshock,orfire.
thebottomofthecabinetwillreducethe Neverleavesudaceunits
placeanypartoftheapplianceunless boildry.
Donotstoreorusegasolineorother humfoillinerstolinesurfaceunitdrip
vicinityofthisoranyotherappliance, installationoftheselinersmayresultin
" i :.. _-_ asa storageareaforfoodorcooking Glazedcookingutensils- Onlycer-
. explosion.Donotusecooktoporoven
utensils, taintypesofglass,glass/ceramic,ce-
ramic,earthenware,orotherglazed
Useonlydrypotholders- Moistor utensilsaresuitableforrange-topser-
damppotholdersonhotsurfacesmay vicewithoutbreakingduetothesud-
resultinbumsfromsteam.Donotlet denchangeintemperature.
potholdertouchhotheatingelements.
Donotuseatowelorotherbulky
cloths, (continuednextpage)
PAGE 1
Page 3
IMPORTANTSAFETYINSTRUCTIONS(continued)
Utensilhandlesshouldbeturnedin- Donotcoverovenracks,theoven Smoothtopcooktop- Donotcookon
wardandnotextendoveradjacent bottomoranyotherpartoftheoven brokencooktop.Ifcooktopshould
surfaceunits- Toreducetheriskof withaluminumfoil- Thiswillcause break,cleaningsolutionsandspillovers
bums,ignitionofflammablematerials, overheatingoftheoven.Usealuminum maypenetratethebrokencooktopand
andspillageduetounintentionalcon- foilonlyasdirectedinthismanual, createariskofelectricshock.Contact
tactwiththeutensil,thehandleofa aqualifiedtechnicianimmediately.
utensilshouldbepositionedsothatitis Cleanventilatinghoodsfrequently- Cleancooktopwithcaution.Ifawet
turnedinward,anddoesnotextend Greaseshouldnotbeallowedtoaccu- spongeorclothisusedtowipespillson
overadjacentsurfaceelements, mulateonhoodorfilter.Whenflaming ahotcookingarea,becarefultoavoid
foodsunderthehood,tumthefanoff. asteambum.Somecleanerscanpro-
Donotsoakremovableheatingele- Thefan,ifoperating,mayspreadthe ducenoxiousfumesifappliedtoahot
merits- Heatingelementsshould flame, surface.
neverbeimmersedinwater.Immersing
elementinwaterwoulddamageinsulat- Deepfatfryers- Useextremecaution Ovendoor- Donotplaceexcessive
ingmaterialinsideelement, whenmovingthegreasekettleordis- weightonanopenovendoororstand
posingofhotgrease, onanopenovendooras,insome
Usecarewhenopeningdoor- Let cases,itcouldcausetherangetotip
hotairorsteamescapebeforeremov- Donottouchsurfaceelementsor over,breakageofthedoor,orserious
ingorreplacingfood. ovenelements,areasnearelements injury.
Donotheatunopenedfoodcontain- mentsmaybehoteventhoughthey
orinteriorsurfacesofoven- Ele-
containertoburstandresultininjury, elementsandinteriorsurfacesofoven
Keepovenventductsunob- maybecomehotenoughtocause
structed- Theventislocatedatthe bums.Duringandafteruse,donot
ere- Build-upofpressuremaycause aredarkincolor.Areasnearsurface __ _=;
rightrearelementforcoilcook'topsor touchorletclothingorotherflammable
atthebaseofthebackguardforthe materialscontactheatingelements,ar-
smoothtopcooktop.Blockageofvent easnearelements,orintedorsurfaces
preventsproperovenaircirculation ofovenuntiltheyhavehadsufficient
andwillaffectovenperformance.Avoid timetocool.Amongtheseareasare
touchingovenventareawhileovenis thecooktop,surfacesfacingthecook-
onandforseveralminutesafteroven top,ovenventopeningandsurfaces
hasbeenturnedoff.Somepartsofthe nearthisopening,ovendoor,andoven Anti-tip bracketwarning:
ventandsurroundingareabecomehot window.Also,donotallowaluminum Toreducetheriskoftippingoftheap-
enoughtocausebums. ject,otherthanautensilonasurface cessiveloadingoftheovendoor,the
Placementofovenracks- Always element,tocontactheatingelements, appliancemustbesecuredbyaprop-
placeovenracksindesiredlocation deviceisinstalledproperly:Usea
whileoveniscool.If rackmustbe flashlightandlookunderneathrangeto
movedwhilehot,usecaretoavoid seethatoneoftherearlevelinglegsis
contactofpotholderwithovenelement, engagedinthebracketslot.Whenre-
foil,meatprobesoranyothermetalob- pliancefromunusualusageorbyex-
erlyinstalledanti-tipdevice.Tocheckif
movingapplianceforcleaning,besure
anti-tipdeviceisengagedwhenrange
isreplaced.Theanti-tipdevicesecures
therearlevelinglegtothefloor,when
properlyengaged.
PAGE 2
(continuednextpage)
Page 4
IMPORTANTSAFETYINSTRUCTIONS(continued)
Circuitbreakerorfuse- Locateand Donotleavechildrenalone- Chil- Thisappliancehasbeentestedfor
markbreakerorfuse.Neverreplacea drenshouldnotbeleftaloneorunat- safeperformanceusingconvention-
blownfuseorresetabreakeruntilyou tendedinanareawhereapplianceisin alcookware.Donotuseanydevices
knowwhathascausedtheproblem, use.Theyshouldneverbeallowedto oraccessoriesthatarenotspecifically
Alwaysreplaceablownfusewithone sitorstandonanypartoftheappli- recommendedinthismanual.Donot
ofthecorrectamperage,donotusea ance.CAUTION:Donotstoreitemsof useeyelidcoversforthesurfaceunits,
substitute, interesttochildrenincabinetsabove stovetopgrills,oradd-onovencon-
anapplianceoronthebackguardofa vectionsystems.Theuseofdevicesor
Controlknobs- Turnoffcontrolatthe range, accessoriesthatarenotexpresslyrec-
completionofacookingoperation, ommendedinthismanualcancreate
Serf-cleaningoven- Donotclean serioussafetyhazards,resultinperfor-
doorgasket.Thedoorgasketisessen- manceproblems,andreducethelifeof
tialforagoodseal.Careshouldbe thecomponentsoftheappliance.
takennottorub,damage,ormovethe Preparedfoodwarning- Followfood
gasket.Donotuseovencleanersor manufacturer'sinstructions.Ifaplastic
ovenlinerprotectivecoatingofanykind frozenfoodcontainerand/oritsfilm
inoraroundanypartoftheself-clean coverdistorts,warps,orisotherwise
oven.Cleanonlypartslistedinthis damagedduringcooking,immediately
manual.Beforeself-cleaningtheoven, discardthefoodanditscontainer.The
removebroilerpan,ovenracks,and Childrenclimbingontheapplianceto foodcouldbecontaminated.
otherutensils.Slide-inanddrop-in reachitemscouldbeseriouslyinjured.
models:Ustenforafan.Afannoise Childrenmustbetaughtthattheap- Importantsafety notice and
shouldbeheardduringacleaning plianceandutensilsinoronitcanbe warning:TheCaliforniaSafeDrinking
cycle.Ifnot,cancelcleancycleandcall hot.Childrenshouldbetaughtthatan WaterandToxicEnforcementActof
aqualifiedtechnicianbeforeself-clean- applianceisnotatoy.Theyshouldnot 1986(Proposition65)requirestheCov-
ingagain, beallowedtoplaywithcontrolsorother emorofCaliforniatopublishalistofsub-
CAUTION:DONOTLEAVEFOODOR partsoftheunit. tocausecancerorreproductiveharm,
COOKINGUTENSILS,ETC.,INOVEN IN CASEOF FIRE: andrequiresbusinessestowarncus-
DURINGTHESELF-CLEANING 1. Turnoffapplianceandventilating tomersof potentialexposurestosuch
MODEOFOPERATION. hood. substances.
stancesknowntotheStateofCalifornia
ATTENTION:NELAISSERAUCUN 2. Usedrychemicalorfoam-typeex-Usersofthisappliancearehereby
ALIMENT,USTENSILEDECUISINE, tinguisheror bakingsodato warnedthatwhentheapplianceisen-
ETC.,DANSLEFOURDURANTLE smothertireorflame.Neveruse gagedintheself-cleancycletheremay
•CYCLED'AUTONETTOYAGE. wateronagreasefire. besomelow-levelexposuretosomeof
3. Iffireisinoven,smotherbyclosing thelistedsubstances,includingcarbon
ovendoor. monoxide.Exposuretothesesub-
4. Iffireisinapanonthesurfaceunit, ventingtheappliancetotheoutdoors
coverpan. duringtheself-cleancycle.
stancescanbeminimizedbyproperly
PAGE 3
Page 5
CLOCKAND OVENCONTROL
° I-I I-I n n n
CLEAR I* IIII c_,B,o,,,ocK SET
{STOP] -" UUU 0
SET CLEAN COOK
_ _ STOP TIMER
DELAYTIMEDBAKE
IT,...}{c.ocK]{cook}{CL...J{T,.. STOP][..O,L}[OVE"]T,.. T°.P
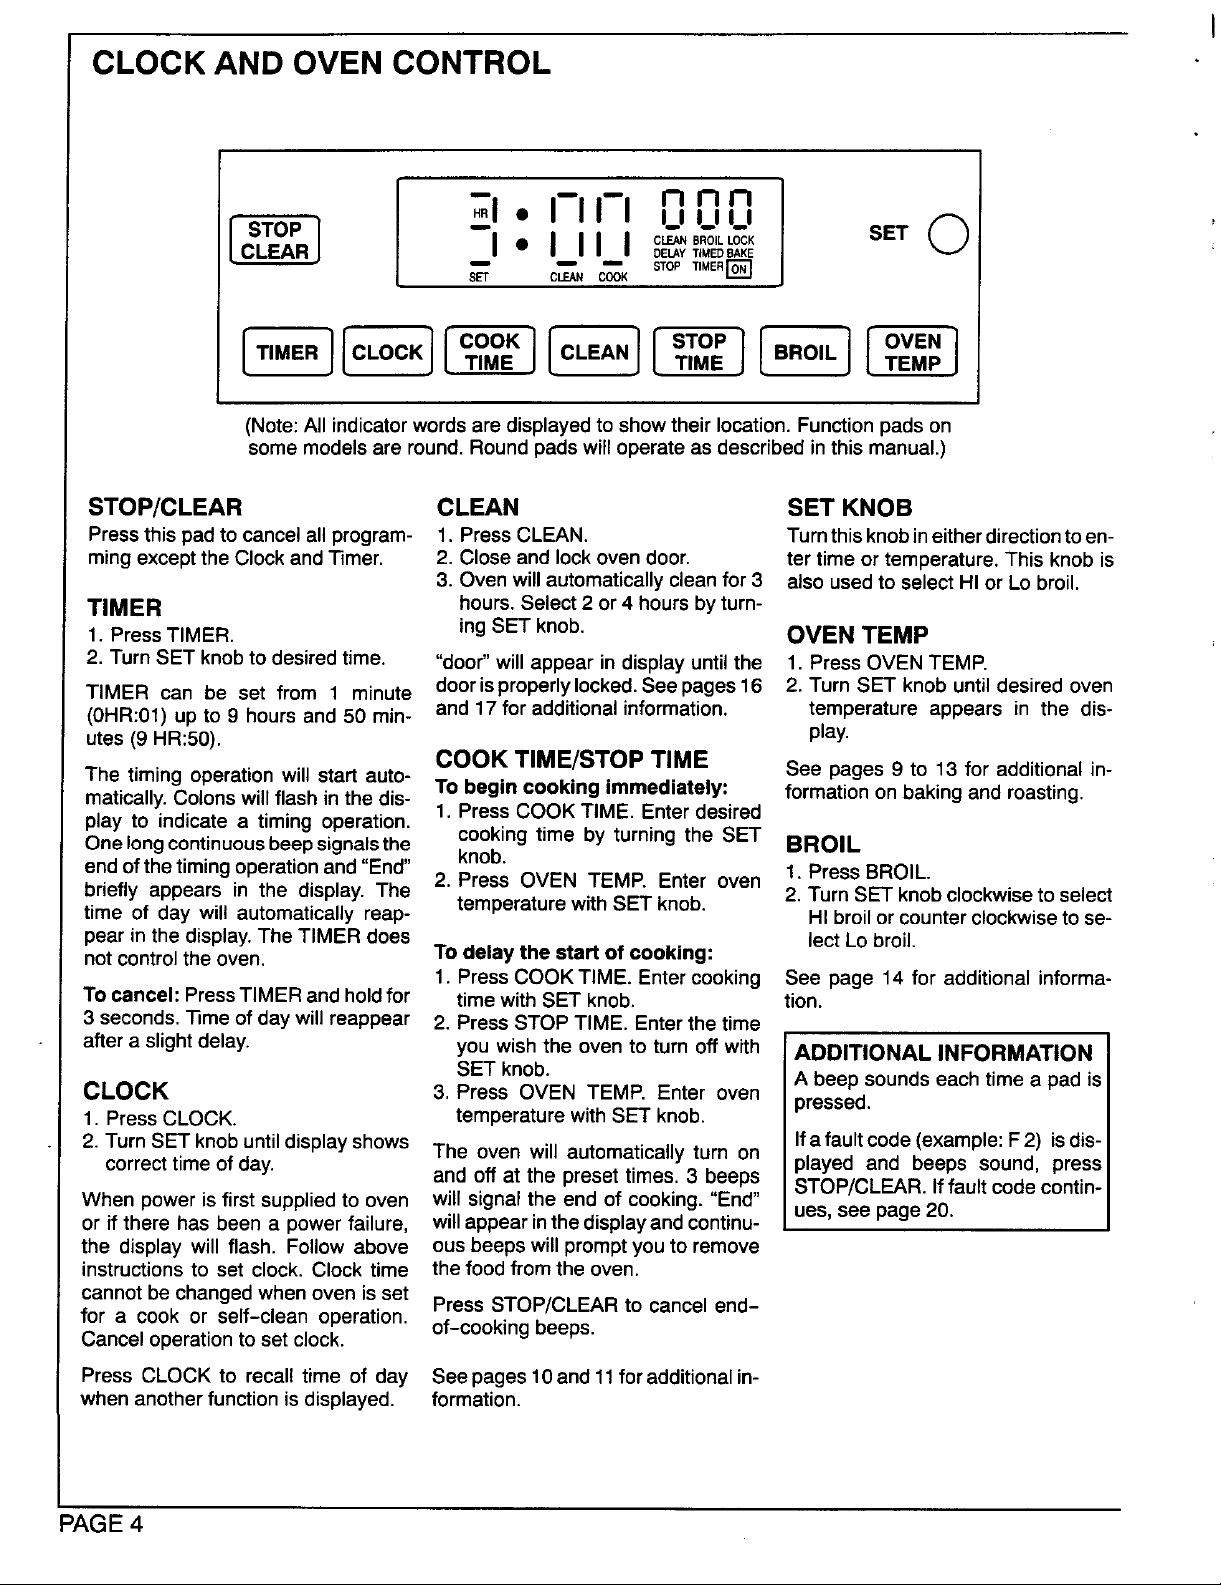
(Note:Allindicatorwordsaredisplayedto showtheirlocation.Functionpads on
some modelsare round. Roundpadswill operateas describedin this manual.)
STOP/CLEAR CLEAN SET KNOB
Pressthispadto cancelallprogram- 1. PressCLEAN. Turnthisknobineitherdirectiontoen-
mingexcepttheClockandTimer. 2. Closeandlockovendoor. ter timeortemperature.Thisknobis
3. Ovenwillautomaticallycleanfor3 alsousedto selectHIor Lobroil.
TIMER hours.Select2 or4 hours by turn-
1. PressTIMER. ingSET knob. OVEN TEMP
2. TurnSETknobtodesiredtime. "door"willappearindisplayuntilthe 1. PressOVENTEMP.
TIMER can be set from 1 minute doorisproperlylocked.Seepages16 2. TurnSET knobuntildesiredoven
(0HR:01)upto9 hoursand50 min- and 17for additionalinformation, temperatureappears in the dis-
utes(9 HR:50). play.
The timingoperationwill startauto-
matically.Colonswillflashinthedis-
play to indicatea timingoperation.
Onelongcontinuousbeepsignalsthe knob.
endofthetimingoperationand"End" 2. Press OVEN TEMP. Enter oven 1. PressBROIL.
briefly appears in the display.The 2. TurnSETknobclockwisetoselect
time of day will automaticallyreap- temperaturewithSETknob. HI broilorcounterclockwiseto se-
pear inthe display.The TIMER does lect Lo broil.
notcontroltheoven. Todelay the start of cooking:
Tocancel: PressTIMERandholdfor timewithSETknob. tion.
3 seconds,]3meofdaywillreappear 2. PressSTOPTIME. Enterthetime
aftera slightdelay, you wishthe oventoturnoffwith ADDITIONAL INFORMATION
CLOCK 3. Press OVEN TEMP. Enter oven pressed.
1. PressCLOCK. temperaturewithSET knob.
2. TurnSET knobuntildisplayshows The oven will automaticallyturn on played and beeps sound, press
correcttime of day. and off at the presettimes. 3 beeps STOP/CLEAR.Iffault code contin-
When powerisfirst suppliedto oven will signal the end of cooking. "End"
or if there has been a powerfailure, will appearinthedisplayandcontinu-
the display will flash. Follow above ous beepswill promptyou to remove
instructions to set clock. Clock time thefoodfrom the oven.
cannotbechangedwhen oven is set Press STOP/CLEARto cancel end-
for a cook or self-clean operation, of-cooking beeps.
Canceloperationto set clock.
COOKTIME/STOPTIME See pages9 to 13 for additionalin-
Tobegin cookingimmediately: formationon bakingandroasting.
1. PressCOOKTIME. Enterdesired
cookingtimeby turningthe SET BROIL
1. PressCOOKTIME.Entercooking See page 14 for additionalinforma-
SETknob. A beepsoundseachtimea padis
Ifafaultcode (example:F2) isdis-
ues,see page 20.
I
Press CLOCK to recall time of day Seepages10and11for additionalin-
whenanotherfunction is displayed, formation.
PAGE 4
Page 6
COIL COOKTOP
•Cooktop IndicatorLights
Freestandingrangeswithacoil-typecooktopwillfeature Rangesareequippedwithtwoindicatorlightswhichglow
an"upswept"cooktop, whenasurfaceelementison.Theindicatorlightwillre-
mainon untilthe elementisturnedoff.Aftera cooking
(NOTE:Thecooktoponaslide-in ordrop-in rangedoes operation,besuretheelementandindicatorlightareoff.
NOT lift up. The cooktopon a Canadianfreestanding
rangedoes NOTliftup.)
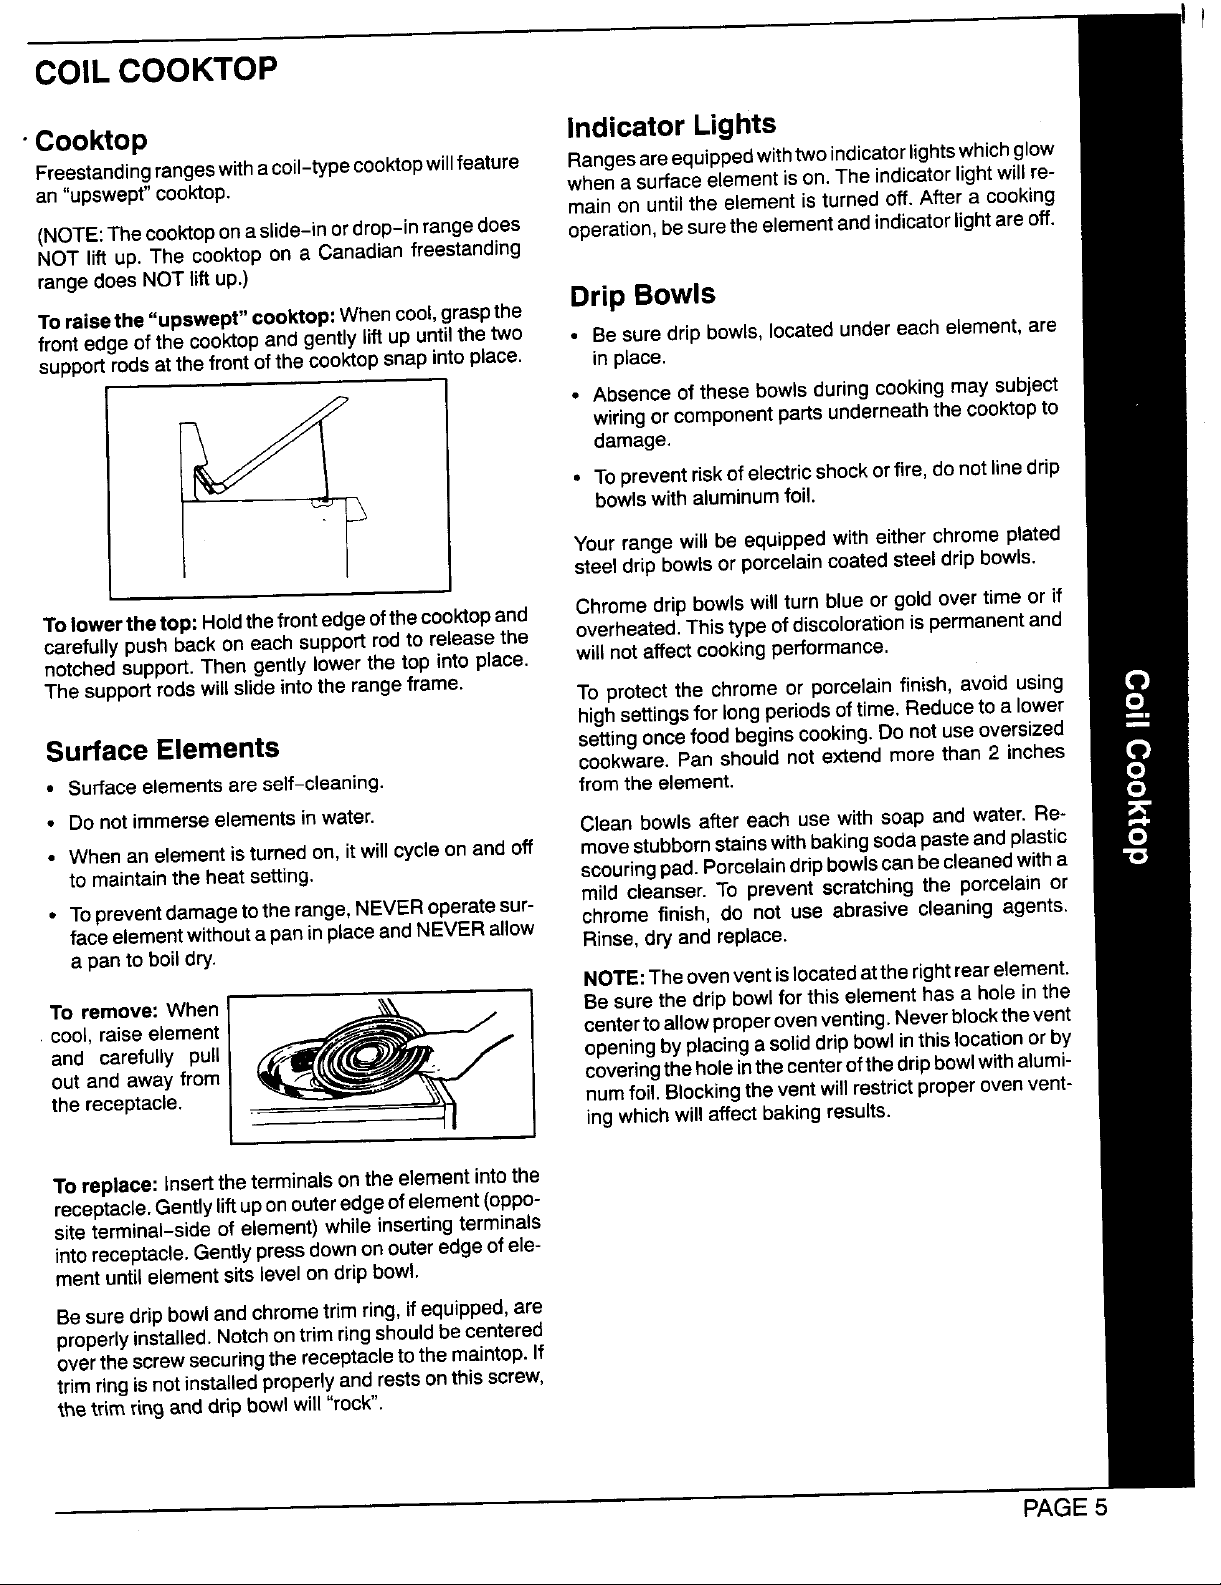
Toraisethe "upswept" cooktop:Whencool,graspthe Drip Bowls
frontedgeof thecooktopand gently lift up untilthe two • Be sure dripbowls, locatedundereach element,are
supportrodsat the front of the cooktopsnapinto place, inplace.
wiringor componentparts underneaththecooktopto
damage.
• Topreventriskof electricshock orfire,do not linedrip
bowlswith aluminumfoil.
Yourrange will be equipped with either chrome plated
• Absence ofthese bowlsduring cookingmay subject
steeldrip bowlsor porcelaincoatedsteeldripbowls.
Tolowerthe top: Holdthefrontedgeofthecooktopand Chromedrip bowlswill turn blueor gold overtime or if
carefullypushback oneach supportrodto releasethe overheated.Thistype ofdiscolorationis permanentand
notchedsupport.Then gently lower the top intoplace, will not affectcookingperformance.
The supportrodswillslideinto the rangeframe. To protect the chrome or porcelainfinish, avoid using
highsettingsfor longperiodsoftime. Reducetoa lower
SurfaceElements settingoncefoodbeginscooking.Donotuseoversized
cookware.Panshouldnotextendmorethan2 inches
• Surfaceelementsare self-cleaning, fromtheelement.
• Donotimmerseelementsinwater.
. Whenanelementisturnedon,itwillcycleonand off movestubbornstainswithbakingsodapasteandplastic
tomaintaintheheatsetting, scouringpad.Porcelaindripbowlscanbecleanedwitha
• Topreventdamagetotherange,NEVERoperatesur- mild cleanser.To preventscratchingthe porcelainor
faceelementwithoutapaninplaceandNEVERallow chromefinish, do not use abrasivecleaningagents.
a panto boildry. Rinse,dryandreplace.
To remove: When _... Besurethe drip bowlfor this elementhas a hole inthe
Clean bowlsaftereach use withsoapand water.Re-
NOTE:Theovenventislocatedattherightrearelement.
and carefully pull openingbyplacingasoliddripbowlinthis locationorby
outand awayfrom coveringthe holeinthe centerofthe dripbowlwithalumi-
the receptacle, numfoil. Blockingtheventwill restrict properovenvent-
cool,raiseelement _ centertoallowproperovenventing.Neverblockthevent
Toreplace: inserttheterminalsonthe elementintothe
receptacle.Gentlyliftuponouteredgeofelement(oppo-
siteterminal-sideofelement)whileinsertingterminals
intoreceptacle.Gentlypressdownonouteredgeofele-
mentuntilelementsitslevelondripbowl.
Besuredripbowlandchrometrimring,ifequipped,are
properlyinstalled.Notchontrimringshouldbecentered
overthescrewsecuringthereceptacletothemaintop.If
trimringisnotinstalledproperlyandrestsonthisscrew,
thetrimringanddripbowlwill"rock".
ingwhichwill affect bakingresults.
PAGE 5
Page 7
SMOOTHTOP COOKTOP
CookingAreas CookingTips
OnCanadianmodelsonly:Thesurfaceunitswillnotop- When cookingdelicatefoodswhich easilyscorchor
erateduringa cleancycle.Thisisnormal, overcook,startwitha lowerheatsettingthengradually
increasethesettinguntilyoufindthe optimumsetting.
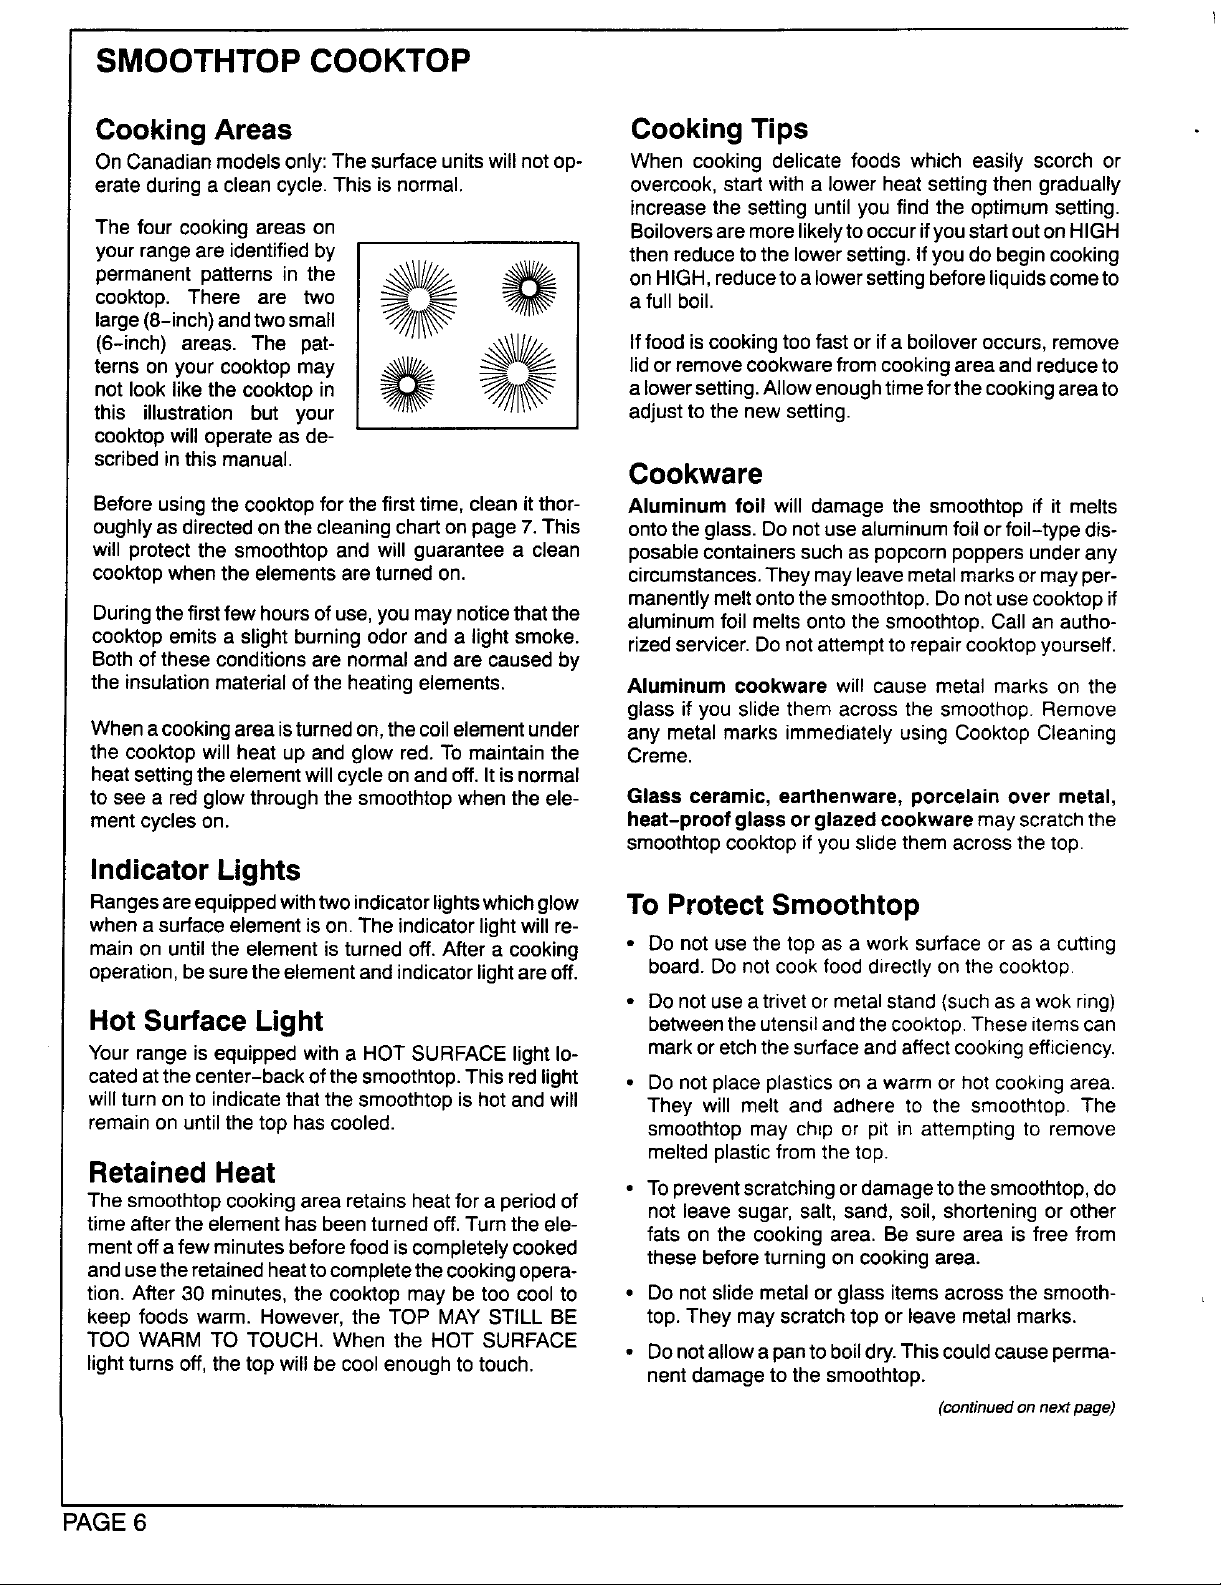
The fourcookingareason BoiloversaremorelikelytooccurifyoustartoutonHIGH
yourrangeareidentifiedby thenreducetothelowersetting.Ifyoudo begincooking
cooktop.permanentpatternsintheThereare two --_1//_-- _ afull°nHIGH,reducetoalowersettingbeforeliquidscometOboil.
large(8-inch)andtwosmall "_//1_
(6-inch) areas. The pat- ..._/1___ Iffood iscookingtoofast or ifa boUoveroccurs,remove
not look like the cooktop in alowersetting.Allowenoughtimeforthecookingareato
ternson your cooktopmay _ _/1__ lidorremovecookwarefromcookingareaandreduceto
this illustration but your adjustto the new setting.
cooktopwill operate as de-
scribedinthismanual. Cookware
Beforeusingthecooktopforthefirsttime,cleanitthor- Aluminum foil will damagethe smoothtopif it melts
oughlyasdirectedonthecleaningchartonpage7.This ontotheglass.Donotusealuminumfoilorfoil-typedis-
willprotectthe smoothtopandwill guaranteea clean posablecontainerssuchas popcornpoppersunderany
cooktopwhentheelementsareturnedon. circumstances.Theymayleavemetalmarksor mayper-
manentlymeltontothesrnoothtop.Donotusecooktopif
Duringthefirstfew hoursofuse,youmaynoticethatthe aluminumfoilmeltsontothesmoothtop.Call an autho-
cooktopemitsa slightburningodoranda lightsmoke, rizedservicer.Do notattempttorepaircooktopyourself.
Bothoftheseconditionsarenormalandare causedby
the insulationmaterialoftheheatingelements. Aluminum cookware will causemetal marks on the
glassif you slidethem acrossthe smoothop.Remove
Whena cookingareaisturnedon,thecoilelementunder anymetalmarksimmediatelyusingCooktopCleaning
thecooktopwillheatup andglowred.Tomaintainthe Creme.
heatsettingtheelementwillcycleonandoff.Itisnormal
tosee a red glowthroughthesmoothtopwhentheele- Glass ceramic, earthenware,porcelain over metal,
mentcycleson. heat-proof glassor glazed¢ookwaremayscratchthe
smoothtopcooktopifyouslidethem acrossthe top.
Indicator Lights
Rangesareequippedwithtwoindicatorlightswhichglow TOProtect Smoothtop
whena surfaceelementison.The indicatorlightwillre-
mainon untilthe element is turned off. After a cooking • Do not usethe top as a work surfaceor as a cutting
operation,besuretheelementandindicatorlightareoff. board.Do not cookfood directlyonthe cooktop
• Donotuse atrivet ormetalstand (suchasawok ring)
HotSurfaceLight betweenthe utensilandthecooktop.These itemscan
Yourrangeisequippedwitha HOT SURFACElightIo- markoretchthesurfaceandaffectcookingefficiency.
catedatthecenter-backofthesrnoothtop.Thisredlight • Donotplaceplasticsona warmor hotcookingarea.
willturnonto indicatethatthesmoothtopis hotandwill They will melt and adhere to the smoothtop.The
remain on untilthe top has cooled, smoothtop may chip or pit in attempting to remove
meltedplasticfromthe top.
RetainedHeat • Topreventscratchingordamagetothesmoothtop,do
Thesmoothtopcookingarea retainsheatfor a periodof not leave sugar, salt, sand, soil, shortening or other
timeafterthe elementhas beenturnedoff. Turntheele- fats on the cookingarea. Be sure area is free from
mentoffafew minutesbeforefoodiscompletelycooked these beforeturningon cookingarea.
andusetheretainedheattocompletethecookingopera-
tion.After 30 minutes,the cooktop may be too coolto • Donotslide metalor glass itemsacross the smooth-
keep foods warm. However,the TOP MAY STILL BE top. They mayscratchtop or leave metalmarks.
TOO WARM TO TOUCH. When the HOT SURFACE
lightturns off, the topwill becool enoughto touch, nentdamageto the smoothtop.
• Donotallowapanto boildry.This couldcauseperma-
(continuedon next page)
PAGE6
Page 8

Care Information Cleaning Chart
,To help keep cooktop clean, be sure CAUTION: Before cleaning, be certain all elements are turned off and the
cookingarea andcookwarebottom are cooktopiscool. Use onlycleaningagents recommended inthe cleaningchart.
clean and dry before each use. Other materialsmay damage the finish of the smoothtop.
To prevent possible damage to the
cooktop, always rinse the bottom of Dailycleaning, CooktopCleaning JGently apply witha soft cloth or a non
cookware to completely remove any lightto moder- Creme.Liquiddishwash- abrasiveplasticbrush, nylonor plastic
cleaning agent residue. This is espe- ate stains, ing detergent. Paste of pad,orpapertoweling,rinsecompletely
cially important whenusinga copperor bakingsodaandwater, and dry.
aluminum cleaner. In the presence of
heat, the cleaning residue may stain, Burnedon or Single-edgerazorblade When cooktop is cool, place edge of
discolor or etch the smoothtop, heavy stains, such as Widget by Gil- single edge razor on cooktop at a 30°
Carefully blot up spillovers around the soil. Cleanremaining soilwith Cooktop
outside of the cooking area as they oc- CleaningCreme.
cur with dry paper towels. BE CARE- Brownor gray CooktopCleaning Gently scour with creme to remove as
FUL NOT TO BURN HANDS WHEN stainsfrom Creme. muchaspossible.Reapplypaste,cover
WIPING UP SPILLS. DO NOT USE A HARDWATER with a damp cloth and let standfor 30
DAMP CLOTH WHICH MAY CAUSE or metalmarks minutes. Scourwith additionalpasteto!
STEAM BURNS. remove remaining stain. Rinse com
When surface iscool, clean as directed
in the chart. DO NOT USE the follow-
ing cleaning agents.
• Abrasives (metal scouring pads,
cleansing powders, scouring clean- Problem Solving Chart
ers or pads) willscratchthesmooth-
top. PROBLEM CAUSE TO PREVENT
lette, angle. Very CAREFULLY scrape off
pletelyanddry.
• Chemicals (oven cleaners, chlorine _ny scratches Coarseparticles(dustsalt "tinyscratchesarenotremovableand
bleaches, rust removers or ammo- or abrasions andsand)betweencook- do not affect cooking. In time, the
nia) may damage the finish of the warebottomandcooktop, scratcheswill becomesmootherand
smoothtop. Incorrectcleaningmateri- less visible. Be sure cookware hot-
• Glass cleaners containing ammonia als. Sliding glassware or toms and cooktop are clean before
may harm the smoothtop, metal acrosstop or using use. Use cookware with a smooth,
• Soiled cloth or sponge will leave an toms. cookwareacross cooktop.
invisible film on the cooktop which
may scratch or cause discoloration Metal-marking Slidingor scraping metal Do notslide metalobjectacrosscook-
the next time the cooktop is used. utensils or oven racks top. CleanimmediatelywithCooktop
IMPORTANT: Watch sugary solutions
carefully to avoid boilovers. Brownstreaks Boilovers,incorrectclean- Removeboitoversbeforereusingthe
if a sugar solution (such as jam, jelly, cloth or sponge, soiled Be sure cookware, especially bot-
candy) is allowed to boilover, it may pit cookware, toms. are cleananddry.
the smoothtop. Turn element to LOW Areasof discol. Mineraldepositsfromwa- Use ccokware w=tt_bottomsthat are
and clean sugary boilovers immedi- orationwitha ter andfoods, cleananddry Usecorrectheatsetting
ately, metallicsheen toprevent boilovers.
Use a wooden spoon or a wooden- Pittingor flak- Sugary boilovers from Use correct heat setting and large
handled metal spatula to scrape boil- ing. sugar syrups, candy, enoughutensiI.Watchcookingopera-
over to a cooler area of the cooktop or jams, jellies, dessert tionto preventboiloversor spattering.
use several layers of dry paper towels sauces, etc.
to wipe up spillover. If a paper towel is
used, be careful to avoid steam burns. CAUTION: Do not use top if the smoothtop is cracked or broken or if metal
Turn element off. When cool, use a melts onto cooktop, Call an authorized servicer. Do not attempt to repair the
single-edge razor blade to scrape off cooktop yourself.
soil. Clean with Cooktop Cleaning
Creme, rinse and dry.
and specks ing materials,usedsoiled cooktop Useacteanclothorsponge.
coekwarewith rough bot- non-scratching bottom. Do not slide
acrosscooktop. CleaningCreme
PAGE7
Page 9

COOKTOP USE
ControlKnobs Cookware
Yourcooktopisequippedwithcontrolknobsthatprovide Cookingperformanceisgreatly affected by thetype of
an infinite choice of settings from LOWto HIGH. The cookware used. Proper cookware will reduce cooking
knobcanbeset on orbetweenanyofthe numberedset- times,useless energyand produce moreeven cooking
tings, results. Forbest results use a heavy gauge metal pan
Tooperate pushin andturnthe knobin eitherdirection
tothe desiredsetting. Cookwarewithuneven,warped,or groovedbottomsdo
Toremoveknobsfor cleaning,gentlypullforward.Wash duce heat conductivity and result in slower, less even
knobsin mild detergentand water.Do not useabrasive heating.
cleaningagents as they will scratch the finish and re-
move markings.Rinse,dry and replace.Turn on each Different types of cookware materials require different
elementto be sureknobshave beenreplacedcorrectly, heatsettingsforthe samecookingoperation.The chart
CookingTips Lowerthe heatsettingif usinga thinnergaugemetalor
Topreventdamageto therange,backguardorutensil,
neveroperatesurfaceunitwithouta paninplace,never Oversizedcookwareor cookwarethat restsacrosstwo
allowa pantoboildryandneveroperateanelementon elements are not recommendedas they may trap
HIGHforextendedperiodsoftime. enoughheatto causedamageto the cooktopor ele-
Foodwill not cookanyfasterat a highersettingthan ments.Thisisespeciallyimportantwhencanning.
neededtomaintainagentleboil.Waterboilsatthesame Do notusewoksequippedwithroundmetalrings.The
temperaturewhetherboilinggentlyor vigorously.If a ring,whichisdesignedtosupportthewokabovetheele-
highsettingisused,excessivespatteringwilloccurand ment,willtrap heatand maydamagethe elementand
foodmaystick orburnontothebottomof thepan. thecooktop.
witha smoothflat bottomand a tight fitting lid.
notmakegood contact with theheating surface,willre-
below is based on heavy gauge aluminum cookware.
othermaterials.
Ifahigherheatsettingisusedtobringliquidtoa boilorto Canning
begincooking,alwaysreduce toalowersettingonceliq-
uidcomesto a boilorfoodbeginscooking.Neverleave UsetheHIGHsettingjustuntilwatercomestoa boilor
food unattendedduring a cookingoperation, ducetothelowestheatsettingthatmaintainstheboilor
Fitthesizeofthecookwaretothe sizeof the element, pressure.Prolongeduseofthe HIGHsetting,ortheuse
Thisconservesenergy, of incorrectcanningutensilsproducesexcessiveheat.
pressureisreachedinthe pressurecanner.Then, re-
Excessiveheat can causepermanentdamageto the
porcelaincooktop,coilelementandthe dripbowl.
SUGGESTEDHEATSETTINGGUIDE
HEATSE'I-rlNGS USES
HIGH Tobringliquidto a boil, blanch,preheatskillet,or reach pressurein a pressurecooker.
Always reduceto a lower heatsettingwhenliquidsjustbegintoboilorfoodsbegintocook.
Medium-High Tobrownorsearmeat;heatoilfordeepfatfrying;scald;tosauteorfry.Maintainfastboilfor
7-9 largeamountsofliquids.
Medium To maintainmoderatetoslowboilforlargeamountsof liquids.
4-6 Tocontinuecookinguncoveredfoodsandformostfryingoperations.
Medium-Low Tocontinuecookingcoveredfoodsandtomaintainpressureinmostpressurecookers.Stew,
1-3 braiseorsteamoperations.Tomaintainboilforsmallamountsof liquid,poach,steamor
simmer.
LOW To keepfoodswarmbeforeserving.Meltchocolate.
NOTE:Refertocookwaremanufacturer'srecommendationsforsuggestedheatsettings.Somemanufacturersdo
notrecommendtheuseofHIGH, orthe useofHIGHforextendedcookingoperations.
PAGE8
Page 10

OVEN USE
OvenCharacteristics
Everyovenhasitsowncharacteristics.Youmayfindthat RACKPOSITIONS:
the cookingtimes and temperaturesyou were accus-
tered slightlywithyour new range.It is normalto notice 5___ "_
somedifferencesbetweenthis rangeandyourprevious 4_ _.Ii i
range. 2
Fan if',
Slide-in and drop-in ranges are equippedwith a fan __.. f
whichautomaticallyturnsonwhenevertheovenissetfor " _"
tomed to with your previous range may need to be al-I f__1_°_._"_---_ _J_ ,_,7
a cookingora cleaningoperation.Thefan will automati- -- "_
callyturnoffwhen the unit has cooled.
Oven Racks foodssuchasfish.
The twoovenracksaredesignedwitha lock-stopposi-
tion to keep racks from comingcompletelyout of the Rack4usedfor two-rack bakingormostbroiling.
oven.Donot attemptto changerack positionswhen the Rack3 usedfor most one-rack baking of cookiesand
ovenis hot. biscuitsona cookiesheet.
Rack 5 (top of oven) used for broiling thin non-fatty
I
To remove: Be sure rack is cool. Pull rack out to the Rack 2 usedfor baking cakes, bundtcakesor breads,
lock-stopposition.Tiltthefrontendupandcontinuepull- foods.
ingrack outofthe oven.
Toreplace:Placerackonracksupports,tiltup andpush pieshells,frozen pies, soufflesor bread.
towardrearof oven.Pulltherackouttothelock-stoppo-
sitiontobe surerackiscorrectlyreplaced.Thenreturnit Use of Aluminum Foil
to its normalposition. Donotcoverentirerackwithaluminumfoilorplacefoil
Itisimportantthatair can circulatefreelywithinthe oven directly under cookware. To catch spillovers, place a
andaroundthe food.To helpensure this, placefood in piece offoila little largerthanthe panonthe rackbelow
the centerof the oven rack.Allow two inchesbetween the pan. Donotplacealuminumfoilacrossthe bottomof
theedgeof the utensil(s)andtheovenwalls. Ifcooking the oven.
ontwo racks,staggerthefoodto ensureproperair flow.
two-rack baking, roasting meats, or cooking larger
Rack1 usedforroastingturkey,bakingangelfoodcake,
Preheating
about10to 15minutesfor the ovento preheat. Itis not
necessaryto preheatthe ovenfor roasting.
Selectinga temperature higher than desired will NOT
preheatthe ovenany faster.Preheatingata highertem-
peraturemayaffectbaking results.
A single beep willindicatethat the ovenis preheated.
Preheatingis necessaryfor conventionalbaking.Allow
DoorLock Lever
Foroptimumbakingresultsofcakes,cookiesorbiscuits, The ovendoorislockedforself-cleanoperationsonly.
useonerack.Positionracksofoodisinthecenterofthe Do not movethedoorlock levertotheright or locked
oven.Useeitherrack position3 or2. positionduringacookingoperation.Ifthe doorislocked,
theoperationwillautomaticallybecancelledand "door"
If cooking on two racks, userack positions4 and 2 for will appearinthedisplay.Ifthe ovenishotenoughto en-
cakes and rack positions 4 and 1 when using cookie gagethe internallock,the ovendoorwill notopen.Allow
sheets.Neverplacetwo cookiesheets on one rack. theoventocoolfor up toan hour,then unlockandopen
Ifroastingalargeturkey,placeturkeyonrack 1andside
disheson rack5. (continuedonnextpage)
thedoor.
PAGE9
Page 11

OVEN OPERATION
BasicInstructions AutomaticOven CookingFeature
TheAutomaticOvenCookingfeatureisusedtoturnthe
1. Positionovenracks, ovenonandoffata presettimeofday.Thisfeaturecan
2. PressOVENTEMPpad. be usedfor a conventionalcookora self-cleanopera-
3. TurnSETknobto desiredtemperature, cleanoperation.
Toset oven for bakingor roasting: TheAutomaticOvenCookingfeaturewillnotoperateun-
1. PressOVENTEMP pad. ofday.
_ _ _ _ _ _ Highly perishablefoods such as dairy products,pork,
* 000°and BAKEindicatorwords will appear in the one food, select foods that cookfor the same lengthof
display.
• The display will returnto the currenttime of day if
the oventemperatureisnot entered within30se- Basic Instructions
conds. Example:Foodistocookfor2 hoursand30minutes
2. Toentertheoventemperature,turntheSETknobuntil (2:30)atan oventemperatureof350°F.Youwishthe
thedesiredtemperatureisdisplayed, foodtobe cookedby6 o'clock(6:00).
• 350°willappearinthe displaywhenthe SET knob 1. PressCOOKTIME pad.
isturnedoneclickineitherdirection.Thetempera- 2. TurnSETknobuntil2:30(2hoursand30minutes
turecanbesetfrom170to550°. isdisplayed.
• Theovenwillturnonwithinafewseconds.TheON
indicatorwordand75° ortheactualoventempera-
ture,whicheverishigher,willappearinthedisplay. 4. TurnSETknobuntil6:00(6 o'clock)isdisplayed.
tion.See page 17 for instructionson delayinga self-
lesstheclockisfunctioningandissetatthecorrecttime
poultry,stuffing,seafoods,or baked goodsare not rec-
ommendedfor delay start cooking.Ifcookingmorethan
timeand atthe sameoventemperature.
3. PressSTOPTIMEpad.
• Thetemperatureinthedisplaywillincreasein5°in" 5. PressOVENTEMPpad.
crernentsuntiltheovenreachesthepresettemper-
ature.Asinglebeepwillsignalthattheovenispre- 6. TurnSETknobuntil350° isdisplayed.
heated.Allow10to15minutesfortheoventopre-
heat. 7. PressCLOCKpadandtimeofdayreappearsinthe
3. Placefoodinthe oven. Checkfoodatthe minimum display.
cookingtime.Cooklongerifneeded. Theovenwillturnonat3:30;willcookthefoodfor21/2
4. At the end of cooking,removefood and pressthe
STOP/CLEARpadto cancelthe operation.The cur- NOTE:Ifyouwishcookingtobeginimmediately,omit
renttimeofdaywillreappearinthe display, steps3 and4.
To recallthepresettemperatureduringpreheat,press
the OVENTEMPpad.
To change the presettemperature,turnthe SET knob
untilthe desiredtemperatureisdisplayed.
The ovenwillautomaticallyturnoffif it is leftonfor12
hours. (continuedon nextpage)
hoursat350°F,andwillautomaticallyturnoffat6:00.
PAGE 10
Page 12

Toset ovenfor immediatestart: Toset oven for delayedstart:
1.PressCOOKT_MEpad. 1. PressCOOKTIME pad.
• 0HR:00willappearinthedisplayandSETCOOK
_ _ _ _ _ _ TIMEwillflash inthe display.
• 0HR:00willappear inthe displayandSETCOOK HOURS:MINUTES. Cooking time can be set
TIMEwillflashin the display, from10minutes(0:10)upto 11hoursand55 min-
2.Turn the SETknobto enterthe cookingtime. utes (11:55).
• The displaywillshowcookingtime inHOURS:MIN-
UTES.Cookingtime can beset from 10 minutes
(0:10)upto 11hoursand55 minutes(11:55). r_--i[_ [--_ r_-_ _} 1-_ _
• Ifyou delay in enteringthe cookingtime, the pro-
gramwill automaticallycanceland thetime of day
will reappearin the display. • SETSTOPTIMEwill flash inthe display.
• Ifyousetthe cookingtimebutdelay inenteringthe 4. Turnthe SET knobto enterthe stoptime.
oventemperature,beepswillsoundandthedisplay • If you delay in enteringthe stop time, beepswill
willflash SETBAKEand 000°. soundand the display willflash SET BAKE and
3. PressOVENTEMP pad. 000°.
4. Enteroventemperaturewiththe SETknob.
• Ifyou pressthe OVENTEMPpad but delay in en-
teringthetemperature,the programwillcanceland 7. PressCLOCKpadto returnthe currenttime of day
thedisplaywillreturnto the time of day. to the display.DEI.JkYBAKE and the preset oven
5. Press CLOCKpad andthe time of day will reappear temperaturewill appear in the displayto showthat
in the display.TIMED BAKEON indicatorwords will theoven has beensetfor a delay startcookingop-
remainin the displayto showthatthe oven hasbeen eration,
setfor AutomaticOven Cooking. 8. Theovenwillautomaticallyturnonatthe presettime
6. Afterafewseconds,the ovenwill turnon andthe dis- food iscooking.
playwill beginto countdown.
7. Attheendofthepresetcookingtime,theovenwillau-
tomaticallyturn off, "End" will appearin the display ous beeps will signalthe end of cooking.
and3beepswill signaltheendofcooking.Continuous
beepswill promptyouto removefood fromthe oven. 10. Press STOP/CLEAR to cancel the beeps and re-
8. PressSTOP/CLEARto cancelthe beepsand remove
food from theoven.
2. Turnthe SETknobto enter the cookingtime.
• The display will show cooking time in
3. Press STOPTIMEpad.
5. PressOVENTEMP pad.
6. Enter oventemperaturewiththe SETknob.
andTIMED BAKEONwillappeartoindicatethatthe
9. Theovenwillautomaticallyturn offatthe presetstop
time."End"will appear in the display and continu-
movefoodfromtheoven.
J
Additional Information
Ifyou delaymorethan 30 seconds betweentouching a
pad andturningtheSET knob,the displaywilleitherre-
turn tothe previoussettingor the time of daywill reap-
pearand the programwill cancel.
To recall the preset stop time or cook time, just press
the correspondingpad.
To reset or cancel the program, press the STOP/
CLEAR pad.
At the end of thecookingoperation,continuousbeeps
will sound untilthe STOP/CLEARpadispressed.
PAGE 11
Page 13

BakingTips
Usea reliablerecipeandaccuratelymeasurefreshin- anda crispercrust.Usethistypeofpanforpies,pie
gredients.Carefullyfollow directionsforoventemper- crustsorbread.
atureandcookingtime.Preheatovenif recommended.
Use the correctrack position.Bakingresultsmay be suchas Baker'sSecretreducethe oventempera-
affectedif the wrongrack is used. ture by25°Fexceptwhenbakingpiesorbread.Use
* Top browning may be darker if food is located
towardthe top ofthe oven.
* Bottom browningmaybe darkeriffoodis located mumbakingresults.Improperplacementof pansinthe
towardthe bottomoftheoven. ovenwillblockairflowandmayresultinunevenbrown-
* When usingtwo racksfor baking,allow enough
spacebetweentheracksforproperair circulation. * Do notcrowda rackwithpans.Neverplacemore
Browningandcookingresultswillbeaffectedifair thanonecookiesheet,one13x9x2-inchcake pan
flowisblocked, ortwo9-inch roundcakepansonone rack.
Cookwarematerialplaysanimportantpartinbakingre- isnotdirectlyoveranotherpan.
suits.Alwaysusethe typeandsizeof pancalledfor in
the recipe.Cookingtimesorcookingresultsmaybe af- * Allow two inchesbetween the pan and the oven
fectedifthewrongsizeisused. walls.
* Shinymetalpanreflectsheatawayfromthefood, Check the cooking progress at the minimum time
produceslighterbrowningand a softercrust.Use recommendedin the recipe. If necessary,continue
shinypansfor bakingcakesor cookies.For opti- checkingat intervalsuntilthefoodis done.If the oven
mumbakingresults,bakecookiesandbiscuitson doorisopenedtoofrequently,heatwillescapetheoven;
a flat cookiesheet.Ifthepanhassides,suchasa thiscanaffectbakingresultsandwastesenergy.
jellyrollpan,browningmaynotbeeven.
* If using oven-proof glassware, or dark pans
the samebakingtime ascalled for in therecipe.
Allow hot air toflow freely throughthe oven foropti-
ing.Foroptimumbrowningandevencookingresults:
* Staggerpanswhenbakingontworackssoonepan
* Dark metalpanor a pan with an anodized(dull) If you add additional ingredientsor alterthe recipe,
bottom absorbsheat, producesdarkerbrowning expectcookingtimesto increaseordecreaseslightly.
Roasting Tips
Roastingisthemethodforcookinglarge,tendercutsof ing. As the fat ontop of the roastmelts,the meat is
meatuncovered,withoutaddingmoisture.Mostmeats bastednaturally,eliminatingtheneedforadditionalbast-
are roastedat 325°1=.Itisnotnecessaryto preheatthe ing.
oven.Placetheroastingpanoneitherofthetwo lowest
rackpositions. Thecookingtimeisdeterminedbytheweightofthemeat
Usetendercutsofmeatweighingthreepoundsormore. useameatthermometer,insertitsothetipisinthecen-
Somegoodchoicesare:Beefrib,ribeye,topround,high terofthethickestpartofthemeat.Itshouldnottouchfat
qualitytipand rumproast,porkloinroast,leg of lamb, orbone.
vealshoulderroastandcuredorsmokedhams.
Seasonmeat,if desired,eitherbeforeorafterroasting, registers approximately 5°F below the doneness
Rubintothesurfaceoftheroastifaddedbeforecooking, wanted.Asthe meatstands,the temperaturewillrise.
Placethemeatfat-side-up ona rackina shallowroast- NOTE: For more Information on cooking meat
ingpan.Placingthemeatonarackholdsitoutofthedrip- and poultry, contact the USDA Meat & Poultry
pings,thusallowingbetterheatcirculationforevencook- HoUineat 1-800-535-4555.
andthe desireddoneness.Formoreaccurateresults,
Removetheroastfromthe ovenwhenthethermometer
PAGE12
Page 14

CommonBakingProblemsAndWhyThey Happen
PROBLEM CAUSE PROBLEM CAUSE
Cakesare uneven. Panstoo closeor touching Cakes don't brownon top. Incorrectrackposition.
Cakehighin middle. Temperaturesettoo high. Excessiveshrinkage. Toolittleleavening.
Cakefalls. Toomuchshorteningor sugar.
Cakes,cookies,biscuits Incorrectrackposition. Temperaturesettoohigh.
don'tbrown evenly. Ovendoor notclosed properly.
eachotheror ovenwalls. Temperatureset too low.
Batterunevenin pans. Overmixing.
Temperaturesettoolow or Toomuchliquid.
bakingtimetoo short, Pansizetoo large ortoo little
Ovennot level, batterin pan.
Undermixing. Ovendooropenedtoo often.
Toomuch liquid.
Bakingtime too long. Overmixing.
Overmixing. Pantoo large.
Toomuchflour. Temperatureset too high.
Panstouchingeachotheror Bakingtime toolong.
ovenwalls. Panstoo closeto eachother
Incorrectrackposition, or ovenwalls.
Toomuchor too little liquid. Uneven texture. Toomuchliquid.
Temperaturesettoolow. Undermixing.
Oldortoolittlebakingpowder. Temperaturesettoolow.
Pantoosmall, Bakingtimetooshort.
Ovendooropenedfrequently.
Addedincorrecttypeofoilto
cakemix. Cakes havetunnels. Not enoughshortening.
Addedadditionalingredients Toomuchbakingpowder.
to cake mixorrecipe. Overmixingorat too high a
Doorgasketnotsealing
properly. Cakescrackon top. Batterovermixed.
Incorrectuse of aluminumfoil. Temperaturesettoo high
Ovennot preheated. Toomuch leavening.
Pansdarkened,dentedor Incorrectrack position.
warped.
speed.
Foroptimumresults,bakeononerack,Ifbakingcakeson Pantoosmall.
two racks,placepanstowardfrontofovenon upperrack Bakingtimetoo short.
andpans toward backof ovenon lowerrack.
Cakes,cookies,biscuitstoo Oven notpreheated. Ifadditionalingredientswere addedto mixor recipe,ex- ]
brownon bottom. Panstouchingeachother or pect cookingtimeto increase.
Follow cool<waremanufacturer'sinstructions for oven
temperature. Glassware and dark cookware such as Pieshavesoakedcrust. Temperaturetoolow at start
Ecko'sBaker'sSecretrequireloweringtheoventemper- of baking.
atureby 25° F. Fillingtoo juicy.
ovenwalls.
Incorrectrackposition. Pie crustedgestoo brown Temperaturesettoo high.
Incorrectuseof aluminumfoil. Panstouchingeachotheror
Placed2 cookiesheetson one ovenwalls.
rack. Edgesof crusttoo thin.
Usedglass, dark, stained,
warpedor dull finish metal
pans. (Use a shiny cookie Piesdon't brown on bottom. Usedshiny metalpans.
sheet.) Temperaturesettoo low.
Cakenot donein middle. Temperaturesettoo high.
Incorrectrackposition.
Used shiny metalpans.
J
PAGE 13
Page 15

Broiling
Broiling is a method of cooking tender meats by direct To set oven to broil:
heat. The cookingtime isdetermined bythe distance be- 1. Press BROIL pad.
tween the meat andthe broilelement, the desired degree 000° and BROIL indicator words will appear in the
of doneness and the thickness of the meat. display.
Broiling Tips: 2. Turn SET knob clockwise to select HI for normal
Broilingrequiresthe use ofthe broilerpanand insert.The perature broiling.
broiler insert must be in place to allow fat and liquidto 3. For optimum results, remove broiler panand preheat
drain to the pan below to prevent spatters, smoke and broil element 3 to 5 minutes.
flare-ups. Improper use may cause grease fires.
Do notcover the broilerinsert withaluminum foil as this tion(opened about 6-inches). Turn meat onceabout
prevents fat from draining into pan below. For easier half way through cooking. Check for doneness by
clean up,the broilerpan can be lined with foil and spray cutting a slit inthe meat near the center for desired
the insert with a non-stick vegetable spray, color.
Remove excess fat and slash remaining fat to helpkeep 5. At the end ofcooking,press STOP/CLEAR to cancel
meat from curling.This also reduces smoking and spat- pear in the display.
tering.
Place oven rack inthe correct rack positionwhenoven is BROIL when broilinglonger cookingfoods such as poul-
cool. Fordarker browning,place meat closer tothe broil try.The lowertemperature allowsfood to cookto thewell
element. Place meat further downif youwish meat to be done stage without excessive browning. Cooking time
well done or if excessive smokingand flaring occurs, may increase if Lo BROIL is selected.
See Care and Cleaning Chart on page 18for instructions Broiltimes may need to be increased if range is installed
on cleaning the broiler pan and insert, on a 208-volt circuit.
broilingor counter clockwise to select Lo for lowtern-
4. Broilwiththe ovendooropenedto the broilstopposi-
the broiloperation. The current time of day willreap-
Use HI BROIL for most broil operations. Select Lo
Broiling Chart
TOTALTIME
TYPE OF MEAT RACK POSITION* DONENESS (MINUTES)**
BACON #4 WellDone 6 to10
BEEF STEAKS
1-inch thick #4 Rare 10to14
#4 Medium 15to 18
#4 WellDone 19 to22
1 1/2-inchthick #4 Rare 18 to20
#4 Medium 22 to 24
#3 WellDone 25 to30
CHICKEN LO BROIL
Whole,split #3 WellDone 45 to60
Pieces #3 WellDone 30 to45
FISHSTEAK OR RLLET
1/2-inchthick #4 Flaky 10to 12
GROUNDBEEF PATTIES
3/4to 1-inchthick #4 Rare 10to 13
HAMSUCE, precooked
1-inch thick #4 12 to16
1 1/2-inchthick #4 21 to 26
LAMBCHOPS
1-inchthick #4 Medium 12to 15
1 1/2-inchthick #3 Medium 15 to 19
PORK CHOPS
3/4-inchthick #4 WellDone 15 to20
1-inchthick #4 Well Done 20 to25
* The bottomrackpositionisposition#1.
** Timesare approximateand mayvarydependingonthemeat,
PAGE 14
Medium 12to 15
WellDone 15to 18
WellDone 16 to20
WellDone 25 to 30
Page 16

MAINTENANCE
Cooktop Light, Ifequipped Do notattemptto openorclosedoor untilthe dooris
Beforereplacingthe cooktoplightbulb,DISCONNECT completelyseatedonthe hingearms.Neverturnonthe
POWERTO RANGE.Be surethebulbiscool.Donot ovenunlessdooris properlyinplace.Whenbaking,be
toucha hotbulbwithadampclothasthebulbmaybreak, affectedifthedoorisnotsecurelyclosed.
Toturnoncook'toplight:Pressandholdrockerswitch
untilthe lightturnson.Theovenlightswitchislocatedon To removelift-off door: Openthedoortothe"stop"po-
thebackguardforfreestandingrangesandonthecontrol sition(openedabout6 inches)and graspthe doorwith
panelforslide-inordrop-inranges.
To replace cooktop light: Graspthe toptrim of the arms.
backguardwith your thumbs underthe front edge and r-..-_ -'_
pull outwardwhileliftingto releasetrimfrom catchesat
eachend.
Removefluorescenttube and replacewithan 18 watt ovenframe. Youcouldbeinjuredifhingesnapsback,
fluorescenttube.Snaptoptrimbackintoplaceand re- Toreplacedoor:Graspthedoorateachside,alignslots
storepower.Resettheclock, inthedoorwiththehingearmsand slidethedoordown
surethedooriscompletelyclosed.Bakingresultswillbe
bothhandsat eachside.Donotusethedoorhandletolift
the door.Liftupevenlyuntilthe doorclearsthe hinge
m
CAUTION:Hingearmsarespringmountedandwillslam
shut againstthe range if accidently hit. Never place
hand or fingers between the hinges and the front
Oven Light ontothe hingearmsuntilcompletelyseatedonhinges.
Toturnontheovenlight,pushtherockerswitchlocated
onthebackguardoronthe controlpanel. Storage Drawer
Toreplace oven light: Besurebulbiscool.Donottouch Thestoragedraweratthebottomoftherangeissafeand
ahotbulbwithadampclothasthebulbmaybreak.Usea convenientfor storingmetaland glasscookware.DO
drypotholder,to preventpossibleharmto hands,and NOT storeplastic,paperware,foodorflammablemate-
verycarefullyunscrewbulbcoverandbulb. rialinthisdrawer.Removedrawertocleanunderrange.
To remove: Emptydrawerthenpulldrawerouttothe
firststopposition.Liftupfrontofdrawerandpullto the
removedrawer.
...... To replace: Fitthe ends of the drawer glidesonto the
_ , secondstop position.Graspsidesandlift upand outto
Replace with a 40 watt appliance bulb. Replace bulb LevelingLegs
coverand reconnect_owerto range.Resetclock. Somefloorsare not level. _ --
rails.Lift up drawerfront and gentlypush into firststop
position. Lift up drawer again and continue to slide
drawertothe closed position.
For proper baking, your
Oven Door rangemustbelevel.Level-
Do notplace excessweweighton an openovendooror ing legsarelocatedoneach
standon an openoven door as,in somecases, it could corner of the base of the
causethe rangetotip over,breakthedooror causeseri- range.Level by turningthe
ousinjuryto the user. legs.
Whenopeningthe ovendoor,allowsteam andhot airto Topreventrangefrom accidentlytipping, range should
escapebeforereachinginoventocheck,addor remove be securedto the floor byslidinga rear levelingleg into
_ood. theanti-tip bracketsuppliedwiththe range.
PAGE 15
Page 17

SELF-CLEAN OVEN
The self-clean ovenusestemperaturesabove normal Basic Instructions
cookingtemperaturestoautomaticallycleantheovenin-
terior. 1. Closeovendoor.
Itisnormalforthe cooktopofthe rangeto becomehot 2. Movethe doorlocklevertothe rightor locked
duringa clean cycle.Therefore,duringa cleancycle, position.
avoidtouchingthecooktoporovenventarealocatedat
thebaseofthebackguardonsmoothtopcooktopsandat 3. PressCLEANpad.
therightrearelementfor coilcooktops.Avoidcontact
withtheovendoorandwindowastheseareasalsobe- 4. TurnSET knobtoselectcleaningtime.
comewarmduringa self-cleancycle.
Itisbettertocleantheovenregularlyratherthanto wait
untilthereisa heavybuild-upofsoilintheoven. * Averagesoil- 3 hours
NOTE: On Canadianmodelsonly,the smoothtopsur- ° Heavysoil- 4 hours
face unitswill NOToperateduringa cleancycle.This is
normal.
Before Self-Cleaning During Self-Cleaning After Self-Cleaning
Remove all pans and the oven Whenthe CLEANpadispressedand Aboutone hourafterthe end ofthe
racksfromthe oven. The racks thedoorislocked,theovenwillauto- cleancycle,theinternallockwilldis-
will discolor and may not slide maticallybeginto heatto cleaning engageandthe LOCK indicatorwill
easily aftera clean cycle, temperatures, turnoff.Atthispoint,thedoorcanbe
Turnoffovenlightbeforecleancycle. As the oven reaches cleaningtern- locklevertothe leftorunlockedposi-
Thelifeofthebulbmaybeshortened peratures,the LOCK indicatorwill tionandopenthedoor.
ifleftonduringthecleancycle, turnonto showthatan internallock
Clean ovenframe, doorframe and mechanismhas engaged. At this Somesoilmayleavealightgray,pow-
aroundthe oven vent with a non- point,theovendoorcannotbelocked deryashwhichcanberemovedwitha
abrasivecleaningagentsuchasBon andopened, damp cloth. If soil remains,it indi-
Amiorsoapandwater.Theseareas To preventdamageto the doorand longenough.Thesoilwillberemoved
arenotexposedtocleaningtempera- locklever,do notforcethedooropen duringthe nextcleancycle.
turesandshouldbecleanedto pre- when the LOCK indicator is dis-
ventsoil frombakingon duringthe played. Iftheovenracksdonotslidesmoothly
cleancycle, after a clean cycle, wipe racks and
The first few times the oven is embossedracksupportswith a small
Wipe up excess grease or spillovers cleaned, somesmoke and odor may amount of vegetable oil to restore
from the oven bottom to prevent ex- be detected. This is normal and will easeof movement.
cessive smokingand flare-ups dur- reduce or disappear with use. If the
ingthe cleancycle, oven is heavily soiled,or ifthe broiler On smoothtop cooktops: Clean
Wipe up acid spillovers suchas lem- pan is left in the oven, smoke and aroundthe vent opening at the base
onjuice,tomatosauceor milk-based odormay occur, of the backguardif there isa deposit
saucesandsugaryspillovers.Porce- from the fumes vented during the
lainenamelis acidresistant,not acid Astheovenheatsandcools,youmay clean cycle.Use soapandwaterand
proof. The porcelain finish may dis-
colorif acidspillsarenotwipedupim- willnot damage your appliance. Fine,hair-like linesmayappearinthe
mediately, oven interior or oven door.This is a
Donotuseovencleanersorovenlin- normalconditionresultingfromheat-
er protectivecoatingsofany kindon ingandcoolingoftheporcelainfinish.
the self-cleanovenfinishoraround These linesdo notaffecttheperfor-
anypartof the oven. manceofthe oven.
Topreventdamage,donotclean or
rubthegasketaroundtheovendoor.
Thegasketisdesignedtosealinheat
duringthe cleancycle.
hearsoundsofmetalpartsexpanding a cloth or non-abrasive pad.
and contracting. This is normal and
• Ughtsoil- 2 hours
unlockedandopened.Movethedoor
cates that the clean cycle was not
PAGE 16
Page 18

Toset ovenfore self-clean cycle: To delaythe startof a cleancycle:
1. Removeovenracksandclosetheovendoor. 1. Removeovenracks and closethe oven door.
2. Movethe door lockleverto the rightor lockedposi- 2. Movethe doorlock lever tothe right or locked posi-
tion. tion.
3. PresstheCLEAN pad. 3. PressCLEANpad.
• 3HR:00willappearinthedisplay,andSETCLEAN 4. TurnSETknobto selectcleaningtime.
TIMEwillflash in the display.Aftera few seconds 5. PressSTOPTIMEpadandturnSETknobtothetime
delay,the oven will automaticallyturn on. CLEAN ofdayyou wishthe oventoturnoff.Thestoptimeand
and ONwill appearinthe display. CLEAN DELAYSTOPTIMEwill appear in the dis-
. Ifyou wish to changethe cleaningtime, pressthe play.
CLEAN pad and turn the SET knobto select 2
hoursfor light soilor 4 hoursfor heavysoil.
• "door" will appear in the display and continous the displayto showthat theovenis setfor a delayed
beepswill soundifthe ovendoor is notlocked, clean operation.
• Ifthedoorisnot lockedorthe cleantime is not en- 7. At the end of a clean cycle, continuousbeeps will
tered within 30 seconds of pressingthe CLEAN sound,PressSTOP/CLEARto cancelthebeeps.
pad,the programwill automaticallybe cancelled.
4. PressCLOCK pad and the current time of day will
reappearinthe display.CLEANandONwillremainin 1. PushSTOP/CLEARpad.
thedisplayto showthatthe ovenis in a cleancycle. 2. Ifthe LOCK indicatorisdisplayed,allowoventocool
Aboutonehourafterthecleancycleends,theLOCKin- upto one hour.Once LOCK indicatorturns off, the
dicatorwill turnoffandthe oven door can be opened, doorcanbeunlockedand opened.
6. Press CLOCKpad and the currenttime of day will
reappearinthedisplay.CLEAN DELAYwillappearin
Tocancelclean cycle:
Theovendooranddoorlockleverwill bedamagedifthe If the LOCKindicatoris not displayedtheovendoor
ovendoorisforcedto open whenthe LOCK indicatoris canbeunlockedand opened.
stilldisplayed,
PAGE17
Page 19

CARE AND CLEANING CHART
Manydifferentcleaningagents arerecommendedfor the various parts ofthe range.The following brandsmay help
youto makeanappropriateselection:Mild abrasivecleaners (BonAmi, Cameo,Soft Scrub, Comet or Ajax); mild
liquid sprays (Fantastik,Formula409); glass cleaners (Windex,GlassPlus,Cinch);non-abrasive scouring pad
(Tufty).Ifacleaningproductisrecommendedforuseonplastic,glassorporcelain,itcanbe usedonthe sameappliance
finish.
Besureall partsarecoolbeforecleaning.
PARTS CLEANINGAGENTS DIRECTIONS Besureall partsareproperlyreplacedaftercleaning,
Broiler pan & in- Soap& water.Plastic Removefromovenafteruse.Coolthenpouroffgrease.Placesoapy
sert scouringpad.Soap clothoverinsertandpan;letsoaktoloosensoil.Washinwarmsoapy
filledscouringpad. water.Usesoapfilledscouringpadtoremovestubbornsoil.Broiler
Dishwasher. panandinsertcan becleanedinthedishwasher.
Baked enamel: Soap&water.Pasteof Usea drypapertowelorclothtowipeupspills,especiallyacidspills,
Sidepanels bakingsoda& water, as soonasthey occur.(Thisisespeciallyimportantforwhitesur-
Backguard Glasscleaner, faces.)Whensurfaceiscool,washwithsoapandwater.Donotuse
Ovendoor abrasiveor harshcleaningliquidsand powdersorovencleaners.
Storagedrawer Thesewillscratchandpermanentlydamagethefinish.Drywithasoft
cloth.On smoothtopcooktops,cleanventopeningareaafter each
ovenuse.
Glass: Soap& water.Paste Washwithsoapandwater.Removestubbornsoilwithpasteofbak-
Ovenwindow ofbakingsoda&wa- ingsodaandwater.Donotuseabrasivematerialssuchas scouring
See pages6 and ter.Glasscleaner, pads,steelwoolor powderedcleaningagents.Theywilldamage
7 forsmoothtop glass.Rinsewithclearwateranddry.Topreventstainingofovenwin-
instructions dow,neveruseexcessiveamountsofwaterwhichmayseepunderor
behindglass.
Metalfinishes Soap&water.Pasteof Washwithsoapandwater.Removestubbornsoilwithpasteofbak-
andtrim bakingsoda&water, ingsodaandwater.Do notuseovencleaners,abrasiveor caustic
agents.Theywilldamagethefinish.
Oven andCoil Elementsareself-cleaning.Soilwillburnoffas elementsareused.
Elements Donotsprayovencleaneronelements,electricalhookuporconnec-
tion.Donotimmersecoil-typesurfaceelementsinwater.
Oven racks Soap & water.Cleans- Cleanwithsoapywater.Removestubbornsoilwithcleansingpowder
ingpowders.Soap or soapfilledscouringpad.Rinseanddry.Rackswillpermanently
filledscouringpad. discolorifleftinthe ovenduringa self-cleanoperation.
Plasticfinishes: Soap&water.Pasteof Do notuse ovencleaner,powderor liquidcleansers,abrasiveor
Doorhandle,trim, bakingsoda & water, causticcleaningagentsonplasticfinishes.These cleaningagents
knobs,endcaps, Non abrasive plastic willscratchor marrfinish.Topreventstainingordiscoloration,wipe
controlpanel pad orsponge, upfat, greaseoracid(tomato,lemon,vinegar,milk,fruitjuice,mari-
nade)immediatelywitha drypapertowelorcloth.Whensurfaceis
cool,cleanwithsoapandwater;rinse,anddry.
Porcelainenamel: Mildliquidcleaners, Porcelainenamelisglassfusedon metal.Itmay crackorchipwith
Cooktoptrim detergentorsoap& misuse.Porcelainenamelis acidresistant,notacidproof.Allspil-
Cooktop, water.Cleansingpow- lovers,especiallyacidorsugarspillovers,shouldbe wipedupira-
coilmodels, dersandnonabrasive mediatelywitha drycloth.Surfacemaydiscolorordullifsoil,espe-
See pages16 and nylonorplasticpads. ciallyacidsoil,isnotremoved.Neverwipeoffawarmorhotsurface
17forself-clean witha dampcloth.Thismaycausecrackingandchipping.Neveruse
oven. ovencleaners,abrasiveorcausticcleaningagentsonexteriorfinish
ofrangeor inthe self-cleanoven.
PAGE 18
Page 20

BEFORE YOU CALL FOR SERVICE
Check these pointsif...
Partor all of yourelectric range does notoperate Bakingresultsdifferfrom previousoven
• Istherangepluglooseordisconnectedfromtheelec- • Oventhermostatcalibrationmay differbetweenold
tricaloutlet? and newoven.The neweroventhermostatmay be
moreaccuratethan the one on you previousoven.
• Areanyhousefusesblownorcircuitbreakerstripped? Followareliablerecipeandreviewbakinginformation
• Hasthepowersupplytothehomebeeninterrupted? onpages12to13.ifyoustillfeeltheoventemperature
• Aretheovencontrolsproperlyset? theoventhermostat.
• Was theelectroniccontrolcorrectlyset?
• Was the doorleft in the lockedpositionfollowinga
self-cleancycle? • Wasthe controlset properlyfor broiling?(Seepage
• Istheovensetforautomaticovencooking? 14).
• ON CANADIANMODELSONLY:Checkto see if a • Wastheproperrackpositionused?(Seepage14).
fuse hasblown(Seepage20). • Didyouallowtimeforthebroilelementto preheat?
Surface elements fail to turn on or heat the food
properly, theslitsforfatdrainage?
• Istherangepluglooseordisconnectfromtheelectri-
caloutlet? Oven light does not operate
• If the rangehas coil elements,are they properly • Isthe bulblooseorburnedout?
pluggedintothereceptacles? • IsthelightswitchintheOnposition?
• Wereappropriateutensilsused?(See Cookwareor
Cooking_ps Sections) Ovenwill not self-clean
• Arethesurfaceelementcontrolsproperlyset? • Is the self-clean controlset properly?(See pages
• Isvoltagetothehousereduced? 16-17).
• CANADIANMODELSONLY:Thesmoothtopcooktop • Istheovensetfora delayedcleanoperation?
willnotoperateduringaself-cleanoperation.Thisis • Isthe ovendoorproperlylocked?
normal. • Wasthe ovenheavilysoiled?
isincorrectsee page20for informationonadjusting
Fooddoes not broilcorrectly
• Didyouusethebroilerpanthatcamewiththerange?
• Wasaluminumfoilusedonthebroilerinsert,blocking
Foodnotbaking or cooking correctly Oven door will not unlock
• Aretheovenracksproperlyplacedforbaking? • Hastheself-cleancyclebeencompleted(_orat least
• Haveyouusedaluminumfoilcorrectly? onehour?
• Wastheovenpreheatedas recommended? • Wasthedoorcorrectlyunlocked?
• Arethecontrolsproperlyset? "F" plusa numberappearsin thedisplay
• Isthere1to 2 inchesofspace betweenpansandthe • This is afaultcode. Ifa faultcodeappears inthedis-
ovenwalls?Arethe rangeand ovenrackslevel?
• Was good cookware/bakewareof the proper size CLEARpad.See page 20 for additionalinformation.
used?
• Wasthe oven ventcovered orblockedonthe range
surface?
• Are you using atestedrecipefroma reliablesource?
playandacontinuousbeepsounds,pressthe STOP/
PAGE 19
Page 21

SERVICE INFORMATION
ExplanationOf FaultCodes AdjustingOvenTemperature
Yourapplianceisequippedwithanelectroniccontrolfea- Your new appliance has been factory tested for oven
turing built-in, self-diagnostic software. This software temperature accuracy. Even though your range has
continuously monitors the control to insure safe and beentested, you mayfind that the cooking results with
properoperation.If the software shoulddetecta ques- yournew ovenare differentfrom yourprevious oven.
tionablesituation,aFAULTCODE(F plusa number)will
appearinthe displayandcontinuousbeepsmaysound. If you havecarefullyfollowed the recipe,reviewed the
bakingtipsonpage12andstillfeelcookingresultsdonot
meetyourexpectations,youcanadjusttheoventemper-
I I oneortwoitemsare notbakingproperly.
i I'_ SET Ifyouthinkthe ovenshouldbe hotterorcooler,youcan
-- O ature.DO NOT ADJUST THE TEMPERATUREif only
Afaultcodeindicatesthattheremaybea functionaler- resultsofthe"test"shouldgiveyouanideaofhowmuch
for.Asa safetyprecaution,thecontrolwillautomatically toadjustthethermostat.
canceltheprogram.
During Normal Oven Cooking
If a fault code appears inthe displayand continuous 2. TurnSET knobuntil550°is displayed.
beeps sound, press the STOP/CLEAR pad. Then,
reprogramthe cookingoperation. 3. Pressand holdtheOVENTEMP padforseveralse-
If thefaultcodereappearsinthe display,callan autho-
rizedservicer.Donotusetheovenuntilthecontrolhas • If 00° does not appear in the display,pressthe
beenserviced.The cooktopcanbeused. STOP/CLEARpadandbeginagain.
During A Self-Clean Cycle the change will be displayed.Forexample,if the
Iftheovenisheavilysoiled,excessivesmokeandflaring temperaturewasreducedby15°, -15° willbedis-
mayresultinafaultcode.Ifthisoccurs,presstheSTOP/ played.
CLEARpadandallowtheoventocoolforanhour.Then, 4. TurntheSET knobtoselectthetemperaturechange
reprogramtheovenforthe cleancycle, desired.
adjustit yourself.To decidehow muchto changethe
thermostat,settheoventemperature25°F higherorlow-
er thanthetemperatureinyourrecipe,thenbake.The
Toadjust the thermostat:
1. PressOVENTEMP pad.
condsuntil00° appearsinthedisplay.
• If the oventemperaturewas previouslyadjusted,
Ifthefault codereappearsin the display,call anautho- • The oventemperaturecan beincreasedupto 35°
rizedservicer.Donotusethe ovenuntilthecontrolhas
beenserviced.Thecooktopcanbeused.
or reducedbyas muchas 35° (-35°) in 5° incre-
merits.
• NOTE:If youdelayinselectingatemperature,the
Fuses (Canadian Ranges Only) programwill automaticallycanceland00°willdis-
Yourrangeisequippedwithseven(7)type"P"fuses.The appear.Beginagainfftheprogramcancels.
fusesare locatedonthebackwalloftherange.Remove
thestoragedrawerforaccesstothefuses. 5. PresstheSTOP/CLEARpadandthe timeofdaywill
reappearinthedisplay.The ovenwillnowbakeatthe
Itisnot necessaryto readjusttheoventemperatureif
there isa powerinterruption.Thisadjustment willnot
affectbroil or clean temperatures.
__ adjustedtemperature.
If part of yourrangedoesnotoperate,checktoseeifa
fusehasblown.Agapinthefusestripor adarkenedwin-
dowindicatesa blownfuse. Replacewiththe sametype
and amperagetype "P"fuse.
PAGE20
Page 22

SERVICE INFORMATION
Do not attempt to service the appliance yourself un- completemodelandserialnumbersoftheappliance,the
lees directed to do so in this book. Contact the name and addressofthe dealerfromwhomyou put-
dealerwho soldyou the appliancefor service, chasedthe appliance,the dateofpurchaseanddetails
concerningyourproblem.
How To Obtain Service Ifyou do not receivesatisfactoryservice,you maycon-
If yourapplianceshouldrequireserviceorreplacement tacttheMajorApplianceConsumerActionPanelbylet-
parts,contactyourDealerorAuthorizedServicer.Use ter includingyourname, address,andtelephonehum-
onlygenuinefactorypartsifreplacementpartsarenec- bet,aswellas themodelandserialnumbersoftheappli-
essary.ConsulttheYellowPagesinyourtelephonedi- ance.
rectoryunderappliancefortheauthorizedservicecenter
nearestyou.Besuretoincludeyourname,address,and MajorApplianceConsumerActionPanel
phonenumber,alongwiththemodelandserialnumbers 20 NorthWackerDrive
ofthe appliance.(See insidefrontcoverforlocationof Chicago,IL 60606
yourmodelandserialnumbers.)
If youare notsatisfiedwiththe localresponseto your independentagencysponsoredbythreetradeassocia-
servicerequirements,call or writeMaytag Customer tions as a courtof appealson consumercomplaints
Service, 240 Edwards Street, S.E., Cleveland, TN whichhavenotbeenresoIvedsatisfactorilywithina rea-
37311, (615) 472-3500. Includeor haveavailablethe sonableperiodof time.
MACAP(MajorApplianceConsumerActionPanel)isan
PAGE21
Page 23

COOKING APPLIANCE
ONE YEAR - FULL WARRANTY
MaytagCustomerServicewillrepairorreplace,withoutcharge,anypartofyourappliancewhichhasadefectinmaterial
orworkmanshipduringthefirstyearafterthedateoftheoriginalinstallation.Thiswarrantyextendstoanyownerduring
the oneyearwarrantyperiodwhentheapplianceislocatedinthe UnitedStatesor Canada.
ADDITIONAL FOUR YEAR - LIMITED WARRANTY
Foranadditionalfouryearperiodbeyondthefirstyearofthe FULLwarrantycoverage:
- MaytagCustomerServicewillreplace,atnocharge,anysmoothtopheatingelement,soliddischeatingele-
ment,orgassealedsurfaceburnerwhichfailsto heatasa resultofdefectiveworkmanshipormaterials.
- MaytagCustomerServicewillreplace,atnocharge,anysmoothtopcookingsurfacewhichcracksorbreaks
duringthenormalhouseholdcooking.
Thesepartsmustbeinstalledbyan authorizedservicer.Any laborchargerequiredforreplacementisNOT coveredby
thislimitedwarranty.Thiswarrantyextendsto anyownerduringtheadditionalfouryearwarrantyperiodwhenthe ap-
plianceislocatedintheUnitedStatesorCanada.
WHAT IS NOT COVERED BY THESE TWO WARRANTIES:
1. Conditionsanddamagesresultingfromanyofthe fol- 4. Productspurchasedforcommercialor industrialuse.
lowing: 5. Thecostofserviceorservicecallto:
a. Improperinstallation,delivery,ormaintenance, a. Correctinstallationerrors.
b. Anyrepair,modification,alterationoradjustmentnot
authorizedby MaytagCustomerService,or an au-
thorizedservicer, uct.
c. Misuse,abuse,accidentsorunreasonableuse.
d. Incorrectelectricalcurrent,voltageorsupply. 6. CONSEQUENTIALORINCIDENTALDAMAGESSUS-
e. Impropersettingofanycontrol. BREACHOF THESE WARRANTIES.Somestatesdo
2. Warrantiesarevoidiftheoriginalserialnumbershave notallowtheexclusionor limitationofconsequentialor
beenremoved,altered,orcannotbereadilydetermined, incidentaldamages,sotheaboveexclusionmaynotap-
3. Lightbulbs, plytoyou.
b. Instructtheconsumerontheproperuseoftheprod-
c. Transporttheapplianceto a servicer,
TAINED BY ANY PERSONAS A RESULT OF ANY
HOW TO RECEIVE WARRANTY SERVICE
1. Contactthedealerfromwhomyoupurchasedtheapplianceoranyauthorizedservicertoreceive
warrantyserviceunderthesewarranties.
2. Shouldyounotreceivesatisfactorywarrantyservicefromyourlocalservicer,contact:
MaytagCustomerService
240 EdwardsStreet,S.E.
Cleveland,TN 37311
(615)472-3500
3. Havethefollowinginformationavailablewhenrequestingwarrantyservice:
- Yournameandaddress.
- Themodelandserialnumbersofyourappliance.
- Thenameandaddressof yourdealerorservicer.
- Thepurchasedateofyourappliance.
- A cleardescriptionoftheproblem.
alter,orenlargeMaytagCustomerService'sresponsibilifiesorobligationsunderthesetwowarranties.Thesetwowarrantiesgiveyouspecificlegalrights,
andyou may also have other rights whichvary from statetostate.
I ThetwowarrantiesdescribedabovearetheonlywdttenorexpressedwarrantiesgivenbyMaytagCustomerService,Nooneisauthorizedto increase,
(12/93)
 Loading...