

Magic Chef 3468VRV, 3468VTV, 3468XRA, 3468XRA-X, 3468XRW Repair Manual
...
IMPORTANTSAFETY
I
NOTICEAND WARNING I WARNING: If the informa- __.
ition in this manual is not
The California Safe DrinkingWater followed exactly, a fire or
and ToxicEnforcement Act of 1986
(Proposition65) requiresthe Governor explosion may result caus-
of Californiato publish a list of sub- Jng property damage, per-
stances knownto the State of Califor- sonal injury or death.
nia to cause cancer or reproductive
harm, and requires businesses to
warn customersof potential exposures - Do not store or use gaso-
tosuch substances, line or other flammable
vapors and liquids in the
Users of this appliance are hereby vicinity ofthis or any oth-
warned that the burning of gas can re- er appliance.
suitin low-level exposure to some of
the listedsubstances, including ben- - WHAT TO DO IF YOU _,
zene, formaldehyde and soot, due pri- SMELL GAS: =.= WARNING
madly to the incompletecombustion of
naturalgas or liquidpetroleum (LP) • DO not try to light any • ALL RANGES
fuels. Properlyadjusted burners will appliance. CAN TIP
minimize incomplete combustion. Ex-
posureto thesesubstances can also
• Do not touch any elec- • INJURY TO PERSONS
be minimized by properlyventing the
burnerstotheoutdoors, trical switch; do not COULD RESULT
use any phone in your
building. • INSTALL ANTI-TIP
FORFUTUREREFERENCE DEVICESPACKED
• Immediately call your WITH RANGE
Forfuture referencewe suggest you
retainthis manualafter recording the gas supplier from a
model number and serial numberof neighbor's phone. • SEE INSTALLATION
thisgas applianceinthespacespro- Follow the gas suppli- INSTRUCTIONS
vided. This informationcan befound er's instructions.
onthe ratingplatelocatedon the
sidesofthe lower rangefrontframe. • If you cannot reach To reduce the risk of tipping of the
Pullout lowerdrawerto see rating your gas supplier, call appliance from unusual usage or by
plate, the fire department, excessive loading of the oven door,
the appliance must be secured by a
- Installation and service properly installed anti-tip device. To
checkif deviceisinstalledproperly:Use
must be performed by a a flashlight and look underneath range
MODEL NUMBER qualified installer, ser- to see that oneof the rear leveling legs
vice agency or the gas isengaged in the bracket slot.
supplier.
SERIAL NUMBER
DATEOF PURCHASE
These numbers identifyyour range.
Please usethem inany correspon-
dence or service calls concerningyour
appliance.
Pleaseretainthe proofof purchase
documentsfor warranty service.
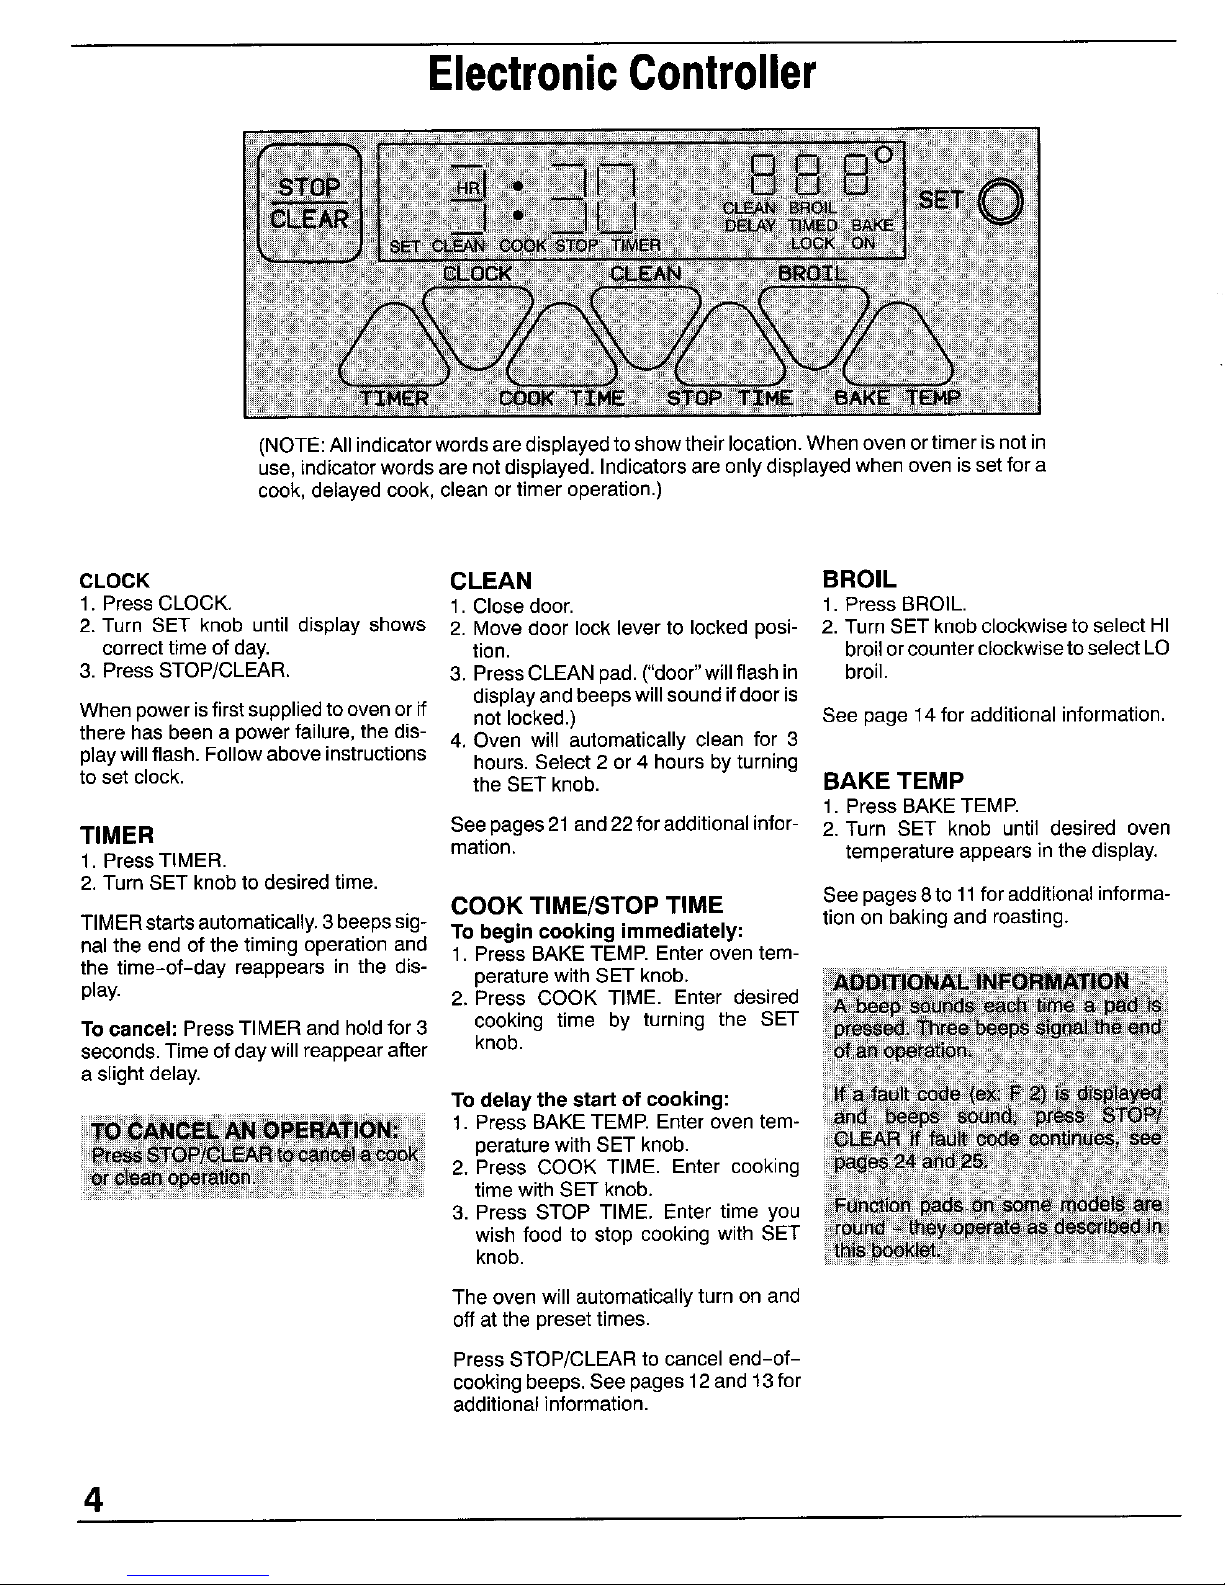
ElectronicController
(NOTE:All indicatorwords aredisplayed to show their location. When ovenortimer isnot in
use,indicator words arenot displayed. Indicatorsare only displayedwhen oven is setfor a
cook,delayed cook, clean or timer operation.)
CLOCK CLEAN BROIL
1. Press CLOCK. 1. Close door. 1. Press BROIL.
2. Turn SET knob until display shows 2. Move door lock lever to locked posi- 2. TurnSET knobclockwise to select HI
correct time of day. tion. broilorcounter clockwisetoselect LO
3. PressSTOP/CLEAR. 3. PressCLEANpad. ("door"will flash in broil.
displayand beepswill sound if dooris
When powerisfirst suppliedto oven or if notlocked.) See page 14 for additional information.
there has been a powerfailure, the dis- 4. Oven will automatically clean for 3
playwillflash. Followabove instructions hours.Select 2 or 4 hours by turning
to set clock, the SET knob. BAKE TEMP
1. Press BAKETEMP.
TIMER Seepages21 and22foradditionalinfor- 2. Turn SET knob until desired oven
1. PressTIMER. mation, temperature appears in the display.
2. Turn SET knobto desiredtime.
COOK TIM E/STOP TIME See pages8to 11for additional informa-
tion on baking and roasting.
TIMERstartsautomatically. 3beepssig- To begin cooking immediately:
hal the end of the timing operation and 1. Press BAKE TEMP. Enteroven tem-
the time-of-day reappears in the dis- perature with SETknob.
play. 2. Press COOK TIME. Enter desired
Tocancel: PressTIMER and holdfor 3 cooking time by turning the SET
seconds.Timeof daywill reappearafter knob.
a slight delay.
To delay the start of cooking:
1. PressBAKE TEMP. Enter oven tem-
perature with SET knob.
2. Press COOK TIME. Enter cooking
time with SETknob.
3. Press STOP TIME. Enter time you
wish food to stop cooking with SET
knob.
The oven will automaticallyturn on and
off at the preset times.
Press STOP/CLEAR to cancel end-of-
cooking beeps.See pages12 and13for
additional information.
4
SurfaceCooking
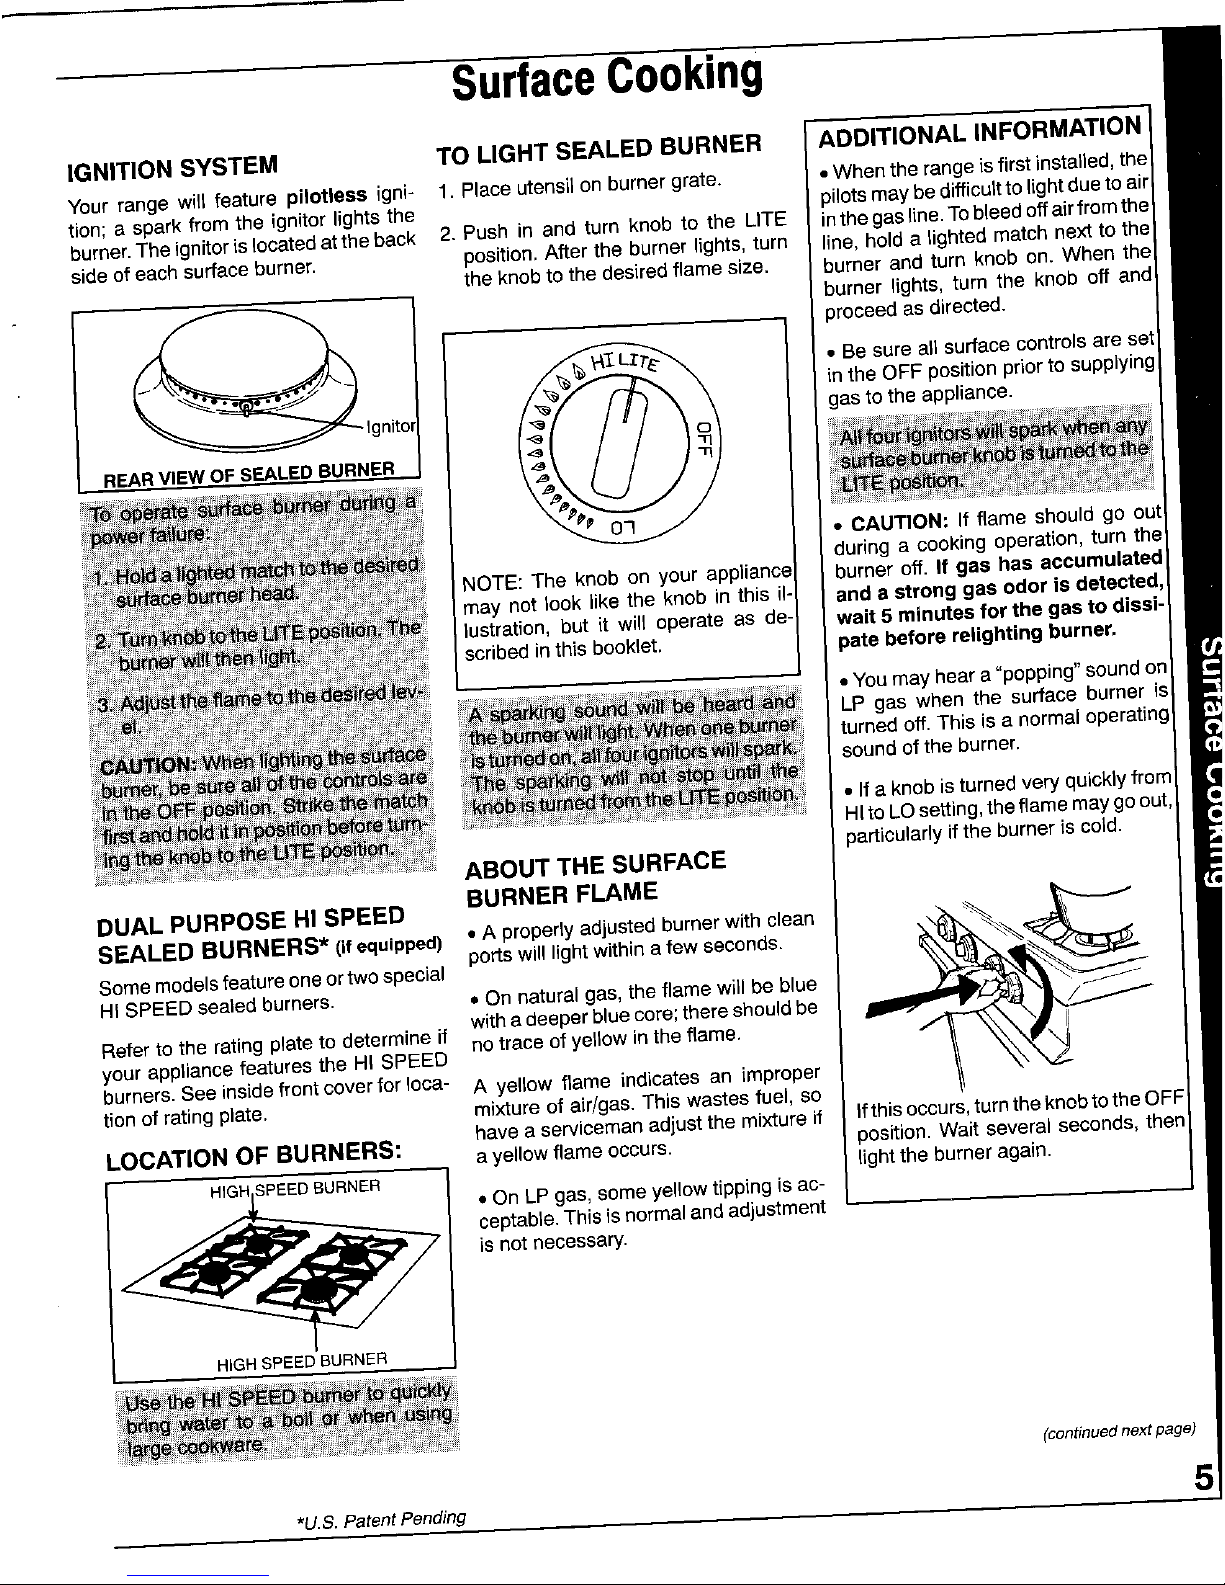
IGNITION SYSTEM TO L]GHT SEALED BURNER ADDITIONAL INFORMATION
Your range will feature pilotless igni- f. Place utensi}on burner grate. • Whenthe rangeisfirst installed, the
tion; a spark from the ignitor lights the pilots maybe difficultto lightdue toair
burner.The ignitoris located atthe back 2. Push in and turn knob to the LITE inthe gasline.To bleed offair fromthe
side of each surface burner, position. After the burner lights, turn line, hold a lighted match next to the
the knob to thedesired flame size. burner and turn knob on. When the
proceed as directed.
• Be sure all surface controls areset
in the OFF position prior to supplying
Ignitor gas to the appliance.
o
REAR VIEW OF SEALED BURNER
• CAUTION: If flame should go out
_ ,,HO_ _ _ _ during a cooking operation, turn the
_ _ _ NOTE: The knob on your appliance burner off. If gas has acoumulated
ii!_!
may not look like the knob in this il- and a strong gas odor is detected,
5
....2 _t_;I _ _E _ ]ustration, but it will operate as de- wait 5 minutes for the gas to dissi-
/t.
,_,_Jr_ scribed inthis booklet, pate before relightin9 burner.
3;_ • Youmay heara "popping"sound o_
LP gas when the surface burner '
turned off.This is a normal operating
_ume_i__ _ _ soundof the burner.
._ _"_O _ _ • Ifa knobis turnedvery quickly from
_ _ _c _ HItoLOsetting,theflamemay goout,
_:! _._, particularlyif the burner is cold.
"_ ABOUT THE SURFACE
DUAL PURPOSEHI SPEED BURNER FLAME
SEALED BURNERS* (ifequipped) =A properlyadjustedburnerwith clean
portswilllightwithinafew seconds.
Somemodelsfeatureoneortwospecial
HISPEED sealed burners. ° On natural gas, the flame will be blue
with adeeper blue core;there should be
Refer to the rating plate to determine if no trace of yellow in the flame.
your appliance features the HI SPEED
burners. See insidefront cover for Ioca- A yellow flame indicates an improper
lion ofrating plate, mixture of air/gas. This wastes fuel, so
have a servicemanadjust the mixture if Ifthis occurs,turn the knobtothe OFF
LOCATION OF BURNERS: ayellow flameoccurs, position. Wait several seconds, then
• On LP gas, someyellowtipping isac-
ceptable. Thisisnormal and adjustment
isnot necessary.
HIGH SPEED BURNER ]
(continuednext page)
*U.S. Patent Pending
SurfaceCooking(continued)
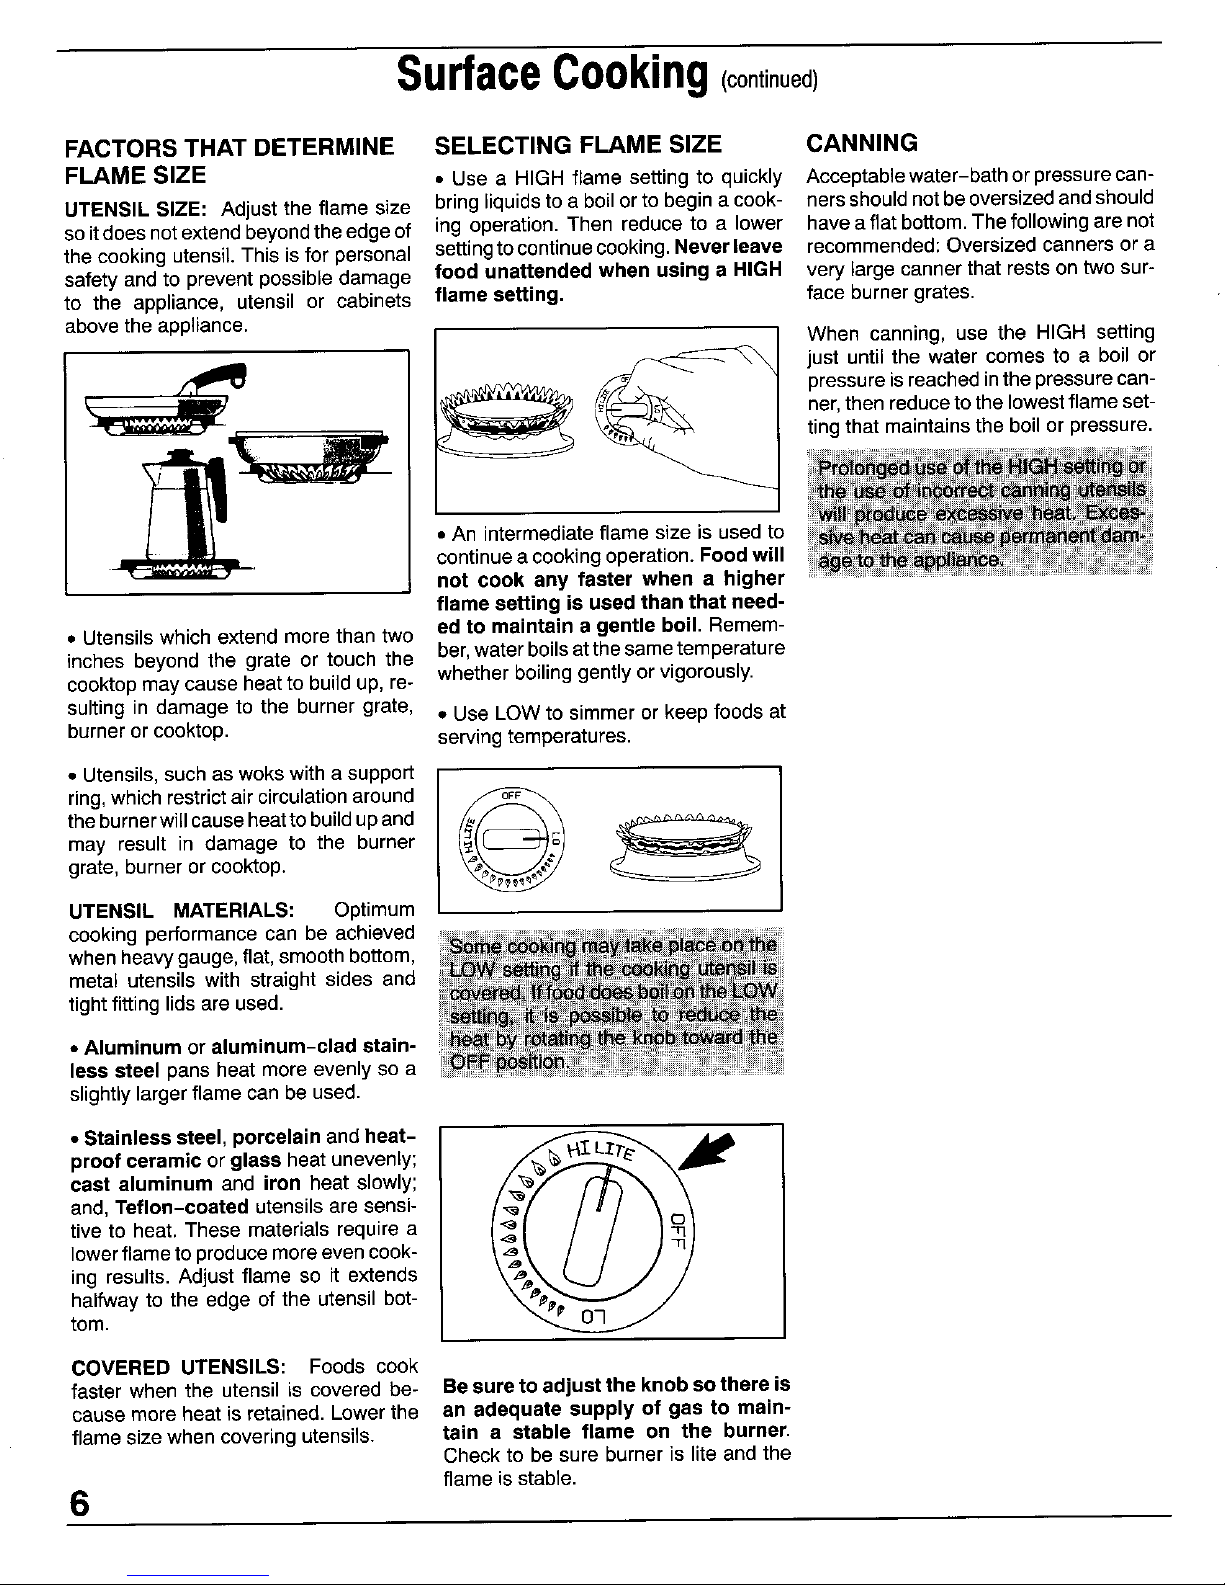
FACTORS THAT DETERMINE SELECTING FLAME SIZE CANNING
FLAME SIZE • Use a HIGH flame setting to quickly Acceptablewater-bathorpressurecan-
UTENSIL SIZE: Adjust the flame size bring liquidsto a boilor to begina cook- nersshould notbeoversized andshould
soit does not extendbeyondthe edgeof ing operation. Then reduce to a lower have afiat bottom.The following are not
the cooking utensil.This is for personal settingtocontinue cooking.Neverleave recommended; Oversized canners ora
safety and to prevent possible damage food unattended when using a HIGH very large canner that rests ontwo sur-
to the appliance, utensil or cabinets flame setting, face burner grates.
above the appliance. When canning, use the HIGH setting
just untilthe water comes to a boil or
_ pressureis reachedinthe pressurecan-
' ner,then reduceto the lowest flameset-
_; ting that maintainsthe boil or pressure.
_ • An intermediateflame size is used to
continue a cooking operation. Food will
not cook any faster when a higher
flame setting is used than that need-
• Utensils which extend more than two ed to maintain a gentle boil. Remem-
inches beyond the grate or touch the ber,water boilsatthesametemperature
cooktop may causeheat to build up, re- whether boiling gentlyor vigorously.
suiting in damage to the burner grate, • Use LOWto simmer or keepfoods at
burneror cooktop, servingtemperatures.
• Utensils,such as woks with a support
ring,which restrictair circulationaround __
theburnerwill cause heatto buildupand
may result in damage to the burner
grate, burner orcooktop.
UTENSIL MATERIALS: Optimum
cooking performance can be achieved
whenheavygauge, flat,smooth bottom,
metal utensils with straight sides and
tightfitting lids are used.
• Aluminum or aluminum-clad stain-
less steel pans heat more evenly so a
slightly largerflame can be used.
• Stainlesssteel, porcelain and heat- _ _,8,
proof ceramicor glass heatunevenly;
cast aluminum and iron heat slowly;
and,Teflon-coated utensilsare sensi-
tiveto heat. These materialsrequirea
lowerflame to producemoreeven cook-
ing results. Adjust flame so it extends
halfway to the edge of the utensil bot-
tom.
COVERED UTENSILS: Foods cook
faster when the utensil is covered be- Be sureto adjustthe knobsothere is
causemore heatis retained, Lowerthe an adequate supply of gas to main-
flame sizewhen covering utensils, tain a stable flame on the burner.
Check to be sure burner is lite and the
flame is stable.
6
UsingYourOven
L.Fb OVEN VENT
The oven ventis located at the baseof
_t the backguardor backsplash,When the
r_ oven is in use,this area mayfeel warm
_,t or hotto the touch.To prevent problems
i_ do not:Block thevent opening,touch the
_ area nearthe opening or place utensils
_ nearthe vent opening.
FAN
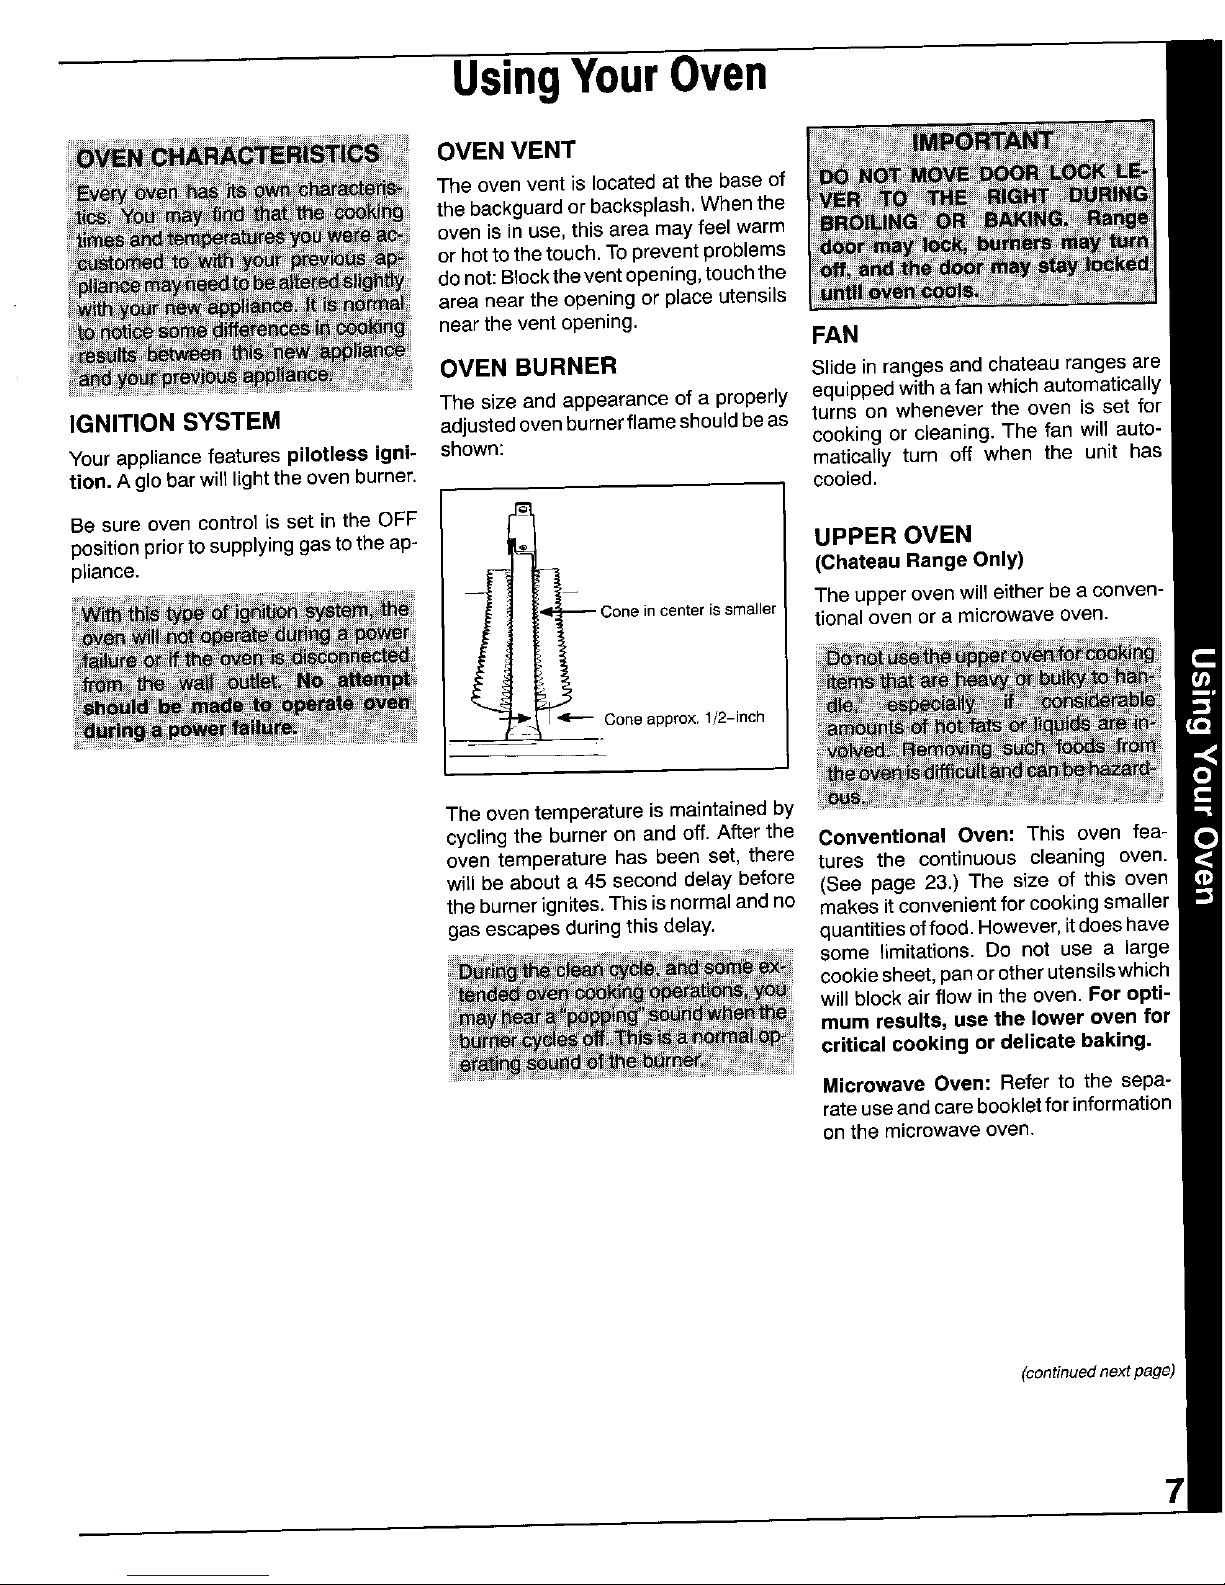
ao_._ OVEN BURNER Slidein ranges and chateau ranges are
The size and appearanceof a properly equippedwitha fanwhichautomatically
IGNITION SYSTEM adjustedovenburnerflameshouldbeas turns on whenever the oven is set for
Your appliance features pilotless igni- shown: cooking or cleaning. The fan will auto-
matically turn off when the unit has
tlon. A glo bar will lightthe ovenburner, cooled.
Be sure oven control is set in the OFF I_
position priorto supplyinggas to the ap- _ UPPER OVEN
pliance. _- (Chateau Range Only)
The upper ovenwill either be a conven-
,_ tional oven or a microwaveoven.
L
.
.
F
- _ _ Cone approx. 1/2-inch
The oventemperature is maintainedby
cyclingthe burner on and off. After the Conventional Oven: This oven lea-
oven temperature has been set, there tures the continuous cleaning oven.
will be about a 45 second delay before (See page 23.) The size of this oven
the burner ignites.This is normaland no makes it convenient for cooking smaller
gas escapes during this delay, quantitiesoffood.However, it does have
some limitations. Do net use a large
cookiesheet, panor other utensilswhich
will block air flow in the oven. For opti-
mum results, use the lower oven for
critical cooking or delicate baking.
Microwave Oven: Refer to the sepa-
rateuseand carebookletfor information
onthe microwave oven.
(continued next page)
7
UsingYourOven(continued)
TO SET THE OVEN TO SET CONVENTIONAL
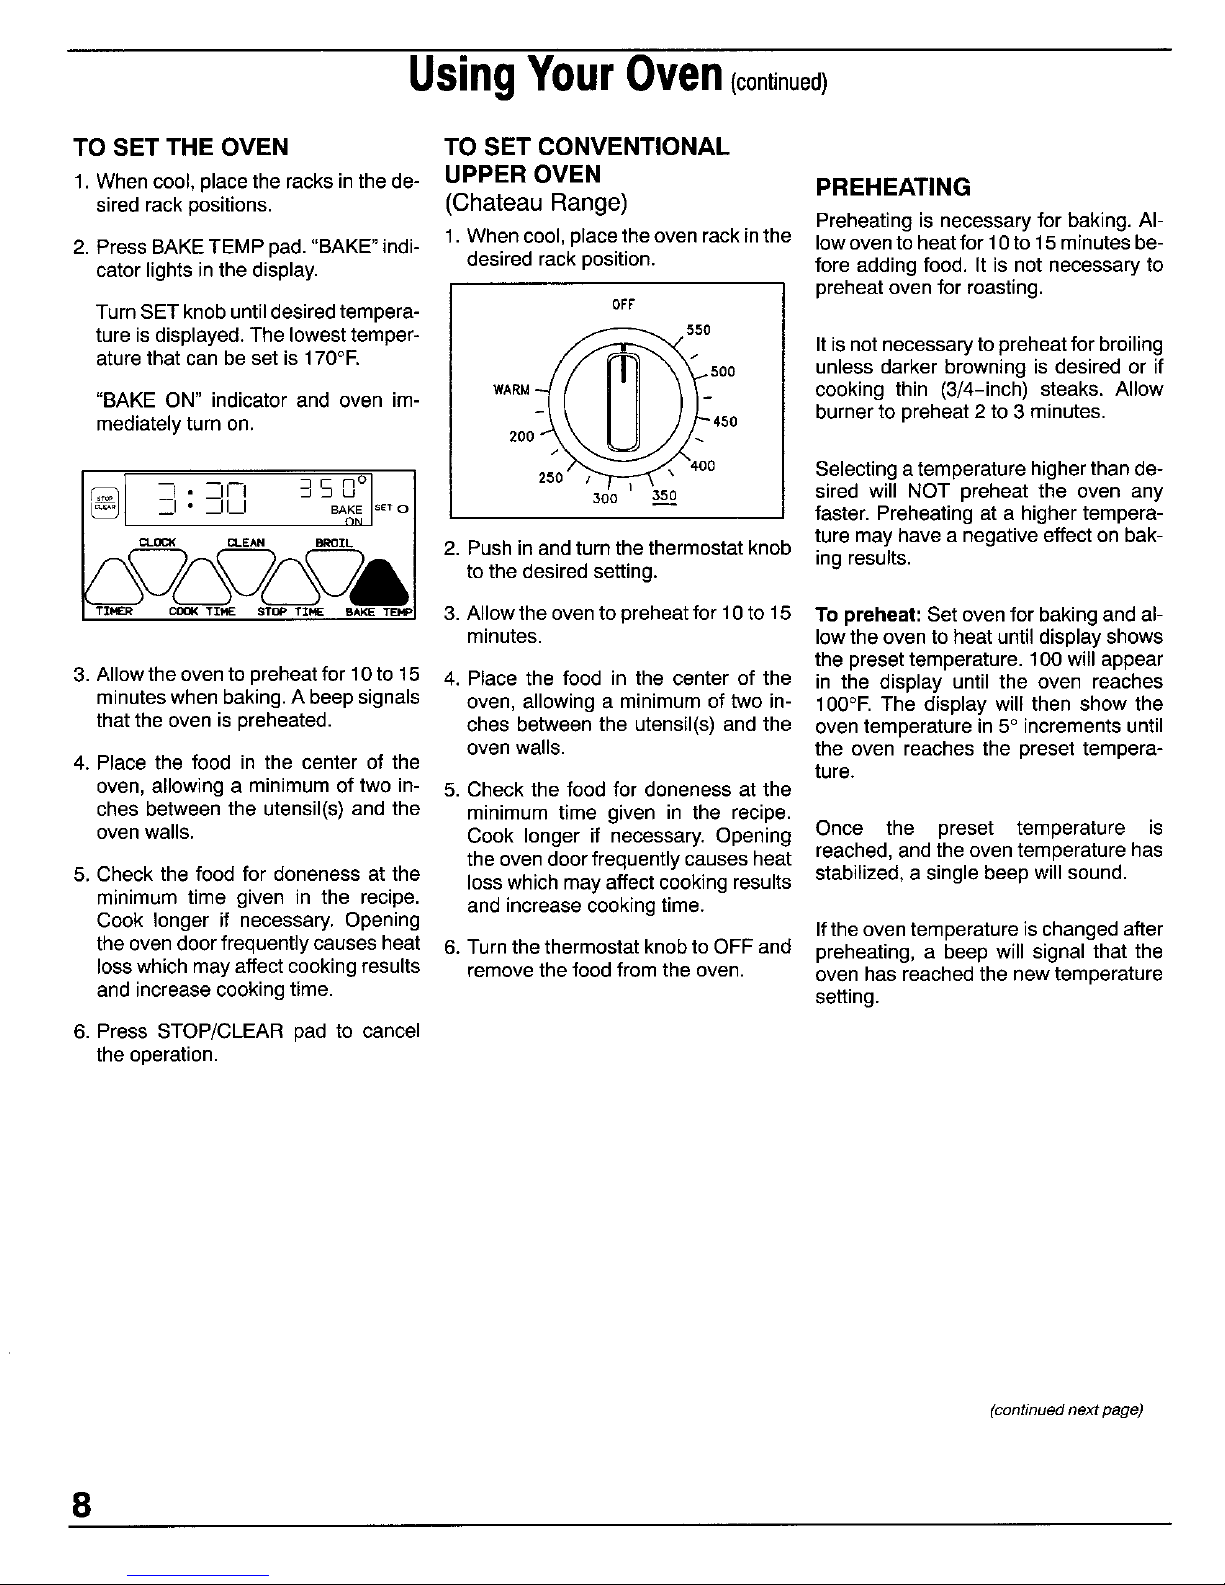
1. Whencool,placetheracksinthede- UPPER OVEN PREHEATING
sired rack positions. (Chateau Range)
Preheating is necessaryfor baking. AI-
2. PressBAKETEMP pad."BAKE" indi- 1. When cool,placethe ovenrack inthe lowoven to heatfor 10to 15 minutes be-
cator lights inthe display, desired rack position, fore adding food. It is not necessary to
preheatoven for roasting.
Turn SETknob untildesiredtempera- OFF
ture isdisplayed.The lowesttemper- 5:_ oo0
ature that can beset is 170°F. It isnotnecessaryto preheat for broiling
WARM_05°° unless darker browning is desired or if
"BAKE ON" indicator and oven im- _ cooking thin (3/4-inch) steaks. Allow
mediately turn on. 2o0., _ 450 burner to preheat 2 to 3 minutes.
Selecting atemperature higher than de-
_[ ] : -'11--] _JS B°I _oo _50 sired will NOT preheat the oven any
_,_, o faster. Preheating at a highertempera-
ture may have a negativeeffect on bak-
=__< o_E^, _qOZL 2. Pushin andturn the thermostat knob
to the desired setting, ing results.
TZ_ coa<TZ_ ST_TZ_ _^E TB_ 3. Allow the ovento preheat for 10to 15 To preheat:Set ovenfor bakingand al-
minutes, lowthe ovento heat until display shows
the preset temperature. 100will appear
3. Allowthe ovento preheatfor 10to 15 4. Place the food in the center of the in the display until the oven reaches
minuteswhen baking.A beep signals oven, allowing a minimum of two in- 100°E The display will then show the
that the oven is preheated, ches between the utensil(s) and the oven temperature in5° increments until
oven walls, the oven reaches the preset tempera-
4. Place the food in the center of the ture.
oven, allowing a minimum of two in- 5. Check the food for doneness at the
ches between the utensil(s) and the minimum time given in the recipe.
oven walls. Cook longer if necessary. Opening Once the preset temperature is
the ovendoorfrequently causesheat reached, and the oventemperature has
5. Check the food for doneness at the loss which may affectcooking results stabilized, a single beep will sound.
minimum time given in the recipe, and increase cooking time.
Cook longer if necessary. Opening Ifthe oventemperature is changedafter
theoven doorfrequently causes heat 6. Turnthe thermostat knobto OFFand preheating, a beep will signal that the
loss which may affect cooking results remove the food from the oven. oven has reachedthe new temperature
and increase cooking time. setting.
6. Press STOP/CLEAR pad to cancel
the operation.
(continuednext page)
8
 Loading...