

Page 1

IMPORTANTSAFETY
NOTICE AND WARNING WARNING: If the informa-
tion in this manual is not
The CaliforniaSafe DrinkingWater followed exactly, a fire or
andToxicEnforcementActof 1986
(Proposition65) requirestheGovernor -explosion
of Californiatopublisha listofsub- mg propertydamage,per-
stances knownto the Stateof Califor- sonal injury or death.
niato cause cancer or reproductive
harm,and requiresbusinessesto
warncustomersofpotentialexposures - Donot store or use gaso-
to such substances, line or other flammable
vapors and liquids in the
Usersofthisapplianceare hereby vicinity of thisor anyoth-
warned that the burningof gascanre- er appliance.
suitin low-levelexposuretosomeof
the listedsubstances,includingben- - WHAT TO DO IF YOU A
zane, formaldehydeandsoot,duepri- SMELL GAS: _ WAII_IM|NQ
marilyto the incompletecombustionof
naturalgas orliquidpetroleum(LP) • DO not try to light any • ALL RANGES
fuels. Properlyadjustedburnerswill appliance. CAN TIP
minimizeincompletecombustion.Ex-
posureto these substancescanalso • DO not touch any elec- • INJURY TO PERSONS
beminimizedbyproperlyventingthe trical switch; do not COULD RESULT
burnerstothe outdoors.
use any phone in your
building. • INSTALL ANTI-TIP
may
result Gags
FORFUTUREREFERENCE DEVICESPACKED
• Immediately call your WITH RANGE
Forfuturereferencewesuggest you gas supplier from a
retain this manual after recording the
model numberandserialnumberof neighbor's phone. • SEE INSTALLATION
this gas appliance in the spaces pro- Follow the gas suppli- INSTRUCTIONS
vided.Thisinformationcan befound er's instructions.
on the rating plate locatedon the
sidesofthe lowerrangefrontframe. • If you cannot reach To reduce the risk of tipping of the
Pulloutlowerdrawertosee rating your gas supplier, call appliance from unusual usage or by
plate, the fire department, excessive loading of the oven door,
- Installation and service properly Installed anti-tip device. To
must be performed by a aflashlight and look underneath range
MODEL NUMBER qualified installer, ser- to see thatone of the rear levelinglegs
vice agency or the gas isengagedinthe bracketslot.
supplier.
SERIAL NUMBER
the appliance must be secured by a
checkifdeviceisinstalledproperly:Use
DATEOF PURCHASE
These numbersidentifyyourrange.
Pleaseuse themin anycorrespon-
denceor servicecallsconcerningyour
appliance.
Pleaseretainthe proofof purchase
documentsfor warrantyservice.
Page 2
_,: _ _,:!_,i_i:!_:_!!_:-!_,:___!! :_!_'_!;'_ _i__'_ o_i_'_'_"_i_i_
i_i'ii_ I _i_i_i'ii_i'ii_i_i!i_ii_i!ii_i_i!i_i_i'ii_i!i_i_i!i!____i_i,i_il.__S_'ii___i_/ _i' _!i:i_!i
Gas Rangewith ElectronicController
TABLE OF CONTENTS
IMPORTANTSAFETY INSTRUCTIONS ......... 1-3 Automaticovencooking ................... 16-17
CLOCK & OVEN CONTROL ..................... 4 Broilingandchart ............................ 18
SURFACECOOKING ......................... 5-6 CONTINUOUS CLEANING OVEN
Ignitionsystem ............................... 5 (ChateauRange) ............................ 19
Conventionalsurfaceburners................... 5 SELF-CLEAN OVEN ........................ 20-21
Sealedsurfaceburners . :...................... 6 CAREAND CLEANING CHART .............. 22-23
Lightingsurfaceburners ...................... 6
Selectingflame size ........................... 7 MAINTENANCE ............................ 24-26
About thesurface flame ........................ 7 Cooktoplight ................................ 24
Adjustingtheflame ............................ 7 Oven light................................... 24
Cookware.................................... 8 Back panellight(ChateauRange) 24
Canning ..................................... 8 Upperovenlight(ChateauRange) ............. 24
USINGYOUR OVEN ......................... 9-18 Cooktop .................................... 25
Ovenlight..................................... 9 Ovendoor .................................. 25
Ovenvent .................................... 9 Door locklever .............................. 26
Fan ......................................... 9
Ignitionsystem ............................... 9 Storagedrawer . 26
Oven burner.................................. 9 .............................
Ovencharacteristics........................... 9 Levelinglegs ................................ 26
Ovenracks, 10 SERVICE .................................. 27-30
Howto set ovenfor baking .................... 11 How to remove rangefQrcleaning and servicing . 27
Preheating .................................. 11 EleCtricalconnection ......................... 27
Use of aluminum foil .......................... 11 Explanation of fault codes ..................... 28
Upper oven (ChateauRange) ................. 12 Proportionalvalve adjustment ................. 28
General baking tips .......................... 13 Adjusting oven temperature ................... 28
Common baking problems .................... 14 Before you callfor service ..................... 29
Roasting and chart ........................... 15 How toobtainservice ......................... 30
Burnergrates................................ 25
Oven bottom ................................ 26
INSTALLER Please leave this The model and serial numbers are found on the rating plate
manual with this appliance, locatedon the sides of the lower range front frame.
Be sure appliance is properly Model Number:
installedby the installer. Serial Number:
CONSUMER To save you time, Dateof Purchase:
energy and money, read and keep Please keepyour sales receipt and/or your cancelled check as
th s manual for future reference, proof of purchase should warranty service be needed. Store
these documents with this booklet.
8113P093-60
(02-96-01)
Page 3
ABOUT Y()UR NEW GAS RANGE
Congratulationsonyour choiceofthis gas range.Asyou use appliance withoutrevisingthis manual. As an example, the
your new range, we know you will apprecia_tethe many knob on your appliance may not look like the illustration in
features that provide excellent performance, ease of this manual.
cleaning, convenienceand dependability.
Should you have any questions about using your new gas
New features have dramatically changed today's cooking appliance, pleasewrite to us at this address:
appliances and the way we cook. It is therefore very
importantto understand howyour new gas range operates CustomerAssistance
BEFOREyou use itfor the first time. c/o Maytag Customer Service
In this Owner's Guide, you will find a wealth of information P.O.Box2370
regarding all aspects of your appliance. By following the Cleveland,TN 37320-2370
instructions carefully, you will be able to fully enjoy and
properly maintain your new range. Be sure to include the model and serial numbers of your
In ourcontinuing effort to improve the qualityof our cooking on the front cover to record this information. Please retain
products,"it may be necessary to make changes to the the proof of purchase documents for warranty service.
appliance. For your convenience, we have provided space
Page 4

IMP()RTANTSAFETYINSTRUCTIONS
Read all instructions before using this appliance.
The following instructions are based on safety Have your applianceinstalledand properlygroundedbYa
considerationsandmustbe strictlyfollowedto eliminatethe qualifiedinstalleraccordingto the installationinstructions,
potentialrisksoffire, electricshock,orpersonalinjury, Havethe installershowyouthe locationofthe gasshutoff
valveand how to shut it off in an emergency.
WARNING: If the information in this
A}ways disconnect power to appliance before Servicing.
manual is not followed exactly, a fire or
explosion may result causing property damage to unit do not attempt to adjust, repair,service, or
To ensure proper operation and avoid possible injury or
replaceany partof your applianceunlessit is specifically
damage, personal injury or death, recommendedin this book.All other servicing should be
referredto a qualifiedinstalleror servicer.
- Do not store or use gasoline or other
flammable vapors and liquids in the
vicinity of this or any other appliance. Besureallpackingmaterialsareremovedfromtheappliance
beforeoperating it.
- WHATTO DO IF YOU SMELL GAS: Keeparea aroundapplianceclear andfree from combustible
materials, gasoline, and other flammable vapors and
• Do not try to light any appliance, materials.
• Do not touch any electrical switch; do If appliance isinstalled near a window,proper precautions
should be taken to prevent curtains from blowing over
not use any phone in your building, burners.
• Immediately call your gas supplier Do notleave anyitemson the cooktop.The hotairfromthe
from a neighbor's phone. Follow the vent mayigniteflammableitemsandmayincreasepressure
gas supplier's instructions, in closed containerswhichmay cause themtoburst.
• If you cannot reach your gas supplier, Many aerosol-type spray cans are EXPLOSIVE when
call the fire department, exposedto heat and may be highly flammable. Avoid their
use or storage near an appliance.
- Installation and service must be Many plastics are vulnerable to heat. Keep plastics away
frompartsoftheappliancethatmay becomewarmorhot.Do
performed by a qualified installer,service not leave plasticitemson the cooktopas_theymay melt or
agency or the gas supplier, softenif left too close to the ventora lighted surface burner.
Toeliminatethe hazard ofreachingover hotsurfaceburners,
cabinetstorage should not be provided directly above a unit.
Ifsuch storage is provided,itshouldbelimitedto itemswhich
subjectedto heatfrom an appliance. Temperatures may be
unsafe for some items, such as volatile liquids, cleaners or
WARNING areused infrequentlyand which are safely storedin an area
aerosolsprays.
• ALL RANGESCAN TIP AND
CAUSEINJURIESTOPERSONS,
EVICES the flame. Extinguish flame then turn on hood to remove
smokeand odor.
Use drychemicalor foam-type extinguisheror bakingsoda
INSTALLATION, to smotherfire orflame. Neverusewateron a greasefire.
If fireis inthe ovenor broilerpan,smotherby closingoven
door.
If fire is in a pan on the surface burner, cover pan, Never
attemptto pick upor move a flaming pan.
Page 5
IMPIIRTANTSAFETYINSTRUCTIONS
WARNING: To reduce the risk of tipping of the appliance
from abnormal usageor by excessiveloadingof the oven
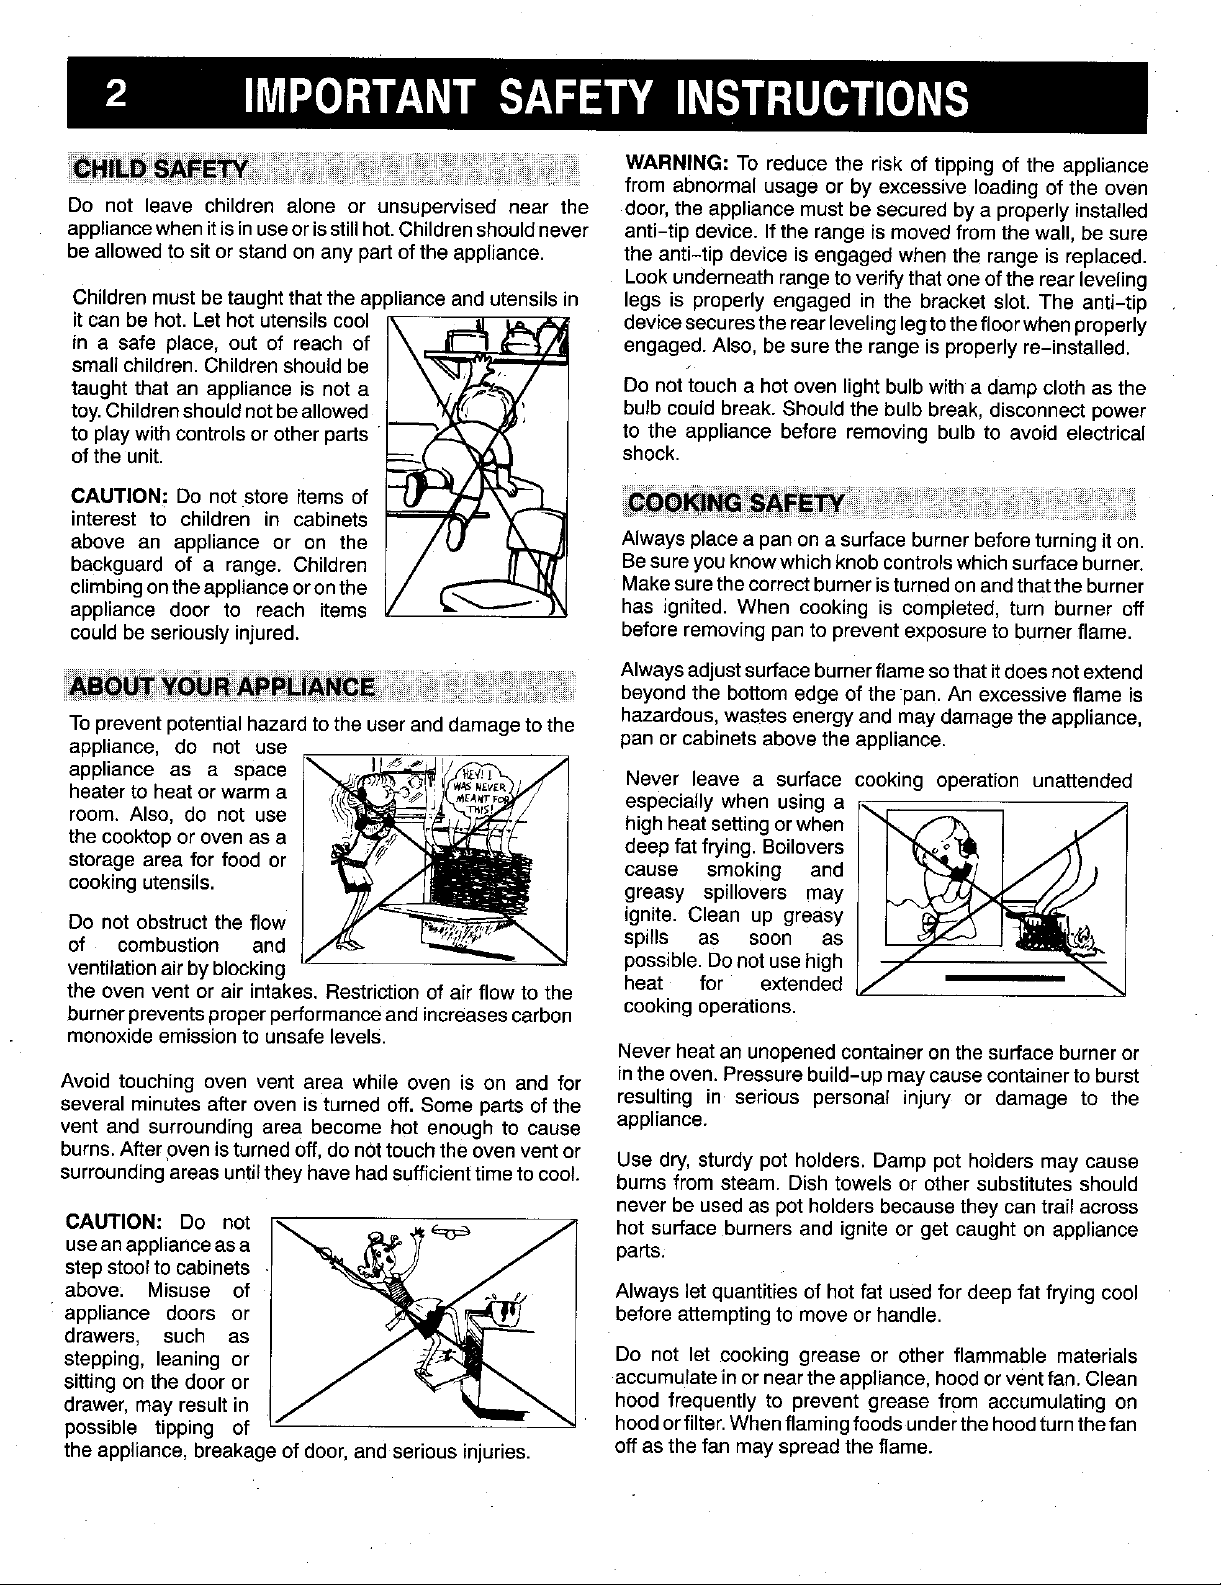
Do not leave children alone or unsupervised near the door,theappliancemustbe secured bya properlyinstalled
appliancewhenitisinuseorisstillhot.Childrenshouldnever anti-tipdevice.If the rangeis movedfromthe wall,be sure
be allowedto sitorstandonany part ofthe appliance, the anti-tip deviceis engagedwhen the range isreplaced.
Lookunderneathrange toverifythatoneofthe rear leveling
Childrenmustbetaughtthattheapplianceand utensilsin legs is properlyengaged in the bracketslot. The anti-tip
itcan be hot.Let hot utensilscool devicesecurestherearlevelinglegtothefloorwhenproperly
in a safe place, out of reach of engaged.Also,be surethe rangeis properlyre-installed.
smallchildren.Childrenshouldbe
taughtthat an applianceis not a Donot toucha hot ovenlightbulbwitha dampclothas the
toy.Childrenshouldnotbeallowed bulbcouldbreak.Shouldthebulb break,disconnectpower
to playwithcontrolsorotherparts to the appliancebefore removing bulb to avoid electrical
ofthe unit. shock.
CAUTION; Do not storeitemsof
interestto children in cabinets
above an appliance or on the Always place a pan on a surface burner beforeturning it on.
backguard of a range. Children Besureyouknowwhichknobcontrolswhichsurfaceburner.
climbingon theappliance oron the Makesurethe correct burner isturned on andthat the burner
appliance door to reach items " has ignited. When cooking is completed, turn burner off
couldbe seriously injured, before removing pan to prevent exposure to burner flame.
Always adjustsurface burnerflame sothat itdoesnot extend
beyond the bottom edge of the pan. An excessive flame is
Toprevent potential hazard tothe user and damageto the hazardous, wastes energy and may damage the appliance,
appliance, do not use pan or cabinets above the appliance.
appliance as a space Never leave a surface cooking operation unattended
heater to heat or warm a especially when using a
room. Also, do not use high heat setting orwhen _/_ I _"'_
the cooktopor oven as a deep fat frying. Boilovers
storage area for food or cause smoking and
cooking utensils, greasy spillovers may
Do not obstruct the flow ignite. Clean up greasy
of combustion and spills as soon as
ventilationairby blocking possible. Donot usehigh
the oven vent or air intakes. Restriction of air flow to the heat for extended
burnerprevents proper performanceand increasescarbon cooking operations.
monoxide emissionto unsafe levels.
Never heat an unopenedcontainer onthe surface burner or
Avoid touching oven vent area while oven is on and for inthe oven. Pressure build-up maycause container to burst
several minutes after oven is turned off. Some parts of the resulting in serious personal injury or damage to the
vent and surrounding area become hot enough to cause appliance.
burns.After oven isturned off, do nottouch the oven vent or Use dry, sturdy pot holders. Damp pot holders may cause
surroundingareas untilthey have had sufficienttime to coot. burns from steam. Dish towels or other substitutes should
never be used as pot holders because they can trail across
CAUTION: Do not _. ,_.o,_=_ j hot surface burners and ignite or get caught on appliance
stepstool to cabinets
above. Misuse of Always let quantities of hot fat used for deep fat frying cool
appliance doors or before attempting to move or handle.
drawers, such as
stepping, leaning or Do not let cooking grease or other flammable materials
sitting on the door or accumulate inor near theappliance, hoodorvent fan. Clean
drawer, may result in hood frequently to prevent grease frgm accumulating on
useanapplianceasa _ parts.
possible tipping of hoodorfilter.Whenflamingfoodsunderthehoodturnthefan
theappliance, breakage of door, and serious injuries, off as the fan may spread the flame.
Page 6

IMPq)RTANTSAFETYINSTRUCTIONS 3
Use caution when wearinggarments made of flammable This appliance has been testedfor safe performance using
material to avoid clothing -_. __,._,j,_ conventional cookware. Do not use any devices or
hanging-sleeved apparel manual. Do not Useeyelidcoversfor the surface units,stove
should not be worn while top grills, or add-on oven convection systems. The use of
cooking.Clothing may ignite devicesoraccessoriesthat are not expressly recommended
fires. Loose fitting or long _ accessories that are not specifically recommended in this
orcatch utensil handles, in this manual can create serious safety hazards, result in
performance problems, and reduce the life of the
Always place oven racks in the desired positionswhile oven components of the appliance.
iscool. Slideoven rack cutto addor remove food, using dry
sturdy pot holders. Always avoid reaching into the oven to
add or removefood. if a rack must be movedwhile hot, use
a dry pot holder. Always turn the oven off at the end of Turnoffallcontrolsandwaitforappliancepartstocoolbefore
cooking, touchingor cleaning them. Do not touch the burnergrates or
Use care when opening the oven doer.Let hot air or steam
escape beforeremoving or replacingfood. Cleanappliancewithcaution. Usecare toavoid steamburns
PREPAREDFOOD WARNING: Followfood manufacturer's Some cleaners can producenoxiousfumes ifapplied to a hot
instructions.Ifaplastic frozen foodcontainer and/orits cover surface.
distorts, warps, or is otherwise damaged during cooking,
immediately discard the food and its container. The food
could be contaminated.
Use pans with flat bottoms and handles that are easily notuseovencleaners ofany kind inor around anypart of the
graspedand stay cool.Avoid using unstable,warped, easily self-clean oven.
tipped or loose handled pans. Pansthat are heavy to move
whenfilled with food may also be hazardous. Before self-cleaning the oven, remove broiler pan, oven
Besure utensil is largeenoughto properlycontain food and to prevent excessivesmoke or flare ups. CAUTION: Do not
avoidbelievers. Pan size isparticularlyimportant in deepfat leave food or cooking utensils, etc. in the oven during the
frying.Besurepanwill accommodatethe volumeoffoodthat self-clean cycle.
is to beadded as well as the bubble action of fat.
To minimize burns, ignition of flammable materials and a self-clean cycle.Therefore, touching or liffingthe cooktop
spillagedueto unintentionalcontact with the utensil,do not during a clean cycle should be avoided.
extend handles over
surrounding areas until theyhave had sufficienttime to cool.
ifawet spongeor cloth isusedto wipespills on ahot surface.
Clean only parts listed in this booklet. Do not clean door
gasket. The door gasket is essential for a good seal. Care'
should betaken notto rub,damage, or movethe gasket. Do
racks, and other utensils, and wipe off excessivespillovers
Itis normalforthe cooktopofthe rangeto become hotduring
burners. Always turn
pan handlestowardthe
side or back of the
appliance, not out into The California Safe DrinkingWater and ToxicEnforcement
the room where they Ac_ of 1986 (Proposition65) requires the Governor of
are easily hit or California to publisha list of substances knownto the State
reached by small of California to cause cancer or reproductive harm, and
adjacent surface _ _
children, requires businesses to warn customers of potential
Never leta pan boildry asthis could damage the utensil and
the appliance. Users of this appliance are hereby warned that the burning
Follow the manufacturer's directions when using oven substances, includingbenzene, formaldehyde andsoot, due
cooking bags, primarilyto theincompletecombustionofnaturalgas orliquid
Only certain types of glass, glass/ceramic, ceramic, or incomplete combustion. Exposure to these substances can
glazed utensils are suitable for cooktop or oven usage also be minimized by properly venting the burners to the
without breakingdue to the sudden change in temperature, outdoors.
exposuresto suchsubstances.
of gas can resultJnlow-level exposureto some ofthe listed
petroleum (LP)fuels. Properlyadjusted burnerswill minimize
SAVETHESEINSTRUCTIONS
Page 7

CLOCK AND OVEN CONTR()L
All indicatorwords are displayed to show theirlocation.The touch pads on your range may
not looklike this illustration but they will operate as described in this manual.
II range will be labeled either
II I " II I C_A,,,O,LL0CK STOPTIMEorOVENSTOP.
II;1o-I1-1 35 n This function pad on yo_Jr
SET BAKE C_AN COOK STOP TIMER[O_ This pad will operate as
Press this pad to cancel all programming except the clock 1. Press OVEN TEMP pad.
and timer. 2. Press the • or • pad to set oven temperature.
Press or press and hold these pads to enter the desired time
or temperature or to select Hi or Lo broil. 1. Press BROIL pad.
1. Press TIMER pad.
2. Set desired time using the • and • pads.
_ DELAY TIMED BAKE
described below.
See pages 11to 15 for additional information.
2. Press • or • pad to select Hi broil or Lo broil.
See page 18 for additional information.
Press or press and hold either pad to change the time by 1 1. Close and lock oven door.
minute, 5 minutes or 10 minutes. 2. Press CLEAN pad.
TIMER can be set from 1 minute (0 HR:01) up to 9 hours and 3. Oven will automatically clean for 3 hours. Press the • or
50 minutes (9 HR:50). • pad to select 2 to 4 hours.
The timing operation will start automatically. Colon flashing "door" will appear in display until the door is properly locked.
in the display indicates a timing operation. One long See pages 20 and 21 for additional information.
continuous beep signals the end of the timing operation. The
time of day wilt automatically reappear in the display. The
TIMER does not control the oven.
To cancel: Press and hold TIMER pad. Time of day will the • or • pad.
reappear after a slight delay. 2. To delay the start of cooking: Press STOP TIME or OVEN
1. Press CLOCK pad. 3. Press OVEN TEMP pad. Enter oven temperature with the
2. Set the correct time of day using the • and • pads. • or • pad.
Tochange the time by one minute, press either pad once. To
change the time in increments of 10 minutes, press and times. Beeps will signal the end of cooking. Press CANCEL
hold either pad. pad to cancel end-of-cooking beeps. See pages 16 and 17
When power isfirst supplied to the oven or if there has been
a power failure, the display will flash.
Press CLOCK pad to recall time of day when another A beep sounds each time a pad is pressed. The oven will
function is displayed, automatically turn off if it is left on for 12 hours.If afault code
Clock time cannot be changed when oven is set for a cook, (example: F 2) is displayed and beeps sound, press
timed bake, or self-clean operation. Cancel operation to set CANCEL pad. If fault code continues, see page 28.
the clock.
1. Press COOK TIME pad. Enter desired cooking time with
STOP pad. Enter time you wish the oven to turn off with
the • or • pad.
The oven will automatically turn on and off at the preset
for additional information.
Page 8
SURFACE COOKING
IMPORTANT: When the applianceis first instaned, the
surfaceburnersandpilotS,if equipped,maybedifficultto
lightdueto air inthe gas line.This mayalsooccurif the The two surface burnerassemblies are secured in place
appliancehas been disconnectedfrom the main gas duringtransportation with springclips. Once the rangeis
supplyorifithasnotbeenusedforseveraldaysorweeks, installed, these clips may be removedto allowquick and
To removethe airinthe gasline,holda lightedmatchnext
tothe burnerhead andturntheknobon.When the burner . _',.,_.
as directed below to light the pilot. For pilotless ignition
models,eitheradjustthe knobto the desired flamesize or
turn the burner off.
easy removal of the burner assemblies.
t
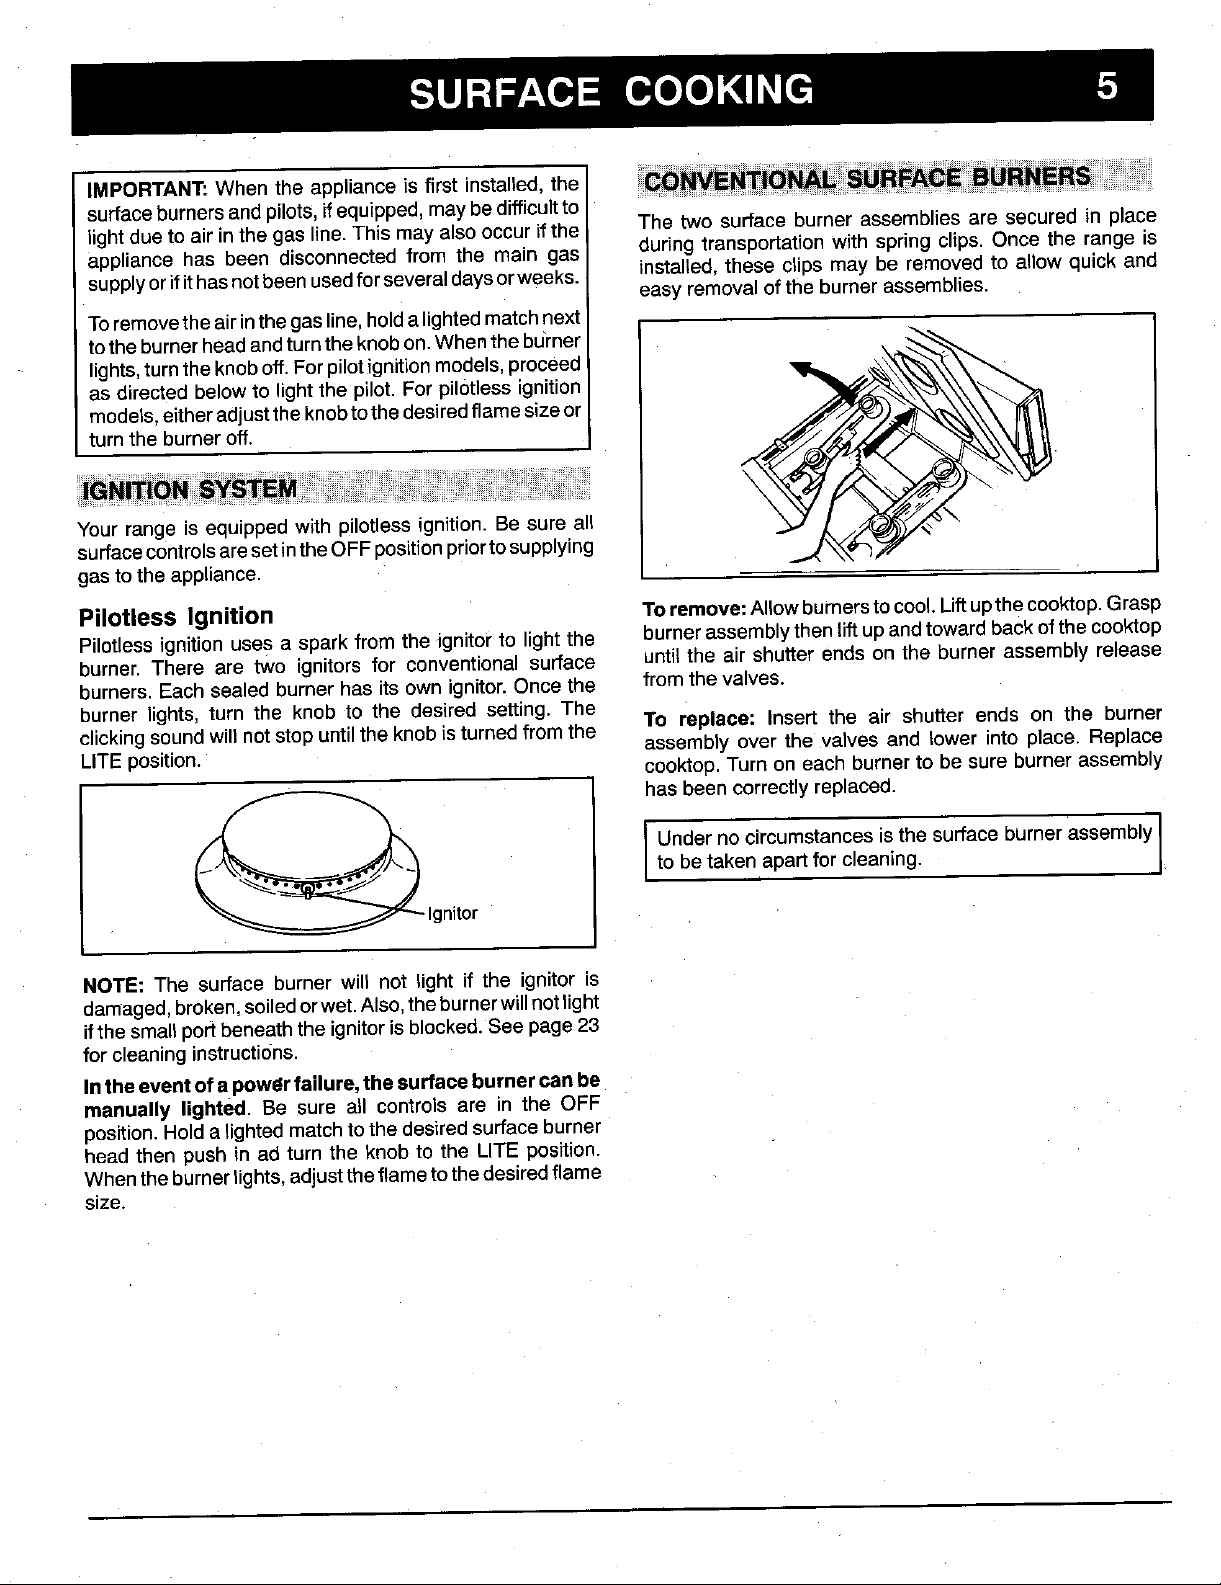
Your range is equipped with pilotless ignition. Be sure all
surfacecontrolsaresetinthe OFFpositionpriorto supplying
lights,turnthe knoboff. Forpilotignition models,proceed __._\_ ;
gasto the appliance.
Pilotless Ignition Toremove:Allow bumerstocool Liftupthecooktop.Grasp
Pilotless ignition uses a spark from the ignitor to light the burnerassembly then liftup andtoward backofthe cooktop
burner. There are two ignitors for conventional surface until the air shutter ends on the burner assembly release
burners. Each sealed burner has its own ignitor. Once the from the valves.
burner lights, turn the knob to the desired setting. The
clickingsound will not stop until the knob isturned from the To replace: Insert the air shutter ends on the burner
LITEposition, cooktop.Turn on each burner to be sure burner assembly
assembly over the valves and lower into place. Replace
_ i as been cOrrectlyreplaced" ,
NOTE: The surface burner will not light if the ignitor is
damaged,broken,soiledorwet.Also,theburnerwillnotlight
ifthe smallport beneaththe ignitoris blocked.See page 23
for cleaning instructions.
Inthe event ofa powerfailure, the surfaceburner canbe
manually lighted. Be sure all controls are in the OFF
position.Hold a lighted match to the desired surface burner
head then push in ad turn the knob to the LITE position.
When theburner lights,adjustthe flame to the desiredflame
size.
Ignitor
Underno circumstances is the surface burner assembly
to be taken apart for cleaning.
Page 9
SURFACE COOKING
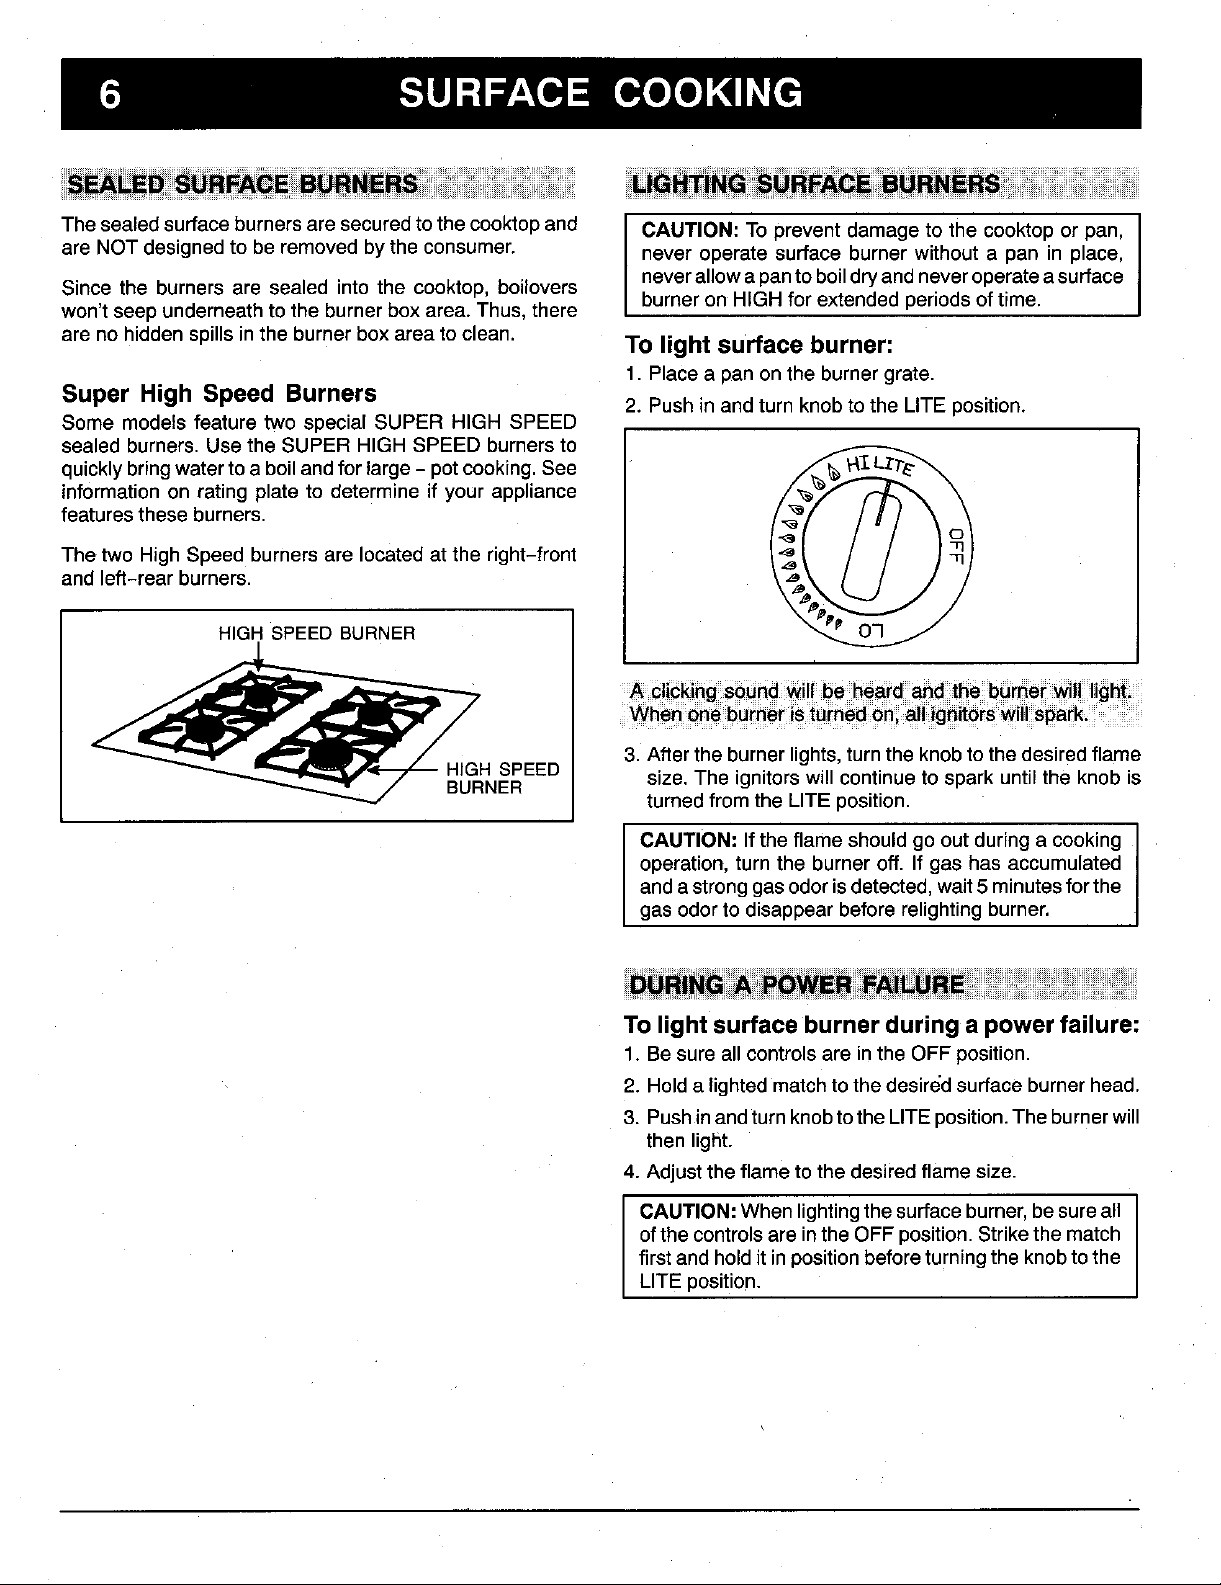
The sealed surface burners are securedto the cooktopand CAUTION: To prevent damage to the cooktopor pan,
are NOT designedto be removedbythe consumer, neveroperatesurface burnerwithouta pan in place,
Since the burnersare sealed into the cooktop,boilovers neverallowapantoboildryandneveroperateasurface
won'tseep underneathto the burnerboxarea. Thus,there burneron HIGH for extendedperiodsoftime.
are nohiddenspillsinthe burnerbox areato clean. TO light
1. Place a pan onthe burnergrate.
Super High Speed Burners
Some modelsfeature two special SUPER HIGH SPEED
sealedburners.Usethe SUPER HIGH SPEED burnersto
quicklybringwater toa boil andfor large- pot cooking. See ,,,_ _ _I LZT_-_,..
informationon ratingplate to determineif yourappliance
featurestheseburners.
The two HighSpeed burnersare locatedat the right-front
and left-rear burners.
2. Push in andturnknobtothe LITE position.
surface burner:
3. After the burner lights,turn the knob to the desired flame
HIGHSPEED size. The ignitors will continue to spark until the knob is
BURNER
turned from the LITE position.
CAUTION: Ifthe flame should go out during a cooking
operation,turn the burner off. If gas has accumulated
anda strong gas odoris detected,wait 5 minutesfor the
gasodor to disappear before relighting burner.
To lightsurface burnerduring a powerfailure:
1. Be sureall controlsareinthe OFF position,
2. Holda lightedmatchtothe desired surface burnerhead.
3. Pushinandturn knobtothe LITEposition.The burnerwill
then light.
4. Adjust the flame to the desired flame size.
CAUTION:Whenlighting the surface burner,besureall
ofthe controls are inthe OFF position. Strikethe match
first and hold it in position beforeturning the knobto the
LITEposition.
Page 10
SURFACE COOKING 7
Usea HIGHflamesettingto quicklybringliquidsto a boilor A properlyadjustedburnerwithclean portswilllightwithina
tobeginacookingoperation.Then reducetoalowersetting fewseconds.
to continuecooking.Never leave food unattended when
using a HIGH flame setting. On natural gas, the flame will be blue with a deeper blue
core;there shouldbe no traceof yellowin theflame.
wastes fuel, so have a serviceman adjust the mixture if a
yellow flame occurs.
_-\_ Ayellowflame indicatesan impropermixtureofair/gas.This
An intermediate flame size is used to continue a cooking You mayhear a"popping" soundonsometypes of gaswhen
operation.Food will not cook any faster when a higher the surfaceburneris turnedoff.Thisis a normaloperating
flame setting is used than needed to maintain a gentle soundof theburner.
boil. Remember, water boils at the same temperature
whetherboilinggentlyorvigorously.
OnLPgas, someyellow tipping isacceptable.This isnormal
and adjustment is not necessary.
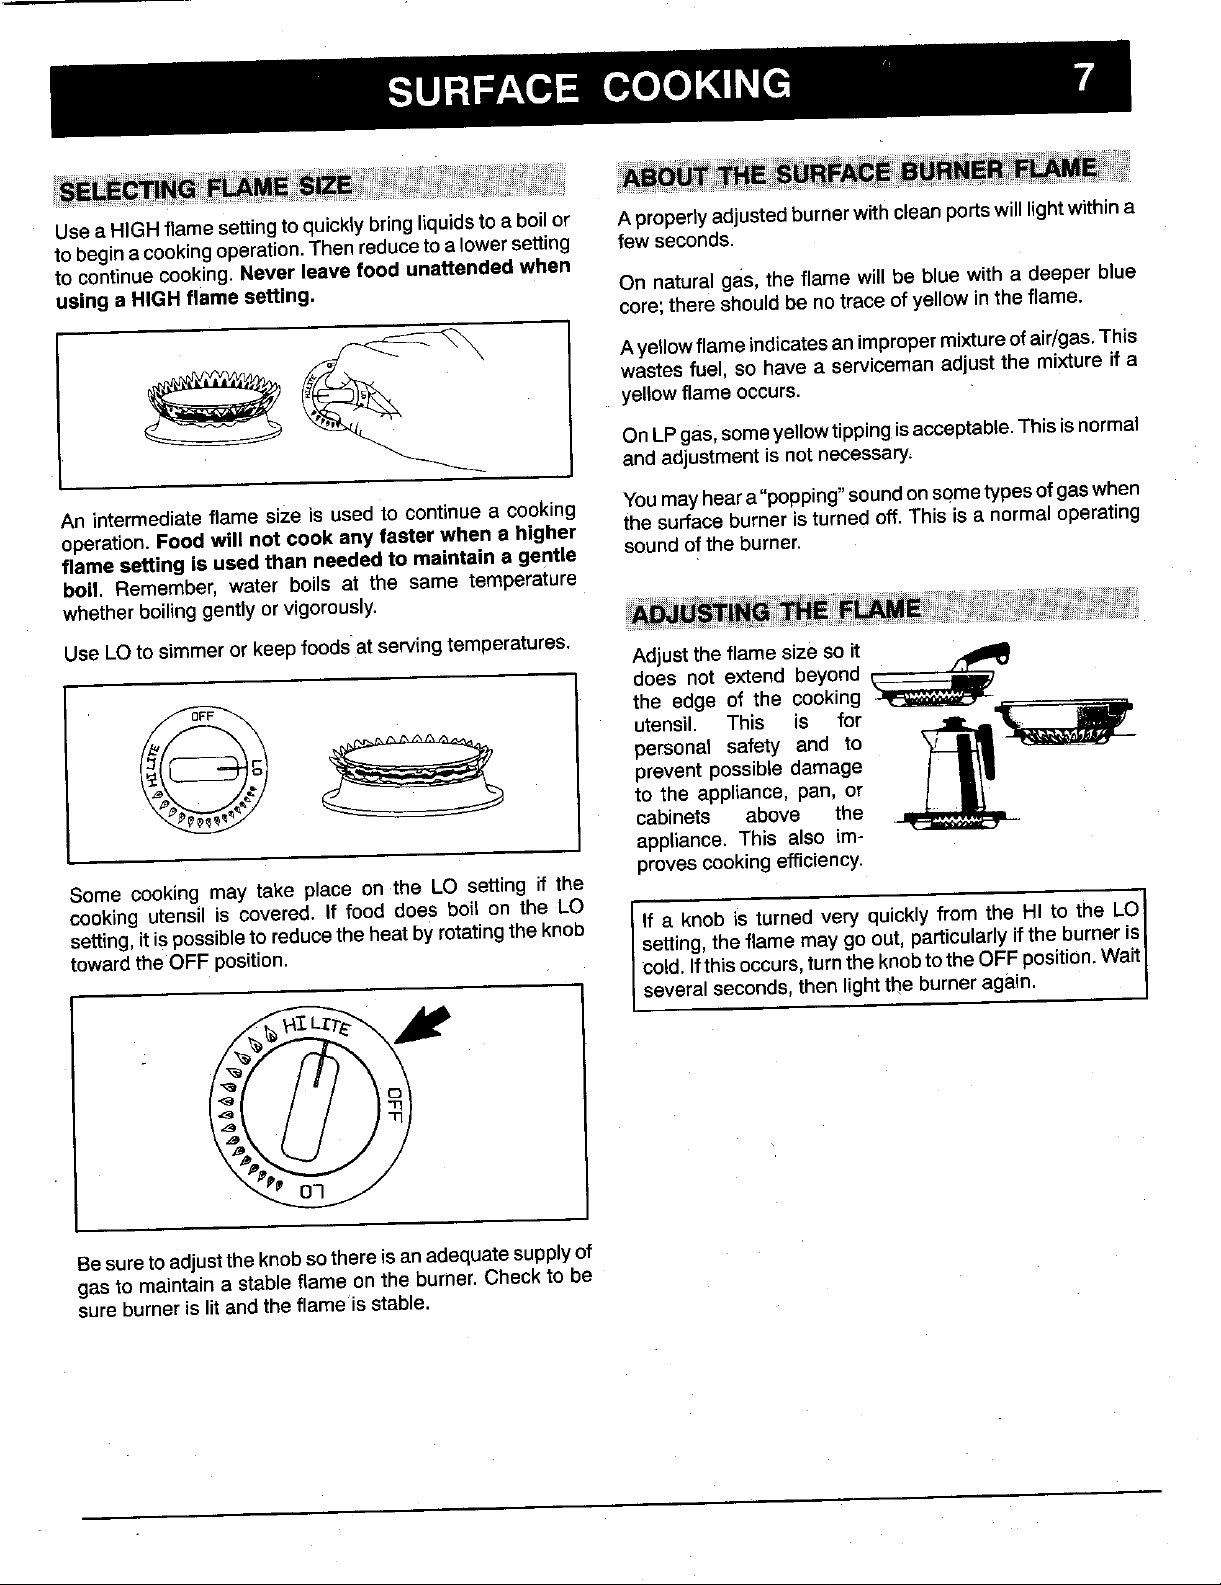
UseLOto simmeror keepfoodsat serv(ngtemperatures.
_ the edge of the cooking
Some cooking may take place on the LO setting if the
cooking
setting,itis possible to reducethe heatby rotatingthe knob
towardthe OFF position, setting,theflamemay go out,particularlyifthe burneris_
utensil is covered. If food does boil on the LO
Adjusttheflamesize so it
does not extend beyond
utensil. This is for
personal safety and to
prevent possible damage
to the appliance, pan, or
cabinets above the
appliance. This also im-
provescooking efficiency.
If a knob is turned very quickly from the HI to the LO)
cold. Ifthisoccurs,turnthe knobtotheOFF position.Wait[
several seconds, then light the burner again. J
Besureto adjusttheknobsothere isan adequate supplyof
gasto maintain a stable flame on the burner. Check to be
sure burner islit and the flame is stable.
Page 11

SURFACE COOKING
Cookwarewhich extends more than two inches beyondthe The pan materialdetermines howevenlyand quickly heatis
grate, rests on two grates, or touches the cooktop may conducted from the heat source to the food. Some widely
cause a build up of heatwhich mayresult in damage to the used pan materials are:
the burner grate, burner or cooktop. Aluminum - excellent heat conductor. Some foods will
Cookware, suchas awok with asupportring,which restricts cause itto darken or pit. Often used as a bottom coatingto
air circulationaround the burner will cause heatto build up improve the heating of otherpan materials.
and may result in damage to the burner grate, burner or
cooktop, requiresconstant polishing. Often used as a bottomcoating
Foods cook faster when the cookware is covered because to improvethe heating of other pan materials.
more heat is retained. Lowerthe flame size when cookware Stainless Steel ± slow conductor of heat. Develops hot
is covered, spots and produces uneven cooking results. Durable,
Copper - excellent heat conductor. Discolors easily,
The cooking performance is greatly affected by the type of attractive, easy to clean and stain resistant. Will distribute
cookwareused. Propercookwarewill reduce cookingtimes, combined or sandwiched together as a bottom coating.
uselessenergyand producemore even cookingresults. For
bestresults usea heavy gauge metalpan witha smooth flat Cast iron - slow heat conductor. Cooks evenly once
bottom,straight sides and a tight fitting lid. temperature is reached. Heavy. Needs seasoning to make
Cookwarewitll uneven,warped, or grooved bottoms do not
makegood contactwiththe heatingsurface,will reduce heat Glass - slow heat conductor. Easy to clean. Some types
conductivityand result in slower, less even heating, mayonly be used in the oven.
To determine the flatness of the bottom of a pan, place the Porcelain Enamel - glass-like substance fused to metal.
edgeofa ruler acrossthe bottom ofthe utensil.Holdit upto Heating characteristics depend on base material. Easy to
thelight. Little or no light should be visible underthe ruler, clean.
Acceptablewater-bath or pressurecanners should notbe
oversized and should not rest on two burner grates. They
should also have flat bottoms.
heat better if other metals (aluminum or copper) are
cleaning easier and to prevent sticking and rusting.
Whencanning,use the HIsettingjust untilthewatercomes
to a boil or pressureis reached in a pressure canner,then
reduce to a setting that maintains the pressure or a boil.
Prolonged use of the HI setting or the use of incorrect
canning utensils will produce excessive heat. Excessive
heatcan cause permanent damageto the appliance.
Page 12

OVEN USE
The oven lightswitchis located on the controlpanel and is Thesizeand appearanceofa properlyadjustedovenburner
markedOVEN LIGHT.Toturnthe oven light on, push in the flame should be as shown:
bottomhalf of the switch.
The oven vent is located at the base of the backguard or
backsplash. When the oven is in use, this area may feel Coneincenterissmaller
warmorhottothe touch.Topreventbakingproblems,donot
blockthe vent opening in anyway.
_1 Coneapprox. 1/2-1nob
-
Slide-inandChateaurangesareequippedwitha fan which
automaticallyturns on wheneverthe oven is set for a
cookingora cleaningoperation.Aftertheoperation,thefan Theoventemperatureismaintainedbycyclingtheburneron
willautomaticallyturnoffwhen the ovenhas cooled, andoff.Afterthe oventemperaturehasbeen set,therew
be abouta 45 second delaybefore the burner ignites.This
is normal and no gas escapes during this delay.
During the clean cycle, and some extended oven cooking
Your appliance features pilotless ignition. A gio bar will operations, you may hear a "popping" sound when the
light the oven burner.With this type of ignition system, the burner cyclesoff. This is a normal operating sound of the
oven will not operate during a power failure or ifthe oven is burner.
disconnectedfrom the wall outlet. No attempt should be
madeto operate oven during a powerfailure.
Be sure oven control Jsset in the OFF position prior to
supplying gas to the appliance. Everyovenhas its owncharacteristics.Youmayfind thatthe
cooking times and temperatures you were accustomed to
with your previousoven may needto be alteredslightlywith
your new oven. It is normal to notice some differences
between this oven and your previous oven,
Page 13

10 OVEN USE
The two oven racks are designed with a safety lock-stop Ifcookingonmorethanone rack,staggerthefoodto ensure
position to keep the racks from accidently coming proper airflow.
completelyoutoftheovenwhen pullingthe rackoutto addor
removefood. Ifcooking ontwo racks, userack positions 4and 2for cakes
and rack positions4 and 1when using cookie sheets.Never
CAUTION: Do not attemptto change the rack positions placetwo cookiesheets on onerack.
whenthe ovenis hot. If roastinga largeturkey,placethe turkeyonrack t orthe
roastingpositionand thesidedisheson rack5.
Toremove:Besuretherackiscool.Pulltherackstraightout
untilitstopsatthelock-stopposition.Tiltthefrontendofthe
rack upand continuepullingtherack out ofthe oven.
To replace: Placethe rackonthe racksupportsandtiltthe ovenracks,one abovethe other,onthe raisedsidesof the
frontendoftherackupslightly.Slideitbackuntilitclearsthe ovenbottom.
lock-stopposition.Lowerthefrontandslidetherackstraight
in.Pull the rack outto the lock-stop positionto be Sureit is rH_ -- _
positionedcorrectlyandthenreturnitto itsnormalposition.
Itisimportantthataircancirculatefreelywithintheovenand
aroundthe food. To help ensure this, place food on the
centeroftheovenrack.Allowtwoinchesbetweentheedge
oftheutensil(s)andthe ovenwalls.
Usedfor roastingtallercutsof meat or turkey.Placeboth
For optimum baking results of cakes, cookies or biscuits,
useonerack. Positiontherack sothefood is inthe center of /
the oven. Use either rackposition3 or 2.
RACK 5 Usedfor toasting bread, or for two-rack baking.
(highestposition)
RACK 4 Usedformostbroilingandtwo-rack baking, 5
RACK
RACK2 Used for roasting small cuts of meat, large
RACK 1 Used for roasting large cuts of meat and large
3 Usedfor most baked goodson a cookie sheet or ;
jelly roll pan, or frozenconveniencefoods.
casseroles, baking loaves of bread, cakes (in
either tube, bundt, or layer pans) or two-rack
baking.
poultry, pies, souffles, or angel food cake, or for
two-rack baking.
Page 14

OVEN USE 11
1. Pressthe OVEN TEMP pad. * Do not movethe door lock leverto the right during a
cookingoperation.If the door islocked,the cooking
• 000° and BAKE indicatorwords will appear in the operationwillbe cancelled. Iftheoven ishot enough to
display, engage the internal lock, the oven door will not open.
2. Press the • or • pad. Then press either pad until the Ifthisoccurs, allowthe oventocool upto onehour,then
desired oven temperature is displayed, unlock and open the door.
• 350° will appear in the display when either pad is • If you press the OVEN TEMP pad and do notset an
pressed once. oven temperature within 30 seconds,the programwill
• The oven temperature can be set from 170° to 550°. inthe display.
• The ON indicator word and 75° or the actual oven • Torecall the presettemperature during preheat, press
temperature, whichever is higher, will appear in the the OVEN TEMp pad.
display.
• The temperature in the display will increase in 5° • Tochangetheoventemperatureduring cooking, press
increments until the oven reaches the preset the • or • pad until the desired temperature is
temperature, displayed.
• Allow 10to 15minutesfor the ovento preheat,A single ° Theoven features an automatic shut-off. Ifthe ovenis
beep will soundwhen the oven is preheated, lefton.for 12hours, itwill automatically turn off.
automatically cancel andthe time of day will reappear
3. Place food inthe oven. Check food for doneness at the
minimumcooking time. Cook longer if needed.
4. At the end of ¢ooking, turn the oven off by pressing the
CANCEL pad. Removefood from the oven. Do not cover an entire rack with foil or place foil directly
Preheating is necessary for baking. Allow about 10to 15
minutesfor the oven to preheat. A single beep willindicate
that theoven is preheated. Itis not necessaryto preheat for
roasting.
Selecting a temperature higher than desired will NOT
preheat the oven any faster, and may have a negative
effecton baking results.
under cookware. Tocatch spillovers,place a pieceof foil, a
little largerthan the pan, on the rack belowthe pan. Do not
placefoil onthe oven bottom.
Page 15

12 OVEN USE
The upper oven of the Chateau rangewillfeature eithera To set upper oven:
microwave oven or a conventionalbakingoven. 1. When cool, place the oven rack in the desired rack
Microwaveoven: Referto theseparateUseandCare Book position.
formicrowaveovenoperatinginstructions. 2. Push in and turn the thermostatknob to the desired
Conventionaloven: Thisoven isequippedwithan electric setting.
bakeelementandfeaturesthe ContinuousCleaningOven.
See page 19 for additionalinformation on the Continuous OFF
Safety instructions for the conventional
upper oven z00
• Donottouchthe bake element,areas near the element
CleaningOven feature. WARM_)5__° 50_ _00
or interiorsurfacesofthe oven.The elementmaybe hot
eventhough itisdark incolor.Areasnearthe elementand 200 3_o
interior surfaces ofthe oven may become hotenough to
cause burns.
• Duringand after use, donot touch Orlet clothingor other
flammable materials contact the bake element, areas 4. Place the food in the center of the oven, allowing a
nearthe elementor interiorsurfaces ofthe oven untilthey minimum of two inches between the utensil(s) and the
have had sufficient time to cool.Among these areas are oven walls and oven door.
the oven vent opening and surfaces near this opening, 5. Check thefood for donenessat the minimumtime given
oven door, and oven window, inthe recipe. Cooklonger ifnecessary.Openingthe oven
• Do not allow aluminum foil, meat probes or any other door frequently causes heat loss which may affect
metal object to contact the bake element, cooking results and increase cooking time.
The size ofthe upper oven makes it convenient for cooking from the oven.
smaller quantities of food. However, it does have some
limitations. Do not use a large cooking sheet, pan or other
largebakeware. Large bakewarewill block the airflow and
affect cooking results.
3.'Allow the oven to preheatfor 10to 15 minutes.
6. Turn the thermostat knob to OFF and remove the food
Foroptimum results,use the loweroven for critical cooking
and delicate baking.
Do not use the upper oven for cooking itemsthat are heavy
orbulky to handle, especially ifconsiderableamounts of hot
fat or liquids are involved. Removing such foods from the
oven isdifficult and can be hazardous.
Page 16

OVEN USE 13
Use a reliable recipe and accuratelymeasurefresh • A dark metal, dull, anodized or satin-finish pan
ingredients. Carefully follow directions for oven absorbsheat and producesdarkerbrowningwith a
temperatureand cookingtime. crispercrust. Use clarkpans for pies, pie crustsor
Preheatovenif recommendedinthe recipeor package
directions.Selecting a temperature higher than the • Foroptimumbakingresults,bakecookiesandbiscuits
desiredtemperaturewillnotpreheattheovenanyfaster, ona flat cookiesheet.Ifthe panhassides,suchas a
Infact,thismayhaveanegativeeffectonbakingresults, jelly rollpan,browningmaynotbe even.
Use the correct rack position. Bakingresultsmaybe • Ifusingheat-proofglassware, ordarkpanssuchas
affectedif the wrongrackis used.For optimumresults, Baker's Secret or Wilton reduce the oven
bake foods on one rack. Select a rack positionthat temperatureby 25°F except when baking pies or
locatesthefoodinthecenteroftheoven.Ifbakingontwo bread.Usethe same bakingtimeas calledfor inthe
racks,selectrackpositions#2and4, #1 and4 or#2 and recipe.
5.
• Topbrowningmay be darker it foodislocatedtoward optimumbakingresults.Improperplacementofpansin
thetopoftheoven. the ovenwill blockair flow and may result in uneven
• Bottom browningmay be darkerif food is located browning.For optimum browningand even cooking
towardthebottomofthe oven. results:
bread.
Allow hot air to flow freely through the oven for
• When usingtworacksforbaking,allowenoughspace • Donotcrowdarackwithpans.Neverplacemorethan
betweenthe racksforproperaircirculation.Browning one cookiesheet, one 13x9x2-inch cake panor two
and cooking results will be affected if air flow is 9-inch roundcakepanson one rack.
blocked. • Staggerpanswhenbakingontworackssoonepanis
notdirectlyoveranotherpan.
Cookware material playsan importantpart in baking
results.Alwaysusethetypeandsizeof pancalledforin • Allowtwo inchesbetweenthe panandtheovenwalls.
the recipe. Cookingtimes or cookingresultsmay be
affectedifthewrongsizeis used. Check the cooking progress at the minimum time
• A shiny metal pan reflectsheat away from thefood. checkingat intervalsuntilthefoodis done. Ifthe oven
Thistypeofpanproduceslighterbrowningandasofter doorisopenedtoofrequently,heatwillescapetheoven;
crust.Useshinypansfor bakingcakesor cookies, thiscanaffectbakingresultsand wastesenergy.
recommendedin the recipe. If necessary, continue
If you add additional ingredients or alter the recipe,
expectcookingtimesto increaseordecreaseslightly.
Page 17

14 OVEN USE
--P-_BLEM CAUSE PROBLEM CAUSE
Cakes are uneven. Panstoocloseortouching Cakes don't brown on top. Incorrectrackposition,
Cakehigh in middle. Temperatureset too high. Excessive shrinkage. Toolittle leavening.
Cake falls. Toomuch shortening or sugar.
Cakes, cookies, biscuits Incorrect rack position. Temperatureset too high.
lon't brown evenly Oven door not closed properly.
Foroptimumresults,bakeon one rack. If bakingcakeson /
tworacks;place panstowardback of oven onupperrack |
andtowardfrontofovenon lowerrack. ]
each otherorovenwalls. Temperaturesettoo low.
Batter uneven inpans. Overmixing.
Temperatureset too lowor Too much liquid.
baking time too short: Pansize too large or too little
Oven not level, batter in pan.
Underrnixing. Oven door opened too often.
Toomuch liquid.
Bakingtimetoo long. Overmixing.
Overmixing. Pan too large.
Toomuch flour. Temperature set too high.
Panstouching each other or Baking time too long.
oven walls. Pans too close to each other
Incorrect rack position, or oven walls.
Toomuch or too little liquid. Uneven texture. Toomuch liquid.
Temperatureset too low. Undermixing.
Old or too little baking powder. Temperatureset too low.
Pan too small Bakingtime too short.
Ovendoor opened frequently.
Added incorrect type of oil to
cake mix. Too much baking powder.
Added additional ingredients Overmixing or at too high a
to cake mix or recipe, speed.
Doorgasket notsealing
properly. Cakes crack on top. Batter overmixed.
Incorrect use of aluminum foil. Temperature set too high.
Oven not preheated. Too much leavening.
Pans darkened, dented or Incorrect rack position.
warped.
Cakes have tunnels. Not enough shortening.
Cake not done in middle.
Temperature
Pantoosmall.
Baking
set too
timetooshort.
high.
"_akes,cookies, biscuits too Oven notpreheated.
brown on bottom. Panstouchingeach otheror cookingtimeto increase.
ovenwalls.
Incorrectrackposition. Pie crust edges too brown. Temperaturesettoo high.
Incorrectuseofaluminumfoil. Panstouchingeachotheror
Placed2 cookie sheets on one oven walls.
rack. Edgesof crust too thin; shield
Used glass, dark, stained, with foil.
warped or dull finish metal
pans. (Use a shiny cookie Pies don't brown on bottom. Used shiny metal pans.
sheet.) Incorrect rack position.
Follow cookware manufacturer's instructions for oven
temperature.Glasswareanddarkcookwaresuchas Ecko's Pies have soaked crust. Temperaturetoo lowat start
I Baker'sSecret requireloweringthe oven temperatureby of baking.
L.25oF. _ Fillingtoojuicy.
[ 'Ifadditionalingredientswereaddedtomixorrecipe,expect ]
Temperatureset too low.
Usedshinymetalpans.
Page 18

OVEN USE 15
Roasting isthe method for cooking large, tender cuts of meat thus allowing better heat circulation for even cooking. As the
uncovered, without adding moisture, fat on top of the roast melts, the meat is basted naturally,
' Roasting Tips: eliminating the need for additional hasting.
Most meats are roasted at 325°F. It is not necessary to The cooking time is determined by the weight of the meat
preheat the oven. Place the roasting pan on either of the two and the desired doneness. For more accurate results, use
lowest rack positions, thickest part of the meat. It should not touch fat or bone.
Use tender cuts of meat weighing three pounds or more.
Some good choices are: Beef rib, ribeye, top round, high Remove the roast from the oven when the thermometer
quality tip and rump roast, pork loin roast, leg of lamb, veal registers the desired internal temperature.
shoulder roast and cured or smoked hams. NOTE: For more information about food safety, call I
Season meat, if desired, either before or after roasting. Rub USDA's Meat & Poultry Hotline at 1-800-535-4555. For I
into the surface of the roast if added before cooking, cooking information write to the National Live Stock and I
Place the meat fat-side-up on a rack in a shallow roasting Illinois 60611.
pan. Placingthemeatonarackholdsitoutofthedrippings, Meat Board, 444 North Michigan Avenue, Chicago,
a meat thermometer. Insert itso the tip is in the center of the
Approximate Oven Approximate*
Weight Temperature internal RoastingTime
Cut of Meat (pounds) in °F Temperature (rain. per lb.)
Beef
RibRoast (cut-side-down) 4 to 8 325°F 145°F(medium/rare 25-35
160°F (medium) 30-35
RibEyeRoast 4 to6 350°F 145°F (medium/rarE 25-35
Loin TenderloinRoast 2 to 3 400°F 145°F(medium/rarE 20-30
Pork, Fresh
ShoulderBlade Roast, (boneless) 4 to6 325°F 160°F 35-45
Shoulder Blade Roast 4to 6 325°F 160°F 30-40
LoinBladeor SirloinRoast 3 to4 325°F 160°F 35-40
BonelessPorkLoin 6 to 8 325°F 160°F 25-35
Pork, Smoked
Ham, Half (fullycooked)** 5to 7 325°F 140°F 25-35
Ham, Half (cook-before-eating) 5 to 7 325°F 140°F 35-45
Poultry
Turkey,unstuffed***. 12 to 16 325°F 180° 185°F ;8-20
t
Turkey,Breast 3to 8 325°F 180°F 30-40
' Chicken,Fryer 2 1/2 to3 1/2 350-375 ° 180°F 20-25
'_ Chicken,Roaster 4to 6 350-375°F 180°F 20-25
16 to 20 325°F t 80°-185°F 16-18
20 to 24 325°F 180°-185°F 14-16
160°F (medium) 30-35
Lamb
Leg (boneless) 2 to 3 325°F 160°F 35-40
170°F 40,45
Whole Leg 5 to 7 325°F 160°F 30-35
* Cooking times are approximate and may vary depending on theshape of the roast. A meat thermometer is themost accurate wa
to determine doneness.
** Add water and follow package directions.
*** Stuffed turkey requiresadditional roasting time. Shield legs and breast with foil to prevent overbrowning and drying of skin.
i
Page 19

16 OVEN USE
The Automatic Oven Cookingfeature is used to turn the To set oven:
oven onandoffat a presettimeofday.Thisfeature canbe
usedto: 1. Placefoodinthe oven.
• Turnthe ovenon immediately(immediate start). 2. Pressthe COOK TIME pad.
• Delaythe startof cooking(delay start). The words SET COOK TIME will flash in the display.
Thefeaturecanbeusedwitheitherovencookingorwiththe
self-cleaningovenfeature.See page21 for instructionson 3. Pressthe • or• padto enterthe cookingtime.
delayingthestart of a clean cycle. 4. Pressthe OVENTEMP pad.
The clockmustbefunctioningandset at thecorrecttimeof ThewordsBAKEand000° willappearin thedisplay.
day for the AutomaticOven Cookingfeature to operate
properly. 5. Pressthe • or • padto enterthe oventemperature.
IMPORTANT Theoven will immediatelyturnon.The wordsTIMED BAKE
• Highly perishablefoods such as dairy products, ON will appear in the displayand the displaywill begin
pork, poultry, seafood, or stuffing are not countingdownthecookingtime.
recommendedfor DelayStart cooking. At the end of the preset cooking time, the oven will
• If cookingmore than one food, selectfoodsthat automaticallyturn offand END will appear in the display.
cookfor the same lengthof timeand at the same Continuousbeeps willremindyoutoremovethe foodfrom
oventemperature, theoven.
Pressthe CANCEL padto cancelthe beeps.The current
To recall the preset cooktime or stop time, press the time ofday willreappearinthe displaywhenthe CANCEL
correspondingpad.... pad ispressed.Removethe foodfromthe oven.
TocanceltheAutomaticOvenCookingoperation,pressthe
CANCELpad. Example For Immediate Start
At the end of the AutomaticOven Cookingoperation,the Food is to cookfor one hourand thirty minutes(1:30) at
ovenwillautomaticallyturn offand continuousbeeps will 375°F"
soundto remindyouto removefoodfrom theoven. Press
theCANCEL padto cancelthe beeps.
Thisfeaturewillonlydelaycookinguptoelevenhoursand
fiftyfiveminutes(11:55). isdisplayed.
Ifyoudelaymorethan30 secondsbetweenpressinga pad 3. Pressthe OVEN TEMP pad.
and the • or • pad, the displaywill either: 4. Pressthe • pad until375° is displayed.
• Returntothe previoussetting.
• Beepandflashtoindicatethenextentry, offatthe presettime.Pressthe CANCEL padtocancelthe
• Returntothecurrenttimeofdayandcanceltheoperation, beeps.
1. Pressthe COOK TIME pad.
2. Pressthe • paduntil1:30 (one hourandthirtyminutes)
Theovenwillturnonimmediatelyandwillautomaticallyturn
Page 20

OVEN USE 17
To set oven: At the presettime, the ovenwill automaticallyturn on and
TIMED BAKEON willappearinthedisplay,The displaywill
1. Placefoodinthe ovenl begincountingdownthe cookingtime.
2. Pressthe COOKTIME pad.
The wordsSET COOKTIME willflashinthe display, automaticallyturn off and END will appear in the display.
3, Pressthe • or • padto enterthecookingtime. theoven.
At the end of the preset cooking time, the oven will
Continuousbeepswillremindyouto removethefoodfrom
The cookingtime will be displayed in hours and
minutes, foodfromtheoven.Thecurrenttime ofdaywillappearinthe
4. PresstheSTOP TIME or OVEN STOP pad. displaywhenthe CANCEL pad is pressed.
The wordsSET STOP TIME willflashinthe display.
5. Pressthe• or• padto enterthetimeyouwishtheoven Example For Delay Start
- toturnoff. Food is to cookfor one hourand thirtyminutes(1:30) at
6. Pressthe OVEN TEMP pad.
The wordsBAKEand000° willappearin the display. 1. PresstheCOOK TIME pad.
7. Pressthe• or• padto enterthe oventemperature. 2. Pressthe • paduntil1:30 (one hourandthirtyminutes)
8. Pressthe CLOCK pad and the currenttime Ofday will
reappearinthe display. 3, Pressthe STOP TIME or OVEN STOPpad.
DELAYBAKEwillappearinthedisplayto indicatethat the 4. Pressthe • pad until6:00 is displayed.
ovenis setfora delay startcookingoperation.
The controlwillautomaticallydeterminewhento turnon
theovenbasedon the COOK TIME and STOP TIME or
OVEN STOP time you set. It is NOT necessary to set a
start time. The oven will automatically turn on and off at the preset
PresstheCANCELpadtocancelthebeepsandremovethe
375°F.Youwishthe foodto becookedby6:00.
isdisplayed.
5. Pressthe OVENTEMP pad.
6. Press the • pad until375° is displayed.
times. Press the CANCEL pad to cancel the beeps.
Page 21

18 OVEN USE
Broiling is a method of cookingtender meats by direct heat. To set oven to broJJ:
The cookingtime isdetermined by the distance between the 1. Press the BROIL pad.
meat and the.oven burner, the desired degree of doneness 00O° and BROIL indicatorwords willappear inthe display.
and the thickness of the meat.
2. Press the • pad to select HI for normal broilingor press
Broiling Tips the V pad to select Lo for low temperature broiling.
Broiling requires the use of the broiler pan and insert. The 3. Close door and cook food according to the broil chart•
broiler insertmustbe inplace toallow fat and liquidtodrain to Turn meat once about half way through cooking. Check
the pan below to prevent spatters, smoke and flare-ups, for doneness bycutting a slit inthe meat near the center
Improper use may cause grease fires• for desired color•
For easier clean up, line the broiler pan with foil and spray 4. At the end of cooking, remove the broiler pan and press
the insert with anon-stick vegetable spray. Do not coverthe the CANCEL pad to cancel the broil operation• The
broiler insert with aluminum foil as this prevents fat from current time of day will reappear in the display.
draining into pan below•
Trim excess fat and slash remaining fat to help keep meat Use HI BROIL for most broil operations• Select Lo BROIL
from curling and to reduce smoking and spattering. Season when broiling longer cooking foods such as poultry. The
meat after cooking• lower temperature allows food to cook to the well done stage
Place oven rack in the correct rack position when oven is BROILis selected•
cool. For darker browning, place meat closer to the oven
burner• Place meat further down if you wish meat to be well
done or if excessive smoking or flaring occurs•
without excessive browning. Cooking time will increase if Lo
See Care and Cleaning Chart on page 22 for instructions on
cleaning the broiler pan and insert.
BACON #4 Well Done 6 to tO
BEEF STEAKS
1-inch thick #4 Medium 15 to 20
CHICKEN LO BROIL
Pieces #3 or#4 Well Done 30 to 45
FISH
Fillets " #4 Flaky 8 to12
Steaks,1-inch thick #4 Flaky 12to 15
GROUND BEEF PATTIES
3/4-inch thick #4 Well Done 15to20
HAMSLICE, precooked
1/2-inchthick #4 Warm 8 to 12
PORK CHOPS
1-inch thick #4 Well Done 20 to25
#4 WellDone 20 to25
* The toc rackposition _s0osition#5.
** Broilingtimes are approximateand may vary depending on the meat.
Page 22

C_
C()NTINUOUS CLEANING OVEN 19
CHATEAU RANGE CONVENTIONAL UPPER OVEN ONLY
The upper oven door liner is porcelain enamel. For I pores and prevent the specialfinish from being exposedto
cleaning instructions refertothe cleaning chart on page the hot oven air. This greatly reduces the cleaning
23. effectivenessof the finish.
These crusty or varnish-like stainsmust either be removed
WHATIS THE CONTINUOUS CLEANING OVEN? or broken up before cleaningcan effectivelytake place.
The finishofthe ContinuousCleaningOvenis identifiedby
its dark gray color,and rough,poroustexture.The rough
texturepreventsgreasespattersfromformingbeadswhich TO MANUALLYCLEAN HEAVY SPILLOVERS
run down the walls leaving unsightly streaks. Rather, the Brush off heavy soil with a nylon brush or plasticpad. DO
roughtexture absorbs spatters and allowsthem to spread, NOT USEpapertowels, clothsorsponges forthe oven walls
thusexposing a largerarea to the hot ovenair.The catalyst, areporous andparticlesofthese materialswill ruboff onthe
whenexposed to heat, speeds the oxidationof soil. walls. Rinse areawith clear water only.
Cleaningaction automatically begins whenever the oven is
turnedonfor bakingorroasting.Theoven MUSTbe "on"for HINTS
cleaningtotake place. Nocleaningwill occurwhen the oven Brittlecrusts or stains can be loosenedby GENTLYtapping
is off. The special catalytic finish must be exposed to hot stainwitha wooden or plasticutensil.Brush awayany loose
ovenairbefore soil will beginto gradually reduce in size. soil that flakes off. Varnishtype stains usually need to be
softened with a small amount of water or damp cloth.
FACTORSAFFECTING LENGTH OF CLEANING TIME Remaining soil will gradually reduce with continued oven
The higherthe oven temperature,the fasterthe cleaning
action. The length of cleaningtime will depend on these DO NOT USE ANY TYPE OF OVEN CLEANER,
factors:Typeofsoil,amountorsizeofsoil,oventemporature POWDERED CLEANSERS, SOAP, DETERGENT OR
andlengthoftime oveniein use.-I'imemayvaryfromafew PASTE ON ANY CONTINUOUS CLEANING SURFACE.
minutestoseveralhours.Soildepositedatthe endofa cycle ALSO,DONOT USEANY ABRASIVEMATERIALS,STEEL
maystillbevisible.Thiswillusua!lyfadewithcontinuedoven WOOL, SHARP INSTRUMENTS OR SCRAPERS FOR
use until the soil gradually disappears or can be wiped up THEY WILL DAMAGE THE FINISH.
manually. The oven will appear presentably clean, even
though somespatters may be present. Avoid spilloversby using utensils that are large enough to
MANUALLYCLEANING HEAVY SPILLOVERS belowthe rack holding the utensilto catchspills.
The specialfinishwill clean moStspattersduringnormal
oven use unless there is a heavy buildupof soil. Heavy Over a period of fime, wear marks may appear on the
spilloverssuchas pie orcasseroleboiloverswill notclean embossedracksupports.This is normaland resultsfrom
effectively without some manual help. The crusty or slidingtheracksinandoutoftheoven. Wearmarkswill not
varnish-likestainsthatformfromthesespilloversclogthe affectthecleaningactionof theoven.
useat normalbakingtemperatures.
hold food. A cookie sheet or piece of aluminum foil, just a
little largerthan the pan, can be placed on the rack directly
Page 23

20 SELF-CLEAN OVEN
The self-clean oven uses temperatures above normal
cookingtemperatures to automaticallycleanthe entire oven
interior. When the doorislocked andthe CLEANpad is pressed,the
oven will automatically begin to heat to cleaning
hotduring a cleancycle. Therefore, duringa clean cycle,
avoid touching the cooktop, oven vent area, oven doorJ On slide-in and Chateau ranges: A fan will automatically}
I CAUTION: It is normal for parts of the range to become temperatures.
and window. I turn on during the self-clean cycle and will automaticallyI
turnoffafterthe clean cyclewhen the ovenhas cooled.Do
Itisbettertocleantheovenregularlyratherthantowaituntil - not operate clean cycle if fan does not turn on; call an
there is a heavybuild-up ofsoil in theoven. authorzealservicer.
Turnoffthe oven lightbeforea cleancycle. Ifthe ovenlightis
lefton, the lightbulbwill burn out duringthe cleancycle. As the oven reaches cleaning temperatures, the LOCK
indicator will appear in the display to show that an internal
lock mechanism has engagedl At this point, the oven door
can not beunlocked and opened.
1. Remove oven racks and close oven door. Toprevent damage to the door and lock lever,do not force
2. Lock oven door. the door open when the LOCK indicator is displayed.,
3. Press CLEAN pad.
4, Press the • or • pad to selectcleaningtime. The first few timesthe oven iscleaned,some smoke and
• Lightsoil- 2 hours odor may be detected. This is normal and will lessen or
• Average soil - 3 hours broiler pan was accidently left inthe oven, smoke and odor
• Heavy soil - 4 hours may occur.
disappear with use. If the oven is heavily soiled, Qrif the
As the oven heats andcools,you may hearsounds ofmetal
partsexpandingand contracting. This is normaland will not
Remove broiler pan, all pans and the oven racks from the damage your appliance,
oven. The racks will discolor and may not slide easily
after a clean cycle.
Cleanovenframe,doorframeandaroundtheovenventwith
a non-abrasive cleaning agent such as Bon Ami or Aboutonehouraftertheendofthecleancycle, theintemal
detergentand water. These areas are not exposed to lockwilldisengageandthe LOCK indicatorwillturnoff.At
cleaningtemperaturesandshouldbecleanedtopreventsoil thispoint,the doorcan be unlockedand opened.Movethe
from bakingon duringthe clean cycle, cloorlocklevertothe left orunlockedpositionand openthe
Wipe upexcess greaseor spilloversfromthe oven bottomto
prevent excessive smoking and flare-ups during the clean Some soilmay leave a lightgray,powdery ashwhich can be
cycle, removedwith a damp cloth. Ifsoil remains,itindicatesthat
Wipe upsugary spillovers andacidspillovers suchas lemon removed during the next clean cycle.
juice, tomato sauce or milk-based sauces. Porcelain
enamelisacidresistant,notacidproof.Theporcelainfinish If the oven racks were left in the oven and do not slide
maydiscolorifacidspillsarenotwipedupimmediately, smoothlyafteracleancycle,wiperacksandembossedrack
Do not use oven cleaners onthe self-clean ovenfinishor supportswithasmallamountofvegetableoiltorestoreease
aroundanypartoftheovenastheywilldamagethefinishor ofmovement.
parts. Fine,hair-like linesmayappearintheoveninteriororoven
Topreventdamage,do notcleanor rubthe gasketaround door.This is a normalconditionresultingfrom heatingand
theovendoor.The gasketisdesignedtosealin heatduring .coolingofthe porcelainfinish.These linesdonotaffectthe
the cleancycle, performanceofthe oven.
door. The oven maystill be hot.
the clean cycle was not long enough. The soil will be
Page 24

SELF-t ;LEAN OVEN 21
To set oven for a self-clean cycle: To delay the start.of a clean cycle:
1. Remove the ovenracks and close the door. 1. Removethe oven racks and close the door.
2. Move the door lock leverto the right untilit rests in the 2, Movethe door lock leverto the right or locked position,
lockedposition. 3. Press CLEAN pad.
3. Pressthe CLEAN pad. 4. Pressthe• or • pad toselect the cleaningtime.
• "door"willappearin thedisplayandbeepswillsound
ifthe doorisnotlocked. 5. PressSTOP TIME orOVEN STOPpadandpressthe •
or • pad to selectthe timeofday youwishthe ovento
• 3 HR:00 will appearin the displayand SET CLEAN turnoff,The stoptimeand CLEANDELAYSTOP TIME
TIME wigflash in the display, will appear inthe display.
• After a few seconds delay, the oven and fan will
automatically turn on. CLEAN TIME and ON will 6. Press the CLOCK pad and the current time of day will
remain in the display, displayto show that the oven is set for a delayed clean
4. The ovenwillautomaticallycleanfor 3 hours. Or,select 2 operation.
hoursforlightsoilupto4hoursforheavysoilbypressing 7. At.the end of the clean cycle, continuous beeps will
the • or • pad. sound. Press the CANCEL padto cancelthe beeps.
5. Press the CLOCK pad and the current time of day will
reappearinthe display.CLEANandONwill remaininthe
displayto show that the ovenis in a clean cycJe. To cancel clean cycle:
IfthedoorisnotlockedortheCleantimeisnotenteredwithin 1. Press the CANCEL pad.
reappearinthe display.CLEAN DELAYwill remaininthe
30 seconds of pressing the CLEAN pad, the prQgramwill 2. Ifthe LOCKindicatoris displayed,allow the oven to cool
automaticallybe cancelled, for upto onehour. Oncethe LOCKindicatorturns off,the
About one hour after the clean cycle ends, the LOCK door can be unlocked and opened.
indicatorwillturn offand the ovendoor canbe unlockedand Ifthe LOCK indicator is notdisplayed, the oven door can
opened, be unlockedand opened.
The oven door and door lock lever will be damaged if the
ovendoor is forced to open when the LOCKindicator is still
displayed.
Page 25

22 CARE AND CLEANING CHART
Because of the many new cleaning products introducedin Mild Liquid Spray Cleaners - Fantastik, Formula409.
the marketplace each year, it is not possible to list all
productsthatcan be safely usedto cleanthis appliance. Non-Abrasive Cleaners - BonAmi, pasteof bakingsoda
Listed beloware just a few examples of recommended andwater.
products. Mildly Abrasive Powder or Liquid Cleansers - Ajax,
REMEMBER, ALWAYS READ THE MANUFACTURER'S BarkeepersFriend,Cameo, Comet,SoftScrub.
INSTRUCTIONS to besurethe cleanercan be safelyused Non-Abrasive or Scratchless Plastic or Nylon Scouring
on this appliance. Also, read and carefully follow the Pads or Sponges - Chore Boy Plastic Cleaning Puff,
manufacturer'sdirectionswhenusinganycleaningproduct. Scrunge Scrub Sponges, or Scotch-Brite No Scratch,
CookwareorKitchenSponge.
To determineif a cleaning productis safe, test a small
inconspicuousarea usingaverylightpressuretosee ifthe Abrasive Scouring Pads - S.O.S., BrilloSteelWoolSoap,
surfacemayscratchordiscolor.Thisisparticularlyimportant Scotch-BriteWoolSoapPads.
for porcelainenamel, highly polished,shiny, painted, or (Brandnames for the above c/eaningproductsare registered
plastic surfaces, trademarksoftherespectivemanufacturers.)
The following brands may helpyou to make an appropriate Be sure appliance is off and all parts are cool before
selection: handlingorcleaningtoavoid damageandpossibleburns.
Glass Cleaners - BonAmi, Cinch, Glass Plus,Windex.
Dishwashing Liquid Detergents - Dawn,Dove,Ivory,Joy. after each use.
If a part is removed, be sure it is correctly replaced.
To prevent staining or discoloration, clean range
Baked Enamel • Soap and water Useadrytowel or clothtowipe upspills, especiallyacid (milk,lemonjuice, fruit,mustard,
or Porcelain Enamel • Pasteof bakingsodaand water tomatosauce)or sugaryspills.Surfacemaydiscolorordullifsoilis notimmediatelyre-
. Cooktop • MiJdJiquidcJeaner moved.This JseepecialJyimportantfor white surfaces.
• Ovendoor • Glass cleaner
• Storagedrawer Whensurfaceiscool,washwithwarmsoapy water,rinseanddry.Forstubbornsoil,use
• Side panels mildlyabrasivecleaningagentssuchasbakingsodapasteorBonAmLIfdesired,athin
• Baokguard coatofmildappliancewaxcanbeusedtoprotectthesidepanels.A glasscleanercan be
Chrome drip bowls, i Soap and water Clean bowlsafter each usewith soapand water.Remove stubbornstains with baking
if equipped • Paste of bakingsodaandwater sodapasteand plasticscouringpad.Topreventscratchingthefinish,do notuse abra-
• Plasticscouringpad sivecleaningagents. Rinse,dry andreplace.
usedto add"shine" tothesurface.
NOTE=Donotuseabrasive,causticor harshcleaningagentssuchassteelwoolpadsor
ovencleaners.These productswillscratchorpermanentlydamagethe surface.
NOTE; Never wipe a warmor hot surface with a damp cloth as this may damage the
surfaceand may causea steam burn.
NOTE=Bowlscan permanentlydiscolorovertime orifexposedtoexcessiveheatorif
soil isallowedto bake on. The discolorationwillnotaffect thecookingperformance.
Page 26

CARE AND CLEANING CHART 2"
',.TS CLE iNG*GE,TS OI EC O"S
Control knobs • Soap andwater TOremoveknobs forcleaning,gentlypullforward.Washin milddetergentand water.Do
Glass
.ovenwidow
• Glass Cieaner __t water, as s_rin_ pads__ w_0i or
, NoTe:Toavoid
Crates * Detergent andwater Grates aremadeof porcelain-coatedsteel.Theycan be cleanedatthe sinkwith deter-
, Non-abrasive plasticpad gentandwaterorinthe dishwasher.Tocleanbakedon soil,placea dampsoapypaper
f!niShes , s0apa stet
;_BackgUard _'GtassCl_a_ cleaner _d a _ _10t_to rem0v__i_germ_rks_ Smudges;
_Trrnparts .... NOTE Donot_Seovencea_ers abrasveotca_tc_gents TheyW damage_e
= :,
Oven bottom See pages 20 and21 for instructions,
• Self-clean porcelain
not soak knobs in water. Do not use abrasive cleaning agents. They will scratch finish
and remove markings. Rinsedry and replace.Turn ON each burner to see if knobs
have been replaced ¢onractly.
p0wde_ed cleaning_ents
toweloverthe grateand let standfor 30 minutes.Use a non-abrasive plasticpadto
scourstubbornSoil.
NOTE:Never operate burner without a grate in place.To protectthe porcelainfinish on
the gratefrom excessiveheat, neveroperate surfaceburner withouta cookingutensilon
the grate. Itis normalfor grates to lose their shine over a period of time.
Protectthe oven bottom by (1) using large enough cookware to prevent believers; (2)
placeapiece ofaluminumfoil,thatJsslighfiylargerthan the cookware,onthe lowerrack.
NEVER placefoil directly on the oven bottom.
Protect oven boffom against acid spills (milk, cheese, tomato, lemon juice, etc.) or
sugary spills (piefilling) as they may pit or discolor the oven bottom.
Ovencavity, Cleaning action begins whenever the Brush off heavy soil with a nylon or plasticpad. Do not use papertowels, cloths, or
upper conventional oven is on. The ovenmust be used for sponges because the oven wallsare porous andparticlesof thesematerials will rub off
(Chateaurange only) cleaning to take place. Higher oven on the walls. Rinse area with clean water only. Do not use any type of oven cleaner,
• Continuous Clean temperatures and longer bakingtimes cleanseror detergent on this surface.
Oven, see page 19 speedthe cleaning action.
Plastic finishes • Soap and water When surface iscool, clean withsoap and water; rinse, and dry.Usea windowcleaner
• Door handles = Pasteof baking soda and water and a softcloth.
• Sackguardtrim • Non-abrasive plasticpad or sponge NOTE: Never use oven cJeanera,abrasive or caustic }iquid or powdered cleaning
• Overlays agentsonplasticfinishes.These cleaningagentswillscratchor marrfinish.
• Knobs NOTE:Toprevent staining ordiscoloration, wipe upfat, greaseor acid (tomato, lemon,
• Endcaps vinegar,milk, fruit juice, marinade) immediately with a dry paper towel or cloth.
Surface burners • Soap andwater All burners: Forease of cleaning,clean burners eachtime the cook-topis used with
• Conventional * Pasteofbakingsodaand water ; warmsoapywater.If abelieveroccursremovepantoanotherburner;coolburnerand
• Sealed °Plasticscouringspongeorped I clean.Toremoveetubbornsoil useadryciothendmildlyabrasivecleanser. Usecareto
• Mildly abrasive cleanser prevent cleaner from clogging ports. Burner must be dry before use. NOTE: Yellow
I tippingor distortionof the flame may occur untilthe burner is completely dry.
Cleanburner portswith astraight pinor smallmetal paperclip. Do notenlarge or distort
ports. Do not use a wooden toothpick as it may break off and clog port. if ports are
clogged or soiled, the burner may not light properly or the flame may not beeven.
Conventional burners: Dryburners in theoven set at 170°E
Sealed burners: Sealed burnercannotbe removedbythe consumer.Whencleaning
burner,usecaretopreventdamagetothe ignitor.Surfaceburnerwillnotlightproperlyif
ignitorisdamaged, broken,soiled,or wet.When_eaning theports, besure to clean the
port directly below the ignitor.
Page 27

24 MAINTENAN(;E
1
Beforereplacingthecooktoplightbulborfluorescenttube, I
DISCONNECTPOWER TO RANGE. Be surethe bulb isI
cool Donot toucha hot bulbwith a damp cloth asthe bulbl On conventional upperoven:Toturn onlight, pressbutton
maybreak. J controlmarkedpanel."BACKPANEL"which is locatedat the base ofthe
On microwave oven model: To turn on light, press "ON"
pad locatedat base of microwave control panel.
Toturn oncooktop light: Pressandhold rockerswitch until
the light turns on. The oven light switch is located on the To replace fluorescent panel light: Be sure bulb is cool.
backguard. Remove three screws holding trim piece along top edge of
glass OR two screws holding trim piece along side edge of
To replace cooktop light; Be sure bulb is cool. Grasp the glass. Support glasswhile removing screws soglass will not
top trim of the backguard with your thumbs under the front fallforward. Removebulb and replace. Reconnect powerto
edge and pull outward while lifting to release trim from . range, check light operation prior to replacing glass panel
catches at each end. and resetthe clock.
On microwave oven model: Refer to the separate
microwave oven use and care booklet for instructions on
removing the cooktop light bulb.
Remove fluorescent tube and replace with an 18 watt
fluorescent tube. Snap top trim back into place and
reconnect powerto range. Reset the clock.
uPPE ..............OVEN E_ _ate_ p_ng__nl'y)
Toturn on oven light: Pushthe rockerswitchlocatedonthe On conventional oven only:Toturnon ovenlight,pushin
backguardor onthe controlpanel.- button,locatedat baseof controlpanel.
To replace oven light: Be sure bulb is cool. Use a dry
potholder,to prevent possibleharm to hands, and very On microwave oven: Oven lightturns on wheneverthe
carefullyunscrewbulbcoverand bulb. dooris opened or when the oven is in a cook or defrost
operation.
-=- ._.__ Usea drypotholderandvery carefullyremovebulb.Replace
with a40 watt APPLIANCE bulb. Reconnectpower to range
_ _ _ _ Toreplaceconventionalovenlight:Beeurebulbiscool.
Replacewith a 40watt appliance bulb. Replace bulb cover microwave oven use and care booklet for instructions on
and reconnect power to range. Resetthe clock. removing the oven light bulb.
and resetthe clock.
On microwave oven model: Refer to the separate
Page 28

MAINTENAN( :E 25
The cooktop featuring conventional surface burners lifts up Do not place excessive weight on an open oven door or
for easy cleaning ofthe burner box area. stand on an open oven door as, in some cases, it could
Toraisethe "lift-up" ¢ooktop: When cool, graspthe front cause the rangetotip over, breakthe door or causeserious
edge ofthe cooktop and gently lift up until the two support injury tothe user.
rods atthe front of the cooktop snap into place.
When opening the oven door, allow steam and hot air to
food.
Do not attempt to open or close door until the door is
completely seated on the hinge arms. Never turn on the
oven unlessdoor isproperly in place.When baking,be sure
__ escape before reaching in oven to check, add or remove
To lower the top: Hold the front edge of the cooktopand To remove lift-off door: Open the door to the "stop"
carefullypush back on each supportrod to release the position(openedabout6 inches)and graspthe doorwith
notchedsupport.Then gentlylowerthetopintoplace.The bothhandsateachside.Do notusethedoorhandletoliftthe
supportrodswillslideintothecooktopframe, door.Liftup evenlyuntilthe doorclearsthehingearms.
thedoor iscompletely closed. Bakingresultswillbeaffected
ifthe door is not securely closed.
The sealed burner cooktop is designed with two contour __
wellsto catch and containspills.Because of this design it is
notnecessaryto lift upthe cooktopto clean underneath.To
prevent damage to the gas tubing or top, do not attempt to
lift orremove the cooktop.
the doorwiththe hingearmsand slidethe doordownonto
thehingearmsuntilcompletelyseated onhinges.
Toreplace door: Graspthedoor ateach side,align slotsin
CAUTION: Hinge arms are spring mounted and will
slam shut against the range if accidently hit. Never
Burnergrates mustbeproperlypositioned place hand or fingers between the hinges and the
beforecooking. Burner grates are durable front oven frame. Youcould be injured ifhinge snaps
butmay gradually lose their shine due to back.
usageand high temperatures.
Grates for the porcelain cooktop are
square. When installing square grates,
place indented sides together so straight
sidesare at front and rear.
CAUTION: Donot operate a surface burner without a pan
on the grate. The porcelain finish on the grate may chipI
without a pan to absorb the intense heatfrom the burner
fame.
Page 29

26 MAINTENAN( ;E
The oven dooris lockedfor a self-clean operation only.Do The storage drawer at the bottom of the range is safe and
not move the door lOCkleverto the right or locked position convenient for storing metat and glass ccokware. DO NOT
during a cooking operation. If the door is locked, the store plastic, paperware, food or flammable material inthis
operation will automatically be cancelled and "door" will drawer. Remove drawer to clean under range.
appearinthedisplay.Ifthe ovenis hotenoughtoengage the
cool for upto an hour,then Unlockand open the door. t
internallock,the ovendoor will notopen.Allow the ovento (_ _1_ . I
Protectoven bottomagainst excessive spilloversespecially
acid orsugary spillovers as theymay discolorthe porcelain.
Use the correct size cooking utensil to avoid boilovers.
Never place cookware or aluminum foil directly on the oven
bottom. To remove: Empty drawer then pull drawer out to the first
stop position. Lift up front of drawer and pull to the second
stop position. Grasp sides and lift up and out to remove
Toreplace: Fit the ends ofthe drawer glidesonto the rails.
Lift up drawer front and gently push in to first stop position.
cJosedposition.
;t1'_ drawer.
_'_-_-"'_ "'_'-_ Some floors are not level. ['ll
To remove: When cool,removethe ovenracks.Slidethe Levelinglegsare locatedon
twocatches,locatedateachrearcomeroftheovenbottom, eachcorner at the base of
towardthe frontofthe oven. the range. Level by turning
Liftthe rear edge of the oven bottom slightly,thenslide it from accidently tipping,
backuntilthefrontedgeoftheovenbottomclearstheoven range should be secured to the floor by sliding a rear
frontframe. Removeoven bottomfrom oven. levelinglegintothe anti-tip bracketsuppliedwiththerange.
Lift up drawer again and continue to slide drawer to the
For proper baking, your / I I
range must be level.
the legs. To prevent range
Page 30

SERVICE INFORMATION 27
Appliances which require electrical power are equipped
Followtheseprocedurestoremoveapplianceforcleaningor with a three-prong grounding plug which must be
servicing: pluggeddirectly into a properlygrounded three-hole 120
1. Shut-offgassupplyto appliance.
2. Disconnectelectricalsupplyto appliance,ifequipped.
3. Disconnectgassupplytubingtoappliance.
4. Slide rangeforward todisengagerange fromthe anti-tip
5. Reverse procedure to reinstall. If gas line has been
disconnected, check for gas leaks after reconnection.
(Seeinstallation Instructionsfor gas leak test method.)
bracket.)bracket"(See Installation Instructions for location of __
A qualifiedservicer should disconnectand reconnectthe Alwaysdisconnect power to appliance before servicing.
gassuppy.
To prevent range from accidently tipping, range must be The three-prong grounding plug offers protection against
securedtothefloor bysliding rearlevelingleg intoananti-tip shock hazards. DO NOT CUT OR REMOVE THE THIRD
bracketsuppliedwiththe range. GROUNDING PRONGFROMTHE POWERCORD PLUG.
voltelectricaloutlet.
WARNING: Possible risks may result from abnormal
usage,includingexcessive loadingofthe ovendoorandof If anungrounded, two-hole or other type electrical outlet is
the riskoftipover,should the appliance not bereinstalled encountered, it is the personal responsibility of the
accordng tothe installatoninstructons. appliance owner to have the outlet replaced with a
properly grounded three-hole electrical outlet.
Page 31

28 SERVI(:E INFORMATION
Your appliance is equipped with self-diagnostic software If you have carefully followed the recipe, reviewed the
whichcontinuously monitors the control to ensure safe and bakingtips in thismanualand stillfeel cooking resultsdonot
proper operation. If the software detects a questionable meet your expectations, you can adjust the oven
situation,a FAULTCODE (F plus a number) will appear in temperature. DO NOT ADJUST THE TEMPERATURE ff
the display, continuous beeps may sound and as a safety only one or two items are not baking properly.
precaution,the operation will be cancelled,
If you think the oven should be hotter or cooler, you can
If afault code appears in the displayand continuous beeps adjust it yourself. To decide how much to change the
sound, press the CANCEL pad. Then, reprogram the thermostat, set the oven temperature 25°F higher or lower
cookingoperation. Ifthe fault code reappearsinthe display, than the temperature in your recipe, then bake. The results
call an authorized servicer. Do not use the oven until the of the "test" should give you an idea of how much to adjust
appliancehas been serviced, the thermostat.
Ifthe oven isheavily soiled, excessive smoke and flaring TO adjust the thermostat:
mayresult in afault code during a self-clean cycle. If thisI
occurs,pressthe CANCELpad andallow the ovento cool 1. Pressthe OVEN TEMP pad.
for an hour. 2. Pressthe • pad until 550° is displayed.
3. Press and hold the OVEN TEMP pad for several
seconds. The display will show the ambient oven
The LOW setting should produce a stable flame when temperaturefor a few secondsthen00° willappear inthe
turningthe knobfrom HIto LO.Theflame should be 1/8inch display.
orlower and must be stable on allports on LOW setting. • If 00° does not appear in the display, press the
To adjust: Operate burner on HI for about 5 minutes to
preheat burner cap. Turn knob back to LO; remove knob, • If the oven temperature was previously adjusted, the
and insert a small screwdriverinto the center of the valve change will be displayed. For example, if the
stem.Adjustflamesizebyturningadjustmentscrewineither temperature was reduced by 15°. -15 ° will be
direction, displayed.
CANCEL pad and begin again.
4. Press the • or• pad to select the temgerature change
desired.
° The oven temperature can be increased upto 35° orreduced by as much as 35° (-35 °) in 5° increments.
• Ifyoudelay inselectingatemperature, the programwill
automatically cancel and 00° will disappear. Begin
againif the program cancels.
5. Press theCANCEL Dadand the timeofday wiltreappear
in the display, The oven will now bake at the aojusted
Flame must be of sufficient size to be stable on all burner [emperature
ports.Ifflame adjustment isneeded, adjustONLYon the LO
setting. Never adjustflame stze ona highersetting. It is not necessary _o readjust the oven temoerature if
there is a power interruption. This aOjustmentwill not
NOTE: All gas adjustments should be done by a qualified affectbroil or clean temperatures.
servicer only.
Page 32

SERVI(;E INFORMATI()N 29
PROBLEM CAUSE CORRECTION
1. Surface burner fails to light a. powersupply not connected a. connect power, check circuitbreaker or
b. air in the gas line b. see page 5 for instructions on bleeding
c. clogged burner port(s) c. clean ports with straight pin
d. surface controlnot completelyturned to d. turn control tothe LITE position until the
the LITE position or turned too quickly burner ignites, then turn control to
from the LITE position desired flame size
e. power failure (pilotless ignition) e. seepage6tolightburnerduringapower
f. onsealed burner models:Burnerwill not f. clean and dry burner head. If brokenor
lightif the ignitor isdamaged, soiled,wet damaged, call a serviceman.
or ifthe portdirectlybelowthe ignitor is
blocked.
2. Burnerflameuneven a. cloggedburnerport(s) a. clean portswithstraightpin
3. Surfaceburnerflame a. air/gas mixturenotproper a. callservicemanto adjustburner
• liftsoffport NOTE:Liftingofflameis normalforsealed NOTE: Besureinstallerproperlyadjusted
• yellowin color burners.SomeyellowtippingwithLPgas is rangeat time of installation.
normaland acceptable.
4. Oven burnerfailsto light a. powersupplynotconnected a. connectpower,checkcircuitbreakeror
b. powerfailure b. oven will not operate duringa power
c. ovenincorrectlyset c. See pages4 or 11
d. AutomaticOven Cookingfeature d. See pages 16-17
incorrectlyset
5. Poppingsoundheardwhen burner Thisis a normalsoundthat occurswith sometypesofgaswhen a hotburneristurnedoff.
extinguishes The poppingsoundis nota safety hazard andwillnotdamage the appliance.
6. Clockand/orovenlightdoesnotwork a. powersupplynotconnected a. connect power supply, check circuit
b. bulbmay belooseor burnedout b. tightenor replacelightbulb
c. malfunctioningswitch,starteror ballast c. call servicemantocheck
d. malfunctioningclockor loosewiring d. call servicemantocheck
7. Moisturecondensationonoven a. it is normalforthewindowto fog during a. leavedoorajar forone ortwominutesto
window,ifequipped thefirst few minutesthe ovenis on allowmoisturetoescape
b. cloth saturated with water is used to b. Use a damp clothto clean windowto
cleanthe window preventexcesswater from seeping
8. Oventemperatureinaccurate a. ovennot preheated a. preheatoven10 to 15 minutes
• foodtakes too longor cookstoo b. incorrectrack position b. see page 10
fast c. incorrectuse of aluminumfoil c. see page 11
• pale browning d. ovenbottomincorrectlyreplaced d. replaceovenbottomcorrectly
• food over-done on outsideand See ProblemCharton page 14
under-done incenter See bakingtips on page 13
• over browning
• poor baking results
9. Ovensmokes excessively during a a. food too close to burner a. move broilerpan down one rackposition
broil operation b. meat hastoo much fat b. trim fat
c. sauce applied too early or marinade not c. apply sauce during last few minutes of
completely drained cooking. If meat has been marinated,
d. soiled broiler pan d. always cleanbroiler pan and insert after
e. broiler insertcovered with aluminumfoil e. never cover insert with foil as this pre-
Fplus a number appears in the display This iscalleda FAULTCODE.Ifafault codeappears inthe display,pressthe CANCELpad.If
anda continuous beep sounds, the fault code reappears, disconnect power to the unit and callthe servicer.
(Example:F 1) See page 28 for FAULTcode information.
fuse box
air from the gas line
failure
fusebox
failure
breakerorfuse box
betweenthe panelsof glass
drain thoroughly before cooking
each use
vents fat from draining to pan below
Page 33

SERVI(:E INFORMATI(IN
Do not attempt to service the appliance yourself unless model and serial numbersof the appliance, the name and
directedtodosointhiamanuaI.Contactthedealerwho address of the dealer from whom you purchased the
sold you the appliance for service, appliance,the dateof purchaseanddetailsconcerning your
problem.
If you do not receive satisfactory service, you may contact
If your appliance should requiPeservice or replacement the Major Appliance Consumer Action Program by letter
parts, contact your dealer or authorized servicer. Use only including your name, address, and telephone number, as
genuine factory parts if replacement parts are necessary, well as the model and serial numbers of the appliance.
Consultthe Yellow Pagesin your telephone directory under
appliancefor the authorized servicecenter nearestyou. Be Major Appliance Consumer Action Program
sure to include your name, address, and phone number, 20 NorthWacker Drive
along with the model and serial numbers of the appliance. Chicago, IL 60606
(See front cover for location of your model and serial
numbers.) MACAP (MajorAppliance ConsumerAction Program) is an
Ifyouare notsatisfiedwiththe localresponse toyourservice as a courtof appeals on consumer complaints which have
requirements,write to Maytag Customer Service, P.O,Box notbeenresolvedsatisfactoritywithin areasonable _eriodof
2370, Cleveland, TN 37320-2370. Include the complete time.
independentagency sponsored by three trade associations
Ztu
50%_T-CNIII_HBN
196%BE-BI(RINL_SPIILIIBS,IIAGAZINESl CATALOGS
 Loading...