

Page 1
Gas Range Featuring
• Conventional Surface Burners
• Analog clock & timer
• Self--cleanoven
• Automatic oven cooking
8113P044-60
(1/93)
Page 2
Page 3

Page 4

Page 5
Time-0f-DayClock
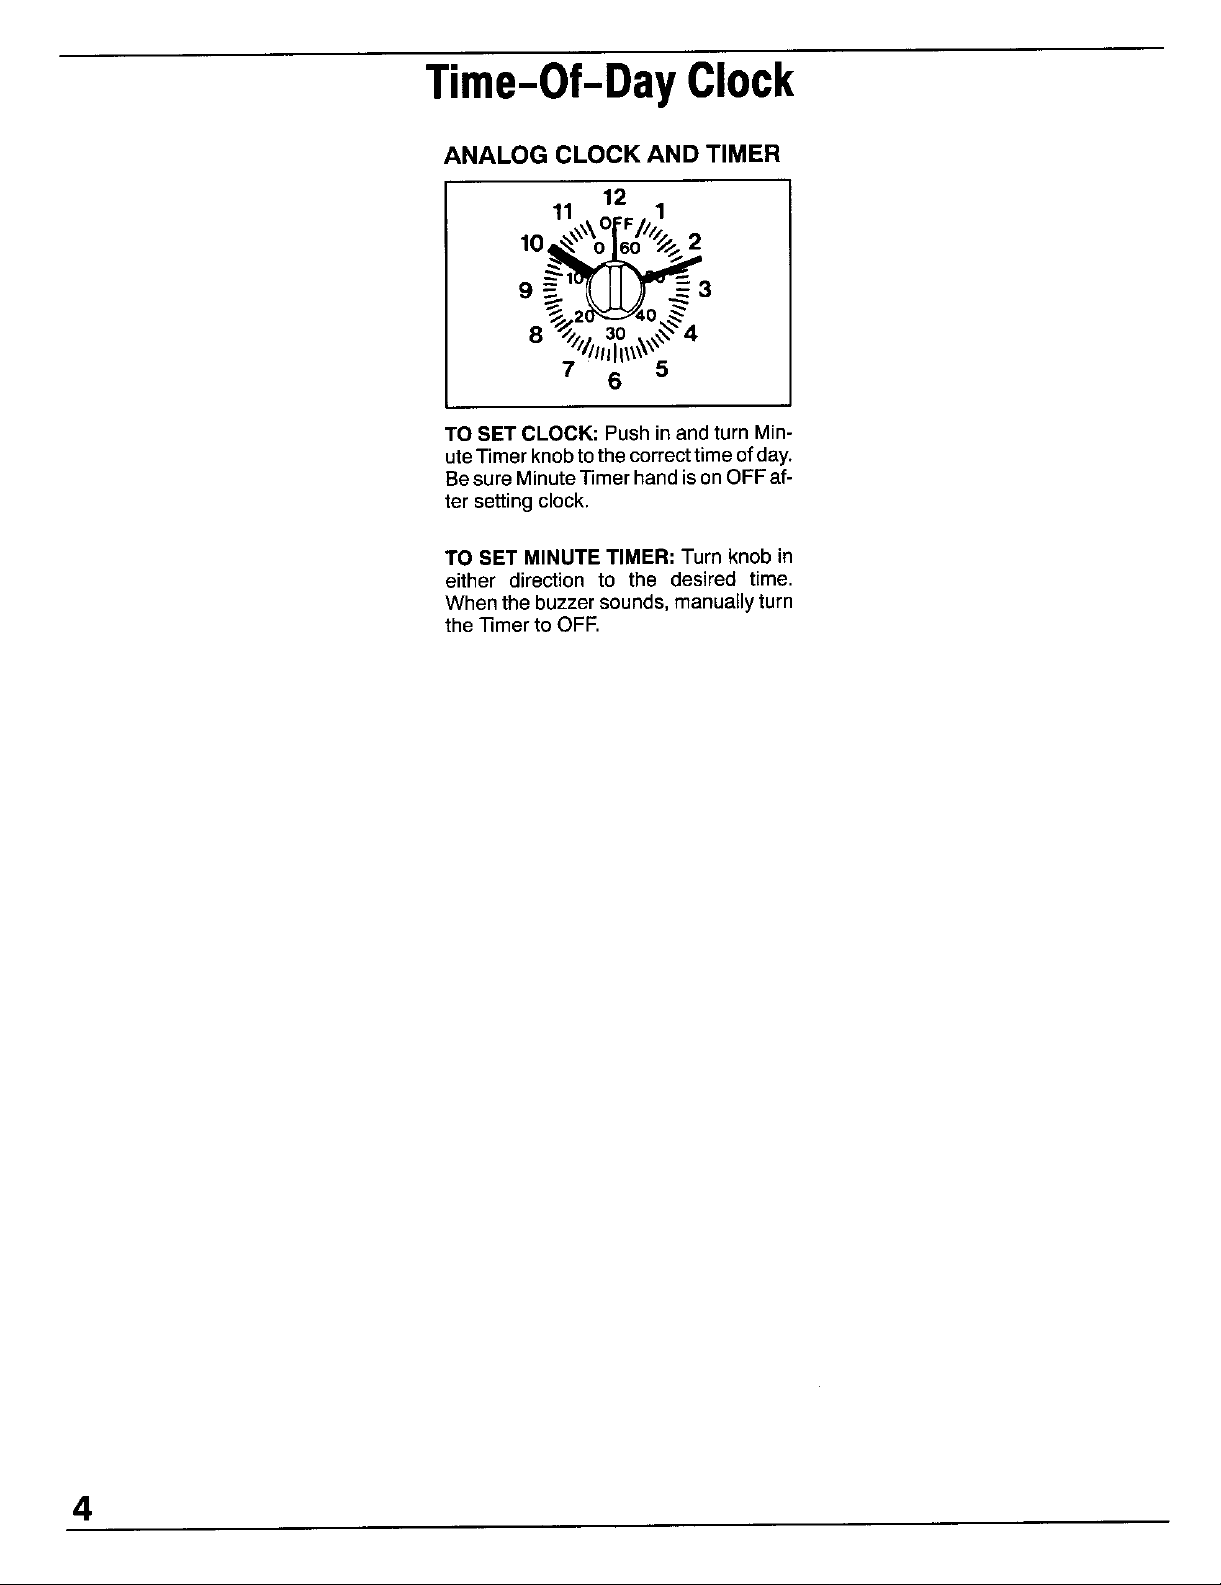
ANALOG CLOCK AND TIMER
12
11 o 1
7 6 5
TO SET CLOCK: Push in and turn Min-
ute Timer knob to the correct time ofday.
Be sure MinuteTimer hand ison OFFaf-
ter setting clock.
TO SET MINUTE TIMER: Turn knob in
either direction to the desired time.
Whenthe buzzer sounds, manuallyturn
the "rimer to OFF.
4
Page 6

SurfaceCooking
IGNITION SYSTEM TO LIGHT SURFACE BURNER ADDITIONAL INFORMATION
Yourrangefeaturespilotless ignition.A 1.Place utensil on burnergrate. • Whenthe range is first installed, the
spark from the ignitor will lightthe burn- pilots may be difficult to lightdue to air
er. 2. Push in and turn knob to the LITE inthegasline.Tobleedoffairfromthe
position. After the burner lights, turn line, hold a lighted match nextto the
ABOUT THE SURFACE the knobto the desired flame size. burner and turn knob on. When the
BURNER FLAME burner lights,turn the knob off and
• A properlyadjustedburner withclean proceedasdirected.
portswillbightwithin a few seconds. _ • Be sure all surface controls are sel
with a deeperblue core;there should be gasto the appliance.
no trace of yellow in the flame. • CAUTION: If flame should go oul
A yellow flame indicates an improper during a cooking operation, turn the
mixture of air/gas.This wastes fuel, so and a strong gas odor is detected,
• On natural gas, the flame will be blue _ inthe OFF position prior to supplying
havea servicemanadjustthe mixtureif wait 5 minutesfor the gas to dissi-
a yellowflame occurs.
• On LPgas, someyellowtippingisac- may not look like the knob in this il- • Youmay heara "popping"soundon
ceptable.Thisisnormalandadjustment lustration,but it will operate as de-
isnot necessary, scribedin thisbooklet, turnedoff.Thisisa normaloperating
NOTE: The knob on your appliance pate before relighting burner.
To operate surface burner during a
power failure:
1. Holda lightedmatch to the desired
surface burner head.
2. Push in and turn knob to the LITE
position. The burnerwill then light.
3. Adjust knob to obtain the desired ifthisoccurs, turntheknobtotheOFF
flame size. position. Wait several seconds, then
burner off. If gas has accumulated
LP gas when the surface burner is
soundofthe burner.
• If a knobisturnedveryquicklyfrom
HItoLOsetting,theflame maygoout,
particularlyifthe burneriscold.
lightthe burner again.
(continuednext page)
5
Page 7

SurfaceCooking(continued)
FACTORS THAT DETERMINE SELECTING FLAME SIZE CANNING
FLAME SIZE • Use a HIGH flame settingto quickly Acceptablewater-bathorpressurecan-
UTENSIL SIZE: Adjustthe flame size bringliquidstoa boilorto beginacook- netsshouldnotbeoversizedandshould
soitdoesnotextendbeyondtheedgeof ing operation.Then reduceto a lower havea flatbottom.Thefollowingarenot
the cookingutensil.This isforpersonal settingtocontinuecooking.Neverleave recommended:Oversizedcannersora
safetyandto preventpossibledamage food unattended when using a HIGH verylargecannerthatrestson twosur-
to the appliance, utensil or cabinets flame setting, face burnergrates.
abovetheappliance. When canning, use the HIGH setting
-- pressureisreachedinthe pressurecan-
_'_--'_' ner,then reduceto thelowest flame set-
__J_ tingthat maintains the boil or pressure.
.___' • An intermediateflame size is used to
continue a cooking operation. Foodwill
• Utensils which extend more than two not cook any faster when a higher
inches beyond the grate or touch the flame setting is used than that need-
cooktop may cause heatto build up, re- ed to maintain a gentle boil. Remem-
suiting in damage to the burner grate, ber,waterboilsatthesametemperature
burneror cooktop, whether boiling gently or vigorously.
• Utensils, suchas woks with a support • Use alowflame size tosimmer or keep
ring,which restrict air circulation around foods at serving temperatures.
theburnerwill causeheattobuild up and
may result in damage to the burner I
UTENSIL MATERIALS: Optimum
cookingperformancecan be achieved
whenheavygauge,flat,smoothbottom,
metal utensilswith straight sides and
grate, burneror cooktop. -_c__-J ""/_
tightfittinglidsare used.
just until the water comes to a boil or
• Aluminum oraluminum-clad stain-
less steel pans heat moreevenlyso a
slightlylargerflame can be used.
• Stainless steel, porcelain and heat-
proofceramic orglass heatunevenly;
cast aluminum and iron heat slowly;
and, Teflon-coated utensilsaresensi-
tiveto heat. These materialsrequirea
lowerflameto producemoreevencook-
ing results.Adjustflame so it extends
halfwayto the edge of the utensilbot-
tom.
COVERED UTENSILS: Foods cook
faster when the utensil is covered be-
cause more heat is retained. Lower the
flame size when covering utensils.
6
Page 8

UsingYourOven
OVEN VENT OVEN THERMOSTAT
The oven vent is locatedat the base of The oventhermostatknobisusedtose-
thebackguard,Whentheovenisinuse, lectand maintaintheoventemperature.
this area may feel warm or hotto the Alwaysturnthisknobjusttothedesired
touch, To prevent problems do not: temperature- not to a highertempera-
Blockthe ventopening,touchthe area ture and then back. This providesmore
nearthe openingorplace utensilsnear accurate oventemperatures.Turn this
the ventopening, knobtoOFF wheneverthe ovenisnotin
OVEN BURNER
IGNITION SYSTEM adjusted ovenburnerflameshould beas
Yourappliance features pilotless igni- shown:
tion. A glo barwill lightthe oven burner, r_
Be sure oven control is set in the OFF
positionprior to supplying gas to the ap-
pliance. Coneincenterissmaller THERMOSTAT
The size and appearance of a properly _,_ t
use.
On some models, there is an indent at
the 350°F setting.
Coneapprox.1/2-inch SELECTOR KNOB
The SELECTOR knob determines the
typeofovenoperation.Turnthisknobto
The oven temperatureismaintainedby desiredsetting.Eachsettingisidentified
cyclingthe burneron and off. Afterthe byan indent (stop)anda"click" sound.
oven temperature has been set, there
will be about a 45 second delay before
the burnerignites.This isnormalandno BAKE
gas escapes during this delay. _ _ O
TIME BAKE
(continuednextpage)
Page 9

UsingYourOven(continued)
TO SET THE OVEN PREHEATING
1. When cool, place the racks inthe de- Preheating is necessaryfor proper bak-
sired rack positions, ing results. Allow the oven to heat until
thedesired oventemperature isreached
2. Push in andturn the oventhermostat (approximately 10 to 15 minutes). Se-
knob to the desired oven tempera- lectingatemperature higherthan thede-
tufa. Turnthe selectorknob to BAKE. sired temperature will not preheat the
Allowthe oven to preheat for 10to 15 oven anyfaster. In fact, this may have a
minuteswhen baking, negative effect on baking results.
3. Place the food in the center of the
oven, allowing a minimum of two in- It is not necessaryto preheatfor broiling
ches between the utensil(s) and the unless darker browning is desired or if
oven walls, cooking thin (3/4-inch) steaks. Allow
4. Check the food for doneness at the
minimum time given in the recipe. Preheatingis notnecessaryfor roasting
Cook longer if necessary. Opening operations.
the ovendoor frequently causes heat
loss which may affectcooking results
and increase cookingtime.
5. Turn the oven thermostat knob to
OFFand remove food from the oven.
burnerto preheat 2 to 3 minutes.
8
(continuednext page)
Page 10

UsingYourOven(continued)
AUTOMATIC OVEN COOKING
The automatic cooking feature is The automaticcooking feature will 1. Placefoodinthe oven.
usedto turnthe ovenonand offat a not operateunlessthe clockisfunc- 2. Pushin and turnSTART knobto
presettime of day. Thisfeature can tioningandissetatthe correcttimeof thetime of day youwish cooking
beusedtodelaythestartofacooking day. tobegin.Ifyouwishtobegincook-
operationora self-clean cycle.(See ing immediately,do NOT set the
page 19 for self-clean instructions.) START STOP STARTknob.
such as dairy products, pork, poultry, _ _ _ _ time of day you wish the oven to
seafoods, or stuffingare not recom- _-9 3_ _-o _ turn off.
IMPORTANT:Highlyperishablefood _\\_/_/ >_'.\\_..__,2/_.'_< 3. PushinandturnSTOPknobtothe
mendedfor delayedcooking.Ifcook- // 6 _'- ,, s \ 4. Turn oventhermostat knobto the
ingmorethan one food, select foods ////the\ \': ;'//111__\ desired setting. Turn selector
thatcookfor the samelengthoftime knobtoTIME BAKE.
andatthe same oventemperature.
The oven will automaticallyturn on
and off at the preset times. Remove
foodfromoven.Turnselectorknobto
BAKE andthermostatknobtoOFF.
(continuednext page)
9
Page 11

CommonBakingProblemsAndWhyTheyHappen
Cakes are uneven. Panstouching each other or Cakes don't brown on top. incorrect rack position.
oven walls. Temperature too low.
Batter uneven in pans. Overmixing.
Oven temperature too low or Toomuch liquid.
bakingtime too short. Pan size too large or too little
Oven not level, batter in pan.
Undermixing. Oven door opened too often.
Too much liquid.
Cake high in middle. Temperaturetoo high. Excessive shrinkage. Too little leavening.
Bakingtime too long. Pantoo large.
Overmixing. Temperaturetoo high.
Toomuch flour. Baking time too long.
Pans touching each other or Pans too close to each other
oven walls, or ovenwalls.
Incorrect rack position.
Cake falls. Toomuch shortening or sugar. Uneven texture. Toomuch liquid.
Too much or too little liquid. Undermixing.
Temperaturetoo low. Temperaturetoo low.
Oldor too littlebaking powder. Bakingtime too short.
Pan too small.
Ovendoor opened frequently. Cakes have tunnels. Not enough shortening.
Added incorrect type of oil to Toomuch baking powder,
cake mix. Overmixing or attoo high a
Added additional ingredients speed.
to cake mix or recipe. Temperaturetoo high.
Cakes, cookies, biscuits Incorrectrack position.
don't brown evenly. Oven door notclosed properly. Cakes crack on top. Batter overmixed.
Door gasket not sealing Temperaturetoo high.
properly. Toomuch leavening.
Incorrect use of aluminum foil. Incorrect rack position.
Oven not preheated.
Pans darkened, dented or
warped. Cake not done in middle. Temperaturetoo high.
Overmixing.
Pan too small.
Bakingtime too short.
Cakes, cookies, biscuits too Oven not preheated.
brown on bottom. Panstouching each other or
oven wafts. Pie crust edges toobrown. Temperaturetoo high.
Incorrect rack position. Pans touching each other or
incorrect useof aluminum foil. oven walls.
Placed 2 cookie sheets on one Edges of crust too thin.
rack. Incorrect rack position.
Used glass, darkened, stained,
warped or dull finish metal Pies or cakes don't brown Used shiny metal pans.
pans. (Use a shiny cookie on bottom. Temperaturetoo low.
sheet.)
10
Pies have soaked crust. Temperaturetoo lowat startof
baking.
Fillingtoo juicy,
Used shiny metal pans.
Page 12

UsingYourOven(continued)
HOW TO BROIL
Broiling is a method of cooking used for tender steaks, rare interior,the meat should be close to the burner. Place
chops, hamburgers,chicken,fish, and somefruitsand vege- thepanfurther down ifyouwish the meatwell doneor ifspat-
tables. The food is placed directly under the oven burner, taring and smoking occurs.
Thecookingtime isdetermined bythe distance betweenthe The distance from the burner depends on the thickness of
meat and the burner, the desired degree of doneness, and the meat and desired degree of doneness. Thin cutsshould
thethickness of the meat. beplaced on rack #1 (top)or #2 (middle);thicker cuts should
be placedon rack#2 or #3 (bottom).Broil until the top of the
GENERAL TIPS meat is browned. Itshould be approximately half cooked by
Broilingrequirestheuseofthebroilerpanandinsertsupplied thetime thetopisbrowned,
withyourappliance.Itisdesignedtodrainexcessliquidand
fat away from the cooking surface to prevent spatters, Trimexcessfatto preventexcessivespatteringorsmoking.
smokeand flare ups. duringcooking.
Foreasierclean-up, linethe broilerpan(bottompiece)with
aluminumfoilandspraytheinsertwithanon-stickvegetable If youplantoseasonthe meat, it is betterto doso afterthe
coating,Do notcoverthebroilerpaninsertwithaluminumfoil surfacehas browned.Salt tendsto delay browningwhich
asthis preventsfat from draininginto the pan below.The can resultinovercooking.Saltingbeforecookingalsodraws
broilercanbe preheatedforafewminutes.However,donot thejuicesout ofthe meat, causingdryness.
preheatthe broiler pan and insert.
Ifthe food is placed tooclose to the burner, overbrowning
and smoking may occur.Generally for a brown exterior and
Cutslashesintheouteredgesofthemeattopreventcurling
BROILING CHART
Food Thickness Position* Doneoess 1st Side 2nd Side BROIL,
Bacon (450°F) thick slice 2 well 3 - 4 1- 2 It is possible to broil longer cooking
Beef Patties 3/4" thick 2 rare 2 - 3 2 - 3 foods such as pork chops at a lower
Steaks (450°F) 1" thick 2 rare 3 - 4 3 - 4
(450oF) 3 well 9 11 9 11 Chart are based on a 2 to 3 minute
Chicken Breast 3 well 10- 14 8 - 10
Halves(450°F) 3. Place the broiler pan on the recom-
Fish Fillets (450°F) 1"thick 2 5- 7 4 - 6 mended rack position shown in the
HamSlices t/2"thick 2 3-5 2-4 4. Follow the suggested times in the
(precooked) broiling chart. Meat should be turned
PorkChops (450°F) 1" thick 4 well 9 - 11 6 - 8
Weiners/Sausage 2 2 - 3 1 - 2 5. Check the doneness by cutting a slit
(precooked) in the meat near the center to check
*The top positionis rack #1. the color.
Quantity&/or Rack Approx, Minutes/Side BROIL. Turn SELECTOR knob to
2 medium 4-5 3-4 temperature to prevent overbrown-
2 well 4-6 4-5 ing. Turn the thermostat knob to
2 medium 5 6 3- 5 temperature broiling.
2 well 6- 8 5- 7 2. Preheat for 2 to 3 minutes ifdesired.
11/2_thick 2 rare 6-7 5-6 NOTE: Cooking times in the Broil
1/2"thick 2 3- 5 3- 5 broiling chart.
2 medium 7 8 6- 7
1. TurntheovenTHERMOSTATknobto
450°F, rather than BROIL, for low
preheat.
once about halfway through itscook-
ing time.
TO BROIL:
11
Page 13

Maintenance
COOKTOP BURNER GRATES SURFACE BURNERS
Yourrangewillfeatureeitheranupswept Surface burnersare secured in place
cooktopora flat cooktop.Bothtopscan duringtransportationwith springclips.
be liftedupforconvenientaccesstothe Once the rangeis installed,thesemay
burnerboxarea.Theflatcooktopcanbe be removedto allowquickand easyre-
removed.Theupswepttopishingedand movalofthe burner.
canbe raisedbutnotremoved.
TO REMOVE BURNER:
To raise upswept took'top: When
cool,grasp front edge of cooktopand When reinstallingsquare grates,place Allowburnertocool.Liftcooktop.To re-
gentlyliftupuntilthetwosupportrodsat indentedsidestogethersostraightsides movebumer, liftupslightlyand pullout.
thefr°nt°fthec°°kt°psnapint°place' are at fr°nt and rear'_,l__ I_ 1
Tolower top" Hold front edge of cook- _/_
top and carefully push back on each
supportrodto releasethenotchedsup-
port. Then gentlylowertop into place.
The supportrodswillslideintothe range Burnergratesare durablebutmaylose
frame, their shinedue to usageand hightem-
peratures.
To remove flat ¢ooktop: When cool,
first remove grates and drip bowls, if
equipped.Grasptwo frontburnerwells
and liftup.
LJ=== J
f. 1
The top can be completely removed or, if
equippedwitha metalsuppport rod, can
rest on the rod. Support rod is located
across thefront of the burner box. (continuednext page)
12
Page 14

Maintenance(continued)
OVEN DOOR OVEN RACKS STORAGE DRAWER
Thetwoovenracksaredesignedwitha The storagedrawerat the bottomofthe
lock-stopedgeto keepthe racksfrom rangeissafeandconvenientforstoring
comingcompletelyoutofthe oven. metal and glass cookware. DO NOT
Toremove:Besuretherackiscool.Pull mable materialinthis drawer. Remove
therackstraightoutuntilitstops.Tiltthe drawertocleanunderrange.
When openingoven door,allowsteam the rackoutof theoven.
andhotairtoescapebeforereachingin broilerdrawer.
ovento check,addor removefood. Toreplace:Tiltthefrontendoftherack
To remove door: Open door to the supports.Slide itbackuntilitclearsthe upfrontofdrawerand pulltothe second
"stop"position(openedabout4 inches) lock-stopposition.Lowerthe frontand stopposition.Graspsidesandliftupand
andgraspdoorwithbothhandsat each slidetherackstraightin.Pulltherackout out to remove drawer. Gently move
side.Donotusedoorhandleto liftdoor. tothe lock-stoppositiontobe sure it is drawer side-to-side as you pull the
Liftupevenlyuntildoorclearsthehinge positionedcorrectlyandthenreturnitto drawerout.
arms. itsnormalpositon.
frontofthe rackupandcontinuepulling Storecleanbroilerpanand insertinthe
upandplacetherack betweenthe rack drawerout tothe firststopposition.Lift
store plastic,paperware, food or flam-
To remove: Empty drawer then pull
To remove: When cool, remove the To replace: Fit ends of drawer glides
oven racks. Slide the two catches, Io- ontorails.Liftupdrawerfrontandgently
cated at each rear corner of the oven push in to first stop position. Gently
bottom,towardthe frontoftheoven. movedrawerside-to-side asyou push
To replace door: Grasp door at each _51//,
armsand slidedoor downontothe hinge
arms untilcompletelyseated on hinges. _ t 3
side,alignslotsinthe doorwiththe hinge _,_{__r_/ _ JJ--
Lift the rear edge of the oven bottom
slightly,thenslide itback untilthefront
edgeofthe ovenbottomclearstheoven
front frame. Remove ovenbottomfrom
oven.
To replace: Fit front edge of oven bot-
tom intofrontframe. Lowerrear of oven
bottom and slide the catches back to
lockovenbottom into place. (continued next page)
_ _ continue to slide drawer to the closed
inthe drawer.Lift updrawer again and
position.
13
Page 15

Maintenance(continued)
OVEN LIGHT HOW TO REMOVE PROPORTIONAL VALVE
RANGE FOR CLEANING ADJUSTMENT (if equipped)
AND SERVICING The LOW setting should produce a sta-
Followthese proceduresto removeap- bleflamewhenturningthe knobfromHI
Before replacingoven light bulb, DIS- pliancefor cleaningorservicing: to LO.The flame shouldbe 1/8 inchor
CONNECT POWER TO RANGE. Be lowerandmustbestableon allportson
surebulbandrangeparts are cool.Do LOWsetting.
nottoucha hotbulbwithadampclothas 1. Shut-off gas supplyto appliance. To adjust: Operate burneron HI for
the bulbmaybreak, about5 minutesto preheatburnercap.
To replace oven light: Use a dry pot 2. Disconnectelectrical supply to ap- TumknobbacktoLO;removeknob, end
holder, to prevent possible harm to pliance,ifequipped, insertasmallscrewdriverintothecenter
hands;andvery carefully unscrewbulb ofthe valve stem. Adjustflame size by
coverandbulb.Replacewitha 40-watt 3, Disconnectgas supplytubingto ap- turningadjustmentscrewineitherdirec-
APPLIANCE bulb,Replace bulbcover, pliance, tion.
Reconnectpowertotherangeandreset
clock. 4. Slide range forward to disengage
rangefromtheanti-tipbracket.(See
InstallationInstructionsfor locationof
-_ 5. Reverseprocedure to reinstall.If gas
linehasbeendisconnected,checkfor
gas leaksafterreconnection. (See In-
stallation Instructionsfor gas leaktest
method.)
LEVELING LEGS
NOTE: A qualifiedservicershoulddis-
connect and reconnectthe gas supply.
Levelinglegs arelocatedon eachcorner
of the base of the range. To prevent range from accidently tip-
ping,range must be securedto the floor
by sliding rear leveling leg into an anti-
tip bracket supplied with the range.
WARNING: Possible risks may result
sive loading ofthe oven door and of the NOTE: All gas adjustments should be
riskof tip over, shouldthe appliance not done by a qualified servicer only.
be reinstalled according to the installa-
tion instructions.
_/ from abnormal usage, including exces-
Place a level horizontally on an oven
rackand check front-to-back and side-
to-side. Level byturning the legs.
14
Page 16

GeneralInformation
ELECTRICAL CONNECTION USE OF ALUMINUM FOIL
Appliances which require electrical Use aluminum foil ONLY as
power are equipped with a three- instructed in this book. Improperuse
prong grounding plug whichmustbe of aluminumfoil may causedamage to
plugged directly into a properly theoven,affectcookingresults,andcan
groundedthree-hole 120voltelectrical alsoresultinshockand]orfirehazards.
outlet.
Foilcan beused ifthese guidelinesare
followed:
/r-_i_, • Do not use aluminum foil directly
_ heatawayfromtheutensilcausinginad-
equatebrowning.Placinga pie directly
' onfoilmayresultinasoggybottomcrust
_ under the cookware. Foil will reflect
A/ways disconnect power to appli- on the oven bottom asthis may dam-
ance before servicing.
The three-pronggroundingplugoffers that is slightlylarger than the cooking
protectionagainst shock hazards. DO utensilcanbeplacedontherackdirectly
NOT CUT OR REMOVE THE THIRD belowtherackcontainingthe utensil,
GROUNDING PRONG FROM THE
POWERCORD PLUG. • Do not completely cover an oven
andinadequatebrowning.
• Do not placealuminumfoil directly
age the oven bottom, A piece of foil
rack with foil. Thisblocksairflowinthe
oven, constitutesa safety hazard, and
will adversely affect cooking results.
• Never cover the broiler insertwith
aluminum foil as this prevents fat
from draining to the pan below, The
broilerpancan be linedwithfoil,
15
Page 17

CareandCleaning
CLEANING CHART
PARTS CLEANING AGENTS DIRECTIONS
Baked Enamel • Soap andwater Useadrytowel orclothtowipe upspills,especiallyacLd(milk,lemonjuice,fruit, mustard,
or Porcelain Enamel • Paste of bakingsoda and water tomato sauce)or sugary spills. Surface may discoloror dull if soil is not immediately re-
. Cooktop * Mild liquid cleaner moved.This isespecially important for white surfaces.
• Oven door ,,Glass cleaner
• Bronerdrawer When surface iscool,washwith warmsoapy water,rinseanddry.Forstubbornsoil,use
• Side panels mildlyabrasivecleaning agentssuch as baking soda paste orBonAmi. Ifdesired,a thin
• Backguard coatofmildappliancewaxcanbeusedtoprotecttheside panels. A glasscleaner canbe
usedto add "shine"to the surface.
NOTE:Donotuseabrasive,causticor harshcleaningagentssuchassteelwool padsor
ovencleaners. These products will scratch or permanently damage the surface.
NOTE:Neverwipe awarm orhot surfacewitha dampcloth asthis may damagethe sur-
face and may cause a steam burn.
Broiler pan and ,, Soap and water Removefromovenafter use. Coolthen pouroffgrease.Placesoapycloth over insertand
insert • Plasticscouring pad pan; let soakto loosen soil. Wash inwarmsoapy water.Use soap-filled scouring padto
• Soap-filled scouring pad remove stubborn soil. Clean in dishwasher if desired.
• Dishwasher
Burner box • Soap and water Burnerbox,locatedunderlift-up cooktop, should becleanedfrequentlyto remove spil-
• Paste of baking soda and water lovers.Ifsoil isnot removed and isallowed to accumulate, itmay damage thefinish. To
• Non-abrasive plastic pad or sponge cleanremove gratesandsurface burners and clean with soap and water,rinse and dry.
• Liquid cleaner
• Glass cleaner
Chrome drip bowls, • Soap and water Clean bowls after each usewith soapand water. Remove stubborn stains with baking
if equipped • Paste of bakingsoda and water sodapasteand plasticscouringpad.Topreventscratchingthefinish, donotuseabrasive
• Plastic scouring pad cleaning agents. Rinse, dry and replace.
Control knobs • Soap and water Toremoveknobsfor cleaning, gently pullforward. Wash inmilddetergentand water. Do
NOTE:Foreasiercleanup,sprayinsertwith anon-stick vegetablecoatingandlinebroiler
panwith aluminum foil.
NOTE:Always store clean broiler panand insert in the broiler compartment. Ifpan and
insertarenotcleanedaftereach use,thesoilmightbecomehot enoughto ignitethenext
time the oven is used.
NOTE:Bowlscanpermanentlydiscolorifexposedto excessiveheatorifsoilis aflowedto
bakeon.
notsoak knobsinwater.Do notuseabrasive cleaning agents.Theywillscratchfinishand
removemarkings, Rinsedry andreplace.TurnON each burner to see if knobshave
been replaced correctly.
16
(continuedon nextpage)
Page 18

CareandCleaning(continued)
PARTS CLEANING AGENTS DIRECTIONS
Glass • Soapendwater Washwithsoapandwater.Useawindowcleanerandasoftclothaftercleaning.Remove
• Backguard • Pasteof bakingsodaandwater stubbornsoilwithpasteof bakingsodaandwater.Rinsewitha clothwrungoutinclear
• Oven window • Glasscleaner water.Dry.Donotuseabrasivematerialssuchasscouringpads,steelwoolorpowdered
cleaningagents.
NOTE: TOavoid inside staining of oven door glass, do not oversaturate cloth.
Grates • Detergentandwater Gratesare madeof porcelain-coatedsteel,Theycan be cleanedatthe sinkwithdeter-
Metalfinishes • Soapand water Wash withsoap andwater. Removestubbornsoilwithpaste ofbaking soda andwater.
• Backguard • Paste ofbakingsoda andwater Use a windowcleaneranda softclothtoremovefingermarksorsmudges.
• Trim parts • Glass cleaner
• Manifoldpanel NOTE:Donotuseovencleaners,abrasiveorcaasticagents.Theywilldamagethefinish.
Oven bottom See page 19forinstructions,
• Self-clean porcelain
• Non-abrasiveplasticpad gentandwaterorinthedishwasher,TOcleanbakedonsoil,placea dampsoapypaper
toweloverthegrateand let standfor 30rainutas.Usea non-a brasiveplasticpadtoscour
stubborn soil.
NOTE:Neveroperateburnerwithoutagrate inplace.Toprotecttheporcelainfinishonthe
gratefromexcessive heat,neveroperatesurfaceburnerwithoutacooking utensilonthe
grate.It is normalfor grates to lose their shine over a periodof time.
Protectthe oven bottomby(1) usinglargeenoughcookwareto preventboilovers;(2)
placeapieceofaluminumtoil,thatisslightlylargerthan thecookware,on thelowerrack.
NEVER place foil directly on the oven bottom.
Protectovenbottomagainstacidspills (milk,cheese,tomato,lemonjuice,etc.) orsugary
spills (piefilling) as they may pitor discolorthe oven bottom.
Oven cavity See page 19for instructions.
• Self-cleanporcelain
I
Oven racks I• Soap andwater Clean withsoapywater.Removestubbornsoilwithcleansingpowderorsoapfilledscour-
• Cleansing powders ing pad. Rinse and dry.
Plastic pad
j• Soap filled scouring pad NOTE: Ifracksbecome difficulttoslide, athincoatofvegetable oilonthe undersideofthe
Plastic finishes • Soapand water When surface iscool, clean with soap and water; rinse, and dry. Usea windowcleaner
• Door handles • Paste of baking soda andwater and asoft cloth.
• Backguardtdm _ • Non-abrasive ptast_cpador sponge
• Overlays NOTE:Neveruseovencleaners,abrasiveorcausticliquidorpowderedcleaningagents
• Knobs on plastic finishes. These cleaning agents will scratch or marr finish.
• End caps NOTE: Topreventstaining ordiscoloration, wipe upfat, greaseor acid (tomato, lemon,
Silicone rubber • Soapand water Washwith soap and water, rinse and dry. Do notremove door gasket.
• Door gasket
Surface burners • Soap andwater Cleanas necessarywithwarmsoapywater.Removestubbornsoilbyscouringwitha
• Pasteofbakingsodaand water non-abrasiveplasticscouringpadandapasteofbakingsodaandwater.Cleanportswith
• Plasticscouringspongeorpad astraightpin.Donotenlargeordistorttheports.Donotusea woodentoothpick.Itmay
Wipeacidorsugarstainsassoonasthe oveniscoolasthesestainsmaydiscolororetch
theporcelain.
rackwitt makestidingeasier.
vinegar,milk,fi'uit juice, marinade) immediately with a dry papertowel or cloth.
breakoffand clogport.DO NOTCLEAN BURNERSWITH THE FOLLOWING caustic
cleaners:ovencleaners,steelwoolorabrasivecleaningagents.Thesemaydamagefin-
ish.Burnerscanbe driedinthe ovenset at t 40°E CAUTION:Burnerand burnertube
mustbe dry before use.
17
Page 19

Self-CleanOven
HOW TO SET OVEN FOR A CLEAN CYCLE
1. Close the oven door.
2. Move the door lock lever to the right
(locked position).
3. Turn the Thermostat knobto CLEAN.
Q
4. Turn the Selector knob to CLEAN.
Q
5 Push in and turn the STOP knob ahead
3 hours.
STOP
\\\XHIII
..\_ 42 7//,
18
Iz e \"
/Imh_k x
(continuednext page)
Page 20

Self-CleanOven(continued)
BEFORE SELF-CLEANING DURING SELF-CLEANING AFTER SELF-CLEANING
The self-cleanoven usestemperatures Itisnormalforthe cooktopof the range Aboutone hourafter the cleancycle is
abovenormalcookingtemperaturesto to become hot during a clean cycle, completed,the internallockwill disen-
automaticallyclean theentireoven. Therefore,touchingthe cooktopduring gageandthe doorlatchcanbe returned
a self-clean cycleshouldbeavoided, to its original(unlocked)position.Turn
The ovenautomaticallybeginsto heat
upwhenthedoorislocked.Astheoven
reachescleaningtemperaturesan inter- Do not attempt to unlock door until
hallockengagesandtheovendoorcan internal lock disengages. Door and
Turnoff oven light before clean cycle, notbeopened.Do notforcelatchtothe latch will be damaged if the latch is
The life ofthebulbmay be shortenedif leftoncethe internallockengages, forced to the left before internal lock
lefton duringthe cleancycle.
The firstfewtimes theovenis cleaned, disengages.
Clean oven frame, door frame and somesmokeandodormaybedetected.
aroundtheovenventwitha non-abra- Thisis normalandwill reduceor disap-
sive cleaningagent such as Bon Ami. pear with use. If the oven is heavily Some soil may leave a lightgray,pow-
These areas are not exposedto clean- soiled,or ifthe broiler panis left in the deryash whichcan be removedwith a
ingtemperaturesandshouldbecleaned oven,smokeand odormayoccur, dampcloth.If soil remains,it indicates
to preventsoilfrombakingonduringthe that the clean cycle was not long
cleancycle. As the oven heatsand cools,you may enough.Thesoilwillberemovedduring
hear sounds of metal parts expanding the next clean cycle.
Wipe up excess grease or spillovers and contracting. This is normal and will
from the oven bottom to prevent exces- notdamage your appliance.
sive smoking or flare-ups during the If the oven racks do not slide smoothly
cleancycle, after a clean cycle, wipe racks and em-
Do not use oven cleaners or oven liner amount of vegetable oil to restore ease
protective coatings of any kind on the of movement.
self-clean ovenfinishor around any part
of the oven.
selectorknobtoOFF.
bossed rack supports with a small
Topreventdamage,donotcleanorrub Fine,hair-like lines may appear inthe
the gasketaroundthe oven door.The oven interioror ovendoor.Thisis a nor-
gasketisdesignedtosealinheatduring realconditionresultingfrom heatingand
thecleancycle, coolingof the porcelainfinish. These
lines do not affect the performanceof
theoven.
19
Page 21

Service
BEFORE CALLING A SERVICE TECHNICIAN, CHECK THE FOLLOWING:
PROBLEM CAUSE CORRECTION
1. Surface burner fails to light a. power supply not connected a. connect power, check circuit breaker or
(pilotless ignition) fuse box
b. clogged burner port(s) b. clean portswith straight pin
c. burners not placed correctly onto gas c. remove and reinstall burner properly
valve
d. surfacecontrol not completely turned to d. turn control to the LITE position until the
the LITE position or turned too quickly burner ignites, then turn control to de-
from theLITE position (pilotless ignition) sired flame size
e. powerfailure (pilotlessignition) e. seepage5tolightburnerduringapower
2. Burner flame uneven a. clogged burner port(s) a. clean ports with straight pin
b. burner not properly positioned b. see page 12to correctly replace burner
3. Surface burner flame a. air/gas mixture not proper a. call serviceman to adjust burner
• lifts off port NOTE: Someyellow tipping with LP gas is
• yellow in color normal and acceptable.
4. Oven burner fails to light a. power supply not connected a. connect power, check circuit breaker or
(pilotless ignition) fuse box
b. powerfailure (pilotlessignition) b. oven willnot operateduring a power fail-
c. oven incorrectly set c. be sure to set both the thermostat and
d. automatic oven cooking feature incor- d. See page 9
rectly set
failure
ure
the selector knobs. See page 7
5. Popping sound heard when burner This is a normal soundthat occurs with some types of gas when a hot burner is turned off.
extinguishes The popping sound is not a safety hazard and will notdamage the appliance.
6. Clookand/orovenlightdoesnotwork a. power supply notconnected a. connect power supply, check circuit
b. bulb may be looseor burned out b. tighten or replace light bulb
c. malfunctioningswitch, starter or ballast c. call serviceman to check
d. malfunctioning clockor loose wiring d. call serviceman to check
7. Moisture condensationon oven a. it is normal for the window to fog during a. leavedoor ajarfor one ortwo minutes to
window, if equipped the first few minutes the oven ison allow moisture to escape
b. cloth saturated with water is used to b. Use a damp cloth to clean window to
clean the window preventexcess water from seeping
8. Oven temperature inaccurate a. oven not preheated a. preheat oven 10 to 15 minutes
• food takes too long or cooks too b. incorrect rack position b. see page 8
fast c. incorrect use of aluminum foil c. see page 15
• pale browning d. oven bottom incorrectly replaced d. replace oven bottom correctly
• food over-done on outside and e. oven thermostat sensing device out of e. reinstall sensing device securely into
under-done in center holding clip(s) clip(s)
• over browning See Problem Chart on page 10
9. Oven smokes excessively during a a. food too closeto burner a. movebroilerpandownonerackposition
broil operation b. meat hastoo much fat b. trim fat
c. sauce applied too early or marinade not c. apply sauce during lastfew minutes of
completely drained cooking. If meat has been marinated,
d. soiled broiler pan d. always clean broiler pan and insert after
e. broiler insertcoveredwith aluminumfoil e. never cover insert with foil as this pre-
breaker or fuse box
between the panelsof glass
See bakingtips on page 9
drain thoroughly before cooking
each use
ventsfat from draining to pan below
10.Poor baking results See pages 8 to 11for information on
baking
2O
Page 22

Service (continued)
SERVICING HOWTO OBTAIN SERVICE
Whenyourappliance requiresserviceor
replacement parts, contact your Dealer
or Authorized Servicer. Use only genu-
ine factory or Maycor parts if replace-
ment parts are necessary. Consult the
Yellow Pages in your telephone direc-
tory underappliance for theservicecen-
ter nearestyou. Be sure to includeyour
name, address, and phone number,
alongwith themodelandserial numbers
of the appliance. (Seeinsidefront cover
for location of your model and serial
numbers.)
Ifyou are unable to obtain service, write
to us. Ouraddress isfound ontherating
plate.See insidefront coverfor location
of rating plate.
If you are not satisfied with the local re-
sponse to your service requirements,
call or write MAYCOR Appliance Parts
and Service Company, 240 Edwards
Street,S.E.,Cleveland, TN37311, (615)
472-3500. Include or have availablethe
complete model and serial numbers of
the appliance, the nameand address of
the dealer from whom you purchased
the appliance, the date of purchase and
detailsconcerning your problem.
Ifyoudidnotreceivesatisfactory service
through your servicer or Maycor you
may contact the Major Appliance Con-
sumer Action Panel by letter including
your name, address, and telephone
number, aswell as the model and serial
numbers of the appliance.
MajorApplianceConsumerActionPanel
MACAP (Major Appliance Consumer
Action Panel) isan independentagency
sponsored by three trade associations
as a court of appeals on consumer com-
plaints which have not been resolved
satisfactorily within a reasonable period
of time.
20NorthWackerDrive
Chicago,IL 60606
21
Page 23

WHAT IS NOT COVERED BY THESE TWO WARRANTIES:
1. Conditions and damages resulting from any of the fol- 4, Products purchased for commercial or industrial use.
lowing: 5. The cost of service or service call to:
a. Improper installation, delivery, or maintenance.
b. Any repair, modification, alteration or adjustment not b. Instruct the consumer on the proper use of the prod-
authorized by Maycor, or a Maycor authorized servic- uct.
er.
c. Misuse, abuse, accidents or unreasonable use. c. Transport the appliance to a servicer.
d. Incorrect electrical current, voltage or supply. 6. CONSEQUENTIALOR INCIDENTAL DAMAGES SUS-
e. Improper setting of any control. BREACH OF THESE WARRANTIES. Some states do
2. Warranties are void if the original serial numbers have not allow the exclusion or limitation of consequential or
been removed, altered, orcannot be readily determined, incidental damages, so the above exclusion may not ap-
3. Light bulbs, ply to you.
a. Correct installation errors.
TAINED BY ANY PERSON AS A RESULT OF ANY
HOW TO RECEIVE WARRANTY SERVICE
1, Contact the dealer from whom you purchased the appliance or any authorized Maycor servicer to
receive warranty service under these warranties.
2. Should you not receive satisfactory warranty service from your local servicer, contact:
Customer Assistance
Maycor Appliance Parts and Service Company
240 Edwards Street, S.E.
Cleveland, TN 37311
(615) 472-3500
(1/93)
3. Have the following information available when requesting warranty service:
- Your name and address.
- The model and serial numbers of your appliance.
- The name and address of your dealer or servicer.
- The purchase date of your appliance.
- A clear description of the problem.
 Loading...