

Page 1
FORFUTUREREFERENCE
Forfuture referencewe suggest you re-
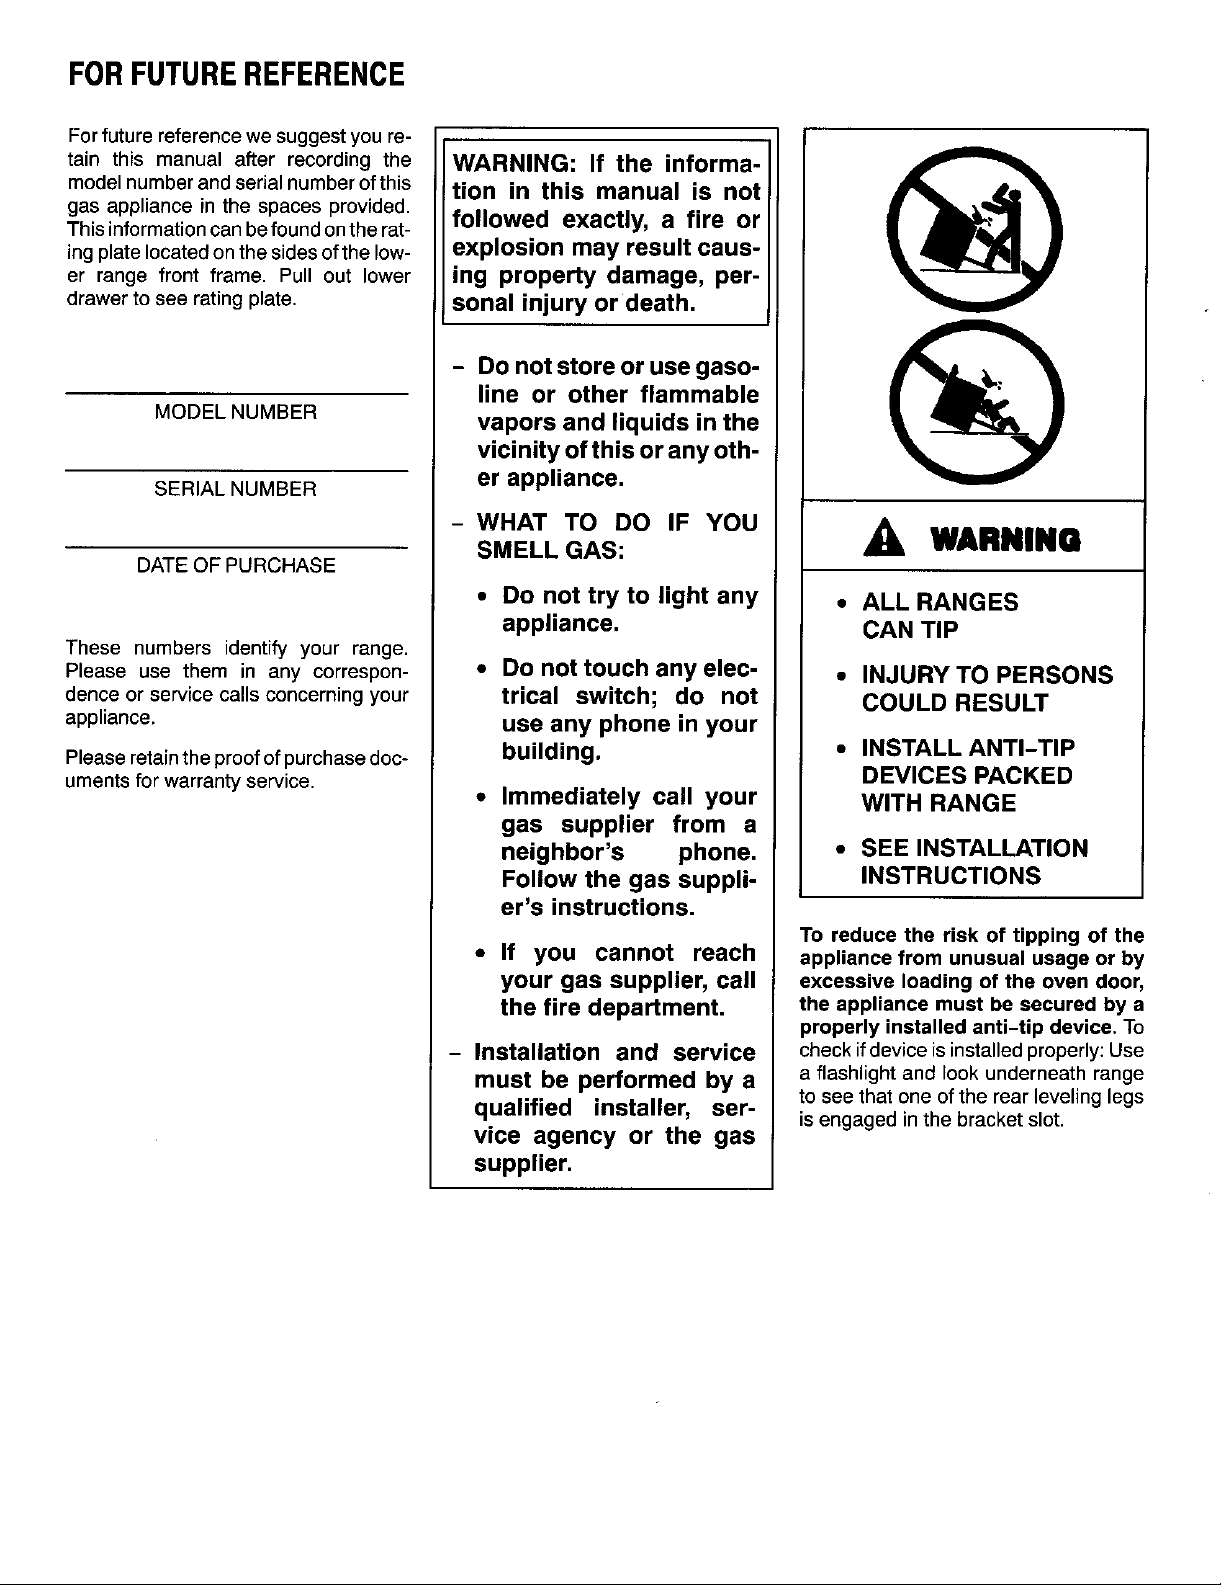
tain this manual after recording the WARNING: If the informa-
modelnumberandserialnumberofthis tion in this manual is not
gas appliance in the spaces provided.
Thisinformationcanbefoundontherat-followed exactly, a fire or
ing platelocated on the sidesof the low- explosion may result caus-
er range front frame. Pull out lower ing property damage, per-
drawer to see rating plate, sonal injury or death.
- Donot store or usegaso- _'_
line or other flammable
MODELNUMBER vapors and liquids in the
vicinity ofthis or anyoth-
SERIAL NUMBER er appliance.
-WHAT TO DO IF YOU
DATEOF PURCHASE
These numbers identify your range.
Pleaseuse themin any correspon- * DOnot touch any elec- • INJURY TO PERSONS
dence or servicecallsconcerningyour trical switch; do not COULD RESULT
appliance, use any phone inyour
Pleaseretaintheproofofpurchasedoc- building. • INSTALLANTI-TIP
umentsfor warrantyservice. DEVICES PACKED
SMELL GAS: _ WARNING
• Do not try to light any • ALL RANGES
appliance. CAN TIP
• Immediately call your WITH RANGE
gas supplier from a
neighbor's phone. • SEE INSTALLATION
Follow the gas suppli- INSTRUCTIONS
er's instructions.
To reduce the risk of tipping of the
• If you cannot reach appliance from unusual usage or by
your gas supplier, call excessive loading of the oven door,
the fire department, the appliance must be secured by a
- Installation and service checkifdeviceisinstalledproperly:Use
must be performed by a a flashlight andlookunderneathrange
properly installed anti-Up device. To
to see that one of the rear leveling legs
qualified installer, ser- is engaged in the bracket slot.
vice agency or the gas
supplier.
Page 2
Page 3
Page 4

Page 5

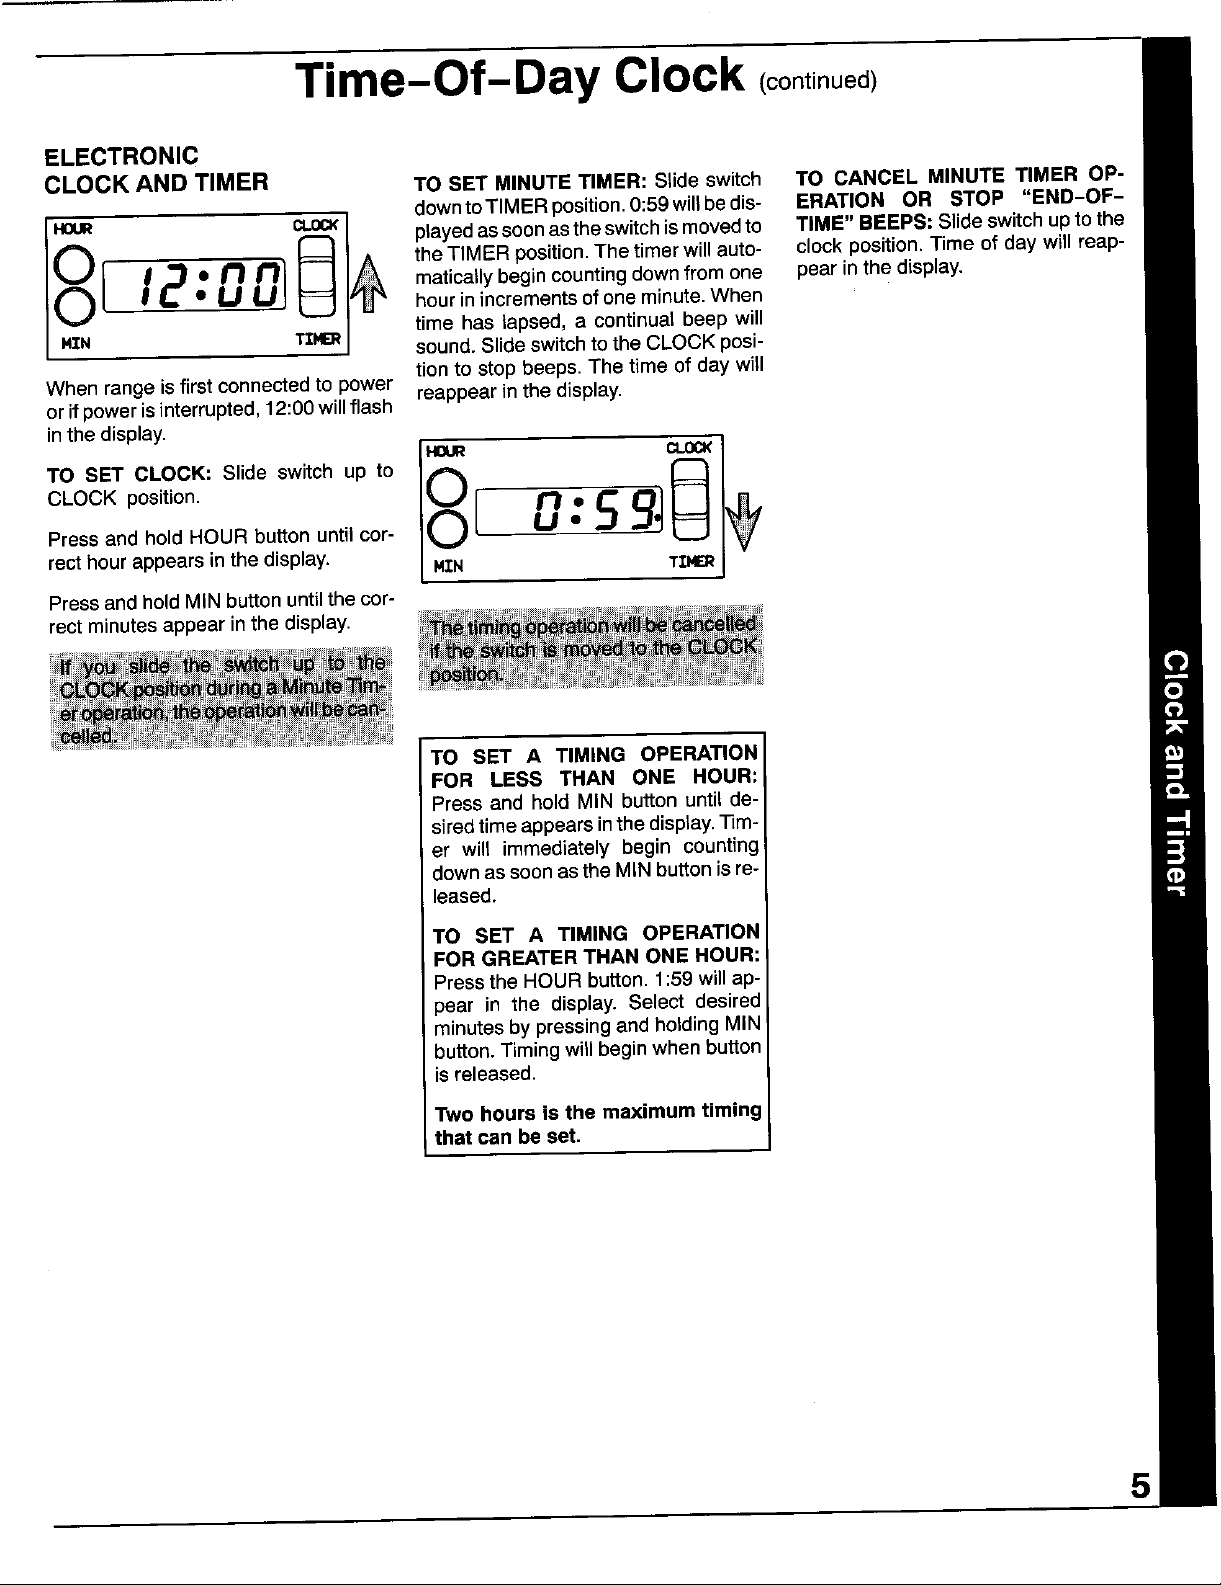
Time-0f-DayClock
Ifyour rangefeaturesa time-of-day clock and minute timer
follow the instructionsfor the illustration that matches the
clock on your range.
ANALOGCLOCKANDTIMER DIGITALANDCLOCKTIMER
12
11 1
CLOCK SET MINUTE TIMER
s "-,;,3o
"///lllll_.',\ "__ 88:88 willflash in the displaywhen the
• 6 b range is first connected to power or if
TO SETCLOCK: Push in and turn Min- TO SET CLOCK: Press and hold
uteTimerknobtothecorrecttimeofday. CLOCK SET button while turning MIN-
BesureMinuteTimer hand is on OFFaf- UTE TIMER knob to the correct time of
tersetting clock, day. MINUTE TIMER knob can be
TO SET MINUTE TIMER: Turn knob in
either direction to the desired time. TO SET MINUTE TIMER: Turn MIN-
Whenthe buzzer sounds, manually turn UTETIMER knob to the right,to the de-
theTimer to OFR sired time, up to 60:00 (1 hour). Timer
power is interrupted.
turned in either direction.
will begincounting down after afew sec-
onds delay. When time has lapsed, a
continualbeepwillsoundfor upto2 min-
utes.
4
(continuedon next page)
Page 6
Time-Of-Day Clock (oon,,nue )
ELECTRONIC
CLOCK AND TIMER TO SET MINUTE TIMER: Slideswitch TO CANCEL MINUTE TIMER OP-
downtoTlMERpoeition. O:59willbedis- ERATION OR STOP "END-OF-
HOUR ¢L0C_ playedas soonastheswitchismovedto TIME" BEEPS: Slideswitchupto the
• n nl maticallybegin countingdown from one pear inthe display.
81,2 @_theTlMERpositlon. Thetimerwillauto-cleckposition._meofdaywillreap-
Whenrange is first connected to power reappear in the display.
orif power is interrupted, 12:00will flash
in the display.
Press and hold HOUR button until cor-
CLocKTOSET CLOCK: Slide switch up tOposition.8[ 0 5_@ _
rect hourappears in the display. 14zN TZ.I_R
Press and bold MIN button until the cor-
rect minutesappear in the display.
• U U ] hourin incrementsof one minute.When
time has lapsed, a continual beep will
"rzMIm sound. Slide switchto the CLOCK posi-
tion to stop beeps. The time of day will
TO SET A TIMING OPERATION
FOR LESS THAN ONE HOUR:
Press and hold MIN buttonuntil de-
siredtimeappearsinthedisplay._m-
er will immediatelybegin counting
downassoonastheMIN buttonisre-
leased.
TO SET A TIMING OPERATION
FORGREATER THAN ONE HOUR:
Pressthe HOUR button.1:59willap-
pear in the display.Select desired
minutesbypressingand holdingMIN
button.Timingwillbeginwhenbutton
isreleased.
Two hours is the maximum timing I
that can be set.
5
Page 7
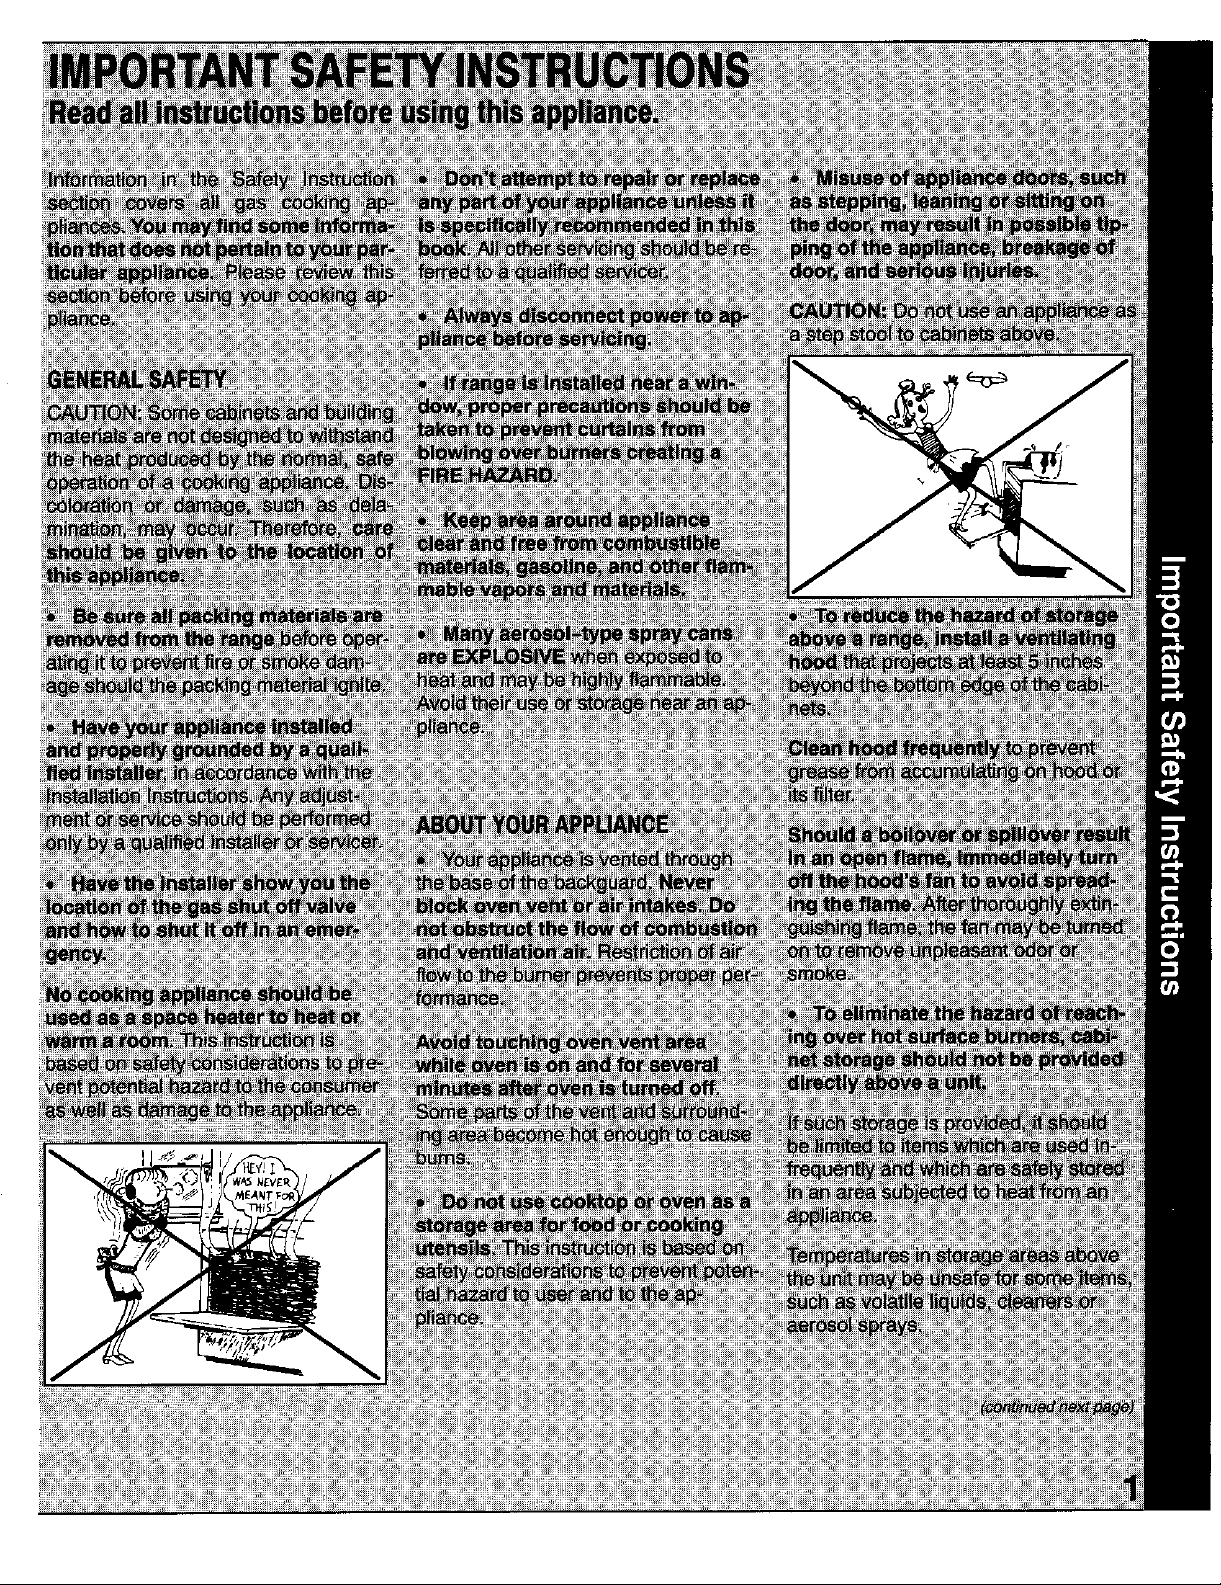
SurfaceCq)oking
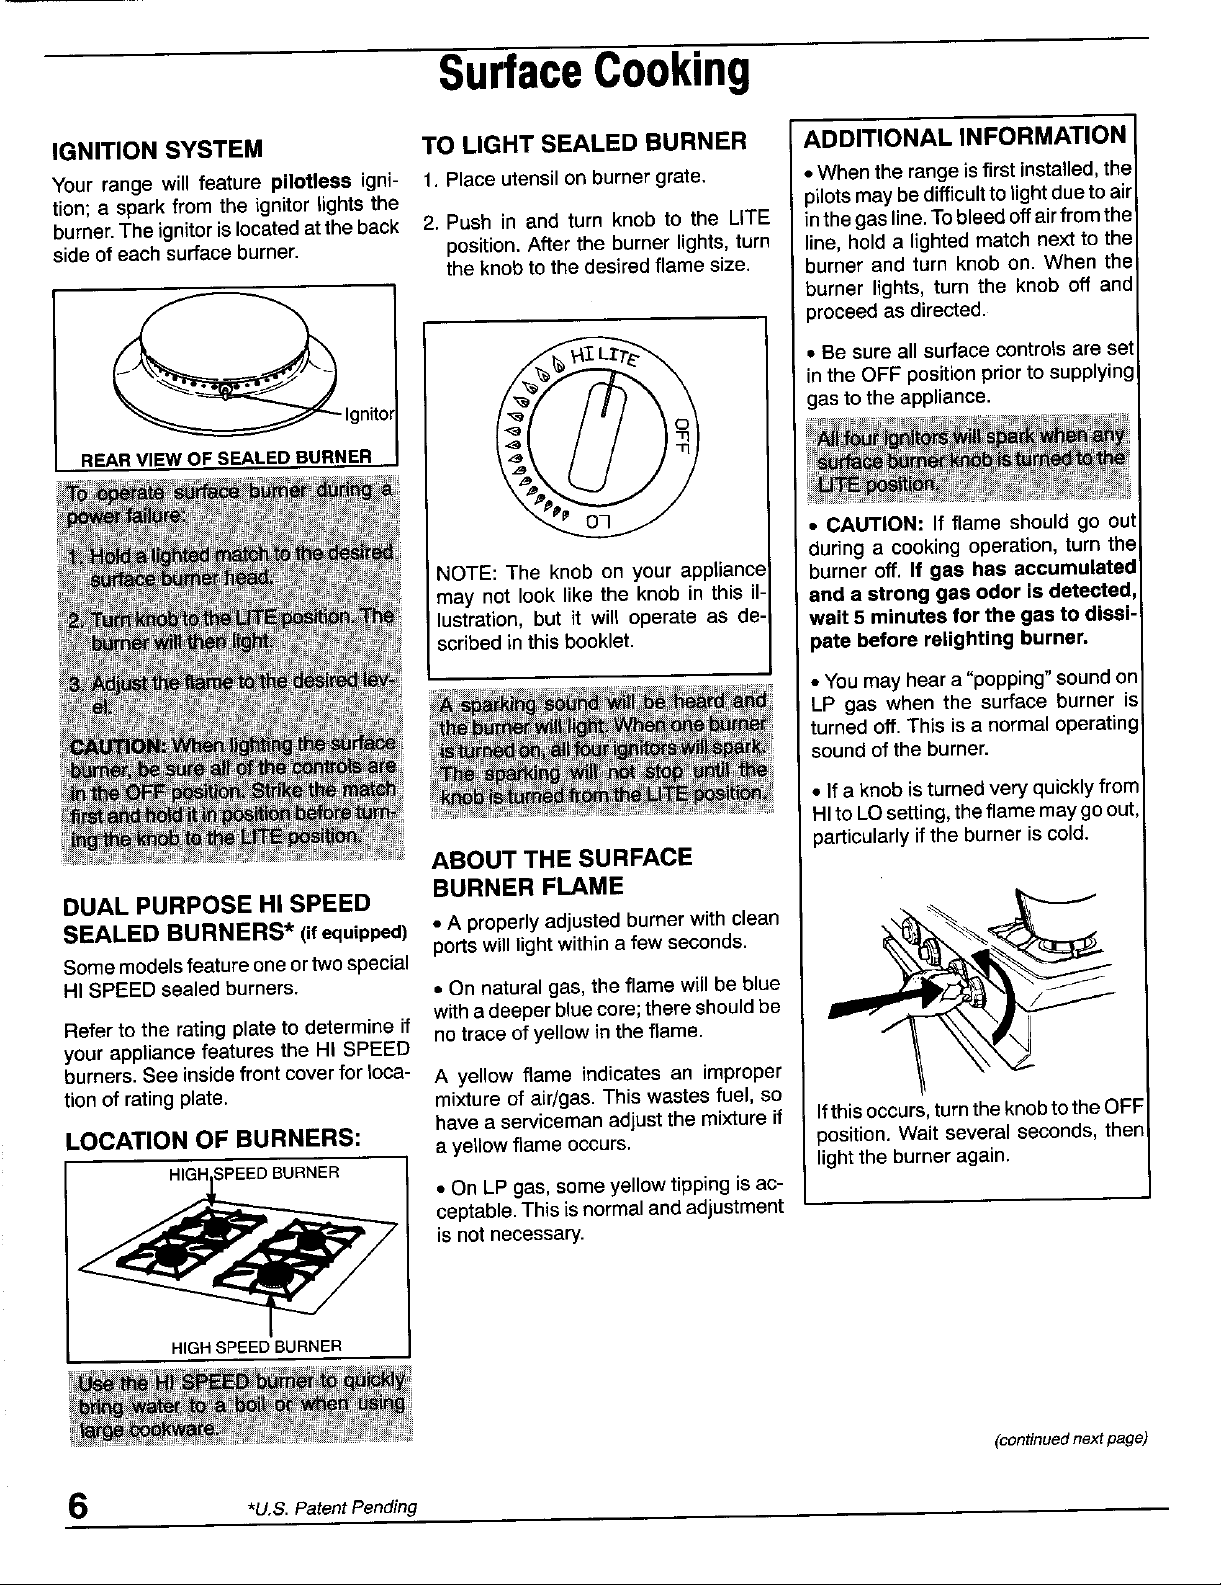
IGNITION SYSTEM TO LIGHT SEALED BURNER ADDITIONAL INFORMATION
Your range will feature pilotless igni- t. Place utensil on burner grate. • When the range is first installed, the
tion; a spark from the ignitor lights the pilots may be difficult to light due to air
burner. The ignitor is located at the back 2. Push in and turn knob to the LITE inthe gas line. Tobleed off air from the
side of each surface burner, position. After the burner lights, turn line, hold a lighted match next to the
Ignitor gas to the appliance.
REARViEW OF SEALED BURNER
the knob to the desired flame size. burner and turn knob on. When the
proceed as directed.
• Be sure all surface controls are set
in the OFF position prior to supplying
_ burner lights, turn the knob off and
NOTE: The knob on your appliance burner off. If gas has accumulated
may not look like the knob in this il- and a strong gas odor is detected,
lustration, but it will operate as de- wait 5 minutes for the gas to dissi-
scribed in this booklet, pate before relighting burner.
ABOUT THE SURFACE
DUAL PURPOSE HI SPEED BURNER FLAME
SEALED BURNERS _ (if equ,pped) " _ _O_er 'Y _dJ_t_d bu met with c,ea_ ___
Some models feature one ortwo special
HI SPEED sealed burners. • On natural gas, the flame will be blue
Refer to the rating plate to determine if no trace of yellow in the flame.
your appliance features the HI SPEED
burners. See inside front cover for toca- A yellow flame indicates an improper
tion of rating plate, mixture of airgas. This wastes fuel, so
ports will lightwithin a few seconds,
with a deeper blue core; there should be _'IP'__
have a serviceman adjust the mixture if Ifthis occurs, turn the knob to the OFF
• CAUTION: If flame should go out
during a cooking operation, turn the
• You may hear a "popping" sound on
LP gas when the surface burner is
turned off. This is a normal operating
sound of the burner.
• If a knob is turned very quickly from
HI to LO setting, theflame may go out,
particularly if the burner is cold.
LOCATION OF BURNERS: a yellow flame occurs, position. Wait several seconds, then
HIGH BURNER light the burner again.
• On LP gas, some yellow tipping is ac-
ceptable. This is normal and adjustment
is not necessary.
HIGHSPEEDBURNER
*U.S. Patent Pending
(continuednextpage)
Page 8

SurfaceCooking oont nue¢,)
FACTORS THAT DETERMINE SELECTING FLAME SIZE CANNING
FLAME SIZE • Use a HiGH flame settingto quickly Acceptablewater-bathorpressurecan-
UTENSIL SIZE: Adjustthe flamesize bringliquidstoa boilor to begina cook- hersshouldnotbeoversizedandshould
soitdoesnotextendbeyondtheedgeof ing operation.Then reduceto a lower haveaflat bottom.Thefollowingarenot
the cookingutensil.Thisisforpersonal settingtocontinuecooking.Neverleave recommended:Oversizedcannersora
safetyand to preventpossibledamage food unattended when using a HIGH very largecannerthat restson two sur-
to the appliance, utensil or cabinets flame setting, face burnergrates.
abovethe appliance. When canning, use the HIGH setting
' ner,then reduceto the lowestflame set-
,_,u_v_ _ pressure sreached nthepressurecan-
just until the water comes to a boil or i
• An intermediate flame size is used to
__i- _ tingthat maintainsthe boil orpressure.
• Utensilswhichextend morethan two ed to maintain a gentle boil. Remem-
inches beyond the grateor touch the ber,waterboilsatthesametemperature
cooktopmay causeheat tobuildup,re- whetherboilinggentlyorvigorously.
suitingin damage to the burnergrate,
burneror cooktop. • Use LOW to simmeror keepfoods at
• Utensils,such as wokswitha support
ring,whichrestrictaircirculationaround
continue a cookingoperation. Foodwill
not cook any faster when a higher
flame setting is used than that need-
servingtemperatures.
may result in damage to the burner
grate, burner or cooktop.
UTENSIL MATERIALS: Optimum
theburnerwillcauseheattobuildupand _
cooking performance can be achieved
whenheavygauge, flat, smooth bottom,
metal utensils with straight sides and
tight fitting lids are used.
• Aluminum oraluminum-clad stain-
less steel pansheat moreevenlyso a
slightly larger flame can be used.
• Stainless steel, porcelain andheat-
cast aluminum and iron heat slowly; /
and, Teflon-coated utensils are sensi-
tive to heat. These materials require a
lowerflameto producemoreevencook- "_ )
ing results, Adjust flame so itextends
halfway to the edge of the utensil bot- \_,
proofceramic or glass heat unevenly; /_ __ t
tom. "_ LoTj
COVERED UTENSILS: Foods cook
faster when the utensil is covered be- Besureto adjust the knob so there is
cause more heat is retained. Lower the an adequate supply of gas to main-
flame size when covering utensils, lain a stable flame on the burner.
Check to be sure burneris lite and the
flameis stable.
Page 9

UsingYourOven
OVEN VENT OVEN THERMOSTAT
The ovenvent is located at the base of The oventhermostat knob isusedto se-
thebackguard.When the oven is inuse, lect and maintain the oven temperature.
this area may feel warm or hot to the Alwaysturn this knobjust tothe desired
touch. To prevent problems do not: temperature- not to a higher tempera-
Block the vent opening, touch the area ture and then back. This provides more
nearthe opening or place utensils near accurate oven temperatures. Turn this
thevent opening, knobto OFFwhenever the oven isnot in
OVEN BURNER
The size and appearance of a properly
IGNITION SYSTEM adjustedoven burnerflame should beas
Your appliance features pilotless igni- shown:
Be sure oven control is set in the OFF
positionpriortosupplyinggastothe ap-
pliance.
use.
T
• is an indent at
ti°n" Aglebar willlightthe °ven burner" I i _ O_ 3_O_ smeoT_'_O_;A
[ "- 1
The oven temperature is maintained by
cycling the burner on and off. After the
oven temperature has been set, there
will be about a 45 second delay before
the burner ignites.This isnormaland no
gas escapes duringthis delay•
(continuednextpage)
8
Page 10

UsingYourOven(cont,noe )
TO SET THE OVEN PREHEATING
1. When cool,placethe racksinthede- Preheatingis necessaryforproperbak-
siredrackpositions, ing results.Allowthe oven to heat until
thedesiredoventemperatureisreached
2. Pushin andturnthe oventhermostat (approximately t0 to 15 minutes). Se-
knob to the desired oven tempera- lectingatemperaturehigherthanthede-
ture.Allow theoven to preheat for 10 sired temperature will not preheat the
to 15 minutes when baking, oven any faster. Infact, this may have a
3. Place the food in the center of the negative effect on baking results.
oven, allowing a minimum of two in- It is not necessaryto preheat for broiling
ches between the utensil(s) and the unless darker browning is desired or if
oven walls, cooking thin (3/4-inch) steaks. Allow
4. Check the food for doneness at the burner to preheat 2 to 3 minutes.
minimum time given in the recipe. Preheating is notnecessaryfor roasting
Cook longer if necessary. Opening operations.
the oven doorfrequently causes heat
losswhich may affect cooking results
and increase cooking time.
5. Turn the oven thermostat knob to
OFFand removefoodfrom the oven.
(cont/nued next page)
9
Page 11

UsingYourOven(continued)
10
(continuednext page)
Page 12

CommonBakingProblemsAndWhyTheyHappen
Cakesare uneven. Panstouching each other or Cakes don'tbrown on top. Incorrect rack position.
Cake high in middle. Temperaturetoo high. Overmixing.
Cake falls, Too much shortening or sugar. Uneven texture. Too much liquid.
Cakes, cookies, biscuits Incorrect rack position.
don'tbrown evenly. Oven door not closed properly. Cakescrack on top. Batter overmixed.
oven walls. Temperaturetoo low.
Batter uneven in pans. Overmixing.
Oven temperature too low or Toomuch liquid.
bakingtime too short. Pan size too large or too little
Oven notlevel, batter in pan.
Undermixing. Oven door opened too often.
Toomuch liquid.
Bakingtime too long. Pantoo large.
Overmixing. Temperaturetoo high.
Too muchflour. Baking time too long.
Panstouching each other or Panstoo close to each other
ovenwalls, or oven walls.
Incorrect rack position.
Too much or too little liquid. Undermixing.
Temperaturetoo low. Temperaturetoo low.
Old or too little baking powder. Bakingtime too short.
Pan too small.
Oven door opened frequently. Cakes have tunnels. Not enough shortening.
Added incorrect type ofoil to Too much baking powder.
cake mix. Overmixing or at too higha
Added additional ingredients speed,
to cake mix or recipe. Temperaturetoo high.
Door gasket not sealing Temperaturetoo high.
properly. Too much leavening.
Incorrect use of aluminum foil. Incorrect rack position.
Oven not preheated.
Pans darkened, dented or
warped. Cake not done in middle. Temperature too high.
Excessive shrinkage. Too little leavening.
Pan too small.
Baking time too short.
Cakes, cookies, biscuitstoo Ovennot preheated.
brown on bottom. Panstouching each other or
oven walls. Pie crust edges too brown. Temperaturetoo high.
Incorrect rack position. Panstouching each other or
incorrect use of aluminum foil. oven walls.
Placed2 cookie sheets on one Edgesof crust too thin.
rack. Incorrect rack position.
Used glass, darkened, stained,
warped or dull finish metal Pies or cakes don't brown Used shiny metalpans.
pans. (Use a shiny cookie on bottom. Temperaturetoo low.
sheet.)
Pies have soaked crust. Temperaturetoo low atstart of
baking.
Fillingtoo juicy.
Used shiny metal pans.
11
Page 13

UsingYourOven ooo,J,oed
HOW TO BROIL
Broilingis a method of cooking used for tendersteaks, rare interior,the meat shouldbeclosetothe burner.Place
chops,hamburgers,chicken,fish,andsomefruitsandvege- the panfurtherdownifyouwishthemeatwelldoneor ifspat-
tables.The foodis placeddirectlyundertheovenburner, teringandsmokingoccurs.
Thecookingtime isdetermined bythe distance betweenthe The distance from the burner depends on the thickness of
meat and the burner,the desired degree of doneness, and the meat and desired degree of doneness. Thin cuts should
the thickness of the meat. be placed on rack#1 (top)or #2 (middle); thickercuts should
beplaced on rack#2 or #3 (bottom). Broil untilthe top ofthe
GENERALTIPS meat is browned. Itshould be approximately half cooked by
Broilingrequirestheuseofthebroilerpanandinsertsupplied the timethe topisbrowned.
withyourappliance.Itisdesignedtodrainexcessliquidand
fat away from the cooking surface to prevent spatters, Trimexcess fat toprevent excessivespattering or smoking.
smoke and flare ups. during cooking.
Foreasierclean-up, line the broiler pan (bottom piece)with
aluminumfoiland spraythe insertwith a non-stick vegetable If you plan to season the meat, it is betterto do so afterthe
coating.Do notcoverthe broilerpan insertwithaluminumfoil surface has browned. Salt tends to delay browning which
as this prevents fat from draining into the pan below. The can resultin overcooking. Salting beforecooking alsodraws
broiler can be preheatedfor afew minutes. However,do not the juices out ofthe meat,causing dryness.
preheatthe broilerpan and insert.
If the food is placed too close to the burner,overbrowning
and smoking may occur. Generallyfor a brown exterior and
Cut slashesinthe outer edgesofthe meatto prevent curling
BROILING CHART TO BROIL:
1. TurntheovenTHERMOSTATknobto
Food Thickness Position Doneness 1st Side 2nd Side
Quantity &/or Approx. Minutes/Side BROIL.
tt is possibleto broil longercooking
Bacon thickslice middle well 4- 5 1- 2 foods such as pork chops at a lower
BeefPatties 3/4"thick middle rare 3-4 2-3 temperature to prevent overbrown-
middle medium 5-6 3-4 ing. Turn the knob to 450°F, rather
middle well 5- 6 4-5 than BROIL, for low temperature
Steaks 1_thick bottom rare 3 - 4 3- 4 broiling.
bottom medium 5- 7 4- 6 2. Preheatfor 2 to 3 minutes if desired.
bottom well 7 - 8 6 7
NOTE: Cooking times in the Broil
112"thick bottom rare 7-8 5-6 Chart are based on a 2 to 3 minute
bottom medium 8 - 10 6 - 8
bottom well 10 - 11 8 - 9 preheat.
ChickenBreastHalves bottom well 8- 9 7- 8 3. Place the broiler pan on the recom-
Fish Fillets 1" thick middle 5 - 6 3 - 5
1/2_ thick middle 4 - 5 3- 5 broilingchart.
mended rack position shown in the
HamSlices 1/2"thick middle 5-6 4-5 4. Foltow the suggested times in the
(precooked) broiling chart. Meat should be turned
once about halfway through itscook-
PorkChops (450°) 1" thick bottom well 12 - 14 8 - 9 ingtime.
Weiners/Sausage middle 2 -4 2 -3 5. Checkthe doneness by cutting a slit
(precooked) in the meat near the center to check
the color.
12
Page 14

Maintenance
COOKTOP BURNER GRATES DUAL PURPOSE
The cooktop is designed with two con- SEALED BURNERS
touredwells which containspillsuntil The four sealed burnersare securedto
theycan be wiped up. Unlikethe stan- thecooktopandareNOTdesignedtobe
dard gas appliance, THIS COOKTOP removedby the consumer.
DOES NOT LIFT-UP NOR IS IT RE-
MOVABLE.To prevent damage to the Since the four burners are sealed into
gas tubing or top, do not attempt to lift thecooktop, boiloverswon't seepunder-
cooktop, neath to the burner box area. Thus
When reinstalling square grates, place there are no hidden spills inthe burner
er, use care to prevent damage to the
Whencleaning aroundthe surface burn-
spark ignitor which is located at the
cloth should catch the ignitor, it could
_[ indentedsidestogether sostraight sides box area toclean'areat front andrear. IGNITORS
damageor break it. Ifthe ignitor isdam-
aged or broken, the surface burner will
not light.
back-side of each burner. If a cleaning
Burner grates are durable but may lose _ Ignitor
their shine due to usage and high tern- REARVIEWOFSEALEDBURNER
peratures.
(continuednext page)
13
Page 15

Maintenance(continued)
OVEN DOOR OVEN RACKS BROILER DRAWER
The two oven racksare designedwitha Storecleanbroilerpanandinsertinthe
lock-stop edge to keep the racksfrom broilerdrawer.
comingcompletelyoutof the oven.
Toremove:Besuretherackiscool.Pull stopposition.Liftupfrontof drawerand
therackstraightout untilitstops.Tiltthe pullto the secondstopposition.Grasp
frontofthe rackupand continuepulling sides and lift up and out to remove
When openingovendoor,allowsteam the rack outof the oven. drawer. Gently move drawer side-to-
andhotairto escapebeforereachingin sideas you pullthedrawerout.
ovento check, add orremovefood. To replace:Tiltthefrontendofthe rack
upand placethe rackbetweenthe rack \ I
To remove
"stop" position (opened about 4 inches) lock-stop position. Lower the front and
and grasp doorwith both hands at each slidethe rackstraight in.Pulltherackout
side. Do not use door handleto lift door. to the lock-stop positionto be sure it is _
Liftup evenly untildoor clearsthe hinge positionedcorrectly andthen return itto
arms. its normal positon.
door:
Open
door to the
supports.Slide it back until it clears the _,_
To remove: Pulldrawerout to the first
m
/_ OVEN Bo'n'OM TOreplace: Fit ends of drawer glides
TO replace door: Grasp door at each __1//7,
side,alignslotsinthedoorwiththe hinge _. _•armsandslidedoordown ontothe hinge
armsuntil completelyseatedon hinges. __.. ___."J'3 "_." _j
To remove: When cool, remove the position.
oven racks. Slide the two catches, lo-
cated at each rear corner of the oven
bottom, toward the front ofthe oven.
Lift the rear edge of the oven bottom
slightly, then slide it back until the front
edgeof the oven bottomclears theoven
frontframe. Remove oven bottom from
oven.
ontorails. Liftup drawerfront and gently
push in to first stop position. Gently
move drawer side-to-side asyou push
in the drawer. Lift up drawer again and
continue to slide drawer to the closed
14
To replace: Fit front edge of oven bot-
tom intofrontframe. Lower rearof oven
bottom and slide the catches back to
lock oven bottom into place. (continuednext page)
Page 16

Maintenance(continued)
OVEN LIGHT HOWTO REMOVE PROPORTIONAL VALVE
RANGE FOR CLEANING ADJUSTMENT (if equipped)
AND SERVICING The LOW setting shouldproducea sta-
Followtheseproceduresto removeap- bleflamewhenturningthe knobfromHI
Before replacing oven light bulb, DIS- pliancefor cleaning or servicing: to LO. The flame should be 1/8 inch or
CONNECT POWER TO RANGE. Be LOWsetting.
sure bulb and range parts are cool. Do 1. Shut-off gas supplyto appliance.
nottoucha hot bulbwith adampclothas To adjust: Operate burner on HI for
the bulb may break. 2. Disconnect electrical supply to ap- about 5 minutes to preheat burner cap.
pliance, if equipped, Turnknob backto LO; remove knob,and
To replace oven light: Use a dry pot insertasmallscrewdriverintothecenter
holder, to prevent possible harm to 3. Disconnectgas supplytubingto ap- ofthe valve stem.Adjustflame size by
hands;very carefully removebulb.Re- pliance, turningadjustmentscrewineitherdirec-
placewitha 40 wattAPPLIANCE bulb. tion.
Reconnectpowertothe range. 4. Slide range forward to disengage
rangefromthe anti-tip bracket.(See
InstallationInstructionsforlocationof
LEVELING LEGS bracket.)
lowerand must be stable on allports on
5. Reverseprocedure to reinstall.Ifgas p_
linehas been disconnected,check for
Levelinglegsare locatedon eachcorner gas leaksafter reconnection. (See In-
ofthe base ofthe range, stallation Instructionsfor gas leak test
method.)
NOTE: A qualified servicer should dis-
connect and reconnect the gas supply.
ping, range must be securedto the floor
by sliding rear leveling leg intoan anti-
f
__ To prevent range from accidently tip-
Place a level horizontally on an oven risk of tip over, should theappliance not
rackand checkfront-to-back and side- be reinstalled according to the installa-
to-side. Level by turning the legs. tion instructions.
tip bracket supplied with the range.
WARNING: Possible risks may result NOTE: All gas adjustments should be
from abnormal usage,including exces-
sive loadingof the oven door and ofthe done by a qualified servicer only.
J
15
Page 17

GeneralInformation
ELECTRICAL CONNECTION USE OF ALUMINUM FOIL
Appliances which require electrical Use aluminum foil ONLY as
power are equipped with a three- instructed in this book. Improperuse
prong grounding plug which mustbe of aluminumfoil may causedamageto
plugged directly into a properly theoven, affectcookingresults,andcan
groundedthree-hole 120 voltelectrical also resultinshockand/orfirehazards.
outlet.
Foilcan be usediftheseguidelinesare
followed:
(_ i_,/ • Do not use aluminum foil directly
_ heatawayfromtheutensilcausinginad-
• equate browning. Placing a pie directly
:' onfoil may resultin asoggy bottomcrust
and inadequate browning.
__ under the cookware. Foil will reflect
• Do not placealuminumfoil directly
A/ways disconnect power to app/i- onthe oven bottom asthis may dam-
ance before servicing, age the oven bottom, A piece of foil
The three-pronggroundingplug offers that is slightlylarger thanthe cooking
protectionagainstshock hazards. DO utensilcan beplacedontherackdirectly
NOT CUT OR REMOVE THE THIRD belowtherackcontainingthe utensil,
GROUNDING PRONG FROM THE
POWER CORD PLUG, • Do not completely cover an oven
rackwith foil.Thisblocksairflowinthe
oven, constitutes a safety hazard, and
will adverselyaffect cooking results.
• Never cover the broiler insertwith
aluminum foil as this prevents fat
from draining to the pan below, The
broilerpancan be linedwithfoil.
16
Page 18

CareandCleaning
illii
CLEANING CHART
PARTS CLEANING AGENTS DIRECTIONS
Baked Enamel * Soap and water Useadrytowelor clothtowipe upspills,especiallyacid (milk,lemonjuice,fruit, mustard,
or Porcelain Enamel • Pasteof baking soda and water tomatosauce) orsugaryspi)ls.Surfacemay discoJoror dull if saJ)Lsnotimmediate/y re-
. Cooktop * Mild liquid cleaner moved. This isespecially importantfor white surfaces.
• Ovendoor * Glasscleaner
• Broilerdrawer When surface iscool,washwith warm soapywater, rinse anddry.Forstubborn soil, use
• Side panels mildlyabrasivecleaning agentssuch as baking sodapasteor BonAmi.If desired,athin
• Backguard coatof mildappliancewax canbeusedto protectthesidepanels. A glasscleanercan be
usedto add "shine" to the surface.
NOTE:Do notuseabrasive,caustic or harshcleaningagentssuch as steelwoolpadsor
ovencleaners. These products will scratch or permanentlydamage the surface.
NOTE:Neverwipea warmor hotsurfacewith adamp clothasthismay damagethesur-
face and may cause e steam burn.
Broiler panand • Soap and water Removefromoven afteruse.Coolthen pouroffgrease.Placesoapyclothoverinsertand
insert • Plastic scouring pad pan; letsoak toloosen son.Washin warmsoapy water.Use soap-filled seoudng padto
Chrome drip bowls, • Soap and water Clean bowls after each use with soap and water. Remove stubborn stains with baking
if equipped • Psate of baking sada and water sodabasteandp]astiescourJngpad.TopreventseratchJngthefinish,donotuseabrasJve
Control knobs * Soapand water Toremoveknobsforcleaning,gentlypullforward.Washinmild detergentandwater.Do
Glass • Soap and water Washwithsoapandwater.Useawindow cleanerandasoftclothaftercleaning,Remove
• Backguard • Pasteof baking soda andwater stubborn soil withpaste of bakingsoda and water. Rinsewith aclothwrung out inclear
• Ovenwindow • Glass cleaner water.Dry.Donot useabrasive materials suchas scouringpads,steelwool orpowdered
• Soap-filled scouring pad remove stubborn soil. Clean in dishwasher if desired.
• Dishwasher
NOTE:Poreasiercleanup,sprayinsertwithanon- stickvegetabtecoeting andline broifer
pan with aluminum foil
NOTE:Always store clean broilerpanand insert Jnthe broJJercompartment, if panand
insertare notcleaned aftereach use,thesoilmight becomehotenough toignitethe next
time the oven isused.
• Plasticscouringpad cleaningagents.Rinse,dry and replace.
NOTE:Bowlscanpermanentlydiscolorifexposedtoexcessiveheatorifsoilisallowedto
bake on.
notsoakknobsinwater.Donotuseabrasivecleaningagents.Theywillscratchfinishand
removemarkings.Rinsedryandreplace.TurnON each burner to seeif knobs have
been replaced correctly.
cleaning agents.
NOTE:To avoid inside stainingof oven door glass, do not oversaturate cloth.
(continuedon next page)
17
Page 19

CareandCleaning(continued)
PARTS CLEANING AGENTS DIRECTIONS
Grates • Detergentand water Gratesaremadeof porcelain-coatedsteel,Theycan becleaned atthesinkwithdeter-
* Non-abrasive plastic pad gent and wateror in the dishwasher.Tocleanbakedon soil, placea dampsoapy paper
Metal finishes • Soap and water Wash with soap andwater. Removestubborn soilwith paste of bakingsoda and water.
• Backguard • Paste of baking soda and water Use awindow cleaner anda soft cloth to remove fingermarks orsmudges.
• Trim parts • Glass cleaner
• Manifoldpanel NOTE:Donotuseovencleaners,abrasiveorcausticagents.Theywilldamagethefinish.
Oven bottom • Soap and water Continuous clean oven bottom:See page 19.
• Porcelainenamel • Pasteof baking soda and water
• Non-abrasive plastic pad Porcelainoven bottom: Clean,whencool,with soapandwater,non-abrasive plasticpad
• Ovencleaner orovencleaner. Rinsewithclearwater. Tomakecleaningeasier, protecttheoven bottom
Oven cavity Cleaning action begins whenever the Brush off heavy soil with a nylon or plastic pad. Do not use paper towels, cloths, or
• Continuous clean oven ison. The oven must be used for spongesbecausetheovenwallsareporousandparticlesofthesematerialswillruboffon
oven cleaningtotake place.Higheroventern- thewalls. Rinseareawith cleanwater only.DOnotuseanytypeofoven cleaner,cleanser
See page 19. }eratures and longer baking times or detergent on this surface.
speedthe cleaning action.
Oven cavity • Soap and water Clean oveninteriorwithsoap andwater; rinse. Usecleansingpowdersoraplastic scour-
• Porcelainoven • Mildabrasive cleaners ingpadto remove stubbornsoil.Wipeacid orsugarstainsas soonasthe oven iscoolas
• Plasticpad thesestains maydiscolor or etchthe porcelain.Donotusemetallicscouringpadsas they
• Ovencleaner willscratchthe porcelain.Tomakecleaningeasier, place 1/2cuphouseholdammoniain a
Oven racks • Soap andwater Cleanwithsoapywater. Removestubbornsoilwith cleansingpowderorsoapfilled scour-
. Cleansing powders ing pad. Rinse and dry.
• Plasticpad
• Soap filled scouring pad NOTE:Ifracks becomedifficulttoslide, athin coatofvegetableoilonthe undersideofthe
Plastic finishes • Soap and water When surface iscool, cleanwith soap and water; rinse,and dry. Use a windowcleaner
• Door handles • Pasteof bakingsoda and water and a soft cloth.
• Backguardtrim • Non-abrasive plastic pad or sponge
• Overlays NOTE:Neveruseovencleaners,abrasive orcausticliquid orpowderedcleaning agents
• Knobs on plasticfinishes. Thesecleaning agents will scratch or marr finish.
• Endcaps NOTE: Toprevent stainingor discoloration,wipe upfat, grease or acid (tomato, lemon,
towelover thegrateandlet standfor 30minutes.Useanon-abrasive plastic padtoscour
stubborn soil.
NOTE:Neveroperateburnerwithout agratein place.Toprotectthe porcelainfinish onthe
grate fromexcessive heat,neveroperatesurfaceburnerwithoutacooking utensilonthe
grate. Itis normal for grates to losetheir shine over aperiod oftime.
by (1)usinglarge enoughcookwareto prevent boilovers; (2) placea pieceofaluminum
foil,that isslightlylargerthanthe cookware, onthe lower rack. NEVERplacefoil directly
on the oven bottom.
Protectoven bottomagainstacidspills (milk,cheese,tomato, lemoniuice, etc.) orsugary
spills (pie filling) as they may pitor discolor the oven bottom.
Foreasiercleaning,ovenbottomcan beremovedandcleanedatthesink.Do notsoakor
immerse oven bottom in water or place under running water.
shallowglassand leaveinacoldovenovernight.The ammoniafumeswillhelploosenthe
burnedongrease andfood. Ovencleaners canbe usedonthe porcelainoven butfollow
manufacturer's directions. Ifoven cleaner was used, thoroughly rinse oven cavity and
capillarytube whichislocatedatthetopofth eoven.Ovencleanerscannotbeusedonthe
continuouscleaning oven finish.
rack will make sliding easier.
vinegar, milk, fruit juice, marinade) immediatelywith a dry paper towel or cloth.
Silicone rubber • Soap andwater Wash with soap and water, rinse and dry. Do not remove door gasket.
• Door gasket
Sealed burners * Soap and water Clean,whencool, asnecessarywithwarmsoapywater. Removestubbornsoilbyscour-
• Paste of baking soda and water ingwitha non-abrasive plasticscouringpadanda pasteof bakingsoda andwater.Clean
• Plastic scouring sponge or pad 3ortswithastraight pin.Donotenlargeordistorttheports. Donot useawoodentoothpick.
Itmaybreakoffandclogport.Sealedsurface burnerscannot beremovedbythe consure-
eF,
NOTE:Whencleaningaroundthe surfaceburner,usecareto preventdamageto the igni-
torwhich islocatedatthe back-side ofeach burner. If a cleaning clothshould catchthe
ignitor,itcould damageorbreak it.Iftheignitor isdamaged or broken,the surface burner
will not light.
18
Page 20

CareandCleaning(cootioue)
CONTINUOUS CLEANING OVEN (if equipped)
WHAT ISTHE CONTINUOUS MANUALLY CLEANING HINTS
CLEANING OVEN? HEAVY SPILLOVERS Brittle crusts or stains can be loosened
The finishof the ContinuousCleaning The specialfinishwill cleanmostspat- byGENTLYtappingstainwithawooden
Oven isidentified by its dark gray color, ters during normal even use unless orplasticutensil Brush away any loose
and rough, porous texture. The rough there is a heavy buildup of soil. Heavy soil that flakes off. Varnish type stains
texture prevents grease spatters from spillovers such as pie or casserole usually needto besoftened with asmall
formingbeads which rundownthe walls boilovers will not clean effectivelywith- amount ofwaterordamp cloth. Remain-
leaving unsightly streaks. Rather, the out some manual help. The crusty or ingsoilwill gradually reducewith contin-
rough texture absorbs spatters and al- varnish-like steins that form fromthese ued ovenuseat normalbakingtempera-
lows them to spread, thus exposing a spilloversclogtheporesandpreventthe tures.
largerareato the hotoven air.The cata- special finish from being exposed to the
lyst, when exposed to heat, speeds the hot oven air. This greatly reduces the
oxidationof soil. cleaning effectiveness of thefinish. DO NOT USE ANY TYPE OF OVEN
CLEANER, POWDERED CLEANS-
ERS, SOAP, DETERGENT OR PASTE
Cleaning action automatically begins These crustyorvarnish-likestainsmust ON ANY CONTINUOUS CLEANING
whenever the oven is turned onfor bak- either be removedor broken up before SURFACE. ALSO, DO NOT USE ANY
ingor roasting.The oven MUST be"on" cleaning can effectively take place. ABRASIVE MATERIALS, STEEL
for cleaning to take place. No cleaning WOOL, SHARP INSTRUMENTS OR
willoccur whenthe oven isoff. The spe- SCRAPERS FOR THEY WILL DAM-
cial catalyticfinish must be exposed to TO MANUALLYCLEAN AGE THE FINISH.
hot oven air before soil will begin to HEAVYSPILLOVERS
graduallyreduceinsize. Brushoffheavysoilwithanylonbrushor
plasticpad.DO NOTUSE papertowels, Avoid spilloversby using utensilsthat
FACTORSAFFECTING LENGTH OF clothsor spongesforthe ovenwalls are arelargeenoughto holdfood.A cookie
CLEANING TIME porousand particlesof these materials sheetorpieceof aluminumfoil,justa lit-
The higher the even temperature, the clear water only. tie larger thanthe pan can be placedon,
fasterthe cleaning action.The length of the rack directly below the rack holding
cleaning time will depend on these fac- the utensilto catch spills.
tors:Type of soil,amount or size of soil,
oven temperature and length of time i
ovenisin use. Time mayvary from afew _ Over a period of time, wear marks may
minutesto severalhours. Soil deposited appearon the embossed rack supports.
atthe end of a cycle may still bevisible. This is normal and results from sliding
This will usually fade with continued the racks in and out of the oven. Wear
oven use until the soil gradually disap- marks will not affectthe cleaning action
pearsor can be wipedup manually.The / of the even.
oven will appear presentably clean,
eventhough some spatters may be pre-
sent.
willruboffonthewails. Rinseareawith
r
19
Page 21

Service
BEFORE CALLING A SERVICETECHNICIAN, CHECK THE FOLLOWING:
PROBLEM CAUSE CORRECTION
1. Surface burnerfails to light a. powersupply not connected a. connect power,check circuit breaker or
b. clogged burner port(s) b. clean ports with straight pin
c. surfacecontrolnotcompletelyturnedto c. tumcontroltotheLITEpositionuntilthe
the LITE position or turned too quickly burner ignites, then turn control to de-
from theLITE position (pilotless ignition) sired flame size
d. powerfailure d. seepageetolightburnerduringapower
2. Burner flame uneven a. clogged burner port(s) a. clean ports with straight pin
3. Surface burner flame a. air/gas mixture not proper a. call serviceman to adjust burner
• lifts off port NOTE: Some yellow tipping with LP gas is
• yellow in color normal and acceptable.
fuse box
failure
4. Oven burner fails to light a. power supply not connected a. connect power, check circuit breaker or
b. powerfailure b. oven can not beoperated during a
5. Poppingsound heard when burner This is a normal sound that occurs with some types of gas when a hot burner is turned off.
extinguishes The popping sound is not a safetyhazard and will not damage the appliance.
6. Clockand/orovenlightdoesnotwork a. power supply not connected a. connect power supply, check circuit
b, bulbmay be loose or burnedout b. tighten or replace light bulb
c. malfunctioning switch, starter or ballast c. call serviceman to check
d, malfunctioningclock or loose wiring d. call servicemanto check
7. Moisture condensation on oven e. itis normalforthewindowtofogduring a. leavedoorajarforoneortwominutesto
window, if equipped thefirst few minutesthe oven is on allow moisture to escape
b. cloth saturated with water is used to b. Use a damp cloth to clean window to
cleanthe window prevent excess water from seeping
8. Oventemperature inaccurate a. oven not preheated a. preheatoven 10 to 15 minutes
• food takes too long or cooks too b. incorrect rack position b. see page9
fast c. incorrect use of aluminum foil c. see page 16
• pale browning d. oven bottom incorrectly replaced d. replaceoven bottom correctly
• food over-done on outside and e. oven thermostat sensing device out of e. reinstall sensing device securely into
under-done in center holding clip(s) clip(s)
• over browning See Problem Chart on page 11
fuse box
power failure or if disconnected
from power.See page 8
breaker or fuse box
between the panels of glass
See baking tips on page 10
9. Oven smokes excessivelyduring a a, foodtoo closeto burner a. move broilerpandown one rack position
broil operation b. meat hastoo much fat b. trim fat
10.Poor baking results See pages 9 to 11for information on
c. sauce applied too early or marinade not c. apply sauce during last few minutes of
completely drained cooking. If meathas been marinated,
d. soiled broiler pan d. always clean broiler pan and insert after
e. broilerinsertcovered with aluminumfoil e. never cover insert with foil as this pre-
drain thoroughly before cooking
each use
vents fat from drainingto pan below
baking
2O
Page 22

Service (continued)
SERVICING HOW TO OBTAIN SERVICE
When yourappliancerequiresserviceor
replacementparts,contactyour Dealer
or AuthorizedServicer.Use only genu-
ine factoryor Maycor parts if replace-
ment parts are necessary.Consultthe
Yellow Pages in your telephonedirec-
toryunderappliancefortheservicecen-
ter nearestyou. Besureto includeyour
name, address, and phone number,
alongwith the model andserial numbers
of the appliance. (See insidefront cover
for location of your model and serial
numbers.)
If youare unable to obtain service,write
to us.Our addressisfound on the rating
plate. See inside front cover for location
of rating plate.
If you are not satisfied with the local re-
sponse to your service requirements,
call or write MAYCORAppliance Parts
and Service Company, 240 Edwards
Street, S.E.,Cleveland, TN37311, (615)
472-3500. Includeor have availablethe
complete model and serial numbers of
the appliance,the nameand address of
the dealer from whom you purchased
theappliance,the date of purchaseand
details concerning your problem.
Ifyou did not receivesatisfactoryservice
through your servicer or Maycor you
may contact the Major Appliance Con-
sumer Action Panel by letter including
your name, address, and telephone
number,as well as the modeland serial
numbersof the appliance.
MajorApplianceConsumerActionPanel
MACAP (Major Appliance Consumer
Action Panel)isan independentagency
sponsored by three trade associations
as acourt ofappeals on consumer com-
plaints which have not been resolved
satisfactorily within a reasonable period
of time.
20NorthWackerDrive
Chicago,IL 60606
21
Page 23

WHAT IS NOTCOVERED BY THESE TWO WARRANTIES:
1. Conditions and damages resultingfrom any of the fol- 4. Productspurchasedforcommercialor industrialuse.
lowing: 5. The costof serviceor servicecallto:
a. Improperinstallation, delivery,or maintenance.
b. Any repair, modification,alteration or adjustment not
authorizedby Maycor,ora Maycorauthorized servic- b. Instructthe consumer on the proper use ofthe prod-
er.
c. Misuse, abuse, accidents or unreasonable use. c. Transport the applianceto a servicer.
d. Incorrect electrical current, voltage or supply. 6. CONSEQUENTIALOR INCIDENTAL DAMAGESSUS-
e. Impropersetting of any control. BREACH OF THESE WARRANTIES. Some states do
2. Warranties are void if the original serial numbers have not allow the exclusion or limitation of consequential or
beenremoved, altered, orcannot bereadilydetermined, incidentaldamages,sothe above exclusion may notap-
3. Light bulbs, plyto you,
a. Correct installation errors.
uct.
TAINED BY ANY PERSON AS A RESULT OF ANY
HOW TO RECEIVE WARRANTY SERVICE
1. Contactthe dealer from whom you purchasedthe appliance or anyauthorized Maycorservicer to
receivewarranty service under thesewarranties.
2. Should you not receive satisfactory warranty servicefrom your local servicer, contact:
Customer Assistance
Maycor Appliance Parts and Service Company
240 EdwardsStreet, S.E.
Cleveland, TN 37311
(615) 4-72-3500
(1/93)
3. Have the following information availablewhen requestingwarranty service:
- Yourname andaddress.
- The modeland serial numbers of your appliance.
- The name and address of your dealer or servicer.
- The purchasedate of your appliance.
- A clear description of the problem.
 Loading...