

Page 1
Owner's Guide
READ AND KEEP THESE INSTRUCTIONS FOR FUTURE REFERENCE.
Gas Range Featuring
• Conventional Surface Burners
• Pilot Ignition
or
• Pilotless Ignition
• Time-of Day Clock, if equipped
CONTENTS
IMPORTANT SAFETY INSTRUCTIONS ......... 1-3 MAINTENANCE ............................ 13-15
Cooktop .................................... 13
CLOCK AND TIMER .......................... 4-5 Burner grates ................................ 13
Analog clock and timer ........................ 4 Surface burners ............................. 13
Digital clock and timer ......................... 4 Oven door .................................. 14
Electronic clock and timer ...................... 5 Oven racks .................................. 14
Oven bottom ................................ 14
SURFACE COOKING ........................ 6-7
Broiler drawer ............................... 14
Ignition system ............................... 6 Oven light ................................... 15
• Pilot ignition
• Pilotless ignition Leveling legs ................................ 15
How to remove range for cleaning. 15
To light surface burner ......................... 6 .............
About the surface burner flame ............... 6 Proportional valve adjustment ................. 15
Additional information ........................ 6 GENERAL INFORMATION 16
Factors that determine flame size .............. 7 Electrical connection
Selecting flame size .......................... 7 Use of aluminum foil
Canning ..................................... 7
CARE AND CLEANING ..................... 17-19
USING YOUR OVEN ................ •......... 8-12 Cleaning chart ............................ 17-18
Oven characteristics ........................... 8 Continuous cleaning oven ................. 19
Ignition system ............................... 8 ....
• Pilot ignition SERVICE ................................. 20-21
• Pilotless gnitior Before calling service chart .................... 20
Oven veto .................................... 8 How to obtain service ......................... 21
Oven burner ................................. 8
Oven Ihermostat ............................ 8 WARRANTY ................................. 22
To set oven .................................. 9
Preheating ................................... 9
Rack positions ................................ 9
General baking tips .......................... 10
Common baking problems .................... 11
How to broil ................................. 12
8113P042-60
(1/93)
Page 2

FORFUTUREREFERENCE
Forfuturereferencewe suggestyoure-
tain this manual after recording the WARNING: If the informa-
modelnumberandserialnumberofthistion in this manual is not
gas appliance in the spaces provided.
Thisinformationcanbefoundontherat-followed exactly, a fire or
ing platelocatedonthesidesofthelow- explosion may result caus-
er range front frame. Pull out lower ing property damage, per-
drawertosee ratingplate, sonal injury or death.
- Do notstore or usegaso- _._ ___
line or other flammable
L%)
MODELNUMBER vapors and liquids in the
vicinity ofthis orany oth-
SERIAL NUMBER er appliance.
-WHAT TO DO IF YOU
SMELL GAS: _k WARNING
DATEOF PURCHASE
• Do not try to light any • ALL RANGES
appliance. CAN TIP
These numbers identifyyour range.
Pleaseusethemin anycorrespon- • DOnottouch any elec- • INJURY TO PERSONS
dence or servicecallsconcerningyour trical switch; do not COULD RESULT
appliance, use any phone in your
Please retaintheproofof purchasedoc- building. • INSTALL ANTI-TIP
DEVICES PACKED
umentsforwarrantyservice. • Immediately call your WITH RANGE
gas supplier from a
• SEE INSTALLATION
neighbor's phone. ,
Follow the gas suppli- INSTRUCTIONS
er's instructions.
To reduce the risk of tipping of the
• If you cannot reach appliance from unusual usage or by
your gas supplier, call excessive loading of the oven door,
the fire department, the appliance must be secured by a
properly installed anti-tip device. To
- Installation and service checkifdevice isinstalledproperly:Use
must be performed by a aflashlightandlookunderneathrange
to see thatone of the rearlevelinglegs
qualified installer, ser- is engagedinthe bracketslot.
vice agency or the gas
supplier.
Page 3
Page 4
Page 5

Page 6
Time-Of-DayClock
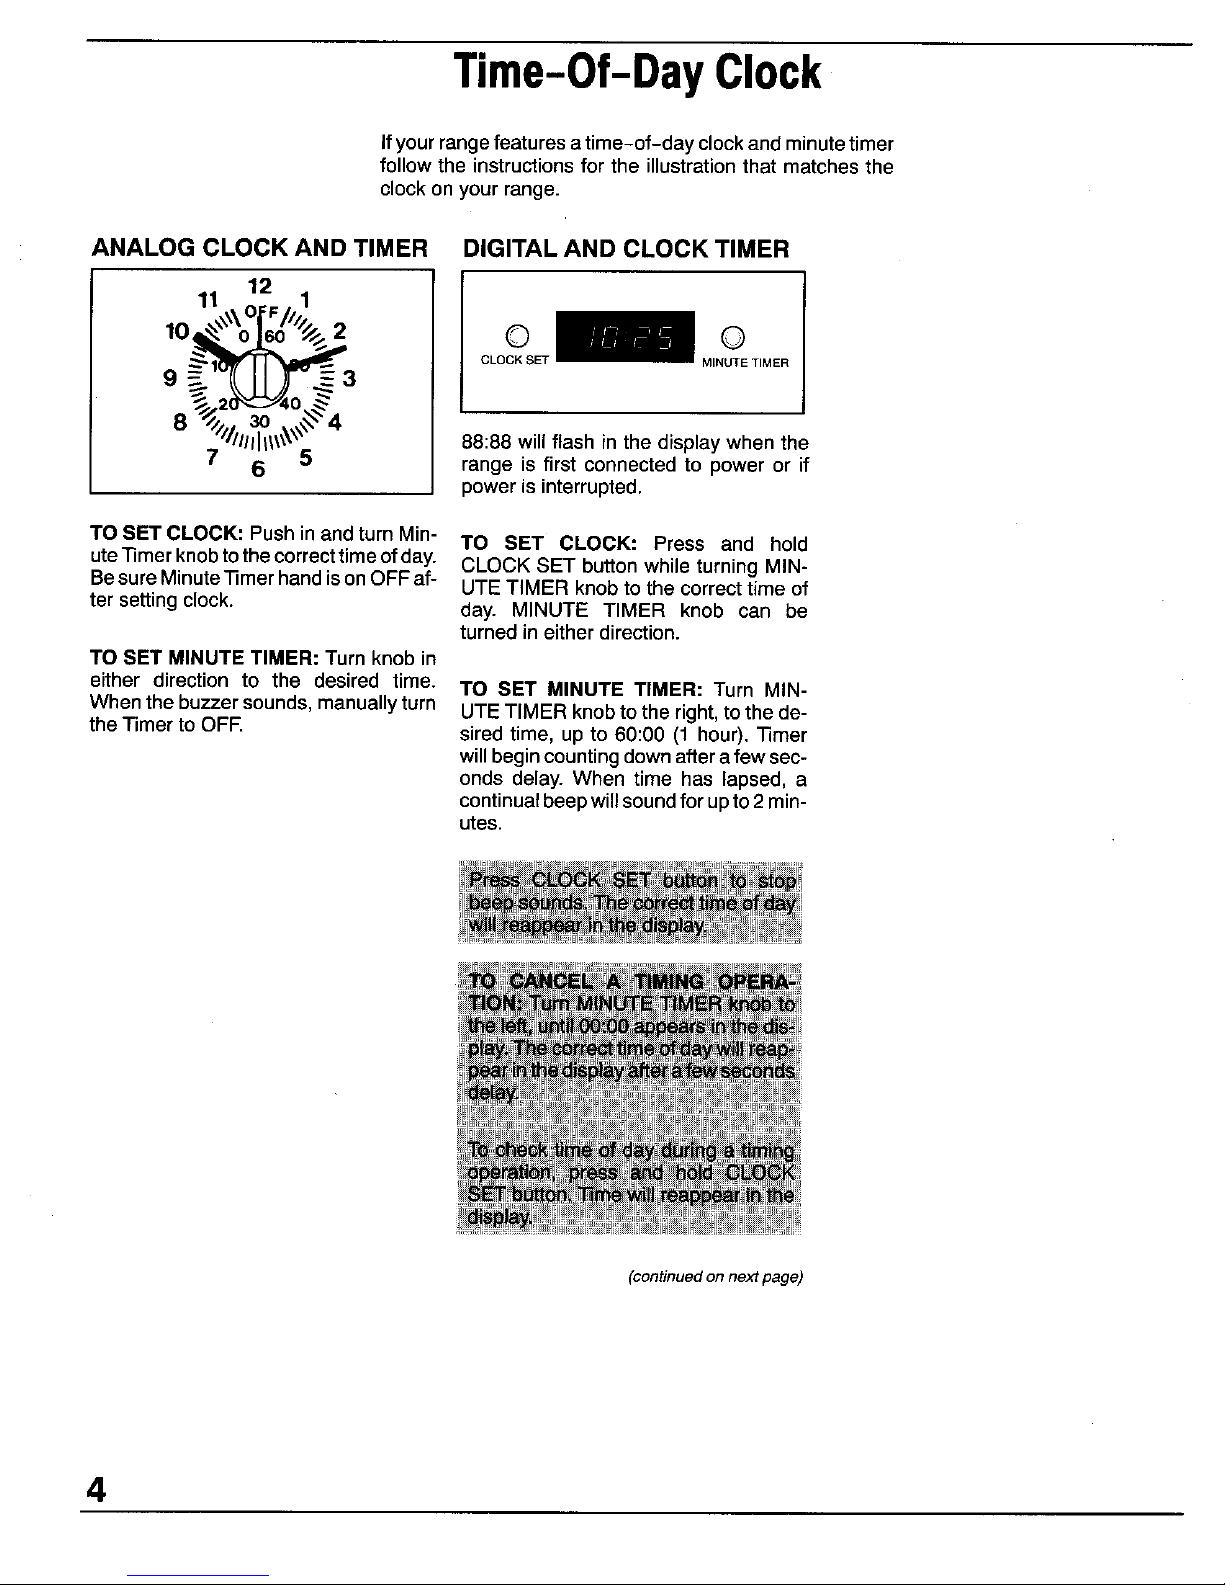
Ifyour rangefeatures atime-of-day clockand minutetimer
follow the instructions for the illustration that matches the
clock on your range.
ANALOG CLOCK AND TIMER DIGITAL AND CLOCK TIMER
12
11.x\ OFF/z1
+o,_"'o Id"%2 0 0
9 _ 1 ___ MINUTETIMER
8 _/,., 3o .,_4
"'//ll/h_x_x\" 88:88 willflash inthe display when the
7 6 5 range is first connected to power or if
poweris interrupted.
TO SETCLOCK: Push in andturn Min- TO SET CLOCK: Press and hold
uteTimerknobtothecorrecttimeofday. CLOCK SET button while turning MIN-
Besure MinuteTimer hand is on OFFaf- UTE TIMER knob to the correct time of
tersetting clock, day. MINUTE TIMER knob can be
turned in eitherdirection.
TO SET MINUTE TIMER: Turn knob in
either direction to the desired time. TO SET MINUTE TIMER: Turn MIN-
When the buzzersounds, manuallyturn UTETIMER knobto the right,to the de-
the Timer to OFF. sired time, up to 60:00 (1 hour). Timer
will begin counting downafter afew sec-
onds delay. When time has lapsed, a
continualbeep will soundfor upto 2 min-
utes.
(continued on next page)
4
Page 7
Time-Of-Day Clock (continued)
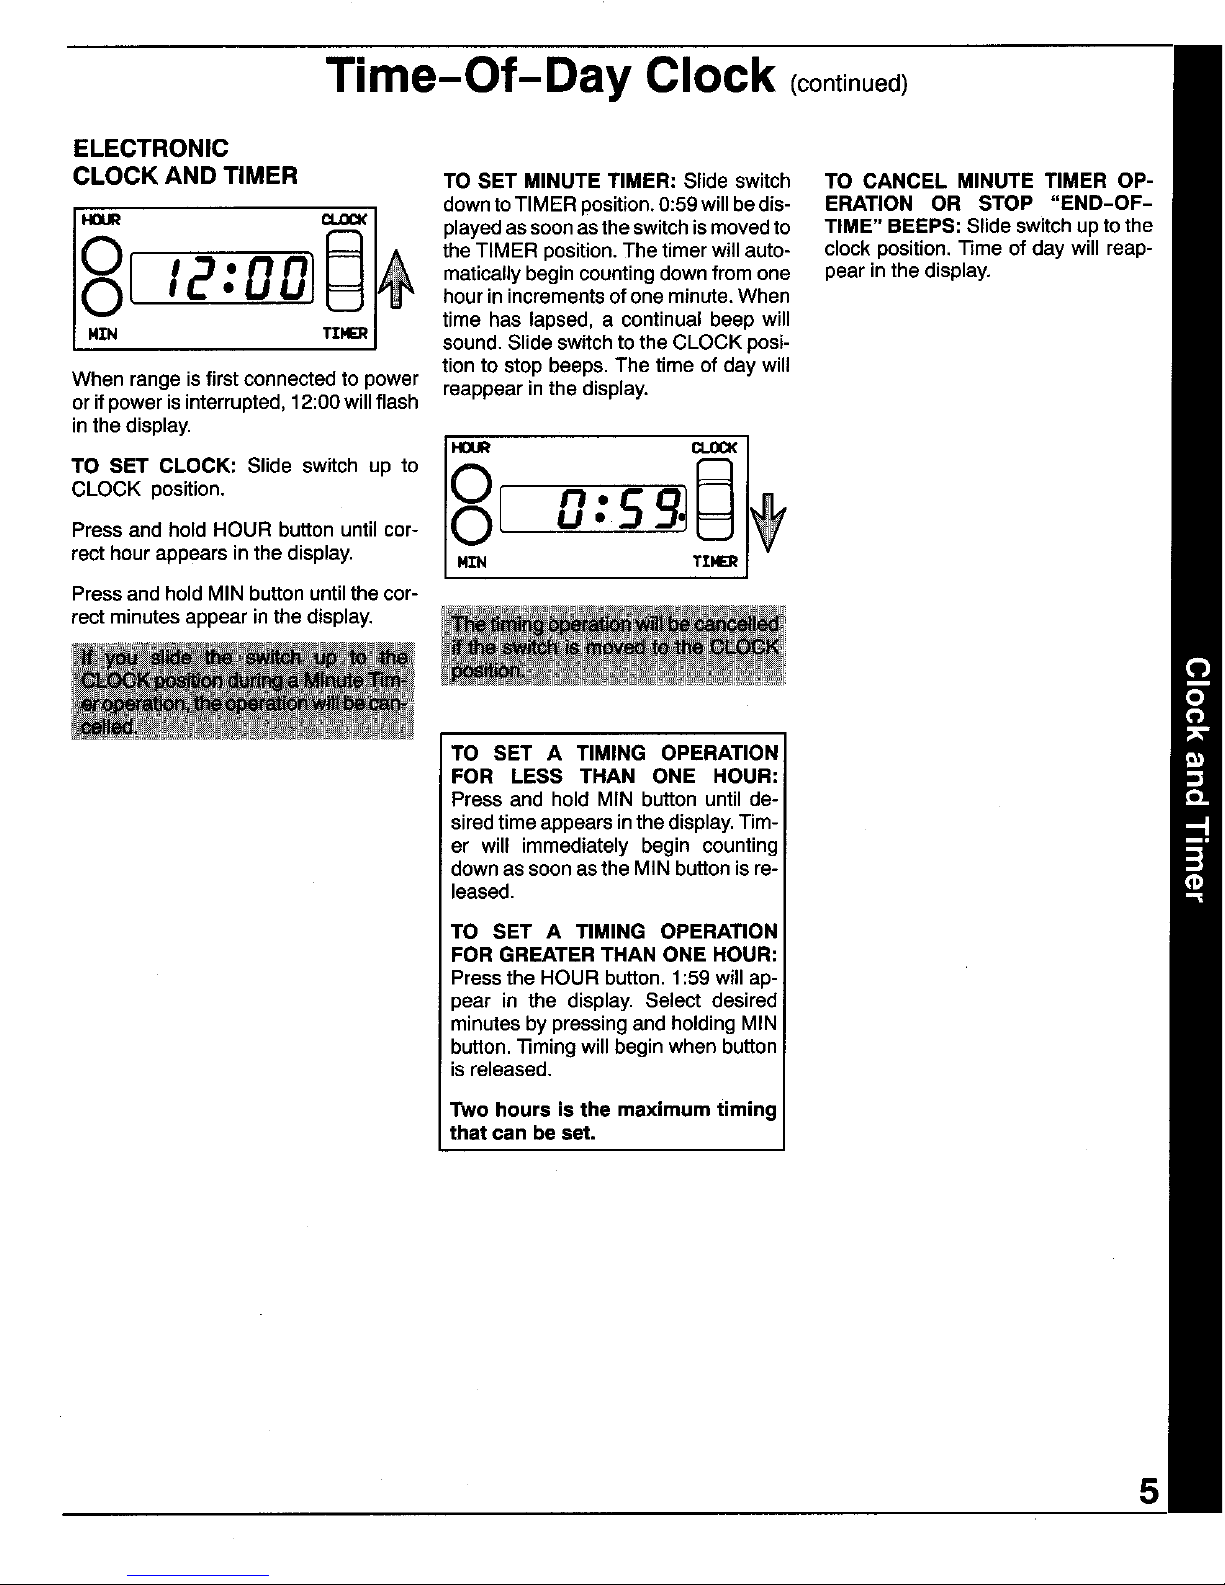
ELECTRONIC
CLOCK AND TIMER TO SET MINUTE TIMER: Slide switch TO CANCEL MINUTE TIMER OP-
downtoTIMERposition.0:59willbedis- ERATION OR STOP "END-OF-
HOUR CLOCK playedassoonastheswitchismovedto TIME" BEEPS: Slideswitchupto the
8[ 12 00] I_ $ the TIMER position.The timerwillauto-clock position."l'imeof day will reap-
maticallybegincountingdownfrom one pear in the display.
hour in incrementsof one minute.When
time has lapsed, a continual beep will
NZN TIMER sound. Slideswitchto the CLOCKposi-
tionto stopbeeps.The time of day will
When rangeisfirstconnectedtopower reappearinthedisplay.
orifpowerisinterrupted,12:00willflash
inthedisplay.
HOUR CLOCK
TO SET CLOCK: Slide switch uptOcLoCKposition. O[ 0 _ 5 _----'_I_ _ f
PressandholdHOUR buttonuntilcor-
rect hourappears in the display. MZN TXNER
PressandholdMINbutton untilthecor-
rectminutesappear inthe display,
TO SET A TIMING OPERATION
FOR LESS THAN ONE HOUR:
Pressand holdMIN buttonuntilde-
siredtimeappearsinthedisplay.Tim-
er will immediatelybegin counting
downassoonasthe MINbuttonisre-
leased.
TO SET A TIMING OPERATION
FORGREATER THAN ONE HOUR:
PresstheHOUR button.1:59willap-
pear in the display. Select desired
minutesbypressingandholdingMIN
button."_mingwillbeginwhen button
isreleased.
Two hours is the maximum timing
that can be set.
5
Page 8

SurfaceCooking
IGNITION SYSTEM TO LIGHT SURFACE BURNER ADDITIONAL INFORMATION
Yourrange will feature either pilot igni- 1. Place utensil on burnergrate. * When the range isfirst installed,the
tion(a standing pilotlightsthe burner) or pilotsmay be difficultto lightdue toair
pilotless ignition (a spark from the igni- 2. Push in and turn knob to the LITE inthegasline.Tobleedoffairfromthe
tor lights the burner), position. After the burner lights, turn line, hold a lighted match next to the
the knob to the desired flame size. burner and turn knob on. When the
PILOT IGNITION burner lights, turn the knob off and
To light pilot: Raise cooktop and hold - proceedas directed.
a lighted match near the pilot ports. I • Be sure all surface controls are set
There are two pilot ports. _ in the OFF position prior to supplying
I_ 1 _ gas to the appliance.
• CAUTION: If flame should go out
during a cooking operation, turn the
burner off. If gas has accurnulated
and a stronggas odor is detected,
NOTE: The knobon your appliance wait 5 minutes for the gasto dissi-
may not look like the knob in this il- pate before relighting burner.
lustration, but it will operate as de- • You may heara"popping" sound on
scribed in this booklet. LP gas when the surface burner is
turned off. This is a normal operating
PILOTLESS IGNITION sound of the burner.
Tooperatesurfaceburnerduringa pow- • Ifa knobisturnedveryquicklyfrom
erfailure: HI toLOsetting,theflamemaygoout,
1. Hold a lighted matchto the desired particularlyifthe burneriscold.
surface burnerhead.
2. Push in and turn knob to the LITE ._ _[_ J-
position.The burner willthen light.
3. Adjust knob to obtain the desired ABOUT THE SURFACE
flame size. BURNER FLAME
• A properlyadjustedburnerwithclean
portswilllightwithina few seconds.
• On naturalgas,the flamewillbe blue
witha deeperbluecore;thereshouldbe
notraceofyellowinthe flame.
Ifthisoccurs,turntheknobtothe OFF
A yellowflame indicatesan improper position.Wait several seconds,then
mixtureof air/gas.This wastes fuel, so lightthe burneragain.
havea servicemanadjustthe mixture if
a yellowflameoccurs.
• On LPgas, someyellowtippingis ac-
ceptable.Thisisnormalandadjustment
isnot necessary. (continuednext page)
6
Page 9

SurfaceCooking(continued)
FACTORS THAT DETERMINE SELECTING FLAME SIZE CANNING
FLAME SIZE • Use a HIGH flame settingto quickly Acceptablewater-bathorpressurecan-
UTENSIL SIZE: Adjustthe flame size bringliquidstoa boilorto begina cook- netsshouldnotbeoversizedandshould
soitdoesnotextendbeyondtheedgeof ing operation.Then reduce to a lower haveaflat bottom.Thefollowingare not
the cookingutensil.Thisisfor personal settingtocontinuecooking.Neverleave recommended:Oversizedcannersora
safetyand to preventpossibledamage food unattended when using a HIGH verylargecannerthat restsontwo sur-
to the appliance, utensil or cabinets flame setting, face burnergrates.
above the appliance. When canning, use the HIGH setting
/._ just until the water comes to a boil or
-- pressureis reached inthe pressurecan-
_'_ __ ner,then reduceto the lowestflame set-
ting that maintains the boil or pressure.
__ • An intermediate flame size is usedto
" continue a cookingoperation. Food will
not cook any faster when a higher
flame setting is used than that need-
. Utensils which extend more than two ed to maintain a gentle boil. Remem-
inches beyond the grate or touch the ber,water boilsatthe sametemperature
cooktopmay cause heatto build up,re- whether boiling gently or vigorously.
suiting in damage to the burner grate,
burneror cooktop. •Use alow flamesize tosimmer orkeep
foods at serving temperatures.
• Utensils,such as woks with a support
ring,which restrictaircirculation around
theburnerwill cause heatto build upand I
may result in damage to the burner __ -t_._x;_ \\\
grate, burneror cooktop.
UTENSIL MATERIALS: Optimum
cooking performance can be achieved
when heavygauge,flat, smooth bottom,
metal utensils with straight sides and
tightfitting lids are used.
• Aluminum or aluminum-clad stain-
less steel pans heat more evenly so a
slightlylargerflamecan be used.
• Stainless steel, porcelain andheat-
proof ceramic or glass heat unevenly;
cast aluminum and iron heat slowly;
and,Teflon-coated utensilsaresensi-
tive to heat. Thesematerials require a
lowerflameto producemore even cook-
ing results. Adjust flame so it extends
halfway to the edge of the utensil bot-
tom.
COVERED UTENSILS: Foods cook
faster when the utensil is covered be-
cause more heat is retained. Lower the
flame size when covering utensils.
7
Page 10

UsingYourOven
OVEN VENT OVEN THERMOSTAT
The oven vent is located at the base of The oven thermostat knob is used to se-
the backguard. When the oven is in use, lect and maintain the oven temperature.
this area may feel warm or hot to the Always turn this knob just to the desired
touch. To prevent problems do not: temperature - not to a higher tempera-
Block the vent opening, touch the area ture and then back. This provides more
near the opening or place utensils near accurate oven temperatures. Turn this
the vent opening, knob to OFF whenever the oven is not in
use.
OVEN BURNER
IGNITION SYSTEM The size and appearance of a properly _,_ t
adjusted oven burnerflame should beas
Your appliance will feature either pilot shown:
ignition (a standing pilot lights the oven 1
burner) or pilotless ignition (a glo bar _ cr_
lights the oven burner). _ / '_
,9
Be sure oven control is set in the OFF
position prior to supplying gas to the ap-
pliance. Coneincenterissmaller THERMOSTAT
PILOT IGNITION On some models, there is an indent at
the 350°F setting.
To light oven pilot: When cool, remove
oven racks and oven bottom. With the _ I_ Coneapprox.1/2-inch /
oven thermostat knob in the OFF posi-
J
tion, hold a lighted match to the pilot Io-
cated at the backend ofthe oven burner. The oven temperature is maintained by
Once pilot lights, replace oven bottom
and racks, cycling the burner on and off. After the
oven temperature has been set, there
will be about a 45 second delay before
_.zJ the burner ignites. This is normal and no
.,_ _ gas escapes during this delay.
\
PILOTLESS IGNITION
With this type of ignition system, the
oven will not operate during a power fail-
ure or if oven is disconnected from the
wall outlet, No attempt should be
made to operate oven during a power
fail ure. (continuednextpage)
8
Page 11

UsingYourOven(continued)
TO SET THE OVEN PREHEATING
1.When cool, place the racks inthe de- Preheatingis necessary for proper bak-
sired rack positions, ing results. Allow the oven to heat until
thedesiredoventemperature is reached
2. Push in and turn the oven thermostat (approximately 10 to 15 minutes). Se-
knob to the desired oven tempera- lectingatemperaturehigherthanthede-
ture. Allow the ovento preheat for 10 sired temperature will not preheat the
to 15 minutes when baking, oven anyfaster. Infact, this may have a
3. Place the food in the center of the negative effect on baking results.
oven, allowing a minimum of two in- Itis notnecessary to preheatfor broiling
ches between the utensil(s) and the unless darker browning is desired or if
oven walls, cooking thin (3/4-inch) steaks. Allow
4. Check the food for doneness at the burnerto preheat 2to 3 minutes.
minimum time given in the recipe. Preheating isnot necessaryfor roasting
Cook longer if necessary. Opening operations.
theoven door frequently causes heat
loss which may affect cooking results
and increasecooking time.
5. Turn the oven thermostat knob to
OFF and removefoodfrom the oven.
(continuednext page)
9
Page 12

UsingYourOven(continued)
_on#nuednextpage)
10
Page 13

CommonBakingProblemsAndWhyTheyHappen
Pans touching each other or Cakesdon't brown on top. Incorrect rack position.
oven walls. Temperature too low.
Batter uneven in pans. Overmixing.
Oven temperature too low or Too much liquid.
baking time too short. Pan size too large ortoo little
Oven not level, batter in pan.
Undermixing. Oven door opened too often.
Toomuch liquid.
Excessive shrinkage. Toolittle leavening.
Cake high inmiddle. Temperature too high, Overmixing.
Baking time too long. Pan too large.
Overmixing. Temperaturetoo high.
Toomuchflour. Bakingtimetoolong.
Pans touchingeach otheror Panstoocloseto each other
ovenwalls, oroven walls.
Incorrectrackposition.
Cake fails. Toomuchshorteningorsugar. Uneven texture. Toomuchliquid.
Toomuchortoo littleliquid. Undermixing.
Temperaturetoolow. Temperaturetoolow.
Old ortoolittlebakingpowder. Bakingtimetooshort.
Pantoo small.
Ovendooropenedfrequently. Cakeshave tunnels, Notenoughshortening.
Addedincorrecttypeof oilto Toomuch bakingpowder.
cake mix. Overmixingorat too higha
Addedadditionalingredients speed.
tocake mixor recipe. Temperaturetoohigh.
Cakes, cookies, biscuits Incorrectrackposition.
don't brown evenly. Oven door not closed properly. Cakescrack on top. Batterovermixed.
Door gasket not sealing Temperature too high.
properly. Toomuch leavening.
Incorrect use ofaluminum foil. Incorrect rack position.
Oven not preheated.
Pansdarkened, dented or
warped. Cake not done inmiddle. Temperature too high.
Pan too small.
Baking time too short.
Cakes, cookies, biscuits too Oven not preheated.
brown on bottom, Panstouching each otheror
oven walls. Pie crust edges too brown. Temperaturetoo high.
Incorrect rack position. Pans touching each other or
Incorrect use of aluminum foil. oven walls.
Placed 2 cookie sheets on one Edges of crust too thin.
rack. Incorrect rack position.
Used glass, darkened, stained,
warped or dull finish metal Pies or cakes don't brown Used shiny metal pans.
pans. (Use a shiny cookie on bottom. Temperaturetoo low.
sheet.)
Pies have soaked crust. Temperaturetoo low at start of
baking.
Fillingtoo juicy.
Used shiny metalpans.
11
Page 14

UsingYourOven(continued)
HOW TO BROIL
Broilingis a method of cooking used for tender steaks, rare interior,the meatshould be closeto the burner.Place
chops,hamburgers,chicken,fish,andsomefruitsandvege- thepanfurtherdownifyouwishthemeatwelldoneorifspat-
tables.The food is placed directly under the oven burner, taring and smoking occurs.
Thecookingtime isdetermined bythe distancebetween the The distance from the burner depends on the thickness of
meat and the burner,the desired degree of doneness, and the meat and desired degree of doneness. Thin cuts should
the thickness ofthe meat. beplacedon rack#1 (top)or #2 (middle);thicker cuts should
beplaced onrack #2 or #3 (bottom). Broil untilthe top ofthe
GENERALTIPS meat isbrowned. Itshould beapproximately half cooked by
Broilingrequiresthe useofthe broiler panandinsert supplied the timethe top is browned.
with your appliance. It is designedto drain excess liquid and
fat away from the cooking surface to prevent spatters, Trimexcessfatto preventexcessive spattering or smoking.
smoke and flare ups. Cut slashesinthe outer edges of the meatto preventcurling
during cooking.
Foreasierclean-up, linethe broilerpan (bottom piece)with
aluminumfoiland spraythe insertwitha non-stick vegetable If you planto season the meat, itis better to do so afterthe
coating.Donot coverthe broilerpan insertwith aluminum foil surface has browned. Salt tends to delay browning which
as this prevents fat from draining into the pan below.The can result inovercooking. Salting before cooking also draws
broiler can be preheatedfor a few minutes.However,do not the juices out of the meat, causing dryness.
preheatthe broiler pan and insert.
Ifthe food isplacedtoo closeto the burner,overbrowning
and smoking may occur.Generallyfor a brown exteriorand
BROILING CHART TO BROIL:
1. TurntheovenTHERMOSTATknobto
Quantity&/or Approx. Minutes/Side BROIL.
Food Thickness Position Doneness I st Side 2nd Side
It is possibleto broil longer cooking
Bacon thickslice middle well 4- 5 1- 2 foods such as pork chopsat a lower
BeefPatties 3/4"thick middle rare 3-4 2-3 temperature to prevent overbrown-
middle medium 5-6 3-4 ing. Turn the knob to 450°F, rather
middle well 5-6 4-5 than BROIL, for low temperature
Steaks 1" thick bottom rare 3 - 4 3- 4 broiling.
bottom medium 5- 7 4 B 2. Preheatfor 2 to 3 minutes ifdesired.
bottom well 7 8 6 - 7
NOTE: Cooking times in the Broil
11/2"thick bottom rare 7- 8 5- 6 Chart are based on a 2 to 3 minute
bottom medium 8 10 6- 8
bottom well 10 - 11 8- 9 preheat.
ChickenBreastHalves bottom well 8- 9 7- 8 3. Place the broiler pan on the recom-
mended rack position shown in the
Fish Fillets 1"thick middle 5 - 6 3 - 5
1/2" thick middle 4- 5 3- 5 broiling chart.
HamSlices 12"thick middle 5-6 4-5 4. Follow the suggested times in the
(precooked) broilingchart. Meat should be turned
once about halfway through its cook-
PorkChops (450°) 1" thick bottom well 12- 14 8 - 9 ing time.
Weiners/Sausage middle 2 - 4 2 - 3 5. Check the doneness by cutting a slit
(precooked) in the meat near the center to check
the color.
12
Page 15

Maintenance
COOKTOP BURNER GRATES SURFACE BURNERS
¥ourrangewillfeatureeitheranupswept Surface burnersare secured in place
cooktopor a fiat cooktop.Bothtopscan duringtransportationwith springclips.
beliftedupforconvenientaccesstothe Once the range isinstalled,these may
burnerboxarea.Theflatcooktopcanbe be removedtoallowquickand easyre-
removed.Theupswepttopishingedand movalofthe burner.
canbe raisedbutnot removed.
TO REMOVE BURNER:
To raise upswept cooktop: When
cool, graspfront edge of cooktopand When reinstallingsquaregrates, place Allowburnertocool.Liftcooktop.Tore-
gentlyliftupuntilthetwosupportrodsat indentedsidestogethersostraightsides movebumer,liftupslightlyandpullout.
the frontofthe cooktopsnapintoplace, are atfrontandrear.
Tolower top: Holdfrontedgeofcook-
top and carefully push back on each
supportrodtoreleasethenotchedsup-
port,Then gentlylowertop intoplace.
Thesupportrodswillslideintotherange Burnergratesaredurablebutmay lose
frame, theirshinedueto usageand hightem-
peratures.
To remove flat cooktop: When cool,
first remove grates and drip bowls,if
equipped.Grasptwofrontburnerwells
and liftup.
I
The top can be completely removed or, if
equipped with a metal suppport rod, can
rest on the rod. Support rod is located
acrossthe front ofthe burner box. (continued next page)
13
Page 16

Maintenance(continued)
OVEN DOOR OVEN RACKS BROILER DRAWER
The two oven racksare designedwith a Store clean broilerpan and insert in the'
lock-stop edge to keep the racks from broiler drawer.
coming completely out of the oven.
To remove: Pull drawer out to the first
Toremove: Besurethe rackiscool.Pull stop position.Lift up front of drawer and
the rack straightout untilitstops. Tiltthe pull to the second stop position. Grasp
front of the rack up and continuepulling sides and lift up and out to remove
When opening oven door, allow steam the rack out of the oven. drawer. Gently move drawer side-to-
and hot airto escape before reaching in side as you pull the drawer out.
oven to check, add or removefood. To replace: Tilt the front end ofthe rack
upandplacetherackbetweenthe rack
To remove door: Open door to the supports.Slideitbackuntilitclearsthe "k / '_
"stop"position(openedabout4 inches) lock-stopposition.Lowerthe frontand
andgraspdoorwithbothhandsateach slidetherackstraightin.Pulltherackout
side.Do notuse doorhandle to lift door. to the lock-stop positionto be sure itis _
Lift upevenly until door clearsthe hinge positionedcorrectly and then return itto
arms. its normal positon.
OVEN BOTTOM To replace: Fit ends of drawer glides
ontorails. Liftup drawerfront and gently
push in to first stop position. Gently
move drawer side-to-side as you push
in the drawer. Lift up drawer again and
continue to slide drawer to the closed
To remove: When cool, remove the position.
oven racks. Slide the two catches, lo-
cated at each rear corner of the oven
bottom,toward the front ofthe oven.
To replace door: Grasp door at each
side,alignslotsinthedoor withthe hinge
armsandslidedoordownontothehinge
armsuntilcompletelyseatedonhinges.
Lift the rear edge of the oven bottom
slightly,then slide it back until the front
edgeoftheoven bottom clearsthe oven
front frame. Remove oven bottom from
oven.
To replace: Fit front edge of oven bot-
tom intofrontframe. Lower rear of oven
bottom and slide the catches back to
lock ovenbottom into place. (continuednext page)
14
Page 17

Maintenance(continued)
OVEN LIGHT HOW TO REMOVE PROPORTIONAL VALVE
RANGE FOR CLEANING ADJUSTMENT (if equipped)
AND SERVICING The LOW setting should produce a
Follow these procedures to remove ap- stable flame when turning the knobfrom
Before replacing oven light bulb, DIS- pliancefor cleaning or servicing: HI toLO. The flame should be 1/8 inch or
lower and must be stable on all ports on
CONNECT POWER TO RANGE. Be LOW setting.
sure bulb and range parts are cool. Do 1. Shut-off gas supply to appliance.
nottouchahotbulbwithadampclothas To adjust: Operate burner on HI for
the bulb may break. 2. Disconnect electrical supply to ap- about 5 minutes to preheat burner cap.
pliance, if equipped. Turn knob backto LO; remove knob, and
To replace oven light: Use a dry pot insert a small screwdriver intothe center
holder, to prevent possible harm to 3. Disconnect gas supply tubing to ap- of the valve stem. Adjust flame size by
hands;very carefully remove bulb. Re- pliance, turning adjustment screw in either direc-
place with a 40 watt APPLIANCE bulb. tion.
Reconnect power tothe range. 4. Slide range forward to disengage
range from the anti-tip bracket. (See
Installation Instructions for location of
LEVELING LEGS bracket.)
5. Reverse procedure to reinstall. If gas i_
line has been disconnected, check for
y
Leveling legs are located on each corner gas leaks after reconnection. (See
of the base of the range. Installation Instructions for gas leak
test method.)
NOTE: A qualified servicer should dis-
connect and reconnect the gas supply.
% _,,_ To prevent range from accidently tip-
ping, range must be secured to the floor
by sliding rear leveling leg into an anti-
tip bracket supplied with the range.
_,_ WARNING: Possible risks may result NOTE: All gas adjustments should be
from abnormal usage, including exces- done by a qualified servicer only.
sive loading of the oven door and of the
Place a level horizontally on an oven risk of tip over, should the appliance not
rack and check front-to-back and side- be reinstalled according to the installa-
to-side. Level by turning the legs. tion instructions.
15
Page 18

GeneralInformation
ELECTRICAL CONNECTION USE OF ALUMINUM FOIL
Appliances which require electrical Use aluminum foil ONLY as
power are equipped with a three- instructed in this book. Improperuse
prong grounding plug whichmust be of aluminumfoil may cause damageto
plugged directly into a properly theoven,affectcookingresults,andcan
groundedthree-hole 120 voltelectrical also resultinshockand/orfire hazards.
outlet.
Foilcan be usediftheseguidelinesare
followed:
_)_ • Do not use aluminum foil directly
_ under the cool(ware. Foil will reflect
heatawayfromtheutensilcausinginad-
equatebrowning.Placinga piedirectly
onfoilmayresultinasoggybottomcrust
and inadequatebrowning.
A/ways disconnect power to app/i- • Do not place aluminum foil directly
ance before servicing, onthe oven bottomas this may dam-
age the oven bottom. A piece of foil
The three-pronggroundingplug offers that is slightlylargerthan the cooking
protectionagainstshock hazards. DO utensilcanbeplacedontherackdirectly
NOT CUT OR REMOVE THE THIRD belowthe rackcontainingthe utensil.
GROUNDING PRONG FROM THE
POWER CORD PLUG. • Do not completely cover an oven
rackwith foil. Thisblocksairflowinthe
oven, constitutesa safety hazard, and
will adversely affect cooking results.
• Never cover the broiler insert with
aluminum foil as this prevents fat
from draining to the pan below. The
broiler pan can be lined withfoil.
16
Page 19

CareandCleaning
CLEANING CHART
PARTS CLEANING AGENTS DIRECTIONS
Baked Enamel • Soap andwater UseadrytowelorclothtowipeupspilFs,especiallyacid(milk,lemonjuice,fruit,mustarc
or Porcelain Enamel • Pasteof bakingsodaandwater tomatosauce)orsugaryspills.Surfacemaydiscolorordullifsoilisnotimmediatelyre-
. Cooktop • Mildliquidcleaner moved.Thisis especiallyimportantforwhitesurfaces.
• Ovendoor • Glass cleaner
• Broilerdrawer Whensurfaceiscool,washwith warm soapywater, rinseanddry. Forstubbornsoil,use
• Side panels mildlyabrasivecleaningagents suchas bakingsoda paste or BonAmi. If desired,athin
• Backguard coatof mildappliance wax canbeusedto protectthe sidepanels.A glasscleanercanbe
usedto add "shine"to the surface.
NOTE:Donot useabrasive, causticor harshcleaningagents suchassteel wool pads or
oven cleaners. These productswill scratch or permanently damage the surface.
NOTE: Neverwipe a warm orhot surfacewith adampcloth asthis maydamagethe sur-
face and may cause a steam burn.
Broiler pan and • Soapand water Removefromovenafteruse.Coolthen pouroffgrease.Placesoapyclothoverinsertand
insert =Plasticscouringpad pan;letsoaktoloosensoil.Washinwarmsoapywater.Usesoap-filledscouringpadto
• Soap-filledscouringpad removestubbornsoil.Cleanin dishwasherifdesired.
• Dishwasher
NOTE:Foreasiercleanup,sprayinsertwithanon-stickvegetablecoatingandlinebroiler
panwithaluminumfoil.
NOTE:Alwaysstorecleanbroilerpanandinsertin thebroilercompartment.If panand
insertarenotcleanedaftereachuse,thesoilmightbecomehotenoughtoignitathenext
timethe ovenis used.
Burner box • Soapandwater Burnerbox,locatedunderlift-up cooktop,shouldbecleanedfrequentlytoremovespil-
• Pasteof bakingsodaand water lovers.Ifsoilisnotremovedand isallowedto accumulate,itmay damagethefinish.To
• Non-abrasiveplasticpador sponge cleanremovegratesandsurfaceburnersand cleanwithsoapandwater,rinseanddry.
• Liquidcleaner
• Glasscleaner
Chrome drip bowls, • Soap and water Cleanbowlsaftereach use withsoapand water.Removestubbornstainswith baking
if equipped • Pasteofbakingsodaandwatar sodapasteandplasticscouringpad.Topreventscratchingthefinish,donotuseabrasive
• Plasticscouringpad cleaningagents.Rinse,dryand replace.
NOTE;Bowlscanpermanentlydiscolorifexposedtoexcessiveheatorifsoilisallowedto
bakeon.
Control knobs * Soapandwater Toremoveknobsforcleaning,gentlypullforward.Washinmilddetergentandwater.Do
notsoakknobsinwater.Donotuseabrasivecleaningagents.Theywillscratchfinishand
removemarkings.Rinsedryand replace.Turn ON each burner to see ifknobs have
beenreplaced correctly.
(continuedon next page)
17
Page 20

CareandCleaning(continued)
PARTS CLEANING AGENTS DIRECTIONS
Glass • Soapand water Washwithsoapandwater.Useawindowcleaneranda softclothaftercleaning.Remove
• Backguard • Paste of bakingsoda andwater stubbornsoil with paste ofbakingsoda and water. Rinsewith acloth wrungout indear
• Oven window • Glasscleaner water. Dry.Donot useabrasive materialssuch asscouringpads,steelwool or powdered
cleaningagents.
NOTE: To avoid inside staining of oven door glass, do notoversaturate cloth.
Grates • Detergentandwater Gratesare madeofporcelain-coated steel.Theycan becleaned atthe sinkwith deter-
• Non-abrasiveplasticpad gentandwateror inthedishwasher.Toclean bakedon soil,placea dampsoapypaper
toweloverthegrateandletstandfor30minutes.Useanon-abrasiveplasticpadtoscour
stubbornsoil.
NOTE:Neveroperateburnerwithoutagrate inplace.Toprotecttheporcelainfinishonthe
gratefrom excessiveheat,neveroperatesurfaceburnerwithout acookingutensilonthe
grate. It isnormal for grates to losetheir shine over a period of time.
Metalfinishes • Soapand water Washwith soap and water.Removestubborn soilwith paste of bakingsoda and water.
• Backguard • Paste of bakingsodaandwater Usea windowcleanerand a softclothto removefingermarksorsmudges.
• Trimparts • Glass cleaner
• Manifoldpanel NOTE:Donotuseovencleaners,abrasiveorcausticagents.Theywilldamagethefinish.
Oven bottom • Soapandwater Continuousclean ovenbottom:See page 19.
• Porcelainenamel • Pasteof bakingsodaandwater
• Non-abrasiveplasticpad Porcelainovenbottom:Clean,whencool,withsoapandwater,non-abrasiveplasticpad
• Oven cleaner orovencleaner.Rinsewithclearwater.Tomakecleaningeasier,protecttheovenbottom
by(1)usinglargeenoughcookwaretopreventboilovers;(2) placea pieceofaluminum
foil,thatisslightlylargerthanthecookware,onthe lowerrack.NEVER placefoildirectly
onthe ovenbottom.
Protectoven bottomagainstacidspills(milk,cheese,tomato,lemonjuice,etc.) orsugary
spills(piefilling)astheymay pit ordiscolorthe oven bottom.
Foreasiercleaning,ovenbottomcanberemovedandcleanedatthesink.Donotsoakor
immerseoven bottominwateror placeunderrunningwater.
Ovencavity Cleaning action beginswheneverthe Brushoffheavy soilwitha nylonor plasticpad. Do notuse paper towels,cloths,or
• Continuousclean ovenis on.The oven mustbe usedfor spongesbecausetheovenwallsareporousandparticlesofthesematerialswiIIruboffon
oven cleaningtotakeplace.Higheroventem- thewalis.Rinseareawitheleanwateronly.Donotuseanytypeofovencleaner,cleanser
Seepage19 )eratures and longer baking times or detergentonthissurfaee.
speedthe cleaningaction.
Oven cavity • Soapandwater Cleanoveninteriorwithsoapandwater;rinse.Usecleansingpowdersoraplasticscour-
. Porcelainoven • Mildabrasivecleaners ingpadtoremovestubbornsoil.Wipeacidorsugarstainsassoonastheoveniscoolas
• Plasticpad thesestainsmaydiscolororetchtheporcelain.Do notusemetallicscouringpadsasthey
• Ovencleaner willsoratehtheporcelain.Tomakecleaningeasier,place1/2cuphouseholdardmoniaina
shallowglassandleaveinacoldovenovernight.Theammoniafumeswillhelploosenthe
burnedon greaseandfood.Ovencleanerscan beusedontheporcelainovenbutfollow
manufacturer'sdirections.Ifovencleanerwas used, thoroughlyrinseovencavityand
capillarytubewhichislocatedatthetopoftheoven.Ovencleanerscannotbeusedonthe
continuouscleaningovenfinish.
Oven racks • Soap and water Cleanwithsoapywater.Removestubbornsoilwithcleansingpowderorsoapfilledscour-
• Cleansing powders ing pad. Rinseand dry.
• Plastic pad
Soapfilled scouring pad NOTE:Ifracksbecomedifficulttoslide, athin coatofvegetableoilonthe undersideofthe
rack will make sliding easier.
Plasticfinishes • Soap and water Whensurface iscool, cleanwith soap and water; rinse,and dry. Use a windowcleaner
• Doorhandles • Pasteof baking soda and water and a soft cloth.
• Backguardtrim • Non-abrasive plastic pador sponge
• Overlays NOTE:Neveruseovencleaners,abrasiveorcausticliquidor powderedcleaningagents
• Knobs onplastic finishes. These cleaning agents will scratch or marr finish.
• Endcaps NOTE:To preventstaining or discoloration,wipe upfat, grease or acid (tomato, lemon,
vinegar, milk,fruitjuice, marinade) immediately with a dry papertowel or cloth.
Silicone rubber • Soapand water Wash withsoapandwater,rinseanddry. Donot removedoorgasket.
• Doorgasket
Surface burners • Soap and water Clean as necessarywith warm soapy water. Removestubborn soilby scouring with a
• Pasteof bakingsodaand water non-abrasiveplasticscouringpadandapasteofbakingsodaandwater.Cleanportswith
• Plasticscouringspongeorpad a straightpin.Donotenlargeordistorttheports.Donotusea woodentoothpick.Itmay
breakoffandclogport.DO NOT CLEANBURNERSWITH THE FOLLOWING caustic
cleaners:ovencleaners,steelwoolorabrasivecleaningagents.Thesemaydamagefin-
ish.Burnerscanbe driedinthe oven setat 140°F.CAUTION: Burnerand burnertube
mustbe drybeforeuse.
18
Page 21

CareandCleaning(continue.)
CONTINUOUS CLEANING OVEN (if equipped)
WHAT IS THE CONTINUOUS MANUALLYCLEANING HINTS
CLEANINGOVEN? HEAVYSPILLOVERS Brittlecrustsor stainscan be loosened
The finish of the ContinuousCleaning The specialfinishwillclean mostspat- byGENTLYtappingstainwithawooden
Ovenisidentifiedbyitsdarkgraycolor, tere during normal oven use unless or plasticutensil.Brushawayany loose
and rough,poroustexture.The rough there is a heavybuildupofsoil. Heavy soil that flakesoff. Varnishtype stains
texturepreventsgrease spattersfrom spilloverssuch as pie or casserole usuallyneedtobesoftenedwithasmall
formingbeadswhichrundownthewalls boiloverswill notclean effectivelywith- amountofwaterordampcloth.Remain-
leaving unsightlystreaks. Rather,the out some manual help. The crustyor ingsoilwillgraduallyreducewithcontin-
roughtexture absorbsspattersand al- varnish-likestainsthatformfromthese uedovenuseat normalbakingtempera-
lowsthem to spread,thus exposinga spilloversclogtheporesandpreventthe tures.
largerareatothe hotovenair.Thecata- specialfinishfrombeingexposedtothe
lyst,when exposedto heat,speedsthe hot oven air. This greatlyreducesthe
oxidationof soil. cleaningeffectivenessofthe finish. DO NOT USE ANY TYPE OF OVEN
CLEANER, POWDERED CLEANS-
ERS, SOAP,DETERGENT OR PASTE
Cleaning action automaticallybegins Thesecrustyorvamish-likestainsmust ON ANY CONTINUOUS CLEANING
whenevertheovenisturnedonforbak- either be removedor brokenupbefore SURFACE. ALSO, DO NOT USE ANY
ingor roasting.The oven MUST be "on" cleaningcaneffectivelytakeplace. ABRASIVE MATERIALS, STEEL
for cleaningto take place. No cleaning WOOL, SHARP INSTRUMENTS OR
willoccurwhentheovenisoff.The spe- SCRAPERS FOR THEY WILL DAM-
cialcatalyticfinish mustbe exposedto TO MANUALLY CLEAN AGETHE FINISH.
hot oven air before soil will begin to HEAVYSPILLOVERS
graduallyreduceinsize. Brushoffheavysoilwitha nylonbrushor
plasticpad.DONOT USE papertowels, Avoidspilloversby usingutensilsthat
FACTORSAFFECTING LENGTH OF clothsorspongesfortheovenwallsare arelargeenoughtoholdfood.A cookie
porousand particlesofthese materials sheetorpieceofaluminumfoil,justa lit-
CLEANING TIME willruboffonthewalls.Rinsearea with tie largerthanthepan,canbeplacedon
The higherthe oven temperature,the
fasterthecleaningaction.The lengthof clearwater only. the rackdirectlybelowthe rackholding
cleaningtimewilldependon thesefac- the utensiltocatchspills.
tors:Typeof soil,amountorsize ofsoil,
oven temperature and length of time
ovenisinuse.Timemayvaryfromafew Overa periodof time, wear marksmay
minutestoseveralhours.Soildeposited appearonthe embossedracksupports.
at theendof a cyclemaystillbevisible. This isnormaland resultsfromsliding
This will usuallyfade with continued the racksinand outofthe oven. Wear
ovenuse untilthesoilgraduallydisap- markswillnot affectthecleaningaction
pearsorcan bewipedupmanually.The oftheoven.
oven will appear presentablyclean,
eventhough some spatters may be pre-
sent.
19
Page 22

Service
BEFORE CALLING A SERVICETECHNICIAN, CHECK THE FOLLOWING:
PROBLEM CAUSE CORRECTION
1. Surface burnerfailsto light a. pilots are notlit (pilotignition) a. see page 6 to light pilots
b. power supply not connected b. connect power,check circuit breakeror
(pilotless ignition) fuse box
c. clogged burner port(s) c. clean ports with straight pin
d. burners not placed correctly onto gas d. remove and reinstall burner properly
valve
e. surface control not completelyturned to e. turn controlto the LITE position untilthe
the LITE position or turned too quickly burner ignites, then turn control to de-
fromthe LITE position (pilotlessignition) sired flame size
f. power failure (pilotlessignition) f. seepage6tolightburnerduringapower
failure
2. Burnerflame uneven a. clogged burner port(s) a. clean ports with straight pin
b. burner not properly positioned b. seepage 13to correctly replace burner
3. Surface burner flame a. air/gas mixture not proper a. callserviceman to adjust burner
• liftsoff port NOTE: Some yellowtipping with LP gas is
• yellow incolor normal and acceptable.
4. Oven burnerfails to light a. power supply not connected a. connect power, check circuit breaker or
(pilotless ignition) fuse box
b. pilot isout (pilot ignition) b. see page6 to lightpilots
c. power failure (pilotlessignition) c. an ovenequipped with pilotless ignition
will not operate during a powerfailure
or if disconnected from power. See
page 8
5. Popping sound heard when burner This is a normal sound that occurs with some types of gas when a hot burner is turned off.
extinguishes The popping sound is nota safetyhazard andwill not damage the appliance.
6. Clockand/or ovenlight doesnotwork a. power supply not connected a, connect power supply, check circuit
breaker or fuse box
b. bulb may be loose or burned out b. tighten or replace light bulb
c. malfunctioning switch,starter or ballast c. callserviceman to check
d+malfunctioning clock or loose wiring d. callserviceman to check
7. Moisturecondensation on oven a. it is normal for the window tofog during a. leavedoorajarforoneortwominutesto
window, if equipped thefirst few minutes the oven ison allow moistureto escape
b. cloth saturated with water is used to b. Use a damp cloth to clean window to
cleanthe window prevent excesswater from seeping
between the panelsof glass
8. Oven temperature inaccurate a. oven not preheated a. preheat oven 10to 15 minutes
• food takes too long or cooks too b. incorrect rack position b. see page 9
fast c. incorrect use of aluminum foil c. see page 16
• pale browning d. oven bottom incorrectly replaced d. replace oven bottom correctly
• food over-done on outside and e. oven thermostat sensing device out of e. reinstall sensing device securely into
under-done in center holdingclip(s) clip(s)
• over browning See Problem Chart on page 11
See baking Upson page 10
9. Oven smokes excessively during a a. food too close to burner a. movebroiler pandownone rack position
broil operation b. meat has too much fat b. trim fat
c. sauce applied too early or marinade not c. apply sauce during last few minutes of
completely drained cooking. If meat has been marinated,
drain thoroughly before cooking
d. soiled broiler pan d. always clean broiler pan and insertafter
each use
e. broilerinsert coveredwith aluminum foil e. never cover insert with foil as this pre-
vents fat from draining to pan below
10.Poor baking results See pages 9 to 11for information on
baking
2O
Page 23

Service (continued)
SERVICING HOW TO OBTAINSERVICE
When your appliance requires service or
replacement parts, contact your Dealer
or Authorized Servicer. Use only genu-
ine factory or Maycor parts if replace-
ment parts are necessary. Consult the
Yellow Pages in your telephone direc-
tory under appliance for the service cen-
ter nearest you. Be sure to include your
name, address, and phone number,
along with the model and serial numbers
of the appliance. (See inside front cover
for location of your model and serial
numbers.)
If you are unable to obtain service, write
to us. Our address is found on the rating
plate. See inside front cover for location
of rating plate.
If you are not satisfied with the local re-
sponse to your service requirements,
call or write MAYCOR Appliance Parts
and Service Company, 240 Edwards
Street, S.E., Cleveland, TN 37311, (615)
472-3500. Include or have available the
complete model and serial numbers of
the appliance, the name and address of
the dealer from whom you purchased
the appliance, the date of purchase and
details concerning your problem.
If you did not receive satisfactory service
through your servicer or Maycor you
may contact the Major Appliance Con-
sumer Action Panel by letter including
your name, address, and telephone
number, as well as the model and serial
numbers of the appliance.
Major Appliance Consumer Action Panel
20 North Wacker Drive
Chicago, IL 60606
MACAP (Major Appliance Consumer
Action Panel) is an independent agency
sponsored by three trade associations
as a court of appeals on consumer com-
plaints which have not been resolved
satisfactorily within a reasonable period
of time.
21
Page 24

WHAT IS NOTCOVERED BYTHESE TWO WARRANTIES:
1, Conditionsanddamagesresultingfromany of the fol- 4, Productspurchasedforcommercialor industrialuse,
lowing: 5. The cost of service orservice call to:
a. Improper installation, delivery,or maintenance.
a. Correct installation errors.
b. Any repair,modification, alteration oradjustment not
authorizedby Maycor,ora Maycorauthorizedservic- b. Instruct the consumer onthe properuse of the prod-
uct.
er.
c. Misuse,abuse, accidents or unreasonable use. c. Transpor_the appliance to a servicer.
d. Incorrect electrical current,voltage or supply. 6. CONSEQUENTIAL OR INCIDENTALDAMAGES SUS-
e. Improper setting of any control. TAINED BY ANY PERSON AS A RESULT OF ANY
BREACH OF THESE WARRANTIES. Some states do
2. Warranties are void if the original serial numbers have not allow the exclusion or limitation of consequential or
beenremoved,altered,orcannot be readilydetermined, incidentaldamages,so the aboveexclusion maynot ap-
3. Light bulbs, ply to you.
HOW TO RECEIVE WARRANTY SERVICE
1. Contactthe dealerfromwhomyoupurchasedtheapplianceorany authorizedMaycorservicerto
receivewarranty service under these warranties.
2. Should you not receivesatisfactory warranty service from your local servicer, contact:
Customer Assistance
Maycor Appliance Parts and Service Company
240 EdwardsStreet, S.E.
Cleveland, TN 37311
(615)472-3500
3. Have the following informationavailable when requestingwarranty service:
- Yourname and address.
- The model and serial numbers of your appliance.
- The name and address of your dealer or servicer.
- The purchase date of your appliance.
- A clear description of the problem.
(1/93)
 Loading...