

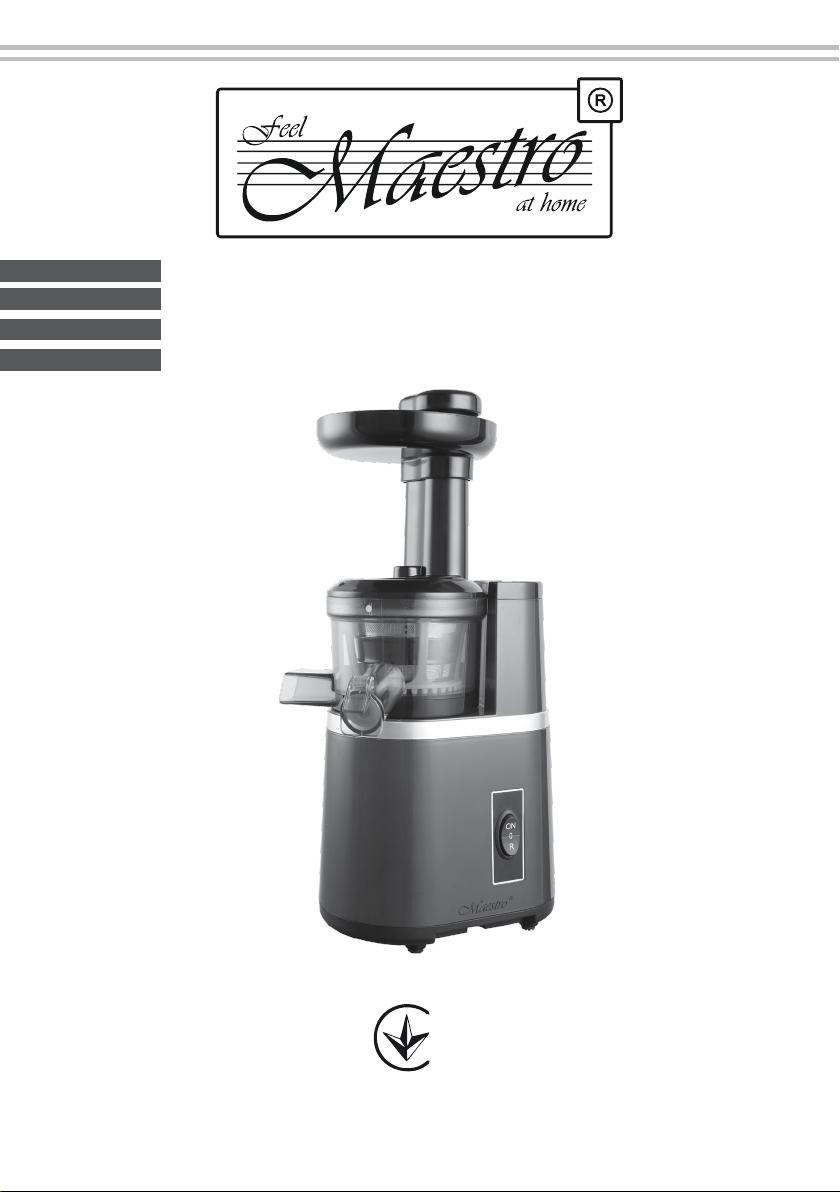
Maestro MR808, MR807 Owner's Manual
EN
PL
RU
UA
Owners manual. Juicer
Instrukcji obsługi. Sokowirówka
Руководство по эксплуатации. Соковыжималка
Керівництво з експлуатації. Соковижималка
Модель/ Model MR808
076
Сerticated in Ukraine
Виріб сертифіковано в Україні
EN
Dear customer, we thank you for purchase of goods
Functionality, design and conformity to the quality standards guarantee to you reliability
and convenience in use of this device.
Please read and comply with these original instructions prior to the initial operation of your
appliance and store them for later use of subsequent owners.
This appliance is designed for squeezing fresh juice from fruits and vegetables.
The product is applicable to family use, and it is inapplicable to commercial use,
otherwise its service life may be shortened.
Under condition of observance of user regulations and a special-purpose designation, a
parts of appliance do not contain unhealthy substances.
Product features
- Non-grinding juicing method featured by slow squeezing is adopted for the product, so the
natural avor and nutrient elements of fruits and vegetables are well retained. The product
has multiple functions, including making vegetable juice and fruit juice, etc.
- The squeezing cup may be separated with the mainframe, and it is convenient to clean.
- Dual-switch design makes the product safer (make the squeezing cup installed onto the
mainframe; apply the front cover of squeezing body, and then turn on the switch to make
the juicer run).
Technical specications
Model MR808
Electrical supply:
Alternating current- AC;
Rated voltage 220-240V;
Rated frequency 50Hz;
Power consumption 150W
Number of operative speeds:
1 working speed forward,
1 speed reverse
Protective class I
Protection class IPX0
Regime of operation: continuous operation during 20minutes max, pause during at least
20minutes to complete cooling.
2
Description of the appliance
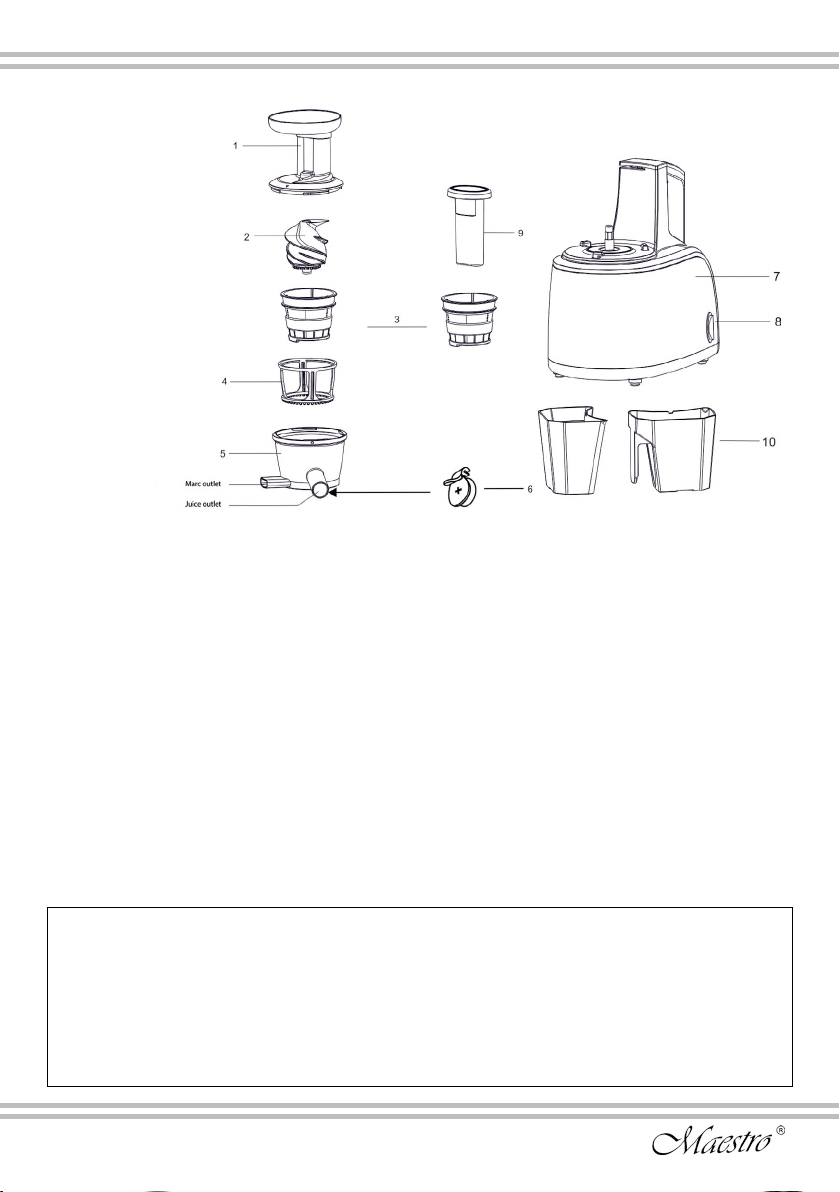
Picture1
1. Feeding tube
2. Auger
3. Filter
4. Washing rack
5. Squeezing cap
6. Stopper
7. Main body (motor unit)
8. Switch «O»- OFF «ON»- forward work regime «R»- reverse regime
9. Pushing rod
10. Marc and juice cups
Safety instructions
When using your appliance, basic safety precautions should always be followed,
including the following:
ATTENTION!
NEVER immerse the main body (motor unit), cable or plug in any liquid.
NEVER touch the appliance with wet or damp hands.
ALWAYS disconnect appliance before cleaning, assembling, disassembling, loading and
unloading products
ONLY plug the appliance into an outlet with an earthed (ground) contact.
Failure to observe these rules may result in electric shock!
3

EN
from the mains when the appliance is not being used.
- DO NOT use the power cord or the appliance in order to pull the plug out of the socket.
- DO NOT leave the appliance exposed to the weather (rain, sun, etc.).
- DO NOT leave the appliance without supervision when it is connected to the power
supply.
- Close supervision is necessary when the appliance is used near children.
- Always unplug from the plug socket when not in use and before cleaning.
- Do not operate the appliance if damaged, after an appliance malfunctions or it has been
damaged in any manner, return to at authorized service engineer for repair.
- In the interest of safety, regular periodic close checks should be carried out on the supply
cord to ensure no damage is evident. Should there be any signs that the cord is damaged
in the slightest degree, the entire appliance should be returned be authorized service
engineer.
- Do not let the cord hang over the edge of a table or counter or touch hot surfaces. Allow
unit to cool before storage.
- Do not use harsh abrasives, caustic cleaners or oven cleaners when cleaning this
appliance.
- This appliance is not intended for use by persons (including children) with reduced
physical, sensory or mental capabilities, or lack of experience and knowledge, unless they
have been given supervision or instruction concerning use of the appliance by a person
responsible for their safety.
- Children should be supervised to ensure that they do not play with the appliance.
- Do not use damaged accessories.
- Please do not make metal sheet or other conducting material inserted into the juicer, so
as to prevent re or short circuit.
- DO NOT let children or untrained persons use the appliance without
supervision.
- DO NOT leave the appliance unnecessarily plugged in. Disconnect the plug
ATTENTION!
- Do not touch moving parts during the appliance operation
- Always disconnect appliance before cleaning, assembling, disassembling, loading and
unloading products
- Perform assembly and disassembly only after full stop of moving parts.
-Do not insert any
In case of failure to observe the rules a danger of serious damages may arise!
- THIS APPLIANCE IS FOR HOUSEHOLD USE ONLY. DO NOT USE THE APPLIANCE
FOR ANYTHING OTHER THAN INTENDED USE.
Purchase industrial devices for commercial use.
4
Actions in extreme situations:
- If a device tumbled into water, immediately, unplug the device, not touching to the device
or water.
- In case of appearance from appliance of smoke, sparkling, strong smell of a burn
isolation, immediately stop use the device, unplug the device, appeal to the nearest service
center.
Operation
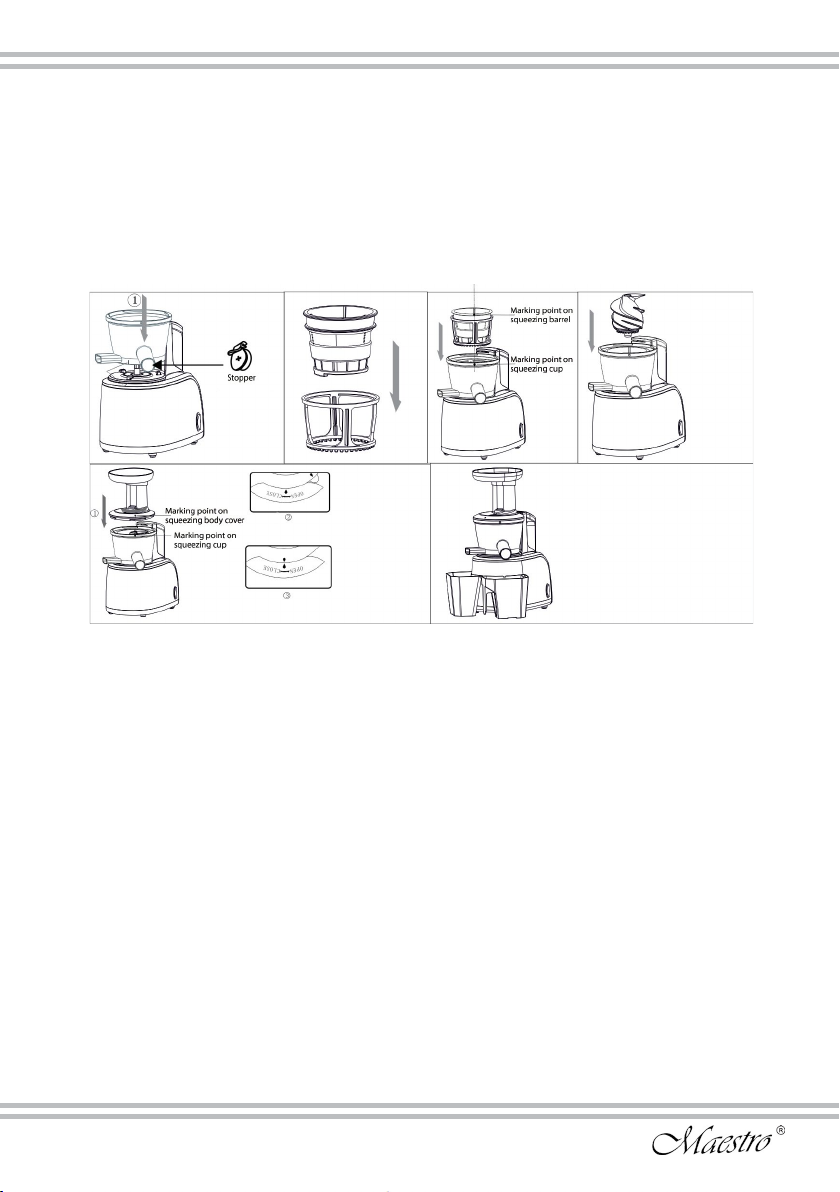
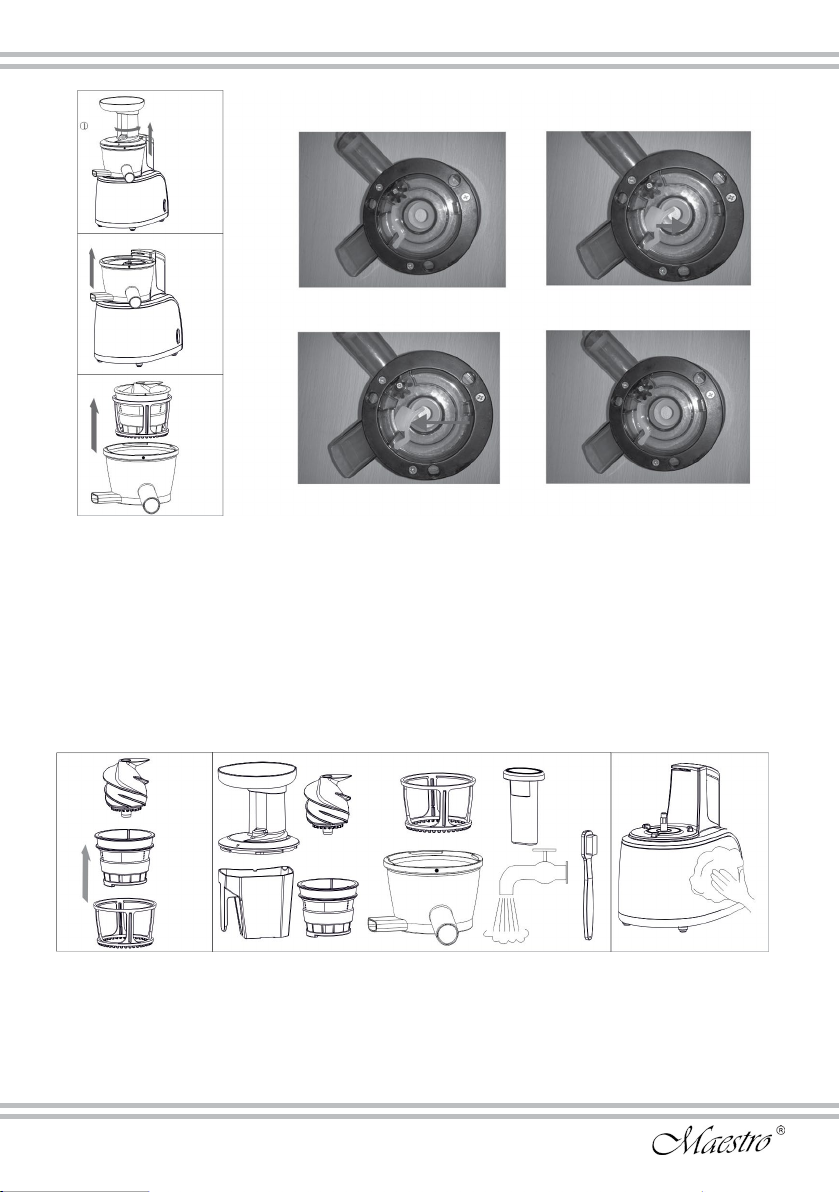
Pic. 2 Pic. 3 Pic. 4 Pic. 5
Pic. 6 Pic. 7
Before startup
- Remove all wrap materials and stickers
- Make sure that all the parts of appliance don’t have damages.
Assembly method
1. Install the main body on a rm stable non slip surface. Make the squeezing cup installed
onto the main body (Picture 2). Make the squeezing cup inserted to the xed point position
of the main body. The stopper is separately packed in the accessories box. Clip the stopper
towards the protruding part of the juice outlet.
2. Before the juice cup is installed, please conrm whether the rubber pad of the marc
outlet at the bottom of the juice cup is properly installed.
Rubber pad installation (see Picture 13 -14 Disassembly method).
Notes: The rubber pad must be properly installed, otherwise leakage phenomenon
may occur.
- Put the lter into the washing rack (Picture 3).
3. Make the assembled lter and washing rack installed into the squeezing cup (Picture 4).
* When installation, please make the marking point on the lter align with that on the
squeezing cup.
4. Make the auger installed into the lter (Picture 5).
5

EN
(Picture 6).
6. See the gure. Make the two juice/marc cups put at the appropriate position: one is used
to receive juice, and another is used to receive marc (Picture 7).
Connect power plug to the mains.
Now your juicer is ready to work.
Turn on the switch
(forward) (Picture 8).
Forward: Make fruits
and vegetables
pushed downwards for
squeezing.
Reverse: Fruits and
vegetables return
upwards. (Picture 9).
Notes: Please don’t
operate switch with wet
hands.
After the squeezing process is completed, please press the stop switch, and pull out the
power plug.
Notes: Please use fresh fruits and vegetables to make the juice. The stale fruits and
vegetables that have been stored in refrigerator for a long time shall be used after
being immersed in cold water for over10min. The kernel of fruits must be removed.
5. Install the feeding tube. When it is installed downwards, the marking point on
feeding tube shall align with that on the squeezing cup. Make “mark” of feeding
tube rotate towards the “mark” on squeezing cup in clockwise direction and lock
Instructions for use
Pic. 8 Рiс. 9
Reverse function
If the machine stops suddenly during operation, press off rstly, and then press the
“reverse” button to make the materials in the auger pushed upwards; and then press
“forward” button (repeat the process for about 3 times).
During “reverse” of the machine, please use hands to press the feed tube slightly (prevent
loosening of the cover).
If the juicer still does not run after the aforesaid operation, please disassemble the
squeezing cup for cleaning, and then try the juicer again.
The hard materials (such as carrot) must be cut into strips, otherwise hard materials maybe
damage juicer.
Notes for use
* Please read the following contents before use.
6

1. The materials shall be put into the juicer slowly one by one, and new materials shall be
put into it after the previous materials have been squeezed.
2. The hard materials (such as carrot) shall be put into the machine after being cut into the
blocks about 10- 20mm. (The materials with particularly strong ber shall be put into the
machine slowly after being cut into the strip of about 20mm length).
3. When the carrot that have been stored at low temperature for over 1 week, it is
unsuitable making juice;
4. The juice amount will be small if the materials are not fresh. When dry materials stored
in refrigerator are used for squeezing, the materials shall be squeezed after being
immersed in clear water for sufcient water absorption, so that the effect will be better.
5. Some Hard and much ber materials are not applicable to make juice (such as kudzu,
sugarcane, etc).
6. There will be certain friction noise when carrot (hard esh) or apple (hard peel) is used
for squeezing, but this has no impact on the product.
7. Juice will be splash from the feed inlet when such materials as cherries tomatoes and
grapes are used for squeezing. when use soft fruit to make juice, please mix some
apple or pear together, it will be better to get more juice and marc will go out more
smoothly.
Notes: Please do not store the squeezed juice for a long time.
The machine is inapplicable to crush grains (motor clamp and mechanical failure are liable
to be caused).
Troubleshooting
Phenomenon Cause Troubleshooting method
The running machine
stops suddenly
The juice amount is
small or juice ows
out of the mainframe
A. Whether the power
plug is properly inserted
B. The quantity of
materials put into the
machine is too large
C. Hard fruits and
vegetables are not cut
A. Dry materials stored
in refrigerator are used
for squeezing
B. The rubber pad at the
bottom of squeezing cup
is not installed properly
A. Make the plug inserted into the socket
B. First, press «reverse» for 2-3 sec. to make
the materials return upwards; then press the
«forward» button (repeat the process for about
3 times). If the machine still does not run,
please clean the machine and then use it.
C. Hard fruits and vegetables (such as carrot)
shall be squeezed after being cut into strips.
A. The juice amount will increase if the
materials are squeezed after being immersed in
clear water for sufcient water absorption.
B. Please reinstall the squeezing rubber pad by
referring to the installation method.
7

EN
Troubleshooting
There is abnormal
noise
The container and
accessories are dyed
after use
A. Accessories are not
properly installed
B. The machine is put on
oblique ground
C. Parts cause extrusion
sound during squeezing
A. Dreg attaches to the
container
B. The container and
accessories are liable to
be dyed when materials
with pigment (such as
carrot, spinach, etc.) are
used for squeezing.
A. Inspect whether the accessories are properly
installed after the machine stops
B. Please put the machine on a plane
C. This is the sound caused by extrusion of
fruits and vegetables, and please do not worry
about it.
A. Clean the machine in time after use
B. Clean the machine with detergent after it is
wiped with edible oil.
Cleaning and maintenance
ATTENTION!
- Never clean the device while it is connected to the mains.
- Before cleaning disconnect the device and wait for full stop of moving parts.
- Do not use abrasive and aggressive detergents, solvents, alkaline, metal objects and
wash-ups.
- Never submerge electric motor unit, its mains cable and plug in water or other liquid, do
not wash the motor unit in water or in a dish washing machine.
Disassembly method
1. Power off to stop the machine, and pull out the power plug.
2. Use hands to hold the feeding tube and rotate it in counter clockwise direction (see the
Picture 10 ); and pull out the feeding tube when it is rotated to the position indicated in the
gure.Hold the juice or mare outlet on the squeezing cup and take it out.
3. Take out the auger+lter+washing rack assembly in the squeezing cup (see the Picture
11-12).
4. Pull out the rubber pad. (Picture 13). After cleaning do not forget install it properly
(Picture 14). Make the rubber pad of marc outlet inserted into the rectangular slot. Make
the rubber pad of marc outlet properly inserted.
5. Respectively disassemble the auger lter and washing rack for cleaning (Picture 15).
- Immediately after terminating the use wash all removable parts with warm soapy water
using soft nylon sponge, then rinse with clean water and wipe with dry and clean towel.
(Picture 16).
If the meshes are blocked up by dreg, please use the cleaning brush for the cleaning, then
8
Рiс. 10
Рiс. 11
Рiс. 13
Рiс. 12
Рiс. 14
rinse with clean water and wipe with dry and clean towel.
Notes: Please wash the machine in time after use, otherwise the dreg will attach to the
container, which will affect the assembly and cleaning, and even result in performance
reduction. The rubber pad at the bottom of the squeezing cup may be washed. Please refer
to the contents.
- Leave the accessories till they are completely dry.
- Wipe the case of the electric drive with a soft cloth and rub it dry with a clean towel.
(Picture 17)
Рiс. 15 Рiс. 16 Рiс. 17
Storage
- Wipe and dry the appliance before storage.
- Store the appliance in a cool, dry and clean place beyond the assess of children and
people with limited physical and mental abilities.
9

EN
using appropriate collection systems.
Subject to technical modications!
Old appliances contain valuable materials that can be recycled. Please arrange
for the proper recycling of old appliances. Please dispose your old appliances
Environmental protection
10

Dziękujemy za zakup sprzętu
Funkcjonalność, wygląd oraz wysoka jakość gwarantują Państwu niezawodność i łatwość
korzystania z niniejszego urządzenia.
Prosimy o uważne przeczytanie niniejszej instrukcji obsługi i zachowanie jej jako
podręcznika przez cały okres użytkowania urządzenia.
Sokownik służy wyłącznie do użytku w gospodarstwie domowym.
Cechami szczególnymi danego modelu są:
– Zastosowana technologia «powolnego wyciskania» w odróżnieniu od typowych
sokowników powoduje, że zbędne jest mielenie i przerabianie warzyw i owoców na puree,
gwarantując maksymalne zachowanie smaku, aromatu, witamin i mikroelementów warzyw
i owoców.
– system «kropla stop» zapobiega wyciekaniu kropli soku podczas przerwy w pracy
urządzenia.
– system ochrony przed włączeniem w przypadku nieprawidłowego złożenia wyrobu.
PL
Dane techniczne
Model: MR 808
Zasilanie: 220-240В, 50Гц;
Moc: 150 W
Ilość szybkości: 1 szybkość, dodatkowo tryb «rewers»
Tryb pracy:
-czas ciągłego działania w trybie pracy do 20 min*
-przerwa (wyłączenie) w celu ochłodzenia, co najmniej 20 min.
*w przypadku używania twardych warzyw i owoców i/lub jeśli temperatura w
pomieszczeniu przekracza 25 0C, czas działania należy skracać, a przerwę wydłużać.
Klasa ochrony przed porażeniem prądem I
Wykonanie korpusu zapobiegające przedostawania się wilgoci, odpowiada klasie IPХ0;
11
Elementy urządzenia
Rysunek 1
1. Pokrywka z podajnikiem
2. Śruba ślimaka
3. Sito
4. Uchwyt sita
5. Pojemnik na sok
6. Zaślepka «kropla stop»
7. Obudowa (napęd elektryczny)
8. Wyłącznik / przełącznik trybów
Pozycje przełącznika: «O»- wyłączone, OFF «ON»- tryb pracy «R»- tryb «rewers»
9. Popychacz
10. Naczynia na sok, miąższ
Środki ostrożności
Szanowny Kliencie, przestrzeganie ogólnie przyjętych zasad bezpieczeństwa
oraz zasad przedstawionych w niniejszej instrukcji gwarantuje bezpieczną pracę
niniejszego urządzenia.
UWAGA!
- Nigdy nie należy zanurzać napęd elektryczny, przewód zasilający i wtyczkę w wodzie lub
innych płynach.
- Nie pozwalać, aby woda i wilgoć znajdowały się na elementach elektrycznych.
- Nie dotykać urządzenia mokrymi rękoma.
12
 Loading...